【Qt从摄像头视频中获取数据】
有时候需要在视频上画图,所以需要能获取到每一帧视频数据。
以前从视频文件或视频流中得到帧,一般都是使用qt + ffmpeg或qt + vlc。
qt对显示处理视频大体有以下方法:
- QMediaPlayer + QVideoWidget
这种方法只适合简单的显示视频功能,不适合对视频进行处理(比如画图)
- QMediaPlayer + QGraphicsVideoItem + QGraphicsScene + QGraphicsView
这种方法功能强大,除了显示视频功能,还可以做复杂的图形处理(具体可以查看QGraphicsScene的使用)
- QMediaPlayer + QAbstractVideoSurface
这种方法比较简单,是我下面要介给的。可以获取到每一帧视频数据,基本可以实现与qt + ffmpeg或qt + vlc相同的效果。
自定义VideoSurface:
class VideoSurface : public QAbstractVideoSurface
{Q_OBJECTpublic:VideoSurface(QObject *parent = Q_NULLPTR);~VideoSurface();QList<QVideoFrame::PixelFormat> supportedPixelFormats(QAbstractVideoBuffer::HandleType handleType = QAbstractVideoBuffer::NoHandle) const;bool present(const QVideoFrame &frame);signals:void frameAvailable(QVideoFrame &frame);};
实现如下:
VideoSurface::VideoSurface(QObject *parent): QAbstractVideoSurface(parent)
{
}VideoSurface::~VideoSurface()
{
}QList<QVideoFrame::PixelFormat> VideoSurface::supportedPixelFormats(QAbstractVideoBuffer::HandleType handleType) const
{QList<QVideoFrame::PixelFormat> listPixelFormats;listPixelFormats << QVideoFrame::Format_ARGB32<< QVideoFrame::Format_ARGB32_Premultiplied<< QVideoFrame::Format_RGB32<< QVideoFrame::Format_RGB24<< QVideoFrame::Format_RGB565<< QVideoFrame::Format_RGB555<< QVideoFrame::Format_ARGB8565_Premultiplied<< QVideoFrame::Format_BGRA32<< QVideoFrame::Format_BGRA32_Premultiplied<< QVideoFrame::Format_BGR32<< QVideoFrame::Format_BGR24<< QVideoFrame::Format_BGR565<< QVideoFrame::Format_BGR555<< QVideoFrame::Format_BGRA5658_Premultiplied<< QVideoFrame::Format_AYUV444<< QVideoFrame::Format_AYUV444_Premultiplied<< QVideoFrame::Format_YUV444<< QVideoFrame::Format_YUV420P<< QVideoFrame::Format_YV12<< QVideoFrame::Format_UYVY<< QVideoFrame::Format_YUYV<< QVideoFrame::Format_NV12<< QVideoFrame::Format_NV21<< QVideoFrame::Format_IMC1<< QVideoFrame::Format_IMC2<< QVideoFrame::Format_IMC3<< QVideoFrame::Format_IMC4<< QVideoFrame::Format_Y8<< QVideoFrame::Format_Y16<< QVideoFrame::Format_Jpeg<< QVideoFrame::Format_CameraRaw<< QVideoFrame::Format_AdobeDng;//qDebug() << listPixelFormats;// Return the formats you will supportreturn listPixelFormats;
}bool  VideoSurface::present(const QVideoFrame &frame)
{// Handle the frame and do your processingif (frame.isValid()){QVideoFrame cloneFrame(frame);emit frameAvailable(cloneFrame);return true;}return false;
}
看了上面的代码就知道,只需要外部连接frameAvailable信号就可以获取到每一帧数据。
具体使用:
QMediaPlayer *mediaPlayer = new QMediaPlayer;
VideoSurface *videoSurface = new VideoSurface;
mediaPlayer->setVideoOutput(videoSurface);
mediaPlayer->setMedia(QUrl("rtsp://admin:admin@192.168.1.112"));
mediaPlayer->play();
把frameAvailable信号与显示窗口的槽连接,比如:
connect(videoSurface, SIGNAL(frameAvailable(QVideoFrame &)), this, SLOT(ProcessFrame(QVideoFrame &)));
void QtVideoTest::ProcessFrame(QVideoFrame &frame)
{qDebug() << "=============ProcessFrame===============";qDebug() << "width : " << frame.width() << " height : " << frame.height();qDebug() << "start time : " << frame.startTime()/1000 << "ms";qDebug() << "end time : " << frame.endTime()/1000 << "ms";qDebug() << "pixelFormat :" << frame.pixelFormat();frame.map(QAbstractVideoBuffer::ReadOnly);QImage recvImage(frame.bits(), frame.width(), frame.height(), QVideoFrame::imageFormatFromPixelFormat(frame.pixelFormat()));qDebug() << "frame data size :" << frame.mappedBytes();frame.unmap();
}
如上,QVideoFrame转QImage,拿QImage进行画图操作就简单了。
Qt6.2.3获取摄像头录制YUV文件,逐帧获取录制,使用QVideoSink
Qt6.2.3获取摄像头录制YUV文件,逐帧获取录制,使用QVideoSink
必须要使用到QVideoSink,相应的依赖模块有:QMediaCaptureSession、QMediaDevices、QCamera、QVideoFrame
具体的使用方法是:
1、创建一个QMediaCaptureSession:
QMediaCaptureSession m_captureSession;
2、设置摄像头:
m_captureSession.setCamera(new QCamera(QMediaDevices::defaultVideoInput()));
3、设置YUV逐帧输出:
m_captureSession.setVideoSink(new QVideoSink m_videoSink);
4、设置YUV格式:
void QVideoSink::setVideoFrame(const QVideoFrame &frame)
5、主动获取一帧YUV数据:
QVideoFrame QVideoSink::videoFrame() const
6、被动接收每一帧:
connect(m_videoSink, &QVideoSink::videoFrameChanged, YourClass, yourParseFunction);
7、获取帧数据:
videoFrame.map(QVideoFrame::ReadOnly);
m_file.write((const char *)videoFrame.bits(0和1), videoFrame.mappedBytes(0和1));
mainwindow.cpp:
#include "mainwindow.h"
#include "ui_mainwindow.h"
#include <QCameraFormat>MainWindow::MainWindow(QWidget *parent): QMainWindow(parent), ui(new Ui::MainWindow)
{ui->setupUi(this);m_camera = new QCamera(QMediaDevices::defaultVideoInput());m_captureSession.setCamera(m_camera);m_captureSession.setVideoSink(&m_videoSink);connect(&m_videoSink, &QVideoSink::videoFrameChanged, this, &MainWindow::on_frame_changed);m_camera->start();m_file.setFileName("test.nv12");m_file.open(QIODevice::WriteOnly | QIODevice::Truncate);
}MainWindow::~MainWindow()
{m_camera->stop();m_file.close();delete ui;
}void MainWindow::on_frame_changed(const QVideoFrame &frame)
{QVideoFrame videoFrame = frame;/*** 我的电脑上返回的格式是Format_NV12:18,每个像素1.5字节,一帧1382400字节,* 如果你需要用别的YUV或者RGB格式,则需要自己设置QVideoSink或者QCamera格式*/QVideoFrameFormat::PixelFormat pixelFormat = videoFrame.pixelFormat();int width = videoFrame.width();int height = videoFrame.height();int planeCount = videoFrame.planeCount();uchar *pdata = nullptr;int len = 0;videoFrame.map(QVideoFrame::ReadOnly);for (int i = 0; i < planeCount; i++) {pdata = videoFrame.bits(i);len = videoFrame.mappedBytes(i);m_file.write((const char *)pdata, len);}frame_num++;qDebug("%d, %d, %d, %d, %d, %p, %d", frame_num,pixelFormat, width, height, planeCount, pdata, len);videoFrame.unmap();
}
mainwindow.h:
#ifndef MAINWINDOW_H
#define MAINWINDOW_H#include <QMainWindow>
#include <QCamera>
#include <QMediaCaptureSession>
#include <QMediaDevices>
#include <QVideoSink>
#include <QVideoFrame>
#include <QFile>QT_BEGIN_NAMESPACE
namespace Ui { class MainWindow; }
QT_END_NAMESPACEclass MainWindow : public QMainWindow
{Q_OBJECTpublic:MainWindow(QWidget *parent = nullptr);~MainWindow();private:Ui::MainWindow *ui;QMediaCaptureSession m_captureSession;QVideoSink m_videoSink;QCamera *m_camera;QFile m_file;int frame_num = 0;private slots:void on_frame_changed(const QVideoFrame &frame); // 一帧视频到来的信号
};
#endif // MAINWINDOW_H
main.cpp:
/*** \brief Qt6.2.3要逐帧获取YUV需要使用QVideoSink和QMediaCaptureSession* \details 编译运行后,窗口弹出即开始录制YUV文件,关闭窗口后文件保存* \note 保存的文件在本工程文件夹上级目录中的debug*目录下的test.nv12*       我的电脑摄像头默认输出是YUV NV12格式1280 * 720*       播放方式是安装ffmpeg软件后,在test.nv12文件目录下使用命令:*       ffplay -f rawvideo -pix_fmt nv12 -video_size 1280x720 test.nv12*/#include "mainwindow.h"
#include <QApplication>int main(int argc, char *argv[])
{QApplication a(argc, argv);MainWindow w;w.show();return a.exec();
}
005_yuv_input_save_file.pro:
QT       += core gui
QT       += multimediagreaterThan(QT_MAJOR_VERSION, 4): QT += widgetsCONFIG += c++17# You can make your code fail to compile if it uses deprecated APIs.
# In order to do so, uncomment the following line.
#DEFINES += QT_DISABLE_DEPRECATED_BEFORE=0x060000    # disables all the APIs deprecated before Qt 6.0.0SOURCES += \main.cpp \mainwindow.cppHEADERS += \mainwindow.hFORMS += \mainwindow.ui# Default rules for deployment.
qnx: target.path = /tmp/$${TARGET}/bin
else: unix:!android: target.path = /opt/$${TARGET}/bin
!isEmpty(target.path): INSTALLS += target
mainwindow.ui:
<?xml version="1.0" encoding="UTF-8"?>
<ui version="4.0"><class>MainWindow</class><widget class="QMainWindow" name="MainWindow"><property name="geometry"><rect><x>0</x><y>0</y><width>800</width><height>600</height></rect></property><property name="windowTitle"><string>MainWindow</string></property><widget class="QWidget" name="centralwidget"><layout class="QVBoxLayout" name="verticalLayout"><item><widget class="QPushButton" name="pushButton"><property name="text"><string>窗口不要开太久!开几秒就够了,否则存储的YUV文件会把你的硬盘塞满!</string></property></widget></item></layout></widget><widget class="QMenuBar" name="menubar"><property name="geometry"><rect><x>0</x><y>0</y><width>800</width><height>22</height></rect></property></widget><widget class="QStatusBar" name="statusbar"/></widget><resources/><connections/>
</ui>
报错:`QVideoFrame::unmap() was called more times then QVideoFrame::map()
原因:格式对不上QVideoFrame转QImage格式对照表`
QVideoFrame Class
参考:QT——QCamera摄像头的切换、分辨率切换、截图显示
cv::QVideoFrame转QImage失败原因及解决方案
相关文章:

【Qt从摄像头视频中获取数据】
有时候需要在视频上画图,所以需要能获取到每一帧视频数据。 以前从视频文件或视频流中得到帧,一般都是使用qt ffmpeg或qt vlc。 qt对显示处理视频大体有以下方法: QMediaPlayer QVideoWidget 这种方法只适合简单的显示视频功能ÿ…...
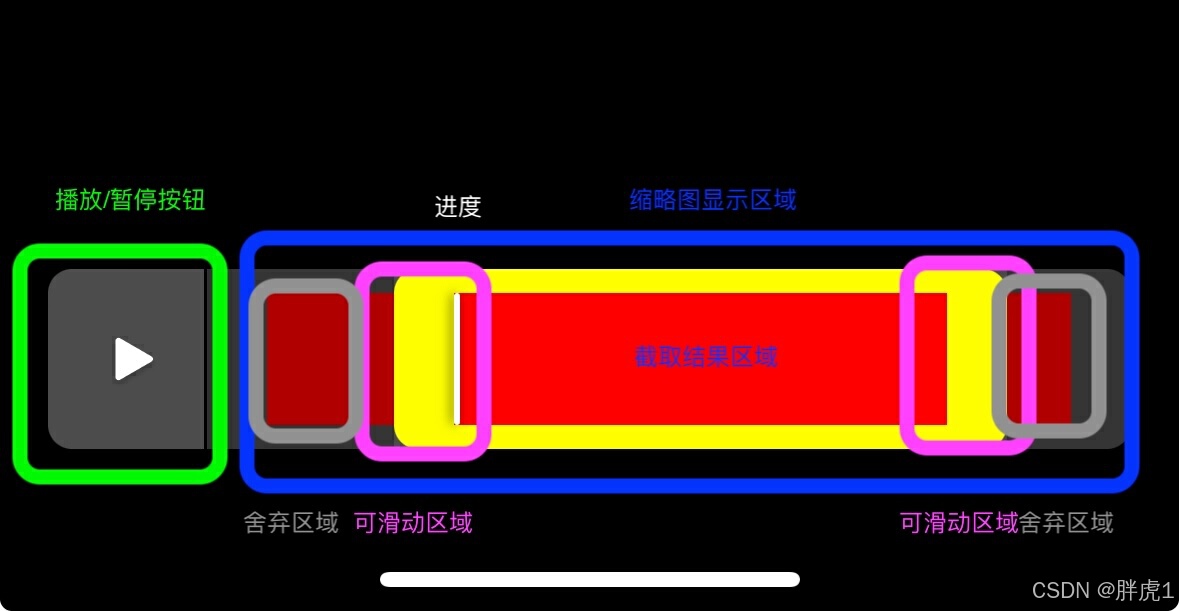
视频截取中的UI小组件
引言 视频截取在社交类 APP 中十分常见。有了上传视频的功能,就不可避免地需要提供截取和编辑的选项。如果我们过度依赖第三方库,项目的代码可能会变得异常臃肿,因为这些库往往包含许多我们用不到的功能,而且它们的 UI 样式和功能…...

java设计模式--结构型模式
结构性模式:适配器模式、桥接模式、装饰模式、组合模式、外观模式、享元模式、代理模式 适配器模式 适配器模式(Adapter Pattern) 充当两个不兼容接口之间的桥梁,属于结构型设计模式。目的是将一个类的接口转换为另一个接口&am…...

消息中间件:Kafka消息丢失与堆积问题分析与解决方案
消息中间件:Kafka消息丢失与堆积问题分析与解决方案 Kafka作为分布式消息系统,广泛应用于实时数据流处理、大数据分析等领域。然而,在实际应用中,Kafka可能会面临消息丢失和消息堆积的问题,这些问题如果得不到有效处理…...

mac终端代理配置指南
终端代理配置指南 在 macOS 中,你可以通过几种不同的方法来配置终端代理。这里介绍两种常见的设置方式:使用 alias 和 shell 函数。 方法 1:使用 Alias 配置代理 打开终端配置文件 默认情况下,macOS 终端使用的是 zsh。如果你的系…...

mbedTLS生成客户端,服务端密钥及CA证书
1. mbedTLS源码:https://github.com/Mbed-TLS/mbedtls.git 2. 生成步骤: 2.1 编译上述源码 2.2 生成CA私钥和自签名证书: 进入编译的build目录,比如:/mbedtls-development/build# 2.2.1生成CA私钥 执行下面的命令&…...

如何有效应对突发技术故障:以网易云音乐为例
引言 在互联网行业,任何一个在线服务都可能遭遇突发的技术故障。这些故障不仅影响用户体验,还可能对公司的品牌形象造成损害。因此,如何快速响应并高效解决这些问题成为了每一个开发团队的重要课题。本文将以网易云音乐在2024年8月19日下午遭…...

上传文件到github仓库
REF: https://blog.csdn.net/litianxiang_kaola/article/details/74075151 已有repository,往仓库里更新内容 点击gitlab里的clone 在git bash中使用git clone,这个时候会将网上的仓库下载到本地,你可以把想要更新的内容直接拖到仓库里 …...

clip-path实现图片边角的裁剪
img {clip-path: polygon(0 7px,7px 0,calc(100% - 20px) 0,100% 20px,100% 100%,16px 100%,0 calc(100% - 16px));}每一个逗号隔开的就是路径坐标 左上角的两个点 0 7px ,7px 0 右上角 calc(100% - 20px) 0,100% 20px 相当于通过这些点练成的线的圈起来的部分就是剩…...

【C++ Primer Plus习题】2.7
问题: 解答: #include <iostream> using namespace std;void print(int hour, int minute) {cout << "Time:" << hour << ":" << minute << endl; }int main() {int hour0;int minute 0;cout << "请输入…...

uboot中 fastboot udp 协议分析
注: 1. 本文所分析的fastboot源码不是android下的源码,而是恩智浦芯片厂商在IMX6UL芯片的uboot源码中自己实现的源码,二者不同,请读者注意区分。一些图片是网上找到的,出处不好注明,请见谅。 2. 分析fastbo…...

redis hash类型的命令
1.hset 格式: hset key field value [field value ...](value是字符串) 返回值:设置成功的键值对的个数 2.hget:获取键值对 格式:hget key field 3.hexists:判断hash中是否存在指定 格式:…...

【OpenCV】 中使用 Lucas-Kanade 光流进行对象跟踪和路径映射
文章目录 一、说明二、什么是Lucas-Kanade 方法三、Lucas-Kanade 原理四、代码实现4.1 第 1 步:用户在第一帧绘制一个矩形4.2 第 2 步:从图像中提取关键点4.3 第 3 步:跟踪每一帧的关键点 一、说明 本文针对基于光流法的目标追踪进行叙述&am…...

ES 支持乐观锁吗?如何实现的?
本篇主要介绍一下Elasticsearch的并发控制和乐观锁的实现原理,列举常见的电商场景,关系型数据库的并发控制、ES的并发控制实践。 并发场景 不论是关系型数据库的应用,还是使用Elasticsearch做搜索加速的场景,只要有数据更新&…...

前端宝典十一:前端工程化稳定性方案
一、工程化体系介绍 1、什么是前端工程化 前端工程化 前端 软件工程;前端工程化 将工程方法系统化地应用到前端开发中;前端工程化 系统、严谨、可量化的方法开发、运营和维护前端应用程序;前端工程化 基于业务诉求,梳理出最…...

yum 数据源的切换
本来准备安装一个ntp 服务器时间进行同步,但是使用yum install ntp -y 但是却失败了 原因是yum自带的镜像源不能用了,所以要想使用yum 多功能只能切换yum 对应的镜像源了 如果你的服务商是可以使用wget命令的: wget -O /etc/yum.repos.d/Ce…...

MySQL入门学习-命令行工具.mysqlbinlog
MySQL 命令行工具mysqlbinlog用于处理二进制日志文件。 一、关于mysqlbinlog工具的详细介绍: 1、命令行工具mysqlbinlog的特点和使用方法: - 特点: - 可以解析和查看二进制日志文件的内容。 - 支持多种输出格式,如文本、SQ…...

WARNING XXX is not overriding the create method in batch
WARNING XXX is not overriding the create method in batch api.modeldef create(self, vals):quvals[name]youqu self.env[crm.qu].sudo().search([(name, , qu),(shi_id,,vals[shi_id])])if len(youqu)>0:raise UserError(_("该区名已存在,无需再填加…...

使用预训练的 ONNX 格式的目标检测模型(基于 YOLOv8n-pose)姿态监测
具体步骤如下: 加载图像: 从指定路径读取一张图像(这里假设图像名为bus.jpg)。将图像从 BGR 颜色空间转换为 RGB 颜色空间。 图像预处理: 计算图像的高度、宽度,并确定其中的最大值作为新图像的边长。创建一…...

matlab实现模拟退火算法
模拟退火算法(Simulated Annealing, SA)是一种通用概率优化算法,用于在给定的大搜索空间内寻找问题的近似全局最优解。该算法灵感来源于物理学中固体物质的退火过程,其中温度逐渐降低,粒子逐渐趋于能量最低状态。 在M…...

Buzz音频转录完全指南:3大核心功能+5个实战场景,快速掌握本地语音转文字技术
Buzz音频转录完全指南:3大核心功能5个实战场景,快速掌握本地语音转文字技术 【免费下载链接】buzz Buzz transcribes and translates audio offline on your personal computer. Powered by OpenAIs Whisper. 项目地址: https://gitcode.com/GitHub_Tr…...
 —— STM32的SPI外设)
STM32单片机学习(28) —— STM32的SPI外设
文章目录概述SPI通信的移位机制(以bit为单位)SPI外设框图第一部分:数据通路SPI通信的数据帧格式SPI外设移位机制(以字节为单位)第二部分:主机时钟生成器SPI通信时钟频率与传输速率第三部分:主从…...

信息系统项目管理师核心知识点精讲
一、项目整合管理(重点:项目章程与项目管理计划) 知识点详解: 项目整体管理是项目管理知识体系的核心,它确保项目各要素协调统一。在考试中,特别要掌握项目章程和项目管理计划的区别与联系。 项目章程是项目的“出生证明”,由项目发起人发布。它正式授权项目,赋予项…...

内存占用3KB!极致瘦身释放MCU无限可能
极致小体积,给工业领域带来了无限的可能:更低硬件成本,更小芯片体积,更低功耗,更高可靠性,让每一颗小MCU都拥有大系统的完整能力。 https://www.bilibili.com/video/BV1eZLi6PEjc/?spm_id_from333.1387.ho…...

【紧急预警】Lindy衰减临界点已提前至第8.3个月!2024最新《营销自动化寿命健康度白皮书》限时开放前500份
更多请点击: https://kaifayun.com 第一章:Lindy衰减临界点的理论重构与实证突破 Lindy效应传统上描述“越老越长寿”的非线性生存规律,但其在现代软件系统、开源生态与协议层技术栈中的适用边界正遭遇结构性挑战。本文首次将Lindy模型从静…...

AhMyth位置跟踪:GPS定位与地理围栏技术深度解析
AhMyth位置跟踪:GPS定位与地理围栏技术深度解析 【免费下载链接】AhMyth Cross-Platform Android Remote Administration Tool | The only maintained version of AhMyth on github | A revival of the original repository at https://GitHub.com/AhMyth/AhMyth-An…...
)
别再纠结了!给激光焊接新手讲透单模和多模激光到底怎么选(附M²因子解读)
激光焊接设备选型指南:单模与多模激光的实战抉择 当你第一次站在激光焊接设备采购的十字路口,面对"单模"和"多模"这两个专业术语时,那种迷茫感我深有体会。五年前,我作为产线技术负责人,需要为汽车…...

音乐解锁工具:让加密音乐文件在任何设备自由播放
音乐解锁工具:让加密音乐文件在任何设备自由播放 【免费下载链接】unlock-music 在浏览器中解锁加密的音乐文件。原仓库: 1. https://github.com/unlock-music/unlock-music ;2. https://git.unlock-music.dev/um/web 项目地址: https://gi…...

抖音批量下载神器:5分钟学会免费无水印视频下载
抖音批量下载神器:5分钟学会免费无水印视频下载 【免费下载链接】douyin-downloader A practical Douyin downloader for both single-item and profile batch downloads, with progress display, retries, SQLite deduplication, and browser fallback support. 抖…...

ComfyUI扩展生态系统的智能管家:ComfyUI-Manager全面解析
ComfyUI扩展生态系统的智能管家:ComfyUI-Manager全面解析 【免费下载链接】ComfyUI-Manager ComfyUI-Manager is an extension designed to enhance the usability of ComfyUI. It offers management functions to install, remove, disable, and enable various cu…...