k8s的搭建
一、安装环境
准备三台主机:
192.168.1.66 k8s-master
192.168.1.77 k8s-node01
192.168.1.88 k8s-node02
网段:
Pod ⽹段 172.16.0.0/16
Service ⽹段 10.96.0.0/16
注:宿主机⽹段、Pod ⽹段、Service ⽹段不能重复,服务器 IP 地址不能设置为 DHCP,需配置为静态 IP。
二、 前期准备
1、用master主机对另外两台node机进行免密登录
[root@k8s-master ~]# ssh-keygen
[root@k8s-master ~]# ssh-copy-id root@192.168.1.77
[root@k8s-master ~]# ssh-copy-id root@192.168.1.88
2、配置主机映射
[root@k8s-master ~]# vim /etc/hosts
192.168.1.66 k8s-master
192.168.1.77 k8s-node01
192.168.1.88 k8s-node02
[root@k8s-master ~]# scp /etc/hosts root@192.168.1.77:/etc/hosts
[root@k8s-master ~]# scp /etc/hosts root@192.168.1.88:/etc/hosts
3、上传repo源
kubernetes.repo
docker-ce.repo
还需要阿里云源以及epel.repo源
如果没有的话也可以在官网下载或是把我之前的文章中把对应的内容写入docker-ce.repo和kubernetes.repo 里。
[root@k8s-master ~]# yun clean all && yum makecache
三、前期环境配置
(对master以及两台node机子进行以下操作)
1、安装必备工具
[root@k8s-master ~]# yum install wget jq psmisc vim net-tools telnet yum-utils device-mapper-persistent-data lvm2 git tree -y
2、关闭安全及swap分区
[root@k8s-master ~]# swapoff -a && sysctl -w vm.swappiness=0
[root@k8s-master ~]# sed -ri '/^[^#]*swap/s@^@#@' /etc/fstab
3、设置时间同步
[root@k8s-master ~]# yum -y install ntpdate
[root@k8s-master ~]# ntpdate time2.aliyun.com
[root@k8s-master ~]# crontab -e
* 5 * * * /usr/sbin/ntpdate time2.aliyun.com
4、设置限制条件
[root@k8s-master ~]# ulimit -SHn 65535 #单个进程可以打开的⽂件数量将被限制为 65535
[root@k8s-master ~]# vim /etc/security/limits.conf
* soft nofile 65536
* hard nofile 131072
* soft nproc 65535
* hard nproc 655350
* soft memlock unlimited
* hard memlock unlimited
5、安装k8s高可用性Git仓库
[root@k8s-master ~]# cd /root/ ; git clone https://gitee.com/dukuan/k8s-ha-install.git # 在 /root/ ⽬录下克隆⼀个名为 k8s-ha-install.git 的 Git 仓库
6、更新系统
[root@k8s-master ~]# yum update -y --exclude=kernel* --nobest && reboot
四、内核模块配置
[root@k8s-master ~]# yum install ipvsadm ipset sysstat conntrack libseccomp -y
[root@k8s-master ~]# modprobe -- ip_vs # 使用 modprobe 命令加载内核模块,核心 IPVS 模块。
[root@k8s-master ~]# modprobe -- ip_vs_rr # IPVS 负载均衡算法 rr
[root@k8s-master ~]# modprobe -- ip_vs_wrr # IPVS 负载均衡算法 wrr
[root@k8s-master ~]# modprobe -- ip_vs_sh # 用于源端负载均衡的模块
[root@k8s-master ~]# modprobe -- nf_conntrack # 用于网络流量过滤和跟踪的模块
[root@k8s-master ~]# vim /etc/modules-load.d/ipvs.conf
# 在系统启动时加载下列 IPVS 和相关功能所需的模块
ip_vs # 负载均衡模块
ip_vs_lc # 用于实现基于连接数量的负载均衡算法
ip_vs_wlc # 用于实现带权重的最少连接算法的模块
ip_vs_rr # 负载均衡rr算法模块
ip_vs_wrr # 负载均衡wrr算法模块
ip_vs_lblc # 负载均衡算法,它结合了最少连接(LC)算法和基于偏置的轮询(Round Robin with Bias)算法
ip_vs_lblcr # 用于实现基于链路层拥塞状况的最少连接负载调度算法的模块
ip_vs_dh # 用于实现基于散列(Hashing)的负载均衡算法的模块
ip_vs_sh # 用于源端负载均衡的模块
ip_vs_fo # 用于实现基于本地服务的负载均衡算法的模块
ip_vs_nq # 用于实现NQ算法的模块
ip_vs_sed # 用于实现随机早期检测(Random Early Detection)算法的模块
ip_vs_ftp # 用于实现FTP服务的负载均衡模块
ip_vs_sh
nf_conntrack # 用于跟踪网络连接的状态的模块
ip_tables # 用于管理防护墙的机制
ip_set # 用于创建和管理IP集合的模块
xt_set # 用于处理IP数据包集合的模块,提供了与iptables等网络工具的接口
ipt_set # 用于处理iptables规则集合的模块
ipt_rpfilter # 用于实现路由反向路径过滤的模块
ipt_REJECT # iptables模块之一,用于将不符合规则的数据包拒绝,并返回特定的错误码
ipip # 用于实现IP隧道功能的模块,使得数据可以在两个网络之间进行传输[root@k8s-master ~]# lsmod | grep -e ip_vs -e nf_conntrack # 查看已写入加载的模块
ip_vs_sh 16384 0
ip_vs_wrr 16384 0
ip_vs_rr 16384 0
ip_vs 172032 6 ip_vs_rr,ip_vs_sh,ip_vs_wrr
nf_conntrack 172032 4 xt_conntrack,nf_nat,ipt_MASQUERADE,ip_vs
nf_defrag_ipv6 20480 2 nf_conntrack,ip_vs
nf_defrag_ipv4 16384 1 nf_conntrack
libcrc32c 16384 5 nf_conntrack,nf_nat,nf_tables,xfs,ip_vs
[root@k8s-master ~]# vim /etc/sysctl.d/k8s.conf
# 写入k8s所需内核模块
net.bridge.bridge-nf-call-iptables = 1 # 控制网络桥接与iptables之间的网络转发行为
net.bridge.bridge-nf-call-ip6tables = 1 # 用于控制网络桥接(bridge)的IP6tables过滤规则。当该参数设置为1时,表示启用对网络桥接的IP6tables过滤规则
fs.may_detach_mounts = 1 # 用于控制文件系统是否允许分离挂载,1表示允许
net.ipv4.conf.all.route_localnet = 1 # 允许本地网络上的路由。设置为1表示允许,设置为0表示禁止。
vm.overcommit_memory=1 # 控制内存分配策略。设置为1表示允许内存过量分配,设置为0表示不允许。
vm.panic_on_oom=0 # 决定当系统遇到内存不足(OOM)时是否产生panic。设置为0表示不产生panic,设置为1表示产生panic。
fs.inotify.max_user_watches=89100 # inotify可以监视的文件和目录的最大数量。
fs.file-max=52706963 # 系统级别的文件描述符的最大数量。
fs.nr_open=52706963 # 单个进程可以打开的文件描述符的最大数量。
net.netfilter.nf_conntrack_max=2310720 # 网络连接跟踪表的最大大小。
net.ipv4.tcp_keepalive_time = 600 # TCP保活机制发送探测包的间隔时间(秒)。
net.ipv4.tcp_keepalive_probes = 3 # TCP保活机制发送探测包的最大次数。
net.ipv4.tcp_keepalive_intvl =15 # TCP保活机制在发送下一个探测包之前等待响应的时间(秒)。
net.ipv4.tcp_max_tw_buckets = 36000 # TCP TIME_WAIT状态的bucket数量。
net.ipv4.tcp_tw_reuse = 1 # 允许重用TIME_WAIT套接字。设置为1表示允许,设置为0表示不允许。
net.ipv4.tcp_max_orphans = 327680 # 系统中最大的孤套接字数量。
net.ipv4.tcp_orphan_retries = 3 # 系统尝试重新分配孤套接字的次数。
net.ipv4.tcp_syncookies = 1 # 用于防止SYN洪水攻击。设置为1表示启用SYN cookies,设置为0表示禁用。
net.ipv4.tcp_max_syn_backlog = 16384 # SYN连接请求队列的最大长度。
net.ipv4.ip_conntrack_max = 65536 # IP连接跟踪表的最大大小。
net.ipv4.tcp_max_syn_backlog = 16384 # 系统中最大的监听队列的长度。
net.ipv4.tcp_timestamps = 0 # 用于关闭TCP时间戳选项。
net.core.somaxconn = 16384 # 用于设置系统中最大的监听队列的长度
[root@k8s-master ~]# reboot
# 保存后,所有节点重启,保证重启后内核依然加载
五、基本组件安装
1、安装Containerd
5.1.1安装Docker
[root@k8s-master ~]# yum remove -y podman runc containerd # 卸载之前的containerd
[root@k8s-master ~]# yum install docker-ce docker-ce-cli containerd.io -y # 安装Docker和containerd
5.1.2配置Containerd所需模块
[root@k8s-master ~]# cat <<EOF | sudo tee /etc/modules-load.d/containerd.conf
>overlay # 用于支持Overlay网络文件系统的模块,它可以在现有的文件系统之上创建叠加层,以实现虚拟化、隔离和管理等功能。
> br_netfilter # 用于containerd的网络过滤模块,它可以对进出容器的网络流量进行过滤和管理。
[root@k8s-master ~]# modprobe -- overlay
[root@k8s-master ~]# modprobe -- br_netfilter
5.1.3配置 Containerd 所需内核
[root@k8s-master ~]# cat <<EOF | sudo tee /etc/sysctl.d/99-kubernetes-cri.conf # tee:读取的数据写入到一个或多个文件中,同时还将其复制到标准输出
> net.bridge.bridge-nf-call-iptables = 1 # 用于控制网络桥接是否调用iptables进行包过滤和转发。
> net.ipv4.ip_forward = 1 # 路由转发,1为开启
> net.bridge.bridge-nf-call-ip6tables = 1 # 控制是否在桥接接口上调用IPv6的iptables进行数据包过滤和转发。
> EOF
net.bridge.bridge-nf-call-iptables = 1
net.ipv4.ip_forward = 1
net.bridge.bridge-nf-call-ip6tables = 1
[root@k8s-master ~]# sysctl --system
1.4 Containerd 配置⽂件
[root@k8s-master ~]# mkdir -p /etc/containerd
[root@k8s-master ~]# containerd config default | tee /etc/containerd/config.toml
[root@k8s-master ~]# vim /etc/containerd/config.toml
63 sandbox_image = "registry.cn-hangzhou.aliyuncs.com/google_containers/pause:3.9"
127 SystemdCgroup = true
[root@k8s-master ~]# systemctl daemon-reload # 加载systemctl控制脚本
[root@k8s-master ~]# systemctl enable --now containerd # 启动containerd并设置开机启动
1.5 配置 crictl 客户端连接的运⾏位置
[root@k8s-master ~]# cat > /etc/crictl.yaml <<EOF
>runtime-endpoint: unix:///run/containerd/containerd.sock
>image-endpoint: unix:///run/containerd/containerd.sock
>timeout: 10
>debug:false
>EOF
2、安装 Kubernetes 组件
[root@k8s-master ~]#yum -y install kubelet-1.28*
[root@k8s-master ~]#yum -y install kubeadm-1.28*
[root@k8s-master ~]#yum -y install kubectl-1.28*
[root@k8s-master ~]#systemctl deamon-reload
[root@k8s-master ~]#ls /var/lib
[root@k8s-master ~]#systemctl enable --now kubelet
[root@k8s-master ~]#netstat -lnput | grep kube
3、Kubernetes 集群初始化
(接下来的的操作单独在master上进行)
5.3.1 Kubeadm 配置⽂件
[root@k8s-master ~]#vim kubeadm-config.yaml #将里面排除最后两个地址后所有的地址改为本机地址
[root@k8s-master ~]# kubeadm config migrate --old-config kubeadm-config.yaml --new-config new.yaml # 将旧的kubeadm配置⽂件转换为新的格式
5.3.2 下载组件镜像
[root@k8s-master ~]#kubeadm config images pull --config new.yaml # 通过新的配置⽂件new.yaml从指定的阿⾥云仓库拉取kubernetes组件镜像
5.3.3 集群初始化
[root@k8s-master ~]# kubeadm init --config /root/new.yaml --upload-certs #生成节点链接
kubeadm join 192.168.1.66:6443 --token 7t2weq.bjbawausm0jaxury --discovery-token-ca-cert-hash sha256:304a92f45959230f54663367ae9a01715f35c9958c7280497b3337b3a
[root@k8s-master ~]#vim token
kubeadm join 192.168.1.66:6443 --token 7t2weq.bjbawausm0jaxury --discovery-token-ca-cert-hash sha256:304a92f45959230f54663367ae9a01715f35c9958c7280497b3337b3a
5.3.4 前往node节点加入集群
node01
[root@k8s-node01 ~]# systemctl stop kubelet
[root@k8s-node01 ~]# kubeadm join 192.168.1.66:6443 --token 7t2weq.bjbawausm0jaxury --discovery-token-ca-cert-hash sha256:304a92f45959230f54663367ae9a01715f35c9958c7280497b3337b3a
node02
[root@k8s-node01 ~]# systemctl stop kubelet
[root@k8s-node01 ~]# kubeadm join 192.168.1.66:6443 --token 7t2weq.bjbawausm0jaxury --discovery-token-ca-cert-hash sha256:304a92f45959230f54663367ae9a01715f35c9958c7280497b3337b3a
回到master主机:
5.3.5 加载环境变量
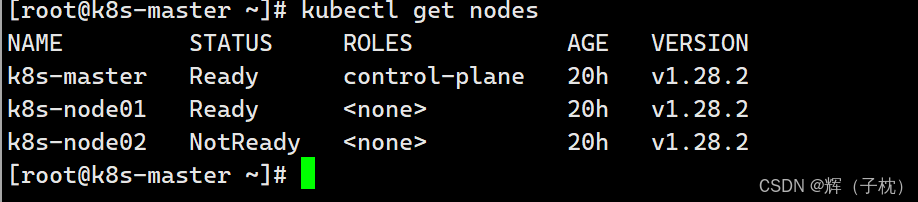
[root@k8s-master ~]# kubectl get nodes #查看集群
[root@k8s-master ~]# vim .bashrc #在最后一行加入(开机自启)
export KUBECONFIG=/etc/kubernetes/admin.conf
5.3.6查看组件容器状态
[root@k8s-master ~]# kubectl get po -n kube-system
5.3.7Calico 组件安装
[root@k8s-master ~]# cd k8s-ha-install/
[root@k8s-master ~]# git checkout manual-installation-v1.28.x && cd calico/
[root@k8s-master ~]# kubectl apply -f calico.yaml # 创建calico的pod
[root@k8s-master ~]# kubectl get po -A 如果到了这里前面还有机子没有跑起来则输入下面6行代码,反之则跳过 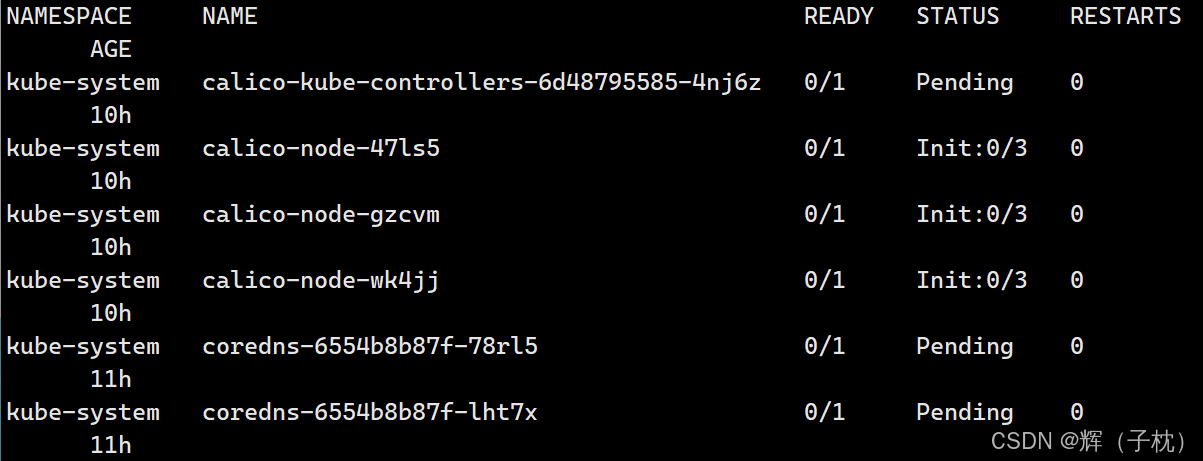
[root@k8s-master ~]# yum list kernel #这6行是三台机子都要使用的命令
[root@k8s-master ~]# yum update kernel
[root@k8s-master ~]# cd /etc/cni/net.d/
[root@k8s-master net.d]# ls
10-calico.conflist calico-kubeconfig # 这两个文件是自己放的,原来没有
[root@k8s-master ~]# reboot
[root@k8s-master ~]# kubectl get po -A # 这个时候等一会儿前面的服务就开始创建并运行了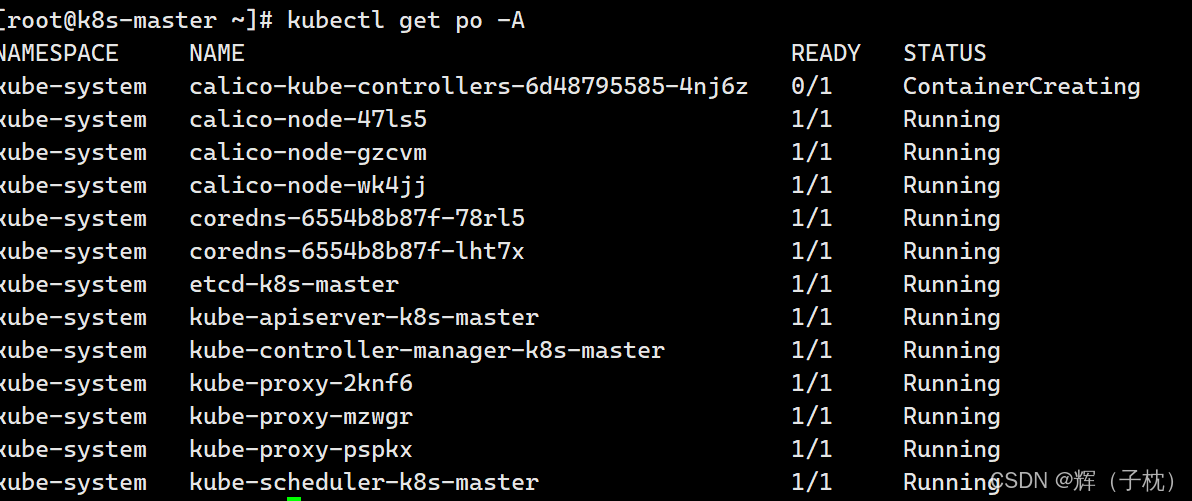
如果这个时候还有问题的话可以去/var/log/messages 查看最后一行就可以找到出错的地方
[root@k8s-master ~]# kubectl run nginx --image=nginx:latest
[root@k8s-master ~]# kubectl get po -Aowide | grep nginx
[root@k8s-master ~]# kubectl logs nginx
[root@k8s-master ~]# kubectl delete pod nginx
[root@k8s-master ~]# curl 172.16.85.194
5.3.8Metrics 部署
5.3.8.1 复制证书到所有 node 节点
[root@k8s-master ~]# scp /etc/kubernetes/pki/front-proxy-ca.crt k8s-node01:/etc/kubernetes/pki-proxy-ca.crt
[root@k8s-master ~]# scp /etc/kubernetes/pki/front-proxy-ca.crt k8s-node02:/etc/kubernetes/pki-proxy-ca.crt
#向node01、node02节点发送代理证书
5.3.8.2 布置metrics(监控)
[root@k8s-master ~]# mkdir pods #上传components.yaml
[root@k8s-master ~]# cd pods
[root@k8s-master pods]#ls
components.yaml 这里的的这个文件也是我们传上去的
[root@k8s-master pods]# kubectl create -f components.yaml # 添加metric server的pod资源
[root@k8s-master pods]# kubectl get po -A |grep metric
[root@k8s-master pods]# kubectl top nodes # 查看node节点的系统资源使⽤情况
[root@k8s-master pods]# kubectl top pods -A # 查看pod容器的系统资源使⽤情况
5.3.9 Dashboard部署
5.3.9.1安装组件
[root@k8s-master pods]# cd k8s-ha-install/dashboard/
[root@k8s-master dashboard]# vim dashboard.yaml # 啥也不用改,可以进去看看脚本
[root@k8s-master dashboard]# vim dashboard-user.yaml # 啥也不用改,可以进去看看脚本
[root@k8s-master dashboard]# kubectl create -f . # 建⽴dashboard的pod资源
[root@k8s-master dashboard]# kubectl get po -A
[root@k8s-master dashboard]# kubectl get po -A|grep dashboard
5.3.9.2 更改 svc 模式
[root@k8s-master dashboard]# kubectl edit svc kubernetes-dashboard -n kubernetes-dashboard
type: NodePort
5.3.9.3 查看访问端口号
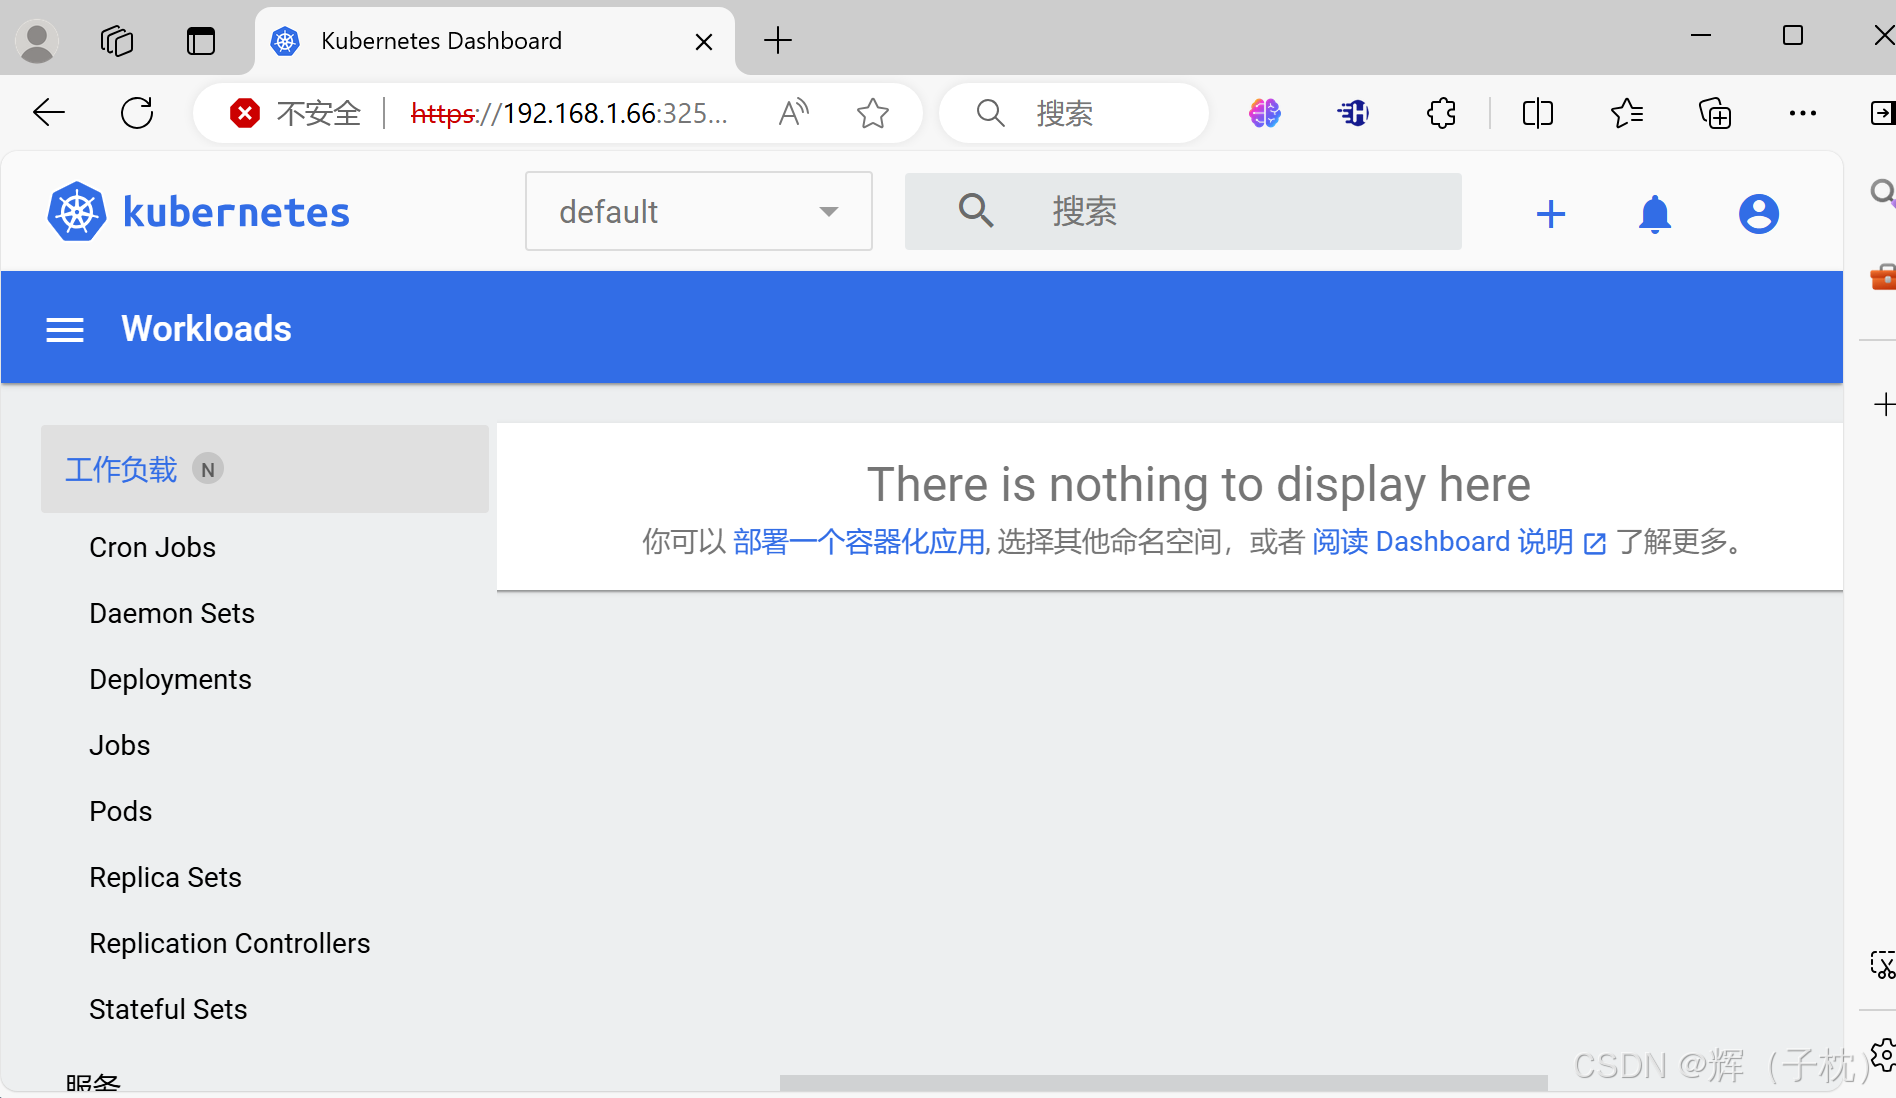
[root@k8s-master dashboard]# kubectl get svc kubernetes-dashboard -n kubernetes-dashboard # 获取kubernetes-dashboard状态信息,包含端⼝,服务IP等
通过浏览器访问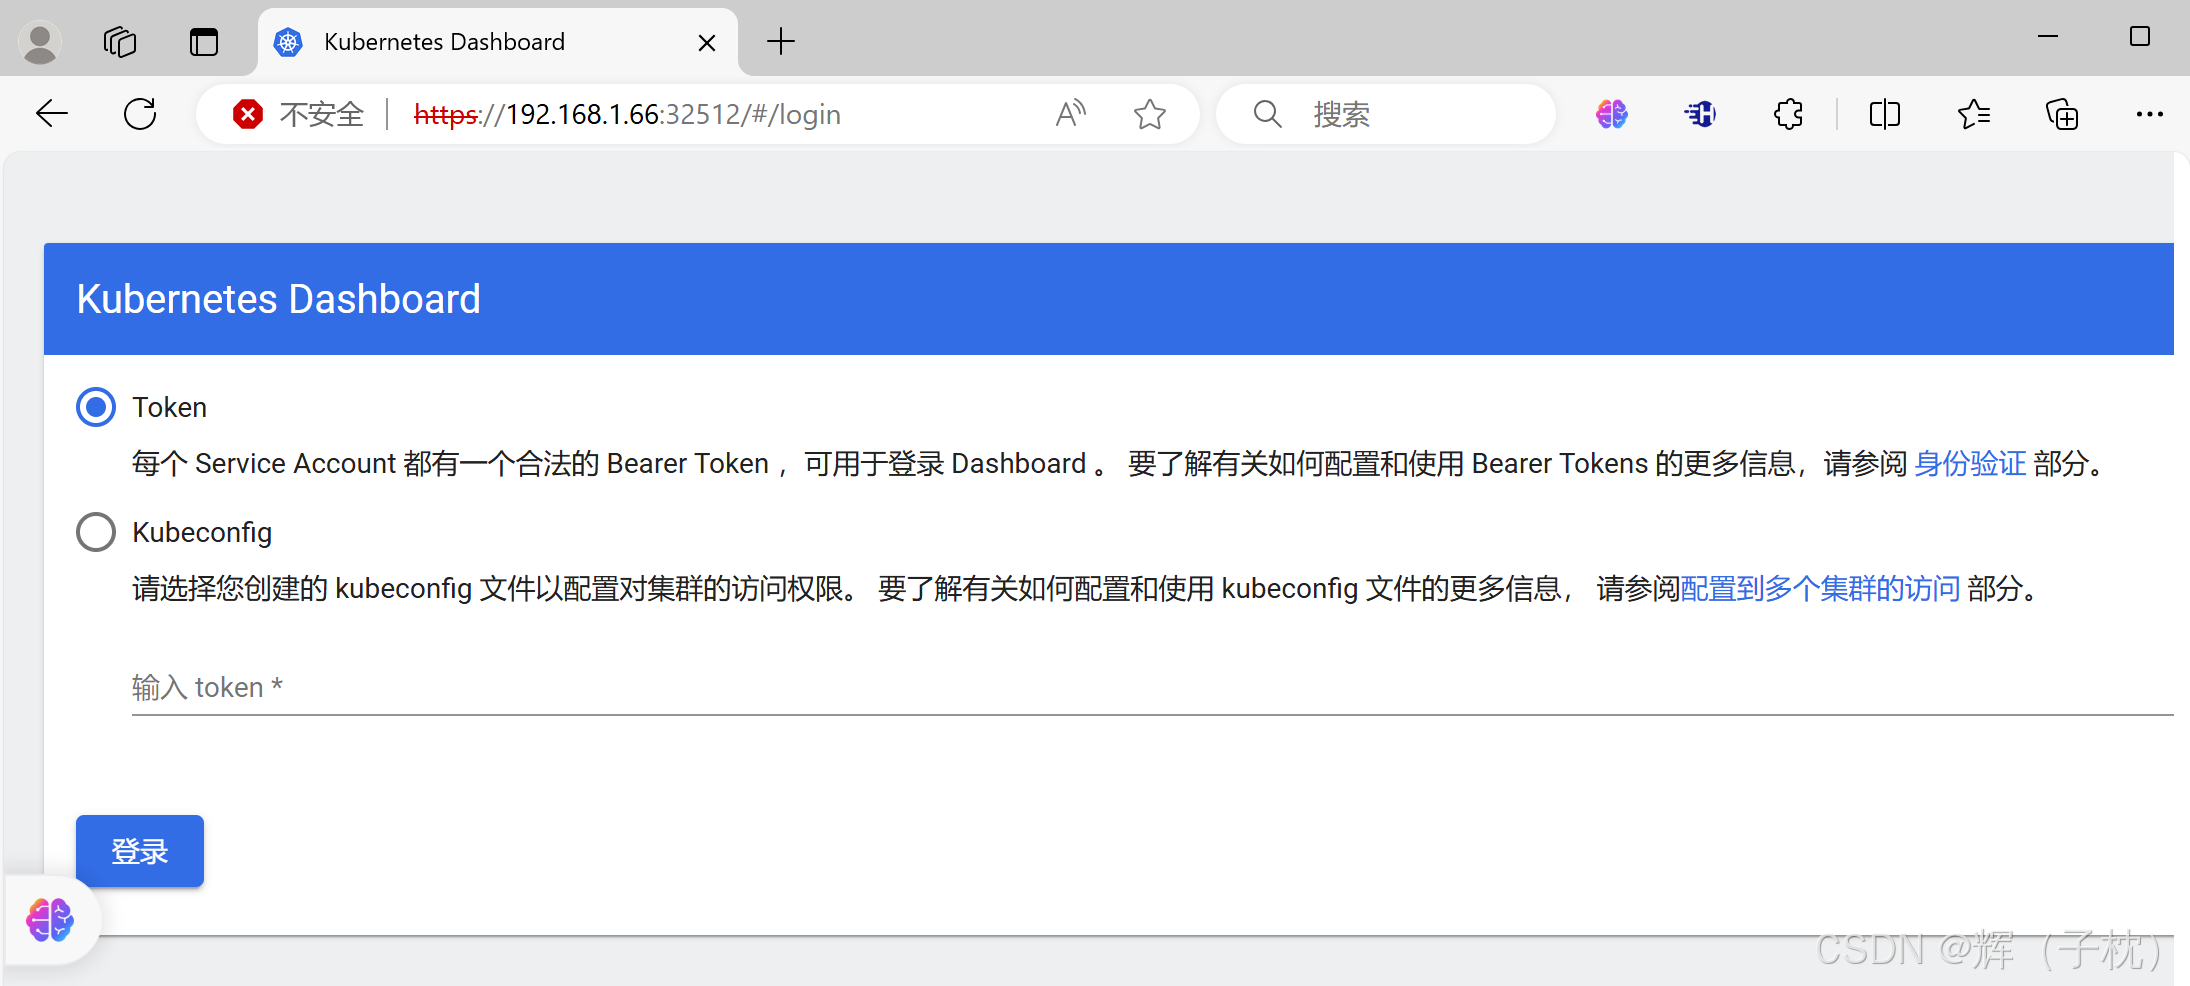
5.3.9.4创建登录token
[root@k8s-master dashboard]# kubectl create token admin-user -n kube-system
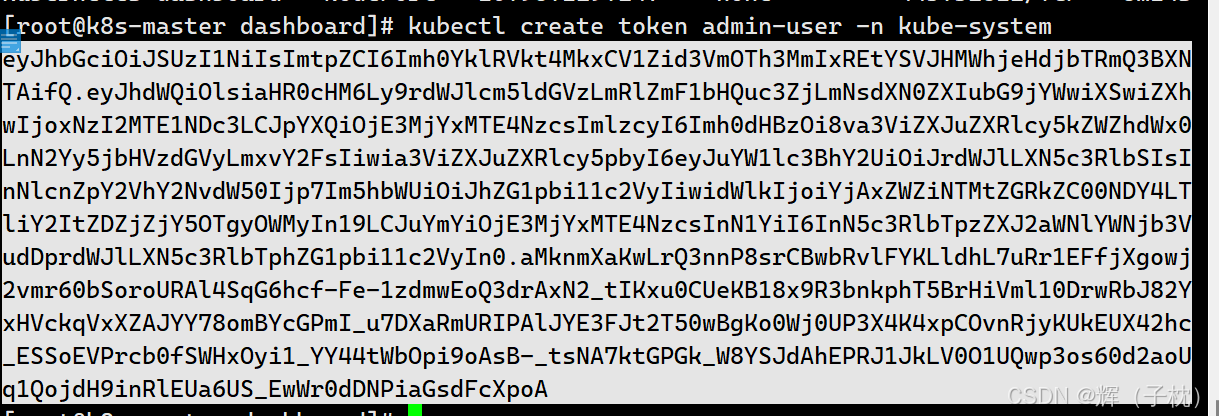
回到浏览器输入token密码登录
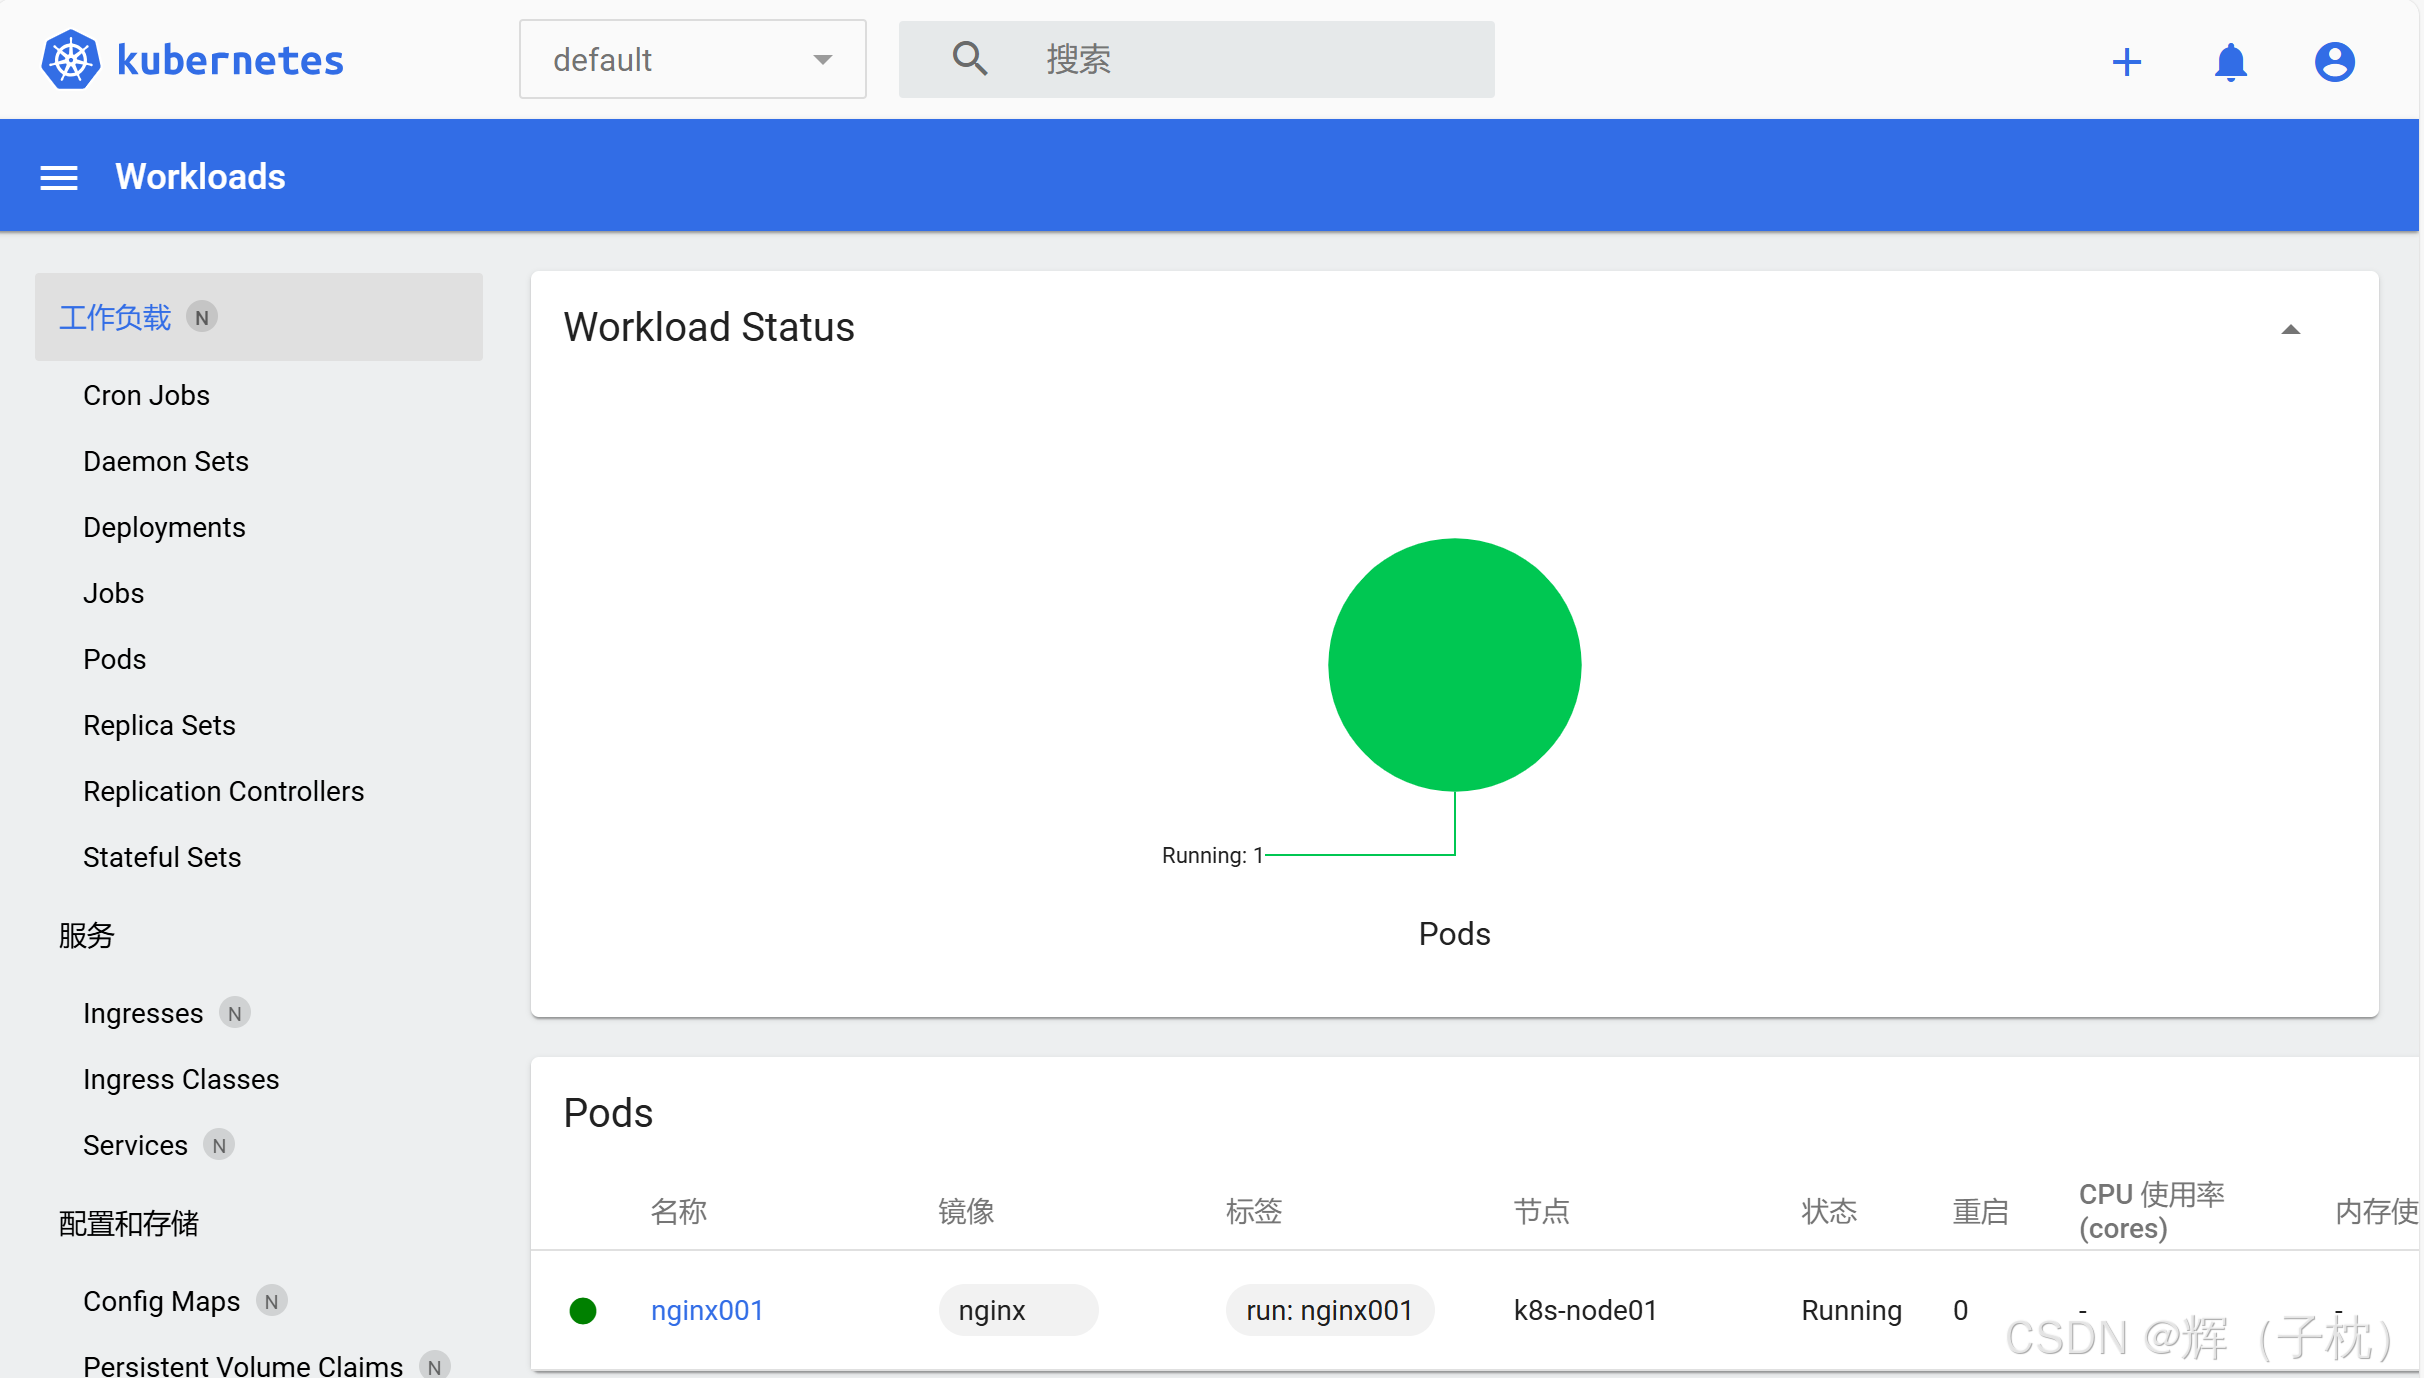
[root@k8s-master dashboard]# kubectl run nginx001 --image=nginx
[root@k8s-master dashboard]# cd
[root@k8s-master ~]# kubectl get pods -A |grep Proxy
5.4 Kube-Proxy
5.4.1 改为ipvs模式
[root@k8s-master ~]# kubectl edit cm kube-proxy -n kube-system
mode: ipvs
5.4.2 更新 Kube-Proxy 的 Pod
[root@k8s-master ~]# kubectl patch daemonset kube-proxy -p "{\"spec\":{\"template\":{\"metada{\"annotations\":{\"date\":\"`date +'%s'`\"}}}}}" -n kube-system
[root@k8s-master ~]# curl 127.0.0.1:10249/proxyMode
ipvs
[root@k8s-master ~]#tail -f /var/log/messages
[root@k8s-master ~]# kubectl get svc
[root@k8s-master ~]# kubectl get po -Aowide #查看pod容器详细信息
[root@k8s-master ~]# kubectl get po -A|wc -l #查看pod有几行
5.4.3 验证是否可正常创建参数
[root@k8s-master ~]# kubectl create deploy cluster-test --image=registry.cn-beijing.aliyuncs.cbalo/debug-tools -- sleep 3600
deployment.apps/cluster-test created # 已创建,表示正常
[root@k8s-master ~]# kubectl get po -A|wc -l
[root@k8s-master ~]# kubectl get po -A|grep clu
[root@k8s-master ~]# kubectl exec -it cluster-test-66bb44bd88-x9sv5 -- bash ## 进⼊pod下的某个容器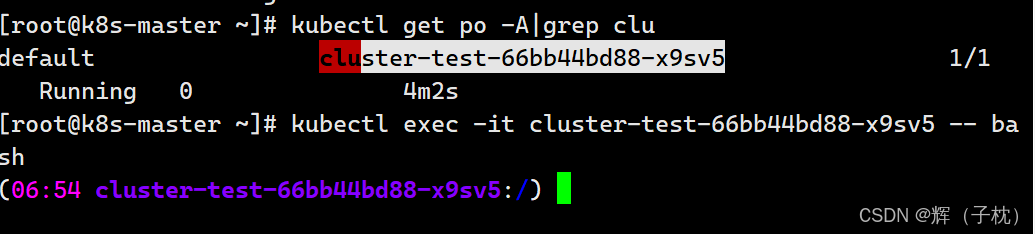
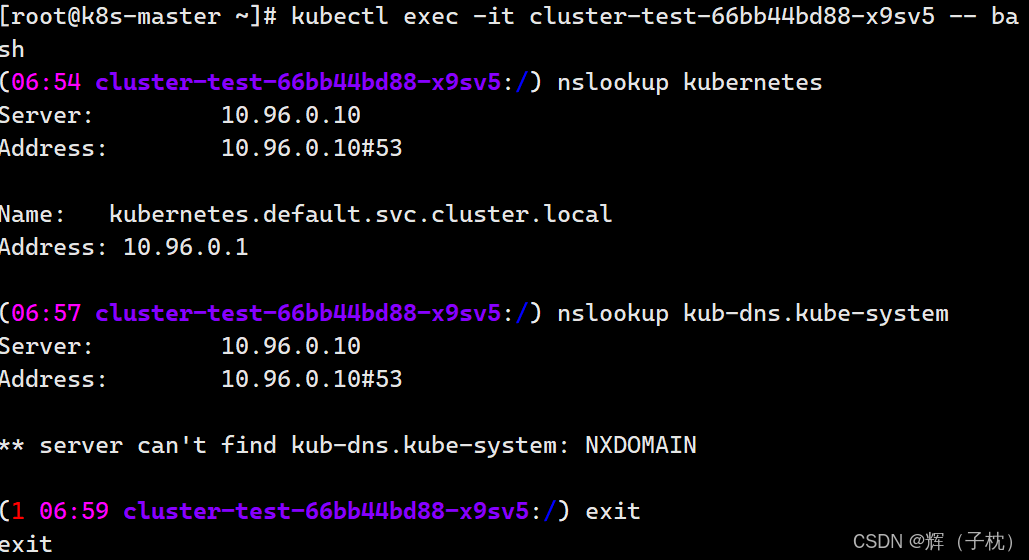
[root@k8s-master ~]# curl -k https://10.96.0.1:443
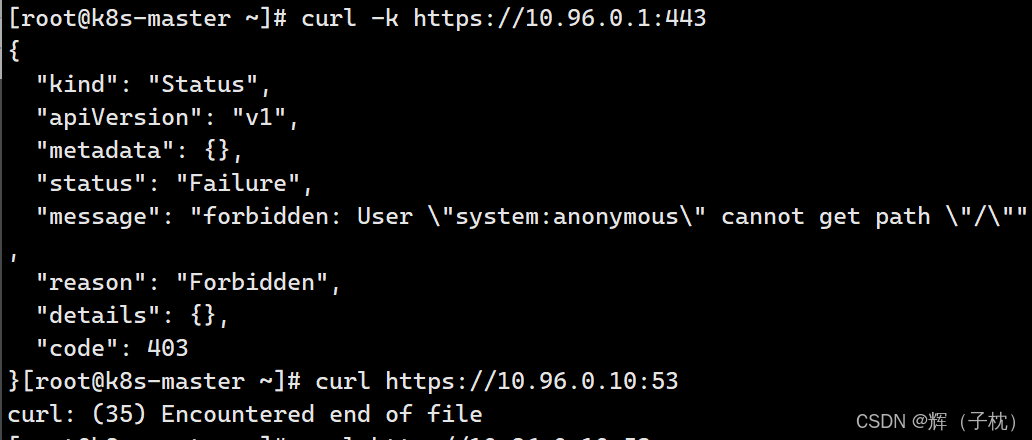
[root@k8s-master ~]# curl http://10.96.0.10:53 #这里这个是由于不安全所以访问不到
[root@k8s-master ~]# ping 172.16.58.195
五、Kubernetes 自动补齐
[root@k8s-master ~]# source <(kubectl completion bash) # 临时开启自动补齐功能
[root@k8s-master ~]# kubectl echo "source <(kubectl completion bash)" >> ~/.bashrc # 永久开启自动补齐功能
相关文章:
k8s的搭建
一、安装环境 准备三台主机: 192.168.1.66 k8s-master 192.168.1.77 k8s-node01 192.168.1.88 k8s-node02 网段: Pod ⽹段 172.16.0.0/16 Service ⽹段 10.96.0.0/16 注:宿主机⽹段、Pod…...

人工智能与机器学习原理精解【19】
文章目录 马尔科夫链概述定义与性质分类应用领域收敛性马尔科夫链蒙特卡洛方法 马尔科夫链原理详解一、定义二、特性三、数学描述四、类型五、应用六、示例定义性质转移概率矩阵应用举例结论 马尔科夫链在语音识别和语音合成中的应用一、马尔科夫链在语音识别中的应用1. 基本概…...

DingoDB:多模态向量数据库的实践与应用
DingoDB:多模态向量数据库的实践与应用 1. 引言 在当今数据驱动的时代,高效处理和分析大规模、多样化的数据变得至关重要。DingoDB作为一个分布式多模态向量数据库,为我们提供了一个强大的解决方案。本文将深入探讨DingoDB的特性、安装过程…...

03.01、三合一
03.01、[简单] 三合一 1、题目描述 三合一。描述如何只用一个数组来实现三个栈。 你应该实现push(stackNum, value)、pop(stackNum)、isEmpty(stackNum)、peek(stackNum)方法。stackNum表示栈下标,value表示压入的值。 构造函数会传入一个stackSize参数…...

github上clone代码过程
从 GitHub 上拉取代码的过程非常简单,一般通过 git clone 命令来完成。以下是详细步骤: 下载git工具 要下载并安装 Git,你可以根据你的操作系统来选择相应的步骤。以下是如何在不同操作系统上安装 Git 的详细说明: 1. 在 Windo…...
ChatGLM3模型搭建教程
一、介绍 ChatGLM3 是智谱 AI 和清华大学 KEG 实验室联合发布的对话预训练模型。ChatGLM3-6B 是 ChatGLM3 系列中的开源模型,在保留了前两代模型对话流畅、部署门槛低等众多优秀特性的基础上,ChatGLM3-6B 引入了如下特性: 更强大的基础模型…...

多层建筑能源参数化模型和城市冠层模型的区别
多层建筑能源参数化(Multi-layer Building Energy Parameterization, BEP)模型和城市冠层模型(Urban Canopy Model, UCM)都是用于模拟城市环境中能量交换和微气候的数值模型,但它们的侧重点和应用场景有所不同。以下是…...

27. Redis并发问题
1. 前言 对于一个在线运行的系统,如果需要修改数据库已有数据,需要先读取旧数据,再写入新数据。因为读数据和写数据不是原子操作,所以在高并发的场景下,关注的数据可能会修改失败,需要使用锁控制。 2. 分布式场景 2.1 分布式锁场景 面试官提问: 为什么要使用分布式锁?…...
)
JVM四种垃圾回收算法以及G1垃圾回收器(面试)
JVM 垃圾回收算法 标记清除算法:标记清除算法将垃圾回收分为两个阶段:标记阶段和清除阶段。 在标记阶段通过根节点,标记所有从根节点开始的对象。然后,在清除阶段,清除所有未被标记的对象 适用场合: 存活对…...

Python 数学建模——Vikor 多标准决策方法
文章目录 前言原理步骤代码实例 前言 Vikor 归根到底其实属于一种综合评价方法。说到综合评价方法,TOPSIS(结合熵权法使用)、灰色关联度分析、秩和比法等方法你应该耳熟能详。Vikor 未必比这些方法更出色,但是可以拓展我们的视野。…...

计算机网络八股总结
这里写目录标题 网络模型划分(五层和七层)及每一层的功能五层网络模型七层网络模型(OSI模型) 三次握手和四次挥手具体过程及原因三次握手四次挥手 TCP/IP协议组成UDP协议与TCP/IP协议的区别Http协议相关知识网络地址,子…...

AMD CMD UMD CommonJs ESM 的历史和区别
这几个东西都是用于定义模块规范的。有些资料会提及到这些概念,不理清楚非常容易困惑。 ESM(ES Module) 这个实际上我们是最熟悉的,就是ES6的模块功能。出的最晚,因为是官方出品,所以大势所趋,…...

人工智能数据基础之微积分入门-学习篇
目录 导数概念常见导数和激活导数python代码绘制激活函数微分概念和法则、积分概念微积分切线切面代码生成案例链式求导法则反向传播算法(重要) 一、概念 二、常见导数及激活导数 常见激活函数及其导数公式: 在神经网络中,激活函数用于引入非线性因素&…...

【PSINS】ZUPT代码解析(PSINS_SINS_ZUPT)|MATLAB
这篇文章写关于PSINS_SINS_ZUPT的相关解析。【值得注意的是】:例程里面给的这个m文件的代码,并没有使用ZUPT的相关技术,只是一个速度观测的EKF 简述程序作用 主要作用是进行基于零速更新(ZUPT)的惯性导航系统(INS)仿真和滤波 什么是ZUPT ZUPT是Zero Velocity Update(…...

多态(上)【C++】
文章目录 多态的概念多态的实现多态产生的条件什么是虚函数?虚函数的重写和协变重写协变 析构函数的重写为什么有必要要让析构函数构成重写? 多态的概念 C中的多态是面向对象编程(OOP)的一个核心特性,指的是同一个接口…...
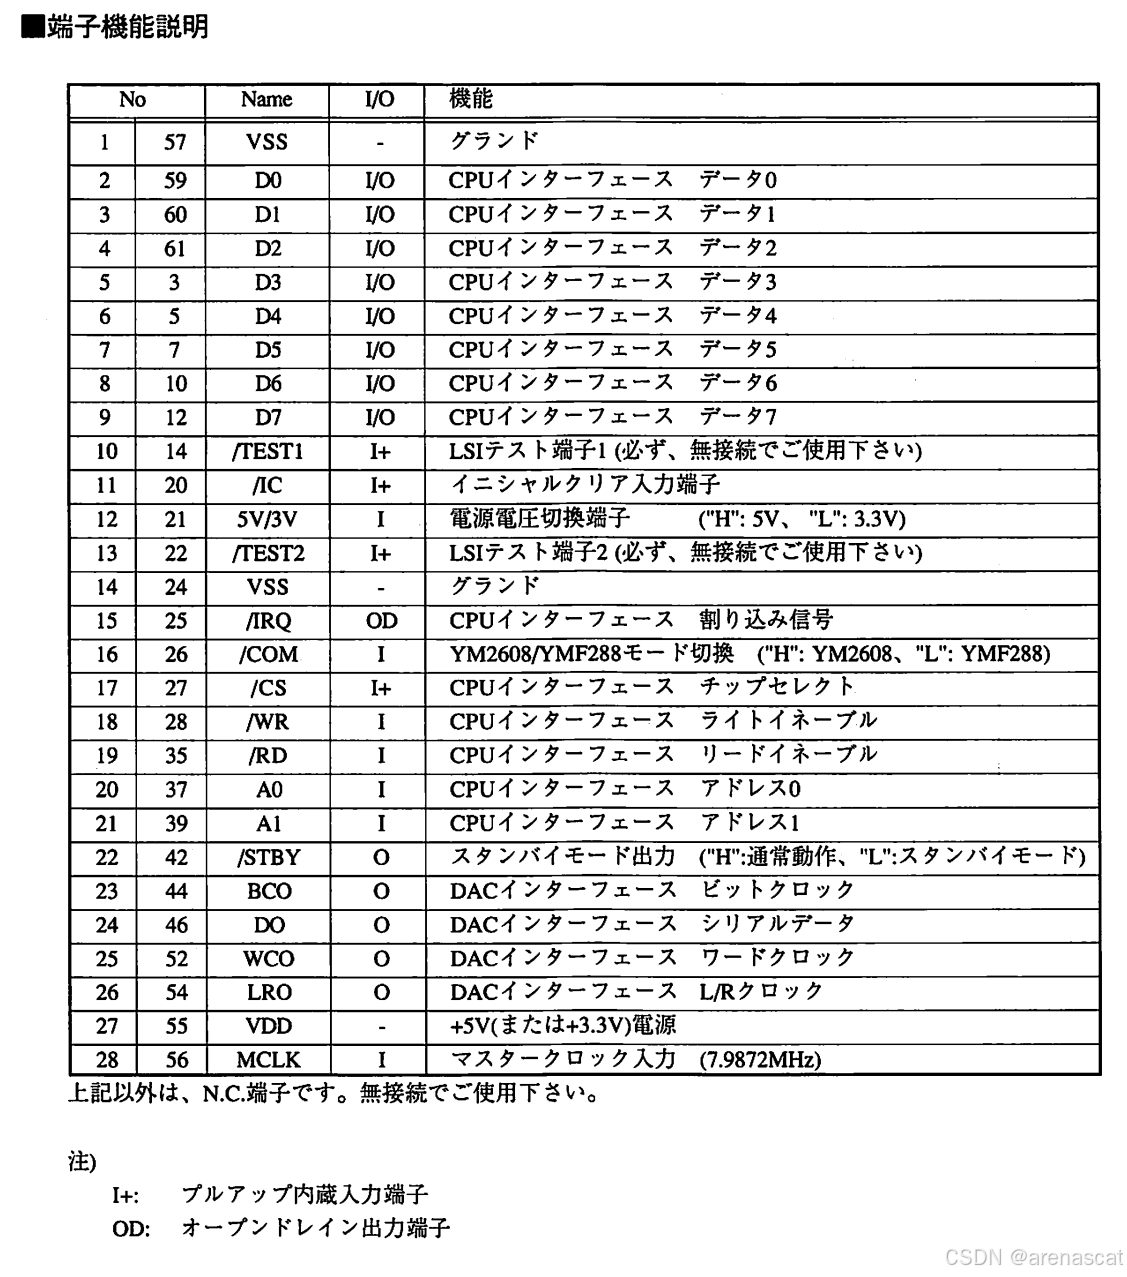
如何驱动一枚30年前的音源芯片,YMF288驱动手记 Part2
一些问题 在上一篇里面虽然策划了想要驱动YMF288所需要做的事情以及目标。但是,在板子打出来后,我在进一步的研究中,发现我犯了个错误,那就是YMF288并不是使用现在很多轻量化的嵌入式,比如ESP32常用的I2S协议的&#x…...

yarn webpack脚手架 react+ts搭建项目
安装 Yarn 首先,确保你已经安装了 Node.js 和 Yarn。如果还没有安装 Yarn,可以通过以下命令安装: npm install -g yarn创建项目 使用 create-react-app 脚手架创建一个带有 TypeScript 的项目,node更新到最新版,并指定…...

防蓝光护眼灯有用吗?五款防蓝光效果好的护眼台灯推荐
现在孩子的很多兴趣班和课后辅导班都是在线上举行,通常对着手机电脑长时间。电子产品有大量蓝光和辐射,会伤害到孩子的眼睛。但为了学习,也是没办法。护眼台灯的出现可以让孩子们的眼睛得到保护,防止蓝光对眼睛的伤害。防蓝光护眼…...

Mac使用Elasticsearch
下载 Past Releases of Elastic Stack Software | Elastic 解压tar -xzvf elasticsearch-8.15.1-darwin-x86_64.tar.gz 修改配置文件config/elasticsearch.yml xpack.security.enabled: false xpack.security.http.ssl: enabled: false 切换目录 cd elasticsearch-8.15.1/…...

DevOps -CI/CD 与自动化部署
DevOps - CI/CD 与自动化部署详解 DevOps 是一种结合开发(Development)与运维(Operations)的方法论,旨在通过工具和文化变革,促进软件开发和运维之间的协作,提升软件交付的效率、质量和稳定性。…...

Topit:macOS窗口置顶神器,让多任务处理效率翻倍
Topit:macOS窗口置顶神器,让多任务处理效率翻倍 【免费下载链接】Topit Pin any window to the top of your screen / 在Mac上将你的任何窗口强制置顶 项目地址: https://gitcode.com/gh_mirrors/to/Topit 你是否经常在macOS上同时处理多个任务时…...

Taurus多执行器对比实战:JMeter/Gatling/Locust统一压测方案
1. 为什么选Taurus做多执行器对比——不是为了炫技,而是为了少踩坑在性能测试领域,我见过太多团队卡在“选型”这一步:刚招来一个会写JMeter脚本的工程师,项目突然要压测WebSocket接口,发现JMeter原生支持弱、插件维护…...

BLE四大广播模式详解:可连接/不可连接/定向/周期广播
一、前言在低功耗蓝牙(BLE)开发中,广播(Advertising)是设备发现、连接建立、数据广播、设备重连的核心基石,所有BLE交互流程均始于广播报文的收发。不同于传统经典蓝牙,BLE所有广播行为标准化、…...

2026 西安 AI 问答曝光搭建技术解析:GEO 知识图谱 + 深度测评
随着大语言模型技术的快速普及,AI 搜索已经成为用户获取企业信息、商家服务的核心入口。根据中国互联网信息中心 2026 年发布的《中国人工智能搜索发展报告》显示,2025 年国内 AI 搜索用户规模突破 8.2 亿,日均搜索请求超过 20 亿次ÿ…...
)
Sora 2原生接入Unity 6.0:5步完成神经渲染管线嵌入,实测帧率提升47%(附GitHub认证插件)
更多请点击: https://kaifayun.com 第一章:Sora 2与Unity整合 Sora 2作为新一代AI视频生成引擎,其开放API设计天然支持与实时3D引擎的深度协同。Unity 2023.2版本通过URP(Universal Render Pipeline)与C# Job System提…...

Linux服务器被挖矿木马劫持的五步应急处置指南
1. 这不是“中病毒”,是服务器被劫持成了矿机——先别慌,但必须立刻断网“服务器被黑客攻击,用来挖矿!”——这句话在运维圈里一出,比收到OOM告警还让人头皮发紧。它不像网页被挂马、数据库被拖库那样有明显业务影响&a…...

Burp Suite拦截与替换机制深度解析:从协议层到规则链
1. 这不是“点开就能用”的功能,而是你和目标系统之间的一道可编程闸门很多人第一次在Burp Suite里点开Proxy → Intercept,看到HTTP请求被拦下来,兴奋地改个User-Agent、删个Cookie就点Forward,以为自己已经掌握了“拦截与替换”…...

为什么鸿蒙 App 最终都会走向状态驱动?
子玥酱 (掘金 / 知乎 / CSDN / 简书 同名) 大家好,我是 子玥酱,一名长期深耕在一线的前端程序媛 👩💻。曾就职于多家知名互联网大厂,目前在某国企负责前端软件研发相关工作,主要聚…...

ComfyUI-Manager完整指南:如何轻松管理你的AI工作流扩展库
ComfyUI-Manager完整指南:如何轻松管理你的AI工作流扩展库 【免费下载链接】ComfyUI-Manager ComfyUI-Manager is an extension designed to enhance the usability of ComfyUI. It offers management functions to install, remove, disable, and enable various c…...

氘可来昔替尼常见副作用为鼻咽炎头痛及腹泻,如何应对?
任何口服药物的临床价值,都必须在疗效与安全性的天平上找到精准的平衡点。氘可来昔替尼以PASI 75应答率的全面胜出证明了自己在银屑病治疗中的卓越地位,而其不良反应谱同样经过了严苛的临床验证。鼻咽炎、头痛和腹泻构成了这款药物最需关注的三大安全信号…...