一个简单的摄像头应用程序6
主要改进点:
使用 ThreadPoolExecutor 管理多线程:
使用 concurrent.futures.ThreadPoolExecutor 来管理多线程,这样可以更高效地处理图像。
在 main 函数中创建一个 ThreadPoolExecutor,并在每个循环中提交图像处理任务。
减少不必要的图像转换:
尽量减少图像格式之间的转换,以减少计算开销。
使用更高效的算法:
选择了更高效的滤波器和对焦方法,例如 cv2.fastNlMeansDenoisingColored 和 cv2.Laplacian。
import cv2
import os
import numpy as np
from PIL import Image, ImageDraw, ImageFont
import datetime
import webbrowser
import logging
import concurrent.futures
import queue# 配置日志
logging.basicConfig(level=logging.INFO, format='%(asctime)s - %(levelname)s - %(message)s')# 检查并创建保存照片和视频的文件夹
def create_folder(folder_name):if not os.path.exists(folder_name):os.makedirs(folder_name)return folder_name# 获取文件夹中的最大编号
def get_next_file_number(folder_name, file_extension):files = os.listdir(folder_name)files = [f for f in files if f.endswith(file_extension)]if files:numbers = [int(f.split('.')[0]) for f in files]return max(numbers) + 1else:return 1# 将PIL图像转换为OpenCV图像
def pil_to_cv(image):return cv2.cvtColor(np.array(image), cv2.COLOR_RGB2BGR)# 自动曝光调整
def auto_exposure(frame, exposure_value):frame = cv2.convertScaleAbs(frame, alpha=exposure_value, beta=0)return frame# 自动对焦
def auto_focus(frame):gray = cv2.cvtColor(frame, cv2.COLOR_BGR2GRAY)laplacian = cv2.Laplacian(gray, cv2.CV_64F).var()if laplacian < 100:  # 如果图像模糊,进行对焦frame = cv2.fastNlMeansDenoisingColored(frame, None, 10, 10, 7, 21)return frame# 鼠标回调函数
def mouse_callback(event, x, y, flags, param):global next_photo_number, next_video_number, running, recording, out, frame, scale_factor, cam_index, roi, button_hints, show_buttons, show_help, frame_width, frame_heightbutton_width = int(frame_width * 0.05)  # 按钮区域宽度占界面宽度的1/20button_height = 40  # 每个按钮的高度if event == cv2.EVENT_LBUTTONDOWN:if 10 <= x <= button_width and 10 <= y <= 50:  # 关闭按钮区域running = Falseelif 10 <= x <= button_width and 70 <= y <= 70 + button_height:  # 拍照按钮区域threading.Thread(target=save_photo, args=(frame.copy(), next_photo_number)).start()next_photo_number += 1elif 10 <= x <= button_width and 120 <= y <= 120 + button_height:  # 开始/停止录像按钮区域if not recording:start_recording()else:stop_recording()elif 10 <= x <= button_width and 170 <= y <= 170 + button_height:  # 放大按钮区域scale_factor = min(3.0, scale_factor * 2)elif 10 <= x <= button_width and 220 <= y <= 220 + button_height:  # 缩小按钮区域scale_factor = max(1.0, scale_factor / 2)elif 10 <= x <= button_width and 270 <= y <= 270 + button_height:  # 切换摄像头按钮区域switch_camera()elif 10 <= x <= button_width and 320 <= y <= 320 + button_height:  # 查看照片按钮区域open_photo_folder()elif 10 <= x <= button_width and 370 <= y <= 370 + button_height:  # 查看视频按钮区域open_video_folder()elif 10 <= x <= button_width and 420 <= y <= 420 + button_height:  # 去除噪点按钮区域apply_denoise()elif 10 <= x <= button_width and 470 <= y <= 470 + button_height:  # 功能菜单按钮区域show_buttons = not show_buttonselif 10 <= x <= button_width and 520 <= y <= 520 + button_height:  # 功能说明按钮区域show_help = not show_helpelif event == cv2.EVENT_RBUTTONDOWN:roi[0], roi[1] = x, yelif event == cv2.EVENT_RBUTTONUP:roi[2], roi[3] = x - roi[0], y - roi[1]if roi[2] < 0:roi[0] += roi[2]roi[2] = -roi[2]if roi[3] < 0:roi[1] += roi[3]roi[3] = -roi[3]elif event == cv2.EVENT_MOUSEMOVE:button_hints = []button_width = int(frame_width * 0.05)  # 按钮区域宽度占界面宽度的1/20button_height = 40  # 每个按钮的高度if 10 <= x <= button_width and 10 <= y <= 50:button_hints.append("关闭")elif 10 <= x <= button_width and 70 <= y <= 70 + button_height:button_hints.append("拍照")elif 10 <= x <= button_width and 120 <= y <= 120 + button_height:button_hints.append("录像")elif 10 <= x <= button_width and 170 <= y <= 170 + button_height:button_hints.append("放大")elif 10 <= x <= button_width and 220 <= y <= 220 + button_height:button_hints.append("缩小")elif 10 <= x <= button_width and 270 <= y <= 270 + button_height:button_hints.append("切换摄像头")elif 10 <= x <= button_width and 320 <= y <= 320 + button_height:button_hints.append("查看照片")elif 10 <= x <= button_width and 370 <= y <= 370 + button_height:button_hints.append("查看视频")elif 10 <= x <= button_width and 420 <= y <= 420 + button_height:button_hints.append("去除噪点")elif 10 <= x <= button_width and 470 <= y <= 470 + button_height:button_hints.append("功能菜单")elif 10 <= x <= button_width and 520 <= y <= 520 + button_height:button_hints.append("功能说明")# 保存照片
def save_photo(frame, photo_number):file_path = os.path.join(photo_folder, f"{photo_number}.jpg")# 去除界面上的按钮clean_frame = remove_buttons(frame)# 裁剪区域clean_frame = clean_frame[roi[1]:roi[1] + roi[3], roi[0]:roi[0] + roi[2]]# 添加时间戳clean_frame = add_timestamp(clean_frame)try:cv2.imwrite(file_path, clean_frame)logging.info(f"照片已保存为 {file_path}")except Exception as e:logging.error(f"保存照片时出错: {e}")# 去除界面上的按钮
def remove_buttons(frame):pil_image = Image.fromarray(cv2.cvtColor(frame, cv2.COLOR_BGR2RGB))draw = ImageDraw.Draw(pil_image)button_width = int(frame_width * 0.05)  # 按钮区域宽度占界面宽度的1/20draw.rectangle((0, 0, button_width, frame_height), fill=(0, 0, 0, 0))  # 透明填充return pil_to_cv(pil_image)# 添加时间戳
def add_timestamp(image):now = datetime.datetime.now().strftime("%Y-%m-%d %H:%M:%S")pil_image = Image.fromarray(cv2.cvtColor(image, cv2.COLOR_BGR2RGB))draw = ImageDraw.Draw(pil_image)draw.text((10, 10), now, font=font, fill=(255, 255, 255))return pil_to_cv(pil_image)# 开始录像
def start_recording():global out, recording, framefile_path = os.path.join(video_folder, f"{next_video_number}.mp4")fourcc = cv2.VideoWriter_fourcc(*'XVID')out = cv2.VideoWriter(file_path, fourcc, 20.0, (roi[2], roi[3]))recording = Truelogging.info(f"开始录像: {file_path}")# 停止录像
def stop_recording():global out, recordingtry:out.release()recording = Falselogging.info("录像已保存")except Exception as e:logging.error(f"停止录像时出错: {e}")# 切换摄像头
def switch_camera():global cap, cam_indexcap.release()cam_index = (cam_index + 1) % 2  # 切换到下一个摄像头cap = cv2.VideoCapture(cam_index)if not cap.isOpened():logging.error("无法打开摄像头")running = False# 打开照片文件夹
def open_photo_folder():folder_path = os.path.abspath(photo_folder)webbrowser.open(folder_path)# 打开视频文件夹
def open_video_folder():folder_path = os.path.abspath(video_folder)webbrowser.open(folder_path)# 应用去噪点滤镜
def apply_denoise():global filter_typefilter_type = "denoise"# 绘制按钮
def draw_buttons(pil_image, font, show_buttons):draw = ImageDraw.Draw(pil_image)button_width = int(frame_width * 0.05)  # 按钮区域宽度占界面宽度的1/20button_height = 40  # 每个按钮的高度buttons = [((10, 10, button_width, 50), "关闭", (0, 0, 255)),((10, 70, button_width, 70 + button_height), "拍照", (255, 0, 0)),((10, 120, button_width, 120 + button_height), "录像", (0, 255, 0)),((10, 170, button_width, 170 + button_height), "放大", (0, 255, 255)),((10, 220, button_width, 220 + button_height), "缩小", (0, 255, 255)),((10, 270, button_width, 270 + button_height), "切换摄像头", (255, 255, 0)),((10, 320, button_width, 320 + button_height), "查看照片", (255, 165, 0)),((10, 370, button_width, 370 + button_height), "查看视频", (255, 165, 0)),((10, 420, button_width, 420 + button_height), "去除噪点", (255, 165, 0)),((10, 470, button_width, 470 + button_height), "功能菜单", (255, 165, 0)),((10, 520, button_width, 520 + button_height), "功能说明", (255, 165, 0))]for (x1, y1, x2, y2), text, color in buttons:if show_buttons or y1 >= 470:draw.rectangle((x1, y1, x2, y2), fill=color)draw.text((x1 + 10, y1 + 10), text, font=font, fill=(255, 255, 255))# 绘制提示信息
def draw_hints(pil_image, hints, font):draw = ImageDraw.Draw(pil_image)button_width = int(frame_width * 0.05)  # 按钮区域宽度占界面宽度的1/20for i, hint in enumerate(hints):draw.text((10, frame_height - 10 - (i + 1) * 30), hint, font=font, fill=(0, 255, 0))# 绘制功能说明
def draw_help(pil_image, font):draw = ImageDraw.Draw(pil_image)help_text = ["功能说明:","q: 退出程序","g: 应用灰度滤镜","b: 应用模糊滤镜","r: 恢复原图","功能菜单: 显示/隐藏功能按钮","功能说明: 显示/隐藏功能说明"]for i, text in enumerate(help_text):draw.text((10, 10 + i * 30), text, font=font, fill=(255, 255, 255))# 应用图像滤镜
def apply_filter(image, filter_type):if filter_type == "grayscale":return cv2.cvtColor(image, cv2.COLOR_BGR2GRAY)elif filter_type == "blur":return cv2.GaussianBlur(image, (15, 15), 0)elif filter_type == "denoise":return cv2.fastNlMeansDenoisingColored(image, None, denoise_strength, 10, 7, 21)return image# 处理图像的线程
def process_frame(frame, exposure_value, filter_type, scale_factor, roi, result_queue):frame = auto_exposure(frame, exposure_value)frame = auto_focus(frame)frame = apply_filter(frame, filter_type)frame = cv2.resize(frame, None, fx=scale_factor, fy=scale_factor, interpolation=cv2.INTER_LINEAR)frame_height, frame_width, _ = frame.shaperoi_x = max(0, min(roi[0], frame_width - 1))roi_y = max(0, min(roi[1], frame_height - 1))roi_width = max(0, min(roi[2], frame_width - roi_x))roi_height = max(0, min(roi[3], frame_height - roi_y))roi = [roi_x, roi_y, roi_width, roi_height]result_queue.put((frame, roi))# 主函数
def main():global running, frame, photo_folder, video_folder, next_photo_number, next_video_number, recording, out, scale_factor, cam_index, roi, button_hints, filter_type, cap, font, show_buttons, show_help, frame_width, frame_height, exposure_value, denoise_strengthphoto_folder = "photos"video_folder = "videos"create_folder(photo_folder)create_folder(video_folder)next_photo_number = get_next_file_number(photo_folder, '.jpg')next_video_number = get_next_file_number(video_folder, '.mp4')running = Truerecording = Falseout = Nonescale_factor = 1.0cam_index = 0button_hints = []filter_type = Noneshow_buttons = Falseshow_help = Falseexposure_value = 1.0denoise_strength = 10try:cap = cv2.VideoCapture(cam_index)if not cap.isOpened():raise RuntimeError("无法打开摄像头")except Exception as e:logging.error(f"错误: {e}")returncv2.namedWindow('摄像头')cv2.setMouseCallback('摄像头', mouse_callback)# 创建滑动条cv2.createTrackbar('曝光', '摄像头', 100, 200, lambda x: set_exposure(x / 100.0))cv2.createTrackbar('去噪强度', '摄像头', 10, 20, lambda x: set_denoise_strength(x))# 使用支持中文的字体文件font_path = "simhei.ttf"  # 确保这个路径指向你的 simhei.ttf 文件font = ImageFont.truetype(font_path, 20)# 初始化ROI(Region of Interest)roi = [0, 0, 1920, 1080]result_queue = queue.Queue()with concurrent.futures.ThreadPoolExecutor(max_workers=4) as executor:while running:ret, frame = cap.read()if not ret:logging.error("无法获取帧")break# 使用多线程处理图像future = executor.submit(process_frame, frame, exposure_value, filter_type, scale_factor, roi, result_queue)frame, roi = result_queue.get()# 获取当前帧的尺寸frame_height, frame_width, _ = frame.shape# 将OpenCV图像转换为PIL图像pil_image = Image.fromarray(cv2.cvtColor(frame, cv2.COLOR_BGR2RGB))# 绘制按钮draw_buttons(pil_image, font, show_buttons)# 绘制ROI区域draw = ImageDraw.Draw(pil_image)draw.rectangle((roi[0], roi[1], roi[0] + roi[2], roi[1] + roi[3]), outline=(0, 255, 0), width=2)# 显示当前照片编号和缩放比例draw.text((10, 430), f"当前照片编号: {next_photo_number}", font=font, fill=(0, 255, 0))draw.text((10, 460), f"当前缩放比例: {scale_factor:.1f}x", font=font, fill=(0, 255, 0))# 绘制提示信息draw_hints(pil_image, button_hints, font)# 绘制功能说明if show_help:draw_help(pil_image, font)# 显示程序名称draw.text((10, 5), "天眼", font=font, fill=(255, 255, 255))# 将PIL图像转换回OpenCV图像frame = pil_to_cv(pil_image)cv2.imshow('摄像头', frame)key = cv2.waitKey(1) & 0xFFif key == ord('q'):  # 按 'q' 键退出running = Falseelif key == ord('g'):  # 按 'g' 键应用灰度滤镜filter_type = "grayscale"elif key == ord('b'):  # 按 'b' 键应用模糊滤镜filter_type = "blur"elif key == ord('r'):  # 按 'r' 键恢复原图filter_type = None# 检查窗口是否被关闭if cv2.getWindowProperty('摄像头', cv2.WND_PROP_VISIBLE) < 1:running = Falseif recording:out.write(frame[roi[1]:roi[1] + roi[3], roi[0]:roi[0] + roi[2]])if recording:stop_recording()cap.release()cv2.destroyAllWindows()# 设置曝光值
def set_exposure(value):global exposure_valueexposure_value = valuelogging.info(f"曝光值设置为: {exposure_value}")# 设置去噪点强度
def set_denoise_strength(value):global denoise_strengthdenoise_strength = valuelogging.info(f"去噪点强度设置为: {denoise_strength}")if __name__ == "__main__":main()
相关文章:

一个简单的摄像头应用程序6
主要改进点: 使用 ThreadPoolExecutor 管理多线程: 使用 concurrent.futures.ThreadPoolExecutor 来管理多线程,这样可以更高效地处理图像。 在 main 函数中创建一个 ThreadPoolExecutor,并在每个循环中提交图像处理任务。 减少…...

Pikachu-目录遍历
目录遍历,跟不安全文件上传下载有差不多; 访问 jarheads.php 、truman.php 都是通过 get 请求,往title 参数传参; 在后台,可以看到 jarheads.php 、truman.php所在目录: /var/www/html/vul/dir/soup 图片…...

用Python实现基于Flask的简单Web应用:从零开始构建个人博客
解锁Python编程的无限可能:《奇妙的Python》带你漫游代码世界 前言 在现代Web开发中,Python因其简洁、易用以及丰富的库生态系统,成为了许多开发者的首选编程语言。Flask作为一个轻量级的Python Web框架,以其简洁和灵活性深受开…...

IDEA的lombok插件不生效了?!!
记录一下,防止找不到解决方案,已经遇到好几次了 前面啰嗦的多,可以直接跳到末尾的解决方法,点击一下 问题现场情况 排查过程 确认引入的依赖正常 —》🆗 idea 是否安装了lombok插件 --》🆗 貌似没有问题…...

CSP-S 2022 T1假期计划
CSP-S 2022 T1假期计划 先思考暴力做法,题目需要找到四个不相同的景点,那我们就枚举这四个景点,判断它们之间的距离是否符合条件,条件是任意两个点之间的距离是否大于 k k k,所以我们需要求出任意两点之间的距离。常用…...

为什么要学习大模型?AI在把传统软件当早餐吃掉?
前言 上周末在推特平台上有一篇写在谷歌文档里的短文,在国外的科技/投资圈得到了非常广泛的浏览,叫做 The End of Software(软件的终结), 作者 Chris Paik 是位于纽约市的风险投资基金 Pace Capital 的创始合伙人&…...

全流程Python编程、机器学习与深度学习实践技术应用
近年来,人工智能领域的飞速发展极大地改变了各个行业的面貌。当前最新的技术动态,如大型语言模型和深度学习技术的发展,展示了深度学习和机器学习技术的强大潜力,成为推动创新和提升竞争力的关键。特别是PyTorch,凭借其…...

pWnos1.0 靶机渗透 (Perl CGI 的反弹 shell 利用)
靶机介绍 来自 vulnhub 主机发现 ┌──(kali㉿kali)-[~/testPwnos1.0] …...
 函数绑定无效)
jquery on() 函数绑定无效
on 前面的元素必须在页面加载的时候就存在于 dom 里面。动态的元素或者样式等,可以放在 on 的第二个参数里面。jQuery on() 方法是官方推荐的绑定事件的一个方法。使用 on() 方法可以给将来动态创建的动态元素绑定指定的事件,例如 append 等。 <div …...

数字化转型与企业创新的双向驱动
数字化转型与企业创新的双向驱动 在全球化的竞争环境中,数字化转型已成为企业保持竞争力的重要手段。未来几年,随着信息技术的进一步发展,数字化转型将不仅限于IT部门,而是深入到企业的各个业务层面,推动创新和效率的…...
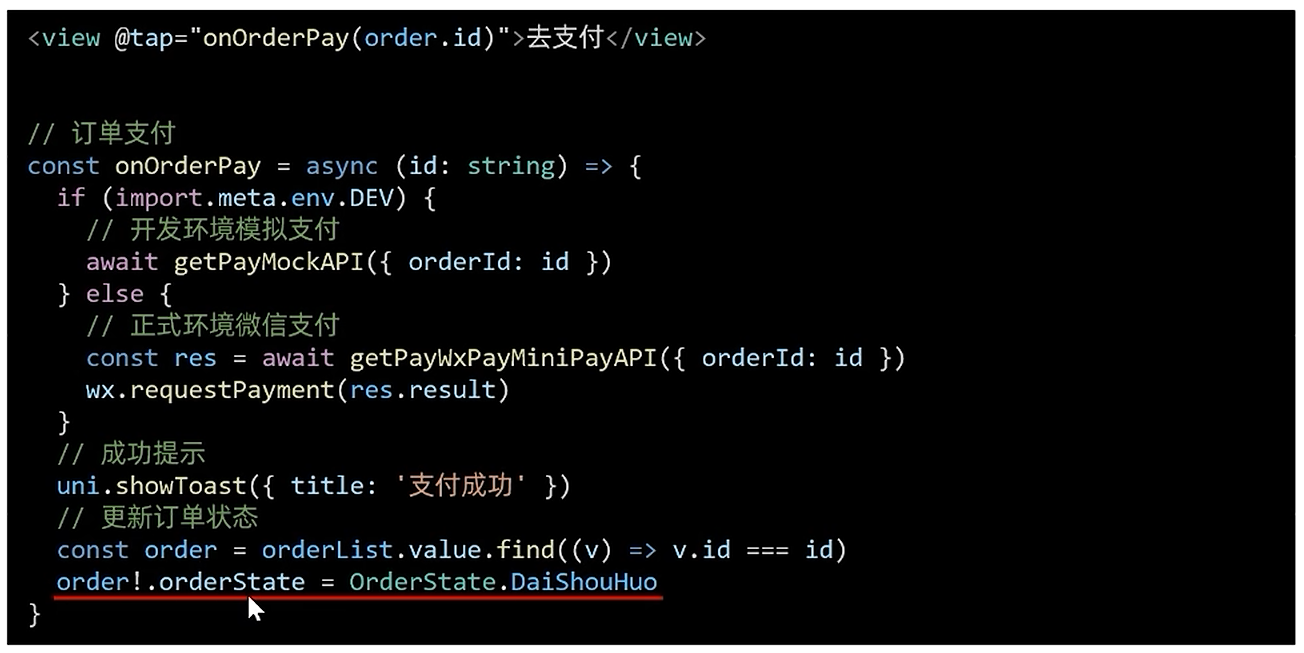
[uni-app]小兔鲜-07订单+支付
订单模块 基本信息渲染 import type { OrderState } from /services/constants import type { AddressItem } from ./address import type { PageParams } from /types/global/** 获取预付订单 返回信息 */ export type OrderPreResult {/** 商品集合 [ 商品信息 ] */goods: …...

Oracle数据库中表压缩的实现方式和特点
Oracle数据库中表压缩的实现方式和特点 在 Oracle 数据库中,表压缩是一项重要的功能,旨在优化存储空间和提高性能。Oracle 提供了多种表压缩技术,以适应不同的应用场景和需求。以下是 Oracle 数据库中表压缩的实现方式和特点: 1…...

【C语言】基础篇
简单输出“helloword” #include<stdio.h> int main(){printf("hello world!");return 0; } 和与商 #include<stdio.h> int main(){int a,b,sum,quotient;printf("Enter two numbers:");scanf("%d %d",&a,&b);sum a b…...

Meta MovieGen AI:颠覆性的文本生成视频技术详解
近年来,生成式AI技术的发展迅猛,尤其是在文本生成图像、文本生成视频等领域。Meta公司近期推出的MovieGen AI,以其强大的文本生成视频能力震撼了整个AI行业。本文将详细解读Meta MovieGen AI的核心技术、功能特性及其在实际应用中的潜力。 一…...

个人文章合集 - 前端相关
前端:简述表单提交前如何进行数据验证 前端:项目一个html中如何引入另一个html? 前端:一张图快速记忆CSS所有属性 前端:三个CSS预处理器(框架)-Sass、LESS 和 Stylus的比较 前端:基于Java角度理解nodejs/np…...

R语言的下载、安装及环境配置(RstudioVSCode)
0x01 R语言篇 一、软件介绍 R for Windows是一个免费的用于统计计算和统计制图的优秀工具,是R语言开发工具。它拥有数据存储和处理系统、数组运算工具(其向量、矩阵运算方面功能尤其强大)、完整连贯的统计分析工具、优秀的统计制图等功能。…...

解决使用重载后的CustomWidget无法正常显示但原生的QWidget却能正常显示的问题
这种情况大部分都是因为没有重写paintEvent: #include <QPainter> #include <QStyleOption>void CustomWidget::paintEvent(QPaintEvent *) { QStyleOption opt; opt.initFrom(this); QPainter p(this); style()->drawPrimitive(QStyle::PE_Widget, &opt,…...

微服务Sleuth解析部署使用全流程
目录 1、Sleuth链路追踪 1、添加依赖 2、修改日志配置文件 3、测试 2、zipkin可视化界面 1、docker安装 2、添加依赖 3、修改配置文件 4、查看页面 5、ribbon配置 1、Sleuth链路追踪 sleuth是链路追踪框架,用于在微服务架构下开发,各个微服务之…...

最具有世界影响力的人颜廷利:全球著名哲学家思想家起名大师
颜廷利教授,这位源自济南唐王镇的杰出人物,不仅是中国当代最杰出的国学大师之一,更是将传统文化与现代科技巧妙结合的先锋。他积极推崇以人工智能技术为辅助的国学研究方法,为这一古老领域注入了新的活力和时代表达。 除了在学术…...
Ubuntu22.04 Docker 国内安装最靠谱教程
目前docker在国内安装常存在众所周知的网络问题,如果安装过程如果从官网地址安装以及安装之后从官网要拉取镜像都存在问题。这篇文章主要针对这两个问题总结最靠谱的docker安装教程。 1. docker安装 1.1 系统环境概述 Ubuntu 22.04linux内核版本 6.8(…...

避开这3个坑,你的软考数据库设计题至少多拿10分:从E-R图合并冲突到SQL约束实战
软考数据库设计题避坑指南:从E-R图到SQL约束的实战技巧 每次软考结束,总有一批考生捶胸顿足——"那道数据库设计题明明会做,怎么又丢分了?"作为参加过三次软考阅卷的数据库讲师,我发现90%的失分都集中在几个…...
)
索尼A6000/A7相机APP免费安装保姆级教程(含最新pmca工具下载)
索尼A6000/A7相机APP免费安装全流程指南(2024最新版) 作为一名长期使用索尼微单的摄影师,我深刻理解官方应用商店里那些本应内置的功能被拆分成付费APP的无奈。延时摄影、多重曝光这些基础功能,在二代机型上居然要额外付费解锁&am…...

FLUX.2-klein-base-9b-nvfp4进阶:利用LSTM时序理解优化视频连贯风格转换
FLUX.2-klein-base-9b-nvfp4进阶:利用LSTM时序理解优化视频连贯风格转换 最近在折腾视频风格转换时,发现一个挺让人头疼的问题:用那些单帧处理的模型,出来的视频总是一闪一闪的,风格也忽明忽暗,看着特别不…...

Mac用户福音:Qwen3-TTS声音克隆在ComfyUI上的M芯片优化方案
Mac用户福音:Qwen3-TTS声音克隆在ComfyUI上的M芯片优化方案 1. 为什么Mac用户需要特别优化方案 苹果M系列芯片凭借其出色的能效比和统一内存架构,已经成为许多创意工作者的首选。然而,在运行AI模型时,特别是像Qwen3-TTS这样的语…...

Qwen3-14B企业知识沉淀:会议录音转写+关键结论自动提炼
Qwen3-14B企业知识沉淀:会议录音转写关键结论自动提炼 1. 企业知识管理的痛点与解决方案 在日常工作中,会议是信息交流的重要场景,但会议录音的整理工作往往耗时费力。传统的人工转写方式存在几个明显问题: 效率低下࿱…...
)
别只盯着时钟了!用Vivado的Set_Data_Check搞定FPGA里两个数据信号的时序检查(附工程源码)
FPGA时序约束进阶:用Set_Data_Check精准控制数据信号时序关系 在FPGA设计中,时序约束是确保电路功能正确性的关键环节。大多数工程师对时钟与数据信号之间的setup/hold约束已经驾轻就熟,但当面对两个数据信号之间的时序关系时,却常…...

3步解锁B站4K视频:bilibili-downloader零基础使用指南
3步解锁B站4K视频:bilibili-downloader零基础使用指南 【免费下载链接】bilibili-downloader B站视频下载,支持下载大会员清晰度4K,持续更新中 项目地址: https://gitcode.com/gh_mirrors/bil/bilibili-downloader 还在为无法保存B站4…...

从特效 SDK 到 AI 动效平台:Neon Vibe Motion 的技术演进之路
多媒体中台在 B 站主要负责剪辑、拍摄、直播等业务场景的动效渲染,开发维护的 SDK 在后文统一称为特效 SDK。 传统的视频特效生产一般分三条链路: 三条链路存在一个困境:效果丰富度、实时可交互、生产效率,三者不可兼得。 那么能…...

避开这5个坑,你的YOLO模型训练效率翻倍:从yaml配置到GPU显存优化实战
YOLO模型训练效率翻倍的5个关键避坑指南:从参数调优到显存管理实战 当你第一次用YOLOv10或v11跑通训练流程时,可能会觉得"不过如此"。但真正投入实战后,90%的开发者都会遇到显存爆炸、训练龟速、指标波动三大噩梦。上周有位使用RTX…...

Linux内核container_of宏解析与应用
1. 理解container_of宏的核心作用在Linux内核开发中,container_of宏是一个极其重要且频繁使用的工具。它的核心功能是通过结构体成员的地址反推出整个结构体的起始地址。想象一下,你手里只有一张照片的某个局部,却能准确找到这张照片在相册中…...