Android View
前面我们了解了Android四大组件的工作流程,Android中还存在一个和四大组件地位相同的概念:View,用于向用户页面展示内容。我们经常使用的TextView、Button、ImageView控件等都继承于它,也会自定义View实现自定义效果。View类源码内容很庞大,有上万行。
文章目录
- 首语
- 位置参数
- 触摸
- TouchSlop
- VelocityTracker
- GestureDetector
- Scroller
- 滑动
- scrollTo/scrollBy
- 动画添加平移效果
- View动画
- 属性动画
- 改变LayoutParams让View重新布局
- layout方法
- 弹性滑动
- Scroller
- 延时策略
- 事件分发机制
- 机制总结
- 源码解析
- 滑动冲突
- 滑动冲突场景
- 处理规则
- 解决方式
- 外部拦截法
- 内部拦截法
- View 工作原理
- ViewRoot/ViewRootImpl
- MeasureSpec
- View工作流程
- measure 过程
- View的measure过程
- ViewGroup的measure过程
- 准确获取某个View的宽高方法
- layout过程
- draw过程
- RemoteViews
- 原理
- 总结
首语
View它是一种控件,Android所有控件的基类,是给用户视觉上的一种呈现。ViewGroup内部包含了许多控件,但它继承于View,说明View可以是单个控件也可以是多个控件组成的一组控件。
位置参数
Android系统中有两种坐标系,分别是Android坐标系和View坐标系。
Android坐标系是将屏幕左上角作为原点,原点向右为x轴正方向,原点向下为y轴正方向。
View坐标系中View的位置是由四个顶点(Top,Left,Right,Bottom)决定,Top是左上角纵坐标,Left是左上角横坐标,Right是右下角横坐标,Bottom是右下角纵坐标。这些坐标都是相对于父布局来说的,是一种相对坐标。其中Top=getTop;Left=getLeft;Right=getRight;Bottom=getBottom。View的宽为width=getRight—getLeft=getWdith。View的高height=getBottom—getTop=getHeight,源码计算也是如此,具体位置坐标可见下图。

中间的Motion指的是用户手指接触屏幕的点。使用getRawX和getRawY方法获取的是Android坐标系的坐标,使用getX和getY方法 获取的是视图坐标,相对于View的距离。这些方法都在处理移动和触摸事件的MotionEvent类中。
触摸
手指接触到屏幕的一瞬间会产生一系列事件。
ACTION_DOWN,手指接触屏幕ACTION_UP,手指抬起ACTION_MOVE,手指在屏幕上移动
public final class MotionEvent extends InputEvent implements Parcelable {public static final int ACTION_DOWN             = 0;public static final int ACTION_UP               = 1;public static final int ACTION_MOVE             = 2;//手势已经终止,不会受到更多触摸点信息public static final int ACTION_CANCEL           = 3;public static final int ACTION_OUTSIDE          = 4;....
}
点击屏幕后松开,事件序列为DOWN->UP,点击屏幕滑动然后松开,事件序列为DOWN->MOVE->UP。
TouchSlop
TouchSlop是系统能识别出滑动的最小距离,它是一个常量。如果手指在屏幕滑动的距离小于这个常量,系统则不认为这是一个滑动事件。可以通过以下API获取这个常量。查看源码它其实是通过frameworks config.xml中定义的config_viewConfigurationTouchSlop控制。
val touchSlop: Int = ViewConfiguration.get(this).scaledTouchSlop
<!-- Base "touch slop" value used by ViewConfiguration as amovement threshold where scrolling should begin. --><dimen name="config_viewConfigurationTouchSlop">8dp</dimen>
VelocityTracker
速度追踪,用于追踪手指在滑动过程中的速度,包括水平和竖直方向的速度。使用很简单,在View的onTouchEvent方法中追踪当前点击事件的速度,然后通过computeCurrentVelocity计算速度,这里的速度指的是一段时间内划过的像素数,比如将时间间隔设为1000ms,在1s内手指在水平方向从左向右划过100像素,那么水平速度就是100,当手指从右往左滑动时,速度可以为负数,具体公式为速度=(终点位置-起点位置)/时间段,接着通过getXVelocity和getXVelocity方法获取水平和竖直速度。最后计算完成重置并回收内存。
override fun onTouchEvent(event: MotionEvent?): Boolean {val velocityTracker = VelocityTracker.obtain()velocityTracker.addMovement(event)velocityTracker.computeCurrentVelocity(1000)val xVelocity = velocityTracker.xVelocity.toInt()val yVelocity = velocityTracker.yVelocity.toInt()velocityTracker.clear()velocityTracker.recycle()return super.onTouchEvent(event)}
GestureDetector
手势检测,用于辅助检测用户的单击、滑动、长按、双击等行为。使用过程如下,首先创建一个GestureDetector实例,实现OnGestureListener监听,也可以实现OnDoubleTapListener监听双击行为,接着在View的onTouchEvent方法中设置event。最后就可以在各个回调方法处理逻辑了。
gestureDetector = GestureDetector(context, object : GestureDetector.OnGestureListener {override fun onDown(e: MotionEvent): Boolean {//按下}override fun onShowPress(e: MotionEvent) {//按下没有移动或松开}override fun onSingleTapUp(e: MotionEvent): Boolean {//按下松开}override fun onScroll(e1: MotionEvent,e2: MotionEvent,distanceX: Float,distanceY: Float): Boolean {//按下拖动}override fun onLongPress(e: MotionEvent) {//长按}override fun onFling(e1: MotionEvent,e2: MotionEvent,velocityX: Float,velocityY: Float): Boolean {//按下快速滑动后松开}})
override fun onTouchEvent(event: MotionEvent?): Boolean {return event?.let { gestureDetector.onTouchEvent(it) }}
Scroller
弹性滑动对象,用于实现View的弹性滑动, 它不是瞬间完成,而是在一定时间间隔内完成的。Scroller本身无法让View弹性滑动,它需要和View的computeScroll方法配合使用完成。
private val scroller = Scroller(context)
private fun smoothScrollTo(destX: Int, destY: Int) {val delta = destX - scrollX//1000ms滑向destXscroller.startScroll(scrollX, 0, delta, 0, 1000)invalidate()}override fun computeScroll() {if (scroller.computeScrollOffset()){scrollTo(scroller.currX,scroller.currY)postInvalidate()}}
监听滑动相关的,建议在onTouchEvent中实现,监听双击这种行为,建议在GestureDetector实现。
滑动
Android设备由于屏幕有限,为了给用户呈现更多的内容,就需要使用滑动来隐藏或显示一些内容,因此,掌握滑动的方法实现是重要的。它的基本思想是当触摸事件传递给View时,记录下触摸点坐标,手指移动时记下移动后触摸的坐标,计算出偏移量,通过偏移量来改变View的坐标。可以通过以下方式实现View的滑动:
scrollTo/scrollBy
View提供了专门的方法来实现滑动,通过scrollTo和scrollBy方法,先看这两个方法的实现。scrollTo表示移动到一个具体的坐标点,而scrollBy表示移动的增量,scrollBy最终也会调用scrollTo。
public void scrollTo(int x, int y) {if (mScrollX != x || mScrollY != y) {int oldX = mScrollX;int oldY = mScrollY;mScrollX = x;mScrollY = y;invalidateParentCaches();onScrollChanged(mScrollX, mScrollY, oldX, oldY);if (!awakenScrollBars()) {postInvalidateOnAnimation();}}}
public void scrollBy(int x, int y) {scrollTo(mScrollX + x, mScrollY + y);}
动画添加平移效果
通过动画让View进行平移,可以通过View动画和属性动画。
View动画
在res目录新建anim文件夹并创建动画文件,然后在代码中引用。
<?xml version="1.0" encoding="utf-8"?>
<set xmlns:android="http://schemas.android.com/apk/res/android"android:fillAfter="true"><!--保留动画后的状态--><translateandroid:fromXDelta="0"android:toXDelta="100"android:fromYDelta="0"android:toYDelta="50"android:duration="500" />
</set>
val imageView = findViewById<ImageView>(R.id.my_image_view)
val animation = AnimationUtils.loadAnimation(this, R.anim.translate_animation)
imageView.startAnimation(animation)
这里需要注意的是,View动画并不能真正改变View的位置,它设置的点击事件在新位置不会生效,这是因为View本身没有发生改变,新位置只是它的分身而已。因此,通过动画实现View滑动请使用属性动画。
属性动画
myButton在水平方向向右平移200像素。通过操作translationX和translationY属性。
val myButton = findViewById<Button>(R.id.myButton)
val animator = ObjectAnimator.ofArgb(myButton, "translationX", 0,200)
animator.duration = 2000 // 2秒
animator.start()
改变LayoutParams让View重新布局
LayoutParams保存了View的布局参数,通过改变View的布局参数margin就可以实现滑动的效果。
val button = findViewById<TextView>(com.google.android.material.R.id.accelerate)val layoutParams : MarginLayoutParams= button.layoutParams as MarginLayoutParamslayoutParams.width+=100layoutParams.leftMargin+=100button.layoutParams=layoutParams
layout方法
view绘制的时候会调用onLayout方法来设置显示的位置,因此可以通过修改view的left、top、bottom、right来控制View的坐标。offsetLeftAndRight和offsetTopAndBottom方法也可以设置左右和上下的偏移值。
private var lastX: Int = 0private var lastY: Int = 0override fun onTouchEvent(event: MotionEvent?): Boolean {if(event != null){val x = event.x.toInt()val y = event.y.toInt()when (event.action) {MotionEvent.ACTION_DOWN -> {lastX =xlastY = y}MotionEvent.ACTION_MOVE -> {val offsetX = x -lastXval offsetY = y -lastYlayout(left+offsetX,top+offsetY,right+offsetX,bottom+offsetY)//对Left和right进行偏移// offsetLeftAndRight(offsetX)//对top和bottom进行偏移// offsetTopAndBottom(offsetY)}}return true}return super.onTouchEvent(event)}
弹性滑动
生硬的滑动用户体验很差,要实现渐进式滑动,提高用户体验,核心思想是将一个滑动分为若干个小滑动。
Scroller
Scroller使用我们在前面已经提到了,看下startScroll的源码,发现它内部只是做了几个参数的传递,startX和startY表示的是滑动的起点,dx和dy表示的要滑动的距离,duration表示的是滑动时间。那么它是如何实现滑动的呢?是它下面的invalidate方法,invalidate方法会导致view重绘,View的draw方法里会调用computeScroll方法,computeScroll方法会向Scroller获取当前的scrollX和scrollY,然后通过scrollTo滑动,接着又调用postInvalidate方法进行第二次重绘,滑动到新位置,如此反复。
public void startScroll(int startX, int startY, int dx, int dy, int duration) {mMode = SCROLL_MODE;mFinished = false;mDuration = duration;mStartTime = AnimationUtils.currentAnimationTimeMillis();mStartX = startX;mStartY = startY;mFinalX = startX + dx;mFinalY = startY + dy;mDeltaX = dx;mDeltaY = dy;mDurationReciprocal = 1.0f / (float) mDuration;}
延时策略
通过发送一系列延时消息从而达到一种渐进式效果。Handler/View的postDelayd/线程的sleep。
事件分发机制
View事件分发是针对点击事件,所谓点击事件的事件分发,就是对MotionEvent事件的分发过程,系统将一个事件传递给一个具体的View,而这个传递过程就是分发过程。
View事件分发的本质是递归过程。点击事件自上而下是传递过程,点击事件自下向上是归过程。当一个点击事件产生后,它的传递过程遵循如下顺序,Activity->Window->ViewGroup->View,这个自上而下的过程是传递过程。顶级View接收到事件后,就会去分发事件,这个自下向上的是归过程。点击事件的分发过程是由三个很重要的方法来共同完成。
- dispatchTouchEvent,用来进行事件的分发,如果事件能传递给当前View,那么它一定会被调用,返回结果受当前View的onTouchEvent方法和下级View的dispatchTouchEvent方法的影响,表示是否消耗当前事件,针对Viewgroup。
override fun dispatchTouchEvent(event: MotionEvent?): Boolean {return super.dispatchTouchEvent(event)}
- onInterceptTouchEvent,用于判断是否拦截某个事件,如果当前View拦截了某个事件,同一个事件序列中,此方法不会再调用。
override fun onInterceptTouchEvent(ev: MotionEvent?): Boolean {return super.onInterceptTouchEvent(ev)}
- onTouchEvent,在dispatchTouchEvent方法中调用,用于处理触摸事件,返回结果表示是否消耗当前事件,不消耗,则在同一个事件序列中,View无法再次接接收该事件。
override fun onTouchEvent(event: MotionEvent?): Boolean {return super.onTouchEvent(event)}
View接收到事件后,由于没有onInterceptTouchEvent方法,所以事件传递给它后,它的onTouchEvent方法就会被调用。onTouchEvent方法如果处理触摸事件,返回true,则不会继续归流程,如果不处理,则会继续归流程,中间没有处理的话,最终回到Activity。
ViewGroup接收到事件后,这时它的dispatchEvent方法就会被调用,如果这个ViewGroup的onInterceptTouchEvent方法返回true,表示拦截当前事件,那点击事件就会交给ViewGroup处理,它的onTouchEvent方法会被调用。如果返回false,表示不拦截当前事件,则会传递给子View,子View的dispatchTouchEvent调用。
一个View需要处理事件时,如果设置了onTouchListener,那么onTouchListener的onTouch方法会被回调,如果返回true,onTouchEvent方法将不会被会回调,因此可见onTouchListener会比onTouchEvent方法优先级更高,在onTouchEvent方法中,如果设置有onClickListener,那么onClick方法会被回调,优先级最低。总结优先级高低为:onTouch->onTouchEvent->onClick。
机制总结
- View的onTouchEvent默认都会消耗事件,除非它是不可点击的(clickable和longClickable为false)。
- View的enable属性不影响onTouchEvent的默认返回值,哪怕一个View是disable的。
- View的onClick发生的前提是当前View是可点击的,并且收到了点击事件。
- 事件传递是由上向下的,ViewGroup传递给子View,通过requestDisallowInterceptTouchEvent方法可以在子View处理ViewGroup的事件分发过程。
源码解析
当一个触摸事件产生时,这个触摸行为则是通过底层硬件来传递捕获,然后交给ViewRootImpl,接着将事件传递给DecorView,而DecorView再交给PhoneWindow,PhoneWindow再交给Activity,然后接下来就是我们常见的View事件分发了。从底层到输入系统(InputManagerService),后面参考输入系统解析。
首先传递给Activity,由Activity的dispatchTouchEvent方法来进行分发,具体的工作是由Activity内部的Window来完成的,Window会将事件传递给decorview,decorview是当前界面的底层容器(setContentView设置的View的父容器),可通过getWindow().getDecorView()进行获取。
从源码可以看出,首先通过Window进行分发,如果返回true表示事件处理结束了,返回false表示没有View处理,Activity的onTouchEvent方法就会被调用。返回false表示触摸事件无响应。
public boolean dispatchTouchEvent(MotionEvent ev) {if (ev.getAction() == MotionEvent.ACTION_DOWN) {//每当一个键盘、触摸或轨迹球事件被分发到活动时,都会调用此方法onUserInteraction();}if (getWindow().superDispatchTouchEvent(ev)) {return true;}return onTouchEvent(ev);}
public boolean onTouchEvent(MotionEvent event) {if (mWindow.shouldCloseOnTouch(this, event)) {finish();return true;}return false;}
Window是一个抽象类,而superDispatchTouchEvent也是一个抽象方法,它的唯一实现是PhoneWindow类。
//frameworks\base\core\java\com\android\internal\policy\PhoneWindow.java
public class PhoneWindow extends Window implements MenuBuilder.Callback {private DecorView mDecor;@Overridepublic boolean superDispatchTouchEvent(MotionEvent event) {return mDecor.superDispatchTouchEvent(event);}
}
DecorView继承于FrameLayout,FrameLayout继承于ViewGroup,dispatchTouchEvent方法实现在ViewGroup类中。
//frameworks\base\core\java\com\android\internal\policy\DecorView.java
public class DecorView extends FrameLayout implements RootViewSurfaceTaker, WindowCallbacks {public boolean superDispatchTouchEvent(MotionEvent event) {return super.dispatchTouchEvent(event);}
}
ViewGroup类的dispatchTouchEvent方法代码庞大,分开解释。
- 首先收到ACTION_DOWN事件的话需要初始化,
cancelAndClearTouchTargets和clearTouchTargets方法取消和清空所有的 touch targets。resetTouchState方法重置所有触摸状态以准备接收新触摸事件。
//frameworks/base/core/java/android/view/ViewGroup.java
@Override
public boolean dispatchTouchEvent(MotionEvent ev) {boolean handled = false;//应用安全策略过滤触摸事件if (onFilterTouchEventForSecurity(ev)) {final int action = ev.getAction();final int actionMasked = action & MotionEvent.ACTION_MASK;// Handle an initial down.if (actionMasked == MotionEvent.ACTION_DOWN) {// Throw away all previous state when starting a new touch gesture.// The framework may have dropped the up or cancel event for the previous gesture// due to an app switch, ANR, or some other state change.cancelAndClearTouchTargets(ev);resetTouchState();}.....
}
private void cancelAndClearTouchTargets(MotionEvent event) {if (mFirstTouchTarget != null) {boolean syntheticEvent = false;if (event == null) {final long now = SystemClock.uptimeMillis();event = MotionEvent.obtain(now, now,MotionEvent.ACTION_CANCEL, 0.0f, 0.0f, 0);event.setSource(InputDevice.SOURCE_TOUCHSCREEN);syntheticEvent = true;}for (TouchTarget target = mFirstTouchTarget; target != null; target = target.next) {resetCancelNextUpFlag(target.child);dispatchTransformedTouchEvent(event, true, target.child, target.pointerIdBits);}clearTouchTargets();if (syntheticEvent) {event.recycle();}}}
private void clearTouchTargets() {TouchTarget target = mFirstTouchTarget;if (target != null) {do {TouchTarget next = target.next;target.recycle();target = next;} while (target != null);mFirstTouchTarget = null;}}
- 接下来判断是否需要拦截事件,由于是第一步ACTION_DOWN事件初始化会让mFirstTouchTarget为null。如果有子View接收了事件,那么mFirstTouchTarget就会被赋值,从后面子View分发事件可以看到。
子View可以调用父View的requestDisallowInterceptTouchEvent方法来设置mGroupFlags的值,告诉父View不要拦截事件。
如果disallowIntercept 为true,说明子View要求父View不要拦截,intercepted为false。
如果disallowIntercept 为false,说明子View没有要求父View拦截,那父View调用onInterceptTouchEvent方法看自己是否需要拦截。
@Override
public boolean dispatchTouchEvent(MotionEvent ev) {if (onFilterTouchEventForSecurity(ev)) {.....1.....// Check for interception.final boolean intercepted;if (actionMasked == MotionEvent.ACTION_DOWN|| mFirstTouchTarget != null) {final boolean disallowIntercept = (mGroupFlags & FLAG_DISALLOW_INTERCEPT) != 0;if (!disallowIntercept) {intercepted = onInterceptTouchEvent(ev);ev.setAction(action); // restore action in case it was changed} else {intercepted = false;}} else {// There are no touch targets and this action is not an initial down// so this view group continues to intercept touches.intercepted = true;}      ....}
}@Overridepublic void requestDisallowInterceptTouchEvent(boolean disallowIntercept) {if (disallowIntercept == ((mGroupFlags & FLAG_DISALLOW_INTERCEPT) != 0)) {// We're already in this state, assume our ancestors are tooreturn;}if (disallowIntercept) {mGroupFlags |= FLAG_DISALLOW_INTERCEPT;} else {mGroupFlags &= ~FLAG_DISALLOW_INTERCEPT;}// Pass it up to our parentif (mParent != null) {mParent.requestDisallowInterceptTouchEvent(disallowIntercept);}}
//默认不拦截,一般会重写拦截逻辑
public boolean onInterceptTouchEvent(MotionEvent ev) {if (ev.isFromSource(InputDevice.SOURCE_MOUSE)&& ev.getAction() == MotionEvent.ACTION_DOWN&& ev.isButtonPressed(MotionEvent.BUTTON_PRIMARY)&& isOnScrollbarThumb(ev.getX(), ev.getY())) {return true;}return false;}
- 拦截处理完成后,就会进行触摸事件的分发,首先会遍历所有子View,将触摸事件分发给子View。
-
如果当前子View不存在焦点,不会分发。
-
如果当前子View不可见且没有播放动画或不在触摸范围,不会分发。
-
如果触摸列表找到了与该View对应的TouchTarget,说明该View正在接收事件,不需要再遍历,直接退出。
如果子View在触摸位置,调用dispatchTransformedTouchEvent方法将事件分发给子View,返回true表示消费了该事件,跳出遍历。
继续调用addTouchTarget 方法给mFirstTouchTarget 赋值了,这里就可以说明第二步,如果子View消费了事件,那么mFirstTouchTarget 不会为空,后续的move/up事件继续分发给这个TouchTarget。当子View没有消费事件或被拦截,那么mFirstTouchTarget 为空,这样这个事件就交给ViewGroup去处理了,从dispatchTransformedTouchEvent方法中可以看到,不论child是否为空,最终都会去调用View.dispatchTouchEvent方法。
@Override
public boolean dispatchTouchEvent(MotionEvent ev) {..............// Check for cancelation.final boolean canceled = resetCancelNextUpFlag(this)|| actionMasked == MotionEvent.ACTION_CANCEL;//当前事件没有取消且没有拦截if (!canceled && !intercepted) {// If the event is targeting accessibility focus we give it to the// view that has accessibility focus and if it does not handle it// we clear the flag and dispatch the event to all children as usual.// We are looking up the accessibility focused host to avoid keeping// state since these events are very rare.//获取焦点viewView childWithAccessibilityFocus = ev.isTargetAccessibilityFocus()? findChildWithAccessibilityFocus() : null;if (actionMasked == MotionEvent.ACTION_DOWN|| (split && actionMasked == MotionEvent.ACTION_POINTER_DOWN)|| actionMasked == MotionEvent.ACTION_HOVER_MOVE) {final int actionIndex = ev.getActionIndex(); // always 0 for downfinal int idBitsToAssign = split ? 1 << ev.getPointerId(actionIndex): TouchTarget.ALL_POINTER_IDS;// Clean up earlier touch targets for this pointer id in case they// have become out of sync.removePointersFromTouchTargets(idBitsToAssign);final int childrenCount = mChildrenCount;if (newTouchTarget == null && childrenCount != 0) {final float x =isMouseEvent ? ev.getXCursorPosition() : ev.getX(actionIndex);final float y =isMouseEvent ? ev.getYCursorPosition() : ev.getY(actionIndex);// Find a child that can receive the event.// Scan children from front to back.final ArrayList<View> preorderedList = buildTouchDispatchChildList();final boolean customOrder = preorderedList == null&& isChildrenDrawingOrderEnabled();final View[] children = mChildren;//遍历子Viewfor (int i = childrenCount - 1; i >= 0; i--) {final int childIndex = getAndVerifyPreorderedIndex(childrenCount, i, customOrder);final View child = getAndVerifyPreorderedView(preorderedList, children, childIndex);// If there is a view that has accessibility focus we want it// to get the event first and if not handled we will perform a// normal dispatch. We may do a double iteration but this is// safer given the timeframe.//没有焦点跳过if (childWithAccessibilityFocus != null) {if (childWithAccessibilityFocus != child) {continue;}childWithAccessibilityFocus = null;i = childrenCount;}//不可见且没有播放动画或没在触摸范围内跳过if (!child.canReceivePointerEvents()|| !isTransformedTouchPointInView(x, y, child, null)) {ev.setTargetAccessibilityFocus(false);continue;}newTouchTarget = getTouchTarget(child);//找到了对应的TouchTarget,说明这个View正在接收事件,不需要再遍历,退出if (newTouchTarget != null) {// Child is already receiving touch within its bounds.// Give it the new pointer in addition to the ones it is handling.newTouchTarget.pointerIdBits |= idBitsToAssign;break;}resetCancelNextUpFlag(child);//处于触摸位置,分发给子View,返回true表示消费了这个事件,跳出if (dispatchTransformedTouchEvent(ev, false, child, idBitsToAssign)) {// Child wants to receive touch within its bounds.mLastTouchDownTime = ev.getDownTime();if (preorderedList != null) {// childIndex points into presorted list, find original indexfor (int j = 0; j < childrenCount; j++) {if (children[childIndex] == mChildren[j]) {mLastTouchDownIndex = j;break;}}} else {mLastTouchDownIndex = childIndex;}mLastTouchDownX = ev.getX();mLastTouchDownY = ev.getY();//mFirstTouchTarget 赋值newTouchTarget = addTouchTarget(child, idBitsToAssign);alreadyDispatchedToNewTouchTarget = true;break;}// The accessibility focus didn't handle the event, so clear// the flag and do a normal dispatch to all children.ev.setTargetAccessibilityFocus(false);}if (preorderedList != null) preorderedList.clear();}//没有子View接收事件,把最近一次的触摸目标赋值给newTouchTarget,先前接收的Viewif (newTouchTarget == null && mFirstTouchTarget != null) {// Did not find a child to receive the event.// Assign the pointer to the least recently added target.newTouchTarget = mFirstTouchTarget;while (newTouchTarget.next != null) {newTouchTarget = newTouchTarget.next;}newTouchTarget.pointerIdBits |= idBitsToAssign;}}}//说明没有子View消费这个事件或被拦截if (mFirstTouchTarget == null) {// No touch targets so treat this as an ordinary view.//ViewGroup自己处理事件handled = dispatchTransformedTouchEvent(ev, canceled, null,TouchTarget.ALL_POINTER_IDS);} else {//子View消费了事件,后续的move/up事件继续分发给这个TouchTarget// Dispatch to touch targets, excluding the new touch target if we already// dispatched to it.  Cancel touch targets if necessary.TouchTarget predecessor = null;TouchTarget target = mFirstTouchTarget;while (target != null) {final TouchTarget next = target.next;if (alreadyDispatchedToNewTouchTarget && target == newTouchTarget) {handled = true;} else {//设置了PFLAG_CANCEL_NEXT_UP_EVENT或被拦截,子View需要取消事件final boolean cancelChild = resetCancelNextUpFlag(target.child)|| intercepted;//分发事件给子Viewif (dispatchTransformedTouchEvent(ev, cancelChild,target.child, target.pointerIdBits)) {handled = true;}if (cancelChild) {if (predecessor == null) {mFirstTouchTarget = next;} else {predecessor.next = next;}target.recycle();target = next;continue;}}predecessor = target;target = next;}}// Update list of touch targets for pointer up or cancel, if needed.//当发生抬起或取消事件,更新触摸目标列表if (canceled|| actionMasked == MotionEvent.ACTION_UP|| actionMasked == MotionEvent.ACTION_HOVER_MOVE) {resetTouchState();} else if (split && actionMasked == MotionEvent.ACTION_POINTER_UP) {//多点触摸下的抬起事件,根据idBits移除对应的触摸点final int actionIndex = ev.getActionIndex();final int idBitsToRemove = 1 << ev.getPointerId(actionIndex);removePointersFromTouchTargets(idBitsToRemove);}}if (!handled && mInputEventConsistencyVerifier != null) {mInputEventConsistencyVerifier.onUnhandledEvent(ev, 1);}return handled;
}
private static boolean resetCancelNextUpFlag(@NonNull View view) {if ((view.mPrivateFlags & PFLAG_CANCEL_NEXT_UP_EVENT) != 0) {view.mPrivateFlags &= ~PFLAG_CANCEL_NEXT_UP_EVENT;return true;}return false;}
private boolean dispatchTransformedTouchEvent(MotionEvent event, boolean cancel,View child, int desiredPointerIdBits) {final boolean handled;// Canceling motions is a special case.  We don't need to perform any transformations// or filtering.  The important part is the action, not the contents.final int oldAction = event.getAction();if (cancel || oldAction == MotionEvent.ACTION_CANCEL) {event.setAction(MotionEvent.ACTION_CANCEL);if (child == null) {handled = super.dispatchTouchEvent(event);} else {handled = child.dispatchTouchEvent(event);}event.setAction(oldAction);return handled;}// Calculate the number of pointers to deliver.final int oldPointerIdBits = event.getPointerIdBits();final int newPointerIdBits = oldPointerIdBits & desiredPointerIdBits;// If for some reason we ended up in an inconsistent state where it looks like we// might produce a motion event with no pointers in it, then drop the event.if (newPointerIdBits == 0) {return false;}// If the number of pointers is the same and we don't need to perform any fancy// irreversible transformations, then we can reuse the motion event for this// dispatch as long as we are careful to revert any changes we make.// Otherwise we need to make a copy.final MotionEvent transformedEvent;if (newPointerIdBits == oldPointerIdBits) {if (child == null || child.hasIdentityMatrix()) {if (child == null) {//子View不存在,ViewGroup调用View的dispatchTouchEvent分发事件,再调用ViewGroup的onTouchEvent 处理事件handled = super.dispatchTouchEvent(event);} else {final float offsetX = mScrollX - child.mLeft;final float offsetY = mScrollY - child.mTop;event.offsetLocation(offsetX, offsetY);//分发给子ViewGroup或子Viewhandled = child.dispatchTouchEvent(event);event.offsetLocation(-offsetX, -offsetY);}return handled;}transformedEvent = MotionEvent.obtain(event);} else {transformedEvent = event.split(newPointerIdBits);}// Perform any necessary transformations and dispatch.if (child == null) {handled = super.dispatchTouchEvent(transformedEvent);} else {final float offsetX = mScrollX - child.mLeft;final float offsetY = mScrollY - child.mTop;transformedEvent.offsetLocation(offsetX, offsetY);if (! child.hasIdentityMatrix()) {transformedEvent.transform(child.getInverseMatrix());}handled = child.dispatchTouchEvent(transformedEvent);}// Done.transformedEvent.recycle();return handled;}
private TouchTarget addTouchTarget(@NonNull View child, int pointerIdBits) {final TouchTarget target = TouchTarget.obtain(child, pointerIdBits);target.next = mFirstTouchTarget;mFirstTouchTarget = target;return target;}
- 第三步提到触摸事件分发给子View会调用它的
dispatchTouchEvent方法。
如果给View设置了OnTouchListener 监听,且在onTouch方法中返回了true,说明View消费了事件。
如果没有设置,那就调用onTouchEvent方法进行处理事件。从源码可以看出OnTouchListener.onTouch方法是先于onTouchEvent方法的,onClick 和 onLongClick 在 onTouchEvent 中被调用,且 onLongClick 优先于 onClick 被执行;如果 onTouch 返回 true,就不会执行 onTouchEvent;onTouch 只有 View 设置了 OnTouchListener,且是 enable 的才执行该方法。
onTouchEvent方法中,可以看到,只要这个View满足CLICKABLE/LONG_CLICKABLE/CONTEXT_CLICKABLE其中一种,不论View状态是否是禁用状态,它都是返回true,代表消费事件。View的longClickable默认为false,clickable根据控件也不一样,例如button的clickable为true,TextView为false,但是View的setOnclickListener/setOnLongClickListener会将clickable/longClickable设置为true。
ACTION_DOWN事件中,如果是长按回调OnLongClickListener.onLongClick方法。ACTION_UP事件中,回调OnClickListener.onClick方法。
源码路径:frameworks/base/core/java/android/view/View.java
public boolean dispatchTouchEvent(MotionEvent event) {// If the event should be handled by accessibility focus first.if (event.isTargetAccessibilityFocus()) {// We don't have focus or no virtual descendant has it, do not handle the event.if (!isAccessibilityFocusedViewOrHost()) {return false;}// We have focus and got the event, then use normal event dispatch.event.setTargetAccessibilityFocus(false);}boolean result = false;if (mInputEventConsistencyVerifier != null) {mInputEventConsistencyVerifier.onTouchEvent(event, 0);}final int actionMasked = event.getActionMasked();if (actionMasked == MotionEvent.ACTION_DOWN) {// Defensive cleanup for new gesture//停止滚动操作stopNestedScroll();}//应用安全策略过滤触摸事件if (onFilterTouchEventForSecurity(event)) {if ((mViewFlags & ENABLED_MASK) == ENABLED && handleScrollBarDragging(event)) {result = true;}//noinspection SimplifiableIfStatementListenerInfo li = mListenerInfo;//设置了TouchListener且enabledif (li != null && li.mOnTouchListener != null&& (mViewFlags & ENABLED_MASK) == ENABLED&& li.mOnTouchListener.onTouch(this, event)) {result = true;}//TouchListener 没有消费,onTouchEvent方法返回trueif (!result && onTouchEvent(event)) {result = true;}}if (!result && mInputEventConsistencyVerifier != null) {mInputEventConsistencyVerifier.onUnhandledEvent(event, 0);}// Clean up after nested scrolls if this is the end of a gesture;// also cancel it if we tried an ACTION_DOWN but we didn't want the rest// of the gesture.//其它事件也停止滚动if (actionMasked == MotionEvent.ACTION_UP ||actionMasked == MotionEvent.ACTION_CANCEL ||(actionMasked == MotionEvent.ACTION_DOWN && !result)) {stopNestedScroll();}return result;}
public boolean onTouchEvent(MotionEvent event) {final float x = event.getX();final float y = event.getY();final int viewFlags = mViewFlags;final int action = event.getAction();final boolean clickable = ((viewFlags & CLICKABLE) == CLICKABLE|| (viewFlags & LONG_CLICKABLE) == LONG_CLICKABLE)|| (viewFlags & CONTEXT_CLICKABLE) == CONTEXT_CLICKABLE;//view disabledif ((viewFlags & ENABLED_MASK) == DISABLED&& (mPrivateFlags4 & PFLAG4_ALLOW_CLICK_WHEN_DISABLED) == 0) {if (action == MotionEvent.ACTION_UP && (mPrivateFlags & PFLAG_PRESSED) != 0) {setPressed(false);}mPrivateFlags3 &= ~PFLAG3_FINGER_DOWN;// A disabled view that is clickable still consumes the touch// events, it just doesn't respond to them//View禁用,但是满足单击,长按,右击都是消费了事件,只是没有响应return clickable;}//扩大View实际触摸区域,称为委托视图,通过setTouchDelegate方法设置if (mTouchDelegate != null) {if (mTouchDelegate.onTouchEvent(event)) {return true;}}//可点击或悬停、长按时显示工具提示if (clickable || (viewFlags & TOOLTIP) == TOOLTIP) {switch (action) {case MotionEvent.ACTION_UP:mPrivateFlags3 &= ~PFLAG3_FINGER_DOWN;if ((viewFlags & TOOLTIP) == TOOLTIP) {handleTooltipUp();}if (!clickable) {removeTapCallback();removeLongPressCallback();mInContextButtonPress = false;mHasPerformedLongPress = false;mIgnoreNextUpEvent = false;break;}boolean prepressed = (mPrivateFlags & PFLAG_PREPRESSED) != 0;if ((mPrivateFlags & PFLAG_PRESSED) != 0 || prepressed) {// take focus if we don't have it already and we should in// touch mode.boolean focusTaken = false;//获取焦点处于可触摸模式if (isFocusable() && isFocusableInTouchMode() && !isFocused()) {focusTaken = requestFocus();}if (prepressed) {// The button is being released before we actually// showed it as pressed.  Make it show the pressed// state now (before scheduling the click) to ensure// the user sees it.setPressed(true, x, y);}if (!mHasPerformedLongPress && !mIgnoreNextUpEvent) {// This is a tap, so remove the longpress checkremoveLongPressCallback();// Only perform take click actions if we were in the pressed stateif (!focusTaken) {// Use a Runnable and post this rather than calling// performClick directly. This lets other visual state// of the view update before click actions start.if (mPerformClick == null) {mPerformClick = new PerformClick();}//调用View.OnClickListenerif (!post(mPerformClick)) {performClickInternal();}}}if (mUnsetPressedState == null) {mUnsetPressedState = new UnsetPressedState();}if (prepressed) {postDelayed(mUnsetPressedState,ViewConfiguration.getPressedStateDuration());} else if (!post(mUnsetPressedState)) {// If the post failed, unpress right nowmUnsetPressedState.run();}removeTapCallback();}mIgnoreNextUpEvent = false;break;case MotionEvent.ACTION_DOWN:if (event.getSource() == InputDevice.SOURCE_TOUCHSCREEN) {mPrivateFlags3 |= PFLAG3_FINGER_DOWN;}mHasPerformedLongPress = false;if (!clickable) {checkForLongClick(ViewConfiguration.getLongPressTimeout(),x,y,TOUCH_GESTURE_CLASSIFIED__CLASSIFICATION__LONG_PRESS);break;}if (performButtonActionOnTouchDown(event)) {break;}// Walk up the hierarchy to determine if we're inside a scrolling container.boolean isInScrollingContainer = isInScrollingContainer();// For views inside a scrolling container, delay the pressed feedback for// a short period in case this is a scroll.if (isInScrollingContainer) {mPrivateFlags |= PFLAG_PREPRESSED;if (mPendingCheckForTap == null) {mPendingCheckForTap = new CheckForTap();}mPendingCheckForTap.x = event.getX();mPendingCheckForTap.y = event.getY//在滚动布局内延迟100模式,反馈按压状态,判断用户是否想滚动postDelayed(mPendingCheckForTap, ViewConfiguration.getTapTimeout());} else {// Not inside a scrolling container, so show the feedback right away//不再滚动,立即反馈按压状态setPressed(true, x, y);//检测长按,是则回调OnLongClickListener.onLongClick方法checkForLongClick(ViewConfiguration.getLongPressTimeout(),x,y,TOUCH_GESTURE_CLASSIFIED__CLASSIFICATION__LONG_PRESS);}break;case MotionEvent.ACTION_CANCEL:if (clickable) {setPressed(false);}removeTapCallback();removeLongPressCallback();mInContextButtonPress = false;mHasPerformedLongPress = false;mIgnoreNextUpEvent = false;mPrivateFlags3 &= ~PFLAG3_FINGER_DOWN;break;case MotionEvent.ACTION_MOVE:if (clickable) {drawableHotspotChanged(x, y);}final int motionClassification = event.getClassification();final boolean ambiguousGesture =motionClassification == MotionEvent.CLASSIFICATION_AMBIGUOUS_GESTURE;int touchSlop = mTouchSlop;if (ambiguousGesture && hasPendingLongPressCallback()) {if (!pointInView(x, y, touchSlop)) {// The default action here is to cancel long press. But instead, we// just extend the timeout here, in case the classification// stays ambiguous.removeLongPressCallback();long delay = (long) (ViewConfiguration.getLongPressTimeout()* mAmbiguousGestureMultiplier);// Subtract the time already spentdelay -= event.getEventTime() - event.getDownTime();checkForLongClick(delay,x,y,TOUCH_GESTURE_CLASSIFIED__CLASSIFICATION__LONG_PRESS);}touchSlop *= mAmbiguousGestureMultiplier;}// Be lenient about moving outside of buttonsif (!pointInView(x, y, touchSlop)) {// Outside button// Remove any future long press/tap checksremoveTapCallback();removeLongPressCallback();if ((mPrivateFlags & PFLAG_PRESSED) != 0) {setPressed(false);}mPrivateFlags3 &= ~PFLAG3_FINGER_DOWN;}final boolean deepPress =motionClassification == MotionEvent.CLASSIFICATION_DEEP_PRESS;if (deepPress && hasPendingLongPressCallback()) {// process the long click action immediatelyremoveLongPressCallback();checkForLongClick(0 /* send immediately */,x,y,TOUCH_GESTURE_CLASSIFIED__CLASSIFICATION__DEEP_PRESS);}break;}return true;}return false;}
public boolean performClick() {// We still need to call this method to handle the cases where performClick() was called// externally, instead of through performClickInternal()notifyAutofillManagerOnClick();final boolean result;final ListenerInfo li = mListenerInfo;if (li != null && li.mOnClickListener != null) {playSoundEffect(SoundEffectConstants.CLICK);li.mOnClickListener.onClick(this);result = true;} else {result = false;}sendAccessibilityEvent(AccessibilityEvent.TYPE_VIEW_CLICKED);notifyEnterOrExitForAutoFillIfNeeded(true);return result;}
public void setOnClickListener(@Nullable OnClickListener l) {if (!isClickable()) {setClickable(true);}getListenerInfo().mOnClickListener = l;}
public void setOnLongClickListener(@Nullable OnLongClickListener l) {if (!isLongClickable()) {setLongClickable(true);}getListenerInfo().mOnLongClickListener = l;}
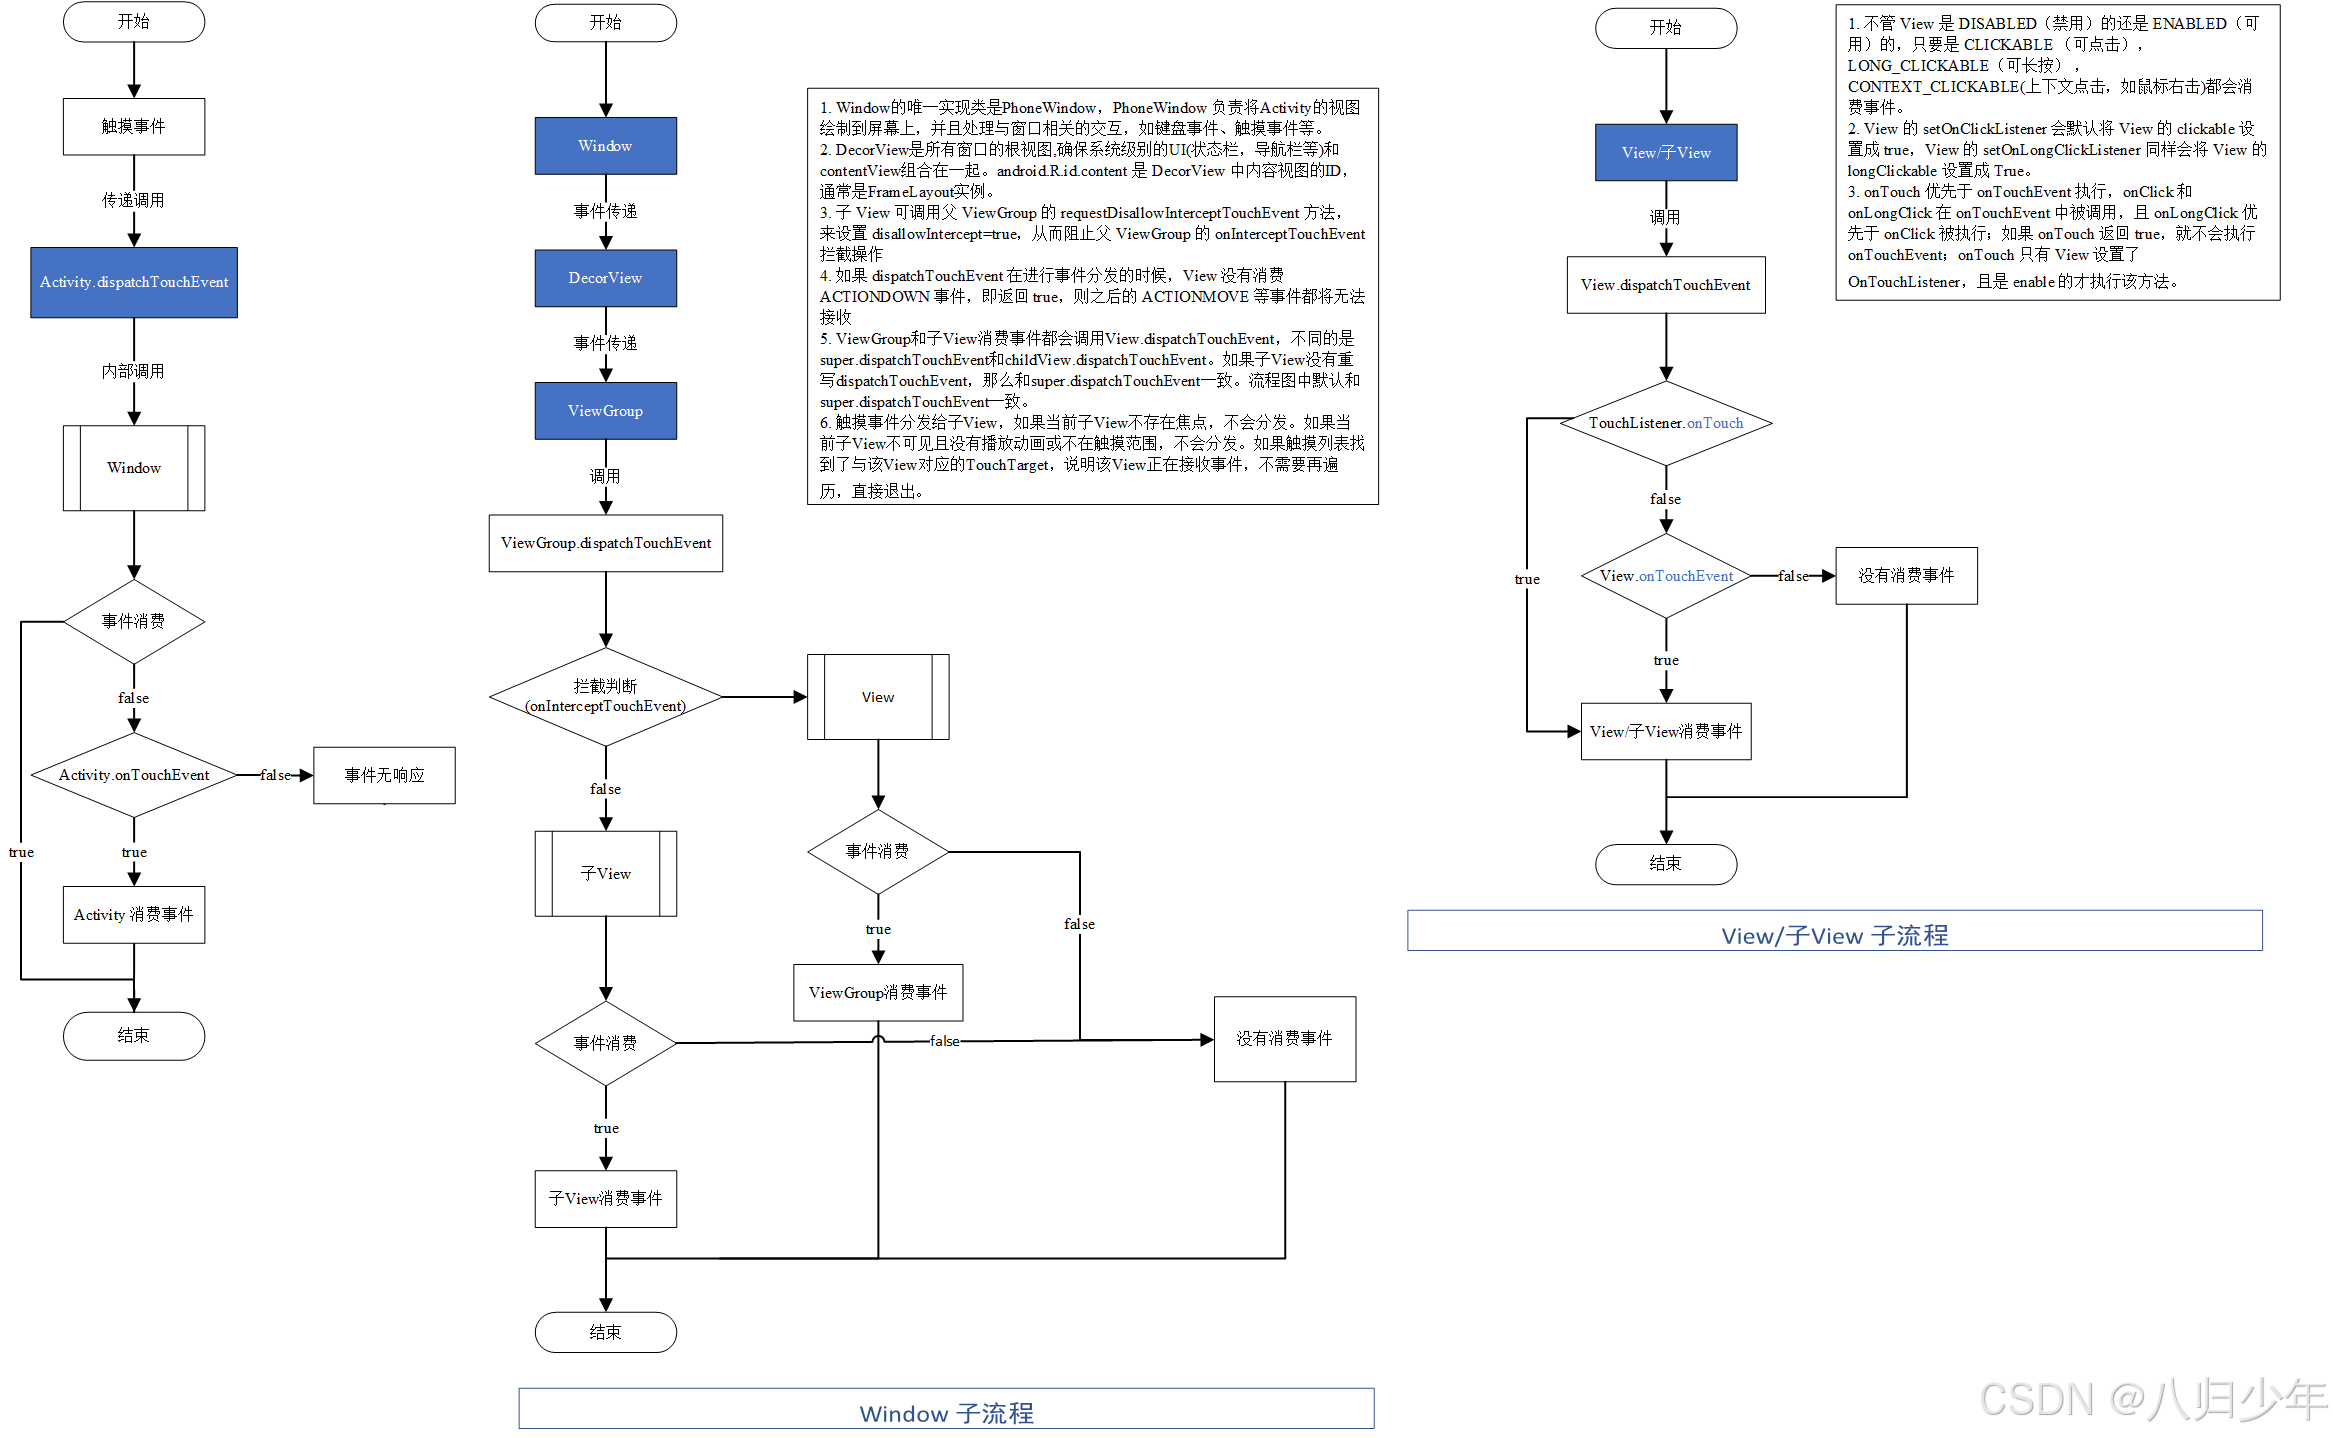
流程图梳理如下:
滑动冲突
滑动冲突场景
- 外部滑动方向和内部滑动方向不一致。
ViewPager和Fragment配合使用组成的页面滑动效果,主流应用都在使用,这种效果中,通过左右滑动来切换页面,每个页面存在一个ListView,上下滑动查看内容,这种场景本身应该存在滑动冲突,但是ViewPager内部处理了这种滑动冲突,因此采用ViewPager无须考虑这个问题,如果采用的是ScrollView而不是ViewPager,那就必须手动处理滑动冲突了,由于滑动冲突内外两层只有一层能滑动,还有其它场景诸如外部上下滑动,内部左右滑动等,属于同一类滑动冲突。
- 外部滑动方向和内部滑动方向一致。
内外两层都在同一方向,当手指滑动时,系统无法知道用户时想让那一层滑动,所以会出现只有一层能滑动或滑动卡顿。
- 以上两种场景的嵌套。
处理规则
- 场景一
当用户左右滑动时,需要让外部的View拦截点击事件,当用户上下滑动时,需要让内部View拦截点击事件,根据滑动过程中两个点之间的坐标可以得出到底是水平滑动还是竖直滑动,如何判断滑动方向呢?可以参考滑动路径和水平方向形成的夹角,也可以根据水平方向和竖直方向上的距离差来判断,与那个方向形成的夹角小,就按照那个方向滑动,那个方向距离差大,就按照那个方向滑动。
- 场景二
这个需要根据业务来判定,什么状态需要外部View来响应滑动,另外一种状态需要内部View来响应滑动。
- 场景三
根据业务来判定,制定不同的方案。
解决方式
外部拦截法
外部拦截法是指点击事件经过父容器的拦截处理,如果父容器需要此事件就拦截,不需要就不拦截,这样就解决滑动冲突问题,也就是通过事件分发机制,需要重写父容器的onInterceptTouchEvent方法,做相应的拦截即可。
以下是外部拦截法的伪代码,ACTION_DOWN事件,父容器必须返回false,这是因为父容器一旦拦截ACTION_DOWN事件,那么ACTION_MOVE和ACTION_UP事件都会交给它处理,这个从事件分发机制的源码分析就清楚。核心处理在ACTION_MOVE事件中,ACTION_UP事件中也必须返回false,否则会导致子元素的onClick事件无法正常响应。
private var downX: Float = 0Fprivate var downY: Float = 0Foverride fun onInterceptTouchEvent(ev: MotionEvent): Boolean {when (ev.action) {MotionEvent.ACTION_DOWN -> {downX = ev.xdownY = ev.y}MotionEvent.ACTION_MOVE -> {val deltaX = ev.x - downXval deltaY = ev.y - downY// 根据滑动方向判断是否拦截事件if (Math.abs(deltaX) > Math.abs(deltaY)) {return true}}}return super.onInterceptTouchEvent(ev)}override fun onTouchEvent(event: MotionEvent): Boolean {// 处理滑动逻辑return true}
内部拦截法
内部拦截法指父容器不拦截任何事件,所有事件传递给子元素,如果子元素需要就消耗掉,否则交给父容器处理,这和事件分发机制相悖,需要配合requestDisallowInterceptTouchEvent方法才能正常工作,伪代码如下:需要重写dispatchTouchEvent方法
// 通过重写 dispatchTouchEvent 方法实现内部拦截override fun dispatchTouchEvent(ev: MotionEvent): Boolean {when (ev.action) {MotionEvent.ACTION_DOWN -> {// 按下时,禁止父View拦截事件parent.requestDisallowInterceptTouchEvent(true)}MotionEvent.ACTION_MOVE -> {// 根据业务逻辑判断是否拦截事件if (shouldInterceptTouchEvent(ev)) {return true}}MotionEvent.ACTION_UP -> {// 手指抬起时,允许父View拦截事件parent.requestDisallowInterceptTouchEvent(false)}}return super.dispatchTouchEvent(ev)}
除了子元素需要处理之外,父容器也需要处理,父容器默认拦截除了ACTION_DOWN以外的其它事件,当子元素调用requestDisallowInterceptTouchEvent时,父容器才能继续拦截所需事件。
由于ACTION_DOWN不受FLAG_DISALLOW_INTERCEPT标记位的控制,所以父容器一旦拦截ACTION_DOWN事件,那么后续的事件无法传递到子元素,这样内部拦截就无法工作了。伪代码如下:
override fun onInterceptTouchEvent(ev: MotionEvent): Boolean {return ev.action != MotionEvent.ACTION_DOWN}
外部拦截法简单易用,但可能存在父容器无法响应事件的问题,内部拦截法不会存在此问题,但代码逻辑复杂,根据场景灵活使用。
View 工作原理
ViewRoot/ViewRootImpl
ViewRoot对应ViewRootImpl类,它是连接WindowManager和DecorView的纽带,View的三大流程(measure/layout/draw)均是通过ViewRoot来完成的,ViewRootImpl是从WindowManagerGlobal中创建的,ViewRootImpl是View中的最高层级,属于所有View的根。
在ActivityThread中,当Activity对象被创建完毕,onResume后,会通过WindowManager将DecorView添加到window上,这个过程中会创建ViewRootImpl。
源码路径:frameworks/base/core/java/android/app/ActivityThread.java
@Override
public void handleResumeActivity(ActivityClientRecord r, boolean finalStateRequest,boolean isForward, boolean shouldSendCompatFakeFocus, String reason) {...if (r.window == null && !a.mFinished && willBeVisible) {r.window = r.activity.getWindow();View decor = r.window.getDecorView();decor.setVisibility(View.INVISIBLE);ViewManager wm = a.getWindowManager();WindowManager.LayoutParams l = r.window.getAttributes();a.mDecor = decor;//应用类型窗口l.type = WindowManager.LayoutParams.TYPE_BASE_APPLICATION;l.softInputMode |= forwardBit;if (r.mPreserveWindow) {a.mWindowAdded = true;r.mPreserveWindow = false;// Normally the ViewRoot sets up callbacks with the Activity// in addView->ViewRootImpl#setView. If we are instead reusing// the decor view we have to notify the view root that the// callbacks may have changed.ViewRootImpl impl = decor.getViewRootImpl();if (impl != null) {impl.notifyChildRebuilt();}}if (a.mVisibleFromClient) {if (!a.mWindowAdded) {a.mWindowAdded = true;//decorview 添加到window中wm.addView(decor, l);} else {// The activity will get a callback for this {@link LayoutParams} change// earlier. However, at that time the decor will not be set (this is set// in this method), so no action will be taken. This call ensures the// callback occurs with the decor set.a.onWindowAttributesChanged(l);}...
}
WindowManager的实现类为WindowManagerImpl,调用addView方法。
源码路径:frameworks/base/core/java/android/view/WindowManagerImpl.java
private final WindowManagerGlobal mGlobal = WindowManagerGlobal.getInstance();@Overridepublic void addView(@NonNull View view, @NonNull ViewGroup.LayoutParams params) {applyTokens(params);mGlobal.addView(view, params, mContext.getDisplayNoVerify(), mParentWindow,mContext.getUserId());}
源码路径:frameworks/base/core/java/android/view/WindowManagerGlobal.java
public void addView(View view, ViewGroup.LayoutParams params,Display display, Window parentWindow, int userId) {ViewRootImpl root;View panelParentView = null;synchronized (mLock) {...//创建ViewRootImplif (windowlessSession == null) {root = new ViewRootImpl(view.getContext(), display);} else {root = new ViewRootImpl(view.getContext(), display,windowlessSession, new WindowlessWindowLayout());}view.setLayoutParams(wparams);//view,ViewRootImpl,LayoutParams顺序添加到WindowManager中    mViews.add(view);mRoots.add(root);mParams.add(wparams);// do this last because it fires off messages to start doing thingstry {//将Window对应的View设置给创建的ViewImpl//通过ViewRootImpl来更新界面并完成window的添加过程root.setView(view, wparams, panelParentView, userId);} catch (RuntimeException e) {final int viewIndex = (index >= 0) ? index : (mViews.size() - 1);// BadTokenException or InvalidDisplayException, clean up.if (viewIndex >= 0) {removeViewLocked(viewIndex, true);}throw e;}}
}
SetView中会进行布局请求,对界面进行布局,开始测量,布局,绘制,调用performTraversals方法。
源码路径:frameworks/base/core/java/android/view/ViewRootImpl.java
public void setView(View view, WindowManager.LayoutParams attrs, View panelParentView,int userId) {...//布局请求,对界面进行布局 requestLayout();InputChannel inputChannel = null;if ((mWindowAttributes.inputFeatures& WindowManager.LayoutParams.INPUT_FEATURE_NO_INPUT_CHANNEL) == 0) {inputChannel = new InputChannel();}try {mOrigWindowType = mWindowAttributes.type;mAttachInfo.mRecomputeGlobalAttributes = true;collectViewAttributes();adjustLayoutParamsForCompatibility(mWindowAttributes);controlInsetsForCompatibility(mWindowAttributes);Rect attachedFrame = new Rect();final float[] compatScale = { 1f };//将该window添加到屏幕,通过AIDL通知WindowManagerService添加windowres = mWindowSession.addToDisplayAsUser(mWindow, mWindowAttributes,getHostVisibility(), mDisplay.getDisplayId(), userId,mInsetsController.getRequestedVisibleTypes(), inputChannel, mTempInsets,mTempControls, attachedFrame, compatScale);if (!attachedFrame.isValid()) {attachedFrame = null;}
}
@Override
public void requestLayout() {if (!mHandlingLayoutInLayoutRequest) {checkThread();mLayoutRequested = true;scheduleTraversals();}}
final TraversalRunnable mTraversalRunnable = new TraversalRunnable();    void scheduleTraversals() {if (!mTraversalScheduled) {mTraversalScheduled = true;mTraversalBarrier = mHandler.getLooper().getQueue().postSyncBarrier();mChoreographer.postCallback(Choreographer.CALLBACK_TRAVERSAL, mTraversalRunnable, null);notifyRendererOfFramePending();pokeDrawLockIfNeeded();}}
void doTraversal() {if (mTraversalScheduled) {mTraversalScheduled = false;mHandler.getLooper().getQueue().removeSyncBarrier(mTraversalBarrier);if (mProfile) {Debug.startMethodTracing("ViewAncestor");}//测量、布局、绘制performTraversals();if (mProfile) {Debug.stopMethodTracing();mProfile = false;}}}
ViewRootImpl中对View进行测量,布局,绘制,其过程主要在performTraversals中。
private void performTraversals() {...if (!mStopped || mReportNextDraw) {if (mWidth != host.getMeasuredWidth() || mHeight != host.getMeasuredHeight()|| dispatchApplyInsets || updatedConfiguration) {...if (measureAgain) {if (DEBUG_LAYOUT) Log.v(mTag,"And hey let's measure once more: width=" + width+ " height=" + height);//View 测量performMeasure(childWidthMeasureSpec, childHeightMeasureSpec);}}...if (didLayout) {//View布局performLayout(lp, mWidth, mHeight);     ...//View绘制if (!performDraw() && mActiveSurfaceSyncGroup != null) {mActiveSurfaceSyncGroup.markSyncReady();}
}
- View测量。最终调用到View的
measure方法
private void performMeasure(int childWidthMeasureSpec, int childHeightMeasureSpec) {if (mView == null) {return;}Trace.traceBegin(Trace.TRACE_TAG_VIEW, "measure");try {//View 测量mView.measure(childWidthMeasureSpec, childHeightMeasureSpec);} finally {Trace.traceEnd(Trace.TRACE_TAG_VIEW);}mMeasuredWidth = mView.getMeasuredWidth();mMeasuredHeight = mView.getMeasuredHeight();mViewMeasureDeferred = false;}
- View布局。最终调用到View的
layout方法。
private void performLayout(WindowManager.LayoutParams lp, int desiredWindowWidth,int desiredWindowHeight) {try {final View host = mView;//View的layout方法进行布局host.layout(0, 0, host.getMeasuredWidth(), host.getMeasuredHeight());...for (int i = 0; i < numValidRequests; ++i) {final View view = validLayoutRequesters.get(i);Log.w("View", "requestLayout() improperly called by " + view +" during layout: running second layout pass");//请求对该View重新布局,最终回调ViewRootImpl的requestLayout方法中重新测量,布局,绘制。view.requestLayout();}...getRunQueue().post(new Runnable() {@Overridepublic void run() {int numValidRequests = finalRequesters.size();for (int i = 0; i < numValidRequests; ++i) {final View view = finalRequesters.get(i);Log.w("View", "requestLayout() improperly called by " + view +" during second layout pass: posting in next frame");view.requestLayout();}}});
}
- View绘制。最终调用到View的
draw方法。
private boolean performDraw() {try {boolean canUseAsync = draw(fullRedrawNeeded, usingAsyncReport && mSyncBuffer);if (usingAsyncReport && !canUseAsync) {mAttachInfo.mThreadedRenderer.setFrameCallback(null);usingAsyncReport = false;}} finally {mIsDrawing = false;Trace.traceEnd(Trace.TRACE_TAG_VIEW);}
}
private boolean draw(boolean fullRedrawNeeded, boolean forceDraw) {...//绘制windowif (!drawSoftware(surface, mAttachInfo, xOffset, yOffset,scalingRequired, dirty, surfaceInsets)) {return false;}
}
private boolean drawSoftware(Surface surface, AttachInfo attachInfo, int xoff, int yoff,boolean scalingRequired, Rect dirty, Rect surfaceInsets) {...if (mTranslator != null) {mTranslator.translateCanvas(canvas);}canvas.setScreenDensity(scalingRequired ? mNoncompatDensity : 0);//View 绘制mView.draw(canvas);drawAccessibilityFocusedDrawableIfNeeded(canvas);...
}
MeasureSpec
MeasureSpec 代表一个32位int值,高2位代表SpecMode,低三位代表specSize,SpecMode指测量模式(三种UNSPECIFIED/EXACTLY/AT_MOST),SpecSize指在某种测量模式下的规格大小,它存在范围为0-2的30次方-1。MeasureSpec决定了一个View的尺寸规格。
public static class MeasureSpec {private static final int MODE_SHIFT = 30;private static final int MODE_MASK  = 0x3 << MODE_SHIFT;@IntDef({UNSPECIFIED, EXACTLY, AT_MOST})@Retention(RetentionPolicy.SOURCE)public @interface MeasureSpecMode {}//父容器没有对子元素施加任何约束。它可以是不受限制的任何大小,这种情况用于系统内部,表示一种测量状态public static final int UNSPECIFIED = 0 << MODE_SHIFT;//父容器已经为子元素确定了确切的大小。无论子元素想要多大,它都将被赋予这些边界。对应LayoutParams的match_parentpublic static final int EXACTLY     = 1 << MODE_SHIFT;//子元素可以大到指定的尺寸为止。对应LayoutParams的wrap_parentpublic static final int AT_MOST     = 2 << MODE_SHIFT;public static int makeMeasureSpec(@IntRange(from = 0, to = (1 << MeasureSpec.MODE_SHIFT) - 1) int size,@MeasureSpecMode int mode) {if (sUseBrokenMakeMeasureSpec) {return size + mode;} else {return (size & ~MODE_MASK) | (mode & MODE_MASK);}}@MeasureSpecModepublic static int getMode(int measureSpec) {//noinspection ResourceTypereturn (measureSpec & MODE_MASK);}public static int getSize(int measureSpec) {return (measureSpec & ~MODE_MASK);}
}
系统内部是通过MeasureSpec来进行View的测量,正常情况下使用View指定MeasureSpec,但也可以给View设置LayoutParams,在View测量的时候,系统会将LayoutParams在父容器的约束下转换成对应的MeasureSpec,然后再根据这个MeasureSpec来确定View测量后的宽高。MeasureSpec不是唯一由LayoutParams决定的,LayoutParams需要和父容器一起才能决定View的MeasureSpec,从而决定View的宽高。
对于顶级View(DecorView)和普通View来说,MeasureSpec转换过程略有不同,对于DecorView,其MeasureSpec由窗口的尺寸和其自身的LayoutParams来共同决定;对于普通View,其MeasureSpec由父容器的MeasureSpec和自身的LayoutParams来共同决定,MeasureSpec一旦确定后,onMeasure中就可以确定View的测量宽高。
对于DecorView来说,在ViewRootImpl中的measureHierarchy方法中展示了DecorView的MeasureSpec的创建过程。desiredWindowWidth和desiredWindowHeight是屏幕的尺寸。根据LayoutParams的宽高参数来划分
- ViewGroup.LayoutParams.MATCH_PARENT
精确模式,大小就是窗口的大小。
- ViewGroup.LayoutParams.WRAP_CONTENT
最大模式,大小不定,不能超过窗口的大小。
- 固定大小
精确模式,大小为LayoutParams中指定的大小。
childWidthMeasureSpec = getRootMeasureSpec(desiredWindowWidth, lp.width,lp.privateFlags);
childHeightMeasureSpec = getRootMeasureSpec(desiredWindowHeight, lp.height,lp.privateFlags);
if (!forRootSizeOnly || !setMeasuredRootSizeFromSpec(childWidthMeasureSpec, childHeightMeasureSpec)) {performMeasure(childWidthMeasureSpec, childHeightMeasureSpec);
} else {// We already know how big the window should be before measuring the views.// We can measure the views before laying out them. This is to avoid unnecessary// measure.mViewMeasureDeferred = true;
}
if (mWidth != host.getMeasuredWidth() || mHeight != host.getMeasuredHeight()) {windowSizeMayChange = true;
}
private static int getRootMeasureSpec(int windowSize, int measurement, int privateFlags) {int measureSpec;final int rootDimension = (privateFlags & PRIVATE_FLAG_LAYOUT_SIZE_EXTENDED_BY_CUTOUT) != 0? MATCH_PARENT : measurement;switch (rootDimension) {case ViewGroup.LayoutParams.MATCH_PARENT:// Window can't resize. Force root view to be windowSize.measureSpec = MeasureSpec.makeMeasureSpec(windowSize, MeasureSpec.EXACTLY);break;case ViewGroup.LayoutParams.WRAP_CONTENT:// Window can resize. Set max size for root view.measureSpec = MeasureSpec.makeMeasureSpec(windowSize, MeasureSpec.AT_MOST);break;default:// Window wants to be an exact size. Force root view to be that size.measureSpec = MeasureSpec.makeMeasureSpec(rootDimension, MeasureSpec.EXACTLY);break;}return measureSpec;}
对于普通View来说,View的measure过程由ViewGroup传递而来,先看下ViewGroup的measureChildWithMargins方法,它会对子元素进行measure,在调用子元素的measure方法之前会先通过getChildMeasureSpec方法得到子元素的MeasureSpec。从代码来看,子元素的MeasureSpec的创建与父容器的MeasureSpec和子元素本身的LayoutParams有关,此外还和View的margin及padding有关。
protected void measureChildWithMargins(View child,int parentWidthMeasureSpec, int widthUsed,int parentHeightMeasureSpec, int heightUsed) {final MarginLayoutParams lp = (MarginLayoutParams) child.getLayoutParams();final int childWidthMeasureSpec = getChildMeasureSpec(parentWidthMeasureSpec,mPaddingLeft + mPaddingRight + lp.leftMargin + lp.rightMargin+ widthUsed, lp.width);final int childHeightMeasureSpec = getChildMeasureSpec(parentHeightMeasureSpec,mPaddingTop + mPaddingBottom + lp.topMargin + lp.bottomMargin+ heightUsed, lp.height);//子View的measure方法,传递创建的MeasureSpecchild.measure(childWidthMeasureSpec, childHeightMeasureSpec);}
public static int getChildMeasureSpec(int spec, int padding, int childDimension) {int specMode = MeasureSpec.getMode(spec);int specSize = MeasureSpec.getSize(spec);//padding 父容器已占用的空间大小,子元素可用大小=父容器尺寸-paddingint size = Math.max(0, specSize - padding);int resultSize = 0;int resultMode = 0;switch (specMode) {// Parent has imposed an exact size on uscase MeasureSpec.EXACTLY:if (childDimension >= 0) {resultSize = childDimension;resultMode = MeasureSpec.EXACTLY;} else if (childDimension == LayoutParams.MATCH_PARENT) {// Child wants to be our size. So be it.resultSize = size;resultMode = MeasureSpec.EXACTLY;} else if (childDimension == LayoutParams.WRAP_CONTENT) {// Child wants to determine its own size. It can't be// bigger than us.resultSize = size;resultMode = MeasureSpec.AT_MOST;}break;// Parent has imposed a maximum size on uscase MeasureSpec.AT_MOST:if (childDimension >= 0) {// Child wants a specific size... so be itresultSize = childDimension;resultMode = MeasureSpec.EXACTLY;} else if (childDimension == LayoutParams.MATCH_PARENT) {// Child wants to be our size, but our size is not fixed.// Constrain child to not be bigger than us.resultSize = size;resultMode = MeasureSpec.AT_MOST;} else if (childDimension == LayoutParams.WRAP_CONTENT) {// Child wants to determine its own size. It can't be// bigger than us.resultSize = size;resultMode = MeasureSpec.AT_MOST;}break;// Parent asked to see how big we want to becase MeasureSpec.UNSPECIFIED:if (childDimension >= 0) {// Child wants a specific size... let them have itresultSize = childDimension;resultMode = MeasureSpec.EXACTLY;} else if (childDimension == LayoutParams.MATCH_PARENT) {// Child wants to be our size... find out how big it should// beresultSize = View.sUseZeroUnspecifiedMeasureSpec ? 0 : size;resultMode = MeasureSpec.UNSPECIFIED;} else if (childDimension == LayoutParams.WRAP_CONTENT) {// Child wants to determine its own size.... find out how// big it should beresultSize = View.sUseZeroUnspecifiedMeasureSpec ? 0 : size;resultMode = MeasureSpec.UNSPECIFIED;}break;}//noinspection ResourceTypereturn MeasureSpec.makeMeasureSpec(resultSize, resultMode);}
View工作流程
View的主要流程主要是指measure、layout、draw三大流程,即测量、布局、绘制,其中measure确定View测量宽高,layout确定View最终宽高和四个顶点的位置,而draw则将View绘制到屏幕上。
measure 过程
View的measure过程
对于View的measure过程,它是由measure方法来完成,measure方法是一个final类型的方法,子类不能重写,在View的measure方法中会调用View的onMeasure方法,setMeasuredDimension方法会设置View宽高的测量值,从getDefaultSize方法可用看出,因为AT_MOST和EXACTLY模式下View的宽高由specSize决定,所以继承View的自定义View使用wrap_content和match_parent没有区别,AT_MOST 模式下specSize就是父容器当前剩余的空间大小,这种和布局中使用match_parent一致,怎么解决这个问题呢?可以参考Text View等原生控件,核心思想就是指定默认的宽高大小。
public final void measure(int widthMeasureSpec, int heightMeasureSpec) {...if (forceLayout || needsLayout) {// first clears the measured dimension flagmPrivateFlags &= ~PFLAG_MEASURED_DIMENSION_SET;resolveRtlPropertiesIfNeeded();int cacheIndex = forceLayout ? -1 : mMeasureCache.indexOfKey(key);if (cacheIndex < 0 || sIgnoreMeasureCache) {// measure ourselves, this should set the measured dimension flag backonMeasure(widthMeasureSpec, heightMeasureSpec);mPrivateFlags3 &= ~PFLAG3_MEASURE_NEEDED_BEFORE_LAYOUT;} else {long value = mMeasureCache.valueAt(cacheIndex);// Casting a long to int drops the high 32 bits, no mask neededsetMeasuredDimensionRaw((int) (value >> 32), (int) value);mPrivateFlags3 |= PFLAG3_MEASURE_NEEDED_BEFORE_LAYOUT;}...
}
protected void onMeasure(int widthMeasureSpec, int heightMeasureSpec) {setMeasuredDimension(getDefaultSize(getSuggestedMinimumWidth(), widthMeasureSpec),getDefaultSize(getSuggestedMinimumHeight(), heightMeasureSpec));}
public static int getDefaultSize(int size, int measureSpec) {int result = size;int specMode = MeasureSpec.getMode(measureSpec);int specSize = MeasureSpec.getSize(measureSpec);switch (specMode) {case MeasureSpec.UNSPECIFIED:result = size;break;case MeasureSpec.AT_MOST:case MeasureSpec.EXACTLY:result = specSize;break;}return result;}
protected int getSuggestedMinimumHeight() {  return (mBackground == null) ? mMinHeight : max(mMinHeight, mBackground.getMinimumHeight());}
protected int getSuggestedMinimumWidth() {//View没有设置背景,则对应设置的android:minWidth,不设置为0,否则为android:minWidth和背景Drawable的原始宽度return (mBackground == null) ? mMinWidth : max(mMinWidth, mBackground.getMinimumWidth());}
protected final void setMeasuredDimension(int measuredWidth, int measuredHeight) {boolean optical = isLayoutModeOptical(this);if (optical != isLayoutModeOptical(mParent)) {Insets insets = getOpticalInsets();int opticalWidth  = insets.left + insets.right;int opticalHeight = insets.top  + insets.bottom;measuredWidth  += optical ? opticalWidth  : -opticalWidth;measuredHeight += optical ? opticalHeight : -opticalHeight;}setMeasuredDimensionRaw(measuredWidth, measuredHeight);}
private void setMeasuredDimensionRaw(int measuredWidth, int measuredHeight) {mMeasuredWidth = measuredWidth;mMeasuredHeight = measuredHeight;mPrivateFlags |= PFLAG_MEASURED_DIMENSION_SET;}
//android\graphics\drawable\Drawable.java
//返回Drawable的原始宽度
public int getMinimumWidth() {final int intrinsicWidth = getIntrinsicWidth();return intrinsicWidth > 0 ? intrinsicWidth : 0;}
ViewGroup的measure过程
对于ViewGroup的measure过程,除了完成自身的measure过程外,还要遍历调用所有子View的measure方法,各个子View再递归执行这个过程。和View不同的是,ViewGroup是一个抽象类,它没有重写View的onMeasure方法,但是它提供了一个叫measureChildren的方法。从代码来看,子View没有GONE时,它就会调用measureChild方法,首先取出子View的LayoutParams,再通过getChildMeasureSpec方法来创建子View的MeasureSpec,接着传递给View的measure方法进行测量,这个前面已经提到了。
protected void measureChildren(int widthMeasureSpec, int heightMeasureSpec) {final int size = mChildrenCount;final View[] children = mChildren;for (int i = 0; i < size; ++i) {final View child = children[i];if ((child.mViewFlags & VISIBILITY_MASK) != GONE) {measureChild(child, widthMeasureSpec, heightMeasureSpec);}}}
protected void measureChild(View child, int parentWidthMeasureSpec,int parentHeightMeasureSpec) {final LayoutParams lp = child.getLayoutParams();final int childWidthMeasureSpec = getChildMeasureSpec(parentWidthMeasureSpec,mPaddingLeft + mPaddingRight, lp.width);final int childHeightMeasureSpec = getChildMeasureSpec(parentHeightMeasureSpec,mPaddingTop + mPaddingBottom, lp.height);//子View的measure方法,传递MeasureSpecchild.measure(childWidthMeasureSpec, childHeightMeasureSpec);}
ViewGroup是一个抽象类,用于测量的onMeasure方法需要各个子ViewGroup去实现,例如Linearlayout、RelativeLayout等,不做统一的实现是因为布局特性差异大,无法统一实现。下面以LinearLayout的onMeasure方法进行分析ViewGroup的measure过程。
以垂直布局的LinearLayout为例,遍历子View并对子View执行measureChildBeforeLayout方法,最终会调用到子View的measure方法,然后通过mTotalLength来保存LinearLayout在竖直方向的初步高度,每测量一个子View,mTotalLength增加,增加部分主要包括子View的高度及子View在竖直方向的margin等。子元素测量完毕后,开始测量自己的大小,如果高度是match_parent,则高度为specSize,如果布局高度是wrap_content,那么测量高度为所有子View占用的总和。宽度是通过resolveSizeAndState方法计算的。
@Override
protected void onMeasure(int widthMeasureSpec, int heightMeasureSpec) {if (mOrientation == VERTICAL) {measureVertical(widthMeasureSpec, heightMeasureSpec);} else {measureHorizontal(widthMeasureSpec, heightMeasureSpec);}
}
void measureVertical(int widthMeasureSpec, int heightMeasureSpec) {...for (int i = 0; i < count; ++i) {measureChildBeforeLayout(child, i, widthMeasureSpec, 0,heightMeasureSpec, usedHeight);final int childHeight = child.getMeasuredHeight();if (useExcessSpace) {// Restore the original height and record how much space// we've allocated to excess-only children so that we can// match the behavior of EXACTLY measurement.lp.height = 0;consumedExcessSpace += childHeight;}final int totalLength = mTotalLength;mTotalLength = Math.max(totalLength, totalLength + childHeight + lp.topMargin +lp.bottomMargin + getNextLocationOffset(child));...final int margin = lp.leftMargin + lp.rightMargin;final int measuredWidth = child.getMeasuredWidth() + margin;maxWidth = Math.max(maxWidth, measuredWidth);...mTotalLength += mPaddingTop + mPaddingBottom;int heightSize = mTotalLength;// Check against our minimum heightheightSize = Math.max(heightSize, getSuggestedMinimumHeight());// Reconcile our calculated size with the heightMeasureSpecint heightSizeAndState = resolveSizeAndState(heightSize, heightMeasureSpec, 0);heightSize = heightSizeAndState & MEASURED_SIZE_MASK;...maxWidth += mPaddingLeft + mPaddingRight;// Check against our minimum widthmaxWidth = Math.max(maxWidth, getSuggestedMinimumWidth());//LinearLayout 测量宽度,然后保存setMeasuredDimension(resolveSizeAndState(maxWidth, widthMeasureSpec, childState),heightSizeAndState);if (matchWidth) {forceUniformWidth(count, heightMeasureSpec);}}
}
void measureChildBeforeLayout(View child, int childIndex,int widthMeasureSpec, int totalWidth, int heightMeasureSpec,int totalHeight) {//ViewGroup的measureChildWithMargins方法,内部调用子View的measure方法measureChildWithMargins(child, widthMeasureSpec, totalWidth,heightMeasureSpec, totalHeight);}
//View.java
public static int resolveSizeAndState(int size, int measureSpec, int childMeasuredState) {final int specMode = MeasureSpec.getMode(measureSpec);final int specSize = MeasureSpec.getSize(measureSpec);final int result;switch (specMode) {case MeasureSpec.AT_MOST:if (specSize < size) {result = specSize | MEASURED_STATE_TOO_SMALL;} else {result = size;}break;case MeasureSpec.EXACTLY:result = specSize;break;case MeasureSpec.UNSPECIFIED:default:result = size;}return result | (childMeasuredState & MEASURED_STATE_MASK);}
View的measure过程比较复杂,measure完成后,可以通过measuredWidth和measuredHeight方法正确获取到View的测量宽高。但需要注意,系统可能需要多次测量measure才能确定最终的测量宽高,因此,最好在onLayout方法中获取View的测量宽高。
准确获取某个View的宽高方法
onWindowFocusChanged方法,当视图窗口获得焦点时,它通常是可见的,也意味着View的位置已经确定。
override fun onWindowFocusChanged(hasFocus: Boolean) {super.onWindowFocusChanged(hasFocus)if (hasFocus) {val width =view.measuredWidthval height=view.measuredHeight}}
2.view.post方法,Android 系统保证在处理消息队列中的消息之前,所有的视图都已经完成了测量和布局。这是因为视图的绘制是 UI 线程的一个关键部分,必须在处理其他任务(如响应用户输入、执行 Runnable 等)之前完成。post方法将一个runnable添加到消息队列中,然后等待执行run方法。
view.post {val width = view.measuredWidthval height = view.measuredHeight}
3.addOnGlobalLayoutListener回调,当View状态树状态发生改变或View树内部View可见性发生变化时,会回调onGlobalLayout,需要注意onGlobalLayout方法会回调多次,需及时移除回调。
view.viewTreeObserver.addOnGlobalLayoutListener(object:ViewTreeObserver.OnGlobalLayoutListener{override fun onGlobalLayout() {val width = view.measuredWidthval height = view.measuredHeightview.viewTreeObserver.removeOnGlobalLayoutListener(this)}})
layout过程
View的layout方法中,首先通过setFrame方法来设定View四个顶点的位置,顶点确定,View在ViewGroup中的位置也就确定了,接着调用onLayout方法,onLayout没有默认实现,以LinearLayout的onLayout方法为例进行分析。
public void layout(int l, int t, int r, int b) {if ((mPrivateFlags3 & PFLAG3_MEASURE_NEEDED_BEFORE_LAYOUT) != 0) {onMeasure(mOldWidthMeasureSpec, mOldHeightMeasureSpec);mPrivateFlags3 &= ~PFLAG3_MEASURE_NEEDED_BEFORE_LAYOUT;}//四个顶点位置int oldL = mLeft;int oldT = mTop;int oldB = mBottom;int oldR = mRight;boolean changed = isLayoutModeOptical(mParent) ?setOpticalFrame(l, t, r, b) : setFrame(l, t, r, b);if (changed || (mPrivateFlags & PFLAG_LAYOUT_REQUIRED) == PFLAG_LAYOUT_REQUIRED) {onLayout(changed, l, t, r, b);if (shouldDrawRoundScrollbar()) {if(mRoundScrollbarRenderer == null) {mRoundScrollbarRenderer = new RoundScrollbarRenderer(this);}} else {mRoundScrollbarRenderer = null;}mPrivateFlags &= ~PFLAG_LAYOUT_REQUIRED;ListenerInfo li = mListenerInfo;if (li != null && li.mOnLayoutChangeListeners != null) {ArrayList<OnLayoutChangeListener> listenersCopy =(ArrayList<OnLayoutChangeListener>)li.mOnLayoutChangeListeners.clone();int numListeners = listenersCopy.size();for (int i = 0; i < numListeners; ++i) {listenersCopy.get(i).onLayoutChange(this, l, t, r, b, oldL, oldT, oldR, oldB);}}}final boolean wasLayoutValid = isLayoutValid();mPrivateFlags &= ~PFLAG_FORCE_LAYOUT;mPrivateFlags3 |= PFLAG3_IS_LAID_OUT;if (!wasLayoutValid && isFocused()) {mPrivateFlags &= ~PFLAG_WANTS_FOCUS;if (canTakeFocus()) {// We have a robust focus, so parents should no longer be wanting focus.clearParentsWantFocus();} else if (getViewRootImpl() == null || !getViewRootImpl().isInLayout()) {// This is a weird case. Most-likely the user, rather than ViewRootImpl, called// layout. In this case, there's no guarantee that parent layouts will be evaluated// and thus the safest action is to clear focus here.clearFocusInternal(null, /* propagate */ true, /* refocus */ false);clearParentsWantFocus();} else if (!hasParentWantsFocus()) {// original requestFocus was likely on this view directly, so just clear focusclearFocusInternal(null, /* propagate */ true, /* refocus */ false);}// otherwise, we let parents handle re-assigning focus during their layout passes.} else if ((mPrivateFlags & PFLAG_WANTS_FOCUS) != 0) {mPrivateFlags &= ~PFLAG_WANTS_FOCUS;View focused = findFocus();if (focused != null) {// Try to restore focus as close as possible to our starting focus.if (!restoreDefaultFocus() && !hasParentWantsFocus()) {// Give up and clear focus once we've reached the top-most parent which wants// focus.focused.clearFocusInternal(null, /* propagate */ true, /* refocus */ false);}}}if ((mPrivateFlags3 & PFLAG3_NOTIFY_AUTOFILL_ENTER_ON_LAYOUT) != 0) {mPrivateFlags3 &= ~PFLAG3_NOTIFY_AUTOFILL_ENTER_ON_LAYOUT;notifyEnterOrExitForAutoFillIfNeeded(true);}notifyAppearedOrDisappearedForContentCaptureIfNeeded(true);}
protected void onLayout(boolean changed, int left, int top, int right, int bottom) {}protected boolean setFrame(int left, int top, int right, int bottom) {...//四个顶点,getWidth/getHeight计算使用mLeft = left;mTop = top;mRight = right;mBottom = bottom;....}
以竖直方向为例,layoutVertical方法中会遍历所有子View并通过setChildFrame方法为子元素指定对应的位置,childTop会不断增加也表示子View会越来越靠下,setChildFrame方法调用子View的layout方法确定位置。
@Override
protected void onLayout(boolean changed, int l, int t, int r, int b) {if (mOrientation == VERTICAL) {layoutVertical(l, t, r, b);} else {layoutHorizontal(l, t, r, b);}}void layoutVertical(int left, int top, int right, int bottom) {final int paddingLeft = mPaddingLeft;int childTop;int childLeft;// Where right end of child should gofinal int width = right - left;int childRight = width - mPaddingRight;// Space available for childint childSpace = width - paddingLeft - mPaddingRight;final int count = getVirtualChildCount();final int majorGravity = mGravity & Gravity.VERTICAL_GRAVITY_MASK;final int minorGravity = mGravity & Gravity.RELATIVE_HORIZONTAL_GRAVITY_MASK;switch (majorGravity) {case Gravity.BOTTOM:// mTotalLength contains the padding alreadychildTop = mPaddingTop + bottom - top - mTotalLength;break;// mTotalLength contains the padding alreadycase Gravity.CENTER_VERTICAL:childTop = mPaddingTop + (bottom - top - mTotalLength) / 2;break;case Gravity.TOP:default:childTop = mPaddingTop;break;}for (int i = 0; i < count; i++) {final View child = getVirtualChildAt(i);if (child == null) {childTop += measureNullChild(i);} else if (child.getVisibility() != GONE) {final int childWidth = child.getMeasuredWidth();final int childHeight = child.getMeasuredHeight();final LinearLayout.LayoutParams lp =(LinearLayout.LayoutParams) child.getLayoutParams();int gravity = lp.gravity;if (gravity < 0) {gravity = minorGravity;}final int layoutDirection = getLayoutDirection();final int absoluteGravity = Gravity.getAbsoluteGravity(gravity, layoutDirection);switch (absoluteGravity & Gravity.HORIZONTAL_GRAVITY_MASK) {case Gravity.CENTER_HORIZONTAL:childLeft = paddingLeft + ((childSpace - childWidth) / 2)+ lp.leftMargin - lp.rightMargin;break;case Gravity.RIGHT:childLeft = childRight - childWidth - lp.rightMargin;break;case Gravity.LEFT:default:childLeft = paddingLeft + lp.leftMargin;break;}if (hasDividerBeforeChildAt(i)) {childTop += mDividerHeight;}childTop += lp.topMargin;setChildFrame(child, childLeft, childTop + getLocationOffset(child),childWidth, childHeight);childTop += childHeight + lp.bottomMargin + getNextLocationOffset(child);i += getChildrenSkipCount(child, i);}}}
private void setChildFrame(View child, int left, int top, int width, int height) {child.layout(left, top, left + width, top + height);}
从源码可以发现,getWidth方法getMeasuredWidth方法区别在于它们使用的变量赋值阶段不同,getMeasuredWidth方法早于getWidth方法,但最终获取的宽高一般情况下是相等。
public final int getMeasuredWidth() {return mMeasuredWidth & MEASURED_SIZE_MASK;}
public final int getMeasuredHeight() {return mMeasuredHeight & MEASURED_SIZE_MASK;}public final int getWidth() {return mRight - mLeft;}public final int getHeight() {return mBottom - mTop;}
draw过程
draw过程核心有4步,代码有注释说明
public void draw(Canvas canvas) {/** Draw traversal performs several drawing steps which must be executed* in the appropriate order:**      1. Draw the background  *      2. If necessary, save the canvas' layers to prepare for fading*      3. Draw view's content*      4. Draw children*      5. If necessary, draw the fading edges and restore layers*      6. Draw decorations (scrollbars for instance)*      7. If necessary, draw the default focus highlight*/// Step 1, draw the background, if neededint saveCount;drawBackground(canvas);...// Step 3, draw the contentonDraw(canvas);...// Step 4, draw the childrendispatchDraw(canvas);....// Step 6, draw decorations (foreground, scrollbars)onDrawForeground(canvas);
}
- 绘制背景
private void drawBackground(Canvas canvas) {final Drawable background = mBackground;...//绘制背景background.draw(canvas);
}
- 绘制本身,还是以LinearLayout为例,最终还是调用Drawable对象的
canvas方法绘制本身。
@Override
protected void onDraw(Canvas canvas) {if (mOrientation == VERTICAL) {drawDividersVertical(canvas);} else {drawDividersHorizontal(canvas);}
}void drawDividersVertical(Canvas canvas) {final int count = getVirtualChildCount();for (int i = 0; i < count; i++) {final View child = getVirtualChildAt(i);if (child != null && child.getVisibility() != GONE) {if (hasDividerBeforeChildAt(i)) {final LayoutParams lp = (LayoutParams) child.getLayoutParams();final int top = child.getTop() - lp.topMargin - mDividerHeight;drawHorizontalDivider(canvas, top);}}}if (hasDividerBeforeChildAt(count)) {final View child = getLastNonGoneChild();int bottom = 0;if (child == null) {bottom = getHeight() - getPaddingBottom() - mDividerHeight;} else {final LayoutParams lp = (LayoutParams) child.getLayoutParams();bottom = child.getBottom() + lp.bottomMargin;}drawHorizontalDivider(canvas, bottom);}}
private Drawable mDivider;void drawHorizontalDivider(Canvas canvas, int top) {mDivider.setBounds(getPaddingLeft() + mDividerPadding, top,getWidth() - getPaddingRight() - mDividerPadding, top + mDividerHeight);mDivider.draw(canvas);}
- 绘制View,会调用ViewGroup的
dispatchDraw方法,LinearLayout没有实现此方法。最终调用子View的draw方法,完成View绘制。
@Override
protected void dispatchDraw(Canvas canvas) {...for (int i = 0; i < childrenCount; i++) {while (transientIndex >= 0 && mTransientIndices.get(transientIndex) == i) {final View transientChild = mTransientViews.get(transientIndex);if ((transientChild.mViewFlags & VISIBILITY_MASK) == VISIBLE ||transientChild.getAnimation() != null) {more |= drawChild(canvas, transientChild, drawingTime);}transientIndex++;if (transientIndex >= transientCount) {transientIndex = -1;}}
}
protected boolean drawChild(Canvas canvas, View child, long drawingTime) {return child.draw(canvas, this, drawingTime);}
- 绘制装饰(前景色,滑动条)
public void onDrawForeground(Canvas canvas) {onDrawScrollIndicators(canvas);onDrawScrollBars(canvas);final Drawable foreground = mForegroundInfo != null ? mForegroundInfo.mDrawable : null;...foreground.draw(canvas);}
View类中存在一个setWillNotDraw方法,给View设置标记位WILL_NOT_DRAW,当View设置了这个标志位,它表示这个View不需要绘制任何内容。这主要用于优化性能,告诉系统这个视图在onDraw方法中不会进行任何绘制操作,因此系统可以跳过对这个视图的绘制过程。ViewGroup默认有WILL_NOT_DRAW标志位,它自身不会进行绘制,但它的子视图仍然可以根据需要进行绘制。
public void setWillNotDraw(boolean willNotDraw) {setFlags(willNotDraw ? WILL_NOT_DRAW : 0, DRAW_MASK);
}
RemoteViews
RemoteViews是一种特殊的View机制,表面理解起来是远程View,其实它是为了跨进程显示、更新界面的一种View结构,RemoteViews在Android使用场景有通知和桌面小部件。对于如何创建通知和桌面小部件应该在开发中经常遇到,这里不展开分析了。
原理
RemoteView并不能支持所有View类型,源码中有说明支持哪些类型:、
RemoteViewsis limited to support for the following layouts:
AdapterViewFlipperFrameLayoutGridLayoutGridViewLinearLayoutListViewRelativeLayoutStackViewViewFlipperAnd the following widgets:
AnalogClockButtonChronometerImageButtonImageViewProgressBarTextClockTextViewAs of API 31, the following widgets and layouts may also be used:
CheckBoxRadioButtonRadioGroupSwitchDescendants of these classes are not supported.
它也没有findViewById方法去获取具体View,而是通过一些对应View set方法进行设置,了解过自定义通知应该了解这些API如何使用。当然也提供了一些反射方法来设置View对应属性,实际上大部分set方法都是通过反射完成的。
public void setInt(@IdRes int viewId, String methodName, int value) {addAction(new ReflectionAction(viewId, methodName, BaseReflectionAction.INT, value));}
public void setIntDimen(@IdRes int viewId, @NonNull String methodName,@DimenRes int dimenResource) {addAction(new ResourceReflectionAction(viewId, methodName, BaseReflectionAction.INT,ResourceReflectionAction.DIMEN_RESOURCE, dimenResource));}
public void setColor(@IdRes int viewId, @NonNull String methodName,@ColorRes int colorResource) {addAction(new ResourceReflectionAction(viewId, methodName, BaseReflectionAction.INT,ResourceReflectionAction.COLOR_RESOURCE, colorResource));}
更多API使用参考官网:https://developer.android.google.cn/reference/android/widget/RemoteViews
那RemoteViews跨进程进行通信,是哪些进程通信呢,首先第一个进程当然是应用进程,其次对于是NotificationManagerService和AppWidgetService对应的SystemServer进程。RemoteViews会通过Binder传递到SystemServer进程,系统根据RemoteViews中的包名和布局信息加载View。系统会对View进行一系列更新操作,这些操作就是通过set方法进行来提交的。set方法对View的更新并不是立即更新,而是RemoteViews内部会记录所有更新操作,更新时机在RemoteViews被加载后才能执行,更新通过NotificationManager和AppWidgetManager来提交更新。
系统没有通过Binder去直接支持View的跨进程访问,因为View的方法太多,大量的进程通信(IPC)操作会影响操作,因此系统提供了一个Action概念,Action代表一个View操作,系统首先将View操作封装到Action并将这些对象跨进程传输到SystemServer,接着在SystemServer中执行Action对象的具体操作,当调用一次set方法,RemoteViews就会添加一个对应action,当我们通过NotificationManager和AppWidgetManager提交更新时,这些action会传输到远程进程并在远程进程中依次执行。
SystemServer进程通过RemoteViews的apply方法进行View的更新操作,RemoteViews的apply方法内部会去遍历所有的Action对象并调用它们的apply方法,具体的View更新操作是由Action对象的apply方法完成。上述实现有点不言而喻,不需要定义大量的Binder接口,远程进程批量执行更新操作避免大量的进程通信操作,提高了程序性能。
BaseReflectionAction的apply方法中可以明显看到他对View的操作会以反射的方式调用。
public void setInt(@IdRes int viewId, String methodName, int value) {addAction(new ReflectionAction(viewId, methodName, BaseReflectionAction.INT, value));}
private void addAction(Action a) {if (hasMultipleLayouts()) {throw new RuntimeException("RemoteViews specifying separate layouts for orientation"+ " or size cannot be modified. Instead, fully configure each layouts"+ " individually before constructing the combined layout.");}if (mActions == null) {mActions = new ArrayList<>();}mActions.add(a);}
public View apply(@NonNull Context context, @NonNull ViewGroup parent,@Nullable InteractionHandler handler, @Nullable SizeF size) {RemoteViews rvToApply = getRemoteViewsToApply(context, size);View result = inflateView(context, rvToApply, parent);rvToApply.performApply(result, parent, handler, null);return result;}
private void performApply(View v, ViewGroup parent, InteractionHandler handler,ColorResources colorResources) {if (mActions != null) {handler = handler == null ? DEFAULT_INTERACTION_HANDLER : handler;final int count = mActions.size();for (int i = 0; i < count; i++) {Action a = mActions.get(i);a.apply(v, parent, handler, colorResources);}}}
//Action 反射获取对应的方法设置属性
private abstract class BaseReflectionAction extends Action {@Overridepublic final void apply(View root, ViewGroup rootParent, InteractionHandler handler,ColorResources colorResources) {final View view = root.findViewById(viewId);if (view == null) return;Class<?> param = getParameterType(this.type);if (param == null) {throw new ActionException("bad type: " + this.type);}Object value = getParameterValue(view);try {getMethod(view, this.methodName, param, false /* async */).invoke(view, value);} catch (Throwable ex) {throw new ActionException(ex);}}
}
总结
View是Android UI中的核心,本文总结了一些Android View相关核心知识,理解它的原理能更好的进行Android UI开发。本文对View的工作过程、事件分发机制、滑动冲突等常见View理论进行总结,后续由其它View相关知识继续补充。
相关文章:
Android View
前面我们了解了Android四大组件的工作流程,Android中还存在一个和四大组件地位相同的概念:View,用于向用户页面展示内容。我们经常使用的TextView、Button、ImageView控件等都继承于它,也会自定义View实现自定义效果。View类源码内…...

从一到无穷大 #38:讨论 “Bazel 集成仅使用 Cmake 的依赖项目” 通用方法
本作品采用知识共享署名-非商业性使用-相同方式共享 4.0 国际许可协议进行许可。 本作品 (李兆龙 博文, 由 李兆龙 创作),由 李兆龙 确认,转载请注明版权。 文章目录 正文样例代码 正文 Bazel项目引用仅使用Cmake依赖项目,目前业界最为普遍…...
Python飞舞蝙蝠
目录 系列文章 写在前面 完整代码 代码分析 写在后面 系列文章 序号直达链接爱心系列1Python制作一个无法拒绝的表白界面2Python满屏飘字表白代码3Python无限弹窗满屏表白代码4Python李峋同款可写字版跳动的爱心5Python流星雨代码6Python漂浮爱心代码7Python爱心光波代码…...

shodan搜索引擎——土豆片的网安之路
工作原理: 在服务器上部署了各种扫描器,如漏洞扫描器,硬件扫描器,目录扫描器等等,24小时不停的扫描,批量对IP地址扫描 优点:方便,很快得到最新扫描结果,漏洞信息 缺点…...
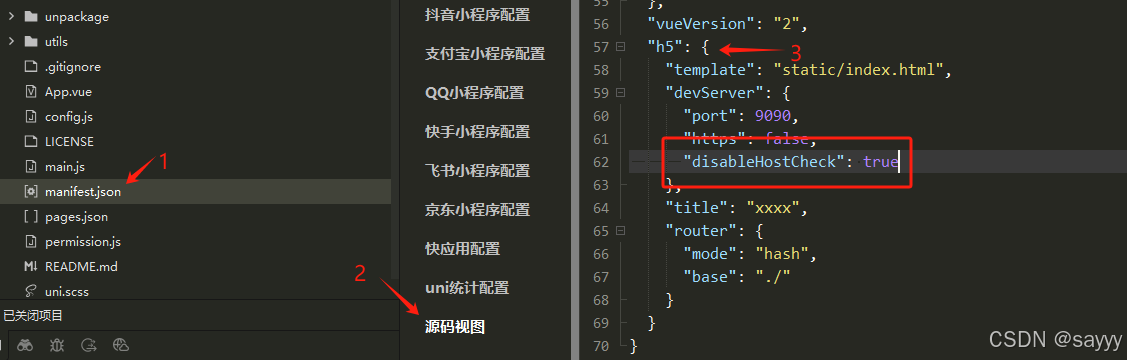
uniapp 报错Invalid Host header
前言 在本地使用 nginx 反向代理 uniapp 时,出现错误 Invalid Host header 错误原因 因项目对 hostname 进行检查,发现 hostname 不是预期的,所以,报错 Invalid Host header 。 解决办法 这样做是处于安全考虑。但࿰…...

删除 AzureArcSetup 安装程序及提示
删除 AzureArcSetup 安装程序及提示 文章目录 删除 AzureArcSetup 安装程序及提示一、基础环境二、适用场景三、过程和方法 版权声明:本文为CSDN博主「杨群」的原创文章,遵循 CC 4.0 BY-SA版权协议,于2024年10月31日首发于CSDN,转…...
NGPT:在超球面上进行表示学习的归一化 Transformer
在超球面上进行表示学习的归一化 Transformer 1. 研究背景2. nGPT 的核心贡献超球面上的网络参数优化作为超球面上的变度量优化器更快的收敛速度 3. 从 GPT 到 nGPT 的演变标记嵌入和输出逻辑 层和块自注意力块MLP 块有效学习率在 ADAM 中的应用总结 4. 实验结果训练加速网络参…...
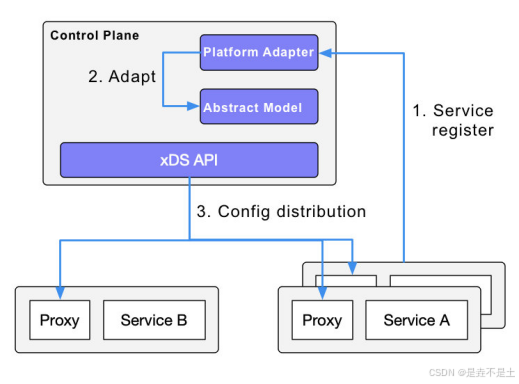
云原生Istio基础
一.Service Mesh 架构 Service Mesh(服务网格)是一种用于处理服务到服务通信的专用基础设施层。它的主要目的是将微服务之间复杂的通信和治理逻辑从微服务代码中分离出来,放到一个独立的层中进行管理。传统的微服务架构中&#x…...

Word2Vec优化与提升技巧
随着自然语言处理领域的快速发展,Word2Vec 已成为常见的词向量生成工具。然而,单纯依赖默认设置往往不能在实际业务需求中取得最佳效果。通过调整模型的参数、优化算法以及合理处理大规模语料库,可以显著提升模型的表现和效率,适应复杂的应用场景。这篇文章将带你深入了解 …...
Java 开发——(下篇)从零开始搭建后端基础项目 Spring Boot 3 + MybatisPlus
上篇速递 - Spring Boot 3 MybatisPlus 五、静态资源访问 1. 基础配置 在 Spring Boot 中访问静态资源非常方便。Spring Boot 默认支持从以下位置加载静态资源: /META-INF/resources//resources//static//public/ 这些目录下的文件可以直接通过 URL 访问。 例…...

Redis 线程控制 问题
前言 相关系列 《Redis & 目录》《Redis & 线程控制 & 源码》《Redis & 线程控制 & 总结》《Redis & 线程控制 & 问题》 参考文献 《Redis分布式锁》 Redis如何实现分布式锁? Redis是单进程单线程的,指令执行时不会…...
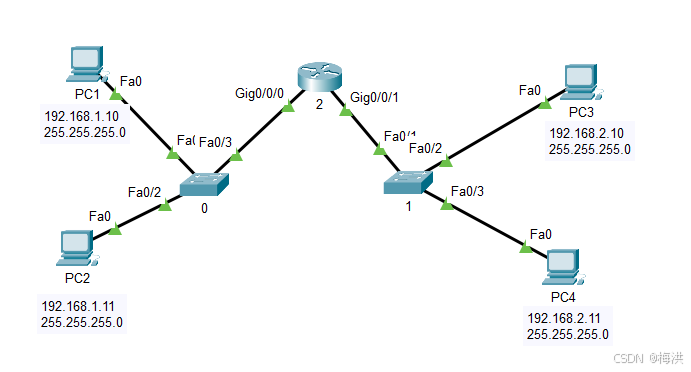
005 IP地址的分类
拓扑结构如下 两台主机处于同一个网关下,通过ping命令检测,可以连通 &nbps; 拓扑结构如下 使用ping 检查两台电脑是否相通, 因为网络号不一样,表示两台电脑不在同一个网络,因此无法连通 拓扑结构如下 不在同一网络的PC要相…...
Java 并发工具(12/30)
目录 Java 并发工具 1. Executor 框架 1.1 线程池 1.2 ExecutorService 和 Future 2. 同步辅助类 2.1 CountDownLatch 2.2 Semaphore 3. 并发集合 3.1 ConcurrentHashMap 总结与后续 Java 并发工具 在多线程编程中,高效管理线程和任务至关重要。Java 提供…...
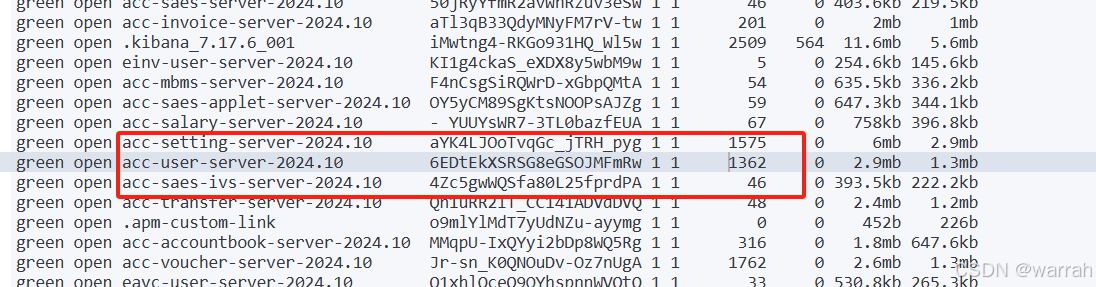
filebeat+elasticsearch+kibana日志分析
1 默认配置 1.1 filebeat filebeat-7.17.yml,从网关中下载k8s的配置,指定es和kibana的配置 通过kibana查询可以查询到日志了,但此时还不知道具体怎么用。 1.2 kibana 在Discover中创建索引格式:filebeat-*,得到如下图…...
Google Recaptcha V2 简单使用
最新的版本是v3,但是一直习惯用v2,就记录一下v2 的简单用法,以免将来忘记了 首先在这里注册你域名,如果是本机可以直接直接填 localhost 或127.0.0.1 https://www.google.com/recaptcha/about/ 这是列子 网站密钥:是…...
Rust编程中的浮点数比较
缘由:在看Rust编写的代码,发现了一行浮点数等于比较的代码,于是编辑如下内容。 在Rust中,进行浮点数比较时需要特别小心,因为浮点数由于精度限制无法精确表示小数,可能会导致直接比较(如 &…...
java访问华为网管软件iMaster NCE的北向接口
最近做的一个项目,需要读取华为一个叫iMaster NCE的网管软件的北向接口。这个iMaster NCE(以下简称NCE)用于管理项目的整个网络,尤其是光网络。业主要求我们访问该软件提供的对外接口,读取一些网络信息,比如…...

UV紫外相机
在产业设备领域,运用相机进行检测的需求很大,应用也很多样,对于图像传感器性能的期望逐年提升。在这样的背景下,可拍摄紫外线(UV:Ultra Violet)图像的相机拥有越来越广泛的应用场景。将UV照明和…...

第十八届联合国世界旅游组织/亚太旅游协会旅游趋势与展望大会在广西桂林开幕
10月19日,第十八届联合国世界旅游组织/亚太旅游协会旅游趋势与展望大会(以下简称“大会”)在广西桂林开幕,来自美国、英国、德国、俄罗斯、柬埔寨等25个国家约120名政府官员、专家学者和旅游业界精英齐聚一堂,围绕“亚洲及太平洋地区旅游业&a…...

Effective Java(第三版) _ 创建和销毁对象
一、前言 《Effective Java》 这本书,在刚从事 Java 开发的时候就被老师推荐阅读过,当时囫囵吞枣的看了一部分,不是特别的理解,也就搁置了,现在已经更新到第三版了,简单翻阅了一下,发现有些条例…...

RMBase数据库数据整理
我下载的RMBase BED文件,打开第一行是这样的:chr1 14414 14415 m6A_site_1 0 - m6A 2 GSE102493 GSM2739535,GSM2991403 29507755 HeLa m6A-seq ENSG00000227232.5 ENST00000488147.1 WASH7P unprocessed_pseudogene exon-11 GGCACACCAATCAATAAAGAACTGAG…...
)
从逻辑漏洞到清晰闭环:用流程图思维提升你的PRD文档质量(附避坑清单)
从逻辑漏洞到清晰闭环:用流程图思维提升你的PRD文档质量(附避坑清单) 在互联网产品开发中,PRD文档的质量往往决定了整个团队的协作效率。我们常遇到这样的场景:开发过程中突然发现某个关键流程存在逻辑断点,…...

别再死记硬背了!用Python的NumPy库实战CR、LU、QR分解,5分钟搞懂矩阵分解到底在干啥
用Python实战矩阵分解:CR、LU、QR的代码实现与可视化解析 线性代数中的矩阵分解就像化学中的元素周期表——它揭示了复杂结构背后的基本组成单元。对于工程师和数据科学家来说,掌握矩阵分解不仅是为了通过考试,更是为了在实际项目中高效解决线…...

两道必掌握的动态规划面试题:最长回文子串 最长公共子序列
目录 一、最长回文子串(Longest Palindromic Substring) 题目描述 1. 暴力解法(时间复杂度 O (n)) 2. 中心扩展法(时间复杂度 O (n),空间 O (1)) 核心思路 Java 代码实现 3. 动态规划解法…...

2026届学术党必备的十大AI写作助手实测分析
Ai论文网站排名(开题报告、文献综述、降aigc率、降重综合对比) TOP1. 千笔AI TOP2. aipasspaper TOP3. 清北论文 TOP4. 豆包 TOP5. kimi TOP6. deepseek 一款基于先进自然语言处理跟知识图谱技术被构建的智能辅助系统是 AI 开题报告工具ÿ…...
)
微信小程序地图开发避坑指南:从获取用户位置到添加自定义标记点(附完整代码)
微信小程序地图开发实战:避开那些让你熬夜的坑 第一次在小程序里集成地图功能时,我天真地以为只要拖个组件就能搞定。直到凌晨三点还在调试那个死活不显示的标记点,才明白地图开发远没有想象中简单。如果你也正在经历这种痛苦,这篇…...

2026年4月20日60秒读懂世界:机器人半马、12306拦截抢票软件与二手车价格战,今天最值得关注的6个信号
🔥个人主页:杨利杰YJlio❄️个人专栏:《Sysinternals实战教程》《Windows PowerShell 实战》《WINDOWS教程》《IOS教程》《微信助手》《锤子助手》 《Python》 《Kali Linux》 《那些年未解决的Windows疑难杂症》🌟 让复杂的事情更…...

Obsidian Weread插件终极指南:5步打造你的个人读书知识库
Obsidian Weread插件终极指南:5步打造你的个人读书知识库 【免费下载链接】obsidian-weread-plugin Obsidian Weread Plugin is a plugin to sync Weread(微信读书) hightlights and annotations into your Obsidian Vault. 项目地址: https://gitcode.com/gh_mir…...

第30篇文章:一个大三计科生的自白
这是我的第30篇文章。不出意外的话,这篇发出去之后,我这个账号的全网浏览量应该就能破10万了。我很清楚,这点数据对那些头部技术博主来说可能不算什么。但对我来说,这是一个挺重要的小节点,是我一点一点写出来的&#…...

AI Agent行动规划算法:动态环境下的最优决策生成
AI Agent行动规划算法:动态环境下的最优决策生成 1. 引言 在人工智能技术飞速发展的今天,AI Agent(智能体)已经成为了连接理论与实践的关键桥梁。从自动驾驶汽车到智能客服机器人,从游戏AI到工业自动化控制,AI Agent正在以前所未有的方式改变着我们的生活和工作方式。然…...