IntelliJ+SpringBoot项目实战(二十)--基于SpringSecurity实现Oauth2服务端和客户端
在前面的帖子中介绍了SpringSecurity+JWT实现了认证和授权的功能。因为基于Oauth2的统一认证在项目需求中越来越多,所以有必要将OAuth2的解决方案也整合进来,这样我们的产品既可以作为一个业务系统,也可以作为一个独立的统一认证服务器。下面详细介绍如何基于SpringSecurity实现OAuth2服务,以及应用如何作为一个客户端调用OAuth2。
一、引入OAuth2依赖
因为SpringSecurity框架已经整合到项目里了,现在我们只需要整合OAuth2的依赖。在openjweb-sys的模块中增加下面的依赖:
<dependency><groupId>org.springframework.security.oauth.boot</groupId><artifactId>spring-security-oauth2-autoconfigure</artifactId><version>2.1.3.RELEASE</version></dependency>
另外需要在openjweb-sys的OpenjwebSysApplication.java类中增加注解:@EnableAuthorizationServer。
如果应用作为OAuth2 Server,Spring Security的WebSecurityConfig和之前介绍的会有所差异,为了能够在OAuth2 Server和非OAuth2 Server之间切换,也就是说根据项目需求来确定是否部署为OAuth2 Server,我们在application-dev.yml中加一个配置参数:
#is this server is oauth2 server
oauth2:server: true
当设置为true时,作为 OAuth2 Server,在本节中我们设置为true,后面会介绍这个参数的使用。
二、本节需要实现的OAuth2功能
1、实现OAuth2 Server端和OAuth2 Client端;
2、OAuth2授权码、根据授权码请求accessToken。
3、根据accessToken获取用户详情。
4、获取refreshToken。
5、客户端的Spring Security登录。
三、开发客户端管理功能
因为OAuth2框架需要通过clientId来识别不同的客户,所以作为OAuth2服务,需要实现一个客户端管理的功能,我们可以基于Mybatis-plus实现,为了简单起见,暂实现查询功能即可,测试数据从数据库中录入。
现在我们开发一个OAuth2客户端管理表,名为comm_sso_client_app:
CREATE TABLE `comm_sso_client_app` (`row_id` varchar(40) NOT NULL COMMENT '唯一行号',`obj_name` varchar(40) DEFAULT NULL COMMENT '名称',`master_row_id` varchar(40) DEFAULT NULL COMMENT '主表RowId',`flow_trans_id` varchar(40) DEFAULT NULL COMMENT '流程事务ID',`sort_no` bigint(20) DEFAULT NULL,`create_dt` varchar(23) DEFAULT NULL COMMENT '创建日期',`update_dt` varchar(23) DEFAULT NULL COMMENT '最后修改日期',`create_uid` varchar(32) DEFAULT NULL COMMENT '创建人',`update_uid` varchar(32) DEFAULT NULL COMMENT '修改人',`data_flg` varchar(6) DEFAULT NULL COMMENT '是否启用',`record_version` bigint(20) NOT NULL,`flow_status` varchar(16) DEFAULT NULL COMMENT '流程状态',`refresh_token_overdue_seconds` bigint(20) DEFAULT NULL,`account` varchar(80) DEFAULT NULL COMMENT '企业账号',`password` varchar(200) DEFAULT NULL COMMENT '登录密码',`client_name` varchar(255) DEFAULT NULL COMMENT '客户端名称',`access_token_overdue_seconds` bigint(20) DEFAULT NULL,`client_id` bigint(20) DEFAULT NULL,`call_back_url` varchar(255) DEFAULT NULL COMMENT '回调地址',PRIMARY KEY (`row_id`)
) ENGINE=InnoDB DEFAULT CHARSET=utf8;-- ----------------------------
-- Records of comm_sso_client_app
-- ----------------------------
INSERT INTO `comm_sso_client_app` VALUES ('qwertyuiopkmjh7890nbgfvcredsz231', null, null, null, null, '2024-11-30 11:11:11', '2024-11-30 11:11:11', 'system', 'system', '1', '0', null, null, 'zzyc', '123456', '众智益成', null, '1', 'http://localhost:8001/demo/oauth2client/callback');
然后我们创建一个实体类:
package org.openjweb.core.entity;import com.baomidou.mybatisplus.annotation.*;
import lombok.Data;
import lombok.extern.slf4j.Slf4j;import java.io.Serializable;@Slf4j
@Data
@TableName("comm_sso_client_app")
public class CommSsoClientApp implements  Serializable {@TableId(type = IdType.ASSIGN_UUID)private String rowId;private String dataFlg;private Integer refreshTokenOverdueSeconds;private String account;private String password;private String clientName;private Integer accessTokenOverdueSeconds;private Long clientId;private String callBackUrl;private Long sortNo;@TableField(fill = FieldFill.INSERT)private String createDt;@TableField(fill = FieldFill.INSERT_UPDATE)private String updateDt;@TableField(fill = FieldFill.INSERT)private String createUid;@TableField(fill = FieldFill.INSERT_UPDATE)private String updateUid;@Versionprivate Long recordVersion = 0L;//因为是非空,所以试着给一个初始值}
创建CommSsoClientAppMapper.java :
package org.openjweb.core.mapper;import com.baomidou.mybatisplus.core.mapper.BaseMapper;
import org.apache.ibatis.annotations.Mapper;
import org.apache.ibatis.annotations.Param;
import org.apache.ibatis.annotations.Select;
import org.openjweb.core.entity.CommSsoClientApp;
import java.util.List;@Mapper
public interface CommSsoClientAppMapper  extends  BaseMapper<CommSsoClientApp> {@Select("SELECT * FROM comm_sso_client_app WHERE account = #{account}")CommSsoClientApp selectByAccountId(@Param("account") String account)  ;}
开发CommSsoClientAppService:
package org.openjweb.core.service;import com.baomidou.mybatisplus.extension.service.impl.ServiceImpl;
import lombok.extern.slf4j.Slf4j;
import org.openjweb.core.entity.CommSsoClientApp;
import org.openjweb.core.mapper.CommSsoClientAppMapper;
import org.springframework.beans.factory.annotation.Autowired;
import org.springframework.stereotype.Service;@Service
@Slf4j
public class CommSsoClientAppService   extends ServiceImpl<CommSsoClientAppMapper, CommSsoClientApp> {@Autowiredprivate CommSsoClientAppMapper commSsoClientAppMapper;public CommSsoClientApp selectByAccountId(String accountId){CommSsoClientApp ent = this.commSsoClientAppMapper.selectByAccountId(accountId);return ent;}
}
接下来再开发一个控制层的类,用于测试,以后也需要实现增删改查:
package org.openjweb.core.api;import org.openjweb.core.entity.CommSsoClientApp;
import org.openjweb.core.service.CommSsoClientAppService;
import org.springframework.beans.factory.annotation.Autowired;
import org.springframework.web.bind.annotation.RequestMapping;
import org.springframework.web.bind.annotation.RestController;/*** 测试地址:http://localhost:8001/demo/ssoclient/queryAccount?account=zzyc*/
@RequestMapping("/demo/ssoclient")
@RestController
public class CommSsoClientAppApi {@Autowiredprivate CommSsoClientAppService commSsoClientAppService;@RequestMapping("queryAccount")public String queryAccount(String account){CommSsoClientApp ent = this.commSsoClientAppService.selectByAccountId(account);if(ent!=null){return ent.getClientName();}return "没查到!";}
}
访问上面代码里的测试地址,可正常查询。
四、开发OAuth2服务端
4.1 配置一个资源服务器
在openjweb-sys中配置一个资源服务器:
import org.springframework.context.annotation.Configuration;
import org.springframework.security.config.annotation.web.builders.HttpSecurity;
import org.springframework.security.config.http.SessionCreationPolicy;
import org.springframework.security.oauth2.config.annotation.web.configuration.EnableResourceServer;
import org.springframework.security.oauth2.config.annotation.web.configuration.ResourceServerConfigurerAdapter;
import org.springframework.security.oauth2.config.annotation.web.configurers.ResourceServerSecurityConfigurer;//资源服务器配置
@Configuration
@EnableResourceServer
public class ResourceServerConfig extends ResourceServerConfigurerAdapter
{@Overridepublic void configure(ResourceServerSecurityConfigurer resources){resources.resourceId("resource-info");}@Overridepublic void configure(HttpSecurity http) throws Exception{//配置拦截接口http.sessionManagement().sessionCreationPolicy(SessionCreationPolicy.STATELESS).and().requestMatchers().antMatchers("/api/user/**").and().authorizeRequests().antMatchers("/api/user/**").authenticated();}
}
4.2 实现OAuth2的ClientDetails
在openjweb-sys中开发一个OAuth2ClientDetails,实现OAuth2的ClientDetails接口:
package org.openjweb.sys.config.oauth.model;import org.openjweb.core.entity.CommSsoClientApp;
import org.springframework.security.core.GrantedAuthority;
import org.springframework.security.crypto.bcrypt.BCryptPasswordEncoder;
import org.springframework.security.oauth2.provider.ClientDetails;import java.util.Collection;
import java.util.HashMap;
import java.util.HashSet;
import java.util.Map;
import java.util.Set;public class OAuth2ClientDetails implements ClientDetails {private CommSsoClientApp client;public OAuth2ClientDetails(CommSsoClientApp client) {this.client = client;}@Overridepublic String getClientId() {return client.getAccount();}@Overridepublic Set<String> getResourceIds() {return new HashSet<>();}@Overridepublic boolean isSecretRequired() {return true;}@Overridepublic String getClientSecret() {return new BCryptPasswordEncoder().encode(client.getPassword());}@Overridepublic boolean isScoped() {return true;}@Overridepublic Set<String> getScope() {Set<String> set = new HashSet<>();set.add("read");return set;}@Overridepublic Set<String> getAuthorizedGrantTypes() {Set<String> set = new HashSet<>();set.add("authorization_code");set.add("refresh_token");return set;}@Overridepublic Set<String> getRegisteredRedirectUri() {Set<String> set = new HashSet<>();set.add(client.getCallBackUrl());return set;}@Overridepublic Collection<GrantedAuthority> getAuthorities() {return new HashSet<>();}@Overridepublic Integer getAccessTokenValiditySeconds() {return client.getAccessTokenOverdueSeconds();}@Overridepublic Integer getRefreshTokenValiditySeconds() {return client.getRefreshTokenOverdueSeconds();}@Overridepublic boolean isAutoApprove(String s) {return true;}@Overridepublic Map<String, Object> getAdditionalInformation() {return new HashMap<>();}}
特别注意,上面代码中,如果getClientSecret()方法中这样写:
return new BCryptPasswordEncoder().encode(client.getPassword());
会报这种错误:There is no PasswordEncoder mapped for the id "null",网上查了这个报错的原因是返回的密码的前面需要有加密算法名称带{}包裹,例如BCrypt的格式:{bcrypt}密码,所以getClientSecret()方法应这么写:
return "{bcrypt}"+new BCryptPasswordEncoder().encode(client.getPassword());这个问题花了好长时间才找到,所以大家开发时要注意!另外网上好像没找到AES的对应加密算法名,所以这里可能不支持AES的加密算法表达式。
因为OAuth2有个一个ClientDetailsService接口,所以还需要实现此接口的方法,这个ClientDetailsService会在后面的OAuth2的认证服务类中使用,另外此类使用了上面的OAuth2ClientDetails类。现在我们实现一个OAuth2ClientDetailsService:
package com.xujianjie.oauth2.provider.config.auth.service;import com.xujianjie.oauth2.provider.config.auth.model.MyClientDetails;
import com.xujianjie.oauth2.provider.model.Client;
import com.xujianjie.oauth2.provider.service.ClientService;import org.springframework.beans.factory.annotation.Autowired;
import org.springframework.security.oauth2.provider.ClientDetails;
import org.springframework.security.oauth2.provider.ClientDetailsService;
import org.springframework.security.oauth2.provider.ClientRegistrationException;
import org.springframework.stereotype.Service;@Service
public class MyClientDetailsService implements ClientDetailsService
{@Autowiredprivate ClientService clientService;@Overridepublic ClientDetails loadClientByClientId(String account) throws ClientRegistrationException{Client client = clientService.findByAccount(account);if (client == null){throw new ClientRegistrationException("企业客户未注册!");}return new MyClientDetails(client);}
}
4.3 实现OAuth2的认证服务配置类
现在开始开发OAuth2的认证服务配置类:
package org.openjweb.sys.config.oauth;import lombok.extern.slf4j.Slf4j;
import org.openjweb.core.service.CommUserService;
import org.openjweb.sys.config.oauth.service.OAuth2ClientDetailsService;
import org.springframework.beans.factory.annotation.Autowired;
import org.springframework.beans.factory.annotation.Qualifier;import org.springframework.context.annotation.Configuration;
import org.springframework.security.authentication.AuthenticationManager;import org.springframework.security.oauth2.config.annotation.configurers.ClientDetailsServiceConfigurer;
import org.springframework.security.oauth2.config.annotation.web.configuration.AuthorizationServerConfigurerAdapter;
import org.springframework.security.oauth2.config.annotation.web.configuration.EnableAuthorizationServer;
import org.springframework.security.oauth2.config.annotation.web.configurers.AuthorizationServerEndpointsConfigurer;//授权服务器配置
@Configuration
@EnableAuthorizationServer
@Slf4j
public class AuthorizationServerConfig extends AuthorizationServerConfigurerAdapter
{@Autowiredprivate CommUserService myUserDetailsService;@Autowiredprivate OAuth2ClientDetailsService myClientDetailsService;@Autowired//@Qualifier("authenticationManagerBean") //authenticationManagerBean有什么区别,对应WebSecurityConfig里的@Qualifier("authenticationManager") //private AuthenticationManager authenticationManager;//service企业认证@Overridepublic void configure(ClientDetailsServiceConfigurer clients) throws Exception {clients.withClientDetails(myClientDetailsService);}@Overridepublic void configure(AuthorizationServerEndpointsConfigurer endpoints) throws Exception {endpoints.authenticationManager(authenticationManager).userDetailsService(myUserDetailsService);}
}
4.4 改造WebSecurityConfig.java
集成OAuth2,需要对WebSecurityConfig.java进行改造。configure(HttpSecurity http)方法中,根据application-dev.yml中的配置,如果启用了OAuth2 Server则使用不同的配置,另外对于JwtAuthenticationFilter这个Bean,如果启用了OAuth2 Server ,则不能使用,所以需要对@Bean增加条件注解:
@Bean@ConditionalOnExpression("'${oauth2.server}'=='false'")JwtAuthenticationFilter jwtAuthenticationFilter() throws Exception {JwtAuthenticationFilter jwtAuthenticationFilter = new JwtAuthenticationFilter(authenticationManager());return jwtAuthenticationFilter;}下面是WebSecurityConfig.java的完整代码:
package org.openjweb.sys.config;import lombok.RequiredArgsConstructor;
import lombok.extern.slf4j.Slf4j;
import org.openjweb.core.service.CommUserService;
import org.openjweb.sys.auth.security.AESPasswordEncoder;
import org.openjweb.sys.auth.security.MD5PasswordEncoder;
import org.openjweb.sys.auth.security.MyAccessDecisionManager;
import org.openjweb.sys.auth.security.MyFilterInvocationSecurityMetadataSource;
import org.openjweb.sys.entry.JwtAuthenticationEntryPoint;
import org.openjweb.sys.filter.JwtAuthenticationFilter;
import org.openjweb.sys.handler.JWTLogoutSuccessHandler;
import org.openjweb.sys.handler.JwtAccessDeniedHandler;
import org.openjweb.sys.handler.LoginFailureHandler;
import org.openjweb.sys.handler.LoginSuccessHandler;
import org.openjweb.sys.provider.MyAuthenticationProvider;
import org.springframework.beans.factory.annotation.Autowired;
import org.springframework.beans.factory.annotation.Value;
import org.springframework.boot.autoconfigure.condition.ConditionalOnExpression;
import org.springframework.context.annotation.Bean;
import org.springframework.context.annotation.Configuration;
import org.springframework.security.authentication.AuthenticationManager;
import org.springframework.security.authentication.dao.DaoAuthenticationProvider;
import org.springframework.security.config.annotation.ObjectPostProcessor;
import org.springframework.security.config.annotation.authentication.builders.AuthenticationManagerBuilder;
import org.springframework.security.config.annotation.method.configuration.EnableGlobalMethodSecurity;
import org.springframework.security.config.annotation.web.builders.HttpSecurity;
import org.springframework.security.config.annotation.web.configuration.EnableWebSecurity;
import org.springframework.security.config.annotation.web.configuration.WebSecurityConfigurerAdapter;
import org.springframework.security.config.http.SessionCreationPolicy;
import org.springframework.security.crypto.bcrypt.BCryptPasswordEncoder;
import org.springframework.security.crypto.password.PasswordEncoder;
import org.springframework.security.web.access.intercept.FilterSecurityInterceptor;@Slf4j
@Configuration
@EnableWebSecurity
@RequiredArgsConstructor
@EnableGlobalMethodSecurity(prePostEnabled = true)
public class WebSecurityConfig extends WebSecurityConfigurerAdapter {@AutowiredCommUserService userDetailService;@Beanpublic PasswordEncoder passwordEncoder(){return new AESPasswordEncoder();}@AutowiredLoginSuccessHandler loginSuccessHandler;@AutowiredLoginFailureHandler loginFailureHandler;@AutowiredJwtAuthenticationEntryPoint jwtAuthenticationEntryPoint;@AutowiredJwtAccessDeniedHandler jwtAccessDeniedHandler;@AutowiredJWTLogoutSuccessHandler jwtLogoutSuccessHandler;@Value("${oauth2.server}")private boolean isOAuth2Server = false;private static final String[] ALLOW_URL_LIST = {//"/login","/logout","/captcha","/favicon.ico",//"/api/jwt/**","/api/cms/**","/api/b2c/**","/api/b2b2c/**","/api/sns/**","/api/comm/**","/api/cms1/**","/api/store/**","/demo/**","/oauth/**" //允许oauth认证的路径};//作用???暴露AuthenticationManager给其他Bean使用@Bean@Overrideprotected AuthenticationManager authenticationManager() throws Exception {return super.authenticationManager();//return super.authenticationManagerBean();}//这个和上面的是什么区别?能一起用吗?/*@Bean@Overridepublic AuthenticationManager authenticationManagerBean() throws Exception{return super.authenticationManagerBean();}*/@Overrideprotected void configure(HttpSecurity http) throws Exception {//下面是第二阶段整合了数据库权限控制的示例log.info("是否配置了oauth2 server:::::");log.info(String.valueOf(this.isOAuth2Server));if(this.isOAuth2Server){log.info("OAUTH2模式...........");http.formLogin()//.loginPage("/login.html").loginProcessingUrl("/login").and().authorizeRequests().antMatchers("/login.html", "/img/**","/demo/**").permitAll().anyRequest().authenticated().and().csrf().disable();}else {log.info("非OAUTH2模式............");http.authorizeRequests().withObjectPostProcessor(new ObjectPostProcessor<FilterSecurityInterceptor>() {@Overridepublic <O extends FilterSecurityInterceptor> O postProcess(O object) {object.setSecurityMetadataSource(cfisms());object.setAccessDecisionManager(cadm());return object;}}).and().formLogin()//先注掉这个检查oauth认证//.successHandler(loginSuccessHandler) //登录成功处理.failureHandler(loginFailureHandler) //登录失败处理.loginProcessingUrl("/login").permitAll()//.loginProcessingUrl("/demo/jwt/login").permitAll().and().logout().logoutSuccessHandler(jwtLogoutSuccessHandler)// 禁用session.and().sessionManagement().sessionCreationPolicy(SessionCreationPolicy.STATELESS)// 配置拦截规则.and().authorizeRequests().antMatchers(ALLOW_URL_LIST).permitAll().anyRequest().authenticated()// 异常处理器.and().exceptionHandling()//接口登录模式打开这个//.authenticationEntryPoint(jwtAuthenticationEntryPoint) //这个影响登录,会导致/login登录蔬菜.accessDeniedHandler(jwtAccessDeniedHandler)// 配置自定义的过滤器//这个jwtAuthenticationFilter 不加也执行了,是否增加了会调整多个过滤器的执行顺序.and().addFilter(jwtAuthenticationFilter()).logout().permitAll().and().csrf().disable();}}@Overrideprotected void configure(AuthenticationManagerBuilder auth) throws Exception {if(true){//如果自定义AuthenticationProvider 则不使用这个//auth.userDetailsService(userDetailService).passwordEncoder(aesPasswordEncoder);//auth.userDetailsService(userDetailService).passwordEncoder(new BCryptPasswordEncoder());DaoAuthenticationProvider provider = new DaoAuthenticationProvider();provider.setUserDetailsService(userDetailService);provider.setPasswordEncoder(passwordEncoder());auth.authenticationProvider(provider);}else{//自定义AuthenticationProviderauth.authenticationProvider(new MyAuthenticationProvider(userDetailService));}}@BeanMyAccessDecisionManager cadm() {//System.out.println("加载角色权限设置。。。。。。。。。。。。");return new MyAccessDecisionManager();}@BeanMyFilterInvocationSecurityMetadataSource cfisms() {//System.out.println("加载权限设置。。。。。。。。。。。。");return new MyFilterInvocationSecurityMetadataSource();}@Bean@ConditionalOnExpression("'${oauth2.server}'=='false'")JwtAuthenticationFilter jwtAuthenticationFilter() throws Exception {JwtAuthenticationFilter jwtAuthenticationFilter = new JwtAuthenticationFilter(authenticationManager());return jwtAuthenticationFilter;}
}
五、OAuth2客户端开发
现在我们在openjweb-sys中开发一个客户端测试API,主要实现:
(1) 跳转到OAuth2 Server请求登录;
(2)获取到授权码后,在请求头增加clientID和密码,向OAuth2 Server的/oauth/token请求登
录。
(3)OAuth2 Server重定向到Spring Security 的登录页,用户登录成功后返回带access-token
的JSON。
(4)接下来用户可带着access-token请求获取用户详细信息接口、或者调用refreshToken刷新
token,或者在本地进行客户端的Spring Security登录。
下面是代码:
package org.openjweb.sys.api;import com.alibaba.fastjson.JSONObject;
import lombok.extern.slf4j.Slf4j;
import org.springframework.http.*;
import org.springframework.web.bind.annotation.RequestMapping;
import org.springframework.web.bind.annotation.RequestMethod;
import org.springframework.web.bind.annotation.RestController;
import org.apache.tomcat.util.codec.binary.Base64;
import org.springframework.util.LinkedMultiValueMap;
import org.springframework.util.MultiValueMap;
import org.springframework.web.client.RestClientResponseException;
import org.springframework.web.client.RestTemplate;import javax.servlet.http.HttpServletResponse;
import java.io.IOException;
import java.util.HashMap;
import java.util.Map;@RestController
@RequestMapping("/demo/oauth2client")
@Slf4j
public class Oauth2DemoApi {@RequestMapping(value = "/login2", method = RequestMethod.GET)public void thirdLogin2(HttpServletResponse response) throws IOException {//localhost:8001/demo/oauth2client/login2String url = "http://localhost:8001/oauth/authorize?response_type=code&client_id=zzyc&redirect_uri=http://localhost:8001/demo/oauth2client/callback";response.sendRedirect(url);}@RequestMapping(value="callback",method = RequestMethod.GET)public JSONObject callback(String code){System.out.println("在回调中callBack中存储返回的值..............");System.out.println("得到的code:::");System.out.println(code );HttpHeaders headers = new HttpHeaders();String clientId = "zzyc";//注意使用自己企业的ID//在请求头中设置client的ID和密码headers.add("authorization", "Basic " + new String(Base64.encodeBase64((clientId + ":" + "123456").getBytes())));MultiValueMap<String, Object> params = new LinkedMultiValueMap<>();params.add("grant_type", "authorization_code");params.add("code", code);params.add("client_id", clientId);params.add("redirect_uri", "http://localhost:8001/demo/oauth2client/callback");String result = null;JSONObject resultJson = new JSONObject();//=http://localhost:8003/oauth/tokentry {log.info("oauth2请求开始..............");//result = new RestTemplate().postForObject("http://localhost:8003/oauth/token", new HttpEntity<>(params, headers), String.class);//result = new RestTemplate().postForObject("http://localhost:8003/oauth/token", new HttpEntity<>(params, headers), String.class);result = new RestTemplate().postForObject("http://localhost:8001/oauth/token", new HttpEntity<>(params, headers), String.class);if (result == null){System.out.println("请求oauth失败,返回空................");}else{log.info("返回result:"+result);}JSONObject json1 = JSONObject.parseObject(result);String accessToken = json1.getString("access_token");String refreshToken = json1.getString("refresh_token");HttpHeaders tmpHeaders = new HttpHeaders();tmpHeaders.add("authorization", "Bearer " + accessToken);try{result = new RestTemplate().exchange("http://localhost:8001/api/user/info", HttpMethod.GET, new HttpEntity<>(tmpHeaders), String.class).getBody();log.info("返回的用户信息result::::::");log.info(result);//将第三方用户写入本系统中JSONObject json = JSONObject.parseObject(result);//用户基本信息//演示refreshtokenHttpHeaders tmpHeaders2 = new HttpHeaders();tmpHeaders2.add("authorization", "Basic " + new String(Base64.encodeBase64((clientId + ":" + "123456").getBytes())));//用这个不行//tmpHeaders2.set("Authorization", "Bearer " + accessToken);// 准备请求体参数Map<String, String> params1 = new HashMap<>();params1.put("grant_type", "refresh_token");//refresh_tokenparams1.put("refresh_token", refreshToken);params1.put("scope", "read"); //scope参数同样用于定义新的访问令牌的权限范围,确保客户端只能访问其被授权的资源// 发送请求,获取响应// 创建请求实体,设置请求头和方法HttpEntity<String> requestEntity = new HttpEntity<>(tmpHeaders2);ResponseEntity<String> response = new RestTemplate().exchange("http://localhost:8001/oauth/token?grant_type=refresh_token&refresh_token="+refreshToken,HttpMethod.POST,//不能用GETrequestEntity, //请求实体,包含请求头和请求体String.class,params1 //URL中的值,没加成功);if(response==null){log.info("response为空!!!!!");}else{log.info("response非空!!!!");}String newResult = response.getBody();log.info("新获取的token:");log.info(newResult);return json;/* 向本地插入新用户...*/}catch (RestClientResponseException e){e.printStackTrace();}}catch (RestClientResponseException e){e.printStackTrace();}return resultJson;}}测试流程:
(1)访问http://localhost:8001/demo/oauth2client/login2 开始测试,此方法将请求重定向到了OAuth2 Server:
http://localhost:8001/oauth/authorize?response_type=code&client_id=zzyc&redirect_uri=http://localhost:8001/demo/oauth2client/callback
(2)OAuth2自动重定向到了Spring Security登录页(前后端分离模式需要考虑如何改造):

输入admin,密码Hello0214@ 然后点Sign in 登录。登录成功后,浏览器的地址显示为:
http://localhost:8001/demo/oauth2client/callback?code=ufk81B 就是带code授权码的地址,后续是在后台拿到授权码后,又请求了 http://localhost:8001/oauth/token ,看上面的代码,请求时在头部有client:123456 client端用户名+密码的authorization头,请求成功后,后台显示返回的数据包:
result:{"access_token":"6d37957a-7a96-43cf-876b-67aad7977447","token_type":"bearer","refresh_token":"80324e85-a819-4f34-bffb-e2d1686583c2","expires_in":43199,"scope":"read"}
然后后面演示了头部带着access_token请求OAuth2 Server的获取用户详情接口http://localhost:8001/api/user/info,返回了用户信息:{"authorities":null,"accountNonExpired":true,"accountNonLocked":true,"credentialsNonExpired":false,"enabled":true,"userId":1,"rowId":"1221212121ssss","loginId":"admin",...}
在实际项目中,可以考虑将OAuth2 Server端登录成功,但本地还没有的用户自动加到本地的用户表中。另外在项目开发中经常需要重新获取token,上面的代码中有调用refreshtoken重新获取token的代码:
Map<String, String> params1 = new HashMap<>();params1.put("grant_type", "refresh_token");//refresh_tokenparams1.put("refresh_token", refreshToken);params1.put("scope", "read"); //scope参数同样用于定义新的访问令牌的权限范围,确保客户端只能访问其被授权的资源// 发送请求,获取响应// 创建请求实体,设置请求头和方法HttpEntity<String> requestEntity = new HttpEntity<>(tmpHeaders2);ResponseEntity<String> response = new RestTemplate().exchange("http://localhost:8001/oauth/token?grant_type=refresh_token&refresh_token="+refreshToken,HttpMethod.POST,//不能用GETrequestEntity, //请求实体,包含请求头和请求体String.class,params1 //URL中的值,没加成功);测试刷新token返回的json:
新获取的token:
2024-12-01 21:58:58.125 INFO 4576 --- [io-8001-exec-10] org.openjweb.sys.api.Oauth2DemoApi : {"access_token":"f0f8ae6e-8ba2-4c9c-ab60-cbb2c3db8f76","token_type":"bearer","refresh_token":"80324e85-a819-4f34-bffb-e2d1686583c2","expires_in":43199,"scope":"read"}
【客户端SpringSecurity登录】
目前只是在服务器端登录拿到了access_token,客户端实际还没有登录,在获取用户详情后,可以参考下面的代码实现本地SpringSecurity登录:
@AutowiredCommUserService sysUserService;@AutowiredLoginSuccessHandler loginSuccessHandler;。。。。。。//在获取用户详情后String loginId = json.getString("loginId");//登录用户,json是上面代码获取用户详情CommUser sysUser = sysUserService.selectUserByLoginId(loginId);// 构建UsernamePasswordAuthenticationToken,这里密码为null,是因为提供了正确的JWT,实现自动登录UsernamePasswordAuthenticationToken token = new UsernamePasswordAuthenticationToken(loginId, null, sysUserService.getUserAuthority(sysUser.getLoginId()));SecurityContextHolder.getContext().setAuthentication(token);ServletRequestAttributes sra = (ServletRequestAttributes) RequestContextHolder.getRequestAttributes();try {loginSuccessHandler.onAuthenticationSuccess(sra.getRequest(), sra.getResponse(), token);}catch(Exception ex){}本文代码量比较大,大家可从github下载完整代码:GitHub - openjweb/cloud at masterOpenJWeb is a java bases low code platform. Contribute to openjweb/cloud development by creating an account on GitHub.![]() https://github.com/openjweb/cloud/tree/master
https://github.com/openjweb/cloud/tree/master
相关文章:
IntelliJ+SpringBoot项目实战(二十)--基于SpringSecurity实现Oauth2服务端和客户端
在前面的帖子中介绍了SpringSecurityJWT实现了认证和授权的功能。因为基于Oauth2的统一认证在项目需求中越来越多,所以有必要将OAuth2的解决方案也整合进来,这样我们的产品既可以作为一个业务系统,也可以作为一个独立的统一认证服务器。下面详…...

如何实现剪裁功能
文章目录 1 概念介绍2 使用方法2.1 ClipOval2.2 ClipRRect3 示例代码我们在上一章回中介绍了AspectRatio Widget相关的内容,本章回中将介绍剪裁类组件(Clip).闲话休提,让我们一起Talk Flutter吧。 1 概念介绍 我们在这里说的剪裁类组件主要是指对子组件进行剪裁操作,常用的…...

LeetCode 动态规划 爬楼梯
爬楼梯 假设你正在爬楼梯。需要 n 阶你才能到达楼顶。 每次你可以爬 1 或 2 个台阶。你有多少种不同的方法可以爬到楼顶呢? 示例 1: 输入:n 2 输出:2 解释:有两种方法可以爬到楼顶。 1 阶 1 阶 2 阶 示例 2ÿ…...

Java 工厂模式:深度解析与应用指南
在 Java 编程的广袤天地里,设计模式宛如璀璨星辰,照亮了开发者构建高效、灵活且可维护软件系统的道路。其中,工厂模式作为创建型设计模式的关键成员,在对象创建环节扮演着举足轻重的角色,极大地增强了代码的适应性与扩…...
-- SVG 集成详解)
HTML5系列(5)-- SVG 集成详解
前端技术探索系列:HTML5 SVG 集成详解 🎨 开篇寄语 👋 前端开发者们, 在前五篇文章中,我们探讨了 HTML5 的多个特性。今天,让我们深入了解 SVG 的魅力,看看如何创建可缩放的矢量图形。 一、…...

深度学习常见数据集处理方法
1、数据集格式转换(json转txt) import json import os 任务:实例分割,labelme的json文件, 转txt文件 Ultralytics YOLO format <class-index> <x1> <y1> <x2> <y2> ... <xn> <yn> # 类…...

1180 - 【入门】数字出现次数
题目描述 有50个数(0-19),求这50个数中相同数字出现的最多次数为几次? 输入 50个数字 输出 1个数字(即相同数字出现的最多次数) 样例 输入 复制 1 10 2 0 15 8 12 7 0 3 15 0 15 18 16 7 17 16 9 …...

C++20: 像Python一样split字符串
概要 Python 的字符串天生支持 split( ) 操作,支持单个字符或字符串作为分隔符。 C 在这方面显得很笨拙,但是在 C20 下经过一番尝试,还是能够提供类似的简洁调用。 Python 代码 s 0,11,336,23,370nums s.split(,) for n in nums:print(n…...

Unity3D UI 嵌套滚动视图
Unity3D 解决 UI 嵌套滚动视图滑动问题。 嵌套滚动视图 滑动问题 在游戏开发中,我们常常会遇到一种情况,在一个滚动视图列表中,每个 item 还包含了一个内嵌的滚动视图。 这样,当我们在滑动外层的滚动视图时,如果点…...

你还没有将 Siri 接入GPT对话功能吗?
由于各种原因,国内ios用户目前无缘自带 AI 功能,但是这并不代表国内 ios 无法接入 AI 功能,接下来手把手带你为iPhone siri 接入 gpt 对话功能。 siri 接入 chatGPT 暂时还无法下载 ChatGPT app,或者没有账号的读者可以直接跳到…...

_C#_串口助手_字符串拼接缺失问题(未知原理)
最近使用WPF开发串口助手时,遇到一个很奇怪的问题,无论是主线程、异步还是多线程,当串口接收速度达到0.016s一次以上,就会发生字符串缺失问题并且很卡。而0.016s就一切如常,仿佛0.015s与0.016s是天堑之隔。 同一份代码…...

浅析大数据时代下的网络安全
一、大数据时代下网络安全的现状 在全球化进程不断深入发展的情况下,互联网行业发展速度也更加迅猛,人们对网络信息的需求量不断增加,所以目前已经进入了大数据时代。 随着计算机技术的不断发展,我国互联网网络规模、网民数量、…...

Mysql数据库基础篇笔记
目录 sql语句 DDL——数据库定义语言(定义库,表,字段) 数据库操作: 表操作: DML 增删改语句 DQL 语法编写顺序: 条件查询 DCL 用户管理: 权限管理: 函数 常见字符串内置函…...

rabbitmq原理及命令
目录 一、RabbitMQ原理1、交换机(Exchange)fanoutdirecttopicheaders(很少用到) 2、队列Queue3、Virtual Hosts4、基础对象 二、RabbitMQ的一些基本操作:1、用户管理2、用户角色3、vhost4、开启web管理接口5、批量删除队列 一、Ra…...
)
React进阶面试题(四)
React 的 reconciliation(协调)算法 Reconciliation是React的diff算法,用于比较更新前后的虚拟DOM树差异,从而使用最小的代价将原始DOM按照新的状态、属性进行更新。其目的是找出两棵树的差异,原生方式直接比较复杂度…...

24/12/1 算法笔记<强化学习> 创建Maze交互
我们今天制作一个栅格的游戏。 我们直接上代码教学。 1.载入库和查找相应的函数版本 import numpy as np import time import sysif sys.version_info.major 2:import Tkinter as tk else:import tkinter as tk 2.设置长宽和单元格大小 UNIT 40 MAZE_H 4 MAZE_W 4 3.初始…...

Linux驱动开发(10):I2C子系统–mpu6050驱动实验
本章我们以板载MPU6050为例讲解i2c驱动程序的编写,本章主要分为五部分内容。 第一部分,i2c基本知识,回忆i2c物理总线和基本通信协议。 第二部分,linux下的i2c驱动框架。 第三部分,i2c总线驱动代码拆解。 第四部分&a…...

《装甲车内气体检测“神器”:上海松柏 K-5S 电化学传感器模组详解》
《装甲车内气体检测“神器”:上海松柏 K-5S 电化学传感器模组详解》 一、引言二、K-5S 电化学传感器模组概述(一)产品简介(二)产品特点(三)产品适用场景 三、电化学传感器原理及优点(一…...

如何将多个JS文件打包成一个JS文件?
文章目录 前言SDK 打包安装 webpack创建 webpack.config.js编译命令行遇到的坑点前言 上一篇已经记录了如何开发一个小游戏聚合SDK,既然是SDK,最终都是给外部人员使用的。调研了一下市面上的前端SDK,最终都是编译成一个 js 文件。我猜理由大概是 js 文件之间的调用都是需要…...
)
100个python经典面试题详解(新版)
应老粉要求,每晚加餐一个最新面试题 包括Python面试中常见的问题,涵盖列表、元组、字符串插值、比较操作符、装饰器、类与对象、函数调用方式、数据结构操作、序列化、数据处理函数等多个方面。 旨在帮助数据科学家和软件工程师准备面试或提升Python技能。 7、Python面试题…...

python打卡day49
知识点回顾: 通道注意力模块复习空间注意力模块CBAM的定义 作业:尝试对今天的模型检查参数数目,并用tensorboard查看训练过程 import torch import torch.nn as nn# 定义通道注意力 class ChannelAttention(nn.Module):def __init__(self,…...

STM32+rt-thread判断是否联网
一、根据NETDEV_FLAG_INTERNET_UP位判断 static bool is_conncected(void) {struct netdev *dev RT_NULL;dev netdev_get_first_by_flags(NETDEV_FLAG_INTERNET_UP);if (dev RT_NULL){printf("wait netdev internet up...");return false;}else{printf("loc…...
微信小程序 - 手机震动
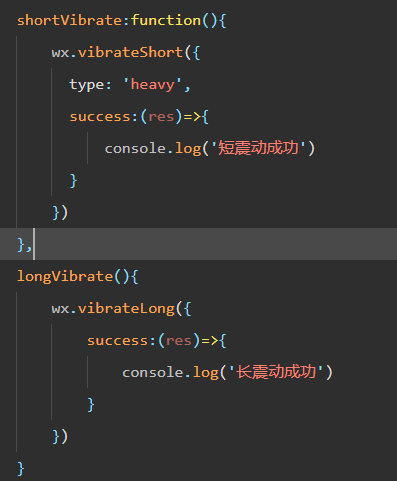
一、界面 <button type"primary" bindtap"shortVibrate">短震动</button> <button type"primary" bindtap"longVibrate">长震动</button> 二、js逻辑代码 注:文档 https://developers.weixin.qq…...
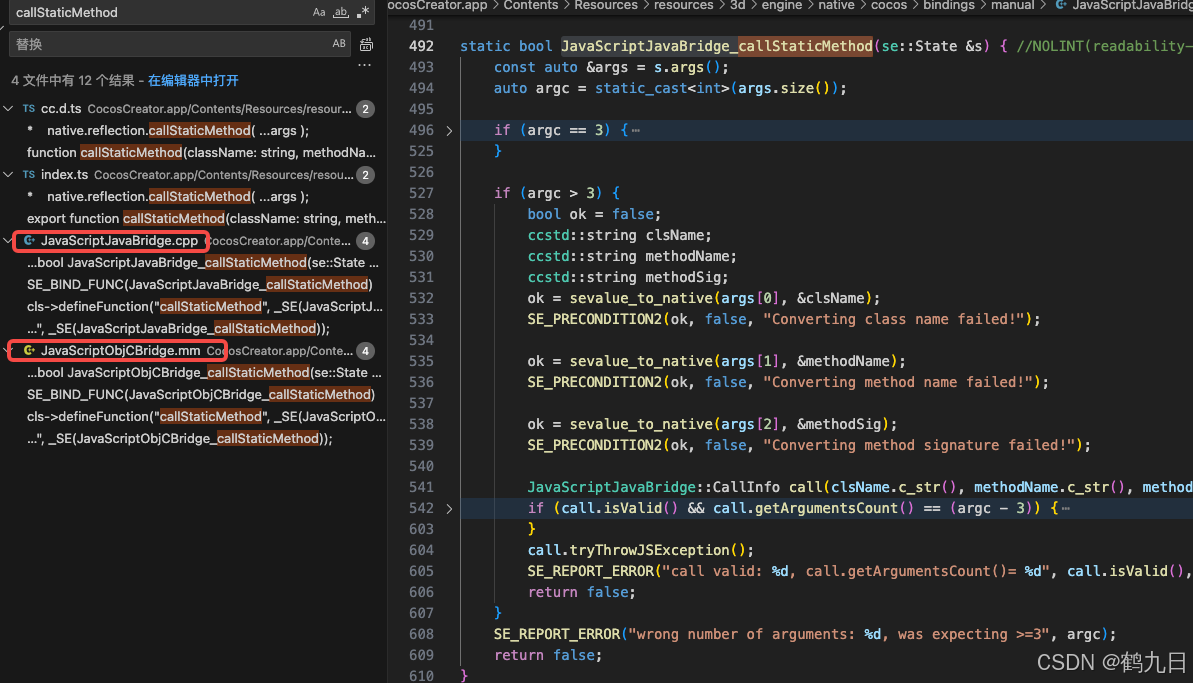
CocosCreator 之 JavaScript/TypeScript和Java的相互交互
引擎版本: 3.8.1 语言: JavaScript/TypeScript、C、Java 环境:Window 参考:Java原生反射机制 您好,我是鹤九日! 回顾 在上篇文章中:CocosCreator Android项目接入UnityAds 广告SDK。 我们简单讲…...

IoT/HCIP实验-3/LiteOS操作系统内核实验(任务、内存、信号量、CMSIS..)
文章目录 概述HelloWorld 工程C/C配置编译器主配置Makefile脚本烧录器主配置运行结果程序调用栈 任务管理实验实验结果osal 系统适配层osal_task_create 其他实验实验源码内存管理实验互斥锁实验信号量实验 CMISIS接口实验还是得JlINKCMSIS 简介LiteOS->CMSIS任务间消息交互…...
Android 之 kotlin 语言学习笔记三(Kotlin-Java 互操作)
参考官方文档:https://developer.android.google.cn/kotlin/interop?hlzh-cn 一、Java(供 Kotlin 使用) 1、不得使用硬关键字 不要使用 Kotlin 的任何硬关键字作为方法的名称 或字段。允许使用 Kotlin 的软关键字、修饰符关键字和特殊标识…...
计算机基础知识解析:从应用到架构的全面拆解
目录 前言 1、 计算机的应用领域:无处不在的数字助手 2、 计算机的进化史:从算盘到量子计算 3、计算机的分类:不止 “台式机和笔记本” 4、计算机的组件:硬件与软件的协同 4.1 硬件:五大核心部件 4.2 软件&#…...

五子棋测试用例
一.项目背景 1.1 项目简介 传统棋类文化的推广 五子棋是一种古老的棋类游戏,有着深厚的文化底蕴。通过将五子棋制作成网页游戏,可以让更多的人了解和接触到这一传统棋类文化。无论是国内还是国外的玩家,都可以通过网页五子棋感受到东方棋类…...

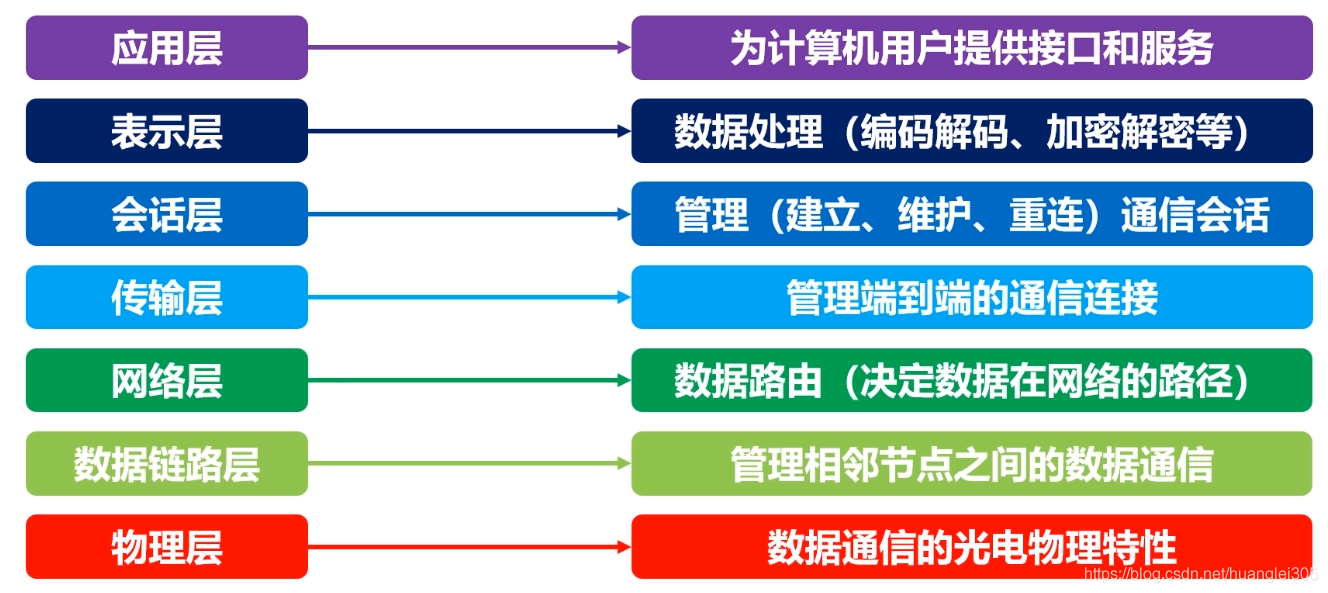
前端高频面试题2:浏览器/计算机网络
本专栏相关链接 前端高频面试题1:HTML/CSS 前端高频面试题2:浏览器/计算机网络 前端高频面试题3:JavaScript 1.什么是强缓存、协商缓存? 强缓存: 当浏览器请求资源时,首先检查本地缓存是否命中。如果命…...

在golang中如何将已安装的依赖降级处理,比如:将 go-ansible/v2@v2.2.0 更换为 go-ansible/@v1.1.7
在 Go 项目中降级 go-ansible 从 v2.2.0 到 v1.1.7 具体步骤: 第一步: 修改 go.mod 文件 // 原 v2 版本声明 require github.com/apenella/go-ansible/v2 v2.2.0 替换为: // 改为 v…...