Python 3 教程第33篇(MySQL - mysql-connector 驱动)
Python MySQL - mysql-connector 驱动
MySQL 是最流行的关系型数据库管理系统,如果你不熟悉 MySQL,可以阅读我们的 MySQL 教程。
本章节我们为大家介绍使用 mysql-connector 来连接使用 MySQL, mysql-connector 是 MySQL 官方提供的驱动器。
我们可以使用 pip 命令来安装 mysql-connector:
python -m pip install mysql-connector
使用以下代码测试 mysql-connector 是否安装成功:
demo_mysql_test.py:
import mysql.connector
执行以上代码,如果没有产生错误,表明安装成功。
注意:如果你的 MySQL 是 8.0 版本,密码插件验证方式发生了变化,早期版本为 mysql_native_password,8.0 版本为 caching_sha2_password,所以需要做些改变:
先修改 my.ini 配置:
[mysqld]
default_authentication_plugin=mysql_native_password
然后在 mysql 下执行以下命令来修改密码:
ALTER USER 'root'@'localhost' IDENTIFIED WITH mysql_native_password BY '新密码';
更多内容可以参考:Python MySQL8.0 链接问题。
创建数据库连接
可以使用以下代码来连接数据库:
demo_mysql_test.py:
import mysql.connector
mydb = mysql.connector.connect(host="localhost",       # 数据库主机地址user="yourusername",    # 数据库用户名passwd="yourpassword"   # 数据库密码
)
print(mydb)
创建数据库
创建数据库使用 “CREATE DATABASE” 语句,以下创建一个名为 runoob_db 的数据库:
demo_mysql_test.py:
import mysql.connector
mydb = mysql.connector.connect(host="localhost",user="root",passwd="123456"
)
mycursor = mydb.cursor()
mycursor.execute("CREATE DATABASE runoob_db")
创建数据库前我们也可以使用 “SHOW DATABASES” 语句来查看数据库是否存在:
demo_mysql_test.py:
输出所有数据库列表:
import mysql.connectormydb = mysql.connector.connect(host="localhost",user="root",passwd="123456"
)
mycursor = mydb.cursor()
mycursor.execute("SHOW DATABASES")
for x in mycursor:print(x)
或者我们可以直接连接数据库,如果数据库不存在,会输出错误信息:
demo_mysql_test.py:
import mysql.connector
mydb = mysql.connector.connect(host="localhost",user="root",passwd="123456",database="runoob_db"
)
创建数据表
创建数据表使用 “CREATE TABLE” 语句,创建数据表前,需要确保数据库已存在,以下创建一个名为 sites 的数据表:
demo_mysql_test.py:
import mysql.connectormydb = mysql.connector.connect(host="localhost",user="root",passwd="123456",database="runoob_db"
)
mycursor = mydb.cursor()
mycursor.execute("CREATE TABLE sites (name VARCHAR(255), url VARCHAR(255))")
执行成功后,我们可以看到数据库创建的数据表 sites,字段为 name 和 url。

我们也可以使用 “SHOW TABLES” 语句来查看数据表是否已存在:
demo_mysql_test.py:
import mysql.connector
mydb = mysql.connector.connect(host="localhost",user="root",passwd="123456",database="runoob_db"
)
mycursor = mydb.cursor()
mycursor.execute("SHOW TABLES")
for x in mycursor:print(x)
主键设置
创建表的时候我们一般都会设置一个主键(PRIMARY KEY),我们可以使用 “INT AUTO_INCREMENT PRIMARY KEY” 语句来创建一个主键,主键起始值为 1,逐步递增。
如果我们的表已经创建,我们需要使用 ALTER TABLE 来给表添加主键:
demo_mysql_test.py:
给 sites 表添加主键。
import mysql.connector
mydb = mysql.connector.connect(host="localhost",user="root",passwd="123456",database="runoob_db"
)
mycursor = mydb.cursor()
mycursor.execute("ALTER TABLE sites ADD COLUMN id INT AUTO_INCREMENT PRIMARY KEY")
如果你还未创建 sites 表,可以直接使用以下代码创建。
demo_mysql_test.py:
给表创建主键。
import mysql.connector
mydb = mysql.connector.connect(host="localhost",user="root",passwd="123456",database="runoob_db"
)
mycursor = mydb.cursor()
mycursor.execute("CREATE TABLE sites (id INT AUTO_INCREMENT PRIMARY KEY, name VARCHAR(255), url VARCHAR(255))")
插入数据
插入数据使用 “INSERT INTO” 语句:
demo_mysql_test.py:
向 sites 表插入一条记录。
import mysql.connector
mydb = mysql.connector.connect(host="localhost",user="root",passwd="123456",database="runoob_db"
)
mycursor = mydb.cursor()
sql = "INSERT INTO sites (name, url) VALUES (%s, %s)"
val = ("RUNOOB", "https://www.runoob.com")
mycursor.execute(sql, val)
mydb.commit()    # 数据表内容有更新,必须使用到该语句
print(mycursor.rowcount, "记录插入成功。")
执行代码,输出结果为:
1 记录插入成功
批量插入
批量插入使用 executemany() 方法,该方法的第二个参数是一个元组列表,包含了我们要插入的数据:
demo_mysql_test.py:
向 sites 表插入多条记录。
import mysql.connector
mydb = mysql.connector.connect(host="localhost",user="root",passwd="123456",database="runoob_db"
)
mycursor = mydb.cursor()
sql = "INSERT INTO sites (name, url) VALUES (%s, %s)"
val = [('Google', 'https://www.google.com'),('Github', 'https://www.github.com'),('Taobao', 'https://www.taobao.com'),('stackoverflow', 'https://www.stackoverflow.com/')
]
mycursor.executemany(sql, val)
mydb.commit()    # 数据表内容有更新,必须使用到该语句
print(mycursor.rowcount, "记录插入成功。")
执行代码,输出结果为:
4 记录插入成功。
执行以上代码后,我们可以看看数据表的记录:

如果我们想在数据记录插入后,获取该记录的 ID ,可以使用以下代码:
demo_mysql_test.py:
import mysql.connector
mydb = mysql.connector.connect(host="localhost",user="root",passwd="123456",database="runoob_db"
)
mycursor = mydb.cursor()
sql = "INSERT INTO sites (name, url) VALUES (%s, %s)"
val = ("Zhihu", "https://www.zhihu.com")
mycursor.execute(sql, val)
mydb.commit()
print("1 条记录已插入, ID:", mycursor.lastrowid)
执行代码,输出结果为:
1 条记录已插入, ID: 6
查询数据
查询数据使用 SELECT 语句:
demo_mysql_test.py:
import mysql.connector
mydb = mysql.connector.connect(host="localhost",user="root",passwd="123456",database="runoob_db"
)
mycursor = mydb.cursor()
mycursor.execute("SELECT * FROM sites")
myresult = mycursor.fetchall()     # fetchall() 获取所有记录
for x in myresult:print(x)
执行代码,输出结果为:
(1, 'RUNOOB', 'https://www.runoob.com')
(2, 'Google', 'https://www.google.com')
(3, 'Github', 'https://www.github.com')
(4, 'Taobao', 'https://www.taobao.com')
(5, 'stackoverflow', 'https://www.stackoverflow.com/')
(6, 'Zhihu', 'https://www.zhihu.com')
也可以读取指定的字段数据:
demo_mysql_test.py:
import mysql.connector
mydb = mysql.connector.connect(host="localhost",user="root",passwd="123456",database="runoob_db"
)
mycursor = mydb.cursor()
mycursor.execute("SELECT name, url FROM sites")
myresult = mycursor.fetchall()
for x in myresult:print(x)
执行代码,输出结果为:
('RUNOOB', 'https://www.runoob.com')
('Google', 'https://www.google.com')
('Github', 'https://www.github.com')
('Taobao', 'https://www.taobao.com')
('stackoverflow', 'https://www.stackoverflow.com/')
('Zhihu', 'https://www.zhihu.com')
如果我们只想读取一条数据,可以使用 fetchone() 方法:
demo_mysql_test.py:
import mysql.connector
mydb = mysql.connector.connect(host="localhost",user="root",passwd="123456",database="runoob_db"
)
mycursor = mydb.cursor()
mycursor.execute("SELECT * FROM sites")
myresult = mycursor.fetchone()
print(myresult)
执行代码,输出结果为:
(1, 'RUNOOB', 'https://www.runoob.com')
where 条件语句
如果我们要读取指定条件的数据,可以使用 where 语句:
demo_mysql_test.py
读取 name 字段为 RUNOOB 的记录:
import mysql.connector
mydb = mysql.connector.connect(host="localhost",user="root",passwd="123456",database="runoob_db"
)
mycursor = mydb.cursor()
sql = "SELECT * FROM sites WHERE name ='RUNOOB'"
mycursor.execute(sql)
myresult = mycursor.fetchall()
for x in myresult:print(x)
执行代码,输出结果为:
(1, 'RUNOOB', 'https://www.runoob.com')
也可以使用通配符 %:
demo_mysql_test.py
import mysql.connector
mydb = mysql.connector.connect(host="localhost",user="root",passwd="123456",database="runoob_db"
)
mycursor = mydb.cursor()
sql = "SELECT * FROM sites WHERE url LIKE '%oo%'"
mycursor.execute(sql)
myresult = mycursor.fetchall()
for x in myresult:print(x)
执行代码,输出结果为:
(1, 'RUNOOB', 'https://www.runoob.com')
(2, 'Google', 'https://www.google.com')
为了防止数据库查询发生 SQL 注入的攻击,我们可以使用 %s 占位符来转义查询的条件:
demo_mysql_test.py
import mysql.connector
mydb = mysql.connector.connect(host="localhost",user="root",passwd="123456",database="runoob_db"
)
mycursor = mydb.cursor()
sql = "SELECT * FROM sites WHERE name = %s"
na = ("RUNOOB", )
mycursor.execute(sql, na)
myresult = mycursor.fetchall()
for x in myresult:print(x)
排序
查询结果排序可以使用 ORDER BY 语句,默认的排序方式为升序,关键字为 ASC,如果要设置降序排序,可以设置关键字 DESC。
demo_mysql_test.py
按 name 字段字母的升序排序:
import mysql.connector
mydb = mysql.connector.connect(host="localhost",user="root",passwd="123456",database="runoob_db"
)
mycursor = mydb.cursor()
sql = "SELECT * FROM sites ORDER BY name"
mycursor.execute(sql)
myresult = mycursor.fetchall()
for x in myresult:print(x)
执行代码,输出结果为:
(3, 'Github', 'https://www.github.com')
(2, 'Google', 'https://www.google.com')
(1, 'RUNOOB', 'https://www.runoob.com')
(5, 'stackoverflow', 'https://www.stackoverflow.com/')
(4, 'Taobao', 'https://www.taobao.com')
(6, 'Zhihu', 'https://www.zhihu.com')
降序排序实例:
demo_mysql_test.py
按 name 字段字母的降序排序:
import mysql.connectormydb = mysql.connector.connect(host="localhost",user="root",passwd="123456",database="runoob_db"
)
mycursor = mydb.cursor()
sql = "SELECT * FROM sites ORDER BY name DESC"
mycursor.execute(sql)
myresult = mycursor.fetchall()
for x in myresult:print(x)
执行代码,输出结果为:
(6, 'Zhihu', 'https://www.zhihu.com')
(4, 'Taobao', 'https://www.taobao.com')
(5, 'stackoverflow', 'https://www.stackoverflow.com/')
(1, 'RUNOOB', 'https://www.runoob.com')
(2, 'Google', 'https://www.google.com')
(3, 'Github', 'https://www.github.com')
Limit
如果我们要设置查询的数据量,可以通过 “LIMIT” 语句来指定
demo_mysql_test.py
读取前 3 条记录:
import mysql.connector
mydb = mysql.connector.connect(host="localhost",user="root",passwd="123456",database="runoob_db"
)
mycursor = mydb.cursor()
mycursor.execute("SELECT * FROM sites LIMIT 3")
myresult = mycursor.fetchall()
for x in myresult:print(x)
执行代码,输出结果为:
(1, 'RUNOOB', 'https://www.runoob.com')
(2, 'Google', 'https://www.google.com')
(3, 'Github', 'https://www.github.com')
也可以指定起始位置,使用的关键字是 OFFSET:
demo_mysql_test.py
从第二条开始读取前 3 条记录:
import mysql.connector
mydb = mysql.connector.connect(host="localhost",user="root",passwd="123456",database="runoob_db"
)
mycursor = mydb.cursor()
mycursor.execute("SELECT * FROM sites LIMIT 3 OFFSET 1")  # 0 为 第一条,1 为第二条,以此类推
myresult = mycursor.fetchall()
for x in myresult:print(x)
执行代码,输出结果为:
(2, 'Google', 'https://www.google.com')
(3, 'Github', 'https://www.github.com')
(4, 'Taobao', 'https://www.taobao.com')
删除记录
删除记录使用 “DELETE FROM” 语句:
demo_mysql_test.py
删除 name 为 stackoverflow 的记录:
import mysql.connector
mydb = mysql.connector.connect(host="localhost",user="root",passwd="123456",database="runoob_db"
)
mycursor = mydb.cursor()
sql = "DELETE FROM sites WHERE name = 'stackoverflow'"
mycursor.execute(sql)
mydb.commit()
print(mycursor.rowcount, " 条记录删除")
执行代码,输出结果为:
1 条记录删除
注意:要慎重使用删除语句,删除语句要确保指定了 WHERE 条件语句,否则会导致整表数据被删除。
为了防止数据库查询发生 SQL 注入的攻击,我们可以使用 %s 占位符来转义删除语句的条件:
demo_mysql_test.py
import mysql.connector
mydb = mysql.connector.connect(host="localhost",user="root",passwd="123456",database="runoob_db"
)
mycursor = mydb.cursor()
sql = "DELETE FROM sites WHERE name = %s"
na = ("stackoverflow", )
mycursor.execute(sql, na)
mydb.commit()
print(mycursor.rowcount, " 条记录删除")
执行代码,输出结果为:
1 条记录删除
更新表数据
数据表更新使用 “UPDATE” 语句:
demo_mysql_test.py
将 name 为 Zhihu 的字段数据改为 ZH:
import mysql.connector
mydb = mysql.connector.connect(host="localhost",user="root",passwd="123456",database="runoob_db"
)
mycursor = mydb.cursor()
sql = "UPDATE sites SET name = 'ZH' WHERE name = 'Zhihu'"
mycursor.execute(sql)
mydb.commit()
print(mycursor.rowcount, " 条记录被修改")
执行代码,输出结果为:
1 条记录被修改
注意:UPDATE 语句要确保指定了 WHERE 条件语句,否则会导致整表数据被更新。
为了防止数据库查询发生 SQL 注入的攻击,我们可以使用 %s 占位符来转义更新语句的条件:
demo_mysql_test.py
import mysql.connector
mydb = mysql.connector.connect(host="localhost",user="root",passwd="123456",database="runoob_db"
)
mycursor = mydb.cursor()
sql = "UPDATE sites SET name = %s WHERE name = %s"
val = ("Zhihu", "ZH")
mycursor.execute(sql, val)
mydb.commit()
print(mycursor.rowcount, " 条记录被修改")
执行代码,输出结果为:
1 条记录被修改
删除表
删除表使用 “DROP TABLE” 语句, IF EXISTS 关键字是用于判断表是否存在,只有在存在的情况才删除:
demo_mysql_test.py
import mysql.connector
mydb = mysql.connector.connect(host="localhost",user="root",passwd="123456",database="runoob_db"
)
mycursor = mydb.cursor()
sql = "DROP TABLE IF EXISTS sites"  # 删除数据表 sites
mycursor.execute(sql)
相关文章:
Python 3 教程第33篇(MySQL - mysql-connector 驱动)
Python MySQL - mysql-connector 驱动 MySQL 是最流行的关系型数据库管理系统,如果你不熟悉 MySQL,可以阅读我们的 MySQL 教程。 本章节我们为大家介绍使用 mysql-connector 来连接使用 MySQL, mysql-connector 是 MySQL 官方提供的驱动器。…...

23种设计模式之外观模式
目录 1. 简介2. 代码2.1 SelectFoodService (选择食品)2.2 PayService (支付服务)2.3 TakeService (制作服务)2.4 OrderService (下单服务)2.5 Food (食品)2.6 TackingSystem (外观类)2.7 Test (测试类) 3. 优缺点3. 总结 1. 简介…...

GateWay使用手册
好的,下面是优化后的版本。为了提高可读性和规范性,我对内容进行了结构化、简化了部分代码,同时增加了注释说明,便于理解。 1. 引入依赖 在 pom.xml 中添加以下依赖: <dependencies><!-- Spring Cloud Gate…...

MySQL1.0
1.数据库的三大范式 范式是为了使数据库设计更加合理,规范,减少数据冗余和数据不一致等问题指定的一系列规则。 第一范式:第一范式要求数据表中的每一列都是不可分割的原子数据项。例如:有一个学生信息表,包含 “学生…...

IDEA使用HotSwapHelper进行热部署
目录 前言JDK1.8特殊准备DECVM安装插件安装与配置参考文档相关下载 前言 碰到了一个项目,用jrebel启动项目时一直报错,不用jrebel时又没问题,找不到原因,又不想放弃热部署功能 因此思考能否通过其他方式进行热部署,找…...

简单web项目自定义部署Dockerfile
本意就是弄清楚如何做web自定义项目的镜像。 基础镜像是java:8u261-jdk,其中java路径为/opt/java webdemo1.0.0.1-SNAPSHOT.jar文件里面已经包含了lib文件。 可以设置PATH也可以不设置,但是建议设置JAVA_HOME FROM swr.cn-north-4.myhuaweicloud.com…...

基础Web安全|SQL注入
基础Web安全 URI Uniform Resource Identifier,统一资源标识符,用来唯一的标识一个资源。 URL Uniform Resource Locator,统一资源定位器,一种具体的URI,可以标识一个资源,并且指明了如何定位这个资源…...

SpringBoot -拦截器Interceptor、过滤器 Filter 及设置
Spring Boot拦截器(Interceptor)的概念 - 在Spring Boot中,拦截器是一种AOP的实现方式。它主要用于<font style"color:#DF2A3F;">拦截请求</font>,在请求处理之前和之后执行特定的代码逻辑。与过滤器不同的…...

C++小问题
怎么分辨const修饰的是谁 是限定谁不能被改变的? 在C中,const关键字的用途和位置非常关键,它决定了谁不能被修改。const可以修饰变量、指针、引用等不同的对象,并且具体的作用取决于const的修饰位置。理解const的规则能够帮助我们…...

avcodec_alloc_context3,avcodec_open2,avcodec_free_context,avcodec_close
avcodec_alloc_context3 是创建编解码器上下文,需要使用 avcodec_free_context释放 需要使用avcodec_free_context 释放 /** * Allocate an AVCodecContext and set its fields to default values. The * resulting struct should be freed with avcodec_free_co…...

强化学习的几个主要方法(策略梯度、PPO、REINFORCE实现等)(下)
由于平台字数限制,上文:https://blog.csdn.net/ooblack/article/details/144198538 4. PPO算法 近端策略优化(proximal policy optimization,PPO)算法是OpenAI的默认强化学习算法,在RLHF中也用到了这个算…...

计算机网络:IP协议详细讲解
目录 前言 一、IP网段划分 二、IP报头 三、解决IP地址不足-->NAT技术 前言 在之前,我们学习了传输层中的TCP和UDP,重点是TCP协议,他帮我们解决具体到主机的哪个应用(端口)、传输的可靠(序列号、校验和…...

2024信创数据库TOP30之华为Gauss DB
近日,由DBC联合CIW/CIS共同发布的“2024信创数据库TOP30”榜单正式揭晓,汇聚了国内顶尖的数据库企业及其产品,成为展示中国信创领域技术实力与发展潜力的重要平台。在这份榜单中,华为的GaussDB凭借其卓越的技术实力、广泛的行业应…...

在线家具商城基于 SpringBoot:设计模式与实现方法探究
第3章 系统分析 用户的需求以及与本系统相似的在市场上存在的其它系统可以作为系统分析中参考的资料,分析人员可以根据这些信息确定出本系统具备的功能,分析出本系统具备的性能等内容。 3.1可行性分析 尽管系统是根据用户的要求进行制作,但是…...

九、Spring Boot集成Spring Security之授权概述
文章目录 往期回顾:Spring Boot集成Spring Security专栏及各章节快捷入口前言一、授权概述二、用户权限三、用户授权流程三、Spring Security授权方式1、请求级别授权2、方法级别授权 往期回顾:Spring Boot集成Spring Security专栏及各章节快捷入口 Spr…...

python之Flask入门—路由参数
语法: /routerName/<string:parameter_name> 其中:routerName代表路由名称<>中的string是参数类型,parameter_name为参数名称 参数类型: (1) string 接收任何没有斜杠(/&#x…...

txt地图格式处理
1、txt地图格式 [属性描述] 坐标系2000国家大地坐标系 几度分带3 投影类型高斯克吕格 计量单位米 带号38 精度0.001 转换参数,,,,,, [地块坐标] 5,475.888,1,测试地块1,面,J50G077061,公路用地,地下, J1,1,113.22222222222222,23.129111721551794 J2,1,113.2722314…...

《数据挖掘:概念、模型、方法与算法(第三版)》
嘿,数据挖掘的小伙伴们!今天我要给你们介绍一本超级实用的书——《数据挖掘:概念、模型、方法与算法》第三版。这本书是数据挖掘领域的经典之作,由该领域的知名专家编写,系统性地介绍了在高维数据空间中分析和提取大量…...

GitLab CVE-2024-8114 漏洞解决方案
漏洞 ID 标题严重等级CVE ID通过 LFS 令牌提升权限高CVE-2024-8114 GitLab 升级指南GitLab 升级路径查看版本漏洞查询 漏洞解读 此漏洞允许攻击者使用受害者的个人访问令牌(PAT)进行权限提升。影响从 8.12 开始到 17.4.5 之前的所有版本、从 17.5 开…...

request和websocket
当然,可以为你详细介绍 FastAPI 中的 Request 对象。Request 对象在 FastAPI 中扮演着重要的角色,负责封装来自客户端的 HTTP 请求信息。了解 Request 对象的使用方法和属性,有助于你更高效地处理请求数据、访问请求上下文以及进行各种操作。…...

Ubuntu系统下交叉编译openssl
一、参考资料 OpenSSL&&libcurl库的交叉编译 - hesetone - 博客园 二、准备工作 1. 编译环境 宿主机:Ubuntu 20.04.6 LTSHost:ARM32位交叉编译器:arm-linux-gnueabihf-gcc-11.1.0 2. 设置交叉编译工具链 在交叉编译之前&#x…...

k8s从入门到放弃之Ingress七层负载
k8s从入门到放弃之Ingress七层负载 在Kubernetes(简称K8s)中,Ingress是一个API对象,它允许你定义如何从集群外部访问集群内部的服务。Ingress可以提供负载均衡、SSL终结和基于名称的虚拟主机等功能。通过Ingress,你可…...
)
IGP(Interior Gateway Protocol,内部网关协议)
IGP(Interior Gateway Protocol,内部网关协议) 是一种用于在一个自治系统(AS)内部传递路由信息的路由协议,主要用于在一个组织或机构的内部网络中决定数据包的最佳路径。与用于自治系统之间通信的 EGP&…...

智能在线客服平台:数字化时代企业连接用户的 AI 中枢
随着互联网技术的飞速发展,消费者期望能够随时随地与企业进行交流。在线客服平台作为连接企业与客户的重要桥梁,不仅优化了客户体验,还提升了企业的服务效率和市场竞争力。本文将探讨在线客服平台的重要性、技术进展、实际应用,并…...
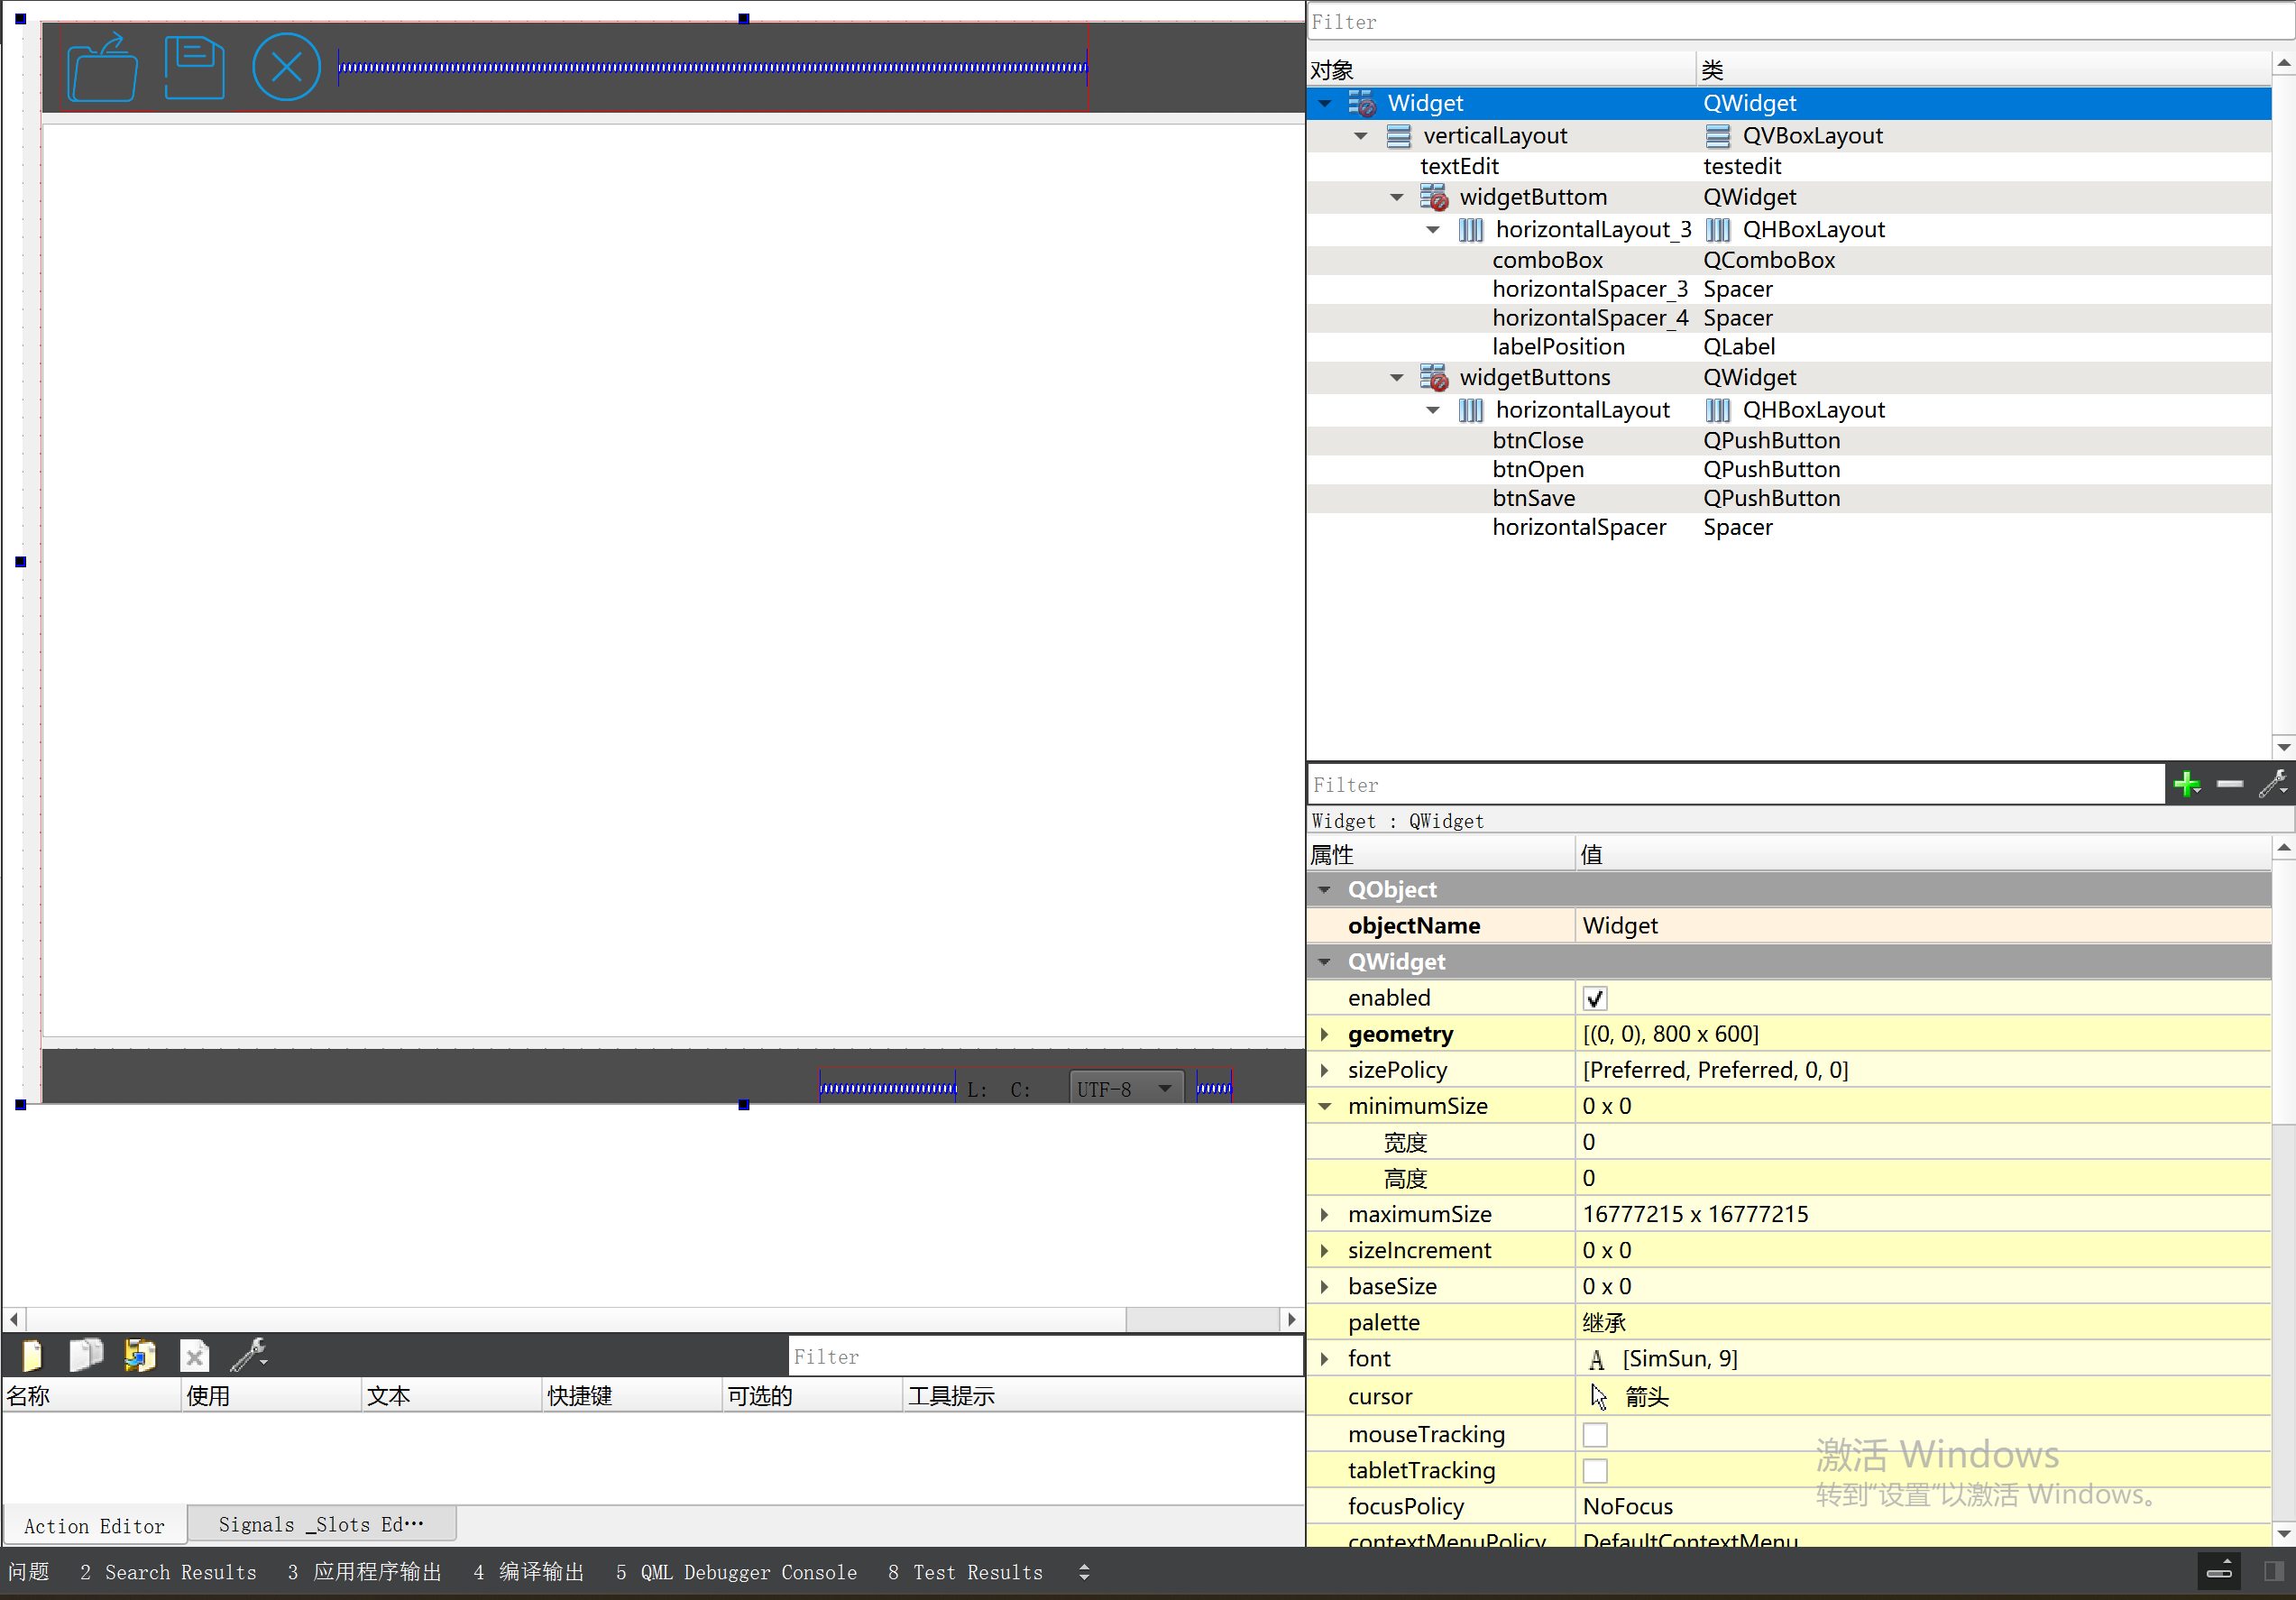
P3 QT项目----记事本(3.8)
3.8 记事本项目总结 项目源码 1.main.cpp #include "widget.h" #include <QApplication> int main(int argc, char *argv[]) {QApplication a(argc, argv);Widget w;w.show();return a.exec(); } 2.widget.cpp #include "widget.h" #include &q…...

Psychopy音频的使用
Psychopy音频的使用 本文主要解决以下问题: 指定音频引擎与设备;播放音频文件 本文所使用的环境: Python3.10 numpy2.2.6 psychopy2025.1.1 psychtoolbox3.0.19.14 一、音频配置 Psychopy文档链接为Sound - for audio playback — Psy…...
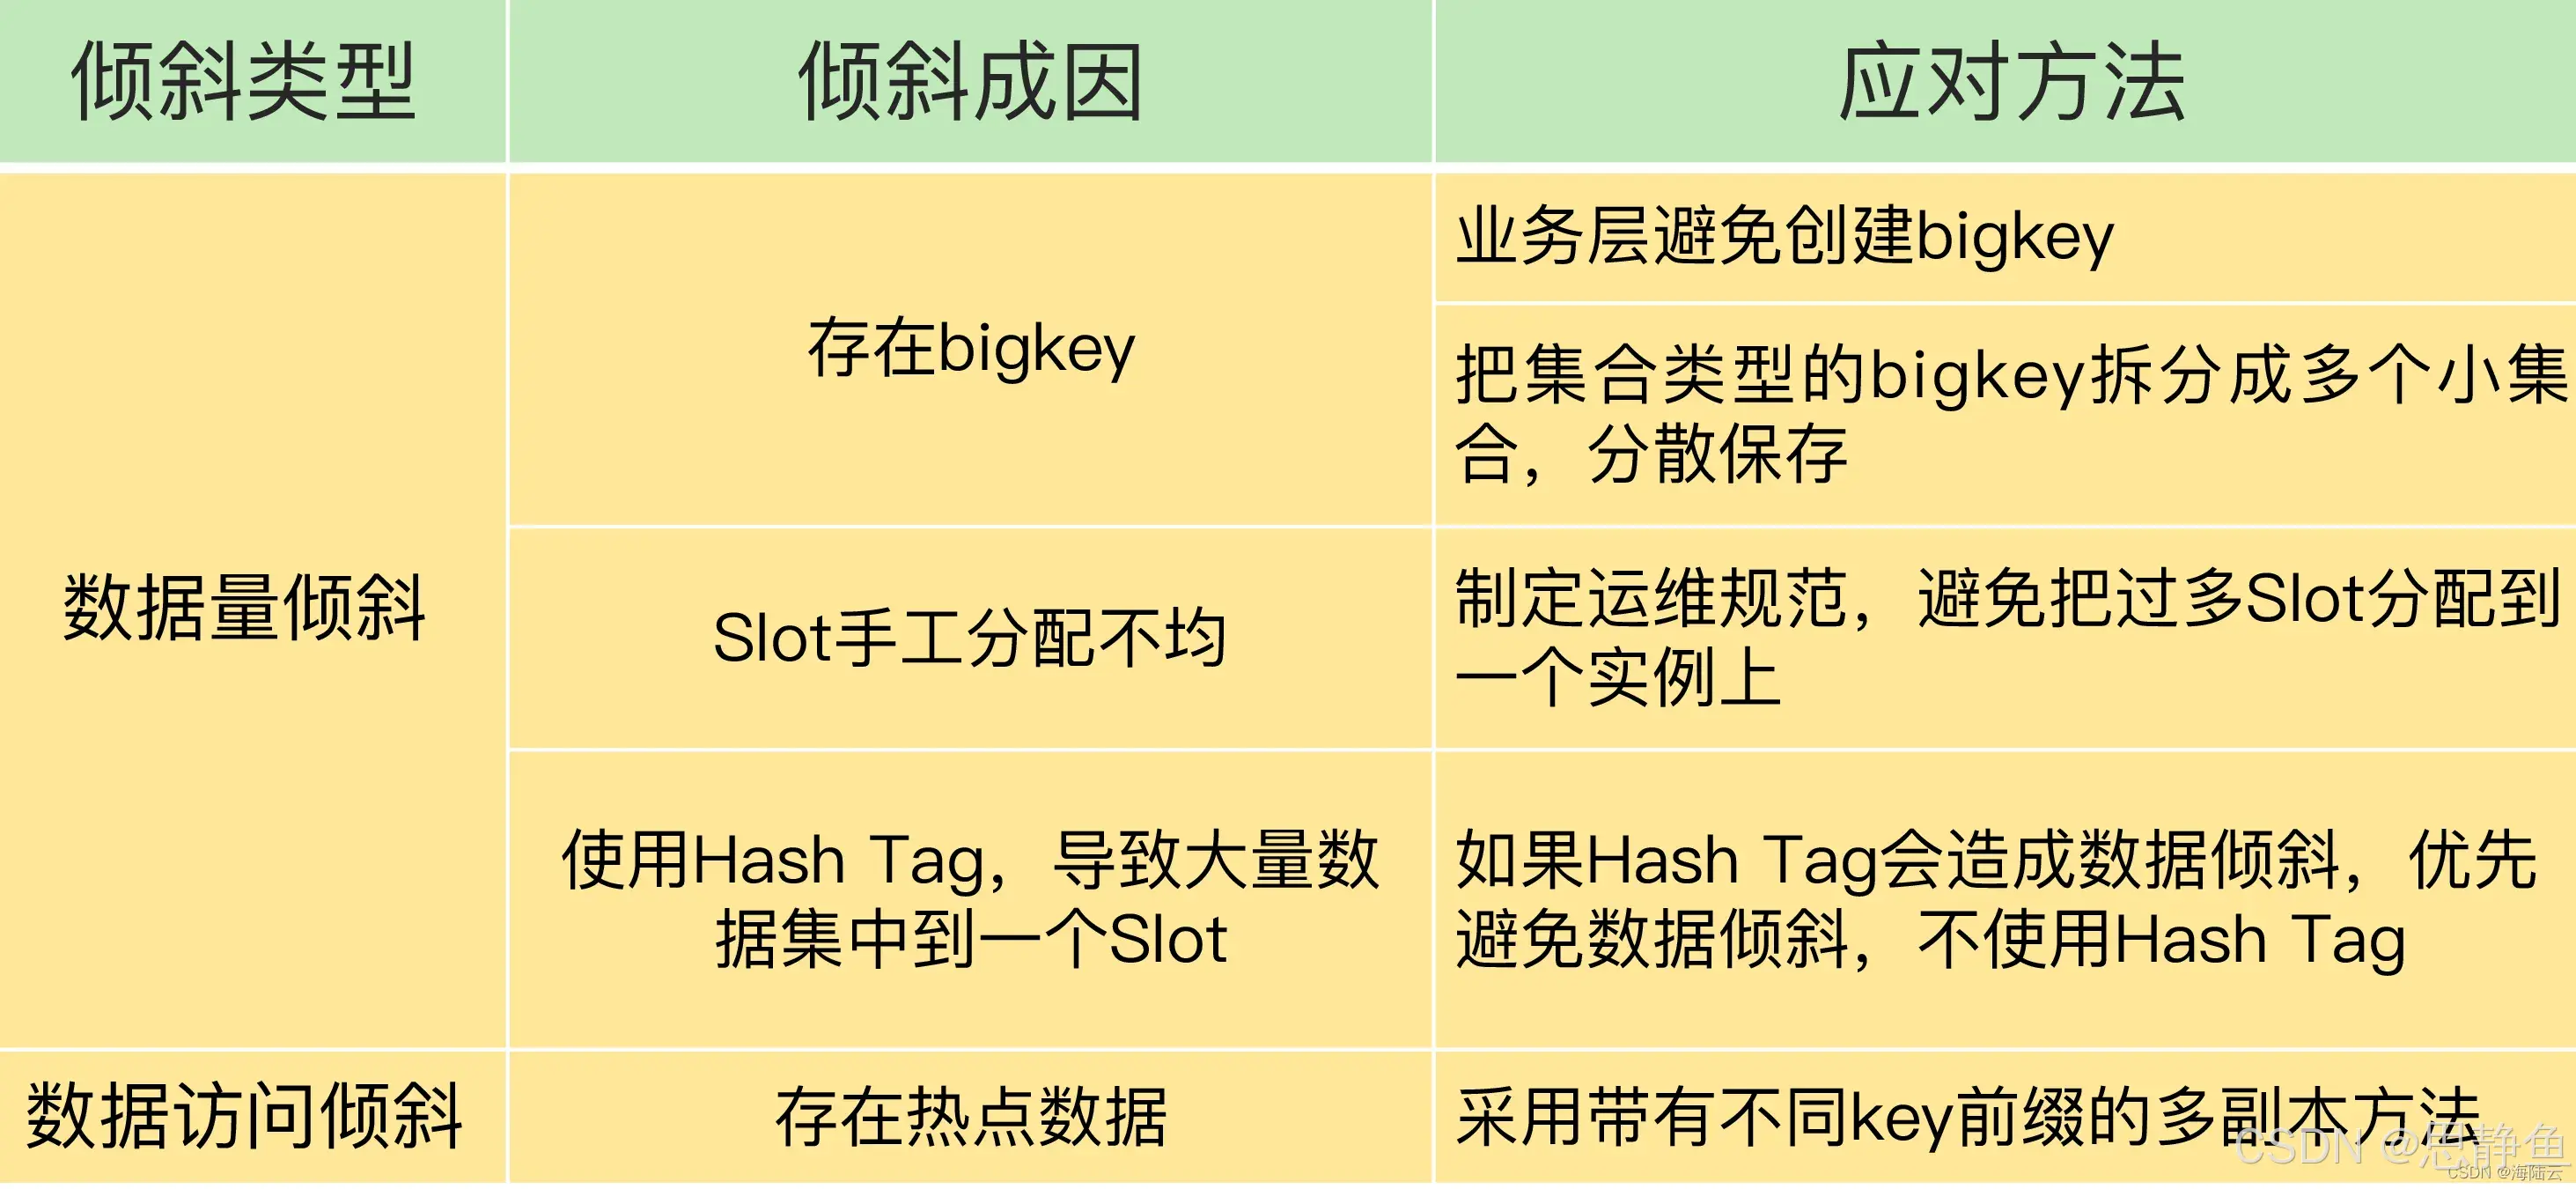
Redis数据倾斜问题解决
Redis 数据倾斜问题解析与解决方案 什么是 Redis 数据倾斜 Redis 数据倾斜指的是在 Redis 集群中,部分节点存储的数据量或访问量远高于其他节点,导致这些节点负载过高,影响整体性能。 数据倾斜的主要表现 部分节点内存使用率远高于其他节…...
Reasoning over Uncertain Text by Generative Large Language Models
https://ojs.aaai.org/index.php/AAAI/article/view/34674/36829https://ojs.aaai.org/index.php/AAAI/article/view/34674/36829 1. 概述 文本中的不确定性在许多语境中传达,从日常对话到特定领域的文档(例如医学文档)(Heritage 2013;Landmark、Gulbrandsen 和 Svenevei…...

CSS设置元素的宽度根据其内容自动调整
width: fit-content 是 CSS 中的一个属性值,用于设置元素的宽度根据其内容自动调整,确保宽度刚好容纳内容而不会超出。 效果对比 默认情况(width: auto): 块级元素(如 <div>)会占满父容器…...

Java求职者面试指南:Spring、Spring Boot、MyBatis框架与计算机基础问题解析
Java求职者面试指南:Spring、Spring Boot、MyBatis框架与计算机基础问题解析 一、第一轮提问(基础概念问题) 1. 请解释Spring框架的核心容器是什么?它在Spring中起到什么作用? Spring框架的核心容器是IoC容器&#…...