angular19-官方教程学习
周日了解到angular已经更新到19了,想按官方教程学习一遍,工欲善其事必先利其器,先更新工具:
安装新版版本
卸载老的nodejs 20.10.0,安装最新的LTS版本
https://nodejs.org
最新LTS版本已经是22.12.0
C:\Program Files\nodejs\ 目录改为 C:\nodejs\
PS C:\angular> node --version
v22.12.0
PS C:\angular> npm --version
10.9.0
重新更新angular
npm install -g @angular/cli
PS C:\angular> npm install -g @angular/cli
added 83 packages, removed 38 packages, and changed 189 packages in 23s
51 packages are looking for funding
run `npm fund` for details
npm notice
npm notice New patch version of npm available! 10.9.0 -> 10.9.2
npm notice Changelog: https://github.com/npm/cli/releases/tag/v10.9.2
npm notice To update run: npm install -g npm@10.9.2
npm notice
提示更新npm到最新版本,我就更新一下。
PS C:\angular> npm install -g npm@10.9.2
added 1 package in 8s
25 packages are looking for funding
run `npm fund` for details
查看angular版本
PS C:\angular> ng version
_ _ ____ _ ___
/ \ _ __ __ _ _ _| | __ _ _ __ / ___| | |_ _|
/ △ \ | '_ \ / _` | | | | |/ _` | '__| | | | | | |
/ ___ \| | | | (_| | |_| | | (_| | | | |___| |___ | |
/_/ \_\_| |_|\__, |\__,_|_|\__,_|_| \____|_____|___|
|___/
Angular CLI: 19.0.4
Node: 22.12.0
Package Manager: npm 10.9.2
OS: win32 x64
Angular:
...
Package Version
------------------------------------------------------
@angular-devkit/architect 0.1900.4 (cli-only)
@angular-devkit/core 19.0.4 (cli-only)
@angular-devkit/schematics 19.0.4 (cli-only)
@schematics/angular 19.0.4 (cli-only)
已经是19.0.4最新版本了,完美。
教程学习
开始学习最新教程:
https://angular.dev/tutorials/first-app
https://www.youtube.com/watch?v=xAT0lHYhHMY&t=148s 教程
Download the code →https://goo.gle/learn-angular-step-1
他这个版本是angular15的,不能直接用,进入目录后npm install, 这个是根据package.json里面的版本信息安装。
我直接建立一个
ng new angular.io-example
PS C:\angular> ng new angular.io-example
✔ Which stylesheet format would you like to use? CSS             [ https://developer.mozilla.org/docs/Web/CSS]
✔ Do you want to enable Server-Side Rendering (SSR) and Static Site Generation (SSG/Prerendering)? No
CREATE angular.io-example/angular.json (2734 bytes)
CREATE angular.io-example/package.json (1087 bytes)
CREATE angular.io-example/README.md (1538 bytes)
CREATE angular.io-example/tsconfig.json (942 bytes)
CREATE angular.io-example/.editorconfig (331 bytes)
CREATE angular.io-example/.gitignore (629 bytes)
CREATE angular.io-example/tsconfig.app.json (439 bytes)
CREATE angular.io-example/tsconfig.spec.json (449 bytes)
CREATE angular.io-example/.vscode/extensions.json (134 bytes)
CREATE angular.io-example/.vscode/launch.json (490 bytes)
CREATE angular.io-example/.vscode/tasks.json (980 bytes)
CREATE angular.io-example/src/main.ts (256 bytes)
CREATE angular.io-example/src/index.html (315 bytes)
CREATE angular.io-example/src/styles.css (81 bytes)
CREATE angular.io-example/src/app/app.component.html (20239 bytes)
CREATE angular.io-example/src/app/app.component.spec.ts (981 bytes)
CREATE angular.io-example/src/app/app.component.ts (306 bytes)
CREATE angular.io-example/src/app/app.component.css (0 bytes)
CREATE angular.io-example/src/app/app.config.ts (318 bytes)
CREATE angular.io-example/src/app/app.routes.ts (80 bytes)
CREATE angular.io-example/public/favicon.ico (15086 bytes)
✔ Packages installed successfully.
Author identity unknown
试试能否运行:ng serve
PS C:\angular\angular.io-example> ng serve
Initial chunk files | Names         |  Raw size
polyfills.js        | polyfills     |  90.20 kB |
main.js             | main          |  18.19 kB |
styles.css          | styles        |  95 bytes || Initial total | 108.48 kBApplication bundle generation complete. [7.280 seconds]Watch mode enabled. Watching for file changes...
NOTE: Raw file sizes do not reflect development server per-request transformations.➜  Local:   http://localhost:4200/➜  press h + enter to show help
1.create Hello World
https://angular.dev/tutorials/first-app/01-hello-world
-
Open
first-app/src/index.html. Note: This step and the next are only for your local environment! -
In
index.html, replace the<title>element with this code to update the title of the app.
<title>Homes</title>3.Next, open first-app/src/app/app.component.ts.
import {Component} from '@angular/core';
@Component({selector: 'app-root',imports: [],template: `<h1>Hello world!</h1>`,styleUrls: ['./app.component.css'],
})
export class AppComponent {title = 'homes';
}
这样就能正确显示Hello World了
2. Create Home Component
ng generate component home
看了视频,与网页教程有区别,增加了两个参数:
ng generate component Home --standalone --inline-template
template就不会单独存储到html中了,放到ts文件中,对于小的组件确实方便。
PS C:\angular\angular.io-example> ng generate component home
CREATE src/app/home/home.component.html (20 bytes)
CREATE src/app/home/home.component.spec.ts (601 bytes)
CREATE src/app/home/home.component.ts (217 bytes)
CREATE src/app/home/home.component.css (0 bytes)
把Home组件增加到app中:
In app.component.ts, import HomeComponent by adding this line to the file level imports
import {HomeComponent} from './home/home.component';In app.component.ts, in @Component, update the imports array property and add HomeComponent.
import {Component} from '@angular/core';
import {HomeComponent} from './home/home.component';
@Component({selector: 'app-root',imports: [HomeComponent],template: `<main><header class="brand-name"><img class="brand-logo" src="/assets/logo.svg" alt="logo" aria-hidden="true" /></header><section class="content"><app-home></app-home></section></main>`,styleUrls: ['./app.component.css'],
})
export class AppComponent {title = 'homes';
}
发现logo.svg没有加载,下载上面链接中的例子,发现多了一个asset文件夹,拷贝到我自己的项目src目录下,还是提示404,最后发现angular.json中要定义这个asset
"tsConfig": "tsconfig.app.json","assets": ["src/favicon.ico","src/assets"],"styles": ["src/styles.css"],"scripts": []
增加后可以正常显示图标和home组件了。
3. Add feature to Home Component
Replace in src/app/home/home.component.ts
import {Component} from '@angular/core';
import {CommonModule} from '@angular/common';
@Component({selector: 'app-home',imports: [CommonModule],template: `<section><form><input type="text" placeholder="Filter by city" /><button class="primary" type="button">Search</button></form></section>`,styleUrls: ['./home.component.css'],
})
export class HomeComponent {}
home.component.css 修改style
.results {display: grid;column-gap: 14px;row-gap: 14px;grid-template-columns: repeat(auto-fill, minmax(400px, 400px));margin-top: 50px;justify-content: space-around;
}
input[type="text"] {border: solid 1px var(--primary-color);padding: 10px;border-radius: 8px;margin-right: 4px;display: inline-block;width: 30%;
}
button {padding: 10px;border: solid 1px var(--primary-color);background: var(--primary-color);color: white;border-radius: 8px;
}
@media (min-width: 500px) and (max-width: 768px) {.results {grid-template-columns: repeat(2, 1fr);}input[type="text"] {width: 70%;}
}
@media (max-width: 499px) {.results {grid-template-columns: 1fr;}
}
修改样式后发现按钮显示不出来了,把根目录的样式文件也改一下:styles.css
/* You can add global styles to this file, and also import other style files */
* {margin: 0;padding: 0;}body {font-family: 'Be Vietnam Pro', sans-serif;}:root {--primary-color: #605DC8;--secondary-color: #8B89E6;--accent-color: #e8e7fa;--shadow-color: #E8E8E8;}button.primary {padding: 10px;border: solid 1px var(--primary-color);background: var(--primary-color);color: white;border-radius: 8px;}
这就可以显示一个搜索框和按钮了:
4. create the application's HousingLocation component
ng generate component housingLocation --standalone --inline-template
PS C:\angular\angular.io-example> ng generate component housingLocation --standalone --inline-template
CREATE src/app/housing-location/housing-location.component.spec.ts (679 bytes)
CREATE src/app/housing-location/housing-location.component.ts (282 bytes)
CREATE src/app/housing-location/housing-location.component.css (0 bytes)
Add the new component to your app's layout
Import HousingLocationComponent in src/app/home/home.component.ts
import {HousingLocationComponent} from '../housing-location/housing-location.component';Add HousingLocationComponent to imports array in src/app/home/home.component.ts
import {Component} from '@angular/core';
import {CommonModule} from '@angular/common';
import {HousingLocationComponent} from '../housing-location/housing-location.component';
@Component({selector: 'app-home',imports: [CommonModule, HousingLocationComponent],template: `<section><form><input type="text" placeholder="Filter by city" /><button class="primary" type="button">Search</button></form></section><section class="results"><app-housing-location></app-housing-location></section>`,styleUrls: ['./home.component.css'],
})
export class HomeComponent {}
增加housing-location组件的style:
.listing {background: var(--accent-color);border-radius: 30px;padding-bottom: 30px;
}
.listing-heading {color: var(--primary-color);padding: 10px 20px 0 20px;
}
.listing-photo {height: 250px;width: 100%;object-fit: cover;border-radius: 30px 30px 0 0;
}
.listing-location {padding: 10px 20px 20px 20px;
}
.listing-location::before {content: url("/assets/location-pin.svg") / "";
}
section.listing a {padding-left: 20px;text-decoration: none;color: var(--primary-color);
}
section.listing a::after {content: "\203A";margin-left: 5px;
}
5. Creating an interface
ng generate interface housingLocation
PS C:\angular\angular.io-example> ng generate interface housingLocation
CREATE src/app/housing-location.ts (39 bytes)
增加interface的内容
export interface HousingLocation {id: number;name: string;city: string;state: string;photo: string;availableUnits: number;wifi: boolean;laundry: boolean;
}
6. Create a test house for your app
Import HomeComponent in src/app/home/home.component.ts
import {HousingLocation} from '../housinglocation';In src/app/home/home.component.ts, replace the empty export class HomeComponent {} definition with this code to create a single instance of the new interface in the component.
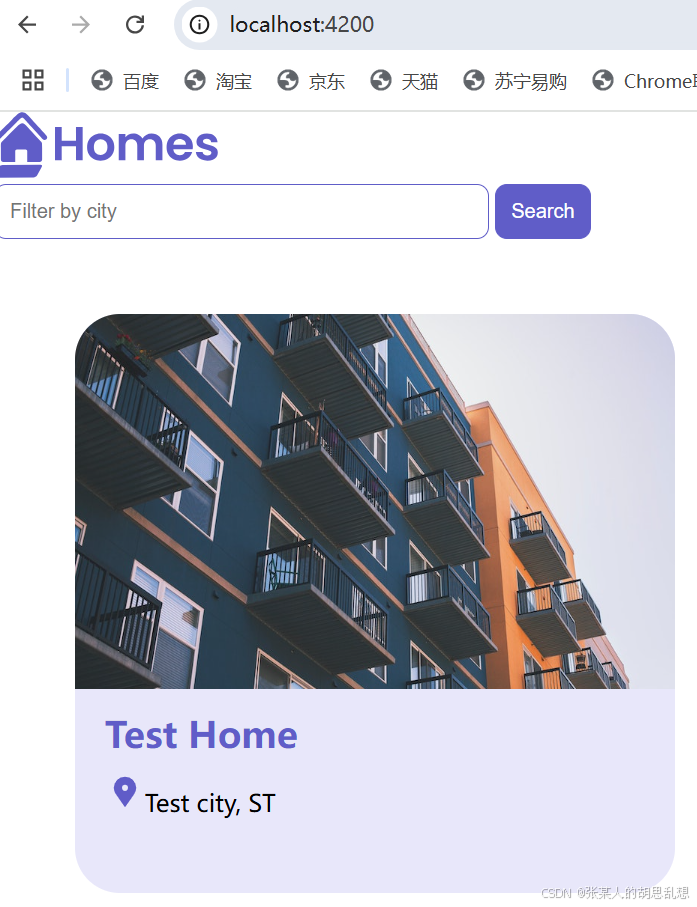
readonly baseUrl = 'https://angular.dev/assets/images/tutorials/common';housingLocation: HousingLocation = {id: 9999,name: 'Test Home',city: 'Test city',state: 'ST',photo: `${this.baseUrl}/example-house.jpg`,availableUnits: 99,wifi: true,laundry: false,};
}
7. Add an input parameter to the component
Import HousingLocationComponent and Input in src/app/housing-location/housing-location.component.ts
import {Component, Input} from '@angular/core';
import {CommonModule} from '@angular/common';
import {HousingLocation} from '../housinglocation';
input
import {Component, Input} from '@angular/core';
import {CommonModule} from '@angular/common';
import {HousingLocation} from '../housinglocation';
@Component({selector: 'app-housing-location',imports: [CommonModule],template: `<p>housing-location works!</p>`,styleUrls: ['./housing-location.component.css'],
})
export class HousingLocationComponent {@Input() housingLocation!: HousingLocation;
}
其中的!表示必须非空。
8. Add a property binding to a component's template
Your app has data bindings in the HomeComponent template.
Your app sends data from the HomeComponent to the HousingLocationComponent.
数据绑定,数据在组件间通过Input传递
Add housingLocation property binding
<app-housing-location [housingLocation]="housingLocation"></app-housing-location></section>`,9. Add an interpolation(插值) to a component's template
Your app will display interpolated values in the HousingLocationComponent template.
Your app will render a housing location data to the browser.
增加插值;渲染数据;
Using the {{ expression }} in Angular templates
Update HousingLocationComponent template
<section class="listing"><imgclass="listing-photo"[src]="housingLocation.photo"alt="Exterior photo of {{ housingLocation.name }}"crossorigin/><h2 class="listing-heading">{{ housingLocation.name }}</h2><p class="listing-location">{{ housingLocation.city }}, {{ housingLocation.state }}</p></section>`,styleUrls: ['./housing-location.component.css'],其中的alt在图片无法加载时显示的信息。
这时已经可以多组件传递interface,并显示结果了:
10. Use *ngFor to list objects in components
使用循环显示列表
Add housing data to the HomeComponent 这次是增加多条数据了
src/app/home/home.component.ts
import {Component} from '@angular/core';
import {CommonModule} from '@angular/common';
import {HousingLocationComponent} from '../housing-location/housing-location.component';
import {HousingLocation} from '../housinglocation';
@Component({selector: 'app-home',imports: [CommonModule, HousingLocationComponent],template: `<section><form><input type="text" placeholder="Filter by city" /><button class="primary" type="button">Search</button></form></section><section class="results"><app-housing-location*ngFor="let housingLocation of housingLocationList"[housingLocation]="housingLocation"></app-housing-location></section>`,styleUrls: ['./home.component.css'],
})
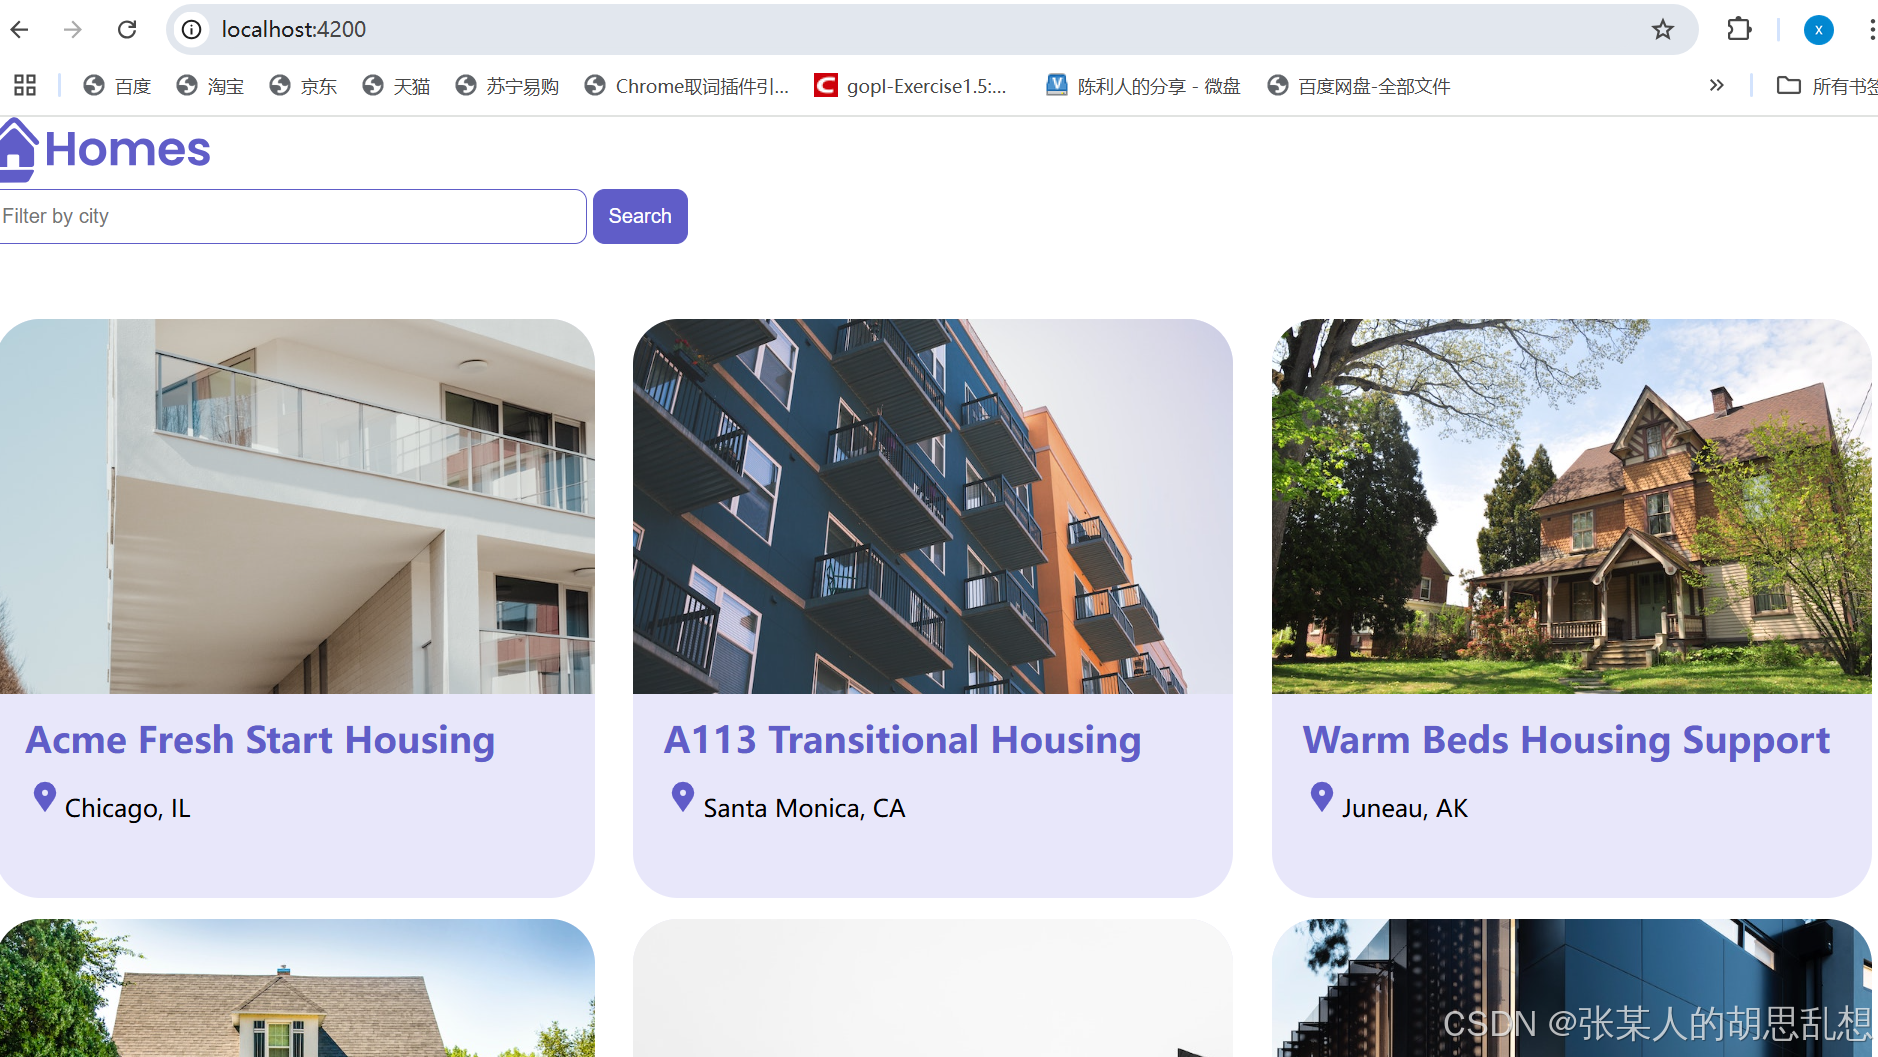
export class HomeComponent {readonly baseUrl = 'https://angular.dev/assets/images/tutorials/common';housingLocationList: HousingLocation[] = [{id: 0,name: 'Acme Fresh Start Housing',city: 'Chicago',state: 'IL',photo: `${this.baseUrl}/bernard-hermant-CLKGGwIBTaY-unsplash.jpg`,availableUnits: 4,wifi: true,laundry: true,},{id: 1,name: 'A113 Transitional Housing',city: 'Santa Monica',state: 'CA',photo: `${this.baseUrl}/brandon-griggs-wR11KBaB86U-unsplash.jpg`,availableUnits: 0,wifi: false,laundry: true,},{id: 2,name: 'Warm Beds Housing Support',city: 'Juneau',state: 'AK',photo: `${this.baseUrl}/i-do-nothing-but-love-lAyXdl1-Wmc-unsplash.jpg`,availableUnits: 1,wifi: false,laundry: false,},{id: 3,name: 'Homesteady Housing',city: 'Chicago',state: 'IL',photo: `${this.baseUrl}/ian-macdonald-W8z6aiwfi1E-unsplash.jpg`,availableUnits: 1,wifi: true,laundry: false,},{id: 4,name: 'Happy Homes Group',city: 'Gary',state: 'IN',photo: `${this.baseUrl}/krzysztof-hepner-978RAXoXnH4-unsplash.jpg`,availableUnits: 1,wifi: true,laundry: false,},{id: 5,name: 'Hopeful Apartment Group',city: 'Oakland',state: 'CA',photo: `${this.baseUrl}/r-architecture-JvQ0Q5IkeMM-unsplash.jpg`,availableUnits: 2,wifi: true,laundry: true,},{id: 6,name: 'Seriously Safe Towns',city: 'Oakland',state: 'CA',photo: `${this.baseUrl}/phil-hearing-IYfp2Ixe9nM-unsplash.jpg`,availableUnits: 5,wifi: true,laundry: true,},{id: 7,name: 'Hopeful Housing Solutions',city: 'Oakland',state: 'CA',photo: `${this.baseUrl}/r-architecture-GGupkreKwxA-unsplash.jpg`,availableUnits: 2,wifi: true,laundry: true,},{id: 8,name: 'Seriously Safe Towns',city: 'Oakland',state: 'CA',photo: `${this.baseUrl}/saru-robert-9rP3mxf8qWI-unsplash.jpg`,availableUnits: 10,wifi: false,laundry: false,},{id: 9,name: 'Capital Safe Towns',city: 'Portland',state: 'OR',photo: `${this.baseUrl}/webaliser-_TPTXZd9mOo-unsplash.jpg`,availableUnits: 6,wifi: true,laundry: true,},];
}ngfor:
<app-housing-location*ngFor="let housingLocation of housingLocationList"[housingLocation]="housingLocation"></app-housing-location></section>`,奇怪的时housing-location.component.ts里面的内容不需要动,就能显示列表了。这是为啥?
显示效果如下:
11. Add routes to the Application
main.ts 增加:
import { provideRouter } from '@angular/router';
bootstrapApplication(AppComponent 增加数组
import { provideRouter } from '@angular/router';bootstrapApplication(AppComponent, {providers: [],
}).catch((err) => console.error(err));
新建 routes.ts
import {Routes} from '@angular/router';
import { HomeComponent } from './app/home/home.component';const routeConfig: Routes = [];export default routeConfig;
还没有路由,继续:
app.component.ts
import { RouterModule } from '@angular/router';imports: [ HomeComponent,RouterModule ],<app-home></app-home> 这种直接引用 home component改为路由
<router-outlet></router-outlet>这时屏幕就显示一个白板了,因为还没有路由
在routes.ts中增加路由
const routeConfig: Routes = [{path: '',component: HomeComponent,title: 'Home page',},
];
在main.ts中引入这个routeConfig
import routeConfig from './routes';bootstrapApplication(AppComponent, {providers: [provideRouter(routeConfig)],
}).catch((err) => console.error(err));
现在功能恢复正常。这样路由配置就加上了。
12 增加 详情组件
ng g c details --standalone --inline-template
ng g c details --standalone --inline-template
CREATE src/app/details/details.component.spec.ts (622 bytes)
CREATE src/app/details/details.component.ts (247 bytes)
CREATE src/app/details/details.component.css (0 bytes)
然后增加详情的路由routes.ts
import { DetailsComponent } from './app/details/details.component';{path: 'details/:id',component: DetailsComponent,title: 'Home details',},
在housing-location.ts中增加
首先引入RouteModule,然后加上路由链接。
import {RouterModule} from '@angular/router';imports: [RouterModule],<a [routerLink]="['/details', housingLocation.id]">Learn More</a>这样这个detail组件就集成到链接中了。
其中routeLinker加了方括号,说明后面时个动态的值,里面传递了参数id.可以用如下形式访问:
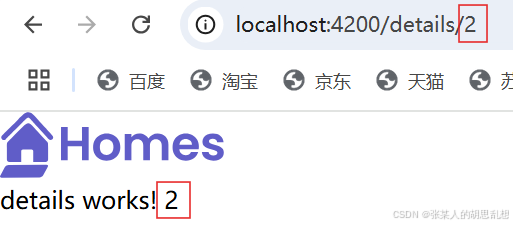
localhost:4200/details/2
相应的routes.ts中也要体现这种动态路由:/details/:id
这个id传递过去后,detail组件要从route中接收,需要引入ActivatedRoute
details.components.ts中增加
import { Component, inject } from '@angular/core';
import {ActivatedRoute} from '@angular/router';template: `<p>details works! {{housingLocationId}}</p>route: ActivatedRoute = inject(ActivatedRoute);
housingLocationId = 0;constructor() {this.housingLocationId = Number(this.route.snapshot.params['id']);
}
这样可以点击到详情可以显示id
13 增加service,并进行依赖注入,用于访问数据
ng g s housing
PS C:\angular\angular.io-example> ng g s housing
CREATE src/app/housing.service.spec.ts (378 bytes)
CREATE src/app/housing.service.ts (145 bytes)
把HousingLocation组件的数据部分挪到这个service中。并增加了两个查找方法,一个全部查找,一个根据id查找。
import { Injectable } from '@angular/core';
import { HousingLocation } from './housing-location';@Injectable({providedIn: 'root'
})
export class HousingService {readonly baseUrl = 'https://angular.dev/assets/images/tutorials/common';protected housingLocationList: HousingLocation[] = [{id: 0,name: 'Acme Fresh Start Housing',city: 'Chicago',state: 'IL',photo: `${this.baseUrl}/bernard-hermant-CLKGGwIBTaY-unsplash.jpg`,availableUnits: 4,wifi: true,laundry: true,},{id: 1,name: 'A113 Transitional Housing',city: 'Santa Monica',state: 'CA',photo: `${this.baseUrl}/brandon-griggs-wR11KBaB86U-unsplash.jpg`,availableUnits: 0,wifi: false,laundry: true,},{id: 2,name: 'Warm Beds Housing Support',city: 'Juneau',state: 'AK',photo: `${this.baseUrl}/i-do-nothing-but-love-lAyXdl1-Wmc-unsplash.jpg`,availableUnits: 1,wifi: false,laundry: false,},{id: 3,name: 'Homesteady Housing',city: 'Chicago',state: 'IL',photo: `${this.baseUrl}/ian-macdonald-W8z6aiwfi1E-unsplash.jpg`,availableUnits: 1,wifi: true,laundry: false,},{id: 4,name: 'Happy Homes Group',city: 'Gary',state: 'IN',photo: `${this.baseUrl}/krzysztof-hepner-978RAXoXnH4-unsplash.jpg`,availableUnits: 1,wifi: true,laundry: false,},{id: 5,name: 'Hopeful Apartment Group',city: 'Oakland',state: 'CA',photo: `${this.baseUrl}/r-architecture-JvQ0Q5IkeMM-unsplash.jpg`,availableUnits: 2,wifi: true,laundry: true,},{id: 6,name: 'Seriously Safe Towns',city: 'Oakland',state: 'CA',photo: `${this.baseUrl}/phil-hearing-IYfp2Ixe9nM-unsplash.jpg`,availableUnits: 5,wifi: true,laundry: true,},{id: 7,name: 'Hopeful Housing Solutions',city: 'Oakland',state: 'CA',photo: `${this.baseUrl}/r-architecture-GGupkreKwxA-unsplash.jpg`,availableUnits: 2,wifi: true,laundry: true,},{id: 8,name: 'Seriously Safe Towns',city: 'Oakland',state: 'CA',photo: `${this.baseUrl}/saru-robert-9rP3mxf8qWI-unsplash.jpg`,availableUnits: 10,wifi: false,laundry: false,},{id: 9,name: 'Capital Safe Towns',city: 'Portland',state: 'OR',photo: `${this.baseUrl}/webaliser-_TPTXZd9mOo-unsplash.jpg`,availableUnits: 6,wifi: true,laundry: true,},];getAllHousingLocations() : HousingLocation[] {return this.housingLocationList;}getHousingLocationById(id: Number): HousingLocation | undefined {return this.housingLocationList.find(housingLocation => housingLocation.id === id);}constructor() { }
}
Home组件取数据的方法加上。注入service,然后取service中的数据。
import { Component,inject } from '@angular/core';
import { HousingService } from '../housing.service';export class HomeComponent {housingLocationList: HousingLocation[] = [];housingService: HousingService = inject(HousingService);constructor() {this.housingLocationList = this.housingService.getAllHousingLocations();}
}
功能恢复运行!
14. 完善详情页
details.component.ts 注入service,引用HousingLocation,通过service经过参数ID查询到HousingLocation对象。
import { Component, inject } from '@angular/core';import {HousingService} from '../housing.service';
import { HousingLocation } from '../housing-location';template: `<p>details works! {{housingLocation?.id}}</p>`,export class DetailsComponent {housingService = inject(HousingService);housingLocation: HousingLocation | undefined;constructor() {const housingLocationId = Number(this.route.snapshot.params['id']);this.housingLocation = this.housingService.getHousingLocationById(housingLocationId);}
再完善一下显示模板
template: `<article><imgclass="listing-photo"[src]="housingLocation?.photo"alt="Exterior photo of {{ housingLocation?.name }}"crossorigin/><section class="listing-description"><h2 class="listing-heading">{{ housingLocation?.name }}</h2><p class="listing-location">{{ housingLocation?.city }}, {{ housingLocation?.state }}</p></section><section class="listing-features"><h2 class="section-heading">About this housing location</h2><ul><li>Units available: {{ housingLocation?.availableUnits }}</li><li>Does this location have wifi: {{ housingLocation?.wifi }}</li><li>Does this location have laundry: {{ housingLocation?.laundry }}</li></ul></section></article>`,增加CSS
.listing-photo {height: 600px;width: 50%;object-fit: cover;border-radius: 30px;float: right;}.listing-heading {font-size: 48pt;font-weight: bold;margin-bottom: 15px;}.listing-location::before {content: url('/assets/location-pin.svg') / '';}.listing-location {font-size: 24pt;margin-bottom: 15px;}.listing-features > .section-heading {color: var(--secondary-color);font-size: 24pt;margin-bottom: 15px;}.listing-features {margin-bottom: 20px;}.listing-features li {font-size: 14pt;}li {list-style-type: none;}.listing-apply .section-heading {font-size: 18pt;margin-bottom: 15px;}label, input {display: block;}label {color: var(--secondary-color);font-weight: bold;text-transform: uppercase;font-size: 12pt;}input {font-size: 16pt;margin-bottom: 15px;padding: 10px;width: 400px;border-top: none;border-right: none;border-left: none;border-bottom: solid .3px;}@media (max-width: 1024px) {.listing-photo {width: 100%;height: 400px;}}这样详情就更新完成了。
视频中还有一个apply按钮,估计是预定这个房子:
<section class="listing-apply"><h2 clas="section-heading">Apply now to live here</h2><button class="primary" type="button">Apply now</button></section>
基本功能完成。后面还有2个视频,分别是form表单,还有就是增加search房子的功能。
太困了,明天上班,未完待续吧。。。。。
相关文章:
angular19-官方教程学习
周日了解到angular已经更新到19了,想按官方教程学习一遍,工欲善其事必先利其器,先更新工具: 安装新版版本 卸载老的nodejs 20.10.0,安装最新的LTS版本 https://nodejs.org 最新LTS版本已经是22.12.0 C:\Program File…...

RocketMQ集群部署完整指南
前言 本文将详细介绍RocketMQ集群的部署流程,包括环境准备、安装配置、启动运维等各个方面。 一、环境准备 1.1 系统要求 64位操作系统,建议LinuxJDK 1.8及以上版本源码安装需要Maven 3.2.x1.2 下载RocketMQ 可从以下地址获取RocketMQ安装包: Apache官方开源地址: http://r…...

解决mysql 内存持续上涨问题
问题背景: 业务量不大,Mysql 内存持续上涨,虽然不是很明显,但随着时间慢慢增长,1~2个月左右内存达到80%一旦有一些执行缓慢的sql 内存会快速上去增加/修改大表的字段内存会快速上去 常规操作: Mysql 设置…...

Qt 小项目 学生管理信息系统
主要是对数据库的增删查改的操作 登录/注册界面: 主页面: 添加信息: 删除信息: 删除第一行(支持多行删除) 需求分析: 用QT实现一个学生管理信息系统,数据库为MySQL 要求…...

16-01、JVM系列之:内存与垃圾回收篇(一)
JVM系列之:内存与垃圾回收篇(一) ##本篇内容概述: 1、JVM结构 2、类加载子系统 3、运行时数据区之:PC寄存器、Java栈、本地方法栈一、JVM与JAVA体系结构 JAVA虚拟机与JAVA语言并没有必然的联系,它只是与特…...

聊聊系统的弹力设计-服务器性能指标篇(一)
一、什么是弹性机制 弹性,大家可以轻易的联想到橡胶,可伸缩性是弹性机制的一个很重要的特点,但是实际上弹性不等同于可伸缩性 弹性(Elasticity) 通常指的是系统能够自动适应负载的变化,即自动扩展和收缩资…...

MQ:kafka-消费者的三种语义
文章目录 前言(一) 创建topic(二) 生产者(三)消费者1. At-most-once Kafka Consumer2. At-least-once kafka consumer3. 使用subscribe实现Exactly-once4. 使用assign实现Exactly-once 前言 本文主要是以kafka 09的client为例子,详解kafka c…...
中国1km分辨率SSP119情景(SSP119、SSP245 SSP585),模式逐月降水量数据集(2021-2100)
目录 简介 摘要 代码 引用 网址推荐 知识星球 机器学习 干旱监测平台 中国1km分辨率SSP119情景EC-Earth3模式逐月降水量数据集(2021-2100) 简介 该数据集为中国多情景多模式逐月降水量数据,空间分辨率为0.0083333(约1km),时间为2021年1月-2100年…...

21天掌握javaweb-->第8天:前后端分离架构与Axios请求
前后端分离架构概念 前后端分离架构是一种现代Web应用开发模式,其中前端和后端分别独立开发和部署,通过API进行数据交互。这种架构使得前端专注于用户界面和用户体验,而后端则专注于业务逻辑和数据处理。 优势 开发效率高:前后端可以并行开发,减少了开发时间。技术栈灵活…...

基于阻塞队列的生产者消费者模型动画演示
一个基于阻塞队列的生产者消费者模型的动画演示: 这是打包好的程序。程序是用 QT 写的。 通过网盘分享的文件:CP模型.7z 链接: https://pan.baidu.com/s/1YjC7YiSqHGqdr6bbffaDWg?pwde6g5 提取码: e6g5 CP模型...

DHCP和BOOTP选项及DHCP协议操作详解
DHCP和BOOTP选项及DHCP协议操作详解 DHCP与BOOTP简介 1. BOOTP(Bootstrap Protocol) 功能:提供静态配置的IP分配。用途:在早期用于无盘工作站启动时获取IP地址和基本配置。缺点:只能提供静态IP配置,无法动…...

数据结构--链表和单链表详解及实现
一.前言 数据结构思维导图如下,灰色标记的是之前讲过的,本文将带你走近单链表(红色标记部分),希望大家有所收获🌹🌹 二.链表的定义和概念 在讲单链表之前,我们先学习一下链表 2.1 链表的定义 链表是一种…...

vue3基础知识
书接上文,这篇继续来学习vue3的核心语法,可以先看上一篇再来看这篇效果更好。 1. computed computed 用于创建 计算属性,即基于其他响应式数据的值动态计算并缓存的属性。它的主要作用是优化性能和提高代码的可维护性,避免不必要…...

【Linux系统】Ubuntu 缓冲区机制
在Ubuntu中,和其他操作系统有个不一样的机制:缓冲区。这篇文章是对与缓冲区的详细介绍。 在 Ubuntu 中(以及其他基于 Linux 的操作系统),缓冲区(Buffer)是内核用于优化 I/O 操作的重要机制。它…...

ChatGPT 最新推出的 Pro 订阅计划,具备哪些能力 ?
OpenAI 最近推出了 ChatGPT Pro,这是一个每月收费 200 美元的高级订阅计划,旨在为用户提供对 OpenAI 最先进模型和功能的高级访问。 以下是 ChatGPT Pro 的主要功能和能力: 高级模型访问: o1 模型:包括 o1 和 o1 Pro…...

数据结构理论
内容来源青岛大学数据结构与算法课程,链接:数据结构与算法基础(青岛大学-王卓)_哔哩哔哩_bilibili 绪论 数据结构概述 数据结构和算法的定义:我们如何把现实中大量而复杂的问题以特定的数据类型和特定的存储结构保存…...

es 3期 第14节-全文文本分词查询
#### 1.Elasticsearch是数据库,不是普通的Java应用程序,传统数据库需要的硬件资源同样需要,提升性能最有效的就是升级硬件。 #### 2.Elasticsearch是文档型数据库,不是关系型数据库,不具备严格的ACID事务特性ÿ…...

六安市第二届网络安全大赛复现
misc 听说你也喜欢俄罗斯方块? ppt拼接之后 缺三个角补上 flag{qfnh_wergh_wqef} 流量分析 流量包分离出来一个压缩包 出来一张图片 黑色代表0白色代表1 101010 1000 rab 反的压缩包 转一下 密码:拾叁拾陆叁拾贰陆拾肆 密文:4p4n5758…...

Sarcomere仿人灵巧手ARTUS,20个自由度拓宽机器人作业边界
Sarcomere Dynamics 是一家深度技术先驱,通过开发和商业化仿人机械来改变机器人行业。专注于为科研人员,系统集成商和制造商提供更实惠、更轻便且更灵活的末端执行器替代品。凭借创新的致动器技术,创造了一款紧凑、轻便且非常坚固的机械手Art…...

Django drf 基于serializers 快速使用
1. 安装: pip install djangorestframework 2. 添加rest_framework到您的INSTALLED_APPS设置。 settings.pyINSTALLED_APPS [...rest_framework, ] 3. 定义模型 models.pyfrom django.db import modelsclass BookModel(models.Model):name models.CharField(max_length64)…...

synchronized 学习
学习源: https://www.bilibili.com/video/BV1aJ411V763?spm_id_from333.788.videopod.episodes&vd_source32e1c41a9370911ab06d12fbc36c4ebc 1.应用场景 不超卖,也要考虑性能问题(场景) 2.常见面试问题: sync出…...
UE5 学习系列(三)创建和移动物体
这篇博客是该系列的第三篇,是在之前两篇博客的基础上展开,主要介绍如何在操作界面中创建和拖动物体,这篇博客跟随的视频链接如下: B 站视频:s03-创建和移动物体 如果你不打算开之前的博客并且对UE5 比较熟的话按照以…...

服务器硬防的应用场景都有哪些?
服务器硬防是指一种通过硬件设备层面的安全措施来防御服务器系统受到网络攻击的方式,避免服务器受到各种恶意攻击和网络威胁,那么,服务器硬防通常都会应用在哪些场景当中呢? 硬防服务器中一般会配备入侵检测系统和预防系统&#x…...

在 Nginx Stream 层“改写”MQTT ngx_stream_mqtt_filter_module
1、为什么要修改 CONNECT 报文? 多租户隔离:自动为接入设备追加租户前缀,后端按 ClientID 拆分队列。零代码鉴权:将入站用户名替换为 OAuth Access-Token,后端 Broker 统一校验。灰度发布:根据 IP/地理位写…...

macOS多出来了:Google云端硬盘、YouTube、表格、幻灯片、Gmail、Google文档等应用
文章目录 问题现象问题原因解决办法 问题现象 macOS启动台(Launchpad)多出来了:Google云端硬盘、YouTube、表格、幻灯片、Gmail、Google文档等应用。 问题原因 很明显,都是Google家的办公全家桶。这些应用并不是通过独立安装的…...

1.3 VSCode安装与环境配置
进入网址Visual Studio Code - Code Editing. Redefined下载.deb文件,然后打开终端,进入下载文件夹,键入命令 sudo dpkg -i code_1.100.3-1748872405_amd64.deb 在终端键入命令code即启动vscode 需要安装插件列表 1.Chinese简化 2.ros …...

Nginx server_name 配置说明
Nginx 是一个高性能的反向代理和负载均衡服务器,其核心配置之一是 server 块中的 server_name 指令。server_name 决定了 Nginx 如何根据客户端请求的 Host 头匹配对应的虚拟主机(Virtual Host)。 1. 简介 Nginx 使用 server_name 指令来确定…...

【android bluetooth 框架分析 04】【bt-framework 层详解 1】【BluetoothProperties介绍】
1. BluetoothProperties介绍 libsysprop/srcs/android/sysprop/BluetoothProperties.sysprop BluetoothProperties.sysprop 是 Android AOSP 中的一种 系统属性定义文件(System Property Definition File),用于声明和管理 Bluetooth 模块相…...
Mac软件卸载指南,简单易懂!
刚和Adobe分手,它却总在Library里给你写"回忆录"?卸载的Final Cut Pro像电子幽灵般阴魂不散?总是会有残留文件,别慌!这份Mac软件卸载指南,将用最硬核的方式教你"数字分手术"࿰…...

大模型多显卡多服务器并行计算方法与实践指南
一、分布式训练概述 大规模语言模型的训练通常需要分布式计算技术,以解决单机资源不足的问题。分布式训练主要分为两种模式: 数据并行:将数据分片到不同设备,每个设备拥有完整的模型副本 模型并行:将模型分割到不同设备,每个设备处理部分模型计算 现代大模型训练通常结合…...