Windows 下Mamba2 / Vim / Vmamba 环境安装问题记录及解决方法终极版(无需绕过triton)
导航
安装教程导航
- Mamba 及 Vim 安装问题参看本人博客:Mamba 环境安装踩坑问题汇总及解决方法(初版)
- Linux 下Mamba 及 Vim 安装问题参看本人博客:Mamba 环境安装踩坑问题汇总及解决方法(重置版)
- Windows 下 Mamba 的安装参看本人博客:Window 下Mamba 环境安装踩坑问题汇总及解决方法 (无需绕过selective_scan_cuda)
- Linux 下 Vim 安装问题参看本人博客:Linux 下 Vim 环境安装踩坑问题汇总及解决方法(重置版)
- Windows 下 Vim 安装问题参看本人博客:Window 下 Vim 环境安装踩坑问题汇总及解决方法
- Linux 下Vmamba 安装教程参看本人博客:Vmamba 安装教程(无需更改base环境中的cuda版本)
- Windows 下 VMamba的安装参看本人博客:Windows 下 VMamba 安装教程(无需更改base环境中的cuda版本且可加速)
- Windows下 Mamba2及高版本 causal_conv1d 安装参考本人博客:Windows 下Mamba2 环境安装问题记录及解决方法(causal_conv1d=1.4.0)
- Windows 下 Mamba / Vim / Vmamba 环境安装终极版参考本人博客:Windows 下Mamba2 / Vim / Vmamba 环境安装问题记录及解决方法终极版(无需绕过triton)
旧安装包合集导航
- Mamba 安装教程博客中涉及到的全部安装包:mamba 安装包,包括Windows和Linux(此版本为初始mamba版本)
- Vim 安装教程博客中涉及到的全部安装包:vim 安装包,包括Windows和Linux(此版本有时需要绕过triton,但不影响计算)
- Vmamba 安装教程博客中涉及到的全部安装包:vmamba 安装包,包括Windows和Linux(此版本有时需要绕过triton,但不影响计算)
- Mamba2 及 更高版本causal_conv1d Windows安装包:mamba 2 windows安装包(此版本Mamba2需要绕过triton,但不影响计算)
Windows安装包终极版合集导航
- mamba 2 windows (cuda12.4)安装包
- Vim windows (cuda12.4)安装包
- Vmamba Windows (cuda12.4)环境安装包
(安装问题 / 资源自取售后 / 论文合作想法请+vx:931744281)
目录
- 导航
- 安装教程导航
- 旧安装包合集导航
- Windows安装包终极版合集导航
- 背景
- 关于 `triton` 的问题
- 安装步骤
- 1. Windows 下前期环境准备
- 2. triton-windows 环境准备
- 3. 从源码编译causal-conv1d 1.4.0 版本
- 4. 从源码编译 mamba-ssm 版本
- 5. Mamba 环境运行验证
- 6. Windows 下 Vim 的安装
- 7. Vim 环境运行验证
- 8. Windows 下 Vmamba 的安装
- 9. Vmamba 环境运行验证
- 出现的问题
- 1. 出现 `fatal error C1083: 无法打开包括文件: “nv/target”'`
- 后记
背景
在笔者之前的系列博客中,例如 Windows 下Mamba2 环境安装问题记录及解决方法(causal_conv1d=1.4.0),以及 Window 下 Vim 环境安装踩坑问题汇总及解决方法 遭遇了与 triton 有关的问题,之后在本人博客 Windows 下安装 triton 教程 ,配置 triton-Windows 之后,终于实现了 mamba / vim / vmamba 在Windows下,无需更改重要代码,直接运行程序。本博客安装版本为:mamba_ssm-2.2.2 和 causal_conv1d-1.4.0。CUDA 版本为12.4。
关于 triton 的问题
由于 triton 官方目前只支持Linux,因此在 Windows 系统运行时,函数中只要涉及到其调用都会出现报错,包括但不限于:
KeyError: 'HOME'RuntimeError: failed to find C compiler, Please specify via cc environment variable.
终极解决方案参考Windows 下 Mamba / Vim / Vmamba 环境安装终极版:Windows 下Mamba2 / Vim / Vmamba 环境安装问题记录及解决方法终极版(无需绕过triton)
即本文在配置 triton-Windows 之后,运行原来的程序将不会出现这些报错。
安装步骤
1. Windows 下前期环境准备
前期环境准备,类似本人原来博客 “Windows 下Mamba2 环境安装问题记录及解决方法(causal_conv1d=1.4.0)” ,但是由于 triton-Windows 对 CUDA 版本的高要求,所以具体更改为:
conda create -n mamba python=3.10
conda activate mamba# CUDA 12.4
pip install torch==2.4.1 torchvision==0.19.1 torchaudio==2.4.1 --index-url https://download.pytorch.org/whl/cu124python -c "import torch; print(torch.cuda.is_available())" # 验证torch安装# 安装cuda
conda install nvidia/label/cuda-12.4.0::cuda-nvccpip install setuptools==68.2.2
conda install packaging
2. triton-windows 环境准备
配置参考本人之前博客 Windows 下安装 triton 教程 ,环境要求:torch >= 2.4.0;CUDA >=12;主要是利用大佬的工作:triton-windows。triton 官方目前只支持Linux系统,之前系列博客中安装的 triton 包只是大佬强行打包,配置均在Linux下,无法实现triton 核心的 triton.jit 和 torch.compile 等功能,配置过程包括:
- 安装 MSVC 和 Windows SDK
- 修改环境变量
- vcredist 安装
前期环境都配置无误后,直接下载 whl 安装:
pip install https://github.com/woct0rdho/triton-windows/releases/download/v3.1.0-windows.post5/triton-3.1.0-cp310-cp310-win_amd64.whl
也可手动下载下来然后在下载路径下安装:
pip install triton-3.1.0-cp310-cp310-win_amd64.whl
验证脚本为:
import torch
import triton
import triton.language as tl@triton.jit
def add_kernel(x_ptr, y_ptr, output_ptr, n_elements, BLOCK_SIZE: tl.constexpr):pid = tl.program_id(axis=0)block_start = pid * BLOCK_SIZEoffsets = block_start + tl.arange(0, BLOCK_SIZE)mask = offsets < n_elementsx = tl.load(x_ptr + offsets, mask=mask)y = tl.load(y_ptr + offsets, mask=mask)output = x + ytl.store(output_ptr + offsets, output, mask=mask)def add(x: torch.Tensor, y: torch.Tensor):output = torch.empty_like(x)assert x.is_cuda and y.is_cuda and output.is_cudan_elements = output.numel()grid = lambda meta: (triton.cdiv(n_elements, meta["BLOCK_SIZE"]),)add_kernel[grid](x, y, output, n_elements, BLOCK_SIZE=1024)return outputa = torch.rand(3, device="cuda")
b = a + a
b_compiled = add(a, a)
print(b_compiled - b)
print("If you see tensor([0., 0., 0.], device='cuda:0'), then it works")
正常输出结果无报错。如下图所示,不再出现 KeyError: 'HOME' 或者 RuntimeError: failed to find C compiler:

一定要等 triton 配置成功了之后才能进行下面的步骤!
3. 从源码编译causal-conv1d 1.4.0 版本
步骤还是参考本人原来博客 “Windows 下Mamba2 环境安装问题记录及解决方法(causal_conv1d=1.4.0)”,不过有可能会遭遇问题,需要先
conda install nvidia/label/cuda-12.4.0::cuda-cccl
如果下载缓慢,可以先把安装包下载下来,然后进行本地安装
conda install --use-local cuda-cccl-12.4.99-0.tar.bz2
接着是下载工程文件,即
git clone https://github.com/Dao-AILab/causal-conv1d.git
cd causal-conv1d
set CAUSAL_CONV1D_FORCE_BUILD=TRUE  # 也可修改setup.py第37行
# 先按照博客修改源码然后再执行这最后一步
pip install .
在执行最后一步编译之前,还是需要修改,参考本人原来博客 “Windows 下Mamba2 环境安装问题记录及解决方法(causal_conv1d=1.4.0)”。
官方没有编译好的适用于Windows版本的 whl,因此需要用上述步骤来手动编译。笔者编译好了 Windows 下的 (cuda12.4)causal-conv1d-1.4.0-cp310-cp310-win-amd64.whl 或者 优惠地址,亦可直接下载安装(只适用于torch 2.4,cuda12.4,python 3.10)。
pip install causal_conv1d-1.4.0-cp310-cp310-win_amd64.whl
成功安装之后,会在相应虚拟环境中(xxx\conda\envs\xxx\Lib\site-packages\)产生 causal_conv1d_cuda.cp310-win_amd64.pyd 文件,此文件对应 causal_conv1d_cuda 包。
4. 从源码编译 mamba-ssm 版本
前期准备以及部分文件的修改同原来博客 “Windows 下Mamba2 环境安装问题记录及解决方法(causal_conv1d=1.4.0)”,具体来说:
1)mamba-ssm 环境准备,下载工程文件,即
git clone https://github.com/state-spaces/mamba.git
cd mamba
set MAMBA_FORCE_BUILD=TRUE  # 也可修改setup.py第40行
# 先按照博客修改源码然后再执行这最后一步
pip install . --no-build-isolation
2)在执行最后一步编译之前,还是需要修改,参考本人原来博客 “Windows 下Mamba2 环境安装问题记录及解决方法(causal_conv1d=1.4.0)”
3)本人编译好的Windows 下的whl 也有:(cuda12.4)mamba-ssm-2.2.2 (只适用于torch 2.4,cuda12.4,python 3.10)或者 优惠地址 以及 【全家桶】,可直接下载安装或联系本人vx自取售后。利用 whl 安装命令为:
pip install mamba_ssm-2.2.2-cp310-cp310-win_amd64.whl
由于此时没有绕过selective_scan_cuda,在虚拟环境中(xxx\conda\envs\xxx\Lib\site-packages\)产生了 selective_scan_cuda.cp310-win-amd64.pyd 文件。
5. Mamba 环境运行验证
参考官方的 readme 文件,运行以下示例:
import torch
from mamba_ssm import Mamba
from mamba_ssm import Mamba2batch, length, dim = 2, 64, 16
x = torch.randn(batch, length, dim).to("cuda")
model = Mamba(# This module uses roughly 3 * expand * d_model^2 parametersd_model=dim, # Model dimension d_modeld_state=16,  # SSM state expansion factord_conv=4,    # Local convolution widthexpand=2,    # Block expansion factor
).to("cuda")
y = model(x)
assert y.shape == x.shape
print('Mamba:', x.shape)batch, length, dim = 2, 64, 256
x = torch.randn(batch, length, dim).to("cuda")
model = Mamba2(# This module uses roughly 3 * expand * d_model^2 parametersd_model=dim, # Model dimension d_modeld_state=64,  # SSM state expansion factor, typically 64 or 128d_conv=4,    # Local convolution widthexpand=2,    # Block expansion factor
).to("cuda")
y = model(x)
assert y.shape == x.shape
print('Mamba2:', x.shape)
正常输出结果无报错。如下图所示,不再出现 KeyError: 'HOME' :

6. Windows 下 Vim 的安装
1)Vim 官方代码仓给的 causal-conv1d 源码有误,过于老旧且不兼容,causal-conv1d版本应≥1.1.0,其他部分还是参考原来的博客 Window 下 Vim 环境安装踩坑问题汇总及解决方法:
git clone https://github.com/Dao-AILab/causal-conv1d.git
cd causal-conv1d
git checkout v1.1.1  # 安装最新版的话,此步可省略
set CAUSAL_CONV1D_FORCE_BUILD=TRUE
pip install .
官方没有编译好的适用于Windows版本的 whl,因此需要用上述步骤来手动编译。笔者编译好了 Windows 下的 (cuda12.4)causal_conv1d-1.1.1-cp310-cp310-win_amd64.whl 或者 优惠地址,亦可直接下载安装(只适用于torch 2.4,cuda12.4,python 3.10)。
pip install causal_conv1d-1.1.1-cp310-cp310-win_amd64.whl
完成前期工作后进入下一步正式编译。注意安装成功后会在相应环境(xxx\conda\envs\xxx\Lib\site-packages\)中生成 causal_conv1d_cuda.cp310-win_amd64.pyd 文件,此文件对应 causal_conv1d_cuda 包。
2)Vim 官方对 mamba-ssm 的源码进行了修改,所以其与原版有不同,可以直接强行利用Vim的源码进行编译,参考原来的博客 Window 下 Vim 环境安装踩坑问题汇总及解决方法。
本人编译好的Windows 下的适用于Vim的whl 也有:(Vim)(cuda12.4)mamba-ssm-1.1.1-cp310-cp310-win-amd64.whl (只适用于torch 2.4,cuda12.4,python 3.10)或者 优惠地址 以及 【全家桶】,可直接下载安装或联系本人vx自取售后。利用 whl 安装命令为:
pip install mamba_ssm-1.1.1-cp310-cp310-win_amd64.whl --no-dependencies causal_conv1d
由于此时没有绕过selective_scan_cuda,在虚拟环境中(xxx\conda\envs\xxx\Lib\site-packages\)产生了 selective-scan-cuda.cp310-win-amd64.pyd 文件,所以运行速度较快。
3)注意在 pip install -r vim/vim_requirements.txt 其他环境时,将 vim/vim_requirements.txt 里面的triton版本注释掉。
7. Vim 环境运行验证
运行以下示例:
# Copyright (c) 2015-present, Facebook, Inc.
# All rights reserved.
import torch
import torch.nn as nn
from functools import partial
from torch import Tensor
from typing import Optionalfrom timm.models.vision_transformer import VisionTransformer, _cfg
from timm.models.registry import register_model
from timm.models.layers import trunc_normal_, lecun_normal_from timm.models.layers import DropPath, to_2tuple
from timm.models.vision_transformer import _load_weightsimport mathfrom collections import namedtuplefrom mamba_ssm.modules.mamba_simple import Mamba
from mamba_ssm.utils.generation import GenerationMixin
from mamba_ssm.utils.hf import load_config_hf, load_state_dict_hffrom rope import *
import randomtry:from mamba_ssm.ops.triton.layernorm import RMSNorm, layer_norm_fn, rms_norm_fn
except ImportError:RMSNorm, layer_norm_fn, rms_norm_fn = None, None, None__all__ = ['vim_tiny_patch16_224', 'vim_small_patch16_224', 'vim_base_patch16_224','vim_tiny_patch16_384', 'vim_small_patch16_384', 'vim_base_patch16_384',
]class PatchEmbed(nn.Module):""" 2D Image to Patch Embedding"""def __init__(self, img_size=224, patch_size=16, stride=16, in_chans=3, embed_dim=768, norm_layer=None,flatten=True):super().__init__()img_size = to_2tuple(img_size)patch_size = to_2tuple(patch_size)self.img_size = img_sizeself.patch_size = patch_sizeself.grid_size = ((img_size[0] - patch_size[0]) // stride + 1, (img_size[1] - patch_size[1]) // stride + 1)self.num_patches = self.grid_size[0] * self.grid_size[1]self.flatten = flattenself.proj = nn.Conv2d(in_chans, embed_dim, kernel_size=patch_size, stride=stride)self.norm = norm_layer(embed_dim) if norm_layer else nn.Identity()def forward(self, x):B, C, H, W = x.shapeassert H == self.img_size[0] and W == self.img_size[1], \f"Input image size ({H}*{W}) doesn't match model ({self.img_size[0]}*{self.img_size[1]})."x = self.proj(x)if self.flatten:x = x.flatten(2).transpose(1, 2)  # BCHW -> BNCx = self.norm(x)return xclass Block(nn.Module):def __init__(self, dim, mixer_cls, norm_cls=nn.LayerNorm, fused_add_norm=False, residual_in_fp32=False, drop_path=0.,):"""Simple block wrapping a mixer class with LayerNorm/RMSNorm and residual connection"This Block has a slightly different structure compared to a regularprenorm Transformer block.The standard block is: LN -> MHA/MLP -> Add.[Ref: https://arxiv.org/abs/2002.04745]Here we have: Add -> LN -> Mixer, returning boththe hidden_states (output of the mixer) and the residual.This is purely for performance reasons, as we can fuse add and LayerNorm.The residual needs to be provided (except for the very first block)."""super().__init__()self.residual_in_fp32 = residual_in_fp32self.fused_add_norm = fused_add_normself.mixer = mixer_cls(dim)self.norm = norm_cls(dim)self.drop_path = DropPath(drop_path) if drop_path > 0. else nn.Identity()if self.fused_add_norm:assert RMSNorm is not None, "RMSNorm import fails"assert isinstance(self.norm, (nn.LayerNorm, RMSNorm)), "Only LayerNorm and RMSNorm are supported for fused_add_norm"def forward(self, hidden_states: Tensor, residual: Optional[Tensor] = None, inference_params=None):r"""Pass the input through the encoder layer.Args:hidden_states: the sequence to the encoder layer (required).residual: hidden_states = Mixer(LN(residual))"""if not self.fused_add_norm:if residual is None:residual = hidden_stateselse:residual = residual + self.drop_path(hidden_states)hidden_states = self.norm(residual.to(dtype=self.norm.weight.dtype))if self.residual_in_fp32:residual = residual.to(torch.float32)else:fused_add_norm_fn = rms_norm_fn if isinstance(self.norm, RMSNorm) else layer_norm_fnif residual is None:hidden_states, residual = fused_add_norm_fn(hidden_states,self.norm.weight,self.norm.bias,residual=residual,prenorm=True,residual_in_fp32=self.residual_in_fp32,eps=self.norm.eps,)else:hidden_states, residual = fused_add_norm_fn(self.drop_path(hidden_states),self.norm.weight,self.norm.bias,residual=residual,prenorm=True,residual_in_fp32=self.residual_in_fp32,eps=self.norm.eps,)hidden_states = self.mixer(hidden_states, inference_params=inference_params)return hidden_states, residualdef allocate_inference_cache(self, batch_size, max_seqlen, dtype=None, **kwargs):return self.mixer.allocate_inference_cache(batch_size, max_seqlen, dtype=dtype, **kwargs)def create_block(d_model,ssm_cfg=None,norm_epsilon=1e-5,drop_path=0.,rms_norm=False,residual_in_fp32=False,fused_add_norm=False,layer_idx=None,device=None,dtype=None,if_bimamba=False,bimamba_type="none",if_divide_out=False,init_layer_scale=None,
):if if_bimamba:bimamba_type = "v1"if ssm_cfg is None:ssm_cfg = {}factory_kwargs = {"device": device, "dtype": dtype}mixer_cls = partial(Mamba, layer_idx=layer_idx, bimamba_type=bimamba_type, if_divide_out=if_divide_out,init_layer_scale=init_layer_scale, **ssm_cfg, **factory_kwargs)norm_cls = partial(nn.LayerNorm if not rms_norm else RMSNorm, eps=norm_epsilon, **factory_kwargs)block = Block(d_model,mixer_cls,norm_cls=norm_cls,drop_path=drop_path,fused_add_norm=fused_add_norm,residual_in_fp32=residual_in_fp32,)block.layer_idx = layer_idxreturn block# https://github.com/huggingface/transformers/blob/c28d04e9e252a1a099944e325685f14d242ecdcd/src/transformers/models/gpt2/modeling_gpt2.py#L454
def _init_weights(module,n_layer,initializer_range=0.02,  # Now only used for embedding layer.rescale_prenorm_residual=True,n_residuals_per_layer=1,  # Change to 2 if we have MLP
):if isinstance(module, nn.Linear):if module.bias is not None:if not getattr(module.bias, "_no_reinit", False):nn.init.zeros_(module.bias)elif isinstance(module, nn.Embedding):nn.init.normal_(module.weight, std=initializer_range)if rescale_prenorm_residual:# Reinitialize selected weights subject to the OpenAI GPT-2 Paper Scheme:#   > A modified initialization which accounts for the accumulation on the residual path with model depth. Scale#   > the weights of residual layers at initialization by a factor of 1/√N where N is the # of residual layers.#   >   -- GPT-2 :: https://openai.com/blog/better-language-models/## Reference (Megatron-LM): https://github.com/NVIDIA/Megatron-LM/blob/main/megatron/model/gpt_model.pyfor name, p in module.named_parameters():if name in ["out_proj.weight", "fc2.weight"]:# Special Scaled Initialization --> There are 2 Layer Norms per Transformer Block# Following Pytorch init, except scale by 1/sqrt(2 * n_layer)# We need to reinit p since this code could be called multiple times# Having just p *= scale would repeatedly scale it downnn.init.kaiming_uniform_(p, a=math.sqrt(5))with torch.no_grad():p /= math.sqrt(n_residuals_per_layer * n_layer)def segm_init_weights(m):if isinstance(m, nn.Linear):trunc_normal_(m.weight, std=0.02)if isinstance(m, nn.Linear) and m.bias is not None:nn.init.constant_(m.bias, 0)elif isinstance(m, nn.Conv2d):# NOTE conv was left to pytorch default in my original initlecun_normal_(m.weight)if m.bias is not None:nn.init.zeros_(m.bias)elif isinstance(m, (nn.LayerNorm, nn.GroupNorm, nn.BatchNorm2d)):nn.init.zeros_(m.bias)nn.init.ones_(m.weight)class VisionMamba(nn.Module):def __init__(self,img_size=224,patch_size=16,stride=16,depth=24,embed_dim=192,channels=3,num_classes=1000,ssm_cfg=None,drop_rate=0.,drop_path_rate=0.1,norm_epsilon: float = 1e-5,rms_norm: bool = False,initializer_cfg=None,fused_add_norm=False,residual_in_fp32=False,device=None,dtype=None,ft_seq_len=None,pt_hw_seq_len=14,if_bidirectional=False,final_pool_type='none',if_abs_pos_embed=False,if_rope=False,if_rope_residual=False,flip_img_sequences_ratio=-1.,if_bimamba=False,bimamba_type="none",if_cls_token=False,if_divide_out=False,init_layer_scale=None,use_double_cls_token=False,use_middle_cls_token=False,**kwargs):factory_kwargs = {"device": device, "dtype": dtype}# add factory_kwargs into kwargskwargs.update(factory_kwargs)super().__init__()self.residual_in_fp32 = residual_in_fp32self.fused_add_norm = fused_add_normself.if_bidirectional = if_bidirectionalself.final_pool_type = final_pool_typeself.if_abs_pos_embed = if_abs_pos_embedself.if_rope = if_ropeself.if_rope_residual = if_rope_residualself.flip_img_sequences_ratio = flip_img_sequences_ratioself.if_cls_token = if_cls_tokenself.use_double_cls_token = use_double_cls_tokenself.use_middle_cls_token = use_middle_cls_tokenself.num_tokens = 1 if if_cls_token else 0# pretrain parametersself.num_classes = num_classesself.d_model = self.num_features = self.embed_dim = embed_dim  # num_features for consistency with other modelsself.patch_embed = PatchEmbed(img_size=img_size, patch_size=patch_size, stride=stride, in_chans=channels, embed_dim=embed_dim)num_patches = self.patch_embed.num_patchesif if_cls_token:if use_double_cls_token:self.cls_token_head = nn.Parameter(torch.zeros(1, 1, self.embed_dim))self.cls_token_tail = nn.Parameter(torch.zeros(1, 1, self.embed_dim))self.num_tokens = 2else:self.cls_token = nn.Parameter(torch.zeros(1, 1, self.embed_dim))# self.num_tokens = 1if if_abs_pos_embed:self.pos_embed = nn.Parameter(torch.zeros(1, num_patches + self.num_tokens, self.embed_dim))self.pos_drop = nn.Dropout(p=drop_rate)if if_rope:half_head_dim = embed_dim // 2hw_seq_len = img_size // patch_sizeself.rope = VisionRotaryEmbeddingFast(dim=half_head_dim,pt_seq_len=pt_hw_seq_len,ft_seq_len=hw_seq_len)self.head = nn.Linear(self.num_features, num_classes) if num_classes > 0 else nn.Identity()# TODO: release this commentdpr = [x.item() for x in torch.linspace(0, drop_path_rate, depth)]  # stochastic depth decay rule# import ipdb;ipdb.set_trace()inter_dpr = [0.0] + dprself.drop_path = DropPath(drop_path_rate) if drop_path_rate > 0. else nn.Identity()# transformer blocksself.layers = nn.ModuleList([create_block(embed_dim,ssm_cfg=ssm_cfg,norm_epsilon=norm_epsilon,rms_norm=rms_norm,residual_in_fp32=residual_in_fp32,fused_add_norm=fused_add_norm,layer_idx=i,if_bimamba=if_bimamba,bimamba_type=bimamba_type,drop_path=inter_dpr[i],if_divide_out=if_divide_out,init_layer_scale=init_layer_scale,**factory_kwargs,)for i in range(depth)])# output headself.norm_f = (nn.LayerNorm if not rms_norm else RMSNorm)(embed_dim, eps=norm_epsilon, **factory_kwargs)# self.pre_logits = nn.Identity()# original initself.patch_embed.apply(segm_init_weights)self.head.apply(segm_init_weights)if if_abs_pos_embed:trunc_normal_(self.pos_embed, std=.02)if if_cls_token:if use_double_cls_token:trunc_normal_(self.cls_token_head, std=.02)trunc_normal_(self.cls_token_tail, std=.02)else:trunc_normal_(self.cls_token, std=.02)# mamba initself.apply(partial(_init_weights,n_layer=depth,**(initializer_cfg if initializer_cfg is not None else {}),))def allocate_inference_cache(self, batch_size, max_seqlen, dtype=None, **kwargs):return {i: layer.allocate_inference_cache(batch_size, max_seqlen, dtype=dtype, **kwargs)for i, layer in enumerate(self.layers)}@torch.jit.ignoredef no_weight_decay(self):return {"pos_embed", "cls_token", "dist_token", "cls_token_head", "cls_token_tail"}@torch.jit.ignore()def load_pretrained(self, checkpoint_path, prefix=""):_load_weights(self, checkpoint_path, prefix)def forward_features(self, x, inference_params=None, if_random_cls_token_position=False,if_random_token_rank=False):# taken from https://github.com/rwightman/pytorch-image-models/blob/master/timm/models/vision_transformer.py# with slight modifications to add the dist_tokenx = self.patch_embed(x)B, M, _ = x.shapeif self.if_cls_token:if self.use_double_cls_token:cls_token_head = self.cls_token_head.expand(B, -1, -1)cls_token_tail = self.cls_token_tail.expand(B, -1, -1)token_position = [0, M + 1]x = torch.cat((cls_token_head, x, cls_token_tail), dim=1)M = x.shape[1]else:if self.use_middle_cls_token:cls_token = self.cls_token.expand(B, -1, -1)token_position = M // 2# add cls token in the middlex = torch.cat((x[:, :token_position, :], cls_token, x[:, token_position:, :]), dim=1)elif if_random_cls_token_position:cls_token = self.cls_token.expand(B, -1, -1)token_position = random.randint(0, M)x = torch.cat((x[:, :token_position, :], cls_token, x[:, token_position:, :]), dim=1)print("token_position: ", token_position)else:cls_token = self.cls_token.expand(B, -1, -1)  # stole cls_tokens impl from Phil Wang, thankstoken_position = 0x = torch.cat((cls_token, x), dim=1)M = x.shape[1]if self.if_abs_pos_embed:# if new_grid_size[0] == self.patch_embed.grid_size[0] and new_grid_size[1] == self.patch_embed.grid_size[1]:#     x = x + self.pos_embed# else:#     pos_embed = interpolate_pos_embed_online(#                 self.pos_embed, self.patch_embed.grid_size, new_grid_size,0#             )x = x + self.pos_embedx = self.pos_drop(x)if if_random_token_rank:# 生成随机 shuffle 索引shuffle_indices = torch.randperm(M)if isinstance(token_position, list):print("original value: ", x[0, token_position[0], 0], x[0, token_position[1], 0])else:print("original value: ", x[0, token_position, 0])print("original token_position: ", token_position)# 执行 shufflex = x[:, shuffle_indices, :]if isinstance(token_position, list):# 找到 cls token 在 shuffle 之后的新位置new_token_position = [torch.where(shuffle_indices == token_position[i])[0].item() for i inrange(len(token_position))]token_position = new_token_positionelse:# 找到 cls token 在 shuffle 之后的新位置token_position = torch.where(shuffle_indices == token_position)[0].item()if isinstance(token_position, list):print("new value: ", x[0, token_position[0], 0], x[0, token_position[1], 0])else:print("new value: ", x[0, token_position, 0])print("new token_position: ", token_position)if_flip_img_sequences = Falseif self.flip_img_sequences_ratio > 0 and (self.flip_img_sequences_ratio - random.random()) > 1e-5:x = x.flip([1])if_flip_img_sequences = True# mamba implresidual = Nonehidden_states = xif not self.if_bidirectional:for layer in self.layers:if if_flip_img_sequences and self.if_rope:hidden_states = hidden_states.flip([1])if residual is not None:residual = residual.flip([1])# rope aboutif self.if_rope:hidden_states = self.rope(hidden_states)if residual is not None and self.if_rope_residual:residual = self.rope(residual)if if_flip_img_sequences and self.if_rope:hidden_states = hidden_states.flip([1])if residual is not None:residual = residual.flip([1])hidden_states, residual = layer(hidden_states, residual, inference_params=inference_params)else:# get two layers in a single for-loopfor i in range(len(self.layers) // 2):if self.if_rope:hidden_states = self.rope(hidden_states)if residual is not None and self.if_rope_residual:residual = self.rope(residual)hidden_states_f, residual_f = self.layers[i * 2](hidden_states, residual, inference_params=inference_params)hidden_states_b, residual_b = self.layers[i * 2 + 1](hidden_states.flip([1]), None if residual == None else residual.flip([1]),inference_params=inference_params)hidden_states = hidden_states_f + hidden_states_b.flip([1])residual = residual_f + residual_b.flip([1])if not self.fused_add_norm:if residual is None:residual = hidden_stateselse:residual = residual + self.drop_path(hidden_states)hidden_states = self.norm_f(residual.to(dtype=self.norm_f.weight.dtype))else:# Set prenorm=False here since we don't need the residualfused_add_norm_fn = rms_norm_fn if isinstance(self.norm_f, RMSNorm) else layer_norm_fnhidden_states = fused_add_norm_fn(self.drop_path(hidden_states),self.norm_f.weight,self.norm_f.bias,eps=self.norm_f.eps,residual=residual,prenorm=False,residual_in_fp32=self.residual_in_fp32,)# return only cls token if it existsif self.if_cls_token:if self.use_double_cls_token:return (hidden_states[:, token_position[0], :] + hidden_states[:, token_position[1], :]) / 2else:if self.use_middle_cls_token:return hidden_states[:, token_position, :]elif if_random_cls_token_position:return hidden_states[:, token_position, :]else:return hidden_states[:, token_position, :]if self.final_pool_type == 'none':return hidden_states[:, -1, :]elif self.final_pool_type == 'mean':return hidden_states.mean(dim=1)elif self.final_pool_type == 'max':return hidden_stateselif self.final_pool_type == 'all':return hidden_stateselse:raise NotImplementedErrordef forward(self, x, return_features=False, inference_params=None, if_random_cls_token_position=False,if_random_token_rank=False):x = self.forward_features(x, inference_params, if_random_cls_token_position=if_random_cls_token_position,if_random_token_rank=if_random_token_rank)# if return_features:#     return x# x = self.head(x)# if self.final_pool_type == 'max':#     x = x.max(dim=1)[0]return x@register_model
def vim_tiny_patch16_224_bimambav2_final_pool_mean_abs_pos_embed_with_midclstok_div2(pretrained=False, **kwargs):model = VisionMamba(patch_size=16, embed_dim=192, depth=24, rms_norm=True, residual_in_fp32=True, fused_add_norm=True,final_pool_type='mean', if_abs_pos_embed=True, if_rope=False, if_rope_residual=False, bimamba_type="v2",if_cls_token=True, if_divide_out=True, use_middle_cls_token=True, **kwargs)model.default_cfg = _cfg()if pretrained:checkpoint = torch.hub.load_state_dict_from_url(url="to.do",map_location="cpu", check_hash=True)model.load_state_dict(checkpoint["model"])return model@register_model
def vim_tiny_patch16_stride8_224_bimambav2_final_pool_mean_abs_pos_embed_with_midclstok_div2(pretrained=False,**kwargs):model = VisionMamba(patch_size=16, stride=8, embed_dim=192, depth=24, rms_norm=True, residual_in_fp32=True, fused_add_norm=True,final_pool_type='mean', if_abs_pos_embed=True, if_rope=False, if_rope_residual=False, bimamba_type="v2",if_cls_token=True, if_divide_out=True, use_middle_cls_token=True, **kwargs)model.default_cfg = _cfg()if pretrained:checkpoint = torch.hub.load_state_dict_from_url(url="to.do",map_location="cpu", check_hash=True)model.load_state_dict(checkpoint["model"])return model@register_model
def vim_small_patch16_224_bimambav2_final_pool_mean_abs_pos_embed_with_midclstok_div2(pretrained=False, **kwargs):model = VisionMamba(patch_size=16, embed_dim=384, depth=24, rms_norm=True, residual_in_fp32=True, fused_add_norm=True,final_pool_type='mean', if_abs_pos_embed=True, if_rope=False, if_rope_residual=False, bimamba_type="v2",if_cls_token=True, if_divide_out=True, use_middle_cls_token=True, **kwargs)model.default_cfg = _cfg()if pretrained:checkpoint = torch.hub.load_state_dict_from_url(url="to.do",map_location="cpu", check_hash=True)model.load_state_dict(checkpoint["model"])return model@register_model
def vim_small_patch16_stride8_224_bimambav2_final_pool_mean_abs_pos_embed_with_midclstok_div2(pretrained=False,**kwargs):model = VisionMamba(patch_size=16, stride=8, embed_dim=384, depth=24, rms_norm=True, residual_in_fp32=True, fused_add_norm=True,final_pool_type='mean', if_abs_pos_embed=True, if_rope=False, if_rope_residual=False, bimamba_type="v2",if_cls_token=True, if_divide_out=True, use_middle_cls_token=True, **kwargs)model.default_cfg = _cfg()if pretrained:checkpoint = torch.hub.load_state_dict_from_url(url="to.do",map_location="cpu", check_hash=True)model.load_state_dict(checkpoint["model"])return modelif __name__ == '__main__':# cuda or cpudevice = torch.device("cuda" if torch.cuda.is_available() else "cpu")print(device)# 实例化模型得到分类结果inputs = torch.randn(1, 3, 224, 224).to(device)model = vim_small_patch16_stride8_224_bimambav2_final_pool_mean_abs_pos_embed_with_midclstok_div2(pretrained=False).to(device)# print(model)outputs = model(inputs)print(outputs.shape)# 实例化mamba模块,输入输出特征维度不变 B C H Wx = torch.rand(10, 16, 64, 128).to(device)B, C, H, W = x.shapeprint("输入特征维度:", x.shape)x = x.view(B, C, H * W).permute(0, 2, 1)print("维度变换:", x.shape)mamba = create_block(d_model=C).to(device)# mamba模型代码中返回的是一个元组:hidden_states, residualhidden_states, residual = mamba(x)x = hidden_states.permute(0, 2, 1).view(B, C, H, W)print("输出特征维度:", x.shape)
正常输出结果无报错。如下图所示,不再出现 KeyError: 'HOME' 或者 RuntimeError: failed to find C compiler:

8. Windows 下 Vmamba 的安装
依旧参考原来的博客:Windows 下 VMamba 安装教程(无需更改base环境中的cuda版本且可加速) 。
Win 下面编译好的 whl (只适用于torch 2.4,cuda12.4,python 3.10)为:(cuda12.4)selective-scan-0.0.2-cp310-cp310-win-amd64.whl(包含core) 或者 优惠地址,相应生成的selective_scan_cuda_core 模块为:selective-scan-cuda-core.cp310-win-amd64.pyd;selective-scan-cuda-oflex.cp310-win-amd64.pyd。
9. Vmamba 环境运行验证
在classification/models/vmamba.py最后添加:
if __name__ == '__main__':device = torch.device("cuda:0")hidden_dim = 3 network = VSSM(hidden_dim).to('cuda:0')input_image = torch.randn(1, 3, 224, 224)input_image = input_image.to(device)output = network(input_image)print("Output shape:", output.shape)
运行无报错即可。
出现的问题
1. 出现 fatal error C1083: 无法打开包括文件: “nv/target”'
具体来说出现以下报错
D:\software\Anaconda\envs\mamba\include\cuda_fp16.h(4100): fatal error C1083: 无法打开包括文件: “nv/target”: No such file or directory
即出现
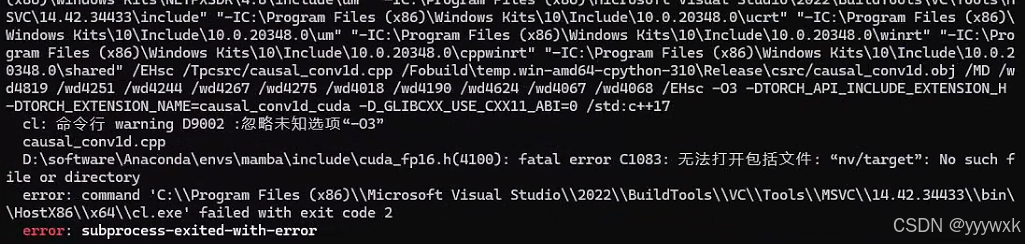
说明其中环境中缺少 CUDA C++ 核心计算库 (CUDA C++ Core Libraries, CCCL),解决方法即为:
conda install nvidia/label/cuda-12.4.0::cuda-cccl
后记
经过系列迭代以及与各位大佬的努力,最终实现了在 Windows 上正常运行 Mamba (含Mamba2)、Vision Mamba(Vim)以及 Vmamba,从最初需要绕过 causal-conv1d-cuda / selective-scan-cuda 的编译(Mamba 官方未考虑Windows下运行),再到需要绕过所有的 Triton 包(Triton 官方只有Linux版),到现在不需要绕过任何东西实现不输Linux的速度,本系列画上了一个比较圆满的句号。其中遇到的所有问题均已记录至本系列博客中,系列博客中已提到的问题请不要重复提问。
相关文章:
Windows 下Mamba2 / Vim / Vmamba 环境安装问题记录及解决方法终极版(无需绕过triton)
导航 安装教程导航 Mamba 及 Vim 安装问题参看本人博客:Mamba 环境安装踩坑问题汇总及解决方法(初版)Linux 下Mamba 及 Vim 安装问题参看本人博客:Mamba 环境安装踩坑问题汇总及解决方法(重置版)Windows …...

GitLab本地服务器配置ssh和克隆项目
1. 本地安装好git git链接:https://git-scm.com/downloads/win 无脑点击下一步安装即可,打开Git Bash命令终端如下: 2. 配置本地用户名和邮箱 git config --global user.name "你的名字" git config --global user.email "你的邮箱&quo…...

Win10和11 git/Android Studio遇到filename too long问题的解决
1、打开windows长文件、长路径支持: 可以参考这篇文章: 修改注册表方法: 使用Admin登陆machine,在run中输入regedit并回车; 找到路径 ’Computer -> HKEY_LOCAL_MACHINE -> SYSTEM -> CurrentControlSet -&g…...
【JavaWeb学习Day11】
java程序操作数据库(JDBC) JDBC:(Java DataBase Connectivity),就是使用Java语言操作关系型数据库的一套API。 本质: 1.sun公司官方定义的一套操作所有关系型数据库的规范、即接口。 2.各个数据库厂商去…...

rom定制系列------小米max3安卓12 miui14批量线刷 默认开启usb功能选项 插电自启等
小米Max3是小米公司于2018年7月19日发布的机型。此机型后在没有max新型号。采用全金属一体机身设计,配备6.9英寸全面屏.八核处理器骁龙636,后置双摄像头1200万500万像素,前置800万像素.机型代码 :nitrogen.官方最终版为稳定版12.5…...
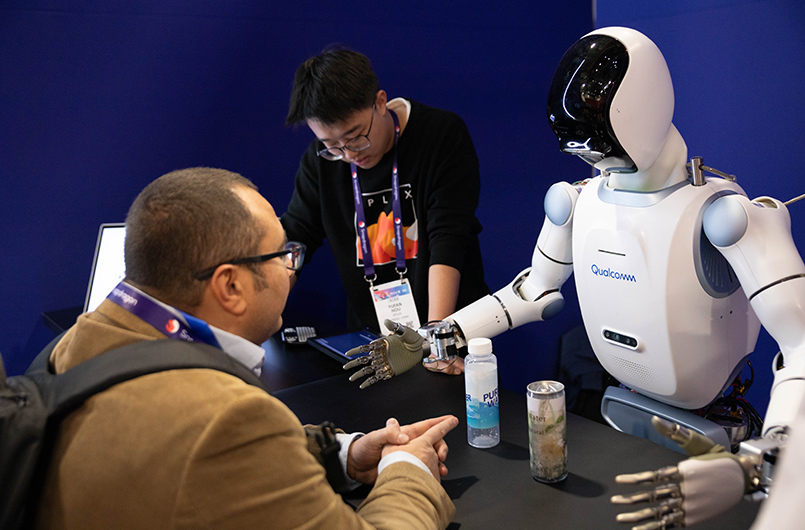
CES 2025|美格智能高算力AI模组助力“通天晓”人形机器人震撼发布
当地时间1月7日,2025年国际消费电子展(CES 2025)在美国拉斯维加斯正式开幕。美格智能合作伙伴阿加犀联合高通在展会上面向全球重磅发布人形机器人原型机——通天晓(Ultra Magnus)。该人形机器人内置美格智能基于高通QC…...

汽车电子相关的协议UDS、DOIP、CAN
UDS协议 UDS(Unified Diagnostic Services,统一诊断服务协议) 是一种标准化的通信协议,广泛应用于汽车电子系统中,尤其是在车辆诊断和服务过程中。它用于车辆的诊断、维护、控制和测试,支持通过车载诊断接…...
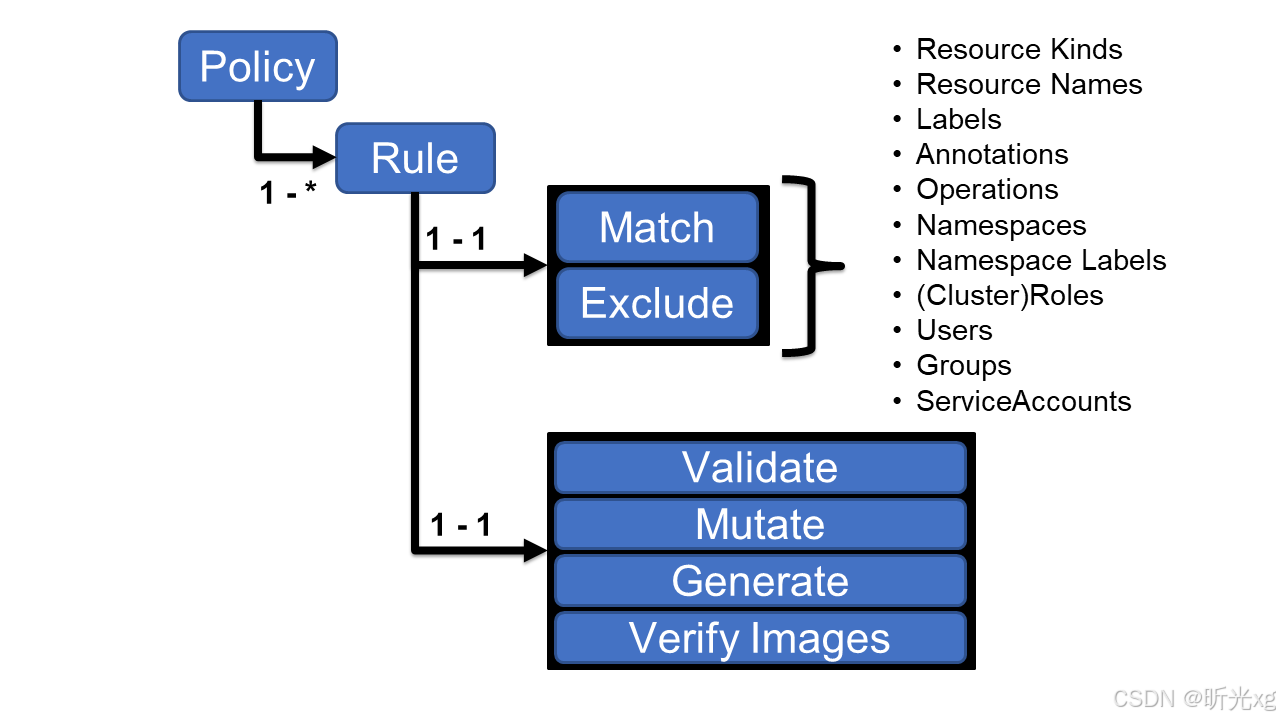
k8s笔记29--使用kyverno提高运维效率
k8s笔记29--使用kyverno提高运维效率 介绍原理安装应用场景自动修正测试环境pod资源强制 Pod 标签限制容器镜像来源禁止特权容器其它潜在场景 注意事项说明 介绍 Kyverno是一个云原生的策略引擎,它最初是为k8s构建的,现在也可以在k8s集群之外用作统一的…...
Life Long Learning(李宏毅)机器学习 2023 Spring HW14 (Boss Baseline)
1. 终身学习简介 神经网络的典型应用场景是,我们有一个固定的数据集,在其上训练并获得模型参数,然后将模型应用于特定任务而无需进一步更改模型参数。 然而,在许多实际工程应用中,常见的情况是系统可以不断地获取新数据,例如 Web 应用程序中的新用户数据或自动驾驶中的…...

libc.so.6不兼容
1、查看电脑所有libc.so.6 daviddavid-Shangqi-X4270:~/MySoft/ubuntusoft$ locate libc.so.6 /home/david/MySoft/ubuntusoft/EXEApp/libc.so.6 /home/david/MySoft/ubuntusoft/EXEApp_TEST/libc.so.6 /home/david/MySoft/ubuntusoft/RTMG_APP/libc.so.6 /home/david/MySoft/…...
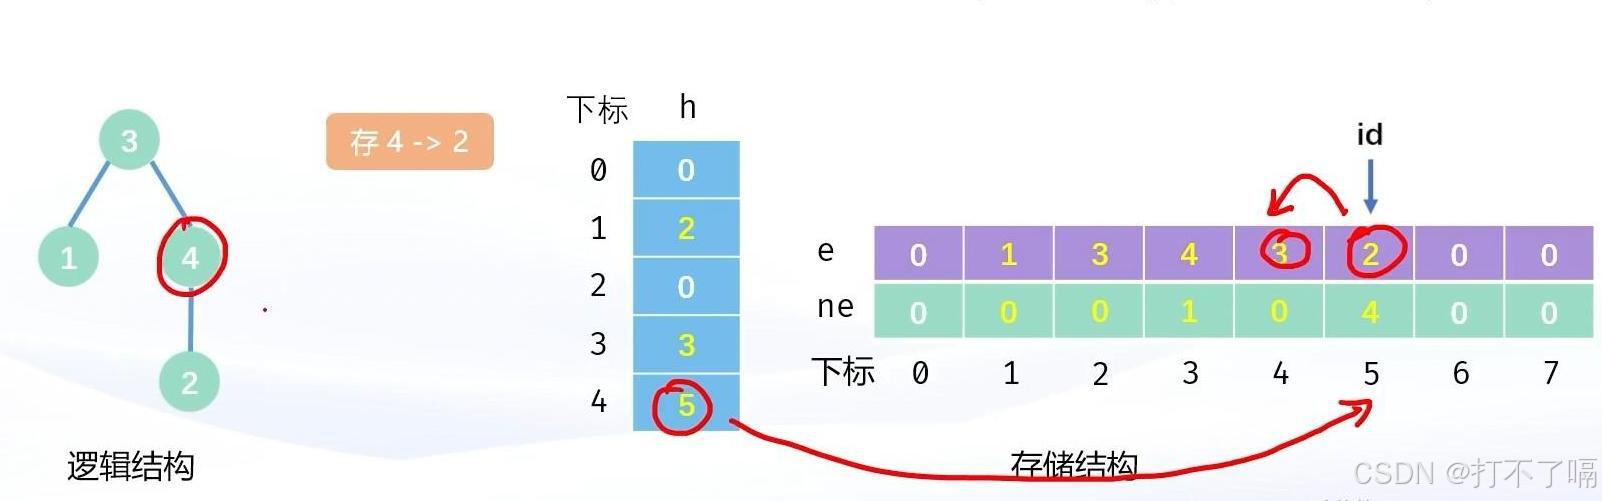
树的模拟实现
一.链式前向星 所谓链式前向星,就是用链表的方式实现树。其中的链表是用数组模拟实现的链表。 首先我们需要创建一个足够大的数组h,作为所有结点的哨兵位。创建两个足够大的数组e和ne,一个作为数据域,一个作为指针域。创建一个变…...

AsyncOperation.allowSceneActivation导致异步加载卡死
先看这段代码,有个诡异的问题,不确定是不是bug public class Test : MonoBehaviour {void Start(){StartCoroutine(LoadScene(Ego.LoadingLevel));}IEnumerator LoadScene(string sceneName){LoadingUI.UpdateProgress(0.9f);yield return new WaitForS…...

如何搭建 Vue.js 开源项目的 CI/CD 流水线
网罗开发 (小红书、快手、视频号同名) 大家好,我是 展菲,目前在上市企业从事人工智能项目研发管理工作,平时热衷于分享各种编程领域的软硬技能知识以及前沿技术,包括iOS、前端、Harmony OS、Java、Python等…...
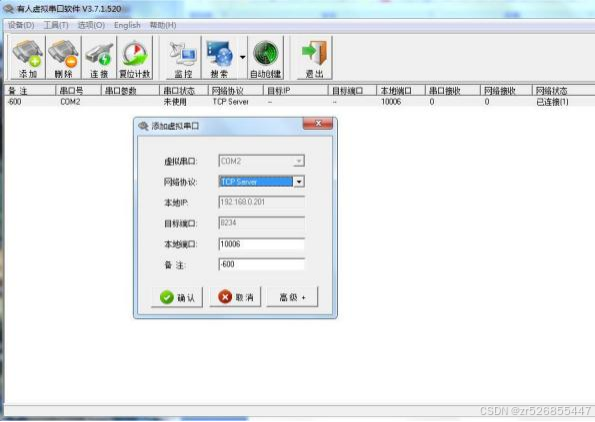
单通道串口服务器(三格电子)
一、产品介绍 1.1 功能简介 SG-TCP232-110 是一款用来进行串口数据和网口数据转换的设备。解决普通 串口设备在 Internet 上的联网问题。 设备的串口部分提供一个 232 接口和一个 485 接口,两个接口内部连接,同 时只能使用一个口工作。 设 备 的网 口…...

【Excel/WPS】根据平均值,生成两列/多列指定范围的随机数/随机凑出两列数据
原理就是通过随机生成函数和平均值函数。 适用场景:在总体打分后,需要在小项中随机生成小分数 第一列:固定的平均值A2第二列: RANDBETWEEN(A2-10,A210)第三列:根据第二列用平均值函数算除 A2*2-B2这是随机值1的公式&am…...
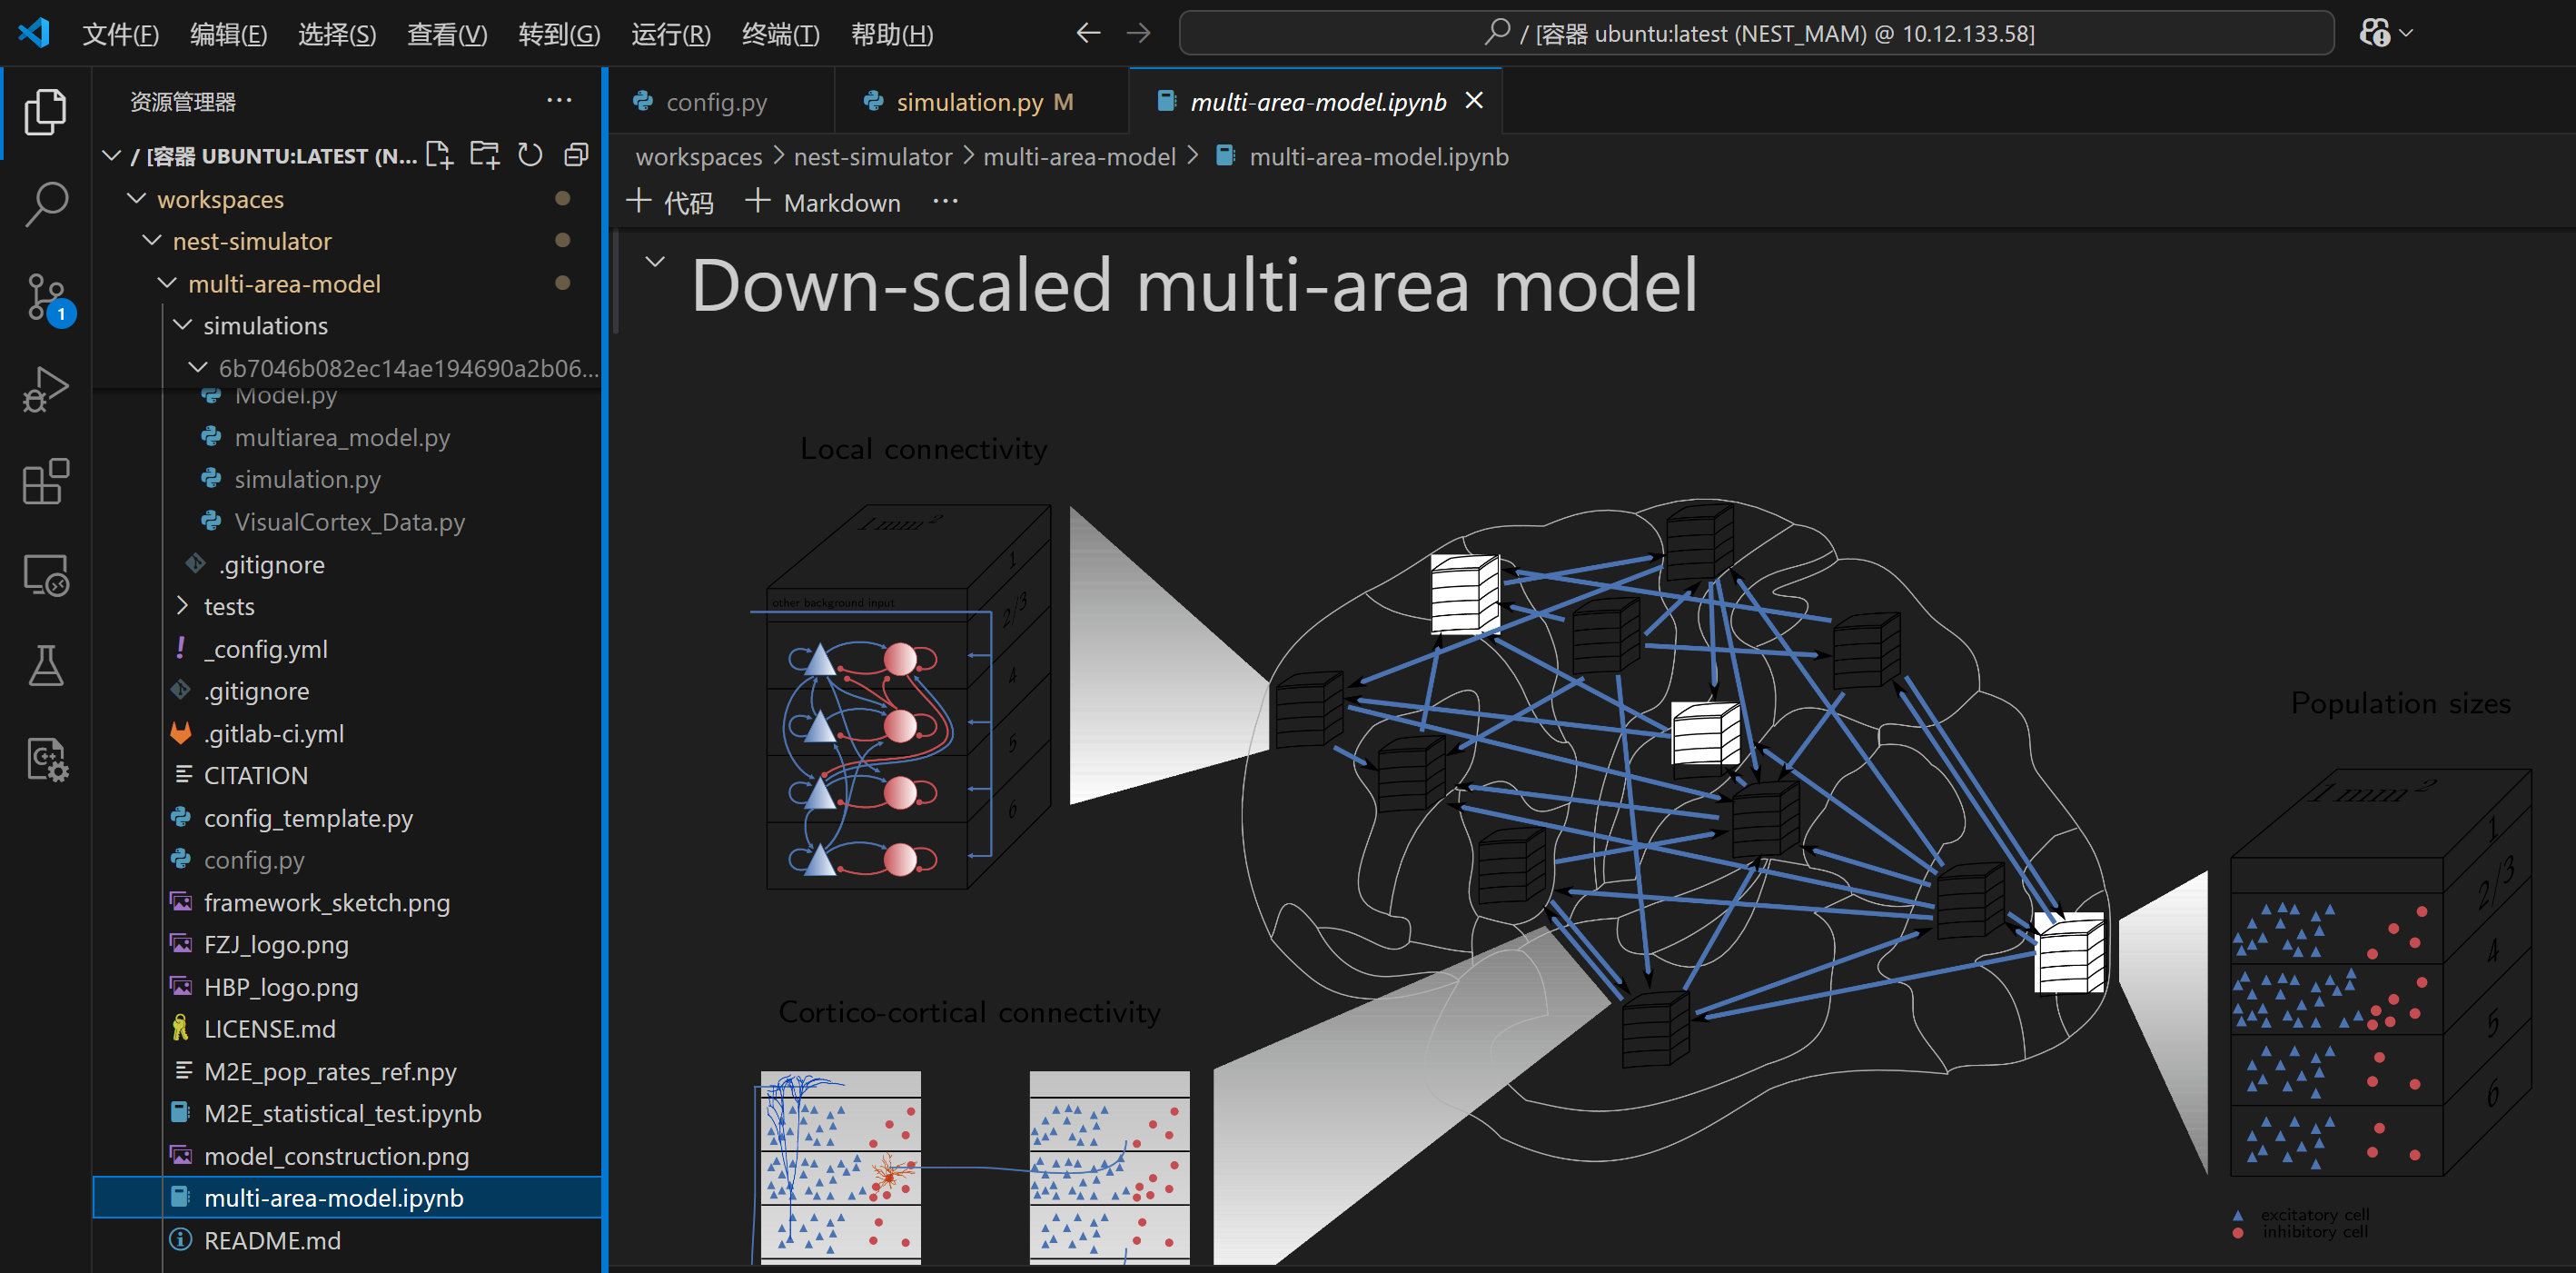
使用网页版Jupyter Notebook和VScode打开.ipynb文件
目录 正文 1、网页版Jupyter Notebook查看 2、VScode查看 因为总是忘记查看文件的网址,收藏了但分类众多每次都找不到……当个记录吧(/捂脸哭)! 正文 此处以gitub中的某个仓库为例: https://github.com/INM-6/mu…...

记录一下vue2项目优化,虚拟列表vue-virtual-scroll-list处理10万条数据
文章目录 封装BrandPickerVirtual.vue组件页面使用组件属性 select下拉接口一次性返回10万条数据,页面卡死,如何优化??这里使用 分页 虚拟列表(vue-virtual-scroll-list),去模拟一个下拉的内容…...
)
CDA数据分析师一级经典错题知识点总结(5)
1、数值型缺失值用中位数补充,分类数据用众数补充。 2、偏态系数>1就是高度偏,0.5到1是中度。 3、分布和检验 在 t检验之前进行 F检验的目的是确保 t检验的方差齐性假设成立。如果 F检验结果显示方差不相等,则需要切换到调整后的 t 检验…...

服务器、电脑和移动手机操作系统
一、服务器操作系统 1、Windows Server 开发商是微软公司。友好的用户界面、与微软生态系统的高度集成、提供了广泛的企业级功能(如Active Directory、DNS、DHCP服务等)。适合需要大量运行Microsoft应用和服务的企业环境,如SQL Server等。经…...

深入解析 Flink 与 Spark 的性能差异
💖 欢迎来到我的博客! 非常高兴能在这里与您相遇。在这里,您不仅能获得有趣的技术分享,还能感受到轻松愉快的氛围。无论您是编程新手,还是资深开发者,都能在这里找到属于您的知识宝藏,学习和成长…...

Libsvm 编译mex不同平台兼容性问题 Application not supported on glnxa64 due to platform dependencies. Intended pl
matlab线上算法执行报错:Application not supported on glnxa64 due to platform dependencies. Intended platforms include: win64 排查后发现是使用了libsvm-3.3, 而libsvm编译的时候是基于win64编译的导致出现此bug.(因为libsvm的开源代码不是matlab࿰…...

多任务学习调参新思路:如何让模型自己决定分类和回归任务谁更重要?
多任务学习中的自适应权重分配:让模型学会动态平衡分类与回归任务 想象一下,你正在训练一个自动驾驶系统,它需要同时完成车辆检测(分类任务)和深度估计(回归任务)。传统方法中,你需要…...

高效信息检索技巧:构建精准检索式的实战指南
1. 布尔逻辑检索:信息检索的基石 我第一次接触布尔逻辑检索是在大学写论文的时候,当时为了找几篇关于机器学习在医疗领域应用的文献,在数据库里输入"machine learning healthcare"直接搜,结果跳出来上万条结果ÿ…...

OpenClaw技能扩展指南:为Phi-3-mini-128k-instruct添加Markdown转换能力
OpenClaw技能扩展指南:为Phi-3-mini-128k-instruct添加Markdown转换能力 1. 为什么需要文档处理技能? 上周我整理技术文档时遇到了一个典型问题:收到同事发来的PDF技术白皮书,需要提取关键章节并转换为Markdown格式存档。手动操…...
——分布式文件传输协议的奇偶校验优化)
Event-B精化实战(三)——分布式文件传输协议的奇偶校验优化
1. 从数值比较到奇偶校验的逻辑跃迁 第一次看到用奇偶性替代数值比较的方案时,我正坐在实验室调试一个分布式存储系统。当时系统里两个节点的指针同步逻辑已经让状态机复杂得像团乱麻,直到偶然翻到Event-B的奇偶校验优化案例,才恍然大悟——原…...

GKD规则分享功能:导出与导入自动化配置的实用技巧
GKD规则分享功能:导出与导入自动化配置的实用技巧 GKD作为一款强大的Android自动化工具,其规则分享功能让用户能够轻松导出和导入精心配置的自动化规则。无论是备份个人设置还是分享给朋友,这个功能都能大幅提升使用效率!&#x…...

7步突破Cursor Pro限制:多语言环境下的AI编程工具全功能解锁指南
7步突破Cursor Pro限制:多语言环境下的AI编程工具全功能解锁指南 【免费下载链接】cursor-free-vip [Support 0.45](Multi Language 多语言)自动注册 Cursor Ai ,自动重置机器ID , 免费升级使用Pro 功能: Youve reache…...

QMK Toolbox终极指南:从零开始掌握键盘固件刷写的完整教程
QMK Toolbox终极指南:从零开始掌握键盘固件刷写的完整教程 【免费下载链接】qmk_toolbox A Toolbox companion for QMK Firmware 项目地址: https://gitcode.com/gh_mirrors/qm/qmk_toolbox QMK Toolbox是机械键盘爱好者的必备神器,这款开源工具集…...

Figma全中文界面解决方案:从安装到精通的实战指南
Figma全中文界面解决方案:从安装到精通的实战指南 【免费下载链接】figmaCN 中文 Figma 插件,设计师人工翻译校验 项目地址: https://gitcode.com/gh_mirrors/fi/figmaCN 作为一名中文设计师,你是否曾因Figma全英文界面而在操作时频繁…...
)
用PLECS和C代码手把手教你实现数字滤波(附完整工程文件)
用PLECS和C代码实现数字滤波的工程实践指南 在电力电子和电机控制领域,数字滤波技术是实现信号处理的关键环节。无论是消除高频噪声还是提取特定频段的信号成分,一个设计良好的数字滤波器都能显著提升系统性能。本文将带您从理论到实践,通过P…...