Android Input系统事件分发分析
“本文基于Android13源码,分析Input系统中,事件分发的实现原理“
整个事件分发到事件的确认过程很长,如果读者只是想大概了解一下,可以直接看末尾总结部分的流程图。
1. 前言
在文章之前,有必要提一下InputReader。其在启动的时候,会创建一个InputReader线程,用于从/dev/input节点获取事件,转换成EventEntry事件加入到InputDispatcher的mInboundQueue。详情见 Input系统—InputReader线程
Inputdispatcher 则负责消费mInboundQueue中的事件,并将事件转化后发送给app端,他们的关系如下:

1.1 InputDispatcher
Inputdispatcher中,在线程里面调用到dispatchOnce方法,该方法中主要做:
- 通过dispatchOnceInnerLocked(),取出mInboundQueue 里面的 EventEntry事件
- 通过enqueueDispatchEntryLocked(),生成事件DispatchEntry并加入connection的
outbound队列。 - 通过startDispatchCycleLocked(),从outboundQueue中取出事件DispatchEntry, 重新放入connection的
waitQueue队列。 - 通过runCommandsLockedInterruptable(),遍历mCommandQueue队列,依次处理所有命令。
- 通过processAnrsLocked(),判断是否需要触发ANR。
- 在startDispatchCycleLocked()里面,通过inputPublisher.publishKeyEvent() 方法将按键事件分发给java层。publishKeyEvent的实现是在InputTransport.cpp 中
通过上面的概括,可以知道按键事件主要存储在3个queue中:
- InputDispatcher的mInboundQueue:存储的是从InputReader 送来的输入事件。
- Connection的outboundQueue:该队列是存储即将要发送给应用的输入事件。
- Connection的waitQueue:队列存储的是已经发给应用的事件,但是应用还未处理完成的。
1.2 InputEventInjectionResult
在处理按键分发过程中,经常会遇到该枚举,对应含义如下
enum InputEventInjectionResult {/* (仅限内部使用)指定注入挂起且其结果未知 */PENDING = -1,/* 事件注射成功. */SUCCEEDED = 0,/* 注入失败,因为注入的事件未针对相应的窗口 */TARGET_MISMATCH = 1,/* 注入失败,因为没有可用的输入目标。*/FAILED = 2,/* Injection failed due to a timeout. */TIMED_OUT = 3,
}
2. 事件分发
InputDispatcher 在start() 方法中会启动一个线程,在被唤醒后会调用到dispatchOnce 方法,在该方法中,通过调用dispatchOnceInnerLocked来分发事件
> frameworks/native/services/inputflinger/dispatcher/InputDispatcher.cppvoid InputDispatcher::dispatchOnce() {nsecs_t nextWakeupTime = LONG_LONG_MAX;{...// 如果没有挂起的命令,则运行调度循环。调度循环可能会将命令排入队列,以便稍后运行。if (!haveCommandsLocked()) {dispatchOnceInnerLocked(&nextWakeupTime);}....}// 等待回调、超时或唤醒。nsecs_t currentTime = now();int timeoutMillis = toMillisecondTimeoutDelay(currentTime, nextWakeupTime);mLooper->pollOnce(timeoutMillis);
}
2.1 dispatchOnceInnerLocked
dispatchOnceInnerLocked主要是:
-
从mInboundQueue 中取出mPendingEvent
-
通过mPendingEvent的type决定事件类型和分发方式。
-
最后如果处理了事件,就处理相关的回收。
主要代码如下:
> frameworks/native/services/inputflinger/dispatcher/InputDispatcher.cppvoid InputDispatcher::dispatchOnceInnerLocked(nsecs_t* nextWakeupTime) {nsecs_t currentTime = now();...// 优化应用切换的延迟。本质上,当按下应用程序切换键(HOME)时,我们会开始一个短暂的超时。// 当它过期时,我们会抢占调度并删除所有其他挂起的事件。bool isAppSwitchDue = mAppSwitchDueTime <= currentTime; // mAppSwitchDueTime是应用切换到期时间if (mAppSwitchDueTime < *nextWakeupTime) {*nextWakeupTime = mAppSwitchDueTime; // 更新下一次唤醒的时间}// 当前没有PendingEvent(即EventEntry),则取一个if (!mPendingEvent) {// 1、mInboundQueue 为空if (mInboundQueue.empty()) {// 如果合适就合成一个重复按键。if (mKeyRepeatState.lastKeyEntry) {if (currentTime >= mKeyRepeatState.nextRepeatTime) {// 用于创建一个新的repeat按键mPendingEvent = synthesizeKeyRepeatLocked(currentTime);} else {if (mKeyRepeatState.nextRepeatTime < *nextWakeupTime) {*nextWakeupTime = mKeyRepeatState.nextRepeatTime;}}}// 如果没有PendingEvent,就直接返回if (!mPendingEvent) {return;}} else {// 2、mInboundQueue不为空,就从队列前面取一个PendingEventmPendingEvent = mInboundQueue.front();mInboundQueue.pop_front();traceInboundQueueLengthLocked();}if (mPendingEvent->policyFlags & POLICY_FLAG_PASS_TO_USER) {// 根据当前的event 类型,post 一个 command 到 mCommandQueue// 最后是调用到Java层的PowerManagerService#userActivityFromNative()pokeUserActivityLocked(*mPendingEvent);}}// 现在我们有一个事件要发送。所有事件最终都会以这种方式取消排队和处理,即使我们打算删除它们。...bool done = false;DropReason dropReason = DropReason::NOT_DROPPED;...switch (mPendingEvent->type) {...case EventEntry::Type::KEY: {...// 最后会调用到dispatchEventLockeddone = dispatchKeyLocked(currentTime, keyEntry, &dropReason, nextWakeupTime);break;}case EventEntry::Type::MOTION: {...// 最后会调用到dispatchEventLockeddone = dispatchMotionLocked(currentTime, motionEntry, &dropReason, nextWakeupTime);break;}}if (done) { if (dropReason != DropReason::NOT_DROPPED) {// 事件没有被丢弃。找到对应的原因并通知dropInboundEventLocked(*mPendingEvent, dropReason);}mLastDropReason = dropReason;// 将mPendingEvent 置为 Null,方便下次重新获取releasePendingEventLocked();*nextWakeupTime = LONG_LONG_MIN; // force next poll to wake up immediately}
}
2.1.1 dispatchKeyLocked
> frameworks/native/services/inputflinger/dispatcher/InputDispatcher.cppbool InputDispatcher::dispatchKeyLocked(nsecs_t currentTime, std::shared_ptr<KeyEntry> entry,DropReason* dropReason, nsecs_t* nextWakeupTime) {//预处理:主要处理按键重复问题if (!entry->dispatchInProgress) {...if (mKeyRepeatState.lastKeyEntry &&mKeyRepeatState.lastKeyEntry->keyCode == entry->keyCode &&// 我们已经看到连续两个相同的按键,这表明设备驱动程序正在自动生成键重复。// 我们在这里记下重复,但我们禁用了自己的下一个键重复计时器,因为很明显我们不需要自己合成键重复。mKeyRepeatState.lastKeyEntry->deviceId == entry->deviceId) {// 确保我们不会从其他设备获取密钥。如果按下了相同的设备 ID,则新的设备 ID 将替换当前设备 ID 以按住重复键并重置重复计数。// 将来,当设备ID上出现KEY_UP时,请将其删除,并且不要停止当前设备上的密钥重复。entry->repeatCount = mKeyRepeatState.lastKeyEntry->repeatCount + 1;resetKeyRepeatLocked();mKeyRepeatState.nextRepeatTime = LONG_LONG_MAX; // 不要自己生成重复} else {//不是重复。保存按键down状态,以防我们稍后遇到重复。resetKeyRepeatLocked();mKeyRepeatState.nextRepeatTime = entry->eventTime + mConfig.keyRepeatTimeout;}mKeyRepeatState.lastKeyEntry = entry;...}// 处理policy 上次要求我们重试的情况if (entry->interceptKeyResult == KeyEntry::INTERCEPT_KEY_RESULT_TRY_AGAIN_LATER) {// 当前时间 < 唤醒时间,则进入等待状态if (currentTime < entry->interceptKeyWakeupTime) {if (entry->interceptKeyWakeupTime < *nextWakeupTime) {*nextWakeupTime = entry->interceptKeyWakeupTime;}return false; // 等到下次醒来}entry->interceptKeyResult = KeyEntry::INTERCEPT_KEY_RESULT_UNKNOWN;entry->interceptKeyWakeupTime = 0;}// 给policy提供拦截key的机会。if (entry->interceptKeyResult == KeyEntry::INTERCEPT_KEY_RESULT_UNKNOWN) {if (entry->policyFlags & POLICY_FLAG_PASS_TO_USER) {sp<IBinder> focusedWindowToken =mFocusResolver.getFocusedWindowToken(getTargetDisplayId(*entry));auto command = [this, focusedWindowToken, entry]() REQUIRES(mLock) {doInterceptKeyBeforeDispatchingCommand(focusedWindowToken, *entry);};postCommandLocked(std::move(command));return false; // wait for the command to run} else {entry->interceptKeyResult = KeyEntry::INTERCEPT_KEY_RESULT_CONTINUE;}} else if (entry->interceptKeyResult == KeyEntry::INTERCEPT_KEY_RESULT_SKIP) {if (*dropReason == DropReason::NOT_DROPPED) {*dropReason = DropReason::POLICY;}}// 如果删除事件,则清理。if (*dropReason != DropReason::NOT_DROPPED) {setInjectionResult(*entry,*dropReason == DropReason::POLICY ? InputEventInjectionResult::SUCCEEDED: InputEventInjectionResult::FAILED);mReporter->reportDroppedKey(entry->id);return true;}// 寻找输入目标std::vector<InputTarget> inputTargets;InputEventInjectionResult injectionResult =findFocusedWindowTargetsLocked(currentTime, *entry, inputTargets, nextWakeupTime);if (injectionResult == InputEventInjectionResult::PENDING) {return false;}setInjectionResult(*entry, injectionResult);if (injectionResult != InputEventInjectionResult::SUCCEEDED) {return true;}// 从事件或焦点显示添加监视器通道。addGlobalMonitoringTargetsLocked(inputTargets, getTargetDisplayId(*entry));// 分发按键dispatchEventLocked(currentTime, entry, inputTargets);return true;
}
2.1.2 dispatchMotionLocked
> frameworks/native/services/inputflinger/dispatcher/InputDispatcher.cppbool InputDispatcher::dispatchMotionLocked(nsecs_t currentTime, std::shared_ptr<MotionEntry> entry,DropReason* dropReason, nsecs_t* nextWakeupTime) {...// 是否是指针事件const bool isPointerEvent = isFromSource(entry->source, AINPUT_SOURCE_CLASS_POINTER);// Identify targets.std::vector<InputTarget> inputTargets;bool conflictingPointerActions = false;InputEventInjectionResult injectionResult;if (isPointerEvent) {  // 指针事件。(例如触摸屏)// 查找已锁定的触摸窗口目标,主要根据读取到的触控事件所属的屏幕displayid、x、y坐标位置等属性来确认目标窗口// 这里不是我们的重点injectionResult =findTouchedWindowTargetsLocked(currentTime, *entry, inputTargets, nextWakeupTime, &conflictingPointerActions);} else {  // 非触摸事件。(例如轨迹球)injectionResult =findFocusedWindowTargetsLocked(currentTime, *entry, inputTargets, nextWakeupTime);}if (injectionResult == InputEventInjectionResult::PENDING) {// 如果是pending就直接返回return false;}....// 从事件或焦点显示添加监视器通道。addGlobalMonitoringTargetsLocked(inputTargets, getTargetDisplayId(*entry));// 分发事件dispatchEventLocked(currentTime, entry, inputTargets);return true;
}
2.2 dispatchEventLocked
dispatchEventLocked 主要是遍历inputTargets,通过prepareDispatchCycleLocked分发事件。
> frameworks/native/services/inputflinger/dispatcher/InputDispatcher.cppvoid InputDispatcher::dispatchEventLocked(nsecs_t currentTime,std::shared_ptr<EventEntry> eventEntry,const std::vector<InputTarget>& inputTargets) {...for (const InputTarget& inputTarget : inputTargets) {sp<Connection> connection =getConnectionLocked(inputTarget.inputChannel->getConnectionToken());if (connection != nullptr) {prepareDispatchCycleLocked(currentTime, connection, eventEntry, inputTarget);}}
}
2.3 prepareDispatchCycleLocked
prepareDispatchCycleLocked内部又会调用enqueueDispatchEntriesLocked方法。
void InputDispatcher::prepareDispatchCycleLocked(nsecs_t currentTime,const sp<Connection>& connection,std::shared_ptr<EventEntry> eventEntry,const InputTarget& inputTarget) {// 不分裂。按原样将事件的调度条目排队。enqueueDispatchEntriesLocked(currentTime, connection, eventEntry, inputTarget);
}
2.4 enqueueDispatchEntriesLocked
主要做两个事情:
- 1)将请求模式的调度条目排队。
- 2)启动调度周期。
> frameworks/native/services/inputflinger/dispatcher/InputDispatcher.cppvoid InputDispatcher::enqueueDispatchEntriesLocked(nsecs_t currentTime,const sp<Connection>& connection,std::shared_ptr<EventEntry> eventEntry,const InputTarget& inputTarget) {bool wasEmpty = connection->outboundQueue.empty();// 将请求模式的调度条目排队。enqueueDispatchEntryLocked(connection, eventEntry, inputTarget,InputTarget::FLAG_DISPATCH_AS_HOVER_EXIT);...// 如果出站队列以前为空,请开始调度周期。if (wasEmpty && !connection->outboundQueue.empty()) {startDispatchCycleLocked(currentTime, connection);}
}
2.4.1 enqueueDispatchEntryLocked
enqueueDispatchEntryLocked 会创建一个新的DispatchEntry,然后将DispatchEntry 加入到connection的outboundQueue中
> frameworks/native/services/inputflinger/dispatcher/InputDispatcher.cppvoid InputDispatcher::enqueueDispatchEntryLocked(const sp<Connection>& connection,std::shared_ptr<EventEntry> eventEntry,const InputTarget& inputTarget,int32_t dispatchMode) {// 这是一个新事件。将新的调度条目排队到此连接的出站队列中。std::unique_ptr<DispatchEntry> dispatchEntry =createDispatchEntry(inputTarget, eventEntry, inputTargetFlags);...// 将生成的 dispatchEntry 加入到 connection的outboundQueue 中connection->outboundQueue.push_back(dispatchEntry.release());traceOutboundQueueLength(*connection);
}
2.4.2 startDispatchCycleLocked
该方法主要通过connection 发布最终的事件,至此,InputDispatcher完成事件的发布,并且将发布的事件保存在connection的waitQueue中。
> frameworks/native/services/inputflinger/dispatcher/InputDispatcher.cppvoid InputDispatcher::startDispatchCycleLocked(nsecs_t currentTime,const sp<Connection>& connection) {while (connection->status == Connection::Status::NORMAL && !connection->outboundQueue.empty()) {// 从outboundQueue 队列中取出 DispatchEntryDispatchEntry* dispatchEntry = connection->outboundQueue.front();// 发布事件status_t status;const EventEntry& eventEntry = *(dispatchEntry->eventEntry);switch (eventEntry.type) {case EventEntry::Type::KEY: {...// 发布按键事件status = connection->inputPublisher.publishKeyEvent(dispatchEntry->seq ...);break;}case EventEntry::Type::MOTION: {...// 发布运动事件。status = connection->inputPublisher.publishMotionEvent(dispatchEntry->seq ...);break;}....}// 如果status 已赋值if (status) {if (status == WOULD_BLOCK) {if (connection->waitQueue.empty()) {// pip 管道满了导致无法发布事件。// 该问题是出乎意料的,因为等待队列是空的,所以管道应该是空的// 将outboundQueue,waitQueue 队列清空,并释放队列中的DispatchEntry 对象abortBrokenDispatchCycleLocked(currentTime, connection, true /*notify*/);} else {// 管道已满,并且waitQueue 不为空,我们正在等待应用程序完成处理一些事件,然后再向其发送更多事件。}} else {// 将outboundQueue,waitQueue 队列清空,并释放队列中的DispatchEntry 对象abortBrokenDispatchCycleLocked(currentTime, connection, true /*notify*/);}return;}// 将事件从outboundQueue中移除connection->outboundQueue.erase(std::remove(connection->outboundQueue.begin(),connection->outboundQueue.end(),dispatchEntry));// 在waitQueue 尾部重新插入connection->waitQueue.push_back(dispatchEntry);}
}
2.5 publishMotionEvent
查看connection的头文件,可以知道connection->inputPublisher 是InputPublisher类
> frameworks/native/services/inputflinger/dispatcher/Connection.hclass Connection : public RefBase {
public:InputPublisher inputPublisher;
}
InputPublisher class的定义如下,负责将输入事件发布到输入通道。
> frameworks/native/include/input/InputTransport.h// 负责将输入事件发布到输入通道。
class InputPublisher {....
private:std::shared_ptr<InputChannel> mChannel;
}class InputChannel : public Parcelable {
}
publishMotionEvent 对应的实现如下
> frameworks/native/libs/input/InputTransport.cppstatus_t InputPublisher::publishMotionEvent(uint32_t seq, int32_t eventId, int32_t deviceId, int32_t source, int32_t displayId ..) {....InputMessage msg;// 设置event的参数msg.header.type = InputMessage::Type::MOTION;msg.body.motion.action = action;....// 调用InputChannel的sendMessage方法return mChannel->sendMessage(&msg);
}
mChannel即 InputChannel
> frameworks/native/include/input/InputTransport.hprivate:std::shared_ptr<InputChannel> mChannel;
2.6 runCommandsLockedInterruptable
dispatchOnceInnerLocked已经分析完,我们再次回到dispatchOnce,分析runCommandsLockedInterruptable方法
> frameworks/native/services/inputflinger/dispatcher/InputDispatcher.cppvoid InputDispatcher::dispatchOnce() {nsecs_t nextWakeupTime = LONG_LONG_MAX;{...// 运行所有挂起的命令(如果有)。如果运行了任何命令,则强制下一次轮询立即唤醒。if (runCommandsLockedInterruptable()) {nextWakeupTime = LONG_LONG_MIN;}...}
}
该方法很简单,就是遍历mCommandQueue 执行对应的command。
> frameworks/native/services/inputflinger/dispatcher/InputDispatcher.cppbool InputDispatcher::runCommandsLockedInterruptable() {do {auto command = std::move(mCommandQueue.front());mCommandQueue.pop_front();// Commands are run with the lock held, but may release and re-acquire the lock from within.// 命令在锁保持的情况下运行,但可能会从内部释放并重新获取锁。command();} while (!mCommandQueue.empty());return true;
}
通过postCommandLocked 方法将command添加到队列中
void InputDispatcher::postCommandLocked(Command&& command) {mCommandQueue.push_back(command);
}
2.7 调用栈
native层的事件分发调用栈如下
libs/input/InputTransport.cpp : InputPublisher::publishMotionEvent()
services/inputflinger/dispatcher/InputDispatcher.cpp : InputDispatcher::startDispatchCycleLocked()
services/inputflinger/dispatcher/InputDispatcher.cpp : InputDispatcher::enqueueDispatchEntriesLocked()
services/inputflinger/dispatcher/InputDispatcher.cpp : InputDispatcher::prepareDispatchCycleLocked()
services/inputflinger/dispatcher/InputDispatcher.cpp : InputDispatcher::dispatchKeyLocked()
services/inputflinger/dispatcher/InputDispatcher.cpp : InputDispatcher::dispatchOnceInnerLocked()
services/inputflinger/dispatcher/InputDispatcher.cpp : InputDispatcher::dispatchOnce()
services/inputflinger/dispatcher/InputDispatcher.cpp : InputDispatcher::start()
3. InputChannel
InputChannel负责将消息发送给到app端,那它是如何做到的呢?
3.1 sendMessage
InputChannel的sendMessage 方法定义如下,
> frameworks/native/libs/input/InputTransport.cppstatus_t InputChannel::sendMessage(const InputMessage* msg) {....ssize_t nWrite;do {nWrite = ::send(getFd(), &cleanMsg, msgLength, MSG_DONTWAIT | MSG_NOSIGNAL);} while (nWrite == -1 && errno == EINTR);....return OK;
}
其中fd很关键,当fd 写入消息的时候,会唤醒处于epoll_wait 状态的线程(原理跟handler一样)
那他是如何跟app端的fd绑定的呢?
3.2 客户端创建FD
在ViewRootImpl的setView方法中,
> frameworks/base/core/java/android/view/ViewRootImpl.javapublic void setView(View view, WindowManager.LayoutParams attrs, View panelParentView) {if ((mWindowAttributes.inputFeatures& WindowManager.LayoutParams.INPUT_FEATURE_NO_INPUT_CHANNEL) == 0) {mInputChannel = new InputChannel();}try {mOrigWindowType = mWindowAttributes.type;mAttachInfo.mRecomputeGlobalAttributes = true;collectViewAttributes();res = mWindowSession.addToDisplay(mWindow, mSeq, mWindowAttributes,getHostVisibility(), mDisplay.getDisplayId(), mWinFrame,mAttachInfo.mContentInsets, mAttachInfo.mStableInsets,mAttachInfo.mOutsets, mAttachInfo.mDisplayCutout, mInputChannel); // 将mInputChannel 注册到WMS中} catch (RemoteException e) {...}if (mInputChannel != null) {if (mInputQueueCallback != null) {mInputQueue = new InputQueue();mInputQueueCallback.onInputQueueCreated(mInputQueue);}// 创建app端监听,即WindowInputEventReceiver 作为事件的接收端mInputEventReceiver = new WindowInputEventReceiver(mInputChannel,Looper.myLooper());}}
mWindowSession.addToDisplay 对应AIDL实现为
> frameworks/base/services/core/java/com/android/server/wm/Session.javaclass Session extends IWindowSession.Stub implements IBinder.DeathRecipient {@Overridepublic int addToDisplay(IWindow window .... DisplayCutout.ParcelableWrapper outDisplayCutout, InputChannel outInputChannel) {// mService 即 WindowManagerServicereturn mService.addWindow(this, window, seq, attrs, viewVisibility, displayId, outFrame,outContentInsets, outStableInsets, outOutsets, outDisplayCutout, outInputChannel);}}
WindowManagerService实现如下
>  frameworks/base/services/core/java/com/android/server/wm/WindowManagerService.javapublic int addWindow(Session session, IWindow client, int seq,LayoutParams attrs, int viewVisibility, int displayId, Rect outFrame,Rect outContentInsets, Rect outStableInsets, Rect outOutsets,DisplayCutout.ParcelableWrapper outDisplayCutout, InputChannel outInputChannel) {final WindowState win = new WindowState(this, session, client, token, parentWindow,appOp[0], seq, attrs, viewVisibility, session.mUid,session.mCanAddInternalSystemWindow);final boolean openInputChannels = (outInputChannel != null&& (attrs.inputFeatures & INPUT_FEATURE_NO_INPUT_CHANNEL) == 0);if  (openInputChannels) {// 通过WindowState 打开对应的inputChannelwin.openInputChannel(outInputChannel);}
}
WindowState实现如下
> frameworks/base/services/core/java/com/android/server/wm/WindowState.java// 输入调度程序使用的输入通道和输入窗口句柄。
final InputWindowHandle mInputWindowHandle;
void openInputChannel(InputChannel outInputChannel) {String name = getName();InputChannel[] inputChannels = InputChannel.openInputChannelPair(name);mInputChannel = inputChannels[0]; mClientChannel = inputChannels[1];mInputWindowHandle.inputChannel = inputChannels[0];if (outInputChannel != null) {mClientChannel.transferTo(outInputChannel);mClientChannel.dispose();mClientChannel = null;} else {mDeadWindowEventReceiver = new DeadWindowEventReceiver(mClientChannel);}//  将inputChannel注册到InputManagerService中mService.mInputManager.registerInputChannel(mInputChannel, mInputWindowHandle);
}
InputManagerService 如下,最后注册到native中
> frameworks/base/services/core/java/com/android/server/input/InputManagerService.java// 注册输入通道,以便将其用作输入事件目标。
public void registerInputChannel(InputChannel inputChannel,InputWindowHandle inputWindowHandle) {nativeRegisterInputChannel(mPtr, inputChannel, inputWindowHandle, false);
}
3.3 native层注册
nativeRegisterInputChannel 实现如下
> frameworks/base/services/core/jni/com_android_server_input_InputManagerService.cppstatic void nativeRegisterInputChannel(JNIEnv* env, jclass /* clazz */,jlong ptr, jobject inputChannelObj, jobject inputWindowHandleObj, jboolean monitor) {NativeInputManager* im = reinterpret_cast<NativeInputManager*>(ptr);sp<InputChannel> inputChannel = android_view_InputChannel_getInputChannel(env,inputChannelObj);if (inputChannel == NULL) {throwInputChannelNotInitialized(env);return;}sp<InputWindowHandle> inputWindowHandle =android_server_InputWindowHandle_getHandle(env, inputWindowHandleObj);status_t status = im->registerInputChannel(env, inputChannel, inputWindowHandle, monitor);if (status) {std::string message;message += StringPrintf("Failed to register input channel.  status=%d", status);jniThrowRuntimeException(env, message.c_str());return;}if (! monitor) {android_view_InputChannel_setDisposeCallback(env, inputChannelObj,handleInputChannelDisposed, im);}
}
3.4 接收端
3.4.1 初始化
WindowInputEventReceiver对应构造函数如下
> frameworks/base/core/java/android/view/ViewRootImpl.javafinal class WindowInputEventReceiver extends InputEventReceiver {public WindowInputEventReceiver(InputChannel inputChannel, Looper looper) {super(inputChannel, looper);}
}
其父类实现如下
>  frameworks/base/core/java/android/view/InputEventReceiver.javapublic InputEventReceiver(InputChannel inputChannel, Looper looper) {mInputChannel = inputChannel;mMessageQueue = looper.getQueue(); // UI线程的loopermReceiverPtr = nativeInit(new WeakReference<InputEventReceiver>(this),inputChannel, mMessageQueue); // 通过nativeInit 与inputChannel绑定mCloseGuard.open("dispose");
}
3.4.2 nativeInit
> frameworks/base/core/jni/android_view_InputEventReceiver.cppstatic jlong nativeInit(JNIEnv* env, jclass clazz, jobject receiverWeak,jobject inputChannelObj, jobject messageQueueObj) {sp<InputChannel> inputChannel = android_view_InputChannel_getInputChannel(env,inputChannelObj);// 获取主线程的消息队列sp<MessageQueue> messageQueue = android_os_MessageQueue_getMessageQueue(env, messageQueueObj);// 创建一个NativeInputEventReceiver对象sp<NativeInputEventReceiver> receiver = new NativeInputEventReceiver(env,receiverWeak, inputChannel, messageQueue);status_t status = receiver->initialize();.....receiver->incStrong(gInputEventReceiverClassInfo.clazz); // retain a reference for the objectreturn reinterpret_cast<jlong>(receiver.get());
}
3.4.3 NativeInputEventReceiver
initialize 实现如下
> frameworks/base/core/jni/android_view_InputEventReceiver.cpp
class NativeInputEventReceiver : public LooperCallback {.....
}
status_t NativeInputEventReceiver::initialize() {setFdEvents(ALOOPER_EVENT_INPUT);return OK;
}
setFdEvents 如下
> frameworks/base/core/jni/android_view_InputEventReceiver.cppvoid NativeInputEventReceiver::setFdEvents(int events) {if (mFdEvents != events) {mFdEvents = events;int fd = mInputConsumer.getChannel()->getFd();if (events) {//将FD添加到消息池中mMessageQueue->getLooper()->addFd(fd, 0, events, this, NULL);} else {mMessageQueue->getLooper()->removeFd(fd);}}
}
当事件分发的时候,looper会调用到NativeInputEventReceiver的handleEvent 方法
> system/core/libutils/Looper.cpp
int Looper::pollInner(int timeoutMillis) {....int callbackResult = response.request.callback->handleEvent(fd, events, data);if (callbackResult == 0) {AutoMutex _l(mLock);removeSequenceNumberLocked(response.seq);}....
}
NativeInputEventReceiver的handleEvent 对应实现如下:
> frameworks/base/core/jni/android_view_InputEventReceiver.cppint NativeInputEventReceiver::handleEvent(int receiveFd, int events, void* data) {....if (events & ALOOPER_EVENT_INPUT) {JNIEnv* env = AndroidRuntime::getJNIEnv();// 调用consumeEvents 来消费事件status_t status = consumeEvents(env, false /*consumeBatches*/, -1, NULL);mMessageQueue->raiseAndClearException(env, "handleReceiveCallback");return status == OK || status == NO_MEMORY ? 1 : 0;}
}status_t NativeInputEventReceiver::consumeEvents(JNIEnv* env,bool consumeBatches, nsecs_t frameTime, bool* outConsumedBatch) {.....if (inputEventObj) {if (kDebugDispatchCycle) {ALOGD("channel '%s' ~ Dispatching input event.", getInputChannelName().c_str());}// 调用java层的InputEventReceiver#dispatchInputEvent方法env->CallVoidMethod(receiverObj.get(),gInputEventReceiverClassInfo.dispatchInputEvent, seq, inputEventObj,displayId);if (env->ExceptionCheck()) {ALOGE("Exception dispatching input event.");skipCallbacks = true;}env->DeleteLocalRef(inputEventObj);}
}
4. Activity事件接收
4.1 WindowInputEventReceiver
从上面得知,事件会分发到InputEventReceiver#dispatchInputEvent方法中
> frameworks/base/core/java/android/view/InputEventReceiver.javaprivate void dispatchInputEvent(int seq, InputEvent event, int displayId) {mSeqMap.put(event.getSequenceNumber(), seq);onInputEvent(event, displayId);
}
WindowInputEventReceiver 重写了onInputEvent 方法
> frameworks/base/core/java/android/view/ViewRootImpl.javafinal class WindowInputEventReceiver extends InputEventReceiver {@Overridepublic void onInputEvent(InputEvent event, int displayId) {enqueueInputEvent(event, this, 0, true);}...
}
4.2 ViewRooImpl
4.2.1 enqueueInputEvent
> frameworks/base/core/java/android/view/ViewRootImpl.javavoid enqueueInputEvent(InputEvent event,InputEventReceiver receiver, int flags, boolean processImmediately) {adjustInputEventForCompatibility(event);QueuedInputEvent q = obtainQueuedInputEvent(event, receiver, flags);// 始终按顺序对输入事件进行排队,而不考虑其时间戳。我们这样做是因为应用程序或 IME 可能会注入密钥事件以响应触摸事件,// 我们希望确保按接收顺序处理注入的密钥,并且我们不能相信注入事件的时间戳是单调的。QueuedInputEvent last = mPendingInputEventTail;if (last == null) {mPendingInputEventHead = q;mPendingInputEventTail = q;} else {last.mNext = q;mPendingInputEventTail = q;}mPendingInputEventCount += 1;if (processImmediately) {doProcessInputEvents(); // 分发输入事件} else {scheduleProcessInputEvents();}
}
4.2.2 doProcessInputEvents
> frameworks/base/core/java/android/view/ViewRootImpl.javavoid doProcessInputEvents() {// 传递队列中所有pending 输入事件。while (mPendingInputEventHead != null) {QueuedInputEvent q = mPendingInputEventHead; // QueuedInputEvent 封装了KeyEvent的信息mPendingInputEventHead = q.mNext;if (mPendingInputEventHead == null) {mPendingInputEventTail = null;}q.mNext = null;mPendingInputEventCount -= 1;long eventTime = q.mEvent.getEventTimeNano();long oldestEventTime = eventTime;if (q.mEvent instanceof MotionEvent) {MotionEvent me = (MotionEvent)q.mEvent;if (me.getHistorySize() > 0) {oldestEventTime = me.getHistoricalEventTimeNano(0);}}// 更新输入事件时间mChoreographer.mFrameInfo.updateInputEventTime(eventTime, oldestEventTime);deliverInputEvent(q);// 给应用提供输入事件}}
4.2.3 deliverInputEvent
> frameworks/base/core/java/android/view/ViewRootImpl.javaprivate void deliverInputEvent(QueuedInputEvent q) {if (mInputEventConsistencyVerifier != null) {mInputEventConsistencyVerifier.onInputEvent(q.mEvent, 0);}InputStage stage;if (q.shouldSendToSynthesizer()) {stage = mSyntheticInputStage;} else {// shouldSkipIme 用于判断是否跳过输入法,默认是跳过stage = q.shouldSkipIme() ? mFirstPostImeInputStage : mFirstInputStage;}if (q.mEvent instanceof KeyEvent) {mUnhandledKeyManager.preDispatch((KeyEvent) q.mEvent);}if (stage != null) {handleWindowFocusChanged();stage.deliver(q); // 通过InputStage分发事件} else {finishInputEvent(q);}}
我们先考虑跳过输入法的场景,故这里的stage是mFirstPostImeInputStage,mFirstPostImeInputStage在setView中赋值,对应是EarlyPostImeInputStage
> frameworks/base/core/java/android/view/ViewRootImpl.javapublic void setView(View view, WindowManager.LayoutParams attrs, View panelParentView) {....InputStage viewPostImeStage = new ViewPostImeInputStage(mSyntheticInputStage);InputStage nativePostImeStage = new NativePostImeInputStage(viewPostImeStage,"aq:native-post-ime:" + counterSuffix);InputStage earlyPostImeStage = new EarlyPostImeInputStage(nativePostImeStage);InputStage imeStage = new ImeInputStage(earlyPostImeStage,"aq:ime:" + counterSuffix);InputStage viewPreImeStage = new ViewPreImeInputStage(imeStage);InputStage nativePreImeStage = new NativePreImeInputStage(viewPreImeStage,"aq:native-pre-ime:" + counterSuffix);mFirstInputStage = nativePreImeStage;mFirstPostImeInputStage = earlyPostImeStage;....
}
4.5 InputStage
InputStage 是一个链表结构,其内部存储下一个InputStage,采用拦截器模式来分发事件。
4.5.1 deliver
> frameworks/base/core/java/android/view/ViewRootImpl.javaabstract class InputStage {private final InputStage mNext;public final void deliver(QueuedInputEvent q) {if ((q.mFlags & QueuedInputEvent.FLAG_FINISHED) != 0) {forward(q);} else if (shouldDropInputEvent(q)) {finish(q, false);} else {apply(q, onProcess(q)); // 调用到子类的onProcess来决定是否需要拦截该事件}}
}
4.6 EarlyPostImeInputStage
EarlyPostImeInputStage 的实现如下
> frameworks/base/core/java/android/view/ViewRootImpl.javafinal class EarlyPostImeInputStage extends InputStage {public EarlyPostImeInputStage(InputStage next) {super(next);}@Overrideprotected int onProcess(QueuedInputEvent q) {if (q.mEvent instanceof KeyEvent) {return processKeyEvent(q);} else {final int source = q.mEvent.getSource();if ((source & InputDevice.SOURCE_CLASS_POINTER) != 0) {return processPointerEvent(q);}}return FORWARD; // 由于是触摸事件,这里会转发给下一个拦截器}.....}
EarlyPostImeInputStage没有对触摸事件做拦截,故会分发给NativePostImeInputStage
4.7 NativePostImeInputStage
定义如下
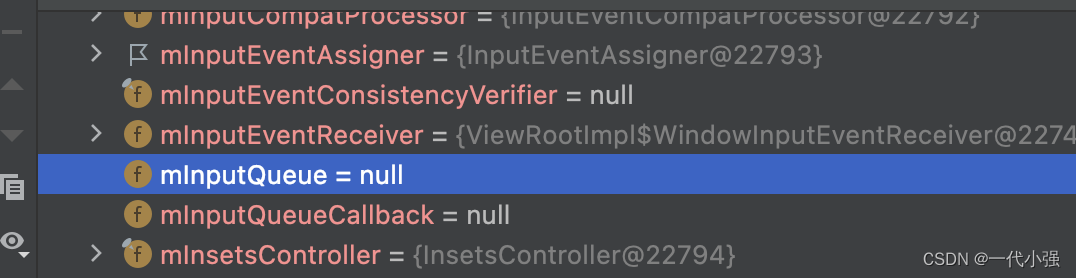
> frameworks/base/core/java/android/view/ViewRootImpl.javafinal class NativePostImeInputStage extends AsyncInputStageimplements InputQueue.FinishedInputEventCallback {public NativePostImeInputStage(InputStage next, String traceCounter) {super(next, traceCounter);}@Overrideprotected int onProcess(QueuedInputEvent q) {if (mInputQueue != null) {mInputQueue.sendInputEvent(q.mEvent, q, false, this);return DEFER;}return FORWARD;}}
mInputQueue 是ViewRootImpl的变量,通过debug发现mInputQueue为null,故会继续转发给ViewPostImeInputStage。
4.8 ViewPostImeInputStage
实现如下
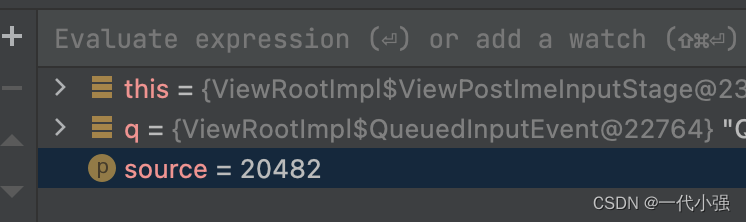
> frameworks/base/core/java/android/view/ViewRootImpl.javafinal class ViewPostImeInputStage extends InputStage {public ViewPostImeInputStage(InputStage next) {super(next);}@Overrideprotected int onProcess(QueuedInputEvent q) {if (q.mEvent instanceof KeyEvent) {return processKeyEvent(q);} else {final int source = q.mEvent.getSource(); //source值是20482if ((source & InputDevice.SOURCE_CLASS_POINTER) != 0) {return processPointerEvent(q);} else if ((source & InputDevice.SOURCE_CLASS_TRACKBALL) != 0) {return processTrackballEvent(q);} else {return processGenericMotionEvent(q);}}}}
通过计算得知source & InputDevice.SOURCE_CLASS_POINTER != 0,故会调用到processPointerEvent 方法
4.8.1 processPointerEvent
实现如下:
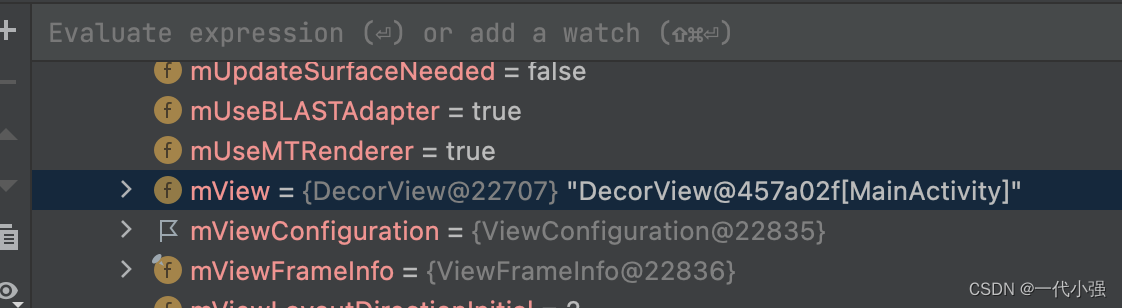
> frameworks/base/core/java/android/view/ViewRootImpl.javafinal class ViewPostImeInputStage extends InputStage {....private int processPointerEvent(QueuedInputEvent q) {final MotionEvent event = (MotionEvent)q.mEvent;mAttachInfo.mUnbufferedDispatchRequested = false;mAttachInfo.mHandlingPointerEvent = true;boolean handled = mView.dispatchPointerEvent(event); // 即调用到DecorView的dispatchPointerEvent方法....return handled ? FINISH_HANDLED : FORWARD; // 如果已经消费事件,就拦截事件,返回finish。}}
其中mView即为ViewRootImpl中的DecorView
4.9 DecorView
4.9.1 dispatchPointerEvent
dispatchPointerEvent实现如下
> frameworks/base/core/java/android/view/View.javapublic final boolean dispatchPointerEvent(MotionEvent event) {if (event.isTouchEvent()) {return dispatchTouchEvent(event);} else {return dispatchGenericMotionEvent(event);}}这里是触摸事件,故会分发给dispatchTouchEvent
4.9.2 dispatchTouchEvent
DecorView 重写了dispatchTouchEvent 方法,内部通过window.callback来决定事件分发。
> frameworks/base/core/java/com/android/internal/policy/DecorView.java@Overridepublic boolean dispatchTouchEvent(MotionEvent ev) {final Window.Callback cb = mWindow.getCallback(); // 通过phineWindow获取callBackreturn cb != null && !mWindow.isDestroyed() && mFeatureId < 0? cb.dispatchTouchEvent(ev) : super.dispatchTouchEvent(ev);}Activity 在attach的时候,会通过phonewindow注册监听
> frameworks/base/core/java/android/app/Activity.javafinal void attach(Context context, ActivityThread aThread,Instrumentation instr, IBinder token, int ident,Application application, Intent intent, ActivityInfo info,CharSequence title, Activity parent, String id,NonConfigurationInstances lastNonConfigurationInstances,Configuration config, String referrer, IVoiceInteractor voiceInteractor,Window window, ActivityConfigCallback activityConfigCallback) {attachBaseContext(context);mFragments.attachHost(null /*parent*/);mWindow = new PhoneWindow(this, window, activityConfigCallback);mWindow.setWindowControllerCallback(this);mWindow.setCallback(this);....}
故最终分发到Activity的dispatchTouchEvent 中
4.10 调用栈
frameworks/base/core/java/android/app/Activity.java : Activity.dispatchTouchEvent()
frameworks/base/core/java/com/android/internal/policy/DecorView.java : DecorView.dispatchTouchEvent()
frameworks/base/core/java/android/view/View.java : View.dispatchPointerEvent()
frameworks/base/core/java/android/view/ViewRootImpl.java : ViewPostImeInputStage.processPointerEvent()
frameworks/base/core/java/android/view/ViewRootImpl.java : ViewPostImeInputStage.onProcess()
frameworks/base/core/java/android/view/ViewRootImpl.java : NativePostImeInputStage.onProcess()
frameworks/base/core/java/android/view/ViewRootImpl.java : EarlyPostImeInputStage.onProcess()
frameworks/base/core/java/android/view/ViewRootImpl.java : ViewRootImpl.deliverInputEvent()
frameworks/base/core/java/android/view/ViewRootImpl.java : ViewRootImpl.enqueueInputEvent()
frameworks/base/core/java/android/view/InputEventReceiver.java : InputEventReceiver.onInputEvent()
frameworks/base/core/java/android/view/InputEventReceiver.java : InputEventReceiver.dispatchInputEvent()
5. View 事件分发
5.1 Activity
dispatchTouchEvent 实现如下
> frameworks/base/core/java/android/app/Activity.javapublic boolean dispatchTouchEvent(MotionEvent ev) {if (ev.getAction() == MotionEvent.ACTION_DOWN) {onUserInteraction();}if (getWindow().superDispatchTouchEvent(ev)) {return true;}return onTouchEvent(ev); // 如果window没有消费,就默认传给activity的onTouchEvent方法。}// 该方法默认不消费public boolean onTouchEvent(MotionEvent event) {if (mWindow.shouldCloseOnTouch(this, event)) {finish();return true;}return false;}5.2 PhoneWindow
superDispatchTouchEvent的实现如下,只是调用DecorView的superDispatchTouchEvent
> frameworks/base/core/java/com/android/internal/policy/PhoneWindow.java@Overridepublic boolean superDispatchTouchEvent(MotionEvent event) {return mDecor.superDispatchTouchEvent(event);}superDispatchTouchEvent 实现也很简单,直接调用ViewGroup 的 dispatchTouchEvent
> frameworks/base/core/java/com/android/internal/policy/DecorView.javapublic boolean superDispatchTouchEvent(MotionEvent event) {return super.dispatchTouchEvent(event);}5.3 ViewGroup
5.3.1 dispatchTouchEvent
view层的事件,最终是由ViewGroup去分发的,在分发的时候,会优先分发给子view
> frameworks/base/core/java/android/view/ViewGroup.java@Overridepublic boolean dispatchTouchEvent(MotionEvent ev) {// 1、检查是否拦截final boolean intercepted;if (actionMasked == MotionEvent.ACTION_DOWN|| mFirstTouchTarget != null) { // 有触摸目标或者action为downfinal boolean disallowIntercept = (mGroupFlags & FLAG_DISALLOW_INTERCEPT) != 0;if (!disallowIntercept) {intercepted = onInterceptTouchEvent(ev); // 判断是否拦截,默认falseev.setAction(action); }} else {// 没有触摸目标,此操作不是初始关闭,因此此视图组继续拦截触摸。intercepted = true;}// 2、检查是否取消final boolean canceled = resetCancelNextUpFlag(this)|| actionMasked == MotionEvent.ACTION_CANCEL;// 没有取消,也没有被拦截 if (!canceled && !intercepted) {// 找一个可以接收事件的孩子。从前到后扫描mChildren。final View[] children = mChildren;for (int i = childrenCount - 1; i >= 0; i--) {if (dispatchTransformedTouchEvent(ev, false, child, idBitsToAssign)) {// childView想在边界内接受触摸。}}}// 分发给触摸目标。if (mFirstTouchTarget == null) {// 没有触摸目标,因此请将其视为普通视图handled = dispatchTransformedTouchEvent(ev, canceled, null,TouchTarget.ALL_POINTER_IDS);}....}
5.3.2 onInterceptTouchEvent
默认不做拦截
> frameworks/base/core/java/android/view/ViewGroup.javapublic boolean onInterceptTouchEvent(MotionEvent ev) {if (ev.isFromSource(InputDevice.SOURCE_MOUSE)&& ev.getAction() == MotionEvent.ACTION_DOWN&& ev.isButtonPressed(MotionEvent.BUTTON_PRIMARY)&& isOnScrollbarThumb(ev.getX(), ev.getY())) {// 事件在滚动条上return true;}return false;}
5.3.3 dispatchTransformedTouchEvent
该方法负责将运动事件转换为特定子视图的坐标空间,如果子项为空,则假定 MotionEvent 将改为发送到此视图组。
> frameworks/base/core/java/android/view/ViewGroup.javaprivate boolean dispatchTransformedTouchEvent(MotionEvent event, boolean cancel,View child, int desiredPointerIdBits) {....// 执行任何必要的转换和调度。if (child == null) {handled = super.dispatchTouchEvent(transformedEvent); // 调用View的dispatchTouchEvent} else {final float offsetX = mScrollX - child.mLeft;final float offsetY = mScrollY - child.mTop;transformedEvent.offsetLocation(offsetX, offsetY);if (! child.hasIdentityMatrix()) {transformedEvent.transform(child.getInverseMatrix());}handled = child.dispatchTouchEvent(transformedEvent); // 调用子View的dispatchTouchEvent}return handled; }
最后都是调用到view的dispatchTouchEvent方法
5.4 View
5.4.1 dispatchTouchEvent
实现如下
> frameworks/base/core/java/android/view/View.javapublic boolean dispatchTouchEvent(MotionEvent event) {.....if (onFilterTouchEventForSecurity(event)) {// 1、如果有设置OnTouchListener,就先交给mOnTouchListener 处理ListenerInfo li = mListenerInfo;if (li != null && li.mOnTouchListener != null&& (mViewFlags & ENABLED_MASK) == ENABLED&& li.mOnTouchListener.onTouch(this, event)) {result = true;}//2、如果没有处理,交给onTouchEvent方法if (!result && onTouchEvent(event)) {result = true;}}....}
5.4.2 onTouchEvent
在action down的时候,会延迟检查是否发生长按事件
> frameworks/base/core/java/android/view/View.javapublic boolean onTouchEvent(MotionEvent event) {// 1、如果设置了mTouchDelegate,就直接交给它处理if (mTouchDelegate != null) {if (mTouchDelegate.onTouchEvent(event)) {return true;}}// 如果可以点击或者支持在悬停或长按时显示工具提示。if (clickable || (viewFlags & TOOLTIP) == TOOLTIP) {switch (action) {case MotionEvent.ACTION_UP:....// 仅当我们处于按下状态时才执行单击操作if (!focusTaken) {if (mPerformClick == null) {mPerformClick = new PerformClick();}if (!post(mPerformClick)) {performClickInternal();}}break;case MotionEvent.ACTION_DOWN:// 对于滚动容器内的视图,请将按下的反馈延迟一小段时间,以防这是滚动。if (isInScrollingContainer) {mPrivateFlags |= PFLAG_PREPRESSED;if (mPendingCheckForTap == null) {mPendingCheckForTap = new CheckForTap();}mPendingCheckForTap.x = event.getX();mPendingCheckForTap.y = event.getY();postDelayed(mPendingCheckForTap, ViewConfiguration.getTapTimeout());} else {// 不在滚动容器内,因此请立即显示反馈setPressed(true, x, y);// 检查是否长按checkForLongClick(0, x, y);}break;}return false;}
5.4.3 LongClick
checkForLongClick用于发送延时消息,触发长按
> frameworks/base/core/java/android/view/View.javaprivate void checkForLongClick(int delayOffset, float x, float y) {if ((mViewFlags & LONG_CLICKABLE) == LONG_CLICKABLE || (mViewFlags & TOOLTIP) == TOOLTIP) {if (mPendingCheckForLongPress == null) {mPendingCheckForLongPress = new CheckForLongPress();}mPendingCheckForLongPress.setAnchor(x, y);mPendingCheckForLongPress.rememberWindowAttachCount();mPendingCheckForLongPress.rememberPressedState();// 延迟消息触发长按事件postDelayed(mPendingCheckForLongPress,ViewConfiguration.getLongPressTimeout() - delayOffset);}}private final class CheckForLongPress implements Runnable {@Overridepublic void run() {if ((mOriginalPressedState == isPressed()) && (mParent != null)&& mOriginalWindowAttachCount == mWindowAttachCount) {// 触发长按if (performLongClick(mX, mY)) {mHasPerformedLongPress = true;}}}....}
5.4.4 onClick
在action up的时候,会post一个PerformClick
> frameworks/base/core/java/android/view/View.javaprivate final class PerformClick implements Runnable {@Overridepublic void run() {performClickInternal();}}private boolean performClickInternal() {// Must notify autofill manager before performing the click actions to avoid scenarios where// the app has a click listener that changes the state of views the autofill service might// be interested on.notifyAutofillManagerOnClick();return performClick();}
最后调用到performClick()
> frameworks/base/core/java/android/view/View.javapublic boolean performClick() {final boolean result;final ListenerInfo li = mListenerInfo;if (li != null && li.mOnClickListener != null) {playSoundEffect(SoundEffectConstants.CLICK);li.mOnClickListener.onClick(this); // 如果设置点击事件就调用onClick回调。result = true;} else {result = false;}sendAccessibilityEvent(AccessibilityEvent.TYPE_VIEW_CLICKED);notifyEnterOrExitForAutoFillIfNeeded(true);return result;}
5.5 调用栈
View 的点击事件调用栈如下
frameworks/base/core/java/android/view/View.java : View.performClick()
frameworks/base/core/java/android/view/View.java : View.performClickInternal()
frameworks/base/core/java/android/view/View.java : PerformClick.run()
frameworks/base/core/java/android/view/View.java : View.onTouchEvent()
frameworks/base/core/java/android/view/View.java : View.dispatchTouchEvent()
frameworks/base/core/java/android/view/ViewGroup.java : ViewGroup.dispatchTransformedTouchEvent()
frameworks/base/core/java/android/view/ViewGroup.java : ViewGroup.dispatchTouchEvent()
frameworks/base/core/java/com/android/internal/policy/DecorView.java : DecorView.superDispatchTouchEvent()
frameworks/base/core/java/com/android/internal/policy/PhoneWindow.java : PhoneWindow.superDispatchTouchEvent()
frameworks/base/core/java/android/app/Activity.java : Activity.dispatchTouchEvent()
6. 事件确认
6.1 ViewPostImeInputStage
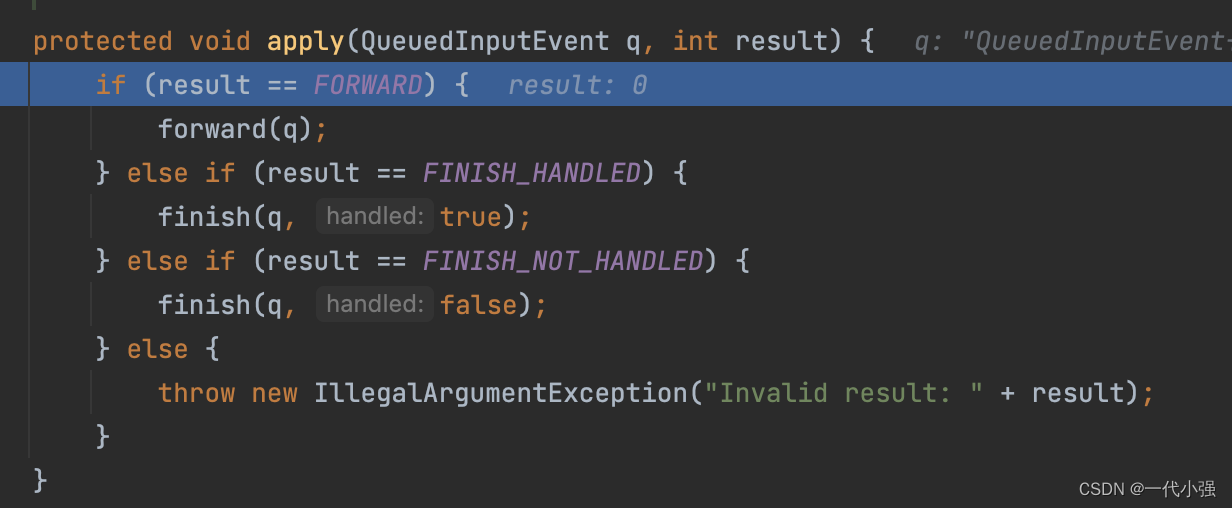
在ViewPostImeInputStage 中,如果我们的view处理了对应的事件,就会调用到finish方法,接着调用下一个处理器
> frameworks/base/core/java/android/view/ViewRootImpl.javaprotected void apply(QueuedInputEvent q, int result) {if (result == FORWARD) {forward(q);} else if (result == FINISH_HANDLED) {finish(q, true);} else if (result == FINISH_NOT_HANDLED) {finish(q, false);} else {throw new IllegalArgumentException("Invalid result: " + result);}}protected void finish(QueuedInputEvent q, boolean handled) {q.mFlags |= QueuedInputEvent.FLAG_FINISHED;if (handled) {q.mFlags |= QueuedInputEvent.FLAG_FINISHED_HANDLED;}forward(q);}// 调用下一个处理器protected void forward(QueuedInputEvent q) {onDeliverToNext(q);}
由初始化得知下一个处理器是SyntheticInputStage
> frameworks/base/core/java/android/view/ViewRootImpl.javapublic void setView(View view, WindowManager.LayoutParams attrs, View panelParentView) {mSyntheticInputStage = new SyntheticInputStage();InputStage viewPostImeStage = new ViewPostImeInputStage(mSyntheticInputStage);}
6.2 SyntheticInputStage
6.2.1 onProcess
> frameworks/base/core/java/android/view/ViewRootImpl.javafinal class SyntheticInputStage extends InputStage {public SyntheticInputStage() {super(null);}@Overrideprotected int onProcess(QueuedInputEvent q) {q.mFlags |= QueuedInputEvent.FLAG_RESYNTHESIZED;if (q.mEvent instanceof MotionEvent) {final MotionEvent event = (MotionEvent)q.mEvent;final int source = event.getSource();if ((source & InputDevice.SOURCE_CLASS_TRACKBALL) != 0) { // 是轨迹球mTrackball.process(event);return FINISH_HANDLED;} else if ((source & InputDevice.SOURCE_CLASS_JOYSTICK) != 0) { // 是操纵杆mJoystick.process(event);return FINISH_HANDLED;} else if ((source & InputDevice.SOURCE_TOUCH_NAVIGATION)== InputDevice.SOURCE_TOUCH_NAVIGATION) { // 是摸导航mTouchNavigation.process(event);return FINISH_HANDLED;}} else if ((q.mFlags & QueuedInputEvent.FLAG_UNHANDLED) != 0) {mKeyboard.process((KeyEvent)q.mEvent);return FINISH_HANDLED;}return FORWARD;}
}
onProcess 返回值是FORWARD,会继续调用onDeliverToNext
forward 方法中直接调用onDeliverToNext
> frameworks/base/core/java/android/view/ViewRootImpl.javaabstract class InputStage {protected void forward(QueuedInputEvent q) {onDeliverToNext(q);}
}
6.2.2 onDeliverToNext
onProcess 返回值是FORWARD,在调用onDeliverToNext 的时候,由于next为null就会调用finish方法
> frameworks/base/core/java/android/view/ViewRootImpl.java
abstract class InputStage {protected void onDeliverToNext(QueuedInputEvent q) {if (mNext != null) {mNext.deliver(q);} else {finishInputEvent(q);}}
}
6.2.3 finishInputEvent
这里的mReceiver 是WindowInputEventReceiver
> frameworks/base/core/java/android/view/ViewRootImpl.javaprivate void finishInputEvent(QueuedInputEvent q) {if (q.mReceiver != null) {boolean handled = (q.mFlags & QueuedInputEvent.FLAG_FINISHED_HANDLED) != 0;q.mReceiver.finishInputEvent(q.mEvent, handled);} else {q.mEvent.recycleIfNeededAfterDispatch();}// 回收队列中的输入事件recycleQueuedInputEvent(q);
}
6.3 WindowInputEventReceiver
finishInputEvent 的实现如下
> frameworks/base/core/java/android/view/InputEventReceiver.java
public final void finishInputEvent(InputEvent event, boolean handled) {....int index = mSeqMap.indexOfKey(event.getSequenceNumber());if (index < 0) {Log.w(TAG, "Attempted to finish an input event that is not in progress.");} else {int seq = mSeqMap.valueAt(index);mSeqMap.removeAt(index);// 调用naive接口通知事件是否已经消费nativeFinishInputEvent(mReceiverPtr, seq, handled);}event.recycleIfNeededAfterDispatch();
}
6.4 android_view_InputEventReceiver
来到native层,nativeFinishInputEvent 实现如下
> frameworks/native/core/jni/android_view_InputEventReceiver.cppstatic void nativeFinishInputEvent(JNIEnv* env, jclass clazz, jlong receiverPtr,jint seq, jboolean handled) {sp<NativeInputEventReceiver> receiver = reinterpret_cast<NativeInputEventReceiver*>(receiverPtr);status_t status = receiver->finishInputEvent(seq, handled);.....
}
6.5 NativeInputEventReceiver
NativeInputEventReceiver::finishInputEvent 方法实现
> frameworks/native/core/jni/android_view_InputEventReceiver.cppstatus_t NativeInputEventReceiver::finishInputEvent(uint32_t seq, bool handled) {....Finish finish{.seq = seq,.handled = handled,};mOutboundQueue.push_back(finish);// 将finish事件添加到集合的最后return processOutboundEvents();
}status_t NativeInputEventReceiver::processOutboundEvents() {while (!mOutboundQueue.empty()) {OutboundEvent& outbound = *mOutboundQueue.begin();status_t status;if (std::holds_alternative<Finish>(outbound)) {const Finish& finish = std::get<Finish>(outbound);// mInputConsumer是InputConsumer的实例status = mInputConsumer.sendFinishedSignal(finish.seq, finish.handled);} else if (std::holds_alternative<Timeline>(outbound)) {const Timeline& timeline = std::get<Timeline>(outbound);status = mInputConsumer.sendTimeline(timeline.inputEventId, timeline.timeline);} ....return status;}return OK;
}
mInputConsumer.sendFinishedSignal() 实现是在InputTransport.cpp 中
6.6 InputTransport
sendFinishedSignal 实现如下
> frameworks/native/libs/input/InputTransport.cppstatus_t InputConsumer::sendFinishedSignal(uint32_t seq, bool handled) {if (seqChainCount) {....while (!status && chainIndex > 0) {chainIndex--;status = sendUnchainedFinishedSignal(chainSeqs[chainIndex], handled);}....}// 为批次中的最后一条消息发送完成信号。return sendUnchainedFinishedSignal(seq, handled);
}
主要在sendUnchainedFinishedSignal中,通过InputChannel 发送完成信号
> frameworks/native/libs/input/InputTransport.cppstatus_t InputConsumer::sendUnchainedFinishedSignal(uint32_t seq, bool handled) {InputMessage msg;msg.header.type = InputMessage::Type::FINISHED;msg.header.seq = seq;msg.body.finished.handled = handled;msg.body.finished.consumeTime = getConsumeTime(seq);status_t result = mChannel->sendMessage(&msg);return result;
}
那这个message是在哪里接收到呢?
6.7 InputManagerService
createInputChannel 的实现如下
> frameworks/base/services/core/java/com/android/server/input/InputManagerService.java// 创建一个输入通道以用作输入事件目标。public InputChannel createInputChannel(String name) {// mNative是NativeInputManagerService 接口的实例,NativeImpl 实现了该接口,所以实现在NativeImpl 中return mNative.createInputChannel(name);}createInputChannel 是一个native方法
> frameworks/base/services/core/java/com/android/server/input/NativeInputManagerService.javaclass NativeImpl implements NativeInputManagerService {....public native InputChannel createInputChannel(String name); }
createInputChannel() 在 native层对应的方法是nativeCreateInputChannel
>  frameworks/base/services/core/jni/com_android_server_input_InputManagerService.cpp// Java层的createInputChannel 方法映射到native的nativeCreateInputChannel 方法
static const JNINativeMethod gInputManagerMethods[] = {...{"createInputChannel", "(Ljava/lang/String;)Landroid/view/InputChannel;",(void*)nativeCreateInputChannel},
}int register_android_server_InputManager(JNIEnv* env) {// 注册native层的方法,与Java层的NativeInputManagerService$NativeImpl绑定int res = jniRegisterNativeMethods(env,"com/android/server/input/""NativeInputManagerService$NativeImpl",gInputManagerMethods, NELEM(gInputManagerMethods));
}static jobject nativeCreateInputChannel(JNIEnv* env, jobject nativeImplObj, jstring nameObj) {NativeInputManager* im = getNativeInputManager(env, nativeImplObj);....base::Result<std::unique_ptr<InputChannel>> inputChannel = im->createInputChannel(name);...jobject inputChannelObj =android_view_InputChannel_createJavaObject(env, std::move(*inputChannel));android_view_InputChannel_setDisposeCallback(env, inputChannelObj,handleInputChannelDisposed, im);return inputChannelObj;
}// NativeInputManager的createInputChannel 方法定义
base::Result<std::unique_ptr<InputChannel>> NativeInputManager::createInputChannel(const std::string& name) {// mInputManager 是 InputManager 的实例return mInputManager->getDispatcher().createInputChannel(name);
}
getDispatcher() 方法返回InputDispatcher实例
6.8 InputDispatcher
createInputChannel实现如下
> frameworks/native/services/inputflinger/dispatcher/InputDispatcher.cppResult<std::unique_ptr<InputChannel>> InputDispatcher::createInputChannel(const std::string& name) {std::unique_ptr<InputChannel> serverChannel;std::unique_ptr<InputChannel> clientChannel;// 将serverChannel(接收端) 与 clientChannel(发送端) 绑定status_t result = InputChannel::openInputChannelPair(name, serverChannel, clientChannel);{ // acquire lockstd::scoped_lock _l(mLock);const sp<IBinder>& token = serverChannel->getConnectionToken();int fd = serverChannel->getFd();sp<Connection> connection =new Connection(std::move(serverChannel), false /*monitor*/, mIdGenerator);mConnectionsByToken.emplace(token, connection);// 注册回调 handleReceiveCallback 方法std::function<int(int events)> callback = std::bind(&InputDispatcher::handleReceiveCallback,this, std::placeholders::_1, token);// 将callback 与 FD(即serverChannel) 关联起来mLooper->addFd(fd, 0, ALOOPER_EVENT_INPUT, new LooperEventCallback(callback), nullptr);} // release lockmLooper->wake();return clientChannel;
}
所以应用层发送的finish事件最终来到了InputDispatcher::handleReceiveCallback 方法
handleReceiveCallback实现如下
> frameworks/native/services/inputflinger/dispatcher/InputDispatcher.cppint InputDispatcher::handleReceiveCallback(int events, sp<IBinder> connectionToken) {sp<Connection> connection = getConnectionLocked(connectionToken);bool notify;if (!(events & (ALOOPER_EVENT_ERROR | ALOOPER_EVENT_HANGUP))) {nsecs_t currentTime = now();bool gotOne = false;status_t status = OK;for (;;) {Result<InputPublisher::ConsumerResponse> result =connection->inputPublisher.receiveConsumerResponse();if (!result.ok()) {status = result.error().code();break;}// 如果分发结束if (std::holds_alternative<InputPublisher::Finished>(*result)) {const InputPublisher::Finished& finish =std::get<InputPublisher::Finished>(*result);// 执行事件分发结束的回收处理finishDispatchCycleLocked(currentTime, connection, finish.seq, finish.handled,finish.consumeTime);} else if (std::holds_alternative<InputPublisher::Timeline>(*result)) {if (shouldReportMetricsForConnection(*connection)) {const InputPublisher::Timeline& timeline =std::get<InputPublisher::Timeline>(*result);mLatencyTracker.trackGraphicsLatency(timeline.inputEventId,connection->inputChannel->getConnectionToken(),std::move(timeline.graphicsTimeline));}}gotOne = true;}}....return 0; // remove the callback
}
finishDispatchCycleLocked实现如下
> frameworks/native/services/inputflinger/dispatcher/InputDispatcher.cppvoid InputDispatcher::finishDispatchCycleLocked(nsecs_t currentTime,const sp<Connection>& connection, uint32_t seq,bool handled, nsecs_t consumeTime) {// 通知其他系统组件并准备开始下一个调度周期。auto command = [this, currentTime, connection, seq, handled, consumeTime]() REQUIRES(mLock) {doDispatchCycleFinishedCommand(currentTime, connection, seq, handled, consumeTime);};postCommandLocked(std::move(command));
}
doDispatchCycleFinishedCommand 该方法主要处理执行完成后的回收动作,包括将对应的事件从waitQueue 队列中移除。
> frameworks/native/services/inputflinger/dispatcher/InputDispatcher.cppvoid InputDispatcher::doDispatchCycleFinishedCommand(... uint32_t seq ..) {std::deque<DispatchEntry*>::iterator dispatchEntryIt = connection->findWaitQueueEntry(seq);// 将事件出列并开始下一个循环。因为锁可能已经被释放,等待队列的内容可能已经被清空,所以我们需要仔细检查一些事情。if (dispatchEntryIt != connection->waitQueue.end()) {dispatchEntry = *dispatchEntryIt;// 将对应的事件从waitQueue移除connection->waitQueue.erase(dispatchEntryIt);const sp<IBinder>& connectionToken = connection->inputChannel->getConnectionToken();// 将事件对应的anr超时移除 mAnrTracker.erase(dispatchEntry->timeoutTime, connectionToken);// 如果连接没有响应if (!connection->responsive) {connection->responsive = isConnectionResponsive(*connection);if (connection->responsive) {// 连接之前没有响应,现在有响应了。processConnectionResponsiveLocked(*connection);}}....}
}
6.9 调用栈
frameworks/native/services/inputflinger/dispatcher/InputDispatcher.cpp : InputDispatcher::doDispatchCycleFinishedCommand()
frameworks/native/services/inputflinger/dispatcher/InputDispatcher.cpp : InputDispatcher::finishDispatchCycleLocked()
frameworks/native/services/inputflinger/dispatcher/InputDispatcher.cpp : InputDispatcher::handleReceiveCallback()
frameworks/native/libs/input/InputTransport.cpp : InputConsumer::sendUnchainedFinishedSignal()
frameworks/native/libs/input/InputTransport.cpp : InputConsumer::sendFinishedSignal()
frameworks/native/core/jni/android_view_InputEventReceiver.cpp : NativeInputEventReceiver::processOutboundEvents()
frameworks/native/core/jni/android_view_InputEventReceiver.cpp : NativeInputEventReceiver::finishInputEvent()
frameworks/native/core/jni/android_view_InputEventReceiver.cpp : nativeFinishInputEvent()
frameworks/base/core/java/android/view/InputEventReceiver.java : InputEventReceiver.finishInputEvent()
frameworks/base/core/java/android/view/ViewRootImpl.java : ViewRootImpl.finishInputEvent()
frameworks/base/core/java/android/view/ViewRootImpl.java : InputStage.forward()
frameworks/base/core/java/android/view/ViewRootImpl.java : InputStage.onDeliverToNext()
frameworks/base/core/java/android/view/ViewRootImpl.java : SyntheticInputStage.apply()
frameworks/base/core/java/android/view/ViewRootImpl.java : ViewPostImeInputStage.apply()
总结
事件分发流程图
![[外链图片转存失败,源站可能有防盗链机制,建议将图片保存下来直接上传(img-FoEWGzHh-1682737256424)(/img/blog_activity_dispatch_input_event/5.png)]](https://img-blog.csdnimg.cn/dc6b95230a9143d7b98ff7e37e12ede3.png)
参考文章:
- Input系统—事件处理全过程
相关文章:
Android Input系统事件分发分析
“本文基于Android13源码,分析Input系统中,事件分发的实现原理“ 整个事件分发到事件的确认过程很长,如果读者只是想大概了解一下,可以直接看末尾总结部分的流程图。 1. 前言 在文章之前,有必要提一下InputReader。其…...
Linux-基本指令2
文章目录 touch(新建一个文件)whoami(查看当前用户名)概念:1.你是如何看待指令的?2.我们在执行指令之前,我们应该先做什么? 概念:/tree . (树状显示文件夹和文件)rmdir && rmrmdirrm ctrl c通配符…...

辨析 项目范围核查、WBS核查
项目范围核查、WBS核查辨析 项目范围核查 项目目标是否完善和准确指标是否可靠和有效约束和限制条件是否真实和符合实际重要假设前提是否合理风险是否可以接受成功把握是否很大范围定义是否能够保证上述目标的实现范围能够给出的效益是否高于成本范围定义是否需要进一步进行辅…...
跳跃游戏类题目 总结篇
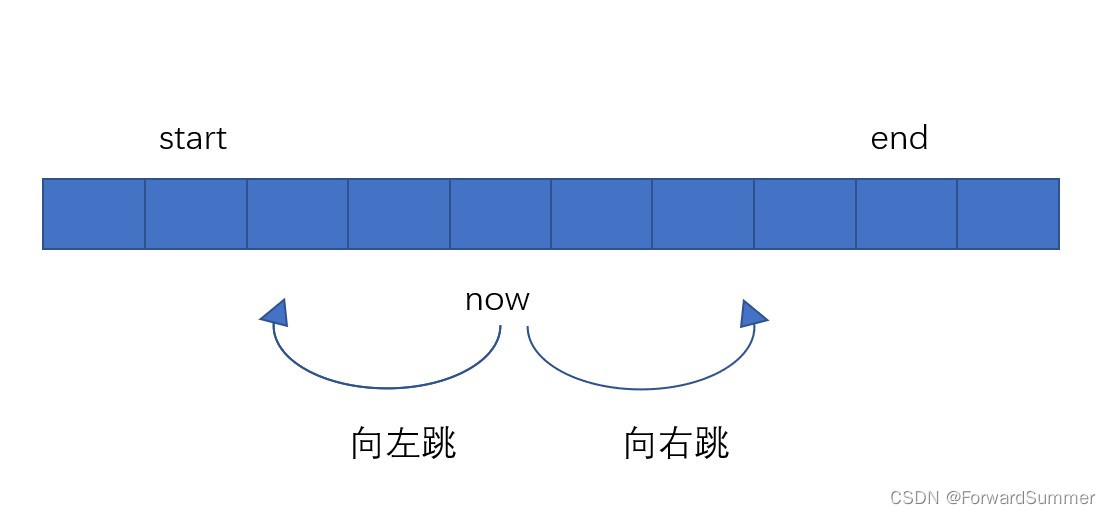
一.跳跃游戏类题目简单介绍 跳跃游戏是一种典型的算法题目,经常是给定一数组arr,从数组的某一位置i出发,根据一定的跳跃规则,比如从i位置能跳arr[i]步,或者小于arr[i]步,或者固定步数,直到到达某…...
Ubuntu20.04 交叉编译Paddle-OCR
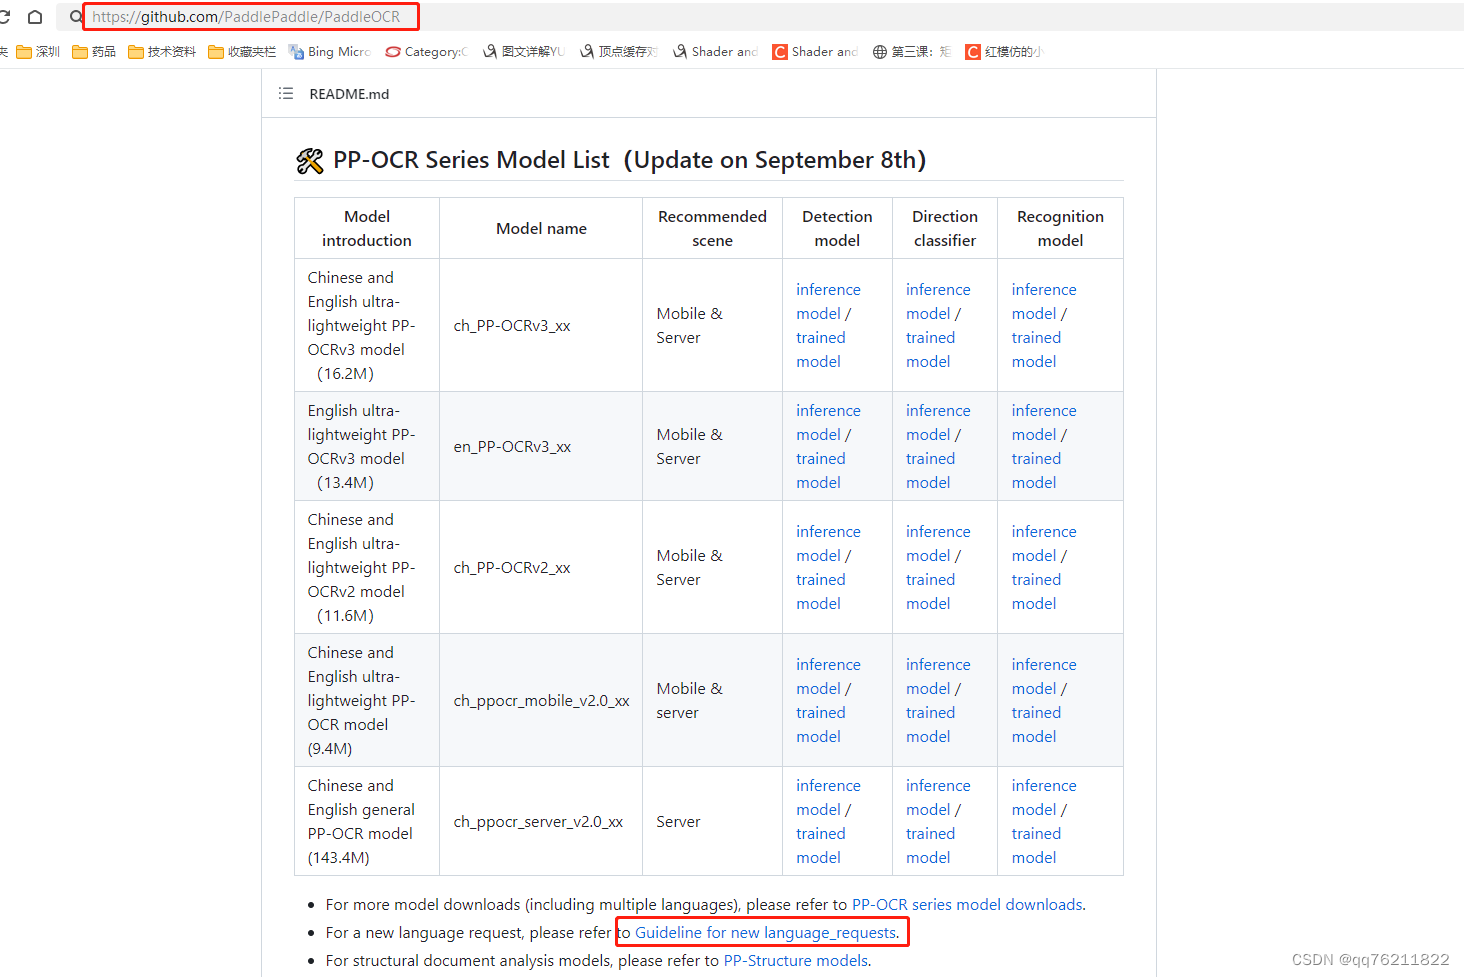
第一步:交叉编译Paddle-Lite 参考链接:https://blog.csdn.net/sz76211822/article/details/130466597?spm1001.2014.3001.5501 第二步:交叉编译opencv4.x 参考链接:https://blog.csdn.net/sz76211822/article/details/13046168…...
Java 基础进阶篇(四)—— 权限修饰符、final 关键字与枚举
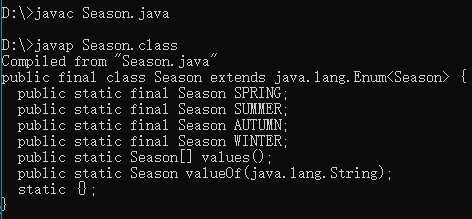
文章目录 一、权限修饰符二、final 关键字2.1 final 作用2.2 final 修饰变量举例2.3 常量 三、枚举3.1 枚举的格式3.2 枚举的特征3.3 枚举的应用 一、权限修饰符 权限修饰符 用于约束成员变量、构造器、方法等的访问范围。 权限修饰符: 有四种作用范围由小到大 (p…...
)
Linux命令集(Linux文件管理命令--touch指令篇)
Linux命令集(Linux文件管理命令--touch指令篇) Linux文件管理命令集(touch指令篇)6. touch(touch)1. 创建名为 file1 的空文件2. 创建名为 file1 和名为 file2 的多个文件3. 创建名为 file1 的文件并将访问时间设置为特定日期4. 创…...

软件工程学习教程大纲
软件工程学习教程大纲 第一章:软件工程概述 1.1 软件工程的定义和作用 软件工程的发展历程和趋势 软件工程的应用领域和特点 1.2 软件开发生命周期 软件开发生命周期的定义和阶段 软件开发生命周期的模型和方法 1.3 软件工程方法和工具 软件工程方法和工具…...
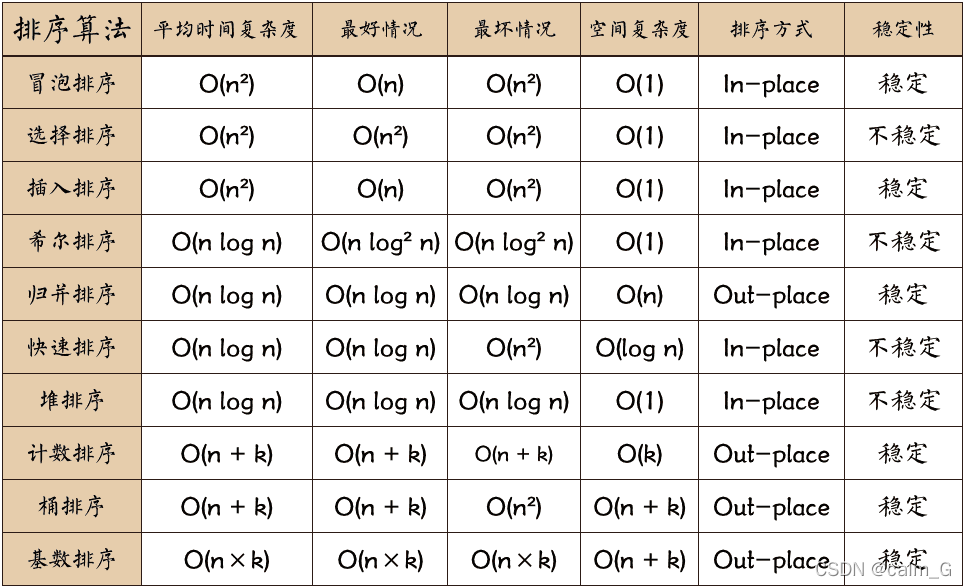
使用ChatGPT生成了十种排序算法
前言 当前ChatGPT非常火爆,对于程序员来说,ChatGPT可以帮助编写很多有用的代码。比如:在算法的实现上,就可以替我们省很多事。所以,小试牛刀一下,看看ChatGPT生成了排序算法怎么样? 简介 排序…...

GEE:MODIS计算遥感指数(NDVI、BSI、NDSI、EVI、LSWI、SIPI、EBI等)
作者:_养乐多_ 本文将介绍如何使用Google Earth Engine(GEE)进行遥感影像分析,具体地,使用MODIS数据集计算和可视化几种植被指数,以评估植被生长的状况,或者作为随机森林分类器训练需要的特征变量。 主要包括,NDVI、BSI、NDSI、EVI、LSWI、SIPI、EBI等。 NDVI(Normal…...

《*** 法治思想学习纲要》学习辅导
《*** 法治思想学习纲要》学习辅导 总分:100 及格分数:60 考试剩余时间: 1时 59分 35秒 单选题(共7题,每题5分) 1、全面依法治国中的“关键少数”是()。 正确答案:C、领导…...

初识Go语言18-面向对象【面向对象的概念、构造函数、继承与重写 泛型】
文章目录 面向对象面向对象的概念构造函数继承与重写泛型 面向对象 面向对象的概念 洗衣服过程剖析: 给洗衣机里加脏衣服和洗衣粉。启动洗衣机。洗衣机自动注水,然后滚动。脏衣服从黑颜色变成白颜色。洗衣机自动停止。 用面向过程的思想实现代码。 //…...
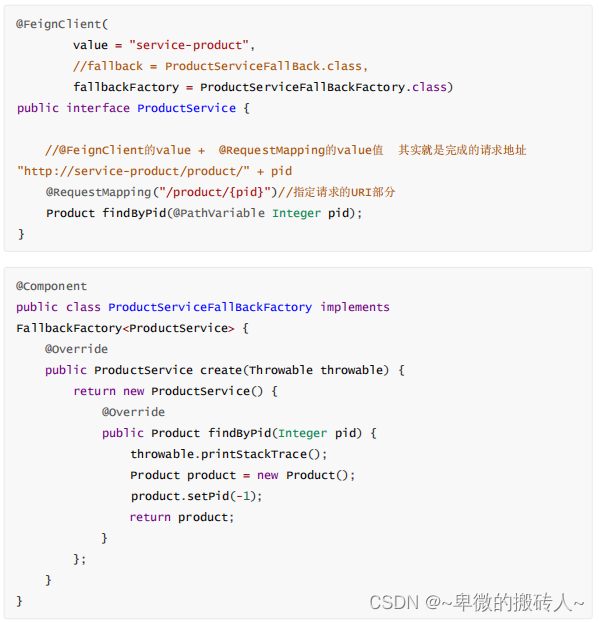
4.微服务项目实战---Sentinel--服务容错
4.1 高并发带来的问题 在微服务架构中,我们将业务拆分成一个个的服务,服务与服务之间可以相互调用,但是由于网络 原因或者自身的原因,服务并不能保证服务的 100% 可用,如果单个服务出现问题,调用这个服务…...

Postgres SELECT INSERT 流程 ?
SELECT 当执行SELECT查询时,PostgreSQL数据库会按照以下流程进行处理: 首先,查询语句会被发送到服务器。 服务器会接收查询请求,并根据查询条件从表中读取数据。 数据库会将数据存储在磁盘上的数据文件中,然后将其读…...

OpenAI推企业版ChatGPT,英伟达造AI安全卫士
GPT现在已经进入了淘金时代。虽然全球涌现出成千上万的大模型或ChatGPT变种,但一直能挣钱的人往往是卖铲子的人。 这不,围绕暴风眼中的大模型,已经有不少企业,开始研究起了大模型的“铲子”产品,而且开源和付费两不误…...
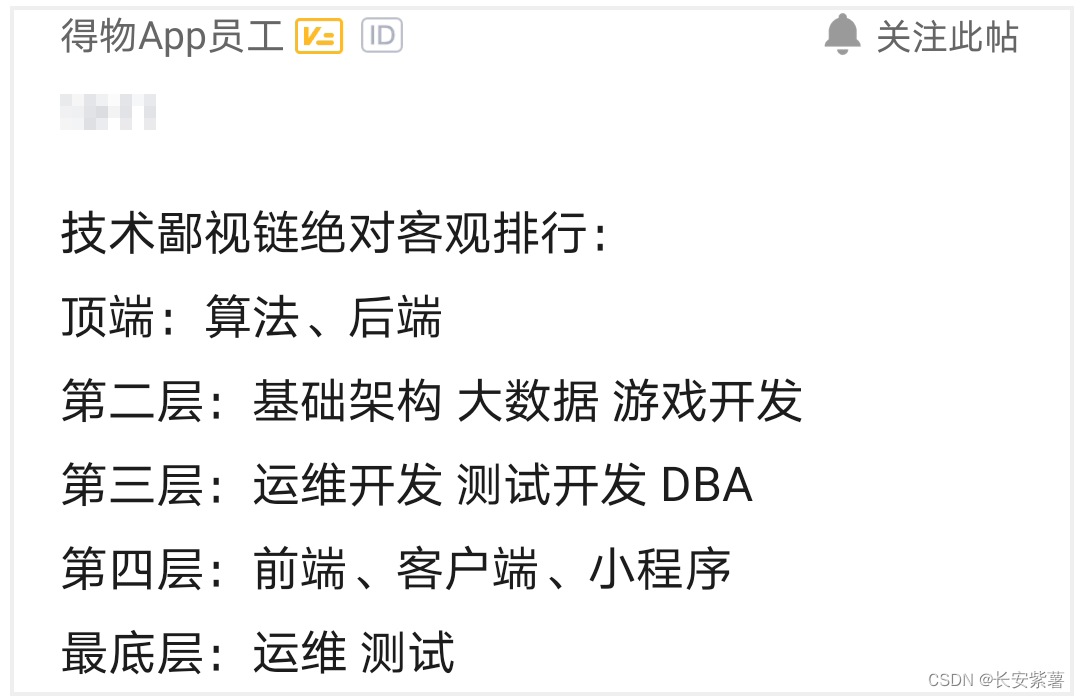
【原创】运维的终点是开发~chatGPT告诉你真相
文章目录 软件技术岗位鄙视链,你在哪层呢?让chatGPT告诉你运维工作好,还是开发工作好问它几个问题来自你的消息: 一个三年开发成长的案例和薪资来自ChatAI的消息:来自你的消息: 一个三年运维成长的案例和薪资来自ChatAI的消息:来自你的消息: …...
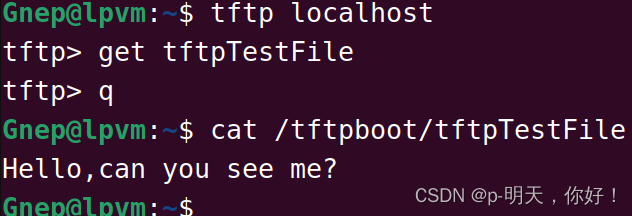
SSH 服务器、NFS 服务器、TFTP 服务器详解及测试
文章目录 前言一、SSH 服务器1、SSH 能做什么?2、安装 SSH 服务器3、测试 SSH 服务4、用 SecureCRT 测试 二、NFS 服务器1、NFS 能做什么?2、安装 NFS 软件包3、添加 NFS 共享目录4、启动 NFS 服务5、测试 NFS 服务器 三、TFTP 服务器1、TFTP 能做什么&a…...
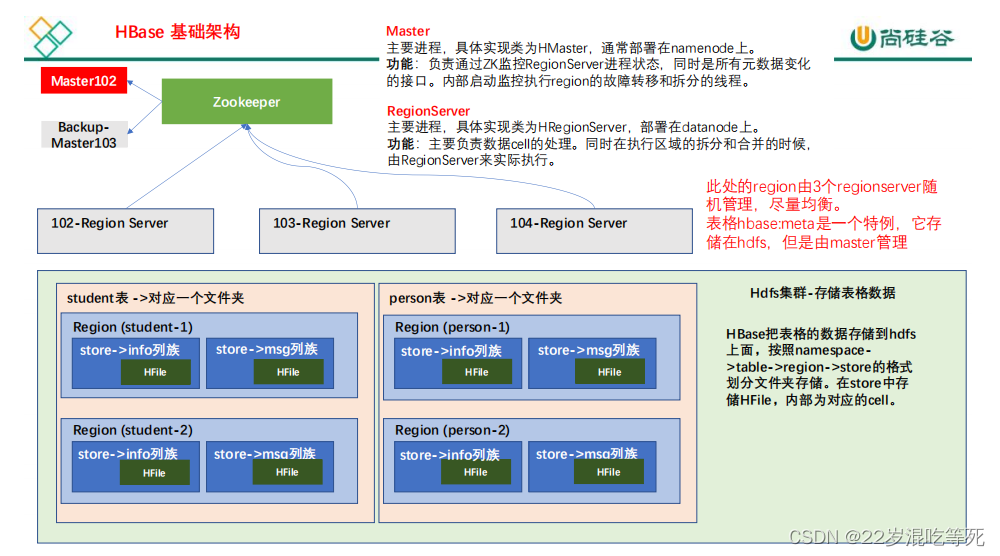
1.3 HBase 基本架构
架构角色: 1)Master 实现类为 HMaster,负责监控集群中所有的 RegionServer 实例。主要作用如下: (1)管理元数据表格 hbase:meta,接收用户对表格创建修改删除的命令并执行 (2&#x…...

微机作业题
答案做的,正确性不保证。 1. 微型计算机的性能主要取决( A )的性能。 A. CPU B. 显示器 C. 硬盘 D. U盘 2. 计算机的工作过程,本质是( A )的过程。 A. 进行科学计算 …...
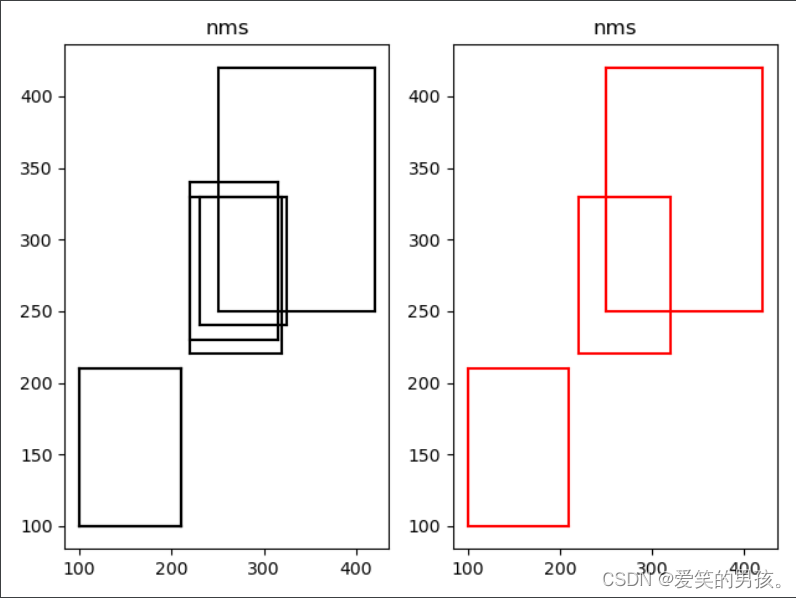
非极大值抑制详细原理(NMS含代码及详细注释)
作者主页:爱笑的男孩。的博客_CSDN博客-深度学习,YOLO,活动领域博主爱笑的男孩。擅长深度学习,YOLO,活动,等方面的知识,爱笑的男孩。关注算法,python,计算机视觉,图像处理,深度学习,pytorch,神经网络,opencv领域.https://blog.csdn.net/Code_and516?typecollect 个…...

DamaiHelper抢票神器:从原理到实战的智能抢票全攻略
DamaiHelper抢票神器:从原理到实战的智能抢票全攻略 【免费下载链接】DamaiHelper 大麦网演唱会演出抢票脚本。 项目地址: https://gitcode.com/gh_mirrors/dama/DamaiHelper DamaiHelper是一款基于Python开发的大麦网自动化抢票工具,通过智能模拟…...

Python 执行式AI:必备基础与语法速查
Python 执行式AI:必备基础与语法速查📝 本章学习目标:本章是入门认知部分,帮助零基础读者建立对AI Agent的初步认知。通过本章学习,你将全面掌握"Python 执行式AI:必备基础与语法速查"这一核心主…...

5分钟快速部署:Python大麦网自动抢票脚本终极指南
5分钟快速部署:Python大麦网自动抢票脚本终极指南 【免费下载链接】Automatic_ticket_purchase 大麦网抢票脚本 项目地址: https://gitcode.com/GitHub_Trending/au/Automatic_ticket_purchase 还在为抢不到心仪演唱会门票而烦恼吗?每次热门演出开…...

浏览器自动化之王:OpenClaw+Qwen3.5-9B实现复杂表单填充
浏览器自动化之王:OpenClawQwen3.5-9B实现复杂表单填充 1. 为什么需要智能表单填充 在日常工作中,我们经常需要处理各种复杂的在线表单。从税务申报到签证预约,这些表单往往包含数十个字段,字段之间存在复杂的逻辑关系。传统自动…...

4.2-4.4
这期准备iic驱动上一期已经准备好了设备树,iic的驱动代码分为 I2C 适配器驱动和 I2C 设备驱动,一般iic适配器驱动由soc厂商去写iic设备树追加:1 &i2c4 { 2 status "okay"; 3 pinctrl-0 <&i2c4m1_xfer…...

CSS如何优化大型网站样式_利用BEM架构保持代码条理性
BEM通过命名约束避免样式冲突和维护灾难:Block(如card)为独立单元,Element(如card__title)须依附Block,Modifier(如card--featured)表状态且不单独使用。为什么BEM能避免…...

S32K3低功耗模式下的RTI定时器唤醒机制解析
1. 为什么需要低功耗定时唤醒? 在嵌入式系统开发中,低功耗设计就像给设备装上了"节能开关"。想象一下你家的智能门锁,平时没人操作时应该处于"打盹"状态,但又要定期"眨眨眼"检查有没有人按门铃。S3…...

保姆级指南:Mac上如何一键部署GLM-4.6V-Flash-WEB,实现图片智能问答
保姆级指南:Mac上如何一键部署GLM-4.6V-Flash-WEB,实现图片智能问答 1. 为什么选择GLM-4.6V-Flash-WEB? 在当今AI技术快速发展的时代,能够"看懂"图片并回答问题的多模态模型变得越来越重要。GLM-4.6V-Flash-WEB是智谱…...

ThinkPHP5防跨目录访问报错?手把手教你如何安全解除LNMP的open_basedir限制
ThinkPHP5跨目录访问难题:LNMP环境下open_basedir限制的深度解析与安全实践 当你在LNMP环境中部署ThinkPHP5应用时,是否遇到过这样的报错信息?那些红色的"Warning"和"Fatal error"不仅打断了安装流程,更让人对…...

Ostrakon-VL-8B模型微调入门:使用自定义餐饮数据集
Ostrakon-VL-8B模型微调入门:使用自定义餐饮数据集 你是不是也遇到过这样的情况?看到一个很棒的视觉语言模型,它能识别各种通用物体,但当你拿一张特色地方菜或者自家餐厅的新品图片给它看时,它却常常“答非所问”&…...