Neovim-配置教程
环境:Ubuntu 20.04
宿主机:windows (windows terminal)WSL2
NVIM:v0.10.0-dev
配置Neovim 需要保证流畅的github环境(以便于快速拉取插件),可以使用代理或是配置Github SSH key
本文已同步更新于个人博客:Neovim 配置教程 | ReturnTmp
本篇博客是学习掘金小册的学习笔记,有兴趣的朋友可以直接点击下文链接了解详情
小册链接:Neovim 配置实战:从0到1打造自己的IDE - nshen - 掘金小册 (juejin.cn)
成品示例图

配置文件整体结构
├── LICENSE
├── README.md
├── init.lua
└── lua├── autocmds.lua├── basic.lua├── colorscheme.lua├── keybindings.lua├── lsp│   ├── cmp.lua│   ├── config│   │   ├── bash.lua│   │   ├── emmet.lua│   │   ├── html.lua│   │   ├── json.lua│   │   ├── lua.lua│   │   ├── markdown.lua│   │   ├── pyright.lua│   │   ├── rust.lua│   │   └── ts.lua│   ├── formatter.lua│   ├── null-ls.lua│   ├── setup.lua│   └── ui.lua├── plugin-config│   ├── bufferline.lua│   ├── comment.lua│   ├── dashboard.lua│   ├── gitsigns.lua│   ├── indent-blankline.lua│   ├── lualine.lua│   ├── nvim-autopairs.lua│   ├── nvim-tree.lua│   ├── nvim-treesitter.lua│   ├── project.lua│   ├── surround.lua│   ├── telescope.lua│   ├── toggleterm.lua│   ├── vimspector.lua│   └── which-key.lua├── plugins.lua└── utils├── fix-yank.lua├── global.lua└── im-select.lua
首先 init.lua 是整个配置的入口文件,负责引用所有其他的模块,基本上想要打开或关闭某个插件只要在这里修改一行代码即可。
-
basic.lua: 基础配置,是对默认配置的一个重置。
-
colorscheme.lua: 我们安装的主题皮肤配置,在这里切换主题。
-
keybindings.lua: 快捷键的设置,所有插件的快捷键也都会放在这里。
-
plugins.lua: 插件安装管理,插件安装或卸载全在这里设置。
-
lsp 文件夹:
是对 Neovim 内置 LSP 功能的配置,包括常见编程语言与语法提示等。
- config : 文件夹包含各种语言服务器单独的配置文件。
- setup.lua : 内置 LSP 的配置。
- cmp.lua : 语法自动补全补全的配置,包括各种补全源,与自定义代码段。
- ui.lua: 对内置 LSP 功能增强和 UI 美化。
- formatter.lua: 独立代码格式化功能。
-
plugin-config 文件夹: 是对第三方插件的配置,未来每添加一个插件,这里就多一个配置文件。
-
utils 文件夹: 是对常见问题的修改,包括输入法切换,针对 windows 的特殊配置等。
配置 Nerd Fonts
官网:Nerd Fonts - Iconic font aggregator, glyphs/icons collection, & fonts patcher
下载字体文件FiraCodeNerdFont-Regular.ttf下载之后双击ttf文件点击安装即可添加到系统字体文件中
配置步骤:
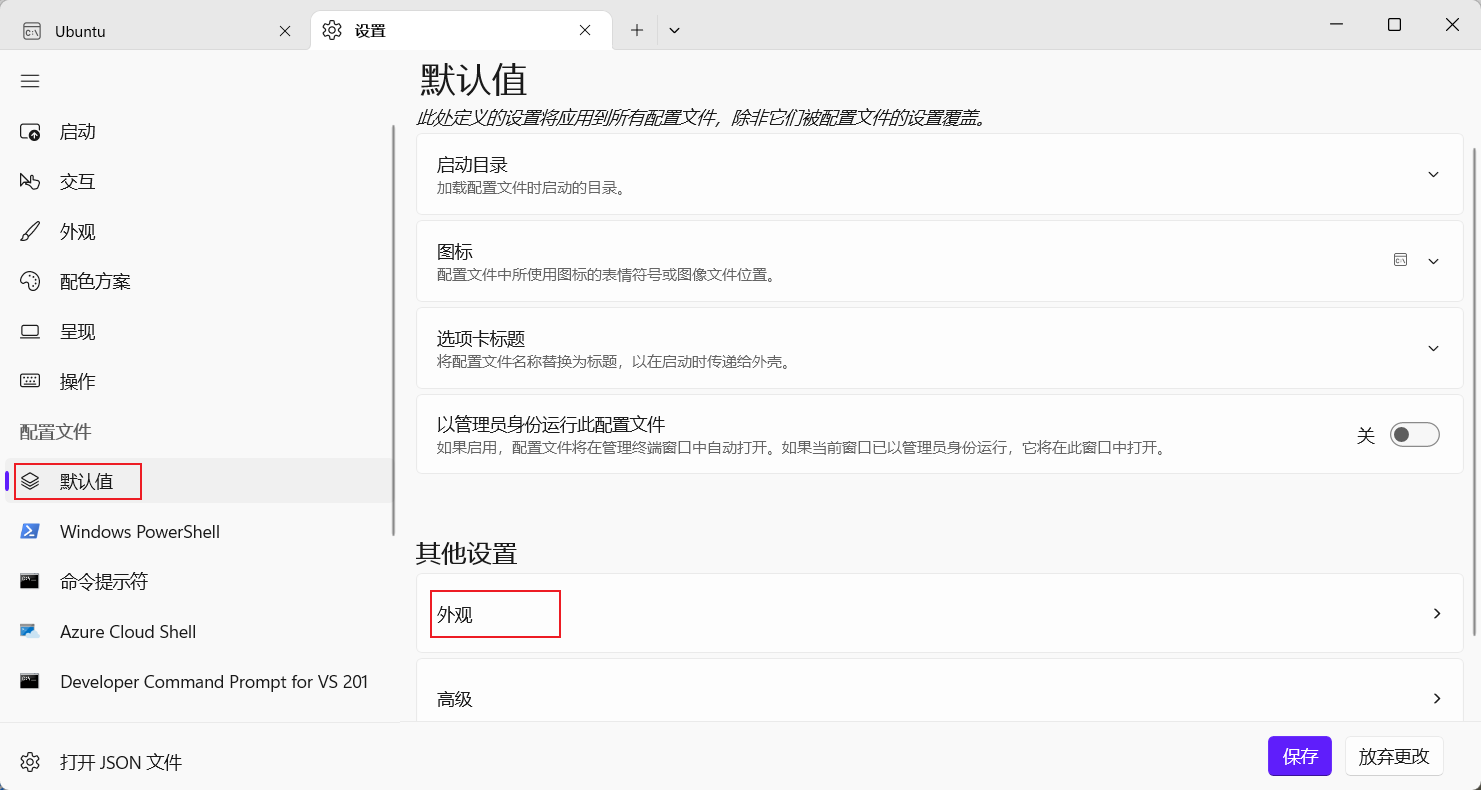
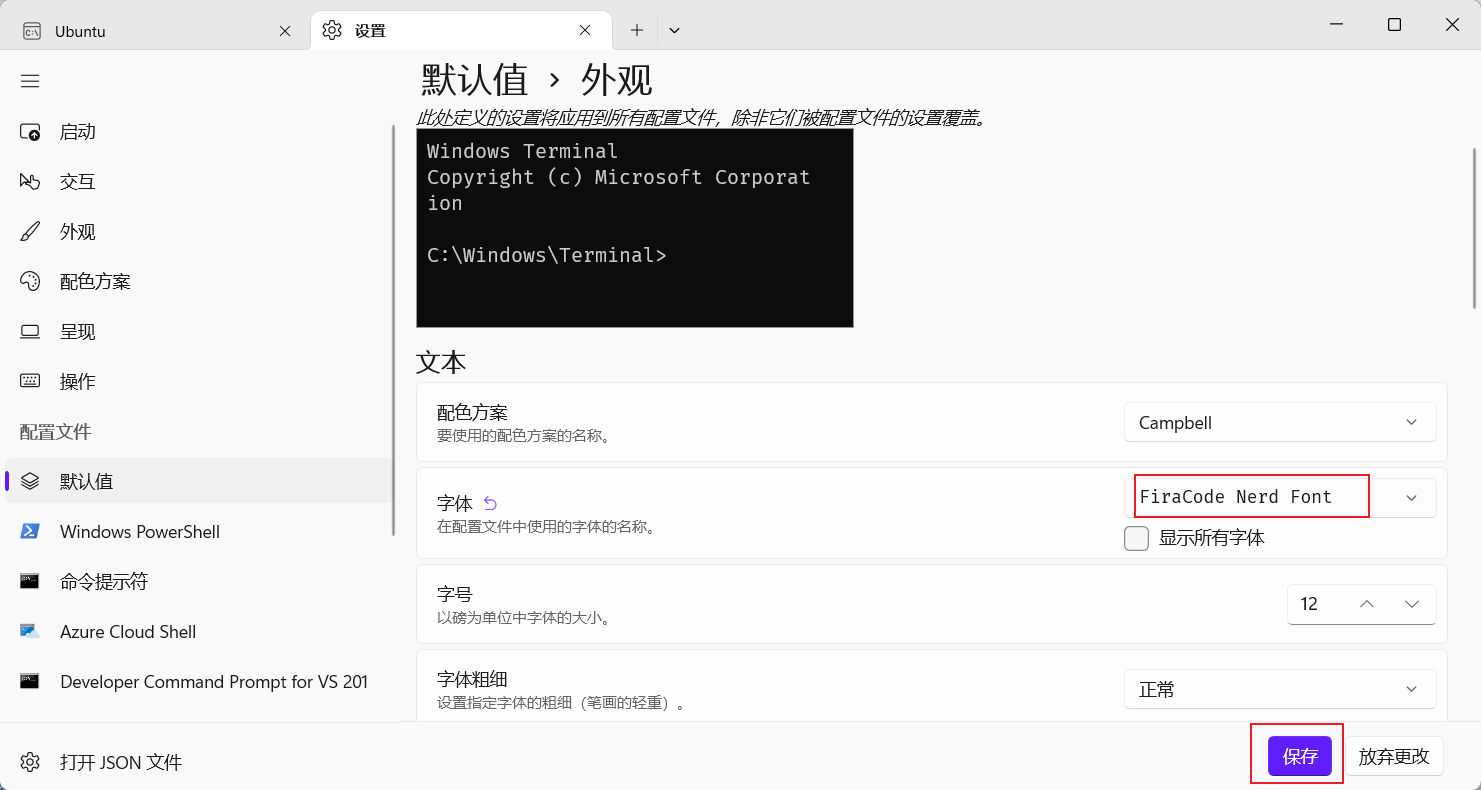
最后点击保存
安装 Neovim
旧版本卸载:sudo apt-get remove neovim
官网:Installing Neovim · neovim/neovim Wiki (github.com)
sudo apt-get install software-properties-common
sudo add-apt-repository ppa:neovim-ppa/unstable
sudo apt-get update
sudo apt-get install neovim
执行nvim --version,确保版本必须为 0.7 及以上。
执行nvim ~/.bashrc
alias vim='nvim'
alias vi='nvim'
alias v='nvim'
执行source ~/.bashrc重新加载配置文件
配置入口 init.lua
~/.config/nvim/init.lua 写入如下内容:
-- 基础设置
require('basic')
require 函数在 Lua 中用于加载一个模块,而这些模块通常位于 runtimepath 中的 lua/ 目录下,也就是我们的 ~/.config/nvim/lua/ 目录。
所以上边的代码,就是加载 ~/.config/nvim/lua/basic.lua 文件(注意:require 里没有 .lua 扩展名)。当然也可以创建 ~/.config/nvim/lua/basic/ 目录,在目录下边创建 init.lua 文件也是可以成功加载的。
创建基础配置文件~/.config/nvim/lua/basic.lua,并添加如下内容:
-- utf8
vim.g.encoding = "UTF-8"
vim.o.fileencoding = 'utf-8'
-- jkhl 移动时光标周围保留8行
vim.o.scrolloff = 8
vim.o.sidescrolloff = 8
-- 使用相对行号
vim.wo.number = true
vim.wo.relativenumber = true
-- 高亮所在行
vim.wo.cursorline = true
-- 显示左侧图标指示列
vim.wo.signcolumn = "yes"
-- 右侧参考线,超过表示代码太长了,考虑换行
vim.wo.colorcolumn = "80"
-- 缩进2个空格等于一个Tab
vim.o.tabstop = 2
vim.bo.tabstop = 2
vim.o.softtabstop = 2
vim.o.shiftround = true
-- >> << 时移动长度
vim.o.shiftwidth = 2
vim.bo.shiftwidth = 2
-- 空格替代tab
vim.o.expandtab = true
vim.bo.expandtab = true
-- 新行对齐当前行
vim.o.autoindent = true
vim.bo.autoindent = true
vim.o.smartindent = true
-- 搜索大小写不敏感,除非包含大写
vim.o.ignorecase = true
vim.o.smartcase = true
-- 搜索不要高亮
vim.o.hlsearch = false
-- 边输入边搜索
vim.o.incsearch = true
-- 命令行高为2,提供足够的显示空间
vim.o.cmdheight = 2
-- 当文件被外部程序修改时,自动加载
vim.o.autoread = true
vim.bo.autoread = true
-- 禁止折行
vim.wo.wrap = false
-- 光标在行首尾时<Left><Right>可以跳到下一行
vim.o.whichwrap = '<,>,[,]'
-- 允许隐藏被修改过的buffer
vim.o.hidden = true
-- 鼠标支持
vim.o.mouse = "a"
-- 禁止创建备份文件
vim.o.backup = false
vim.o.writebackup = false
vim.o.swapfile = false
-- smaller updatetime
vim.o.updatetime = 300
-- 设置 timeoutlen 为等待键盘快捷键连击时间500毫秒,可根据需要设置
vim.o.timeoutlen = 500
-- split window 从下边和右边出现
vim.o.splitbelow = true
vim.o.splitright = true
-- 自动补全不自动选中
vim.g.completeopt = "menu,menuone,noselect,noinsert"
-- 样式
vim.o.background = "dark"
vim.o.termguicolors = true
vim.opt.termguicolors = true
-- 不可见字符的显示,这里只把空格显示为一个点
vim.o.list = true
vim.o.listchars = "space:·"
-- 补全增强
vim.o.wildmenu = true
-- Dont' pass messages to |ins-completin menu|
vim.o.shortmess = vim.o.shortmess .. 'c'
-- 补全最多显示10行
vim.o.pumheight = 10
-- 永远显示 tabline
vim.o.showtabline = 2
-- 使用增强状态栏插件后不再需要 vim 的模式提示
vim.o.showmode = false
快捷键设置
创建lua/keybindings.lua
vim.g.mapleader = " "
vim.g.maplocalleader = " "local map = vim.api.nvim_set_keymap
-- 复用 opt 参数
local opt = {noremap = true, silent = true }-- 取消 s 默认功能
map("n", "s", "", opt)
-- windows 分屏快捷键
map("n", "sv", ":vsp<CR>", opt)
map("n", "sh", ":sp<CR>", opt)
-- 关闭当前
map("n", "sc", "<C-w>c", opt)
-- 关闭其他
map("n", "so", "<C-w>o", opt)
-- Alt + hjkl  窗口之间跳转
map("n", "<A-h>", "<C-w>h", opt)
map("n", "<A-j>", "<C-w>j", opt)
map("n", "<A-k>", "<C-w>k", opt)
map("n", "<A-l>", "<C-w>l", opt)-- 左右比例控制
map("n", "<C-Left>", ":vertical resize -2<CR>", opt)
map("n", "<C-Right>", ":vertical resize +2<CR>", opt)
map("n", "s,", ":vertical resize -20<CR>", opt)
map("n", "s.", ":vertical resize +20<CR>", opt)
-- 上下比例
map("n", "sj", ":resize +10<CR>", opt)
map("n", "sk", ":resize -10<CR>", opt)
map("n", "<C-Down>", ":resize +2<CR>", opt)
map("n", "<C-Up>", ":resize -2<CR>", opt)
-- 等比例
map("n", "s=", "<C-w>=", opt)-- Terminal相关
map("n", "<leader>t", ":sp | terminal<CR>", opt)
map("n", "<leader>vt", ":vsp | terminal<CR>", opt)
map("t", "<Esc>", "<C-\\><C-n>", opt)
map("t", "<A-h>", [[ <C-\><C-N><C-w>h ]], opt)
map("t", "<A-j>", [[ <C-\><C-N><C-w>j ]], opt)
map("t", "<A-k>", [[ <C-\><C-N><C-w>k ]], opt)
map("t", "<A-l>", [[ <C-\><C-N><C-w>l ]], opt)-- visual模式下缩进代码
map("v", "<", "<gv", opt)
map("v", ">", ">gv", opt)
-- 上下移动选中文本
map("v", "J", ":move '>+1<CR>gv-gv", opt)
map("v", "K", ":move '<-2<CR>gv-gv", opt)-- 上下滚动浏览
map("n", "<C-j>", "4j", opt)
map("n", "<C-k>", "4k", opt)
-- ctrl u / ctrl + d  只移动9行,默认移动半屏
map("n", "<C-u>", "9k", opt)
map("n", "<C-d>", "9j", opt)-- 在visual 模式里粘贴不要复制
map("v", "p", '"_dP', opt)-- 退出
map("n", "q", ":q<CR>", opt)
map("n", "qq", ":q!<CR>", opt)
map("n", "Q", ":qa!<CR>", opt)-- insert 模式下,跳到行首行尾
map("i", "<C-h>", "<ESC>I", opt)
map("i", "<C-l>", "<ESC>A", opt)
最后在init.lua中引入快捷键文件
-- 快捷键映射
require("keybindings")
插件配置
目前在 Neovim 最常见的插件管理器主要有 vim-plug 和 packer 两个。
安装步骤(请参照官网步骤):
执行git clone --depth 1 https://github.com/wbthomason/packer.nvim\ ~/.local/share/nvim/site/pack/packer/start/packer.nvim
安装成功后添加配置文件lua/plugins.lua,添加如下内容
local packer = require("packer")
packer.startup(function(use)-- Packer 可以管理自己本身use 'wbthomason/packer.nvim'-- 你的插件列表...
end)
init.lua中添加如下内容
-- Packer 插件管理
require("plugins")
配置生效后,Neovim 会增加以下命令。
:PackerCompile: 每次改变插件配置时,必须运行此命令或PackerSync, 重新生成编译的加载文件:PackerClean: 清除所有不用的插件:PackerInstall: 清除,然后安装缺失的插件:PackerUpdate: 清除,然后更新并安装插件:PackerSync: 执行PackerUpdate后,再执行PackerCompile:PackerLoad: 立刻加载 opt 插件
通过上边的说明,我们观察到 :PackerSync 命令包含了 :PackerUpdate 和:PackerCompile,而 :PackerUpdate 又包含了 :PackerClean 和 :PackerInstall 流程。
所以通常情况下,无论安装还是更新插件,我只需要下边这一条命令就够::PackerSync
每次修改完 lua/plugins.lua 这个文件后,保存退出,重新打开并调用 :PackerSync 就可以了
添加自动安装
lua/plugins.lua 文件,在最后添加
-- 每次保存 plugins.lua 自动安装插件
pcall(vim.cmd,[[augroup packer_user_configautocmd!autocmd BufWritePost plugins.lua source <afile> | PackerSyncaugroup end]]
)
注意:保证自己可以ping 通 github 的情况下,但是仍旧执行
:PackerSync失败,按 R 多次拉取失败插件,如果依旧失败则在错误插件处点击回车,查看问题,具体问题具体分析,我一般多试几次 R 就会成功
配置主题
init.lua中添加如下内容:
-- 主题设置 (新增)
require("colorscheme")
lua/colorscheme.lua添加
local colorscheme = "tokyonight"
local status_ok, _ = pcall(vim.cmd, "colorscheme " .. colorscheme)
if not status_ok thenvim.notify("colorscheme " .. colorscheme .. " 没有找到!")return
end
安装第三方主题
lua/plugins.lua文件
packer.startup({function(use)-- Packer 可以升级自己use("wbthomason/packer.nvim")--------------------- colorschemes ---------------------- tokyonightuse("folke/tokyonight.nvim")--------------------------------------------------------- 略...
})
:w保存 p退出
其他主体配色链接:neovim-colorscheme · GitHub Topics
lua/plugins.lua添加插件配置后,修改 lua/colorscheme.lua 内 colorscheme 变量为相应的主题即可
侧边栏文件浏览器
相关插件:
- nvim-tree/nvim-tree.lua: A file explorer tree for neovim written in lua (github.com)
lua/plugins.lua 中添加
packer.startup({function(use)-- Packer 可以升级自己use("wbthomason/packer.nvim")-------------------------- plugins --------------------------------------------- nvim-tree (新增)use({ "kyazdani42/nvim-tree.lua", requires = "kyazdani42/nvim-web-devicons" })...略
配置 nvim-tree
lua/plugin-config/nvim-tree.lua
local status, nvim_tree = pcall(require, "nvim-tree")
if not status thenvim.notify("没有找到 nvim-tree")return
end-- 列表操作快捷键
local list_keys = require('keybindings').nvimTreeList
nvim_tree.setup({-- 不显示 git 状态图标git = {enable = false,},-- project plugin 需要这样设置update_cwd = true,update_focused_file = {enable = true,update_cwd = true,},-- 隐藏 .文件 和 node_modules 文件夹filters = {dotfiles = true,custom = { 'node_modules' },},view = {-- 宽度width = 40,-- 也可以 'right'side = 'left',-- 隐藏根目录hide_root_folder = false,-- 自定义列表中快捷键mappings = {custom_only = false,list = list_keys,},-- 不显示行数number = false,relativenumber = false,-- 显示图标signcolumn = 'yes',},actions = {open_file = {-- 首次打开大小适配resize_window = true,-- 打开文件时关闭quit_on_open = true,},},-- wsl install -g wsl-open-- https://github.com/4U6U57/wsl-open/system_open = {cmd = 'wsl-open', -- mac 直接设置为 open},
})
-- 自动关闭
vim.cmd([[autocmd BufEnter * ++nested if winnr('$') == 1 && bufname() == 'NvimTree_' . tabpagenr() | quit | endif
]])
上边代码就是 nvim-tree 的配置,可以根据注释进行修改。这里简单解释一下,值得注意的是 system_open 项,如果想要在 WSL 中用 Windows 系统默认设置打开文件,需要使用 Node.js 全局安装一个 wsl-open 包,使用命令 npm install -g wsl-open,如果不需要这个功能,也可以不用安装。 如果不是 Windows 系统也就不需要安装。
nvim-tree 初始化支持很多参数,如果想知道还有哪些其他的参数,可以运行 :h nvim-tree.setup 调出帮助文档查看。
lua/keybindings.lua添加
-- 插件快捷键
local pluginKeys = {}-- nvim-tree
-- alt + m 键打开关闭tree
map("n", "<A-m>", ":NvimTreeToggle<CR>", opt)
-- 列表快捷键
pluginKeys.nvimTreeList = {-- 打开文件或文件夹{ key = {"<CR>", "o", "<2-LeftMouse>"}, action = "edit" },-- 分屏打开文件{ key = "v", action = "vsplit" },{ key = "h", action = "split" },-- 显示隐藏文件{ key = "i", action = "toggle_custom" }, -- 对应 filters 中的 custom (node_modules){ key = ".", action = "toggle_dotfiles" }, -- Hide (dotfiles)-- 文件操作{ key = "<F5>", action = "refresh" },{ key = "a", action = "create" },{ key = "d", action = "remove" },{ key = "r", action = "rename" },{ key = "x", action = "cut" },{ key = "c", action = "copy" },{ key = "p", action = "paste" },{ key = "s", action = "system_open" },
}
return pluginKeys
init.lua添加
-- 插件配置
require("plugin-config.nvim-tree")
但是出现问题view.mappings.list has been deprecated in favour of on_attach.please run,应该是某些插件更新:相关链接:Migrating To on_attach · nvim-tree/nvim-tree.lua Wiki (github.com)
表明view.mappings and remove_keymaps已经启用需要移除
解决方案:
注释掉view.mappings
执行:NvimTreeGenerateOnAttach,复制nvim-tree-on-attach.lua中的内容粘贴到 nvim-tree.lua中(需要添加在setup之前)
添加
require("nvim-tree").setup({...on_attach = on_attach,
})
问题解决~
顶部标签页和底部信息栏
相关插件:
- akinsho/bufferline.nvim: A snazzy bufferline for Neovim (github.com)
- nvim-lualine/lualine.nvim: A blazing fast and easy to configure neovim statusline plugin written in pure lua. (github.com)
顶部标签页
lua/plugins.lua
packer.startup({function(use)-- Packer 可以升级自己use("wbthomason/packer.nvim")-------------------------- plugins --------------------------------------------- nvim-treeuse({ "kyazdani42/nvim-tree.lua", requires = "kyazdani42/nvim-web-devicons" })-- bufferline (新增)use({ "akinsho/bufferline.nvim", requires = { "kyazdani42/nvim-web-devicons", "moll/vim-bbye" }})...略
:w 保存,自动安装,安装完整按 q 退出
出现**GnuTLS recv error (-110)**问题
解决方案:
# 依次执行
apt-get install gnutls-bin
# 关闭 SSL 验证
git config --global http.sslVerify false
# 第二个命令是用于设置缓冲区大小
git config --global http.postBuffer 1048576000
# 或是
sudo update-alternatives --set fakeroot /usr/bin/fakeroot-tcp
这里我增加了一个 moll/vim-bbye 依赖,因为这个插件安装后会增加一个 :Bdelete 命令,相比内置的 :bdelete, 它删除 buffer 的同时,并不会搞乱布局 。 待会儿我们会配置 Bdelete 为关闭 Tab 的命令。
新建lua/plugin-config/bufferline.lua文件并添加内容
local status, bufferline = pcall(require, "bufferline")
if not status thenvim.notify("没有找到 bufferline")return
end-- bufferline 配置
-- https://github.com/akinsho/bufferline.nvim#configuration
bufferline.setup({options = {-- 关闭 Tab 的命令,这里使用 moll/vim-bbye 的 :Bdelete 命令close_command = "Bdelete! %d",right_mouse_command = "Bdelete! %d",-- 侧边栏配置-- 左侧让出 nvim-tree 的位置,显示文字 File Exploreroffsets = {{filetype = "NvimTree",text = "File Explorer",highlight = "Directory",text_align = "left",},},-- 使用 nvim 内置 LSP 后续课程会配置diagnostics = "nvim_lsp",-- 可选,显示 LSP 报错图标---@diagnostic disable-next-line: unused-localdiagnostics_indicator = function(count, level, diagnostics_dict, context)local s = " "for e, n in pairs(diagnostics_dict) dolocal sym = e == "error" and " " or (e == "warning" and " " or "")s = s .. n .. symendreturn send,},
})
lua/keybindings.lua
-- bufferline
-- 左右Tab切换
map("n", "<C-h>", ":BufferLineCyclePrev<CR>", opt)
map("n", "<C-l>", ":BufferLineCycleNext<CR>", opt)
-- 关闭
--"moll/vim-bbye"
map("n", "<C-w>", ":Bdelete!<CR>", opt)
map("n", "<leader>bl", ":BufferLineCloseRight<CR>", opt)
map("n", "<leader>bh", ":BufferLineCloseLeft<CR>", opt)
map("n", "<leader>bc", ":BufferLinePickClose<CR>", opt)
init.lua添加
require("plugin-config.bufferline")
底部信息栏
lua/plugins.lua
-- lualine (新增)use({ "nvim-lualine/lualine.nvim", requires = { "kyazdani42/nvim-web-devicons" } })use("arkav/lualine-lsp-progress")
新建lua/plugin-config/lualine.lua
-- 如果找不到lualine 组件,就不继续执行
local status, lualine = pcall(require, "lualine")
if not status thenvim.notify("没有找到 lualine")return
endlualine.setup({options = {theme = "tokyonight",component_separators = { left = "|", right = "|" },-- https://github.com/ryanoasis/powerline-extra-symbolssection_separators = { left = " ", right = "" },},extensions = { "nvim-tree", "toggleterm" },sections = {lualine_c = {"filename",{"lsp_progress",spinner_symbols = { " ", " ", " ", " ", " ", " " },},},lualine_x = {"filesize",{"fileformat",-- symbols = {-- unix = '', -- e712-- dos = '', -- e70f-- mac = '', -- e711-- },symbols = {unix = "LF",dos = "CRLF",mac = "CR",},},"encoding","filetype",},},
})
init.lua添加
require("plugin-config.lualine")
模糊搜索快速查找文件
相关插件:nvim-telescope/telescope.nvim: Find, Filter, Preview, Pick. All lua, all the time. (github.com)
lua/plugins.lua
-- telescope (新增)use { 'nvim-telescope/telescope.nvim', requires = { "nvim-lua/plenary.nvim" } }
:checkhealth telescope 检查依赖情况,这里通常会提示 ripgrep 不存在,因为 telescope 依赖以下两个项目。
- sharkdp/fd: A simple, fast and user-friendly alternative to ‘find’ (github.com)
- BurntSushi/ripgrep: ripgrep recursively searches directories for a regex pattern while respecting your gitignore (github.com)
解决方案:
# 20.04 安装 repgrep
sudo apt install ripgrep
# 18.04 安装 repgrep
sudo add-apt-repository ppa:x4121/ripgrep
sudo apt-get update
sudo apt install ripgrep
# 安装 fd
npm install -g fd-find
配置 node 环境
node
配置源,需要哪个版本可以将16替换为相应版本
curl -sL https://deb.nodesource.com/setup_16.x | sudo -E bash -
安装
sudo apt-get update -y
sudo apt install -y nodejs
如果不想要自己配置指定版本源的情况下,可以直接执行
sudo apt update -y
sudo apt install nodejs npm
nvm
官网:nvm-sh/nvm: Node Version Manager - POSIX-compliant bash script to manage multiple active node.js versions (github.com)
git clone nvm仓库时遇到如下错误
GnuTLS recv error (-110): The TLS connection 。。。
我是因为Ipv6的问题,可以git clone -4 指定使用Ipv4连接
但是执行ap-get update遇到问题:
Err:12 http://ppa.launchpad.net/x4121/ripgrep/ubuntu focal Release
404 Not Found [IP: 185.125.190.52 80]
Reading package lists…
E: The repository ‘http://ppa.launchpad.net/x4121/ripgrep/ubuntu focal Release’ does not have a Release file.
这是因为之前我执行过sudo add-apt-repository ppa:x4121/ripgrep所以可以直接手动删除
解决方案(自动移除再更新):
sudo apt-add-repository -r ppa:x4121/ripgrep
# 指的是先移除armagetronad-dev这个ppa包,再添加这个ppa包
sudo apt update -q
手动删除
cd /etc/apt/sources.list.d
rm x4121-ubuntu-ripgrep-focal.list
# .save 文件是备份,不需要管
后面我在使用更新插件包时爆出:Could not resolve host github.com
解决1(失败):
# 从全局配置文件中删除代理设置
git config --global --unset http.proxy
git config --global --unset https.proxy
解决2(成功):
我直接ping了下网络,发现不只是github连不上,而是整个WSL网络都不能使用,在宿主机中我查看WSL网络配置,发现未修复之前两个红框中的ip地址是没有的
[外链图片转存失败,源站可能有防盗链机制,建议将图片保存下来直接上传(img-ey8Oa3Ol-1683939661824)(null)]
直接在宿主机上使用管理员权限执行netsh winsock reset重启网络即可(注意:不需要重启)
下面解决方案没有试过,仅作为备用方案
解决3:
# 重启 WSL 指令
$ wsl --shutdown
# 之后就重新启动进入即可
$ wsl
自定义启动页与项目列表
当我们在命令行中输入 nvim 不带任何路径并敲击回车的时候,就会打开这个界面,通常我们会在这个界面中配置最常用功能,比如打开最近编辑过的文件,快速打开项目文件夹,快速修改快捷键等。
使用官方配置的图像: Ascii Header Text · nvimdev/dashboard-nvim Wiki (github.com)
使用字体生成器:[Text to ASCII Art Generator (TAAG) (patorjk.com)](http://patorjk.com/software/taag/#p=display&f=ANSI Shadow&t=rettmp)
同样 plugins.lua 中添加:
-- dashboard-nvim (新增)use("glepnir/dashboard-nvim")
创建 lua/plugin-config/dashboard.lua ,并添加:
local status, db = pcall(require, "dashboard")
if not status thenvim.notify("没有找到 dashboard")return
enddb.setup({theme = 'doom',config = {header = {
[[ ]],
[[ ]],
[[██████╗ ███████╗████████╗████████╗███╗ ███╗██████╗ ]],
[[██╔══██╗██╔════╝╚══██╔══╝╚══██╔══╝████╗ ████║██╔══██╗]],
[[██████╔╝█████╗ ██║ ██║ ██╔████╔██║██████╔╝]],
[[██╔══██╗██╔══╝ ██║ ██║ ██║╚██╔╝██║██╔═══╝ ]],
[[██║ ██║███████╗ ██║ ██║ ██║ ╚═╝ ██║██║ ]],
[[╚═╝ ╚═╝╚══════╝ ╚═╝ ╚═╝ ╚═╝ ╚═╝╚═╝ ]],
[[ ]],
[[ [ version : 1.0.0 ] ]],
[[ ]],}, --your headercenter = {{icon = " ",desc = "Projects ",action = "Telescope projects",},{icon = " ",desc = "Recently files ",action = "Telescope oldfiles",},{icon = " ",desc = "Edit keybindings ",action = "edit ~/.config/nvim/lua/keybindings.lua",},{icon = " ",desc = "Edit Projects ",action = "edit ~/.local/share/nvim/project_nvim/project_history",},},footer = {} --your footer}
})
但是里面的 Telescope projects 并不是 telescope 内置的命令。需要安装ahmedkhalf/project.nvim插件,执行如下步骤
步骤
添加插件
-- project
use("ahmedkhalf/project.nvim")
确保lua/plugin-config/nvim-tree.lua文件中有如下代码:
nvim_tree.setup({--- 上略-- project plugin 需要这样设置update_cwd = true,update_focused_file = {enable = true,update_cwd = true,},-- 下略
}
创建lua/plugin-config/project.lua
local status, project = pcall(require, "project_nvim")
if not status thenvim.notify("没有找到 project_nvim")return
end-- nvim-tree 支持
vim.g.nvim_tree_respect_buf_cwd = 1project.setup({detection_methods = { "pattern" },patterns = { ".git", "_darcs", ".hg", ".bzr", ".svn", "Makefile", "package.json", ".sln" },
})local status, telescope = pcall(require, "telescope")
if not status thenvim.notify("没有找到 telescope")return
end
pcall(telescope.load_extension, "projects")
init.lua
require("plugin-config.dashboard")
require("plugin-config.project")
手动编辑 project_history 列表
执行:lua print(require("project_nvim.utils.path").historyfile)
我得到了~/.local/share/nvim/project_nvim/project_history这个文件,直接编辑即可
添加
/root/.config/nvim
以后的话可以方便编写nvim项目配置 😃
语法高亮安装及配置
相关插件:nvim-treesitter/nvim-treesitter: Nvim Treesitter configurations and abstraction layer (github.com)
添加插件
-- treesitter (新增)use({ "nvim-treesitter/nvim-treesitter", run = ":TSUpdate" })
手动安装Language parser
运行 :TSInstallInfo 命令查看 language parsers 列表与安装状态
[外链图片转存失败,源站可能有防盗链机制,建议将图片保存下来直接上传(img-ihzik4QO-1683939658098)(C:\Users\86150\AppData\Roaming\Typora\typora-user-images\image-20230509193140841.png)]
安装::TSInstall javascript
卸载::TSUninstall javascript
安装后会在 packer 中生成相应语言的so文件
自动安装配置
lua/plugin-config/nvim-treesitter.lua
local status, treesitter = pcall(require, "nvim-treesitter.configs")
if not status thenvim.notify("没有找到 nvim-treesitter")return
endtreesitter.setup({-- 安装 language parser-- :TSInstallInfo 命令查看支持的语言ensure_installed = { "json", "html", "css", "vim", "lua", "javascript", "typescript", "tsx" },-- 启用代码高亮模块highlight = {enable = true,additional_vim_regex_highlighting = false,},
})
init.lua
require("plugin-config.nvim-treesitter")
稍微说下里面 nvim-treesitter 中的配置
增量选择模块
当你的光标在一个语法结点上时,可以设置一个增加键和一个减少键,敲击这两个,在表现上为不断外扩和收缩选中代码。
增加和减少结点的快捷键设置成了 回车 和 退格 。通过不断的按 Enter 选择区域会从里层不断外扩, Backspace 则相反不断内收。
-- 启用增量选择模块
incremental_selection = {enable = true,keymaps = {init_selection = "<CR>",node_incremental = "<CR>",node_decremental = "<BS>",scope_incremental = "<TAB>",},
},
代码缩进
在 visual 模式中按 = 即可实现代码缩进
-- 启用代码缩进模块 (=)indent = {enable = true,},
代码折叠
快捷键中设置了zc 组合键来折叠 {} 中的内容,还使用 zo 组合键来打开对应的折叠。
-- 开启 Folding 模块
vim.opt.foldmethod = "expr"
vim.opt.foldexpr = "nvim_treesitter#foldexpr()"
-- 默认不要折叠
-- https://stackoverflow.com/questions/8316139/how-to-set-the-default-to-unfolded-when-you-open-a-file
vim.opt.foldlevel = 99
执行:TSModuleInfo查看是否成功
如果出现问题先执行TSUpdate看是否可以解决,无法解决查看官方issues或wiki
LSP 基础配置
目的:实现类似IDE的智能提示、语法检查和解析、悬停文档等交互体验
定义:LSP(Language Server Protocol) 语言服务协议,该协议定义了在编辑器或IDE与语言服务器之间使用的协议,该语言服务器提供了例如自动补全,转到定义,查找所有引用等的功能;语言服务器索引格式的目标是支持在开发工具中进行丰富的代码导航或者一个无需本地源码副本的WebUI。
开启 neovim 内置LSP
执行:h lsp查看quick start,里面的步骤如下
- 使用包管理器安装语言服务器
- 为每一种语言服务器配置LSP客户端
- 配置快捷键(keymaps)和自动命令(autocmds)
配置客户端
安装插件:neovim/nvim-lspconfig: Quickstart configs for Nvim LSP (github.com)
配置语言服务器
安装插件:williamboman/nvim-lsp-installer: Further development has moved to https://github.com/williamboman/mason.nvim!
配置插件:
--------------------- LSP --------------------use("williamboman/nvim-lsp-installer")-- Lspconfiguse({ "neovim/nvim-lspconfig" })
安装 LSP Server
运行:LspInstallInfo ,点击 i 即可安装相应的 Server ,进入之后安装 Lua server
[外链图片转存失败,源站可能有防盗链机制,建议将图片保存下来直接上传(img-T4tt5Dgq-1683939661761)(null)]
从最上面的介绍得知作者未来会用 mason.nvim 取代 nvim-lsp-installer,mason.nvim 项目支持更多的 server 安装,不仅仅是LSP Server 还支持 DAP servers、 linters、formatters 等等超过 150 个包,100+ 种编程语言,并且升级也是非常简单的
但是安装失败,直接重新安装即可成功
但是有时遇到could not find executable "unzip" in path 问题,可以使用如下命令
sudo apt-get install zip unzip
但是安装成功之后发现问题,我从issues中了解到是因为lua server的仓库地址发生变化
[外链图片转存失败,源站可能有防盗链机制,建议将图片保存下来直接上传(img-EGkOjmCU-1683939659326)(null)]
鉴于nvim-lsp-installer出现的各种问题,现在使用mason.nvim代替nvim-lsp-installer
步骤:
- 运行
:LspUninstallAll卸载nvim-lsp-installer - plugins.lua 替换 nvim-lsp-installer 插件为 mason.nvim 和 mason-lspconfig.nvim
use({ "williamboman/mason.nvim" })use({ "williamboman/mason-lspconfig.nvim" })
lua/lsp/setup.lua相应部分替换为(这个文件后面会创建,现在先讲下)
local status, mason = pcall(require, "mason")
if not status thenvim.notify("没有找到 mason")return
endlocal status, mason_config = pcall(require, "mason-lspconfig")
if not status thenvim.notify("没有找到 mason-lspconfig")return
endlocal status, lspconfig = pcall(require, "lspconfig")
if not status thenvim.notify("没有找到 lspconfig")return
end-- :h mason-default-settings
-- ~/.local/share/nvim/mason
mason.setup({ui = {icons = {package_installed = "✓",package_pending = "➜",package_uninstalled = "✗",},},
})-- mason-lspconfig uses the `lspconfig` server names in the APIs it exposes - not `mason.nvim` package names
-- https://github.com/williamboman/mason-lspconfig.nvim/blob/main/doc/server-mapping.md
mason_config.setup({ensure_installed = {"lua_ls",},
})-- 安装列表
-- { key: 服务器名, value: 配置文件 }
-- key 必须为下列网址列出的 server name,不可以随便写
-- https://github.com/williamboman/nvim-lsp-installer#available-lsps
local servers = {lua_ls = require("lsp.config.lua"), -- lua/lsp/config/lua.lua
}for name, config in pairs(servers) doif config ~= nil and type(config) == "table" then-- 自定义初始化配置文件必须实现on_setup 方法config.on_setup(lspconfig[name])else-- 使用默认参数lspconfig[name].setup({})end
endrequire("lsp.ui")
保存之后默认安装到 ~/.local/share/nvim/mason
执行:Mason即可打开,操作基本和上面的一样,只不过多了 1,2,3,4,5 是上边TAB快捷键,按 2 即可切换到 LSP
Mason 仓库地址:Mason
配置 LSP Server
创建一个新的目录 lua/lsp/ 专门存放 lsp 相关的配置,使用:h mason-lspconfig-automatic-server-setup查看如何配置setup,或是直接看官网
创建lua/lsp/setup.lua
local status, mason = pcall(require, "mason")
if not status thenvim.notify("没有找到 mason")return
endlocal status, mason_config = pcall(require, "mason-lspconfig")
if not status thenvim.notify("没有找到 mason-lspconfig")return
endlocal status, lspconfig = pcall(require, "lspconfig")
if not status thenvim.notify("没有找到 lspconfig")return
end-- :h mason-default-settings
-- ~/.local/share/nvim/mason
mason.setup({ui = {icons = {package_installed = "✓",package_pending = "➜",package_uninstalled = "✗",},},
})-- mason-lspconfig uses the `lspconfig` server names in the APIs it exposes - not `mason.nvim` package names
-- https://github.com/williamboman/mason-lspconfig.nvim/blob/main/doc/server-mapping.md
mason_config.setup({ensure_installed = {"lua_ls",},
})-- 安装列表
-- { key: 服务器名, value: 配置文件 }
-- key 必须为下列网址列出的 server name,不可以随便写
-- https://github.com/williamboman/nvim-lsp-installer#available-lsps
local servers = {lua_ls = require("lsp.config.lua"), -- lua/lsp/config/lua.lua
}for name, config in pairs(servers) doif config ~= nil and type(config) == "table" then-- 自定义初始化配置文件必须实现on_setup 方法config.on_setup(lspconfig[name])else-- 使用默认参数lspconfig[name].setup({})end
endrequire("lsp.ui")
配置 lua Server
创建/lua/lsp/config/lua.lua
-- https://github.com/neovim/nvim-lspconfig/blob/master/doc/server_configurations.md
local runtime_path = vim.split(package.path, ';')
table.insert(runtime_path, 'lua/?.lua')
table.insert(runtime_path, 'lua/?/init.lua')local opts = {settings = {Lua = {runtime = {-- Tell the language server which version of Lua you're using (most likely LuaJIT in the case of Neovim)version = 'LuaJIT',-- Setup your lua pathpath = runtime_path,},diagnostics = {-- Get the language server to recognize the `vim` globalglobals = { 'vim' },},workspace = {-- Make the server aware of Neovim runtime fileslibrary = vim.api.nvim_get_runtime_file('', true),checkThirdParty = false,},-- Do not send telemetry data containing a randomized but unique identifiertelemetry = {enable = false,},},},flags = {debounce_text_changes = 150,},on_attach = function(client, bufnr)-- 禁用格式化功能,交给专门插件插件处理client.resolved_capabilities.document_formatting = falseclient.resolved_capabilities.document_range_formatting = falselocal function buf_set_keymap(...)vim.api.nvim_buf_set_keymap(bufnr, ...)end-- 绑定快捷键require('keybindings').mapLSP(buf_set_keymap)-- 保存时自动格式化vim.cmd('autocmd BufWritePre <buffer> lua vim.lsp.buf.formatting_sync()')end,
}-- 查看目录等信息
return {on_setup = function(server)server:setup(opts)end,
}
配置 LSP 快捷键
lua/keybindings.lua
-- lsp 回调函数快捷键设置
pluginKeys.mapLSP = function(mapbuf)-- renamemapbuf("n", "<leader>rn", "<cmd>lua vim.lsp.buf.rename()<CR>", opt)-- code actionmapbuf("n", "<leader>ca", "<cmd>lua vim.lsp.buf.code_action()<CR>", opt)-- go xxmapbuf("n", "gd", "<cmd>lua vim.lsp.buf.definition()<CR>", opt)mapbuf("n", "gh", "<cmd>lua vim.lsp.buf.hover()<CR>", opt)mapbuf("n", "gD", "<cmd>lua vim.lsp.buf.declaration()<CR>", opt)mapbuf("n", "gi", "<cmd>lua vim.lsp.buf.implementation()<CR>", opt)mapbuf("n", "gr", "<cmd>lua vim.lsp.buf.references()<CR>", opt)-- diagnosticmapbuf("n", "gp", "<cmd>lua vim.diagnostic.open_float()<CR>", opt)mapbuf("n", "gk", "<cmd>lua vim.diagnostic.goto_prev()<CR>", opt)mapbuf("n", "gj", "<cmd>lua vim.diagnostic.goto_next()<CR>", opt)mapbuf("n", "<leader>f", "<cmd>lua vim.lsp.buf.formatting()<CR>", opt)-- 没用到-- mapbuf('n', '<leader>q', '<cmd>lua vim.diagnostic.setloclist()<CR>', opt)-- mapbuf("n", "<C-k>", "<cmd>lua vim.lsp.buf.signature_help()<CR>", opt)-- mapbuf('n', '<space>wa', '<cmd>lua vim.lsp.buf.add_workspace_folder()<CR>', opt)-- mapbuf('n', '<space>wr', '<cmd>lua vim.lsp.buf.remove_workspace_folder()<CR>', opt)-- mapbuf('n', '<space>wl', '<cmd>lua print(vim.inspect(vim.lsp.buf.list_workspace_folders()))<CR>', opt)-- mapbuf('n', '<space>D', '<cmd>lua vim.lsp.buf.type_definition()<CR>', opt)
end
init.lua
-- 内置LSP (新增)
require("lsp.setup")
这里记录下:使用:verbose map可以查看所有生效的快捷键
基于 LSP 代码补全及自定义代码段
相关插件:hrsh7th/nvim-cmp: A completion plugin for neovim coded in Lua. (github.com)
相关概念:
-
补全引擎
补全引擎就是为 Neovim 提供代码补全核心功能的插件,比如 nvim-cmp
-
补全源
补全源就是补全引擎需要的数据来源,最常见的来源是来自 Language Server 提供的数据,它会知道某个类有哪些属性和方法等。
-
snippet 引擎
snippet 引擎就是自定义代码段的引擎,常见的有
vsnip、luasnip等
添加插件
-- 补全引擎use("hrsh7th/nvim-cmp")-- snippet 引擎use("hrsh7th/vim-vsnip")-- 补全源use("hrsh7th/cmp-vsnip")use("hrsh7th/cmp-nvim-lsp") -- { name = nvim_lsp }use("hrsh7th/cmp-buffer") -- { name = 'buffer' },use("hrsh7th/cmp-path") -- { name = 'path' }use("hrsh7th/cmp-cmdline") -- { name = 'cmdline' }-- 常见编程语言代码段use("rafamadriz/friendly-snippets")
注意:只有
hrsh7th/nvim-cmp是补全引擎插件本身,其他cmp-xxx基本都是插件补全来源,也就是说当你输入一个变量的时候,可以从多个来源显示补全的内容。像 hrsh7th/cmp-nvim-lsp 就是 Neovim 内置 LSP 提供的补全内容,hrsh7th/cmp-buffer 补全当前 buffer 的内容, hrsh7th/cmp-cmdline 是命令行的补全,hrsh7th/cmp-path 则是用来补全路径,如果配置了这个,当输入一个路径的时候会补全路径
创建lua/lsp/cmp.lua
local cmp = require("cmp")cmp.setup({-- 指定 snippet 引擎snippet = {expand = function(args)-- For `vsnip` users.vim.fn["vsnip#anonymous"](args.body)-- For `luasnip` users.-- require('luasnip').lsp_expand(args.body)-- For `ultisnips` users.-- vim.fn["UltiSnips#Anon"](args.body)-- For `snippy` users.-- require'snippy'.expand_snippet(args.body)end,},-- 补全源sources = cmp.config.sources({{ name = "nvim_lsp" },-- For vsnip users.{ name = "vsnip" },-- For luasnip users.-- { name = 'luasnip' },--For ultisnips users.-- { name = 'ultisnips' },-- -- For snippy users.-- { name = 'snippy' },}, { { name = "buffer" }, { name = "path" } }),-- 快捷键设置mapping = require("keybindings").cmp(cmp),
})-- / 查找模式使用 buffer 源
cmp.setup.cmdline("/", {mapping = cmp.mapping.preset.cmdline(),sources = {{ name = "buffer" },},
})-- : 命令行模式中使用 path 和 cmdline 源.
cmp.setup.cmdline(":", {mapping = cmp.mapping.preset.cmdline(),sources = cmp.config.sources({{ name = "path" },}, {{ name = "cmdline" },}),
})
lua/keybindings.lua添加
-- nvim-cmp 自动补全
pluginKeys.cmp = function(cmp)return {-- 出现补全["<A-.>"] = cmp.mapping(cmp.mapping.complete(), {"i", "c"}),-- 取消补全["<A-,>"] = cmp.mapping({i = cmp.mapping.abort(),c = cmp.mapping.close()}),-- 上一个["<C-k>"] = cmp.mapping.select_prev_item(),-- 下一个["<C-j>"] = cmp.mapping.select_next_item(),-- 确认["<CR>"] = cmp.mapping.confirm({select = true,behavior = cmp.ConfirmBehavior.Replace}),-- 如果窗口内容太多,可以滚动["<C-u>"] = cmp.mapping(cmp.mapping.scroll_docs(-4), {"i", "c"}),["<C-d>"] = cmp.mapping(cmp.mapping.scroll_docs(4), {"i", "c"}),}
end
init.lua
require("lsp.cmp") -- (新增)
LSP 功能增强
UI 插件,同时 lspage还可以自定义快捷键,对于我自己而言我认为有些地方文字更加直观,如果有些朋友需要美化可自行查找
弹窗显示错误
当一行代码很长的时候,右侧的提示文字就会显示不全
之前配置过 gp 快捷键使用弹窗显示错误,可以有效解决
功能增强
相关插件:kkharji/lspsaga.nvim: The neovim language-server-client UI (github.com)
添加插件
use("tami5/lspsaga.nvim" )
创建lua/lsp/ui.lua
local lspsaga = require 'lspsaga'
lspsaga.setup { -- defaults ...debug = false,use_saga_diagnostic_sign = true,-- diagnostic signerror_sign = "",warn_sign = "",hint_sign = "",infor_sign = "",diagnostic_header_icon = " ",-- code action title iconcode_action_icon = " ",code_action_prompt = {enable = true,sign = true,sign_priority = 40,virtual_text = true,},finder_definition_icon = " ",finder_reference_icon = " ",max_preview_lines = 10,finder_action_keys = {-- open = "o",open = "<CR>",vsplit = "s",split = "i",-- quit = "q",quit = "<ESC>",scroll_down = "<C-f>",scroll_up = "<C-b>",},code_action_keys = {-- quit = "q",quit = "<ESC>",exec = "<CR>",},rename_action_keys = {-- quit = "<C-c>",quit = "<ESC>",exec = "<CR>",},definition_preview_icon = " ",border_style = "single",rename_prompt_prefix = "➤",rename_output_qflist = {enable = false,auto_open_qflist = false,},server_filetype_map = {},diagnostic_prefix_format = "%d. ",diagnostic_message_format = "%m %c",highlight_prefix = false,
}lua/keybindings.lua中的mapLSP 函数替换为
-- lsp 回调函数快捷键设置
pluginKeys.mapLSP = function(mapbuf)-- rename--[[Lspsaga 替换 rnmapbuf("n", "<leader>rn", "<cmd>lua vim.lsp.buf.rename()<CR>", opt)--]]mapbuf("n", "<leader>rn", "<cmd>Lspsaga rename<CR>", opt)-- code action--[[Lspsaga 替换 camapbuf("n", "<leader>ca", "<cmd>lua vim.lsp.buf.code_action()<CR>", opt)--]]mapbuf("n", "<leader>ca", "<cmd>Lspsaga code_action<CR>", opt)-- go xx--[[mapbuf('n', 'gd', '<cmd>Lspsaga preview_definition<CR>', opt)--]]mapbuf("n", "gd", "<cmd>lua vim.lsp.buf.definition()<CR>", opt)--[[Lspsaga 替换 ghmapbuf("n", "gh", "<cmd>lua vim.lsp.buf.hover()<CR>", opt)--]]mapbuf("n", "gh", "<cmd>Lspsaga hover_doc<cr>", opt)--[[Lspsaga 替换 grmapbuf("n", "gr", "<cmd>lua vim.lsp.buf.references()<CR>", opt)--]]mapbuf("n", "gr", "<cmd>Lspsaga lsp_finder<CR>", opt)--[[Lspsaga 替换 gp, gj, gkmapbuf("n", "gp", "<cmd>lua vim.diagnostic.open_float()<CR>", opt)mapbuf("n", "gj", "<cmd>lua vim.diagnostic.goto_next()<CR>", opt)mapbuf("n", "gk", "<cmd>lua vim.diagnostic.goto_prev()<CR>", opt)--]]-- diagnosticmapbuf("n", "gp", "<cmd>Lspsaga show_line_diagnostics<CR>", opt)mapbuf("n", "gj", "<cmd>Lspsaga diagnostic_jump_next<cr>", opt)mapbuf("n", "gk", "<cmd>Lspsaga diagnostic_jump_prev<cr>", opt)mapbuf("n", "<leader>f", "<cmd>lua vim.lsp.buf.format({ bufnr = bufnr })<CR>", opt)-- 未用-- mapbuf("n", "gD", "<cmd>lua vim.lsp.buf.declaration()<CR>", opt)-- mapbuf("n", "gi", "<cmd>lua vim.lsp.buf.implementation()<CR>", opt)-- mapbuf('n', '<leader>q', '<cmd>lua vim.diagnostic.setloclist()<CR>', opt)-- mapbuf("n", "<C-k>", "<cmd>lua vim.lsp.buf.signature_help()<CR>", opt)-- mapbuf('n', '<space>wa', '<cmd>lua vim.lsp.buf.add_workspace_folder()<CR>', opt)-- mapbuf('n', '<space>wr', '<cmd>lua vim.lsp.buf.remove_workspace_folder()<CR>', opt)-- mapbuf('n', '<space>wl', '<cmd>lua print(vim.inspect(vim.lsp.buf.list_workspace_folders()))<CR>', opt)-- mapbuf('n', '<space>D', '<cmd>lua vim.lsp.buf.type_definition()<CR>', opt)
end
init.lua
require("lsp.ui")
代码格式化
之前lua/keybindings.lua定义过格式化快捷键
mapbuf("n", "<leader>f", "<cmd>lua vim.lsp.buf.format({ bufnr = bufnr })<CR>", opt)
但是你会发现格式化不起作用,这是因为使用的 Lua Language Server 并没有实现格式化功能。
格式化方案有如下两种:
- 第一种是使用专门的格式化插件;
- 第二种是给 Language Server 注入格式化功能。
这里只讲解第二种
相关插件:jose-elias-alvarez/null-ls.nvim: Use Neovim as a language server to inject LSP diagnostics, code actions, and more via Lua. (github.com)
添加插件
-- 代码格式化use({ "jose-elias-alvarez/null-ls.nvim", requires = "nvim-lua/plenary.nvim" })
添加配置文件 lua/lsp/null-ls.lua
local status, null_ls = pcall(require, "null-ls")
if not status thenvim.notify("没有找到 null-ls")return
endlocal formatting = null_ls.builtins.formattingnull_ls.setup({debug = false,sources = {-- Formatting -----------------------  brew install shfmtformatting.shfmt,-- StyLuaformatting.stylua,-- frontendformatting.prettier.with({ -- 只比默认配置少了 markdownfiletypes = {"javascript","javascriptreact","typescript","typescriptreact","vue","css","scss","less","html","json","yaml","graphql",},prefer_local = "node_modules/.bin",}),-- formatting.fixjson,-- formatting.black.with({ extra_args = { "--fast" } }),},-- 保存自动格式化on_attach = function(client, bufnr)if client.supports_method("textDocument/formatting") thenvim.api.nvim_clear_autocmds({ group = augroup, buffer = bufnr })vim.api.nvim_create_autocmd("BufWritePre", {group = augroup,buffer = bufnr,callback = function()-- on 0.8, you should use vim.lsp.buf.format({ bufnr = bufnr }) insteadvim.lsp.buf.format({ bufnr = bufnr })-- vim.lsp.buf.formatting_sync()end,})endend,
})
init.lua
require("lsp.null-ls")
安装之后可以运行:LspInfo查看绑定的Language Server

然后我们可以看到有两个 LSP 了,null-ls 作为通用 LSP,可以在任何 filetypes 中运行。
然后执行:NullLsInfo查看源的激活情况
[外链图片转存失败,源站可能有防盗链机制,建议将图片保存下来直接上传(img-n4BqlCgg-1683939661651)(null)]
之后的话即可使用:lua vim.lsp.buf.format()命令或是直接使用快捷键<leader>f进行格式化
但是我们会发现包如下错误,这是因为相应语言应该配置相应的Code Formatter,显示报错就是缺少Lua语言的StyLua,其它语言可以自行配置相应的Formatter
[外链图片转存失败,源站可能有防盗链机制,建议将图片保存下来直接上传(img-iIOB3ONA-1683939661588)(null)]
下面展示如何配置stylua
配置环境
stylua 需要配置 rust 环境 ,rust官网:安装 Rust - Rust 程序设计语言 (rust-lang.org)
因为我是使用WSL,因此直接执行如下命令即可
curl --proto '=https' --tlsv1.2 -sSf https://sh.rustup.rs | sh
执行source "$HOME/.cargo/env"
执行rustc --version看是否成功,失败则看是否添加~/.cargo/bin路径到环境变量中
安装步骤
执行
cargo install stylua
输出stylua -V看是否成功
出现问题
格式化之后里面的空格就都变成了"^I", 原本应该是“·”的
直接将basic.lua文件中设置vim.o.listchars = "space:·,tab:··"或是设置vim.o.list = false
前端开发必要配置
配置语法高亮
执行:TSInstall css scss json html vue javascript typescript
执行:TSInstallInfo查看安装情况
配置 LSP
lua/lsp/setup.lua
mason_config.setup({ensure_installed = {"lua_ls", "html", "cssls"}
})
...
local servers = {lua_ls = require("lsp.config.lua"),-- 新增html = require("lsp.config.html"),cssls = require("lsp.config.css")
}
创建lsp/common-config.lua
local M = {}M.keyAttach = function(bufnr)local function buf_set_keymap(mode, lhs, rhs)vim.keymap.set(mode, lhs, rhs, { noremap = true, silent = true, buffer = bufnr })end-- 绑定快捷键require("keybindings").mapLSP(buf_set_keymap)
end-- 禁用格式化功能,交给专门插件插件处理
M.disableFormat = function(client)if vim.fn.has("nvim-0.8") == 1 thenclient.server_capabilities.documentFormattingProvider = falseclient.server_capabilities.documentRangeFormattingProvider = falseelseclient.resolved_capabilities.document_formatting = falseclient.resolved_capabilities.document_range_formatting = falseend
end-- M.capabilities = require("cmp_nvim_lsp").update_capabilities(vim.lsp.protocol.make_client_capabilities())
M.capabilities = require("cmp_nvim_lsp").default_capabilities()M.flags = {debounce_text_changes = 150,
}return M
创建lsp/config/html.lua
local common = require("lsp.common-config")
local opts = {capabilities = common.capabilities,flags = common.flags,on_attach = function(client, bufnr)-- 禁用本身语言格式化common.disableFormat(client)common.keyAttach(bufnr)end,
}
return {on_setup = function(server)server.setup(opts)end,
}
创建lsp/config/css.lua
local common = require("lsp.common-config")
local opts = {capabilities = common.capabilities,flags = common.flags,on_attach = function(client, bufnr)common.disableFormat(client)common.keyAttach(bufnr)end,settings = {css = {validate = true,-- tailwindcsslint = {unknownAtRules = "ignore",},},less = {validate = true,lint = {unknownAtRules = "ignore",},},scss = {validate = true,lint = {unknownAtRules = "ignore",},},},
}return {on_setup = function(server)server.setup(opts)end,
}
上面不禁用的话也是可以的,只不过会和默认的null-ls中的 prettier 格式化冲突,每次格式化都需要选择
注意html、css文件均是需要项目根目录有package.json文件和prettier依赖
# 创建package.json并安装prettier依赖,顺便把eslint也配置上
npm init -y && npm i -D prettier eslint
Emmet LSP 配置
使用 emmet 可是使用简单的语法可以快速打出 HTML 结构标签
创建lua/lsp/config/emmet.lua
local opts = {filetypes = { "html", "typescriptreact", "javascriptreact", "css", "sass", "scss", "less" },
}
return {on_setup = function(server)server.setup(opts)end,
}
lua/lsp/setup.lua修改
mason_config.setup({ensure_installed = {"lua_ls", "html", "cssls", "emmet_ls"}
})
...
local servers = {lua_ls = require("lsp.config.lua"),html = require("lsp.config.html"),cssls = require("lsp.config.css"),-- 新增emmet_ls = require("lsp.config.emmet")
}
配置 jsonls
JSON Schema Store 插件,即JSON增强包
plugins.lua添加插件
-- JSON 增强
use("b0o/schemastore.nvim")
新建lua/lsp/config/json.lua
local common = require("lsp.common-config")
local opts = {capabilities = common.capabilities,flags = common.flags,on_attach = function(client, bufnr)-- use fixjson to format-- https://github.com/rhysd/fixjsoncommon.disableFormat(client)common.keyAttach(bufnr)end,settings = {json = {schemas = require("schemastore").json.schemas(),},},
}return {on_setup = function(server)server.setup(opts)end,
}
lsp/config/setup.lua修改
mason_config.setup({ensure_installed = {"lua_ls", "html", "cssls", "emmet_ls","jsonls"}
})local servers = {lua_ls = require("lsp.config.lua"),html = require("lsp.config.html"),cssls = require("lsp.config.css"),emmet_ls = require("lsp.config.emmet"),-- 新增jsonls = require("lsp.config.json")
}
配置 tssserver
添加TS增强包插件
use({ "jose-elias-alvarez/nvim-lsp-ts-utils", requires = "nvim-lua/plenary.nvim" })
创建lsp/config/ts.lua
local common = require("lsp.common-config")
local keybindings = require("keybindings")
local ts_utils = require("nvim-lsp-ts-utils")
local opts = {flags = common.flags,capabilities = common.capabilities,-- https://github.com/jose-elias-alvarez/nvim-lsp-ts-utils/blob/main/lua/nvim-lsp-ts-utils/utils.lua-- 传入 tsserver 初始化参数-- make inlay hints workinit_options = {hostInfo = "neovim",preferences = {includeInlayParameterNameHints = "all",includeInlayParameterNameHintsWhenArgumentMatchesName = true,includeInlayFunctionParameterTypeHints = true,includeInlayVariableTypeHints = true,includeInlayPropertyDeclarationTypeHints = true,includeInlayFunctionLikeReturnTypeHints = true,includeInlayEnumMemberValueHints = true,},},on_attach = function(client, bufnr)common.disableFormat(client)common.keyAttach(bufnr)-- defaultsts_utils.setup({debug = false,disable_commands = false,enable_import_on_completion = false,-- import allimport_all_timeout = 5000, -- ms-- lower numbers = higher priorityimport_all_priorities = {same_file = 1, -- add to existing import statementlocal_files = 2, -- git files or files with relative path markersbuffer_content = 3, -- loaded buffer contentbuffers = 4, -- loaded buffer names},import_all_scan_buffers = 100,import_all_select_source = false,-- if false will avoid organizing importsalways_organize_imports = true,-- filter diagnosticsfilter_out_diagnostics_by_severity = {},-- https://github.com/microsoft/TypeScript/blob/main/src/compiler/diagnosticMessages.jsonfilter_out_diagnostics_by_code = {80001,},-- inlay hintsauto_inlay_hints = true,inlay_hints_highlight = "Comment",inlay_hints_priority = 200, -- priority of the hint extmarksinlay_hints_throttle = 150, -- throttle the inlay hint requestinlay_hints_format = { -- format options for individual hint kindType = {},Parameter = {},Enum = {},-- Example format customization for `Type` kind:-- Type = {--     highlight = "Comment",--     text = function(text)--         return "->" .. text:sub(2)--     end,-- },},-- update imports on file moveupdate_imports_on_move = false,require_confirmation_on_move = false,watch_dir = nil,})-- required to fix code action ranges and filter diagnosticsts_utils.setup_client(client)-- no default maps, so you may want to define some herekeybindings.mapTsLSP(bufnr)end,
}return {on_setup = function(server)server.setup(opts)end,
}
同样setup.lua修改
mason_config.setup({ensure_installed = {"lua_ls", "html", "cssls", "emmet_ls", "jsonls", "tsserver"}
})-- 安装列表
-- { key: 服务器名, value: 配置文件 }
-- key 必须为下列网址列出的 server name,不可以随便写
-- https://github.com/williamboman/nvim-lsp-installer#available-lsps
local servers = {lua_ls = require("lsp.config.lua"),html = require("lsp.config.html"),cssls = require("lsp.config.css"),emmet_ls = require("lsp.config.emmet"),jsonls = require("lsp.config.json"),-- 新增tsserver = require("lsp.config.ts")
}
添加快捷键lua/keybindings.lua
-- typescript 快捷键
pluginKeys.mapTsLSP = function(mapbuf)mapbuf("n", "gs", ":TSLspOrganize<CR>", opt)mapbuf("n", "gr", ":TSLspRenameFile<CR>", opt)mapbuf("n", "gi", ":TSLspImportAll<CR>", opt)
end
- gs 删除不用的 import 语句并重新排序。
- gr 用于改变文件名,同时其他文件中引用该文件的文件名也会被修改。
- gi 导入当前文件的所有依赖,并且会自动排序
ESLint 和 Prettier 配置
null-ls 中除了格式化 Formatting,还有Diagnostics(红字错误提示) 和 Code Actions(代码触发的行为)
lsp/null-ls.lua修改为
local status, null_ls = pcall(require, "null-ls")
if not status thenvim.notify("没有找到 null-ls")return
endlocal formatting = null_ls.builtins.formatting
local diagnostics = null_ls.builtins.diagnostics
local code_actions = null_ls.builtins.code_actionsnull_ls.setup({debug = false,sources = { -- Formatting -----------------------  brew install shfmtformatting.shfmt, -- StyLuaformatting.stylua, -- frontendformatting.prettier.with({ -- 只比默认配置少了 markdownfiletypes = {"javascript", "javascriptreact", "typescript", "typescriptreact", "vue", "css", "scss", "less","html", "json", "yaml", "graphql"},prefer_local = "node_modules/.bin"}), -- Diagnostics  ---------------------diagnostics.eslint.with({prefer_local = "node_modules/.bin"}), -- code actions ---------------------code_actions.gitsigns, code_actions.eslint.with({prefer_local = "node_modules/.bin"})},-- #{m}: message-- #{s}: source name (defaults to null-ls if not specified)-- #{c}: code (if available)diagnostics_format = "[#{s}] #{m}",-- 保存自动格式化on_attach = function(client, bufnr)if client.supports_method("textDocument/formatting") thenvim.api.nvim_clear_autocmds({group = augroup,buffer = bufnr})vim.api.nvim_create_autocmd("BufWritePre", {group = augroup,buffer = bufnr,callback = function()-- on 0.8, you should use vim.lsp.buf.format({ bufnr = bufnr }) insteadvim.lsp.buf.format({bufnr = bufnr})-- vim.lsp.buf.formatting_sync()end})endend
})
code_actions.gitsigns 没有安装可以注释掉
使用<leader>ca调用 Code Action 自动修复快捷键
Rust 开发配置
前文已安装rust环境,此处不赘述
语法高亮
plugin-config/nvim-treesitter.lua中的ensure_installed中添加"rust"
或是执行:TSInstall rust
代码提示
lsp/setup.lua
mason_config.setup({ensure_installed = {"lua_ls", "html", "cssls", "emmet_ls", "jsonls", "rust_analyzer"}
})
...
local servers = {-- 新增rust_analyzer = require("lsp.config.rust"),
}
lsp/config/rust.lua
local common = require("lsp.common-config")
local opts = {capabilities = common.capabilities,flags = common.flags,on_attach = function(client, bufnr)common.disableFormat(client)common.keyAttach(bufnr)end,settings = {-- to enable rust-analyzer settings visit:-- https://github.com/rust-analyzer/rust-analyzer/blob/master/docs/user/generated_config.adoc["rust-analyzer"] = {-- enable clippy on savecheckOnSave = {command = "clippy",},},},
}return {on_setup = function(server)local ok_rt, rust_tools = pcall(require, "rust-tools")if not ok_rt thenprint("Failed to load rust tools, will set up `rust_analyzer` without `rust-tools`.")server.setup(opts)else-- We don't want to call lspconfig.rust_analyzer.setup() when using rust-toolsrust_tools.setup({server = opts,-- dap = require("dap.nvim-dap.config.rust"),})endend,
}
添加 Rust 增强包插件
-- Rust 增强
use("simrat39/rust-tools.nvim")
代码格式化
安装相应 Formtter
rustup component add rustfmt
null-ls.lua
source中添加
-- rustfmt
formatting.rustfmt,
filetypes中添加"rust"
其他配置
自动补全括号
插件仓库:windwp/nvim-autopairs: autopairs for neovim written by lua (github.com)
引入插件
use("windwp/nvim-autopairs")
创建lua/plugin-config/nvim-autopairs.lua
-- https://github.com/windwp/nvim-autopairs
local status, autopairs = pcall(require, "nvim-autopairs")
if not status thenvim.notify("没有找到 nvim-autopairs")return
end
autopairs.setup({check_ts = true,ts_config = {lua = { "string" }, -- it will not add a pair on that treesitter nodejavascript = { "template_string" },java = false, -- don't check treesitter on java},
})
-- If you want insert `(` after select function or method item
local cmp_autopairs = require("nvim-autopairs.completion.cmp")
local cmp = require("cmp")
cmp.event:on("confirm_done", cmp_autopairs.on_confirm_done({ map_char = { tex = "" } }))
init.lua
快速注释插件
插件仓库:numToStr/Comment.nvim: // Smart and powerful comment plugin for neovim. Supports treesitter, dot repeat, left-right/up-down motions, hooks, and more (github.com)
添加插件
use("numToStr/Comment.nvim")
创建lua/plugin-config/comment.lua
local status, comment = pcall(require, "Comment")
if not status thenvim.notify("没有找到 Comment")return
endlocal default_opts = {---Add a space b/w comment and the line---@type boolean|fun():booleanpadding = true,---Whether the cursor should stay at its position---NOTE: This only affects NORMAL mode mappings and doesn't work with dot-repeat---@type booleansticky = true,---Lines to be ignored while comment/uncomment.---Could be a regex string or a function that returns a regex string.---Example: Use '^$' to ignore empty lines---@type string|fun():stringignore = nil,---LHS of toggle mappings in NORMAL + VISUAL mode---@type tabletoggler = {---Line-comment toggle keymapline = "gcc",---Block-comment toggle keymapblock = "gbc",},---LHS of operator-pending mappings in NORMAL + VISUAL mode---@type tableopleader = {---Line-comment keymapline = "gc",---Block-comment keymapblock = "gb",},---LHS of extra mappings---@type tableextra = {---Add comment on the line aboveabove = "gcO",---Add comment on the line belowbelow = "gco",---Add comment at the end of lineeol = "gcA",},---Create basic (operator-pending) and extended mappings for NORMAL + VISUAL mode---NOTE: If `mappings = false` then the plugin won't create any mappings---@type boolean|tablemappings = {---Operator-pending mapping---Includes `gcc`, `gbc`, `gc[count]{motion}` and `gb[count]{motion}`---NOTE: These mappings can be changed individually by `opleader` and `toggler` configbasic = true,---Extra mapping---Includes `gco`, `gcO`, `gcA`extra = false,---Extended mapping---Includes `g>`, `g<`, `g>[count]{motion}` and `g<[count]{motion}`extended = false,},---Pre-hook, called before commenting the line---@type fun(ctx: Ctx):stringpre_hook = nil,---Post-hook, called after commenting is done---@type fun(ctx: Ctx)post_hook = nil,
}-- 关闭了extra快捷键,只用keybindings里定义的基础快捷键
comment.setup(vim.tbl_deep_extend("force", default_opts, require("keybindings").comment))
定义快捷键 keybindings.lua gcc 快捷键作为行注释,gbc 快捷键作为块注释
-- 代码注释插件
-- see ./lua/plugin-config/comment.lua
pluginKeys.comment = {-- Normal 模式快捷键toggler = {line = "gcc", -- 行注释block = "gbc", -- 块注释},-- Visual 模式opleader = {line = "gc",bock = "gb",},
}
init.lua中引入
require("plugin-config.comment")
Surround 配置
引入插件
-- surrounduse("ur4ltz/surround.nvim")
lua/plugin-config/surround.lua
local status, surround = pcall(require, "surround")
if not status thenvim.notify("没有找到 surround")return
endsurround.setup({mappings_style = "surround",
})
init.lua
surround 官方快捷键如下
Normal Mode - Sandwich Mode
Provides key mapping to add surrounding characters.( visually select then press s<char> or press sa{motion}{char})
Provides key mapping to replace surrounding characters.( sr<from><to> )
Provides key mapping to delete surrounding characters.( sd<char> )
ss repeats last surround command.
Normal Mode - Surround Mode
Provides key mapping to add surrounding characters.( visually select then press s<char> or press ys{motion}{char})
Provides key mapping to replace surrounding characters.( cs<from><to> )
Provides key mapping to delete surrounding characters.( ds<char> )
Insert Mode
<c-s><char> will insert both pairs in insert mode.
<c-s><char><space> will insert both pairs in insert mode with surrounding whitespace.
<c-s><char><c-s> will insert both pairs on newlines insert mode.
常用快捷键
ds<char>cs<from><to>ys{motion}{char}
其他问题
我在推送仓库时频繁遇到GnuTLS recv error (-110)
解决链接:git - GnuTLS recv error (-110)
#!/bin/bash
set -e
sudo apt-get install build-essential fakeroot dpkg-dev -y
sudo apt-get build-dep git -y
sudo apt-get install libcurl4-openssl-dev -y
cd ~
mkdir source-git
cd source-git/
apt-get source git
cd git-2.*.*/
sed -i -- 's/libcurl4-gnutls-dev/libcurl4-openssl-dev/' ./debian/control
sed -i -- '/TEST\s*=\s*test/d' ./debian/rules
dpkg-buildpackage -rfakeroot -b -uc -us
sudo dpkg -i ../git_*ubuntu*.deb
直接运行这个脚本即可
之后推送遇到remote: Support for password authentication was removed on August 13, 2021问题,虽然我不太清楚我配了SSH key,为什么还是走的密码验证,但是我还是按照他的提示来做获取token,直接github首页中Setting->Developer settings->Personal access tokens 生成token
执行
git remote set-url origin https://<your_token>@github.com/<USERNAME>/<REPO>.git
最后即可免密推送
结语
对我自己而言,配置的这些功能虽然少,但是暂时够用,如果追求更多的功能,可以直接用小册作者的仓库,或是其他优秀仓库
其实我觉得其实作为个人使用来说,没有特殊需求的情况下不是很推荐自己配置,只需要看懂本篇博客,然后可以做到更改别人写好的配置即可
还有就是切忌盲目复制粘贴,一定要看官方文档
本篇博客示例配置仓库:ReturnTmp/rettmp-nvim
掘金小册作者仓库:https://github.com/nshen/learn-neovim-lua
注意:v2分支是neovim 8.0+适用
或是直接使用作者的新仓库:nshen/InsisVim: 🗃 An out-of-the-box Neovim IDE solution that setup development environment in an incredibly simple way. (github.com)
除了小册作者的配置仓库,这里再推荐一个优秀Neovim配置仓库:ayamir/nvimdots: A well configured and structured Neovim. (github.com)
至此Neovim配置学习就结束了😄
相关文章:
Neovim-配置教程
环境:Ubuntu 20.04 宿主机:windows (windows terminal)WSL2 NVIM:v0.10.0-dev 配置Neovim 需要保证流畅的github环境(以便于快速拉取插件),可以使用代理或是配置Github SSH key 本文…...
Windows管理内存的3种方式——堆、虚拟内存、共享内存
一、操作系统管理内存概述 在 Windows 操作系统中,每个进程都被分配了 4GB 的虚拟地址空间,这被称为进程的虚拟地址空间。虚拟地址空间提供了一个抽象的地址空间,使得每个进程都可以认为它拥有自己的独立内存空间。这个虚拟地址空间被分为两…...

PCM/FM解调原理与Matlab算法仿真
调制的作用是将调制信息的频谱从低频搬移到高频,以适合信道传输。关于调制的原理,在上一节中已经讲过了。在这一节中,主要讲解FM的解调原理。与调制相对应的是在接收端需要解调过程将调制信息复原,所以解调是影响通信系统性能的重要技术。 解调方法按照是否需要载波恢复的…...

我的『1024』创作纪念日
目录 ◐机缘 ◑收获 ◐日常 ◑成就 ◐憧憬 记得,2020年07月22日我撰写了第1篇技术博客:《遗传算法实例解析》在这平凡的一天,我赋予了它不平凡的意义也许是立志成为一名专业T作者、也许是记录一段刚实践的经验但在那一刻,我已…...
Python ---> 衍生的数据技术
我的个人博客主页:如果’真能转义1️⃣说1️⃣的博客主页 关于Python基本语法学习---->可以参考我的这篇博客:《我在VScode学Python》 随着人工智能技术的发展,挖掘和分析商业运用大数据已经成为一种推动应用, 推动社会发展起着…...

【27】linux进阶——rpm软件包的管理
大家好,这里是天亮之前ict,本人网络工程大三在读小学生,拥有锐捷的ie和红帽的ce认证。每天更新一个linux进阶的小知识,希望能提高自己的技术的同时,也可以帮助到大家 另外其它专栏请关注: 锐捷数通实验&…...
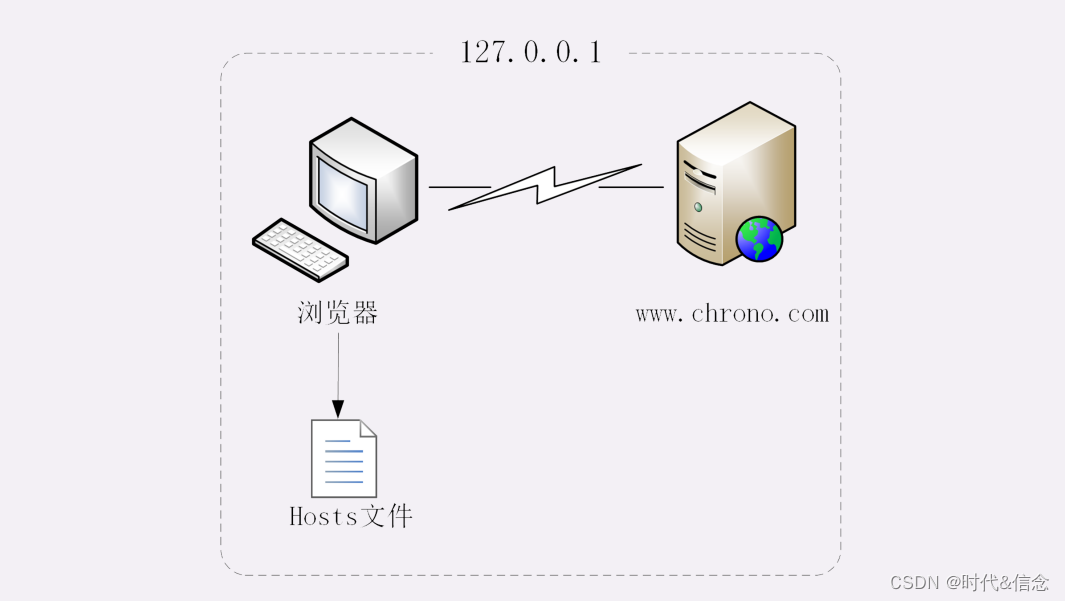
HTTP第六讲——键入网址再按下回车,后面究竟发生了什么?
使用 IP 地址访问 Web 服务器 首先我们运行 www 目录下的“start”批处理程序,启动本机的 OpenResty 服务器,启动后可以用“list”批处理确认服务是否正常运行。 然后我们打开 Wireshark,选择“HTTP TCP port(80)”过滤器,再鼠标…...

layui目录和项目引入
1.目录结构如下 ├─css //css目录 │ │─modules //模块css目录(一般如果模块相对较大,我们会单独提取,比如下面三个:) │ │ ├─laydate │ │ ├─layer │ │ └─layim │ └─layui.css //核心样式文件…...

Ubuntu22.04 将EFI启动分区迁移到另一块硬盘
机器上有两块硬盘, 一块已经安装了Win10, 另一块新装Ubuntu22.04, 在新硬盘上划分分区的时候, 有分出256M给 BOOT EFI, 但是安装的时候没注意, 启动分区不知道怎的跑到 Windows 所在的硬盘上了 记录一下将 /boot/efi 分区迁移至 Ubuntu 所在硬盘, 并创建 Grub 的记录. 预留的…...

只要学会这些AI工具,一个人就是一家营销咨询公司
本教程收集于:AIGC从入门到精通教程 只要学会这些AI工具,一个人就是一家营销咨询公司 随着AI工具的不断涌现,您只需掌握市面上热门的AI工具,便可独自开展营销咨询公司。通过一系列AI工具,您可以为企业提供全案服务,收获丰厚回报。 例如,在协助一家美妆初创公司出海时,…...

[离散数学] 函数
文章目录 函数判断函数的条件复合函数复合函数的性质 逆函数 函数 判断函数的条件 dom F A ⇔ \Leftrightarrow ⇔所有x 都有 F(x)与之对应 有唯一的与其对应 < x , y > ∈ f ∧ < y , z > ∈ f ⇒ y z <x,y>\in f \land <y,z…...

好家伙,又一份牛逼笔记面世了...
最近网传的一些裁员的消息,搞的人心惶惶。已经拿到大厂offer的码友来问我:大厂还能去,去了会不会被裁。 还在学习的网友来问我:现在还要冲互联网么? 我是认为大家不用恐慌吧,该看啥看啥,该学啥…...
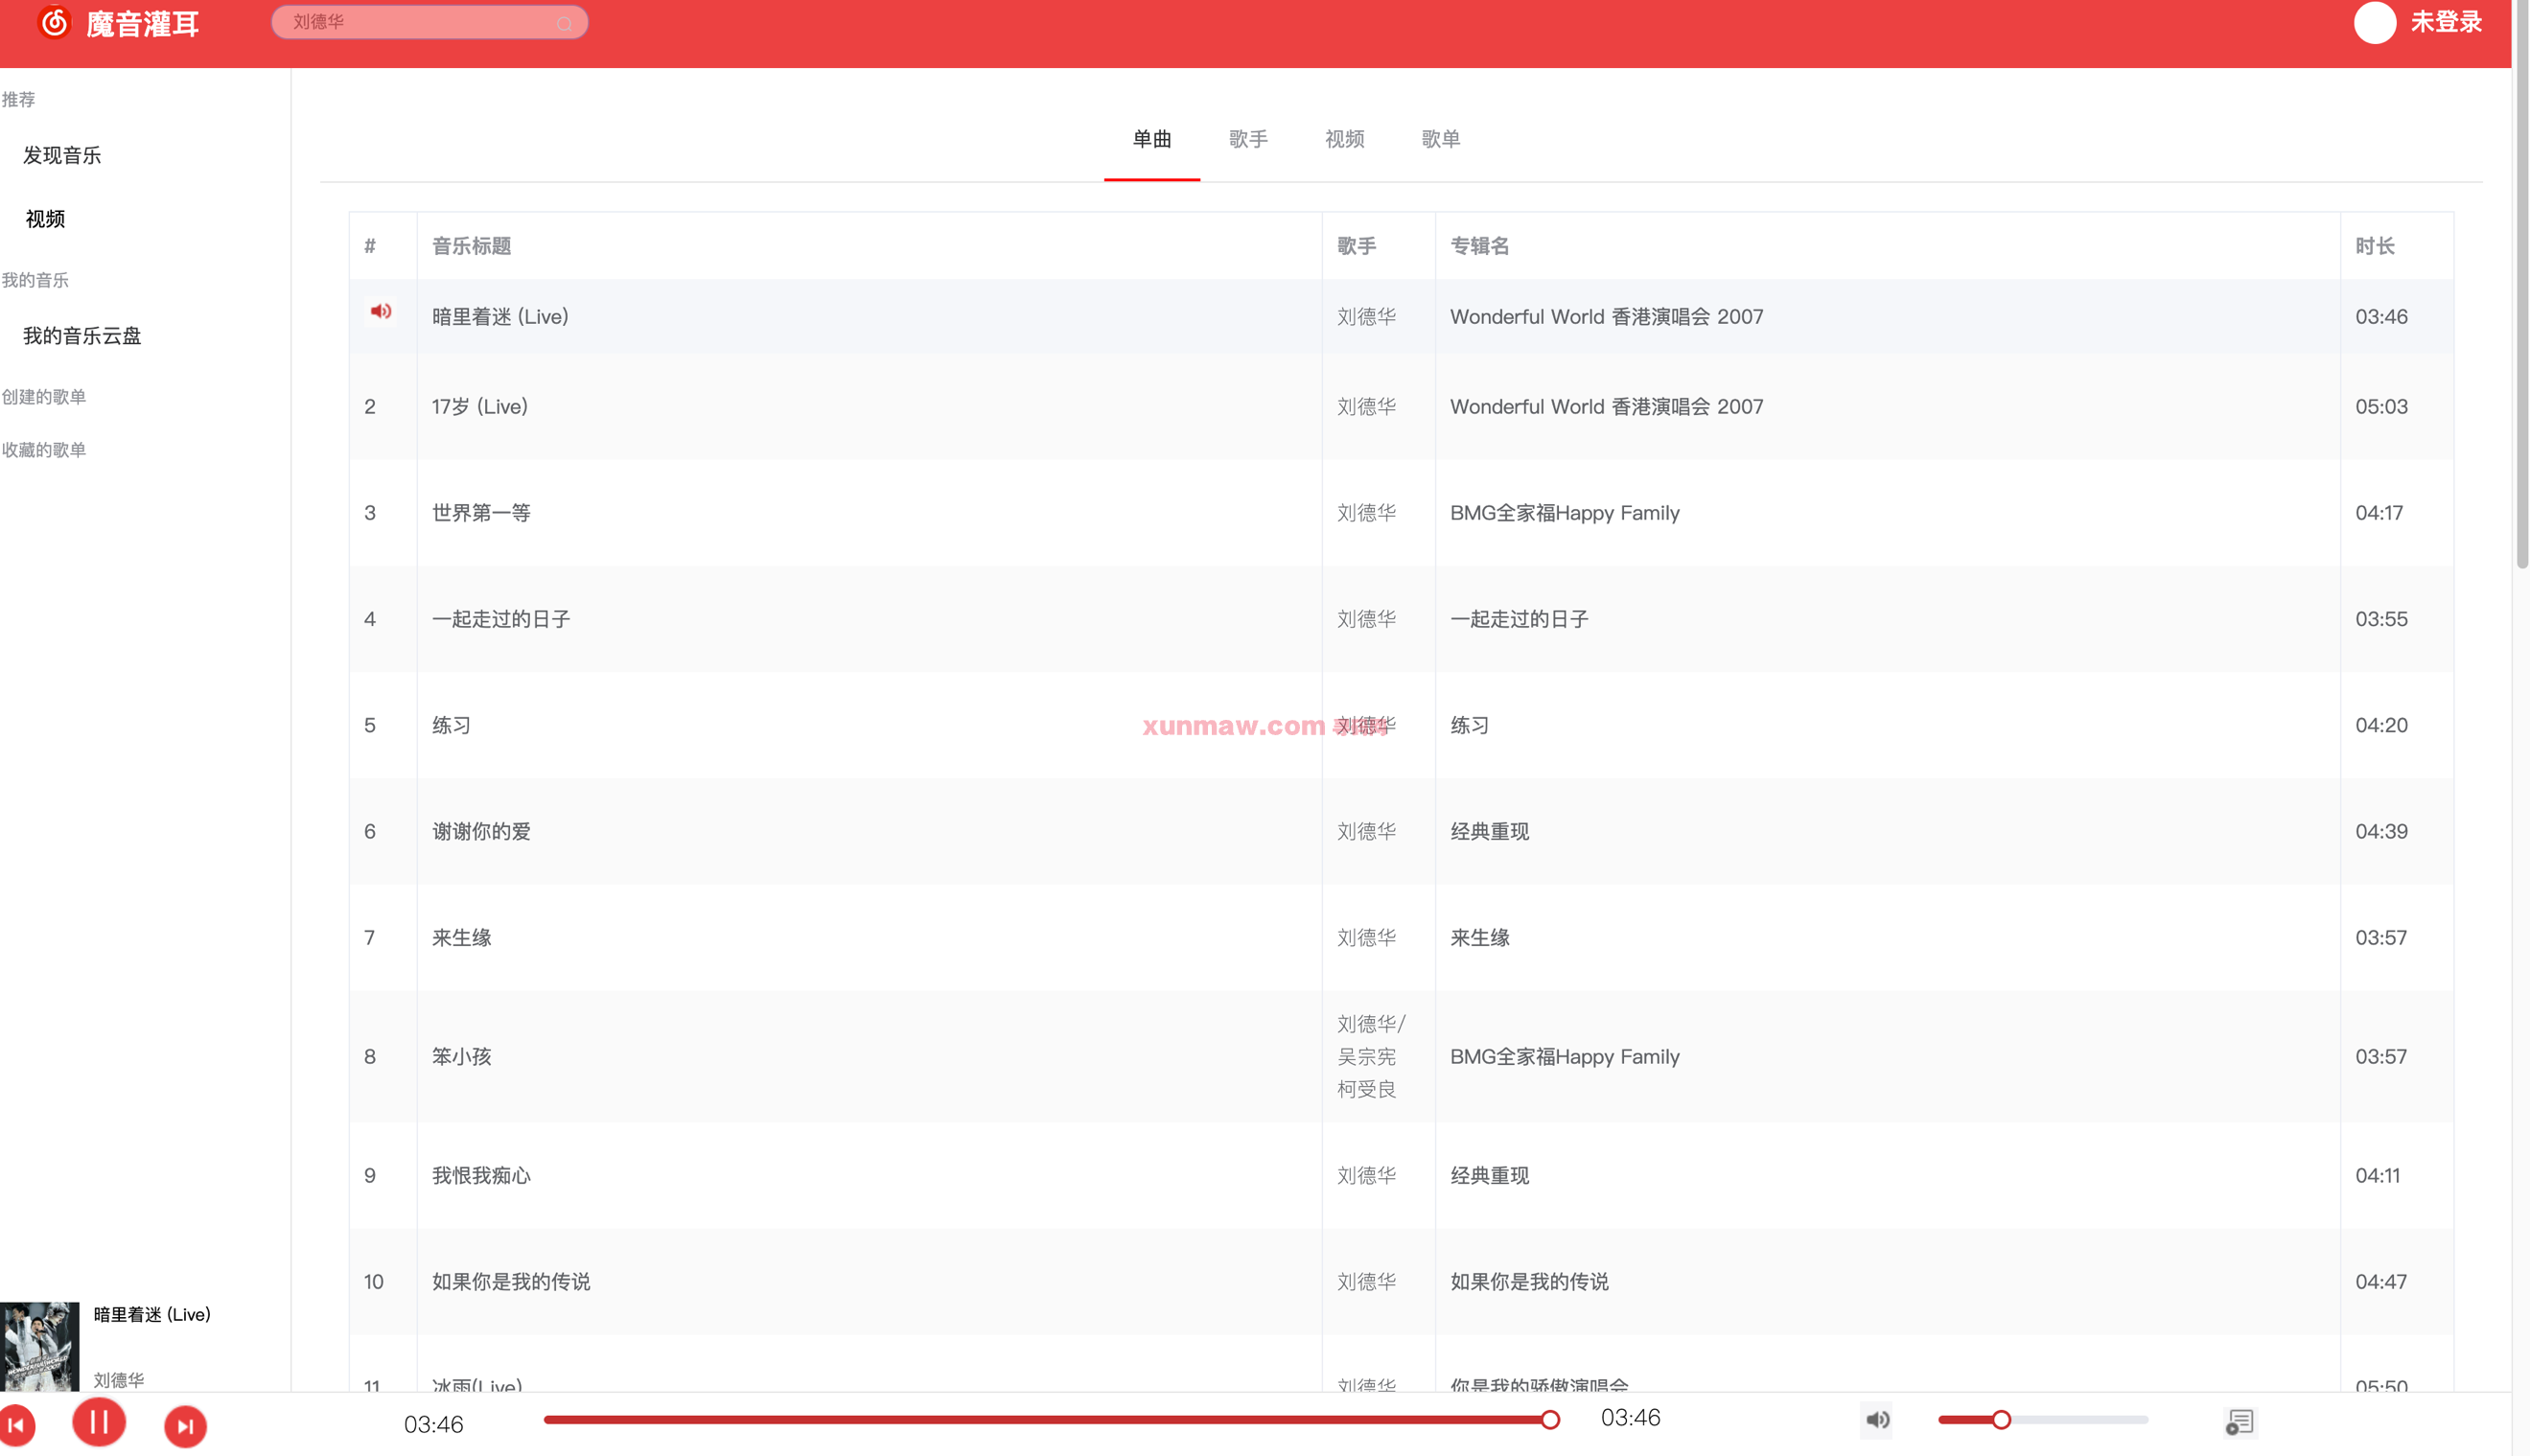
基于nodejs+vue3 的高仿网易云音乐
大家好,我是小寻,欢迎大家关注我的公众号:工具优选,加入前端、java群聊哦! 今天给大家分享一个超高水准的项目:基于nodejsvue3研发的高仿网易云音乐,项目内容出自寻码网! 技术栈&a…...
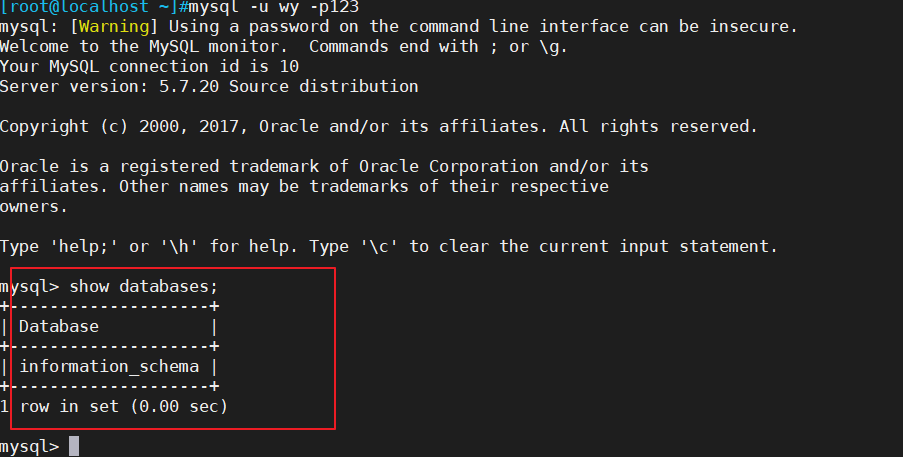
MySQL数据库用户管理以及数据库用户授权
一、数据库用户管理 1、新建用户 CREATE USER 用户名来源地址 [IDENTIFIED BY [PASSWORD] 密码]; ---------------------------------------------------------------------------------------------------------- 用户名:指定将创建的用户名 来源地址:…...

全面分析生物技术的优缺点以及应用场景
一、 引言 生物识别技术具有不可撤销性、高度便利性和较低错误率等优势,在安全领域中也备受瞩目。然而,对于生物识别技术在应对安全挑战方面的可靠性和有效性,但争议并未被完全解决 二、生物识别技术的介绍 所谓生物识别技术就是,…...

OpenAI是什么?
OpenAI是一家人工智能技术公司,成立于2015年,总部位于美国旧金山。它的创始人包括埃隆马斯克等多名知名人士,公司的目标是推进人工智能技术的发展,同时确保人工智能的发展不会对人类造成负面影响。 OpenAI在研究和开发各种人工智能…...

量子计算——新兴领域的前沿技术
随着人类社会文明的不断进步,计算技术也在不断发展。传统计算机在过去的几十年中快速发展,计算速度、存储能力等方面发生了天翻地覆的变化。但随着大数据、人工智能、区块链等新兴领域的迅速崛起,传统计算机的发展似乎面临了瓶颈。在这样的背…...

.Net平台下OpenGL绘制图形(1)(VS2019,Winform,C#)
1、介绍 OpenGL(英语:Open Graphics Library,译名:开放图形库或者“开放式图形库”)是用于渲染2D、3D矢量图形的跨语言、跨平台的应用程序编程接口(API)。这个接口由近350个不同的函数调用组成…...

Casso的创作纪念日
机缘 注册CSDN的时候才刚上大学,到现在使用CSDN已经四年了,距发布第一篇文章却只刚过去一百多天,刚看到这个提醒消息的时候只感慨时间过得真快,自己也在慢慢成长着,当初刚开始学习的时候,查资料用得最多的就…...

Bernhard‘s Talk on Towards Causal NLP 笔记
因果学习系列笔记 这是我的 GitHub 因果学习笔记仓库 https://github.com/xin007-kong/ryCausalLearning,欢迎 star🤩 讲者是 Bernhard Schlkopf talk 链接:(41) Bernhard Schoelkopf | Towards Causal NLP | KeynoteEMNLP 2021 Causal Infer…...

RAG技术解析:如何用向量检索增强大语言模型的生成能力?
RAG技术解析:如何用向量检索增强大语言模型的生成能力? 在人工智能领域,大语言模型(LLM)的崛起彻底改变了人机交互的方式。然而,这些模型在实际应用中仍面临知识更新滞后、事实性错误(幻觉&…...

【PS进阶技巧】透视变形工具在电商设计中的实战应用
1. 透视变形工具:电商设计师的秘密武器 每次看到电商平台上那些角度完美、展示全面的商品主图,你是不是也很好奇它们是怎么做出来的?作为一个在电商设计领域摸爬滚打多年的老手,我可以负责任地告诉你:90%的"完美角…...

如何快速解密QQ音乐文件:QMCFLAC2MP3终极转换指南
如何快速解密QQ音乐文件:QMCFLAC2MP3终极转换指南 【免费下载链接】qmcflac2mp3 直接将qmcflac文件转换成mp3文件,突破QQ音乐的格式限制 项目地址: https://gitcode.com/gh_mirrors/qm/qmcflac2mp3 还在为QQ音乐下载的加密音频文件无法在其他播放…...
)
海康威视Fastjson漏洞实战:手把手教你复现RCE攻击链(附修复方案)
海康威视Fastjson漏洞深度解析与防御实践 1. Fastjson漏洞背景与影响范围 Fastjson作为Java生态中广泛使用的JSON解析库,其安全漏洞已成为企业级应用的重要威胁源。2025年曝出的海康威视运行管理中心漏洞(CVE-2025-34067)因其CVSS 10.0的评分…...

为什么你的PADS Layout泪滴添加不成功?可能是这5个细节没注意
为什么你的PADS Layout泪滴添加总失败?5个工程师不愿透露的细节 在PCB设计领域,泪滴(Teardrop)是连接焊盘与走线之间的过渡结构,它能有效增强机械强度、改善信号完整性和提高生产工艺良率。但许多设计师在使用PADS Lay…...

VideoAgentTrek-ScreenFilter与ComfyUI工作流整合:可视化视频过滤管道搭建
VideoAgentTrek-ScreenFilter与ComfyUI工作流整合:可视化视频过滤管道搭建 你是不是也遇到过这样的烦恼?手里有一段视频,只想提取其中屏幕显示的部分,比如手机录屏、电脑操作演示,或者电影里的某个界面。手动一帧帧去…...

Z-Image-Turbo快速入门:3步启动WebUI,零基础玩转AI绘画
Z-Image-Turbo快速入门:3步启动WebUI,零基础玩转AI绘画 1. 为什么选择Z-Image-Turbo 如果你正在寻找一个既强大又容易上手的AI绘画工具,Z-Image-Turbo绝对值得一试。这个由阿里巴巴通义实验室开源的高效文生图模型,在速度和画质…...

Qwen3-ForcedAligner与MySQL协同优化:大规模语音数据处理
Qwen3-ForcedAligner与MySQL协同优化:大规模语音数据处理 1. 引言 语音数据处理正成为企业数字化转型的重要一环。无论是客服中心的通话记录、在线教育平台的课程内容,还是多媒体内容的字幕生成,都需要高效处理海量语音数据。传统的语音处理…...

Sentaurus TCAD中浪涌仿真参数详解:如何优化sdevice代码提升收敛性
Sentaurus TCAD浪涌仿真参数调优实战:从代码优化到收敛性提升 半导体器件仿真工程师在日常工作中最常遇到的挑战之一,就是如何让复杂的浪涌仿真顺利收敛。上周我在分析一款功率MOSFET的ESD特性时,连续三天被同一个仿真卡住——每次运行到某个…...

59. 如何使用 Rancher2 Terraform Provider 时启用调试日志
环境 Rancher2 Terraform Provider 情况If you encounter an issue with the Rancher2 Terraform Provider, capturing the debug output can be essential for troubleshooting or providing context to Rancher Support. This article explains how to enable debug logging …...