07-Vue技术栈之(组件之间的通信方式)
目录
- 1、组件的自定义事件
- 1.1 绑定自定义事件:
- 1.1.1 第一种方式
- 1.1.2 第二种方式
- 1.1.3 自定义事件只触发一次
- 1.2 解绑自定义事件
- 1.3绑定原生DOM事件
- 1.4 总结
- 2、全局事件总线(GlobalEventBus)
- 2.1 应用全局事件总线
- 3、 消息订阅与发布(pubsub)
- 3.1 应用消息订阅与发布
前言:
组件之间通信的方式有很多种,比如props、自定义事件、全局事件总线、消息订阅与发布、父链与子组件索引、插槽、Vuex等都可以实现组件之间的通信。在这里我将介绍以下三种通信方式。
1、组件的自定义事件
- 它是一种组件间通信的方式,适用于:子组件 ===> 父组件
- 使用场景:A是父组件,B是子组件,B想给A传数据,那么就要在A中给B绑定自定义事件(事件的回调在A中)。
1.1 绑定自定义事件:
1.1.1 第一种方式
- 在父组件中:
<Demo @dome="test"/>或<Demo v-on:dome="test"/> - 触发自定义事件:
this.$emit('dome',数据)
代码示例:
app组件
<template><div><h1 class="title">你好啊</h1><Student @dome="test" /></div>
</template><script>
import Student from "./components/Student";
export default {name: "App",components: { Student },methods: {test() {console.log("我被触发了");},},
};
</script><style scoped>
</style>
子组件student
<template><div class="demo"><button @click="domes">点我触发</button></div>
</template><script>
export default {name: "Student",methods: {domes() {this.$emit("dome");},},
};
</script><style scoped>
</style>
1.1.2 第二种方式
在父组件中:
<Demo ref="xxx"/>......mounted(){this.$refs.xxx.$on('demo',this.test)}
代码示例:
app组件
<template><div><h1 class="title">你好啊</h1><!-- <Student @dome.once="test" /> --><Student ref="student" /></div>
</template><script>
import Student from "./components/Student";
export default {name: "App",components: { Student },methods: {test() {console.log("我被调用了");},},mounted() {this.$refs.student.$on("dome", this.test);},
};
</script><style scoped>
</style>
子组件student
<template><div class="demo"><button @click="domes">点我触发</button></div>
</template><script>
export default {name: "Student",methods: {domes() {this.$emit("dome");},},
};
</script><style scoped>
</style>
注意:通过
this.$refs.xxx.$on('dome',回调)绑定自定义事件时,回调要么配置在methods中,要么用箭头函数,否则this指向会出问题!
代码示例:
mounted() {this.$refs.student.$on("dome", function() {console.log(this);this指向子组件student将普通函数换成箭头函数,this指向就还是原来的app组件});},
1.1.3 自定义事件只触发一次
若想让自定义事件只能触发一次,可以使用once修饰符,或$once方法。
代码示例:
- once修饰符使用方法
代码示例:
app组件
<template><div><h1 class="title">你好啊</h1><Student @dome.once="test" /><!--绑定自定义事件,一次性 --><!-- <Student ref="student" /> --></div>
</template><script>
import Student from "./components/Student";
export default {name: "App",components: { Student },methods: {test() {console.log("我被调用了");},},/*  mounted() {this.$refs.student.$on("dome", this.test);}, */
};
</script><style scoped>
</style>- $once使用方法
代码示例:
app组件
<template><div><h1 class="title">你好啊</h1><!-- <Student @dome.once="test" /> --><Student ref="student" /></div>
</template><script>
import Student from "./components/Student";
export default {name: "App",components: { Student },methods: {test() {console.log("我被调用了");},},mounted() {this.$refs.student.$once("dome", this.test);//绑定自定义事件(一次性)},
};
</script><style scoped>
</style>
1.2 解绑自定义事件
- 解绑自定义事件通过
this.$off('atguigu')
代码示例:
app组件
<template><div><h1 class="title">你好啊</h1><Student @dome="test" @dome2="test2"/><!-- <Student ref="student" /> --></div>
</template><script>
import Student from "./components/Student";
export default {name: "App",components: { Student },methods: {test() {console.log("我被调用了");},test2() {console.log("我是第二个事件");},},/* mounted() {this.$refs.student.$on("dome", this.test);}, */
};
</script><style scoped>
</style>子student组件
<template><div class="demo"><button @click="domes">点我触发</button><button @click="unbind">点我解绑事件</button></div>
</template><script>
export default {name: "Student",methods: {domes() {this.$emit("dome");this.$emit("dome2");//绑定多个自定义事件},unbind() {// this.$off("dome")//解绑一个自定义事件// this.$off(['dome','dome2'])//解绑多个自定义事件this.$off()//解绑所有的自定义事}},
};
</script><style scoped>
</style>
1.3绑定原生DOM事件
- 组件上也可以绑定原生DOM事件,需要使用
native修饰符。如果不加上native修饰符,Vue会默认将此事件当作自定义事件。
代码示例:
<Student @click.native="xxx"/>
1.4 总结
-
一种组件间通信的方式,适用于:子组件 ===> 父组件
-
使用场景:A是父组件,B是子组件,B想给A传数据,那么就要在A中给B绑定自定义事件(事件的回调在A中)。
-
绑定自定义事件:
-
第一种方式,在父组件中:
<Demo @atguigu="test"/>或<Demo v-on:atguigu="test"/> -
第二种方式,在父组件中:
<Demo ref="demo"/> ...... mounted(){this.$refs.xxx.$on('atguigu',this.test) } -
若想让自定义事件只能触发一次,可以使用
once修饰符,或$once方法。
-
-
触发自定义事件:
this.$emit('atguigu',数据) -
解绑自定义事件
this.$off('atguigu') -
组件上也可以绑定原生DOM事件,需要使用
native修饰符。 -
注意:通过
this.$refs.xxx.$on('atguigu',回调)绑定自定义事件时,回调要么配置在methods中,要么用箭头函数,否则this指向会出问题!
2、全局事件总线(GlobalEventBus)
-
一种组件间通信的方式,适用于任意组件间通信。
-
安装全局事件总线:
new Vue({......beforeCreate() {Vue.prototype.$bus = this //安装全局事件总线,$bus就是当前应用的vm},...... }) -
使用事件总线:
-
接收数据:A组件想接收数据,则在A组件中给$bus绑定自定义事件,事件的回调留在A组件自身。
methods(){demo(data){......} } ...... mounted() {this.$bus.$on('xxxx',this.demo) } -
提供数据:
this.$bus.$emit('xxxx',数据) -
最好在beforeDestroy钩子中,用$off去解绑当前组件所用到的事件。
2.1 应用全局事件总线
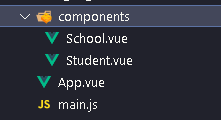
- 我们利用全局事件总线来完成一个兄弟间的通信
目录结构图:
代码示例:
在main文件里面安装全局事件总线
//引入Vue
import Vue from 'vue'
//引入App
import App from './App.vue'
//关闭Vue的生产提示
Vue.config.productionTip = false//创建vm
new Vue({el:'#app',render: h => h(App),beforeCreate() {Vue.prototype.$bus = this //安装全局事件总线},
})
没有涉及到和app组件通信,所以app组件正常编写即可
<template><div class="app"><h1>{{msg}}</h1><School/><Student/></div>
</template><script>import Student from './components/Student'import School from './components/School'export default {name:'App',components:{School,Student},data() {return {msg:'你好啊!',}}}
</script><style scoped>.app{background-color: gray;padding: 5px;}
</style>由于我们将school组件作为接受数据方,所以我们要给school组件种的$bus绑定自定义事件,事件的回调留在school组件自身。
<template><div class="school"><h2>学校名称:{{name}}</h2><h2>学校地址:{{address}}</h2></div>
</template><script>export default {name:'School',data() {return {name:'东方',address:'北京',}},mounted() {// console.log('School',this)this.$bus.$on('hello',(data)=>{console.log('我是School组件,收到了数据',data)})},beforeDestroy() {this.$bus.$off('hello')},}
</script><style scoped>.school{background-color: skyblue;padding: 5px;}
</style>
由于我们将student组件作为提供数据方,所以我们要在student组件中调用自定义事件
<template><div class="student"><h2>学生姓名:{{name}}</h2><h2>学生性别:{{sex}}</h2><button @click="sendStudentName">把学生名给School组件</button></div>
</template><script>export default {name:'Student',data() {return {name:'张三',sex:'男',}},mounted() {// console.log('Student',this.x)},methods: {sendStudentName(){this.$bus.$emit('hello',this.name)}},}
</script><style lang="less" scoped>.student{background-color: pink;padding: 5px;margin-top: 30px;}
</style>
3、 消息订阅与发布(pubsub)
-
一种组件间通信的方式,适用于任意组件间通信。
-
使用步骤:
-
安装pubsub:
npm i pubsub-js -
引入:
import pubsub from 'pubsub-js' -
接收数据:A组件想接收数据,则在A组件中订阅消息,订阅的回调留在A组件自身。
methods(){demo(data){......} } ...... mounted() {this.pid = pubsub.subscribe('xxx',this.demo) //订阅消息 } -
提供数据:
pubsub.publish('xxx',数据) -
最好在beforeDestroy钩子中,用
PubSub.unsubscribe(pid)去取消订阅。
-
3.1 应用消息订阅与发布
- 将上面的
全局事件总线案例应用消息订阅与发布的方法实现一下,整体思路是一样的。
目录结构图:
首先我们先要安装pubsub:npm i pubsub-js,然后在需要通信的组件中引入import pubsub from 'pubsub-js'这个包。
代码示例:
main文件
//引入Vue
import Vue from 'vue'
//引入App
import App from './App.vue'
//关闭Vue的生产提示
Vue.config.productionTip = false//创建vm
new Vue({el:'#app',render: h => h(App),
})
app组件
<template><div class="app"><h1>{{msg}}</h1><School/><Student/></div>
</template><script>import Student from './components/Student'import School from './components/School'export default {name:'App',components:{School,Student},data() {return {msg:'你好啊!',}}}
</script><style scoped>.app{background-color: gray;padding: 5px;}
</style>school组件作为接受信息订阅方
<template><div class="school"><h2>学校名称:{{name}}</h2><h2>学校地址:{{address}}</h2></div>
</template><script>import pubsub from 'pubsub-js'export default {name:'School',data() {return {name:'东方',address:'北京',}},mounted() {this.pubId = pubsub.subscribe('hello',(msgName,data)=>{console.log(this)// console.log('有人发布了hello消息,hello消息的回调执行了',msgName,data)})},beforeDestroy() {pubsub.unsubscribe(this.pubId)},}
</script><style scoped>.school{background-color: skyblue;padding: 5px;}
</style>
student组件作为发布信息方
<template><div class="student"><h2>学生姓名:{{name}}</h2><h2>学生性别:{{sex}}</h2><button @click="sendStudentName">把学生名给School组件</button></div>
</template><script>import pubsub from 'pubsub-js'export default {name:'Student',data() {return {name:'张三',sex:'男',}},mounted() {},methods: {sendStudentName(){pubsub.publish('hello',666)}},}
</script><style lang="less" scoped>.student{background-color: pink;padding: 5px;margin-top: 30px;}
</style>
相关文章:
07-Vue技术栈之(组件之间的通信方式)
目录 1、组件的自定义事件1.1 绑定自定义事件:1.1.1 第一种方式1.1.2 第二种方式1.1.3 自定义事件只触发一次 1.2 解绑自定义事件1.3绑定原生DOM事件1.4 总结 2、全局事件总线(GlobalEventBus)2.1 应用全局事件总线 3、 消息订阅与发布&#…...

度量学习Metirc Learning和基于负例的对比学习Contrastive Learning的异同点思考
参考:对比学习(Contrastive Learning):研究进展精要 - 知乎 参考:对比学习论文综述【论文精读】_哔哩哔哩_bilibili 参考:度量学习DML之Contrastive Loss及其变种_对比损失的变种_胖胖大海的博客-CSDN博客 参考&…...

3.编写油猴脚本之-helloword
3.编写油猴脚本之-helloword Start 通过上一篇文章的学习,我们安装完毕了油猴插件。今天我们来编写一个helloword的脚步,体验一下油猴。 1. 开始 点击油猴插件>添加新脚本 默认生成的脚本 // UserScript // name New Userscript // name…...

openwrt的openclash提示【更新失败,请确认设备闪存空间足够后再试】
网上搜索了一下,问题应该是出在“无法从网络下载内核更新包”或者“无法识别内核的版本号” 解决办法:手动下载(我是只搞了DEV内核就搞定了TUN和Meta没有动) --> 上传到路由器上 --> 解压缩 --> 回到openclash界面更新配…...
torch.nn.Module
它是所有的神经网络的根父类! 你的神经网络必然要继承 可以看一下这篇文章...
论文解析-基于 Unity3D 游戏人工智能的研究与应用
1.重写 AgentAction 方法 1.1 重写 AgentAction 方法 这段代码是一个重写了 AgentAction 方法的方法。以下是对每行代码解释: ①public override void AgentAction(float[] vectorAction) 这行代码声明了一个公共的、重写了父类的 AgentAction 方法的方法。它接受…...
6、Flutterr聊天界面网络请求
一、准备网络数据 1.1 数据准备工作 来到网络数据制造的网址,注册登录后,新建仓库,名为WeChat_flutter;点击进入该仓库,删掉左侧的示例接口,新建接口. 3. 接着点击右上角‘编辑’按钮,新建响应内容,类型为Array,一次生成50条 4. 点击chat_list左侧添加按钮,新建chat_list中的…...

Java 8 腰斩!Java 17 暴涨 430%!!(文末福利)
New Relic 最新发布了一份 “2023 年 Java 生态系统状况报告”,旨在提供有关当今 Java 生态系统状态的背景和见解。该报告基于从数百万个提供性能数据的应用程序中收集的数据,对生产中使用最多的版本、最受欢迎的 JDK 供应商、容器的兴起等多方面进行了调…...

如何手写一个支持H.265的高清播放器
概述 音视频编解码技术在当前的互联网行业中十分热门,特别是高清视频播放器的开发,其中包括4K、8K等超高清分辨率的播放器,具有极高的市场需求和广泛的应用场景。H265编码技术更是实现高清视频压缩的重要手段之一。如果想要掌握音视频编解码…...

Day 1 认识软件测试——(软件测试定义、目的、原则)
Day 1 认识软件测试——(软件测试定义、目的、原则) 文章目录 Day 1 认识软件测试——(软件测试定义、目的、原则)软件测试的定义软件测试的目的软件测试的经济学问题黑盒测试白盒测试软件测试原则小结所谓软件测试,就是一个过程或一系列过程,用来确定计算机代码完成了其…...
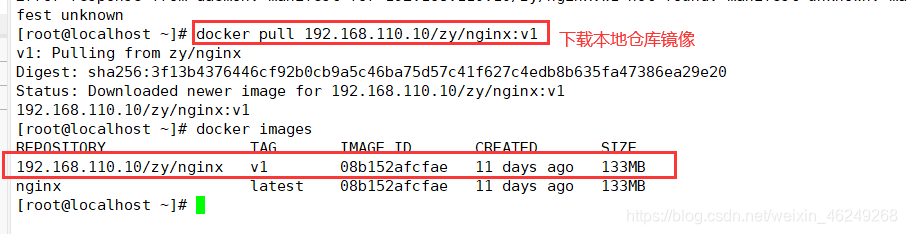
Docker Harbor
目录 一、Docker Harbor概述 1、Harbor的优势 2、Harbor知识点 3、Docker私有仓库架构 二、Harbor构建Docker私有仓库 1、环境配置 2、案例需求 3、部署docker-compose服务 4、部署harbor服务 5、启动harbor ① 访问 ② 添加项目并填写项目名称 ③ 通过127.0.0.1来…...

第三十四章 Unity人形动画(上)
在我们DirectX课程中,我们讲过一个模型最少拥有网格和材质,可以没有动画。游戏场景中的静态物体就可以是这样的模型,例如花草树木,建筑物等等,他们通过MeshRenderer就可以渲染。对于一个带有动画的FBX文件,…...

计算机图形学-GAMES101-7
引言 场景中有很多的三角形,如果实现可见性和遮挡呢? 一个简单的想法是,从远到近画,近处的物体自然会覆盖掉远处的物体,这种画法也叫画家算法。 但是实际绘制中物体的顺序是不容易确定的,比如如下图绘制…...

AndroidAuto 解决PCTS NF7
直接上代码 public void handleNavigationFocusRequest(int focusType) {// Always grant requested focus in this example.-mGal.galReceiver.sendNavigationFocusState(focusType);+mGal.galReceiver.sendNavigationFocusState...
GPT:你知道这五年我怎么过的么?
时间轴 GPT 首先最初版的GPT,来源于论文Improving Language Understanding by Generative Pre-Training(翻译过来就是:使用通用的预训练来提升语言的理解能力)。GPT这个名字其实并没有在论文中提到过,后人将论文名最后…...
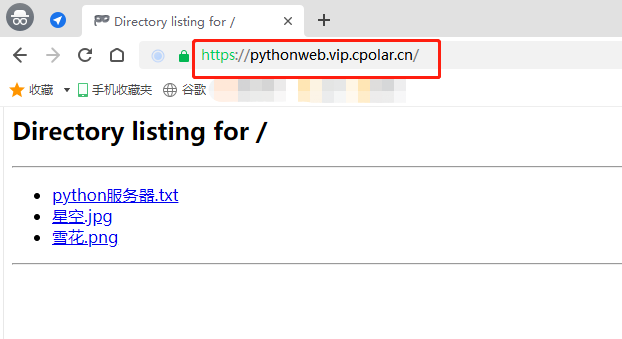
Python一行命令搭建HTTP服务器并外网访问 - 内网穿透
文章目录 1.前言2.本地http服务器搭建2.1.Python的安装和设置2.2.Python服务器设置和测试 3.cpolar的安装和注册3.1 Cpolar云端设置3.2 Cpolar本地设置 4.公网访问测试5.结语 转载自远程内网穿透的文章:【Python】快速简单搭建HTTP服务器并公网访问「cpolar内网穿透…...

TypeScript5-泛型
泛型是 TS 中一个重要的概念,它可以创建可复用的组件,同时保持对类型信息的一致性。 泛型提供了一种方式使得类型可以被参数化,这样就可以创建可以适用于各种数据类型的函数或类,而不仅仅限于一个数据类型。 一、泛型 先来看一…...
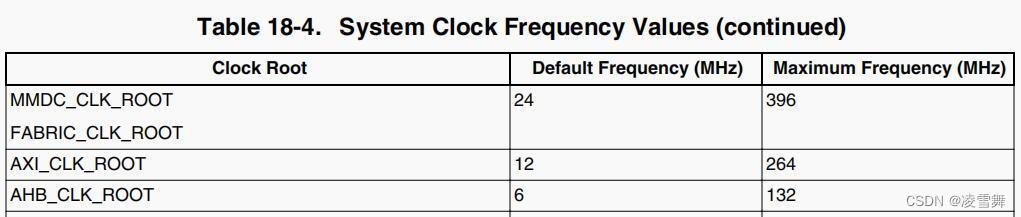
IMX6ULL裸机篇之DDR3的时钟配置
一. MMDC 控制器 对于 I.MX6U 来说,有 DDR 内存控制器,否则的话它怎么连接 DDR 呢?MMDC控制器 就是 I.MX6U 的 DDR内存控制器。 MMDC 外设包含一个内核(MMDC_CORE)和 PHY(MMDC_PHY),内核和 PHY 的功能如下: MMDC 内…...
)
PBDB Data Service:Specimens and measurements(标本和测量)
Specimens and measurements(标本和测量) 描述摘要1. [Single specimen(单个标本)](https://blog.csdn.net/whitedrogen/article/details/130685099)2. [Add specimen records or update existing records(添加标本记录…...

Zookeeper(一)
简介 设计模式角度 Zookeeper:是一个基于观察者模式设计的分布式服务管理框架,它负责存储和管理大家都关心的数据,然后接受观察者的注册,一旦这些数据的状态发生变化,Zookeeper就将负责通知已经在Zookeeper上注册的那…...
Gateway ODATA (V2) CURD之Delete)
SAP-Fiori:系列(4)Gateway ODATA (V2) CURD之Delete
在 OData V2 服务中,DELETE 操作用于删除指定的实体资源。本文将从客户端调用、HTTP 协议细节、ABAP 后端实现、常见错误等方面全面介绍 OData 的删除功能。如果你已经熟悉了 OData 的查询(GET)和创建(POST)࿰…...

TCP、UDP、ARP、Socket 与网络加密协议知识点整理——【2026】软考中级知识整理
TCP、UDP、ARP、Socket 与网络加密协议知识点整理 在计算机网络中,TCP、UDP、IP、ARP、ICMP、Socket、PPP、IPSec 等概念经常一起出现,也容易混淆。本文主要从协议层次、核心作用、典型应用和考试常见考点几个角度进行整理。 出自:智澈乐尚网…...

HEIF Utility:Windows用户的终极HEIF图片处理解决方案
HEIF Utility:Windows用户的终极HEIF图片处理解决方案 【免费下载链接】HEIF-Utility HEIF Utility - View/Convert Apple HEIF images on Windows. 项目地址: https://gitcode.com/gh_mirrors/he/HEIF-Utility 你是否曾经遇到过这样的困扰?从iPh…...

2026年AI智能体开发全攻略
截至2026年4月26日,AI智能体(AI Agent)已从“概念验证阶段”全面迈入工业化部署成熟期。根据IBM与AWS联合发布的《2026年智能体AI核心指南》,全球已有68%的财富500强企业在至少3个核心业务线中规模化运行自主智能体集群࿱…...
【含Matlab源码 15370期】)
【优化求解】带惯性项的自适应交替方向乘子法iADMMn求解带正则化的逻辑回归矩阵分解问题(对比ADMM和梯度下降法GD算法)【含Matlab源码 15370期】
💥💥💥💥💥💥💥💥💞💞💞💞💞💞💞💞💞Matlab武动乾坤博客之家💞…...

深度学习中的Dropout正则化技术与Keras实践
1. 理解Dropout正则化的核心价值在深度学习模型训练过程中,过拟合就像一位记忆力超强却缺乏理解力的学生——它能完美复述训练数据中的每个细节,却无法应对新问题的变化。2012年由Hinton团队提出的Dropout技术,通过随机"关闭"神经网…...

Inter字体完全指南:为数字界面选择最佳屏幕字体的终极解决方案
Inter字体完全指南:为数字界面选择最佳屏幕字体的终极解决方案 【免费下载链接】inter The Inter font family 项目地址: https://gitcode.com/gh_mirrors/in/inter 你是否曾在设计网站、应用或数字产品时,为字体选择而烦恼?屏幕上的文…...

边缘资源“幽灵占用”正在吞噬你的SLO!MCP 2026 v2.4.0新增Resource Shadow Detection功能全解
更多请点击: https://intelliparadigm.com 第一章:边缘资源“幽灵占用”问题的本质与SLO影响 边缘计算环境中,“幽灵占用”指资源(如 CPU、内存、GPU 或网络端口)被进程或容器长期持有却未实际执行有效负载࿰…...
]跨平台)
Rust的#[repr(C)]跨平台
Rust的#[repr(C)]跨平台:打破语言壁垒的桥梁 在现代软件开发中,跨平台兼容性是一个不可忽视的挑战。Rust作为一门注重安全与性能的系统级语言,通过#[repr(C)]属性提供了一种高效的跨语言交互方案。这一特性不仅简化了Rust与其他语言…...

掌握Cura切片引擎:从模型到完美打印的实战进阶指南
掌握Cura切片引擎:从模型到完美打印的实战进阶指南 【免费下载链接】Cura 3D printer / slicing GUI built on top of the Uranium framework 项目地址: https://gitcode.com/gh_mirrors/cu/Cura 你是否曾经为3D打印中的支撑结构难去除而烦恼?或是…...