Spring架构篇--2.7.3 远程通信基础--Netty原理--bind实现端口的绑定
前言:在对ServerBootstrap 进行属性赋值之后,通过bind 方法完成端口的绑定,并开始在NioEventLoop中进行轮询进行事件的处理;本文主要探究ServersocketChannel 在netty 中是如何完成注册,以及端口的绑定
1 Nio selector 多路复用模型:
为了更好的探究netty 的channel 的注册和端口的绑定,先来回顾下Nio selector 的事件注册以及端口绑定步骤以及netty 步骤的对应:
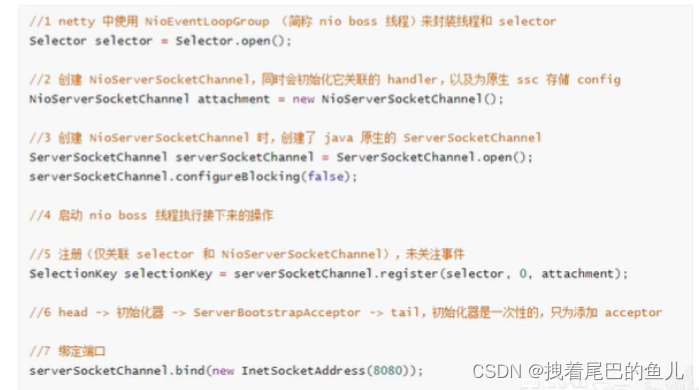
可以看到在 nio 中的步骤,在netty 也都是有的;然后对以上步骤的关键点在netty 中实现进行探究;
2 跟踪bind 方法: server.bind(this.port).sync()
2.1 AbstractBootstrap 类 server.bind(this.port):
AbstractBootstrap bind 完成端口的绑定和监听
public ChannelFuture bind(int inetPort) {return this.bind(new InetSocketAddress(inetPort));
}
使用new InetSocketAddress(inetPort) 构建要监听的端口,然后通过bind 方法进行绑定
AbstractBootstrap 的bind 方法:
public ChannelFuture bind(SocketAddress localAddress) {// 验证父类事件处理 的EventLoopGroup 和NioServerSocketChannel 工厂类是否赋值this.validate();// 端口的绑定和启动return this.doBind((SocketAddress)ObjectUtil.checkNotNull(localAddress, "localAddress"));
}
关键点 :2.2 进入 AbstractBootstrap doBind:在这里开始真正进行channel 管道的初始化,注册占位事件,完成端口的绑定
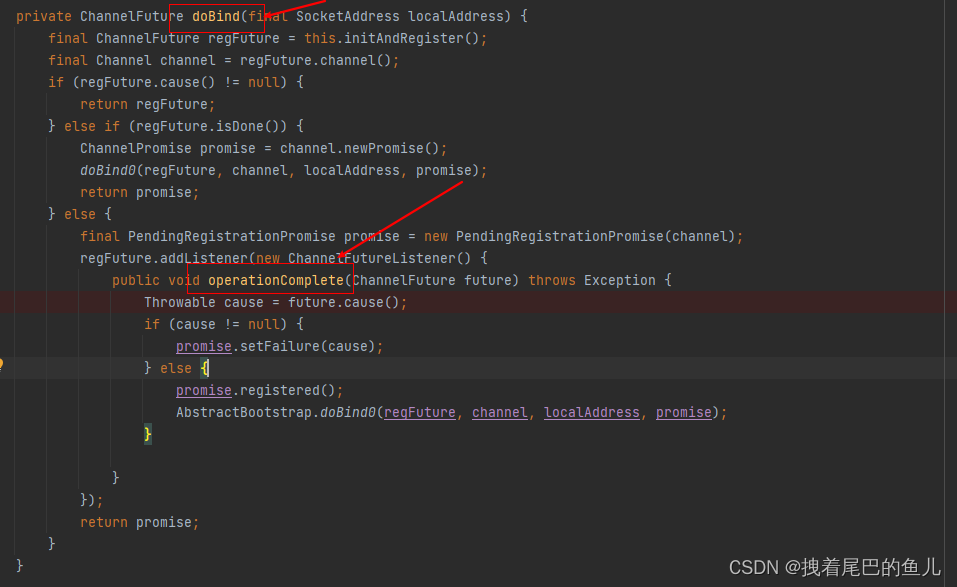
private ChannelFuture doBind(final SocketAddress localAddress) {
// 初始化NioServerSocketChannel 对象并赋值 regFuture final ChannelFuture regFuture = this.initAndRegister();
// 得到NioServerSocketChannel  channel 对象final Channel channel = regFuture.channel();if (regFuture.cause() != null) {return regFuture;} else if (regFuture.isDone()) {
// 通道初始化完成ChannelPromise promise = channel.newPromise();
// 地址绑定doBind0(regFuture, channel, localAddress, promise);return promise;} else {final PendingRegistrationPromise promise = new PendingRegistrationPromise(channel);regFuture.addListener(new ChannelFutureListener() {public void operationComplete(ChannelFuture future) throws Exception {Throwable cause = future.cause();if (cause != null) {promise.setFailure(cause);} else {promise.registered();AbstractBootstrap.doBind0(regFuture, channel, localAddress, promise);}}});return promise;}
}
关键点 :2.2.1 this.initAndRegister():NioServerSocketChannel 对象的初始化,以及channel 管道的占位事件注册:
AbstractBootstrap 类中 initAndRegister 方法
final ChannelFuture initAndRegister() {Channel channel = null;try {
//  调用NioServerSocketChannel 无参构造方法 初始化 NioServerSocketChannel 对象channel = this.channelFactory.newChannel();
// NioServerSocketChannel 对象初始化this.init(channel);} catch (Throwable var3) {if (channel != null) {channel.unsafe().closeForcibly();return (new DefaultChannelPromise(channel, GlobalEventExecutor.INSTANCE)).setFailure(var3);}return (new DefaultChannelPromise(new FailedChannel(), GlobalEventExecutor.INSTANCE)).setFailure(var3);}
// 从父类group 中的EventLoopGroup 选出一个EventLoop 并注册到channel 管道上ChannelFuture regFuture = this.config().group().register(channel);if (regFuture.cause() != null) {
// 注册失败 关闭ServerSocketChannel  通道if (channel.isRegistered()) {channel.close();} else {channel.unsafe().closeForcibly();}}
// 返回注册的结果, 由于是异步的方法 返回regFuture return regFuture;
}
关键点 2.2.1.1 this.channelFactory.newChannel() 的方法:NioServerSocketChannel 以及jdk 原生的ServerSocketChannel 对象创建:
(1) this.channelFactory.newChannel() 通过反射机制调用NioServerSocketChannel 的鬼样子方法中,进行jdk 原生的ServerSocketChannel 对象创建:
// 获取 WindowsSelectorProvider 的实例对象
private static final SelectorProvider DEFAULT_SELECTOR_PROVIDER = SelectorProvider.provider();
public NioServerSocketChannel() {this(newSocket(DEFAULT_SELECTOR_PROVIDER));
}private static java.nio.channels.ServerSocketChannel newSocket(SelectorProvider provider) {try {// 返回ServerSocketChannelImpl 的实例对象return provider.openServerSocketChannel();} catch (IOException var2) {throw new ChannelException("Failed to open a server socket.", var2);}
}
this(newSocket(DEFAULT_SELECTOR_PROVIDER));
NioServerSocketChannel 的this 方法:
public NioServerSocketChannel(java.nio.channels.ServerSocketChannel channel) {
// 父类方法对ServerSocketChannel  对象设置属性super((Channel)null, channel, 16);
// ServerSocketChannel   的config 对象进行初始化
//   private final ServerSocketChannelConfig config;this.config = new NioServerSocketChannelConfig(this, this.javaChannel().socket());
}
super((Channel)null, channel, 16) 调用 AbstractNioMessageChannel:这里可以看到把感兴趣的事件accept 16 作为参数进行了传递
// parent 为null ,ch 为ServerSocketChannel channel 对象,
// readInterestOp为int OP_ACCEPT = 1 << 4; 对应客户端连接服务器事件
protected AbstractNioMessageChannel(Channel parent, SelectableChannel ch, int readInterestOp) {super(parent, ch, readInterestOp);
}
关键点(2)继续进父类的调用:AbstractNioChannel: 对java 原生的ServerSocketChannel 的channel 管道的非阻塞属性进行了设置
private static final InternalLogger logger = InternalLoggerFactory.getInstance(AbstractNioChannel.class);
private final SelectableChannel ch;
protected final int readInterestOp;
volatile SelectionKey selectionKey;
boolean readPending;
private final Runnable clearReadPendingRunnable = new Runnable() {public void run() {AbstractNioChannel.this.clearReadPending0();}
};
private ChannelPromise connectPromise;
private ScheduledFuture<?> connectTimeoutFuture;
private SocketAddress requestedRemoteAddress;protected AbstractNioChannel(Channel parent, SelectableChannel ch, int readInterestOp) {super(parent);
//  将ServerSocketChannel 对象进行赋值this.ch = ch;
// 感兴趣的事件 进行赋值 16 final int OP_ACCEPT = 1 << 4; 对应客户端连接服务器事件this.readInterestOp = readInterestOp;try {// 设置管道非阻塞ch.configureBlocking(false);} catch (IOException var7) {try {ch.close();} catch (IOException var6) {logger.warn("Failed to close a partially initialized socket.", var6);}throw new ChannelException("Failed to enter non-blocking mode.", var7);}
}
关键点(3) super(parent); 调用父类:AbstractChannel:这里对java 原生的ServerSocketChannel 的pipeline 进行双向链表的初始化,以便后续加入对accept事件handler 的加入;
private static final InternalLogger logger = InternalLoggerFactory.getInstance(AbstractChannel.class);
private final Channel parent;
private final ChannelId id;
private final Channel.Unsafe unsafe;
private final DefaultChannelPipeline pipeline;
private final VoidChannelPromise unsafeVoidPromise = new VoidChannelPromise(this, false);
private final CloseFuture closeFuture = new CloseFuture(this);
private volatile SocketAddress localAddress;
private volatile SocketAddress remoteAddress;
private volatile EventLoop eventLoop;
private volatile boolean registered;
private boolean closeInitiated;
private Throwable initialCloseCause;
private boolean strValActive;
private String strVal;protected AbstractChannel(Channel parent) {
// parent 为nullthis.parent = parent;
// chanel 通道设置idthis.id = this.newId();
// chanel 通过设置文件描述this.unsafe = this.newUnsafe();
// 当前通道初始 pipeline this.pipeline = this.newChannelPipeline();
}
this.newChannelPipeline():
protected DefaultChannelPipeline newChannelPipeline() {return new DefaultChannelPipeline(this);
}
DefaultChannelPipeline 类中对pipeline 完成初始化:
static final InternalLogger logger = InternalLoggerFactory.getInstance(DefaultChannelPipeline.class);
private static final String HEAD_NAME = generateName0(HeadContext.class);
private static final String TAIL_NAME = generateName0(TailContext.class);
private static final FastThreadLocal<Map<Class<?>, String>> nameCaches = new FastThreadLocal<Map<Class<?>, String>>() {protected Map<Class<?>, String> initialValue() {return new WeakHashMap();}
};
private static final AtomicReferenceFieldUpdater<DefaultChannelPipeline, MessageSizeEstimator.Handle> ESTIMATOR = AtomicReferenceFieldUpdater.newUpdater(DefaultChannelPipeline.class, MessageSizeEstimator.Handle.class, "estimatorHandle");
final AbstractChannelHandlerContext head;
final AbstractChannelHandlerContext tail;
private final Channel channel;
private final ChannelFuture succeededFuture;
private final VoidChannelPromise voidPromise;
private final boolean touch = ResourceLeakDetector.isEnabled();
private Map<EventExecutorGroup, EventExecutor> childExecutors;
private volatile MessageSizeEstimator.Handle estimatorHandle;
private boolean firstRegistration = true;
private PendingHandlerCallback pendingHandlerCallbackHead;
private boolean registered;
// channel 为 NioServerSocketChannel对象
protected DefaultChannelPipeline(Channel channel) {
// chanel 赋值this.channel = (Channel)ObjectUtil.checkNotNull(channel, "channel");this.succeededFuture = new SucceededChannelFuture(channel, (EventExecutor)null);
// 管道初始化异常 异常原因 promisethis.voidPromise = new VoidChannelPromise(channel, true);
// pipeline 双向链表设置this.tail = new TailContext(this);this.head = new HeadContext(this);this.head.next = this.tail;this.tail.prev = this.head;
}
(4)NioServerSocketChannel 的config 初始化:在完成了对NioServerSocketChannel 对象的创建并初始化pipeline和设置其为非阻塞流之后;回到 NioServerSocketChannel 类中:
this.config = new NioServerSocketChannelConfig(this, this.javaChannel().socket())private NioServerSocketChannelConfig(NioServerSocketChannel channel, ServerSocket javaSocket) {super(channel, javaSocket);
}
super(channel, javaSocket) 方法调用到DefaultServerSocketChannelConfig 类:
protected final ServerSocket javaSocket;
private volatile int backlog;public DefaultServerSocketChannelConfig(ServerSocketChannel channel, ServerSocket javaSocket) {super(channel);this.backlog = NetUtil.SOMAXCONN;// ServerSocket  进行赋值this.javaSocket = (ServerSocket)ObjectUtil.checkNotNull(javaSocket, "javaSocket");
}
继续super(channel);调用到 DefaultChannelConfig
//  channel 为 ServerSocketChannel 对象
public DefaultChannelConfig(Channel channel) {this(channel, new AdaptiveRecvByteBufAllocator());
}
protected DefaultChannelConfig(Channel channel, RecvByteBufAllocator allocator) {
// channel NioServerSocketChannel   allocator:通道所用的缓冲区this.allocator = ByteBufAllocator.DEFAULT;this.msgSizeEstimator = DEFAULT_MSG_SIZE_ESTIMATOR;
// 通道属性的赋值this.connectTimeoutMillis = 30000;this.writeSpinCount = 16;this.autoRead = 1;this.autoClose = true;this.writeBufferWaterMark = WriteBufferWaterMark.DEFAULT;this.pinEventExecutor = true;this.setRecvByteBufAllocator(allocator, channel.metadata());this.channel = channel;
}
2.2.1.2 继续看 initAndRegister() 中的this.init(channel) 方法:
// channel为 NioServerSocketChannel 对象
void init(Channel channel) {// 将父类AbstractBootstrap 的options 属性赋值到 NioServerSocketChannel 对象setChannelOptions(channel, this.newOptionsArray(), logger);// 将父类AbstractBootstrap 的attrs属性赋值到 NioServerSocketChannel 对象setAttributes(channel, (Map.Entry[])this.attrs0().entrySet().toArray(EMPTY_ATTRIBUTE_ARRAY));
// 获取 ServerSocketChannel 初始化的pipeline DetaultChannelPipelineChannelPipeline p = channel.pipeline();
// 获取 子事件轮询组final EventLoopGroup currentChildGroup = this.childGroup;
// 获取子事件的 业务逻辑处理任务final ChannelHandler currentChildHandler = this.childHandler;
// 获取的子事件中设置的配置项final Map.Entry[] currentChildOptions;synchronized(this.childOptions) {currentChildOptions = (Map.Entry[])this.childOptions.entrySet().toArray(EMPTY_OPTION_ARRAY);}
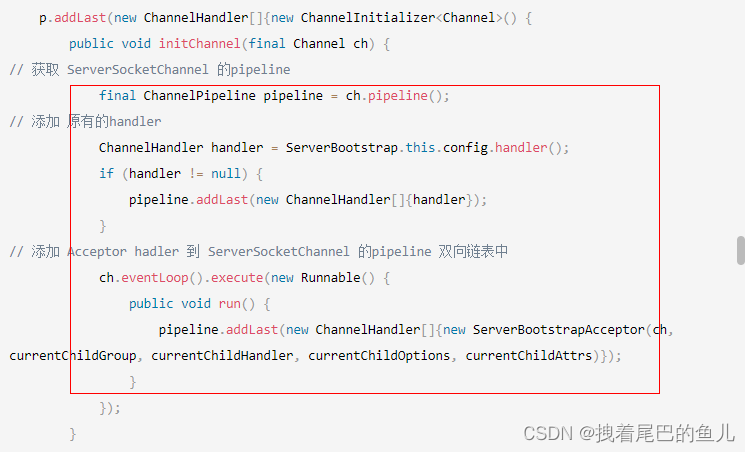
// 子事件设置的属性final Map.Entry<AttributeKey<?>, Object>[] currentChildAttrs = (Map.Entry[])this.childAttrs.entrySet().toArray(EMPTY_ATTRIBUTE_ARRAY);p.addLast(new ChannelHandler[]{new ChannelInitializer<Channel>() {public void initChannel(final Channel ch) {
// 获取 ServerSocketChannel 的pipelinefinal ChannelPipeline pipeline = ch.pipeline();
// 添加 原有的handlerChannelHandler handler = ServerBootstrap.this.config.handler();if (handler != null) {pipeline.addLast(new ChannelHandler[]{handler});}
// 添加 Acceptor hadler 到 ServerSocketChannel 的pipeline 双向链表中ch.eventLoop().execute(new Runnable() {public void run() {pipeline.addLast(new ChannelHandler[]{new ServerBootstrapAcceptor(ch, currentChildGroup, currentChildHandler, currentChildOptions, currentChildAttrs)});}});}}});
}关键点:(1)下面代码向ServerSocketChannel 中的pipeline 在双向链表的尾部增加了一个处理客户端连接事件的handler,并且可以看到这个添加handler 的操作是在ServerSocketChannel 初始化完成之后 由eventLoop 中的线程执行了任务:handler 在增加之后双向链表的构造:header->acceptor->tail
pipeline.addLast(new ChannelHandler[]{new ServerBootstrapAcceptor(ch, currentChildGroup, currentChildHandler, currentChildOptions, currentChildAttrs)})
到这里可以做下小结:
- this.channelFactory.newChannel() 完成了对NioServerSocketChannel 的创建,此处可以对应NIo 中的 SocketChannel socketChannel = SocketChannel.open();
- this.init(channel); 对创建的SocketChannel 进行属性的初始化,对于事件处理的Pipeline进行双向链表的初始化,此处可以对应NIo 中的 socketChannel.configureBlocking(false);
- 并且在ServerSocketChannel 真正完成初始化之后会有nio 的Eventloop 线程将ServerBootstrapAcceptor的handler 增加到ServerSocketChannel pipeline 链表中;
(2)再回到 AbstractBootstrap 的 initAndRegister() 方法中:看下事件是如果被注册到ServerSocketChannel 上:
final ChannelFuture initAndRegister() {Channel channel = null;try {
//  调用NioServerSocketChannel 无参构造方法 初始化 NioServerSocketChannel 对象channel = this.channelFactory.newChannel();
// NioServerSocketChannel 对象初始化this.init(channel);} catch (Throwable var3) {if (channel != null) {channel.unsafe().closeForcibly();return (new DefaultChannelPromise(channel, GlobalEventExecutor.INSTANCE)).setFailure(var3);}return (new DefaultChannelPromise(new FailedChannel(), GlobalEventExecutor.INSTANCE)).setFailure(var3);}
// 从父类group 中的EventLoopGroup 选出一个EventLoop 并注册到channel 管道上ChannelFuture regFuture = this.config().group().register(channel);if (regFuture.cause() != null) {
// 注册失败 关闭ServerSocketChannel  通道if (channel.isRegistered()) {channel.close();} else {channel.unsafe().closeForcibly();}}
// 返回注册的结果return regFuture;
}
关键点(3): ChannelFuture regFuture = this.config().group().register(channel):事件轮询器注册到ServerSocketChannel 对象上:
调用 MultithreadEventLoopGroup 中的register 方法
public ChannelFuture register(Channel channel) {return this.next().register(channel);
}
next() 方法: 使用在new NioEventLoopGroup 时设置的 选择器,从父类 EventExecutor[] children 数组中选择一个 EventExecutor ;然后继续看register 方法:
SingleThreadEventLoop 中的register:
public ChannelFuture register(Channel channel) {
// 创建DefaultChannelPromise 的promise 对象 赋值 当前的ServerSocketChannel channel 和 子事件轮询器的EventExecutor ,并返回包装类的ChannelPromisereturn this.register((ChannelPromise)(new DefaultChannelPromise(channel, this)));
}
public ChannelFuture register(ChannelPromise promise) {ObjectUtil.checkNotNull(promise, "promise");
//  NioServerSocketChannel 的channel 进行registerpromise.channel().unsafe().register(this, promise);return promise;
}
继续进入AbstractChannel 类中的register 方法:
public final void register(EventLoop eventLoop, final ChannelPromise promise) {ObjectUtil.checkNotNull(eventLoop, "eventLoop");if (AbstractChannel.this.isRegistered()) {promise.setFailure(new IllegalStateException("registered to an event loop already"));} else if (!AbstractChannel.this.isCompatible(eventLoop)) {promise.setFailure(new IllegalStateException("incompatible event loop type: " + eventLoop.getClass().getName()));} else {
// 子事件轮训器进行赋值AbstractChannel.this.eventLoop = eventLoop;// eventLoop 是否有线程可以直接使用if (eventLoop.inEventLoop()) {this.register0(promise);} else {try {
// new 一个线程来执行registereventLoop.execute(new Runnable() {public void run() {AbstractUnsafe.this.register0(promise);}});} catch (Throwable var4) {// 注册失败,设置异常原因AbstractChannel.logger.warn("Force-closing a channel whose registration task was not accepted by an event loop: {}", AbstractChannel.this, var4);this.closeForcibly();AbstractChannel.this.closeFuture.setClosed();this.safeSetFailure(promise, var4);}}}
}
关键点(3.1 )调用AbstractUnsafe register0 方法:完成占位事件的注册
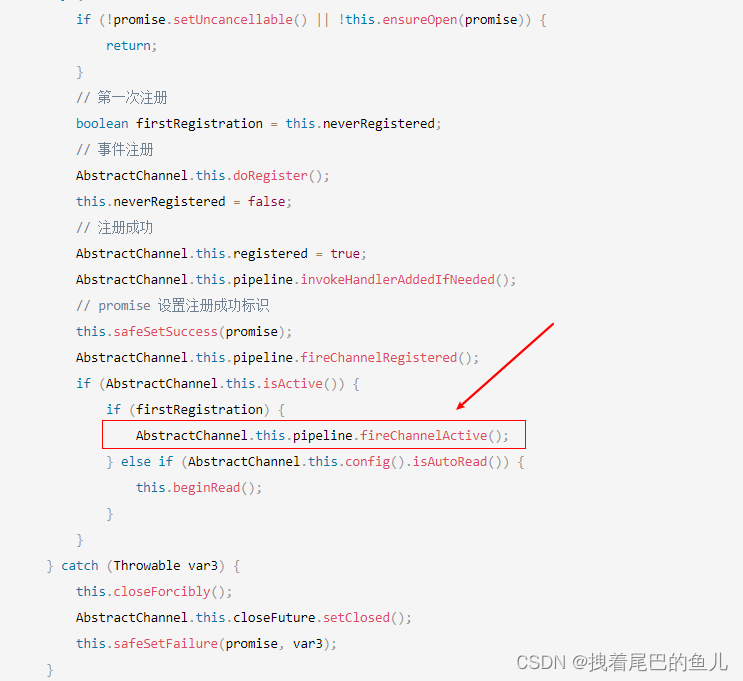
private voidregister0(ChannelPromise promise) {try {if (!promise.setUncancellable() || !this.ensureOpen(promise)) {return;}// 第一次注册boolean firstRegistration = this.neverRegistered;// 事件注册AbstractChannel.this.doRegister();this.neverRegistered = false;// 注册成功AbstractChannel.this.registered = true;AbstractChannel.this.pipeline.invokeHandlerAddedIfNeeded();// promise 设置注册成功标识this.safeSetSuccess(promise);AbstractChannel.this.pipeline.fireChannelRegistered();if (AbstractChannel.this.isActive()) {if (firstRegistration) {AbstractChannel.this.pipeline.fireChannelActive();} else if (AbstractChannel.this.config().isAutoRead()) {this.beginRead();}}} catch (Throwable var3) {this.closeForcibly();AbstractChannel.this.closeFuture.setClosed();this.safeSetFailure(promise, var3);}}
关键点(3.2 )AbstractChannel.this.doRegister():占位事件0完成注册:
AbstractNioChannel 类中 doRegister 方法:
protected void doRegister() throws Exception {boolean selected = false;while(true) {try {//  this.javaChannel() 为ServerSocketChannel对象//  ServerSocketChannel对象 调用 register 方法this.selectionKey = this.javaChannel().register(this.eventLoop().unwrappedSelector(), 0, this);return;} catch (CancelledKeyException var3) {if (selected) {throw var3;}this.eventLoop().selectNow();selected = true;}}
}
ServerSocketChannel对象 调用 register 方法
AbstractSelectableChannel 类中 register 方法
// Selector  为 从父事件NioEventLoopGroup 中选择出来的某个NioEventLoop 对应的 Selector 选择器器
// ops 感兴趣的事件 0 ,
// att 属性NioServerSocketChannel 对象
public final SelectionKey register(Selector sel, int ops,Object att)throws ClosedChannelException
{synchronized (regLock) {if (!isOpen())throw new ClosedChannelException();if ((ops & ~validOps()) != 0)throw new IllegalArgumentException();if (blocking)throw new IllegalBlockingModeException();SelectionKey k = findKey(sel);if (k != null) {k.interestOps(ops);k.attach(att);}if (k == null) {// New registrationsynchronized (keyLock) {if (!isOpen())throw new ClosedChannelException();k = ((AbstractSelector)sel).register(this, ops, att);addKey(k);}}return k;}
}
调用AbstractSelector 的 register 方法完成将事件注册到selector多路复用器中:
protected final SelectionKey register(AbstractSelectableChannel var1, int var2, Object var3) {if (!(var1 instanceof SelChImpl)) {throw new IllegalSelectorException();} else {SelectionKeyImpl var4 = new SelectionKeyImpl((SelChImpl)var1, this);var4.attach(var3);synchronized(this.publicKeys) {this.implRegister(var4);}var4.interestOps(var2);return var4;}
}
关键点(3.3) AbstractChannel.this.pipeline.invokeHandlerAddedIfNeeded() 在channel初始化完成之后回调到initAndRegister() 中的this.init(channel) 方法,完成accept handler 的增加:
可以看到具体进行accept 事件增加的处理是借由 EventLoop 中的execute 进行任务的提交;
关键点关键点(3.4) this.safeSetSuccess(promise) 为promise 设置成功结果后回调到AbstractBootstrap的doBind的operationComplete 方法进行端口号的绑定:
关键点 2.2.1.3 ServerSocketChannel 管道初始化完成之后 进行doBind0 端口的板绑定
private ChannelFuture doBind(final SocketAddress localAddress) {final ChannelFuture regFuture = this.initAndRegister();final Channel channel = regFuture.channel();if (regFuture.cause() != null) {return regFuture;} else if (regFuture.isDone()) {ChannelPromise promise = channel.newPromise();doBind0(regFuture, channel, localAddress, promise);return promise;} else {final PendingRegistrationPromise promise = new PendingRegistrationPromise(channel);// 监听注册完成的事件regFuture.addListener(new ChannelFutureListener() {public void operationComplete(ChannelFuture future) throws Exception {Throwable cause = future.cause();if (cause != null) {promise.setFailure(cause);} else {// 设置注册成功标识promise.registered();// 绑定端口AbstractBootstrap.doBind0(regFuture, channel, localAddress, promise);}}});return promise;}
}
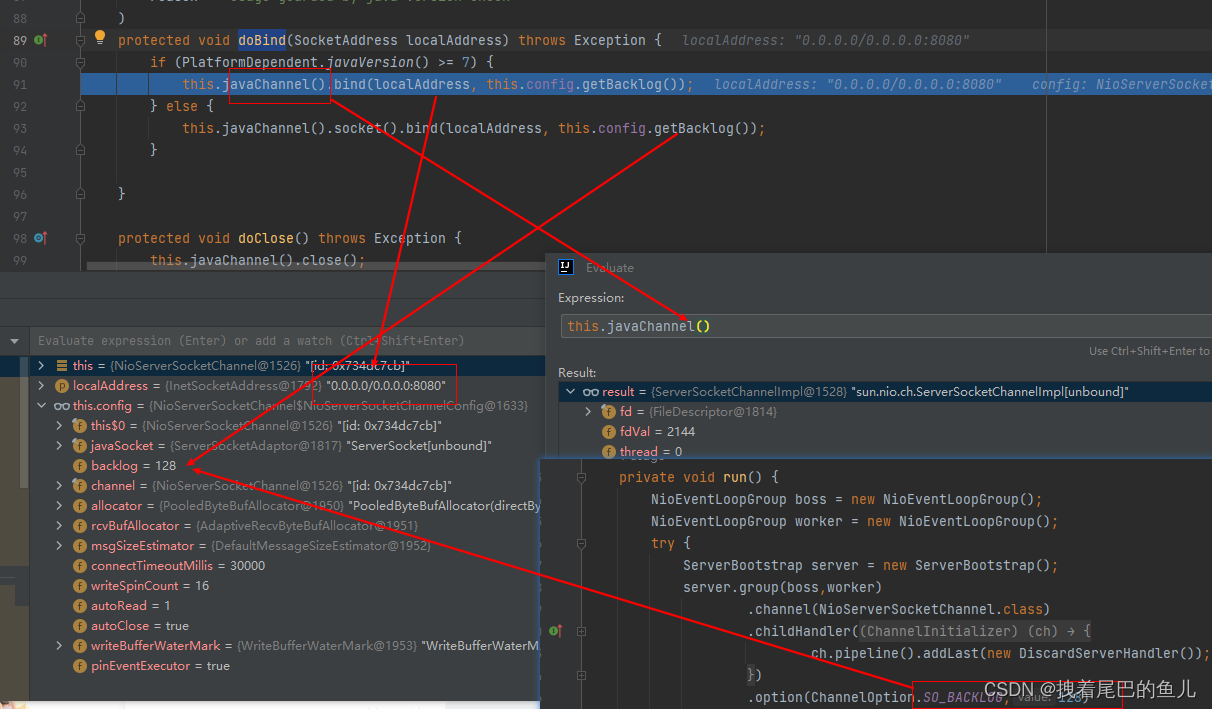
(1) AbstractBootstrap 的doBind0 方法:使用nio 线程进行channel 的绑定:
// ChannelFuture  为 DefaultChannelPromise
// channel 为  NioServerSocketChannel
// localAddress为 0.0.0.0/0.0.0.0:8080
// promise为 AbstractBootstrap$PendingRegistrationPromise
private static void doBind0(final ChannelFuture regFuture, final Channel channel, final SocketAddress localAddress, final ChannelPromise promise) {channel.eventLoop().execute(new Runnable() {public void run() {if (regFuture.isSuccess()) {channel.bind(localAddress, promise).addListener(ChannelFutureListener.CLOSE_ON_FAILURE);} else {promise.setFailure(regFuture.cause());}}});
}
AbstractChannel 的bind 方法:
public ChannelFuture bind(SocketAddress localAddress, ChannelPromise promise) {//  this.pipeline 取的 NioServerSocketChannel 的pipeline return this.pipeline.bind(localAddress, promise);
}
DefaultChannelPipeline 类中bind 方法:
public final ChannelFuture bind(SocketAddress localAddress, ChannelPromise promise) {return this.tail.bind(localAddress, promise);
}
(2) AbstractChannelHandlerContext 类中bind 方法, 找到第一个Outbound handler (head 节点)完成端口绑定:
public ChannelFuture bind(final SocketAddress localAddress, final ChannelPromise promise) {ObjectUtil.checkNotNull(localAddress, "localAddress");if (this.isNotValidPromise(promise, false)) {return promise;} else {final AbstractChannelHandlerContext next = this.findContextOutbound(512);EventExecutor executor = next.executor();if (executor.inEventLoop()) {// 端口绑定next.invokeBind(localAddress, promise);} else {safeExecute(executor, new Runnable() {public void run() {next.invokeBind(localAddress, promise);}}, promise, (Object)null, false);}return promise;}
}
AbstractChannelHandlerContext 类 invokeBind 方法:
private void invokeBind(SocketAddress localAddress, ChannelPromise promise) {if (this.invokeHandler()) {try {((ChannelOutboundHandler)this.handler()).bind(this, localAddress, promise);} catch (Throwable var4) {notifyOutboundHandlerException(var4, promise);}} else {this.bind(localAddress, promise);}}
关键点(3) 最终进入NioServerSocketChannel 中的doBind 进行端口的绑定 使用原生的java ServerSocketChannel 进行端口的绑定:
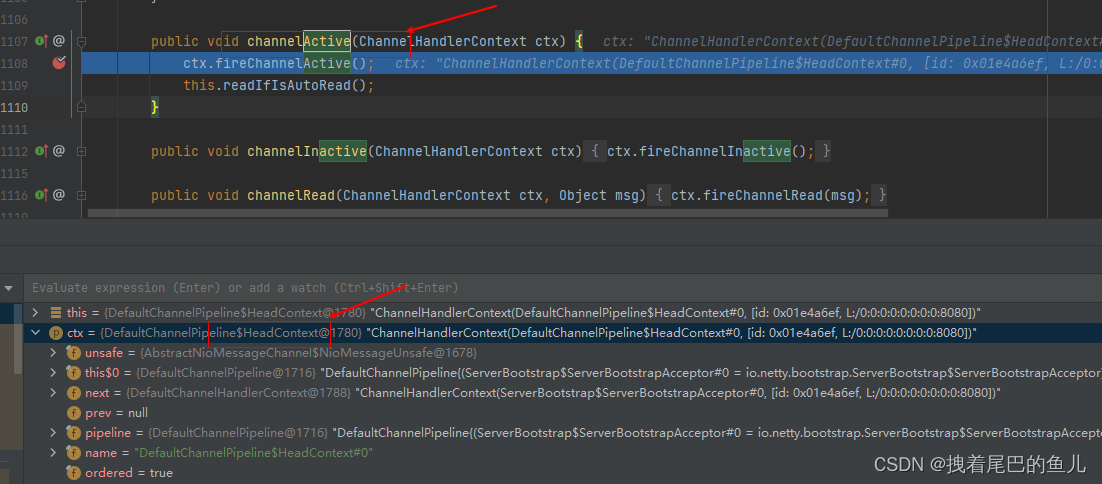
关键点(4) 在dobind 之后:判断channel 管道是否已经就绪了,如果就绪 就依次调用 NioServerSocketChannel 的Pipeline 中的 每个handler 中的channelActive 方法:
目前Pipeline 中有3个handler :header->acceptor->tail
(5) 最终进入head 头节点的 DefaultChannelPipeline 中的channelActive方法 :
(6) 进入AbstractChannelHandlerContext read 方法,从tail 向前找到Outbound 的handler 然后进行操作:
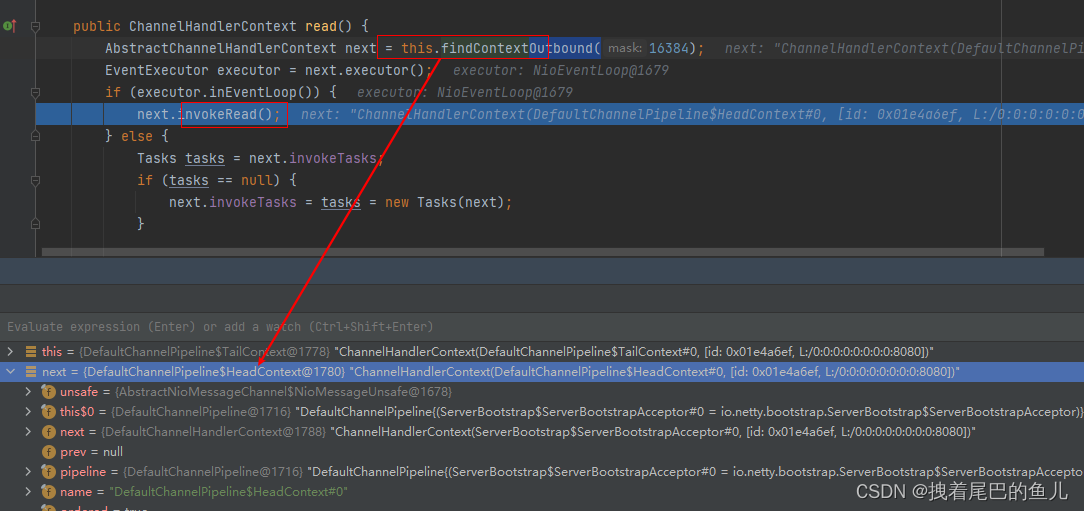
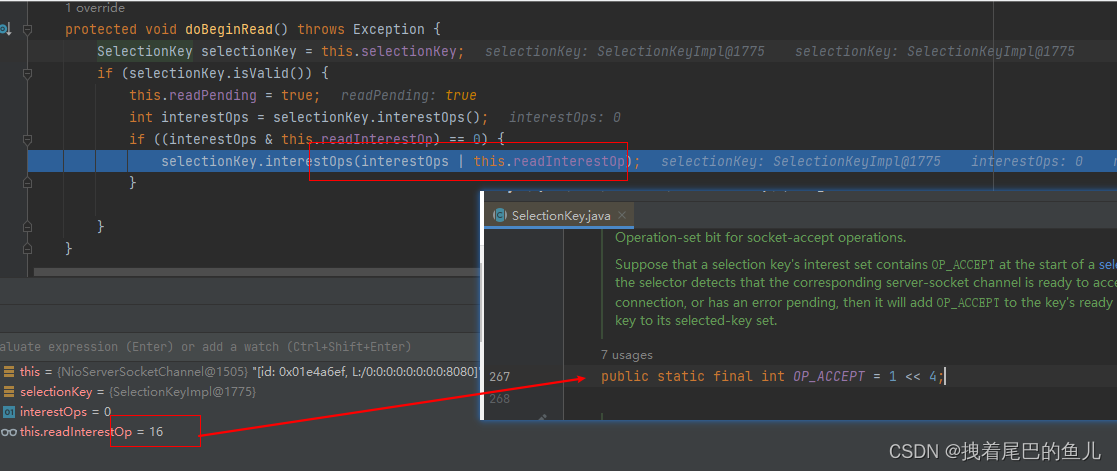
关键点(7):进入到AbstractNioChannel中doBeginRead() 然后关注accept 事件:
到这里我们看到了NioServerSocketChannel 对象的初始化,以及非阻塞属性的设置,已经最终对管道accept 事件 的注册;
3 对于bind 方法总结:
- initAndRegister 分为init 和register ;
- init 中可以理解为 在main 线程中创建了创 NioServerSocketChannel 对象并且, 在main 线程中 添加 NioServerSocketChannel 初始化 handler ;并随后在NioServerSocketChannel 管道初始化完成之后,使用nio 线程向NioServerSocketChannel 的Pipeline 增加accept 处理客户端连接的handler;
- register 中会切换到nio线程完成对NioServerSocketChannel 初始事件的绑定;
- 在dobind0 中 使用nio 线程完成NioServerSocketChannel 端口的绑定,并触发NioServerSocketChannel active 事件 进入到head 节点selectionKey.interestOps(SelectionKey.OP ACCEPT): 对于accept 事件进行绑定;
- 这里nio 线程指的是我们声明的boss NioEventLoopGroup;需要注意的是 NioEventLoopGroup 中存在多个NioEventLoop,每个NioEventLoop 都有自己的selector,任务队列;所以每个NioEventLoop 都可以处理io 事件,普通任务,和定时任务;值得注意的是每个NioEventLoop 的处理任务的线程只有一个(虽然有线程池,但是也只有一个线程,典型的多生产者,一个消费者);
相关文章:
Spring架构篇--2.7.3 远程通信基础--Netty原理--bind实现端口的绑定
前言:在对ServerBootstrap 进行属性赋值之后,通过bind 方法完成端口的绑定,并开始在NioEventLoop中进行轮询进行事件的处理;本文主要探究ServersocketChannel 在netty 中是如何完成注册,以及端口的绑定 1 Nio selecto…...

【改进的多同步挤压变换】基于改进多同步挤压的高分辨率时频分析工具,用于分析非平稳信号(Matlab代码实现)
💥💥💞💞欢迎来到本博客❤️❤️💥💥 🏆博主优势:🌞🌞🌞博客内容尽量做到思维缜密,逻辑清晰,为了方便读者。 ⛳️座右铭&a…...
有关 python 切片的趣事
哈喽大家好,我是咸鱼 今天来讲一个我在实现 python 列表切片时遇到的趣事 在正式开始之前,我们先来了解一下切片(slice) 切片操作是访问序列(列表、字符串…)中元素的另一种方法,它可以访问一…...
ChatGPT 会带来失业潮吗?
(永久免费,扫码加入) 最近在翻知乎上的一些文章,很多都是跟ChatGPT有关的。因为本身是搞Python编程的,知乎推荐系统给我推荐了一篇廖雪峰老师的文章,觉得很有意思。 一共1119个赞,还是很厉害的&…...

如何对待工作中的失误
在日复一日的工作中,我们免不了会产生一些失误,会因此感到沮丧和失望。但如何正确地对待和处理这些失误才是最重要的,它直接影响到我们的工作表现和个人成长。一起来谈谈作为职场人的你时如何处理工作中的失误的吧! 一、在面对失…...

微信小程序快速入门【一】
微信小程序快速入门【一】 文章目录 微信小程序快速入门【一】👨🏫内容1:背景👨⚖️内容2:准备工作👨💻内容3:新建一个小程序🍉文末推荐 👨…...
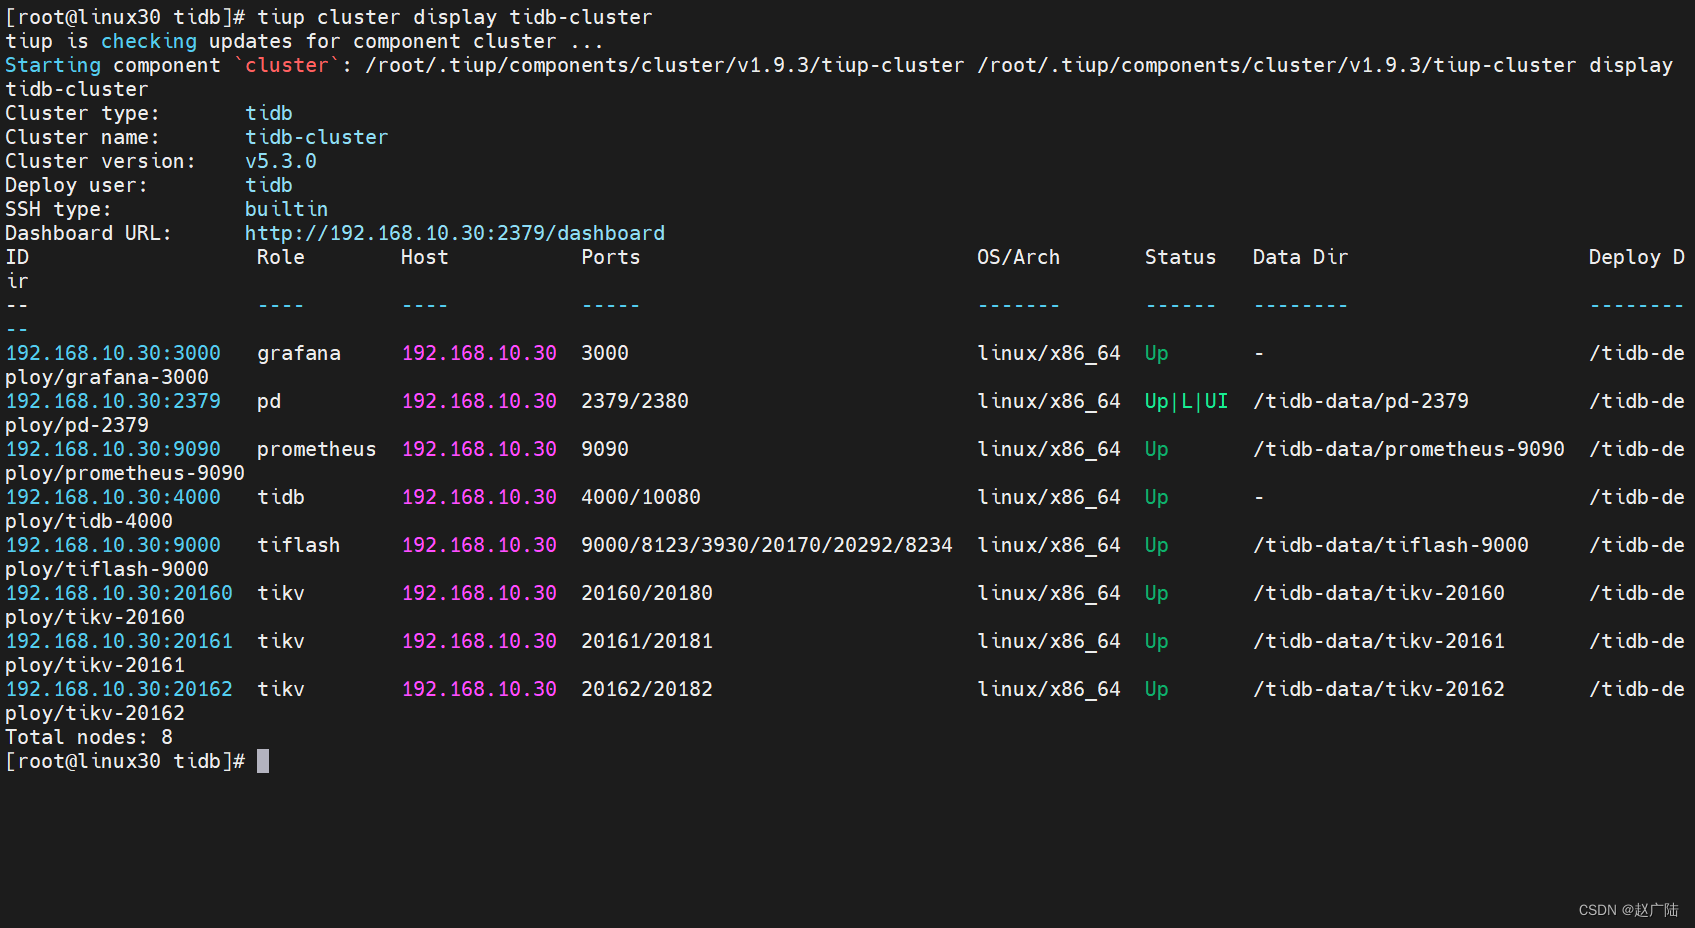
TiDB亿级数据亚秒响应查询集群部署
目录 1 集群部署1.1 环境要求1.1.1 操作系统建议配置1.1.2 服务器建议配置 1.2 环境准备1.3 安装TiUP1.3.1 什么是TiUP1.3.2 安装TiUP组件1.3.3 配置TiUP环境1.3.4 检查TiUP 工具是否安装1.3.5 安装 cluster 组件1.3.6 升级cluster组件 1.4 编辑部署文件1.4.1 常见的部署场景1.…...

并发——同步访问共享的可变数据
关键字 synchronized 可以保证在同一时刻,只有一个线程可以执行某一个方法,或者某一段代码块。许多程序员把同步的概念仅仅理解为一种互斥的方式。即,当一个对象被一个线程修改的时候,可以阻止另一个线程观察到内部不一致的状态。…...
禁用容器网络)
Docker网络模型(九)禁用容器网络
禁用容器网络 如果你想完全禁用容器上的协议栈,你可以在启动容器时使用 --network none 标志。在容器内,只有回环设备被创建。下面的例子说明了这一点。 创建容器 $ docker run --rm -dit \--network none \--name no-net-alpine \alpine:latest \ash通…...

JavaScript 教程---互联网文档计划
学习目标: 每天记录一章笔记 学习内容: JavaScript 教程---互联网文档计划 笔记时间: 2023-6-5 --- 2023-6-11 学习产出: 1.入门篇 1、JavaScript 的核心语法包含部分 基本语法标准库宿主API 基本语法:比如操作符…...

做好功能测试需要的8项基本技能【点工进来】
功能测试是测试工程师的基础功,很多人功能测试还做不好,就想去做性能测试、自动化测试。很多人对功能测试的理解就是点点点,如何自己不用心去悟,去研究,那么你的职业生涯也就停留在点点点上了。在这里,我把…...
在弹出框内三个元素做水平显示
最终效果图要求是这样: js代码: // 显示弹出窗口 function showPopup(node) {var popup document.createElement(div);popup.className popup;var inputContainer1 document.createElement(div);/* inputContainer1.className input-container1; */…...
纠删码技术在vivo存储系统的演进【上篇】
作者:vivo 互联网服务器团队- Gong Bing 本文将学术界和工业界的纠删码技术的核心研究成果进行了相应的梳理,然后针对公司线上存储系统的纠删码进行分析,结合互联网企业通用的IDC资源、服务器资源、网络资源、业务特性进行分析对原有纠删码技…...
如何实现APP自动化测试?
APP测试,尤其是APP的自动化测试,在软件测试工程师的面试中越来越会被问到了。为了更好的回答这个问题,我今天就给大家分享一下,如何进行APP的自动化测试。 一、为了实现JavaAppiumJunit技术用于APP自动化测试,所以需要…...

INNODB和MyISAM区别
1 存储引擎是MyISAM 如下: CREATE table test_myisam (cli int ) ENGINEMyISAM 存储目录里会有三个文件 test_myisam.frm为“表定义”,是描述数据表结构的文件 test_myisam.MYI文件是表的索引 test_myisam.MYD文件是表的数据 2 存储引擎是INNODB…...
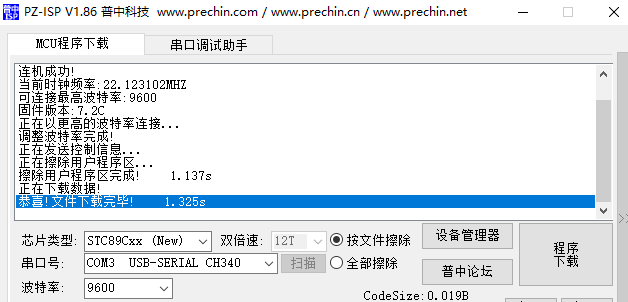
普中自动下载软件1.86下载程序失败案例
今天在用开发板做一个功能,下载的时候报错了,说芯片超时 确定驱动安装好了的 波特率也试了一圈 线也换过了 最后发现是芯片类型选错了,这个开发板是用的stc89c52,所以我选了图里这个,但是翻了开发板配套的资料,发现…...

JavaScript HTML DOM
JavaScript HTML DOM(文档对象模型)是一种用于访问和操作HTML文档元素的编程接口。它将HTML文档表示为一个树形结构,使开发人员可以使用JavaScript来操作和修改HTML元素、属性、样式和事件。 通过使用HTML DOM,你可以使用JavaScr…...
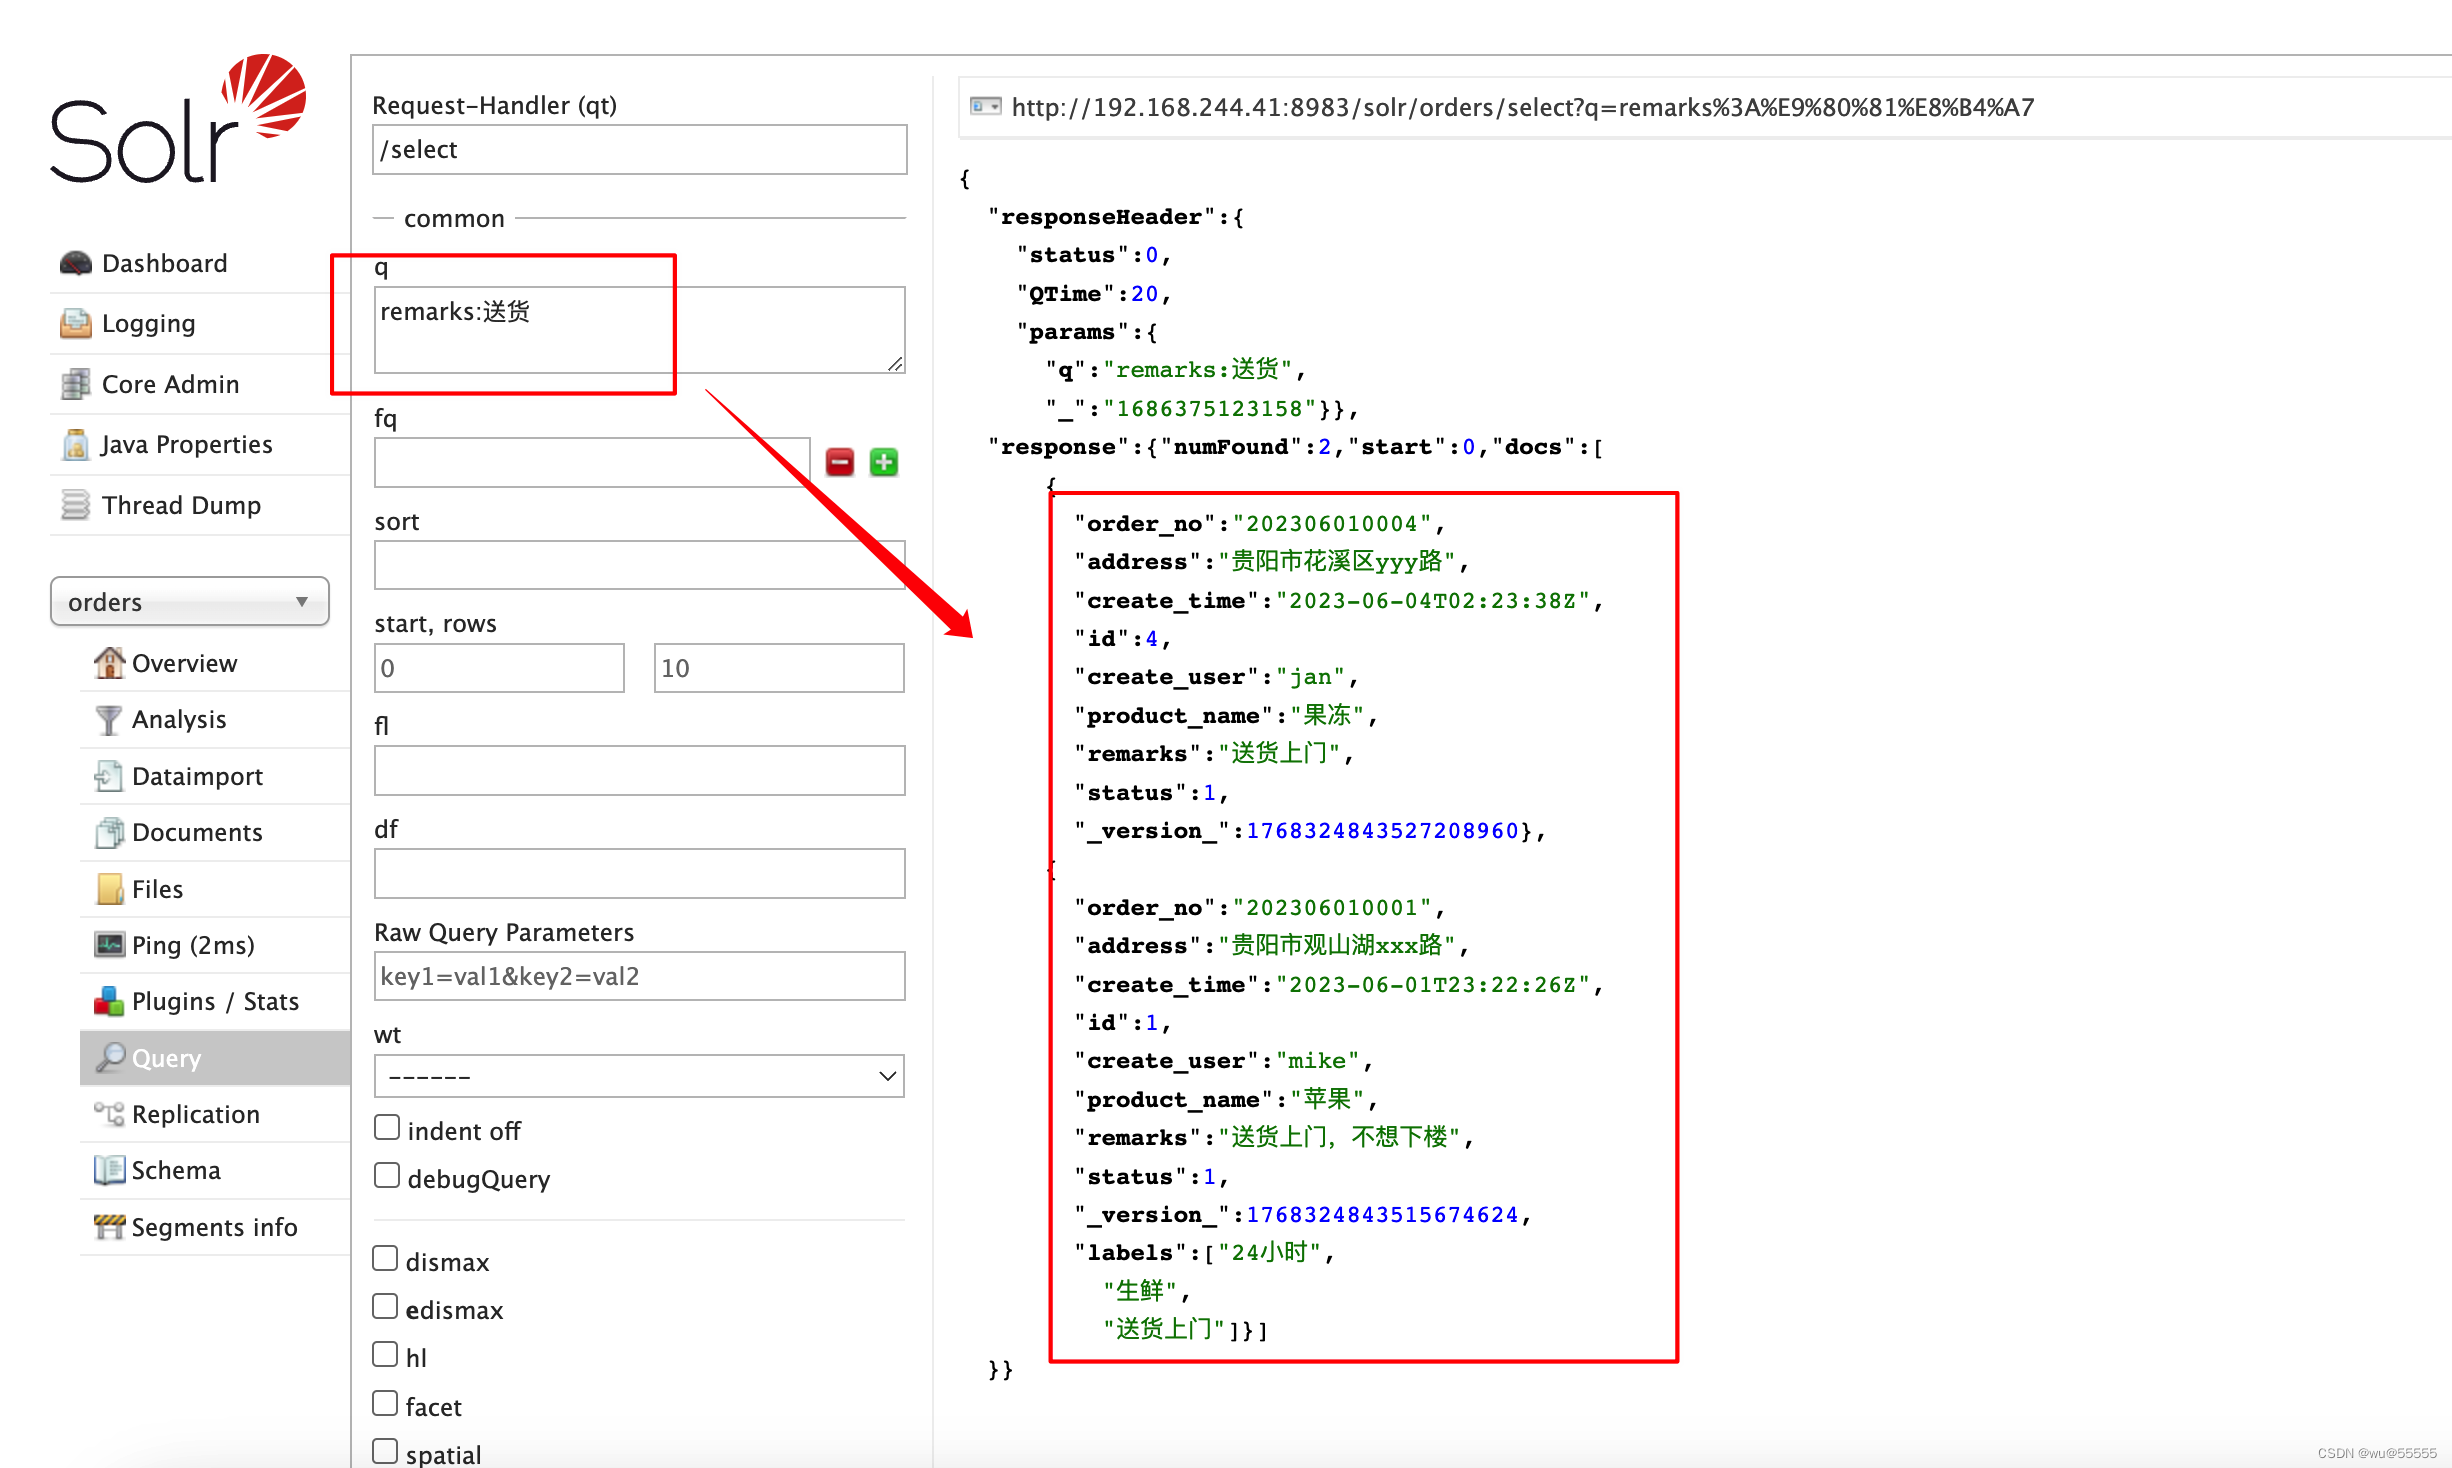
solr快速上手:配置IK中文分词器(七)
0. 引言 solr作为搜索引擎,常用在我们对于搜索速度有较高要求且大数据量的业务场景,我们之前已经配置过英文分词器,但是针对中文分词不够灵活和实用,要实现真正意义上的中文分词,还需要单独安装中文分词器 solr快速上…...

【软件测试】接口测试工具APIpost
说实话,了解APIpost是因为,我的所有接口相关的文章下,都有该APIpost水军的评论,无非就是APIpost是中文版的postman,有多么多么好用,虽然咱也还不是什么啥网红,但是不知会一声就乱在评论区打广告…...

第六章 假言:那么、就、则;才。
第六章 假言:那么、就、则;才。 第一节 假言-公式化转换-等价矛盾 真题(2012-38)-假言-A→B的公式化转换-A→B的等价命题:①逆否命题:非B→非A。 38.经理说:“有了自信不一定赢。”董事长回…...
)
AISMM人才培养体系正式启用倒计时72天!未备案机构将失去官方认证资格(附首批17家白名单)
更多请点击: https://intelliparadigm.com 第一章:2026奇点智能技术大会:AISMM人才培养体系 体系定位与核心理念 AISMM(Artificial Intelligence Skills Maturity Model)是2026奇点智能技术大会正式发布的国家级AI人…...

第31篇:Vibe Coding时代:LangGraph + Celery 后台任务实战,解决 Agent 长任务阻塞接口和服务超时问题
第31篇:Vibe Coding时代:LangGraph + Celery 后台任务实战,解决 Agent 长任务阻塞接口和服务超时问题 一、问题场景:Agent 本地跑没问题,一接 API 就超时 前面我们已经把 LangGraph Agent 封装成 FastAPI 服务,也做过简单的线程后台执行。 但是在真实项目里,线程方案很…...

【国家级AI合规新标前哨】:AISMM自评估工具已嵌入信通院预审流程——你是否还在用过时的LMM框架?
更多请点击: https://intelliparadigm.com 第一章:2026奇点智能技术大会:AISMM自评估工具 AISMM(Artificial Intelligence System Maturity Model)是2026奇点智能技术大会上正式发布的开源评估框架,专为AI…...

学之思开源考试系统:3步快速搭建专业在线考试平台的完整指南
学之思开源考试系统:3步快速搭建专业在线考试平台的完整指南 【免费下载链接】xzs-mysql 学之思开源考试系统是一款 java vue 的前后端分离的考试系统。主要优点是开发、部署简单快捷、界面设计友好、代码结构清晰。支持web端和微信小程序,能覆盖到pc机…...

OpenModScan:完全免费的Modbus主站测试工具终极指南
OpenModScan:完全免费的Modbus主站测试工具终极指南 【免费下载链接】OpenModScan Open ModScan is a Free Modbus Master (Client) Utility 项目地址: https://gitcode.com/gh_mirrors/op/OpenModScan 还在为昂贵的工业通讯测试工具而烦恼吗?面对…...

FreedomGPT本地AI对话工具:基于Electron+React与llama.cpp的离线部署指南
1. 项目概述:一个能让你完全掌控的本地AI对话工具 如果你和我一样,对把数据交给云端大模型总有点不放心,或者受够了网络延迟和API调用限制,那么FreedomGPT这个项目绝对值得你花时间研究一下。简单来说,它是一个基于El…...

如何用CellProfiler实现高通量细胞图像分析:从预处理到定量测量的完整实战指南
如何用CellProfiler实现高通量细胞图像分析:从预处理到定量测量的完整实战指南 【免费下载链接】CellProfiler An open-source application for biological image analysis 项目地址: https://gitcode.com/gh_mirrors/ce/CellProfiler CellProfiler是一款专为…...
)
第六章 机器人变身“多面手”?手把手教你从零创建Coze插件(无需写代码)
|不写代码 | 按需定制 | 让机器人拥有无限能力不知不觉,这个专栏已经陪你走过了五篇文章。你已经学会了:— ✅ 从零创建第一个AI智能体(天气查询) — ✅ 用工作流编排机器人,告别“大…...

Python requests库调用公司接口报SSL版本错误?别急着改代码,先检查这个隐藏的‘元凶’
Python requests库SSL版本错误的隐秘陷阱:当抓包工具成为"元凶" 调试Python脚本时遇到SSLError(1, [SSL: WRONG_VERSION_NUMBER])错误,很多开发者会本能地检查代码中的SSL验证设置或服务器配置。但今天我要分享的这个案例,问题根源…...

开源像素智能体监控平台:可视化调试AI决策,提升自动化任务效率
1. 项目概述:一个面向像素级智能体的开源监控平台最近在折腾一些AI智能体项目,特别是那些需要处理图像、进行像素级交互的自动化任务时,我遇到了一个很实际的问题:我怎么知道我的智能体“看”到了什么,又在“想”什么&…...