STM32MP157驱动开发——按键驱动(tasklet)
文章目录
- “tasklet”机制:
- 内核函数
- 定义 tasklet
- 使能/ 禁止 tasklet
- 调度 tasklet
- 删除 tasklet
- tasklet软中断方式的按键驱动程序(stm32mp157)
- tasklet使用方法:
- button_test.c
- gpio_key_drv.c
- Makefile
- 修改设备树文件
- 编译测试
“tasklet”机制:
阅读Linux 系统中异常与中断可知,Linux 系统对中断处理的演进过程中,实现了中断的扩展:硬件中断、软件中断
硬件中断有:GPIO,网络中断(net),系统滴答中断(tick)等
软件中断有:定时器,tasklet等
内核中的软中断:

该数组里面有个action成员,该成员是个函数,函数会调用链表里面每个tasklet结构体的软件中断处理函数,即下面链表的每个成员都是tasklet结构体,有对应的处理函数和flag标志位
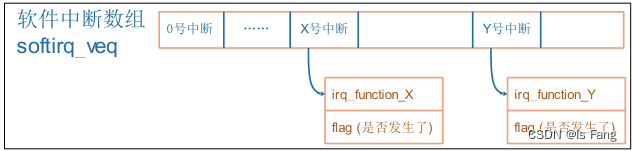
如何触发软中断?——由软件决定,对于 X 号软件中断,只需要把它的 flag 设置为 1 就表示发生了该中断
内核函数
内核源码位置:include\linux\interrupt.h
定义 tasklet
使用结构体tasklet_struct 来表示一个tasklet
struct tasklet_struct
{struct tasklet_struct *next;unsigned long state;atomic_t count;void (*func)(unsigned long);unsigned long data;
};
成员解释:
-
state 有 2 位:
- bit0 表示 TASKLET_STATE_SCHED
- 等于 1 时表示已经执行了 tasklet_schedule 把该 tasklet 放入队列了;tasklet_schedule 会判断该位,如果已经等于 1 那么它就不会再次把tasklet 放入队列。
- bit1 表示 TASKLET_STATE_RUN
- 等于 1 时,表示正在运行 tasklet 中的 func 函数;函数执行完后内核会把该位清 0。
- bit0 表示 TASKLET_STATE_SCHED
-
count
- 表示该 tasklet 是否使能:等于 0 表示使能了,非 0 表示被禁止了。对于 count 非 0 的 tasklet,里面的 func 函数不会被执行。
可以用这 2 个宏来定义结构体:
#define DECLARE_TASKLET(name, func, data) \
struct tasklet_struct name = { NULL, 0, ATOMIC_INIT(0), func, data }
#define DECLARE_TASKLET_DISABLED(name, func, data) \
struct tasklet_struct name = { NULL, 0, ATOMIC_INIT(1), func, data }
注意:使用 DECLARE_TASKLET_DISABLED 定义的 tasklet 结构体,它是禁止的;使用之前要先调用 tasklet_enable 使能它。
也可以使用函数来初始化 tasklet 结构体:
extern void tasklet_init(struct tasklet_struct *t,void (*func)(unsigned long), unsigned long data);
使能/ 禁止 tasklet
static inline void tasklet_enable(struct tasklet_struct *t);
static inline void tasklet_disable(struct tasklet_struct *t);
- tasklet_enable 把 count 增加 1;
- tasklet_disable 把 count 减 1。
调度 tasklet
static inline void tasklet_schedule(struct tasklet_struct *t);
把 tasklet 放入链表,并且设置它的 TASKLET_STATE_SCHED 状态为 1。
删除 tasklet
extern void tasklet_kill(struct tasklet_struct *t);
- 如果一个 tasklet 未被调度,tasklet_kill 会把它的TASKLET_STATE_SCHED 状态清 0;
- 如果一个 tasklet 已被调度,tasklet_kill 会等待它执行完华,再把它TASKLET_STATE_SCHED 状态清 0。
通常在卸载驱动程序时调用 tasklet_kill
tasklet软中断方式的按键驱动程序(stm32mp157)
tasklet使用方法:
- 先定义 tasklet,需要使用时(在硬件中断处理函数中)调用 tasklet_schedule,驱动卸载前调用tasklet_kill。tasklet_schedule 只是把 tasklet 放入内核队列,它的 func 函数会在由内核处理软件中断的执行过程中被调用
button_test.c
实现功能:首先以非阻塞的方式读取环形缓冲区十次,然后以阻塞的方式读取按键的值
#include <sys/types.h>
#include <sys/stat.h>
#include <fcntl.h>
#include <unistd.h>
#include <stdio.h>
#include <string.h>
#include <poll.h>
#include <signal.h>static int fd;/** ./button_test /dev/my_gpio_key**/
int main(int argc, char **argv)
{int val;struct pollfd fds[1];int timeout_ms = 5000;int ret;int	flags;int i;/* 1. 判断参数 */if (argc != 2) {printf("Usage: %s <dev>\n", argv[0]);return -1;}/* 2. 打开文件 */fd = open(argv[1], O_RDWR | O_NONBLOCK);if (fd == -1){printf("can not open file %s\n", argv[1]);return -1;}//非阻塞的方式读取十次for (i = 0; i < 10; i++) {if (read(fd, &val, 4) == 4)printf("get button: 0x%x\n", val);elseprintf("get button: -1\n");}//修改为阻塞的方式,是休眠唤醒机制,没有数据则休眠flags = fcntl(fd, F_GETFL);fcntl(fd, F_SETFL, flags & ~O_NONBLOCK);while (1){if (read(fd, &val, 4) == 4)printf("get button: 0x%x\n", val);elseprintf("while get button: -1\n");}close(fd);return 0;
}
gpio_key_drv.c
实现功能,每个按键都能打印tasklet里面的软中断函数
#include <linux/module.h>
#include <linux/poll.h>#include <linux/fs.h>
#include <linux/errno.h>
#include <linux/miscdevice.h>
#include <linux/kernel.h>
#include <linux/major.h>
#include <linux/mutex.h>
#include <linux/proc_fs.h>
#include <linux/seq_file.h>
#include <linux/stat.h>
#include <linux/init.h>
#include <linux/device.h>
#include <linux/tty.h>
#include <linux/kmod.h>
#include <linux/gfp.h>
#include <linux/gpio/consumer.h>
#include <linux/platform_device.h>
#include <linux/of_gpio.h>
#include <linux/of_irq.h>
#include <linux/interrupt.h>
#include <linux/irq.h>
#include <linux/slab.h>
#include <linux/fcntl.h>
#include <linux/timer.h>struct gpio_key{int gpio;struct gpio_desc *gpiod;int flag;int irq;struct timer_list key_timer;struct tasklet_struct tasklet;//每个按键都有软中断函数
} ;static struct gpio_key *gpio_keys_first;/* 主设备号                                                                 */
static int major = 0;
static struct class *gpio_key_class;/* 环形缓冲区 */
#define BUF_LEN 128
static int g_keys[BUF_LEN];
static int r, w;struct fasync_struct *button_fasync;#define NEXT_POS(x) ((x+1) % BUF_LEN)static int is_key_buf_empty(void)
{return (r == w);
}static int is_key_buf_full(void)
{return (r == NEXT_POS(w));
}static void put_key(int key)
{if (!is_key_buf_full()){g_keys[w] = key;w = NEXT_POS(w);}
}static int get_key(void)
{int key = 0;if (!is_key_buf_empty()){key = g_keys[r];r = NEXT_POS(r);}return key;
}static DECLARE_WAIT_QUEUE_HEAD(gpio_key_wait);static void key_timer_expire(struct timer_list *t)
{struct gpio_key *gpio_key = from_timer(gpio_key, t, key_timer);int val;int key;val = gpiod_get_value(gpio_key->gpiod);printk("key_timer_expire key %d %d\n", gpio_key->gpio, val);key = (gpio_key->gpio << 8) | val;put_key(key);wake_up_interruptible(&gpio_key_wait);kill_fasync(&button_fasync, SIGIO, POLL_IN);
}static void key_tasklet_func(unsigned long data)
{/* data ==> gpio */struct gpio_key *gpio_key = data;int val;int key;val = gpiod_get_value(gpio_key->gpiod);printk("key_tasklet_func key %d %d\n", gpio_key->gpio, val);
}/* 实现对应的open/read/write等函数,填入file_operations结构体                   */
static ssize_t gpio_key_drv_read (struct file *file, char __user *buf, size_t size, loff_t *offset)
{//printk("%s %s line %d\n", __FILE__, __FUNCTION__, __LINE__);int err;int key;if (is_key_buf_empty() && (file->f_flags & O_NONBLOCK))return -EAGAIN;wait_event_interruptible(gpio_key_wait, !is_key_buf_empty());key = get_key();err = copy_to_user(buf, &key, 4);return 4;
}static unsigned int gpio_key_drv_poll(struct file *fp, poll_table * wait)
{printk("%s %s line %d\n", __FILE__, __FUNCTION__, __LINE__);poll_wait(fp, &gpio_key_wait, wait);return is_key_buf_empty() ? 0 : POLLIN | POLLRDNORM;
}static int gpio_key_drv_fasync(int fd, struct file *file, int on)
{if (fasync_helper(fd, file, on, &button_fasync) >= 0)return 0;elsereturn -EIO;
}/* 定义自己的file_operations结构体                                              */
static struct file_operations gpio_key_drv = {.owner	 = THIS_MODULE,.read    = gpio_key_drv_read,.poll    = gpio_key_drv_poll,.fasync  = gpio_key_drv_fasync,
};static irqreturn_t gpio_key_isr(int irq, void *dev_id)
{struct gpio_key *gpio_key = dev_id;//printk("gpio_key_isr key %d irq happened\n", gpio_key->gpio);//在硬件中断函数里面调用软tasklet_schedule(&gpio_key->tasklet);mod_timer(&gpio_key->key_timer, jiffies + HZ/50);return IRQ_HANDLED;
}/* 1. 从platform_device获得GPIO* 2. gpio=>irq* 3. request_irq*/
static int gpio_key_probe(struct platform_device *pdev)
{int err;struct device_node *node = pdev->dev.of_node;int count;int i;enum of_gpio_flags flag;printk("%s %s line %d\n", __FILE__, __FUNCTION__, __LINE__);count = of_gpio_count(node);if (!count){printk("%s %s line %d, there isn't any gpio available\n", __FILE__, __FUNCTION__, __LINE__);return -1;}gpio_keys_first= kzalloc(sizeof(struct gpio_key) * count, GFP_KERNEL);for (i = 0; i < count; i++){		gpio_keys_first[i].gpio = of_get_gpio_flags(node, i, &flag);if (gpio_keys_first[i].gpio < 0){printk("%s %s line %d, of_get_gpio_flags fail\n", __FILE__, __FUNCTION__, __LINE__);return -1;}gpio_keys_first[i].gpiod = gpio_to_desc(gpio_keys_first[i].gpio);gpio_keys_first[i].flag = flag & OF_GPIO_ACTIVE_LOW;gpio_keys_first[i].irq  = gpio_to_irq(gpio_keys_first[i].gpio);//setup_timer(&gpio_keys_first[i].key_timer, key_timer_expire, &gpio_keys_first[i]);timer_setup(&gpio_keys_first[i].key_timer, key_timer_expire, 0);gpio_keys_first[i].key_timer.expires = ~0;add_timer(&gpio_keys_first[i].key_timer);tasklet_init(&gpio_keys_first[i].tasklet, key_tasklet_func, &gpio_keys_first[i]);//为每个按键都注册软中断处理函数,传入的参数是按下的按键}for (i = 0; i < count; i++){err = request_irq(gpio_keys_first[i].irq, gpio_key_isr, IRQF_TRIGGER_RISING | IRQF_TRIGGER_FALLING, "my_gpio_key", &gpio_keys_first[i]);}/* 注册file_operations 	*/major = register_chrdev(0, "my_gpio_key", &gpio_key_drv);  /* /dev/gpio_key */gpio_key_class = class_create(THIS_MODULE, "my_gpio_key_class");if (IS_ERR(gpio_key_class)) {printk("%s %s line %d\n", __FILE__, __FUNCTION__, __LINE__);unregister_chrdev(major, "my_gpio_key");return PTR_ERR(gpio_key_class);}device_create(gpio_key_class, NULL, MKDEV(major, 0), NULL, "my_gpio_key"); /* /dev/my_gpio_key */return 0;}static int gpio_key_remove(struct platform_device *pdev)
{//int err;struct device_node *node = pdev->dev.of_node;int count;int i;device_destroy(gpio_key_class, MKDEV(major, 0));class_destroy(gpio_key_class);unregister_chrdev(major, "my_gpio_key");count = of_gpio_count(node);for (i = 0; i < count; i++){free_irq(gpio_keys_first[i].irq, &gpio_keys_first[i]);del_timer(&gpio_keys_first[i].key_timer);tasklet_kill(&gpio_keys_first[i].tasklet);//通常在卸载驱动程序时调用 tasklet_kill}kfree(gpio_keys_first);return 0;
}static const struct of_device_id my_keys[] = {{ .compatible = "first_key,gpio_key" },{ },
};/* 1. 定义platform_driver */
static struct platform_driver gpio_keys_driver = {.probe      = gpio_key_probe,.remove     = gpio_key_remove,.driver     = {.name   = "my_gpio_key",.of_match_table = my_keys,},
};/* 2. 在入口函数注册platform_driver */
static int __init gpio_key_init(void)
{int err;printk("%s %s line %d\n", __FILE__, __FUNCTION__, __LINE__);err = platform_driver_register(&gpio_keys_driver); return err;
}/* 3. 有入口函数就应该有出口函数:卸载驱动程序时,就会去调用这个出口函数*     卸载platform_driver*/
static void __exit gpio_key_exit(void)
{printk("%s %s line %d\n", __FILE__, __FUNCTION__, __LINE__);platform_driver_unregister(&gpio_keys_driver);
}/* 7. 其他完善:提供设备信息,自动创建设备节点                                     */module_init(gpio_key_init);
module_exit(gpio_key_exit);MODULE_LICENSE("GPL");
Makefile
# 1. 使用不同的开发板内核时, 一定要修改KERN_DIR
# 2. KERN_DIR中的内核要事先配置、编译, 为了能编译内核, 要先设置下列环境变量:
# 2.1 ARCH,          比如: export ARCH=arm64
# 2.2 CROSS_COMPILE, 比如: export CROSS_COMPILE=aarch64-linux-gnu-
# 2.3 PATH,          比如: export PATH=$PATH:/home/book/100ask_roc-rk3399-pc/ToolChain-6.3.1/gcc-linaro-6.3.1-2017.05-x86_64_aarch64-linux-gnu/bin
# 注意: 不同的开发板不同的编译器上述3个环境变量不一定相同,
#       请参考各开发板的高级用户使用手册KERN_DIR =   /home/book/100ask_stm32mp157_pro-sdk/Linux-5.4all:make -C $(KERN_DIR) M=`pwd` modules $(CROSS_COMPILE)gcc -o button_test button_test.c
clean:make -C $(KERN_DIR) M=`pwd` modules cleanrm -rf modules.order  button_test# 参考内核源码drivers/char/ipmi/Makefile
# 要想把a.c, b.c编译成ab.ko, 可以这样指定:
# ab-y := a.o b.o
# obj-m += ab.oobj-m += gpio_key_drv.o
修改设备树文件
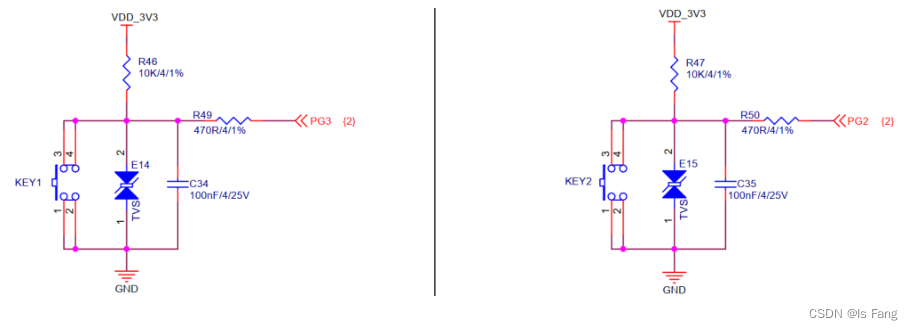
对于一个引脚要用作中断时,
- a) 要通过 PinCtrl 把它设置为 GPIO 功能;【ST 公司对于 STM32MP157 系列芯片,GPIO 为默认模式 不需要再进行配置Pinctrl 信息】
- b) 表明自身:是哪一个 GPIO 模块里的哪一个引脚【修改设备树】
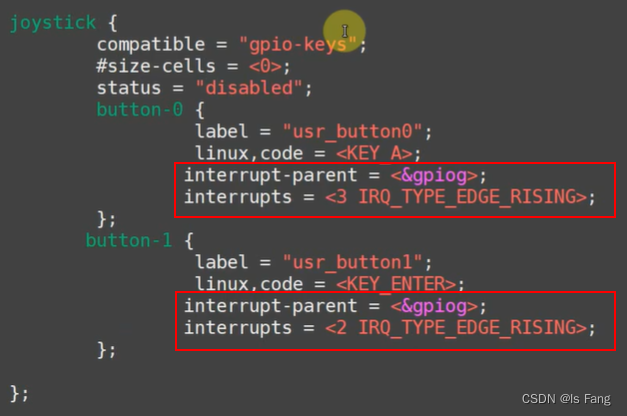
打开内核的设备树文件:arch/arm/boot/dts/stm32mp157c-100ask-512d-lcd-v1.dts
gpio_keys_first {compatible = "first_key,gpio_key";gpios = <&gpiog 3 GPIO_ACTIVE_LOW&gpiog 2 GPIO_ACTIVE_LOW>;
};
与此同时,需要把用到引脚的节点禁用
注意,如果其他设备树文件也用到该节点,需要设置属性为disabled状态,在arch/arm/boot/dts目录下执行如下指令查找哪些设备树用到该节点
grep "&gpiog" * -nr
如果用到该节点,需要添加属性去屏蔽:
status = "disabled";
编译测试
首先要设置 ARCH、CROSS_COMPILE、PATH 这三个环境变量后,进入 ubuntu 上板子内核源码的目录,在Linux内核源码根目录下,执行如下命令即可编译 dtb 文件:
make dtbs V=1
编译好的文件在路径由DTC指定,移植设备树到开发板的共享文件夹中,先保存源文件,然后覆盖源文件,重启后会挂载新的设备树,进入该目录查看是否有新添加的设备节点
cd /sys/firmware/devicetree/base
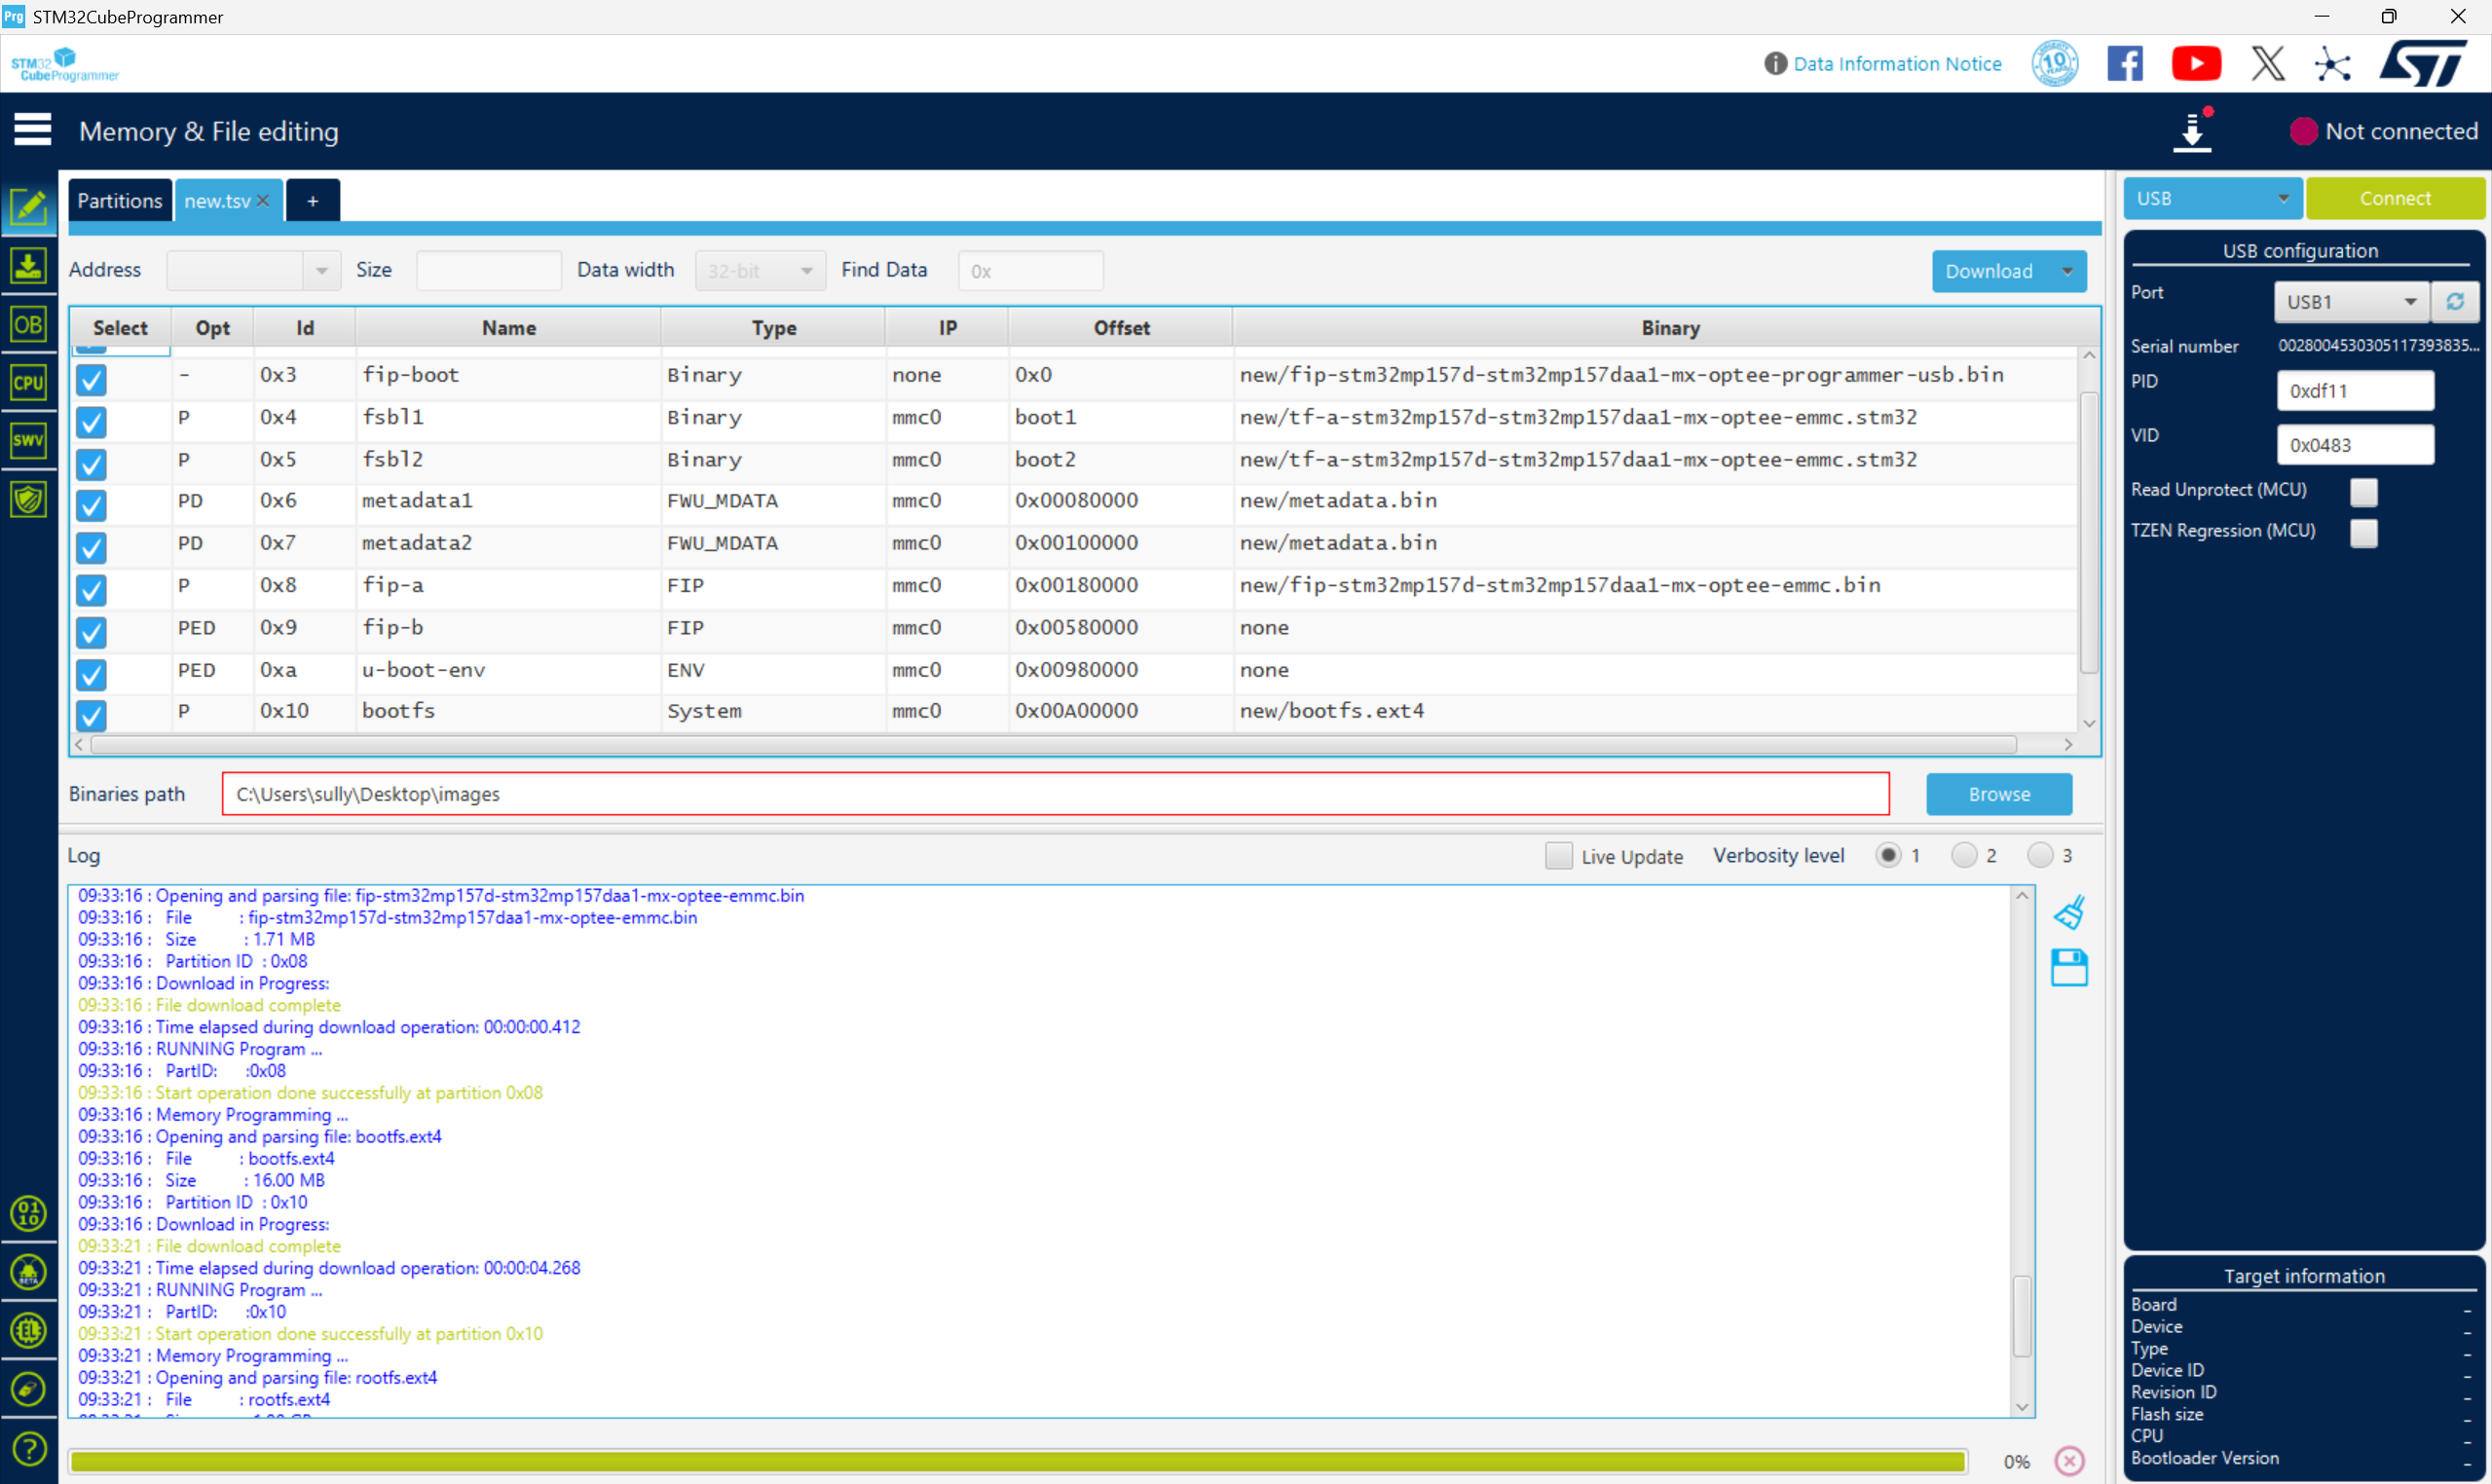
编译驱动程序,在Makefile文件目录下执行make指令,此时,目录下有编译好的内核模块gpio_key_drv.ko和可执行文件button_test文件移植到开发板上
确定一下烧录系统:cat /proc/mounts,查看boot分区挂载的位置,将其重新挂载在boot分区:mount /dev/mmcblk2p2 /boot,然后将共享文件夹里面的设备树文件拷贝到boot目录下,这样的话设备树文件就在boot目录下
cp /mnt/stm32mp157c-100ask-512d-lcd-v1.dtb /boot
重启后挂载,运行
insmod -f gpio_key_drv.ko // 强制安装驱动程序
ls /dev/my_gpio_key
./button_test /dev/my_gpio_key & //后台运行,此时prink函数打印的内容看不到
然后按下按键
相关文章:
STM32MP157驱动开发——按键驱动(tasklet)
文章目录 “tasklet”机制:内核函数定义 tasklet使能/ 禁止 tasklet调度 tasklet删除 tasklet tasklet软中断方式的按键驱动程序(stm32mp157)tasklet使用方法:button_test.cgpio_key_drv.cMakefile修改设备树文件编译测试 “tasklet”机制: …...
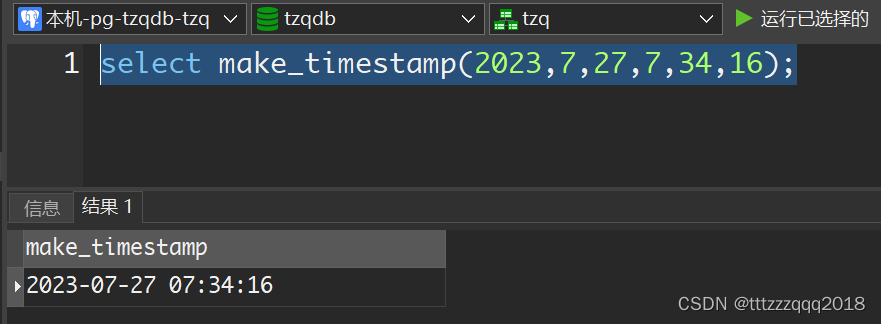
PostgreSQL构建时间
– PostgreSQL构建时间 select make_timestamp(2023,7,27,7,34,16);...

2023-将jar包上传至阿里云maven私有仓库(云效制品仓库)
一、背景介绍 如果要将平时积累的代码工具jar包,上传至云端,方便团队大家一起使用,一般的方式就是上传到Maven中心仓库(但是这种方式步骤多,麻烦,而且上传之后审核时间比较长,还不太容易通过&a…...

嵌入式linux之OLED显示屏SPI驱动实现(SH1106,ssd1306)
周日业余时间太无聊,又不喜欢玩游戏,大家的兴趣爱好都是啥?我觉得敲代码也是一种兴趣爱好。正巧手边有一块儿0.96寸的OLED显示屏,一直在吃灰,何不把玩一把?于是说干就干,最后在我的imax6ul的lin…...
关于element ui 安装失败的问题解决方法、查看是否安装成功及如何引入
Vue2引入 执行npm i element-ui -S报错 原因:npm版本太高 报错信息: 解决办法: 使用命令: npm install --legacy-peer-deps element-ui --save 引入: 在main.js文件中引入 //引入Vue import Vue from vue; //引入…...
Selenium多浏览器处理
Python 版本 #导入依赖 import os from selenium import webdriverdef test_browser():#使用os模块的getenv方法来获取声明环境变量browserbrowser os.getenv("browser").lower()#判断browser的值if browser "headless":driver webdriver.PhantomJS()e…...

浅谈 AI 大模型的崛起与未来展望:马斯克的 xAI 与中国产业发展
文章目录 💬话题📋前言🎯AI 大模型的崛起🎯中国 AI 产业的进展与挑战🎯AI 大模型的未来展望🧩补充 📝最后 💬话题 北京时间 7 月 13 日凌晨,马斯克在 Twiiter 上宣布&am…...

【CesiumJS材质】(1)圆扩散
效果示例 最佳实践: 其他效果: 要素说明: 代码 /** Date: 2023-07-21 15:15:32* LastEditors: ReBeX 420659880qq.com* LastEditTime: 2023-07-27 11:13:17* FilePath: \cesium-tyro-blog\src\utils\Material\EllipsoidFadeMaterialP…...

实战-单例模式和创建生产者相结合
实际中遇到了这样一个问题: The producer group[xxxx] has been created before, specify another instanceName (like producer.setInstanceName) please. 发生的原因是:一个进程内,创建了多个相同topic的producer。 所以问题就转换成了如何…...

[SQL挖掘机] - 窗口函数介绍
介绍: 窗口函数也称为 OLAP 函数。OLAP 是 OnLine AnalyticalProcessing 的简称,意思是对数据库数据进行实时分析处理。窗口函数是一种用于执行聚合计算和排序操作的功能强大的sql函数。它们可以在查询结果集中创建一个窗口(window)…...

原生js实现锚点滚动顶部
简介 使用原生js API实现滚动到指定容器的顶部,API是scrollIntoView 使用 let eldocment.querySelector() 获取dom元素el.scrollIntoView()该元素滚动到其父元素的顶部 高级用法 scrollIntoView(Options)//option可以配置如下 options{behavior:smoot…...

使用mysql接口遇到点问题
game_server加入了dbstorage的代码。dbstorage实现了与mysql的交互:driver_mysql。其中调用了mysql相关的接口。所以game_server需要链接libmysql.lib。 从官网下载了mysql的源码:在用cmake构建mysql工程的时候,遇到了一些问题。 msyql8.0需…...

excel绘制折线图或者散点图
一、背景 假如现在通过代码处理了一批数据,想看数据的波动情况,是不是还需要写个pyhon代码,读取文件,绘制曲线,看起来也简单,但是还有更简单的方法,就是直接生成csv文件,csv文件就是…...
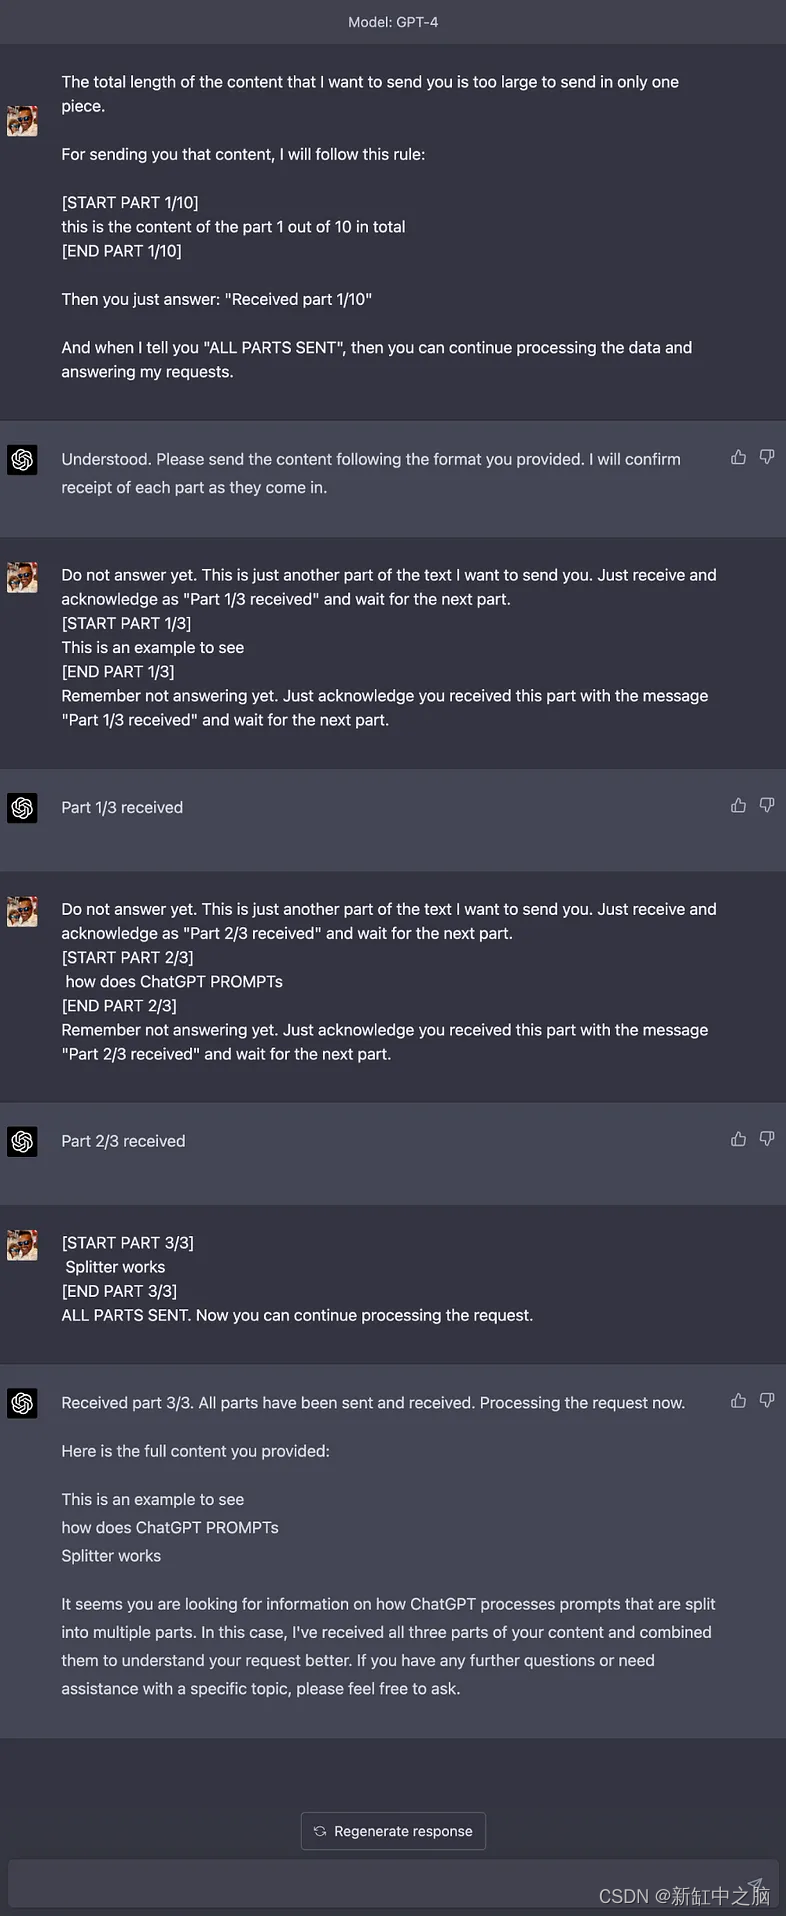
ChatGPT长文本对话输入方法
ChatGPT PROMPTs Splitter 是一个开源工具,旨在帮助你将大量上下文数据分成更小的块发送到 ChatGPT 的提示,并根据如何处理所有块接收到 ChatGPT(或其他具有字符限制的语言模型)的方法。 推荐:用 NSDT设计器 快速搭建可…...

FFmpeg-swresample的更新
auto convert的创建 在FFmpeg/libavfilter/formats.c中定义了negotiate_video和negotiate_audio,在格式协商,对于video如果需要scale,那么就会自动创建scale作为convert,对于audio,如果需要重采样,则会创建…...
回答网友 修改一个exe
网友说:他有个很多年前的没有源码的exe,在win10上没法用,让俺看一下。 俺看了一下,发现是窗体设计的背景色的问题。这个程序的背景色用的是clInactiveCaptionText。clInactiveCaptionText 在win10之前的系统上是灰色,但…...

数据可视化 - 动态柱状图
基础柱状图 通过Bar构建基础柱状图 from pyecharts.charts import Bar from pyecharts.options import LabelOpts # 使用Bar构建基础柱状图 bar Bar() # 添加X轴 bar.add_xaxis(["中国", "美国", "英国"]) # 添加Y轴 # 设置数值标签在右侧 b…...

【JVM】JVM五大内存区域介绍
目录 一、程序计数器(线程私有) 二、java虚拟机栈(线程私有) 2.1、虚拟机栈 2.2、栈相关测试 2.2.1、栈溢出 三、本地方法栈(线程私有) 四、java堆(线程共享) 五、方法区&…...
自动驾驶感知系统--惯性导航定位系统
惯性导航定位 惯性是所有质量体本身的基本属性,所以建立在牛顿定律基础上的惯性导航系统(Inertial Navigation System,INS)(简称惯导系统)不与外界发生任何光电联系,仅靠系统本身就能对车辆进行连续的三维定位和三维定向。卫星导…...
Netty简介
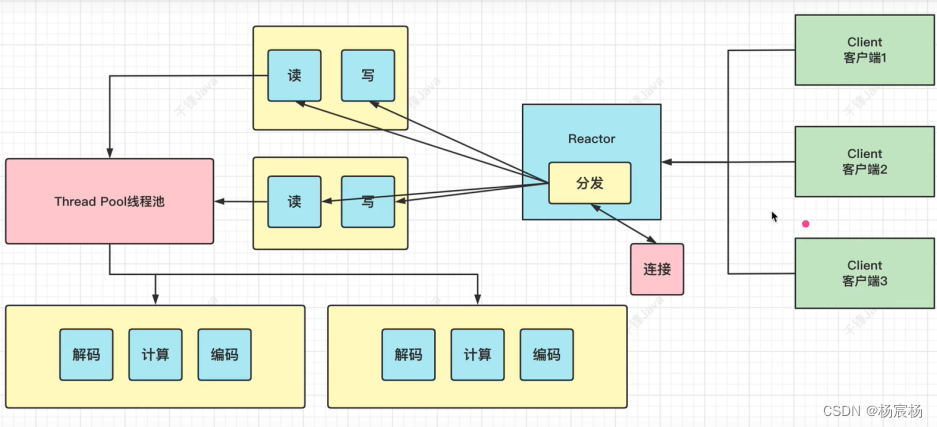
Netty Netty初体验基础概念Reactor模型传统的阻塞IO模型基础Reactor模型多线程Reactor模型 为什么要使用Netty? (NIO的框架,用于解决高并发出现的问题) *BIO:同步且阻塞的IO NIO:同步且非阻塞的IO(不是说线程&#x…...
第19节 Node.js Express 框架
Express 是一个为Node.js设计的web开发框架,它基于nodejs平台。 Express 简介 Express是一个简洁而灵活的node.js Web应用框架, 提供了一系列强大特性帮助你创建各种Web应用,和丰富的HTTP工具。 使用Express可以快速地搭建一个完整功能的网站。 Expre…...

逻辑回归:给不确定性划界的分类大师
想象你是一名医生。面对患者的检查报告(肿瘤大小、血液指标),你需要做出一个**决定性判断**:恶性还是良性?这种“非黑即白”的抉择,正是**逻辑回归(Logistic Regression)** 的战场&a…...
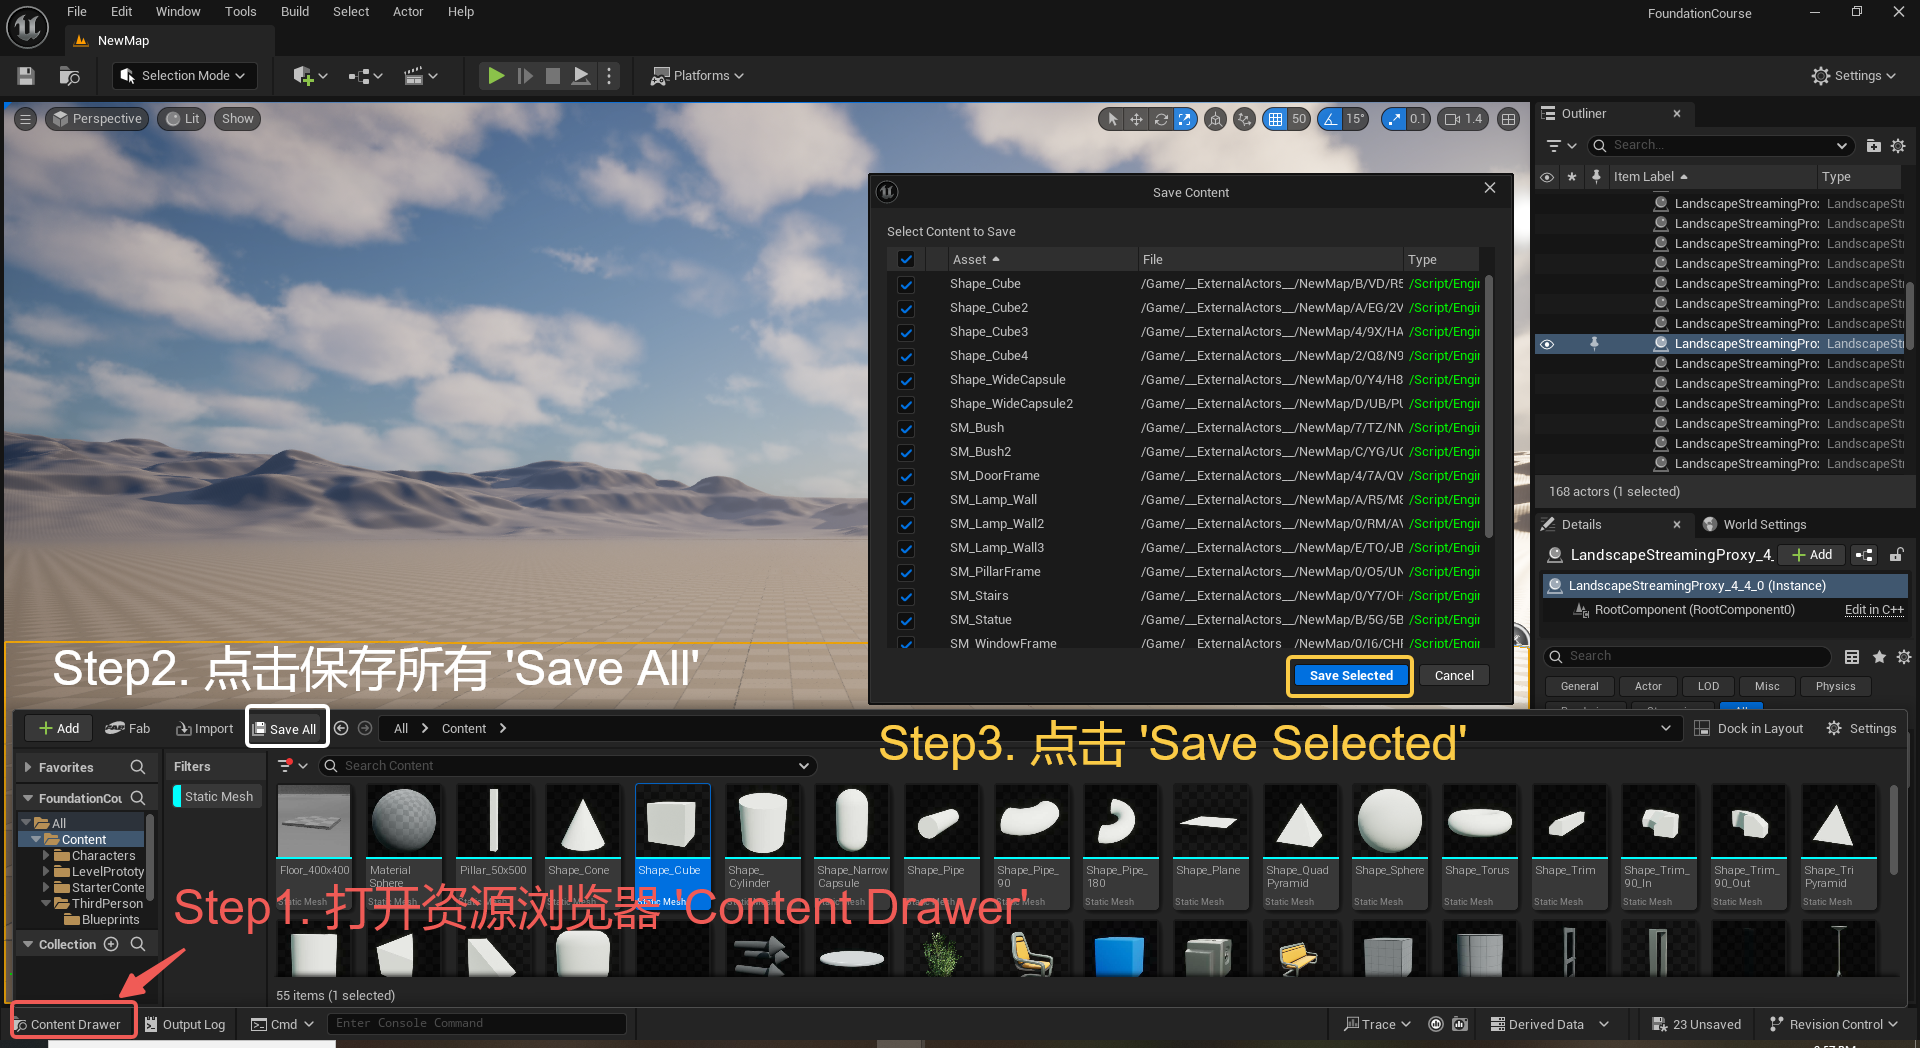
UE5 学习系列(三)创建和移动物体
这篇博客是该系列的第三篇,是在之前两篇博客的基础上展开,主要介绍如何在操作界面中创建和拖动物体,这篇博客跟随的视频链接如下: B 站视频:s03-创建和移动物体 如果你不打算开之前的博客并且对UE5 比较熟的话按照以…...

大语言模型如何处理长文本?常用文本分割技术详解
为什么需要文本分割? 引言:为什么需要文本分割?一、基础文本分割方法1. 按段落分割(Paragraph Splitting)2. 按句子分割(Sentence Splitting)二、高级文本分割策略3. 重叠分割(Sliding Window)4. 递归分割(Recursive Splitting)三、生产级工具推荐5. 使用LangChain的…...
从零开始打造 OpenSTLinux 6.6 Yocto 系统(基于STM32CubeMX)(九)
设备树移植 和uboot设备树修改的内容同步到kernel将设备树stm32mp157d-stm32mp157daa1-mx.dts复制到内核源码目录下 源码修改及编译 修改arch/arm/boot/dts/st/Makefile,新增设备树编译 stm32mp157f-ev1-m4-examples.dtb \stm32mp157d-stm32mp157daa1-mx.dtb修改…...

IoT/HCIP实验-3/LiteOS操作系统内核实验(任务、内存、信号量、CMSIS..)
文章目录 概述HelloWorld 工程C/C配置编译器主配置Makefile脚本烧录器主配置运行结果程序调用栈 任务管理实验实验结果osal 系统适配层osal_task_create 其他实验实验源码内存管理实验互斥锁实验信号量实验 CMISIS接口实验还是得JlINKCMSIS 简介LiteOS->CMSIS任务间消息交互…...

重启Eureka集群中的节点,对已经注册的服务有什么影响
先看答案,如果正确地操作,重启Eureka集群中的节点,对已经注册的服务影响非常小,甚至可以做到无感知。 但如果操作不当,可能会引发短暂的服务发现问题。 下面我们从Eureka的核心工作原理来详细分析这个问题。 Eureka的…...
uniapp 开发ios, xcode 提交app store connect 和 testflight内测
uniapp 中配置 配置manifest 文档:manifest.json 应用配置 | uni-app官网 hbuilderx中本地打包 下载IOS最新SDK 开发环境 | uni小程序SDK hbulderx 版本号:4.66 对应的sdk版本 4.66 两者必须一致 本地打包的资源导入到SDK 导入资源 | uni小程序SDK …...
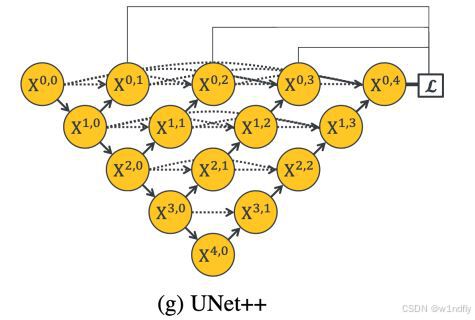
nnUNet V2修改网络——暴力替换网络为UNet++
更换前,要用nnUNet V2跑通所用数据集,证明nnUNet V2、数据集、运行环境等没有问题 阅读nnU-Net V2 的 U-Net结构,初步了解要修改的网络,知己知彼,修改起来才能游刃有余。 U-Net存在两个局限,一是网络的最佳深度因应用场景而异,这取决于任务的难度和可用于训练的标注数…...

vue3 daterange正则踩坑
<el-form-item label"空置时间" prop"vacantTime"> <el-date-picker v-model"form.vacantTime" type"daterange" start-placeholder"开始日期" end-placeholder"结束日期" clearable :editable"fal…...