WPF学习:Slider — 冒泡显示值
想做一个下图所示的Slider,以冒泡的方式显示其Value值,该怎么做呢?

功能要求,当鼠标放在滑块上的时候,冒“泡”显示值;当滑块移动的时候,“泡”跟随移动。
看似简单的功能,但要完美实现,确实要花费不少心思的。
方法一:使用Canvas面板。
- 改造Slider
Slider的样式改造,比较简单,重写其模板即可。
<Slider.Template><ControlTemplate TargetType="Slider"><Border Name="border" SnapsToDevicePixels="True"Background="{TemplateBinding Panel.Background}" BorderBrush="{TemplateBinding Border.BorderBrush}" BorderThickness="{TemplateBinding Border.BorderThickness}" ><Grid><Border Background="Gray" Height="4" CornerRadius="2"/><Track Name="PART_Track" Grid.Row="1"><Track.DecreaseRepeatButton><RepeatButton><RepeatButton.Template><ControlTemplate TargetType="RepeatButton"><Border Height="4" CornerRadius="2" Background="#FF006CBE"/></ControlTemplate></RepeatButton.Template></RepeatButton></Track.DecreaseRepeatButton><Track.Thumb><Thumb Name="thumb" VerticalAlignment="Center" Focusable="False"><Thumb.Template><ControlTemplate TargetType="Thumb"><Grid><Ellipse Name="thumbEllipse" Width="10" Height="10" Fill="White" StrokeThickness="1" Stroke="#FF006CBE" /></Grid></ControlTemplate></Thumb.Template></Thumb></Track.Thumb></Track></Grid></Border></ControlTemplate></Slider.Template></Slider>
- 添加“泡”
很明显,这个“泡”的形状、文字都是一个元素,因此需要使用面板来将两个元素组合起来。这里最好使用Canvas,因为它的子元素是绝对定位的,可以通过Canvas.Left、Canvas.Top等属性安排子元素的位置,且Canvas也不会影响父元素的布局。因此将Slider的模板继续改造一下,如下所示:
<Slider Name="slider" Width="255"><Slider.Template><ControlTemplate TargetType="Slider"><Border Name="border" SnapsToDevicePixels="True"Background="{TemplateBinding Panel.Background}" BorderBrush="{TemplateBinding Border.BorderBrush}" BorderThickness="{TemplateBinding Border.BorderThickness}" ><Grid><Border Background="Gray" Height="4" CornerRadius="2"/><Track Name="PART_Track" Grid.Row="1"><Track.DecreaseRepeatButton><RepeatButton><RepeatButton.Template><ControlTemplate TargetType="RepeatButton"><Border Height="4" CornerRadius="2" Background="#FF006CBE"/></ControlTemplate></RepeatButton.Template></RepeatButton></Track.DecreaseRepeatButton><Track.Thumb><Thumb Name="thumb" VerticalAlignment="Center" Focusable="False"><Thumb.Template><ControlTemplate TargetType="Thumb"><Grid><Ellipse Name="thumbEllipse" Width="10" Height="10" Fill="White" StrokeThickness="1" Stroke="#FF006CBE" /><Canvas Name="canvas" Opacity="0"><Grid Canvas.Bottom="10" Canvas.Left="-8"><Path Width="25" Stretch="Uniform" Fill="White" Stroke="#FF006CBE" StrokeThickness="1" Data="M172,633.14a339.4,339.4,0,0,1-169.9-294C2.13,151.76,154.2-.29,341.57-.29S681,151.76,681,339.11a339.38,339.38,0,0,1-169.9,294h0a183.88,183.88,0,0,0-84.27,106.38h0l-85.26,283.61L256.3,739.52A183.88,183.88,0,0,0,172,633.14Z"/><TextBlock HorizontalAlignment="Center" Margin="0,5,0,0" Text="{Binding RelativeSource={RelativeSource Mode=FindAncestor, AncestorType=Slider}, Path=Value, Converter={StaticResource double2Int}}"/></Grid></Canvas></Grid><ControlTemplate.Triggers><Trigger Property="IsMouseOver" Value="True"><Setter TargetName="canvas" Property="Opacity" Value="1"/></Trigger><Trigger Property="IsDragging" Value="True"><Setter TargetName="canvas" Property="Opacity" Value="1"/></Trigger></ControlTemplate.Triggers></ControlTemplate></Thumb.Template></Thumb></Track.Thumb></Track></Grid></Border></ControlTemplate></Slider.Template></Slider>
红色部分为添加的代码。有两点需要注意:
-
TextBlock.Text属性的绑定,使用了RelativeSource模式。
-
记得要添加触发器(Trigger),使的Canvas能在指定的状态下显示出来。
以这种方式改的Slider控件,有一个问题:“泡”不能超出窗体显示。也就是说当滑块处于屏幕的边缘时,这个“泡”是显示不出来的。
方法二:使用Window
WPF框架中有Popup控件和Tooltip控件。通过微软的源代码可知,他们的实现都是使用Window控件。即在一定的条件下打开一个Windows,并显示内容,在另一个条件下,则关闭这个Window。
根据这个思路,就可以自定义一个控件,并实现更多的功能
- 自定义控件
控件类:FellowPopup,其他的几个类为辅助类。
/// <summary>
/// 坐标系转换类
/// </summary>
public static class CoordinateHelper
{/// <summary>/// 将用户空间坐标系的点,转换为屏幕坐标系的点。/// 已考虑系统Dpi问题/// </summary>/// <param name="relativeTo">可视化对象。它的坐标系原点在左上角</param>/// <param name="point">在可视化对象坐标系中的点</param>/// <returns></returns>public static Point ClientToScreen(Visual relativeTo, Point point){if (relativeTo == null) return point;Point targetToScreen = relativeTo.PointToScreen(point);            // 将point的点转换为屏幕坐标系的点var source = PresentationSource.FromVisual(relativeTo);double dpiX = 96.0, dpiY = 96.0;if (source?.CompositionTarget != null){dpiX = 96.0 * source.CompositionTarget.TransformToDevice.M11;dpiY = 96.0 * source.CompositionTarget.TransformToDevice.M22;}return new Point(targetToScreen.X * 96.0 / dpiX, targetToScreen.Y * 96 / dpiY);}
}public static class DependencyPropertyHelper
{/// <summary>/// 为依赖属性注册值发生改变时的回调方法/// </summary>/// <param name="Register">含有依赖属性的对象</param>/// <param name="dependencyProperty">依赖属性</param>/// <param name="action">要注册的值发生改变时的回调方法</param>/// <param name="runOnceImmediately">是否立即执行一次</param>public static void RegisterDependencyPropertyChanged(this DependencyObject Register, DependencyProperty dependencyProperty, EventHandler action, bool runOnceImmediately = false){DependencyPropertyDescriptor obj = DependencyPropertyDescriptor.FromProperty(dependencyProperty, Register.GetType());if(obj != null) obj.AddValueChanged(Register, action);if(runOnceImmediately) action?.Invoke(Register,new EventArgs());}
}/// <summary>
/// 放置模式
/// </summary>
public enum PlacementMode
{/// <summary>/// 顶部靠左/// </summary>TopLeft,/// <summary>/// 顶部居中/// </summary>TopMiddle,/// <summary>/// 顶部靠右/// </summary>TopRight,/// <summary>/// 左侧居中/// </summary>LeftMiddle,/// <summary>/// 右侧居中/// </summary>RightMiddle,/// <summary>/// 底部靠左/// </summary>BottomLeft,/// <summary>/// 底部居中/// </summary>BottomMiddle,/// <summary>/// 底部靠右/// </summary>BottomRight
}/// <summary>
/// 可跟随控件移动的弹出提示框。
/// </summary>
public class FellowPopup : ContentControl
{private Window _popupWnd;/// <summary>/// 水平位置偏移量/// </summary>public double HorizontalOffset{get => (double)GetValue(HorizontalOffsetProperty);set => SetValue(HorizontalOffsetProperty, value);}internal static readonly DependencyProperty HorizontalOffsetProperty = DependencyProperty.Register("HorizontalOffset", typeof(double), typeof(FellowPopup), new PropertyMetadata(0.0d, OnValueChanged));/// <summary>/// 垂直偏移量/// </summary>public double VerticalOffset{get => (double)GetValue(VerticalOffsetProperty);set => SetValue(VerticalOffsetProperty, value);}internal static readonly DependencyProperty VerticalOffsetProperty = DependencyProperty.Register("VerticalOffset", typeof(double), typeof(FellowPopup), new PropertyMetadata(0.0d, OnValueChanged));/// <summary>/// 放置位置/// </summary>public PlacementMode Placement{get => (PlacementMode)GetValue(PlacementProperty);set => SetValue(PlacementProperty, value);}internal static readonly DependencyProperty PlacementProperty = DependencyProperty.Register("Placement", typeof(PlacementMode), typeof(FellowPopup), new PropertyMetadata(PlacementMode.BottomRight,OnValueChanged));/// <summary>/// 放置的目标元素/// </summary>public FrameworkElement PlacementTarget{get => (FrameworkElement)GetValue(PlacementTargetProperty);set => SetValue(PlacementTargetProperty, value);}internal static readonly DependencyProperty PlacementTargetProperty = DependencyProperty.Register("PlacementTarget", typeof(FrameworkElement), typeof(FellowPopup), new PropertyMetadata(null,OnValueChanged));private static void OnValueChanged(DependencyObject d, DependencyPropertyChangedEventArgs e){FellowPopup popup = (FellowPopup)d;popup.UpdateLocation();}/// <summary>/// 是否打开。当其为true时,则显示提示框,false则不显示提示框/// </summary>public bool IsOpen{get => (bool)GetValue(IsOpenProperty);set => SetValue(IsOpenProperty, value);}internal static readonly DependencyProperty IsOpenProperty = DependencyProperty.Register("IsOpen", typeof(bool), typeof(FellowPopup), new PropertyMetadata(false,OnIsOpenChanged));private static void OnIsOpenChanged(DependencyObject d, DependencyPropertyChangedEventArgs e){FellowPopup fp = d as FellowPopup;if((bool)e.NewValue ) fp.Open();else  fp.Close();}#region 触发位置更新/// <summary>/// 触发位置更新的控件/// </summary>public FrameworkElement TriggerElement{get => (FrameworkElement)GetValue(TriggerElementProperty);set => SetValue(TriggerElementProperty, value);}internal static readonly DependencyProperty TriggerElementProperty = DependencyProperty.Register("TriggerElement", typeof(UIElement), typeof(FellowPopup), new PropertyMetadata(null, OnTriggerChanged));/// <summary>/// 触发位置更新的控件的属性/// 此属性应该是TriggerElement的属性。/// 当此属性的值发生变化时,会触发FellowPopup的UpdateLocation方法。/// </summary>public DependencyProperty TriggerProperty{get => (DependencyProperty)GetValue(TriggerPropertyProperty);set => SetValue(TriggerPropertyProperty, value);}internal static readonly DependencyProperty TriggerPropertyProperty = DependencyProperty.Register("TriggerProperty", typeof(DependencyProperty), typeof(FellowPopup), new PropertyMetadata(null, OnTriggerChanged));private static void OnTriggerChanged(DependencyObject d, DependencyPropertyChangedEventArgs e){FellowPopup fp = (FellowPopup)d;if (fp.TriggerElement == null || fp.TriggerProperty == null) return;// 如果定义属性的类,与TriggerElement类相同,或者TriggerElement类是它的子类Type propertyType = fp.TriggerProperty.OwnerType;Type elementType = fp.TriggerElement.GetType();if ((elementType != propertyType) && (!elementType.IsSubclassOf(propertyType))) throw new ArgumentException("TriggerElement不包含TriggerProperty属性");DependencyPropertyHelper.RegisterDependencyPropertyChanged(fp.TriggerElement, fp.TriggerProperty, delegate (object sender, EventArgs args){fp.UpdateLocation();}, false);}#endregionstatic FellowPopup(){DefaultStyleKeyProperty.OverrideMetadata(typeof(FellowPopup), new FrameworkPropertyMetadata(typeof(FellowPopup)));}/// <summary>/// 打开窗体/// </summary>private void Open(){_popupWnd = new Window(){Topmost = true,ShowActivated = false,AllowsTransparency = true,WindowStyle = WindowStyle.None,BorderThickness = new Thickness(0),SizeToContent = SizeToContent.WidthAndHeight,WindowStartupLocation = WindowStartupLocation.Manual,Background = this.Background,Content = this.Content,ContentStringFormat = this.ContentStringFormat,ContentTemplate = this.ContentTemplate,ContentTemplateSelector = this.ContentTemplateSelector,};UpdateLocation();_popupWnd.Show();}// 关闭_popup窗体,并回收private void Close(){if (_popupWnd != null){_popupWnd.Close();GC.SuppressFinalize(_popupWnd);}}/// <summary>/// 更新弹出窗体的位置。/// </summary>private void UpdateLocation(){if (_popupWnd == null) return;if(PlacementTarget == null){_popupWnd.Left = 0;_popupWnd.Top = 0;return;}double contentWidth = _popupWnd.Content == null ? 0 : ((FrameworkElement)_popupWnd.Content).ActualWidth;double contentHeght = _popupWnd.Content == null ? 0 : ((FrameworkElement)_popupWnd.Content).ActualHeight;Point targetToScreen;switch (Placement){case PlacementMode.TopLeft:targetToScreen = CoordinateHelper.ClientToScreen(PlacementTarget,new Point(0, 0));_popupWnd.Left = targetToScreen.X - contentWidth - HorizontalOffset;_popupWnd.Top = targetToScreen.Y - contentHeght - VerticalOffset;break;case PlacementMode.TopMiddle:targetToScreen = CoordinateHelper.ClientToScreen(PlacementTarget, new Point(PlacementTarget.ActualWidth/2, 0));_popupWnd.Left = targetToScreen.X - contentWidth / 2 + HorizontalOffset;_popupWnd.Top = targetToScreen.Y - contentHeght - VerticalOffset;break;case PlacementMode.TopRight:targetToScreen = CoordinateHelper.ClientToScreen(PlacementTarget, new Point(PlacementTarget.ActualWidth, 0));_popupWnd.Left = targetToScreen.X + HorizontalOffset;_popupWnd.Top = targetToScreen.Y - contentHeght - VerticalOffset;break;case PlacementMode.LeftMiddle:targetToScreen = CoordinateHelper.ClientToScreen(PlacementTarget, new Point(0, PlacementTarget.ActualHeight / 2));_popupWnd.Left = targetToScreen.X - contentWidth - HorizontalOffset;_popupWnd.Top = targetToScreen.Y - contentHeght / 2;break;case PlacementMode.RightMiddle:targetToScreen = CoordinateHelper.ClientToScreen(PlacementTarget, new Point(PlacementTarget.ActualWidth, PlacementTarget.ActualHeight / 2));_popupWnd.Left = targetToScreen.X + HorizontalOffset;_popupWnd.Top = targetToScreen.Y - contentHeght / 2;break;case PlacementMode.BottomLeft:targetToScreen = CoordinateHelper.ClientToScreen(PlacementTarget, new Point(0, PlacementTarget.ActualHeight));_popupWnd.Left = targetToScreen.X - contentWidth - HorizontalOffset;_popupWnd.Top = targetToScreen.Y + VerticalOffset;break;case PlacementMode.BottomMiddle:targetToScreen = CoordinateHelper.ClientToScreen(PlacementTarget, new Point(PlacementTarget.ActualWidth / 2, PlacementTarget.ActualHeight));_popupWnd.Left = targetToScreen.X - contentWidth / 2 - HorizontalOffset;_popupWnd.Top = targetToScreen.Y + VerticalOffset;break;case PlacementMode.BottomRight:targetToScreen = CoordinateHelper.ClientToScreen(PlacementTarget, new Point(PlacementTarget.ActualWidth, PlacementTarget.ActualHeight));_popupWnd.Left = targetToScreen.X + HorizontalOffset;_popupWnd.Top = targetToScreen.Y + VerticalOffset;break;}}
}
(1)在FellowPopup类中,定义了一个Window类型的变量_popup,用于展示“泡”的内容。PlacementTarget、Placement、HorizontalOffset、VerticalOffset四个属性,用于设置_popup的Left和Top属性,以确定_popup在屏幕中的位置。
这里需要注意,Visual.PointToScreen()方法,参数point是在Visual坐标空间的点,其返回值为将这个点,转换为屏幕坐标系的点。但转换后的点,未考虑到系统DPI及屏幕缩放的情况。因此,需要将这个点再运算,使之成为当前屏幕DPI及缩放模式下的点坐标。
(2)TriggerElement、TriggerProperty属性,用于指示,当哪个元素的哪个属性值发生变化时,更新位置。
要想让一个窗体跟着控件移动,就必须告诉窗体,控件当前的位置在哪儿,然后去计算窗体应该在哪儿。而在WPF中,几乎没有控件会实时报告自己的位置。因此,必须找到元素的一个属性,当元素的“位置”发生改变的时候,这个属性值会发生变化。
除了找到这样的一个属性外,还需要注册一个属性值发生改变时的回调方法。在本例中,滑块在滑动的过程中,本身没有属性(公开的)值发生改变,但是Slider的Value属性会发生改变。因此可以选择它,来触发FellowPopup的位置改变。
由此可见,PlacementTarge系列与TriggerElement可以是不同的。一个用于“布置”窗体,一个用于“触发”窗体。
-
使用自定义控件
定义好了控件后,就可以在Xaml中使用它了。继续改造Slider的模板:<!-- 别忘了转换器 --><local:Double2IntConverter x:Key="double2Int" /> <Slider Name="slider" Width="255"><Slider.Template><ControlTemplate TargetType="Slider"><Border Name="border" SnapsToDevicePixels="True"Background="{TemplateBinding Panel.Background}" BorderBrush="{TemplateBinding Border.BorderBrush}" BorderThickness="{TemplateBinding Border.BorderThickness}" ><Grid><Border Background="Gray" Height="4" CornerRadius="2"/><Track Name="PART_Track" Grid.Row="1"><Track.DecreaseRepeatButton><RepeatButton><RepeatButton.Template><ControlTemplate TargetType="RepeatButton"><Border Height="4" CornerRadius="2" Background="#FF006CBE"/></ControlTemplate></RepeatButton.Template></RepeatButton></Track.DecreaseRepeatButton><Track.Thumb><Thumb Name="thumb" VerticalAlignment="Center" Focusable="False"><Thumb.Template><ControlTemplate TargetType="Thumb"><Grid><Ellipse Name="thumbEllipse" Width="10" Height="10" Fill="White" StrokeThickness="1" Stroke="#FF006CBE" /><local:FellowPopup x:Name="popup" Background="Transparent"Placement="TopMiddle" PlacementTarget="{Binding ElementName=thumbEllipse}"TriggerElement="{Binding RelativeSource={RelativeSource Mode=FindAncestor, AncestorType=Slider}}"TriggerProperty="Slider.Value"><Grid HorizontalAlignment="Center" VerticalAlignment="Center"><Path Width="25" Stretch="Uniform" Fill="White" Stroke="#FF006CBE" StrokeThickness="1" Data="M172,633.14a339.4,339.4,0,0,1-169.9-294C2.13,151.76,154.2-.29,341.57-.29S681,151.76,681,339.11a339.38,339.38,0,0,1-169.9,294h0a183.88,183.88,0,0,0-84.27,106.38h0l-85.26,283.61L256.3,739.52A183.88,183.88,0,0,0,172,633.14Z"/><TextBlock HorizontalAlignment="Center" Margin="0,5,0,0" Text="{Binding RelativeSource={RelativeSource Mode=FindAncestor, AncestorType=Slider}, Path=Value, Converter={StaticResource double2Int}}"/></Grid></local:FellowPopup></Grid><ControlTemplate.Triggers><Trigger Property="IsMouseOver" Value="True"><Setter TargetName="popup" Property="IsOpen" Value="True"/></Trigger><Trigger Property="IsDragging" Value="True"><Setter TargetName="popup" Property="IsOpen" Value="True"/></Trigger></ControlTemplate.Triggers></ControlTemplate></Thumb.Template></Thumb></Track.Thumb></Track></Grid></Border></ControlTemplate></Slider.Template></Slider>
复制代码
注意Placement、TriggerElement、TriggerProperty、Text等属性的绑定方式。
至此,改造搞定。以第二种方式改造的Slider,“泡”可以显示在主窗体之上。没有任何东西会挡住他,以为它是TopMost的。另外也可以再添加自己的逻辑去设置“泡”的位置。
以上为自己学习总结,如有错误,请指正。
相关文章:
WPF学习:Slider — 冒泡显示值
想做一个下图所示的Slider,以冒泡的方式显示其Value值,该怎么做呢? 功能要求,当鼠标放在滑块上的时候,冒“泡”显示值;当滑块移动的时候,“泡”跟随移动。 看似简单的功能,但要完美…...
Vue实战第4章:主页设计之中部内容设计
前言 本篇在讲什么 接上篇文章,我们制作了一个自定义的网页导航栏,本篇文章我们简单制作一个内容页 仅介绍简单的应用,仅供参考 本篇适合什么 适合初学Vue的小白 适合想要自己搭建网站的新手 适合没有接触过vue-router的前端程序 本篇…...
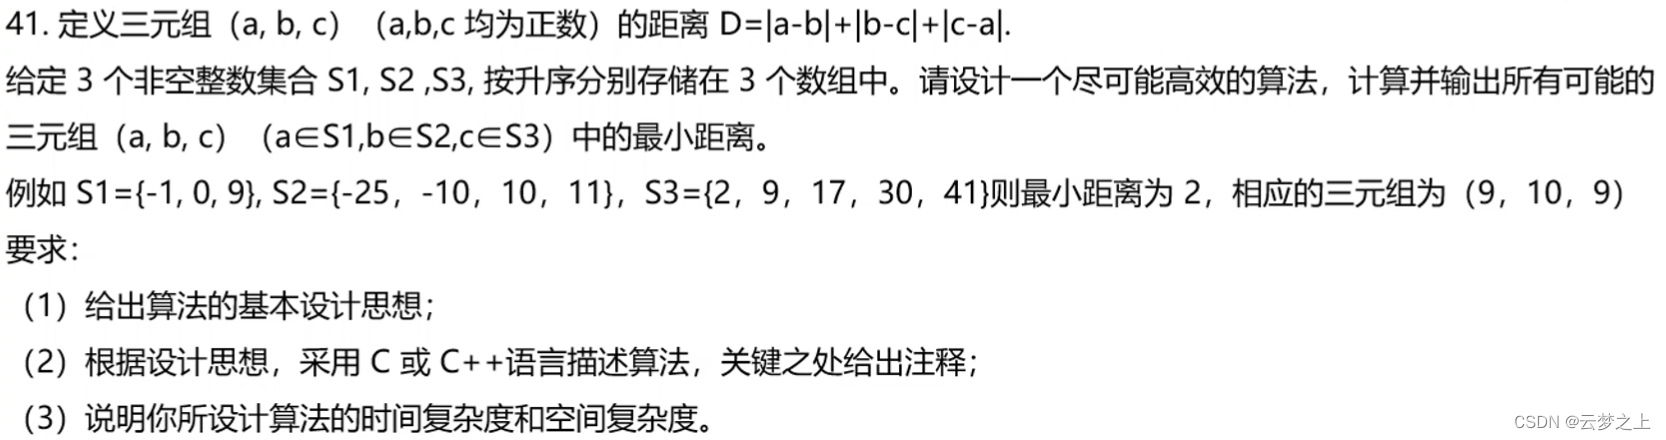
数据结构代码总结(C语言实现)
目录如何应对数据结构的代码题?采取的学习流程①首先对C语言的语法的熟悉②学习掌握基本代码的写法,做到熟练2.1插入排序2.2快速排序2.3二分查找2.4树的遍历③跟着网上视频开始熟悉对一些问题的解答④结合真题的代码,寻找其中的结题规律如何应…...

zookeeper 复习 ---- chapter04
zookeeper 复习 ---- chapter04zookeeper 的精髓是什么? 1:它有四个节点类型 持久无序的节点 临时无序的节点 持久有序的节点 临时有序的节点 临时的节点的特征:当客户端和服务器端断开连接,当前客户端创建的节点被服务器端自动删…...

thinkphp6.0连接MYSQL
目录8.连接多个数据库7.多级控制器不存在6.分页5.非法请求4.关于路由**3.初体验页面****2.加入fileheader添加注释****1.配置mysql0. 官方开发手册一些网址 http://127.0.0.1:8000/index 原桌面 http://127.0.0.1:8000/hello/fsh hello,fsh(index中hello方法&#x…...
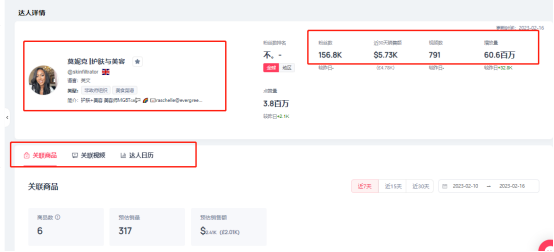
商家必读!超店有数分享,tiktok达人营销变现如何更快一步?
近几年来,“粉丝经济”发展越来越迅猛,“网红带货”已经成为了一种营销的方式。这种方式让商家能基于达人的影响下迅速抢占自己的私域流量池。消费者会基于对达人的信任,购买达人推荐的产品。达人效应可以助力品牌走出营销困境。如果商家想要…...
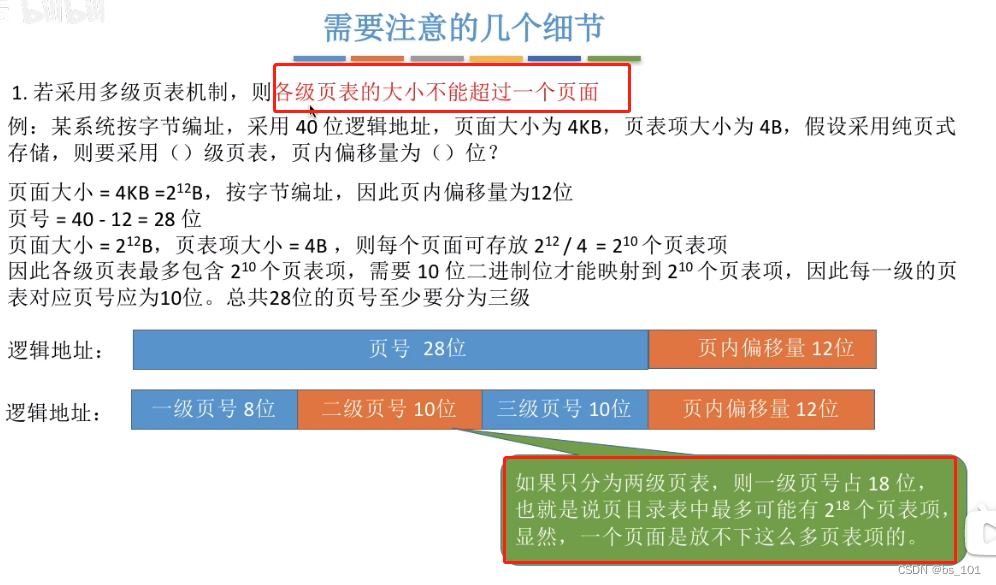
操作系统(day11)--快表,两级页表
具有快表的地址变换机构 时间局限性:会有大量连续的指令需要访问同一个内存块的数据的情况(程序中的循环) 空间局限性:一旦程序访问了某个存储单元,在不久之后,其附近的存储单元也很有可能被访问。…...
预告| 亮点抢先看!第四届OpenI/O启智开发者大会主论坛24日启幕!
2023年2月24日至25日,第四届OpenI/O启智开发者大会将在深圳隆重举行。“算网筑基、开源启智、AI赋能”作为今年大会的主题,吸引了全球业界关注的目光。大会集结中国算力网资源基座、开源社区治理及AI开源生态建设、国家级开放创新应用平台、NLP大模型等前…...
的通用提交的封装 —— 两种方案,A.使用dataSet的自身的submit,B.使用axios.post来提交)
猪齿鱼(Choerodon UI )的通用提交的封装 —— 两种方案,A.使用dataSet的自身的submit,B.使用axios.post来提交
submit组件(otherSubmit/axiosSubmit) 一、背景与简介 1、首先我们申请表提交,分为【保存】提交与【其他】提交; 1.1【保存】提交,要求表单必须要有变更,DataToJSON默认为dirty(只转换变更的…...
CISCN(Web Ezpentest)GC、序列化、case when
目录 REGEXP的一个点(正则) like(默认不区分大小写) 当禁用了空格 regexp,like的区分大小写的使用方法 [CISCN 2022 初赛]ezpentest 卡点 2022 HFCTF babysql 最近又学到了一道新知识,case when的错…...

OSG三维渲染引擎编程学习之五十七:“第六章:OSG场景工作机制” 之 “6.1 OSG访问器”
目录 第六章 OSG场景工作机制 6.1 OSG访问器 6.1.1 访问器模式 6.1.2 osg::NodeVisitor 6.1.3 访问器示例...
Python3 输入和输出实例及演示
在前面几个章节中,我们其实已经接触了 Python 的输入输出的功能。本章节我们将具体介绍 Python 的输入输出。 输出格式美化 Python两种输出值的方式: 表达式语句和 print() 函数。 第3种方式是使用文件对象的 write() 方法,标准输出文件可以用 sys.std…...
)
召回-回忆录(持续更新)
0.召回方法 词召回 swing、itemCF 缺点: 有冷启动问题不是全局召回,冷门活动难以得到召回结果容易召回过多的头部热门活动 向量召回 参考文献: 经典推荐算法学习(七)| Graph Embedding技术学习 | 从DeepWalk到No…...

1243. 糖果/状态压缩dp【AcWing】
1243. 糖果 糖果店的老板一共有 M种口味的糖果出售。 为了方便描述,我们将 M种口味编号 1∼M。 小明希望能品尝到所有口味的糖果。 遗憾的是老板并不单独出售糖果,而是 K颗一包整包出售。 幸好糖果包装上注明了其中 K颗糖果的口味,所以小…...
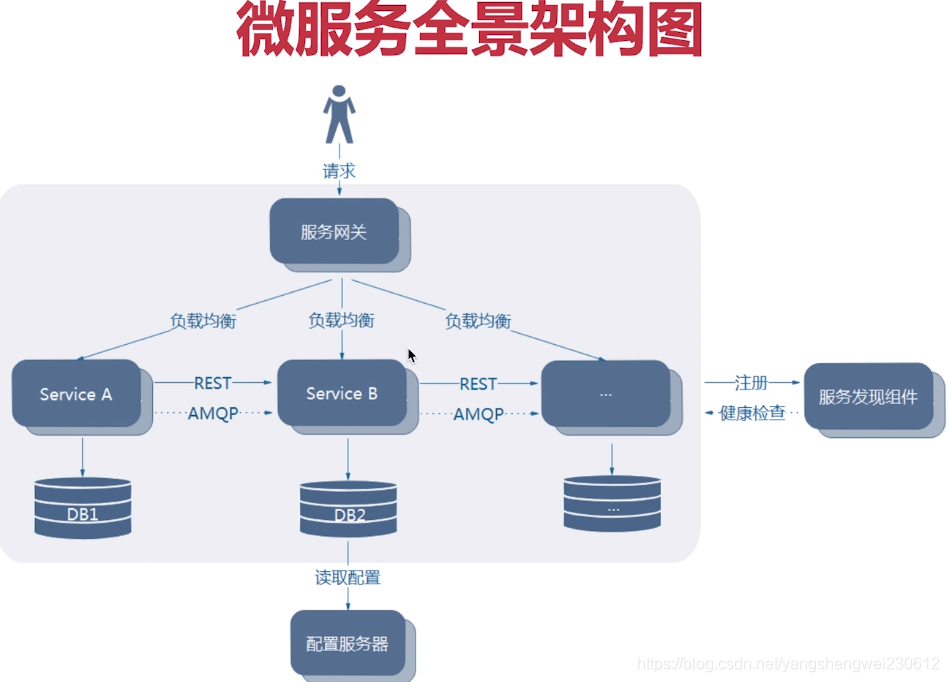
【Spring Cloud Alibaba】001-单体架构与微服务架构
【Spring Cloud Alibaba】001-单体架构与微服务 文章目录【Spring Cloud Alibaba】001-单体架构与微服务一、单体架构1、单体应用与单体架构2、单体应用架构图3、单体架构优缺点优点缺点二、微服务1、微服务的“定义”2、微服务的特性3、微服务架构图4、微服务的优缺点优点缺点…...

Renderer 使用材质分析:materials、sharedMaterials 及 MaterialPropertyBlock
一、materials 与 sharedMaterials 1.1 使用上的区别与差异 Unity 开发时,在 C# 中通过 Renderer 取材质操作是非常常见的操作,Renderer 有两种常规获取材质的方式: sharedMaterials:可以理解这个就是原始材质,所有使…...

java学习----网络编程
网络编程入门 网络编程概述 计算机网络 计算机网络是指地理位置不同的具有独立功能的计算机及其外部设备,通过通信线路连接起来,在网络操作系统,网络管理软件及网络通信协议的管理协调下,实现资源共享和信息传递的计算机系统…...

这些「误区」99%的研发都踩过
意识不到误区的存在最为离谱; 01生活中,职场上,游戏里,都少不了正面对喷过:意识太差; 在个人的认知中意识即思维,意识太差即思维中存在的误区比较多; 每个人或多或少都存在思维上的…...

Bi系统跟数据中台的区别是什么?
随着数据时代的发展,BI分析是当今数据时代必不可少的能力之一。BI系统通过系统化产品化的方法,能够大幅降低数据的获取成本、提升数据使用效率。同时借助可视化、交互式的操作,可以高效支持业务的分析及发展。 BI如此火热,随之而…...
微信小程序反编译方法分享
文章目录一、前言二、准备工作(一)安装Nodejs(二)解密和逆向工具三、小程序缓存文件解密(一)定位小程序缓存路径(二)源码解密(三)源码反编译四、小结一、前言…...

终极指南:如何在Android设备上实现Zwift离线骑行模拟
终极指南:如何在Android设备上实现Zwift离线骑行模拟 【免费下载链接】zwift-offline Use Zwift offline 项目地址: https://gitcode.com/gh_mirrors/zw/zwift-offline 你是否厌倦了网络不稳定导致的Zwift训练中断?想要在任何地方都能享受专业的虚…...

5秒极速转换!m4s转换工具:B站缓存视频合并为MP4的完整指南
5秒极速转换!m4s转换工具:B站缓存视频合并为MP4的完整指南 【免费下载链接】m4s-converter 一个跨平台小工具,将bilibili缓存的m4s格式音视频文件合并成mp4 项目地址: https://gitcode.com/gh_mirrors/m4/m4s-converter 你是否在B站缓…...

观察Taotoken用量看板如何帮助控制月度API支出
🚀 告别海外账号与网络限制!稳定直连全球优质大模型,限时半价接入中。 👉 点击领取海量免费额度 观察Taotoken用量看板如何帮助控制月度API支出 在项目开发中,大模型API的调用成本往往是预算管理的重要一环。如果缺乏…...

极域电子教室破解指南:快速恢复电脑控制权的完整方案
极域电子教室破解指南:快速恢复电脑控制权的完整方案 【免费下载链接】JiYuTrainer 极域电子教室防控制软件, StudenMain.exe 破解 项目地址: https://gitcode.com/gh_mirrors/ji/JiYuTrainer 你是否曾经在学校的计算机教室中,面对被极域电子教室…...

猫抓Cat-Catch:浏览器资源嗅探技术的3大架构演进与实战解析
猫抓Cat-Catch:浏览器资源嗅探技术的3大架构演进与实战解析 【免费下载链接】cat-catch 猫抓 浏览器资源嗅探扩展 / cat-catch Browser Resource Sniffing Extension 项目地址: https://gitcode.com/GitHub_Trending/ca/cat-catch 猫抓Cat-Catch作为一款专业…...

地质建模革命:如何使用GemPy在10分钟内构建专业3D地质模型 [特殊字符]
地质建模革命:如何使用GemPy在10分钟内构建专业3D地质模型 🚀 【免费下载链接】gempy GemPy is an open-source, Python-based 3-D structural geological modeling software, which allows the implicit (i.e. automatic) creation of complex geologic…...

别再用鼠标了!树莓派新手必学的20个命令行操作,5分钟上手
别再用鼠标了!树莓派新手必学的20个命令行操作,5分钟上手 第一次打开树莓派的终端时,那个闪烁的光标是不是让你想起了90年代的黑客电影?别担心,命令行不是程序员的专属工具。就像学骑自行车前总要拆掉辅助轮࿰…...

免费激活IDM的终极解决方案:开源脚本完整指南
免费激活IDM的终极解决方案:开源脚本完整指南 【免费下载链接】IDM-Activation-Script IDM Activation & Trail Reset Script 项目地址: https://gitcode.com/gh_mirrors/id/IDM-Activation-Script 你是否经常遇到IDM(Internet Download Mana…...

标书高效制作:Word 排版快捷键 + AI 工具组合工作流
在招投标文档制作中,Word 排版、格式调整、段落对齐、目录生成等重复操作,往往占用大量时间。熟练使用快捷键可以显著提升编辑速度,而结合 AI 辅助工具,则能从流程层面实现效率升级。本文分享一套安全、合规、无营销的纯办公实践方…...

抖音直播数据采集:如何用Golang构建实时弹幕监控系统
抖音直播数据采集:如何用Golang构建实时弹幕监控系统 【免费下载链接】douyin-live-go 抖音(web) 弹幕爬虫 golang 实现 项目地址: https://gitcode.com/gh_mirrors/do/douyin-live-go 在直播电商和内容创作日益火爆的今天,数据驱动的运营决策变得…...