Tomcat 一次请求的生命周期
在使用 Tomcat 的时候,我们只需要在 Servlet 实现类中写我们的业务逻辑代码即可,不需要管 Socket 连接、协议处理要怎么实现,因为这部分作为不经常变动的部分,被封装到了 Tomcat 中,程序员只需要引入 Tomcat 中即可,这也是面向对象编程的经典实践。
那么 Tomcat 中的一次请求都要经过哪些类的处理呢?以及 Tomcat 在处理的时候做了哪些方面的考量和设计呢?
Connector
我们知道,Tomcat 中的 Connector 组件负责 Socket 连接的创建和管理,以及网络字节流的传输。在 Connector 组件中,有三个组件 Endpoint、Processor、Adapt。
- Endpoint:负责 ServerSocket 的创建和循环获取 Socket 连接
- Processor:根据具体的协议,解析字节流中的数据
- Adapt:将 Tomcat Request 转换成 ServletRequest,将 ServletResponse 转换成 Tomcat Response
Tomcat 的设计者将 Endpoint 和 Processor 又做了一次封装,将它们封装在 ProtocolHandler 中,表示协议处理器。
从上面看,请求会先在 Endpoint 对象中被接受,然后在 Processor 中被解析,最后通过 Adapt 转换后发送给 Servlet 容器。
Endpoint
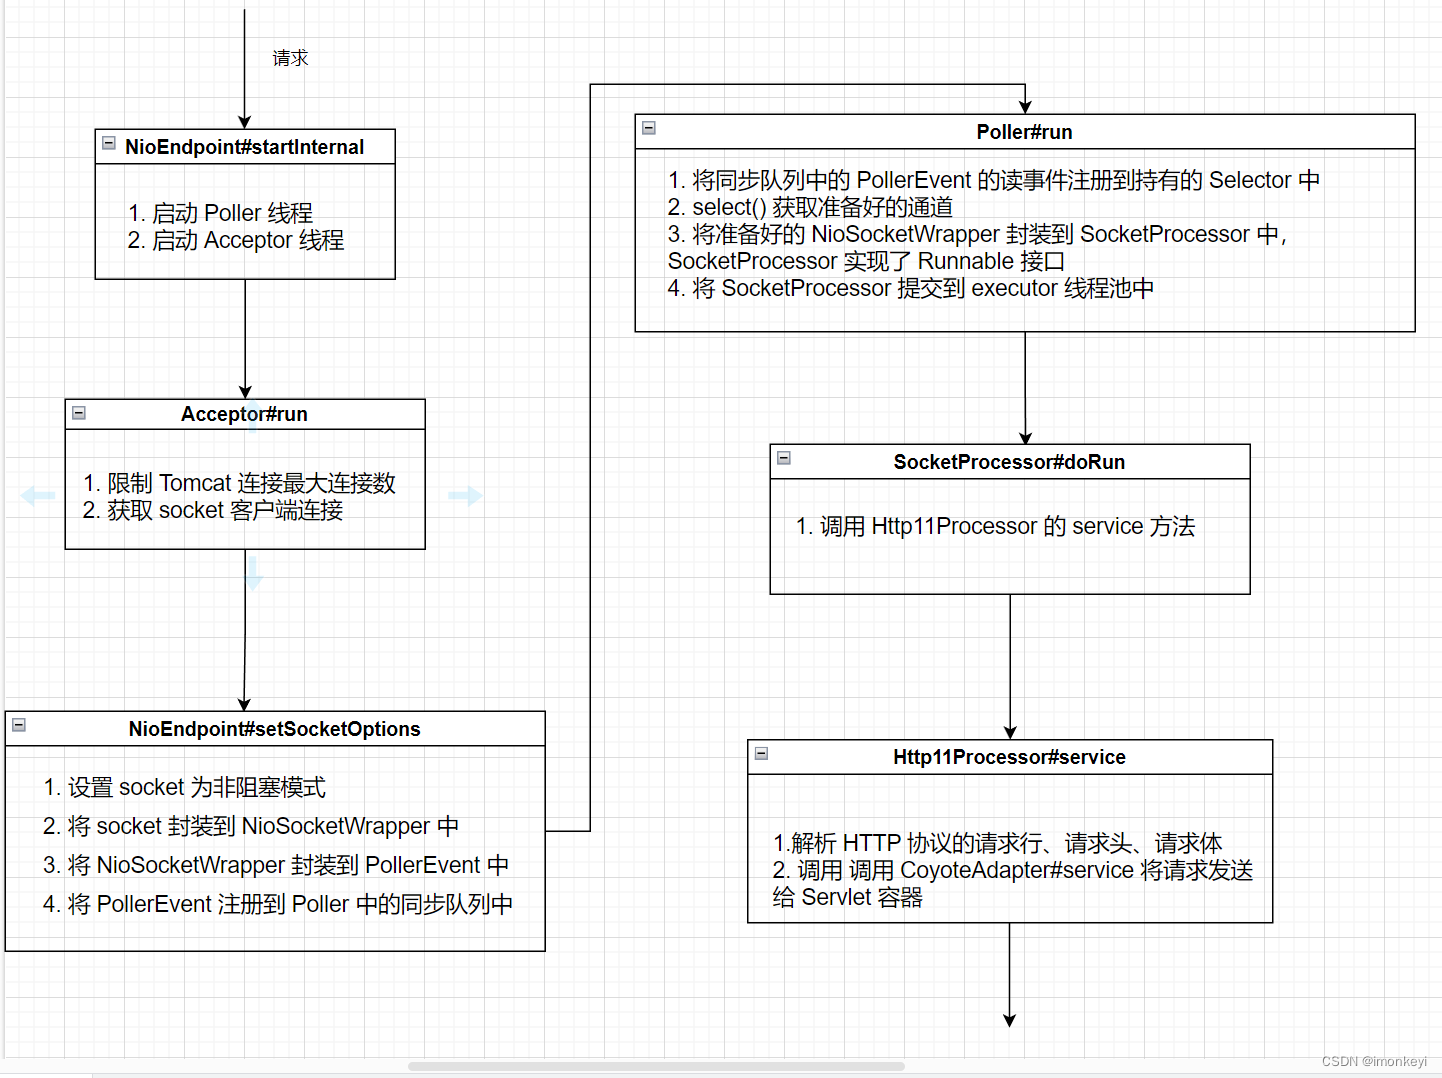
NioEndpoint#startInternal
生命周期方法,在启动 Tomcat 的时候会调用 Server#start -> Service.start -> Connector.start -> ProtocolHandler.start() -> EndPoint.start() -> Endpoint.startInternal()
@Override
public void startInternal() throws Exception {if (!running) {running = true;paused = false;if (socketProperties.getProcessorCache() != 0) {processorCache = new SynchronizedStack<>(SynchronizedStack.DEFAULT_SIZE,socketProperties.getProcessorCache());}if (socketProperties.getEventCache() != 0) {eventCache = new SynchronizedStack<>(SynchronizedStack.DEFAULT_SIZE,socketProperties.getEventCache());}if (socketProperties.getBufferPool() != 0) {nioChannels = new SynchronizedStack<>(SynchronizedStack.DEFAULT_SIZE,socketProperties.getBufferPool());}// Create worker collectionif (getExecutor() == null) {createExecutor();}initializeConnectionLatch();// Start poller thread// 启动一个 Poller 线程并赋值给 NioEndpoint 的 poller 成员变量// 这个变量在后续处理 PollerEvent 的时候会用到poller = new Poller();Thread pollerThread = new Thread(poller, getName() + "-Poller");pollerThread.setPriority(threadPriority);pollerThread.setDaemon(true);pollerThread.start();// 启动 Acceptor 线程startAcceptorThread();}
}
AbstractEndpoint#startAcceptorThread
创建并启动 Acceptor 线程
protected void startAcceptorThread() {acceptor = new Acceptor<>(this);String threadName = getName() + "-Acceptor";acceptor.setThreadName(threadName);Thread t = new Thread(acceptor, threadName);t.setPriority(getAcceptorThreadPriority());t.setDaemon(getDaemon());t.start();
}
Acceptor#run
Acceptor 的 run 方法中循环获取 socket 连接,为了减少篇幅和方便阅读,我简化了代码:
public void run() {int errorDelay = 0;long pauseStart = 0;try {// 循环,直到我们接收到一个 shutdown 命令while (!stopCalled) {if (stopCalled) {break;}state = AcceptorState.RUNNING;try {// 如果我们到达了最大连接数,则阻塞该线程endpoint.countUpOrAwaitConnection();if (endpoint.isPaused()) {continue;}U socket = null;try {// 获取 socket 连接socket = endpoint.serverSocketAccept();} catch (Exception ioe) {...}// Successful accept, reset the error delayerrorDelay = 0;if (!stopCalled && !endpoint.isPaused()) {// setSocketOptions() 方法会把 socket 交给合适的 processor 处理if (!endpoint.setSocketOptions(socket)) {endpoint.closeSocket(socket);}} else {endpoint.destroySocket(socket);}} catch (Throwable t) {...}}} finally {stopLatch.countDown();}state = AcceptorState.ENDED;
}
NioEndpoint#setSocketOptions
这里主要做了三件事:
- 设置 socket 为非阻塞模式
- 将 socket 封装到 NioSocketWrapper 中
- 将 NioSocketWrapper 注册到 Poller 中
其中 NioSocketWrapper 是 NioEndpoint 的静态内部类,Poller 是 NioEndpoint 的内部类,它实现了 Runnable 接口。
@Override
protected boolean setSocketOptions(SocketChannel socket) {NioSocketWrapper socketWrapper = null;try {// Allocate channel and wrapperNioChannel channel = null;if (nioChannels != null) {channel = nioChannels.pop();}if (channel == null) {SocketBufferHandler bufhandler = new SocketBufferHandler(socketProperties.getAppReadBufSize(),socketProperties.getAppWriteBufSize(),socketProperties.getDirectBuffer());if (isSSLEnabled()) {channel = new SecureNioChannel(bufhandler, this);} else {channel = new NioChannel(bufhandler);}}// NioSocketWrapper 是 NioEndpoint 的静态内部类// 将 socket 封装到 NioSocketWrapper 中NioSocketWrapper newWrapper = new NioSocketWrapper(channel, this);channel.reset(socket, newWrapper);connections.put(socket, newWrapper);socketWrapper = newWrapper;// 设置 socket 为非阻塞模式socket.configureBlocking(false);socketProperties.setProperties(socket.socket());socketWrapper.setReadTimeout(getConnectionTimeout());socketWrapper.setWriteTimeout(getConnectionTimeout());socketWrapper.setKeepAliveLeft(NioEndpoint.this.getMaxKeepAliveRequests());// Poller 是 NioEndpoint 的内部类,它实现了 Runnable 接口poller.register(socketWrapper);return true;} catch (Throwable t) {...}// Tell to close the socket if neededreturn false;
}
Poller#register -> Poller#addEvent
- 在 NioSocketWrapper 中设置感兴趣的事件是 SelectionKey.OP_READ,也就是读事件,此时还没有注册到 Selector 上
- 将 NioSocketWrapper 封装成 PollerEvent,并添加到 Poller 持有的同步队列中
/*** Registers a newly created socket with the poller.** @param socketWrapper The socket wrapper*/
public void register(final NioSocketWrapper socketWrapper) {// 设置感兴趣的事件是读事件socketWrapper.interestOps(SelectionKey.OP_READ);//this is what OP_REGISTER turns into.// 将 NioSocketWrapper 封装成 PollerEventPollerEvent pollerEvent = createPollerEvent(socketWrapper, OP_REGISTER);addEvent(pollerEvent);
}private void addEvent(PollerEvent event) {// 将 PollerEvent 添加到 Poller 中 Tomcat 自定义的同步队列中events.offer(event);if (wakeupCounter.incrementAndGet() == 0) {selector.wakeup();}
}
Poller#run
Poller 线程在一个死循环中,首先通过 events() 方法,将 PollerEvent 同步队列中的 socket 用持有的 Selector 注册感兴趣的事件。
然后获取准备好的通道, 每一个通道都传入 processKey 方法中
@Override
public void run() {// Loop until destroy() is calledwhile (true) {boolean hasEvents = false;try {if (!close) {hasEvents = events();if (wakeupCounter.getAndSet(-1) > 0) {keyCount = selector.selectNow();} else {keyCount = selector.select(selectorTimeout);}wakeupCounter.set(0);}if (close) {events();timeout(0, false);try {selector.close();} catch (IOException ioe) {log.error(sm.getString("endpoint.nio.selectorCloseFail"), ioe);}break;}// Either we timed out or we woke up, process events firstif (keyCount == 0) {hasEvents = (hasEvents | events());}} catch (Throwable x) {ExceptionUtils.handleThrowable(x);log.error(sm.getString("endpoint.nio.selectorLoopError"), x);continue;}Iterator<SelectionKey> iterator =keyCount > 0 ? selector.selectedKeys().iterator() : null;// 如果 Selector 存在已经准备好的通道,则遍历就绪的通道集while (iterator != null && iterator.hasNext()) {SelectionKey sk = iterator.next();iterator.remove();NioSocketWrapper socketWrapper = (NioSocketWrapper) sk.attachment();if (socketWrapper != null) {processKey(sk, socketWrapper);}}// Process timeoutstimeout(keyCount,hasEvents);}getStopLatch().countDown();
}
Poller#events
public boolean events() {boolean result = false;PollerEvent pe = null;for (int i = 0, size = events.size(); i < size && (pe = events.poll()) != null; i++ ) {// 遍历存储 PollerEvent 的同步队列,如果队列大于零,则设置返回值 result 为 trueresult = true;NioSocketWrapper socketWrapper = pe.getSocketWrapper();SocketChannel sc = socketWrapper.getSocket().getIOChannel();int interestOps = pe.getInterestOps();if (sc == null) {log.warn(sm.getString("endpoint.nio.nullSocketChannel"));socketWrapper.close();} else if (interestOps == OP_REGISTER) {try {sc.register(getSelector(), SelectionKey.OP_READ, socketWrapper);} catch (Exception x) {log.error(sm.getString("endpoint.nio.registerFail"), x);}} else {// 当前 socketChannel 是否在 selector 中注册final SelectionKey key = sc.keyFor(getSelector());if (key == null) {socketWrapper.close();} else {final NioSocketWrapper attachment = (NioSocketWrapper) key.attachment();if (attachment != null) {try {int ops = key.interestOps() | interestOps;attachment.interestOps(ops);// 在 selector 上注册 READ 事件,每个 Poller 都会创建一个单独的 Selectorkey.interestOps(ops);} catch (CancelledKeyException ckx) {cancelledKey(key, socketWrapper);}} else {cancelledKey(key, socketWrapper);}}}if (running && eventCache != null) {// 重置 PollerEvent 并放回缓存 PollerEvent 的同步栈中pe.reset();eventCache.push(pe);}}return result;
}
Poller#processKey
该方法的核心逻辑是做条件判断,通过判断 socket 准备好的事件的类型,调用不同的方法来处理。如果是读事件,最终会走到 processSocket(socketWrapper, SocketEvent.OPEN_READ, true) 。
protected void processKey(SelectionKey sk, NioSocketWrapper socketWrapper) {try {if (close) {cancelledKey(sk, socketWrapper);} else if (sk.isValid()) {if (sk.isReadable() || sk.isWritable()) {if (socketWrapper.getSendfileData() != null) {processSendfile(sk, socketWrapper, false);} else {unreg(sk, socketWrapper, sk.readyOps());boolean closeSocket = false;// Read goes before writeif (sk.isReadable()) {if (socketWrapper.readOperation != null) {if (!socketWrapper.readOperation.process()) {closeSocket = true;}} else if (socketWrapper.readBlocking) {synchronized (socketWrapper.readLock) {socketWrapper.readBlocking = false;socketWrapper.readLock.notify();}} else if (!processSocket(socketWrapper, SocketEvent.OPEN_READ, true)) {closeSocket = true;}}if (!closeSocket && sk.isWritable()) {if (socketWrapper.writeOperation != null) {if (!socketWrapper.writeOperation.process()) {closeSocket = true;}} else if (socketWrapper.writeBlocking) {synchronized (socketWrapper.writeLock) {socketWrapper.writeBlocking = false;socketWrapper.writeLock.notify();}} else if (!processSocket(socketWrapper, SocketEvent.OPEN_WRITE, true)) {closeSocket = true;}}if (closeSocket) {cancelledKey(sk, socketWrapper);}}}} else {// Invalid keycancelledKey(sk, socketWrapper);}} catch (CancelledKeyException ckx) {cancelledKey(sk, socketWrapper);} catch (Throwable t) {ExceptionUtils.handleThrowable(t);log.error(sm.getString("endpoint.nio.keyProcessingError"), t);}
}
Poller#processSocket
该方法用来将 NioSocketWrapper 封装到 SocketProcessor 中,SocketProcessor 是 NioEndpoint 的内部类,它实现了 Runnable 接口,创建好 SocketProcessor 之后将它放到 executor 线程池中执行。
public boolean processSocket(SocketWrapperBase<S> socketWrapper,SocketEvent event, boolean dispatch) {try {if (socketWrapper == null) {return false;}SocketProcessorBase<S> sc = null;if (processorCache != null) {sc = processorCache.pop();}if (sc == null) {sc = createSocketProcessor(socketWrapper, event);} else {sc.reset(socketWrapper, event);}Executor executor = getExecutor();if (dispatch && executor != null) {executor.execute(sc);} else {sc.run();}} catch (RejectedExecutionException ree) {getLog().warn(sm.getString("endpoint.executor.fail", socketWrapper) , ree);return false;} catch (Throwable t) {ExceptionUtils.handleThrowable(t);// This means we got an OOM or similar creating a thread, or that// the pool and its queue are fullgetLog().error(sm.getString("endpoint.process.fail"), t);return false;}return true;
}
SocketProcessor#doRun
前面我们说过 Connector 组件中包含了 Endpoint、Processor 和 Adapt 三个组件,三个组件各司其职完成了 Socket 客户端的连接、网络字节流的解析和 Request 和 Response 对象的转换。
在 SocketProcessor 线程会调用 Processor 组件的 process 方法来根据不同的协议解析字节流。
@Override
protected void doRun() {boolean launch = false;try {SocketState state = SocketState.OPEN;// Process the request from this socketif (event == null) {state = getHandler().process(socketWrapper, SocketEvent.OPEN_READ);} else {state = getHandler().process(socketWrapper, event);}if (state == SocketState.CLOSED) {// Close socket and poolsocketWrapper.close();} else if (state == SocketState.UPGRADING) {launch = true;}} catch (VirtualMachineError vme) {ExceptionUtils.handleThrowable(vme);} catch (Throwable t) {log.error(sm.getString("endpoint.processing.fail"), t);if (socketWrapper != null) {((Nio2SocketWrapper) socketWrapper).close();}} finally {...}
}
AbstractProtocol#process
调用 AbstractProcessLight 类的 process 方法
@Override
public SocketState process(SocketWrapperBase<S> wrapper, SocketEvent status) {if (wrapper == null) {// Nothing to do. Socket has been closed.return SocketState.CLOSED;}S socket = wrapper.getSocket();Processor processor = (Processor) wrapper.takeCurrentProcessor();try {...processor.setSslSupport(wrapper.getSslSupport(getProtocol().getClientCertProvider()));SocketState state = SocketState.CLOSED;do {// 调用 AbstractProcessLight 类的 process 方法state = processor.process(wrapper, status);...} while ( state == SocketState.UPGRADING);...if (processor != null) {wrapper.setCurrentProcessor(processor);}return state;} catch(java.net.SocketException e) {...}// Make sure socket/processor is removed from the list of current// connectionsrelease(processor);return SocketState.CLOSED;
}
AbstractProcessLight#process
该方法主要做一些条件判断,如果我们的请求是一个简单的 GET 请求,则会执行到 state = service(socketWrapper); 这行代码。
@Override
public SocketState process(SocketWrapperBase<?> socketWrapper, SocketEvent status)throws IOException {SocketState state = SocketState.CLOSED;Iterator<DispatchType> dispatches = null;do {if (dispatches != null) {DispatchType nextDispatch = dispatches.next();if (getLog().isDebugEnabled()) {getLog().debug("Processing dispatch type: [" + nextDispatch + "]");}state = dispatch(nextDispatch.getSocketStatus());if (!dispatches.hasNext()) {state = checkForPipelinedData(state, socketWrapper);}} else if (status == SocketEvent.DISCONNECT) {// Do nothing here, just wait for it to get recycled} else if (isAsync() || isUpgrade() || state == SocketState.ASYNC_END) {state = dispatch(status);state = checkForPipelinedData(state, socketWrapper);} else if (status == SocketEvent.OPEN_WRITE) {// Extra write event likely after async, ignorestate = SocketState.LONG;} else if (status == SocketEvent.OPEN_READ) {// 读事件state = service(socketWrapper);} else if (status == SocketEvent.CONNECT_FAIL) {logAccess(socketWrapper);} else {state = SocketState.CLOSED;}...} while (state == SocketState.ASYNC_END ||dispatches != null && state != SocketState.CLOSED);return state;
}
Http11Processor#service
Http11Processor 类是 HTTP/1.1 协议的实现,这里会按照请求行、请求头、请求体的顺序解析字节流。
因为代码太多,这里不做展示,请求最终会调用 CoyoteAdapter#service,CoyoteAdapter 是 Adapter 的实现类,它属于 Connector 组件中的 Adapter 组件,用于完成 Request 和 Response 对象的适配工作,并调用 Container 的 Pipeline,至此请求进入到 Servlet 容器中。
@Override
public void service(org.apache.coyote.Request req, org.apache.coyote.Response res)throws Exception {Request request = (Request) req.getNote(ADAPTER_NOTES);Response response = (Response) res.getNote(ADAPTER_NOTES);...try {// Parse and set Catalina and configuration specific// request parameterspostParseSuccess = postParseRequest(req, request, res, response);if (postParseSuccess) {//check valves if we support asyncrequest.setAsyncSupported(connector.getService().getContainer().getPipeline().isAsyncSupported());// Calling the containerconnector.getService().getContainer().getPipeline().getFirst().invoke(request, response);}...} catch (IOException e) {// Ignore} finally {...}
}
总结
简单的梳理了 HTTP 请求进入 Tomcat 的代码调用栈之后,我们可以通过上面的流程画出请求的流程图:
Http11Processor 中主要是对 HTTP 协议的实现,相比于这部分,我对 Endpoint 中的处理更感兴趣,因为这部分更接近操作系统,这里我们只讨论了 Endpoint 在 NIO 模式下的处理流程,在使用 NIO 模式的时候,Tomcat 做了哪些设计和努力来让 Tomcat 能够支持高并发呢?
随着 Tomcat 版本的不断更新,每个版本都会对这部分做一些小优化,该篇文章我用的 Tomcat 是 8.5.84 的版本,其中 Endpoint 中的 Acceptor 和 Poller 都只开启了一个线程,在之后的版本中改成了可以开启多个线程,增加线程可以提高吞吐量。
Container
在上节讲解 Connector 组件的时候我们了解到,Connector 最终会调用到 CoyoteAdapter#service 方法,该方法会通过 Engine 的 Pipeline 将请求发送给 Servlet 容器。
CoyoteAdapter#service
@Override
public void service(org.apache.coyote.Request req, org.apache.coyote.Response res)throws Exception {...try {// Parse and set Catalina and configuration specific// request parameterspostParseSuccess = postParseRequest(req, request, res, response);if (postParseSuccess) {//check valves if we support asyncrequest.setAsyncSupported(connector.getService().getContainer().getPipeline().isAsyncSupported());// Calling the containerconnector.getService().getContainer().getPipeline().getFirst().invoke(request, response);}...} catch (IOException e) {// Ignore} finally {...}
}
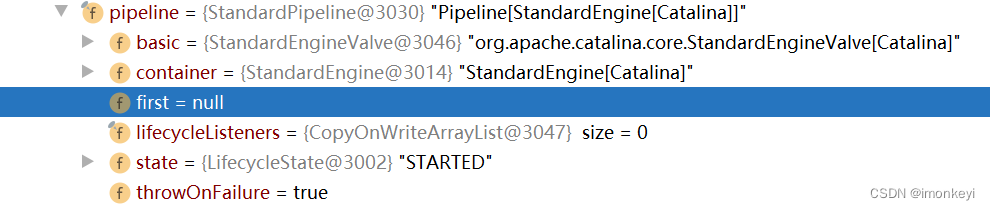
在 Servlet 容器中,组件被组织成具有层次结构,大容器包小容器,最小的容器就是 Servlet,Engine -> Host -> Context -> Wrapper。每个容器组件都实现了 Container 接口,且都持有 Pipeline 对象,Pipeline 和 Valve 组合形成了责任链模式。
Pipeline 持有链路中第一个 First Valve 和最后一个 Basic Valve,每个 Valve 持有下一个 Valve 的应用,每个容器在初始化的时候会给 Pipeline 配置好 Basic Valve,每个 Pipeline 的 Basic Valve 会调用子容器 Pipeline 的 First Valve,于是请求就可以在容器中流转。
我们启动本地的 Tomcat,并发起一个 GET 请求,在 IDEA 中 debug 看在默认配置下各容器都持有哪些 Valve。
首先请求会到 StandardEngine,可以看出持有的是 StandardPipeline,它没有 First Valve,只有 Basic Valve,所以它只有一个 Valve,在该 Valve 中完成请求的转发。
之后请求到 StandardHost,它的 StandardPipeline 中既有 First Valve 也有 Basic Valve,Pipeline 中整个责任链如下:
-
NonLoginAuthenticator
-
StandardContextValve

之后请求到 StandardHost,它的 StandardPipeline 也只有一个 Basic Valve。

最后是 StandardWrapper,它的 StandardPipeline 也只有一个 Basic Valve。

StandardWrapperValve
有上可知,StandardWrapperValve 应该是最后一个 Valve 了,再之后就是 Servlet 了。这里单独拿出来细究是怎么到 Servlet 的 service 方法的。
@Override
public final void invoke(Request request, Response response)throws IOException, ServletException {...// Allocate a servlet instance to process this requesttry {if (!unavailable) {// 实例化 Servlet,Servlet 是延迟实例化的,只有用到了才会实例化,在实例化的时候会调用 Servlet 的 init 方法servlet = wrapper.allocate();}} catch (UnavailableException e) {...}...// Create the filter chain for this request// 为该请求创建 filterChainApplicationFilterChain filterChain =ApplicationFilterFactory.createFilterChain(request, wrapper, servlet);// Call the filter chain for this request// NOTE: This also calls the servlet's service() methodContainer container = this.container;try {if ((servlet != null) && (filterChain != null)) {// Swallow output if neededif (context.getSwallowOutput()) {try {SystemLogHandler.startCapture();if (request.isAsyncDispatching()) {request.getAsyncContextInternal().doInternalDispatch();} else {// 触发过滤器链filterChain.doFilter(request.getRequest(),response.getResponse());}} finally {String log = SystemLogHandler.stopCapture();if (log != null && log.length() > 0) {context.getLogger().info(log);}}} else {if (request.isAsyncDispatching()) {request.getAsyncContextInternal().doInternalDispatch();} else {// 触发过滤器链filterChain.doFilter(request.getRequest(), response.getResponse());}}}} catch (ClientAbortException | CloseNowException e) {...} finally {// 释放资源...}
}
由代码可知会先创建一个 filterChain,servlet 就是在这里面被调用的,我们继续看创建 filterChain 的方法。
public static ApplicationFilterChain createFilterChain(ServletRequest request,Wrapper wrapper, Servlet servlet) {// If there is no servlet to execute, return nullif (servlet == null) {return null;}// Create and initialize a filter chain objectApplicationFilterChain filterChain = null;if (request instanceof Request) {Request req = (Request) request;if (Globals.IS_SECURITY_ENABLED) {// Security: Do not recyclefilterChain = new ApplicationFilterChain();} else {filterChain = (ApplicationFilterChain) req.getFilterChain();if (filterChain == null) {filterChain = new ApplicationFilterChain();req.setFilterChain(filterChain);}}} else {// Request dispatcher in usefilterChain = new ApplicationFilterChain();}filterChain.setServlet(servlet);filterChain.setServletSupportsAsync(wrapper.isAsyncSupported());// Acquire the filter mappings for this ContextStandardContext context = (StandardContext) wrapper.getParent();FilterMap filterMaps[] = context.findFilterMaps();// If there are no filter mappings, we are doneif ((filterMaps == null) || (filterMaps.length == 0)) {return filterChain;}// Acquire the information we will need to match filter mappingsDispatcherType dispatcher =(DispatcherType) request.getAttribute(Globals.DISPATCHER_TYPE_ATTR);String requestPath = null;Object attribute = request.getAttribute(Globals.DISPATCHER_REQUEST_PATH_ATTR);if (attribute != null){requestPath = attribute.toString();}String servletName = wrapper.getName();// Add the relevant path-mapped filters to this filter chainfor (FilterMap filterMap : filterMaps) {if (!matchDispatcher(filterMap, dispatcher)) {continue;}if (!matchFiltersURL(filterMap, requestPath)) {continue;}ApplicationFilterConfig filterConfig = (ApplicationFilterConfig)context.findFilterConfig(filterMap.getFilterName());if (filterConfig == null) {// FIXME - log configuration problemcontinue;}filterChain.addFilter(filterConfig);}// Add filters that match on servlet name secondfor (FilterMap filterMap : filterMaps) {if (!matchDispatcher(filterMap, dispatcher)) {continue;}if (!matchFiltersServlet(filterMap, servletName)) {continue;}ApplicationFilterConfig filterConfig = (ApplicationFilterConfig)context.findFilterConfig(filterMap.getFilterName());if (filterConfig == null) {// FIXME - log configuration problemcontinue;}filterChain.addFilter(filterConfig);}// Return the completed filter chainreturn filterChain;
}
- 通过 new 关键字创建 ApplicationFilterChain
- 获取 Context 中所有的 Filter 实例,并通过路径和 servlet name 筛选出匹配当前 Servlet 的 Filter 实例添加到 ApplicationFilterChain 中
创建成功后调用 filterChain.doFilter() 方法触发过滤器链。
@Override
public void doFilter(ServletRequest request, ServletResponse response)throws IOException, ServletException {if( Globals.IS_SECURITY_ENABLED ) {final ServletRequest req = request;final ServletResponse res = response;try {java.security.AccessController.doPrivileged(new java.security.PrivilegedExceptionAction<Void>() {@Overridepublic Void run()throws ServletException, IOException {internalDoFilter(req,res);return null;}});} catch( PrivilegedActionException pe) {Exception e = pe.getException();if (e instanceof ServletException) {throw (ServletException) e;} else if (e instanceof IOException) {throw (IOException) e;} else if (e instanceof RuntimeException) {throw (RuntimeException) e;} else {throw new ServletException(e.getMessage(), e);}}} else {internalDoFilter(request,response);}
}private void internalDoFilter(ServletRequest request,ServletResponse response)throws IOException, ServletException {// Call the next filter if there is oneif (pos < n) {ApplicationFilterConfig filterConfig = filters[pos++];try {Filter filter = filterConfig.getFilter();if (request.isAsyncSupported() && "false".equalsIgnoreCase(filterConfig.getFilterDef().getAsyncSupported())) {request.setAttribute(Globals.ASYNC_SUPPORTED_ATTR, Boolean.FALSE);}if( Globals.IS_SECURITY_ENABLED ) {final ServletRequest req = request;final ServletResponse res = response;Principal principal =((HttpServletRequest) req).getUserPrincipal();Object[] args = new Object[]{req, res, this};SecurityUtil.doAsPrivilege ("doFilter", filter, classType, args, principal);} else {filter.doFilter(request, response, this);}} catch (IOException | ServletException | RuntimeException e) {throw e;} catch (Throwable e) {e = ExceptionUtils.unwrapInvocationTargetException(e);ExceptionUtils.handleThrowable(e);throw new ServletException(sm.getString("filterChain.filter"), e);}return;}// We fell off the end of the chain -- call the servlet instancetry {if (ApplicationDispatcher.WRAP_SAME_OBJECT) {lastServicedRequest.set(request);lastServicedResponse.set(response);}if (request.isAsyncSupported() && !servletSupportsAsync) {request.setAttribute(Globals.ASYNC_SUPPORTED_ATTR,Boolean.FALSE);}// Use potentially wrapped request from this pointif ((request instanceof HttpServletRequest) &&(response instanceof HttpServletResponse) &&Globals.IS_SECURITY_ENABLED ) {final ServletRequest req = request;final ServletResponse res = response;Principal principal =((HttpServletRequest) req).getUserPrincipal();Object[] args = new Object[]{req, res};SecurityUtil.doAsPrivilege("service",servlet,classTypeUsedInService,args,principal);} else {servlet.service(request, response);}} catch (IOException | ServletException | RuntimeException e) {throw e;} catch (Throwable e) {e = ExceptionUtils.unwrapInvocationTargetException(e);ExceptionUtils.handleThrowable(e);throw new ServletException(sm.getString("filterChain.servlet"), e);} finally {if (ApplicationDispatcher.WRAP_SAME_OBJECT) {lastServicedRequest.set(null);lastServicedResponse.set(null);}}
}
ApplicationFilterChain 中有一个 pos 变量来记录过滤器链执行位置,执行每次从 Filter 数组 filters 中获取 Filter 后 pos 就加一。等到 Filter 被调用完之后会执行 servlet.service(request, response);。由此可见 Filter 是在 Servlet init 方法执行之后,service 方法执行之前执行的。
相关文章:
Tomcat 一次请求的生命周期
在使用 Tomcat 的时候,我们只需要在 Servlet 实现类中写我们的业务逻辑代码即可,不需要管 Socket 连接、协议处理要怎么实现,因为这部分作为不经常变动的部分,被封装到了 Tomcat 中,程序员只需要引入 Tomcat 中即可&am…...

spring cloud gateway中配置uri
gateway中配置uri配置有三种方式: websocket方式:uri: ws://localhost:9000http方式: uri: http://localhost:8130/lb注册中心配置方式(注册的服务名称): uri: lb://monitor-ms gateway的lb方式识别的服务名称命名规则: "[…...

使用NAudio录制wav音频
NAudio NAudio官网 环境 Unity2019.4.34f1c1 Window10 NAudio 1.10 .Net 3.5 录制音频 WaveInEvent类可录制音频 StartRecording方法 启用录制StopRecording方法 停止录制DataAvailable 录制中回调RecordingStopped 录制结束回调 WaveFileWriter类可存储音频 Write方法…...

数据结构之动态内存管理机制
目录 数据结构之动态内存管理机制 占用块和空闲块 系统的内存管理 可利用空间表 分配存储空间的方式 空间分配与回收过程产生的问题 边界标识法管理动态内存 分配算法 回收算法 伙伴系统管理动态内存 可利用空间表中结点构成 分配算法 回收算法 总结 无用单元收…...
【汇编语言】栈及栈操作的实现
文章目录 栈结构栈操作栈的小结 栈结构 栈是一种只能在一端插入或删除的数据结构;栈有两个基本的操作:入栈和出栈; 入栈:将一个新的元素放到栈顶;出栈:从栈顶取出一个元素; 栈的操作规则&#…...
【JavaEE】面向切面编程AOP是什么-Spring AOP框架的基本使用
【JavaEE】Spring AOP(1) 文章目录 【JavaEE】Spring AOP(1)1. Spring AOP 是什么1.1 AOP 与 Spring AOP1.2 没有AOP的世界是怎样的1.3 AOP是什么 2. Spring AOP 框架的学习2.1 AOP的组成2.1.1 Aspect 切面2.1.2 Pointcut 切点2.1…...
SpringBoot+微信小程序奶茶在线点单小程序系统 附带详细运行指导视频
文章目录 一、项目演示二、项目介绍三、运行截图四、主要代码 一、项目演示 项目演示地址: 视频地址 二、项目介绍 项目描述:这是一个基于SpringBoot微信小程序框架开发的奶茶在线点单小程序系统。首先,这是一个前后端分离的项目ÿ…...

【支付宝小程序】开发基础--文件结构教程
🦖我是Sam9029,一个前端 Sam9029的CSDN博客主页:Sam9029的博客_CSDN博客-JS学习,CSS学习,Vue-2领域博主 🐱🐉🐱🐉恭喜你,若此文你认为写的不错,不要吝啬你的赞扬,求收…...
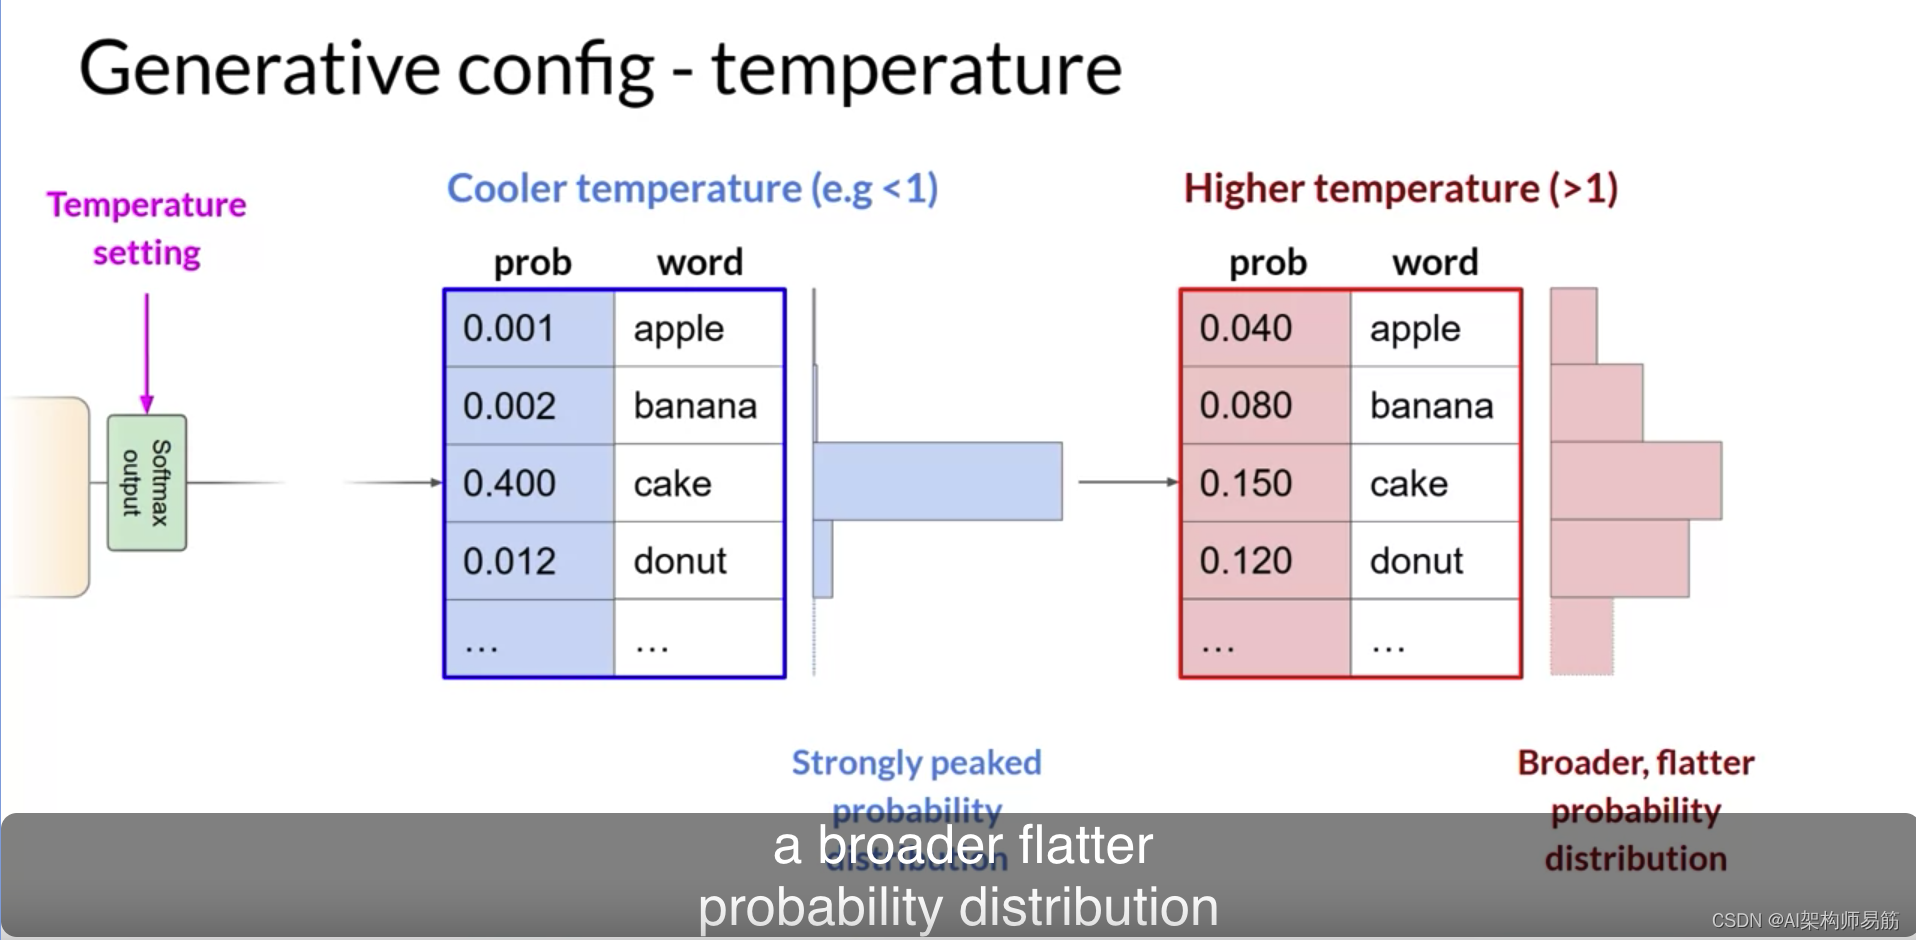
LLM 生成式配置的推理参数温度 top k tokens等 Generative configuration inference parameters
在这个视频中,你将了解一些方法和相关的配置参数,这些参数可以用来影响模型在下一个词生成时的最终决策方式。如果你在Hugging Face网站或AWS的游乐场中使用过LLMs,你可能已经看到了这些控制选项,用来调整LLM的行为。每个模型都暴…...

npm的镜像源和代理的查看和修改
一、镜像源 查询当前镜像源 npm get registry 设置为淘宝镜像 npm config set registry http://registry.npm.taobao.org/ 设置回默认的官方镜像 npm config set registry https://registry.npmjs.org/ 设置electron为淘宝镜像 npm config set ELECTRON_MIRROR "h…...
IP库新增经过实践的Verilog 库
网上严重缺乏实用的 Verilog 设计。Project F 库是尝试让 FPGA 初学者变得更好部分。 设计包括 Clock- 时钟生成 (PLL) 和域交叉Display - 显示时序、帧缓冲区、DVI/HDMI 输出Essential- 适用于多种设计的便捷模块Graphics- 绘制线条和形状Maths- 除法、LFSR、平方根、正弦....…...
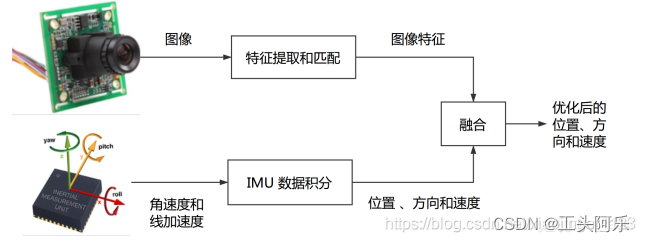
SLAM-VIO视觉惯性里程计
SLAM 文章目录 SLAM前言IMU与视觉比较单目视觉缺陷:融合IMU优势:相机-IMU标定松耦合紧耦合基于滤波的融合方案:基于优化的融合方案: 前言 VIO(visual-inertial odometry)即视觉惯性里程计,有时…...

分布式 RPC 框架入门
分布式 RPC 框架入门 警告 torch.distributed.rpc 程序包是实验性的,随时可能更改。 它还需要 PyTorch 1.4.0才能运行,因为这是第一个支持 RPC 的版本。 本教程使用两个简单的示例来演示如何使用 torch.distributed.rpc 软件包构建分布式训练…...

Spring boot与Spring cloud 之间的关系
Spring boot与Spring cloud 之间的关系 Spring boot 是 Spring 的一套快速配置脚手架,可以基于spring boot 快速开发单个微服务,Spring Boot,看名字就知道是Spring的引导,就是用于启动Spring的,使得Spring的学习和使用…...

报名开启 | HarmonyOS第一课“营”在暑期系列直播
<HarmonyOS第一课>2023年再次启航! 特邀HarmonyOS布道师云集华为开发者联盟直播间 聚焦HarmonyOS 4版本新特性 邀您一同学习赢好礼! 你准备好了吗? ↓↓↓预约报名↓↓↓ 点击关注了解更多资讯,报名学习...
Apache DolphinScheduler 支持使用 OceanBase 作为元数据库啦!
DolphinScheduler是一个开源的分布式任务调度系统,拥有分布式架构、多任务类型、可视化操作、分布式调度和高可用等特性,适用于大规模分布式任务调度的场景。目前DolphinScheduler支持的元数据库有Mysql、PostgreSQL、H2,如果在业务中需要更好…...
matlab使用教程(17)—广度优先和深度优先搜索
1.可视化广度优先搜索和深度优先搜索 此示例说明如何定义这样的函数:该函数通过突出显示图的节点和边来显示 bfsearch 和 dfsearch 的可视化结果。 创建并绘制一个有向图。 s [1 2 3 3 3 3 4 5 6 7 8 9 9 9 10]; t [7 6 1 5 6 8 2 4 4 3 7 1 6 8 2]; G dig…...
 - CSerialPort源码简介)
CSerialPort教程4.3.x (2) - CSerialPort源码简介
CSerialPort教程4.3.x (2) - CSerialPort源码简介 前言 CSerialPort项目是一个基于C/C的轻量级开源跨平台串口类库,可以轻松实现跨平台多操作系统的串口读写,同时还支持C#, Java, Python, Node.js等。 CSerialPort项目的开源协议自 V3.0.0.171216 版本…...
【数据结构OJ题】有效的括号
原题链接:https://leetcode.cn/problems/valid-parentheses/ 目录 1. 题目描述 2. 思路分析 3. 代码实现 1. 题目描述 2. 思路分析 这道题目主要考查了栈的特性: 题目的意思主要是要做到3点匹配:类型、顺序、数量。 题目给的例子是比较…...
Java性能分析中常用命令和工具
当涉及到 Java 性能分析时,有一系列强大的命令和工具可以帮助开发人员分析应用程序的性能瓶颈、内存使用情况和线程问题。以下是一些常用的 Java 性能分析命令和工具,以及它们的详细说明和示例。 以下是一些常用的性能分析命令和工具汇总: …...
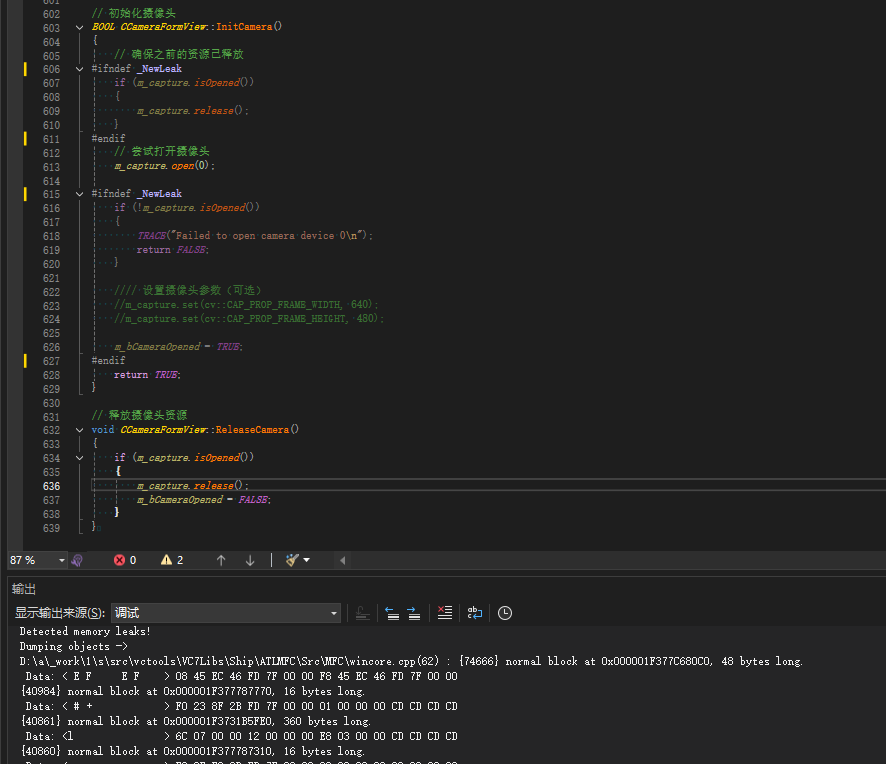
MFC内存泄露
1、泄露代码示例 void X::SetApplicationBtn() {CMFCRibbonApplicationButton* pBtn GetApplicationButton();// 获取 Ribbon Bar 指针// 创建自定义按钮CCustomRibbonAppButton* pCustomButton new CCustomRibbonAppButton();pCustomButton->SetImage(IDB_BITMAP_Jdp26)…...
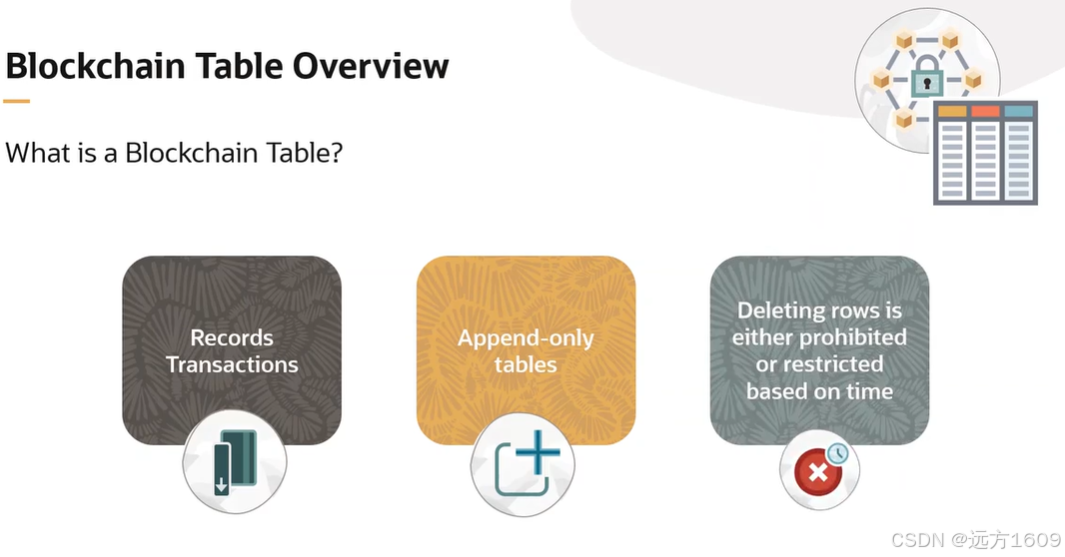
23-Oracle 23 ai 区块链表(Blockchain Table)
小伙伴有没有在金融强合规的领域中遇见,必须要保持数据不可变,管理员都无法修改和留痕的要求。比如医疗的电子病历中,影像检查检验结果不可篡改行的,药品追溯过程中数据只可插入无法删除的特性需求;登录日志、修改日志…...

大型活动交通拥堵治理的视觉算法应用
大型活动下智慧交通的视觉分析应用 一、背景与挑战 大型活动(如演唱会、马拉松赛事、高考中考等)期间,城市交通面临瞬时人流车流激增、传统摄像头模糊、交通拥堵识别滞后等问题。以演唱会为例,暖城商圈曾因观众集中离场导致周边…...

uni-app学习笔记二十二---使用vite.config.js全局导入常用依赖
在前面的练习中,每个页面需要使用ref,onShow等生命周期钩子函数时都需要像下面这样导入 import {onMounted, ref} from "vue" 如果不想每个页面都导入,需要使用node.js命令npm安装unplugin-auto-import npm install unplugin-au…...

Cilium动手实验室: 精通之旅---20.Isovalent Enterprise for Cilium: Zero Trust Visibility
Cilium动手实验室: 精通之旅---20.Isovalent Enterprise for Cilium: Zero Trust Visibility 1. 实验室环境1.1 实验室环境1.2 小测试 2. The Endor System2.1 部署应用2.2 检查现有策略 3. Cilium 策略实体3.1 创建 allow-all 网络策略3.2 在 Hubble CLI 中验证网络策略源3.3 …...
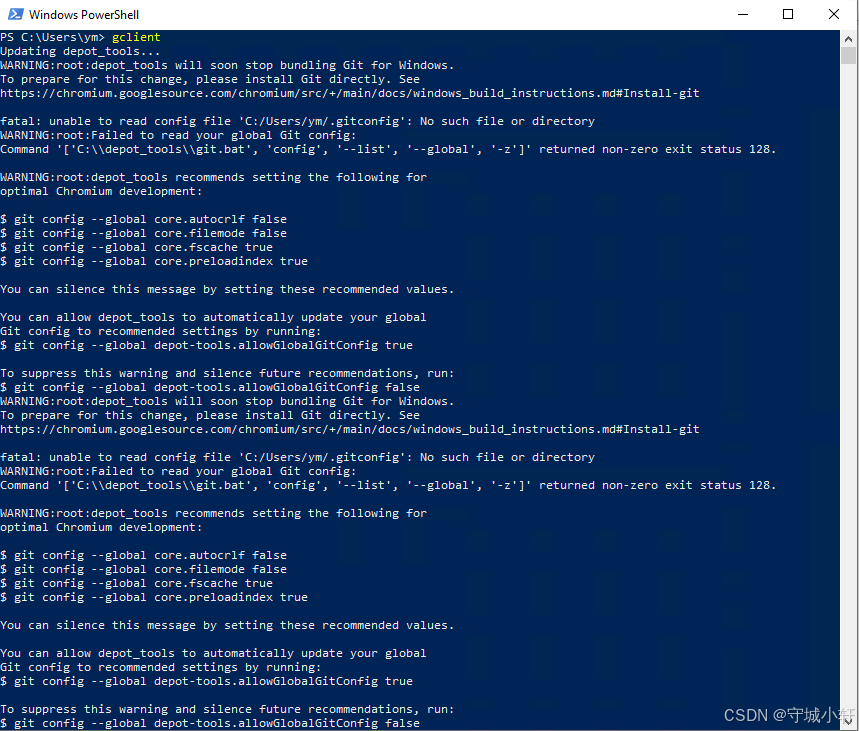
Chromium 136 编译指南 Windows篇:depot_tools 配置与源码获取(二)
引言 工欲善其事,必先利其器。在完成了 Visual Studio 2022 和 Windows SDK 的安装后,我们即将接触到 Chromium 开发生态中最核心的工具——depot_tools。这个由 Google 精心打造的工具集,就像是连接开发者与 Chromium 庞大代码库的智能桥梁…...

多元隐函数 偏导公式
我们来推导隐函数 z z ( x , y ) z z(x, y) zz(x,y) 的偏导公式,给定一个隐函数关系: F ( x , y , z ( x , y ) ) 0 F(x, y, z(x, y)) 0 F(x,y,z(x,y))0 🧠 目标: 求 ∂ z ∂ x \frac{\partial z}{\partial x} ∂x∂z、 …...
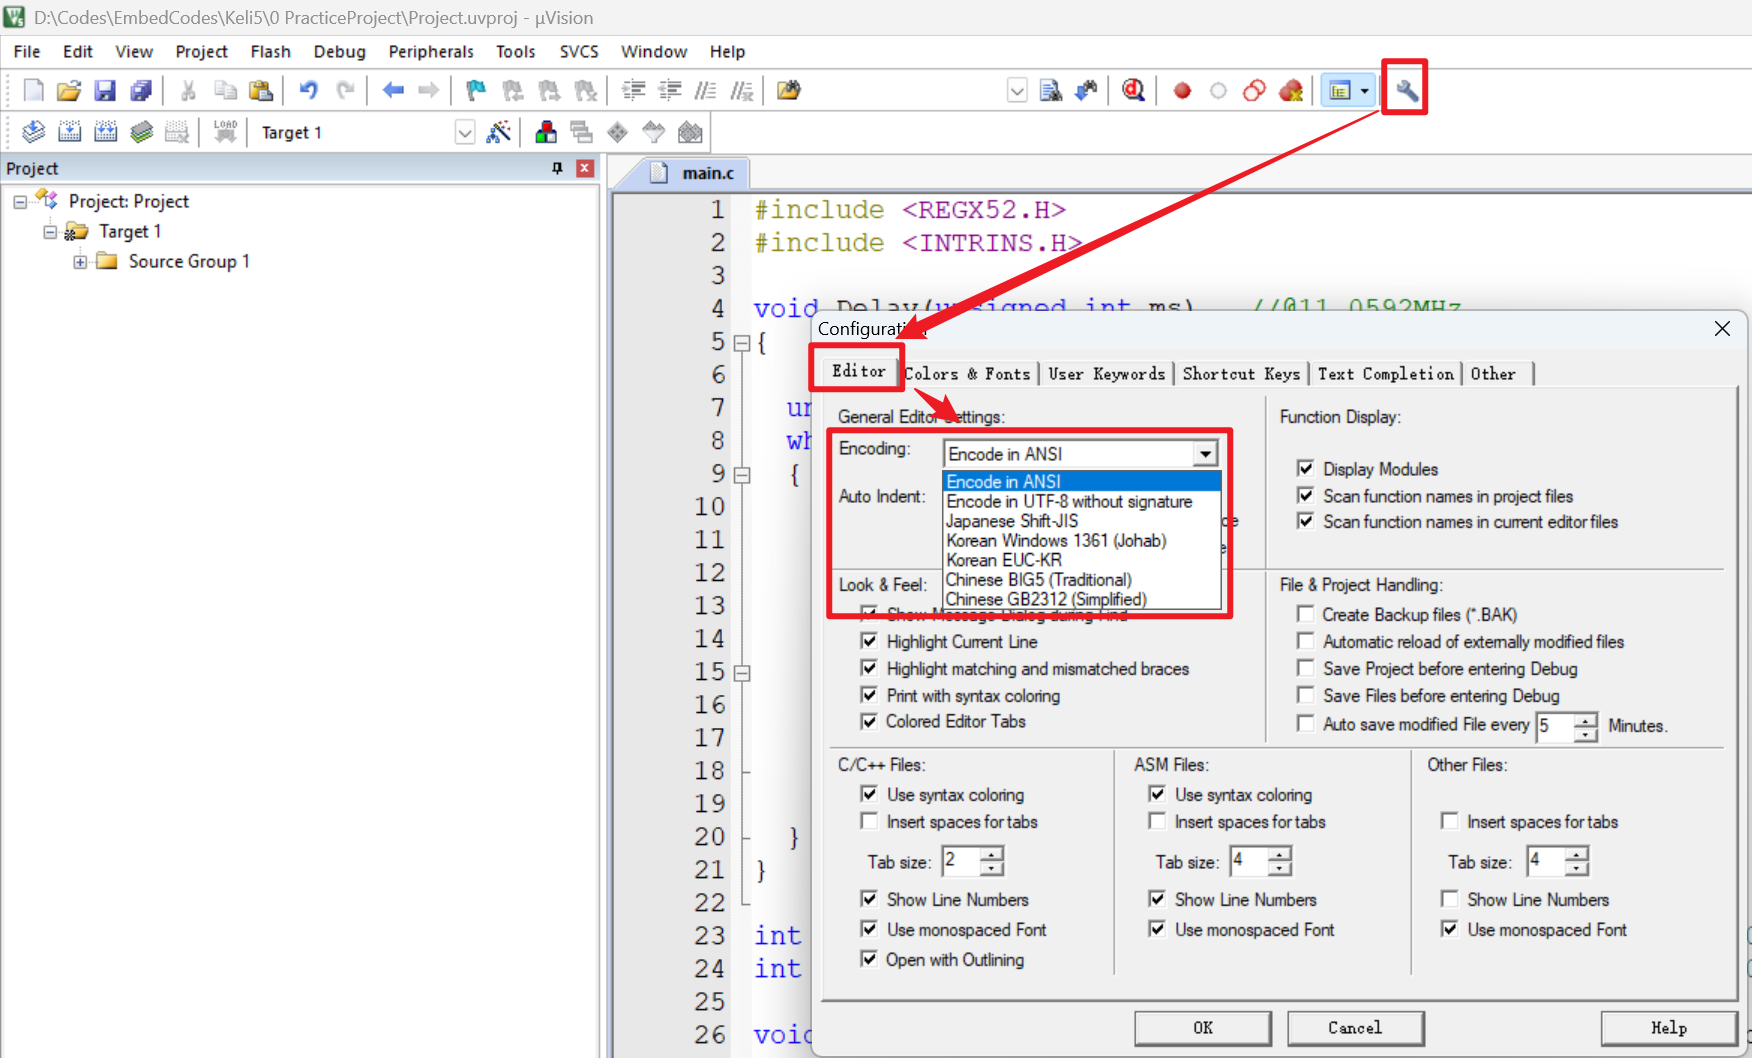
【51单片机】4. 模块化编程与LCD1602Debug
1. 什么是模块化编程 传统编程会将所有函数放在main.c中,如果使用的模块多,一个文件内会有很多代码,不利于组织和管理 模块化编程则是将各个模块的代码放在不同的.c文件里,在.h文件里提供外部可调用函数声明,其他.c文…...

跨平台商品数据接口的标准化与规范化发展路径:淘宝京东拼多多的最新实践
在电商行业蓬勃发展的当下,多平台运营已成为众多商家的必然选择。然而,不同电商平台在商品数据接口方面存在差异,导致商家在跨平台运营时面临诸多挑战,如数据对接困难、运营效率低下、用户体验不一致等。跨平台商品数据接口的标准…...

算法250609 高精度
加法 #include<stdio.h> #include<iostream> #include<string.h> #include<math.h> #include<algorithm> using namespace std; char input1[205]; char input2[205]; int main(){while(scanf("%s%s",input1,input2)!EOF){int a[205]…...