vue集成mars3d后,basemaps加不上去
首先:
<template>
<div id="centerDiv" class="mapcontainer">
<mars-map :url="configUrl" @οnlοad="onMapload" />
</div>
</template>
<script>
import MarsMap from '../components/mars-work/mars-map.vue'
import * as mars3d from 'mars3d'
//npm install mars3d-echarts --save
import 'mars3d-echarts'
const Cesium = mars3d.Cesium
export default {
// eslint-disable-next-line vue/multi-word-component-names
name: 'Index',
components: {
MarsMap
},
data() {
const basePathUrl = window.basePathUrl || ''
return {
configUrl: basePathUrl + 'config/config.json'
}
},
methods: {
// 地图构造完成回调
onMapload(map) {
// 以下为演示代码
map.setCameraView({ lat: 30.617828, lng: 116.294045, alt: 44160, heading: 357, pitch: -59 })
// 创建entity图层
const graphicLayer = new mars3d.layer.GraphicLayer()
map.addLayer(graphicLayer)
const tiles3dLayer = new mars3d.layer.TilesetLayer({
url: '//data.mars3d.cn/3dtiles/bim-qiaoliang/tileset.json',
maximumScreenSpaceError: 16,
position: { lng: 117.096906, lat: 31.851564, alt: 45 },
rotation: { z: 17.5 },
flyTo: true
})
map.addLayer(tiles3dLayer)
const poiQueryButton = new PoiQueryButton({
insertIndex: 0 // 插入的位置顺序
})
map.addControl(poiQueryButton)
// 2.在layer上绑定监听事件
graphicLayer.on(this.mars3d.EventType.click, function (event) {
console.log('监听layer,单击了矢量对象', event)
})
graphicLayer.on(this.mars3d.EventType.mouseOver, function (event) {
console.log('监听layer,鼠标移入了矢量对象', event)
})
graphicLayer.on(this.mars3d.EventType.mouseOut, function (event) {
console.log('监听layer,鼠标移出了矢量对象', event)
})
// 可在图层上绑定popup,对所有加到这个图层的矢量数据都生效
graphicLayer.bindPopup('我是layer上绑定的Popup', {
anchor: [0, -10]
})
// 可在图层绑定右键菜单,对所有加到这个图层的矢量数据都生效
graphicLayer.bindContextMenu([
{
text: '删除对象',
iconCls: 'fa fa-trash-o',
callback: function (e) {
const graphic = e.graphic
if (graphic) {
graphicLayer.removeGraphic(graphic)
}
}
}
])
},
addDemoGraphic1: (graphicLayer) => {
const graphic = new mars3d.graphic.LabelEntity({
position: new mars3d.LngLatPoint(116.1, 31.0, 1000),
style: {
text: '火星科技Mars3D平台',
font_size: 25,
font_family: '楷体',
color: '#003da6',
outline: true,
outlineColor: '#bfbfbf',
outlineWidth: 2,
horizontalOrigin: Cesium.HorizontalOrigin.CENTER,
verticalOrigin: Cesium.VerticalOrigin.BOTTOM,
visibleDepth: false
},
attr: { remark: '示例1' }
})
graphicLayer.addGraphic(graphic)
},
addDemoGraphic2: (graphicLayer) => {
const graphic = new mars3d.graphic.PointEntity({
position: [116.2, 31.0, 1000],
style: {
color: '#ff0000',
pixelSize: 10,
outline: true,
outlineColor: '#ffffff',
outlineWidth: 2
},
attr: { remark: '示例2' }
})
graphicLayer.addGraphic(graphic)
},
addDemoGraphic3: (graphicLayer) => {
const graphic = new mars3d.graphic.BillboardEntity({
name: '贴地图标',
position: [116.3, 31.0, 1000],
style: {
image: 'img/marker/mark-blue.png',
scale: 1,
horizontalOrigin: Cesium.HorizontalOrigin.CENTER,
verticalOrigin: Cesium.VerticalOrigin.BOTTOM,
clampToGround: true
},
attr: { remark: '示例3' }
})
graphicLayer.addGraphic(graphic)
},
addDemoGraphic4: (graphicLayer) => {
const graphic = new mars3d.graphic.PlaneEntity({
position: new mars3d.LngLatPoint(116.4, 31.0, 1000),
style: {
plane: new Cesium.Plane(Cesium.Cartesian3.UNIT_Z, 0.0),
dimensions: new Cesium.Cartesian2(4000.0, 4000.0),
materialType: mars3d.MaterialType.Image2,
materialOptions: {
image: 'img/textures/poly-rivers.png',
transparent: true
}
},
attr: { remark: '示例4' }
})
graphicLayer.addGraphic(graphic)
},
addDemoGraphic5: (graphicLayer) => {
const graphic = new mars3d.graphic.BoxEntity({
position: new mars3d.LngLatPoint(116.5, 31.0, 1000),
style: {
dimensions: new Cesium.Cartesian3(2000.0, 2000.0, 2000.0),
fill: true,
color: '#00ffff',
opacity: 0.9,
heading: 45,
roll: 45,
pitch: 0
},
attr: { remark: '示例5' }
})
graphicLayer.addGraphic(graphic)
},
addDemoGraphic6: (graphicLayer) => {
const graphic = new mars3d.graphic.CircleEntity({
position: [116.1, 30.9, 1000],
style: {
radius: 1800.0,
color: '#00ff00',
opacity: 0.3,
outline: true,
outlineWidth: 3,
outlineColor: '#ffffff',
clampToGround: true
},
popup: '直接传参的popup',
attr: { remark: '示例6' }
})
graphicLayer.addGraphic(graphic)
},
addDemoGraphic7: (graphicLayer) => {
const graphic = new mars3d.graphic.CylinderEntity({
position: [116.2, 30.9, 1000],
style: {
length: 3000.0,
topRadius: 0.0,
bottomRadius: 1300.0,
color: '#00FFFF',
opacity: 0.7
},
popup: '直接传参的popup',
attr: { remark: '示例7' }
})
graphicLayer.addGraphic(graphic)
},
addDemoGraphic8: (graphicLayer) => {
const graphic = new mars3d.graphic.EllipsoidEntity({
position: new mars3d.LngLatPoint(116.3, 30.9, 1000),
style: {
radii: new Cesium.Cartesian3(1500.0, 1500.0, 1500.0),
color: 'rgba(255,0,0,0.5)',
outline: true,
outlineColor: 'rgba(255,255,255,0.3)'
},
attr: { remark: '示例8' }
})
graphicLayer.addGraphic(graphic)
},
addDemoGraphic9: (graphicLayer) => {
const graphic = new mars3d.graphic.ModelEntity({
name: '消防员',
position: [116.4, 30.9, 1000],
style: {
url: '//data.mars3d.cn/gltf/mars/firedrill/xiaofangyuan-run.gltf',
scale: 16,
minimumPixelSize: 100
},
attr: { remark: '示例9' }
})
graphicLayer.addGraphic(graphic)
},
addDemoGraphic10: (graphicLayer) => {
const graphic = new mars3d.graphic.PolylineEntity({
positions: [
[116.5, 30.9, 1000],
[116.52, 30.91, 1000],
[116.53, 30.89, 1000]
],
style: {
width: 5,
color: '#3388ff'
},
attr: { remark: '示例10' }
})
graphicLayer.addGraphic(graphic) // 还可以另外一种写法: graphic.addTo(graphicLayer)
},
addDemoGraphic11: (graphicLayer) => {
const graphic = new mars3d.graphic.PolylineVolumeEntity({
positions: [
[116.1, 30.8, 1000],
[116.12, 30.81, 1000],
[116.13, 30.79, 1000]
],
style: {
shape: 'pipeline',
radius: 80,
color: '#3388ff',
opacity: 0.9
},
attr: { remark: '示例11' }
})
graphicLayer.addGraphic(graphic) // 还可以另外一种写法: graphic.addTo(graphicLayer)
},
addDemoGraphic12: (graphicLayer) => {
const graphic = new mars3d.graphic.CorridorEntity({
positions: [
[116.2, 30.8, 1000],
[116.22, 30.81, 1000],
[116.23, 30.79, 1000],
[116.247328, 30.806077, 610.41]
],
style: {
width: 500,
color: '#3388ff'
},
attr: { remark: '示例12' }
})
graphicLayer.addGraphic(graphic) // 还可以另外一种写法: graphic.addTo(graphicLayer)
},
addDemoGraphic13: (graphicLayer) => {
const graphic = new mars3d.graphic.WallEntity({
positions: [
[116.3, 30.8, 1000],
[116.31, 30.81, 1000],
[116.334639, 30.800735, 721.39],
[116.32, 30.79, 1000]
],
style: {
closure: true,
diffHeight: 500,
// 动画线材质
materialType: mars3d.MaterialType.LineFlow,
materialOptions: {
image: 'img/textures/fence.png',
color: '#00ff00',
speed: 10,
axisY: true
}
},
attr: { remark: '示例13' }
})
graphicLayer.addGraphic(graphic) // 还可以另外一种写法: graphic.addTo(graphicLayer)
},
addDemoGraphic14: (graphicLayer) => {
const graphic = new mars3d.graphic.RectangleEntity({
positions: [
[116.383144, 30.819978, 444.42],
[116.42216, 30.793431, 1048.07]
],
style: {
color: '#3388ff',
opacity: 0.5,
outline: true,
outlineWidth: 3,
outlineColor: '#ffffff'
},
attr: { remark: '示例14' }
})
graphicLayer.addGraphic(graphic) // 还可以另外一种写法: graphic.addTo(graphicLayer)
},
addDemoGraphic15: (graphicLayer) => {
const graphic = new mars3d.graphic.PolygonEntity({
positions: [
[116.510278, 30.834372, 567.29],
[116.530085, 30.809331, 448.31],
[116.507367, 30.788551, 98.21],
[116.472468, 30.823091, 677.39]
],
style: {
materialType: mars3d.MaterialType.Water,
materialOptions: {
normalMap: 'img/textures/waterNormals.jpg', // 水正常扰动的法线图
frequency: 8000.0, // 控制波数的数字。
animationSpeed: 0.02, // 控制水的动画速度的数字。
amplitude: 5.0, // 控制水波振幅的数字。
specularIntensity: 0.8, // 控制镜面反射强度的数字。
baseWaterColor: '#006ab4', // rgba颜色对象基础颜色的水。#00ffff,#00baff,#006ab4
blendColor: '#006ab4' // 从水中混合到非水域时使用的rgba颜色对象。
}
},
attr: { remark: '示例15' }
})
graphicLayer.addGraphic(graphic) // 还可以另外一种写法: graphic.addTo(graphicLayer)
}
}
}
</script>
<style>
.mapcontainer {
position: relative;
height: 100%;
overflow: hidden;
}
</style>
其次:
<template>
<div :id="`mars3d-container${mapKey}`" class="mars3d-container"></div>
</template>
<script>
import Vue from "vue";
// 使用免费开源版本
// import "mars3d-cesium/Build/Cesium/Widgets/widgets.css";
// import "mars3d/dist/mars3d.css";
// import * as mars3d from "mars3d";
// const Cesium = mars3d.Cesium;
// let mars3d = window.mars3d;
// 导入插件(其他插件类似,插件清单访问:http://mars3d.cn/dev/guide/start/architecture.html)
// echarts插件
// import 'mars3d-echarts'
// 为了方便使用,绑定到原型链,在其他vue文件,直接 this.mars3d 来使用
// Vue.prototype.mars3d = mars3d
// Vue.prototype.Cesium = mars3d.Cesium
export default {
name: "mars3dViewer",
props: {
// 地图唯一性标识
mapKey: {
type: String,
default: "",
},
// 初始化配置config.json的地址
url: String,
// 自定义参数
options: Object,
},
mounted() {
window.mars3d.Resource.fetchJson({ url: this.url }).then((data) => {
// 构建地图
this.initMars3d({
...data.map3d,
...this.options,
});
});
},
beforeDestroy() {
const map = this[`map${this.mapKey}`];
if (map) {
map.destroy();
delete this[`map${this.mapKey}`];
}
console.log(">>>>> 地图卸载完成 >>>>");
},
methods: {
initMars3d(mapOptions) {
console.log(mapOptions);
// if (this[`map${this.mapKey}`]) {
// this[`map${this.mapKey}`].destroy();
// }
// 创建三维地球场景
var map = new window.mars3d.Map(
`mars3d-container${this.mapKey}`,
mapOptions
);
this[`map${this.mapKey}`] = map;
console.log(">>>>> 地图创建成功 >>>>", map);
// 挂载到全局对象下,所有组件通过 this.map 访问
// Vue.prototype[`map${this.mapKey}`] = map
// 绑定对alert的处理,右键弹出信息更美观。
// window.haoutil = window.haoutil || {}
// window.haoutil.msg = (msg) => {
// this.$message.success(msg)
// }
// window.haoutil.alert = (msg) => {
// this.$message.success(msg)
// }
// 抛出事件
this.$emit("onload", map);
},
},
};
</script>
<style>
.mars3d-container {
height: 100%;
overflow: hidden;
}
/**cesium 工具按钮栏*/
.cesium-viewer-toolbar {
top: auto !important;
bottom: 35px !important;
left: 12px !important;
right: auto !important;
}
.cesium-toolbar-button img {
height: 100%;
}
.cesium-viewer-toolbar > .cesium-toolbar-button,
.cesium-navigationHelpButton-wrapper,
.cesium-viewer-geocoderContainer {
margin-bottom: 5px;
float: left;
clear: both;
text-align: center;
}
.cesium-button {
background-color: #3f4854;
color: #e6e6e6;
fill: #e6e6e6;
box-shadow: 0 1px 4px rgba(0, 0, 0, 0.3);
line-height: 32px;
}
/**cesium 底图切换面板*/
.cesium-baseLayerPicker-dropDown {
bottom: 0;
left: 40px;
max-height: 700px;
margin-bottom: 5px;
}
/**cesium 帮助面板*/
.cesium-navigation-help {
top: auto;
bottom: 0;
left: 40px;
transform-origin: left bottom;
}
/**cesium 二维三维切换*/
.cesium-sceneModePicker-wrapper {
width: auto;
}
.cesium-sceneModePicker-wrapper .cesium-sceneModePicker-dropDown-icon {
float: right;
margin: 0 3px;
}
/**cesium POI查询输入框*/
.cesium-viewer-geocoderContainer .search-results {
left: 0;
right: 40px;
width: auto;
z-index: 9999;
}
.cesium-geocoder-searchButton {
background-color: #3f4854;
}
.cesium-viewer-geocoderContainer .cesium-geocoder-input {
background-color: rgba(63, 72, 84, 0.7);
}
.cesium-viewer-geocoderContainer .cesium-geocoder-input:focus {
background-color: rgba(63, 72, 84, 0.9);
}
.cesium-viewer-geocoderContainer .search-results {
background-color: #3f4854;
}
/**cesium info信息框*/
.cesium-infoBox {
top: 50px;
background: rgba(63, 72, 84, 0.9);
}
.cesium-infoBox-title {
background-color: #3f4854;
}
/**cesium 任务栏的FPS信息*/
.cesium-performanceDisplay-defaultContainer {
top: auto;
bottom: 35px;
right: 50px;
}
.cesium-performanceDisplay-ms,
.cesium-performanceDisplay-fps {
color: #fff;
}
/**cesium tileset调试信息面板*/
.cesium-viewer-cesiumInspectorContainer {
top: 10px;
left: 10px;
right: auto;
background-color: #3f4854;
}
</style>

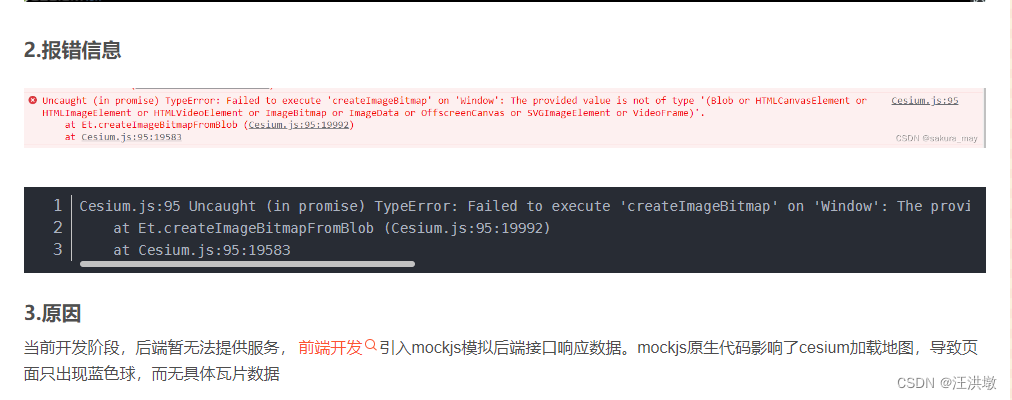
问题的原因是:
服务有返回东西,使用的就是示例中的配置;数据正常返回了,mock拦截机制的原因,自行处理把mock注释掉就解决了。


相关文章:
vue集成mars3d后,basemaps加不上去
首先: <template> <div id"centerDiv" class"mapcontainer"> <mars-map :url"configUrl" οnlοad"onMapload" /> </div> </template> <script> import MarsMap from ../component…...

油管视频直接生成PPT的AI工具!剖析c.ai和Pi的用户需求;独立创业者的操作指南;广告大佬的三个AI绘画实战 | ShowMeAI日报
👀日报&周刊合集 | 🎡生产力工具与行业应用大全 | 🧡 点赞关注评论拜托啦! 🤖 2023 CCF BDCI 数字安全公开赛,大模型安全竞赛等你「码」力全开 网站:https://www.datafountain.cn/special/B…...

WebSocket- 前端篇
官网代码 // 为了浏览器兼容websocketconst WebSocket window.WebSocket || window.MozWebSocket// 创建连接 this.socket new WebSocket(ws://xxx)// 连接成功this.socket.onopen (res)>{console.log(websocket 连接成功)this.socket.send(入参字段) // 传递的参数字段}…...

如何在 Python 中将图像转换为 PDF
一、说明 如何使得图像转化成pdf文件, 想要将一个或多个图像转换为 PDF 文档?看看img2pdf和PyPDF2软件包就是您的最佳选择。 二、需要哪些程序包? 首先,您只需要一个 Python 环境,最好是 3.10 或更高版本。本教程中的代…...

使用python编写脚本测试目标主机的TCP端口连通性
使用Python的Socket模块的connect()函数来尝试连接目标主机的特定端口。如果连接成功,则说明该端口是打开的;否则,该端口是关闭的。 下面是一个示例脚本,可以检测目标IP的22端口是否开启: import socket def check_po…...
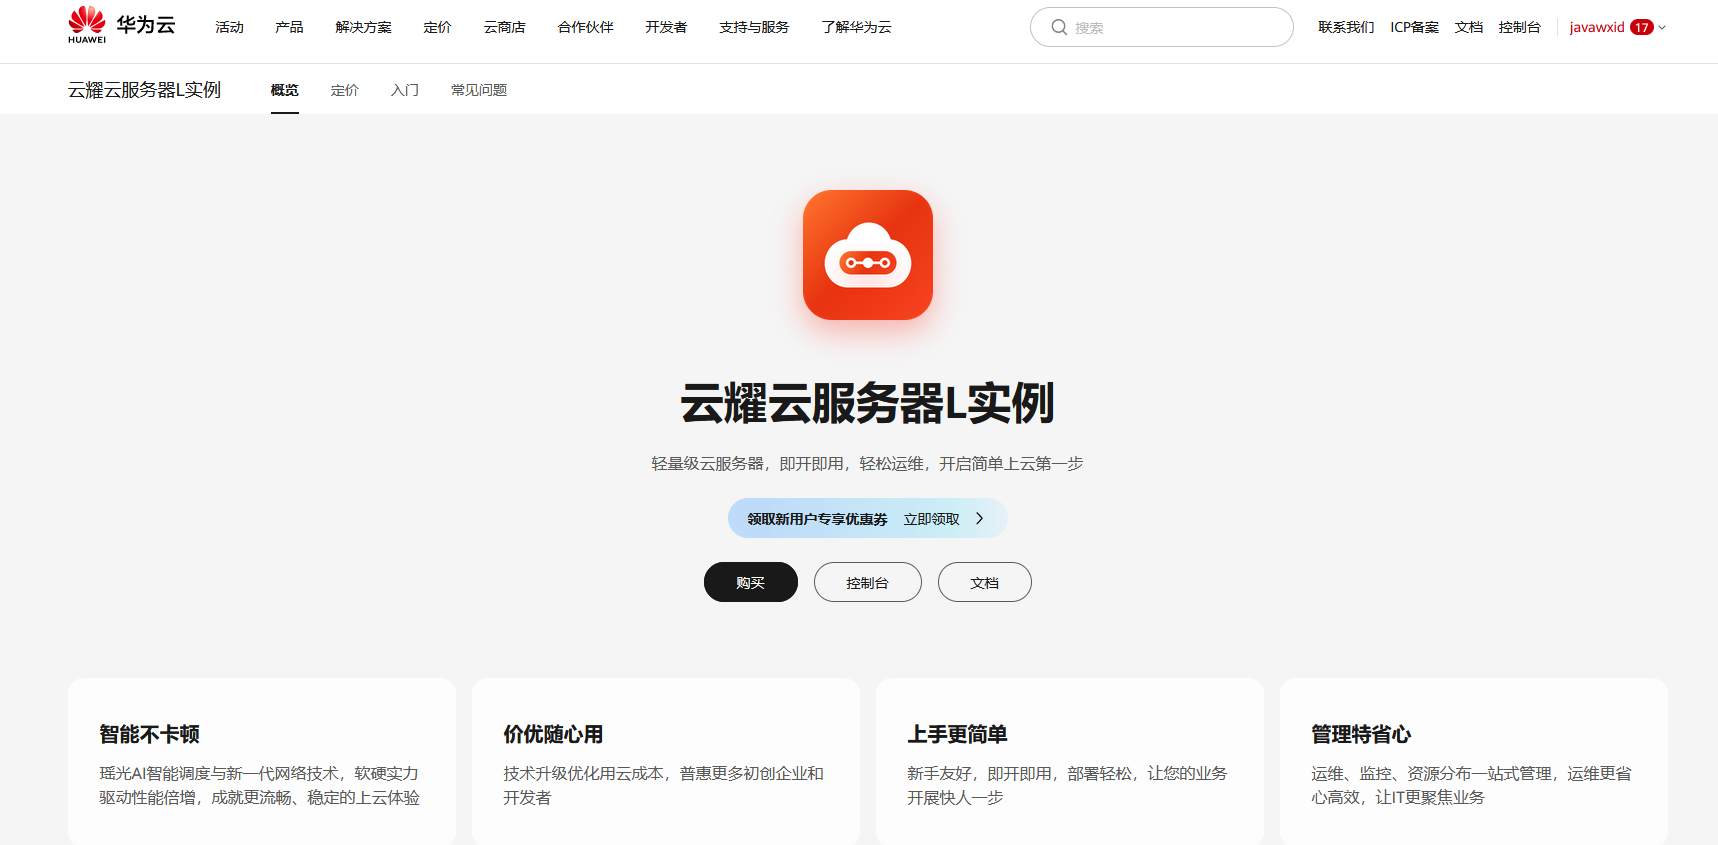
华为云云服务器评测|基于华为云云耀云服务器L实例开展性能评测,例如 MySQL、Clickhouse、Elasticsearch等等
在当今云计算时代,越来越多的企业和个人开始选择将应用部署在云服务器上,以便更好地满足高性能、可靠性和可扩展性等需求。而华为云云耀云服务器L实例不仅提供了高性能和可靠性的计算和存储资源,而且具有灵活和高效的成本控制,深受…...
Git分布式版本控制系统与github
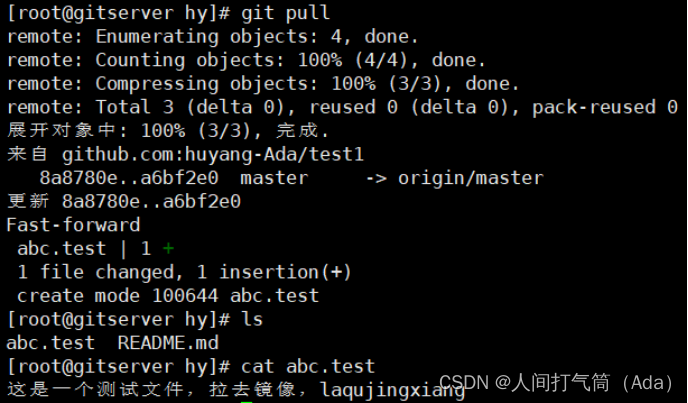
第四阶段提升 时 间:2023年8月29日 参加人:全班人员 内 容: Git分布式版本控制系统与github 目录 一、案例概述 二、版本控制系统 (一) 本地版本控制 (二)集中化的版本控制系统 &…...
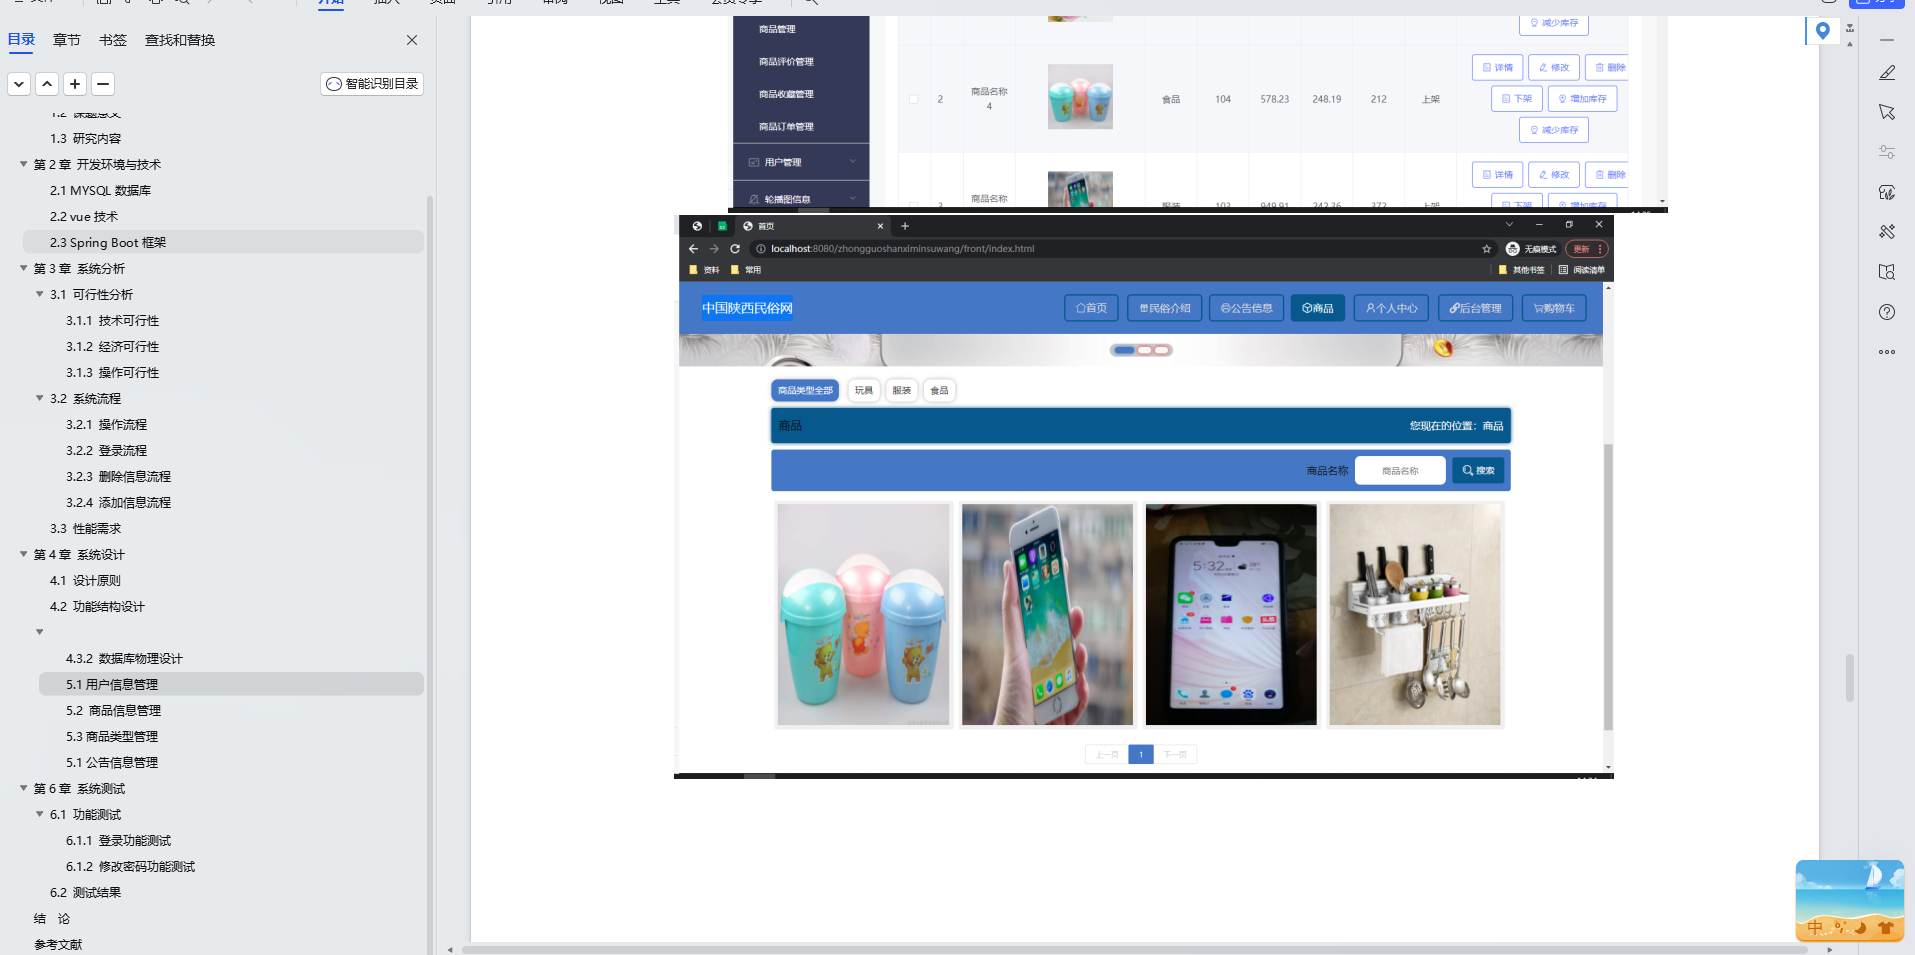
基于Java+SpringBoot+Vue前后端分离中国陕西民俗网设计和实现
博主介绍:✌全网粉丝30W,csdn特邀作者、博客专家、CSDN新星计划导师、Java领域优质创作者,博客之星、掘金/华为云/阿里云/InfoQ等平台优质作者、专注于Java技术领域和毕业项目实战✌ 🍅文末获取源码联系🍅 👇🏻 精彩专…...
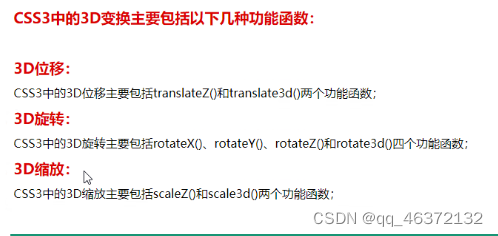
CSS3D+动画
CSS3D 1.css3D 给父元素设置 perspective:景深:近大远小的效果900-1200px这个范围内 transform-style:是否设置3D环境 flat 2D环境 默认值 perserve-3D环境 3D功能函数 1.位移: translateZ()translate3D(x,y,z) <!DOCTYPE html> <html lang"en"><h…...

list对象中如何根据对象中某个属性去重使用Java8流实现
list对象中如何根据对象中某个属性去重使用Java8流实现? 在 Java 8 的流操作中,可以使用 distinct 方法来对一个对象流进行去重,但是默认情况下它会使用对象的 equals() 方法来判断重复。如果你希望根据对象的某个属性进行去重,则可以使用 …...
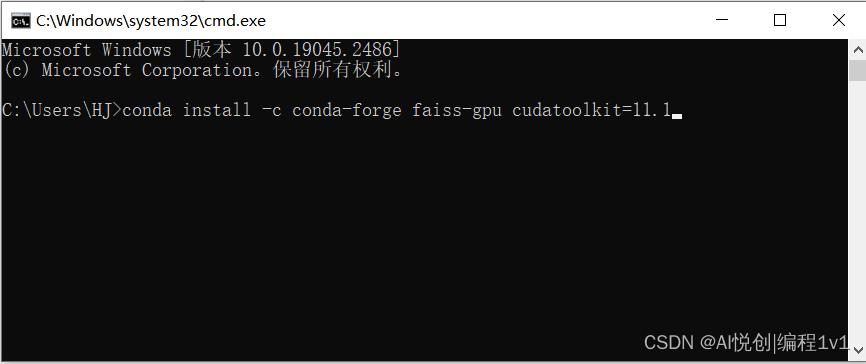
2023 在Windows上的安装Faiss-GPU(使用anaconda)
该方法安装完 faiss-gpu 之后,不仅会装这个库,还会装很多依赖库。为了防止自己本地一些同名库的版本被修改,建议新建一个虚拟环境来安装。如果本地库版本修改对自己没影响,也可以忽略。 你好,我是悦创。 登录网站&…...

HTML及CSS入门及精通
前言 HTML(超文本标记语言)和CSS(层叠样式表)是构建网页的两个基本技术。HTML用于定义网页的结构和内容,而CSS用于控制网页的样式和布局。本教程将介绍HTML和CSS的入门知识,并逐步引导您掌握更高级的技巧和…...
frp实现二级代理
kali是攻击机 (192.168.0.106) windows server2012是边界服务器,拥有两个网卡,作为一级代理, (192.168.0.108,10.10.10.136) ad01是内网机器,不出网 (10.10.1…...

Vue组件设置背景色
vh:浏览器视区高度百分值 wh:浏览器视区宽度百分值 min-height:最小高度,其他时候自适应 给组件根标签设置:min-height:100vh,就可以正常添加背景色,而且背景色随内容展开而自适…...

Java+Github+Jenkins部署
Java项目—Jenkins部署笔记 一,准备 一台服务器操作系统,示例为ubuntu 22.0.4 可运行lsb_release -a查看 二,安装 docker 更新软件包列表: sudo apt update安装必要的软件包,以便使用HTTPS通过APT下载软件包&#x…...

vue使用命令npm install 报错 cb() never called!
一.错误说明,npm本身下载就慢,有可能是网络的问题。 二.解决方案,把npm设置成淘宝镜像后,再重新npm install npm config set registry https://registry.npm.taobao.org 三.还是不行,还会出现同样的问题,那接下来先清理一下npm缓存 npm cache…...

什么是LatexEasy及其在数学排版中的作用
LatexEasy是一种强大的排版系统,特别擅长处理数学公式和科技文档。它基于 TeX,是由计算机科学家 Donald Knuth 开发的。LaTeX 可以让你专注于内容,而不必过多关心排版细节,特别适用于数学家、工程师和科学研究者。 什么是 LaTeX&…...

axios 和fetch的取舍,以及比较
废话不多说,直接直捣黄龙: 区别 相同点 都是一种基于promise的异步解决方案。都可以解决回调地狱问题 不同点 axios是一个封装好的库,需要npm进行安装,fetch是es6新增的api 语法: fetch(url, { method: GET, // o…...

K-Means(K-均值)聚类算法理论和实战
目录 K-Means 算法 K-Means 术语 K 值如何确定 K-Means 场景 美国总统大选摇争取摆选民 电商平台用户分层 给亚洲球队做聚类 编辑 其他场景 K-Means 工作流程 K-Means 开发流程 K-Means的底层代码实现 K-Means 的评价标准 K-Means 算法 对于 n 个样本点来说&am…...

Python-pyqt不同窗口数据传输【使用静态函数】
文章目录 前言程序1:caogao1.py输入数据界面程序2:caogao2.py接收数据界面 程序3 :将输入数据界面和接收数据界面组合成一个总界面讲解 总结 前言 在编写pyqt 页面时有时候需要不同页面进行数据传输。本文讲解静态函数方法。直接看示例。 程…...

IwaraDownloadTool完全指南:从零开始掌握视频下载神器
IwaraDownloadTool完全指南:从零开始掌握视频下载神器 【免费下载链接】IwaraDownloadTool Iwara 下载工具 | Iwara Downloader 项目地址: https://gitcode.com/gh_mirrors/iw/IwaraDownloadTool IwaraDownloadTool是一款专为Iwara视频平台设计的强大下载工具…...

NCM格式解密实战指南:3步高效解决网易云音乐播放限制
NCM格式解密实战指南:3步高效解决网易云音乐播放限制 【免费下载链接】ncmdump 项目地址: https://gitcode.com/gh_mirrors/ncmd/ncmdump 还在为网易云音乐下载的NCM加密文件无法在其他设备播放而烦恼吗?ncmdump是一款专为技术用户设计的NCM格式…...

git-aware-prompt实战案例:大型团队如何统一终端开发环境
git-aware-prompt实战案例:大型团队如何统一终端开发环境 【免费下载链接】git-aware-prompt Display current Git branch name in your terminal prompt when in a Git working directory. 项目地址: https://gitcode.com/gh_mirrors/gi/git-aware-prompt 在…...

c工具实战案例:用C脚本快速开发命令行工具的完整流程
c工具实战案例:用C脚本快速开发命令行工具的完整流程 【免费下载链接】c Compile and execute C "scripts" in one go! 项目地址: https://gitcode.com/gh_mirrors/c2/c c工具是一款能够让开发者一次性编译并执行C“脚本”的实用工具,它…...

掌握CefFlashBrowser:构建完整的Flash内容解决方案
掌握CefFlashBrowser:构建完整的Flash内容解决方案 【免费下载链接】CefFlashBrowser Flash浏览器 / Flash Browser 项目地址: https://gitcode.com/gh_mirrors/ce/CefFlashBrowser 还在为无法访问经典Flash内容而烦恼吗?当主流浏览器纷纷放弃Fla…...

为什么92%的MCP项目卡在模态同步阶段?资深专家用3个数学模型讲透时序一致性本质
更多请点击: https://intelliparadigm.com 第一章:MCP多模态处理的核心挑战与破局路径 MCP(Multimodal Co-Processing)架构在融合视觉、语音、文本与传感器信号时,面临模态对齐粒度不一致、时序异步性显著、语义鸿沟…...

Windows 安装 Hermes Agent 对接微信机器人-养马教程
Hermes Agent是龙虾之后的又一热门工具,他是具备内置学习循环的自主智能体。本文介绍在Windows11 安装 Hermes Agent 并对接微信工具 官方文档:https://hermes-agent.nousresearch.com/ 1. 安装前准备 1.1 Windows 侧要求 windows本文基于wls安装&…...

Hugging Face Model Hub:NLP模型共享与部署实战指南
1. Hugging Face平台概述:机器学习界的GitHubHugging Face已经成为当今机器学习领域最重要的基础设施之一,尤其是对于自然语言处理(NLP)从业者而言。我第一次接触这个平台是在2019年,当时正在为一个文本分类项目寻找预…...

LSTM时间序列预测实战:从原理到生产部署
1. 时序预测与LSTM的核心价值时间序列数据就像一条蜿蜒的河流,每个数据点都是特定时刻的水流状态。从股票价格到气象数据,从设备传感器读数到电商销量统计,这类按时间顺序排列的数据蕴含着丰富的动态规律。传统统计方法(如ARIMA&a…...

Windows平台AI硬件加速:ONNX Runtime实战指南
1. 项目概述:当Windows应用遇上硬件加速AI在Windows平台上集成AI功能时,开发者常面临两大痛点:一是不同硬件环境下的性能差异巨大,二是从训练到部署的工程链路复杂。三年前我在开发一个文档分类工具时,就曾为如何让模型…...