k8s部署手册-v06
一、基础配置
1.修改主机名
hostnamectl set-hostname k8s-master01
hostnamectl set-hostname k8s-master02
hostnamectl set-hostname k8s-master03
hostnamectl set-hostname k8s-node01
hostnamectl set-hostname k8s-node02
2.添加 主机名与IP地址解析
cat > /etc/hosts <<EOF
127.0.0.1 localhost localhost.localdomain localhost4 localhost4.localdomain4
::1 localhost localhost.localdomain localhost6 localhost6.localdomain6192.168.1.220 k8s-master01
192.168.1.221 k8s-master02
192.168.1.222 k8s-master03
192.168.1.223 k8s-node01
192.168.1.224 k8s-node02
EOF
3.升级服务器,时间同步,关闭防火墙,重启服务器
#添加访问互联路由
cat > /etc/resolv.conf <<EOF
nameserver 114.114.114.114
nameserver 8.8.8.8
EOFcat /etc/resolv.conf# ssh连接Linux比较慢
#sed -i "s|#UseDNS yes|UseDNS no|" /etc/ssh/sshd_config
#sed -i "s|GSSAPIAuthentication yes|GSSAPIAuthentication no|" /etc/ssh/sshd_config#设置为阿里云yum源rm -rf /etc/yum.repos.d/bak && mkdir -p /etc/yum.repos.d/bak && mv /etc/yum.repos.d/* /etc/yum.repos.d/bakcurl -o /etc/yum.repos.d/CentOS-7.repo http://mirrors.aliyun.com/repo/Centos-7.repoyum clean all && yum makecachecd /etc/yum.repos.d#CentOS7使用/etc/rc.d/rc.local设置开机自动启动
chmod +x /etc/rc.d/rc.local# 将vim设置为黏贴模式,防止复制时自动缩进
echo "set paste" >> /root/.vimrc#安装依赖包yum -y install vim net-tools lrzsz unzip gcc telnet wget sshpass ntpdate ntp curlyum -y install conntrack ipvsadm ipset  iptables  sysstat libseccomp git  #时间同步
echo '*/5 * * * * /usr/sbin/ntpdate ntp1.aliyun.com >/dev/null 2>&1'>/var/spool/cron/root && crontab -l#设置防火墙为 Iptables 并设置空规则
systemctl  stop firewalld  &&  systemctl  disable firewalldyum -y install iptables-services  &&  systemctl  start iptables  &&  systemctl  enable iptables  &&  iptables -F  &&  service iptables save#关闭 SELINUX
swapoff -a && sed -i '/ swap / s/^\(.*\)$/#\1/g' /etc/fstab
setenforce 0 && sed -i 's/^SELINUX=.*/SELINUX=disabled/' /etc/selinux/config#调整内核参数,对于 K8S
cat > /etc/sysctl.d/kubernetes.conf <<EOF
net.bridge.bridge-nf-call-iptables=1
net.bridge.bridge-nf-call-ip6tables=1
net.ipv4.ip_forward=1
#net.ipv4.tcp_tw_recycle=0
vm.swappiness=0 # 禁止使用 swap 空间,只有当系统 OOM 时才允许使用它
vm.overcommit_memory=1 # 不检查物理内存是否够用
vm.panic_on_oom=0 # 开启 OOM
fs.inotify.max_user_instances=8192
fs.inotify.max_user_watches=1048576
fs.file-max=52706963
fs.nr_open=52706963
net.ipv6.conf.all.disable_ipv6=1
net.netfilter.nf_conntrack_max=2310720
EOFmodprobe ip_vs_rr && modprobe br_netfilter && sysctl -p /etc/sysctl.d/kubernetes.conf#关闭系统不需要服务
systemctl stop postfix && systemctl disable postfix#  k8s持久化保存日志的目录
mkdir /var/log/journal
mkdir /etc/systemd/journald.conf.d
cat > /etc/systemd/journald.conf.d/99-prophet.conf <<EOF
[Journal]
# 持久化保存到磁盘
Storage=persistent# 压缩历史日志
Compress=yesSyncIntervalSec=5m
RateLimitInterval=30s
RateLimitBurst=1000# 最大占用空间 10G
SystemMaxUse=10G# 单日志文件最大 200M
SystemMaxFileSize=200M# 日志保存时间 36 周
MaxRetentionSec=36week# 不将日志转发到 syslog
ForwardToSyslog=no
EOFsystemctl restart systemd-journald
4.升级内核,重启服务器
# 导入elrepo gpg key
rpm --import https://www.elrepo.org/RPM-GPG-KEY-elrepo.org# 安装elrepo YUM源仓库
yum -y install https://www.elrepo.org/elrepo-release-7.0-4.el7.elrepo.noarch.rpm# 安装kernel-ml版本,ml为长期稳定版本,lt为长期维护版本
yum --enablerepo="elrepo-kernel" -y install kernel-lt.x86_64# 设置grub2默认引导为0
grub2-set-default 0# 重新生成grub2引导文件
grub2-mkconfig -o /boot/grub2/grub.cfg# 更新后,需要重启,使用升级的内核生效。
reboot# 重启后,需要验证内核是否为更新对应的版本
uname -r
二、sealos部署k8s-v1.19
1.安装sealos3.3
#添加访问互联路由
cat > /etc/resolv.conf <<EOF
nameserver 8.8.8.8
nameserver 114.114.114.114
nameserver 223.5.5.5
EOFcat /etc/resolv.conf#时间同步
ntpdate ntp1.aliyun.comwget -c https://github.com/fanux/sealos/releases/download/v3.3.8/sealos#tar zxvf sealos*.tar.gz sealo
chmod +x sealos && mv sealos /usr/binsealos version#时间同步
ntpdate ntp1.aliyun.com
2.离线安装k8s 1.19
链接:https://pan.baidu.com/s/1F9sZoHBX1K1ihBP9rZSHBQ?pwd=jood
提取码:jood#时间同步
ntpdate ntp1.aliyun.com#安装
sealos init --passwd 1qaz@WSX \--master 192.168.1.220 \--master 192.168.1.221 \--master 192.168.1.222 \--node 192.168.1.223 \--node 192.168.1.224 \--pkg-url /root/kube1.19.16.tar.gz \--version v1.19.16#安装
sealos init --passwd 1qaz@WSX \--master 192.168.1.115 \--master 192.168.1.116 \--master 192.168.1.117 \--node 192.168.1.118 \--node 192.168.1.119 \--pkg-url /root/kube1.19.16.tar.gz \--version v1.19.16
3.验证集群
kubectl get nodeskubectl get pod -A#配置kubectl自动补全
yum install -y bash-completion
source /usr/share/bash-completion/bash_completion
source <(kubectl completion bash)
echo "source <(kubectl completion bash)" >> /etc/profile#查看污点
kubectl describe node |grep -i taints#去除污点
#kubectl taint node k8s-master02 node-role.kubernetes.io/master:NoSchedule-
#kubectl taint node k8s-master03 node-role.kubernetes.io/master:NoSchedule-
4.sealos3.3常用命令
#添加 node 节点:
sealos join --node 192.168.1.63,192.168.1.64#添加master
sealos join --master 192.168.1.61,192.168.1.62#删除 node 节点:
sealos clean --node 192.168.1.63,192.168.1.64#删除 master 节点:
sealos clean --master 192.168.1.61,192.168.1.62#重置集群
sealos clean --all -f
5.安装top命令
cat > /root/top.yaml <<EOF
apiVersion: v1
kind: ServiceAccount
metadata:labels:k8s-app: metrics-servername: metrics-servernamespace: kube-system
---
apiVersion: rbac.authorization.k8s.io/v1
kind: ClusterRole
metadata:labels:k8s-app: metrics-serverrbac.authorization.k8s.io/aggregate-to-admin: "true"rbac.authorization.k8s.io/aggregate-to-edit: "true"rbac.authorization.k8s.io/aggregate-to-view: "true"name: system:aggregated-metrics-reader
rules:
- apiGroups:- metrics.k8s.ioresources:- pods- nodesverbs:- get- list- watch
---
apiVersion: rbac.authorization.k8s.io/v1
kind: ClusterRole
metadata:labels:k8s-app: metrics-servername: system:metrics-server
rules:
- apiGroups:- ""resources:- pods- nodes- nodes/stats- namespaces- configmapsverbs:- get- list- watch
---
apiVersion: rbac.authorization.k8s.io/v1
kind: RoleBinding
metadata:labels:k8s-app: metrics-servername: metrics-server-auth-readernamespace: kube-system
roleRef:apiGroup: rbac.authorization.k8s.iokind: Rolename: extension-apiserver-authentication-reader
subjects:
- kind: ServiceAccountname: metrics-servernamespace: kube-system
---
apiVersion: rbac.authorization.k8s.io/v1
kind: ClusterRoleBinding
metadata:labels:k8s-app: metrics-servername: metrics-server:system:auth-delegator
roleRef:apiGroup: rbac.authorization.k8s.iokind: ClusterRolename: system:auth-delegator
subjects:
- kind: ServiceAccountname: metrics-servernamespace: kube-system
---
apiVersion: rbac.authorization.k8s.io/v1
kind: ClusterRoleBinding
metadata:labels:k8s-app: metrics-servername: system:metrics-server
roleRef:apiGroup: rbac.authorization.k8s.iokind: ClusterRolename: system:metrics-server
subjects:
- kind: ServiceAccountname: metrics-servernamespace: kube-system
---
apiVersion: v1
kind: Service
metadata:labels:k8s-app: metrics-servername: metrics-servernamespace: kube-system
spec:ports:- name: httpsport: 443protocol: TCPtargetPort: httpsselector:k8s-app: metrics-server
---
apiVersion: apps/v1
kind: Deployment
metadata:labels:k8s-app: metrics-servername: metrics-servernamespace: kube-system
spec:selector:matchLabels:k8s-app: metrics-serverstrategy:rollingUpdate:maxUnavailable: 0template:metadata:labels:k8s-app: metrics-serverspec:containers:- args:- --cert-dir=/tmp- --kubelet-insecure-tls- --secure-port=4443- --kubelet-preferred-address-types=InternalIP,ExternalIP,Hostname- --kubelet-use-node-status-port#这里可以自己把metrics-server做到自己的阿里云镜像里面,并把下面替换成自己的镜像地址image: registry.cn-hangzhou.aliyuncs.com/lfy_k8s_images/metrics-server:v0.4.3imagePullPolicy: IfNotPresentlivenessProbe:failureThreshold: 3httpGet:path: /livezport: httpsscheme: HTTPSperiodSeconds: 10name: metrics-serverports:- containerPort: 4443name: httpsprotocol: TCPreadinessProbe:failureThreshold: 3httpGet:path: /readyzport: httpsscheme: HTTPSperiodSeconds: 10securityContext:readOnlyRootFilesystem: truerunAsNonRoot: truerunAsUser: 1000volumeMounts:- mountPath: /tmpname: tmp-dirnodeSelector:kubernetes.io/os: linuxpriorityClassName: system-cluster-criticalserviceAccountName: metrics-servervolumes:- emptyDir: {}name: tmp-dir
---
apiVersion: apiregistration.k8s.io/v1
kind: APIService
metadata:labels:k8s-app: metrics-servername: v1beta1.metrics.k8s.io
spec:group: metrics.k8s.iogroupPriorityMinimum: 100insecureSkipTLSVerify: trueservice:name: metrics-servernamespace: kube-systemversion: v1beta1versionPriority: 100
EOFkubectl apply -f /root/top.yaml
三、部署nfs
1.服务端
#添加访问互联路由
cat > /etc/resolv.conf <<EOF
nameserver 114.114.114.114
nameserver 8.8.8.8
EOF# 我们这里在192.168.1.225上安装(在生产中,大家要提供作好NFS-SERVER环境的规划)
yum -y install nfs-utils# 创建NFS挂载目录
mkdir /nfs_dir
chown nobody.nobody /nfs_dir# 修改NFS-SERVER配置
echo '/nfs_dir *(rw,sync,no_root_squash)' > /etc/exports# 重启服务
systemctl restart rpcbind.service
systemctl restart nfs-utils.service
systemctl restart nfs-server.service # 增加NFS-SERVER开机自启动
systemctl enable  rpcbind.service
systemctl enable  nfs-utils.service
systemctl enable  nfs-server.service # 验证NFS-SERVER是否能正常访问
#showmount -e 192.168.1.225
2.客户端
#需要挂载的服务器执行
mkdir /nfs_dir
yum install nfs-utils -y#挂载
mount 192.168.1.225:/nfs_dir /nfs_dir#添加开机挂载
echo "mount 192.168.1.225:/nfs_dir /nfs_dir" >> /etc/rc.localcat /etc/rc.local
四、部署StorageClass
1.创建nfs-sc.yaml
cat > /root/nfs-sc.yaml <<EOF
apiVersion: v1
kind: ServiceAccount
metadata:name: nfs-client-provisionernamespace: kube-system---
kind: ClusterRole
apiVersion: rbac.authorization.k8s.io/v1
metadata:name: nfs-client-provisioner-runner
rules:- apiGroups: [""]resources: ["persistentvolumes"]verbs: ["get", "list", "watch", "create", "delete"]- apiGroups: [""]resources: ["persistentvolumeclaims"]verbs: ["get", "list", "watch", "update"]- apiGroups: ["storage.k8s.io"]resources: ["storageclasses"]verbs: ["get", "list", "watch"]- apiGroups: [""]resources: ["events"]verbs: ["list", "watch", "create", "update", "patch"]- apiGroups: [""]resources: ["endpoints"]verbs: ["get", "list", "watch", "create", "update", "patch"]---
kind: ClusterRoleBinding
apiVersion: rbac.authorization.k8s.io/v1
metadata:name: run-nfs-client-provisioner
subjects:- kind: ServiceAccountname: nfs-client-provisionernamespace: kube-system
roleRef:kind: ClusterRolename: nfs-client-provisioner-runnerapiGroup: rbac.authorization.k8s.io---
kind: Deployment
apiVersion: apps/v1
metadata:name: nfs-provisioner-01namespace: kube-system
spec:replicas: 1strategy:type: Recreateselector:matchLabels:app: nfs-provisioner-01template:metadata:labels:app: nfs-provisioner-01spec:serviceAccountName: nfs-client-provisionercontainers:- name: nfs-client-provisioner
#老版本插件使用jmgao1983/nfs-client-provisioner:latest
#          image: jmgao1983/nfs-client-provisioner:latestimage: vbouchaud/nfs-client-provisioner:latestimagePullPolicy: IfNotPresentvolumeMounts:- name: nfs-client-rootmountPath: /persistentvolumesenv:- name: PROVISIONER_NAMEvalue: nfs-provisioner-01  # 此处供应者名字供storageclass调用- name: NFS_SERVERvalue: 192.168.1.225   # 填入NFS的地址- name: NFS_PATHvalue: /nfs_dir   # 填入NFS挂载的目录volumes:- name: nfs-client-rootnfs:server: 192.168.1.225   # 填入NFS的地址path: /nfs_dir   # 填入NFS挂载的目录---
apiVersion: storage.k8s.io/v1
kind: StorageClass
metadata:name: nfs-boge
provisioner: nfs-provisioner-01
# Supported policies: Delete、 Retain , default is Delete
reclaimPolicy: Retain
EOF#创建
kubectl apply -f /root/nfs-sc.yaml#查看
kubectl -n kube-system get podkubectl get sc
五、harbor仓库搭建
1.安装
#目录/root上传文件docker-compose和harbor-offline-installer-v1.2.0.tgzmv /root/docker-compose /usr/local/bin/
chmod a+x /usr/local/bin/docker-composeln -s /usr/local/bin/docker-compose /usr/bin/docker-composetar -zxvf harbor-offline-installer-v2.4.1.tgzmv harbor /usr/local/cd /usr/local/harbor/cp harbor.yml.tmpl harbor.yml#修改配置信息
sed -i 's/hostname: reg.mydomain.com/hostname: 192.168.1.225/g' harbor.yml
sed -i 's/https/#https/g' harbor.yml
sed -i 's/port: 443/#port: 443/g' harbor.yml
sed -i 's/certificate/#certificate/g' harbor.yml
sed -i 's/private_key/#private_key/g' harbor.yml#数据库目录
mkdir /datacat > /etc/docker/daemon.json <<EOF
{"registry-mirrors": ["https://gv33cz42.mirror.aliyuncs.com", "https://registry.cn-hangzhou.aliyuncs.com", "https://registry.docker-cn.com", "https://docker.mirrors.ustc.edu.cn", "https://dockerhub.azk8s.cn"],"insecure-registries":["192.168.1.225:80"],"exec-opts": ["native.cgroupdriver=systemd"],"max-concurrent-downloads": 20,"live-restore": true,"storage-driver": "overlay2","max-concurrent-uploads": 10,"debug": true,"log-opts": {"max-size": "100m","max-file": "10"}
}
EOFsystemctl daemon-reload && systemctl restart docker && systemctl status docker#安装
./install.sh## 重启harbor
cd /usr/local/harbor/
docker-compose down -v
docker-compose up -d
docker ps|grep harbor
netstat -ntlp访问url
http://192.168.1.225/
2.需要访问仓库的其他节点的 daemon.json添加如下内容
cat > /etc/docker/daemon.json <<EOF
{"registry-mirrors": ["https://bxsfpjcb.mirror.aliyuncs.com"],"max-concurrent-downloads": 10,"log-driver": "json-file","log-level": "warn","log-opts": {"max-size": "10m","max-file": "3"},"insecure-registries":["127.0.0.1","192.168.1.225:80"],"data-root":"/var/lib/docker"
}
EOF#重启
systemctl daemon-reload && systemctl restart docker && systemctl status docker
3.节点使用仓库
#登入仓库网站
docker login -u admin -p Harbor12345 192.168.1.225:80#下载镜像
docker pull daocloud.io/library/nginx:1.9.1#给镜像打上标签
docker tag daocloud.io/library/nginx:1.9.1 192.168.1.225:80/library/nginx:1.9.1#镜像上传
docker push 192.168.1.225:80/library/nginx:1.9.1#删除镜像
docker rmi 192.168.1.225:80/library/nginx:1.9.1#将镜像保存为本地tar文件,
docker save k8s.gcr.io/coredns:1.7.0  > /root/coredns-v1.7.0.tar #使用load加载tar文件
docker load -i  /root/coredns-v1.7.0.tar
4.批量打包上传harbor镜像
cd /root
#查看服务器镜像名称
docker images | awk 'NR!=1{print $1":"$2}' > 01-image-old.txt && cat 01-image-old.txt# /换成-
rm -rf  02-image-sed.txt && cp 01-image-old.txt 02-image-sed.txt && sed -i  "s|/|-|g" 02-image-sed.txt  && cat /root/02-image-sed.txt#打标签harbor仓库vim /root/03-tar-image.sh
#####################################################
#!/bin/sh
old=/root/01-image-old.txt
new=/root/02-image-sed.txt
l=$(cat /root/01-image-old.txt| wc -l)
for ((i=1 ; i<=$l ; i++))
do
a=$(sed -n "$i"p $old)
b=$(sed -n "$i"p $new)
#echo "update xxxx  set uid='$a' where uid='$b';"
docker tag $a 192.168.1.225:80/library/$b
done
######################################################运行打仓库标签
bash /root/03-tar-image.shdocker images |grep library#查看打标harbor仓库images名称
docker images |grep 192.168.1.225 | awk '{print $1":"$2}'  > 04-tar-image.txt && cat 04-tar-image.txt#上传到harbor仓库
for h in `cat 04-tar-image.txt`; do docker push $h; done#删除打标镜像
for d in `cat 04-tar-image.txt`; do docker rmi $d; done
docker images |grep library#删除创建的文件
rm -rf /root/0*txt  03-tar-image.sh
六、kuboard界面管理
1.下载地址
curl -o kuboard-v3.yaml https://addons.kuboard.cn/kuboard/kuboard-v3-storage-class.yaml
2.编辑yaml
#编辑 kuboard-v3.yaml 文件中的配置,该部署文件中,有3处配置必须修改:storageClassNamevolumeClaimTemplates:- metadata:name: dataspec:# 请填写一个有效的 StorageClass namestorageClassName: nfs-bogeaccessModes: [ "ReadWriteMany" ]resources:requests:storage: 5Gi---
apiVersion: v1
kind: PersistentVolumeClaim
metadata:name: kuboard-data-pvcnamespace: kuboard
spec:storageClassName: nfs-bogeaccessModes:- ReadWriteOnceresources:requests:storage: 10Gi
3.执行
kubectl create -f kuboard-v3.yamlkubectl get pod -n kuboard#############################################访问
http://192.168.1.220:30080/
输入初始用户名和密码,并登录用户名: admin密码: Kuboard123
#############################################	#查看错误
journalctl -f -u kubelet.service
七、helm3安装
1.helm包下载地址
wget https://get.helm.sh/helm-v3.6.1-linux-amd64.tar.gz
2.安装helm
#解压 && 移动到 /usr/bin 目录下:tar -xvf helm-v3.6.1-linux-amd64.tar.gz && cd linux-amd64/ && mv helm /usr/bin #查看版本
helm version
3.配置仓库
#添加公用的仓库
helm repo add incubator https://charts.helm.sh/incubator
helm repo add bitnami https://charts.bitnami.com/bitnami
# 配置helm微软源地址
helm repo add stable http://mirror.azure.cn/kubernetes/charts
# 配置helm阿里源地址
helm repo add aliyun https://kubernetes.oss-cn-hangzhou.aliyuncs.com/chartshelm repo add stable   https://kubernetes.oss-cn-hangzhou.aliyuncs.com/charts
helm repo add google  https://kubernetes-charts.storage.googleapis.com
helm repo add jetstack https://charts.jetstack.io# 查看仓库
helm repo list
# 更新仓库
helm repo update  # 删除仓库
#helm repo remove  aliyun# helm list#解决 执行helm警告kube/config文件不安全问题
chmod g-rw ~/.kube/config
chmod o-r ~/.kube/config
八、haproxy+keepalived+ingress
1.部署阿里云ingress
mkdir -p /data/k8s/cd /data/k8s/cat > /data/k8s/aliyun-ingress-nginx.yaml <<EOF
apiVersion: v1
kind: Namespace
metadata:name: ingress-nginxlabels:app: ingress-nginx
---
apiVersion: v1
kind: ServiceAccount
metadata:name: nginx-ingress-controllernamespace: ingress-nginxlabels:app: ingress-nginx
---
apiVersion: rbac.authorization.k8s.io/v1beta1
kind: ClusterRole
metadata:name: nginx-ingress-controllerlabels:app: ingress-nginx
rules:- apiGroups:- ""resources:- configmaps- endpoints- nodes- pods- secrets- namespaces- servicesverbs:- get- list- watch- apiGroups:- "extensions"- "networking.k8s.io"resources:- ingressesverbs:- get- list- watch- apiGroups:- ""resources:- eventsverbs:- create- patch- apiGroups:- "extensions"- "networking.k8s.io"resources:- ingresses/statusverbs:- update- apiGroups:- ""resources:- configmapsverbs:- create- apiGroups:- ""resources:- configmapsresourceNames:- "ingress-controller-leader-nginx"verbs:- get- update
---
apiVersion: rbac.authorization.k8s.io/v1beta1
kind: ClusterRoleBinding
metadata:name: nginx-ingress-controllerlabels:app: ingress-nginx
roleRef:apiGroup: rbac.authorization.k8s.iokind: ClusterRolename: nginx-ingress-controller
subjects:- kind: ServiceAccountname: nginx-ingress-controllernamespace: ingress-nginx
---
apiVersion: v1
kind: Service
metadata:labels:app: ingress-nginxname: nginx-ingress-lbnamespace: ingress-nginx
spec:# DaemonSet need:# ----------------type: ClusterIP# ----------------# Deployment need:# ----------------
#  type: NodePort# ----------------ports:- name: httpport: 80targetPort: 80protocol: TCP- name: httpsport: 443targetPort: 443protocol: TCP- name: metricsport: 10254protocol: TCPtargetPort: 10254selector:app: ingress-nginx
---
kind: ConfigMap
apiVersion: v1
metadata:name: nginx-configurationnamespace: ingress-nginxlabels:app: ingress-nginx
data:keep-alive: "75"keep-alive-requests: "100"upstream-keepalive-connections: "10000"upstream-keepalive-requests: "100"upstream-keepalive-timeout: "60"allow-backend-server-header: "true"enable-underscores-in-headers: "true"generate-request-id: "true"http-redirect-code: "301"ignore-invalid-headers: "true"log-format-upstream: '{"@timestamp": "$time_iso8601","remote_addr": "$remote_addr","x-forward-for": "$proxy_add_x_forwarded_for","request_id": "$req_id","remote_user": "$remote_user","bytes_sent": $bytes_sent,"request_time": $request_time,"status": $status,"vhost": "$host","request_proto": "$server_protocol","path": "$uri","request_query": "$args","request_length": $request_length,"duration": $request_time,"method": "$request_method","http_referrer": "$http_referer","http_user_agent":  "$http_user_agent","upstream-sever":"$proxy_upstream_name","proxy_alternative_upstream_name":"$proxy_alternative_upstream_name","upstream_addr":"$upstream_addr","upstream_response_length":$upstream_response_length,"upstream_response_time":$upstream_response_time,"upstream_status":$upstream_status}'max-worker-connections: "65536"worker-processes: "2"proxy-body-size: 20mproxy-connect-timeout: "10"proxy_next_upstream: error timeout http_502reuse-port: "true"server-tokens: "false"ssl-ciphers: ECDHE-RSA-AES128-GCM-SHA256:ECDHE-ECDSA-AES128-GCM-SHA256:ECDHE-RSA-AES256-GCM-SHA384:ECDHE-ECDSA-AES256-GCM-SHA384:DHE-RSA-AES128-GCM-SHA256:DHE-DSS-AES128-GCM-SHA256:kEDH+AESGCM:ECDHE-RSA-AES128-SHA256:ECDHE-ECDSA-AES128-SHA256:ECDHE-RSA-AES128-SHA:ECDHE-ECDSA-AES128-SHA:ECDHE-RSA-AES256-SHA384:ECDHE-ECDSA-AES256-SHA384:ECDHE-RSA-AES256-SHA:ECDHE-ECDSA-AES256-SHA:DHE-RSA-AES128-SHA256:DHE-RSA-AES128-SHA:DHE-DSS-AES128-SHA256:DHE-RSA-AES256-SHA256:DHE-DSS-AES256-SHA:DHE-RSA-AES256-SHA:AES128-GCM-SHA256:AES256-GCM-SHA384:AES128-SHA256:AES256-SHA256:AES128-SHA:AES256-SHA:AES:CAMELLIA:DES-CBC3-SHA:!aNULL:!eNULL:!EXPORT:!DES:!RC4:!MD5:!PSK:!aECDH:!EDH-DSS-DES-CBC3-SHA:!EDH-RSA-DES-CBC3-SHA:!KRB5-DES-CBC3-SHAssl-protocols: TLSv1 TLSv1.1 TLSv1.2ssl-redirect: "false"worker-cpu-affinity: auto
---
kind: ConfigMap
apiVersion: v1
metadata:name: tcp-servicesnamespace: ingress-nginxlabels:app: ingress-nginx
---
kind: ConfigMap
apiVersion: v1
metadata:name: udp-servicesnamespace: ingress-nginxlabels:app: ingress-nginx
---
apiVersion: apps/v1
kind: DaemonSet
metadata:name: nginx-ingress-controllernamespace: ingress-nginxlabels:app: ingress-nginxannotations:component.version: "v0.30.0"component.revision: "v1"
spec:# Deployment need:# ----------------
#  replicas: 1# ----------------selector:matchLabels:app: ingress-nginxtemplate:metadata:labels:app: ingress-nginxannotations:prometheus.io/port: "10254"prometheus.io/scrape: "true"scheduler.alpha.kubernetes.io/critical-pod: ""spec:# DaemonSet need:# ----------------hostNetwork: true# ----------------serviceAccountName: nginx-ingress-controllerpriorityClassName: system-node-criticalaffinity:podAntiAffinity:preferredDuringSchedulingIgnoredDuringExecution:- podAffinityTerm:labelSelector:matchExpressions:- key: appoperator: Invalues:- ingress-nginxtopologyKey: kubernetes.io/hostnameweight: 100nodeAffinity:requiredDuringSchedulingIgnoredDuringExecution:nodeSelectorTerms:- matchExpressions:- key: typeoperator: NotInvalues:- virtual-kubeletcontainers:- name: nginx-ingress-controllerimage: registry.cn-beijing.aliyuncs.com/acs/aliyun-ingress-controller:v0.30.0.2-9597b3685-aliyunimagePullPolicy: IfNotPresentargs:- /nginx-ingress-controller- --configmap=$(POD_NAMESPACE)/nginx-configuration- --tcp-services-configmap=$(POD_NAMESPACE)/tcp-services- --udp-services-configmap=$(POD_NAMESPACE)/udp-services- --publish-service=$(POD_NAMESPACE)/nginx-ingress-lb- --annotations-prefix=nginx.ingress.kubernetes.io- --enable-dynamic-certificates=true- --v=2securityContext:allowPrivilegeEscalation: truecapabilities:drop:- ALLadd:- NET_BIND_SERVICErunAsUser: 101env:- name: POD_NAMEvalueFrom:fieldRef:fieldPath: metadata.name- name: POD_NAMESPACEvalueFrom:fieldRef:fieldPath: metadata.namespaceports:- name: httpcontainerPort: 80- name: httpscontainerPort: 443livenessProbe:failureThreshold: 3httpGet:path: /healthzport: 10254scheme: HTTPinitialDelaySeconds: 10periodSeconds: 10successThreshold: 1timeoutSeconds: 10readinessProbe:failureThreshold: 3httpGet:path: /healthzport: 10254scheme: HTTPperiodSeconds: 10successThreshold: 1timeoutSeconds: 10
#          resources:
#            limits:
#              cpu: "1"
#              memory: 2Gi
#            requests:
#              cpu: "1"
#              memory: 2GivolumeMounts:- mountPath: /etc/localtimename: localtimereadOnly: truevolumes:- name: localtimehostPath:path: /etc/localtimetype: FilenodeSelector:boge/ingress-controller-ready: "true"tolerations:- operator: ExistsinitContainers:- command:- /bin/sh- -c- |mount -o remount rw /proc/syssysctl -w net.core.somaxconn=65535sysctl -w net.ipv4.ip_local_port_range="1024 65535"sysctl -w fs.file-max=1048576sysctl -w fs.inotify.max_user_instances=16384sysctl -w fs.inotify.max_user_watches=524288sysctl -w fs.inotify.max_queued_events=16384image: registry.cn-beijing.aliyuncs.com/acs/busybox:v1.29.2imagePullPolicy: IfNotPresentname: init-sysctlsecurityContext:privileged: trueprocMount: Default
---
## Deployment need for aliyun'k8s:
#apiVersion: v1
#kind: Service
#metadata:
#  annotations:
#    service.beta.kubernetes.io/alibaba-cloud-loadbalancer-id: "lb-xxxxxxxxxxxxxxxxxxx"
#    service.beta.kubernetes.io/alibaba-cloud-loadbalancer-force-override-listeners: "true"
#  labels:
#    app: nginx-ingress-lb
#  name: nginx-ingress-lb-local
#  namespace: ingress-nginx
#spec:
#  externalTrafficPolicy: Local
#  ports:
#  - name: http
#    port: 80
#    protocol: TCP
#    targetPort: 80
#  - name: https
#    port: 443
#    protocol: TCP
#    targetPort: 443
#  selector:
#    app: ingress-nginx
#  type: LoadBalancer
EOFkubectl  apply -f /data/k8s/aliyun-ingress-nginx.yaml
2.node01/02节点打标签
#允许节点打标签
kubectl label node k8s-node01  boge/ingress-controller-ready=true
kubectl label node k8s-node02  boge/ingress-controller-ready=true#删除标签
#kubectl label node k8s-node01 boge/ingress-controller-ready-
#kubectl label node k8s-node02 boge/ingress-controller-ready-#查看标签
kubectl get nodes --show-labelskubectl -n ingress-nginx get po -owide
3.haproxy+keepalived部署
3.0 k8s-mast01/02/03上面部署
yum install haproxy keepalived  -y#重启程序
systemctl restart haproxy.service && systemctl status haproxy.service
systemctl restart keepalived.service && systemctl status haproxy.service # 查看运行状态
systemctl status haproxy.service
systemctl status keepalived.service#开机自启动
systemctl  enable keepalived.service
systemctl  enable haproxy.service
3.1 k8s-mast01/02/03修改配置haproxy
cat >> /etc/haproxy/haproxy.cfg <<EOF
###################################################
listen ingress-httpbind 0.0.0.0:80mode tcpoption tcplogoption dontlognulloption dontlog-normalbalance roundrobinserver 192.168.1.223 192.168.1.223:80 check inter 2000 fall 2 rise 2 weight 1server 192.168.1.224 192.168.1.224:80 check inter 2000 fall 2 rise 2 weight 1listen ingress-httpsbind 0.0.0.0:443mode tcpoption tcplogoption dontlognulloption dontlog-normalbalance roundrobinserver 192.168.1.223 192.168.1.223:443 check inter 2000 fall 2 rise 2 weight 1server 192.168.1.224 192.168.1.224:443 check inter 2000 fall 2 rise 2 weight 1
###################################################
EOF
3.2 k8s-mast01/02/03修改keepalived配置
cat > /etc/keepalived/keepalived.conf <<EOF
global_defs {router_id lb-master
}
vrrp_script check-haproxy {script "killall -0 haproxy"interval 5weight -60
}
vrrp_instance VI-kube-master {state MASTERpriority 120dont_track_primaryinterface ens160  				# 注意这里的网卡名称修改成你机器真实的内网网卡名称virtual_router_id 111advert_int 3              # 指定VRRP 心跳包通告间隔时间,默认3秒track_script {check-haproxy}virtual_ipaddress {192.168.1.100				#vip  地址}
}
EOF
3.3 k8s-mast01/02/03 重启服务
#重启服务
systemctl restart haproxy.service
systemctl restart keepalived.service# 查看运行状态
systemctl status haproxy.service
systemctl status keepalived.service
4.部署nginx-ingress
cat > /root/nginx-ingress.yaml <<EOF
apiVersion: v1
kind: Service
metadata:name: nginxlabels:app: nginx
spec:ports:- port: 80protocol: TCPtargetPort: 80selector:app: nginx
---
apiVersion: apps/v1
kind: Deployment
metadata:name: nginxlabels:app: nginx
spec:replicas: 1selector:matchLabels:app: nginxtemplate:metadata:labels:app: nginxspec:containers:- name: nginximage: nginximagePullPolicy: IfNotPresent #镜像在本地不存在时才会拉取ports:- containerPort: 80
---
apiVersion: extensions/v1beta1
kind: Ingress
metadata:name: nginx-ingress
spec:rules:- host: nginx.boge.comhttp:paths:- backend:serviceName: nginxservicePort: 80path: /
EOF
5.测试nginx-ingress
kubectl apply -f /root/nginx-ingress.yaml
#查看创建的ingress资源
kubectl get ingress -A#服务器新增域名解析
echo "192.168.1.100 nginx.boge.com" >> /etc/hosts# 我们在其它节点上,加下本地hosts,来测试下效果
192.168.1.100 nginx.boge.com#测试
curl nginx.boge.com
九、elk日志监控
1.创建测试tomcat
cat > 01-tomcat-test.yaml <<EOF
apiVersion: apps/v1
kind: Deployment
metadata:labels:app: tomcatname: tomcat
spec:replicas: 1selector:matchLabels:app: tomcattemplate:metadata:labels:app: tomcatspec:tolerations:- key: "node-role.kubernetes.io/master"effect: "NoSchedule"containers:- name: tomcatimage: "tomcat:7.0"env:      # 注意点一,添加相应的环境变量(下面收集了两块日志1、stdout 2、/usr/local/tomcat/logs/catalina.*.log)- name: aliyun_logs_tomcat-syslog   # 如日志发送到es,那index名称为 tomcat-syslogvalue: "stdout"- name: aliyun_logs_tomcat-access   # 如日志发送到es,那index名称为 tomcat-accessvalue: "/usr/local/tomcat/logs/catalina.*.log"volumeMounts:   # 注意点二,对pod内要收集的业务日志目录需要进行共享,可以收集多个目录下的日志文件- name: tomcat-logmountPath: /usr/local/tomcat/logsvolumes:- name: tomcat-logemptyDir: {}
EOFkubectl apply -f 01-tomcat-test.yaml
2.部署elasticsearch
kubectl create ns loggingcat > 02-elasticsearch.6.8.13-statefulset.yaml << EOF
apiVersion: apps/v1
kind: StatefulSet
metadata:labels:addonmanager.kubernetes.io/mode: Reconcilek8s-app: elasticsearch-loggingversion: v6.8.13name: elasticsearch-loggingnamespace: logging
spec:replicas: 1revisionHistoryLimit: 10selector:matchLabels:k8s-app: elasticsearch-loggingversion: v6.8.13serviceName: elasticsearch-loggingtemplate:metadata:labels:k8s-app: elasticsearch-loggingversion: v6.8.13spec:
#      nodeSelector:
#        esnode: "true"  ## 注意给想要运行到的node打上相应labelscontainers:- env:- name: NAMESPACEvalueFrom:fieldRef:apiVersion: v1fieldPath: metadata.namespace- name: cluster.namevalue: elasticsearch-logging-0- name: ES_JAVA_OPTSvalue: "-Xms512m -Xmx512m"image: elastic/elasticsearch:6.8.13name: elasticsearch-loggingports:- containerPort: 9200name: dbprotocol: TCP- containerPort: 9300name: transportprotocol: TCPvolumeMounts:- mountPath: /usr/share/elasticsearch/dataname: elasticsearch-loggingdnsConfig:options:- name: single-request-reopeninitContainers:- command:- /bin/sysctl- -w- vm.max_map_count=262144image: busyboximagePullPolicy: IfNotPresentname: elasticsearch-logging-initresources: {}securityContext:privileged: true- name: fix-permissionsimage: busyboxcommand: ["sh", "-c", "chown -R 1000:1000 /usr/share/elasticsearch/data"]securityContext:privileged: truevolumeMounts:- name: elasticsearch-loggingmountPath: /usr/share/elasticsearch/datavolumes:- name: elasticsearch-logginghostPath:path: /esdata
---
apiVersion: v1
kind: Service
metadata:labels:k8s-app: elasticsearch-loggingname: elasticsearchnamespace: logging
spec:ports:- port: 9200protocol: TCPtargetPort: dbselector:k8s-app: elasticsearch-loggingtype: ClusterIP
EOFkubectl apply -f 02-elasticsearch.6.8.13-statefulset.yaml
3.部署kibana
cat > 03-kibana.6.8.13.yaml <<EOF
apiVersion: apps/v1
kind: Deployment
metadata:name: kibananamespace: logginglabels:app: kibana
spec:selector:matchLabels:app: kibanatemplate:metadata:labels:app: kibanaspec:containers:- name: kibanaimage: elastic/kibana:6.8.13resources:limits:cpu: 1000mrequests:cpu: 100menv:- name: ELASTICSEARCH_URLvalue: http://elasticsearch:9200ports:- containerPort: 5601
---
apiVersion: v1
kind: Service
metadata:name: kibananamespace: logginglabels:app: kibana
spec:ports:- port: 5601protocol: TCPtargetPort: 5601type: ClusterIPselector:app: kibana
---
apiVersion: extensions/v1beta1
kind: Ingress
metadata:name: kibananamespace: logging
spec:rules:- host: kibana.boge.comhttp:paths:- path: /backend:serviceName: kibanaservicePort: 5601
EOFkubectl apply -f 03-kibana.6.8.13.yaml
4.部署log-pilot
cat > 04-log-pilot.yml <<EOF
apiVersion: apps/v1
kind: DaemonSet
metadata:name: log-pilotnamespace: logginglabels:app: log-pilot# 设置期望部署的namespacespec:selector:matchLabels:app: log-pilotupdateStrategy:type: RollingUpdatetemplate:metadata:labels:app: log-pilotannotations:scheduler.alpha.kubernetes.io/critical-pod: ''spec:# 是否允许部署到Master节点上#tolerations:#- key: node-role.kubernetes.io/master#  effect: NoSchedulecontainers:- name: log-pilot# 版本请参考https://github.com/AliyunContainerService/log-pilot/releasesimage: registry.cn-hangzhou.aliyuncs.com/acs/log-pilot:0.9.7-filebeatresources:limits:memory: 500Mirequests:cpu: 200mmemory: 200Mienv:- name: "NODE_NAME"valueFrom:fieldRef:fieldPath: spec.nodeName##--------------------------------
#          - name: "LOGGING_OUTPUT"
#            value: "logstash"
#          - name: "LOGSTASH_HOST"
#            value: "logstash-g1"
#          - name: "LOGSTASH_PORT"
#            value: "5044"##--------------------------------- name: "LOGGING_OUTPUT"value: "elasticsearch"## 请确保集群到ES网络可达- name: "ELASTICSEARCH_HOSTS"value: "elasticsearch:9200"## 配置ES访问权限#- name: "ELASTICSEARCH_USER"#  value: "{es_username}"#- name: "ELASTICSEARCH_PASSWORD"#  value: "{es_password}"##--------------------------------## https://github.com/AliyunContainerService/log-pilot/blob/master/docs/filebeat/docs.md## to file need configure 1
#          - name: LOGGING_OUTPUT
#            value: file
#          - name: FILE_PATH
#            value: /tmp
#          - name: FILE_NAME
#            value: filebeat.logvolumeMounts:- name: sockmountPath: /var/run/docker.sock- name: rootmountPath: /hostreadOnly: true- name: varlibmountPath: /var/lib/filebeat- name: varlogmountPath: /var/log/filebeat- name: localtimemountPath: /etc/localtimereadOnly: true## to file need configure 2
#        - mountPath: /tmp
#          name: myloglivenessProbe:failureThreshold: 3exec:command:- /pilot/healthzinitialDelaySeconds: 10periodSeconds: 10successThreshold: 1timeoutSeconds: 2securityContext:capabilities:add:- SYS_ADMINterminationGracePeriodSeconds: 30volumes:- name: sockhostPath:path: /var/run/docker.sock- name: roothostPath:path: /- name: varlibhostPath:path: /var/lib/filebeattype: DirectoryOrCreate- name: varloghostPath:path: /var/log/filebeattype: DirectoryOrCreate- name: localtimehostPath:path: /etc/localtime## to file need configure 3
#      - hostPath:
#          path: /tmp/mylog
#          type: ""
#        name: mylog
EOFkubectl apply -f 04-log-pilot.yml
4.1 url配置
节点加入hosts解析
echo “192.168.1.100 kibana.boge.com” >> /etc/hosts
5.配置kibana页面
Managenment>index Patterns>Create index pattern
#创建日志
Create index pattern> index pattern(tomcat-access*)>Next step#创建时间
Time Filter field name(@timestamp)>Create index pattern#查看日志展示
Discover>tomcat-access*
十、Prometheus监控
1.导入离线包
链接:https://pan.baidu.com/s/1DyMJPT8r_TUpI8Dr31SVew?pwd=m1bk
提取码:m1bk#导入上传tar包
sudo docker load -i alertmanager-v0.21.0.tar
sudo docker load -i grafana-7.3.4.tar
sudo docker load -i k8s-prometheus-adapter-v0.8.2.tar
sudo docker load -i kube-rbac-proxy-v0.8.0.tar
sudo docker load -i kube-state-metrics-v1.9.7.tar
sudo docker load -i node-exporter-v1.0.1.tar
sudo docker load -i prometheus-config-reloader-v0.43.2.tar
sudo docker load -i prometheus_demo_service.tar
sudo docker load -i prometheus-operator-v0.43.2.tar
sudo docker load -i prometheus-v2.22.1.tar
2.主节点创建
#解压下载的代码包
sudo unzip kube-prometheus-master.zip
sudo rm -f kube-prometheus-master.zip && cd kube-prometheus-master#这里建议先看下有哪些镜像,便于在下载镜像快的节点上先收集好所有需要的离线docker镜像
find ./ -type f |xargs grep 'image: '|sort|uniq|awk '{print $3}'|grep ^[a-zA-Z]|grep -Evw 'error|kubeRbacProxy'|sort -rn|uniqkubectl create -f manifests/setup
kubectl create -f manifests/#过一会查看创建结果:
kubectl -n monitoring get all# 附:清空上面部署的prometheus所有服务:
# kubectl delete --ignore-not-found=true -f manifests/ -f manifests/setup
3. 访问下prometheus的UI
# 修改下prometheus UI的service模式,便于我们访问
kubectl -n monitoring patch svc prometheus-k8s -p '{"spec":{"type":"NodePort"}}'# kubectl -n monitoring get svc prometheus-k8s
NAME             TYPE       CLUSTER-IP    EXTERNAL-IP   PORT(S)          AGE
prometheus-k8s   NodePort   10.68.23.79   <none>        9090:22129/TCP   7m43s
3.1 修改用户权限
#   kubectl edit clusterrole prometheus-k8s
#------ 原始的rules -------
rules:
- apiGroups:- ""resources:- nodes/metricsverbs:- get
- nonResourceURLs:- /metricsverbs:- get
#---------------------------apiVersion: rbac.authorization.k8s.io/v1
kind: ClusterRole
metadata:name: prometheus-k8s
rules:
- apiGroups:- ""resources:- nodes- services- endpoints- pods- nodes/proxyverbs:- get- list- watch
- apiGroups:- ""resources:- configmaps- nodes/metricsverbs:- get
- nonResourceURLs:- /metricsverbs:- get
4. 监控ingress-nginx
cat > servicemonitor.yaml <<EOF
apiVersion: monitoring.coreos.com/v1
kind: ServiceMonitor
metadata:labels:app: ingress-nginxname: nginx-ingress-scrapingnamespace: ingress-nginx
spec:endpoints:- interval: 30spath: /metricsport: metricsjobLabel: appnamespaceSelector:matchNames:- ingress-nginxselector:matchLabels:app: ingress-nginx
EOFkubectl apply -f servicemonitor.yamlkubectl -n ingress-nginx get servicemonitors.monitoring.coreos.com
十一、安装kubesphere3.3
官网参考文档
https://kubesphere.com.cn/docs/v3.3/pluggable-components/alerting/
1.部署kubesphere时需要默认 StorageClass
kubectl edit sc nfs-boge
metadata:annotations:storageclass.beta.kubernetes.io/is-default-class: "true"
2.下载yaml
您的 Kubernetes 版本必须为:v1.20.x、v1.21.x、* v1.22.x、* v1.23.x 和 * v1.24.x。带星号的版本可能出现边缘节点部分功能不可用的情况。因此,如需使用边缘节点,推荐安装 v1.21.x。
wget https://github.com/kubesphere/ks-installer/releases/download/v3.3.0/kubesphere-installer.yaml
wget https://github.com/kubesphere/ks-installer/releases/download/v3.3.0/cluster-configuration.yamlwget https://github.com/kubesphere/ks-installer/releases/download/v3.3.2/kubesphere-installer.yaml
wget https://github.com/kubesphere/ks-installer/releases/download/v3.3.2/cluster-configuration.yaml#修改cluster-configuration.yaml
#将ectd下的 endpointIps改为你的master节点的私有IP地址。
#endpointIps: XX.X.X.Xetcd:monitoring: true       # Enable or disable etcd monitoring dashboard installation. You have to create a Secret for etcd before you enable it.endpointIps: '192.168.1.220,192.168.1.221,192.168.1.222'
参考修改
apiVersion: installer.kubesphere.io/v1alpha1
kind: ClusterConfiguration
metadata:name: ks-installernamespace: kubesphere-systemlabels:version: v3.1.1
spec:persistence:storageClass: ""        #这里保持默认即可,因为我们有了默认的存储类authentication:jwtSecret: ""           # Keep the jwtSecret consistent with the Host Cluster. Retrieve the jwtSecret by executing "kubectl -n kubesphere-system get cm kubesphere-config -o yaml | grep -v "apiVersion" | grep jwtSecret" on the Host Cluster.local_registry: ""        # Add your private registry address if it is needed.etcd:monitoring: true       # 改为"true",表示开启etcd的监控功能endpointIps: 192.168.11.24  # 改为自己的master节点IP地址port: 2379              # etcd port.tlsEnable: truecommon:redis:enabled: true         #改为"true",开启redis功能openldap:enabled: true         #改为"true",开启轻量级目录协议minioVolumeSize: 20Gi # Minio PVC size.openldapVolumeSize: 2Gi   # openldap PVC size.redisVolumSize: 2Gi # Redis PVC size.monitoring:# type: external   # Whether to specify the external prometheus stack, and need to modify the endpoint at the next line.endpoint: http://prometheus-operated.kubesphere-monitoring-system.svc:9090 # Prometheus endpoint to get metrics data.es:   # Storage backend for logging, events and auditing.# elasticsearchMasterReplicas: 1   # The total number of master nodes. Even numbers are not allowed.# elasticsearchDataReplicas: 1     # The total number of data nodes.elasticsearchMasterVolumeSize: 4Gi   # The volume size of Elasticsearch master nodes.elasticsearchDataVolumeSize: 20Gi    # The volume size of Elasticsearch data nodes.logMaxAge: 7                     # Log retention time in built-in Elasticsearch. It is 7 days by default.elkPrefix: logstash              # The string making up index names. The index name will be formatted as ks-<elk_prefix>-log.basicAuth:enabled: falseusername: ""password: ""externalElasticsearchUrl: ""externalElasticsearchPort: ""console:enableMultiLogin: true  # Enable or disable simultaneous logins. It allows different users to log in with the same account at the same time.port: 30880alerting:                # (CPU: 0.1 Core, Memory: 100 MiB) It enables users to customize alerting policies to send messages to receivers in time with different time intervals and alerting levels to choose from.enabled: true         # 改为"true",开启告警功能# thanosruler:#   replicas: 1#   resources: {}auditing:                # Provide a security-relevant chronological set of records,recording the sequence of activities happening on the platform, initiated by different tenants.enabled: true         #  改为"true",开启审计功能devops:                  # (CPU: 0.47 Core, Memory: 8.6 G) Provide an out-of-the-box CI/CD system based on Jenkins, and automated workflow tools including Source-to-Image & Binary-to-Image.enabled: true             # 改为"true",开启DevOps功能jenkinsMemoryLim: 2Gi      # Jenkins memory limit.jenkinsMemoryReq: 1500Mi   # Jenkins memory request.jenkinsVolumeSize: 8Gi     # Jenkins volume size.jenkinsJavaOpts_Xms: 512m  # The following three fields are JVM parameters.jenkinsJavaOpts_Xmx: 512mjenkinsJavaOpts_MaxRAM: 2gevents:                  # Provide a graphical web console for Kubernetes Events exporting, filtering and alerting in multi-tenant Kubernetes clusters.enabled: true         # 改为"true",开启集群的事件功能ruler:enabled: truereplicas: 2logging:                 # (CPU: 57 m, Memory: 2.76 G) Flexible logging functions are provided for log query, collection and management in a unified console. Additional log collectors can be added, such as Elasticsearch, Kafka and Fluentd.enabled: true        # 改为"true",开启日志功能logsidecar:enabled: truereplicas: 2metrics_server:                    # (CPU: 56 m, Memory: 44.35 MiB) It enables HPA (Horizontal Pod Autoscaler).enabled: false                   # 这个不用修改,因为在上面我们已经安装过了,如果这里开启,镜像是官方的,会拉取镜像失败monitoring:storageClass: ""                 # If there is an independent StorageClass you need for Prometheus, you can specify it here. The default StorageClass is used by default.# prometheusReplicas: 1          # Prometheus replicas are responsible for monitoring different segments of data source and providing high availability.prometheusMemoryRequest: 400Mi   # Prometheus request memory.prometheusVolumeSize: 20Gi       # Prometheus PVC size.# alertmanagerReplicas: 1          # AlertManager Replicas.multicluster:clusterRole: none  # host | member | none  # You can install a solo cluster, or specify it as the Host or Member Cluster.network:networkpolicy: # Network policies allow network isolation within the same cluster, which means firewalls can be set up between certain instances (Pods).# Make sure that the CNI network plugin used by the cluster supports NetworkPolicy. There are a number of CNI network plugins that support NetworkPolicy, including Calico, Cilium, Kube-router, Romana and Weave Net.enabled: true # 改为"true",开启网络策略ippool: # Use Pod IP Pools to manage the Pod network address space. Pods to be created can be assigned IP addresses from a Pod IP Pool.type: none #如果你的网络插件是calico,需要修改为"calico",这里我是Flannel,保持默认。topology: # Use Service Topology to view Service-to-Service communication based on Weave Scope.type: none # Specify "weave-scope" for this field to enable Service Topology. "none" means that Service Topology is disabled.openpitrix: # An App Store that is accessible to all platform tenants. You can use it to manage apps across their entire lifecycle.store:enabled: true # 改为"true",开启应用商店servicemesh:         # (0.3 Core, 300 MiB) Provide fine-grained traffic management, observability and tracing, and visualized traffic topology.enabled: true     # 改为"true",开启微服务治理kubeedge:          # Add edge nodes to your cluster and deploy workloads on edge nodes.enabled: false   # 这个就不修改了,这个是边缘服务,我们也没有边缘的设备。cloudCore:nodeSelector: {"node-role.kubernetes.io/worker": ""}tolerations: []cloudhubPort: "10000"cloudhubQuicPort: "10001"cloudhubHttpsPort: "10002"cloudstreamPort: "10003"tunnelPort: "10004"cloudHub:advertiseAddress: # At least a public IP address or an IP address which can be accessed by edge nodes must be provided.- ""            # Note that once KubeEdge is enabled, CloudCore will malfunction if the address is not provided.nodeLimit: "100"service:cloudhubNodePort: "30000"cloudhubQuicNodePort: "30001"cloudhubHttpsNodePort: "30002"cloudstreamNodePort: "30003"tunnelNodePort: "30004"edgeWatcher:nodeSelector: {"node-role.kubernetes.io/worker": ""}tolerations: []edgeWatcherAgent:nodeSelector: {"node-role.kubernetes.io/worker": ""}tolerations: []
3.运行yaml
kubectl apply -f kubesphere-installer.yamlkubectl apply -f cluster-configuration.yaml4. 查看日志
kubectl logs -n kubesphere-system $(kubectl get pod -n kubesphere-system -l 'app in (ks-install, ks-installer)' -o jsonpath='{.items[0].metadata.name}') -f#访问任意机器的 30880端口
#账号 : admin
#密码 : P@88w0rd
5. 解决etcd监控证书找不到问题
kubectl -n kubesphere-monitoring-system create secret generic kube-etcd-client-certs  \
--from-file=etcd-client-ca.crt=/etc/kubernetes/pki/etcd/ca.crt  \
--from-file=etcd-client.crt=/etc/kubernetes/pki/etcd/healthcheck-client.crt  \
--from-file=etcd-client.key=/etc/kubernetes/pki/etcd/healthcheck-client.key
6. 在安装后启用告警系统,
在 cluster-configuration.yaml 文件中,搜索 alerting,将 enabled 的 false 更改为 true 以启用告警系统。完成后保存文件
alerting:enabled: true # 将“false”更改为“true”。#运行
kubectl apply -f kubesphere-installer.yamlkubectl apply -f cluster-configuration.yaml
6.0 配置钉钉报警
6.1 钉钉自定义机器配置
添加自定义机器人,安全配置,勾选** 加签**
6.2 操作步骤
左上角>平台管理>平台设置>通知管理>通知配置>钉钉>群机器人配置
开启-已启用
填写自己的 Webhook URL
填写自己的 密钥 (加签)
发送测试信息
确定查看钉钉群消息.是否发送成功?????
7. 在安装后启用应用商店,
在该 YAML 文件中,搜索 openpitrix,将 enabled 的 false 改为 true。完成后,点击右下角的确定,保存配置。
openpitrix:store:enabled: true # 将“false”更改为“true”。#运行
kubectl apply -f kubesphere-installer.yamlkubectl apply -f cluster-configuration.yaml
8.在安装后启用服务网格 istio
在该配置文件中,搜索 servicemesh,并将 enabled 的 false 改为 true。完成后,点击右下角的确定,保存配置
servicemesh:
enabled: true # 将“false”更改为“true”。
istio: # Customizing the istio installation configuration, refer to https://istio.io/latest/docs/setup/additional-setup/customize-installation/components:ingressGateways:- name: istio-ingressgateway # 将服务暴露至服务网格之外。默认不开启。enabled: falsecni:enabled: false # 启用后,会在 Kubernetes pod 生命周期的网络设置阶段完成 Istio 网格的 pod 流量转发设置工作。
9.在安装前启用 DevOps
在该 YAML 文件中,搜索 devops,将 enabled 的 false 改为 true。完成后,点击右下角的确定,保存配置。
devops:enabled: true # 将“false”更改为“true”。
10. 卸载方法
kubectl delete -f cluster-configuration.yaml --force
kubectl delete -f kubesphere-installer.yaml --force
#删除残余文件
vi del.sh
#!/usr/bin/env bashfunction delete_sure(){cat << eof
$(echo -e "\033[1;36mNote:\033[0m")
Delete the KubeSphere cluster, including the module kubesphere-system kubesphere-devops-system kubesphere-devops-worker kubesphere-monitoring-system kubesphere-logging-system openpitrix-system.
eofread -p "Please reconfirm that you want to delete the KubeSphere cluster.  (yes/no) " ans
while [[ "x"$ans != "xyes" && "x"$ans != "xno" ]]; doread -p "Please reconfirm that you want to delete the KubeSphere cluster.  (yes/no) " ans
doneif [[ "x"$ans == "xno" ]]; thenexit
fi
}delete_sure# delete ks-installer
kubectl delete deploy ks-installer -n kubesphere-system 2>/dev/null# delete helm
for namespaces in kubesphere-system kubesphere-devops-system kubesphere-monitoring-system kubesphere-logging-system openpitrix-system kubesphere-monitoring-federated
dohelm list -n $namespaces | grep -v NAME | awk '{print $1}' | sort -u | xargs -r -L1 helm uninstall -n $namespaces 2>/dev/null
done# delete kubefed
kubectl get cc -n kubesphere-system ks-installer -o jsonpath="{.status.multicluster}" | grep enable
if [[ $? -eq 0 ]]; then# delete kubefed types resourcesfor kubefed in `kubectl api-resources --namespaced=true --api-group=types.kubefed.io -o name`dokubectl delete -n kube-federation-system $kubefed --all 2>/dev/nulldonefor kubefed in `kubectl api-resources --namespaced=false --api-group=types.kubefed.io -o name`dokubectl delete $kubefed --all 2>/dev/nulldone# delete kubefed core resoucesfor kubefed in `kubectl api-resources --namespaced=true --api-group=core.kubefed.io -o name`dokubectl delete -n kube-federation-system $kubefed --all 2>/dev/nulldonefor kubefed in `kubectl api-resources --namespaced=false --api-group=core.kubefed.io -o name`dokubectl delete $kubefed --all 2>/dev/nulldone# uninstall kubefed charthelm uninstall -n kube-federation-system kubefed 2>/dev/null
fihelm uninstall -n kube-system snapshot-controller 2>/dev/null# delete kubesphere deployment & statefulset
kubectl delete deployment -n kubesphere-system `kubectl get deployment -n kubesphere-system -o jsonpath="{.items[*].metadata.name}"` 2>/dev/null
kubectl delete statefulset -n kubesphere-system `kubectl get statefulset -n kubesphere-system -o jsonpath="{.items[*].metadata.name}"` 2>/dev/null# delete monitor resources
kubectl delete prometheus -n kubesphere-monitoring-system k8s 2>/dev/null
kubectl delete Alertmanager -n kubesphere-monitoring-system main 2>/dev/null
kubectl delete DaemonSet -n kubesphere-monitoring-system node-exporter 2>/dev/null
kubectl delete statefulset -n kubesphere-monitoring-system `kubectl get statefulset -n kubesphere-monitoring-system -o jsonpath="{.items[*].metadata.name}"` 2>/dev/null# delete grafana
kubectl delete deployment -n kubesphere-monitoring-system grafana 2>/dev/null
kubectl --no-headers=true get pvc -n kubesphere-monitoring-system -o custom-columns=:metadata.namespace,:metadata.name | grep -E kubesphere-monitoring-system | xargs -n2 kubectl delete pvc -n 2>/dev/null# delete pvc
pvcs="kubesphere-system|openpitrix-system|kubesphere-devops-system|kubesphere-logging-system"
kubectl --no-headers=true get pvc --all-namespaces -o custom-columns=:metadata.namespace,:metadata.name | grep -E $pvcs | xargs -n2 kubectl delete pvc -n 2>/dev/null# delete rolebindings
delete_role_bindings() {for rolebinding in `kubectl -n $1 get rolebindings -l iam.kubesphere.io/user-ref -o jsonpath="{.items[*].metadata.name}"`dokubectl -n $1 delete rolebinding $rolebinding 2>/dev/nulldone
}# delete roles
delete_roles() {kubectl -n $1 delete role admin 2>/dev/nullkubectl -n $1 delete role operator 2>/dev/nullkubectl -n $1 delete role viewer 2>/dev/nullfor role in `kubectl -n $1 get roles -l iam.kubesphere.io/role-template -o jsonpath="{.items[*].metadata.name}"`dokubectl -n $1 delete role $role 2>/dev/nulldone
}# remove useless labels and finalizers
for ns in `kubectl get ns -o jsonpath="{.items[*].metadata.name}"`
dokubectl label ns $ns kubesphere.io/workspace-kubectl label ns $ns kubesphere.io/namespace-kubectl patch ns $ns -p '{"metadata":{"finalizers":null,"ownerReferences":null}}'delete_role_bindings $nsdelete_roles $ns
done# delete clusterroles
delete_cluster_roles() {for role in `kubectl get clusterrole -l iam.kubesphere.io/role-template -o jsonpath="{.items[*].metadata.name}"`dokubectl delete clusterrole $role 2>/dev/nulldonefor role in `kubectl get clusterroles | grep "kubesphere" | awk '{print $1}'| paste -sd " "`dokubectl delete clusterrole $role 2>/dev/nulldone
}
delete_cluster_roles# delete clusterrolebindings
delete_cluster_role_bindings() {for rolebinding in `kubectl get clusterrolebindings -l iam.kubesphere.io/role-template -o jsonpath="{.items[*].metadata.name}"`dokubectl delete clusterrolebindings $rolebinding 2>/dev/nulldonefor rolebinding in `kubectl get clusterrolebindings | grep "kubesphere" | awk '{print $1}'| paste -sd " "`dokubectl delete clusterrolebindings $rolebinding 2>/dev/nulldone
}
delete_cluster_role_bindings# delete clusters
for cluster in `kubectl get clusters -o jsonpath="{.items[*].metadata.name}"`
dokubectl patch cluster $cluster -p '{"metadata":{"finalizers":null}}' --type=merge
done
kubectl delete clusters --all 2>/dev/null# delete workspaces
for ws in `kubectl get workspaces -o jsonpath="{.items[*].metadata.name}"`
dokubectl patch workspace $ws -p '{"metadata":{"finalizers":null}}' --type=merge
done
kubectl delete workspaces --all 2>/dev/null# make DevOps CRs deletable
for devops_crd in $(kubectl get crd -o=jsonpath='{range .items[*]}{.metadata.name}{"\n"}{end}' | grep "devops.kubesphere.io"); dofor ns in $(kubectl get ns -ojsonpath='{.items..metadata.name}'); dofor devops_res in $(kubectl get $devops_crd -n $ns -oname); dokubectl patch $devops_res -n $ns -p '{"metadata":{"finalizers":[]}}' --type=mergedonedone
done# delete validatingwebhookconfigurations
for webhook in ks-events-admission-validate users.iam.kubesphere.io network.kubesphere.io validating-webhook-configuration resourcesquotas.quota.kubesphere.io
dokubectl delete validatingwebhookconfigurations.admissionregistration.k8s.io $webhook 2>/dev/null
done# delete mutatingwebhookconfigurations
for webhook in ks-events-admission-mutate logsidecar-injector-admission-mutate mutating-webhook-configuration
dokubectl delete mutatingwebhookconfigurations.admissionregistration.k8s.io $webhook 2>/dev/null
done# delete users
for user in `kubectl get users -o jsonpath="{.items[*].metadata.name}"`
dokubectl patch user $user -p '{"metadata":{"finalizers":null}}' --type=merge
done
kubectl delete users --all 2>/dev/null# delete helm resources
for resource_type in `echo helmcategories helmapplications helmapplicationversions helmrepos helmreleases`; dofor resource_name in `kubectl get ${resource_type}.application.kubesphere.io -o jsonpath="{.items[*].metadata.name}"`; dokubectl patch ${resource_type}.application.kubesphere.io ${resource_name} -p '{"metadata":{"finalizers":null}}' --type=mergedonekubectl delete ${resource_type}.application.kubesphere.io --all 2>/dev/null
done# delete workspacetemplates
for workspacetemplate in `kubectl get workspacetemplates.tenant.kubesphere.io -o jsonpath="{.items[*].metadata.name}"`
dokubectl patch workspacetemplates.tenant.kubesphere.io $workspacetemplate -p '{"metadata":{"finalizers":null}}' --type=merge
done
kubectl delete workspacetemplates.tenant.kubesphere.io --all 2>/dev/null# delete federatednamespaces in namespace kubesphere-monitoring-federated
for resource in $(kubectl get federatednamespaces.types.kubefed.io -n kubesphere-monitoring-federated -oname); dokubectl patch "${resource}" -p '{"metadata":{"finalizers":null}}' --type=merge -n kubesphere-monitoring-federated
done# delete crds
for crd in `kubectl get crds -o jsonpath="{.items[*].metadata.name}"`
doif [[ $crd == *kubesphere.io ]] || [[ $crd == *kubefed.io ]] ; then kubectl delete crd $crd 2>/dev/null; fi
done# delete relevance ns
for ns in kube-federation-system kubesphere-alerting-system kubesphere-controls-system kubesphere-devops-system kubesphere-devops-worker kubesphere-logging-system kubesphere-monitoring-system kubesphere-monitoring-federated openpitrix-system kubesphere-system
dokubectl delete ns $ns 2>/dev/null
done
#执行删除
sh del.sh
十二、 GitLab安装
1. 单独准备服务器,采用Docker安装
docker search gitlab
docker pull gitlab/gitlab-ce
2.准备docker-compose.yml文件
mkdir -p /data/gitvim /data/git/docker-compose.ymlversion: '3.1'
services:gitlab:image: 'gitlab/gitlab-ce:latest'container_name: gitlabrestart: alwaysenvironment:GITLAB_OMNIBUS_CONFIG: |external_url 'http://10.1.100.225:8929'#自己安装git的服务器IPgitlab_rails['gitlab_shell_ssh_port'] = 2224ports:- '8929:8929'- '2224:2224'volumes:- './config:/etc/gitlab'- './logs:/var/log/gitlab'- './data:/var/opt/gitlab'
3.启动容器(需要稍等很久……)
cd /data/git
docker-compose up -d
4.访问GitLab首页
http://10.1.100.225:8929
5.查看root用户初始密码
docker exec -it gitlab cat /etc/gitlab/initial_root_password
6.第一次登录网页,需要修改密码 Password
**右上角>>**Administrator>Preferences>Password
十三、DevOps初始化环境
1.linux系统 安装Jenkins、jdk 、maven
1.下载地址
JDK包下载地址
https://www.oracle.com/java/technologies/downloads/
MAven下载地址
https://maven.apache.org/download.cgi
2.安装jdk maven
tar -zxvf jdk-8*.tar.gz -C /usr/local/
tar -zxvf apache-maven-*.tar.gz -C /usr/local/cd /usr/local
mv apache-maven*/ maven
mv jdk1.8*/ jdk
2.1 编辑maven配置
vim /usr/local/maven/conf/settings.xml
<!--#maven配置阿里云仓库,在160行插入-->
<mirror><id>nexus-aliyun</id><mirrorOf>central</mirrorOf><name>Nexus aliyun</name><url>http://maven.aliyun.com/nexus/content/groups/public</url>
</mirror><!--#maven配置jdk,在252行插入-->
<profile>    <id>jdk1.8</id>    <activation>    <activeByDefault>true</activeByDefault>    <jdk>1.8</jdk>    </activation>    <properties>    <maven.compiler.source>1.8</maven.compiler.source>    <maven.compiler.target>1.8</maven.compiler.target>    <maven.compiler.compilerVersion>1.8</maven.compiler.compilerVersion>    </properties>
</profile> <!--#maven配置jdk,在257行插入--><activeProfiles><activeProfile>jdk1.8</activeProfile></activeProfiles>
3.安装jenkins
3.1 下载
docker pull jenkins/jenkins:2.319.1-lts
3.2 创建yaml
mkdir -p /data/jenkins/
cd /data/jenkins/
vim /data/jenkins/docker-compose.yml
version: "3.1"
services:jenkins:image: jenkins/jenkinscontainer_name: jenkinsports:- 8080:8080- 50000:50000volumes:- ./data/:/var/jenkins_home/- /var/run/docker.sock:/var/run/docker.sock- /usr/bin/docker:/usr/bin/docker- /etc/docker/daemon.json:/etc/docker/daemon.json
3.3 启动jenkins
#修改Jenkins用户权限
cd /var/runchown root:root docker.sock#其他用户有读和写权限
chmod o+rw docker.sockcd /data/jenkins/
docker-compose up -d#授权
chmod 777 /data/jenkins/data/cat /data/jenkins/data/hudson.model.UpdateCenter.xml
#重新启动Jenkins容器后,由于Jenkins需要下载大量内容,但是由于默认下载地址下载速度较慢,
#需要重新设置下载地址为国内镜像站# 清华大学的插件源也可以
# 修改数据卷中的hudson.model.UpdateCenter.xml文件
# 将下载地址替换为http://mirror.esuni.jp/jenkins/updates/update-center.json# 清华大学的插件源也可以
#https://mirrors.tuna.tsinghua.edu.cn/jenkins/updates/update-center.json#重启
docker-compose restart#查看日志
docker logs -f jenkins
3.4 访问页面,安装插件
http://10.1.100.225:8080
1.输入密码2.选择插件来安装3.点击安装
4.jenkins插件安装
中文界面>系统管理>插件管理>可选插件>搜索插件
英文界面> Manage Jenkins–Manage Plugins-Available>搜索插件
Locale
Localization
Git Parameter
Publish Over SSH
5. 配置jenkins
mv /usr/local/maven/ /data/jenkins/data/
mv /usr/local/jdk/ /data/jenkins/data/
5.1 加载本地jdk
Dashboard>系统管理>全局工具配置>Add JDK>去掉对钩 (√)自动安装
NAME
jdk8
JAVA_HOME
/var/jenkins_home/jdk/
5.1 加载本地maven
Dashboard>系统管理>全局工具配置>Add Maven>去掉对钩 (√)自动安装
NAME
maven
JAVA_HOME
/var/jenkins_home/maven/
Save Apply
保存 应用
运行mvn测试
mvn help:system
3.jenkins拉取测试
系统管理>系统配置>Publish over SSH>SSH Servers>Add
#自定义项目名称
name
test
#主机IP
Hostname
10.1.100.25
#主机用户名
Username
root
#拉取项目路径
Remote Directory
/data/work/mytest
点击高级
√ Use password authentication, or use a different key
#输入服务器密码
Passphrase / Password
xxxx
#点击 测试
Test ConfigurationSave Apply
保存 应用
4.Jenkins服务器设置免密登入k8s-mast服务器
#Jenkins服务器-进入jenkins容器
docker exec -it jenkins bash
#进入jenkins容器-生成免密登录公私钥,根据提示按回车
ssh-keygen -t rsa
#进入jenkins容器-查看jenkins 秘钥
cat /var/jenkins_home/.ssh/id_rsa.pub
#k8s-mast服务器中authorized_keys 加入Jenkins服务器秘钥
echo “xxxxxx” >> /root/.ssh/authorized_keys
十四、开发环境部署IDEA
工具下载:
链接:https://pan.baidu.com/s/1Jkyh_kgrT2o388Xiujbdeg?pwd=b7rx
提取码:b7rx
1. windows配置maven 和jdk
https://blog.csdn.net/weixin_46565024/article/details/122758111
2. IDEA简单得项目创建
File>New>ProjectSpring Initializr>NextType(选择Maven)>Java Version (选择8) > NextWeb> 勾选√Spring Web> Next>Finish
创建项目报错:Error:java:无效的源发行版:12
解决方法:https://www.cnblogs.com/bJydsJ/p/16699429.html
相关文章:

k8s部署手册-v06
一、基础配置 1.修改主机名 hostnamectl set-hostname k8s-master01 hostnamectl set-hostname k8s-master02 hostnamectl set-hostname k8s-master03 hostnamectl set-hostname k8s-node01 hostnamectl set-hostname k8s-node022.添加 主机名与IP地址解析 cat > /etc/ho…...

Qt 5.15集成Crypto++ 8.7.0(MSVC 2019)笔记
一、背景 笔者已介绍过在Qt 5.15.x中使用MinGW(8.10版本)编译并集成Crypto 8.7.0。 但是该编译出来的库(.a和.dll)不适用MSVC(2019版本)构建环境,需要重新编译(.lib或和.dll…...
)
LeetCode——贪心篇(一)
刷题顺序及思路来源于代码随想录,网站地址:https://programmercarl.com 目录 455. 分发饼干 376. 摆动序列 53. 最大子数组和 122. 买卖股票的最佳时机 II 55. 跳跃游戏 45. 跳跃游戏 II 1005. K 次取反后最大化的数组和 455. 分发饼干 假设你是…...
2023高教社杯 国赛数学建模C题思路 - 蔬菜类商品的自动定价与补货决策
1 赛题 在生鲜商超中,一般蔬菜类商品的保鲜期都比较短,且品相随销售时间的增加而变差, 大部分品种如当日未售出,隔日就无法再售。因此, 商超通常会根据各商品的历史销售和需 求情况每天进行补货。 由于商超销售的蔬菜…...
线性运算的推广与矩阵基础)
【理解线性代数】(四)线性运算的推广与矩阵基础
1. 数值加法和乘法 数值加法与乘法,是小学数学课程中的基本数学运算。例如: 加法:112 乘法:2*24 在这个知识层次下,运算的基本单位是数字。 2. 从数值到向量 数值加法,可以看作一维空间中的向量加法&…...

C# 什么是继承和派生
C# 什么是继承和派生 在 C# 中,继承(Inheritance)是一种机制,它允许一个类(子类)从另一个类(父类)中继承属性和方法。这种关系使得子类可以重用父类的代码,同时可以在子…...

无涯教程-JavaScript - HEX2BIN函数
描述 HEX2BIN函数将十六进制数转换为二进制数。 语法 HEX2BIN (number, [places])争论 Argument描述Required/Optionalnumber 您要转换的十六进制数。 数字不能超过10个字符(40位)。数字的最高有效位是符号位(从右数第40位)。其余的39位是幅度位。 负数使用二进制补码表示。…...
前端面试0906
// 请给出输出结果 function foo(){ console.log(a); } function bar(){ var a 3; console.log(this.a); foo(); } var a 2; bar(); 2 2 // 请从下面的问题中挑选3道进行回答 1. 防抖和节流分别是什么,一般用在什么场景? 防抖(Debounc…...

OceanBase社区版4.x核心技术解密
数字化时代,各行各业的数据量呈现爆发式增长,对于海量数据价值的挖掘和应用,正成为推动创新的主要力量,与此同时,数据计算复杂度正在提升。在此背景下,对于数据处理的基石数据库而言,正面临市场…...

快速安装k8s
RKE安装方式 官方文章资源地址 https://rke.docs.rancher.com/installation rke工具下载地址(arm,amd,windows都有) https://github.com/rancher/rke/releases x86的用amd64下载rke工具 https://github.com/rancher/rke/releases/download/v1.4.8/rke_li…...

[FFmpeg] 常用ffmpeg命令
去水印 ffmpeg -i water.jpeg -strict -2 -vf delogox300:y250:w56:h18:show0 no_water.jpeg 打时间戳 ffmpeg -i perf_60Hz_Raw.mp4 -vf "drawtextfontsize160:fontcolorred:text%{pts\:hms}" -c:v libx264 -an -f mp4 perf_output.mp4 -y ffmpeg -i perf_8k.mp4 -v…...

代码随想录训练营第五十七天|647. 回文子串、516.最长回文子序列
647. 回文子串 题目链接/文章讲解/视频讲解:代码随想录 1.代码展示 //647.回文子串 int countSubstrings(string s) {//step1 构建dp数组,明确dp数组的含义,dp[i][j]的含义是在下标为i和j区间内的字串是否为回文串vector<vector<bool&…...
对线程池设置做压测
线程池代码 Configuration public class ThreadPoolConfig {// 核心线程池大小private int corePoolSize 24;// 最大可创建的线程数private int maxPoolSize 25;// 队列最大长度private int queueCapacity 100;// 线程池维护线程所允许的空闲时间private int keepAliveSeco…...

【网络通信 -- WebRTC】项目实战记录 -- mediasoup android 适配 webrtc m94
【网络通信 -- WebRTC】项目实战记录 -- mediasoup android 适配 webrtc m94 【1】下载并配置 depot_tools 下载 depot_tools git clone https://chromium.googlesource.com/chromium/tools/depot_tools.git编辑 ~/.bashrc 将 depot_tools 添加到路径中 vim ~/.bashrc export…...
【力扣周赛】第 357 场周赛(⭐反悔贪心)
文章目录 竞赛链接Q1:6925. 故障键盘解法1——直接模拟解法2——双端队列 Q2:6953. 判断是否能拆分数组(贪心)Q3:2812. 找出最安全路径⭐解法1——多源BFS瓶颈路模型?解法2——多源BFS 倒序枚举答案 并查…...

css重置
css 重置 CSS 重置的主要目标是确保浏览器之间的一致性,并撤消所有默认样式,创建一个空白板。 如今,主流浏览器都实现了css规范,在布局或间距方面没有太大差异。但是通过自定义 CSS 重置,也可以改善用户体验和提高开…...

tcpdump相关
Linux内核角度分析tcpdump原理(一)Linux内核角度分析tcpdump原理(二)...
MFC新建内部消息
提示:记录一下MFC新建内部消息的成功过程 文章目录 前言一、pandas是什么?二、使用步骤 1.引入库2.读入数据总结 前言 先说一下基本情况,因为要在mapview上增加一个显示加载时间的功能。然后发现是要等加载完再显示时间,显示在主…...

linux查找目录
要在Linux中查找目录,可以使用find命令。下面是查询目录的几个示例: 1,查找当前目录下所有子目录: find . -type d 2,在指定路径下查找目录: find /path/to/directory -type d 3,查找以特定名称开头的目录: find . -t…...
机器学习:可解释学习
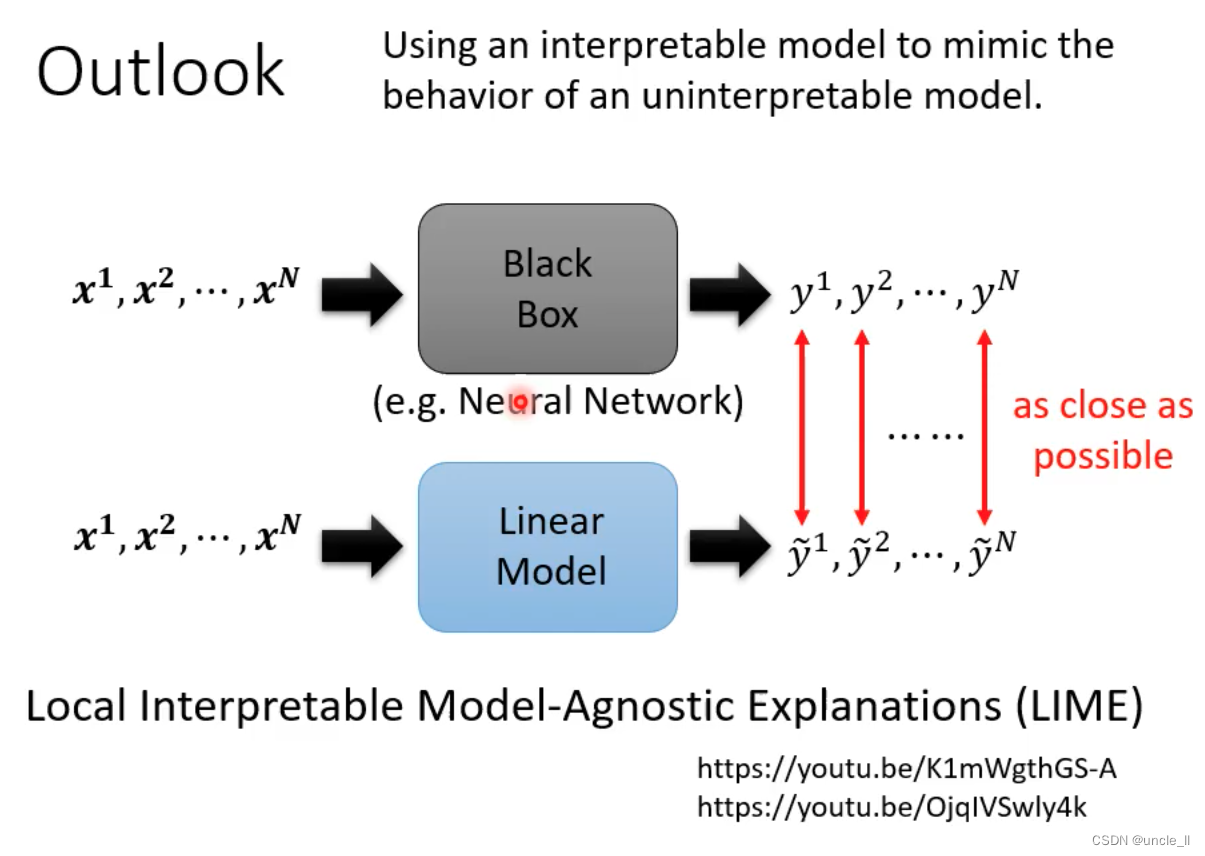
文章目录 可解释学习为什么需要可解释机器学习可解释还是强模型可解释学习的目标可解释机器学习Local ExplanationGlobal Explanation 可解释学习 神马汉斯,只有在有人看的时候能够答对。 为什么需要可解释机器学习 贷款,医疗需要给出理由,让…...

HTML 语义化
目录 HTML 语义化HTML5 新特性HTML 语义化的好处语义化标签的使用场景最佳实践 HTML 语义化 HTML5 新特性 标准答案: 语义化标签: <header>:页头<nav>:导航<main>:主要内容<article>&#x…...
Flask RESTful 示例
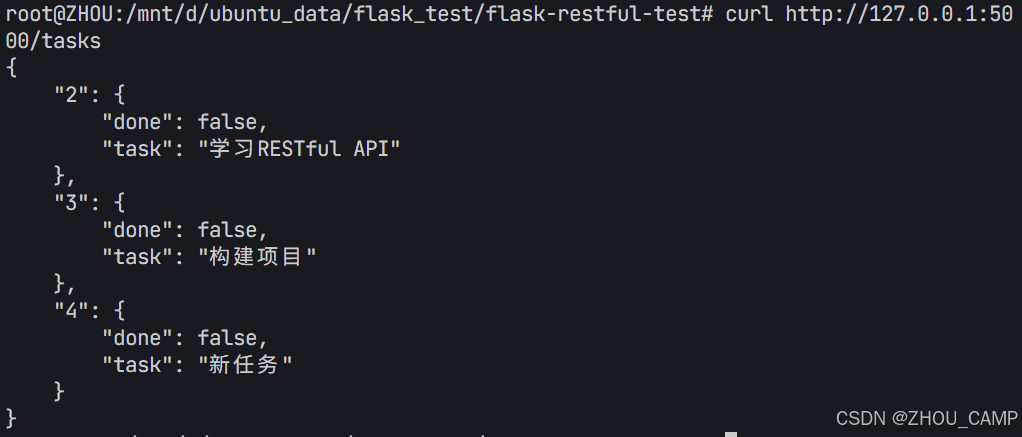
目录 1. 环境准备2. 安装依赖3. 修改main.py4. 运行应用5. API使用示例获取所有任务获取单个任务创建新任务更新任务删除任务 中文乱码问题: 下面创建一个简单的Flask RESTful API示例。首先,我们需要创建环境,安装必要的依赖,然后…...

Redis相关知识总结(缓存雪崩,缓存穿透,缓存击穿,Redis实现分布式锁,如何保持数据库和缓存一致)
文章目录 1.什么是Redis?2.为什么要使用redis作为mysql的缓存?3.什么是缓存雪崩、缓存穿透、缓存击穿?3.1缓存雪崩3.1.1 大量缓存同时过期3.1.2 Redis宕机 3.2 缓存击穿3.3 缓存穿透3.4 总结 4. 数据库和缓存如何保持一致性5. Redis实现分布式…...

Python爬虫实战:研究feedparser库相关技术
1. 引言 1.1 研究背景与意义 在当今信息爆炸的时代,互联网上存在着海量的信息资源。RSS(Really Simple Syndication)作为一种标准化的信息聚合技术,被广泛用于网站内容的发布和订阅。通过 RSS,用户可以方便地获取网站更新的内容,而无需频繁访问各个网站。 然而,互联网…...

pam_env.so模块配置解析
在PAM(Pluggable Authentication Modules)配置中, /etc/pam.d/su 文件相关配置含义如下: 配置解析 auth required pam_env.so1. 字段分解 字段值说明模块类型auth认证类模块,负责验证用户身份&am…...

在 Nginx Stream 层“改写”MQTT ngx_stream_mqtt_filter_module
1、为什么要修改 CONNECT 报文? 多租户隔离:自动为接入设备追加租户前缀,后端按 ClientID 拆分队列。零代码鉴权:将入站用户名替换为 OAuth Access-Token,后端 Broker 统一校验。灰度发布:根据 IP/地理位写…...

什么是EULA和DPA
文章目录 EULA(End User License Agreement)DPA(Data Protection Agreement)一、定义与背景二、核心内容三、法律效力与责任四、实际应用与意义 EULA(End User License Agreement) 定义: EULA即…...

Rust 异步编程
Rust 异步编程 引言 Rust 是一种系统编程语言,以其高性能、安全性以及零成本抽象而著称。在多核处理器成为主流的今天,异步编程成为了一种提高应用性能、优化资源利用的有效手段。本文将深入探讨 Rust 异步编程的核心概念、常用库以及最佳实践。 异步编程基础 什么是异步…...
JUC笔记(上)-复习 涉及死锁 volatile synchronized CAS 原子操作
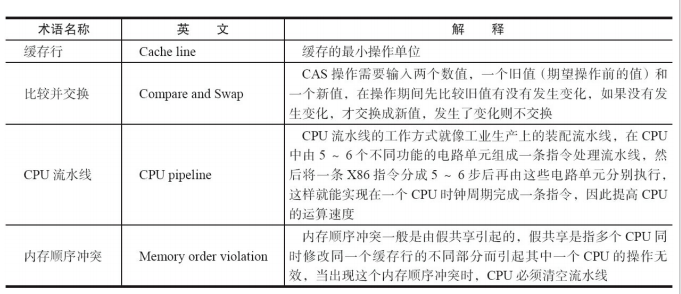
一、上下文切换 即使单核CPU也可以进行多线程执行代码,CPU会给每个线程分配CPU时间片来实现这个机制。时间片非常短,所以CPU会不断地切换线程执行,从而让我们感觉多个线程是同时执行的。时间片一般是十几毫秒(ms)。通过时间片分配算法执行。…...
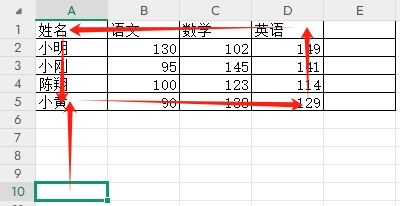
3-11单元格区域边界定位(End属性)学习笔记
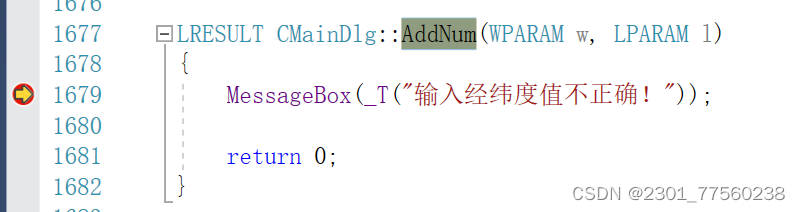
返回一个Range 对象,只读。该对象代表包含源区域的区域上端下端左端右端的最后一个单元格。等同于按键 End 向上键(End(xlUp))、End向下键(End(xlDown))、End向左键(End(xlToLeft)End向右键(End(xlToRight)) 注意:它移动的位置必须是相连的有内容的单元格…...