【MongoDB】Ubuntu22.04 下安装 MongoDB | 用户权限认证 | skynet.db.mongo 模块使用
文章目录
- Ubuntu 22.04 安装 MongoDB
- 后台启动 MongoDB
- shell 连入 MongoDB 服务
- MongoDB 用户权限认证
- 创建 root 用户
- 开启认证
- 重启 MongoDB 服务
- 创建其他用户
- 查看用户信息
- 验证用户权限
- 删除用户
- skynet.db.mongo 模块使用
- auth
- ensureIndex
- find、findOne
- insert、safe_insert
- delete、safe_delete
- update、safe_update
- aggregate
- safe_batch_insert、safe_batch_delete
Ubuntu 22.04 安装 MongoDB
其他平台安装教程可参考官网:https://www.mongodb.com/docs/manual/tutorial/install-mongodb-on-ubuntu/
- 确定主机运行哪个 Ubuntu 版本:(配置一致的继续往下看)
cat /etc/lsb-release

- 安装 mongodb 社区版的相关依赖
sudo apt-get install libcurl4 libgssapi-krb5-2 libldap-2.5-0 libwrap0 libsasl2-2 libsasl2-modules libsasl2-modules-gssapi-mit openssl liblzma5 gnupg curl
- 导入 MongoDB 公共 GPG 密钥
curl -fsSL https://pgp.mongodb.com/server-7.0.asc | \sudo gpg -o /usr/share/keyrings/mongodb-server-7.0.gpg \--dearmor
- 创建
/etc/apt/sources.list.d/mongodb-org-7.0.list列表文件
echo "deb [ arch=amd64,arm64 signed-by=/usr/share/keyrings/mongodb-server-7.0.gpg ] https://repo.mongodb.org/apt/ubuntu jammy/mongodb-org/7.0 multiverse" | sudo tee /etc/apt/sources.list.d/mongodb-org-7.0.list
- 重新加载本地包数据库
sudo apt-get update
- 安装最新的稳定版本
sudo apt-get install -y mongodb-org
后台启动 MongoDB
-
配置
/etc/mongod.conf:bindIp: 0.0.0.0fork: true
# mongod.conf# for documentation of all options, see:
#   http://docs.mongodb.org/manual/reference/configuration-options/# Where and how to store data.
storage:dbPath: /var/lib/mongodb
#  engine:
#  wiredTiger:# where to write logging data.
systemLog:destination: filelogAppend: truepath: /var/log/mongodb/mongod.log# network interfaces
net:port: 27017bindIp: 0.0.0.0# how the process runs
processManagement:fork: truetimeZoneInfo: /usr/share/zoneinfo#security:#operationProfiling:#replication:#sharding:## Enterprise-Only Options:#auditLog:
sudo mongod -f /etc/mongod.conf
执行后结果如下:
about to fork child process, waiting until server is ready for connections.
forked process: 361
child process started successfully, parent exiting
ps -ef | grep mongod:可以看到有mongod进程在后台运行

shell 连入 MongoDB 服务
mongosh:mongodb 客户端连接工具(安装时自带)

成功连入使用:

MongoDB 用户权限认证
创建 root 用户
在 MongoDB 中,root 账号是具有最高权限的账号,可以执行所有操作。
use admin
db.createUser({user:'root', pwd:'root',roles:['root']})
开启认证
我们需要开启 MongoDB 的认证功能,以确保只有经过认证的用户才能访问数据库。
/etc/mongod.conf
在启动配置文件中,添加以下配置:
security:authorization: enabled
重启 MongoDB 服务,认证功能才会生效。
重启 MongoDB 服务
官方描述:Sending a KILL signal kill -9 will probably cause damage as mongod will not be able to cleanly exit. (In such a scenario, run the repairDatabase command.)
可以采用在 mongosh 连入数据库后,执行下述指令来友好关闭服务进程。
use admin
db.shutdownServer()
创建其他用户
在MongoDB中,每个数据库都有自己的权限系统,可以为每个数据库创建不同的账号并赋予不同的角色。
db.createUser({user: 'cauchy', pwd: 'root', roles: [{ role: 'readWrite', db: 'test'}]})
readWrite: https://www.mongodb.com/docs/manual/reference/built-in-roles/#mongodb-authrole-readWrite
roles 可参考:https://www.mongodb.com/docs/manual/reference/built-in-roles/
查看用户信息
执行下述指令,查看当前数据库系统中的所有用户信息:
use admin
db.system.users.find()

验证用户权限
在 test 数据库中,验证当前 cauchy 用户权限
use test
db.auth('cauchy', 'root')
删除用户
use test
db.dropUser('cauchy')
skynet.db.mongo 模块使用
本节主要讲解在 Skynet 框架中一些常用的 API,以及如何使用相应的 API 来执行 MongoDB 的 CRUD。
前置变量、方法:
host = "127.0.0.1"
port = 27017
username = "cauchy"
password = "root"
authdb = "test"
db_name = "test"function create_client()return mongo.client({host = host, port = port,username = username,password = password, authdb = authdb})
end
auth
数据库连接认证
- 用法:
db:auth(user, pwd)
测试代码:
function test_auth()local ok, err, retlocal c = mongo.client({host = host, port = port,})local db = c[db_name]db:auth(username, password)db.testcol:dropIndex("*")db.testcol:drop()ok, err, ret = db.testcol:safe_insert({test_key = 1});assert(ok and ret and ret.n == 1, err)
end
如果注释掉认证:-- db:auth(username, password),则会报错提示需要权限认证。

ensureIndex
创建索引
- 用法:
db.collection:ensureIndex({ key1 }, { option })
源码 mongo.lua 中,这个 API 实际上就是创建索引:
mongo_collection.ensureIndex = mongo_collection.createIndex
测试代码:
function test_insert_with_index()local ok, err, retlocal c = create_client()local db = c[db_name]db.testcol:dropIndex("*")db.testcol:drop()db.testcol:ensureIndex({test_key = 1}, {unique = true, name = "test_key_index"})--[[ mongoshdb.testcol.getIndexes()]]ok, err, ret = db.testcol:safe_insert({test_key = 1})assert(ok and ret and ret.n == 1, err)ok, err, ret = db.testcol:safe_insert({test_key = 1})assert(ok == false and string.find(err, "duplicate key error"))
end
执行结果:

find、findOne
查找符合条件的文档,find 查找所有,findOne 查找第一条
- 用法:
db.collection:find(query, projection)、db.collection:findOne(query, projection) projection:查询结果的投影
源码:(next、find、findOne)
local mongo_cursor = {}
local cursor_meta =	{__index	= mongo_cursor,
}
------------------------------------------------------------------------------------------------------
function mongo_cursor:next()if self.__ptr == nil thenerror "Call	hasNext	first"endlocal r	= self.__document[self.__ptr]self.__ptr = self.__ptr	+ 1if self.__ptr >	#self.__document thenself.__ptr = nilendreturn r
end
------------------------------------------------------------------------------------------------------
function mongo_collection:findOne(query, projection)local cursor = self:find(query, projection)if cursor:hasNext() thenreturn cursor:next()endreturn nil
end
------------------------------------------------------------------------------------------------------
function mongo_collection:find(query, projection)return setmetatable( {__collection = self,__query	= query	and	bson_encode(query) or empty_bson,__projection = projection and bson_encode(projection) or empty_bson,__ptr =	nil,__data = nil,__cursor = nil,__document = {},__flags	= 0,__skip = 0,__limit = 0,__sort = empty_bson,} ,	cursor_meta)
end
-
简单查看上述源码,可以发现
cursor:next返回__document中的内容,即为实际找到的文档内容。 -
find返回一张表,表中有很多字段(__collection、__cursor、__document等),这张表的元表是cursor_meta,而cursor_meta的属性__index是表mongo_cursor。所以在用find查找符合条件的文档时,返回的值应该使用next方法去一个个遍历获取所有的返回结果,即为__document中的内容。 -
findOne直接就是返回查找到的第一个文档,如上述return cursor:next()。
insert、safe_insert
插入一条文档
- 用法:
db.collection:insert(doc)、db.collection:safe_insert(doc)
源码:
function mongo_collection:insert(doc)if doc._id == nil thendoc._id	= bson.objectid()endself.database:send_command("insert", self.name, "documents", {bson_encode(doc)})
end
------------------------------------------------------------------------------------------------------
function mongo_collection:safe_insert(doc)local r = self.database:runCommand("insert", self.name, "documents", {bson_encode(doc)})return werror(r)
end
如上述源码,safe_insert 会返回一些相关信息(由 werror 返回),而 insert 没有任何返回值。
delete、safe_delete
删除符合条件的一条或多条文档
- 用法:
db.collection:delete(query, single)、db.collection:safe_delete(query, single) single:删除条数(即limit限制)
源码:
function mongo_collection:delete(query, single)self.database:runCommand("delete", self.name, "deletes", {bson_encode({q = query,limit = single and 1 or 0,})})
end
------------------------------------------------------------------------------------------------------
function mongo_collection:safe_delete(query, single)local r = self.database:runCommand("delete", self.name, "deletes", {bson_encode({q = query,limit = single and 1 or 0,})})return werror(r)
end
如上述源码,safe_delete 会返回一些相关信息(由 werror 返回),而 delete 没有任何返回值。
测试代码:
function test_find_and_remove()local ok, err, retlocal c = create_client()local db = c[db_name]db.testcol:dropIndex("*")db.testcol:drop()local cursor = db.testcol:find()assert(cursor:hasNext() == false)db.testcol:ensureIndex({test_key = 1}, {test_key2 = -1}, {unique = true, name = "test_index"})ok, err, ret = db.testcol:safe_insert({test_key = 1, test_key2 = 1})assert(ok and ret and ret.n == 1, err)cursor = db.testcol:find()assert(cursor:hasNext() == true)local v = cursor:next()assert(v)assert(v.test_key == 1)ok, err, ret = db.testcol:safe_insert({test_key = 1, test_key2 = 2})assert(ok and ret and ret.n == 1, err)ok, err, ret = db.testcol:safe_insert({test_key = 2, test_key2 = 3})assert(ok and ret and ret.n == 1, err)ret = db.testcol:findOne({test_key2 = 1})assert(ret and ret.test_key2 == 1, err)ret = db.testcol:find({test_key2 = {['$gt'] = 0}}):sort({test_key = 1}, {test_key2 = -1}):skip(1):limit(1)--[[ mongoshdb.testcol.find({test_key2: {$gt: 0}}).sort({test_key: 1}, {test_key2: -1}).skip(1).limit(1)]]assert(ret:count() == 3)assert(ret:count(true) == 1)if ret:hasNext() thenret = ret:next()endassert(ret and ret.test_key2 == 1)db.testcol:delete({test_key = 1})db.testcol:delete({test_key = 2})ret = db.testcol:findOne({test_key = 1})assert(ret == nil)
end
上述代码中有调用了sort、 skip、limit,如源码所示,即为 find 返回的表中,__sort、__skip 、__limit字段附上了值,而不是直接对数据执行排序,跳转、约束等操作。
count比较特殊,会实际执行一次指令runCommand,需要参数with_limit_and_skip。如果参数为nil或false,则执行会忽略skip和limit,反之,会加上。
源码(sort、 skip、limit、count ):
-- cursor:sort { key = 1 } or cursor:sort( {key1 = 1}, {key2 = -1})
function mongo_cursor:sort(key, key_v, ...)if key_v thenlocal key_list = unfold({}, key, key_v , ...)key = bson_encode_order(table.unpack(key_list))endself.__sort = keyreturn self
endfunction mongo_cursor:skip(amount)self.__skip = amountreturn self
endfunction mongo_cursor:limit(amount)self.__limit = amountreturn self
endfunction mongo_cursor:count(with_limit_and_skip)local cmd = {'count', self.__collection.name,'query', self.__query,}if with_limit_and_skip thenlocal len = #cmdcmd[len+1] = 'limit'cmd[len+2] = self.__limitcmd[len+3] = 'skip'cmd[len+4] = self.__skipendlocal ret = self.__collection.database:runCommand(table.unpack(cmd))assert(ret and ret.ok == 1)return ret.n
end
update、safe_update
更新一条文档
- 用法:
db.collection:update(query,update,upsert,multi)、db.collection:safe_update(query,update,upsert,multi) upsert: 默认是false。如果不存在 query 对应条件的文档,是 true 则插入一条新文档,false 则不插入。multi: 默认是 false,只更新找到的第一条记录。是 true,就把按条件查出来多条记录全部更新。
示例代码:
function test_update()local ok, err, rlocal c = create_client()local db = c[db_name]db.testcol:dropIndex("*")db.testcol:drop()db.testcol:safe_insert({test_key = 1, test_key2 = 1})db.testcol:safe_insert({test_key = 1, test_key2 = 2})-- ok, err, r = db.testcol:safe_update({test_key2 = 2}, { ['$set'] = {test_key = 2} }, true, false)-- assert(ok and r and r.n == 1)ok, err, r = db.testcol:safe_update({test_key = 1}, { ['$set'] = {test_key2 = 3} }, true, true)assert(ok and r and r.n == 2)
end
aggregate
聚合,将来自多个 doc 的 value 组合在一起,并通过对分组数据进行各种操作处理,返回计算后的数据结果,主要用于处理数据(例如统计平均值,求和等)。
- 用法:
db.collection:aggregate({ { ["$project"] = {tags = 1} } }, {cursor={}}) @param pipeline: array@param options: map
测试代码:
function test_runcommand()local ok, err, retlocal c = create_client()local db = c[db_name]db.testcol:dropIndex("*")db.testcol:drop()ok, err, ret = db.testcol:safe_insert({test_key = 1, test_key2 = 1})assert(ok and ret and ret.n == 1, err)ok, err, ret = db.testcol:safe_insert({test_key = 1, test_key2 = 2})assert(ok and ret and ret.n == 1, err)ok, err, ret = db.testcol:safe_insert({test_key = 2, test_key2 = 3})assert(ok and ret and ret.n == 1, err)local pipeline = {{["$group"] = {_id = mongo.null,test_key_total = { ["$sum"] = "$test_key"},test_key2_total = { ["$sum"] = "$test_key2" },}}}ret = db:runCommand("aggregate", "testcol", "pipeline", pipeline, "cursor", {})assert(ret and ret.cursor.firstBatch[1].test_key_total == 4)assert(ret and ret.cursor.firstBatch[1].test_key2_total == 6)local res = db.testcol:aggregate(pipeline, {cursor={}})assert(res and res.cursor.firstBatch[1].test_key_total == 4)assert(res and res.cursor.firstBatch[1].test_key2_total == 6)
end
官方的 aggregate 接口手册:https://www.mongodb.com/docs/manual/reference/command/aggregate/
safe_batch_insert、safe_batch_delete
批量插入和删除
- 用法:
db.collection:safe_batch_insert(docs)、db.collection:safe_batch_delete(docs)
测试代码:
function test_batch_insert_delete()local ok, err, retlocal c = create_client()local db = c[db_name]db.testcol:dropIndex("*")db.testcol:drop()local insert_docs = {}local insert_length = 10for i = 1, insert_length do table.insert(insert_docs, {test_key = i})end db.testcol:safe_batch_insert(insert_docs)ret = db.testcol:find()assert(insert_length == ret:count(), "test safe batch insert failed")local delete_docs = {}local delete_length = 5for i = 1, delete_length do table.insert(delete_docs, {test_key = i})end db.testcol:safe_batch_delete(delete_docs)assert(ret:count() == insert_length - delete_length, "test safe batch delete failed")
end
更多的 skynet.db.mongo 模块用法可以去源码阅读查看。
附上 MongoDB 7.0 Manual
相关文章:
【MongoDB】Ubuntu22.04 下安装 MongoDB | 用户权限认证 | skynet.db.mongo 模块使用
文章目录 Ubuntu 22.04 安装 MongoDB后台启动 MongoDBshell 连入 MongoDB 服务 MongoDB 用户权限认证创建 root 用户开启认证重启 MongoDB 服务创建其他用户查看用户信息验证用户权限删除用户 skynet.db.mongo 模块使用authensureIndexfind、findOneinsert、safe_insertdelete、…...
Python对象序列化
迷途小书童的 Note 读完需要 7分钟 速读仅需 3 分钟 大家好,我是迷途小书童! 在 Python 开发中,我们经常需要将对象数据保存到磁盘,或者通过网络传输对象信息。这时就需要序列化,Pickle 库为我们提供了极为方便的对象序…...
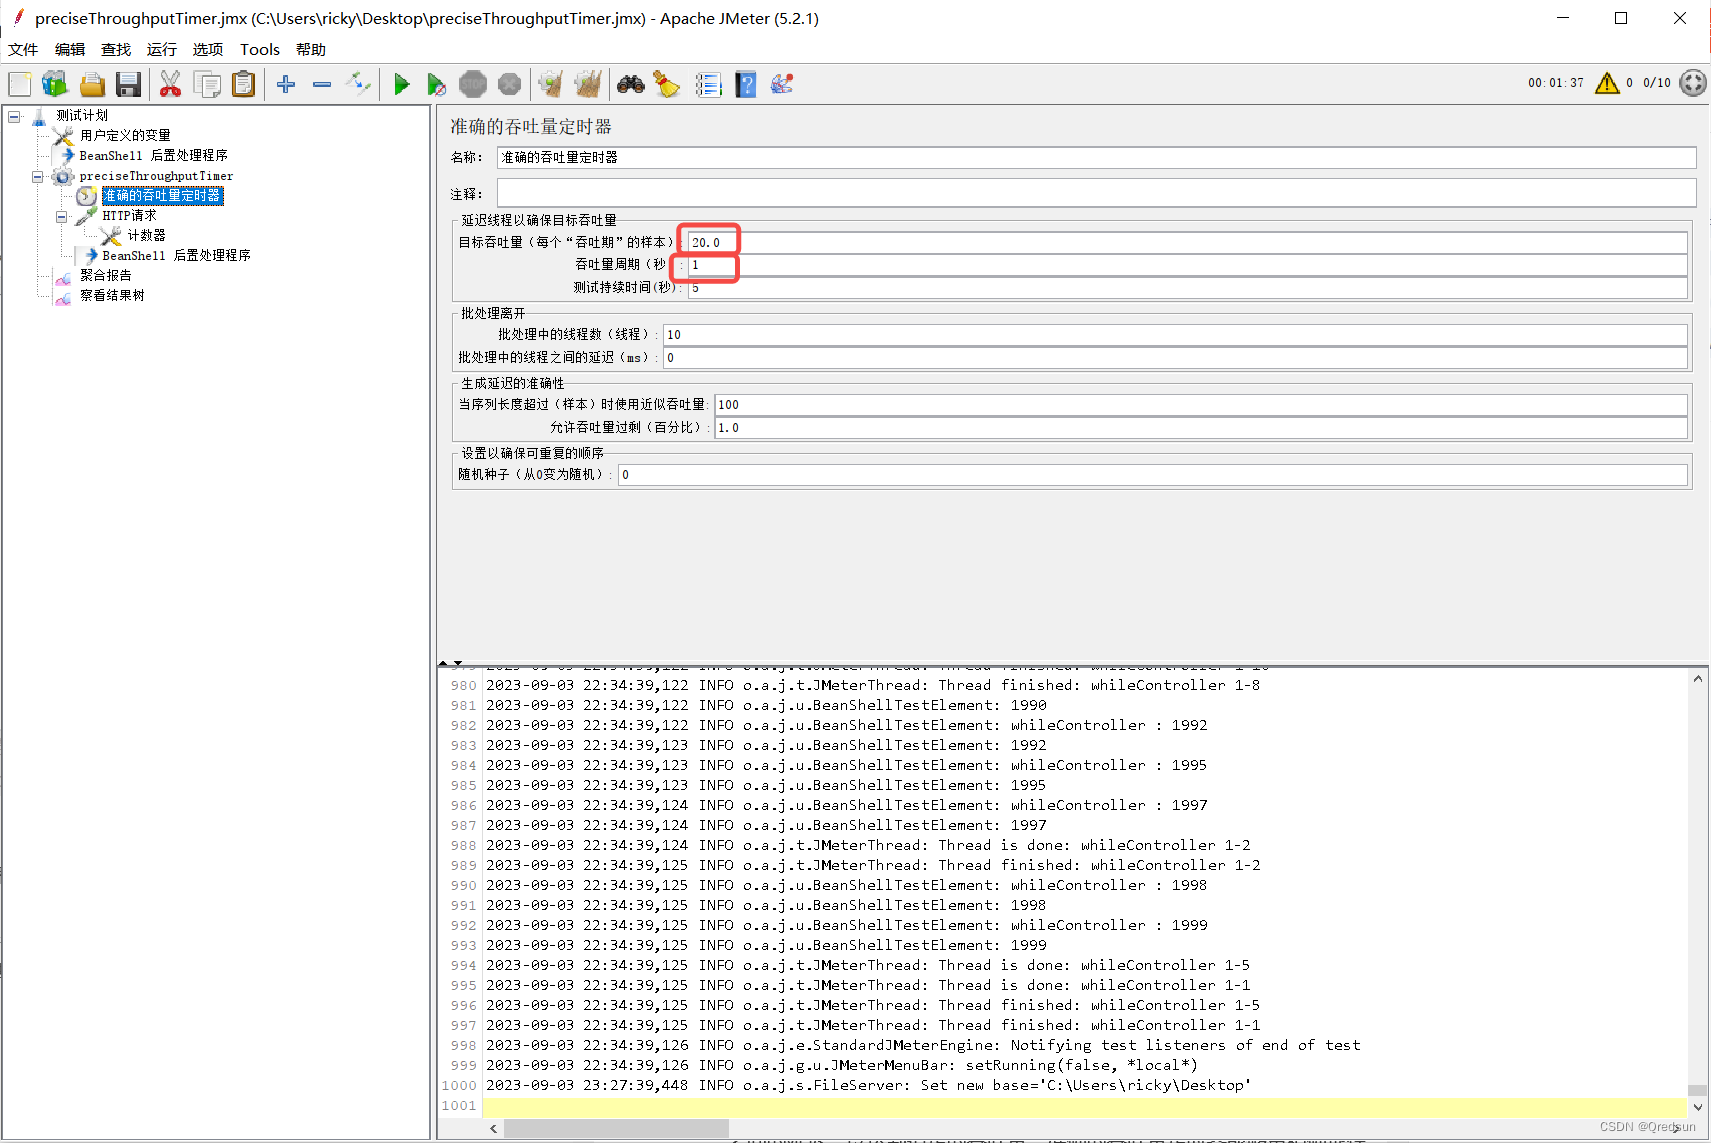
jmeter 准确的吞吐量定时器 Precise Throughput Timer
准确的吞吐量定时器使用实例 提取码:gpex: 说明:配置10个线程,每个线程请求200次,通过准确地的定时器模拟QPS为20的场景 配置测试接口参考链接 配置jmeter测试脚本,主要关注准确的吞吐量定时器参数配置 目…...
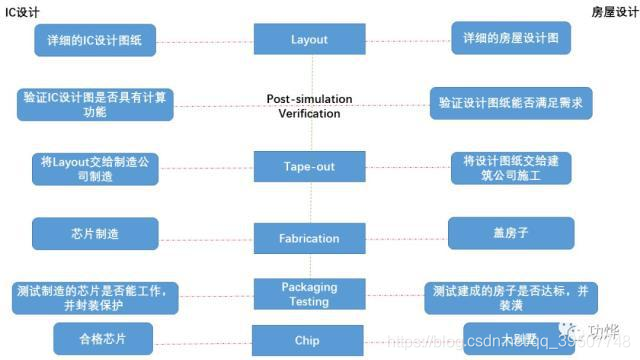
后端/DFT/ATPG/PCB/SignOff设计常用工具/操作/流程及一些文件类型
目录 1.PD/DFT常用工具及流程 1.1 FC和ICC2 1.2 LC (Library compiler) 1.3 PrimeTime 1.4 Redhawk与PA 1.5 Calibre和物理验证PV 1.6 芯片设计流程 2.后端、DFT、ATPG的一些常见文件 2.1 LEF和DEF 2.2 ATPG的CTL和STIL 2.3 BSDL 2.4 IPXCT 3.PCB设计的一些工作和工…...

jvm 程序计算器 程序计数器是否溢出 程序计数器是做什么的 java程序计数器会内存溢出吗 程序计数器作用与用处 jvm内存模型 jvm合集(一)
1. jvm内存模型: 内存模型: 程序计数器 堆 栈 本地方法栈 方法区 2. java代码编译为class文件,由类加载器加载到jvm,然后由解释器,jit即时编译到机器码,机器码再到cpu执行 3. 程序计数器: 是一块较小的内存…...
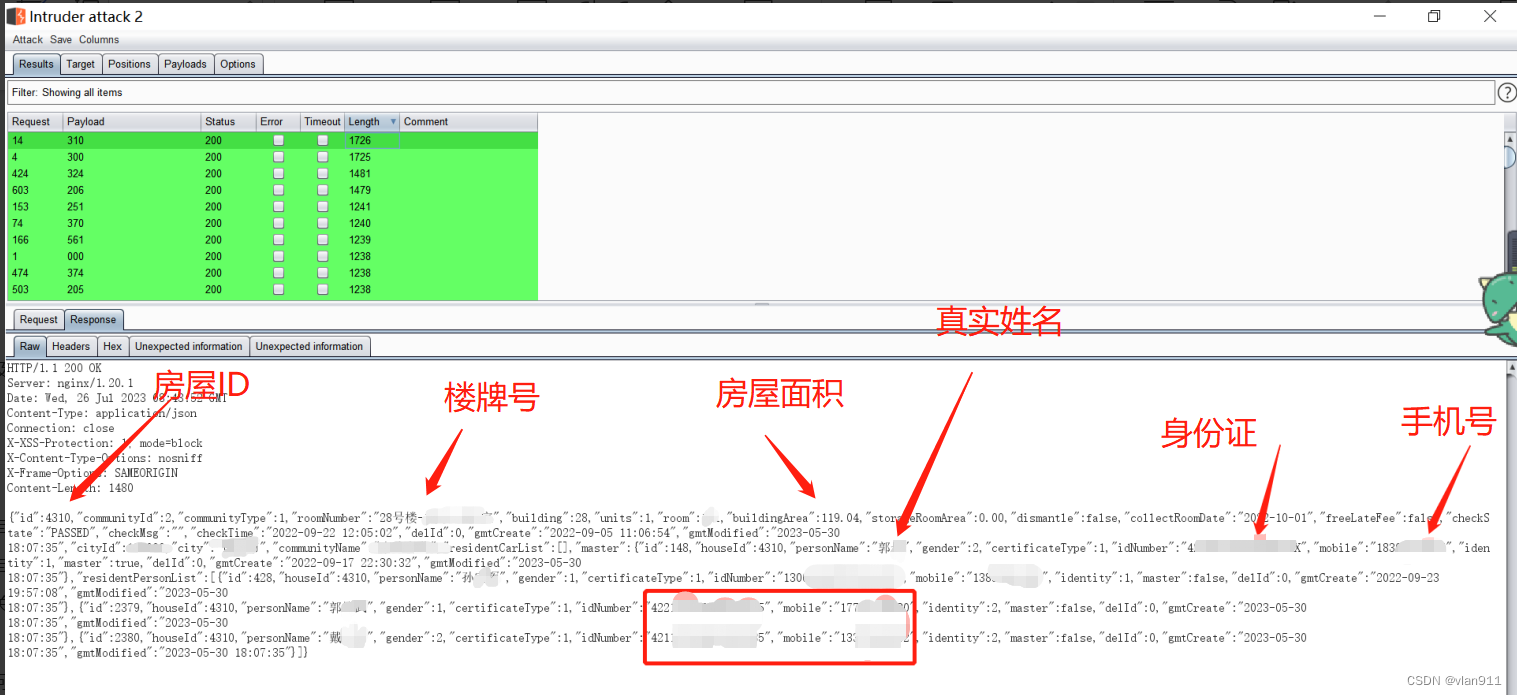
关于近期小程序测试的常见漏洞演示
本章节将为大家介绍一下小程序常见的漏洞的展示案例,包括支付业务逻辑漏洞、任意用户登录漏洞、水平越权漏洞等高危漏洞。 以上小程序测试均获取授权,并且客户均已得到修复(仅供学习,请勿恶意攻击) 关于微信小程序如何拦截数据包ÿ…...
磐基2.0部署apisix集群
一、部署etcd集群 由于etcd是磐基2.0的组件服务,直接通过组件部署即可。如需手动部署,参考如下链接 k8s 部署etcd集群_k8s部署etcd_平凡似水的人生的博客-CSDN博客前言公司计划使用etcd来做统一配置管理,由于服务都在阿里云托管k8s集群上&a…...

Python requests爬虫豆瓣图片返回数据为空。
爬个豆瓣图片,记录个小问题,发现爬取豆瓣原图的时候拿不到数据,返回为空,爬小图可以,爬其他网站的也都正常,最后发现是header中If-Modified-Since这个参数的原因,加上了就拿不到数据,…...

【Spring事务的实现原理】
Spring事务的实现原理就是通过拦截Transactional注解标识的方法,使用事务增强器对这些方法进行事务管理。其中关键的是事务管理器和事务属性源的配置和使用。Spring事务的实现原理可以简单理解为以下几个步骤: 从配置文件中获取PlatformTransactionManag…...

摆动输入连杆夹持机构
1、运动与受力分析 import sympy as sy import numpy as np import matplotlib.pyplot as plt a,a1,b,b1,c,c1,d2,d3,fi,F,L,e sy.symbols(a,a1,b,b1,c,c1,d2,d3,fi,F,L,e)A(-d2,0) D(0,d3) B(-d2a*cos(fi),a*sin(fi)) C(-c*cos(pu),d3c*sin(pu)) B(-d2a*cos(fipi),a*sin(fipi…...

C++——类与对象(下篇)
前言 前面已经介绍了类与对象(上),类与对象(中)的两篇文章,下面是类与对象的最后一些重要知识点的介绍和总结。 目录 再谈构造函数Static成员友元内部类匿名对象拷贝对象时的一些编译器优化再次理解封装…...

stm32 freeRTOS lwip TCP快速发送,内存泄露问题
现象1: 发送缓慢,tcp_write之后要等200多ms才能过发送出去,而且粘包严重。 解决办法 tcp_write之后,立马调用tcp_output ,tcp就会立马发送。 tcp_write tcp_output 现象2: 持续快速发送和接受TCP数据出…...

Ei、Scopus双检索 | 2024年第三届人工智能与机器学习前沿国际会议(FAIML 2024)
会议简介 Brief Introduction 2024年第三届人工智能与机器学习前沿国际会议(FAIML 2024) 会议时间:2024年4月26日-28日 召开地点:中国宜昌 大会官网:www.faiml.org FAIML 2024将围绕“人工智能与机器学习”的最新研究领域而展开,为…...

win10环境下搭建QT+opencv
安装步骤 源码编译安装免编译/cmake安装vs2022环境安装 问题解决 modules/core/CMakeFiles/opencv_core.dir/vs_version.rc.obj] Error 1 PS D:\Qt\Tools\mingw730_64\bin> D:\Qt\Tools\mingw730_64\bin\windres.exe D:\Opencv\opencv\opencv\build\modules\core\vs_ver…...
React16、18 使用 Redux
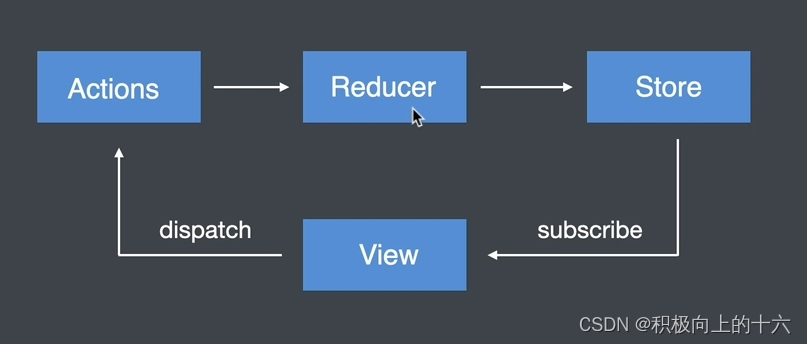
Redux 核心 Redux 介绍 Redux 是javaScript 状态容器,提供可预测化的状态管理 Redux 工作流程 Actions:对象,描述对状态进行怎样的操作 Reducer:函数,操作状态并返回新的状态 Store:存储状态的容器&am…...

【Python】Python运算符/部分函数对应的双下划线魔法方法
先说下Python版本:【Python 3.7.8】 以下用图片表格展示,一是防扒,二是没精力改成md格式。 还有就是内容肯定没有完全包含(而且也很难做到),像是__reduce__与py自带模块pickle有关(pickle用于对象序列化/反序列化)、sys.getsizeo…...
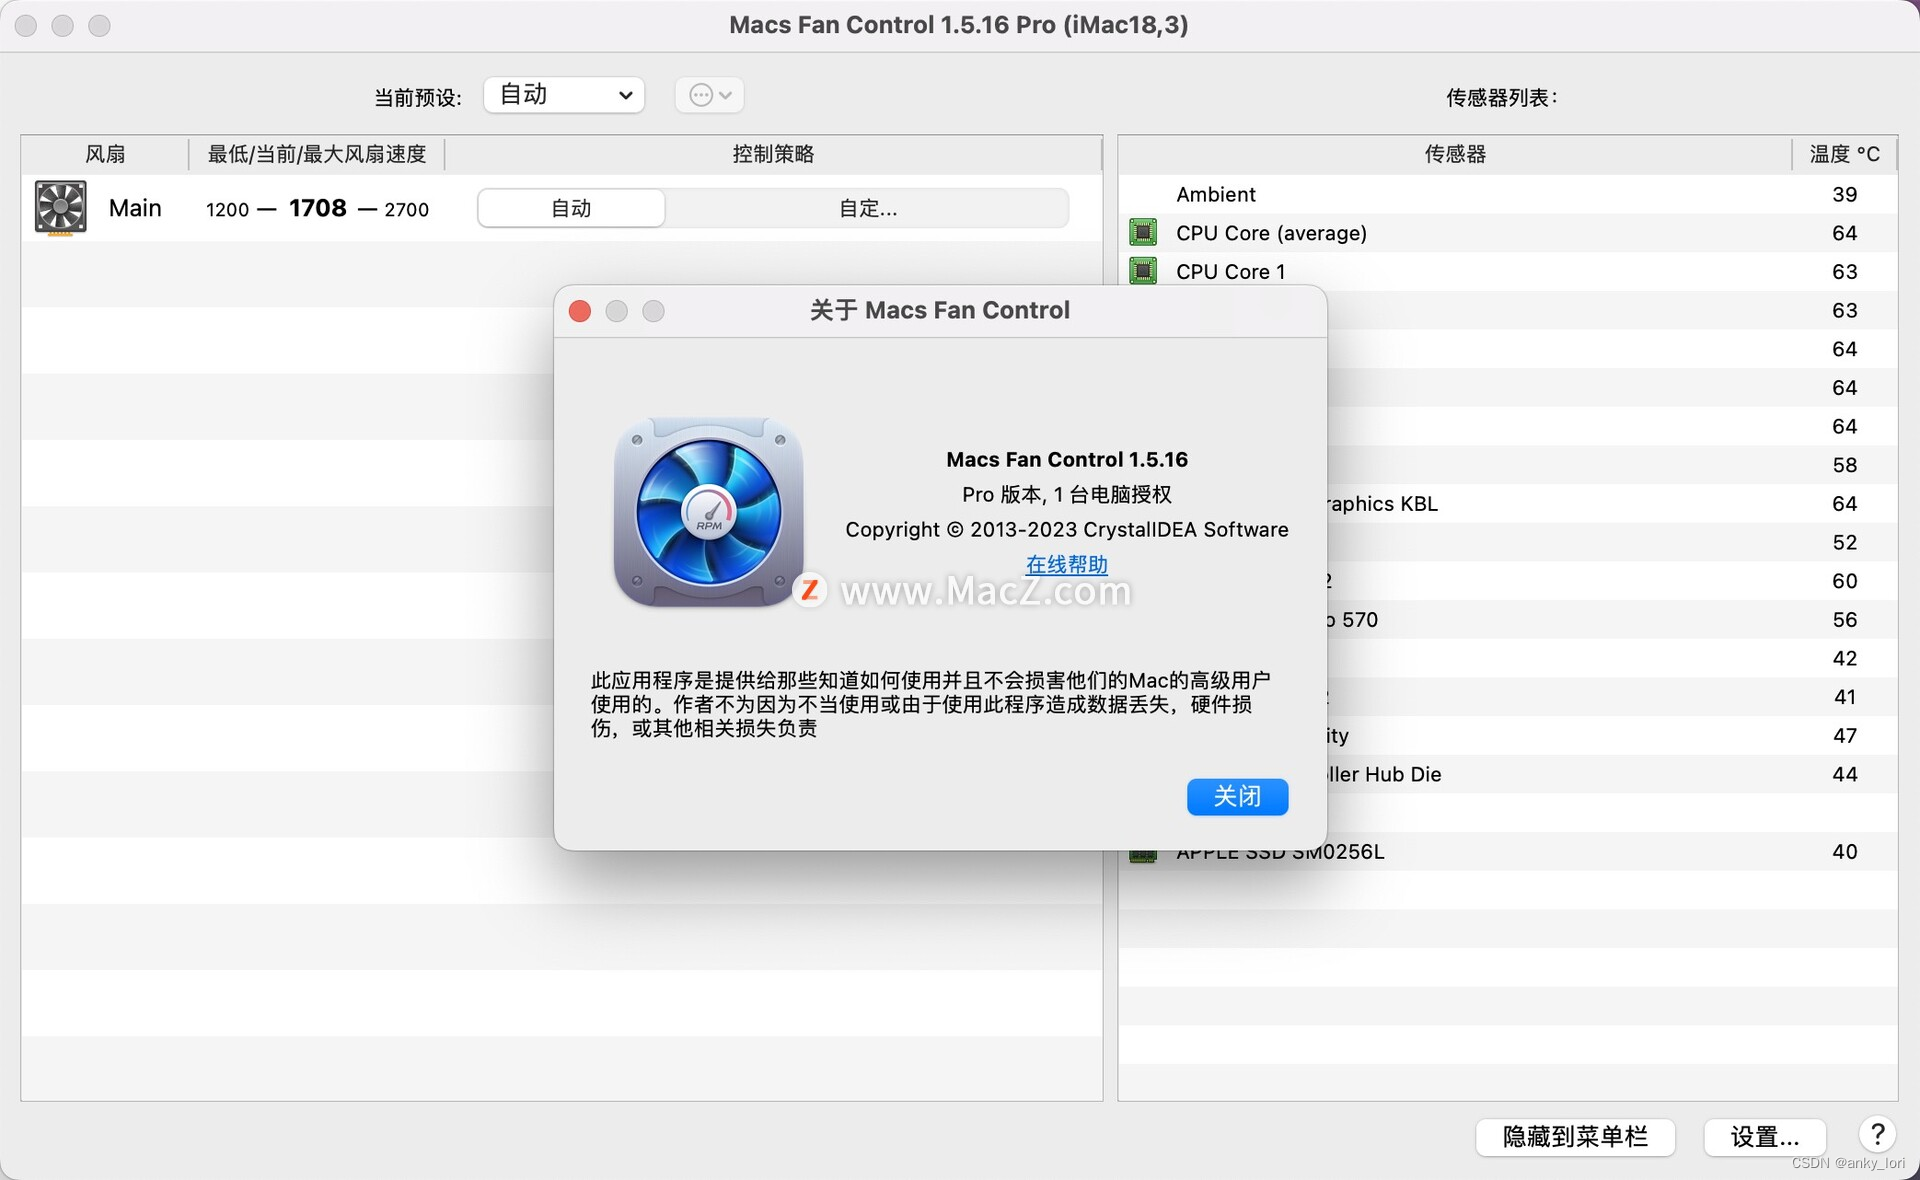
Macs Fan Control 1.5.16 Pro for mac风扇调节软件
Macs Fan Control是一款专门为 Mac 用户设计的软件,它可以帮助用户控制和监控 Mac 设备的风扇速度和温度。这款软件允许用户手动调整风扇速度,以提高设备的散热效果,减少过热造成的风险。 Macs Fan Control 可以在菜单栏上显示当前系统温度和…...

某技术公司技术二面面试题总结
存在一个单体架构的服务,怎么拆分为微服务的架构 将一个单体应用程序拆分成微服务架构是一个复杂的过程,需要深入的计划和实施。以下是一般的步骤和策略,可以帮助您成功地将单体应用程序拆分为微服务: 理解单体应用程序ÿ…...

初试小程序轮播组件
文章目录 一、轮播组件(一)swiper组件1、功能描述2、属性说明 (二)swiper-item组件1、功能描述2、属性说明 二、案例演示(一)运行效果(二)实现步骤1、创建小程序项目2、准备图片素材…...

Centos7 Yum安装PHP7.2
1、安装源 安装php72w,是需要配置额外的yum源地址的,否则会报错不能找到相关软件包。 php高版本的yum源地址,有两部分,其中一部分是epel-release,另外一部分来自webtatic。如果跳过epel-release的话,安装…...
)
rknn优化教程(二)
文章目录 1. 前述2. 三方库的封装2.1 xrepo中的库2.2 xrepo之外的库2.2.1 opencv2.2.2 rknnrt2.2.3 spdlog 3. rknn_engine库 1. 前述 OK,开始写第二篇的内容了。这篇博客主要能写一下: 如何给一些三方库按照xmake方式进行封装,供调用如何按…...
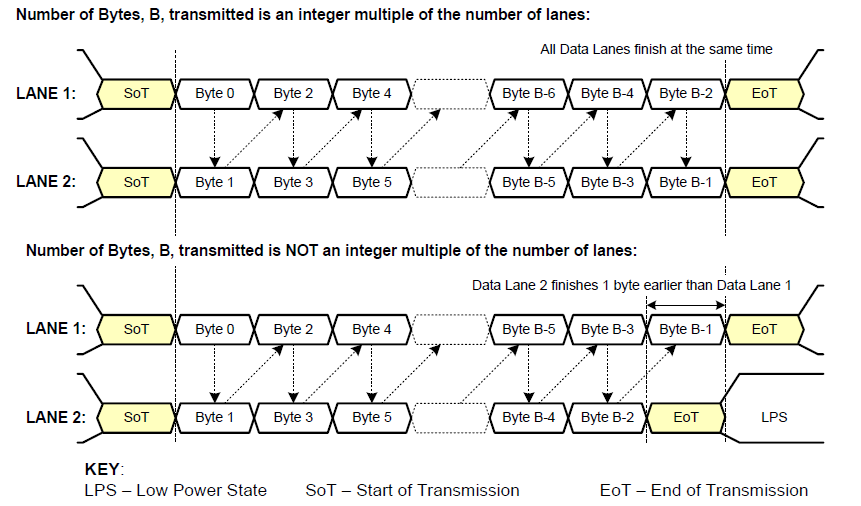
《从零掌握MIPI CSI-2: 协议精解与FPGA摄像头开发实战》-- CSI-2 协议详细解析 (一)
CSI-2 协议详细解析 (一) 1. CSI-2层定义(CSI-2 Layer Definitions) 分层结构 :CSI-2协议分为6层: 物理层(PHY Layer) : 定义电气特性、时钟机制和传输介质(导线&#…...

对WWDC 2025 Keynote 内容的预测
借助我们以往对苹果公司发展路径的深入研究经验,以及大语言模型的分析能力,我们系统梳理了多年来苹果 WWDC 主题演讲的规律。在 WWDC 2025 即将揭幕之际,我们让 ChatGPT 对今年的 Keynote 内容进行了一个初步预测,聊作存档。等到明…...

[10-3]软件I2C读写MPU6050 江协科技学习笔记(16个知识点)
1 2 3 4 5 6 7 8 9 10 11 12 13 14 15 16...

ETLCloud可能遇到的问题有哪些?常见坑位解析
数据集成平台ETLCloud,主要用于支持数据的抽取(Extract)、转换(Transform)和加载(Load)过程。提供了一个简洁直观的界面,以便用户可以在不同的数据源之间轻松地进行数据迁移和转换。…...
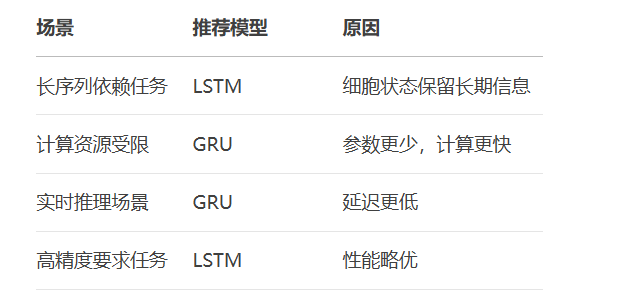
RNN避坑指南:从数学推导到LSTM/GRU工业级部署实战流程
本文较长,建议点赞收藏,以免遗失。更多AI大模型应用开发学习视频及资料,尽在聚客AI学院。 本文全面剖析RNN核心原理,深入讲解梯度消失/爆炸问题,并通过LSTM/GRU结构实现解决方案,提供时间序列预测和文本生成…...
相比,优缺点是什么?适用于哪些场景?)
Redis的发布订阅模式与专业的 MQ(如 Kafka, RabbitMQ)相比,优缺点是什么?适用于哪些场景?
Redis 的发布订阅(Pub/Sub)模式与专业的 MQ(Message Queue)如 Kafka、RabbitMQ 进行比较,核心的权衡点在于:简单与速度 vs. 可靠与功能。 下面我们详细展开对比。 Redis Pub/Sub 的核心特点 它是一个发后…...
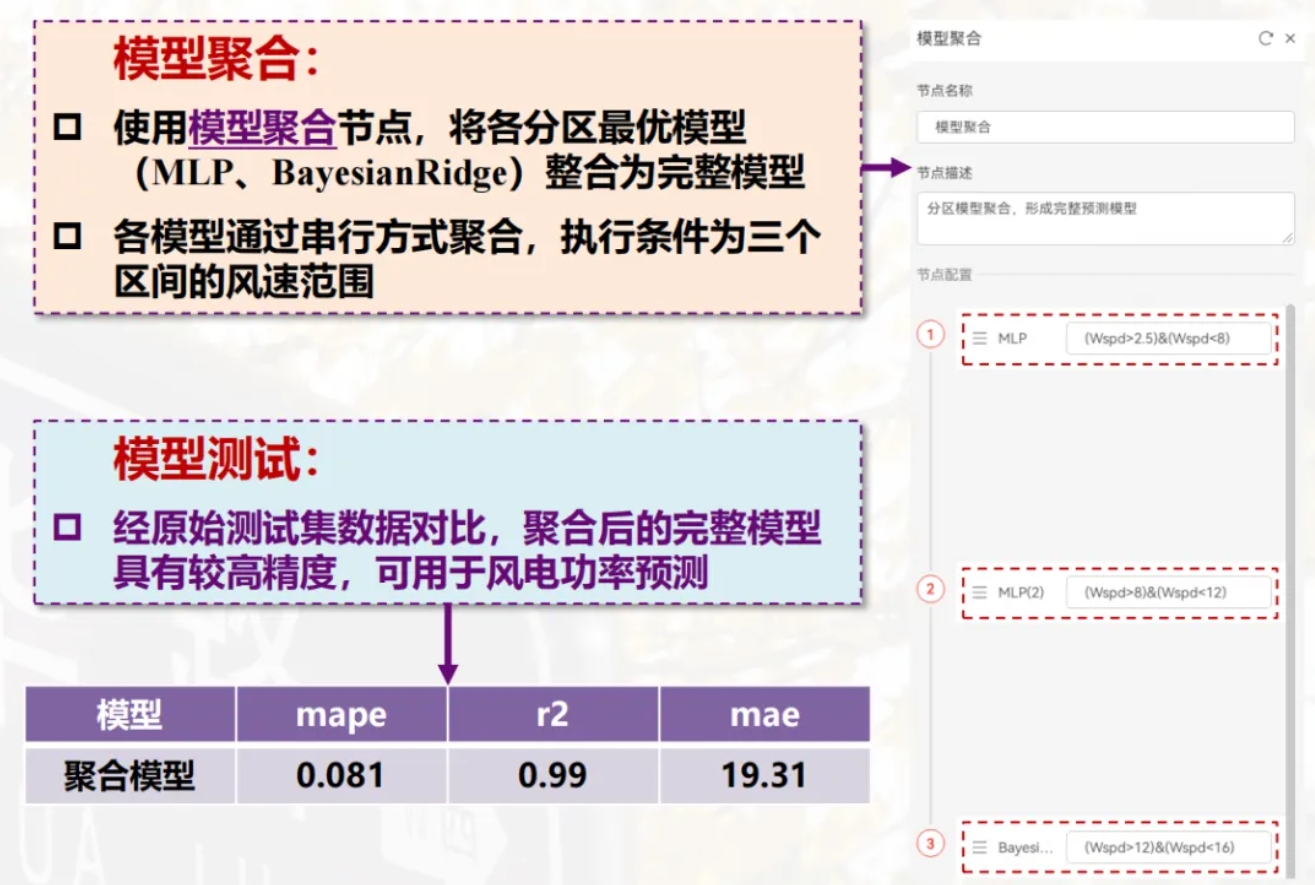
用机器学习破解新能源领域的“弃风”难题
音乐发烧友深有体会,玩音乐的本质就是玩电网。火电声音偏暖,水电偏冷,风电偏空旷。至于太阳能发的电,则略显朦胧和单薄。 不知你是否有感觉,近两年家里的音响声音越来越冷,听起来越来越单薄? —…...

LangChain知识库管理后端接口:数据库操作详解—— 构建本地知识库系统的基础《二》
这段 Python 代码是一个完整的 知识库数据库操作模块,用于对本地知识库系统中的知识库进行增删改查(CRUD)操作。它基于 SQLAlchemy ORM 框架 和一个自定义的装饰器 with_session 实现数据库会话管理。 📘 一、整体功能概述 该模块…...

AirSim/Cosys-AirSim 游戏开发(四)外部固定位置监控相机
这个博客介绍了如何通过 settings.json 文件添加一个无人机外的 固定位置监控相机,因为在使用过程中发现 Airsim 对外部监控相机的描述模糊,而 Cosys-Airsim 在官方文档中没有提供外部监控相机设置,最后在源码示例中找到了,所以感…...