关键点数据增强
1.关键点数据增强
# 关键点数据增强
from PIL import Image, ImageDraw
import random
import json
from pathlib import Path# 创建一个黑色背景图像
width, height = 5000, 5000  # 图像宽度和高度
background_color = (0, 0, 0)  # 黑色填充# 随机分布图像
num_images = 1  # 要随机分布的图像数量
folder_path = Path("E:/2") # 测试图像目录
output_path = Path("E:/5") # 输出图像目录
for file in folder_path.rglob("*.jpg"):# eg: file = "目录名/123.jpg",file_name = "123.jpg"file_name = file.nameimage_origin = Image.open(file)width_origin,height_origin = image_origin.sizefor _ in range(num_images):#随机选择图像的位置x = random.randint(0, width - width_origin)y = random.randint(0, height - height_origin)print(x,y)canvas = Image.new("RGB", (width,height), background_color) #新建一个mask,全黑填充canvas.paste(image_origin, (x,y)) #将原图从(x,y)处粘贴到mask上Path.mkdir(output_path, exist_ok=True)img_name = 'a' + '_' + file_name #改变增强后图片的名字canvas.save(output_path / img_name)jsonFile = file.with_suffix(".json")print(jsonFile)if Path.exists(jsonFile): #判断图片是否有对应的json文件print(f"找到{file}的Json文件")with open(jsonFile, "r", encoding="utf-8") as f:objectDict = json.load(f)objectDict["imageData"] =  None # 清空json文件里加密的imgdataobjectDict["imageHeight"] = heightobjectDict["imageWidth"] = widthjson_name = 'a' + '_' + jsonFile.name #改变增强后json文件的名字for i in range(len(objectDict["shapes"])):if objectDict["shapes"][i]["shape_type"] in ["rectangle","line"]: #矩形框、线段objectDict["shapes"][i]['points'][0][0]+=xobjectDict["shapes"][i]['points'][0][1]+=yobjectDict["shapes"][i]['points'][1][0]+=xobjectDict["shapes"][i]['points'][1][1]+=yif objectDict["shapes"][i]["shape_type"] in ["polygon"]: #多段线for polygonMat in objectDict["shapes"][i]['points']:polygonMat[0]+=xpolygonMat[1]+=yif objectDict["shapes"][i]["shape_type"] in ["point"]: #关键点objectDict["shapes"][i]['points'][0][0]+=xobjectDict["shapes"][i]['points'][0][1]+=ywith open(output_path / json_name, 'w',encoding='utf-8') as f:json.dump(objectDict, f)else:print("没有Json文件")
2.关键点可视化
# 可视化关键点位置
import cv2
import numpy as np
import json
import matplotlib.pyplot as plt# 载入图像
img_path = 'meter_6_25.jpg'
img_bgr = cv2.imread(img_path)# 载入labelme格式的json标注文件
labelme_path = 'meter_6_25.json'with open(labelme_path, 'r', encoding='utf-8') as f:labelme = json.load(f)# 查看标注信息  rectangle:矩形  point:点  polygon:多边形
# print(labelme.keys())
# dict_keys(['version', 'flags', 'shapes', 'imagePath', 'imageData', 'imageHeight', 'imageWidth'])
# print(labelme['shapes'])# <<<<<<<<<<<<<<<<<<可视化框(rectangle)标注>>>>>>>>>>>>>>>>>>>>>
# 框可视化配置
bbox_color = (255, 129, 0)           # 框的颜色
bbox_thickness = 5                   # 框的线宽# 框类别文字
bbox_labelstr = {'font_size':6,         # 字体大小'font_thickness':14,   # 字体粗细'offset_x':0,          # X 方向,文字偏移距离,向右为正'offset_y':-80,       # Y 方向,文字偏移距离,向下为正
}
# 画框
for each_ann in labelme['shapes']:  # 遍历每一个标注if each_ann['shape_type'] == 'rectangle':  # 筛选出框标注# 框的类别bbox_label = each_ann['label']# 框的两点坐标bbox_keypoints = each_ann['points']bbox_keypoint_A_xy = bbox_keypoints[0]bbox_keypoint_B_xy = bbox_keypoints[1]# 左上角坐标bbox_top_left_x = int(min(bbox_keypoint_A_xy[0], bbox_keypoint_B_xy[0]))bbox_top_left_y = int(min(bbox_keypoint_A_xy[1], bbox_keypoint_B_xy[1]))# 右下角坐标bbox_bottom_right_x = int(max(bbox_keypoint_A_xy[0], bbox_keypoint_B_xy[0]))bbox_bottom_right_y = int(max(bbox_keypoint_A_xy[1], bbox_keypoint_B_xy[1]))# 画矩形:画框img_bgr = cv2.rectangle(img_bgr, (bbox_top_left_x, bbox_top_left_y), (bbox_bottom_right_x, bbox_bottom_right_y),bbox_color, bbox_thickness)# 写框类别文字:图片,文字字符串,文字左上角坐标,字体,字体大小,颜色,字体粗细img_bgr = cv2.putText(img_bgr, bbox_label, (bbox_top_left_x + bbox_labelstr['offset_x'],bbox_top_left_y + bbox_labelstr['offset_y']),cv2.FONT_HERSHEY_SIMPLEX, bbox_labelstr['font_size'], bbox_color,bbox_labelstr['font_thickness'])# <<<<<<<<<<<<<<<<<<可视化关键点(keypoint)标注>>>>>>>>>>>>>>>>>>>>>
# 关键点的可视化配置
# 关键点配色
kpt_color_map = {'0': {'name': '0', 'color': [0, 0, 255], 'radius': 25, 'thickness':-1},'1': {'name': '1', 'color': [255, 0, 0], 'radius': 25, 'thickness':-1},'2': {'name': '2', 'color': [255, 0, 0], 'radius': 25, 'thickness':-1},'3': {'name': '3', 'color': [0, 255, 0], 'radius': 25, 'thickness':-1},'4': {'name': '4', 'color': [0, 255, 0], 'radius': 25, 'thickness':-1},'5': {'name': '5', 'color': [193, 182, 255], 'radius': 25, 'thickness':-1},'6': {'name': '6', 'color': [193, 182, 255], 'radius': 25, 'thickness':-1},# '7': {'name': '7', 'color': [16, 144, 247], 'radius': 25},# '8': {'name': '8', 'color': [16, 144, 247], 'radius': 25},
}# 点类别文字
kpt_labelstr = {'font_size':4,             # 字体大小'font_thickness':12,       # 字体粗细'offset_x':30,             # X 方向,文字偏移距离,向右为正'offset_y':100,            # Y 方向,文字偏移距离,向下为正
}# 画点
for each_ann in labelme['shapes']:  # 遍历每一个标注if each_ann['shape_type'] == 'point':  # 筛选出关键点标注kpt_label = each_ann['label']  # 该点的类别# 该点的 XY 坐标kpt_xy = each_ann['points'][0]kpt_x, kpt_y = int(kpt_xy[0]), int(kpt_xy[1])# 该点的可视化配置kpt_color = kpt_color_map[kpt_label]['color']  # 颜色kpt_radius = kpt_color_map[kpt_label]['radius']  # 半径kpt_thickness = kpt_color_map[kpt_label]['thickness']  # 线宽(-1代表填充)# 画圆:画该关键点img_bgr = cv2.circle(img_bgr, (kpt_x, kpt_y), kpt_radius, kpt_color, kpt_thickness)# 写该点类别文字:图片,文字字符串,文字左上角坐标,字体,字体大小,颜色,字体粗细img_bgr = cv2.putText(img_bgr, kpt_label, (kpt_x + kpt_labelstr['offset_x'], kpt_y + kpt_labelstr['offset_y']),cv2.FONT_HERSHEY_SIMPLEX, kpt_labelstr['font_size'], kpt_color,kpt_labelstr['font_thickness'])# # <<<<<<<<<<<<<<<<<<可视化多段线(polygon)标注>>>>>>>>>>>>>>>>>>>>>
# # 多段线的可视化配置
# poly_color = (151, 57, 224)
# poly_thickness = 3
#
# poly_labelstr = {
#     'font_size':4,          # 字体大小
#     'font_thickness':12,    # 字体粗细
#     'offset_x':-200,        # X 方向,文字偏移距离,向右为正
#     'offset_y':0,           # Y 方向,文字偏移距离,向下为正
# }
#
# # 画多段线
# img_mask = np.ones(img_bgr.shape, np.uint8) #创建一个和img_bgr一样大小的黑色mask
#
# for each_ann in labelme['shapes']:  # 遍历每一个标注
#
#     if each_ann['shape_type'] == 'polygon':  # 筛选出多段线(polygon)标注
#
#         poly_label = each_ann['label']  # 该多段线的类别
#
#         poly_points = [np.array(each_ann['points'], np.int32).reshape((-1, 1, 2))]  #reshape后增加一个维度
#
#         # 该多段线平均 XY 坐标,用于放置多段线类别文字
#         x_mean = int(np.mean(poly_points[0][:, 0, :][:, 0])) #取出所有点的x坐标并求平均值
#         y_mean = int(np.mean(poly_points[0][:, 0, :][:, 1])) #取出所有点的y坐标并求平均值
#
#         # 画该多段线轮廓
#         img_bgr = cv2.polylines(img_bgr, poly_points, isClosed=True, color=poly_color, thickness=poly_thickness)
#
#         # 画该多段线内部填充
#         img_mask = cv2.fillPoly(img_mask, poly_points, color=poly_color) #填充的颜色为color=poly_color
#
#         # 写该多段线类别文字:图片,文字字符串,文字左上角坐标,字体,字体大小,颜色,字体粗细
#         img_bgr = cv2.putText(img_bgr, poly_label,
#                               (x_mean + poly_labelstr['offset_x'], y_mean + poly_labelstr['offset_y']),
#                               cv2.FONT_HERSHEY_SIMPLEX, poly_labelstr['font_size'], poly_color,
#                               poly_labelstr['font_thickness'])# opacity = 0.8 # 透明度,越大越接近原图
# img_bgr = cv2.addWeighted(img_bgr, opacity, img_mask, 1-opacity, 0)# 可视化
plt.imshow(img_bgr[:,:,::-1]) # 将bgr通道转换成rgb通道
plt.show()# 当前目录下保存可视化结果
cv2.imwrite('meter.jpg', img_bgr)
3.json2txt(用YOLOV8进行关键点训练)
#将坐标框、关键点、线段的json标注转换为txt
import os
import json
import shutil
import numpy as np
from tqdm import tqdm# 框的类别
bbox_class = {'meter3':0
}
# 关键点的类别,注意按顺序写
keypoint_class = ['0','1','2','3','4','5','6','7','8']path = 'E:/6' #json文件存放路径
save_folder='E:/7' #转换后的txt文件存放路径# 定义单个json文件的转换
def process_single_json(labelme_path, save_folder):with open(labelme_path, 'r', encoding='utf-8') as f:labelme = json.load(f)img_width = labelme['imageWidth']  # 图像宽度img_height = labelme['imageHeight']  # 图像高度# 生成 YOLO 格式的 txt 文件suffix = labelme_path.split('.')[-2]# print(suffix)yolo_txt_path = suffix + '.txt'# print(yolo_txt_path)with open(yolo_txt_path, 'w', encoding='utf-8') as f:for each_ann in labelme['shapes']:  # 遍历每个标注if each_ann['shape_type'] == 'rectangle':  # 每个框,在 txt 里写一行yolo_str = ''# 框的信息# 框的类别 IDbbox_class_id = bbox_class[each_ann['label']]yolo_str += '{} '.format(bbox_class_id)# 左上角和右下角的 XY 像素坐标bbox_top_left_x = int(min(each_ann['points'][0][0], each_ann['points'][1][0]))bbox_bottom_right_x = int(max(each_ann['points'][0][0], each_ann['points'][1][0]))bbox_top_left_y = int(min(each_ann['points'][0][1], each_ann['points'][1][1]))bbox_bottom_right_y = int(max(each_ann['points'][0][1], each_ann['points'][1][1]))# 框中心点的 XY 像素坐标bbox_center_x = int((bbox_top_left_x + bbox_bottom_right_x) / 2)bbox_center_y = int((bbox_top_left_y + bbox_bottom_right_y) / 2)# 框宽度bbox_width = bbox_bottom_right_x - bbox_top_left_x# 框高度bbox_height = bbox_bottom_right_y - bbox_top_left_y# 框中心点归一化坐标bbox_center_x_norm = bbox_center_x / img_widthbbox_center_y_norm = bbox_center_y / img_height# 框归一化宽度bbox_width_norm = bbox_width / img_width# 框归一化高度bbox_height_norm = bbox_height / img_heightyolo_str += '{:.5f} {:.5f} {:.5f} {:.5f} '.format(bbox_center_x_norm, bbox_center_y_norm,bbox_width_norm, bbox_height_norm)## 找到该框中所有关键点,存在字典 bbox_keypoints_dict 中bbox_keypoints_dict = {}for each_ann in labelme['shapes']:  # 遍历所有标注if each_ann['shape_type'] == 'point':  # 筛选出关键点标注# 关键点XY坐标、类别x = int(each_ann['points'][0][0])y = int(each_ann['points'][0][1])label = each_ann['label']if (x > bbox_top_left_x) & (x < bbox_bottom_right_x) & (y < bbox_bottom_right_y) & \(y > bbox_top_left_y):  # 筛选出在该个体框中的关键点bbox_keypoints_dict[label] = [x, y]if each_ann['shape_type'] == 'line':  # 筛选出线段标注# 起点XY坐标、类别x0 = int(each_ann['points'][0][0])y0 = int(each_ann['points'][0][1])label = each_ann['label']bbox_keypoints_dict[label] = [x0, y0]# 终点XY坐标、类别x1 = int(each_ann['points'][1][0])y1 = int(each_ann['points'][1][1])label = int(each_ann['label']) + 1 #将字符串转为整形,并+1,代表最后一个点label = str(label) #将整型转为字符串bbox_keypoints_dict[label] = [x1, y1]# print(bbox_keypoints_dict)# if (x > bbox_top_left_x) & (x < bbox_bottom_right_x) & (y < bbox_bottom_right_y) & \#         (y > bbox_top_left_y):  # 筛选出在该个体框中的关键点#     bbox_keypoints_dict[label] = [x, y]## 把关键点按顺序排好for each_class in keypoint_class:  # 遍历每一类关键点if each_class in bbox_keypoints_dict:keypoint_x_norm = bbox_keypoints_dict[each_class][0] / img_widthkeypoint_y_norm = bbox_keypoints_dict[each_class][1] / img_heightyolo_str += '{:.5f} {:.5f} {} '.format(keypoint_x_norm, keypoint_y_norm, 2)  # 2可见不遮挡 1遮挡 0没有点else:  # 不存在的点,一律为0# yolo_str += '0 0 0 '.format(keypoint_x_norm, keypoint_y_norm, 0)yolo_str += '0 0 0 '# yolo_str += ' '# 写入 txt 文件中f.write(yolo_str + '\n')shutil.move(yolo_txt_path, save_folder) #从yolo_txt_path文件夹中移动到save_folder文件夹中# print('{} --> {} 转换完成'.format(labelme_path, yolo_txt_path))# json2txt
for labelme_path0 in os.listdir(path):labelme_path = path + '/' + labelme_path0print(labelme_path)process_single_json(labelme_path, save_folder)
print('YOLO格式的txt标注文件已保存至 ', save_folder)
相关文章:

关键点数据增强
1.关键点数据增强 # 关键点数据增强 from PIL import Image, ImageDraw import random import json from pathlib import Path# 创建一个黑色背景图像 width, height 5000, 5000 # 图像宽度和高度 background_color (0, 0, 0) # 黑色填充# 随机分布图像 num_images 1 # …...

最小化安装移动云大云操作系统--BCLinux-for-Euler-22.10-everything-x86_64-230316版
CentOS 结束技术支持,转为RHEL的前置stream版本后,国内开源Linux服务器OS生态转向了开源龙蜥和开源欧拉两大开源社区,对应衍生出了一系列商用Linux服务器系统。BCLinux-for-Euler-22.10是中国移动基于开源欧拉操作系统22.03社区版本深度定制的…...

003传统图机器学习、图特征工程
文章目录 一. 人工特征工程、连接特征二. 在节点层面对连接特征进行特征提取三. 在连接层面对连接特征进行特征提取四. 在全图层面对连接特征进行特征提取 一. 人工特征工程、连接特征 节点、连接、子图、全图都有各自的属性特征, 属性特征一般是多模态的。除属性特…...
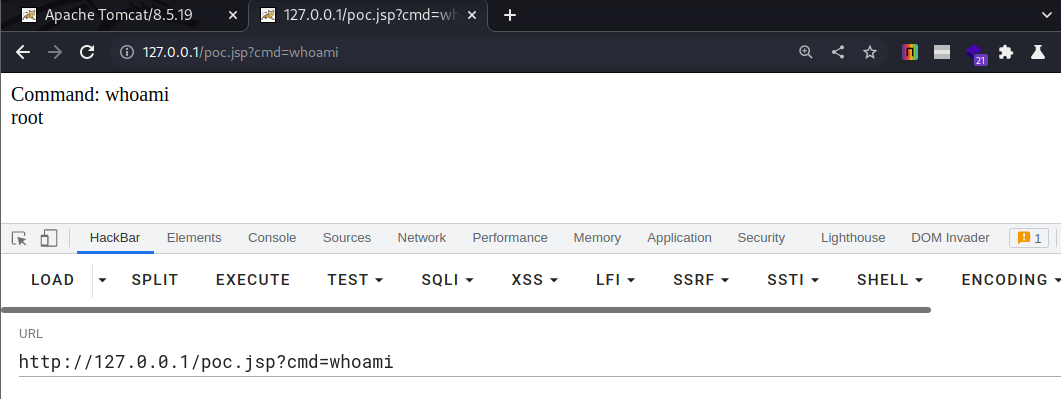
Apache Tomcat 漏洞复现
文章目录 Apache Tomcat 漏洞复现1. Tomcat7 弱密码和后端 Getshell 漏洞1.1 漏洞描述1.2 漏洞复现1.3 漏洞利用1.3.1 jsp小马1.3.2 jsp大马 1.4 安全加固 2. Aapache Tomcat AJP任意文件读取/包含漏洞2.1 漏洞描述2.1 漏洞复现2.2 漏洞利用工具2.4 修复建议 3. 通过 PUT 方法的…...

Oracle-常用权限-完整版
-- 创建用户 create user TCK identified by oracle; -- 赋权 grant connect,resource to TCK; -- 删除权限 revoke select any table from TCK -- 删除用户 CASCADE(用户下的数据级联删除) drop user TCK CASCADE -- 查询权限列表 select * from user_role_privs; select * fr…...
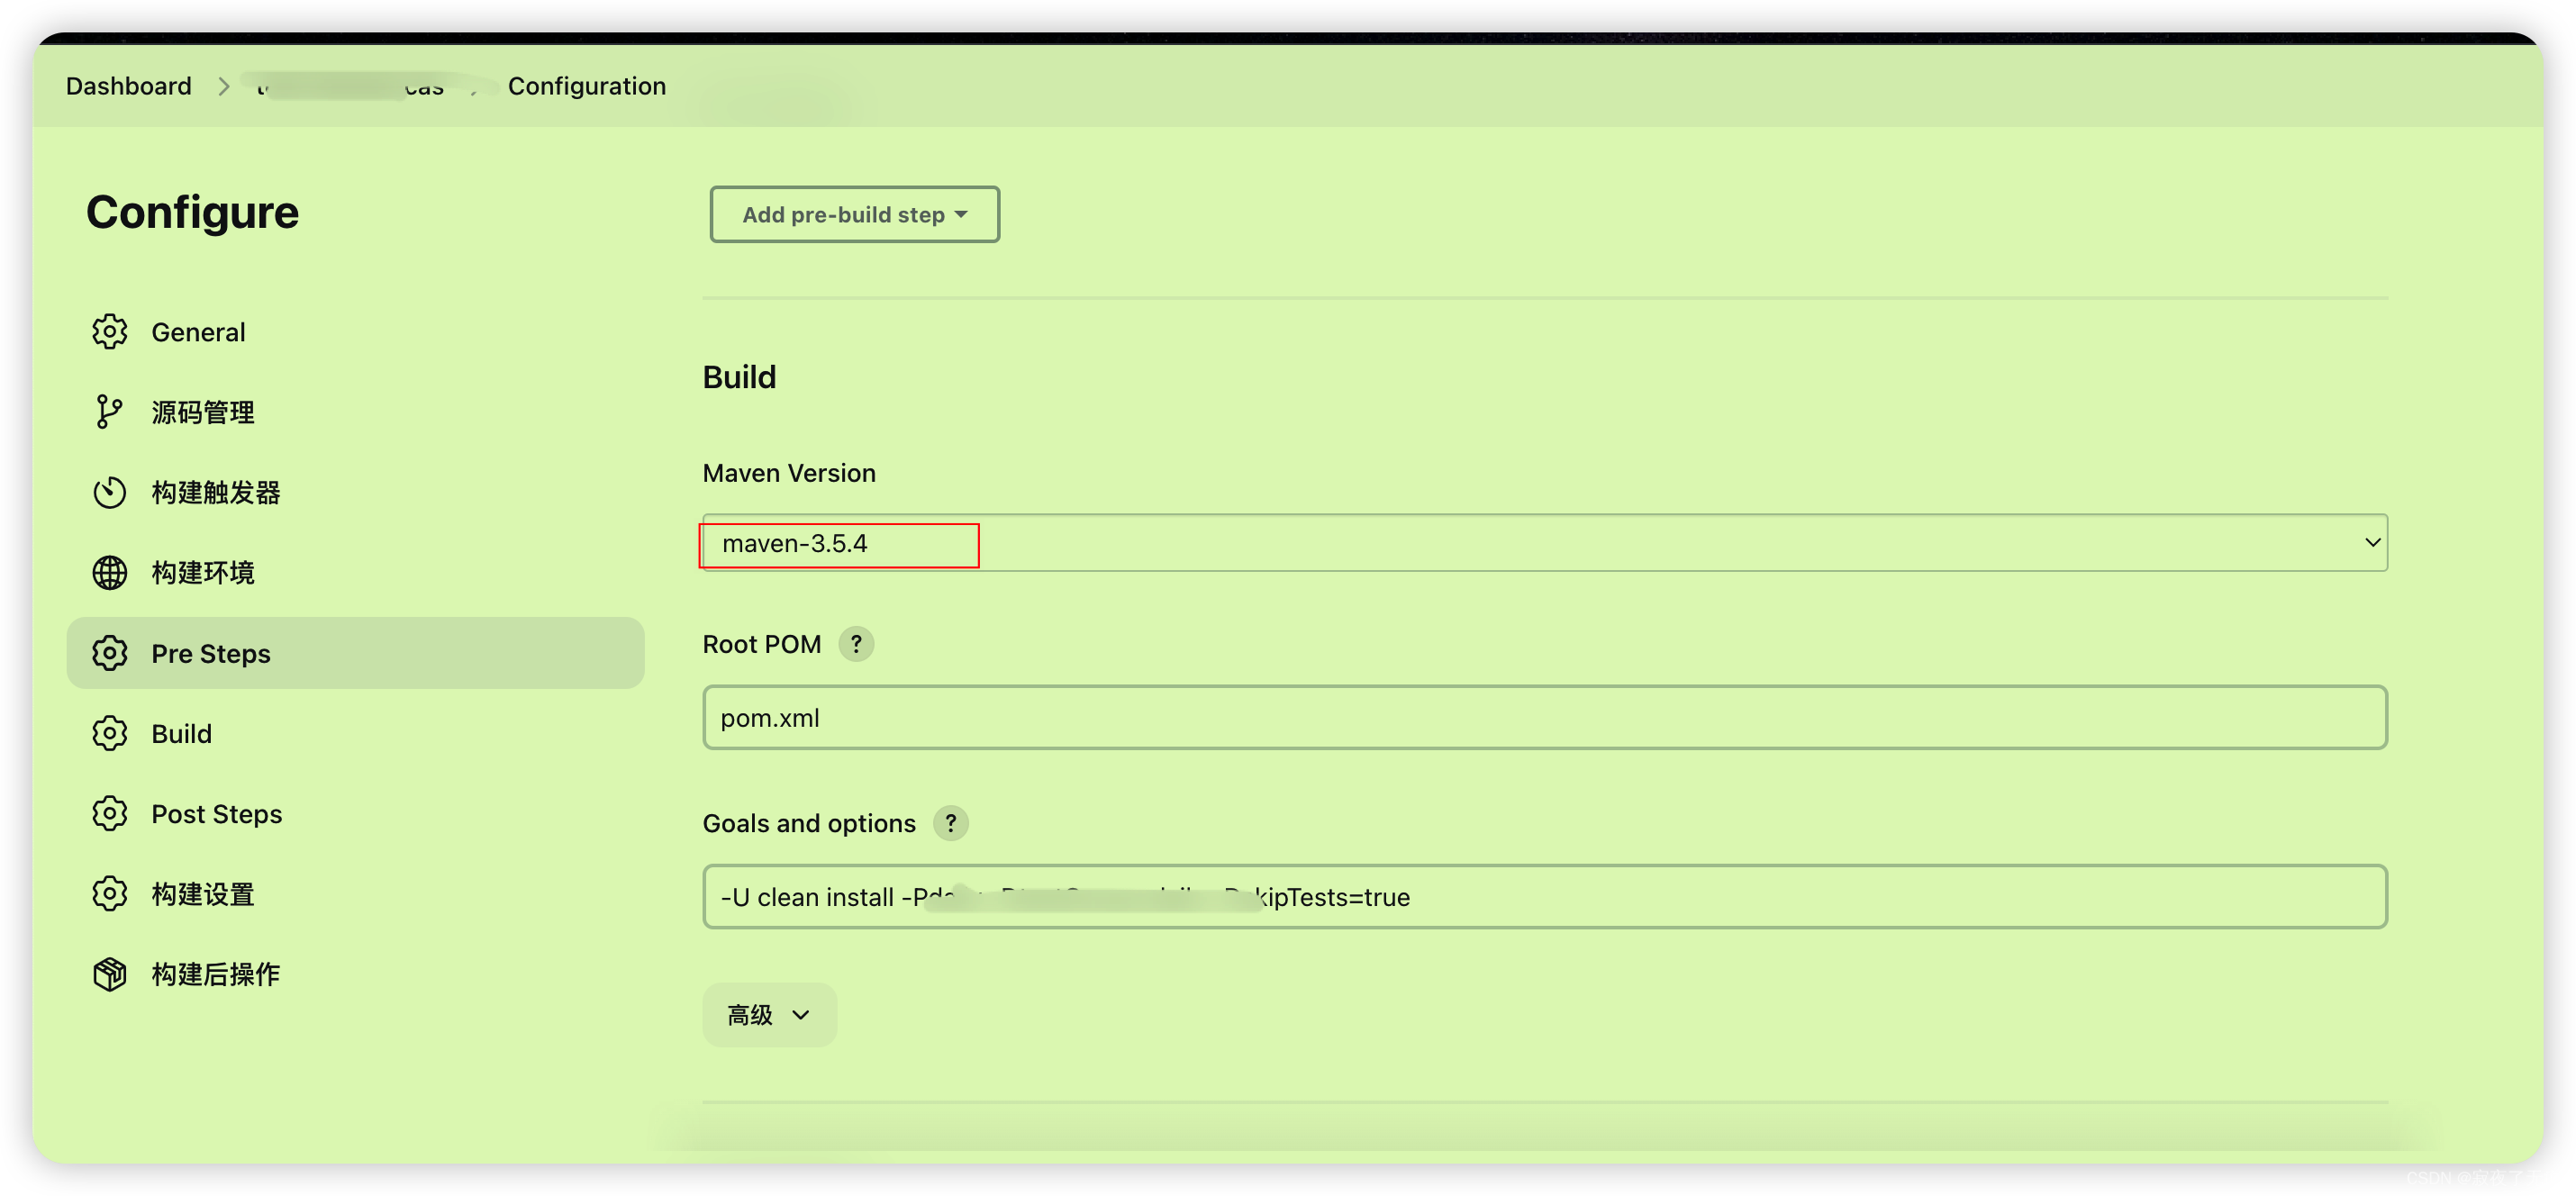
jenkins 发布job切换不同的jdk版本/ maven版本
1. 技术要求 因为有个新的项目需要使用jdk17 而旧的项目需要jdk1.8 这就需要jenkins在发布项目的时候可以指定jdk版本 2. 解决 jenkins全局工具配置页面 配置新的jdk 路径 系统管理-> 全局工具配置 如上新增个jdk 名称叫 jdk-17 然后配置jdk-17的根路径即可(这…...
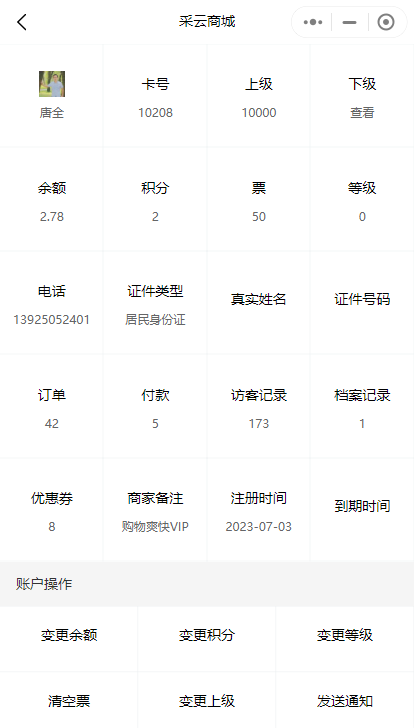
如何在小程序中给会员设置备注
给会员设置备注是一项非常有用的功能,它可以帮助商家更好地管理和了解自己的会员。下面是一个简单的教程,告诉商家如何在小程序中给会员设置备注。 1. 找到指定的会员卡。在管理员后台->会员管理处,找到需要设置备注的会员卡。也支持对会…...
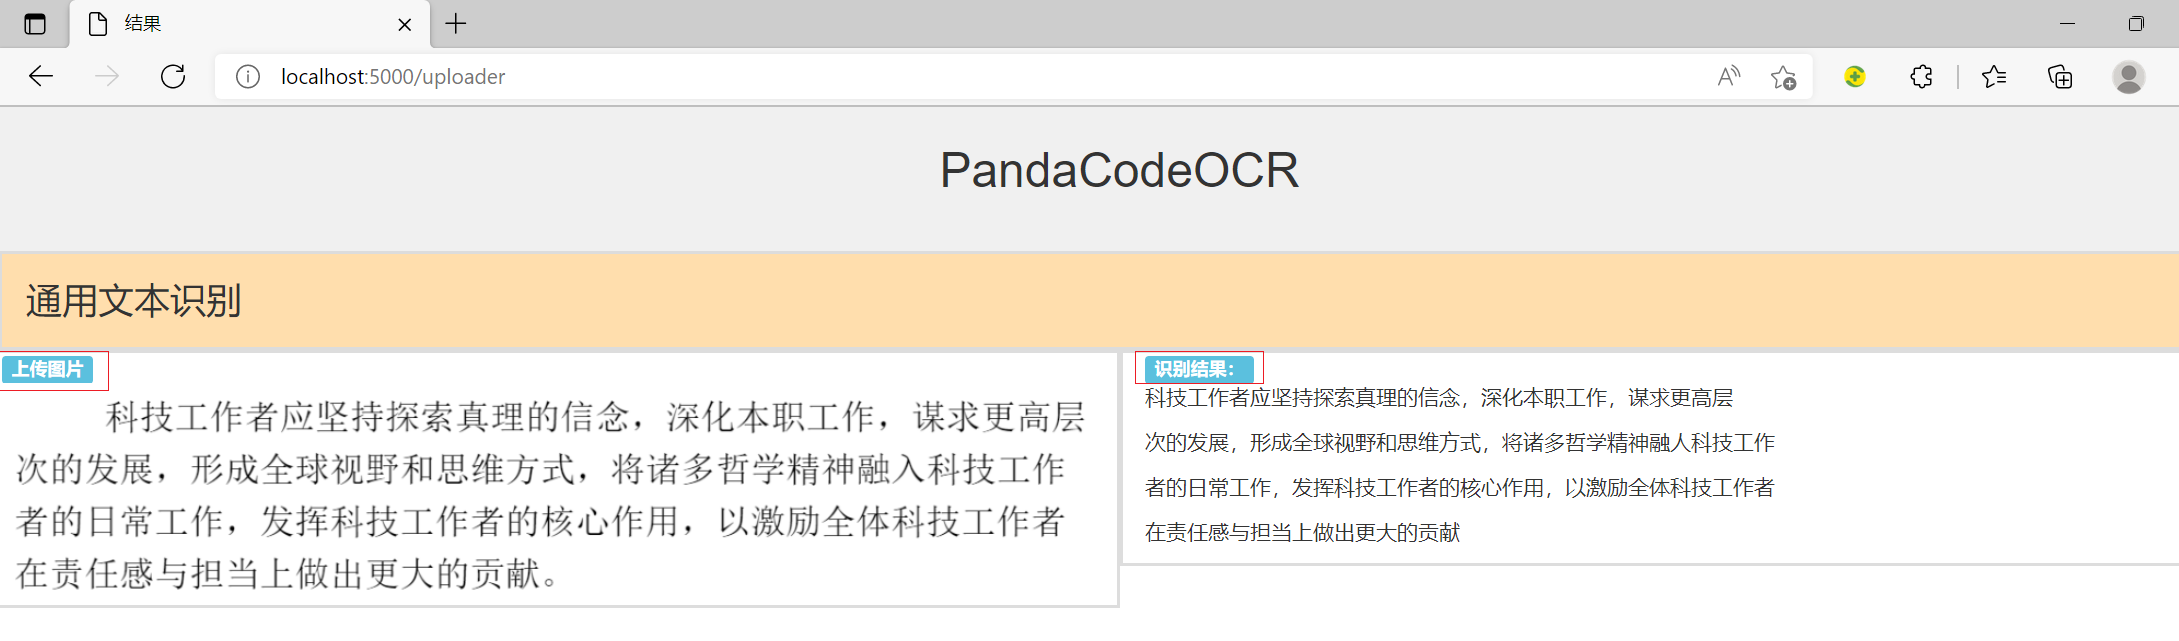
PaddleOCR学习笔记2-初步识别服务
今天初步实现了网页,上传图片,识别显示结果到页面的服务。后续再完善。 采用flask paddleocr bootstrap快速搭建OCR识别服务。 代码结构如下: 模板页面代码文件如下: upload.html : <!DOCTYPE html> <html> <…...

【Opencv】Pyhton 播放上一帧,下一帧,存video,逐帧分析
文章目录 读取具体哪一帧等待按钮写入解码方式与文件格式对应全部代码 读取具体哪一帧 这个方法可以获取某一帧: while True:cap.set(cv2.CAP_PROP_POS_FRAMES, current_frame)ret, frame cap.read()if not ret:break等待按钮 这个方法可以显示当前帧,…...

【关于Java:认识异常】
文章目录 一、1. 异常概念与体系结构1.1 异常的概念1.2 常见的异常1.算数异常2.数组越界异常3.空指针异常 1.3 异常的体系结构1.4 异常的分类1. 编译时异常2. 运行时异常(RuntimeException) 二、 异常的处理方式2.1 防御式编程2.2 EAFP:(异常…...

【C++ • STL • 力扣】详解string相关OJ
文章目录 1、仅仅翻转字母2、字符串中的第一个唯一字符3、字符串里最后一个单词的长度4、验证一个字符串是否是回文5、字符串相加总结 ヾ(๑╹◡╹)ノ" 人总要为过去的懒惰而付出代价 ヾ(๑╹◡╹)ノ" 1、仅仅翻转字母 力扣链接 代码1展示&…...
【Tomcat服务部署及优化】
Tomcat 一、什么是Tomcat?二、Tomcat 核心组件2.1 Tomcat 组件2.3 Container组件的结构2.4 Tomcat 请求过程 三、Tomcat 部署3.1 安装JDK3.2 设置JDK环境变量3.3 安装Tomcat并用supervisor启动解压添加到supervisord服务测试能否通过supervisorctl启动 四、Tomcat的端口和主要…...
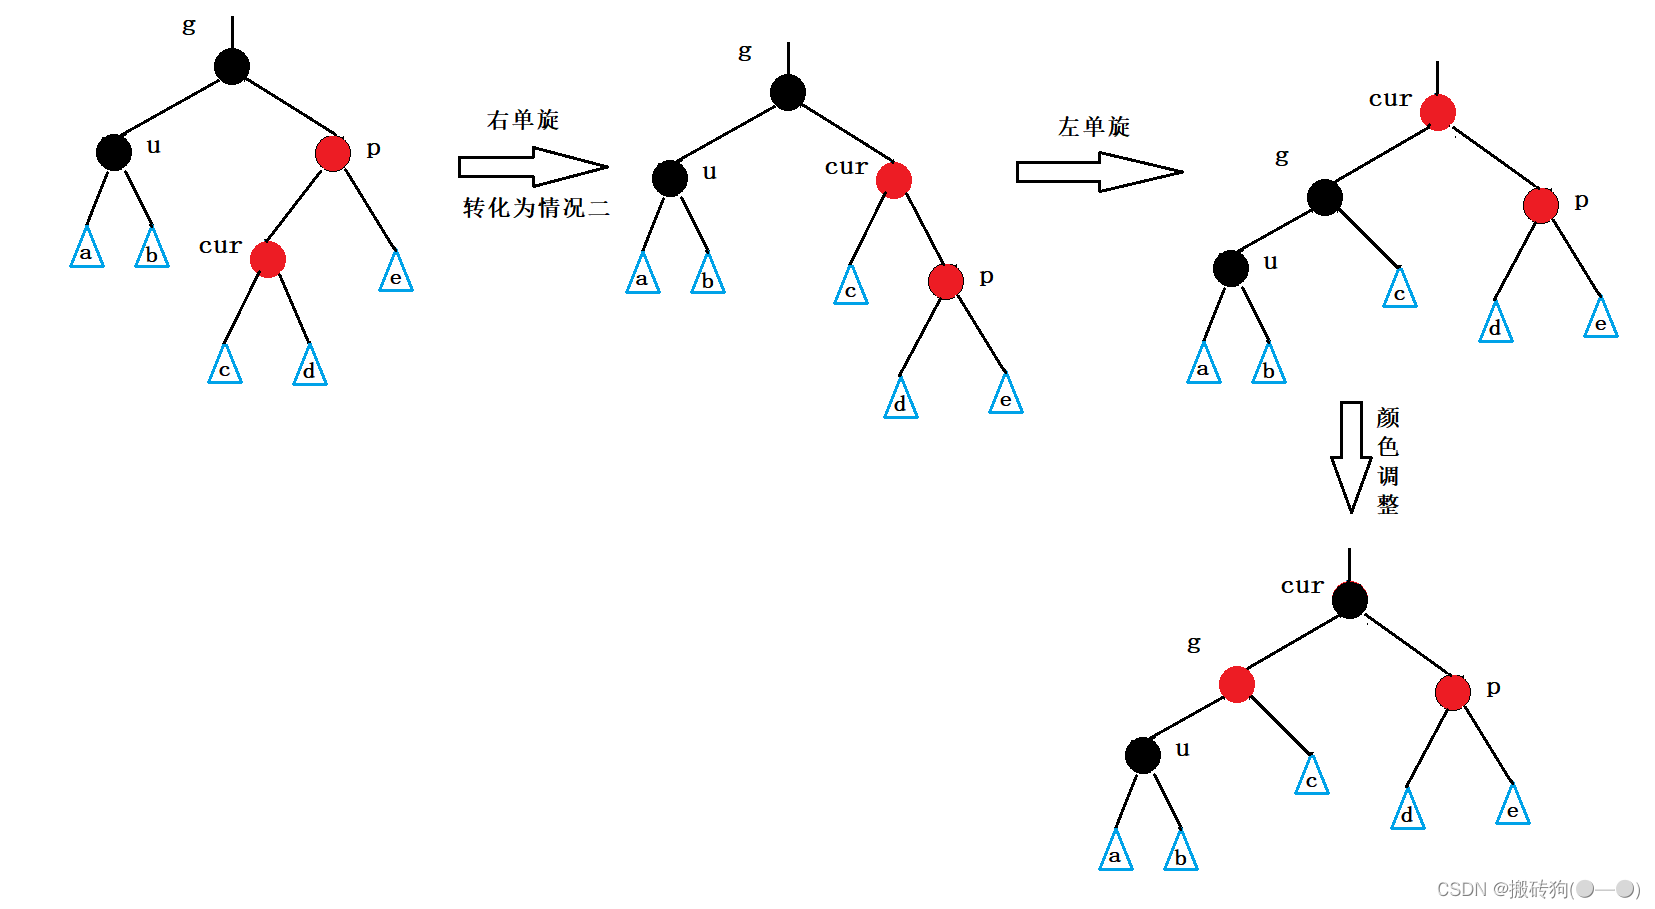
C++之红黑树
红黑树 红黑树的概念红黑树的性质红黑树结点的定义红黑树的插入红黑树的验证红黑树与AVL树的比较 红黑树的概念 红黑树,是一种二叉搜索树,但在每个结点上增加一个存储位表示结点的颜色,可以是Red或Black。 通过对任何一条从根到叶子的路径上…...
TCP)
Go语言网络编程(socket编程)TCP
1、TCP编程 1.1.1 Go语言实现TCP通信 TCP协议 TCP/IP(Transmission Control Protocol/Internet Protocol) 即传输控制协议/网间协议,是一种面向连接(连接导向)的、可靠的、基于字节流的传输层(Transport layer)通信协…...

C语言——局部和全局变量
局部变量 定义在函数内部的变量称为局部变量(Local Variable) 局部变量的作用域(作用范围)仅限于函数内部, 离开该函数后是无效的 离开该函数后,局部变量自动释放 示例代码: #include <stdio.h>// 函数定义 …...
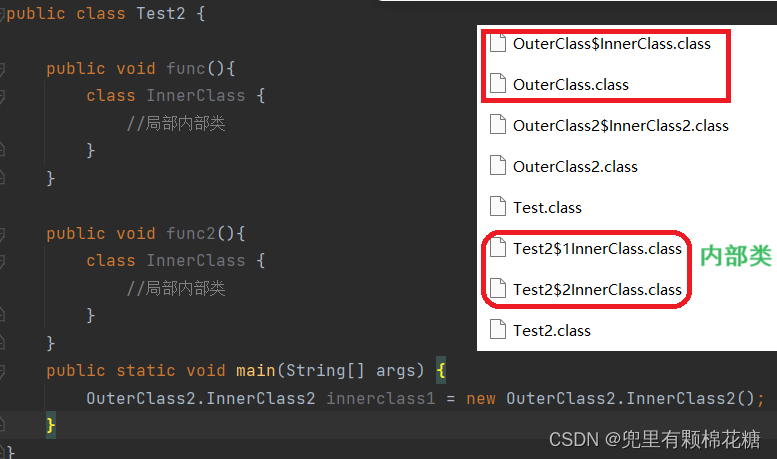
【Java基础篇 | 类和对象】--- 聊聊什么是内部类
个人主页:兜里有颗棉花糖 欢迎 点赞👍 收藏✨ 留言✉ 加关注💓本文由 兜里有颗棉花糖 原创 收录于专栏【JavaSE_primary】 本专栏旨在分享学习Java的一点学习心得,欢迎大家在评论区讨论💌 前言 当一个事物的内部&…...

合宙Air724UG LuatOS-Air LVGL API控件-页面 (Page)
页面 (Page) 当控件内容过多,无法在屏幕内完整显示时,可让其在 页面 内显示。 示例代码 page lvgl.page_create(lvgl.scr_act(), nil) lvgl.obj_set_size(page, 150, 200) lvgl.obj_align(page, nil, lvgl.ALIGN_CENTER, 0, 0)label lvgl.label_crea…...
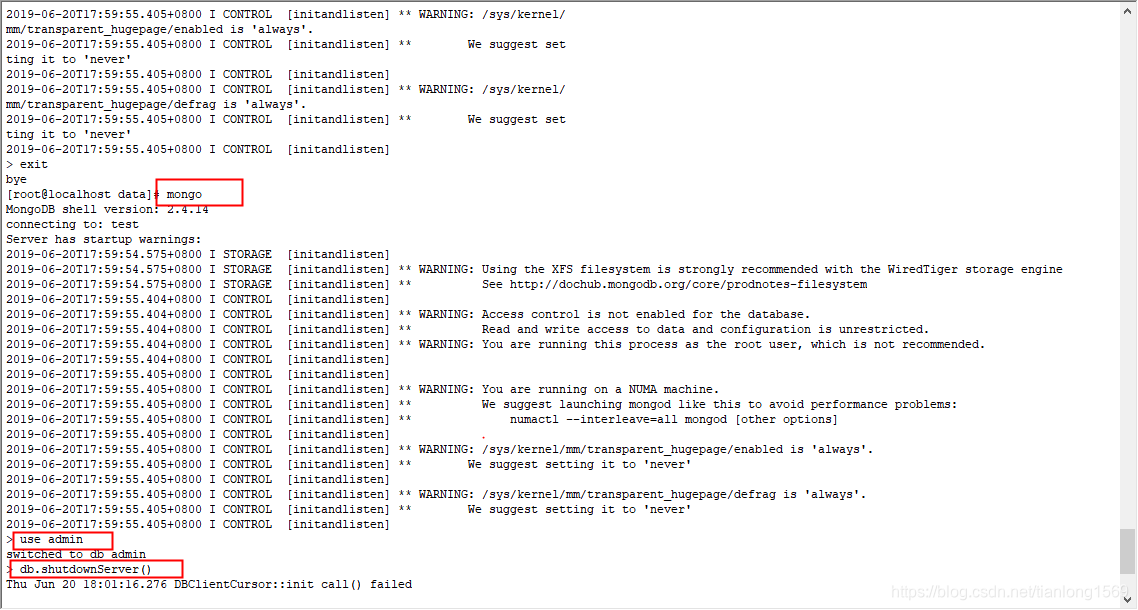
mongodb数据库操作
1、启动mongodb /usr/local/mongodb/bin/mongod --dbpath /var/mongodb/data/--logpath /var/mongodb/logs/log.log &在mongodb启动命令中 --dbpath 指定mongodb的数据存储路径 --logpath 指定mongodb的日志存储路径 2、停止mongodb 第一步先进入mongo命令行模式 第二…...
第 2 章 线性表 ( 双链循环线性表(链式存储结构)实现)
1. 背景说明 2. 示例代码 1) status.h /* DataStructure 预定义常量和类型头文件 */#ifndef STATUS_H #define STATUS_H#define CHECK_NULL(pointer) if (!(pointer)) { \printf("FuncName: %-15s Line: %-5d ErrorCode: %-3d\n", __func__, __LINE__, ERR_NULL_PTR…...

redis在日常开发工作中的常见用法
redis是一款内存型数据库,在开发工作中经常用到,功能强大; 特别开一篇文章用来记录一下它的常见用法,算是一种总结; 它最主要的特点就是高可用的,速度快,分布式;有人说速度快&…...

前端缓存策略:让你的应用飞起来
前端缓存策略:让你的应用飞起来 一、引言 又到了我这个毒舌工匠上线的时间了!今天咱们来聊聊前端缓存策略这个话题。别以为缓存只是后端的事情,前端缓存同样重要。一个好的缓存策略能够大大提高应用的性能和用户体验,让你的应用飞…...
)
保姆级教程:在CentOS 7.9上从源码编译安装nvtop 3.1.0(含CMake 3.29.7依赖安装)
在CentOS 7.9上从源码构建GPU监控神器nvtop 3.1.0的全流程指南 当你面对一台运行CentOS 7.9的老旧服务器,需要实时监控NVIDIA、AMD或Intel GPU的运行状态时,nvtop无疑是最佳选择之一。这款类似htop的工具能直观展示GPU使用率、温度、显存占用等关键指标&…...

手把手教你开发电竞护航系统:从零到上线的小程序全流程
手把手教你开发电竞护航系统:从零到上线的小程序全流程 电竞产业近年来呈现爆发式增长,职业选手和游戏爱好者对专业服务的需求与日俱增。一款优秀的电竞护航小程序不仅能提供赛事资讯、战队管理、训练计划等基础功能,更能通过智能算法为玩家匹…...

**发散创新:基于Python的本体推理与知识表示实战解析**在人工智能和语义网技术飞速发展的今天,**知识表
发散创新:基于Python的本体推理与知识表示实战解析 在人工智能和语义网技术飞速发展的今天,知识表示(Knowledge Representation) 已成为构建智能系统的底层核心能力之一。它不仅决定了系统对现实世界的理解深度,还直接…...

如何用DS4Windows让PS手柄在PC游戏世界畅通无阻
如何用DS4Windows让PS手柄在PC游戏世界畅通无阻 【免费下载链接】DS4Windows Like those other ds4tools, but sexier 项目地址: https://gitcode.com/gh_mirrors/ds/DS4Windows 你是否曾遇到这样的尴尬场景:购买了心仪的PS4或PS5手柄,想在PC上畅…...

输入可视化革命:如何用input-overlay消除直播中的操作信息差
输入可视化革命:如何用input-overlay消除直播中的操作信息差 【免费下载链接】input-overlay Show keyboard, gamepad and mouse input on stream 项目地址: https://gitcode.com/gh_mirrors/in/input-overlay 观众为何总是误解你的操作意图? 当…...
)
Android黑屏别慌!手把手教你用dumpsys和Winscope精准定位问题(附实战案例)
Android黑屏问题深度排查:从dumpsys到Winscope的实战指南 当你的Android设备突然黑屏,那种感觉就像在黑暗中摸索——你不知道问题出在哪里,更不知道如何解决。但别担心,今天我要分享的这套排查方法,将为你点亮一盏明灯…...

终极Limbus Company自动化助手:5大功能彻底解放你的双手
终极Limbus Company自动化助手:5大功能彻底解放你的双手 【免费下载链接】AhabAssistantLimbusCompany AALC,PC端Limbus Company小助手。AALC,Limbus Company Assistant on PC 项目地址: https://gitcode.com/gh_mirrors/ah/AhabAssistantL…...
)
多页原理图设计救星:用AD端口交叉引用快速定位信号流向(含Ctrl跳转技巧)
多页原理图设计救星:用AD端口交叉引用快速定位信号流向(含Ctrl跳转技巧) 在复杂的PCB设计项目中,多页原理图往往让工程师们头疼不已。想象一下,当你面对一个包含数十张图纸的设计,需要追踪某个信号从输入到…...
)
从零开始:5个必知的图像篡改检测数据集下载与使用指南(附避坑提醒)
从零开始:5个必知的图像篡改检测数据集下载与使用指南(附避坑提醒) 当你第一次接触图像篡改检测领域时,最令人头疼的往往不是算法本身,而是如何找到合适的数据集。我曾见过不少研究生花费数周时间在各大论坛和GitHub仓…...