spring6-实现简易版IOC容器
手写简易版IOC容器
- 1、回顾Java反射
- 2、实现Spring的IoC
我们都知道,Spring框架的IOC是基于Java反射机制实现的,下面我们先回顾一下java反射。
1、回顾Java反射
Java反射机制是在运行状态中,对于任意一个类,都能够知道这个类的所有属性和方法;对于任意一个对象,都能够调用它的任意方法和属性;这种动态获取信息以及动态调用对象方法的功能称为Java语言的反射机制。简单来说,反射机制指的是程序在运行时能够获取自身的信息。
要想解剖一个类,必须先要获取到该类的Class对象。而剖析一个类或用反射解决具体的问题就是使用相关API**(1)java.lang.Class(2)java.lang.reflect**,所以,Class对象是反射的根源。
自定义类
package com.atguigu.reflect;public class Car {//属性private String name;private int age;private String color;//无参数构造public Car() {}//有参数构造public Car(String name, int age, String color) {this.name = name;this.age = age;this.color = color;}//普通方法private void run() {System.out.println("私有方法-run.....");}//get和set方法public String getName() {return name;}public void setName(String name) {this.name = name;}public int getAge() {return age;}public void setAge(int age) {this.age = age;}public String getColor() {return color;}public void setColor(String color) {this.color = color;}@Overridepublic String toString() {return "Car{" +"name='" + name + '\'' +", age=" + age +", color='" + color + '\'' +'}';}
}
编写测试类
package com.atguigu.reflect;import org.junit.jupiter.api.Test;
import java.lang.reflect.Constructor;
import java.lang.reflect.Field;
import java.lang.reflect.Method;public class TestCar {//1、获取Class对象多种方式@Testpublic void test01() throws Exception {//1 类名.classClass clazz1 = Car.class;//2 对象.getClass()Class clazz2 = new Car().getClass();//3 Class.forName("全路径")Class clazz3 = Class.forName("com.atguigu.reflect.Car");//实例化Car car = (Car)clazz3.getConstructor().newInstance();System.out.println(car);}//2、获取构造方法@Testpublic void test02() throws Exception {Class clazz = Car.class;//获取所有构造// getConstructors()获取所有public的构造方法
//        Constructor[] constructors = clazz.getConstructors();// getDeclaredConstructors()获取所有的构造方法public  privateConstructor[] constructors = clazz.getDeclaredConstructors();for (Constructor c:constructors) {System.out.println("方法名称:"+c.getName()+" 参数个数:"+c.getParameterCount());}//指定有参数构造创建对象//1 构造public
//        Constructor c1 = clazz.getConstructor(String.class, int.class, String.class);
//        Car car1 = (Car)c1.newInstance("夏利", 10, "红色");
//        System.out.println(car1);//2 构造privateConstructor c2 = clazz.getDeclaredConstructor(String.class, int.class, String.class);c2.setAccessible(true);Car car2 = (Car)c2.newInstance("捷达", 15, "白色");System.out.println(car2);}//3、获取属性@Testpublic void test03() throws Exception {Class clazz = Car.class;Car car = (Car)clazz.getDeclaredConstructor().newInstance();//获取所有public属性//Field[] fields = clazz.getFields();//获取所有属性(包含私有属性)Field[] fields = clazz.getDeclaredFields();for (Field field:fields) {if(field.getName().equals("name")) {//设置允许访问field.setAccessible(true);field.set(car,"五菱宏光");System.out.println(car);}System.out.println(field.getName());}}//4、获取方法@Testpublic void test04() throws Exception {Car car = new Car("奔驰",10,"黑色");Class clazz = car.getClass();//1 public方法Method[] methods = clazz.getMethods();for (Method m1:methods) {//System.out.println(m1.getName());//执行方法 toStringif(m1.getName().equals("toString")) {String invoke = (String)m1.invoke(car);//System.out.println("toString执行了:"+invoke);}}//2 private方法Method[] methodsAll = clazz.getDeclaredMethods();for (Method m:methodsAll) {//执行方法 runif(m.getName().equals("run")) {m.setAccessible(true);m.invoke(car);}}}
}
2、实现Spring的IoC
我们知道,IoC(控制反转)和DI(依赖注入)是Spring里面核心的东西,那么,我们如何自己手写出这样的代码呢?下面我们就一步一步写出Spring框架最核心的部分。
①搭建子模块
搭建模块:guigu-spring,搭建方式如其他spring子模块
②准备测试需要的bean
添加依赖
<dependencies><!--junit5测试--><dependency><groupId>org.junit.jupiter</groupId><artifactId>junit-jupiter-api</artifactId><version>5.3.1</version></dependency>
</dependencies>
创建UserDao接口
package com.atguigu.spring6.test.dao;public interface UserDao {public void print();
}
创建UserDaoImpl实现
package com.atguigu.spring6.test.dao.impl;import com.atguigu.spring.dao.UserDao;public class UserDaoImpl implements UserDao {@Overridepublic void print() {System.out.println("Dao层执行结束");}
}
创建UserService接口
package com.atguigu.spring6.test.service;public interface UserService {public void out();
}
创建UserServiceImpl实现类
package com.atguigu.spring.test.service.impl;import com.atguigu.spring.core.annotation.Bean;
import com.atguigu.spring.service.UserService;@Bean
public class UserServiceImpl implements UserService {//    private UserDao userDao;@Overridepublic void out() {//userDao.print();System.out.println("Service层执行结束");}
}
③定义注解
我们通过注解的形式加载bean与实现依赖注入
bean注解
package com.atguigu.spring.core.annotation;import java.lang.annotation.ElementType;
import java.lang.annotation.Retention;
import java.lang.annotation.RetentionPolicy;
import java.lang.annotation.Target;@Target(ElementType.TYPE)
@Retention(RetentionPolicy.RUNTIME)
public @interface Bean {
}
依赖注入注解
package com.atguigu.spring.core.annotation;import java.lang.annotation.ElementType;
import java.lang.annotation.Retention;
import java.lang.annotation.RetentionPolicy;
import java.lang.annotation.Target;@Target({ElementType.FIELD})
@Retention(RetentionPolicy.RUNTIME)
public @interface Di {
}
说明:上面两个注解可以随意取名
④定义bean容器接口
package com.atguigu.spring.core;public interface ApplicationContext {Object getBean(Class clazz);
}
⑤编写注解bean容器接口实现
AnnotationApplicationContext基于注解扫描bean
package com.atguigu.spring.core;import java.util.HashMap;public class AnnotationApplicationContext implements ApplicationContext {//存储bean的容器private HashMap<Class, Object> beanFactory = new HashMap<>();@Overridepublic Object getBean(Class clazz) {return beanFactory.get(clazz);}/*** 根据包扫描加载bean* @param basePackage*/public AnnotationApplicationContext(String basePackage) {}
}
⑥编写扫描bean逻辑
我们通过构造方法传入包的base路径,扫描被@Bean注解的java对象,完整代码如下:
package com.atguigu.spring.core;import com.atguigu.spring.core.annotation.Bean;import java.io.File;
import java.util.HashMap;public class AnnotationApplicationContext implements ApplicationContext {//存储bean的容器private HashMap<Class, Object> beanFactory = new HashMap<>();private static String rootPath;@Overridepublic Object getBean(Class clazz) {return beanFactory.get(clazz);}/*** 根据包扫描加载bean* @param basePackage*/public AnnotationApplicationContext(String basePackage) {try {String packageDirName = basePackage.replaceAll("\\.", "\\\\");Enumeration<URL> dirs =Thread.currentThread().getContextClassLoader().getResources(packageDirName);while (dirs.hasMoreElements()) {URL url = dirs.nextElement();String filePath = URLDecoder.decode(url.getFile(),"utf-8");rootPath = filePath.substring(0, filePath.length()-packageDirName.length());loadBean(new File(filePath));}} catch (Exception e) {throw new RuntimeException(e);}}private  void loadBean(File fileParent) {if (fileParent.isDirectory()) {File[] childrenFiles = fileParent.listFiles();if(childrenFiles == null || childrenFiles.length == 0){return;}for (File child : childrenFiles) {if (child.isDirectory()) {//如果是个文件夹就继续调用该方法,使用了递归loadBean(child);} else {//通过文件路径转变成全类名,第一步把绝对路径部分去掉String pathWithClass = child.getAbsolutePath().substring(rootPath.length() - 1);//选中class文件if (pathWithClass.contains(".class")) {//    com.xinzhi.dao.UserDao//去掉.class后缀,并且把 \ 替换成 .String fullName = pathWithClass.replaceAll("\\\\", ".").replace(".class", "");try {Class<?> aClass = Class.forName(fullName);//把非接口的类实例化放在map中if(!aClass.isInterface()){Bean annotation = aClass.getAnnotation(Bean.class);if(annotation != null){Object instance = aClass.newInstance();//判断一下有没有接口if(aClass.getInterfaces().length > 0) {//如果有接口把接口的class当成key,实例对象当成valueSystem.out.println("正在加载【"+ aClass.getInterfaces()[0] +"】,实例对象是:" + instance.getClass().getName());beanFactory.put(aClass.getInterfaces()[0], instance);}else{//如果有接口把自己的class当成key,实例对象当成valueSystem.out.println("正在加载【"+ aClass.getName() +"】,实例对象是:" + instance.getClass().getName());beanFactory.put(aClass, instance);}}}} catch (ClassNotFoundException | IllegalAccessException | InstantiationException e) {e.printStackTrace();}}}}}}}
⑦java类标识Bean注解
@Bean
public class UserServiceImpl implements UserService
@Bean
public class UserDaoImpl implements UserDao
⑧测试Bean加载
package com.atguigu.spring;import com.atguigu.spring.core.AnnotationApplicationContext;
import com.atguigu.spring.core.ApplicationContext;
import com.atguigu.spring.test.service.UserService;
import org.junit.jupiter.api.Test;public class SpringIocTest {@Testpublic void testIoc() {ApplicationContext applicationContext = new AnnotationApplicationContext("com.atguigu.spring.test");UserService userService = (UserService)applicationContext.getBean(UserService.class);userService.out();System.out.println("run success");}
}
控制台打印测试
⑨依赖注入
只要userDao.print();调用成功,说明就注入成功
package com.atguigu.spring.test.service.impl;import com.atguigu.spring.core.annotation.Bean;
import com.atguigu.spring.core.annotation.Di;
import com.atguigu.spring.dao.UserDao;
import com.atguigu.spring.service.UserService;@Bean
public class UserServiceImpl implements UserService {@Diprivate UserDao userDao;@Overridepublic void out() {userDao.print();System.out.println("Service层执行结束");}
}
执行第八步:报错了,说明当前userDao是个空对象
⑩依赖注入实现
package com.atguigu.spring.core;import com.atguigu.spring.core.annotation.Bean;
import com.atguigu.spring.core.annotation.Di;import java.io.File;
import java.lang.reflect.Field;
import java.util.HashMap;
import java.util.Map;public class AnnotationApplicationContext implements ApplicationContext {//存储bean的容器private HashMap<Class, Object> beanFactory = new HashMap<>();private static String rootPath;@Overridepublic Object getBean(Class clazz) {return beanFactory.get(clazz);}/*** 根据包扫描加载bean* @param basePackage*/public AnnotationApplicationContext(String basePackage) {try {String packageDirName = basePackage.replaceAll("\\.", "\\\\");Enumeration<URL> dirs =Thread.currentThread().getContextClassLoader().getResources(packageDirName);while (dirs.hasMoreElements()) {URL url = dirs.nextElement();String filePath = URLDecoder.decode(url.getFile(),"utf-8");rootPath = filePath.substring(0, filePath.length()-packageDirName.length());loadBean(new File(filePath));}} catch (Exception e) {throw new RuntimeException(e);}//依赖注入loadDi();}private  void loadBean(File fileParent) {if (fileParent.isDirectory()) {File[] childrenFiles = fileParent.listFiles();if(childrenFiles == null || childrenFiles.length == 0){return;}for (File child : childrenFiles) {if (child.isDirectory()) {//如果是个文件夹就继续调用该方法,使用了递归loadBean(child);} else {//通过文件路径转变成全类名,第一步把绝对路径部分去掉String pathWithClass = child.getAbsolutePath().substring(rootPath.length() - 1);//选中class文件if (pathWithClass.contains(".class")) {//    com.xinzhi.dao.UserDao//去掉.class后缀,并且把 \ 替换成 .String fullName = pathWithClass.replaceAll("\\\\", ".").replace(".class", "");try {Class<?> aClass = Class.forName(fullName);//把非接口的类实例化放在map中if(!aClass.isInterface()){Bean annotation = aClass.getAnnotation(Bean.class);if(annotation != null){Object instance = aClass.newInstance();//判断一下有没有接口if(aClass.getInterfaces().length > 0) {//如果有接口把接口的class当成key,实例对象当成valueSystem.out.println("正在加载【"+ aClass.getInterfaces()[0] +"】,实例对象是:" + instance.getClass().getName());beanFactory.put(aClass.getInterfaces()[0], instance);}else{//如果有接口把自己的class当成key,实例对象当成valueSystem.out.println("正在加载【"+ aClass.getName() +"】,实例对象是:" + instance.getClass().getName());beanFactory.put(aClass, instance);}}}} catch (ClassNotFoundException | IllegalAccessException | InstantiationException e) {e.printStackTrace();}}}}}}private void loadDi() {for(Map.Entry<Class,Object> entry : beanFactory.entrySet()){//就是咱们放在容器的对象Object obj = entry.getValue();Class<?> aClass = obj.getClass();Field[] declaredFields = aClass.getDeclaredFields();for (Field field : declaredFields){Di annotation = field.getAnnotation(Di.class);if( annotation != null ){field.setAccessible(true);try {System.out.println("正在给【"+obj.getClass().getName()+"】属性【" + field.getName() + "】注入值【"+ beanFactory.get(field.getType()).getClass().getName() +"】");field.set(obj,beanFactory.get(field.getType()));} catch (IllegalAccessException e) {e.printStackTrace();}}}}}}
执行第八步:执行成功,依赖注入成功
相关文章:

spring6-实现简易版IOC容器
手写简易版IOC容器 1、回顾Java反射2、实现Spring的IoC 我们都知道,Spring框架的IOC是基于Java反射机制实现的,下面我们先回顾一下java反射。 1、回顾Java反射 Java反射机制是在运行状态中,对于任意一个类,都能够知道这个类的所…...

Feign接口调用GET请求@RequestParam传参丢失
文章目录 问题现象排查解决GET加注解解决使用POST方式解决 时间戳传参失败 问题现象 项目使用的是Spring Cloud微服务,服务间调用使用的是Feign在一次服务调用时,发现GET传参丢失,没有传递过去任何参数加了RequestParam注解,发现…...

LeetCode每日一题 | 309.买卖股票的最佳时机含冷冻期
题目链接: 309. 买卖股票的最佳时机含冷冻期 - 力扣(LeetCode) 题目描述: 算法图解: 解题代码: class Solution { public:int maxProfit(vector<int>& prices) {int n prices.size();vector&…...

HTML的学习 Day02(列表、表格、表单)
文章目录 一、列表列表主要分为以下三种类型:1. 无序列表(Unordered List):2. 有序列表(Ordered List):将有序列表的数字改为字母或自定义内容li.../li 列表项标签中value属性,制定列…...

Android shape记录
之前一直觉得dataPath很好用,可以画各种矢量图。今天发现用shape画图也不错,记录一下自己用shape画的图。 一般使用shape就是定义形状、stroke边、solid内部、corners圆角等,代码 <?xml version "1.0" encoding "utf-8&q…...
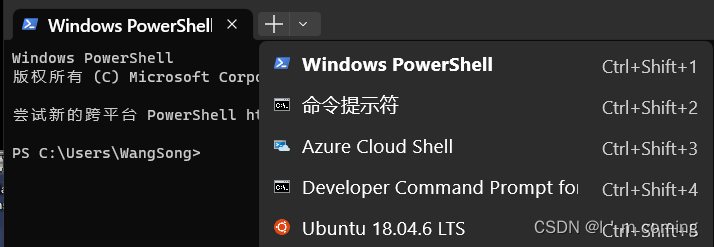
WSL2和ubuntu的安装过程
目录 1.WSL2的安装 2.Ubuntu的安装 3.安装完成后的打开方式 1.WSL2的安装 按下WINX键,选择Windows PowerShell (管理员) 1.1执行以下命令,该命令的作用是:启用适用于 Linux 的 Windows 子系统 dism.exe /online /enable-feature /featur…...

力扣第150题 逆波兰表达式求值 stack c++
题目 150. 逆波兰表达式求值 中等 给你一个字符串数组 tokens ,表示一个根据 逆波兰表示法 表示的算术表达式。 请你计算该表达式。返回一个表示表达式值的整数。 注意: 有效的算符为 、-、* 和 / 。每个操作数(运算对象)都…...
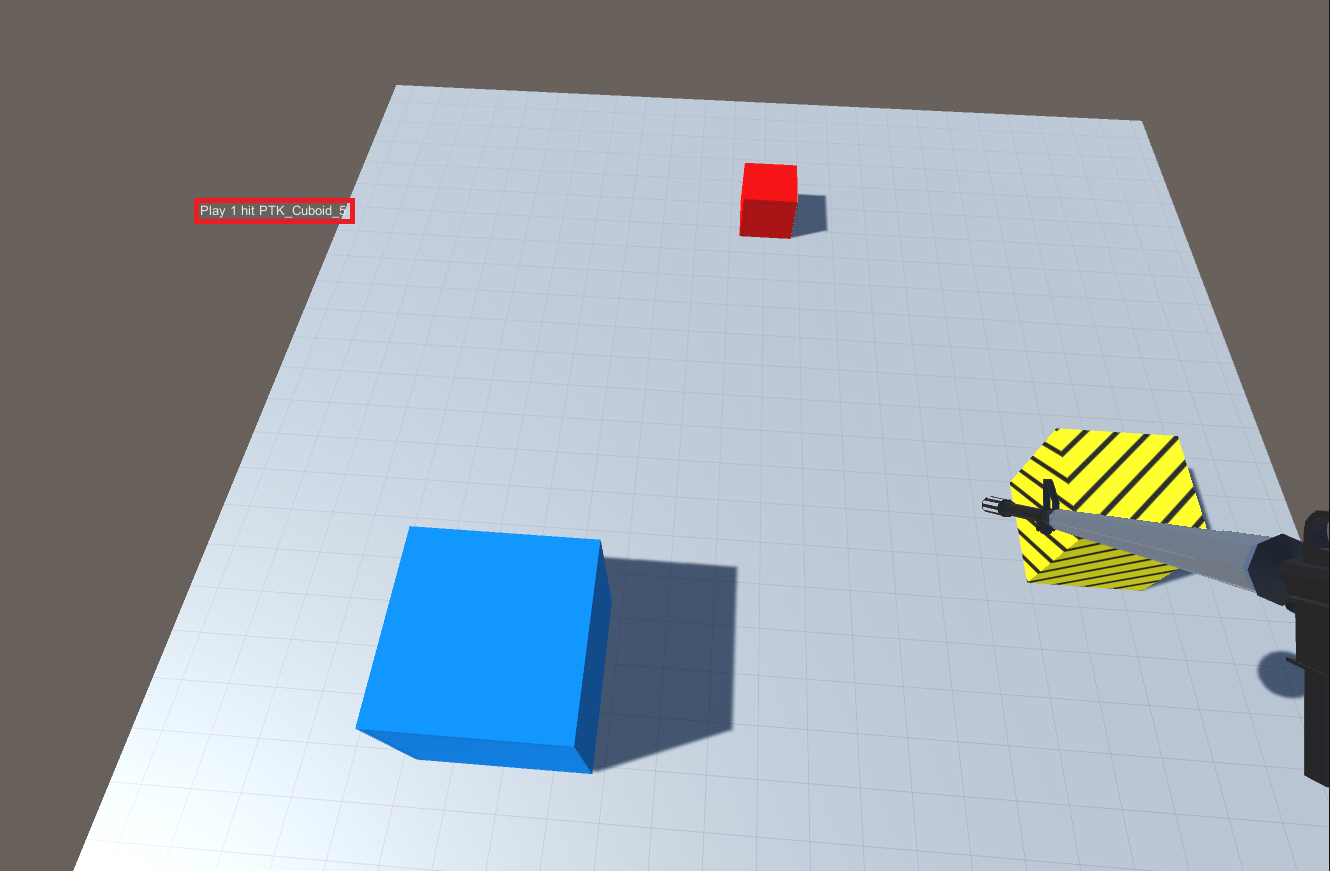
三、飞行和射击
目录 1.飞行的实现 2.限制玩家视角 3.射击的实现 4.附录 1.飞行的实现 (1)在Player预制体上挂载Configuration Joint组件,并修改其Y Drive属性 (2) 修改PlayerInput.cs和PlayerController.cs以实现飞行 PlayerIn…...
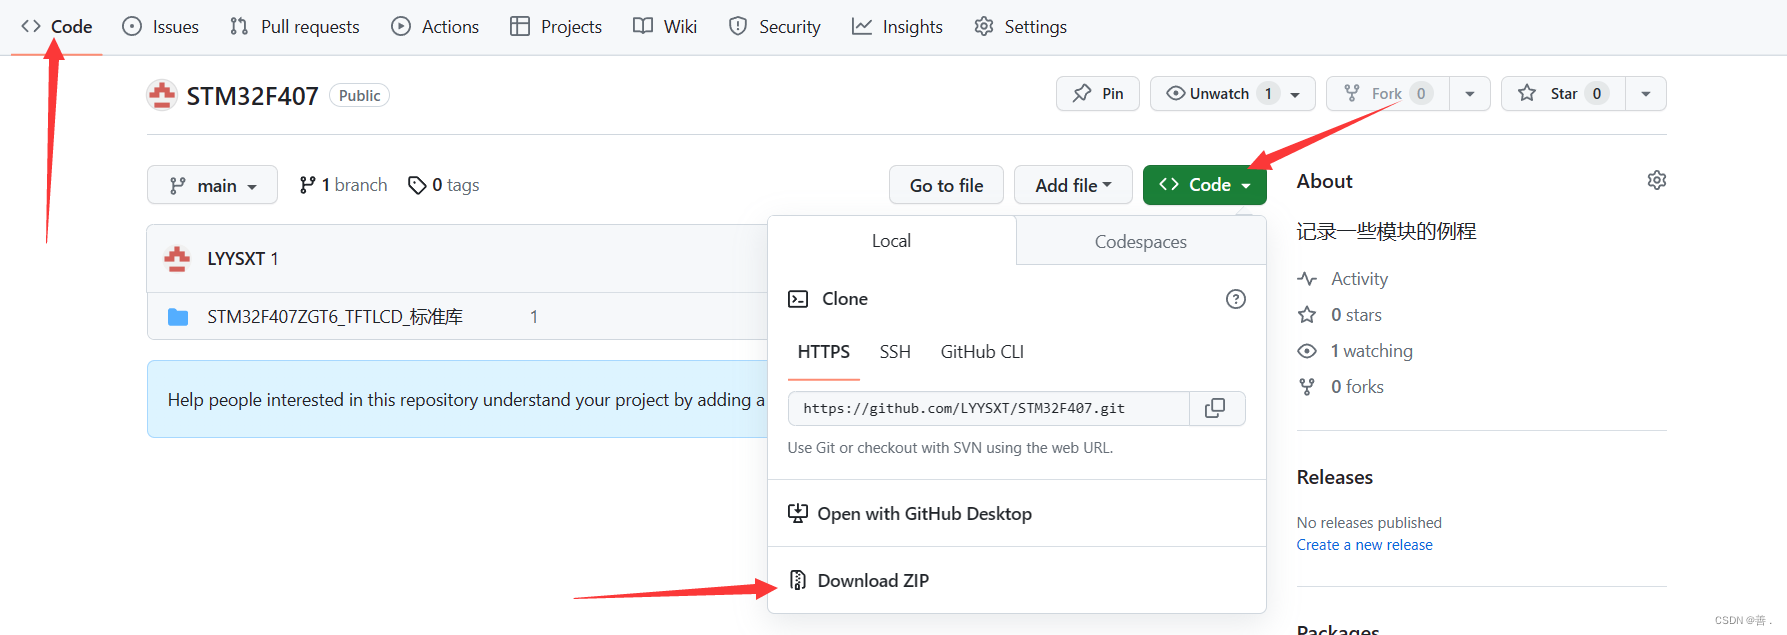
GitHub与GitHubDesktop的使用
1、介绍 见天来学习使用GitHub与GitHubDesktop。 学习前先来介绍一下什么是GitHub。 GitHub是一个基于Git的代码托管平台和开发者社区。它提供了一个Web界面,让开发者能够轻松地托管、共享和管理他们的软件项目。 在GitHub上,开发者可以创建自己的代…...

AIGC 微调的方法
AIGC 的微调方法可以分为以下步骤: 数据准备:收集尽可能多的数据,包括输入和输出数据,并将其划分为训练集、验证集和测试集。 模型选择:选择合适的模型结构,例如多层感知器(MLP)、卷…...

gcc编译webrtc x64
gcc使用Ubuntu系统已经有的gcc version 7.5.0 (Ubuntu 7.5.0-3ubuntu1~18.04) 1、下载离线版webrtc(也可以翻墙下载webrtc) 百度云链接: 链接: https://pan.baidu.com/s/1oHVz9bxXlW3Q6uO996c5XA 提取码: ojbs 2、下载gn https://github.com/timnieder…...

uni-app 实现凸起的 tabbar 底部导航栏
效果图 在 pages.json 中设置隐藏自带的 tabbar 导航栏 "custom": true, // 开启自定义tabBar(不填每次原来的tabbar在重新加载时都回闪现) 新建一个 custom-tabbar.vue 自定义组件页面 custom-tabbar.vue <!-- 自定义底部导航栏 --> <template><v…...

中国1km土壤特征数据集(2010年)
简介: 中国1km土壤特征数据集(2010)是基于第二次全国土壤调查的中国1:1000000比例尺土壤图和8595个土壤剖面图,以及美国农业部(USDA)中国区域土地和气候模拟标准,开发了一个多层土壤粒度分布数…...
计算机网络笔记 第二章 物理层
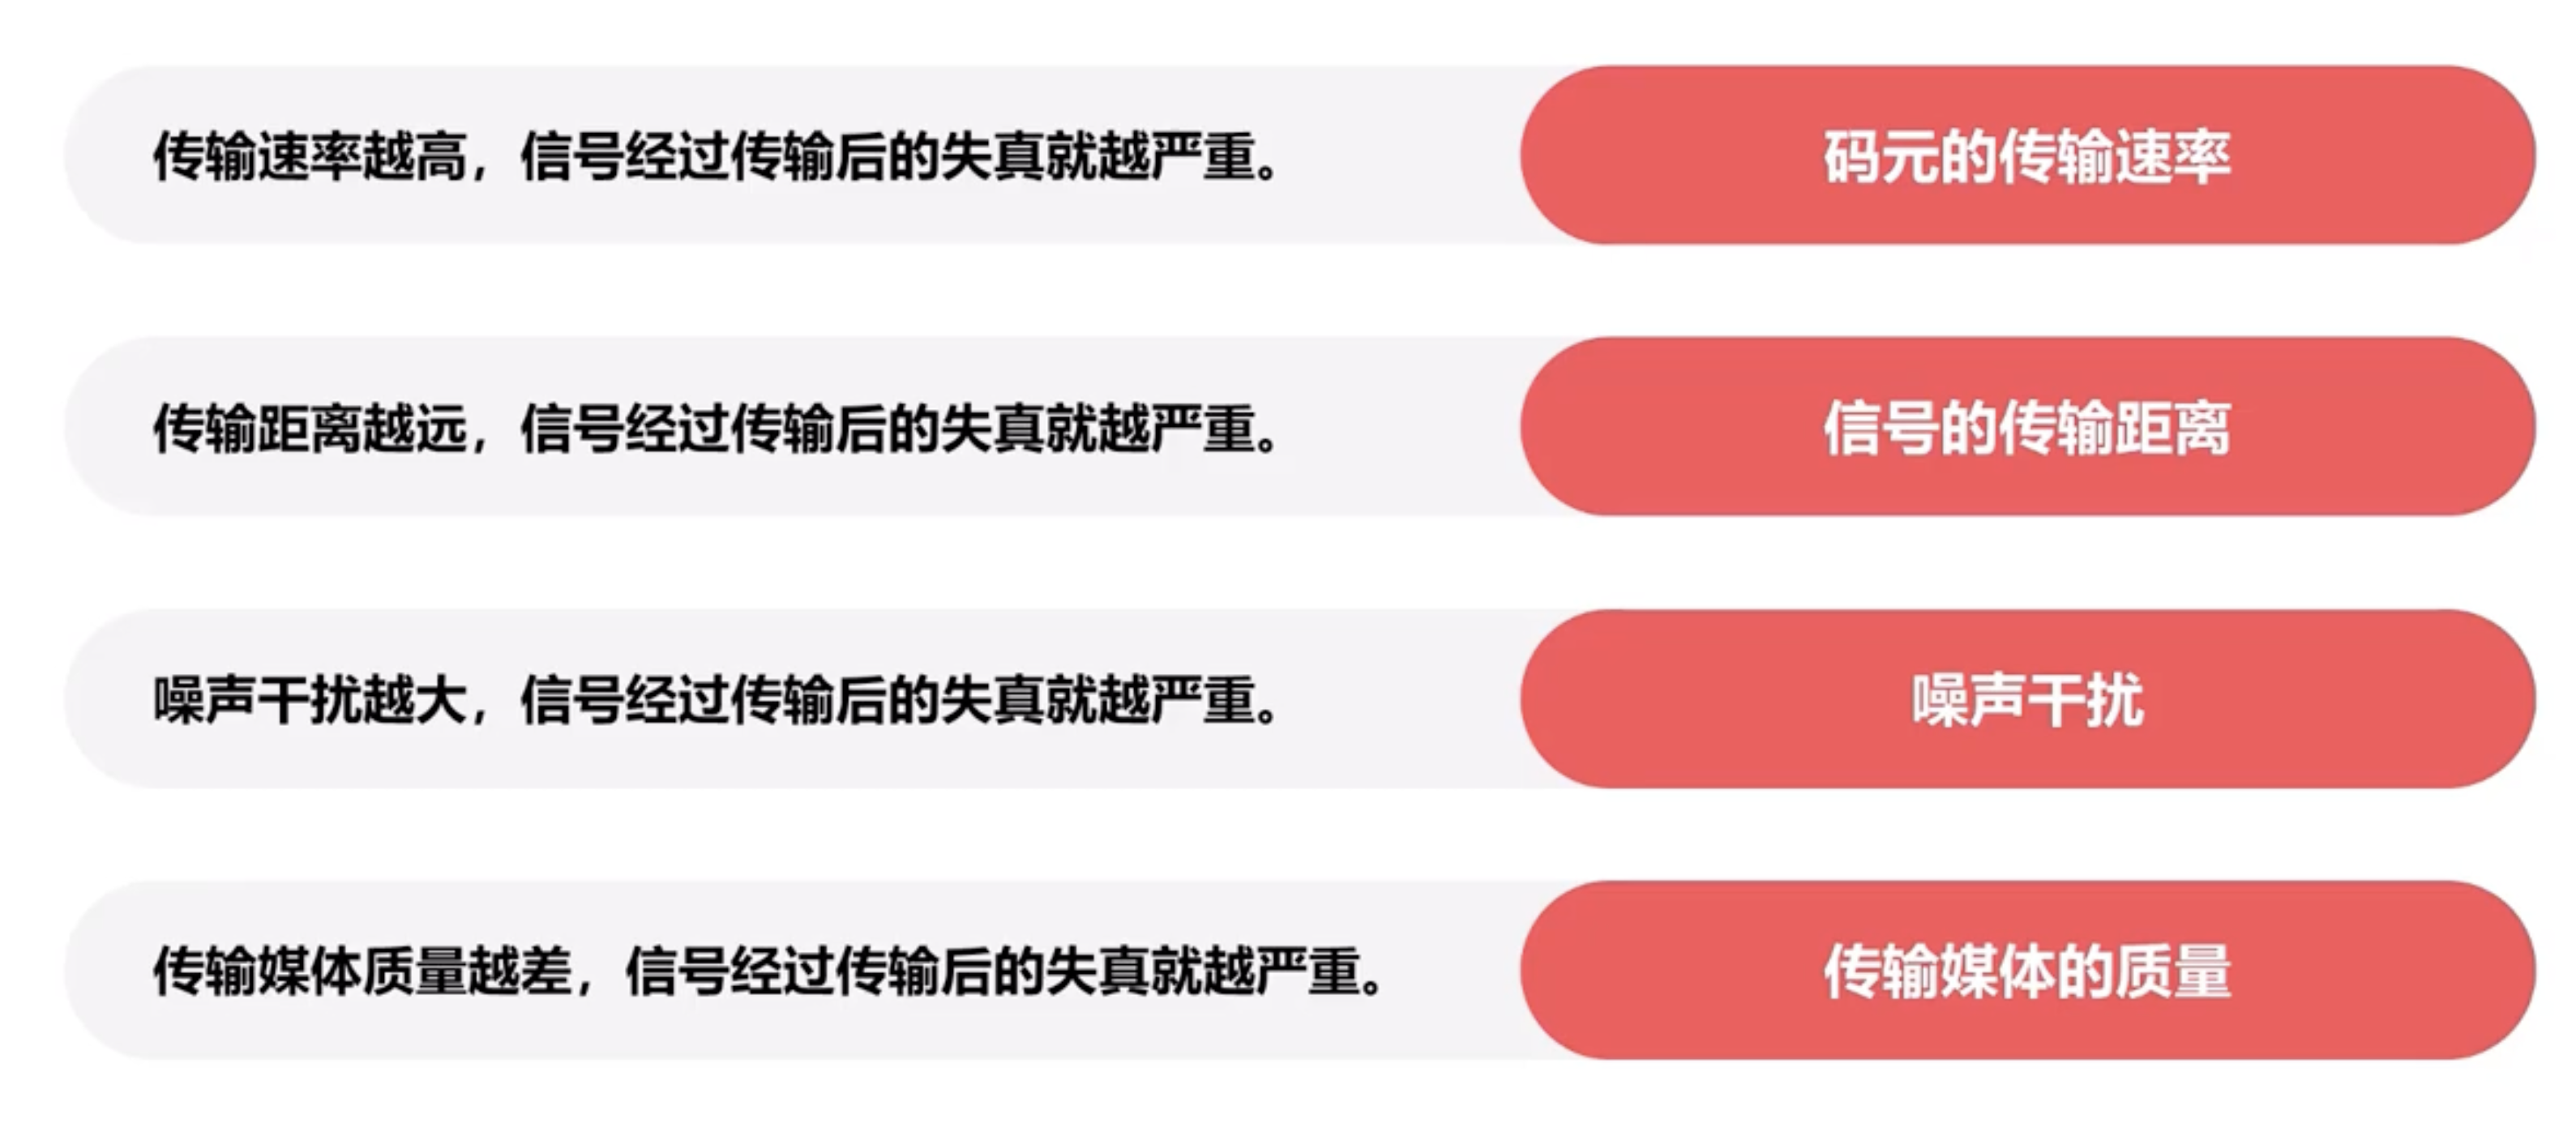
2.1 物理层概述 物理层要实现的功能 物理层接口特性 机械特性 形状和尺寸引脚数目和排列固定和锁定装置 电气特性 信号电压的范围阻抗匹配的情况传输速率距离限制 功能特性 -规定接口电缆的各条信号线的作用 过程特性 规定在信号线上传输比特流的一组操作过程࿰…...
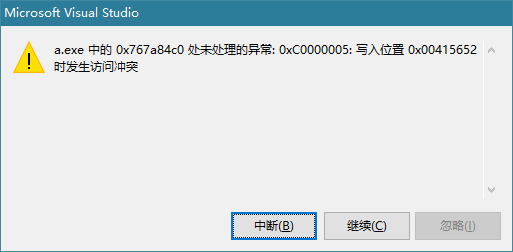
使用CreateProcess崩溃:处未处理的异常: 0xC0000005: 写入位置 0x00415652 时发生访问冲突
问题代码 if (!CreateProcess(NULL,L"pela.exe",NULL,NULL,TRUE,NULL,NULL,NULL,&si,&pi)){return 0;}如果CreateProcess的第二个参数字符串是常量或者是储存在堆中的就会被写保护,崩溃。如果字符串定义到栈或者全局变量就不存在此问题了。 正确的…...
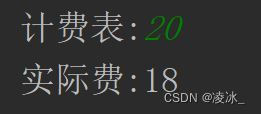
Java 华为真题-出租车计费
需求 程序员小明打了一辆出租车去上班。出于职业敏感,他注意到这辆出租车的计费表有点问题,总是偏大。 出租车司机解释说他不喜欢数字4,所以改装了计费表,任何数字位置遇到数字4就直接跳过,其余功能都正常。 比如&…...
开源layui前端框架 收款码生成系统源码 多合一收款码生成源码 带50多套UI模板
Layui前端的多合一收款码在线生成系统源码_附多套前端UI模板。 卡特三合一收款码生成系统源码,和收款啦采用一样的原理。 内部多达50多套模板,前端跟付款界面都特别好看。 识别收款码之后会自动加密,非常安全。 一样没有后台,一样…...

微服务moleculer01
1.官网地址: Moleculer - Progressive microservices framework for Node.js 2. github代码地址: GitHub - moleculerjs/moleculer: :rocket: Progressive microservices framework for Node.js Moleculer是基于Node.js的一款快速、多功能的微服务框…...

C++中将指针传递给函数
C中将指针传递给函数 指针是一种将内存空间传递给函数的有效方式,其中可包含函数完成其工作所需的数据,也可包含操作结果。将指针作为函数参数时,确保函数只能修改您希望它修改的参数很重要。例如,如果函数根据以指针方式传入的半…...
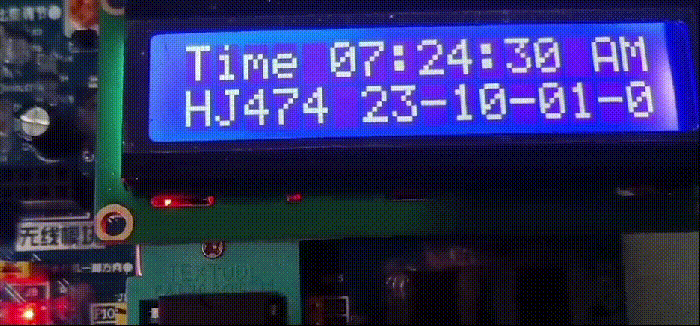
【51单片机编写占空比按秒渐亮与渐暗】2023-10-2
昨天刚在W10上安装CH340驱动,又下载到板子上LCD1602定时器时钟程序,为了调试,调用了一个LED观察控制蜂鸣器按秒响的变量,几经调试才发觉该开发板用的是有源蜂鸣器,不用IO取反操作,直接控制IO的高低电平即可…...

炉石传说脚本Hearthstone-Script:三步从零到精通的自动化游戏指南 [特殊字符]
炉石传说脚本Hearthstone-Script:三步从零到精通的自动化游戏指南 🎮 【免费下载链接】Hearthstone-Script Hearthstone script(炉石传说脚本)(2024.01.25停更至国服回归) 项目地址: https://gitcode.com…...

MOVA开源:AI同步生成音视频的全新突破
MOVA开源:AI同步生成音视频的全新突破 【免费下载链接】MOVA-360p 项目地址: https://ai.gitcode.com/OpenMOSS/MOVA-360p 导语:MOVA-360p模型正式开源,标志着AI音视频生成领域告别"无声时代",首次实现视频与音…...

探索RBMO - BiLSTM - Attention分类算法:MATLAB实现与应用
【24年5月顶刊算法】RBMO-BiLSTM-Attention分类 基于红嘴蓝鹊优化器(RBMO)-双向长短期记忆网络(BiLSTM)-注意力机制(Attention)的数据分类预测(可更换为回归/单变量/多变量时序预测,前私),Matlab代码,可直接运行,适合小白新手 无需…...

Onekey核心价值解析:5个维度带你重新认识Steam游戏清单获取
Onekey核心价值解析:5个维度带你重新认识Steam游戏清单获取 【免费下载链接】Onekey Onekey Steam Depot Manifest Downloader 项目地址: https://gitcode.com/gh_mirrors/one/Onekey Onekey是一款开源的Steam Depot清单下载器,通过智能化的数据获…...

QMCDecode:免费解锁QQ音乐加密文件的终极解决方案
QMCDecode:免费解锁QQ音乐加密文件的终极解决方案 【免费下载链接】QMCDecode QQ音乐QMC格式转换为普通格式(qmcflac转flac,qmc0,qmc3转mp3, mflac,mflac0等转flac),仅支持macOS,可自动识别到QQ音乐下载目录,默认转换结…...

Hunyuan-MT-7B在学术论文翻译中的精准应用
Hunyuan-MT-7B在学术论文翻译中的精准应用 1. 学术翻译的痛点与挑战 学术论文翻译从来都不是简单的文字转换工作。想象一下,你辛辛苦苦写好的论文,里面充满了专业术语、复杂公式和严谨的参考文献,如果翻译时出现偏差,整个研究的…...

STM32WU55蓝牙开发避坑指南:从官方例程到8通道肌电信号传输实战
STM32WU55蓝牙开发避坑指南:从官方例程到8通道肌电信号传输实战 当肌电信号采集遇上低功耗蓝牙,工程师们往往面临一个尴尬的平衡:既要满足医疗级数据精度,又要兼顾穿戴设备的续航需求。STM32WU55系列以其双核架构和集成射频模块&a…...

ThinkPad双风扇深度解析:TPFanCtrl2实战配置与性能优化指南
ThinkPad双风扇深度解析:TPFanCtrl2实战配置与性能优化指南 【免费下载链接】TPFanCtrl2 ThinkPad Fan Control 2 (Dual Fan) for Windows 10 and 11 项目地址: https://gitcode.com/gh_mirrors/tp/TPFanCtrl2 TPFanCtrl2是一款专为ThinkPad双风扇机型设计的…...

Ostrakon-VL-8B模型压缩实践:在有限显存下的部署与推理
Ostrakon-VL-8B模型压缩实践:在有限显存下的部署与推理 你是不是也遇到过这样的情况:好不容易找到一个功能强大的视觉语言大模型,比如最近挺火的Ostrakon-VL-8B,结果一看显存要求,直接傻眼了——动辄需要几十个G的显存…...

模拟OJ1 2 3
判断素数(改错)作者: Turbo时间限制: 1s章节: 循环问题描述给定程序的功能是:判断一个整数是否是素数,若是输出YES,否则输出NO!。请改正程序中的错误,使它能得出正确的结果。注意:不得增行或删行…...