【多模态融合】TransFusion学习笔记(2)
接上篇【多模态融合】TransFusion学习笔记(1)。
从TransFusion-L到TransFusion
ok,终于可以给出论文中那个完整的框架图了,我第一眼看到这个图有几个疑问:
Q:Image Guidance这条虚线引出的Query Initialization是什么意思?
Q:图像分支中的Image Features as K,V是将整张图像的特征图都作为K,V么?
Q:有了第2阶段之后Initial Prediction还需要么?
Q:如果第一阶段的Q来自纯lidar bev feature map,用它来聚合Image Features靠普么,毕竟是两种模态的特征?
Q:第2阶段的Transformer Decoder Layer with SMCA,这个SMCA是什么意思?
Q:如果仅仅是纯Lidar分支产生的object query去聚合image featuers产生最终的预测肯定是不够的,你可能得到一个修正之后更准的边界框或者分类,但是lidar漏掉的框是没办法恢复的,所以应该还有补漏的环节?

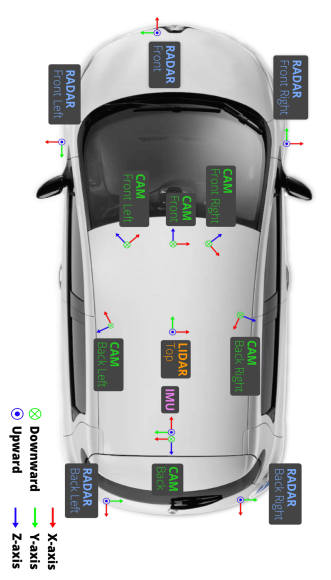
带着诸的疑问结合论文及代码继续分析,仍然假定batch为2,数据集为nuScenes。说到nuScenes需要大该了解以下他lidar和camera配置。他在车顶端配备了一个32线Lidar,然后按321队形配置了6个Camera。所以,代码中推理的时候每一个batch同时包含了6张图像。
#源文件mmdet3d/models/dense_heads/transfusion_head.py
def forward(self, feats, img_feats, img_metas):"""Forward pass.Args:feats (list[torch.Tensor]): Multi-level features, e.g.,features produced by FPN.Returns:tuple(list[dict]): Output results. first index by level, second index by layer"""if img_feats is None:img_feats = [None]res = multi_apply(self.forward_single, feats, img_feats, [img_metas])assert len(res) == 1, "only support one level features."return res现在再来看Tranfusion检测头推理入口forward函数的时候,img_feats和img_metas就包含了满满的图像及其特征信息了,其中img_feats的shape为(12,256,112,200),12为batch(2)*6(cameras的数量),它将batch和n_views整合在了一起,明白这一点很重要。
def forward_single(self, inputs, img_inputs, img_metas):"""Forward function for CenterPoint.Args:inputs (torch.Tensor): Input feature map with the shape of[B, 512, 128(H), 128(W)]. (consistent with L748)Returns:list[dict]: Output results for tasks."""batch_size = inputs.shape[0]lidar_feat = self.shared_conv(inputs) ##=>[2, 128, 128, 128]lidar_feat_flatten = lidar_feat.view(batch_size, lidar_feat.shape[1], -1) #=>[BS, C, H*W]bev_pos = self.bev_pos.repeat(batch_size, 1, 1).to(lidar_feat.device)if self.fuse_img:img_feat = self.shared_conv_img(img_inputs) # [BS * n_views, C, H, W]img_h, img_w, num_channel = img_inputs.shape[-2], img_inputs.shape[-1], img_feat.shape[1]# =>[B, C, H, n_views, W]raw_img_feat = img_feat.view(batch_size, self.num_views, num_channel, img_h, img_w).permute(0, 2, 3, 1, 4) # =>[B, C, H, n_views*W]img_feat = raw_img_feat.reshape(batch_size, num_channel, img_h, img_w * self.num_views) # =>(B,C,n_view*W)img_feat_collapsed = img_feat.max(2).values# positional encoding for image guided query initializationif self.img_feat_collapsed_pos is None:img_feat_collapsed_pos = self.img_feat_collapsed_pos = self.create_2D_grid(1, img_feat_collapsed.shape[-1]).to(img_feat.device)else:img_feat_collapsed_pos = self.img_feat_collapsed_posbev_feat = lidar_feat_flattenfor idx_view in range(self.num_views):bev_feat = self.decoder[2 + idx_view](bev_feat, img_feat_collapsed[..., img_w * idx_view:img_w * (idx_view + 1)], bev_pos, img_feat_collapsed_pos[:, img_w * idx_view:img_w * (idx_view + 1)])从if self.fuse_img条件判断进入的这段代码逻辑用于生成融合了的LiDAR-Camera BEV feature map F-lc。

图:展示如何操作一个batch中的6张Image feature map,形成高度压缩后的K,V。
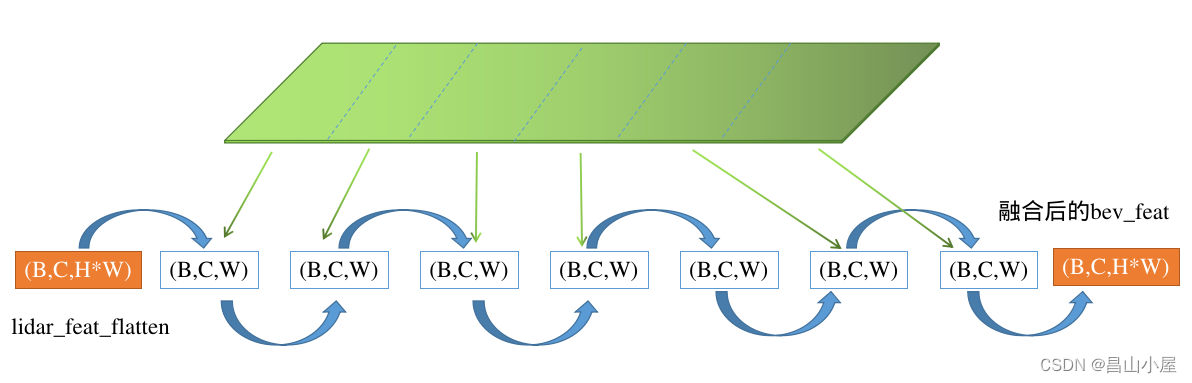
图:展示Lidar features和6张Height Collapsed Image features融合的过程
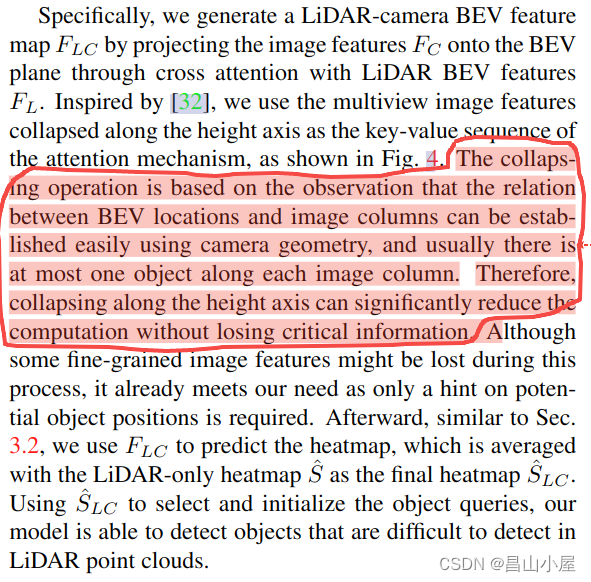
使用Dense的Lidar BEV features作为Q,使用高度压缩后的Image Features作为K,V。为什么要对Image Features进行高度压缩,作者在论文中也做了解释。
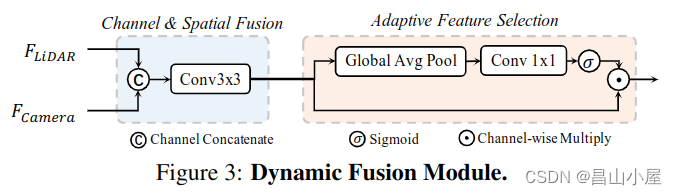
关于如何融合lidar bev features和image features得到一个更具表达能力的bev feature map,在若干其它论文中都有涉及,较为著名的比如以下图所示的BEVFusion。

BEVFusion这种特征融合的方式很直观,但是他需要将multi-view的图像特征通过LSS或其它方式编码到BEV空间,然后使用一个Dynamic Fusion Module得到融合后的特征。这种融合简单粗暴,也是Hard-Association的。
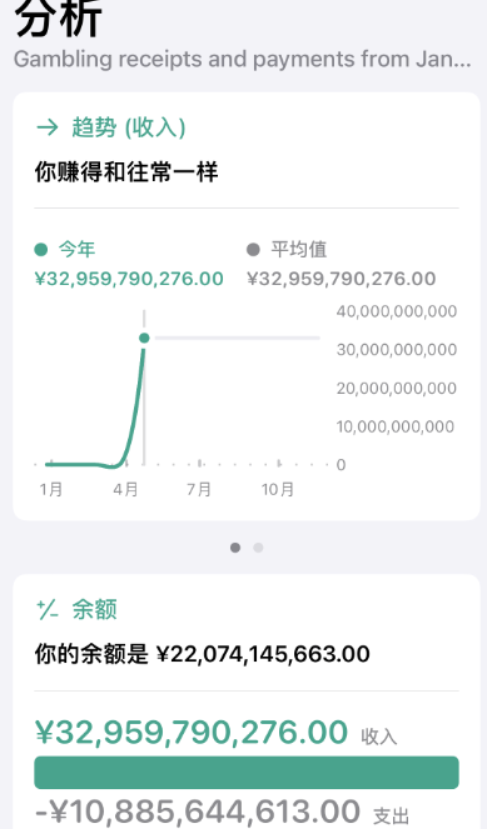
考虑一个问题,如果使用BEVFusion这种多模态融合的bev feature map替换TransFusion-L中纯Lidar产生的bev featuremap会有什么效果呢?bevfusion的作者就做了这个实验。
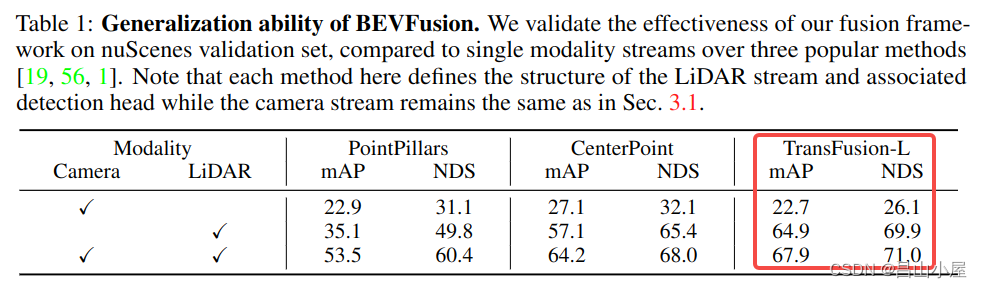
从最后一列的nuScenes Validation上的结果来看mAP和NDS分别提了3.%和1.1%。怎么说呢,有用,但好像又觉得没赚到啥。毕竟费了大力气把不同视角下的image特征提取出来再编码到BEV空间,融合完成后mAP相比纯Lidar只是涨了3个点,基本上还是Lidar在支撑着。
################################## image guided query initialization#################################if self.initialize_by_heatmap:##=>[2, 10, 128, 128])dense_heatmap = self.heatmap_head(lidar_feat)dense_heatmap_img = Noneif self.fuse_img:dense_heatmap_img = self.heatmap_head_img(bev_feat.view(lidar_feat.shape)) # [BS, num_classes, H, W]heatmap = (dense_heatmap.detach().sigmoid() + dense_heatmap_img.detach().sigmoid()) / 2else:heatmap = dense_heatmap.detach().sigmoid()padding = self.nms_kernel_size // 2local_max = torch.zeros_like(heatmap)local_max_inner = F.max_pool2d(heatmap, kernel_size=self.nms_kernel_size, stride=1, padding=0)local_max[:, :, padding:(-padding), padding:(-padding)] = local_max_inner## for Pedestrian & Traffic_cone in nuScenesif self.test_cfg['dataset'] == 'nuScenes':local_max[:, 8, ] = F.max_pool2d(heatmap[:, 8], kernel_size=1, stride=1, padding=0)local_max[:, 9, ] = F.max_pool2d(heatmap[:, 9], kernel_size=1, stride=1, padding=0)elif self.test_cfg['dataset'] == 'Waymo': # for Pedestrian & Cyclist in Waymolocal_max[:, 1, ] = F.max_pool2d(heatmap[:, 1], kernel_size=1, stride=1, padding=0)local_max[:, 2, ] = F.max_pool2d(heatmap[:, 2], kernel_size=1, stride=1, padding=0)##非max-heat的地方就被set为0了heatmap = heatmap * (heatmap == local_max)##torch.Size([2, 10, 16384]) <==heatmap = heatmap.view(batch_size, heatmap.shape[1], -1)# top #num_proposals among all classestop_proposals = heatmap.view(batch_size, -1).argsort(dim=-1, descending=True)[..., :self.num_proposals]top_proposals_class = top_proposals // heatmap.shape[-1]##index有什么用??top_proposals_index = top_proposals % heatmap.shape[-1]query_feat = lidar_feat_flatten.gather(index=top_proposals_index[:, None, :].expand(-1, lidar_feat_flatten.shape[1], -1), dim=-1)self.query_labels = top_proposals_classone_hot = F.one_hot(top_proposals_class, num_classes=self.num_classes).permute(0, 2, 1)query_cat_encoding = self.class_encoding(one_hot.float())query_feat += query_cat_encodingquery_pos = bev_pos.gather(index=top_proposals_index[:, None, :].permute(0, 2, 1).expand(-1, -1, bev_pos.shape[-1]), dim=1)else:query_feat = self.query_feat.repeat(batch_size, 1, 1) # [BS, C, num_proposals]base_xyz = self.query_pos.repeat(batch_size, 1, 1).to(lidar_feat.device) # [BS, num_proposals, 2]回到TransFusion上面,在没有融合Image Features之前,heatmap需要从纯lidar feature map出。现在有了融合后的feature map,自然heatmap又多了一条出路。这就是代码中既有一个dense_heatmap,又多出来了一个dense_heatmap_img,他们最终通过以下代码进行了融合。
heatmap = (dense_heatmap.detach().sigmoid() + dense_heatmap_img.detach().sigmoid()) / 2不看代码我还以为就只是利用了从dense_heatmap_img出的heatmap,作者这里还是做了一下结合,结合方式也比较简单,各自simgoid之后相加取平均。
ret_dicts = []for i in range(self.num_decoder_layers):prefix = 'last_' if (i == self.num_decoder_layers - 1) else f'{i}head_'# Transformer Decoder Layer# :param query: B C Pq :param query_pos: B Pq 3/6query_feat = self.decoder[i](query_feat, lidar_feat_flatten, query_pos, bev_pos)# Predictionres_layer = self.prediction_heads[i](query_feat) ##FFNres_layer['center'] = res_layer['center'] + query_pos.permute(0, 2, 1)first_res_layer = res_layerif not self.fuse_img:ret_dicts.append(res_layer)# for next level positional embeddingquery_pos = res_layer['center'].detach().clone().permute(0, 2, 1)这段代码和单模态的TransFusion-L比,query_feat还是从纯lidar bev feature map取的,lidar_feat_flatten也还是原来那个展开了的lidar bev featuremap。但是,此时的query_feat所在的热点位置因为是从融合的bev featuremap出的,所以就有了"Image Guidance"的一说。
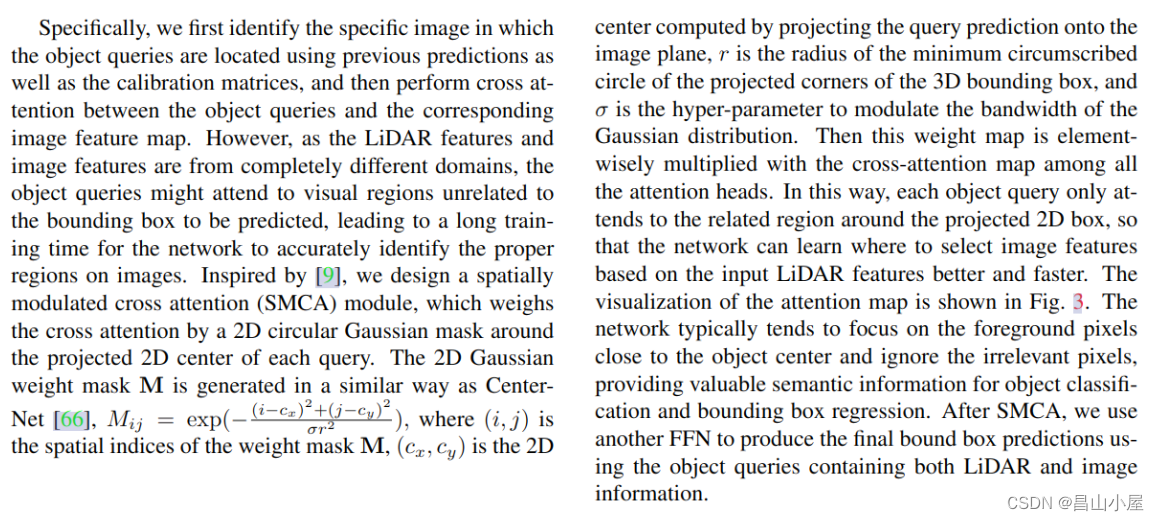
################################## transformer decoder layer (img feature as K,V)#################################if self.fuse_img:# positional encoding for image fusionimg_feat = raw_img_feat.permute(0, 3, 1, 2, 4) # [BS, n_views, C, H, W]img_feat_flatten = img_feat.view(batch_size, self.num_views, num_channel, -1) # [BS, n_views, C, H*W]if self.img_feat_pos is None:(h, w) = img_inputs.shape[-2], img_inputs.shape[-1]img_feat_pos = self.img_feat_pos = self.create_2D_grid(h, w).to(img_feat_flatten.device)else:img_feat_pos = self.img_feat_posprev_query_feat = query_feat.detach().clone()query_feat = torch.zeros_like(query_feat) # create new container for img query featurequery_pos_realmetric = query_pos.permute(0, 2, 1) * self.test_cfg['out_size_factor'] * self.test_cfg['voxel_size'][0] + self.test_cfg['pc_range'][0]query_pos_3d = torch.cat([query_pos_realmetric, res_layer['height']], dim=1).detach().clone()if 'vel' in res_layer:vel = copy.deepcopy(res_layer['vel'].detach())else:vel = Nonepred_boxes = self.bbox_coder.decode(copy.deepcopy(res_layer['heatmap'].detach()),copy.deepcopy(res_layer['rot'].detach()),copy.deepcopy(res_layer['dim'].detach()),copy.deepcopy(res_layer['center'].detach()),copy.deepcopy(res_layer['height'].detach()),vel,)on_the_image_mask = torch.ones([batch_size, self.num_proposals]).to(query_pos_3d.device) * -1for sample_idx in range(batch_size if self.fuse_img else 0):lidar2img_rt = query_pos_3d.new_tensor(img_metas[sample_idx]['lidar2img'])img_scale_factor = (query_pos_3d.new_tensor(img_metas[sample_idx]['scale_factor'][:2]if 'scale_factor' in img_metas[sample_idx].keys() else [1.0, 1.0]))img_flip = img_metas[sample_idx]['flip'] if 'flip' in img_metas[sample_idx].keys() else Falseimg_crop_offset = (query_pos_3d.new_tensor(img_metas[sample_idx]['img_crop_offset'])if 'img_crop_offset' in img_metas[sample_idx].keys() else 0)img_shape = img_metas[sample_idx]['img_shape'][:2]img_pad_shape = img_metas[sample_idx]['input_shape'][:2]boxes = LiDARInstance3DBoxes(pred_boxes[sample_idx]['bboxes'][:, :7], box_dim=7)query_pos_3d_with_corners = torch.cat([query_pos_3d[sample_idx], boxes.corners.permute(2, 0, 1).view(3, -1)], dim=-1) # [3, num_proposals] + [3, num_proposals*8]# transform point clouds back to original coordinate system by reverting the data augmentationif batch_size == 1: # skip during inference to save timepoints = query_pos_3d_with_corners.Telse:points = apply_3d_transformation(query_pos_3d_with_corners.T, 'LIDAR', img_metas[sample_idx], reverse=True).detach()num_points = points.shape[0]for view_idx in range(self.num_views):pts_4d = torch.cat([points, points.new_ones(size=(num_points, 1))], dim=-1)pts_2d = pts_4d @ lidar2img_rt[view_idx].t()##相机内参前面那个1/zpts_2d[:, 2] = torch.clamp(pts_2d[:, 2], min=1e-5)pts_2d[:, 0] /= pts_2d[:, 2]pts_2d[:, 1] /= pts_2d[:, 2]# img transformation: scale -> crop -> flip# the image is resized by img_scale_factorimg_coors = pts_2d[:, 0:2] * img_scale_factor # Nx2img_coors -= img_crop_offset# grid sample, the valid grid range should be in [-1,1]coor_x, coor_y = torch.split(img_coors, 1, dim=1) # each is Nx1if img_flip:# by default we take it as horizontal flip# use img_shape before padding for fliporig_h, orig_w = img_shapecoor_x = orig_w - coor_x##e.g. 200个proposal总共有200 + 200*8 = 1800个坐标点coor_x, coor_corner_x = coor_x[0:self.num_proposals, :], coor_x[self.num_proposals:, :]coor_y, coor_corner_y = coor_y[0:self.num_proposals, :], coor_y[self.num_proposals:, :]coor_corner_x = coor_corner_x.reshape(self.num_proposals, 8, 1)coor_corner_y = coor_corner_y.reshape(self.num_proposals, 8, 1)coor_corner_xy = torch.cat([coor_corner_x, coor_corner_y], dim=-1)h, w = img_pad_shapeon_the_image = (coor_x > 0) * (coor_x < w) * (coor_y > 0) * (coor_y < h)on_the_image = on_the_image.squeeze()# skip the following computation if no object query fall on current imageif on_the_image.sum() <= 1:continueon_the_image_mask[sample_idx, on_the_image] = view_idx# add spatial constraint#out_size_factor_img是什么out的factor?center_ys = (coor_y[on_the_image] / self.out_size_factor_img)center_xs = (coor_x[on_the_image] / self.out_size_factor_img)centers = torch.cat([center_xs, center_ys], dim=-1).int() # center on the feature mapcorners = (coor_corner_xy[on_the_image].max(1).values - coor_corner_xy[on_the_image].min(1).values) / self.out_size_factor_img#gaosi geradius = torch.ceil(corners.norm(dim=-1, p=2) / 2).int() # radius of the minimum circumscribed circle of the wireframesigma = (radius * 2 + 1) / 6.0"""The 2D gaussian weight mask M is generated in a similar way as Center-Net,Mij = exp(((i-cx)^2+(j-cy)^2)/(sigma*radius^2)),where (i,j) is the spatial indices of the weight mask M,(cx,cy) is the 2D center computed by projecting the query prediction onto the image plane """distance = (centers[:, None, :] - (img_feat_pos - 0.5)).norm(dim=-1) ** 2gaussian_mask = (-distance / (2 * sigma[:, None] ** 2)).exp()gaussian_mask[gaussian_mask < torch.finfo(torch.float32).eps] = 0 ##太远的地方权重太小,直接给0attn_mask = gaussian_maskquery_feat_view = prev_query_feat[sample_idx, :, on_the_image]query_pos_view = torch.cat([center_xs, center_ys], dim=-1)query_feat_view = self.decoder[self.num_decoder_layers](query_feat_view[None], img_feat_flatten[sample_idx:sample_idx + 1, view_idx], query_pos_view[None], img_feat_pos, attn_mask=attn_mask.log())query_feat[sample_idx, :, on_the_image] = query_feat_view.clone()self.on_the_image_mask = (on_the_image_mask != -1)res_layer = self.prediction_heads[self.num_decoder_layers](torch.cat([query_feat, prev_query_feat], dim=1))res_layer['center'] = res_layer['center'] + query_pos.permute(0, 2, 1)for key, value in res_layer.items():pred_dim = value.shape[1]res_layer[key][~self.on_the_image_mask.unsqueeze(1).repeat(1, pred_dim, 1)] = first_res_layer[key][~self.on_the_image_mask.unsqueeze(1).repeat(1, pred_dim, 1)]ret_dicts.append(res_layer)上面这段代码是TransFusion的高潮部分,只是现在的为K,V取自Image features。之所以说"取",自然就是每个object query取聚合所有视图下的Image Features,那样效率太低,也难以收敛。问题的关键是一个object query和哪些Image Features建立关联。有了第一阶段预测出的Initial Predict Boxes这个问题就好办一些了。关于怎么利用第一阶段的predict boxes以及Gaussian Circule作者在论文中已经写的很清楚了,应该算是诸多论文中的常规操作。
看到这里其实大该明白了作者所说的"soft-association",虽然由predict boxes到image features借助了标定关系。但是通过object query聚合对应局部image featues这里利用了TransFormer,尤其是利用其中的cross attention做了跟当前object query上下文相关的特征聚合,即使传感器之间没有严格对齐也更加鲁棒。
相关文章:
【多模态融合】TransFusion学习笔记(2)
接上篇【多模态融合】TransFusion学习笔记(1)。 从TransFusion-L到TransFusion ok,终于可以给出论文中那个完整的框架图了,我第一眼看到这个图有几个疑问: Q:Image Guidance这条虚线引出的Query Initialization是什么意思? Q:图像分支中的…...
Pyhon-每日一练(1)
🌈write in front🌈 🧸大家好,我是Aileen🧸.希望你看完之后,能对你有所帮助,不足请指正!共同学习交流. 🆔本文由Aileen_0v0🧸 原创 CSDN首发🐒 如…...
MySQL:数据库的物理备份和恢复-冷备份(3)
介绍 物理备份: 直接复制数据文件进行的备份 优点:不需要其他的工具,直接复制就好,恢复直接复制备份文件即可 缺点:与存储引擎有关,跨平台能力较弱 逻辑备份: 从数据库中导出数据另存而进行的备…...

功能比较:Redisson vs Jedis
Redis最流行的两个Java客户端库是Redisson和Jedis。Redisson提供内存中的数据网格功能,支持Redis的各种分布式对象和服务。另一方面,Jedis是一个更轻量级的产品,它缺乏其他库的某些功能。 如果你正在为Redis寻找一个Java客户端库…...
Spring web security
儅使用spring的web security時,默認會轉向自帶的spring security example page。而不會轉向error page。 TODO: <dependency><groupId>org.springframework.boot</groupId><artifactId>spring-boot-starter-security</artifactId> &l…...
SpringCloud(二)Docker、Spring AMQP、ElasticSearch
文章目录 DockerDocker与虚拟机Docker架构镜像、容器、镜像托管平台Docker架构Docker实践 Spring AMQP简单使用案例工作队列- WorkQueue发布订阅服务FanoutExchangeDirectExchangeTopicExchange 消息转换器 ElasticSearch倒排索引IK分词器IK分词拓展与停用字典 操作索引库mappi…...
7.Tensors For Beginneers - Convector Components
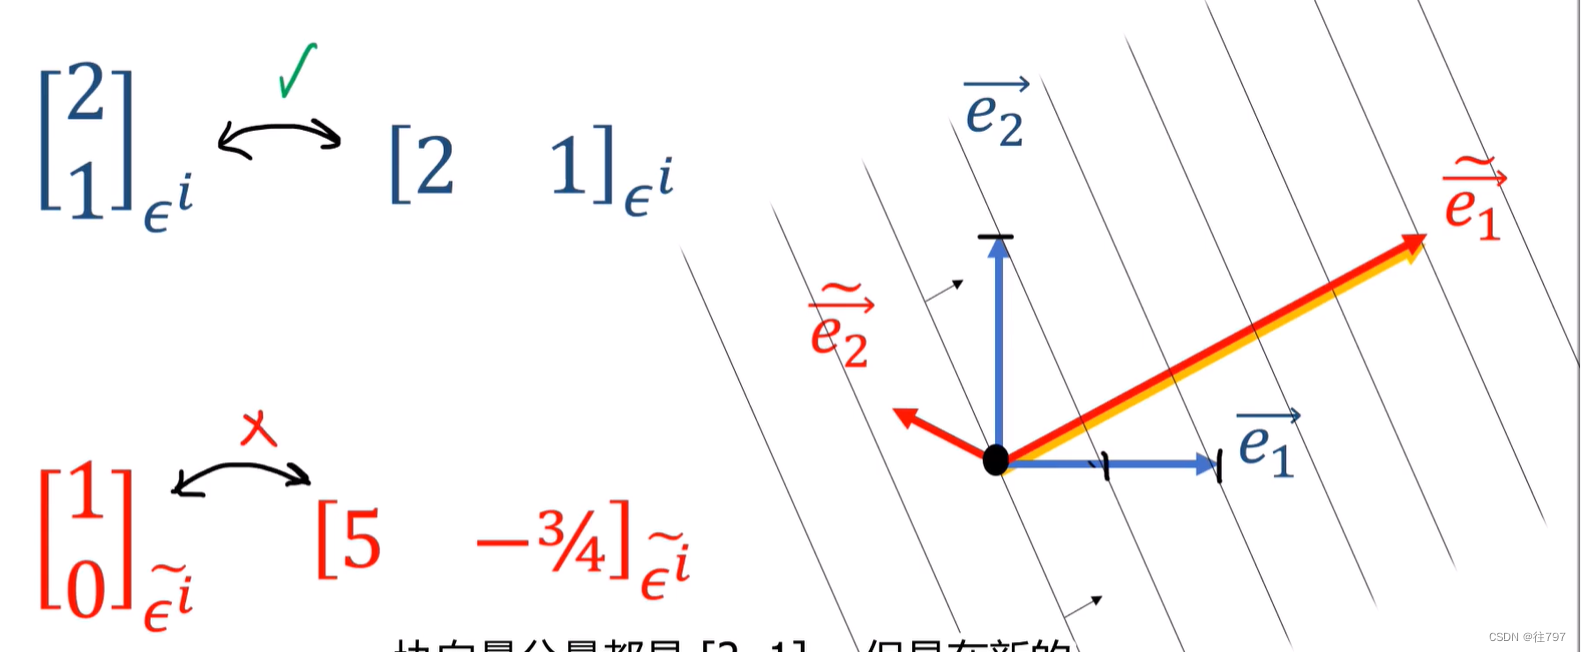
介绍协向量时,曾说过它们有点像 行向量, 行向量确实以某种方式代表了协向量, 这里说明一下: 协向量是不变的; 协向量组件是可变的。 协向量不依赖坐标系,协向量的组件取决于坐标系。 当我们说协向量具有组…...
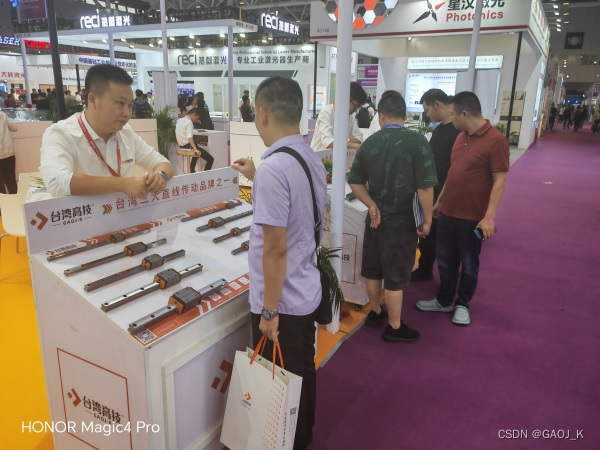
直线导轨坏了可以维修吗?
直线导轨是工业自动化设备中常用的零部件,其性能和使用寿命对设备的稳定运行和产能有着直接的影响,在生产中,由于各种原因,直线导轨会出现各种问题,那么,直线导轨的维修方法究竟是怎样的呢?我们…...
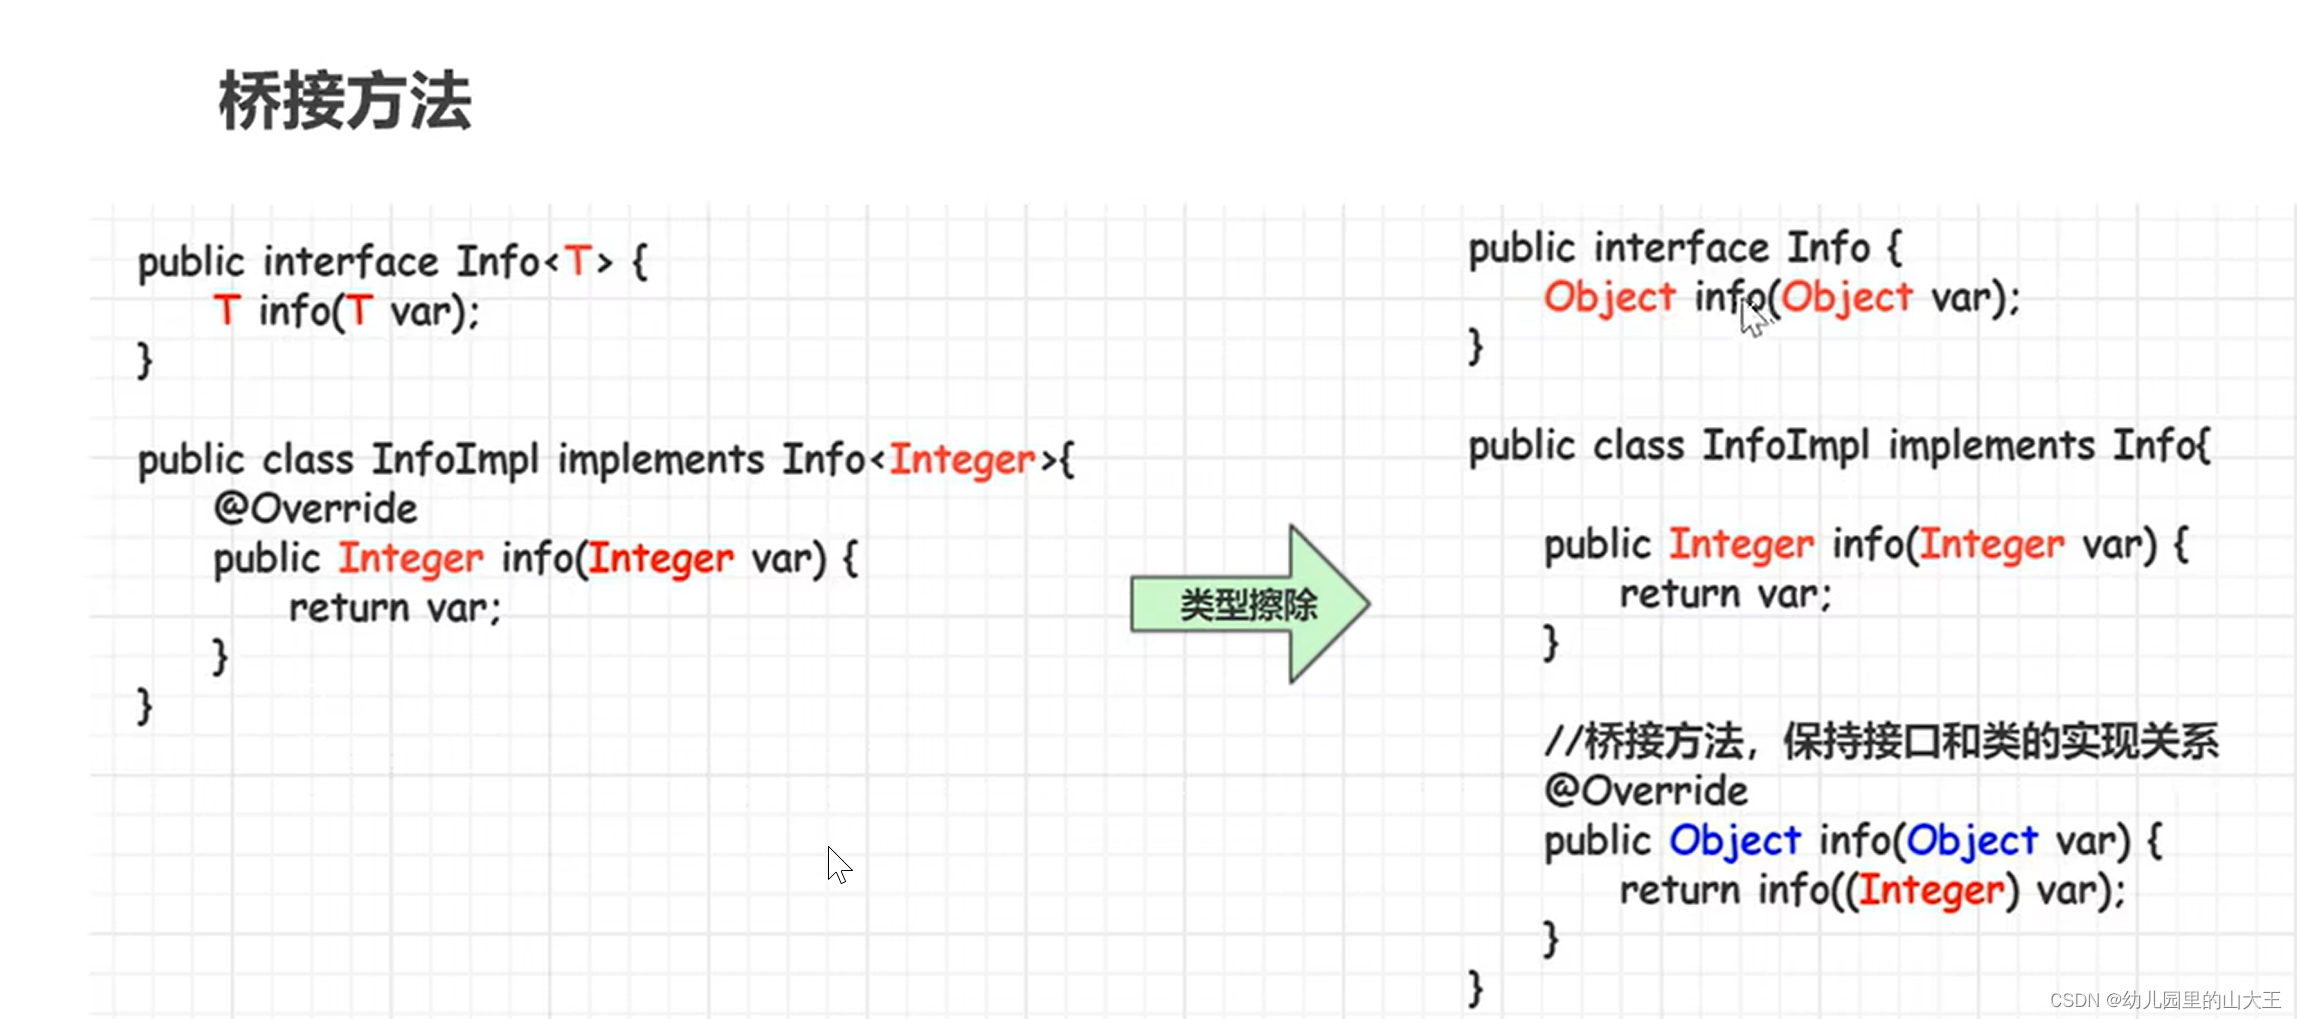
Java基础--泛型详解
一、背景 java推出泛型之前,集合元素类型可以是object类型,能够存储任意的数据类型对象,但是在使用过程中,如果不知道集合里面的各个元素的类型,在进行类型转换的时候就很容易引发ClassCastException异常。 二、概念 …...
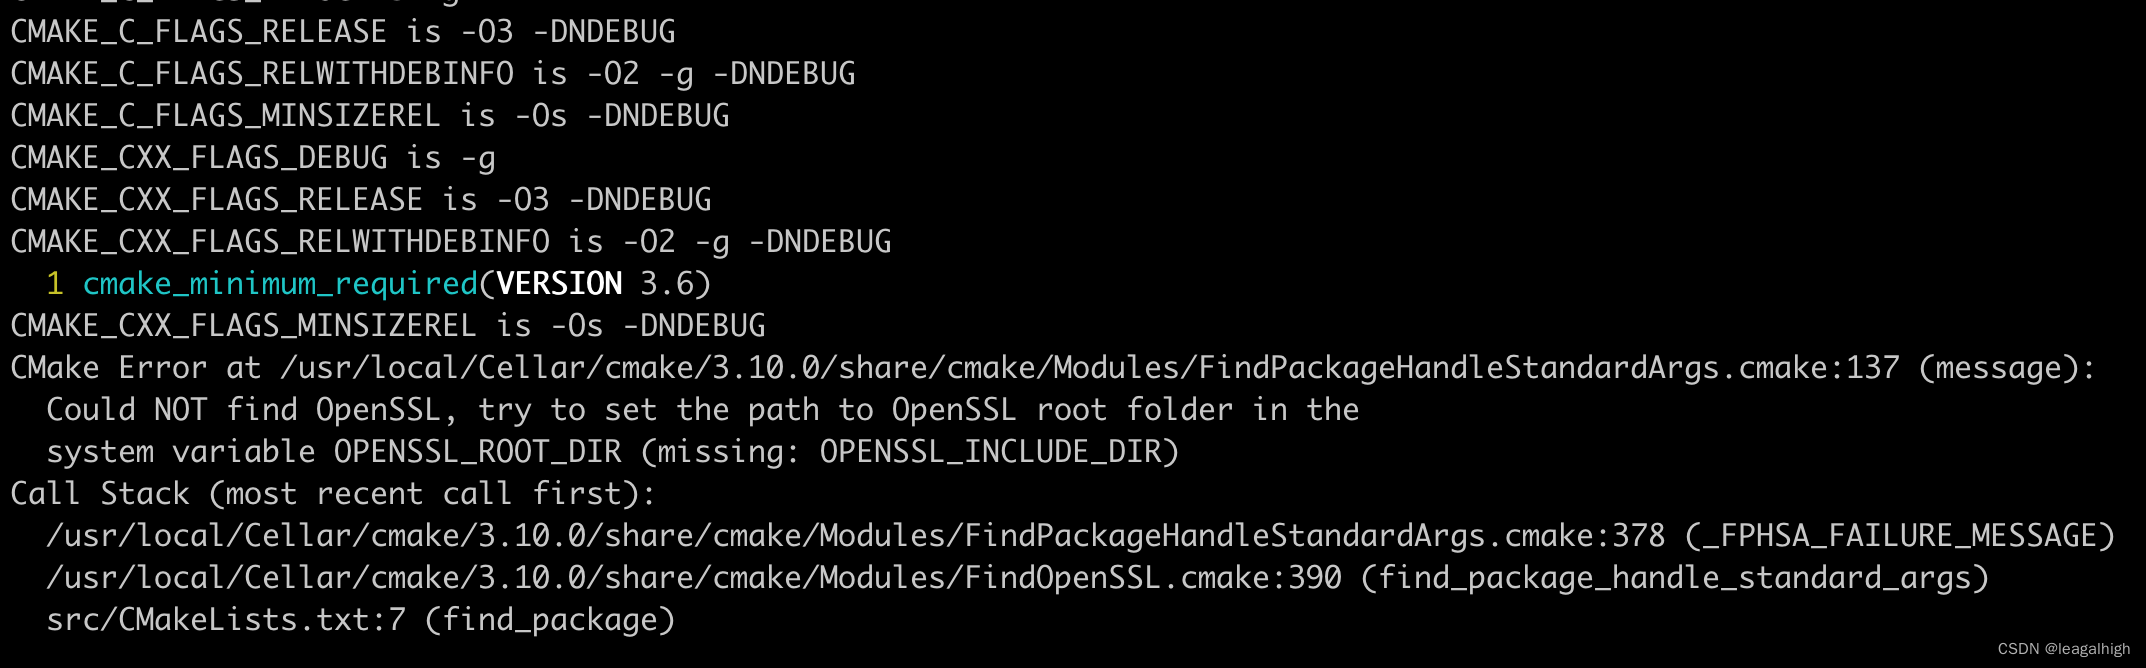
学习搜狗的workflow,MacBook上如何编译
官网说可以在MacBook上也可以运行,但是编译的时候却有找不到openssl的错误: 看其他博客也有类似的错误,按照类似的思路去解决 问题原因和解决办法 cmake编译的时候,没有找到openssl的头文件,需要设置cmake编译环境下…...
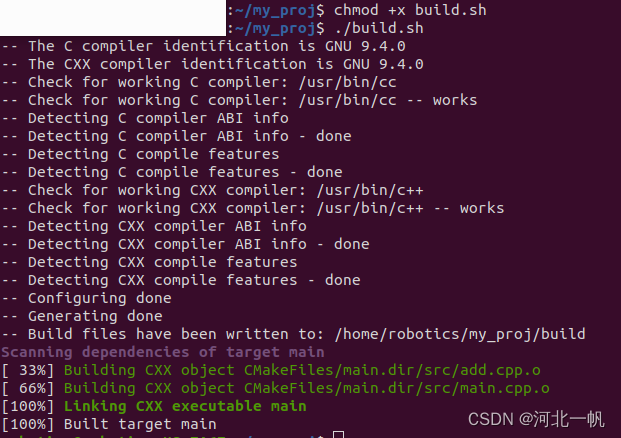
Ubuntu使用cmake和vscode开发自己的项目,引用自己的头文件和openCV
创建文件夹 mkdir my_proj 继续创建include 和 src文件夹,形成如下的目录结构 用vscode打开项目 创建add.h #ifndef ADD_H #define ADD_Hint add(int numA, int numB);#endif add.cpp #include "add.h"int add(int numA, int numB) {return numA nu…...
 dataset, dataloader)
2) dataset, dataloader
dataset, dataloader torchvision.datasets里面集成了一些常见的数据集,例如MNIST和CIFAR10 1) Dataset 以MNIST为例,其使用方式如下 import torch import torchvision from torchvision import transformstrain_dataset = torchvision.datasets.MNIST(root=../data,trai…...
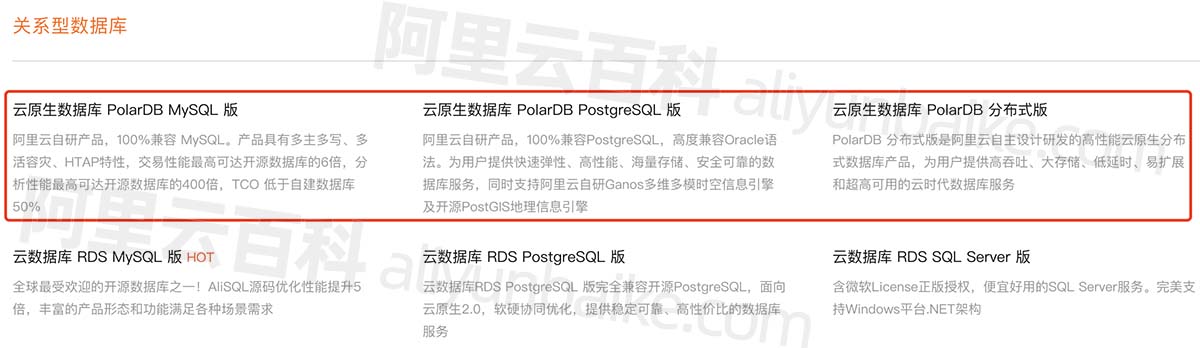
阿里云PolarDB自研数据库详细介绍_兼容MySQL、PostgreSQL和Oracle语法
阿里云PolarDB数据库是阿里巴巴自研的关系型分布式云原生数据库,PolarDB兼容三种数据库引擎:MySQL、PostgreSQL、Oracle(语法兼容),目前提供云原生数据库PolarDB MySQL版、云原生数据库PolarDB PostgreSQL版和云原生数…...
[软件工具]opencv-svm快速训练助手教程解决opencv C++ SVM模型训练与分类实现任务支持C# python调用
opencv中已经提供了svm算法可以对图像实现多分类,使用svm算法对图像分类的任务多用于场景简单且对时间有要求的场景,因为opencv的svm训练一般只需要很短时间就可以完成训练任务。但是目前网上没有一个工具很好解决训练问题,大部分需要自己编程…...
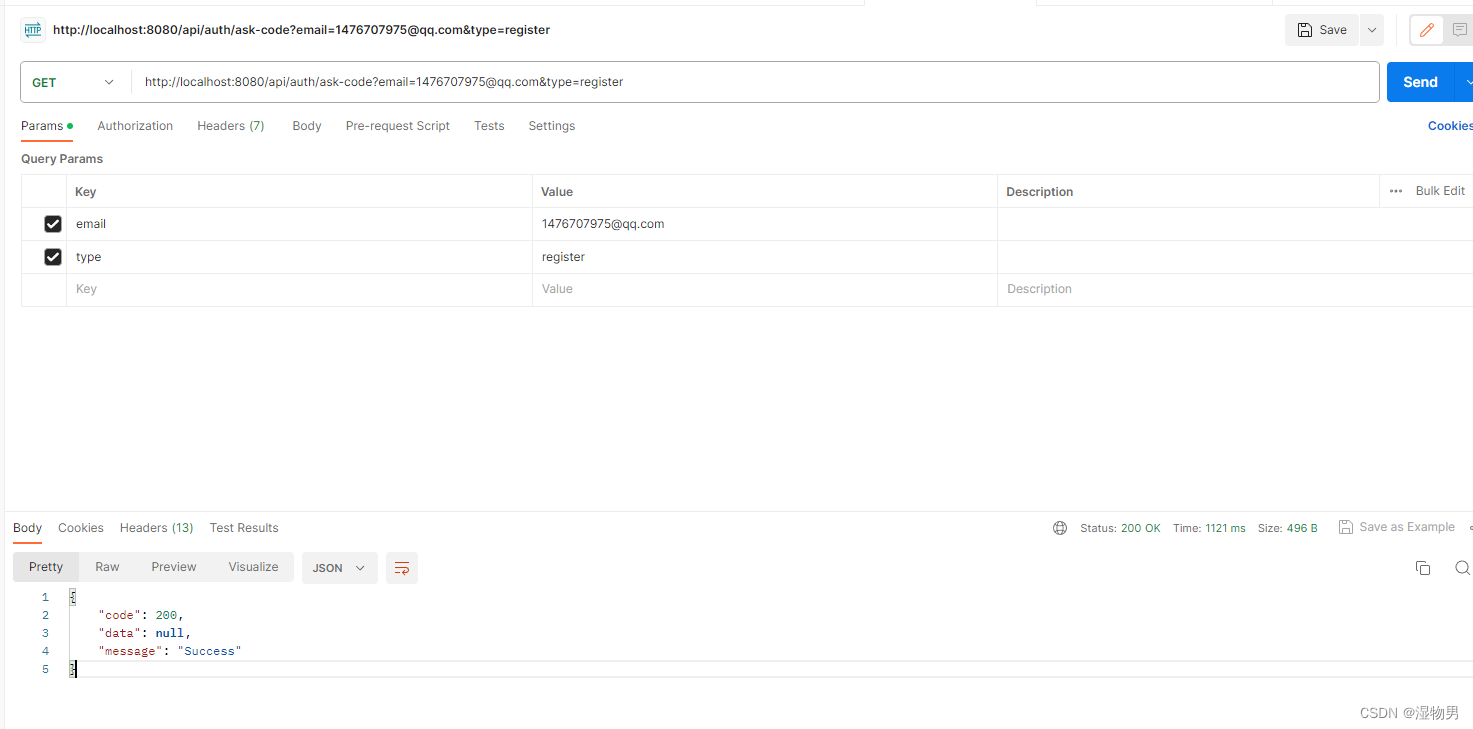
邮件注册(一)验证码发送
通过邮箱实现注册,用户请求验证码完成注册操作。 导入依赖: <dependency><groupId>org.springframework.boot</groupId><artifactId>spring-boot-starter-mail</artifactId></dependency><dependency><g…...
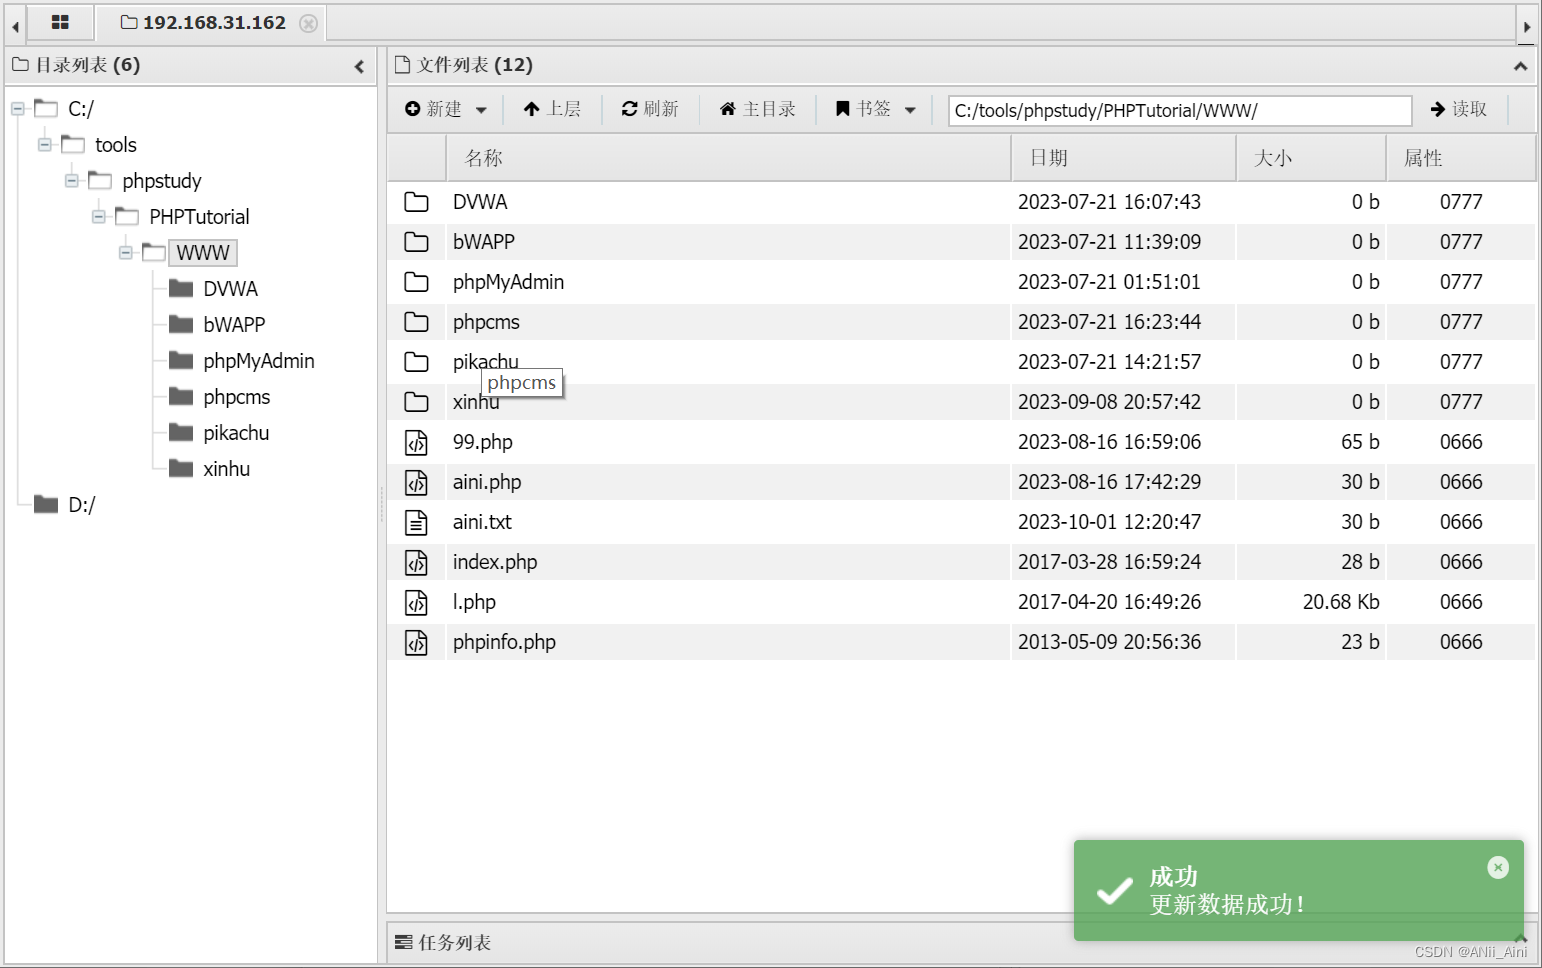
【网络安全---sql注入(2)】如何通过SQL注入getshell?如何通过SQL注入读取文件或者数据库数据?一篇文章告诉你过程和原理。
前言 本篇博客主要是通过piakchu靶场来讲解如何通过SQL注入漏洞来写入文件,读取文件。通过SQL输入来注入木马来getshell等,讲解了比较详细的过程; 如果想要学习SQL注入原理以及如何进行SQL注入,我也写了一篇详细的SQL注入方法及…...
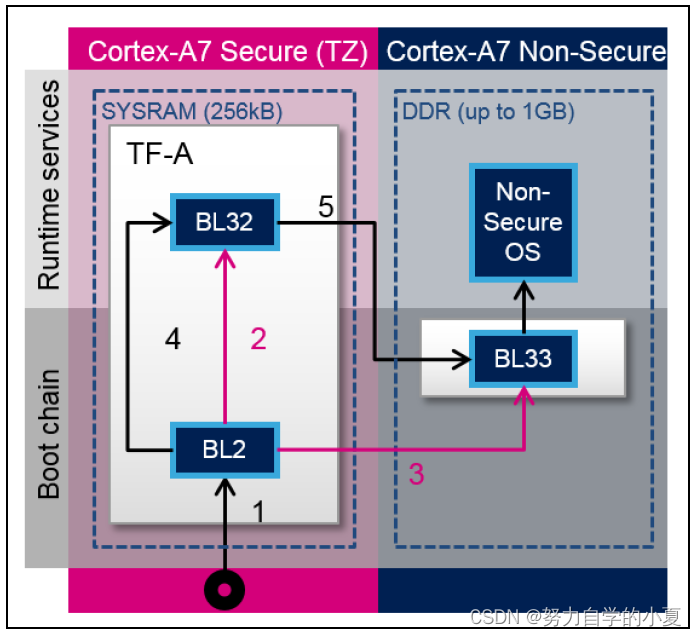
正点原子嵌入式linux驱动开发——TF-A移植
经过了之前的学习,除了TF-A的详细启动流程仍待更新,TF-A的使用和其对应的大致启动流程已经进行过了学习。但是当我们实际做产品时,硬件平台肯定会和ST官方的有区别,比如DDR容量会改变,自己的硬件没有使用到官方EVK开发…...
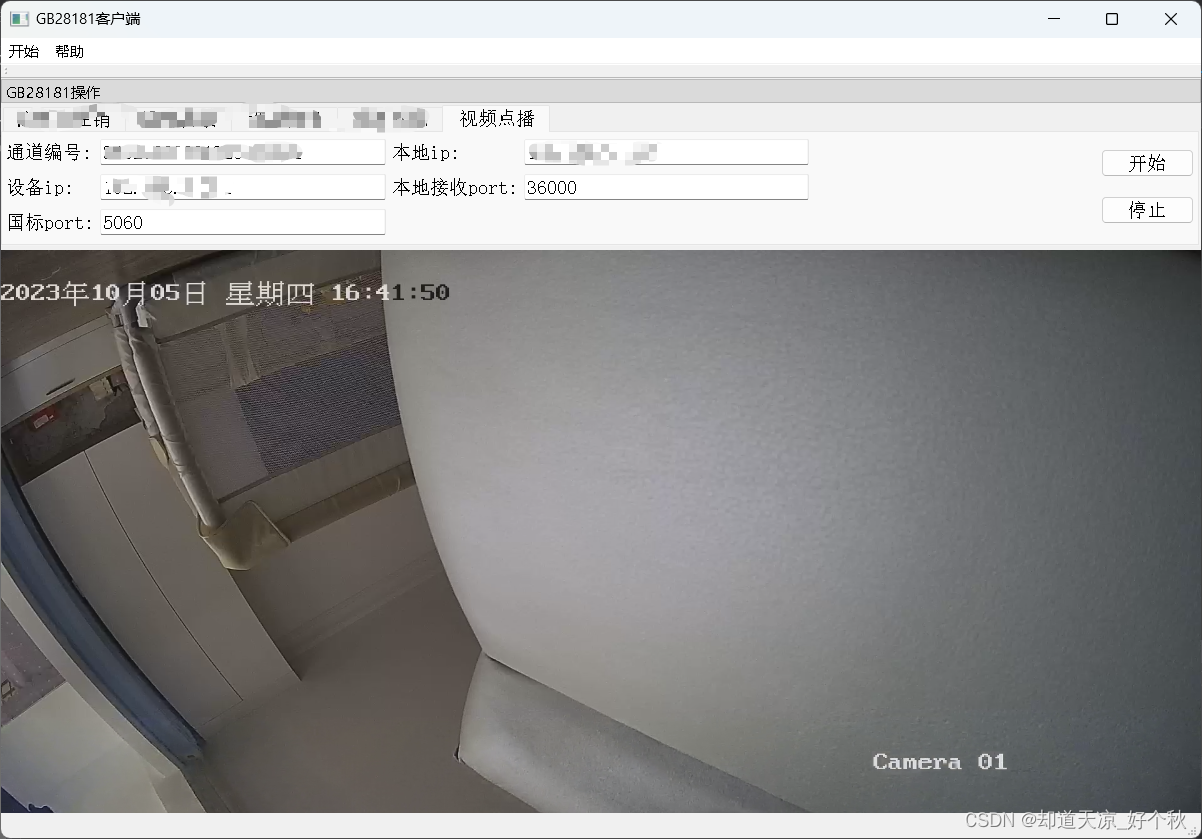
GB28181学习(六)——实时视音频点播(数据传输部分)
GB28181系列文章: 总述:https://blog.csdn.net/www_dong/article/details/132515446 注册与注销:https://blog.csdn.net/www_dong/article/details/132654525 心跳保活:https://blog.csdn.net/www_dong/article/details/132796…...
JMeter接口自动化测试(数据驱动)
之前我们的用例数据都是配置在HTTP请求中,每次需要增加,修改用例都需要打开JMeter重新编辑,当用例越来越多的时候,用例维护起来就越来越麻烦,有没有好的方法来解决这种情况呢?我们可以将用例的数据存放在cs…...
数据结构:二叉树(超详解析)
目录 1.树概念及结构 1.1树的概念 1.2树的相关概念 1.3树的表示 1.3.1孩子兄弟表示法: 1.3.2双亲表示法:只存储双亲的下标或指针 两节点不在同一树上: 2.二叉树概念及结构 2.1.概念 2.2.特殊的二叉树: 2…...
idea大量爆红问题解决
问题描述 在学习和工作中,idea是程序员不可缺少的一个工具,但是突然在有些时候就会出现大量爆红的问题,发现无法跳转,无论是关机重启或者是替换root都无法解决 就是如上所展示的问题,但是程序依然可以启动。 问题解决…...
Docker 运行 Kafka 带 SASL 认证教程
Docker 运行 Kafka 带 SASL 认证教程 Docker 运行 Kafka 带 SASL 认证教程一、说明二、环境准备三、编写 Docker Compose 和 jaas文件docker-compose.yml代码说明:server_jaas.conf 四、启动服务五、验证服务六、连接kafka服务七、总结 Docker 运行 Kafka 带 SASL 认…...
)
【位运算】消失的两个数字(hard)
消失的两个数字(hard) 题⽬描述:解法(位运算):Java 算法代码:更简便代码 题⽬链接:⾯试题 17.19. 消失的两个数字 题⽬描述: 给定⼀个数组,包含从 1 到 N 所有…...
2025盘古石杯决赛【手机取证】
前言 第三届盘古石杯国际电子数据取证大赛决赛 最后一题没有解出来,实在找不到,希望有大佬教一下我。 还有就会议时间,我感觉不是图片时间,因为在电脑看到是其他时间用老会议系统开的会。 手机取证 1、分析鸿蒙手机检材&#x…...
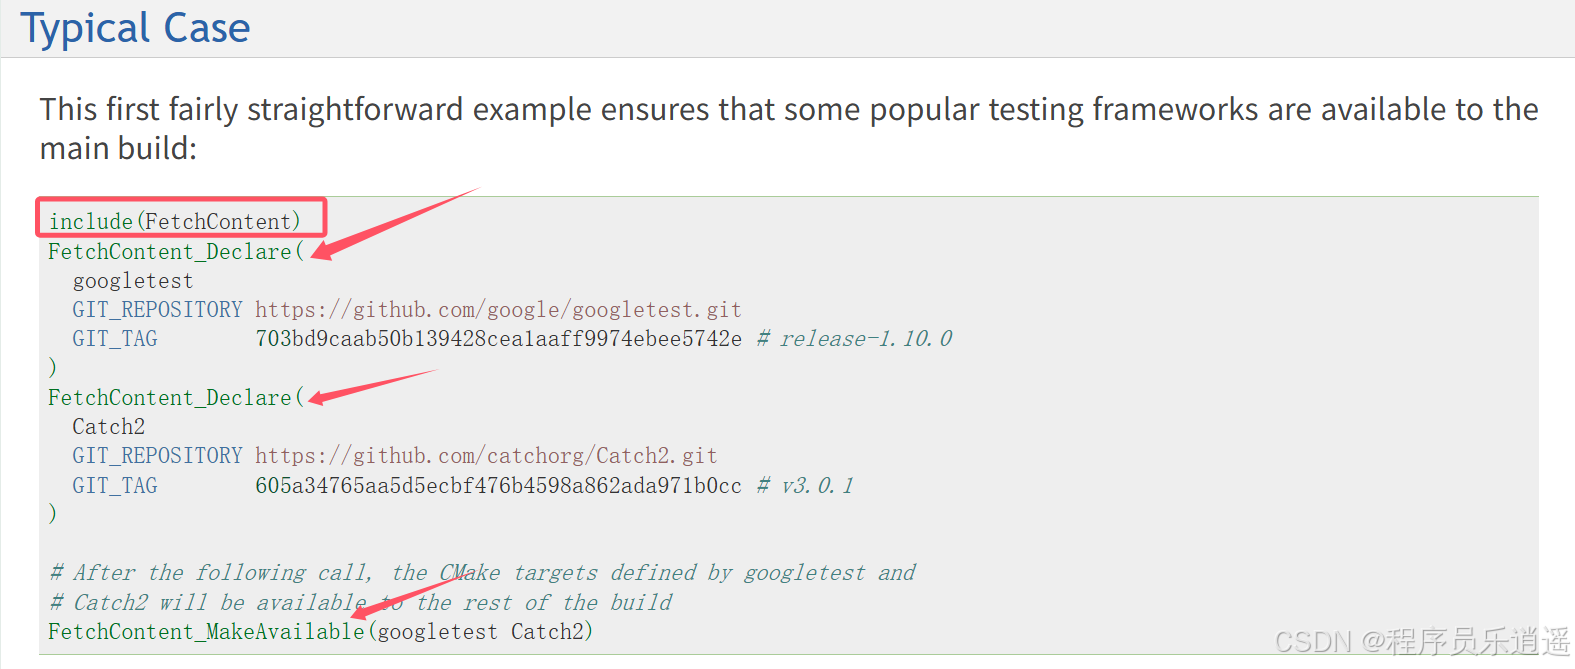
CMake 从 GitHub 下载第三方库并使用
有时我们希望直接使用 GitHub 上的开源库,而不想手动下载、编译和安装。 可以利用 CMake 提供的 FetchContent 模块来实现自动下载、构建和链接第三方库。 FetchContent 命令官方文档✅ 示例代码 我们将以 fmt 这个流行的格式化库为例,演示如何: 使用 FetchContent 从 GitH…...

CRMEB 中 PHP 短信扩展开发:涵盖一号通、阿里云、腾讯云、创蓝
目前已有一号通短信、阿里云短信、腾讯云短信扩展 扩展入口文件 文件目录 crmeb\services\sms\Sms.php 默认驱动类型为:一号通 namespace crmeb\services\sms;use crmeb\basic\BaseManager; use crmeb\services\AccessTokenServeService; use crmeb\services\sms\…...
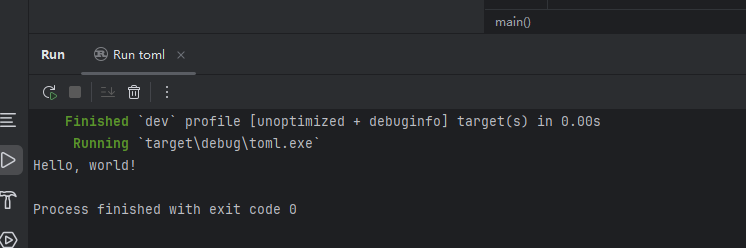
Rust 开发环境搭建
环境搭建 1、开发工具RustRover 或者vs code 2、Cygwin64 安装 https://cygwin.com/install.html 在工具终端执行: rustup toolchain install stable-x86_64-pc-windows-gnu rustup default stable-x86_64-pc-windows-gnu 2、Hello World fn main() { println…...
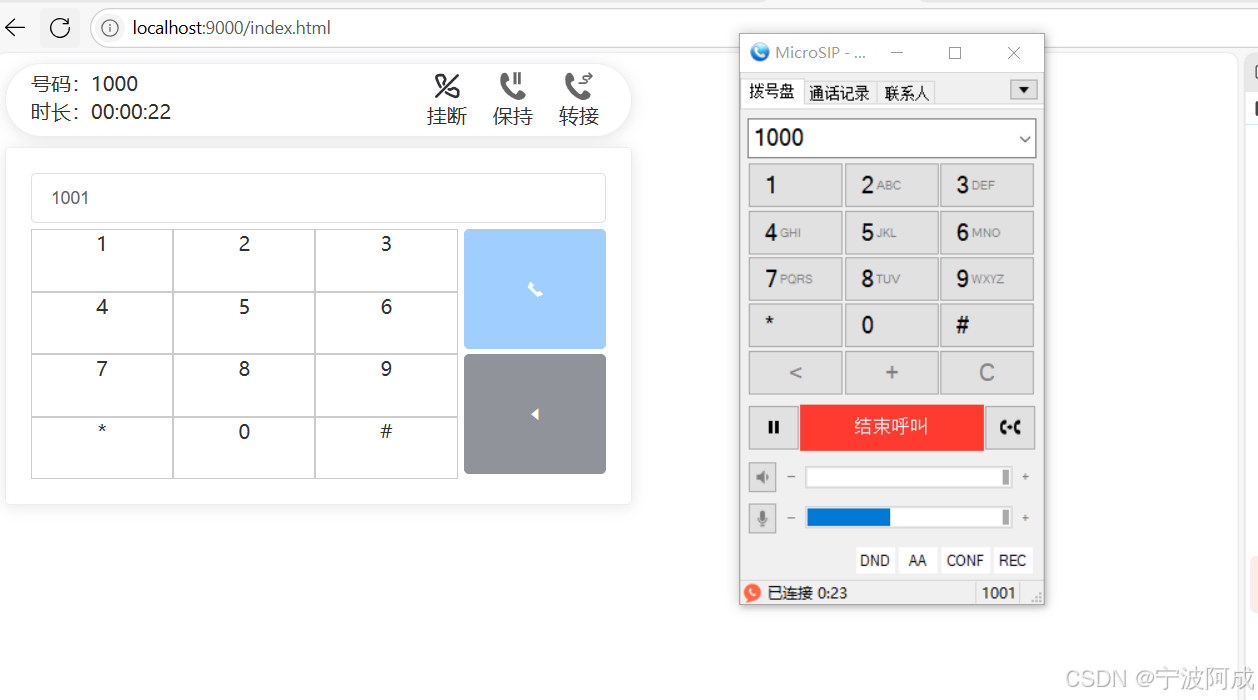
通过MicroSip配置自己的freeswitch服务器进行调试记录
之前用docker安装的freeswitch的,启动是正常的, 但用下面的Microsip连接不上 主要原因有可能一下几个 1、通过下面命令可以看 [rootlocalhost default]# docker exec -it freeswitch fs_cli -x "sofia status profile internal"Name …...

用鸿蒙HarmonyOS5实现中国象棋小游戏的过程
下面是一个基于鸿蒙OS (HarmonyOS) 的中国象棋小游戏的实现代码。这个实现使用Java语言和鸿蒙的Ability框架。 1. 项目结构 /src/main/java/com/example/chinesechess/├── MainAbilitySlice.java // 主界面逻辑├── ChessView.java // 游戏视图和逻辑├──…...
实现跳一跳小游戏)
鸿蒙(HarmonyOS5)实现跳一跳小游戏
下面我将介绍如何使用鸿蒙的ArkUI框架,实现一个简单的跳一跳小游戏。 1. 项目结构 src/main/ets/ ├── MainAbility │ ├── pages │ │ ├── Index.ets // 主页面 │ │ └── GamePage.ets // 游戏页面 │ └── model │ …...