网络库OKHttp(1)流程+拦截器
序、慢慢来才是最快的方法。
背景
OkHttp是一套处理HTTP网络请求的依赖库,由Square公司设计研发并开源,目前可以在Java和Kotlin中使用。对于Android App来说,OkHttp现在几乎已经占据了所有的网络请求操作。
OKHttp源码官网

版本
api 'com.squareup.okhttp3:okhttp:4.10.0'
发起网络请求示例代码
val okHttpClient = OkHttpClient()val request :Request = Request.Builder().url("").build()val newCall = okHttpClient.newCall(request)//同步请求newCall.execute()//异步请求newCall.enqueue(object : Callback {override fun onFailure(call: Call, e: IOException) {TODO("Not yet implemented")}override fun onResponse(call: Call, response: Response) {TODO("Not yet implemented")}})
核心类
OkHttpClient 、Request 、Call 、RealCall 、Dispatcher 、Deque 、AsyncCall 、Response
- OkHttpClient:
Okhttp用于请求的执行客户端 - Request: 通过Bulider设计模式,构建的一个请求对象
- Call: 是通过
client.newCall生成的请求执行对象,当执行了execute之后才会真正的开始执行网络请求 - Response: 是通过网络请求后,从服务器返回的信息都在里面。内含返回的状态码,以及代表响应消息正文的
ResponseBody
- interceptor 用户定义的拦截器,在重试拦截器之前执行
- retryAndFollowUpInterceptor 重试拦截器
- BridgeInterceptor 建立网络桥梁的拦截器,主要是为了给网络请求时候,添加各种各种必要参数。如Cookie,Content-type
- CacheInterceptor 缓存拦截器,主要是为了在网络请求时候,根据返回码处理缓存。
- ConnectInterceptor 连接拦截器,主要是为了从连接池子中查找可以复用的socket连接。
- networkInterceptors 用户定义的网络拦截器,在CallServerInterceptor(执行网络请求拦截器)之前运行。
- CallServerInterceptor 真正执行网络请求的逻辑。
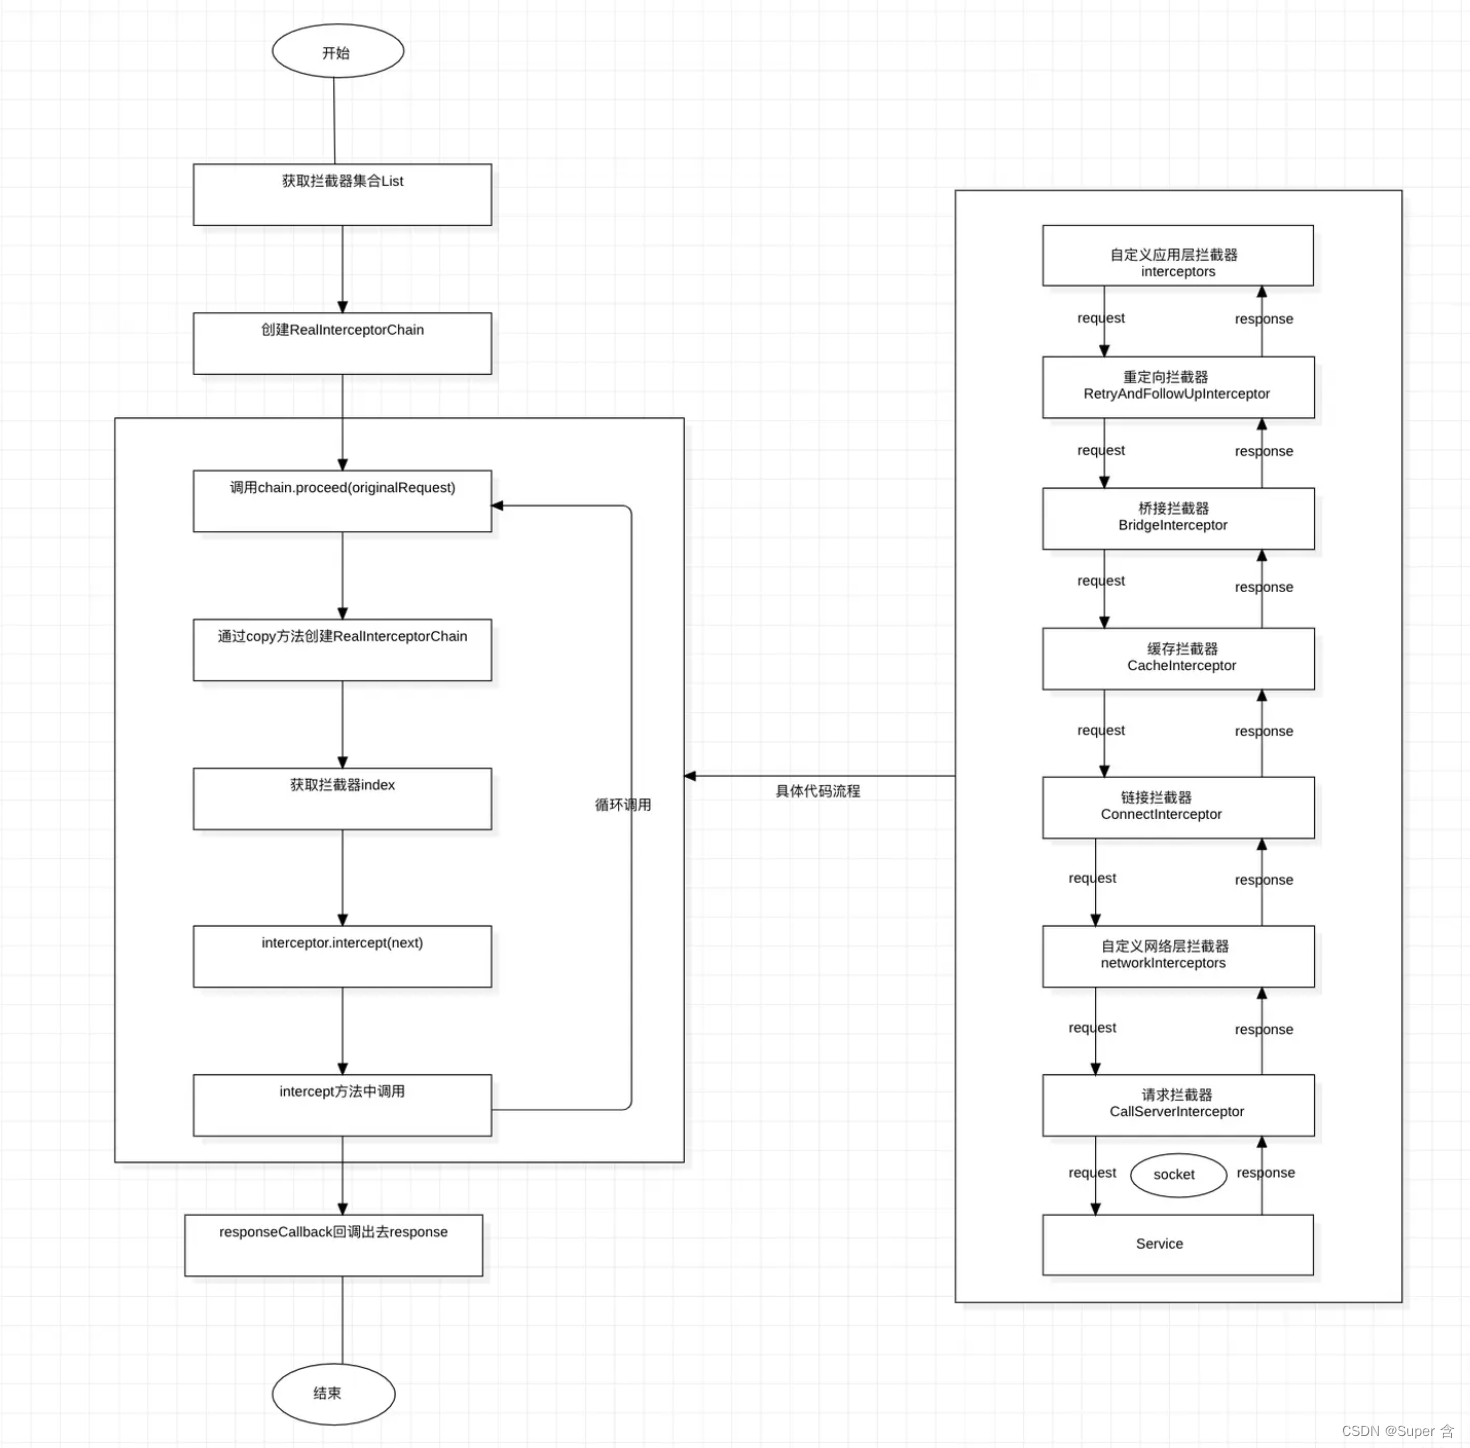
1.网路请求流程

OkHttpClient 网络配置层
class Builder constructor() {//Okhttp 请求分发器,是整个OkhttpClient的执行核心internal var dispatcher: Dispatcher = Dispatcher()//Okhttp连接池,不过会把任务委托给RealConnectionPool处理internal var connectionPool: ConnectionPool = ConnectionPool()//用户定义的拦截器,在重试拦截器之前执行internal val interceptors: MutableList<Interceptor> = mutableListOf()//用户定义的网络拦截器,在CallServerInterceptor(执行网络请求拦截器)之前运行。internal val networkInterceptors: MutableList<Interceptor> = mutableListOf()//流程监听器internal var eventListenerFactory: EventListener.Factory = EventListener.NONE.asFactory()//连接失败时是否重连internal var retryOnConnectionFailure = true//服务器认证设置internal var authenticator: Authenticator = Authenticator.NONE//是否重定向internal var followRedirects = true//是否重定向到httpsinternal var followSslRedirects = true//cookie持久化的设置internal var cookieJar: CookieJar = CookieJar.NO_COOKIES//缓存设置internal var cache: Cache? = null//DNS设置internal var dns: Dns = Dns.SYSTEM//代理设置internal var proxy: Proxy? = nullinternal var proxySelector: ProxySelector? = nullinternal var proxyAuthenticator: Authenticator = Authenticator.NONE//默认的socket连接池internal var socketFactory: SocketFactory = SocketFactory.getDefault()//用于https的socket连接池internal var sslSocketFactoryOrNull: SSLSocketFactory? = null//用于信任Https证书的对象internal var x509TrustManagerOrNull: X509TrustManager? = nullinternal var connectionSpecs: List<ConnectionSpec> = DEFAULT_CONNECTION_SPECS//http协议集合internal var protocols: List<Protocol> = DEFAULT_PROTOCOLS//https对host的检验internal var hostnameVerifier: HostnameVerifier = OkHostnameVerifierinternal var certificatePinner: CertificatePinner = CertificatePinner.DEFAULTinternal var certificateChainCleaner: CertificateChainCleaner? = null//请求超时internal var callTimeout = 0//连接超时internal var connectTimeout = 10_000//读取超时internal var readTimeout = 10_000//写入超时internal var writeTimeout = 10_000internal var pingInterval = 0internal var minWebSocketMessageToCompress = RealWebSocket.DEFAULT_MINIMUM_DEFLATE_SIZEinternal var routeDatabase: RouteDatabase? = null}
client.newCall(request):
override fun newCall(request: Request): Call = RealCall(this, request, forWebSocket = false)
在这里生成一个RealCall对象,这里第三个参数是否为websocket,默认是false。 在拿到RealCall对象之后,这里有两种方式起发送网络请求:
- execute() : 这种方式很少用
- enqueue() : 这种方式是将每个请求放在队列中,按照顺序逐个去进行消费。
RealCall.enqueue()
override fun enqueue(responseCallback: Callback) {check(executed.compareAndSet(false, true)) { "Already Executed" }callStart()client.dispatcher.enqueue(AsyncCall(responseCallback))
}private fun callStart() {this.callStackTrace = Platform.get().getStackTraceForCloseable("response.body().close()")eventListener.callStart(this)
}
这里主要做了一下几步
- 首先回调eventListener的callStart()方法,
- 然后把创建AsyncCall对象将responseCallback传进去。
- 最后Dispatcher的enqueue()方法.
Dispatcher.enqueue()
class Dispatcher constructor() {......//按运行顺序准备异步调用的队列
private val readyAsyncCalls = ArrayDeque<AsyncCall>()//正在运行的异步请求队列, 包含取消但是还未finish的AsyncCall
private val runningAsyncCalls = ArrayDeque<AsyncCall>()//正在运行的同步请求队列, 包含取消但是还未finish的RealCall
private val runningSyncCalls = ArrayDeque<RealCall>()......internal fun enqueue(call: AsyncCall) {synchronized(this) {readyAsyncCalls.add(call)if (!call.call.forWebSocket) {val existingCall = findExistingCallWithHost(call.host)if (existingCall != null) call.reuseCallsPerHostFrom(existingCall)}}promoteAndExecute()
}private fun findExistingCallWithHost(host: String): AsyncCall? {for (existingCall in runningAsyncCalls) {if (existingCall.host == host) return existingCall}for (existingCall in readyAsyncCalls) {if (existingCall.host == host) return existingCall}return null
}- 首先将AsyncCall加入readyAsyncCalls队列中.
- 然后通过findExistingCallWithHost查找在runningAsyncCalls和readyAsyncCalls是否存在相同host的AsyncCall,如果存在则调用call.reuseCallsPerHostFrom()进行复用
- 最后调用 promoteAndExecute() 通过线程池执行队列中的AsyncCall对象
Dispatcher.promoteAndExecute()
private fun promoteAndExecute(): Boolean {this.assertThreadDoesntHoldLock()val executableCalls = mutableListOf<AsyncCall>()//判断是否有请求正在执行val isRunning: Boolean//加锁,保证线程安全synchronized(this) {//遍历 readyAsyncCalls 队列val i = readyAsyncCalls.iterator()while (i.hasNext()) {val asyncCall = i.next()//runningAsyncCalls的数量不能大于最大并发请求数 64if (runningAsyncCalls.size >= this.maxRequests) break // Max capacity.//同一Host的最大数是5if (asyncCall.callsPerHost.get() >= this.maxRequestsPerHost) continue // Host max capacity.//从readyAsyncCalls队列中移除并加入到executableCalls和runningAsyncCalls中i.remove()asyncCall.callsPerHost.incrementAndGet()executableCalls.add(asyncCall)runningAsyncCalls.add(asyncCall)}isRunning = runningCallsCount() > 0}//遍历executableCalls 执行asyncCallfor (i in 0 until executableCalls.size) {val asyncCall = executableCalls[i]asyncCall.executeOn(executorService)}return isRunning
}
在这里遍历readyAsyncCalls队列,判断runningAsyncCalls的数量是否大于最大并发请求数64, 判断同一Host的请求是否大于5,然后将AsyncCall从readyAsyncCalls队列中移除,并加入到executableCalls和runningAsyncCalls中,遍历executableCalls 执行asyncCall.
RealCall.AsyncCall.exceuteOn()
internal inner class AsyncCall(private val responseCallback: Callback
) : Runnable {......fun executeOn(executorService: ExecutorService) {client.dispatcher.assertThreadDoesntHoldLock()var success = falsetry {//执行AsyncCall 的run方法executorService.execute(this)success = true} catch (e: RejectedExecutionException) {val ioException = InterruptedIOException("executor rejected")ioException.initCause(e)noMoreExchanges(ioException)responseCallback.onFailure(this@RealCall, ioException)} finally {if (!success) {client.dispatcher.finished(this) // This call is no longer running!}}}override fun run() {threadName("OkHttp ${redactedUrl()}") {var signalledCallback = falsetimeout.enter()try {//执行OkHttp的拦截器  获取response对象val response = getResponseWithInterceptorChain()signalledCallback = true//通过该方法将response对象回调出去responseCallback.onResponse(this@RealCall, response)} catch (e: IOException) {if (signalledCallback) {Platform.get().log("Callback failure for ${toLoggableString()}", Platform.INFO, e)} else {//遇到IO异常  回调失败方法responseCallback.onFailure(this@RealCall, e)}} catch (t: Throwable) {//遇到其他异常  回调失败方法cancel()if (!signalledCallback) {val canceledException = IOException("canceled due to $t")canceledException.addSuppressed(t)responseCallback.onFailure(this@RealCall, canceledException)}throw t} finally {client.dispatcher.finished(this)}}}
}
这里可以看到AsyncCall就是一个Runable对象,线程执行就会调用该对象的run方法,而executeOn方法就是执行runable对象. 在run方法中主要执行了以下几步:
- 调用getResponseWithInterceptorChain()执行OkHttp拦截器,获取response对象
- 调用responseCallback的onResponse方法将Response对象回调出去
- 如果遇见IOException异常则调用responseCallback的onFailure方法将异常回调出去
- 如果遇到其他异常,调用cancel()方法取消请求,调用responseCallback的onFailure方法将异常回调出去
- 调用Dispatcher的finished方法结束执行
RealCall.getResponseWithInterceptorChain()
@Throws(IOException::class)
internal fun getResponseWithInterceptorChain(): Response {// 拦截器集合val interceptors = mutableListOf<Interceptor>()//添加用户自定义集合interceptors += client.interceptorsinterceptors += RetryAndFollowUpInterceptor(client)interceptors += BridgeInterceptor(client.cookieJar)interceptors += CacheInterceptor(client.cache)interceptors += ConnectInterceptor//如果不是sockect 添加newtwork拦截器if (!forWebSocket) {interceptors += client.networkInterceptors}interceptors += CallServerInterceptor(forWebSocket)//构建拦截器责任链val chain = RealInterceptorChain(call = this,interceptors = interceptors,index = 0,exchange = null,request = originalRequest,connectTimeoutMillis = client.connectTimeoutMillis,readTimeoutMillis = client.readTimeoutMillis,writeTimeoutMillis = client.writeTimeoutMillis)var calledNoMoreExchanges = falsetry {//执行拦截器责任链获取Responseval response = chain.proceed(originalRequest)//如果取消了  则抛出异常if (isCanceled()) {response.closeQuietly()throw IOException("Canceled")}return response} catch (e: IOException) {calledNoMoreExchanges = truethrow noMoreExchanges(e) as Throwable} finally {if (!calledNoMoreExchanges) {noMoreExchanges(null)}}
}
在这里主要执行了以下几步操作
- 首先构建一个可变interceptor集合,将所有拦截器添加进去,这里如果是websocket则不添加networkInterceptor拦截器,这个interceptor集合的添加顺序也就是OkHttp拦截器的执行顺序
- 构建一个RealInterceptorChain对象,将所有的拦截器包裹
- 调用RealInterceptorChain的proceed的方法,获得Response对象
简单的总结一下:这里才用了责任链设计模式,构建RealInterceptorChain对象,然后执行proceed方法获取response对象
2.Interceptor
fun interface Interceptor {//拦截方法@Throws(IOException::class)fun intercept(chain: Chain): Responsecompanion object {inline operator fun invoke(crossinline block: (chain: Chain) -> Response): Interceptor =Interceptor { block(it) }}interface Chain {//获取Request对象fun request(): Request//处理请求获取Reponse@Throws(IOException::class)fun proceed(request: Request): Response......}
}
class RealInterceptorChain(internal val call: RealCall,private val interceptors: List<Interceptor>,private val index: Int,internal val exchange: Exchange?,internal val request: Request,internal val connectTimeoutMillis: Int,internal val readTimeoutMillis: Int,internal val writeTimeoutMillis: Int
) : Interceptor.Chain {internal fun copy(index: Int = this.index,exchange: Exchange? = this.exchange,request: Request = this.request,connectTimeoutMillis: Int = this.connectTimeoutMillis,readTimeoutMillis: Int = this.readTimeoutMillis,writeTimeoutMillis: Int = this.writeTimeoutMillis) = RealInterceptorChain(call, interceptors, index, exchange, request, connectTimeoutMillis,readTimeoutMillis, writeTimeoutMillis)......override fun call(): Call = calloverride fun request(): Request = request@Throws(IOException::class)override fun proceed(request: Request): Response {check(index < interceptors.size)......val next = copy(index = index + 1, request = request)val interceptor = interceptors[index]@Suppress("USELESS_ELVIS")val response = interceptor.intercept(next) ?: throw NullPointerException("interceptor $interceptor returned null")......return response}
}
这里看一看到copy()方法就是创建了一个RealInterceptorChain()对象,不过需要注意的是index在创建对象时是index = index + 1,这样就会执行index对应下标的拦截器,不断的调用下一个拦截器,直到有response对象返回,也就是chain.proceed(originalRequest)结束。
RetryAndFollowUpInterceptor(错误重定向拦截器)
主要处理了如下几个方向的问题:
- 1.异常,或者协议重试(408客户端超时,权限问题,503服务暂时不处理,retry-after为0)
- 2.重定向
- 3.重试的次数不能超过20次。
RetryAndFollowUpInterceptor.intercept()
@Throws(IOException::class)
override fun intercept(chain: Interceptor.Chain): Response {
val realChain = chain as RealInterceptorChain
var request = chain.request
val call = realChain.call
var followUpCount = 0
var priorResponse: Response? = null
var newExchangeFinder = true
var recoveredFailures = listOf<IOException>()
while (true) {//这里会新建一个ExchangeFinder,ConnectInterceptor会使用到call.enterNetworkInterceptorExchange(request, newExchangeFinder)var response: Responsevar closeActiveExchange = truetry {if (call.isCanceled()) {throw IOException("Canceled")}try {response = realChain.proceed(request)newExchangeFinder = true} catch (e: RouteException) {//尝试通过路由连接失败。该请求将不会被发送。if (!recover(e.lastConnectException, call, request, requestSendStarted = false)) {throw e.firstConnectException.withSuppressed(recoveredFailures)} else {recoveredFailures += e.firstConnectException}newExchangeFinder = falsecontinue} catch (e: IOException) {//尝试与服务器通信失败。该请求可能已发送。if (!recover(e, call, request, requestSendStarted = e !is ConnectionShutdownException)) {throw e.withSuppressed(recoveredFailures)} else {recoveredFailures += e}newExchangeFinder = falsecontinue}//尝试关联上一个response,注意:body是为nullif (priorResponse != null) {response = response.newBuilder().priorResponse(priorResponse.newBuilder().body(null).build()).build()}val exchange = call.interceptorScopedExchange//会根据 responseCode 来判断,构建一个新的request并返回来重试或者重定向val followUp = followUpRequest(response, exchange)if (followUp == null) {if (exchange != null && exchange.isDuplex) {call.timeoutEarlyExit()}closeActiveExchange = falsereturn response}//如果请求体是一次性的,不需要再次重试val followUpBody = followUp.bodyif (followUpBody != null && followUpBody.isOneShot()) {closeActiveExchange = falsereturn response}response.body?.closeQuietly()//最大重试次数,不同的浏览器是不同的,比如:Chrome为21,Safari则是16if (++followUpCount > MAX_FOLLOW_UPS) {throw ProtocolException("Too many follow-up requests: $followUpCount")}request = followUppriorResponse = response} finally {call.exitNetworkInterceptorExchange(closeActiveExchange)}
}
}
-
1.调用RealCall的enterNetworkInterceptorExchange方法实例化一个
ExchangeFinder在RealCall对象中。 -
2.执行RealCall的proceed 方法,进入下一个拦截器,进行下一步的请求处理。
-
3.如果出现路由异常,则通过recover方法校验,当前的连接是否可以重试,不能重试则抛出异常,离开当前的循环。
private fun recover(e: IOException,call: RealCall,userRequest: Request,requestSendStarted: Boolean
): Boolean {//禁止重连if (!client.retryOnConnectionFailure) return false// 不能再次发送请求体if (requestSendStarted && requestIsOneShot(e, userRequest)) return false// 致命异常if (!isRecoverable(e, requestSendStarted)) return false// 没有更多线路可以重连if (!call.retryAfterFailure()) return false// 对于故障恢复,将相同的路由选择器与新连接一起使用return true
}
BridgeInterceptor(应用层和网络层的桥接拦截器)
主要处理了如下几个问题:
- 主要将Content-Type、Content-Length、Host等一些数据添加到头部。
- 拿到数据之后对数据进行处理,判断是否为gzip,进行对数据数据解压。
BridgeInterceptor.intercept()
@Throws(IOException::class)
override fun intercept(chain: Interceptor.Chain): Response {//获取原始请求数据val userRequest = chain.request()val requestBuilder = userRequest.newBuilder()//重新构建请求 添加一些必要的请求头信息val body = userRequest.bodyif (body != null) {val contentType = body.contentType()if (contentType != null) {requestBuilder.header("Content-Type", contentType.toString())}val contentLength = body.contentLength()if (contentLength != -1L) {requestBuilder.header("Content-Length", contentLength.toString())requestBuilder.removeHeader("Transfer-Encoding")} else {requestBuilder.header("Transfer-Encoding", "chunked")requestBuilder.removeHeader("Content-Length")}}if (userRequest.header("Host") == null) {requestBuilder.header("Host", userRequest.url.toHostHeader())}if (userRequest.header("Connection") == null) {requestBuilder.header("Connection", "Keep-Alive")}var transparentGzip = falseif (userRequest.header("Accept-Encoding") == null && userRequest.header("Range") == null) {transparentGzip = truerequestBuilder.header("Accept-Encoding", "gzip")}val cookies = cookieJar.loadForRequest(userRequest.url)if (cookies.isNotEmpty()) {requestBuilder.header("Cookie", cookieHeader(cookies))}if (userRequest.header("User-Agent") == null) {requestBuilder.header("User-Agent", userAgent)}//执行下一个拦截器val networkResponse = chain.proceed(requestBuilder.build())cookieJar.receiveHeaders(userRequest.url, networkResponse.headers)//创建一个新的responseBuilder,目的是将原始请求数据构建到response中val responseBuilder = networkResponse.newBuilder().request(userRequest)if (transparentGzip &&"gzip".equals(networkResponse.header("Content-Encoding"), ignoreCase = true) &&networkResponse.promisesBody()) {val responseBody = networkResponse.bodyif (responseBody != null) {val gzipSource = GzipSource(responseBody.source())val strippedHeaders = networkResponse.headers.newBuilder().removeAll("Content-Encoding").removeAll("Content-Length").build()//修改response header信息,移除Content-Encoding,Content-Length信息responseBuilder.headers(strippedHeaders)val contentType = networkResponse.header("Content-Type"//修改response body信息responseBuilder.body(RealResponseBody(contentType, -1L, gzipSource.buffer()))}}return responseBuilder.build()
}
- 设置头部的Content-Type.说明内容类型是什么
- 如果contentLength大于等于0,则设置头部的Content-Length(说明内容大小是多少);否则设置头部的Transfer-Encoding为chunked(说明传输编码为分块传输)
- 如果Host不存在,设置头部的Host(在Http 1.1之后出现,可以通过同一个URL访问到不同主机,从而实现服务器虚拟服务器的负载均衡。如果1.1之后不设置就会返回404)。
- 如果Connection不存在,设置头部的Connection为Keep-Alive(代表连接状态需要保持活跃)
- 如果Accept-Encoding且Range为空,则强制设置Accept-Encoding为gzip(说明请求将会以gzip方式压缩)
- 从CookieJar的缓存中取出cookie设置到头部的Cookie
- 如果User-Agent为空,则设置User-Agent到头部
CacheInterceptor(缓存拦截器)
用户通过OkHttpClient.cache来配置缓存,缓存拦截器通过CacheStrategy来判断是使用网络还是缓存来构建response。
CacheInterceptor.intercept()
@Throws(IOException::class)
override fun intercept(chain: Interceptor.Chain): Response {val call = chain.call()//通过request从OkHttpClient.cache中获取缓存val cacheCandidate = cache?.get(chain.request())val now = System.currentTimeMillis()//创建缓存策略val strategy = CacheStrategy.Factory(now, chain.request(), cacheCandidate).compute()//为空表示不使用网络,反之,则表示使用网络val networkRequest = strategy.networkRequest//为空表示不使用缓存,反之,则表示使用缓存val cacheResponse = strategy.cacheResponse//追踪网络与缓存的使用情况cache?.trackResponse(strategy)val listener = (call as? RealCall)?.eventListener ?: EventListener.NONE//有缓存但不适用,关闭它if (cacheCandidate != null && cacheResponse == null) {cacheCandidate.body?.closeQuietly()}//如果网络被禁止,但是缓存又是空的,构建一个code为504的response,并返回if (networkRequest == null && cacheResponse == null) {return Response.Builder().request(chain.request()).protocol(Protocol.HTTP_1_1).code(HTTP_GATEWAY_TIMEOUT).message("Unsatisfiable Request (only-if-cached)").body(EMPTY_RESPONSE).sentRequestAtMillis(-1L).receivedResponseAtMillis(System.currentTimeMillis()).build().also {listener.satisfactionFailure(call, it)}}//如果我们禁用了网络不使用网络,且有缓存,直接根据缓存内容构建并返回responseif (networkRequest == null) {return cacheResponse!!.newBuilder().cacheResponse(stripBody(cacheResponse)).build().also {listener.cacheHit(call, it)}}//为缓存添加监听if (cacheResponse != null) {listener.cacheConditionalHit(call, cacheResponse)} else if (cache != null) {listener.cacheMiss(call)}var networkResponse: Response? = nulltry {//执行下一个拦截器networkResponse = chain.proceed(networkRequest)} finally {//捕获I/O或其他异常,请求失败,networkResponse为空,且有缓存的时候,不暴露缓存内容if (networkResponse == null && cacheCandidate != null) {//否则关闭缓存响应体cacheCandidate.body?.closeQuietly()}}//如果有缓存if (cacheResponse != null) {//且网络返回response code为304的时候,使用缓存内容新构建一个Response返回。if (networkResponse?.code == HTTP_NOT_MODIFIED) {val response = cacheResponse.newBuilder().headers(combine(cacheResponse.headers, networkResponse.headers)).sentRequestAtMillis(networkResponse.sentRequestAtMillis).receivedResponseAtMillis(networkResponse.receivedResponseAtMillis).cacheResponse(stripBody(cacheResponse)).networkResponse(stripBody(networkResponse)).build()networkResponse.body!!.close()cache!!.trackConditionalCacheHit()cache.update(cacheResponse, response)return response.also {listener.cacheHit(call, it)}} else {//否则关闭缓存响应体cacheResponse.body?.closeQuietly()}}//构建网络请求的responseval response = networkResponse!!.newBuilder().cacheResponse(stripBody(cacheResponse)).networkResponse(stripBody(networkResponse)).build()//如果cache不为null,即用户在OkHttpClient中配置了缓存,则将上一步新构建的网络请求response存到cache中if (cache != null) {//根据response的code,header以及CacheControl.noStore来判断是否可以缓存if (response.promisesBody() && CacheStrategy.isCacheable(response, networkRequest)) {// 将该response存入缓存val cacheRequest = cache.put(response)return cacheWritingResponse(cacheRequest, response).also {if (cacheResponse != null) {listener.cacheMiss(call)}}}//根据请求方法来判断缓存是否有效,只对Get请求进行缓存,其它方法的请求则移除if (HttpMethod.invalidatesCache(networkRequest.method)) {try {//缓存无效,将该请求缓存从client缓存配置中移除cache.remove(networkRequest)} catch (_: IOException) {}}}return response
}
网络请求前:
- 首先根据request从OkHttpClient.cache中获取缓存,通过
CacheStrategy获取本次请求的请求体及缓存的响应体。 - 如果 请求体
networkRequest和响应体cacheResponse都为空的话,则返回错误码为 504 - 如果 请求体
networkRequest为空 响应体cacheResponse不为空的话,则将该响应体返回 - 如果请求体
networkRequest不为空的话,则进入下一个拦截器。
网络请求后:
- 如果当前
cacheResponse不为空,且networkResponse状态码为304, 则代表数据没有变化,那么就会根据cacheResponse构建一个新的response,根据当前时间更新到缓存当中,并返回到上一拦截器中 - 如果
networkResponse状态码不为304,则判断是否进行缓存,最后返回到上一拦截器中
从LruCache中获取缓存
val cacheCandidate = cache?.get(chain.request())
internal fun get(request: Request): Response? {val key = key(request.url)val snapshot: DiskLruCache.Snapshot = try {cache[key] ?: return null} catch (_: IOException) {return null // Give up because the cache cannot be read.}val entry: Entry = try {Entry(snapshot.getSource(ENTRY_METADATA))} catch (_: IOException) {snapshot.closeQuietly()return null}val response = entry.response(snapshot)if (!entry.matches(request, response)) {response.body?.closeQuietly()return null}return response
}
@JvmStatic
fun key(url: HttpUrl): String = url.toString().encodeUtf8().md5().hex()
- 首先将url转化为urf-8,并且通过md5拿到摘要,再调用hex获取16进制的字符串,该字符串就是LruCache的key;
- 通过key获取到
DiskLruCache.Snapshot对象(这里在DiskLruCache中重写了get方法),根据DiskLruCache.Snapshot对象获取到okio 的source。
DiskLruCache:
@Synchronized @Throws(IOException::class)
operator fun get(key: String): Snapshot? {initialize()checkNotClosed()validateKey(key)val entry = lruEntries[key] ?: return nullval snapshot = entry.snapshot() ?: return nullredundantOpCount++journalWriter!!.writeUtf8(READ).writeByte(' '.toInt()).writeUtf8(key).writeByte('\n'.toInt())if (journalRebuildRequired()) {cleanupQueue.schedule(cleanupTask)}return snapshot
}
ConnectInterceptot(链接拦截器)
object ConnectInterceptor : Interceptor {@Throws(IOException::class)override fun intercept(chain: Interceptor.Chain): Response {val realChain = chain as RealInterceptorChainval exchange = realChain.call.initExchange(chain)val connectedChain = realChain.copy(exchange = exchange)return connectedChain.proceed(realChain.request)}
}
- 首先初始化一个可交换连接的对象
- 拷贝一个全新的
RealInterceptorChain对象,并且调用该对象的proceed方法执行下一拦截器
这个拦截器主要操作都在initExchange(chain)当中
initExchange()
internal fun initExchange(chain: RealInterceptorChain): Exchange {synchronized(this) {check(expectMoreExchanges) { "released" }check(!responseBodyOpen)check(!requestBodyOpen)}val exchangeFinder = this.exchangeFinder!!val codec = exchangeFinder.find(client, chain)val result = Exchange(this, eventListener, exchangeFinder, codec)this.interceptorScopedExchange = resultthis.exchange = resultsynchronized(this) {this.requestBodyOpen = truethis.responseBodyOpen = true}if (canceled) throw IOException("Canceled")return result
}
exchangeFinder
fun find(client: OkHttpClient,chain: RealInterceptorChain
): ExchangeCodec {try {val resultConnection = findHealthyConnection(connectTimeout = chain.connectTimeoutMillis,readTimeout = chain.readTimeoutMillis,writeTimeout = chain.writeTimeoutMillis,pingIntervalMillis = client.pingIntervalMillis,connectionRetryEnabled = client.retryOnConnectionFailure,doExtensiveHealthChecks = chain.request.method != "GET")return resultConnection.newCodec(client, chain)} catch (e: RouteException) {trackFailure(e.lastConnectException)throw e} catch (e: IOException) {trackFailure(e)throw RouteException(e)}
}
- 通过
findHealthyConnection找到一个健康的连接resultConnection,也就是一个活跃的连接, - 调用
resultConnection.newCodec(client, chain)获取到ExchangeCodec进行返回
findHealthyConnection
@Throws(IOException::class)
private fun findHealthyConnection(connectTimeout: Int,readTimeout: Int,writeTimeout: Int,pingIntervalMillis: Int,connectionRetryEnabled: Boolean,doExtensiveHealthChecks: Boolean
): RealConnection {while (true) {val candidate = findConnection(connectTimeout = connectTimeout,readTimeout = readTimeout,writeTimeout = writeTimeout,pingIntervalMillis = pingIntervalMillis,connectionRetryEnabled = connectionRetryEnabled)if (candidate.isHealthy(doExtensiveHealthChecks)) {return candidate}candidate.noNewExchanges()if (nextRouteToTry != null) continueval routesLeft = routeSelection?.hasNext() ?: trueif (routesLeft) continueval routesSelectionLeft = routeSelector?.hasNext() ?: trueif (routesSelectionLeft) continuethrow IOException("exhausted all routes")}
}
findConnection从OkHttp的连接池中找到对应的RealConnection进行返回,如果没有的话,则创建一个candidate.isHealthy(doExtensiveHealthChecks)检查该连接是否活跃可用- 如果当前连接是不健康,则调用
candidate.noNewExchanges()将noNewExchanges设置为true,表示该连接存在问题 if (routesSelectionLeft) continue判断是否还有其他路由需要尝试,如果有的话则返回true,进入下一循环。
findConnection()
@Throws(IOException::class)
private fun findConnection(connectTimeout: Int,readTimeout: Int,writeTimeout: Int,pingIntervalMillis: Int,connectionRetryEnabled: Boolean
): RealConnection {if (call.isCanceled()) throw IOException("Canceled")val callConnection = call.connection if (callConnection != null) {var toClose: Socket? = nullsynchronized(callConnection) {if (callConnection.noNewExchanges || !sameHostAndPort(callConnection.route().address.url)) {toClose = call.releaseConnectionNoEvents()}}if (call.connection != null) {check(toClose == null)return callConnection}toClose?.closeQuietly()eventListener.connectionReleased(call, callConnection)}refusedStreamCount = 0connectionShutdownCount = 0otherFailureCount = 0if (connectionPool.callAcquirePooledConnection(address, call, null, false)) {val result = call.connection!!eventListener.connectionAcquired(call, result)return result}val routes: List<Route>?val route: Routeif (nextRouteToTry != null) {routes = nullroute = nextRouteToTry!!nextRouteToTry = null} else if (routeSelection != null && routeSelection!!.hasNext()) {routes = nullroute = routeSelection!!.next()} else {var localRouteSelector = routeSelectorif (localRouteSelector == null) {localRouteSelector = RouteSelector(address, call.client.routeDatabase, call, eventListener)this.routeSelector = localRouteSelector}val localRouteSelection = localRouteSelector.next()routeSelection = localRouteSelectionroutes = localRouteSelection.routesif (call.isCanceled()) throw IOException("Canceled")if (connectionPool.callAcquirePooledConnection(address, call, routes, false)) {val result = call.connection!!eventListener.connectionAcquired(call, result)return result}route = localRouteSelection.next()}val newConnection = RealConnection(connectionPool, route)call.connectionToCancel = newConnectiontry {newConnection.connect(connectTimeout,readTimeout,writeTimeout,pingIntervalMillis,connectionRetryEnabled,call,eventListener)} finally {call.connectionToCancel = null}call.client.routeDatabase.connected(newConnection.route())if (connectionPool.callAcquirePooledConnection(address, call, routes, true)) {val result = call.connection!!nextRouteToTry = routenewConnection.socket().closeQuietly()eventListener.connectionAcquired(call, result)return result}synchronized(newConnection) {connectionPool.put(newConnection)call.acquireConnectionNoEvents(newConnection)}eventListener.connectionAcquired(call, newConnection)return newConnection
}
-
call.connection首先从RealCall对象中获取RealConnection。 -
在获取到
RealConnection对象时,存在三种情况RealConnection对象不为空,但是host和port不匹配RealConnection对象不为空,完全匹配RealConnection对象为空
-
判断
RealConnection对象是否为空, 如果不为空则检查一下host和port是否匹配。- 如果不匹配则调用
releaseConnectionNoEvents(),把RealConnection绑定的RealCall队列中对应的RealCall移除,并从ConnectionPool中移除该RealConnection,当前RealCall中绑定的RealConnection设置为空, 并获取当前缓存RealConnection的socket对象,并关闭该socket。 - 如果
noNewExchanges为false,并且host和port匹配,则返回该callConnection对象 - 如果
RealConnection对象为空,则会通过connectionPool和route生成一个新的RealConnection对象
- 如果不匹配则调用
我们继续向下看
if (connectionPool.callAcquirePooledConnection(address, call, null, false)) {val result = call.connection!!eventListener.connectionAcquired(call, result)return result
}
callAcquirePooledConnection
fun callAcquirePooledConnection(address: Address,call: RealCall,routes: List<Route>?,requireMultiplexed: Boolean
): Boolean {for (connection in connections) {synchronized(connection) {if (requireMultiplexed && !connection.isMultiplexed) return@synchronizedif (!connection.isEligible(address, routes)) return@synchronizedcall.acquireConnectionNoEvents(connection)return true}}return false
}
这里我们主要看connection.isEligible是否符合条件
internal fun isEligible(address: Address, routes: List<Route>?): Boolean {assertThreadHoldsLock()//如果当前RealConnection复用的RealCall队列的大小大于allocationLimit 限制大小,或者noNewExchanges 为trueif (calls.size >= allocationLimit || noNewExchanges) return false//如果RealConnection 中的route和当前传递进来的地址的address不一致,直接返回false即可if (!this.route.address.equalsNonHost(address)) return false
//如果RealConnection 中的route 和传递进来的host一致了,那么说明address和host都一致就是一个资源路径可以返回true。if (address.url.host == this.route().address.url.host) {return true }// 如果host 不一致,且http2Connection 为空,也就不是http 2.0协议,那么就不可能做到不同的资源路径进行复用的情况直接返回if (http2Connection == null) return false
//此时就是必须要符合http 2.0的协议才能进行连接的复用,也就是路由可以共享。如果传进来的routes是空 或者通过routeMatchesAny 查找只要出现socket的地址一致且是直接连接的地址,则返回true,返回false一半就是代理的服务。此时就会直接返回if (routes == null || !routeMatchesAny(routes)) return false
//想要进一步匹配,那么整个网络请求的HostnameVerifier 校验服务器主机名的必须为OkHostnameVerifierif (address.hostnameVerifier !== OkHostnameVerifier) return false//其次匹配HttpUrl和RealConnection的route 能否匹配。如果port 端口不匹配则直接返回false,如果host 匹配则直接返回true。否则就必须要保证noCoalescedConnections 为true (noCoalescedConnections 这个标志位为true,则说明该连接可以共享连接,但是不共享主机.),handshake不为空(说明已经经过了三次握手),且本次校验可以通过主机服务器名的校验。if (!supportsUrl(address.url)) return falsetry {address.certificatePinner!!.check(address.url.host, handshake()!!.peerCertificates)} catch (_: SSLPeerUnverifiedException) {return false}return true
}
RouteSelector 生成
var localRouteSelector = routeSelector
if (localRouteSelector == null) {localRouteSelector = RouteSelector(address, call.client.routeDatabase, call, eventListener)this.routeSelector = localRouteSelector
}
class RouteSelector(private val address: Address,private val routeDatabase: RouteDatabase,private val call: Call,private val eventListener: EventListener
) {......init {resetNextProxy(address.url, address.proxy)}......
}
private fun resetNextProxy(url: HttpUrl, proxy: Proxy?) {fun selectProxies(): List<Proxy> {if (proxy != null) return listOf(proxy)val uri = url.toUri()if (uri.host == null) return immutableListOf(Proxy.NO_PROXY)val proxiesOrNull = address.proxySelector.select(uri)if (proxiesOrNull.isNullOrEmpty()) return immutableListOf(Proxy.NO_PROXY)return proxiesOrNull.toImmutableList()}eventListener.proxySelectStart(call, url)proxies = selectProxies()nextProxyIndex = 0eventListener.proxySelectEnd(call, url, proxies)
}
- 如果
proxy不为空,则创建一个含有proxy的集合返回 - 如果
host为空,则创建一个Proxy.NO_PROXY的集合返回 - 否则调用address 的proxySelector 的select方法获取代理集合返回
如果有需要进行代理可以在OkhttpClientBuilder的addProxy中为不同的uri设置自己的代理规则。
接着往下看,这里是获取route,下面创建RealConnection对象需要使用
val localRouteSelection = localRouteSelector.next()
routeSelection = localRouteSelection
routes = localRouteSelection.routesif (call.isCanceled()) throw IOException("Canceled")
......
route = localRouteSelection.next()val newConnection = RealConnection(connectionPool, route)- 首先调用next获取
Selection对象,通过调用next方法获取route,生成RealConnection对象。下面逐步分析。
@Throws(IOException::class)
operator fun next(): Selection {if (!hasNext()) throw NoSuchElementException()val routes = mutableListOf<Route>()while (hasNextProxy()) {val proxy = nextProxy()for (inetSocketAddress in inetSocketAddresses) {val route = Route(address, proxy, inetSocketAddress)if (routeDatabase.shouldPostpone(route)) {postponedRoutes += route} else {routes += route}}if (routes.isNotEmpty()) {break}}if (routes.isEmpty()) {routes += postponedRoutespostponedRoutes.clear()}return Selection(routes)
}@Throws(IOException::class)
private fun nextProxy(): Proxy {if (!hasNextProxy()) {throw SocketException("No route to ${address.url.host}; exhausted proxy configurations:$proxies")}val result = proxies[nextProxyIndex++]resetNextInetSocketAddress(result)return result
}
nextProxy不断的遍历获取所有的proxy,调用resetNextInetSocketAddress,创建route添加到集合当中
@Throws(IOException::class)
private fun resetNextInetSocketAddress(proxy: Proxy) {// Clear the addresses. Necessary if getAllByName() below throws!val mutableInetSocketAddresses = mutableListOf<InetSocketAddress>()inetSocketAddresses = mutableInetSocketAddressesval socketHost: Stringval socketPort: Intif (proxy.type() == Proxy.Type.DIRECT || proxy.type() == Proxy.Type.SOCKS) {socketHost = address.url.hostsocketPort = address.url.port} else {val proxyAddress = proxy.address()require(proxyAddress is InetSocketAddress) {"Proxy.address() is not an InetSocketAddress: ${proxyAddress.javaClass}"}socketHost = proxyAddress.socketHostsocketPort = proxyAddress.port}if (socketPort !in 1..65535) {throw SocketException("No route to $socketHost:$socketPort; port is out of range")}if (proxy.type() == Proxy.Type.SOCKS) {mutableInetSocketAddresses += InetSocketAddress.createUnresolved(socketHost, socketPort)} else {eventListener.dnsStart(call, socketHost)// Try each address for best behavior in mixed IPv4/IPv6 environments.val addresses = address.dns.lookup(socketHost)if (addresses.isEmpty()) {throw UnknownHostException("${address.dns} returned no addresses for $socketHost")}eventListener.dnsEnd(call, socketHost, addresses)for (inetAddress in addresses) {mutableInetSocketAddresses += InetSocketAddress(inetAddress, socketPort)}}
}
- 如果代理类型是
Proxy.Type.SOCKS,则先获取address.url的host和port,并调用InetSocketAddress.createUnresolved解析,并添加到mutableInetSocketAddresses集合中。 - 如果代理类型是
Proxy.Type.DIRECT,则先获取address.url的host和port,然后调用address.dns的lookup方法获取地址,并通过改地址和port生成InetSocketAddress添加到mutableInetSocketAddresses集合中。 - 如果代理类型是
Proxy.Type.HTTP,则获取传递进来的Proxy中的host和port,调用address.dns的lookup方法获取地址,并通过改地址和port生成InetSocketAddress添加到mutableInetSocketAddresses集合中。
newConnection.connect()
fun connect(connectTimeout: Int,readTimeout: Int,writeTimeout: Int,pingIntervalMillis: Int,connectionRetryEnabled: Boolean,call: Call,eventListener: EventListener
) {check(protocol == null) { "already connected" }var routeException: RouteException? = nullval connectionSpecs = route.address.connectionSpecsval connectionSpecSelector = ConnectionSpecSelector(connectionSpecs)if (route.address.sslSocketFactory == null) {if (ConnectionSpec.CLEARTEXT !in connectionSpecs) {throw RouteException(UnknownServiceException("CLEARTEXT communication not enabled for client"))}val host = route.address.url.hostif (!Platform.get().isCleartextTrafficPermitted(host)) {throw RouteException(UnknownServiceException("CLEARTEXT communication to $host not permitted by network security policy"))}} else {if (Protocol.H2_PRIOR_KNOWLEDGE in route.address.protocols) {throw RouteException(UnknownServiceException("H2_PRIOR_KNOWLEDGE cannot be used with HTTPS"))}}while (true) {try {if (route.requiresTunnel()) {connectTunnel(connectTimeout, readTimeout, writeTimeout, call, eventListener)if (rawSocket == null) {break}} else {connectSocket(connectTimeout, readTimeout, call, eventListener)}establishProtocol(connectionSpecSelector, pingIntervalMillis, call, eventListener)eventListener.connectEnd(call, route.socketAddress, route.proxy, protocol)break} catch (e: IOException) {socket?.closeQuietly()rawSocket?.closeQuietly()socket = nullrawSocket = nullsource = nullsink = nullhandshake = nullprotocol = nullhttp2Connection = nullallocationLimit = 1eventListener.connectFailed(call, route.socketAddress, route.proxy, null, e)if (routeException == null) {routeException = RouteException(e)} else {routeException.addConnectException(e)}if (!connectionRetryEnabled || !connectionSpecSelector.connectionFailed(e)) {throw routeException}}}if (route.requiresTunnel() && rawSocket == null) {throw RouteException(ProtocolException("Too many tunnel connections attempted: $MAX_TUNNEL_ATTEMPTS"))}idleAtNs = System.nanoTime()
}
-
这里分为两种情况
- requiresTunnel判断
sslSocketFactory不为空,并且代理模式为Proxy.Type.HTTP时,会调用connectTunnel连接socket,其实最终还是调用connectSocket方法。 - requiresTunnel为false时,则直接调用connectSocket连接socket
- requiresTunnel判断
-
完成上面的操作之后调用
establishProtocol方法
@Throws(IOException::class)
private fun connectSocket(connectTimeout: Int,readTimeout: Int,call: Call,eventListener: EventListener
) {val proxy = route.proxyval address = route.addressval rawSocket = when (proxy.type()) {Proxy.Type.DIRECT, Proxy.Type.HTTP -> address.socketFactory.createSocket()!!else -> Socket(proxy)}this.rawSocket = rawSocketeventListener.connectStart(call, route.socketAddress, proxy)rawSocket.soTimeout = readTimeouttry {Platform.get().connectSocket(rawSocket, route.socketAddress, connectTimeout)} catch (e: ConnectException) {throw ConnectException("Failed to connect to ${route.socketAddress}").apply {initCause(e)}}try {source = rawSocket.source().buffer()sink = rawSocket.sink().buffer()} catch (npe: NullPointerException) {if (npe.message == NPE_THROW_WITH_NULL) {throw IOException(npe)}}
}
- 如果代理模式是
Proxy.Type.DIRECT, Proxy.Type.HTTP则通过SocketFactory创建socket对象。 - 如果代理模式是
Proxy.Type.SOCKS,则直接new 一个socekt对象。 - 通过
connectSocket方法,调用socekt的connect方法建立连接。 - 通过Okio分别获取source 写入流和sink 输出流缓存在RealConnection中。
connectTunnel
@Throws(IOException::class)
private fun connectTunnel(connectTimeout: Int,readTimeout: Int,writeTimeout: Int,call: Call,eventListener: EventListener
) {var tunnelRequest: Request = createTunnelRequest()val url = tunnelRequest.urlfor (i in 0 until MAX_TUNNEL_ATTEMPTS) {//MAX_TUNNEL_ATTEMPTS=21connectSocket(connectTimeout, readTimeout, call, eventListener)tunnelRequest = createTunnel(readTimeout, writeTimeout, tunnelRequest, url) ?: break rawSocket?.closeQuietly()rawSocket = nullsink = nullsource = nulleventListener.connectEnd(call, route.socketAddress, route.proxy, null)}
}
- 调用createTunnelRequest创建一个通道确认的请求
- 调用connectSocket创建socket连接
- createTunnel创建一个隧道,在 21 次重试范围内,进行 socket 和 tunnel 的连接。如果
createTunnel返回是null,说明隧道建立成功。
@Throws(IOException::class)
private fun createTunnelRequest(): Request {val proxyConnectRequest = Request.Builder().url(route.address.url).method("CONNECT", null).header("Host", route.address.url.toHostHeader(includeDefaultPort = true)).header("Proxy-Connection", "Keep-Alive") // For HTTP/1.0 proxies like Squid..header("User-Agent", userAgent).build()val fakeAuthChallengeResponse = Response.Builder().request(proxyConnectRequest).protocol(Protocol.HTTP_1_1).code(HTTP_PROXY_AUTH).message("Preemptive Authenticate").body(EMPTY_RESPONSE).sentRequestAtMillis(-1L).receivedResponseAtMillis(-1L).header("Proxy-Authenticate", "OkHttp-Preemptive").build()val authenticatedRequest = route.address.proxyAuthenticator.authenticate(route, fakeAuthChallengeResponse)return authenticatedRequest ?: proxyConnectRequest
}
这个过程构建了构建了一个代理用的proxyConnectRequest 连接请求对象,以及一个虚假的响应,这个响应会包含proxyConnectRequest。然后通过设置的proxyAuthenticator 进行权限校验。
@Throws(IOException::class)
private fun createTunnel(readTimeout: Int,writeTimeout: Int,tunnelRequest: Request,url: HttpUrl
): Request? {var nextRequest = tunnelRequest// 拼接CONNECT命令val requestLine = "CONNECT ${url.toHostHeader(includeDefaultPort = true)} HTTP/1.1"while (true) {val source = this.source!!val sink = this.sink!!//对应http/1.1 编码HTTP请求并解码HTTP响应val tunnelCodec = Http1ExchangeCodec(null, this, source, sink)source.timeout().timeout(readTimeout.toLong(), MILLISECONDS)sink.timeout().timeout(writeTimeout.toLong(), MILLISECONDS)//发送CONNECT,请求打开隧道连接,tunnelCodec.writeRequest(nextRequest.headers, requestLine)//完成连接tunnelCodec.finishRequest()//构建response,操控的是inputStream流val response = tunnelCodec.readResponseHeaders(false)!!.request(nextRequest).build()tunnelCodec.skipConnectBody(response)when (response.code) {HTTP_OK -> {if (!source.buffer.exhausted() || !sink.buffer.exhausted()) {throw IOException("TLS tunnel buffered too many bytes!")}return null}HTTP_PROXY_AUTH -> {nextRequest = route.address.proxyAuthenticator.authenticate(route, response)?: throw IOException("Failed to authenticate with proxy")if ("close".equals(response.header("Connection"), ignoreCase = true)) {return nextRequest}}else -> throw IOException("Unexpected response code for CONNECT: ${response.code}")}}
}
establishProtocol
private fun establishProtocol(connectionSpecSelector: ConnectionSpecSelector,pingIntervalMillis: Int,call: Call,eventListener: EventListener
) {if (route.address.sslSocketFactory == null) {if (Protocol.H2_PRIOR_KNOWLEDGE in route.address.protocols) {socket = rawSocketprotocol = Protocol.H2_PRIOR_KNOWLEDGEstartHttp2(pingIntervalMillis)return}socket = rawSocketprotocol = Protocol.HTTP_1_1return}eventListener.secureConnectStart(call)connectTls(connectionSpecSelector)eventListener.secureConnectEnd(call, handshake)if (protocol === Protocol.HTTP_2) {startHttp2(pingIntervalMillis)}
}
- 判断
route.address.sslSocketFactory == null,如果为true的话,则说明该请求为http请求- 如果http请求里包涵了“h2_prior_knowledge”协议,代表是一个支持明文的http2请求,所以仍然开启的是http2的连接
- 如果http请求里不包涵了“h2_prior_knowledge”协议,则正常建立http连接
- 如果
route.address.sslSocketFactory == null,如果为false的话,则说明该请求为https请求- 建立TLS连接
- 建立http2连接
connectTls
private void connectTls(ConnectionSpecSelector connectionSpecSelector) throws IOException {Address address = route.address();SSLSocketFactory sslSocketFactory = address.sslSocketFactory();boolean success = false;SSLSocket sslSocket = null;try {sslSocket = (SSLSocket) sslSocketFactory.createSocket(rawSocket, address.url().host(), address.url().port(), true);ConnectionSpec connectionSpec = connectionSpecSelector.configureSecureSocket(sslSocket)if (connectionSpec.supportsTlsExtensions()) {Platform.get().configureTlsExtensions(sslSocket, address.url().host(), address.protocols());}sslSocket.startHandshake();SSLSession sslSocketSession = sslSocket.getSession();Handshake unverifiedHandshake = Handshake.get(sslSocketSession);if (!address.hostnameVerifier().verify(address.url().host(), sslSocketSession)) {List<Certificate> peerCertificates = unverifiedHandshake.peerCertificates();if (!peerCertificates.isEmpty()) {X509Certificate cert = (X509Certificate) peerCertificates.get(0);throw new SSLPeerUnverifiedException("Hostname " + address.url().host() + " not verified:"+ "\n certificate: " + CertificatePinner.pin(cert)+ "\n DN: " + cert.getSubjectDN().getName()+ "\n subjectAltNames: " + OkHostnameVerifier.allSubjectAltNames(cert));} else {throw new SSLPeerUnverifiedException("Hostname " + address.url().host() + " not verified (no certificates)");}}address.certificatePinner().check(address.url().host(),unverifiedHandshake.peerCertificates());String maybeProtocol = connectionSpec.supportsTlsExtensions()? Platform.get().getSelectedProtocol(sslSocket): null;socket = sslSocket;source = Okio.buffer(Okio.source(socket));sink = Okio.buffer(Okio.sink(socket));handshake = unverifiedHandshake;protocol = maybeProtocol != null? Protocol.get(maybeProtocol): Protocol.HTTP_1_1;success = true;} catch (AssertionError e) {...} finally {...}}
- 将刚刚得到的socket通过sslSocketFactory进行包裹,得到一个新的sslSocket
- 调用configureSecureSocket对sslSocket进行配置协议。
- 通过supportsTlsExtensions方法查看是否支持TLS拓展
- 调用sslSocket.startHandshake()方法,开始握手协议
- 判断(!address.hostnameVerifier().verify(address.url().host(), sslSocketSession)对sslSocket的地址与主机地址进行校验,确保一致可用。
- 开始 证书校验
- 将刚才完成握手和协议校验的sslSocket保存起来,并且获得用于IO传输的source、sink
@Throws(IOException::class)
private fun startHttp2(pingIntervalMillis: Int) {val socket = this.socket!!val source = this.source!!val sink = this.sink!!socket.soTimeout = 0 val http2Connection = Http2Connection.Builder(client = true, taskRunner = TaskRunner.INSTANCE).socket(socket, route.address.url.host, source, sink).listener(this).pingIntervalMillis(pingIntervalMillis).build()this.http2Connection = http2Connectionthis.allocationLimit = Http2Connection.DEFAULT_SETTINGS.getMaxConcurrentStreams()http2Connection.start()
}
这个拦截器的主要作用是获取一个活跃可用连接,
- 首先从RealCall对象中获取,如果找到直接返回,
- 如果从RealCall对象没有获取到, 则再从连接池中查找,如果找到也是直接返回,
- 如果从连接池中没有找到,则通过路由再次在连接池中查询,如果找到也是直接返回
- 如果从连接池中再次没有找到,那么就创建一个
RealConnection对象,然后创建Socket连接,封装地址信息,并将该连接添加到连接池中,最后进行返回
NetWorkInterceptor(网络连接器)
CallServerInterceptor(请求拦截器)
@Throws(IOException::class)
override fun intercept(chain: Interceptor.Chain): Response {val realChain = chain as RealInterceptorChainval exchange = realChain.exchange!!val request = realChain.requestval requestBody = request.bodyval sentRequestMillis = System.currentTimeMillis()exchange.writeRequestHeaders(request)var invokeStartEvent = truevar responseBuilder: Response.Builder? = nullif (HttpMethod.permitsRequestBody(request.method) && requestBody != null) {if ("100-continue".equals(request.header("Expect"), ignoreCase = true)) {exchange.flushRequest()responseBuilder = exchange.readResponseHeaders(expectContinue = true)exchange.responseHeadersStart()invokeStartEvent = false}if (responseBuilder == null) {if (requestBody.isDuplex()) {exchange.flushRequest()val bufferedRequestBody = exchange.createRequestBody(request, true).buffer()requestBody.writeTo(bufferedRequestBody)} else {val bufferedRequestBody = exchange.createRequestBody(request, false).buffer()requestBody.writeTo(bufferedRequestBody)bufferedRequestBody.close()}} else {exchange.noRequestBody()if (!exchange.connection.isMultiplexed) {exchange.noNewExchangesOnConnection()}}} else {exchange.noRequestBody()}if (requestBody == null || !requestBody.isDuplex()) {exchange.finishRequest()}if (responseBuilder == null) {responseBuilder = exchange.readResponseHeaders(expectContinue = false)!!if (invokeStartEvent) {exchange.responseHeadersStart()invokeStartEvent = false}}var response = responseBuilder.request(request).handshake(exchange.connection.handshake()).sentRequestAtMillis(sentRequestMillis).receivedResponseAtMillis(System.currentTimeMillis()).build()var code = response.codeif (code == 100) {responseBuilder = exchange.readResponseHeaders(expectContinue = false)!!if (invokeStartEvent) {exchange.responseHeadersStart()}response = responseBuilder.request(request).handshake(exchange.connection.handshake()).sentRequestAtMillis(sentRequestMillis).receivedResponseAtMillis(System.currentTimeMillis()).build()code = response.code}exchange.responseHeadersEnd(response)response = if (forWebSocket && code == 101) {response.newBuilder().body(EMPTY_RESPONSE).build()} else {response.newBuilder().body(exchange.openResponseBody(response)).build()}if ("close".equals(response.request.header("Connection"), ignoreCase = true) ||"close".equals(response.header("Connection"), ignoreCase = true)) {exchange.noNewExchangesOnConnection()}if ((code == 204 || code == 205) && response.body?.contentLength() ?: -1L > 0L) {throw ProtocolException("HTTP $code had non-zero Content-Length: ${response.body?.contentLength()}")}return response
}
exchange.writeRequestHeaders(request)写入请求头信息- 判断请求方式是不是
GET或HEAD,如果不是则需要传入请求体,接着判断请求头中的Expect值是否为100-continue,如果是的话,则会读取响应体的头部信息,如果读出的Response.Builder为空,接着判断requestBody.isDuplex(),如果为true的话,则刷新缓冲区,通过exchange.createRequestBody(request, true).buffer()创建bufferedRequestBody,往请求的requestBody写入数据,如果为false的话,,通过exchange.createRequestBody(request, true).buffer()创建bufferedRequestBody,写入输出流中发送数据。 - 如果请求方式是
GET或HEAD的话,则没有请求体。 - 如果
requestBody为空,也就是没有请求体,或者requestBody.isDuplex()为false的话,则结束请求。 - 如果responseBuilder为空的话,则调用
exchange.readResponseHeaders方法 - 获取响应体
- 判断响应体的code是否为100,如果响应体为100 则是说后面还有数据需要传输,则会重新调用
exchange.readResponseHeaders方法,再次生成响应体 - 判断code是否为101 并且 为websocekt请求,如果是的话,则生成一个空的response,否则就会通过
exchange.openResponseBody(response)读取response中的数据生成一个响应体。 - 最后判断code是否为204、205并且响应体的body为空的话则抛出异常,否则正常返回
。。。。。。。省略
参考:
Overview - OkHttp
OkHttp-源码分析(一) - 掘金
OkHttp-源码分析(二) - 掘金
OkHttp-源码分析(三) - 掘金
OKHTTP 源码分析(1)调用流程梳理_okhttpclient().newbuilder().build();-CSDN博客
相关文章:
网络库OKHttp(1)流程+拦截器
序、慢慢来才是最快的方法。 背景 OkHttp 是一套处理 HTTP 网络请求的依赖库,由 Square 公司设计研发并开源,目前可以在 Java 和 Kotlin 中使用。对于 Android App 来说,OkHttp 现在几乎已经占据了所有的网络请求操作。 OKHttp源码官网 版…...
关于 Invalid bound statement (not found): 错误的解决
关于 Invalid bound statement not found: 错误的解决 前言错误原因解决方法1. 检查SQL映射文件2. 检查MyBatis配置3. 检查SQL语句4. 检查命名约定5. 清除缓存6. 启用日志记录 重点注意 结语 我是将军我一直都在,。! 前言 当开发Java Spring Boot应用程…...
深入理解强化学习——智能体的类型:有模型强化学习智能体与免模型强化学习智能体
分类目录:《深入理解强化学习》总目录 根据智能体学习的事物不同,我们可以把智能体进行归类。基于价值的智能体(Value-based agent)显式地学习价值函数,隐式地学习它的策略。策略是其从学到的价值函数里面推算出来的。…...
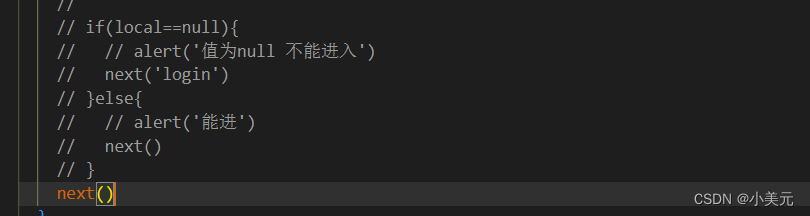
vue项目获得开源代码之后跳过登录界面
readme运行 进入到账号和密码 找到main.js 比如说,以上这段代码 剩下next()就成功进入了...
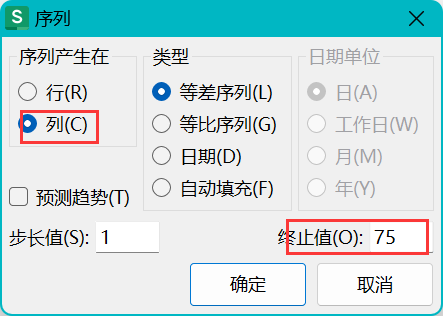
WPS、Excel表格增加一列,序列1到任意大小 / 填充某个范围的数字到列
Excel添加一列递增的数字方法有如下: 一、最常用的,使用鼠标放到右下角下拉增加 1、选中起始框的右下角,直到显示黑色实心十字 2、一直向下拖动 3、成功 这种填充方式是最常用的,100以内都可以轻松瞬间完成 1~100填充 但是如果…...
在 rider 里用配置 Perforce(P4)的注意事项
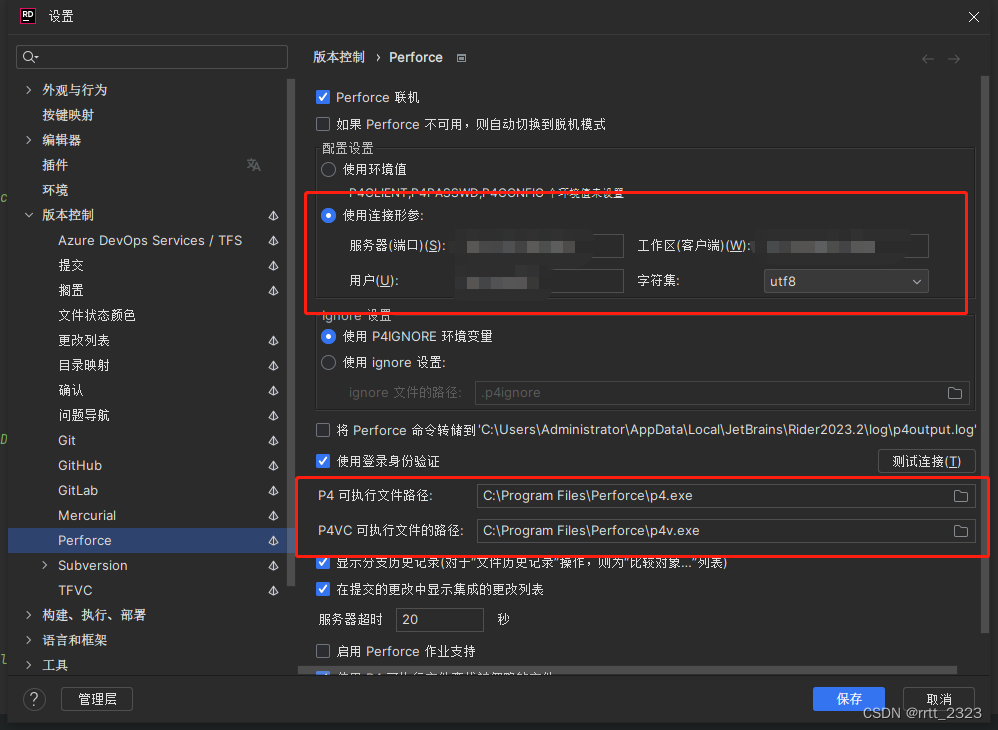
整个配置界面里,关键就配2处位置,但是都有些误导性。 1是连接形参的4个参数都得填,字符集看你项目的要求,这里工作区其实指的是你的工作空间,还不如显示英文的 Workspace 呢,搞得我一开始没填,…...
)
在Spring中,标签管理的Bean中,为什么使用@Autowired自动装配修饰引用类(前提条件该引用类也是标签管理的Bean)
Autowired是Spring框架的一个注解,它可以用来完成自动装配。 自动装配是Spring框架的一个特性,它可以避免手动去注入依赖,而是由框架自动注入。这样可以减少代码的重复性和提高开发效率。 在使用Autowired注解时,Spring会自动搜…...

俄罗斯YandexGPT 2在国家考试中获得高分;OpenAI API开发者快速入门指南
🦉 AI新闻 🚀 俄罗斯YandexGPT 2聊天机器人成功在国家考试中获得高分 摘要:俄罗斯YandexGPT 2聊天机器人通过国家统一考试文学科目,以55分的加权分数成功进入大学。Yandex团队强调他们在开发过程中确保数据库不包含任何关于统考…...

Nginx 同一端口下部署多个 Vue3 项目
前言 前端多项目部署到 Nginx 的同一监听端口下的解决方案,项目由一个主项目和多个子项目组成,主项目和子项目都是单独打包。 主子项目之间是使用的腾讯开源的无界(WebComponent 容器 iframe 沙箱)前端框架,能够完善…...
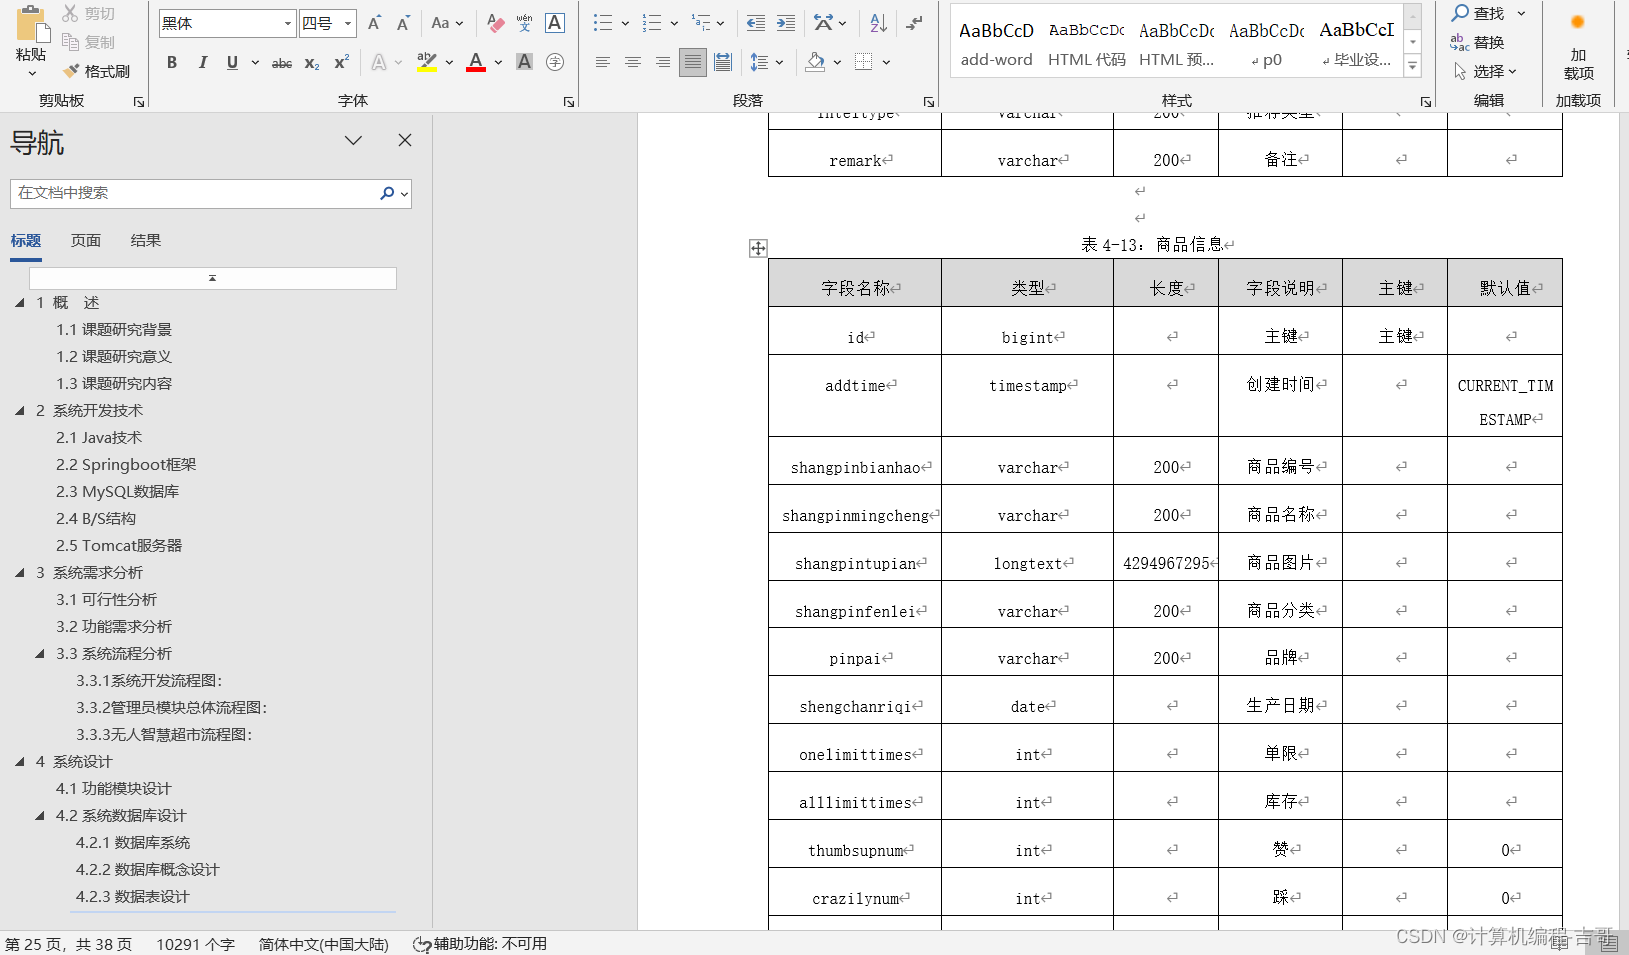
计算机毕业设计 无人智慧超市管理系统的设计与实现 Javaweb项目 Java实战项目 前后端分离 文档报告 代码讲解 安装调试
🍊作者:计算机编程-吉哥 🍊简介:专业从事JavaWeb程序开发,微信小程序开发,定制化项目、 源码、代码讲解、文档撰写、ppt制作。做自己喜欢的事,生活就是快乐的。 🍊心愿:点…...

js构造函数和原型链
以下是一个简单的JS原型链代码示例: function Person(name, age) {this.name name;this.age age; }Person.prototype.sayHello function() {console.log(Hello, Im ${this.name} and Im ${this.age} years old.); }let person1 new Person(Alice, 20);person1.…...
矩阵和array()数组(待完善))
python中matrix()矩阵和array()数组(待完善)
参考:python矩阵中matrix()和array()函数区别-CSDN博客 区别: 维度:ndarray可以是多维的,包括1D、2D、3D等,而matrix只能是2维的,也就是矩阵。数据类型:ndarray的数据类型可以不一致…...

设计海报都有哪些好用的软件推荐
在新媒体时代,设计在各个方面都是不可分割的。它最初是设计师的工作,并逐渐成为新媒体编辑的必要技能。 网页内容需要图片和文字,应用程序需要独特的风格基调,人们更喜欢分享视频和图片,而不是简单的文本。因此&#…...
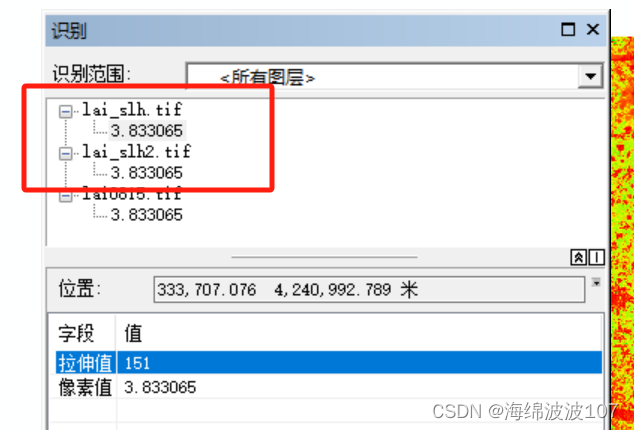
Arcgis中像元值变化问题,拉伸显示的是否为实际像元值范围?
Arcgis中合并栅格但像元值变化 问题描述 这是四幅栅格,范围都在-1-9之间,怀疑这个范围是否是真实的范围。因为经常听到同学说放到arcgis拉伸显示之后,值变化了,所以研究一下。 原因 可以打开ENVI的像元快速统计工具ÿ…...
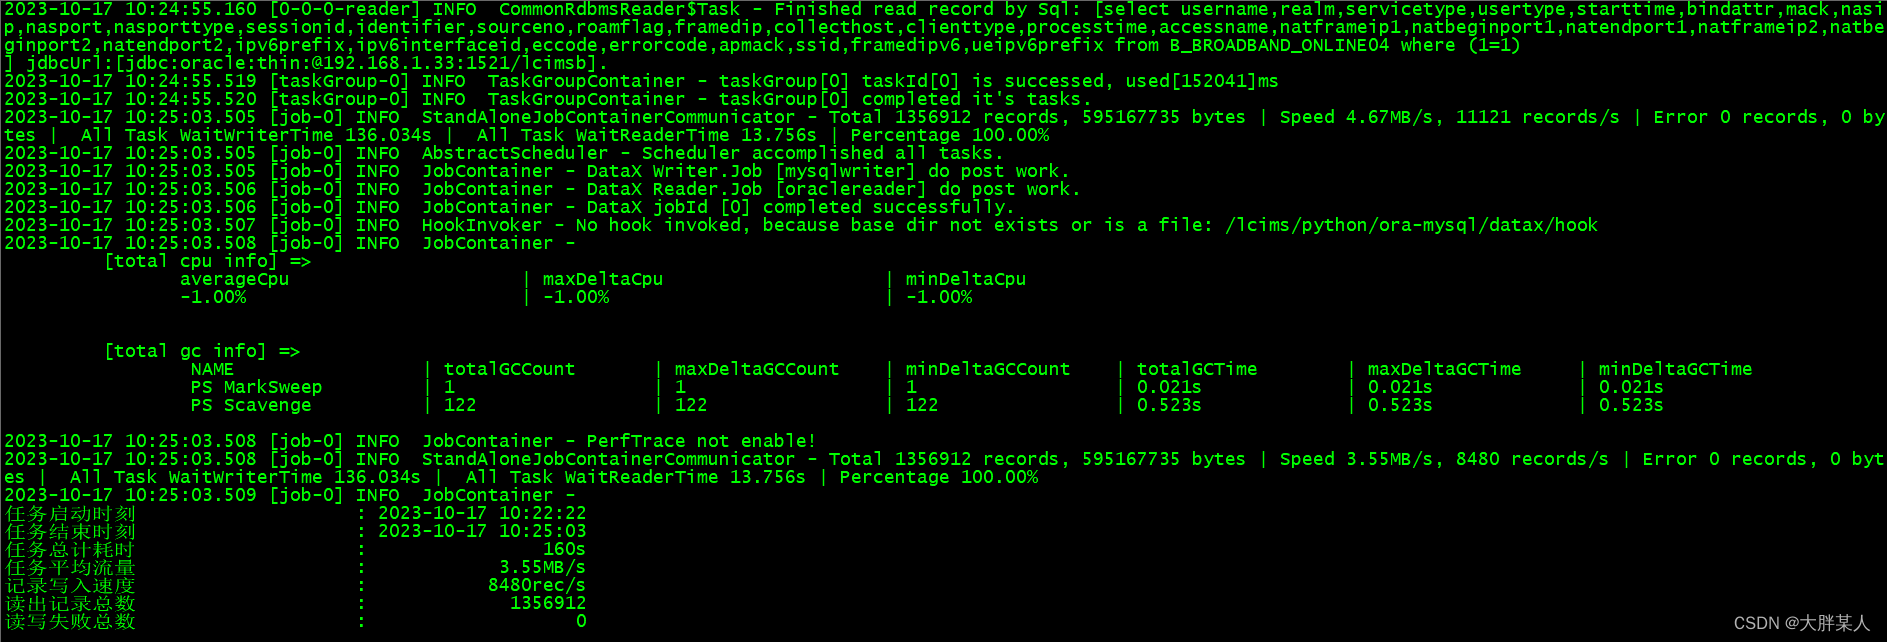
oracle库中数据利用datax工具同步至mysql库
查看oracle版本 $sqlplus aaa/aaaa192.168.1.1/lcfaSQL*Plus: Release 19.0.0.0.0 - Production on Tue Oct 17 15:56:46 2023 Version 19.15.0.0.0Copyright (c) 1982, 2022, Oracle. All rights reserved.Last Successful login time: Tue Oct 17 2023 15:56:03 08:00Conne…...
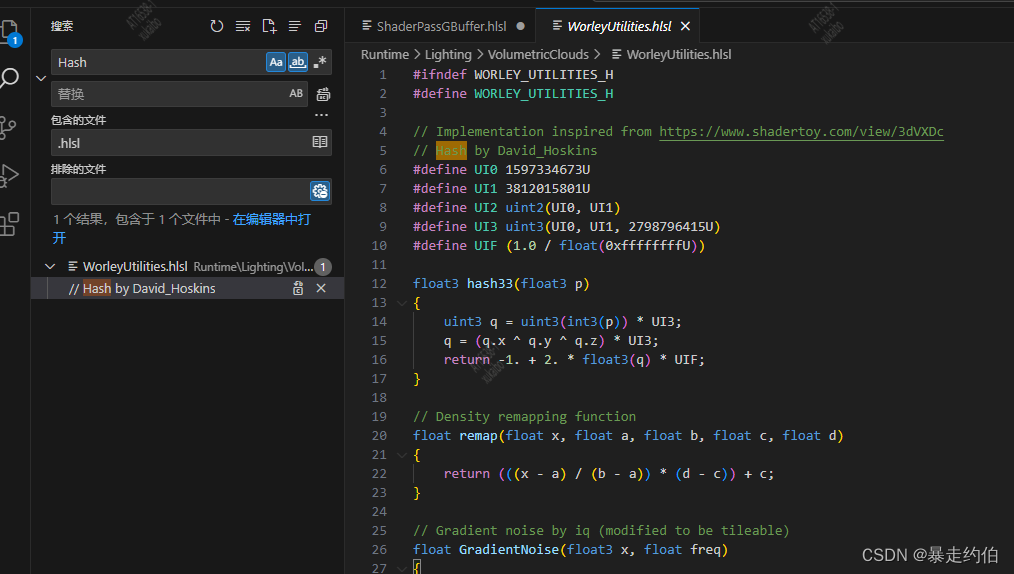
【Unity HDRP渲染管线下的WorleyUtilities文件,“Hash”函数】
Unity HDRP内置文件WorleyUtilities WorleyUtilities文件路径如下:文件代码如下然后转译到ShaderLab中:存档:WorleyUtilities文件路径如下: D:…\Library\PackageCache\com.unity.render-pipelines.high-definition@14.0.8\Runtime\Lighting\VolumetricClouds\WorleyUtili…...

前端跨域问题解决
一、同源策略 同源策略是一个重要的安全策略,它用于限制一个Origin的文档或者它加载的脚本如何能与另一个源的资源进行交互。它能帮助阻隔恶意文档,减少可能被攻击的媒介。 Origin:指web文档的来源,Web 内容的来源取决于访问的U…...
【前端】Js
目 录 一.前置知识第一个程序JavaScript 的书写形式注释输入输出 二.语法概览变量的使用理解 动态类型基本数据类型 三.运算符算术运算符赋值运算符 & 复合赋值运算符自增自减运算符比较运算符逻辑运算符位运算移位运算 四.条件语句if 语句三元表达式switch 五.循环语句whi…...
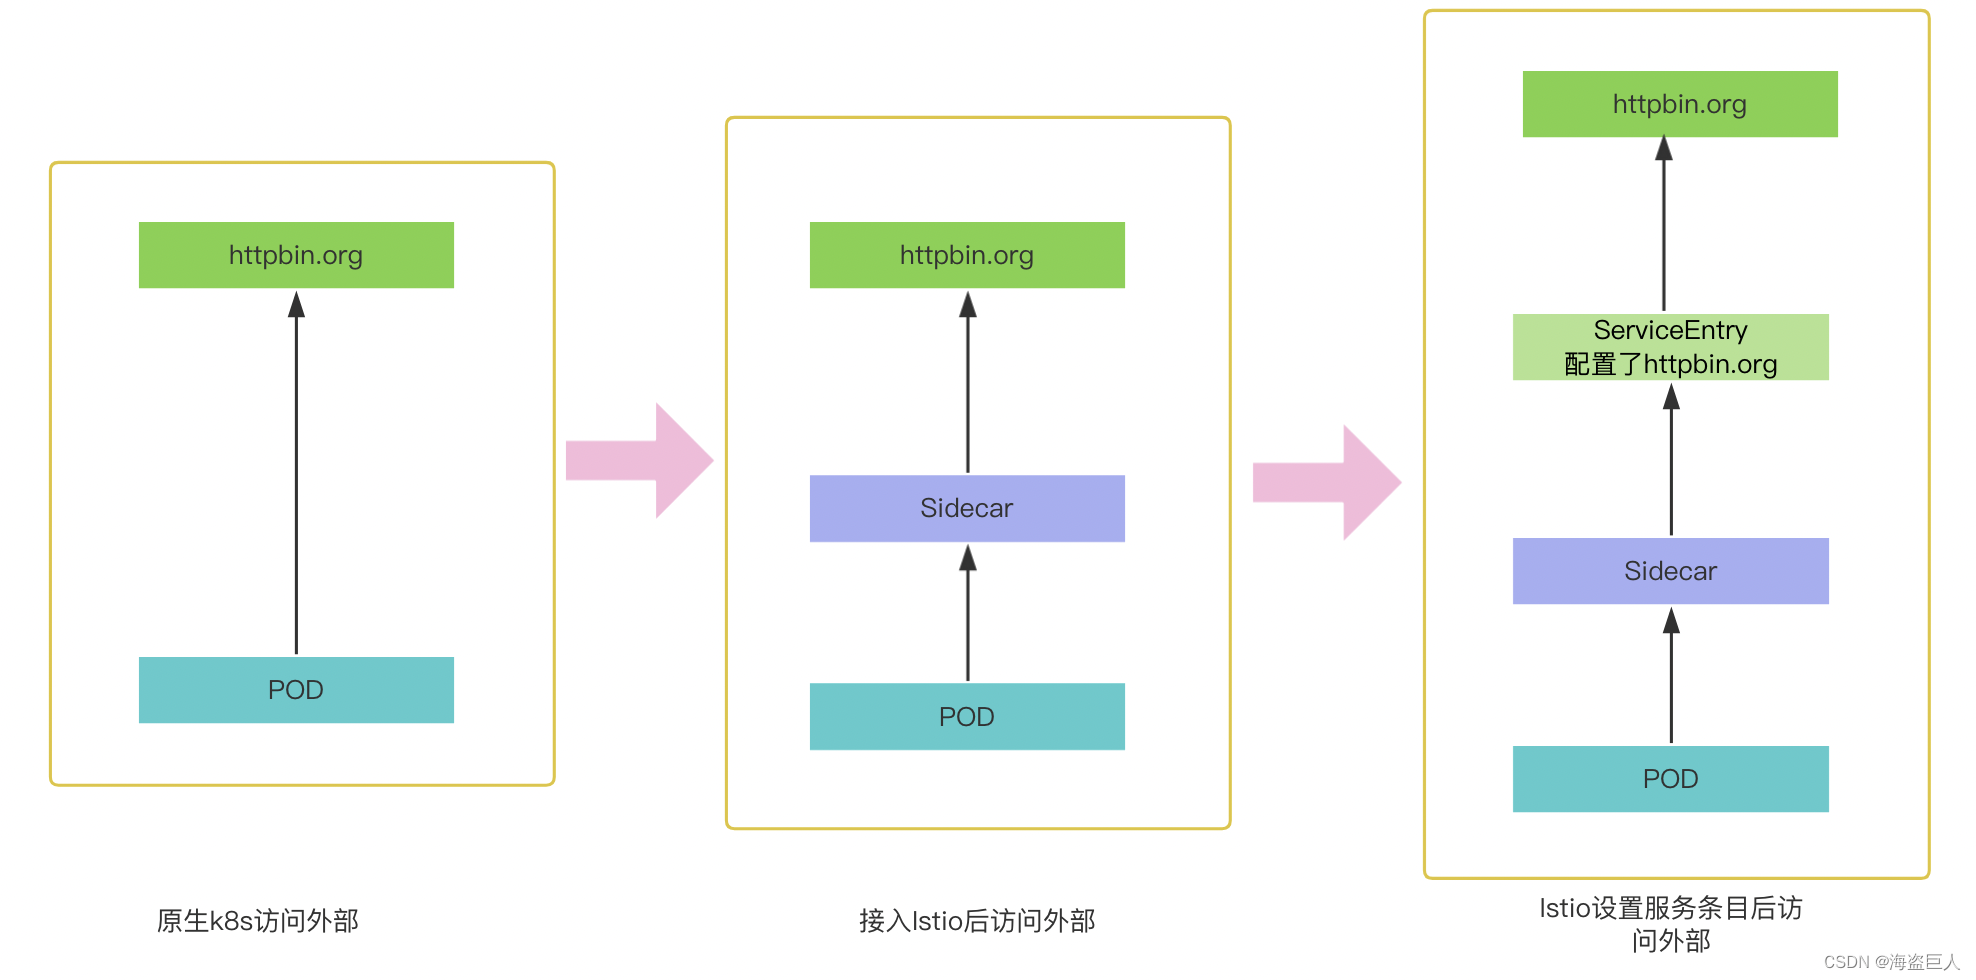
第四章 Istio出口流量管理
文章目录 访问外部服务Envoy 代理将请求传递给网格外服务配置服务条目以提供对外部服务的受控访问访问外部 HTTP 服务 直接访问外部服务 出口网关清理 HTTP 网关其他 访问外部服务 为了更好的做好网络访问控制,k8s结合Istio出口网络升级示意图 来自 Istio 的 pod…...

leetcode做题笔记188. 买卖股票的最佳时机 IV
给你一个整数数组 prices 和一个整数 k ,其中 prices[i] 是某支给定的股票在第 i 天的价格。 设计一个算法来计算你所能获取的最大利润。你最多可以完成 k 笔交易。也就是说,你最多可以买 k 次,卖 k 次。 注意:你不能同时参与多…...

AI 人工智能领域主动学习的航空航天应用案例
当AI学会"主动提问":航空航天领域的主动学习实践启示 关键词 主动学习(Active Learning)、航空航天AI、数据稀缺性、查询策略、专家标注、故障诊断、卫星遥感 摘要 在航空航天这样高风险、高精度的领域,AI模型往往面临&…...

突破VK视频下载限制的终极解决方案:VK-Video-Downloader完全指南
突破VK视频下载限制的终极解决方案:VK-Video-Downloader完全指南 【免费下载链接】VK-Video-Downloader Скачивайте видео с сайта ВКонтакте в желаемом качестве 项目地址: https://gitcode.com/gh_mirrors/vk/…...

5个突破地域限制的Locale-Emulator使用指南:解决软件区域兼容性问题
5个突破地域限制的Locale-Emulator使用指南:解决软件区域兼容性问题 【免费下载链接】Locale-Emulator Yet Another System Region and Language Simulator 项目地址: https://gitcode.com/gh_mirrors/lo/Locale-Emulator 在全球化的软件使用环境中ÿ…...

项目博客:山东大学软件学院项目实训-创新实训
项目实训...

Stable-Diffusion-V1-5 生成科学插图:辅助学术论文与科普内容创作
Stable-Diffusion-V1-5 生成科学插图:辅助学术论文与科普内容创作 你有没有过这样的经历?为了给论文或科普文章配一张理想的示意图,在绘图软件里折腾半天,结果画出来的东西总感觉差了点意思。或者,想找一个能清晰展示…...

无MCU快充移动电源改造为露营灯充电宝
1. 项目概述 IP5356-188-BZ 是一款高度集成的多协议快充移动电源管理 SoC,内置同步升降压控制器、电量计量单元、LED 驱动电路及 USB 协议识别模块。本项目基于该芯片的硬件特性,将标准双节锂电移动电源改造为兼具高功率快充能力与实用照明功能的露营灯充…...

Cogito-v1-preview-llama-3B保姆级教程:Ollama模型拉取→加载→提问全链路
Cogito-v1-preview-llama-3B保姆级教程:Ollama模型拉取→加载→提问全链路 Cogito v1 预览版是Deep Cogito推出的混合推理模型系列,在大多数标准基准测试中均超越了同等规模下最优的开源模型,包括来自LLaMA、DeepSeek和Qwen等模型的同类表现…...

3个步骤实现毫秒级Android跨平台控制:QtScrcpy开源工具全指南
3个步骤实现毫秒级Android跨平台控制:QtScrcpy开源工具全指南 【免费下载链接】QtScrcpy QtScrcpy 可以通过 USB / 网络连接Android设备,并进行显示和控制。无需root权限。 项目地址: https://gitcode.com/GitHub_Trending/qt/QtScrcpy 作为一款轻…...

Qwen3.5-35B-AWQ-4bit效果展示:多目标图像中主体关系推理与动作逻辑还原
Qwen3.5-35B-AWQ-4bit效果展示:多目标图像中主体关系推理与动作逻辑还原 1. 模型能力概览 Qwen3.5-35B-AWQ-4bit是一款专为视觉多模态理解设计的量化模型,在保持高效推理的同时,展现出令人惊艳的图片分析能力。这个模型特别擅长处理复杂场景…...

SpringCloud动态路由利器--router4j
前言 本文介绍Java的动态路由中间件:router4j。router4j用于SpringCloud项目,它可以将某个url请求路由到指定的机器上,也可以将所有请求强制转到指定机器。 问题描述 Java后端在开发SpringCloud项目时如果同一个应用起了多个实例ÿ…...