DLO-SLAM代码阅读
文章目录
- DLO-SLAM
- 点评
- 代码解析
- OdomNode
- 代码结构
- 主函数 main
- 激光回调函数 icpCB
- 初始化 initializeDLO
- 重力对齐 gravityAlign
- 点云预处理 preprocessPoints
- 关键帧指标 computeMetrics
- 设定关键帧阈值setAdaptiveParams
- 初始化目标数据 initializeInputTarget
- 设置源数据 setInputSources
- 得到下一个位姿 getNextPose
- Imu得帧间 integrateIMU
- 得到 getSubmapKeyframes
- 取k个最近帧下标 pushSubmapIndices
- 关键帧凸包 computeConvexHull
- 更新关键帧updateKeyframes
- imu回调 imuCB
- MapNode
- 主函数
- 构造函数 MapNode
- 关键帧回调 keyframeCB
- 保存地图 savePcd
- 相关
- End
DLO-SLAM
这篇SLAM论文《Direct LiDAR Odometry: Fast Localization with Dense Point Clouds》作为NASA喷气推进实验室CoSTAR团队研究和开发的新作,收到了学术界广泛的关注。其主要用作DARPA地下挑战的里程计,提出了一种能够实现高速高精度处理高速实时处理密集点云的激光里程计(LO)的思路,下面是他们的Github开源代码。
点评
- 代码有些小trick还是很不错的。
- 本文采用稠密点云进行匹配,说是:精度比提取特征(loam系列)的高。
- 由于计算量大的问题,本文首先不进行点云去畸变降低耗时,同时 动态确定 阈值筛选关键帧
- 自适应阈值筛选关键帧,窄道时阈值会缩小。
- 采用 激光与激光匹配和激光与submap匹配,其中submap采用关键帧空间构建子图。
- 子图由 邻近关键帧+关键帧凸包+关键帧凹包构成,基于帧标记确定是否需要重新生成。
- 本文采用 NanoGIcp 轻量级 激光点匹配。
- 子图协方差、法向量由链接关键帧近似,代码中采用scan2scan直接赋值,不需重新计算
代码解析
OdomNode
代码结构
主函数 main
描述:
- 主函数基本啥也没干,就定义了OdomNode,然后等待ros结束,捕捉了程序终止的指令
- OdomNode 主要是两个回调,激光和imu回调,下面有其详细的描述
void controlC(int sig) {dlo::OdomNode::abort();}int main(int argc, char** argv) {ros::init(argc, argv, "dlo_odom_node");ros::NodeHandle nh("~");signal(SIGTERM, controlC);sleep(0.5);dlo::OdomNode node(nh);ros::AsyncSpinner spinner(0);spinner.start();node.start();ros::waitForShutdown();return 0;}
核心为 dlo::OdomNode
核心成员:
// 订阅
ros::Subscriber icp_sub;
ros::Subscriber imu_sub;
this->icp_sub = this->nh.subscribe("pointcloud", 1, &dlo::OdomNode::icpCB, this);
this->imu_sub = this->nh.subscribe("imu", 1, &dlo::OdomNode::imuCB, this);//发布
ros::Publisher odom_pub;
ros::Publisher pose_pub;
ros::Publisher keyframe_pub;
ros::Publisher kf_pub;
this->odom_pub = this->nh.advertise<nav_msgs::Odometry>("odom", 1);
this->pose_pub = this->nh.advertise<geometry_msgs::PoseStamped>("pose", 1);
this->kf_pub = this->nh.advertise<nav_msgs::Odometry>("kfs", 1, true);
this->keyframe_pub = this->nh.advertise<sensor_msgs::PointCloud2>("keyframe", 1, true);
激光回调函数 icpCB
主要功能:
- imu -> s2s -> s2m 的一个match 得到姿态
步骤:
- 两个检测,不满足直接返回
- 若 点云中 点个数过少
- DLO 程序未初始化,则初始化(IMU 校准,重力对齐)
- 数据预处理,点云+关键帧阈值
- 点云预处理 (去 Nan点 + 区域滤波+ 体素滤波)
- 计算关键帧指标,独立线程计算
- 该帧点云长度中位数进行低通滤波,然后 基于长度设定关键帧选择阈值
- 基于指标确定关键帧阈值
- 若目标信息为空时,进行初始化,然后 return
- 当前帧设为源数据,得到 当前帧的位姿 getNextPose
- IMU + S2S + S2M 三者共同作用得到的
- 更新关键帧 ,得到关键帧周围数量 + 最近关键帧距离及id
- 启动独立线程,发送数据到ros
- 启动独立线程,调试语句并发布自定义 DLO 消息
/*** ICP Point Cloud Callback**/
void dlo::OdomNode::icpCB(const sensor_msgs::PointCloud2ConstPtr& pc) {double then = ros::Time::now().toSec();/// 当前时刻更新this->scan_stamp = pc->header.stamp;this->curr_frame_stamp = pc->header.stamp.toSec();// If there are too few points in the pointcloud, try again/// 如果点云中的点太少,该帧直接丢弃this->current_scan = pcl::PointCloud<PointType>::Ptr (new pcl::PointCloud<PointType>);pcl::fromROSMsg(*pc, *this->current_scan);if (this->current_scan->points.size() < this->gicp_min_num_points_) {ROS_WARN("Low number of points!");return;}// DLO Initialization procedures (IMU calib, gravity align)/// DLO 初始化程序(IMU 校准,重力对齐)if (!this->dlo_initialized) {this->initializeDLO();return;}// Preprocess points 预处理点云this->preprocessPoints();// Compute Metrics  计算关键帧指标,独立线程计算this->metrics_thread = std::thread( &dlo::OdomNode::computeMetrics, this );this->metrics_thread.detach(); // detach()的作用是将子线程和主线程的关联分离// Set Adaptive Parameters  根据空间度量设置关键帧阈值if (this->adaptive_params_use_){this->setAdaptiveParams();}// Set initial frame as target  初始化目标信息if(this->target_cloud == nullptr) {this->initializeInputTarget();return;}// Set source frame 设置源数据this->source_cloud = pcl::PointCloud<PointType>::Ptr (new pcl::PointCloud<PointType>);this->source_cloud = this->current_scan;// Set new frame as input source for both gicp objectsthis->setInputSources();// Get the next pose via IMU + S2S + S2Mthis->getNextPose();// 更新当前关键帧,得到关键帧周围数量 + 最近关键帧距离及id// Update current keyframe poses and mapthis->updateKeyframes();// Update trajectory  更新轨迹this->trajectory.push_back( std::make_pair(this->pose, this->rotq) );// Update next time stampthis->prev_frame_stamp = this->curr_frame_stamp;// Update some statistics 计算本次耗时this->comp_times.push_back(ros::Time::now().toSec() - then);// Publish stuff to ROS  启动独立线程,发送数据到rosthis->publish_thread = std::thread( &dlo::OdomNode::publishToROS, this );this->publish_thread.detach();// Debug statements and publish custom DLO message// 启动独立线程,调试语句并发布自定义 DLO 消息this->debug_thread = std::thread( &dlo::OdomNode::debug, this );this->debug_thread.detach();}
初始化 initializeDLO
步骤:
- 若 使用imu 但未标定时,直接 返回
- 若 使用imu+已经标定+需重力对齐+未初始化
- 进行重力对齐
- 若提供初始位姿,则初始位姿进行赋值
void dlo::OdomNode::initializeDLO() {// Calibrate IMU 使用imu但未标定时,returnif (!this->imu_calibrated && this->imu_use_) {return;}// Gravity Align 重力对齐if (this->gravity_align_ && this->imu_use_ && this->imu_calibrated && !this->initial_pose_use_) {std::cout << "Aligning to gravity... "; std::cout.flush();this->gravityAlign();}// Use initial known pose 若提供初始位姿时,进行赋值if (this->initial_pose_use_) {std::cout << "Setting known initial pose... "; std::cout.flush();// set known position 赋值变量有:pose T,t_s2s,T_s2s_prev,originthis->pose = this->initial_position_;this->T.block(0,3,3,1) = this->pose;this->T_s2s.block(0,3,3,1) = this->pose;this->T_s2s_prev.block(0,3,3,1) = this->pose;this->origin = this->initial_position_;// set known orientation 赋值变量有:rotq,T,T_s2s,T_s2s_prevthis->rotq = this->initial_orientation_;this->T.block(0,0,3,3) = this->rotq.toRotationMatrix();this->T_s2s.block(0,0,3,3) = this->rotq.toRotationMatrix();this->T_s2s_prev.block(0,0,3,3) = this->rotq.toRotationMatrix();std::cout << "done" << std::endl << std::endl;}this->dlo_initialized = true;std::cout << "DLO initialized! Starting localization..." << std::endl;}
重力对齐 gravityAlign
步骤:
- 原理:缓存1s以内加速度的值,将初始方向设为:重力方向与加速度方向的夹角
- 取一秒之内的 imu 加速度,并计算其 均值加速度
- 归一化均值加速度
- 定义重力矢量(假设点向下)
- 计算两个向量之间的角度,并进行归一化
- 设置重力对齐方向,并打印
void dlo::OdomNode::gravityAlign() {// get average acceleration vector for 1 second and normalizeEigen::Vector3f lin_accel = Eigen::Vector3f::Zero();///< 取一秒之内的 imu 加速度,并计算其 均值加速度  const double then = ros::Time::now().toSec();int n=0;while ((ros::Time::now().toSec() - then) < 1.) {lin_accel[0] += this->imu_meas.lin_accel.x;lin_accel[1] += this->imu_meas.lin_accel.y;lin_accel[2] += this->imu_meas.lin_accel.z;++n;}lin_accel[0] /= n; lin_accel[1] /= n; lin_accel[2] /= n;// normalize  归一化(单位1)double lin_norm = sqrt(pow(lin_accel[0], 2) + pow(lin_accel[1], 2) + pow(lin_accel[2], 2));lin_accel[0] /= lin_norm; lin_accel[1] /= lin_norm; lin_accel[2] /= lin_norm;// define gravity vector (assume point downwards) 定义重力矢量(假设点向下)Eigen::Vector3f grav;grav << 0, 0, 1;// calculate angle between the two vectors 计算两个向量之间的角度Eigen::Quaternionf grav_q = Eigen::Quaternionf::FromTwoVectors(lin_accel, grav);// normalize  角度进行归一化double grav_norm = sqrt(grav_q.w()*grav_q.w() + grav_q.x()*grav_q.x() + grav_q.y()*grav_q.y() + grav_q.z()*grav_q.z());grav_q.w() /= grav_norm; grav_q.x() /= grav_norm; grav_q.y() /= grav_norm; grav_q.z() /= grav_norm;// set gravity aligned orientation  设置重力对齐方向this->rotq = grav_q;this->T.block(0,0,3,3) = this->rotq.toRotationMatrix();this->T_s2s.block(0,0,3,3) = this->rotq.toRotationMatrix();this->T_s2s_prev.block(0,0,3,3) = this->rotq.toRotationMatrix();// rpy 并进行打印auto euler = grav_q.toRotationMatrix().eulerAngles(2, 1, 0);double yaw = euler[0] * (180.0/M_PI);double pitch = euler[1] * (180.0/M_PI);double roll = euler[2] * (180.0/M_PI);std::cout << "done" << std::endl;std::cout << "  Roll [deg]: " << roll << std::endl;std::cout << "  Pitch [deg]: " << pitch << std::endl << std::endl;
}
点云预处理 preprocessPoints
步骤:
- 保留原始点云
original_scan - 当前点云 移除 Nans 的点
- 当前点云 过滤指定立方体的点云:1m 以内的
- 当前点云 体素滤波:scan:0.05/ submap:0.1
void dlo::OdomNode::preprocessPoints() {// Original Scan 保留原始点云,用于关键帧存储*this->original_scan = *this->current_scan;// Remove NaNs 移除Nans点std::vector<int> idx;this->current_scan->is_dense = false;pcl::removeNaNFromPointCloud(*this->current_scan, *this->current_scan, idx);// Crop Box Filter 过滤指定立方体内的点if (this->crop_use_) {this->crop.setInputCloud(this->current_scan);this->crop.filter(*this->current_scan);}// Voxel Grid Filter 体素滤波if (this->vf_scan_use_) {this->vf_scan.setInputCloud(this->current_scan);this->vf_scan.filter(*this->current_scan);}}
关键帧指标 computeMetrics
步骤:
- 主要调用了computeSpaciousness 库
- 首先计算了各个激光点的长度
- 取长度的中值,并进行 低通滤波
- nth_element是一种部分排序算法,它重新排列 [first, last) 中的元素
- 得到 激光长度的中位数
- 低通滤波,0.95,0.05 比例
- 将该值保存,为关键帧阈值做准备
void dlo::OdomNode::computeMetrics() {this->computeSpaciousness();
}/**计算当前扫描的空间**/
void dlo::OdomNode::computeSpaciousness() {// compute range of points 计算激光点到原点的长度 std::vector<float> ds;for (int i = 0; i <= this->current_scan->points.size(); i++) {float d = std::sqrt(pow(this->current_scan->points[i].x, 2) + pow(this->current_scan->points[i].y, 2) + pow(this->current_scan->points[i].z, 2));ds.push_back(d);}// median  取长度的中值,并进行 低通滤波// nth_element 是一种部分排序算法,它重新排列 [first, last) 中的元素std::nth_element(ds.begin(), ds.begin() + ds.size()/2, ds.end());float median_curr = ds[ds.size()/2];static float median_prev = median_curr;float median_lpf = 0.95*median_prev + 0.05*median_curr;median_prev = median_lpf;// pushthis->metrics.spaciousness.push_back( median_lpf );}
设定关键帧阈值setAdaptiveParams
步骤:
- 根据空间度量设置关键帧阈值
- 关键帧步长:
- 若激光均值长度 [20,+∞][20,+\infty][20,+∞]:10.0 m
- 若激光均值长度 [10,20][10,20][10,20]:5.0 m
- 若激光均值长度 [5,10][5,10][5,10]:1.0 m
- 若激光均值长度 [0.0,5.0][0.0,5.0][0.0,5.0]:0.5 m
void dlo::OdomNode::setAdaptiveParams() {// Set Keyframe Thresh from Spaciousness Metricif (this->metrics.spaciousness.back() > 20.0){this->keyframe_thresh_dist_ = 10.0;} else if (this->metrics.spaciousness.back() > 10.0 && this->metrics.spaciousness.back() <= 20.0) {this->keyframe_thresh_dist_ = 5.0;} else if (this->metrics.spaciousness.back() > 5.0 && this->metrics.spaciousness.back() <= 10.0) {this->keyframe_thresh_dist_ = 1.0;} else if (this->metrics.spaciousness.back() <= 5.0) {this->keyframe_thresh_dist_ = 0.5;}// set concave hull alphathis->concave_hull.setAlpha(this->keyframe_thresh_dist_);
}
初始化目标数据 initializeInputTarget
步骤:
- 先将点云数据转为 NanoGICP 格式的数据
- 初始化关键帧
- 若使用 submap时,初始化 submap,并进行体素滤波
- 保留历史关键帧树
- 关键帧 位姿+ 是否第一次
- 关键帧 点云
- 当前关键帧 点云
- 计算 kdtree 和关键帧法线
- 发布 关键帧点云,独立线程
- 关键帧个数+1
相关信息
- NanoGICP
gicp_s2s,gicp- 定制的迭代最接近点解算器,用于轻量级点云扫描与交叉对象数据共享匹配
void dlo::OdomNode::initializeInputTarget() {this->prev_frame_stamp = this->curr_frame_stamp;// Convert ros message 点云 pcl-> NanoGICP 的转换,并计算其协方差this->target_cloud = pcl::PointCloud<PointType>::Ptr (new pcl::PointCloud<PointType>);this->target_cloud = this->current_scan;this->gicp_s2s.setInputTarget(this->target_cloud);this->gicp_s2s.calculateTargetCovariances();// initialize keyframes 初始化关键帧pcl::PointCloud<PointType>::Ptr first_keyframe (new pcl::PointCloud<PointType>);pcl::transformPointCloud (*this->target_cloud, *first_keyframe, this->T);// voxelization for submap 若使用submap时,设定submap 并进行体素滤波if (this->vf_submap_use_) {this->vf_submap.setInputCloud(first_keyframe);this->vf_submap.filter(*first_keyframe);}// keep history of keyframes 保留历史关键帧this->keyframes.push_back(std::make_pair(std::make_pair(this->pose, this->rotq), first_keyframe));*this->keyframes_cloud += *first_keyframe;*this->keyframe_cloud = *first_keyframe;// compute kdtree and keyframe normals (use gicp_s2s input source as temporary storage because it will be overwritten by setInputSources())// 计算 kdtree 和关键帧法线(使用 gicp_s2s 输入源作为临时存储,因为它将被 setInputSources() 覆盖this->gicp_s2s.setInputSource(this->keyframe_cloud);this->gicp_s2s.calculateSourceCovariances();this->keyframe_normals.push_back(this->gicp_s2s.getSourceCovariances());// 定义发布关键帧线程this->publish_keyframe_thread = std::thread( &dlo::OdomNode::publishKeyframe, this );this->publish_keyframe_thread.detach();// 关键帧数量+1++this->num_keyframes;}
设置源数据 setInputSources
- 设置 S2S gicp 的输入源
- 这将构建源云的 KdTree
- 这不会为 s2m 构建 KdTree,因为 force_no_update 为真
- 使用自定义 NanoGICP 函数为 S2M gicp 设置 pcl::Registration 输入源
- 现在使用之前构建的 KdTree 设置 S2M gicp 的 KdTree
void dlo::OdomNode::setInputSources(){// set the input source for the S2S gicp// this builds the KdTree of the source cloud// this does not build the KdTree for s2m because force_no_update is truethis->gicp_s2s.setInputSource(this->current_scan);// set pcl::Registration input source for S2M gicp using custom NanoGICP functionthis->gicp.registerInputSource(this->current_scan);// now set the KdTree of S2M gicp using previously built KdTreethis->gicp.source_kdtree_ = this->gicp_s2s.source_kdtree_;this->gicp.source_covs_.clear();}
得到下一个位姿 getNextPose
步骤:
- 基于s2s得到全局姿态
- 若使用imu时,则imu预积分得帧间位姿:
imu_SE3 imu_SE3作为初值,得到 s2s的关系- 基于上次全局姿态 进而得到当前位姿位姿
T_s2s, pose_s2s, rotSO3_s2s, rotq_s2s- 当前位姿,当前姿态平移,当前姿态旋转矩阵,归一化四元数旋转
- 为 s2m 赋值 s2s的协方差
- 若使用imu时,则imu预积分得帧间位姿:
- 得到 submap地图帧
- 先基于当前位姿得到submap地图帧索引
- 欧式距离 dist + 凸包距离dist + 凹包距离dist
- 若索引有变化,则重新生成地图+法向量
- 先基于当前位姿得到submap地图帧索引
- 以 s2s 为初值,进行 s2m匹配,得到最终的全局位姿
- 数据进行更新,s2s值更新,last值更新等
void dlo::OdomNode::getNextPose() {//// FRAME-TO-FRAME PROCEDURE//// Align using IMU prior if availablepcl::PointCloud<PointType>::Ptr aligned (new pcl::PointCloud<PointType>);// 若使用imu,则 imu进行积分,并进行对齐if (this->imu_use_) {this->integrateIMU();this->gicp_s2s.align(*aligned, this->imu_SE3);} else {this->gicp_s2s.align(*aligned);}// Get the local S2S transform 通过 点到点匹配器 得到最后一帧的姿态Eigen::Matrix4f T_S2S = this->gicp_s2s.getFinalTransformation();// Get the global S2S transform //计算得到最后一帧与前一帧的相对关系this->propagateS2S(T_S2S);// reuse covariances from s2s for s2m// 为 s2m 重用 s2s 的协方差this->gicp.source_covs_ = this->gicp_s2s.source_covs_;// Swap source and target (which also swaps KdTrees internally) for next S2S// 为下一个 S2S 交换源和目标(也在内部交换 KdTrees)this->gicp_s2s.swapSourceAndTarget();//// FRAME-TO-SUBMAP //// Get current global submap人 得到该帧submapthis->getSubmapKeyframes();// 如果子图已经改变,则s2m匹配的target就改变了if (this->submap_hasChanged) {// Set the current global submap as the target cloudthis->gicp.setInputTarget(this->submap_cloud);// Set target cloud's normals as submap normalsthis->gicp.setTargetCovariances( this->submap_normals );}// Align with current submap with global S2S transformation as initial guess// 与当前子图对齐,将全局 S2S 转换作为初始猜测this->gicp.align(*aligned, this->T_s2s);// Get final transformation in global frame 在全局坐标系下得到最终的转换this->T = this->gicp.getFinalTransformation();// Update the S2S transform for next propagation 更新s2s的转换为下次迭代做准备this->T_s2s_prev = this->T;// Update next global pose// Both source and target clouds are in the global frame now, so tranformation is global//更新下一个全局姿势// 源云和目标云现在都在全局框架中,所以转换是全局的,不需要啥操作this->propagateS2M();// Set next target cloud as current source cloud 将下一个目标云设置为当前源云*this->target_cloud = *this->source_cloud;}Imu得帧间 integrateIMU
步骤:
- 从imuBuf中取 两帧之间的 imu观测数据
imu_frame - 观测数据
imu_frame按时间进行排序 - 进行 计算两帧之间的角度变化
- 角度归一化,位置给0,进行赋值
void dlo::OdomNode::integrateIMU() {// Extract IMU data between the two framesstd::vector<ImuMeas> imu_frame;for (const auto& i : this->imu_buffer) {// IMU data between two frames is when:// current frame's timestamp minus imu timestamp is positive// previous frame's timestamp minus imu timestamp is negativedouble curr_frame_imu_dt = this->curr_frame_stamp - i.stamp;double prev_frame_imu_dt = this->prev_frame_stamp - i.stamp;if (curr_frame_imu_dt >= 0. && prev_frame_imu_dt <= 0.) {imu_frame.push_back(i);}}// Sort measurements by timestd::sort(imu_frame.begin(), imu_frame.end(), this->comparatorImu);// Relative IMU integration of gyro and accelerometerdouble curr_imu_stamp = 0.;double prev_imu_stamp = 0.;double dt;Eigen::Quaternionf q = Eigen::Quaternionf::Identity();for (uint32_t i = 0; i < imu_frame.size(); ++i) {if (prev_imu_stamp == 0.) {prev_imu_stamp = imu_frame[i].stamp;continue;}// Calculate difference in imu measurement times IN SECONDScurr_imu_stamp = imu_frame[i].stamp;dt = curr_imu_stamp - prev_imu_stamp;prev_imu_stamp = curr_imu_stamp;// Relative gyro propagation quaternion dynamicsEigen::Quaternionf qq = q;q.w() -= 0.5*( qq.x()*imu_frame[i].ang_vel.x + qq.y()*imu_frame[i].ang_vel.y + qq.z()*imu_frame[i].ang_vel.z ) * dt;q.x() += 0.5*( qq.w()*imu_frame[i].ang_vel.x - qq.z()*imu_frame[i].ang_vel.y + qq.y()*imu_frame[i].ang_vel.z ) * dt;q.y() += 0.5*( qq.z()*imu_frame[i].ang_vel.x + qq.w()*imu_frame[i].ang_vel.y - qq.x()*imu_frame[i].ang_vel.z ) * dt;q.z() += 0.5*( qq.x()*imu_frame[i].ang_vel.y - qq.y()*imu_frame[i].ang_vel.x + qq.w()*imu_frame[i].ang_vel.z ) * dt;}// Normalize quaterniondouble norm = sqrt(q.w()*q.w() + q.x()*q.x() + q.y()*q.y() + q.z()*q.z());q.w() /= norm; q.x() /= norm; q.y() /= norm; q.z() /= norm;// Store IMU guessthis->imu_SE3 = Eigen::Matrix4f::Identity();this->imu_SE3.block(0, 0, 3, 3) = q.toRotationMatrix();}
得到 getSubmapKeyframes
步骤:
- 先清空用于生成子图的关键帧索引容器
- 计算每个帧到当前帧的欧氏距离(平移量)
- 将每种 符合前K个最近邻帧放入 submap队列
- 查找来自 距离 关键帧的前k个最邻近帧
- 查找来自 凸包 关键帧的前k个最邻近帧
- 查找来自 凹包 关键帧的前k个最邻近帧
- 将submap关键帧index 进行排序,然后删除重复的id
- sort 排序+unique删除重复
- 当前submap_index 与旧submap_index 是否一致
- 一致,则直接结束
- 否则,重新生成 submap点云地图+法向量,并更新 旧submap_index
void dlo::OdomNode::getSubmapKeyframes() {// clear vector of keyframe indices to use for submap// 清空用于子图的关键帧索引容器this->submap_kf_idx_curr.clear();//// TOP K NEAREST NEIGHBORS FROM ALL KEYFRAMES// 来自所有关键帧的 前K个最近邻帧// calculate distance between current pose and poses in keyframe setstd::vector<float> ds;std::vector<int> keyframe_nn; int i=0;Eigen::Vector3f curr_pose = this->T_s2s.block(0,3,3,1);for (const auto& k : this->keyframes) {// 计算位姿(平移量)的欧氏距离float d = sqrt( pow(curr_pose[0] - k.first.first[0], 2) + pow(curr_pose[1] - k.first.first[1], 2) + pow(curr_pose[2] - k.first.first[2], 2) );ds.push_back(d);keyframe_nn.push_back(i); i++;}// get indices for top K nearest neighbor keyframe poses// 得到 k个最近 关键帧位姿的下标this->pushSubmapIndices(ds, this->submap_knn_, keyframe_nn);//// TOP K NEAREST NEIGHBORS FROM CONVEX HULL//// get convex hull indices 得到关键帧位姿凸包的indexthis->computeConvexHull();// get distances for each keyframe on convex hull// 得到凸包中每个关键帧到当前帧位姿的距离std::vector<float> convex_ds;for (const auto& c : this->keyframe_convex) {convex_ds.push_back(ds[c]);}// get indicies for top kNN for convex hull // 筛选出凸包 k个邻近关键帧的下标this->pushSubmapIndices(convex_ds, this->submap_kcv_, this->keyframe_convex);//// TOP K NEAREST NEIGHBORS FROM CONCAVE HULL//// get concave hull indices 获取凹包的indexsthis->computeConcaveHull();// get distances for each keyframe on concave hullstd::vector<float> concave_ds;for (const auto& c : this->keyframe_concave) {concave_ds.push_back(ds[c]);}// get indicies for top kNN for convex hullthis->pushSubmapIndices(concave_ds, this->submap_kcc_, this->keyframe_concave);//// BUILD SUBMAP//// concatenate all submap clouds and normals// 将submap关键帧 进行排序,然后删除重复的idstd::sort(this->submap_kf_idx_curr.begin(), this->submap_kf_idx_curr.end());auto last = std::unique(this->submap_kf_idx_curr.begin(), this->submap_kf_idx_curr.end());this->submap_kf_idx_curr.erase(last, this->submap_kf_idx_curr.end());// sort current and previous submap kf list of indicesstd::sort(this->submap_kf_idx_curr.begin(), this->submap_kf_idx_curr.end());std::sort(this->submap_kf_idx_prev.begin(), this->submap_kf_idx_prev.end());// check if submap has changed from previous iteration 检测submap是否改变if (this->submap_kf_idx_curr == this->submap_kf_idx_prev){this->submap_hasChanged = false;} else {this->submap_hasChanged = true;// reinitialize submap cloud, normals// 重新初始化 子图 点云+法线,并赋值上一次点云pcl::PointCloud<PointType>::Ptr submap_cloud_ (boost::make_shared<pcl::PointCloud<PointType>>());this->submap_normals.clear();for (auto k : this->submap_kf_idx_curr) {// create current submap cloud 生成submap*submap_cloud_ += *this->keyframes[k].second;// grab corresponding submap cloud's normalsthis->submap_normals.insert( std::end(this->submap_normals), std::begin(this->keyframe_normals[k]), std::end(this->keyframe_normals[k]) );}this->submap_cloud = submap_cloud_;this->submap_kf_idx_prev = this->submap_kf_idx_curr;}}
取k个最近帧下标 pushSubmapIndices
思路:
- 先按照优先队列的思路,找到第k小的dist元素
- 然后遍历 frame_dist,将小于等于该值的 frame放入
submap_kf_idx_curr
void dlo::OdomNode::pushSubmapIndices(std::vector<float> dists, int k, std::vector<int> frames) {// maintain max heap of at most k elements// 定义一个 优先队列std::priority_queue<float> pq;/// 优先队列,默认大顶堆,top最大,这样只保留了 较小的 K个数for (auto d : dists) {if (pq.size() >= k && pq.top() > d) {pq.push(d);pq.pop();} else if (pq.size() < k) {pq.push(d);}}// get the kth smallest element, which should be at the top of the heap// / 获取第k小的元素,它应该在堆顶float kth_element = pq.top();// get all elements smaller or equal to the kth smallest element// 获取小于或等于第 k 个最小元素的所有元素for (int i = 0; i < dists.size(); ++i) {if (dists[i] <= kth_element)this->submap_kf_idx_curr.push_back(frames[i]);}}
关键帧凸包 computeConvexHull
思路:
- 将位姿作为点云,基于凸包进行索引,凹包类似
步骤:
- 将关键帧位姿 push 作为点云
- 计算点云的凸包,
- 获取凸包上关键帧的索引
- 赋值关键帧凸包索引
void dlo::OdomNode::computeConvexHull() {// at least 4 keyframes for convex hullif (this->num_keyframes < 4) {return;}// create a pointcloud with points at keyframespcl::PointCloud<PointType>::Ptr cloud = pcl::PointCloud<PointType>::Ptr (new pcl::PointCloud<PointType>);for (const auto& k : this->keyframes) {PointType pt;pt.x = k.first.first[0];pt.y = k.first.first[1];pt.z = k.first.first[2];cloud->push_back(pt);}// calculate the convex hull of the point cloud 计算点云的凸包this->convex_hull.setInputCloud(cloud);// get the indices of the keyframes on the convex hull 获取凸包上关键帧的索引pcl::PointCloud<PointType>::Ptr convex_points = pcl::PointCloud<PointType>::Ptr (new pcl::PointCloud<PointType>);this->convex_hull.reconstruct(*convex_points);pcl::PointIndices::Ptr convex_hull_point_idx = pcl::PointIndices::Ptr (new pcl::PointIndices);this->convex_hull.getHullPointIndices(*convex_hull_point_idx);this->keyframe_convex.clear();for (int i=0; i<convex_hull_point_idx->indices.size(); ++i) {this->keyframe_convex.push_back(convex_hull_point_idx->indices[i]);}}
更新关键帧updateKeyframes
步骤:
- 将当前点云基于全局位姿转换到 map坐标系
- 遍历关键帧,计算当前姿势附近的数量 + 最近距离及id
- 计算当前姿势和关键帧姿势之间的距离
- 基于距离+1.5阈值 得到 当前姿态附近的数量
void dlo::OdomNode::updateKeyframes() {// transform point cloudthis->transformCurrentScan();// calculate difference in pose and rotation to all poses in trajectoryfloat closest_d = std::numeric_limits<float>::infinity();int closest_idx = 0;int keyframes_idx = 0;int num_nearby = 0;for (const auto& k : this->keyframes) {// calculate distance between current pose and pose in keyframesfloat delta_d = sqrt( pow(this->pose[0] - k.first.first[0], 2) + pow(this->pose[1] - k.first.first[1], 2) + pow(this->pose[2] - k.first.first[2], 2) );// count the number nearby current poseif (delta_d <= this->keyframe_thresh_dist_ * 1.5){++num_nearby;}// store into variableif (delta_d < closest_d) {closest_d = delta_d;closest_idx = keyframes_idx;}keyframes_idx++;}
imu回调 imuCB
功能:
- 该回调中主要做的活:先静止几秒算bias,然后数据去偏差放入队列中
步骤:
- 得到imu的测量数据,角速度+线速度
- 若未标定过,则进行求bias偏差
- 先取静止三秒的 陀螺仪和加速度计数据
- 然后求均值作为偏差
- 将测量数据减去bias得到实际测量值
- 将实际测量值放入队列中
void dlo::OdomNode::imuCB(const sensor_msgs::Imu::ConstPtr& imu) {// 不使用imu时,直接returnif (!this->imu_use_) {return;}double ang_vel[3], lin_accel[3];// Get IMU samples 得到imu的测量数据,角速度+线速度ang_vel[0] = imu->angular_velocity.x;ang_vel[1] = imu->angular_velocity.y;ang_vel[2] = imu->angular_velocity.z;lin_accel[0] = imu->linear_acceleration.x;lin_accel[1] = imu->linear_acceleration.y;lin_accel[2] = imu->linear_acceleration.z;if (this->first_imu_time == 0.) {this->first_imu_time = imu->header.stamp.toSec();}// IMU calibration procedure - do for three seconds IMU 校准程序 - 做三秒钟 if (!this->imu_calibrated) { //imu未标定时static int num_samples = 0;static bool print = true;if ((imu->header.stamp.toSec() - this->first_imu_time) < this->imu_calib_time_) {num_samples++;this->imu_bias.gyro.x += ang_vel[0];this->imu_bias.gyro.y += ang_vel[1];this->imu_bias.gyro.z += ang_vel[2];this->imu_bias.accel.x += lin_accel[0];this->imu_bias.accel.y += lin_accel[1];this->imu_bias.accel.z += lin_accel[2];// 一次打印,imu开始标定if(print) {std::cout << "Calibrating IMU for " << this->imu_calib_time_ << " seconds... "; std::cout.flush();print = false;}} else {// 计算 陀螺仪b和加速度g的平均偏差,标定成功this->imu_bias.gyro.x /= num_samples;this->imu_bias.gyro.y /= num_samples;this->imu_bias.gyro.z /= num_samples;this->imu_bias.accel.x /= num_samples;this->imu_bias.accel.y /= num_samples;this->imu_bias.accel.z /= num_samples;this->imu_calibrated = true;std::cout << "done" << std::endl;std::cout << " Gyro biases [xyz]: " << this->imu_bias.gyro.x << ", " << this->imu_bias.gyro.y << ", " << this->imu_bias.gyro.z << std::endl << std::endl;}} else {// Apply the calibrated bias to the new IMU measurementsthis->imu_meas.stamp = imu->header.stamp.toSec();// 去过畸变的 bias,将其放入队列中this->imu_meas.ang_vel.x = ang_vel[0] - this->imu_bias.gyro.x;this->imu_meas.ang_vel.y = ang_vel[1] - this->imu_bias.gyro.y;this->imu_meas.ang_vel.z = ang_vel[2] - this->imu_bias.gyro.z;this->imu_meas.lin_accel.x = lin_accel[0];this->imu_meas.lin_accel.y = lin_accel[1];this->imu_meas.lin_accel.z = lin_accel[2];// Store into circular bufferthis->mtx_imu.lock();this->imu_buffer.push_front(this->imu_meas);this->mtx_imu.unlock();}}
MapNode
主函数
该主函数主要构建了 MapNode,然后等待直到 ros关闭为止
#include "dlo/map.h"void controlC(int sig) {dlo::MapNode::abort();}int main(int argc, char** argv) {ros::init(argc, argv, "dlo_map_node");ros::NodeHandle nh("~");signal(SIGTERM, controlC);sleep(0.5);dlo::MapNode node(nh);ros::AsyncSpinner spinner(1);spinner.start();node.start();ros::waitForShutdown();return 0;}
MapNode 核心成员
class dlo::MapNode {public:MapNode(ros::NodeHandle node_handle);~MapNode();static void abort() {abort_ = true;}void start();void stop();private:void abortTimerCB(const ros::TimerEvent& e);void publishTimerCB(const ros::TimerEvent& e);void keyframeCB(const sensor_msgs::PointCloud2ConstPtr& keyframe);bool savePcd(direct_lidar_odometry::save_pcd::Request& req,direct_lidar_odometry::save_pcd::Response& res);void getParams();ros::NodeHandle nh;ros::Timer abort_timer;ros::Timer publish_timer;ros::Subscriber keyframe_sub;ros::Publisher map_pub;ros::ServiceServer save_pcd_srv;pcl::PointCloud<PointType>::Ptr dlo_map;pcl::VoxelGrid<PointType> voxelgrid;ros::Time map_stamp;std::string odom_frame;bool publish_full_map_;double publish_freq_;double leaf_size_;static std::atomic<bool> abort_;};构造函数 MapNode
步骤:
- 获取参数
string odom_frame; bool publish_full_map_ ; double publish_freq_; double leaf_size_;- 获取节点 NS 并删除前导字符 ns
- 连接帧名称字符串
odom_frame = ns + "/" + this->odom_frame;
- 创建定时器
abort_timer,实时检测 程序是否停止,停止则使ros停止 - 如果 发布整个地图时,则 创建发布地图定时器,按一定周期发布点云地图
PointCloud2
dlo::MapNode::MapNode(ros::NodeHandle node_handle) : nh(node_handle) {// 得到参数this->getParams();this->abort_timer = this->nh.createTimer(ros::Duration(0.01), &dlo::MapNode::abortTimerCB, this);if (this->publish_full_map_){this->publish_timer = this->nh.createTimer(ros::Duration(this->publish_freq_), &dlo::MapNode::publishTimerCB, this);}// 订阅关键帧,发布点云地图this->keyframe_sub = this->nh.subscribe("keyframes", 1, &dlo::MapNode::keyframeCB, this);this->map_pub = this->nh.advertise<sensor_msgs::PointCloud2>("map", 1);// 保存地图到 pcd 服务this->save_pcd_srv = this->nh.advertiseService("save_pcd", &dlo::MapNode::savePcd, this);// initialize map 初始化地图this->dlo_map = pcl::PointCloud<PointType>::Ptr (new pcl::PointCloud<PointType>);ROS_INFO("DLO Map Node Initialized");
}
关键帧回调 keyframeCB
步骤:
- 将关键帧数据格式由 ros->pcl
- 关键帧点云数据进行体素滤波降采样
- 关键帧加载到全局地图中
- 发布地图
void dlo::MapNode::keyframeCB(const sensor_msgs::PointCloud2ConstPtr& keyframe) {// convert scan to pcl format : ros type to pclpcl::PointCloud<PointType>::Ptr keyframe_pcl = pcl::PointCloud<PointType>::Ptr (new pcl::PointCloud<PointType>);pcl::fromROSMsg(*keyframe, *keyframe_pcl);// voxel filter : 该关键帧进行降采样this->voxelgrid.setLeafSize(this->leaf_size_, this->leaf_size_, this->leaf_size_);this->voxelgrid.setInputCloud(keyframe_pcl);this->voxelgrid.filter(*keyframe_pcl);// save keyframe to map 地图中保存该关键帧this->map_stamp = keyframe->header.stamp;*this->dlo_map += *keyframe_pcl;if (!this->publish_full_map_) {// 发布if (keyframe_pcl->points.size() == keyframe_pcl->width * keyframe_pcl->height) {sensor_msgs::PointCloud2 map_ros;pcl::toROSMsg(*keyframe_pcl, map_ros);map_ros.header.stamp = ros::Time::now();map_ros.header.frame_id = this->odom_frame;this->map_pub.publish(map_ros);}}}
保存地图 savePcd
步骤:
- 地图进行提速滤波后保存
bool dlo::MapNode::savePcd(direct_lidar_odometry::save_pcd::Request& req,direct_lidar_odometry::save_pcd::Response& res) {// 地图格式转换pcl::PointCloud<PointType>::Ptr m =pcl::PointCloud<PointType>::Ptr (boost::make_shared<pcl::PointCloud<PointType>>(*this->dlo_map));float leaf_size = req.leaf_size;std::string p = req.save_path;std::cout << std::setprecision(2) << "Saving map to " << p + "/dlo_map.pcd" << "... "; std::cout.flush();// voxelize map 地图进行体素滤波pcl::VoxelGrid<PointType> vg;vg.setLeafSize(leaf_size, leaf_size, leaf_size);vg.setInputCloud(m);vg.filter(*m);// save map 保存地图int ret = pcl::io::savePCDFileBinary(p + "/dlo_map.pcd", *m);res.success = ret == 0;if (res.success) {std::cout << "done" << std::endl;} else {std::cout << "failed" << std::endl;}return res.success;}
相关
点云曲面重建
-
知乎 here
-
PCL库种surface模块是用来对三维扫描获取的原始点云进行曲面重建的,该模块包含实现点云重建的基础算法与数据结构。
-
ConvexHull凸包、ConcaveHull凹包
ConvexHull凸包
-
Class pcl::ConcaveHull< PointInT > -
类ConvexHull实现了创建凸多边形的算法,该类的实现其实是Hull库实现的接口封装,ConcvexHull支持二维和三维点集。
-
#include <pcl/surface/convex_hull.h>
ConvexHull ()
//  空构造函数
virtual  ~ConvexHull ()
//  空析构函数
void  reconstruct (PointCloud &points, std::vector< pcl::Vertices > &polygons)
//  计算所有输入点的凸多边形,参数 points存储最终产生的凹多边形上的顶点,参数 polygons存储一系列顶点集,每个顶点集构成的一个多边形,Vertices数据结构包含一组点的索引,索引是point中的点对应的索引。
void  reconstruct (PointCloud &points)
//  计算所有输入点的凸多边形﹐输出的维数取决于输入的维数是二维或三维,输出结果为多边形顶点并存储在参数output中。
void  setComputeAreaVolume (bool value)
//  是否计算凸多边形的面积和体积,如果参数value为真,调用qhull库计算凸多边形的总面积和总体积。为节省计算资源,参数value缺省值为false。
double  getTotalArea () const
//  获取凸包的总面积,如果 setComputeAreaVolume设置为真时,才会有有效输出。
double  getTotalVolume () const
//  获取凸包的总体积,如果 setComputeAreaVolume设置为真时,才会有有效输出。
void  setDimension (int dimension)
//  设置输入数据的维数(二维或三维),参数dimension为设置输入数据的维度﹐如果没有设置,输入数据的维度将自动根据输入点云设置。
int  getDimension () const
//  返回计算得到多边形的维数(二维或三维)。
void  getHullPointIndices (pcl::PointIndices &hull_point_indices) const
//  检索凸包的输入点云的索引。
ConcaveHull凹包
-
类ConcaveHull实现了创建凹多边形的算法,该类的实现其实是Hull库实现的接口封装,ConcaveHull支持二维和三维点集。
-
#include <pcl/surface/concave_hull.h>
ConcaveHull ()
//  空构造函数
virtual  ~ConcaveHull ()
//  空析构函数
void  setSearchMethod (const KdTreePtr &tree)
//  设置搜索时所用的搜索机制,参数tree指向搜索时所用的搜索对象,例如kd-tree、octree等对象。
virtual void  setInputCloud (const PointCloudConstPtr &cloud)
//  设置输入点云,参数cloud 为输入点云的共享指针引用。
virtual void  setIndices (const IndicesPtr &indices)
//  为输入点云提供点云索引向量的指针。
virtual void  setIndices (const IndicesConstPtr &indices)
//  为输入点云提供点云索引向量的指针,该索引为常数,不能更改。
virtual void  setIndices (const PointIndicesConstPtr &indices)
//  为输入点云提供点云不变索引向量指针的指针。
virtual void  setIndices (size_t row_start, size_t col_start, size_t nb_rows, size_t nb_cols)
//  为输入点云中要用到的部分提供索引,该方法只能用于有序点云。参数row_start为行偏移、col_start为列偏移、nb_rows表示 row_start进行的行偏移数,nb_cols表示进行的列偏移数。
void  reconstruct (PointCloud &points, std::vector< pcl::Vertices > &polygons)
//  计算所有输入点的凹多边形,参数 points存储最终产生的凹多边形上的顶点,参数 polygons存储一系列顶点集,每个顶点集构成的一个多边形,Vertices数据结构包含一组点的索引,索引是point中的点对应的索引。
void  reconstruct (PointCloud &output)
//  计算所有输入点的凹多边形﹐输出的维数取决于输入的维数是二维或三维,输出结果为多边形顶点并存储在参数output中。
void  setAlpha (double alpha)
//  设置alpha值,参数alpha限制voronoi图中多边形边长的长短(边长越短多边形越细分),alpha值是一个非零的正值,定义了voronoi图中多边形顶点到中心点的最大距离。
double  getAlpha ()
//  获取alpha值
void  setVoronoiCenters (PointCloudPtr voronoi_centers)
//  设置参数voronoi_centers,如果设置,最终产生的凹多边形对应的voronoi图中的多边形的中心将被存储在参数voronoi_centers中。
void  setKeepInformation (bool value)
//  设置参数keep_information,如果keep_information为真,凹多边形中的顶点就保留其他信息,如 RGB值、法线等。
int  getDim () const
//  返回计算得到多边形的维数(二维或三维)。
int  getDimension () const
//  返回计算得到多边形的维数(二维或三维)。
void  setDimension (int dimension)
//  设置输入数据的维数(二维或三维),参数dimension为设置输入数据的维度﹐如果没有设置,输入数据的维度将自动根据输入点云设置。
void  getHullPointIndices (pcl::PointIndices &hull_point_indices) const
//  检索凸包的输入点云的索引。
End
相关文章:

DLO-SLAM代码阅读
文章目录DLO-SLAM点评代码解析OdomNode代码结构主函数 main激光回调函数 icpCB初始化 initializeDLO重力对齐 gravityAlign点云预处理 preprocessPoints关键帧指标 computeMetrics设定关键帧阈值setAdaptiveParams初始化目标数据 initializeInputTarget设置源数据 setInputSour…...
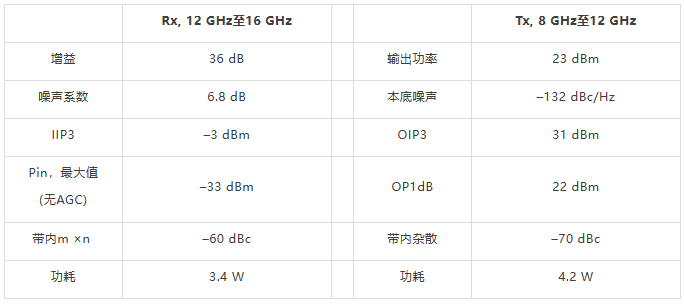
X和Ku波段小尺寸无线电设计
卫星通信、雷达和信号情报(SIGINT)领域的许多航空航天和防务电子系统早就要求使用一部分或全部X和Ku频段。随着这些应用转向更加便携的平台,如无人机(UAV)和手持式无线电等,开发在X和Ku波段工作,同时仍然保持极高性能水平的新型小尺寸、低功耗…...

推荐算法 - 汇总
本文主要对推荐算法整体知识点做汇总,做到总体的理解;深入理解需要再看专业的材料。推荐算法的意义推荐根据用户兴趣和行为特点,向用户推荐所需的信息或商品,帮助用户在海量信息中快速发现真正所需的商品,提高用户黏性…...
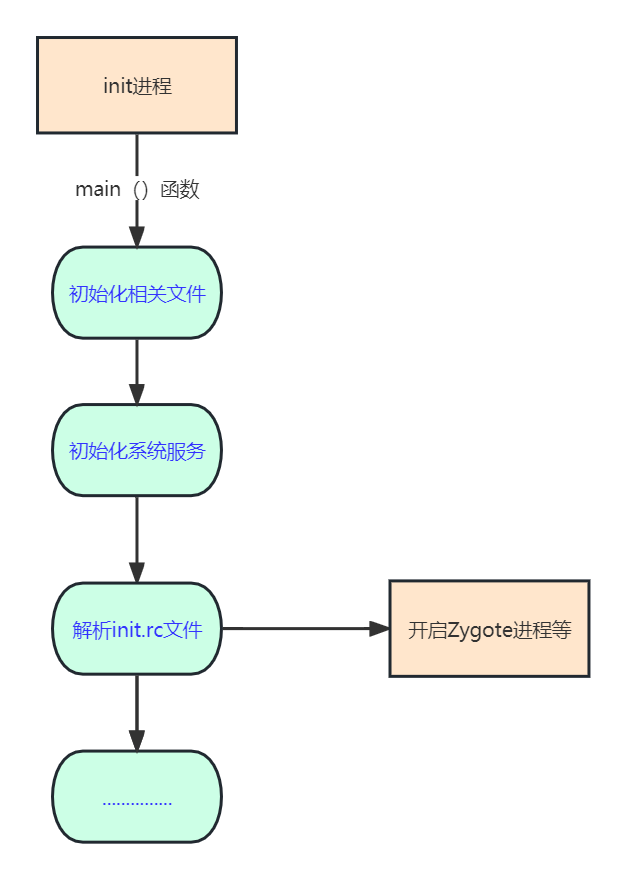
Android 系统的启动流程
前言:从开机的那一刻,到开机完成后launcher将所有应用进行图标展示的这个过程,大概会有哪一些操作?执行了哪些代码?作为Android开发工程师的我们,有必要好好的梳理一遍。既然要梳理Android系统的启动流程&a…...

自学5个月Java找到了9K的工作,我的方式值得大家借鉴 第二部分
我的学习心得,我认为能不能自学成功的要素有两点。 第一点就是自身的问题,虽然想要转行学习Java的人很多,但是非常强烈的想要转行学好的人是小部分。而大部分人只是抱着试试的心态来学习Java,这是完全不可能的。所以能不能学成Jav…...

Vue 3 第五章:reactive全家桶
文章目录1. reactive1.1. reactive函数创建一个响应式对象1.2. 修改reactive创建的响应式对象的属性2. readOnly2.1. 使用 readonly 函数创建一个只读的响应式对象2.2. 如何修改嵌套在只读响应式对象中的对象?3. shallowReactive3.1. 使用 shallowReactive 函数创建一个浅层响…...

【联机对战】微信小程序联机游戏开发流程详解
现有一个微信小程序叫中国象棋项目,棋盘类的单机游戏看着有缺少了什么,现在给补上了,加个联机对战的功能,增加了可玩性,对新手来说,实现联机游戏还是有难度的,那要怎么实现的呢,接下…...

优化基于axios接口管理的骚操作
优化基于axios接口管理的骚操作! 本文针对中大型的后台项目的接口模块优化,在不影响项目正常运行的前提下,增量更新。 强化功能 1.接口文件写法简化(接口模块半自动化生成) 2.任务调度、Loading调度(接口层…...
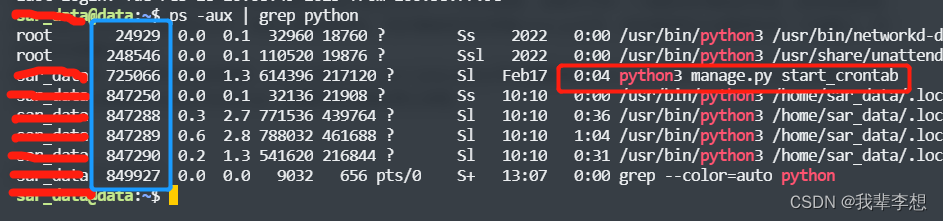
【Django功能开发】如何正确使用定时任务(启动、停止)
系列文章目录 【Django开发入门】ORM的增删改查和批量操作 【Django功能开发】编写自定义manage命令 文章目录系列文章目录前言一、django定时任务二、django-apscheduler基本使用1.安装django-apscheduler2.配置settings.py的INSTALLED_APPS3.通过命令生成定时记录表3.如何创…...

7个好用到爆的音频、配乐素材网站,BGM都在这里了
现在只要有一部手机,人人都能成为视频创作者。一个好的视频不能缺少的就是内容、配乐,越来越注重版权的当下,音效素材使用不当造成侵权的案例层出不穷。为了避免侵权,找素材让很多创作者很头疼。 今天我就整理了7个可以免费下载&…...
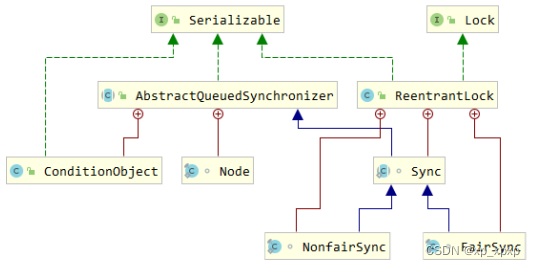
JUC(二)
1.可重入锁–ReentrantLock原理 1.1.非公平锁的实现原理 1.1.1.加锁解锁流程 1>.先从构造器开始看,默认为非公平锁,可以在构造函数中设置参数指定公平锁 public ReentrantLock() {sync = new NonfairSync(); }public ReentrantLock...
ATS认证教学
我用的版本是ATS7.11、系统版本是用最新的ios13.2.1 定义 ATS旨在分析通过UART、USB和蓝牙传输传输的iAP流量、通过USB和无线(蓝牙和Wi-Fi)传输的CarPlay流量、通过Wi-Fi传输的AirPlay 2流量以及闪电音频流量。 ATS是Apple’s Accessory Test System的…...
【操作系统】进程管理
进程与线程 1. 进程 进程是资源分配的基本单位 进程控制块 (Process Control Block, PCB) 描述进程的基本信息和运行状态,所谓的创建进程和撤销进程,都是指对 PCB 的操作。 下图显示了 4 个程序创建了 4 个进程,这 4 个进程可以并发地执行…...

一分钟掌握技术术语:API(接口)
很多产品经理在项目开发过程中经常听到:你调我这个接口就好了;这个功能你写个接口给我;有什么不懂的就看下API接口文档。 开发经常说的接口是什么意思呢?术语解释:API(Application Programming Interface&…...
RabbitMQ之交换机
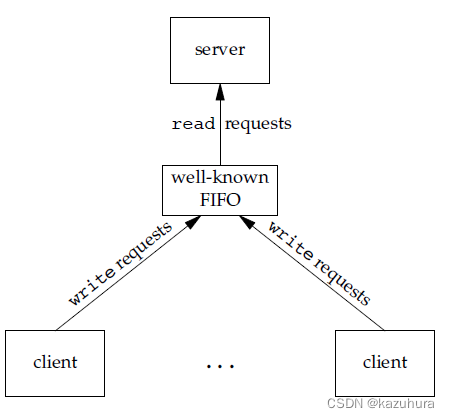
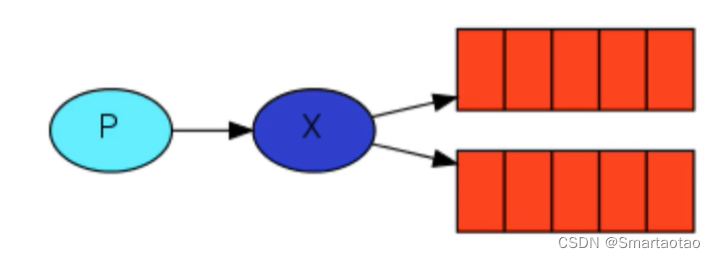
交换机 在上一节中,我们创建了一个工作队列。我们假设的是工作队列背后,每个任务都恰好交付给一个消费者(工作进程)。在这一部分中,我们将做一些完全不同的事情-我们将消息传达给多个消费者。这种模式称为“发布/订阅”. 为了说明这种模式,我们将构建一个简单的日志系统。它…...
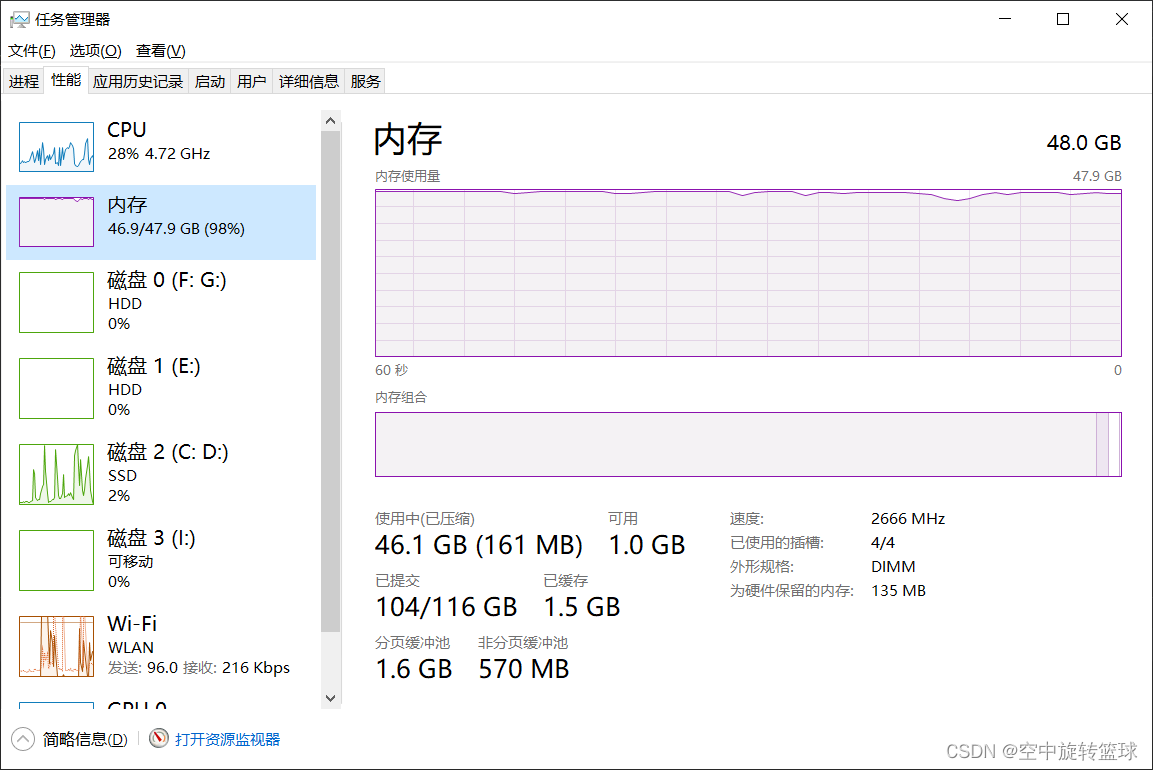
Tensorflow深度学习对遥感图像分类,内存不够怎么办?
问题描述在使用Tensorflow-cpu对图像分类的时候,在预读数据过程中,由于数据量过大,内存不足,导致计算失败。使用环境:win10系统 Pycharm tensorflow-cpu2.5.0 CPU: i7 8700 内存64G图1 CPU配置图图2 内存信息图使用数据…...

基础存贮模型介绍
基础存贮模型 这里主要讨论在需求量稳定的情况下,贮存量需要多少的问题。当贮存量过大时,会提高库存成本,也会造成积压资金;当贮存量过小时,会导致一次性订购费用增加,或者不能及时满足需求。 下面讨论不允…...

JNDIExploit使用方法
JNDIExploit 一款用于 JNDI注入 利用的工具,大量参考/引用了 Rogue JNDI 项目的代码,支持直接植入内存shell,并集成了常见的bypass 高版本JDK的方式,适用于与自动化工具配合使用。 对 feihong-cs 大佬的项目https://github.com/fe…...

建议一般人不要全职做副业
欢迎关注勤于奋每天12点准时更新国外LEAD相关技术全职做国外LEAD,听起来不错,但是效果不一定好,没有自控力来全职做,基本要废了自己,最好抽时间来做。我现在就是全职做国外LEAD,外加其他一些项目࿰…...
pytorch入门6--数据分析(pandas)
pandas是基于Numpy构建的,提供了众多比NumPy更高级、更直观的数据处理功能,尤其是它的DataFrame数据结构,可以用处理数据库或电子表格的方式来处理分析数据。 使用Pandas前,需导入以下内容: import numpy as np from …...

UE5 BaseEditorSettings.ini加载原理与配置生效机制
1. 为什么你改了BaseEditorSettings.ini却没生效?——从UE5编辑器启动流程讲起很多人在UE5项目里折腾半天,把BaseEditorSettings.ini文件翻来覆去改了十几遍,重启编辑器后发现:缩放比例还是不对、网格间距没变、甚至“启用实时预览…...

OpenClaw技能安装失败全解析:从依赖冲突到网络问题的系统性解决方案
1. 项目概述:当技能“卡住”时,我们遇到了什么?最近在折腾OpenClaw这类开源AI助手平台时,不少朋友都踩进了同一个坑:从官方市场或者第三方渠道找到了心仪的技能(Skill),点击“安装”…...

机器学习与深度学习在地球物理勘探中的应用:基于电阻率数据预测极化率模型
1. 项目概述与核心价值在花岗岩这类地质条件复杂的地区搞勘探,最头疼的就是地下情况“看不清”。传统的电阻率(ERT)和激发极化(IP)联合反演,就像用一把刻度模糊的尺子去量一块表面坑洼不平的石头——面对高…...

机器学习模型评估中的构念效度:超越基准测试分数的科学推断
1. 项目概述与核心问题在机器学习的日常研究和工程实践中,我们每天都在和各种各样的基准测试(Benchmark)打交道。无论是为了比较新提出的ResNet变体在ImageNet上的Top-1准确率,还是评估一个大型语言模型在MMLU上的常识推理能力&am…...

深圳实体门店有必要做GEO AI代运营吗
深圳实体门店有必要做GEO AI代运营吗一、开篇引言2026年深圳本地实体商业竞争进入白热化阶段,全城数百万家线下实体门店涵盖本地生活、家装工装、汽车服务、餐饮娱乐、教育培训等全品类,传统线下地推、门店自然客流、传统团购平台引流效果持续下滑&#…...
)
Sora 2原生接入Unity 6.0:5步完成神经渲染管线嵌入,实测帧率提升47%(附GitHub认证插件)
更多请点击: https://kaifayun.com 第一章:Sora 2与Unity整合 Sora 2作为新一代AI视频生成引擎,其开放API设计天然支持与实时3D引擎的深度协同。Unity 2023.2版本通过URP(Universal Render Pipeline)与C# Job System提…...

FM3773 低功耗离线式恒流/恒压 PSR 控制器
概述 FM3773 是一种高性能的交流/直流用于电池充电器和适配器的电源控制器,内置 850V 功率三极管。该设备采用脉冲频率调制(PFM)的方法来建立非连续导通模式(DCM)反激式电源。 FM3773 提供精确的恒定电压,恒…...

告别CAJ格式困扰:3分钟学会用开源工具将知网文献转为PDF
告别CAJ格式困扰:3分钟学会用开源工具将知网文献转为PDF 【免费下载链接】caj2pdf Convert CAJ (China Academic Journals) files to PDF. 转换中国知网 CAJ 格式文献为 PDF。佛系转换,成功与否,皆是玄学。 项目地址: https://gitcode.com/…...

CANoe诊断测试没CDD文件怎么办?手把手教你用Fault Memory窗口和CAPL脚本读取解析DTC故障码
CANoe诊断测试无CDD文件的实战解决方案:从Fault Memory到CAPL脚本全解析当CDD文件缺失或定义不清晰时,诊断测试工程师常常陷入困境。本文将深入探讨如何利用Fault Memory窗口的基础功能,并通过CAPL脚本实现更灵活、更强大的故障码读取与解析方…...

破解材料数据荒:合成数据与随机森林预测聚合物阻燃性能
1. 项目概述与核心挑战在材料研发领域,尤其是涉及公共安全的聚合物阻燃性研究,传统实验方法正面临巨大瓶颈。想象一下,你是一位材料工程师,需要设计一种用于高铁内饰或高层建筑电缆护套的新型聚合物,其阻燃性能必须满足…...