ApiSix的docker 容器化部署及使用
⼀.etcd安装
Docekr安装Etcd
环境准备
此处安装,是利⽤下载的 etcd 源⽂件,利⽤ docker build 构建完整镜像,具体操作如下:
1.环境准备
1.1. 新建⽂件夹
在磁盘某个路径下新建⼀个⽂件夹,⽤处操作 Dockerfile 和 源⽂件。
演⽰中的路径在 /data/docker-compose/etcd ,如特殊说明,否则都在此路径,以下简称
ETCD_HOME
1.2. 下载
在 ETCD_HOME 中下载最新版本,官⽅下载地址如下: wget https://github.com/etcd-io/etcd/
1.3. ⽂件解压
解压⽂件 tar.gz 得到 etcd-v3.4.20-linux-amd64 ⽂件夹。
tar -zxvf etcd-v3.4.20-linux-amd64.tar.gz
1.4. ⽂件拷⻉
在 etcd-v3.4.20-linux-amd64 ⽂件夹下,有 etcd 和 etcdctl 两个⽂件,拷⻉⾄与 etcd-v3.4.20-linuxamd64 同⼀级。
cp etcd-v3.4.20-linux-amd64/etcd etcd-v3.4.20-linux-amd64/etcdctl .

2.安装
2.1Dockerfile编写
FROM alpine:latest
ADD etcd /usr/local/bin/
ADD etcdctl /usr/local/bin/
RUN mkdir -p /var/etcd/
RUN mkdir -p /var/lib/etcd/
RUN echo 'hosts: files mdns4_minimal [NOTFOUND=return] dns mdns4' >> /etc/nsswitch.conf
EXPOSE 2379 2380
CMD ["/usr/local/bin/etcd"]
2.2构建镜像并推送
//打包为docker镜像
docker build -t 阿里云镜像仓库地址/xxxx/etcd:5.1.Z .
//将docker镜像推送到阿里云上
docker push  阿里云镜像仓库地址/xxxxx/etcd:5.1.Z
2.3启动镜像
docker run -d -v /usr/share/ca-certificates/:/etc/ssl/certs -p 4001:4001 -p 2380:2380 -p 2379:2379 \--name etcd 阿里云镜像仓库地址/xxxx/etcd:5.1.Z /usr/local/bin/etcd \-name etcd0 \-advertise-client-urls http://182.182.33.103:2379 \-listen-client-urls http://0.0.0.0:2379 \-initial-advertise-peer-urls http://0.0.0.0:2380 \-listen-peer-urls http://0.0.0.0:2380 \-initial-cluster-token etcd-cluster-1 \-initial-cluster etcd0=http://0.0.0.0:2380 \-initial-cluster-state new
name: 节点名称
advertise-client-urls: 知客户端url, 也就是服务的url 就是etcd部署在那台机器上就写那台的ip
initial-advertise-peer-urls: 告知集群其他节点url
listen-peer-urls: 监听URL,用于与其他节点通讯
initial-cluster-token: 集群的ID
initial-cluster: 集群中所有节点
3.下载并安装etcd-manager(etcd的可视化客户端)
https://etcdmanager.io/
二.安装apisix
1.首先在创建如下文件夹和文件:
文件地址:
/opt/apisix/apisix-conf/
上传config.yaml到上面的文件夹下
内容:主要修改的是etcd:host部分
#
# Licensed to the Apache Software Foundation (ASF) under one or more
# contributor license agreements.  See the NOTICE file distributed with
# this work for additional information regarding copyright ownership.
# The ASF licenses this file to You under the Apache License, Version 2.0
# (the "License"); you may not use this file except in compliance with
# the License.  You may obtain a copy of the License at
#
#     http://www.apache.org/licenses/LICENSE-2.0
#
# Unless required by applicable law or agreed to in writing, software
# distributed under the License is distributed on an "AS IS" BASIS,
# WITHOUT WARRANTIES OR CONDITIONS OF ANY KIND, either express or implied.
# See the License for the specific language governing permissions and
# limitations under the License.
#apisix:node_listen: 9080              # APISIX listening portenable_ipv6: falseenable_control: truecontrol:ip: "0.0.0.0"port: 9092deployment:admin:allow_admin:               # https://nginx.org/en/docs/http/ngx_http_access_module.html#allow- 0.0.0.0/0              # We need to restrict ip access rules for security. 0.0.0.0/0 is for test.admin_key:- name: "admin"key: edd1c9f034335f136f87ad84b625c8f1role: admin                 # admin: manage all configuration data- name: "viewer"key: 4054f7cf07e344346cd3f287985e76a2role: vieweretcd:host:                           # it's possible to define multiple etcd hosts addresses of the same etcd cluster.- "http://182.182.33.103:2379"          # multiple etcd addressprefix: "/apisix"               # apisix configurations prefixtimeout: 30                     # 30 secondsplugin_attr:prometheus:export_addr:ip: "0.0.0.0"port: 9091
/opt/apisix/dashboard_conf/
上传conf.yaml文件到上面的文件夹下
内容:主要修改etcd cluster
#
# Licensed to the Apache Software Foundation (ASF) under one or more
# contributor license agreements.  See the NOTICE file distributed with
# this work for additional information regarding copyright ownership.
# The ASF licenses this file to You under the Apache License, Version 2.0
# (the "License"); you may not use this file except in compliance with
# the License.  You may obtain a copy of the License at
#
#     http://www.apache.org/licenses/LICENSE-2.0
#
# Unless required by applicable law or agreed to in writing, software
# distributed under the License is distributed on an "AS IS" BASIS,
# WITHOUT WARRANTIES OR CONDITIONS OF ANY KIND, either express or implied.
# See the License for the specific language governing permissions and
# limitations under the License.
#conf:listen:host: 0.0.0.0     # `manager api` listening ip or host nameport: 9000          # `manager api` listening portallow_list:           # If we don't set any IP list, then any IP access is allowed by default.- 0.0.0.0/0etcd:endpoints:          # supports defining multiple etcd host addresses for an etcd cluster- "http://182.182.33.103:2379"# yamllint disable rule:comments-indentation# etcd basic auth info# username: "root"    # ignore etcd username if not enable etcd auth# password: "123456"  # ignore etcd password if not enable etcd authmtls:key_file: ""          # Path of your self-signed client side keycert_file: ""         # Path of your self-signed client side certca_file: ""           # Path of your self-signed ca cert, the CA is used to sign callers' certificates# prefix: /apisix     # apisix config's prefix in etcd, /apisix by defaultlog:error_log:level: warn       # supports levels, lower to higher: debug, info, warn, error, panic, fatalfile_path:logs/error.log  # supports relative path, absolute path, standard output# such as: logs/error.log, /tmp/logs/error.log, /dev/stdout, /dev/stderraccess_log:file_path:logs/access.log  # supports relative path, absolute path, standard output# such as: logs/access.log, /tmp/logs/access.log, /dev/stdout, /dev/stderr# log example: 2020-12-09T16:38:09.039+0800        INFO        filter/logging.go:46        /apisix/admin/routes/r1        {"status": 401, "host": "127.0.0.1:9000", "query": "asdfsafd=adf&a=a", "requestId": "3d50ecb8-758c-46d1-af5b-cd9d1c820156", "latency": 0, "remoteIP": "127.0.0.1", "method": "PUT", "errs": []}security:# access_control_allow_origin: "http://httpbin.org"# access_control_allow_credentials: true          # support using custom cors configration# access_control_allow_headers: "Authorization"# access_control-allow_methods: "*"# x_frame_options: "deny"content_security_policy: "default-src 'self'; script-src 'self' 'unsafe-eval' 'unsafe-inline'; style-src 'self' 'unsafe-inline'; frame-src *"  # You can set frame-src to provide content for your grafana panel.authentication:secret:secret              # secret for jwt token generation.# NOTE: Highly recommended to modify this value to protect `manager api`.# if it's default value, when `manager api` start, it will generate a random string to replace it.expire_time: 3600     # jwt token expire time, in secondusers:                # yamllint enable rule:comments-indentation- username: admin   # username and password for login `manager api`password: admin- username: userpassword: userplugins:                          # plugin list (sorted in alphabetical order)- api-breaker- authz-keycloak- basic-auth- batch-requests- consumer-restriction- cors# - dubbo-proxy- echo# - error-log-logger# - example-plugin- fault-injection- grpc-transcode- hmac-auth- http-logger- ip-restriction- jwt-auth- kafka-logger- key-auth- limit-conn- limit-count- limit-req# - log-rotate# - node-status- openid-connect- prometheus- proxy-cache- proxy-mirror- proxy-rewrite- redirect- referer-restriction- request-id- request-validation- response-rewrite- serverless-post-function- serverless-pre-function# - skywalking- sls-logger- syslog- tcp-logger- udp-logger- uri-blocker- wolf-rbac- zipkin- server-info- traffic-split
2.执行下载和启动docker的命令
docker run -d --name apisix -p 9080:9080 -p 9443:9443 -p 9180:9180 -v /opt/apisix/apisix-conf/config.yaml:/usr/local/apisix/conf/config.yaml:ro apache/apisix:latest
下面这是web端命令:
docker run -d --name apisix-dashboard -p 9000:9000 -v /opt/apisix/dashboard_conf/conf.yaml:/usr/local/apisix-dashboard/conf/conf.yaml apache/apisix-dashboard:3.0.0-alpine
容器启动成功后访问ApiSix仪表台,如下图成功访问
3.apisix代理地址的使用
配置上游:
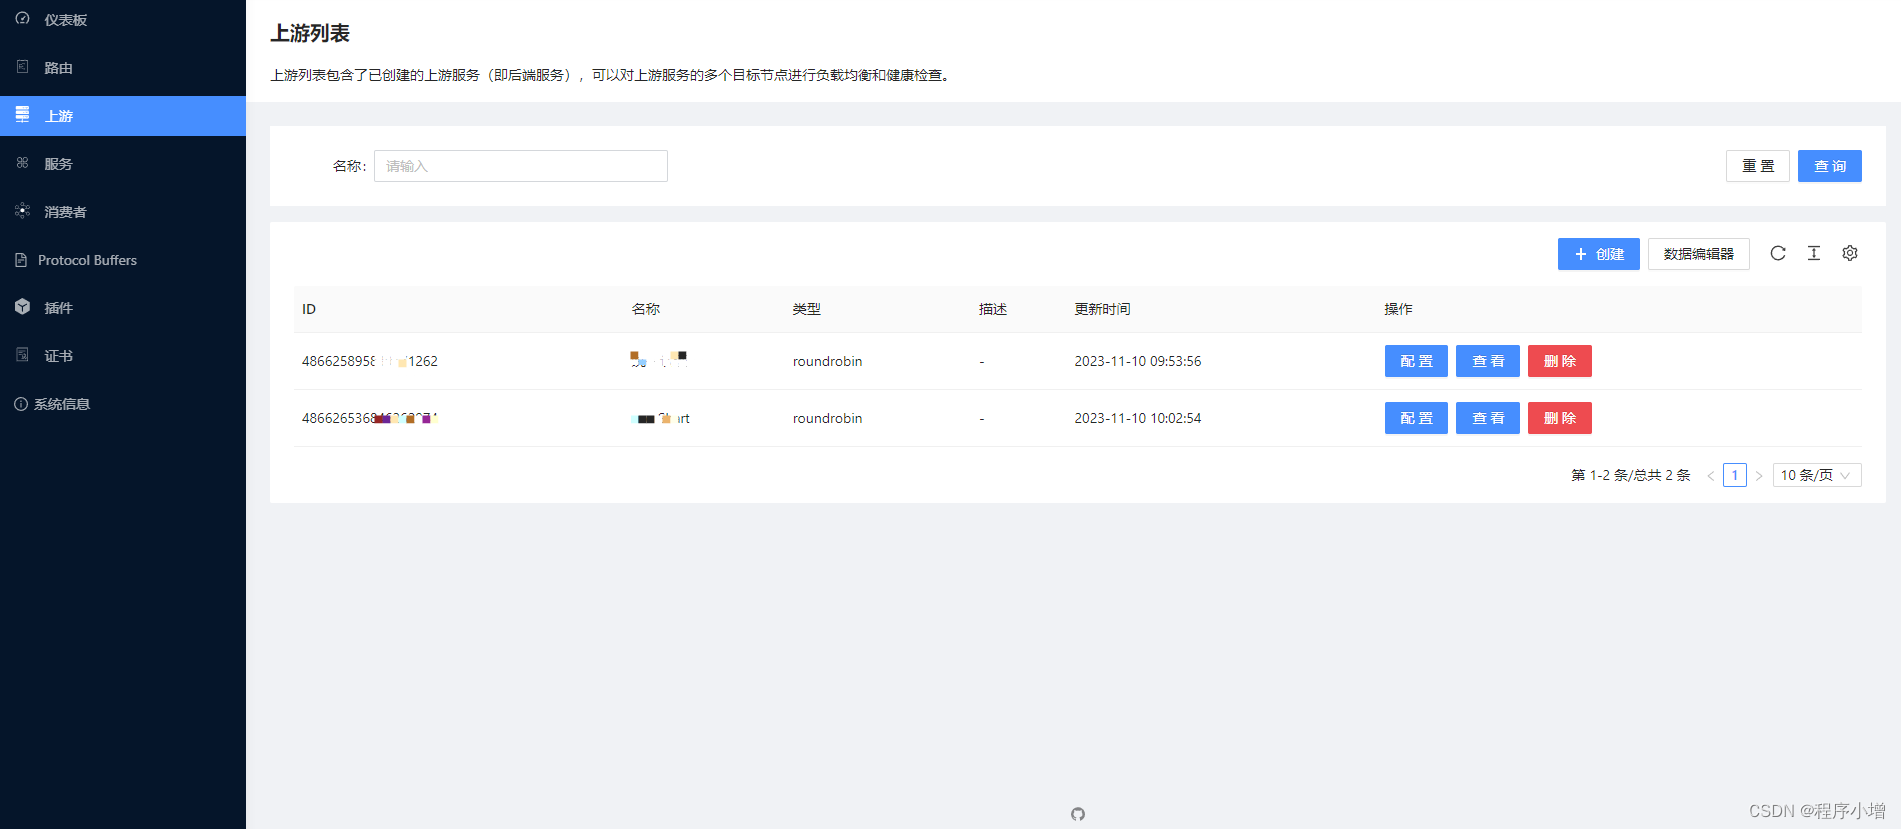
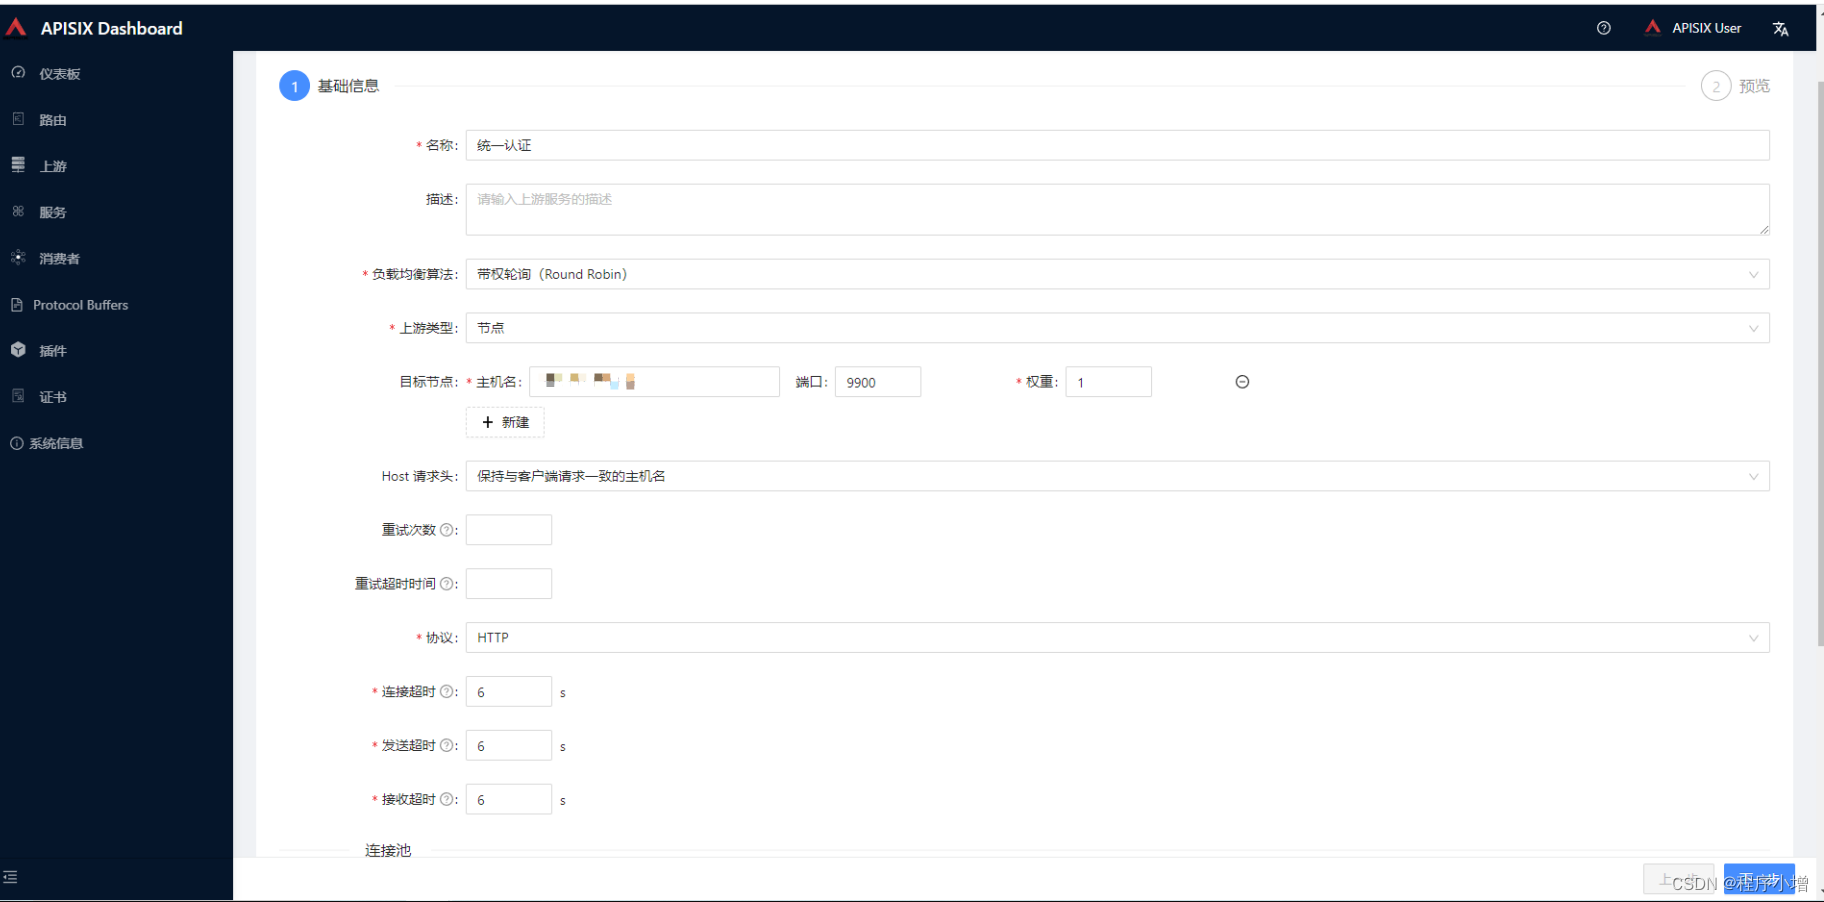
填写名称、可选择上游类型。这里选择的是节点,当然可以选择服务发现,但是需要配置。
创建完上游后可以创建路由

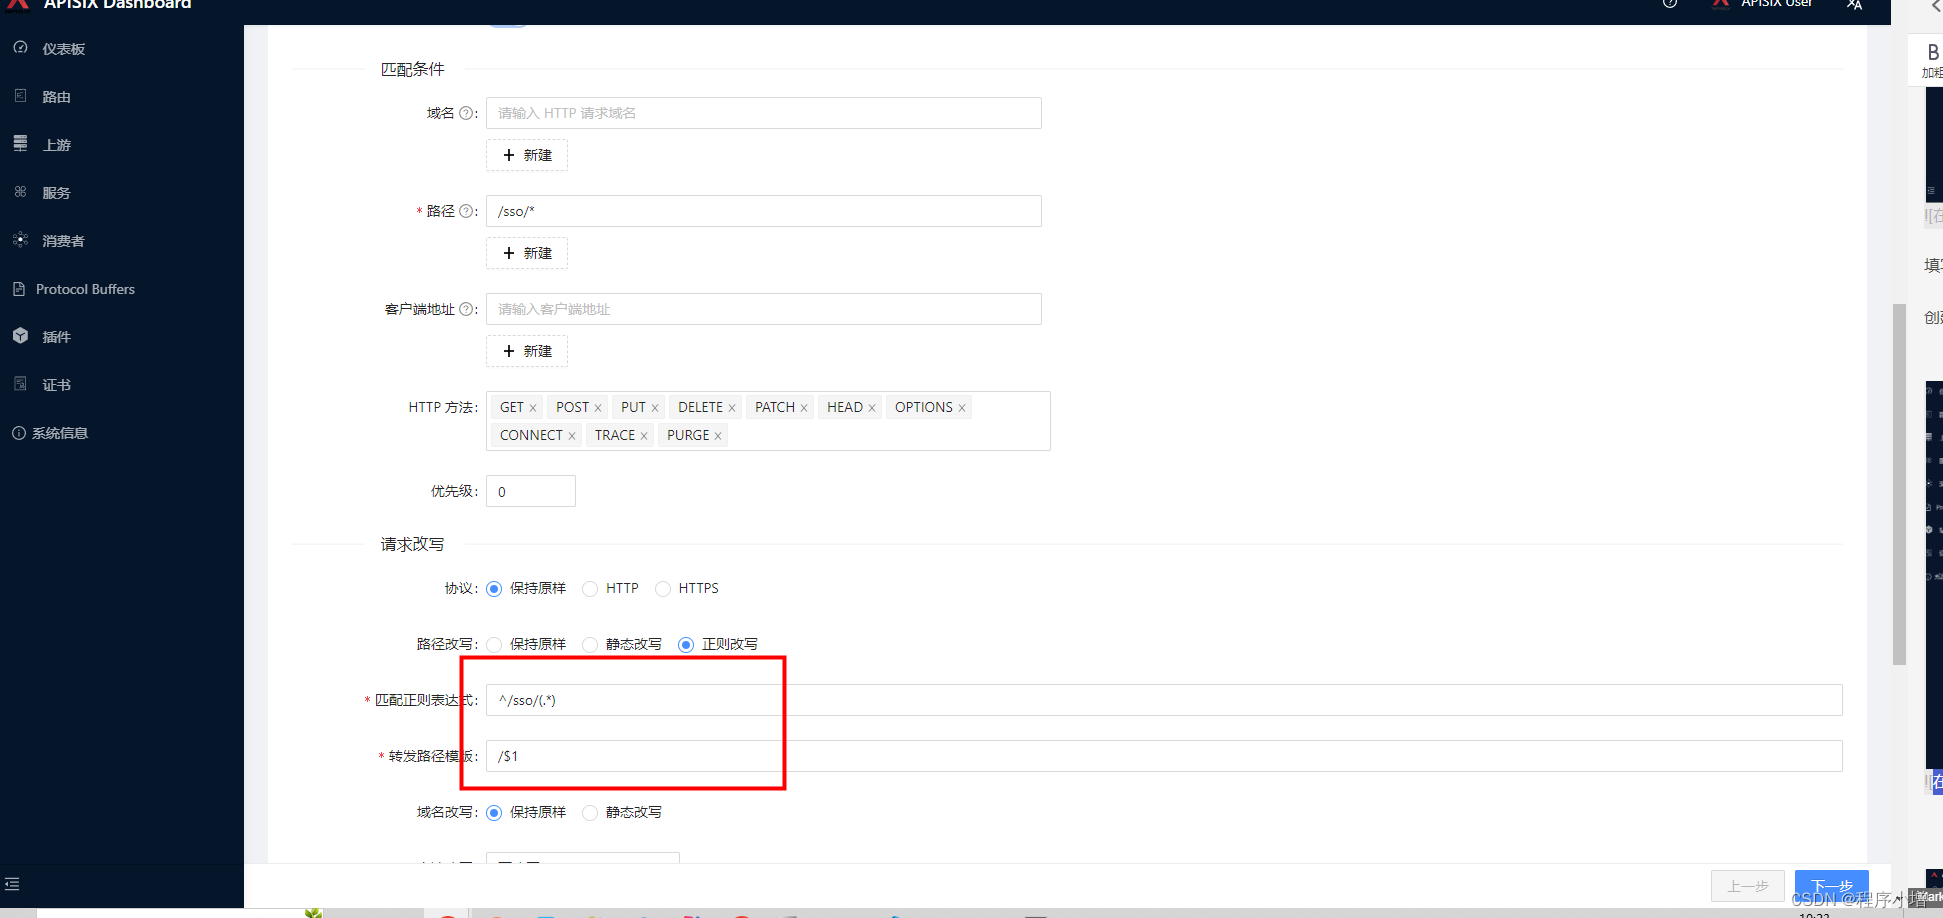
点击下一步选择上游服务

然后一直下一步到提交。
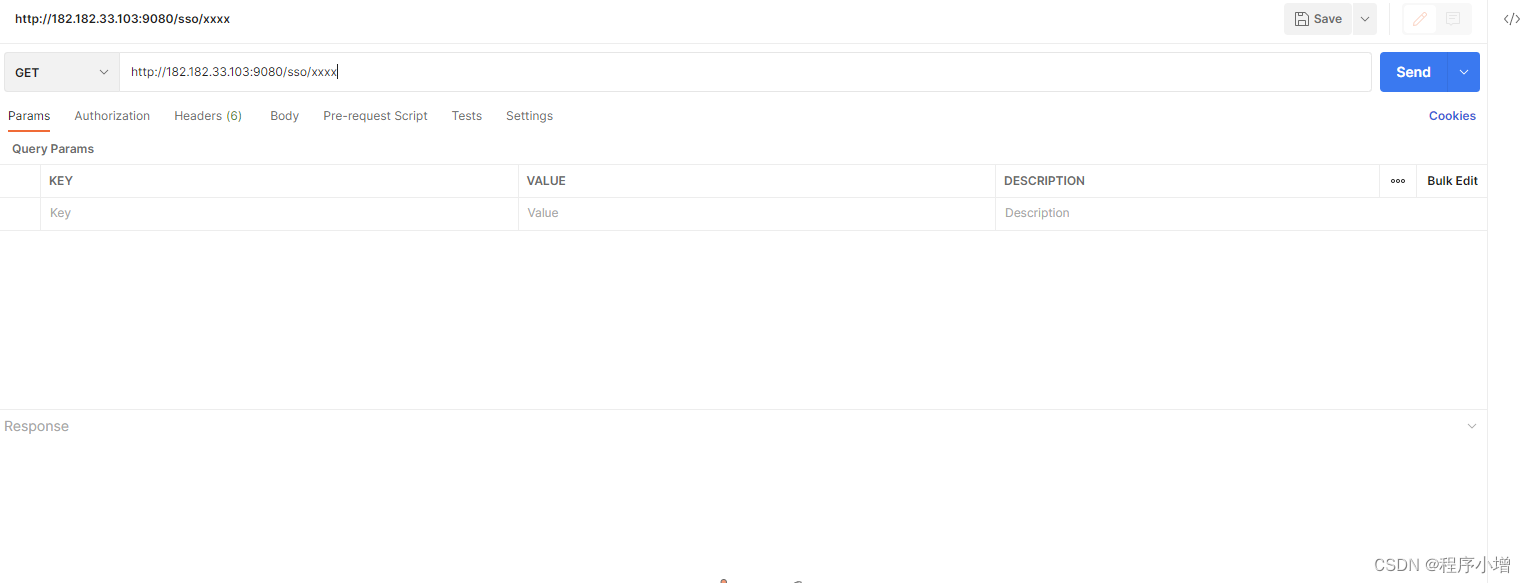
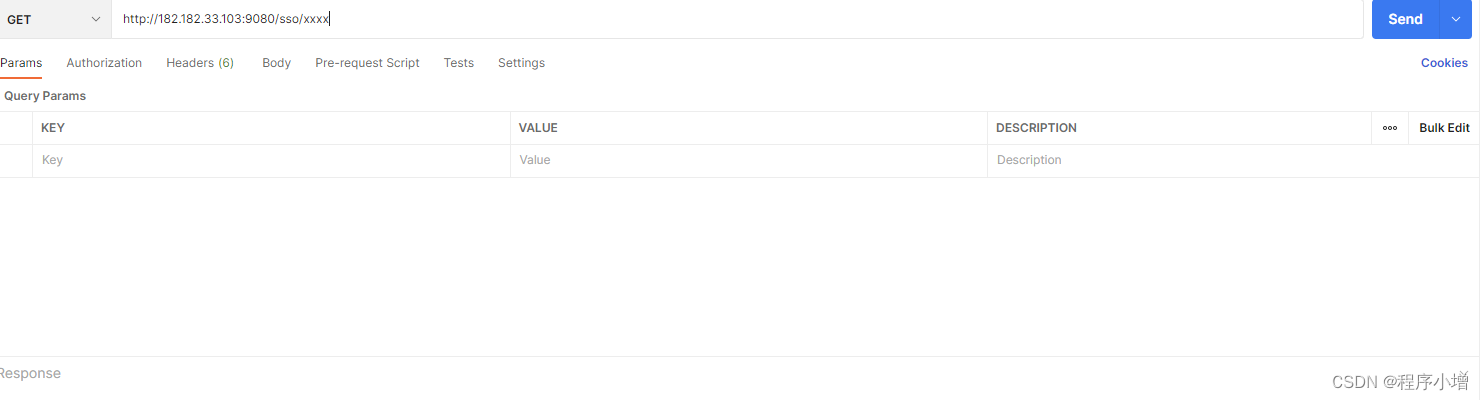
之后就可以打开postman进行测试了。
默认访问的端口是9080
apisix相关文档:
https://apisix.apache.org/zh/docs/apisix/getting-started/README/https://apisix.apache.org/zh/docs/
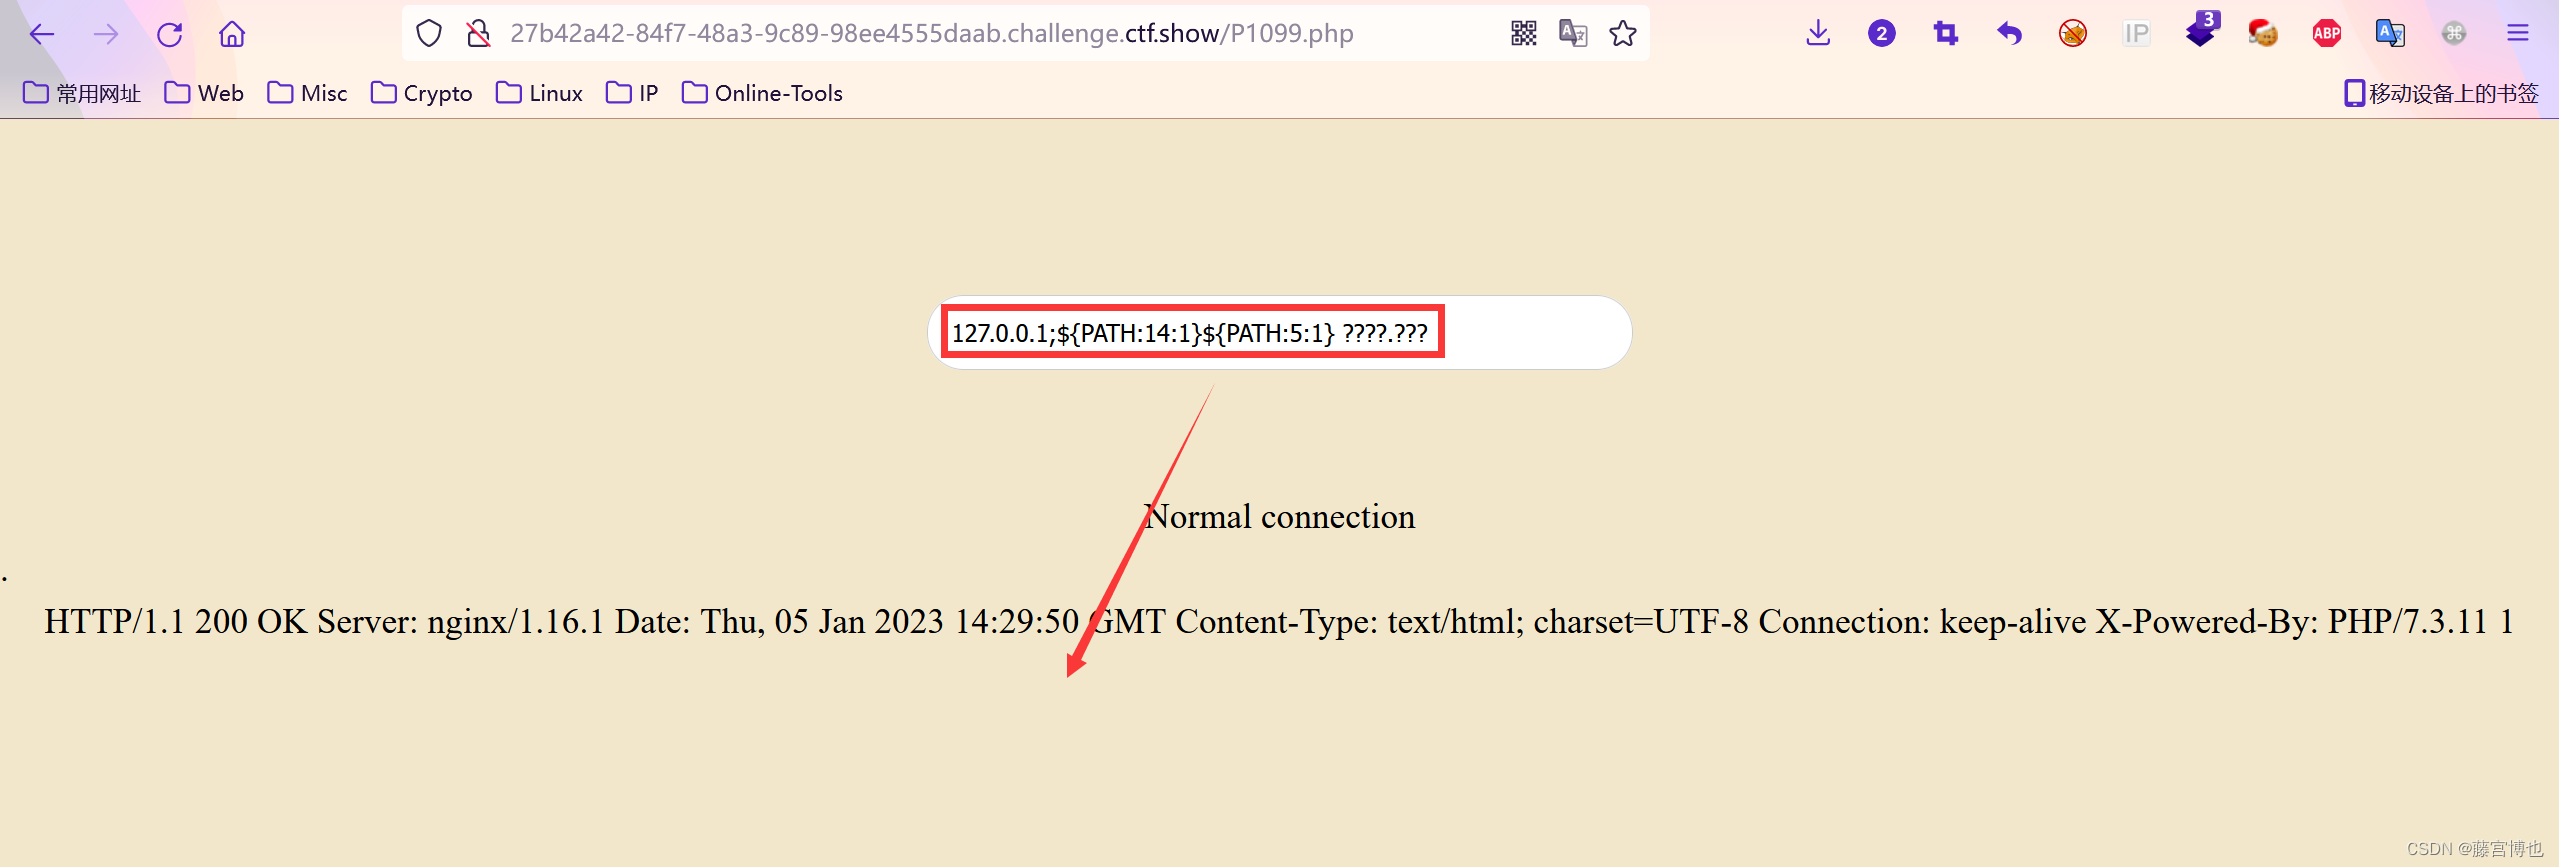
三.代理轮询的使用
1.上游类型为节点
配置上游。
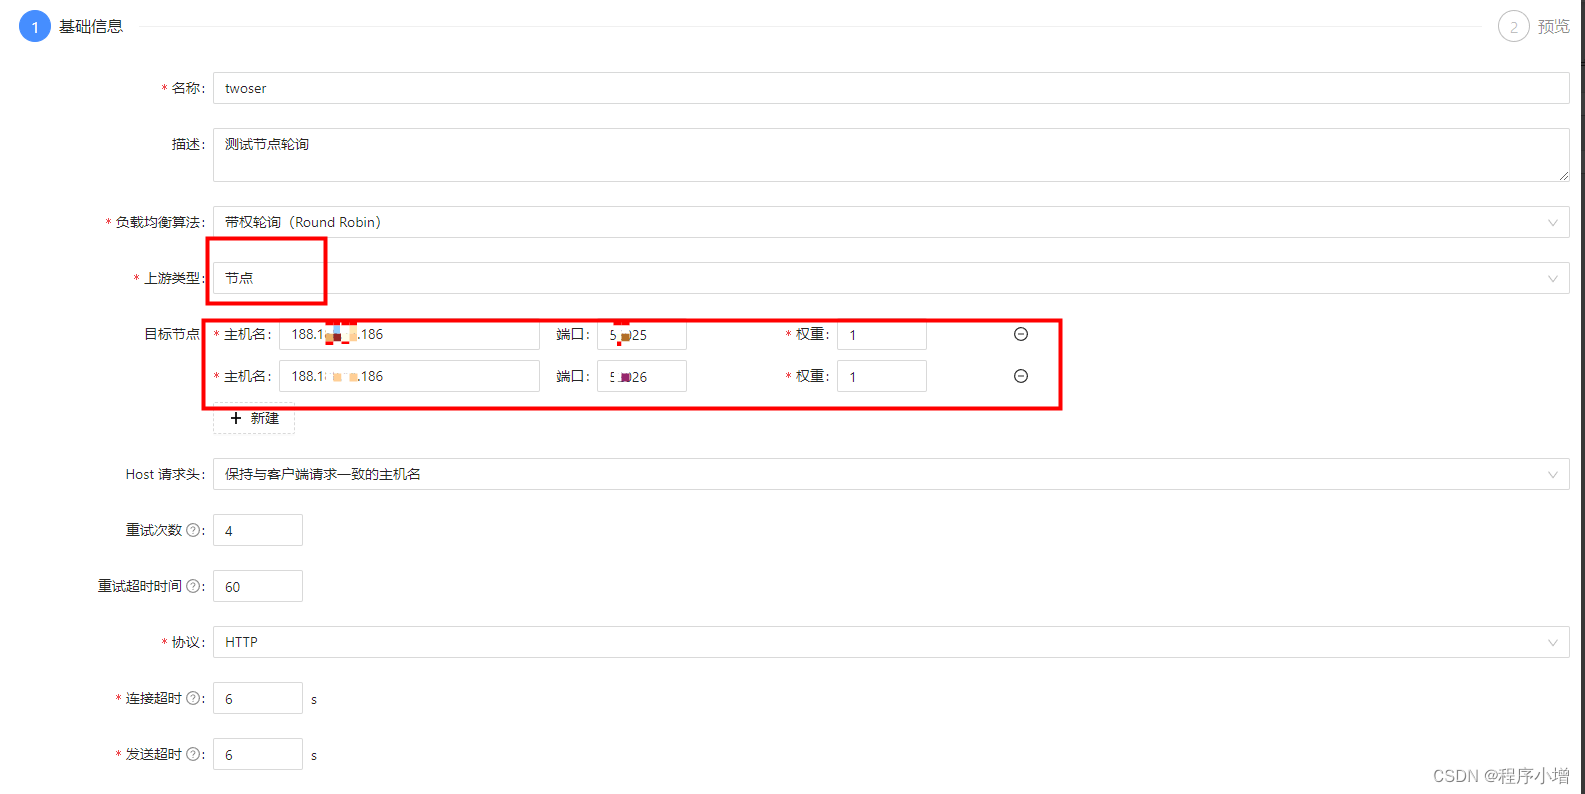
上述目标节点的配置其实是同一个后端服务的,只不过我在一台机器上无法使用相同的端口所以修改了一下端口,这个的含义就是我的一个后端服务做了集群部署,这样配置就可以轮询去访问多台服务器上的同一个后端服务。
上游配置完可以配置服务也可以直接配置路由,当配置服务后再配置路由绑定服务选择自己创建的服务。
2.服务发现的形式(这里以nacos注册中心为例)
服务发现的文章可以看看这篇:https://www.aneasystone.com/archives/2023/03/apisix-service-discovery.html
在/opt/apisix/apisix-conf/
的config.yaml文件中添加nacos配置
整体配置:
nacos:host:- "http://nacos:nacos@193.193.173.721:8848"prefix: "/nacos/v1/"fetch_interval: 30 # default 30 secweight: 100 # default 100timeout:connect: 2000 # default 2000 mssend: 2000 # default 2000 msread: 5000 # default 5000 ms
简洁配置:
discovery:nacos:host:- "http://193.193.173.721:8848"
官网文档地址:https://apisix.apache.org/zh/docs/apisix/discovery/nacos/
配置完成后重启apisix服务
配置上游

上游配置完可以配置服务也可以直接配置路由。
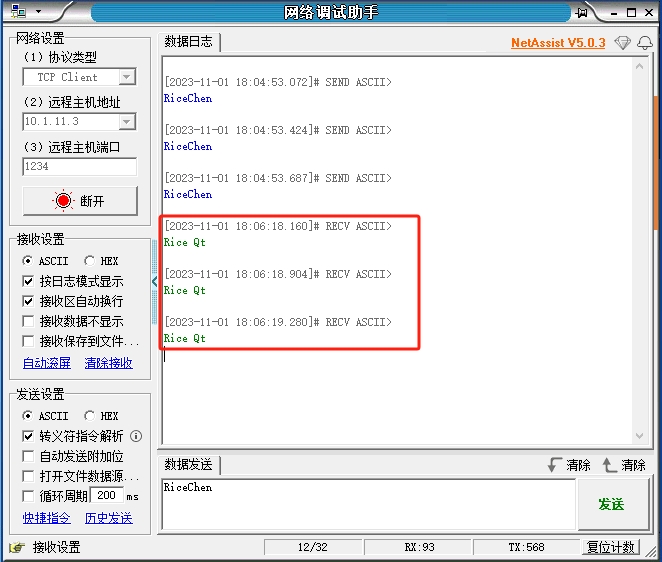
nacos截图
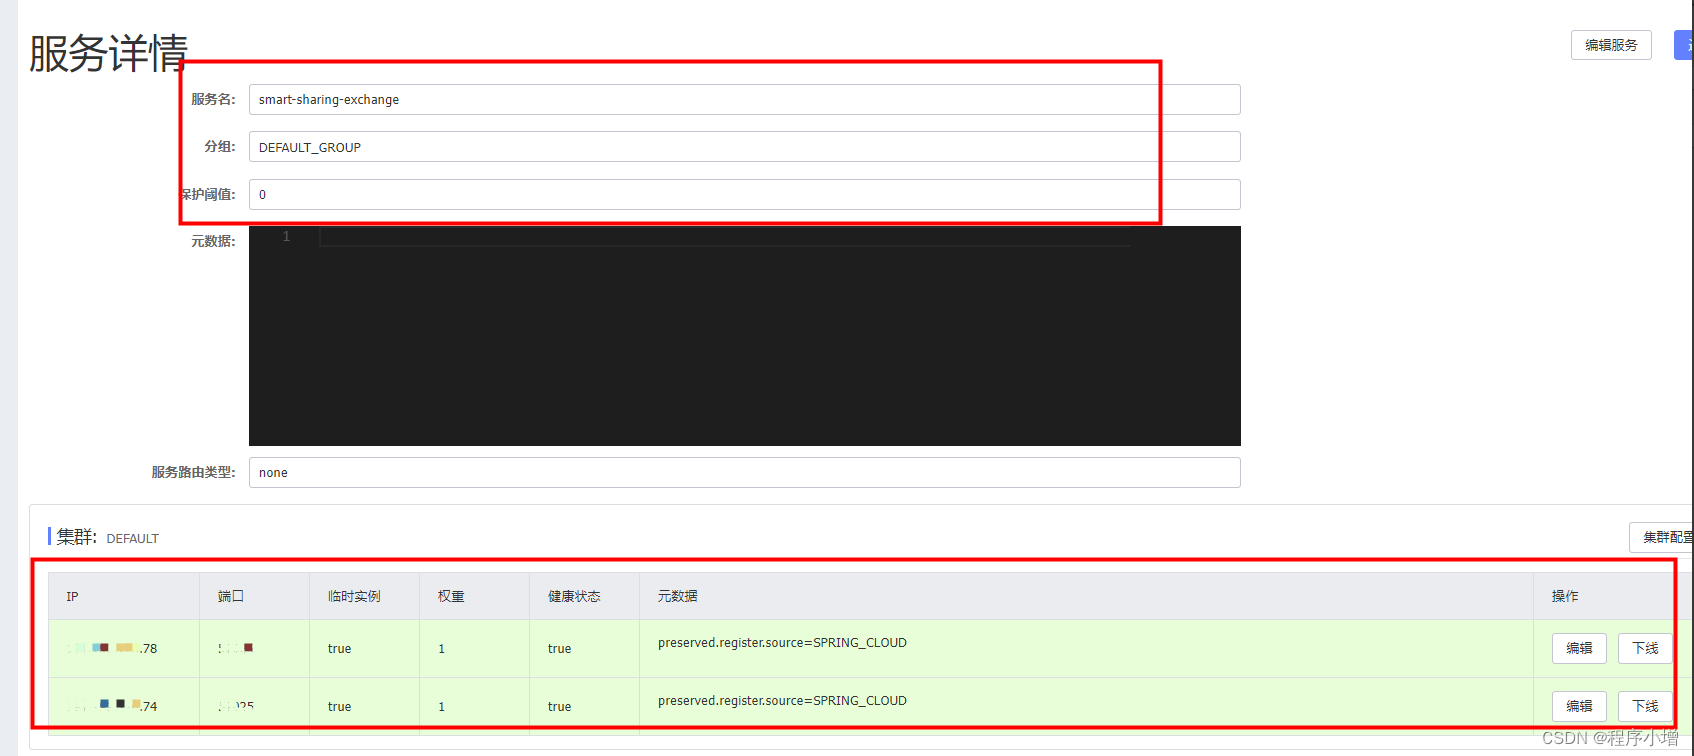
分别访问不同服务器上的同一个服务,发现可以做到轮询访问。
相关文章:
ApiSix的docker 容器化部署及使用
⼀.etcd安装 Docekr安装Etcd 环境准备 此处安装,是利⽤下载的 etcd 源⽂件,利⽤ docker build 构建完整镜像,具体操作如下: 1.环境准备 1.1. 新建⽂件夹 在磁盘某个路径下新建⼀个⽂件夹,⽤处操作 Dockerfi…...

第十节HarmonyOS 使用资源引用类型
Resource是资源引用类型,用于设置组件属性的值。推荐大家优先使用Resource类型,将资源文件(字符串、图片、音频等)统一存放于resources目录下,便于开发者统一维护。同时系统可以根据当前配置加载合适的资源,…...

ntopng如何将漏洞扫描与流量监控相结合,以提高网络安全性
来源:艾特保IT 虹科干货 | ntopng如何将漏洞扫描与流量监控相结合,以提高网络安全性 欢迎关注虹科,为您提供最新资讯! ntopng为人所知的“身份”是被动流量监控。然而,如今的ntopng6.0也进化出主动监控功能来…...
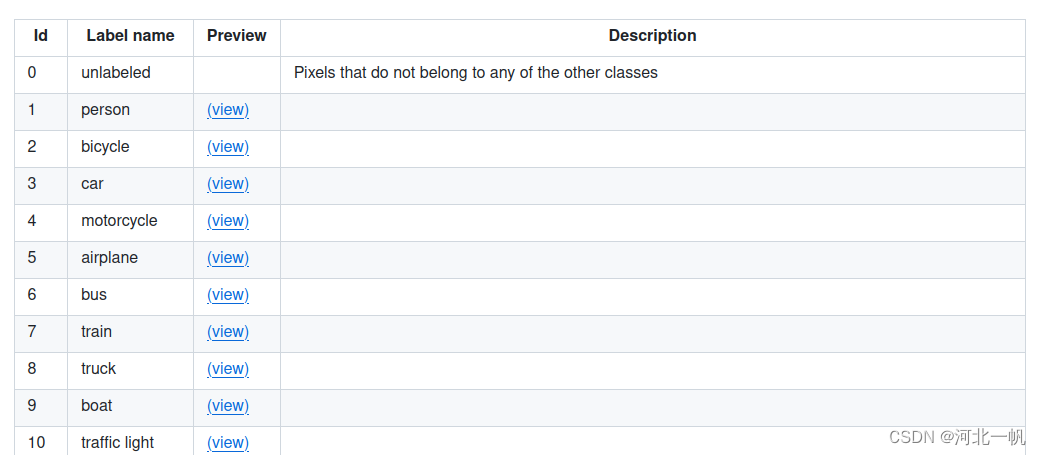
使用coco数据集进行语义分割(1):数据预处理,制作ground truth
如何coco数据集进行目标检测的介绍已经有很多了,但是关于语义分割几乎没有。本文旨在说明如何处理 stuff_train2017.json stuff_val2017.json panoptic_train2017.json panoptic_val2017.json,将上面那些json中的dict转化为图片的label mask&am…...

神经网络 模型表示2
神经网络 模型表示2 使用向量化的方法会使得计算更为简便。以上面的神经网络为例,试着计算第二层的值: 我们令 z ( 2 ) θ ( 1 ) x {{z}^{\left( 2 \right)}}{{\theta }^{\left( 1 \right)}}x z(2)θ(1)x,则 a ( 2 ) g ( z ( 2 ) ) {{a}…...

ubuntu使用SSH服务远程登录另一台设备
1、安装openssh-client和openssh-server 查看当前的ubuntu是否安装了ssh-server服务。默认只安装ssh-client服务。 dpkg -l | grep ssh查看有没有openssh-client的相关字眼。 2、安装ssh-server服务(受控制方) sudo apt-get install openssh-server再…...

读书笔记:《Effective Modern C++(C++14)》
Effective Modern C(C14) GitHub - CnTransGroup/EffectiveModernCppChinese: 《Effective Modern C》- 完成翻译 Deducing Types 模版类型推导: 引用,const,volatile被忽略数组名和函数名退化为指针通用引用&#…...

PCL 点云加权均值收缩
文章目录 一、简介二、实现代码三、实现效果参考资料一、简介 受到之前Matlab 加权均值质心计算(WMN)的启发,我们在计算每个点的加权质心时可以很容易的发现,他们这些点会受到周围邻近点密度的影响,最后会收缩到某一个区域,那么这个区域也必定是我们比较感兴趣的一些点,…...
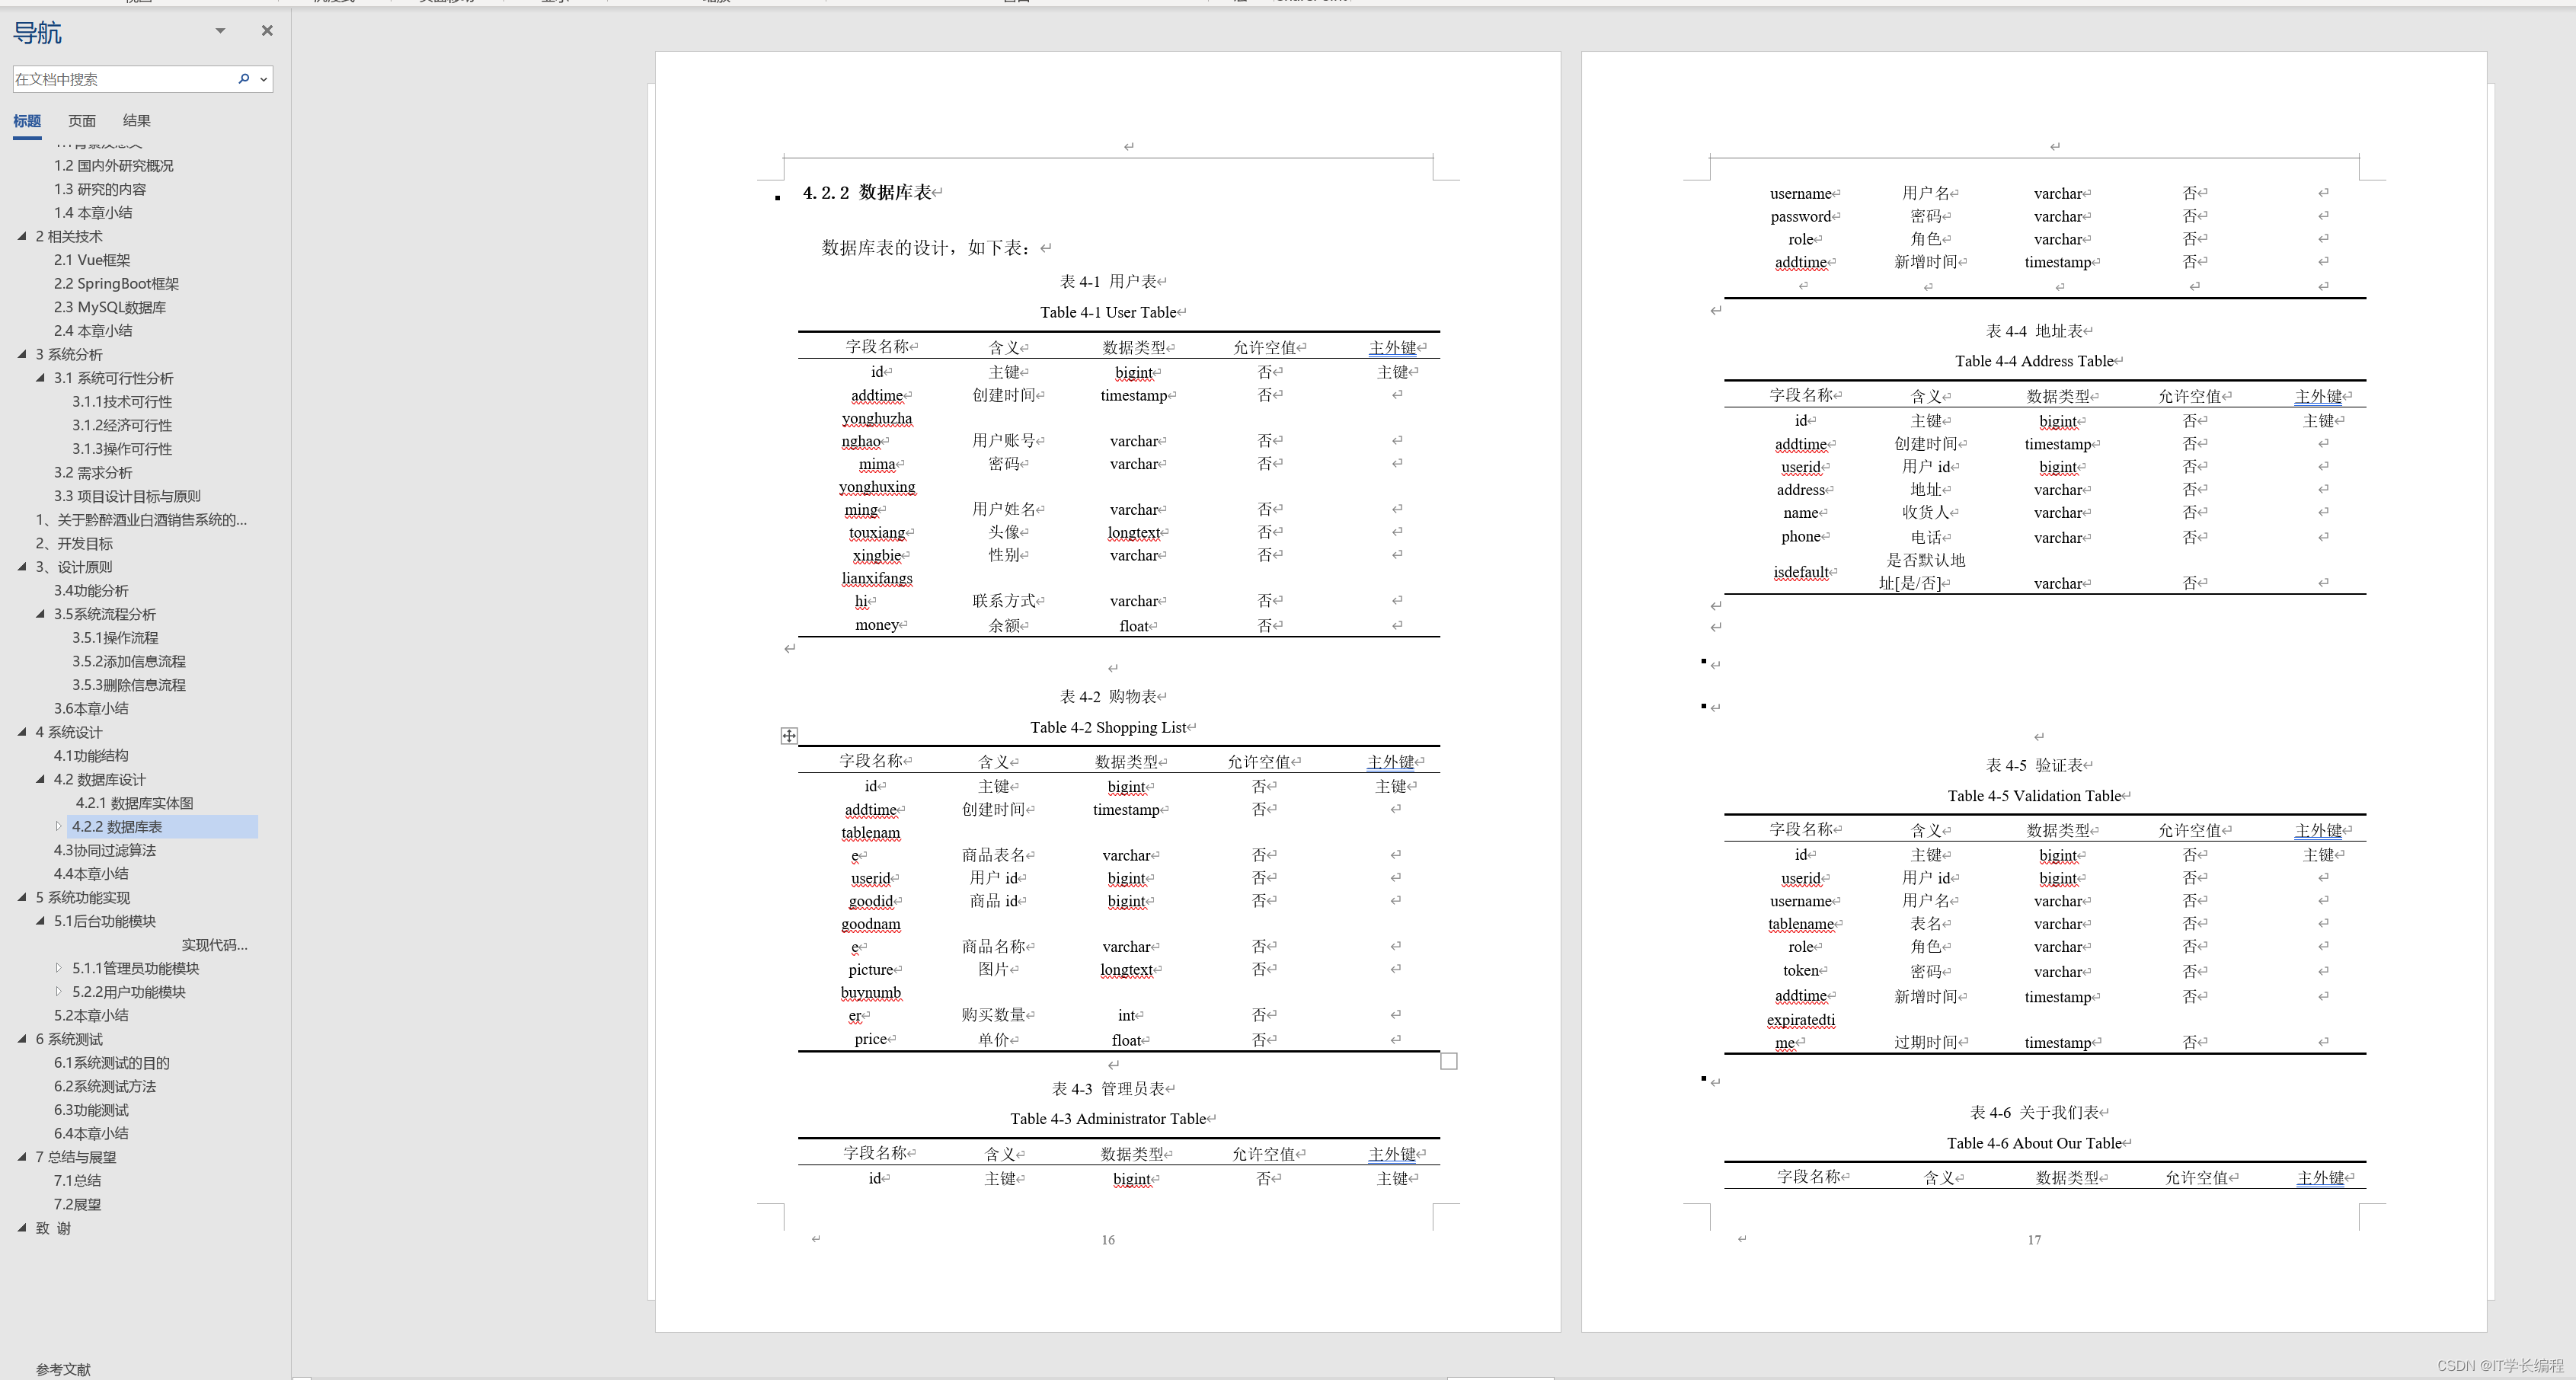
计算机毕业设计 基于协同推荐的白酒销售管理系统的设计与实现 Java实战项目 附源码+文档+视频讲解
博主介绍:✌从事软件开发10年之余,专注于Java技术领域、Python人工智能及数据挖掘、小程序项目开发和Android项目开发等。CSDN、掘金、华为云、InfoQ、阿里云等平台优质作者✌ 🍅文末获取源码联系🍅 👇🏻 精…...
:包含内嵌表单元素的表单)
React-hook-form-mui(五):包含内嵌表单元素的表单
前言 在上一篇文章中,我们介绍了react-hook-form-mui如何与与后端数据联调。在实际项目中,从后端获取的数据可能是复杂的数据对象,本文将介绍,如何通过react-hook-form-mui实现一个包含内嵌表单元素的表单 Demo 以下代码实现了…...
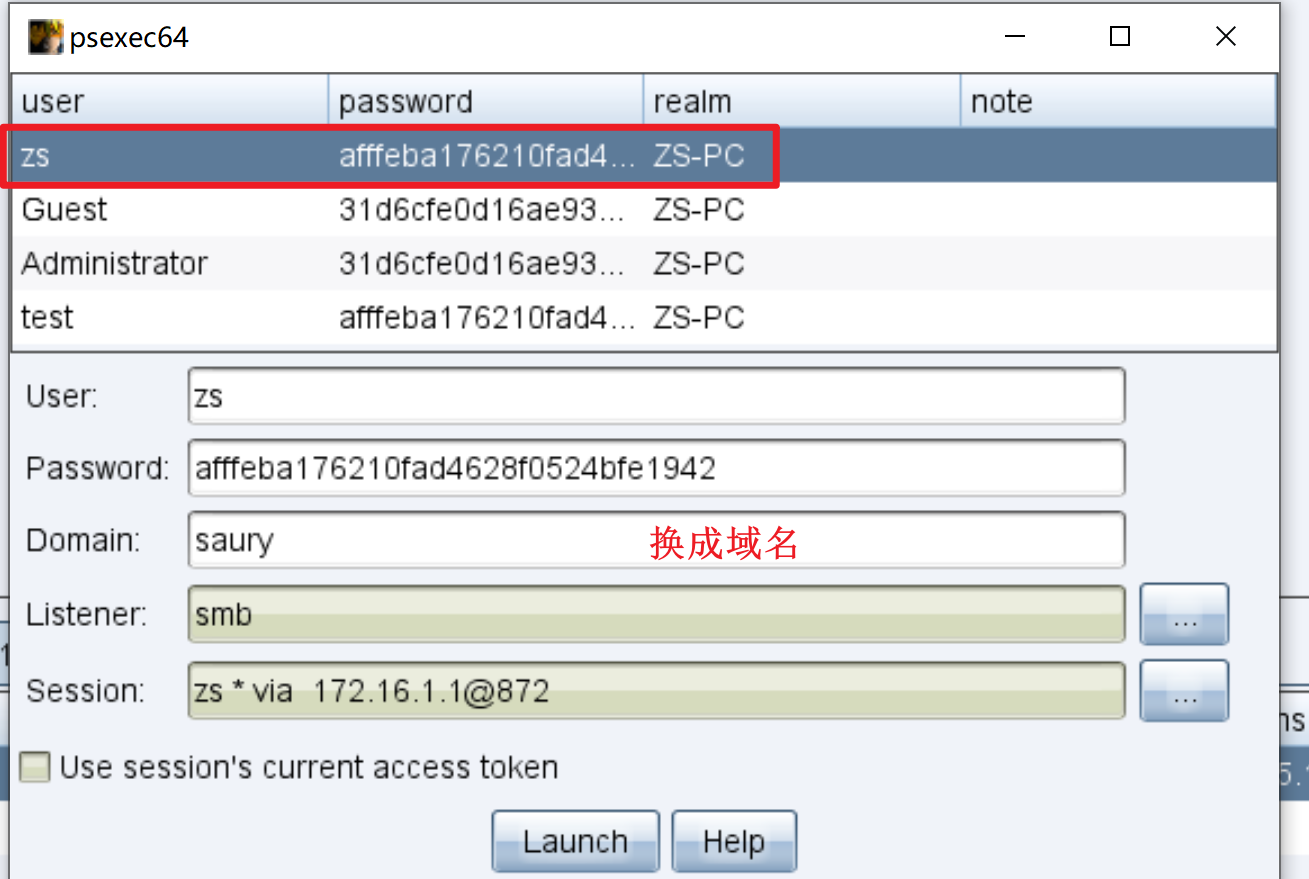
【内网安全】搭建网络拓扑,CS内网横向移动实验
文章目录 搭建网络拓扑 ☁环境CS搭建,木马生成上传一句话,获取WebShellCS上线reGeorg搭建代理,访问内网域控IIS提权信息收集横向移动 实验拓扑结构如下: 搭建网络拓扑 ☁ 环境 **攻击者win10地址:**192.168.8.3 dmz win7地址&…...

1、输入一行字符,分别统计出其中的英文字母、空格、数字和其他字符的个数。
1、输入一行字符,分别统计出其中的英文字母、空格、数字和其他字符的个数。 int main(){char str[N];int letter 0,space 0,digit 0, others 0;printf("请输入一行字符:");gets(str);for(int i0;str[i]!\0;i){if((a<str[i] && …...

戴尔科技推出全新96核Precision 7875塔式工作站
工作站行业一直是快节奏且充满惊喜的。在过去25年中,戴尔Precision一直处于行业前沿,帮助创作者、工程师、建筑师、研究人员等将想法变为现实,并对整个世界产生影响。工作站所发挥的作用至关重要,被视为化不可能为可能的必要工具。如今,人工智能(AI)和生成式AI(GenAI)的浪潮正在…...
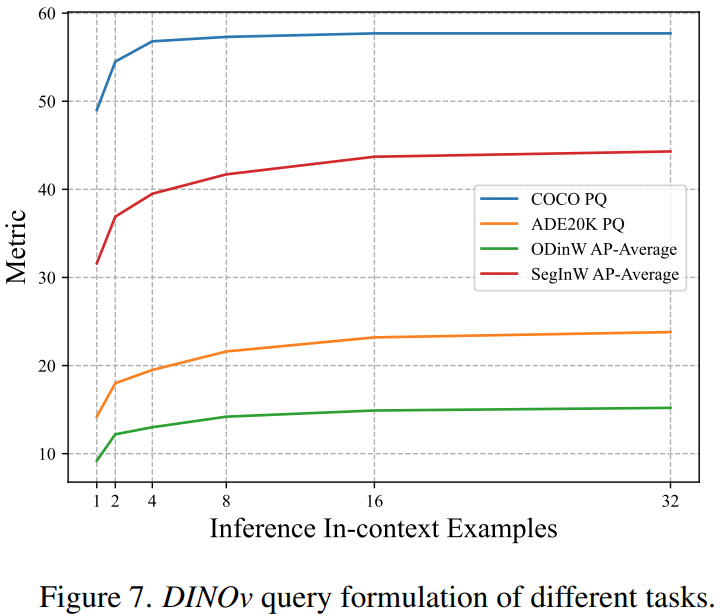
论文阅读——DINOv
首先是关于给了提示然后做分割的一些方法的总结: 左边一列是prompt类型,右边一列是使用各个类型的prompt的模型。这些模型有分为两大类:Generic和Refer,通用分割和参考分割。Generic seg 是分割和提示语义概念一样的所有的物体&am…...

JOSEF电流继电器 DL-33 整定范围0.5-2A 柜内安装板前接线
系列型号: DL-31电流继电器; DL-32电流继电器; DL-33电流继电器; DL-34电流继电器; 一、用途 DL-30系列电流继电器用于电机保护、变压器保护和输电线的过负荷和短路保护线路中,作为起动元件。 二、结构和原理 继电器系电磁式,瞬时动作…...
RCE绕过
1.[SCTF 2021]rceme 总结下获取disabled_funciton的方式 1.phpinfo() 2.var_dump(ini_get(“disable_functions”)); 3.var_dump(get_cfg_var(“disable_functions”)); 其他的 var_dump(get_cfg_var(“open_basedir”)); var_dump(ini_get_all()); <?php if(isset($_POS…...
Qt应用开发--国产工业开发板全志T113-i的部署教程
Qt在工业上的使用场景包括工业自动化、嵌入式系统、汽车行业、航空航天、医疗设备、制造业和物联网应用。Qt被用来开发工业设备的用户界面、控制系统、嵌入式应用和其他工业应用,因其跨平台性和丰富的功能而备受青睐。 Qt能够为工业领域带来什么好处: -…...

css 常用动画效果
css 常用动画效果 文章目录 css 常用动画效果1.上下运动动画2.宽度变化动画 1.上下运动动画 <div class"box"><div class"item"></div> </div>css .box {position: relative; }.item {position: absolute;width: 50px;height: 50…...
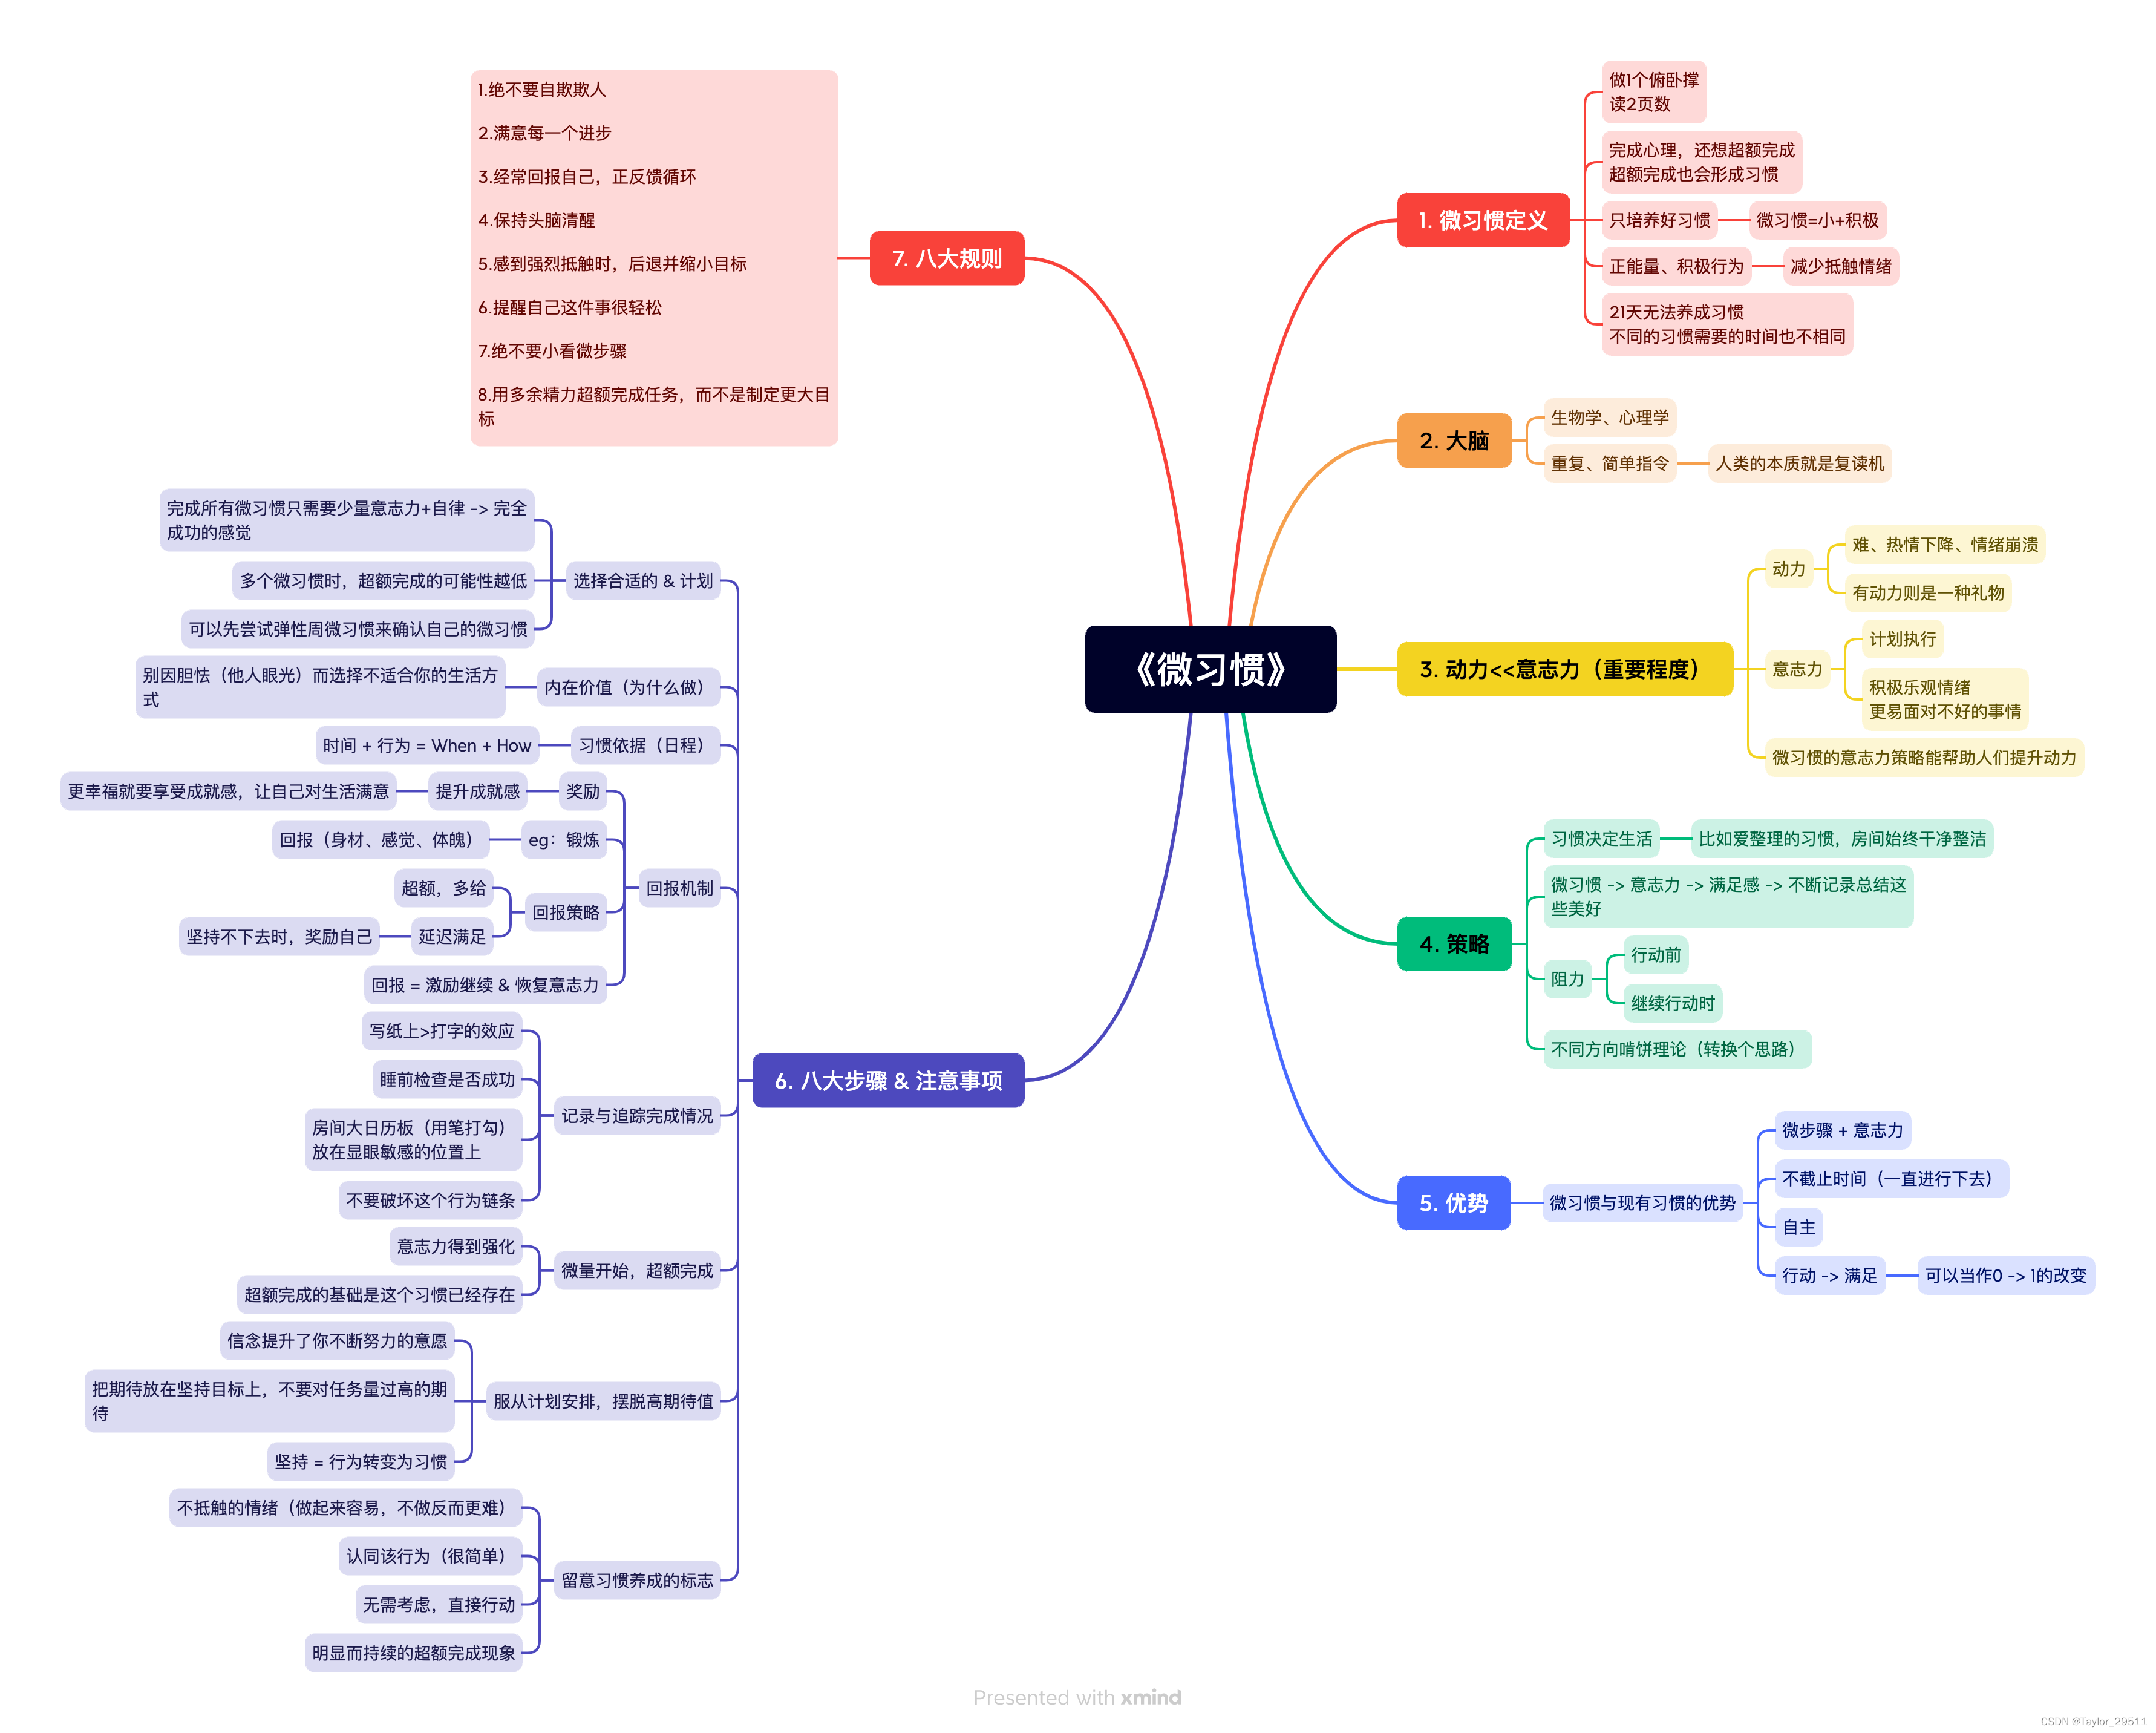
【读书笔记】微习惯
周日晚上尝试速读一本书《微习惯》,共七章看了下目录结构并不复杂,计划每章7-8分钟读完, 从20:15-21:00。读的时候,订下闹钟,催促着自己的进度。边读边记了一些要点和微信读书里面的划线。 第六章实践内容最为丰富&…...

Oracle SQL优化
1、书写顺序和执行顺序 在Oracle SQL中,查询的书写顺序和执行顺序是不同的。 1.1SQL书写顺序如下: SELECTFROMWHEREGROUP BYHAVINGORDER BY 1.2 SQL执行顺序 FROM:数据源被确定,表连接操作也在此步骤完成。 WHERE:对…...
)
浏览器访问 AWS ECS 上部署的 Docker 容器(监听 80 端口)
✅ 一、ECS 服务配置 Dockerfile 确保监听 80 端口 EXPOSE 80 CMD ["nginx", "-g", "daemon off;"]或 EXPOSE 80 CMD ["python3", "-m", "http.server", "80"]任务定义(Task Definition&…...
)
IGP(Interior Gateway Protocol,内部网关协议)
IGP(Interior Gateway Protocol,内部网关协议) 是一种用于在一个自治系统(AS)内部传递路由信息的路由协议,主要用于在一个组织或机构的内部网络中决定数据包的最佳路径。与用于自治系统之间通信的 EGP&…...

3403. 从盒子中找出字典序最大的字符串 I
3403. 从盒子中找出字典序最大的字符串 I 题目链接:3403. 从盒子中找出字典序最大的字符串 I 代码如下: class Solution { public:string answerString(string word, int numFriends) {if (numFriends 1) {return word;}string res;for (int i 0;i &…...
用docker来安装部署freeswitch记录
今天刚才测试一个callcenter的项目,所以尝试安装freeswitch 1、使用轩辕镜像 - 中国开发者首选的专业 Docker 镜像加速服务平台 编辑下面/etc/docker/daemon.json文件为 {"registry-mirrors": ["https://docker.xuanyuan.me"] }同时可以进入轩…...
 自用)
css3笔记 (1) 自用
outline: none 用于移除元素获得焦点时默认的轮廓线 broder:0 用于移除边框 font-size:0 用于设置字体不显示 list-style: none 消除<li> 标签默认样式 margin: xx auto 版心居中 width:100% 通栏 vertical-align 作用于行内元素 / 表格单元格ÿ…...
嵌入式学习笔记DAY33(网络编程——TCP)
一、网络架构 C/S (client/server 客户端/服务器):由客户端和服务器端两个部分组成。客户端通常是用户使用的应用程序,负责提供用户界面和交互逻辑 ,接收用户输入,向服务器发送请求,并展示服务…...

使用LangGraph和LangSmith构建多智能体人工智能系统
现在,通过组合几个较小的子智能体来创建一个强大的人工智能智能体正成为一种趋势。但这也带来了一些挑战,比如减少幻觉、管理对话流程、在测试期间留意智能体的工作方式、允许人工介入以及评估其性能。你需要进行大量的反复试验。 在这篇博客〔原作者&a…...

Linux 中如何提取压缩文件 ?
Linux 是一种流行的开源操作系统,它提供了许多工具来管理、压缩和解压缩文件。压缩文件有助于节省存储空间,使数据传输更快。本指南将向您展示如何在 Linux 中提取不同类型的压缩文件。 1. Unpacking ZIP Files ZIP 文件是非常常见的,要在 …...
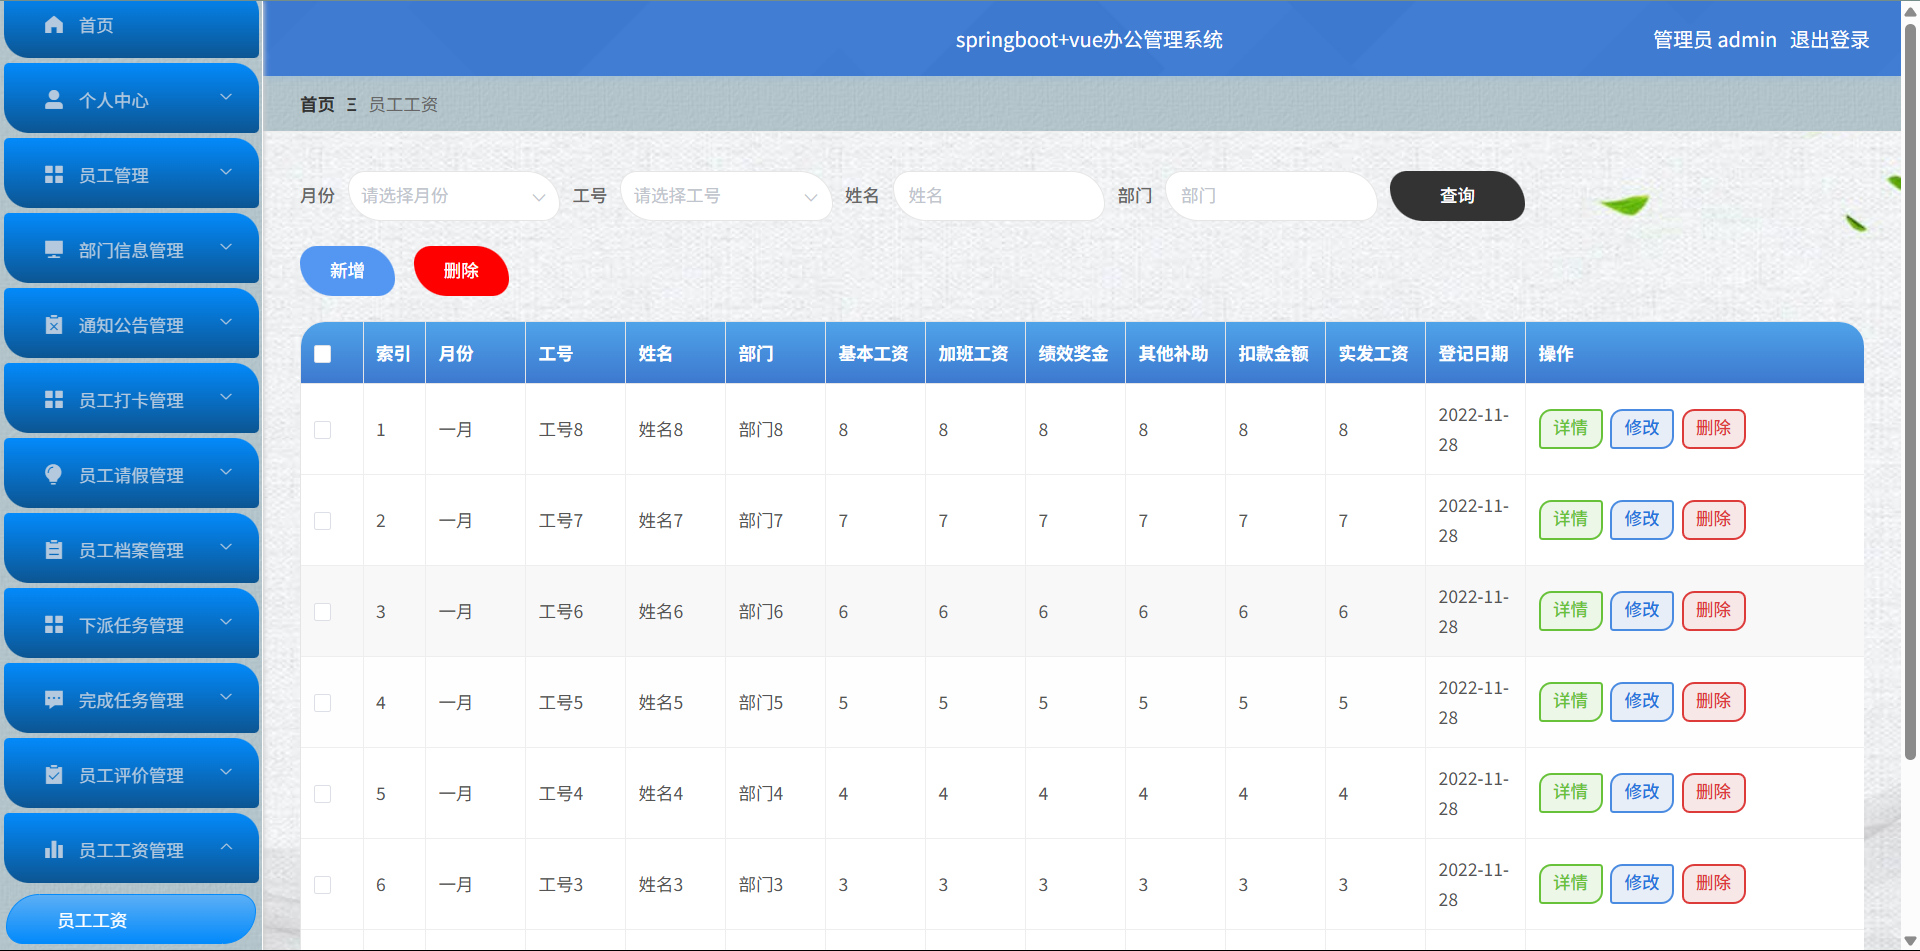
基于Springboot+Vue的办公管理系统
角色: 管理员、员工 技术: 后端: SpringBoot, Vue2, MySQL, Mybatis-Plus 前端: Vue2, Element-UI, Axios, Echarts, Vue-Router 核心功能: 该办公管理系统是一个综合性的企业内部管理平台,旨在提升企业运营效率和员工管理水…...

Linux nano命令的基本使用
参考资料 GNU nanoを使いこなすnano基础 目录 一. 简介二. 文件打开2.1 普通方式打开文件2.2 只读方式打开文件 三. 文件查看3.1 打开文件时,显示行号3.2 翻页查看 四. 文件编辑4.1 Ctrl K 复制 和 Ctrl U 粘贴4.2 Alt/Esc U 撤回 五. 文件保存与退出5.1 Ctrl …...