基于Maven构建OSGI应用(Maven和OSGI结合)
基于Maven构建OSGI应用。
使用Maven来构建项目,包括项目的创建、子模块buldle的创建等。使用OSGI来实现动态模块化管理,实现模块的热插拔效果(即插即用)。
创建一个Maven项目:helloworld,并在该项目下创建两个Maven 子模块:helloworld-client、helloworld-server。
创建 helloworld maven项目、填写参数及Advanced Settings:

创建 helloworld-server maven子模块:

同样的方式再创建 helloworl-client maven 子模块。
接下来就是 hellworld-server、helloworld-client 编码以及OSGI及编译打包配置。
OSGI及编译打包配置,直接通过修改3个pom文件(1个主pom、2个子模块的pom)来配置,最终配置结果如下:
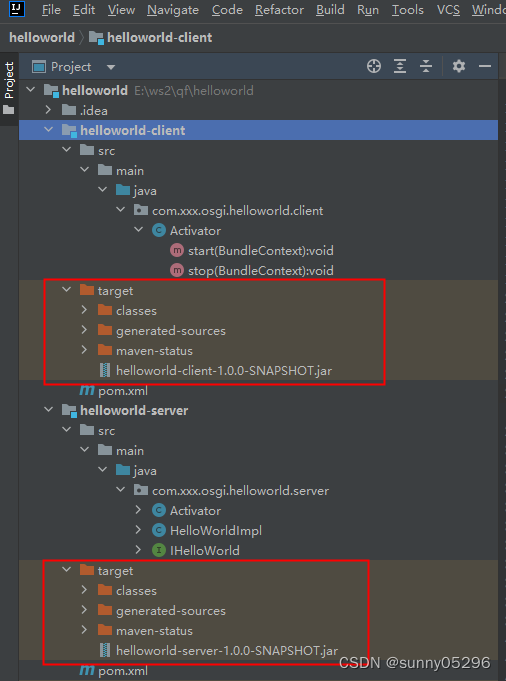
1)代码结构:

client->Activator.java:
package com.xxx.osgi.helloworld.client;import com.xxx.osgi.helloworld.server.HelloWorldImpl;
import org.osgi.framework.BundleActivator;
import org.osgi.framework.BundleContext;
import org.osgi.framework.ServiceReference;import java.util.Objects;/*** @author frank* @date 2023/12/8*/
public class Activator implements BundleActivator {public void start(BundleContext bundleContext) throws Exception {System.out.println("helloworld-client: start");System.out.println("helloworld-client: call server getHelloMsg()");ServiceReference<HelloWorldImpl> reference = bundleContext.getServiceReference(HelloWorldImpl.class);if (Objects.nonNull(reference)) {HelloWorldImpl service = bundleContext.getService(reference);if (Objects.nonNull(service)) {String msg = service.getHelloMsg("Frank");System.out.println("SUCCESS: return msg is:\n" + msg);} else {System.out.println("ERROR: service not found!");}bundleContext.ungetService(reference);} else {System.out.println("ERROR: service reference not found!");}}public void stop(BundleContext bundleContext) throws Exception {System.out.println("helloworld-client: stop");}
}
server->Activator.java
package com.xxx.osgi.helloworld.server;import org.osgi.framework.BundleActivator;
import org.osgi.framework.BundleContext;
import org.osgi.framework.ServiceReference;import java.util.Dictionary;
import java.util.Hashtable;
import java.util.Objects;/*** @author frank* @date 2023/12/9*/
public class Activator implements BundleActivator {public void start(BundleContext bundleContext) throws Exception {System.out.println("helloworld-server: start");HelloWorldImpl server = new HelloWorldImpl();Dictionary<String, Object> properties = new Hashtable<String, Object>();bundleContext.registerService(HelloWorldImpl.class, server, properties);System.out.println("helloworld-server: 服务已发布(注册)!");}public void stop(BundleContext bundleContext) throws Exception {System.out.println("helloworld-server: stop");}
}
server->IHelloWorld.java
package com.xxx.osgi.helloworld.server;/*** @author frank* @date 2023/12/9*/
public interface IHelloWorld {String getHelloMsg(String name);
}
server->HelloWorldImpl.java
package com.xxx.osgi.helloworld.server;/*** @author frank* @date 2023/12/9*/
public class HelloWorldImpl implements IHelloWorld {public String getMethodName() {return "[" + Thread.currentThread().getStackTrace()[2].getMethodName() + ":" +Thread.currentThread().getStackTrace()[2].getLineNumber() + "] ";}public String getHelloMsg(String name) {return getMethodName() + " HelloWorld " + name;}
}
2)主pom:
<project xmlns="http://maven.apache.org/POM/4.0.0" xmlns:xsi="http://www.w3.org/2001/XMLSchema-instance"xsi:schemaLocation="http://maven.apache.org/POM/4.0.0 http://maven.apache.org/xsd/maven-4.0.0.xsd"><modelVersion>4.0.0</modelVersion><groupId>org.xxx.osgi</groupId><artifactId>helloworld</artifactId><version>1.0.0-SNAPSHOT</version><modules><module>helloworld-client</module><module>helloworld-server</module></modules><packaging>pom</packaging><name>helloworld</name><url>http://maven.apache.org</url><properties><project.build.sourceEncoding>UTF-8</project.build.sourceEncoding><maven.compiler.source>8</maven.compiler.source><parent.maven.bundle.plugin.version>2.4.0</parent.maven.bundle.plugin.version></properties><dependencies><dependency><groupId>junit</groupId><artifactId>junit</artifactId><version>3.8.1</version><scope>test</scope></dependency><dependency><!-- 该版本 maven 仓库找不到,如果要用该版本可以在 Project Structure->Project Settings->Modules 中设置:--><!-- 设置 OSGI:General->Configure OSGI Core Library->Use Library 指定本地 jar 文件静态添加 osgi lib  --><!--<groupId>org.eclipse</groupId><artifactId>osgi</artifactId><version>3.18.600.v20231110-1900</version><scope>provided</scope>--><!-- 该版本maven仓库可以找到,可以用这个版本。在 pom 中指定 osgi lib 的 dependency 依赖 --><groupId>org.eclipse</groupId><artifactId>osgi</artifactId><version>3.10.0-v20140606-1445</version><scope>provided</scope></dependency></dependencies>
</project>
3)hellworld-client 子模块pom:
<project xmlns="http://maven.apache.org/POM/4.0.0" xmlns:xsi="http://www.w3.org/2001/XMLSchema-instance"xsi:schemaLocation="http://maven.apache.org/POM/4.0.0 http://maven.apache.org/xsd/maven-4.0.0.xsd"><parent><artifactId>helloworld</artifactId><groupId>org.xxx.osgi</groupId><version>1.0.0-SNAPSHOT</version></parent><modelVersion>4.0.0</modelVersion><artifactId>helloworld-client</artifactId><packaging>bundle</packaging><name>helloworld-client</name><url>http://maven.apache.org</url><properties><project.build.sourceEncoding>UTF-8</project.build.sourceEncoding></properties><dependencies><!-- osgi lib 使用主 pom 中定义的依赖,子模块不再重复定义 osgi lib dependency --><dependency><groupId>org.xxx.osgi</groupId><artifactId>helloworld-server</artifactId><version>${project.version}</version></dependency></dependencies><build><plugins><plugin><!-- osgi 打包配置,使用 maven-bundle-plugin 插件进行 osgi 打包 bundle jar --><!-- 使用maven-bundle-plugin打包方式时指定manifest文件不生效,但可在 instructions 中配置 manifest 参数 --><groupId>org.apache.felix</groupId><artifactId>maven-bundle-plugin</artifactId><version>${parent.maven.bundle.plugin.version}</version><extensions>true</extensions><configuration><instructions><!-- 如果要把依赖的 jar 也一起打包进去,在 Import-Package 中指定、并设置 Embed-Dependency --><!-- <Embed-Dependency>*;scope=compile|runtime</Embed-Dependency> --><Bundle-Name>${project.name}</Bundle-Name><Bundle-SymbolicName>$(replace;${project.artifactId};-;_)</Bundle-SymbolicName><Bundle-Version>${project.version}</Bundle-Version><Bundle-Activator>com.xxx.osgi.helloworld.client.Activator</Bundle-Activator><Import-Package>org.osgi.framework,com.xxx.osgi.helloworld.server;version=${project.version}"</Import-Package><Export-Package>com.xxx.osgi.helloworld.client;version="${project.version}"</Export-Package></instructions></configuration></plugin></plugins></build>
</project>
4)helloworld-server 子模块pom:
<project xmlns="http://maven.apache.org/POM/4.0.0" xmlns:xsi="http://www.w3.org/2001/XMLSchema-instance"xsi:schemaLocation="http://maven.apache.org/POM/4.0.0 http://maven.apache.org/xsd/maven-4.0.0.xsd"><parent><artifactId>helloworld</artifactId><groupId>org.xxx.osgi</groupId><version>1.0.0-SNAPSHOT</version></parent><modelVersion>4.0.0</modelVersion><artifactId>helloworld-server</artifactId><packaging>bundle</packaging><name>helloworld-server</name><url>http://maven.apache.org</url><properties><project.build.sourceEncoding>UTF-8</project.build.sourceEncoding></properties><dependencies><!-- osgi lib 使用主 pom 中定义的依赖,子模块不再重复定义 osgi lib dependency --></dependencies><build><plugins><plugin><!-- osgi 打包配置,使用 maven-bundle-plugin 插件进行 osgi 打包 bundle jar --><!-- 使用maven-bundle-plugin打包方式时指定manifest文件不生效,但可在 instructions 中配置 manifest 参数 --><groupId>org.apache.felix</groupId><artifactId>maven-bundle-plugin</artifactId><version>${parent.maven.bundle.plugin.version}</version><extensions>true</extensions><configuration><instructions><!-- 如果要把依赖的 jar 也一起打包进去,在 Import-Package 中指定、并设置 Embed-Dependency --><!-- <Embed-Dependency>*;scope=compile|runtime</Embed-Dependency> --><Bundle-Name>${project.name}</Bundle-Name><Bundle-SymbolicName>$(replace;${project.artifactId};-;_)</Bundle-SymbolicName><Bundle-Version>${project.version}</Bundle-Version><Bundle-Activator>com.xxx.osgi.helloworld.server.Activator</Bundle-Activator><Import-Package>org.osgi.framework</Import-Package><Export-Package>com.xxx.osgi.helloworld.server;version="${project.version}"</Export-Package></instructions></configuration></plugin></plugins></build>
</project>
注意:
i)OSGI框架(OSGI Library)通过pom配置后自动manve刷新就可以自动在 Project Settings-> Modules 中自动生成 OSGI 配置了,包括OSGI Library也自设置了,这里无需手动修改其他OSGI配置,默认即可。根据pom自动生成的OSGI配置如下:

Configure OSGI Core Library 点击打开显示如下:
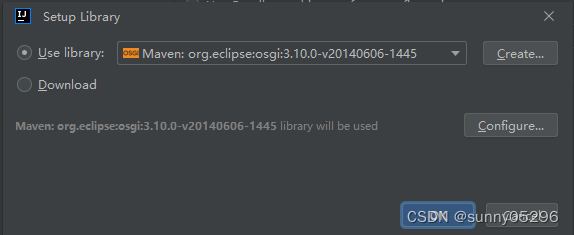
版本号就是pom中指定OSGI dependency 的版本。
ii)pom文件中配置打包插件使用:maven-bundle-plugin 插件,该插件是专门为OSGI打包提供的插件,但是它不能导出 META-INF 中的内容到 Export-Package jar 包中。也就是说使用 maven-bundle-plugin 插件打包导出的 bundle jar 包中的 manifest 只能通过 pom.xml 文件中的 maven-bundle-plugin 打包参数项来配置,不能直接指定使用自己项目中指定的 manifest 文件(指定了也不生效)。另外,Project Settings -> Modules 中的 Manifest Generation 配置也没有用。
另外,maven-bundle-plugin 打包插件支持了一个标签:
<Embed-Dependency>*;scope=compile|runtime</Embed-Dependency>,
有了这个标签,可以直接把依赖的 jar 打入 bundle jar 包中去。
5)编译打包:
mvn clean package
执行命令,就会生成目标jar文件:
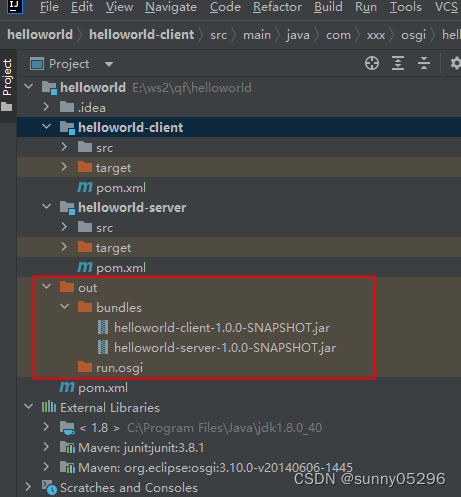
6)添加 debug / run 配置,可在idea中运行或调试:
为client和server分别添加一个 debug/run 配置,Bundle name配置中添加 4个 必须依赖的系统jar和各自子模块的jar:

添加 debug/run 配置并运行后,会自动生成 out 目录:
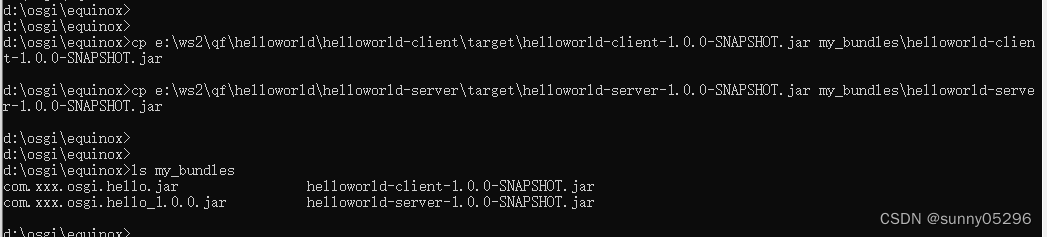
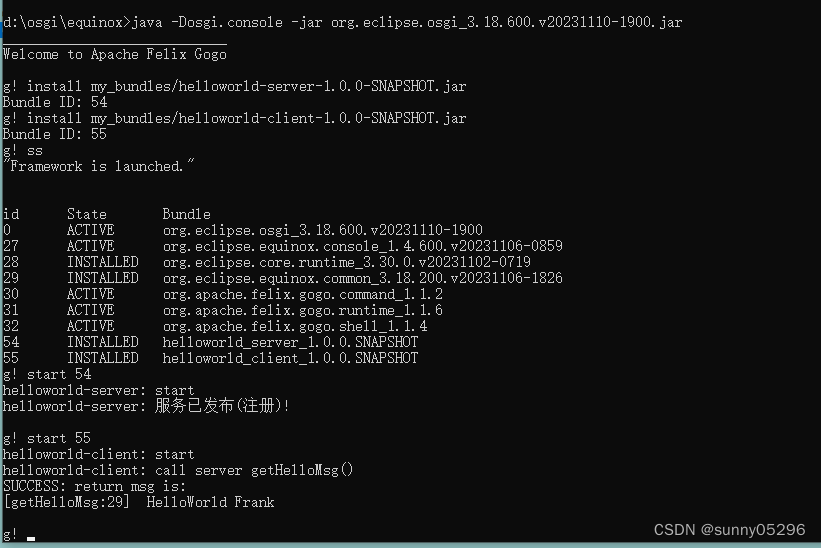
7)拷贝生成的 client & server bundle(jar) 到OSGI环境执行:
我本地Windows配置的OSGI运行环境位于:d:\osgi\equinox\
d:> cd d:\osgi\equinox\
d:\osgi\equinox> ls
org.eclipse.osgi_3.18.600.v20231110-1900.jar
plugins
start.bat
d:\osgi\equinox> mkdir my_bundles
d:\osgi\equinox> cp e:\ws2\qf\helloworld\helloworld-client\target\helloworld-client-1.0.0-SNAPSHOT.jar my_bundles\helloworld-client-1.0.0-SNAPSHOT.jar
d:\osgi\equinox> cp e:\ws2\qf\helloworld\helloworld-server\target\helloworld-server-1.0.0-SNAPSHOT.jar my_bundles\helloworld-server-1.0.0-SNAPSHOT.jar
8)执行bundles:
install & start bundles,server需要先启动、再启动client:
到此为止,基于Maven构建OSGI应用示例完毕。
注意:如果pom中指定<maven.compiler.source>8</maven.compiler.source>时编译报错:java: Compilation failed: internal java compiler error,报错截图如下:

检查下面几处相关设置是否正确:
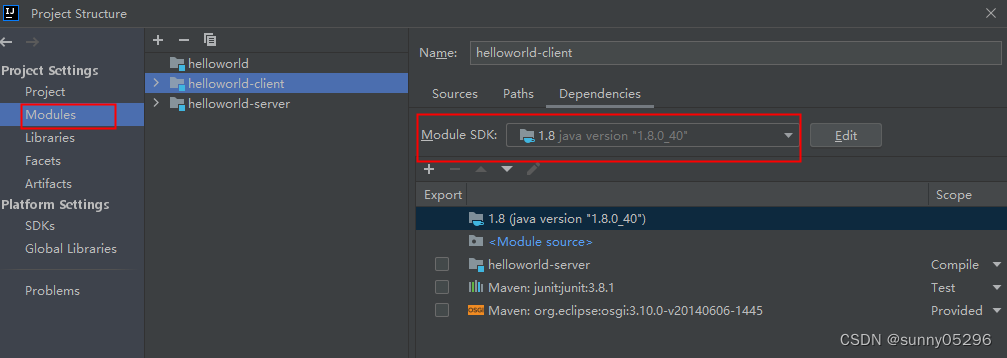
1)检查File->Project Structure->Project Settings->Modules配置中的Dependencies->Module SDK:
2)检查Settings->Buile,Execution,Deployment->Compiler->Java Compiler设置Module的Per-module bytecode version->Target bytecode version:
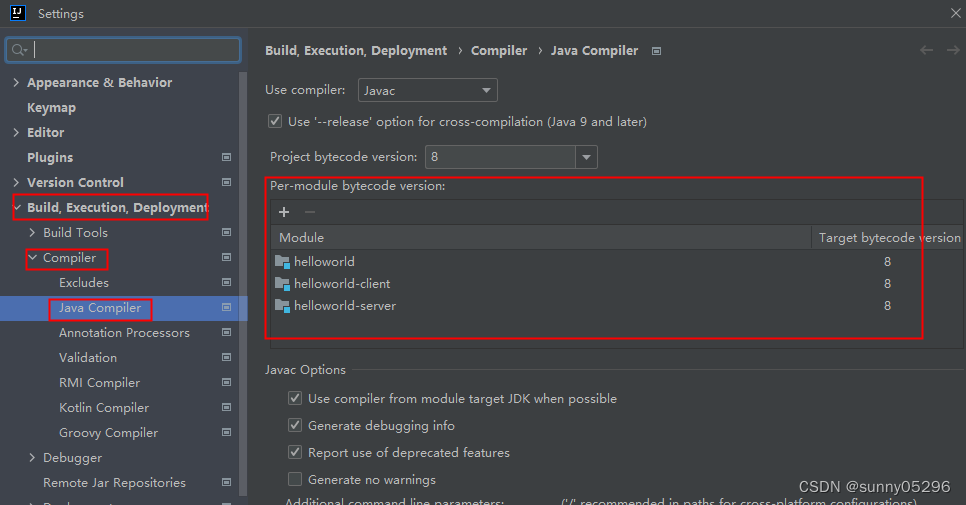
如果 Per-module bytecode version -> Target bytecode version 不一致(我最初默认是1.5)、修改为一致(8),问题就解决了。
相关文章:
基于Maven构建OSGI应用(Maven和OSGI结合)
基于Maven构建OSGI应用。 使用Maven来构建项目,包括项目的创建、子模块buldle的创建等。使用OSGI来实现动态模块化管理,实现模块的热插拔效果(即插即用)。 创建一个Maven项目:helloworld,并在该项目下创建…...

oracle分组排序后取第一条
在 Oracle 中,可以使用「ROW_NUMBER」函数对某个列进行分组并排序,然后通过「WHERE」语句取第一条记录。 假设有一张「USERS」表,其中包含「ID」、「NAME」、「AGE」和「COUNTRY」列,您可以使用以下 SQL 语句对「AGE」列进行分组…...

MAMBA介绍:一种新的可能超过Transformer的AI架构
有人说,“理解了人类的语言,就理解了世界”。一直以来,人工智能领域的学者和工程师们都试图让机器学习人类的语言和说话方式,但进展始终不大。因为人类的语言太复杂,太多样,而组成它背后的机制,…...
win系统一台电脑安装两个不同版本的mysql教程
文章目录 1.mysql下载zip包(地址)2.解压在你的电脑上(不要再C盘和带中文的路径)3.创建my.ini文件4.更改环境变量(方便使用, 可选)5.打包mysql服务6.初始化mysql的data7.启动刚刚打包的服务8.更改密码 1.mys…...

esp32-s3部署yolox_nano进行目标检测
ESP32-S3部署yolox_nano进行目标检测 一、生成模型部署项目01 环境02 配置TVM包03 模型量化3.1预处理3.2 量化 04 生成项目 二、烧录程序 手上的是ESP32-S3-WROOM-1 N8R8芯片,整个链路跑通了,但是识别速度太慢了,20秒一张图,所以暂…...
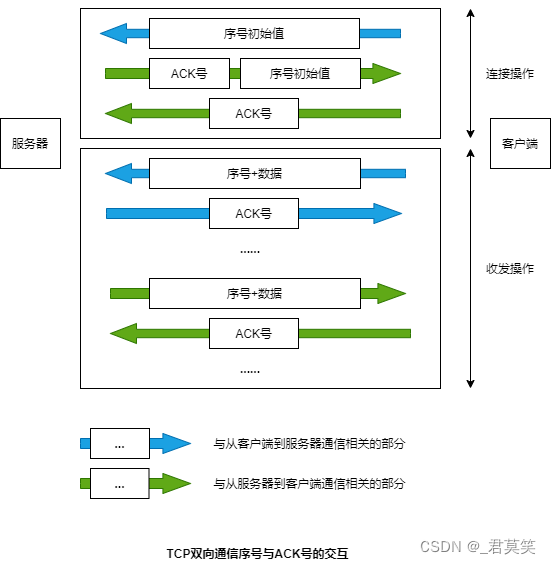
TCP传输数据的确认机制
实际的TCP收发数据的过程是双向的。 TCP采用这样的方式确认对方是否收到了数据,在得到对方确认之前,发送过的包都会保存在发送缓冲区中。如果对方没有返回某些包对应的ACK号,那么就重新发送这些包。 这一机制非常强大。通过这一机制…...

使用Ansible Expect模块实现自动化交互式任务
Ansible是一种功能强大的自动化工具,可用于自动化配置管理、部署和任务执行。其中的Expect模块是Ansible的一个重要组件,它允许我们自动化处理需要与交互式命令行进行交互的任务。本文将介绍如何使用Ansible的Expect模块,并提供一些示例来说明…...
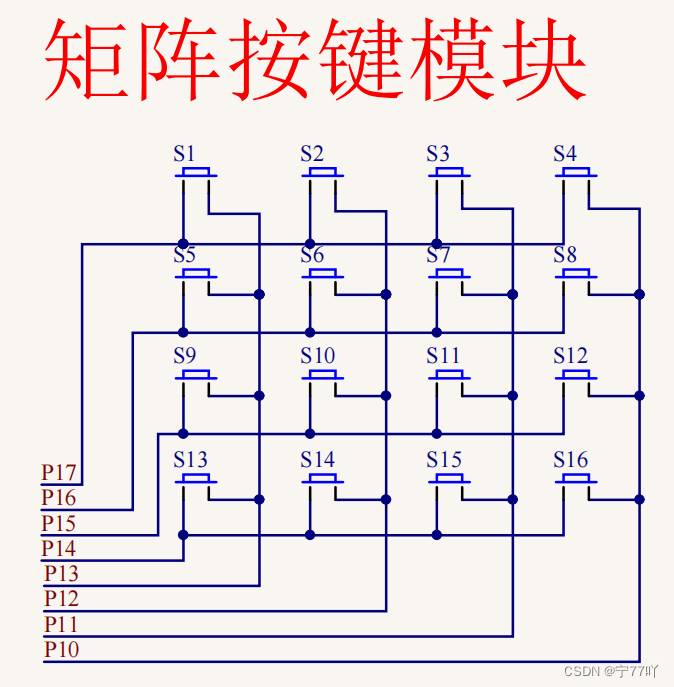
51单片机独立按键以及矩阵按键的使用以及其原理--独立按键 K1 控制 D1 指示灯亮灭以及数码管显示矩阵按键 S1-S16 按下后键值 0-F
IO 的使用–按键 本文主要涉及8051单片机按键的使用,包括独立按键以及矩阵按键的使用以及其原理,其中代码实例包括: 1.独立按键 K1 控制 D1 指示灯亮灭 2.通过数码管显示矩阵按键 S1-S16 按下后键值 0-F 文章目录 IO 的使用--按键一、按键消抖二、独立按…...
chrome安装jsonview
写在前面 通过jsonview可以实现,当http响应时application/json时直接在浏览器格式化显示,增加可读性。本文看下如何安装该插件到chrome中。 1:安装 首先在这里 下载插件包,然后解压备用。接着在chrome按照如下步骤操作…...
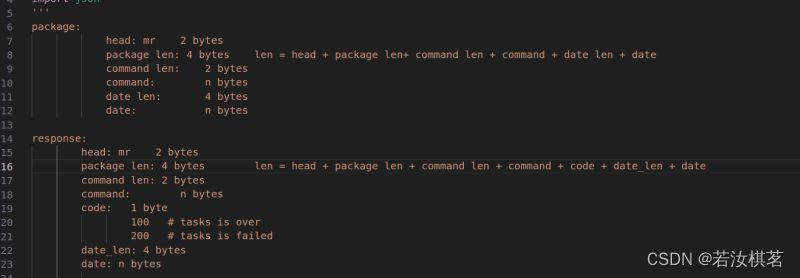
使用TouchSocket适配一个c++的自定义协议
这里写目录标题 说明一、新建项目二、创建适配器三、创建服务器和客户端3.1 服务器3.2 客户端3.3 客户端发送3.4 客户端接收3.5 服务器接收与发送 四、关于同步Send 说明 今天有小伙伴咨询我,他和同事(c端)协商了一个协议,如果使…...
VSC改造MD编辑器及图床方案分享
VSC改造MD编辑器及图床方案分享 用了那么多md编辑器,到头来还是觉得VSC最好用。这次就来分享一下我的blog文件编辑流吧。 这篇文章包括:VSC下md功能扩展插件推荐、图床方案、blog文章管理方案 VSC插件 Markdown All in One Markdown Image - 粘粘图片…...

SpringBoot的依赖管理和自动配置
与其明天开始,不如现在行动! 文章目录 1 依赖管理机制2 自动配置机制2.1 初步理解2.2 完整流程 💎总结 1 依赖管理机制 为什么导入starter-web后所有相关依赖都会导入进来? 开发什么场景,导入什么场景启动器-spring-bo…...
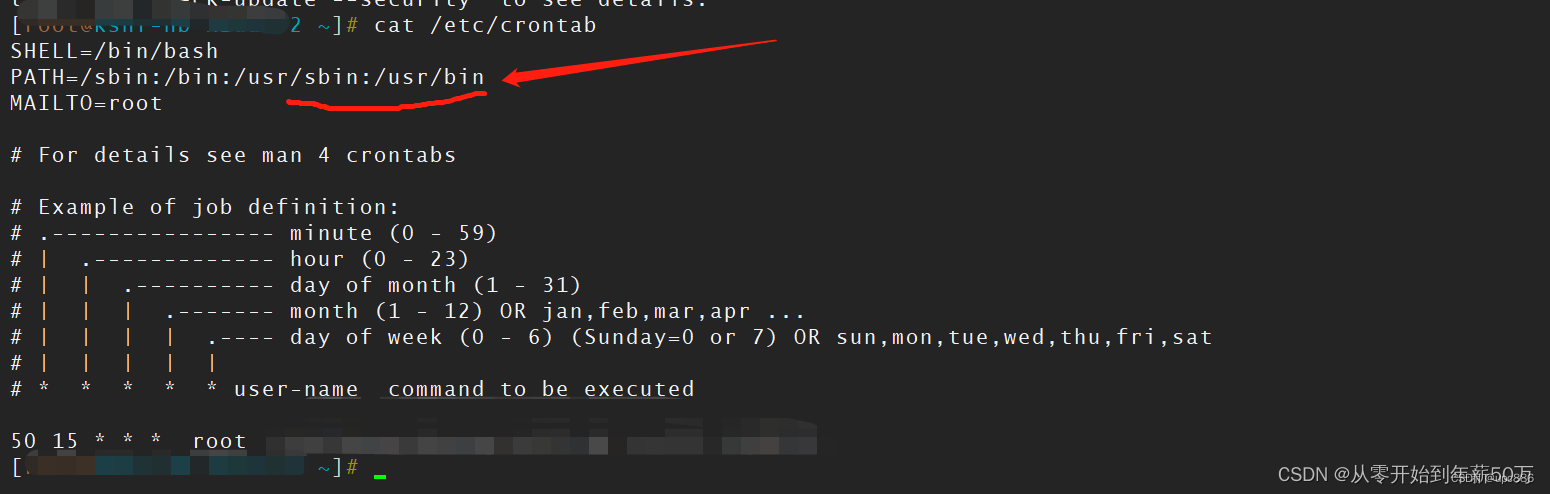
linux 定时任务
使用 crontab Usage: crontab [-u user] [-e|-l|-r] Crontab 的格式说明如下: * 逗号(‘,’) 指定列表值。如: “1,3,4,7,8″ * 中横线(‘-’) 指定范围值 如 “1-6″, 代表 “1,2,3,4,5,6″ * 星号 (‘*’) 代表所有可能的值 */15 表示每 15 分钟执行一次 # Use the ha…...

增强现实中的真实人/机/环与虚拟人/机/环
在增强现实中,真实人与虚拟人、真实机器与虚拟机器、真实环境与虚拟环境之间有着密切的关系。增强现实技术通过将真实与虚拟相结合,打破了传统的现实世界与虚拟世界的界限,创造出了一种新的体验方式。真实人、真实机器和真实环境与其对应的虚…...
Python网络爬虫环境的安装指南
网络爬虫是一种自动化的网页数据抓取技术,广泛用于数据挖掘、信息搜集和互联网研究等领域。Python作为一种强大的编程语言,拥有丰富的库支持网络爬虫的开发。本文将为你详细介绍如何在你的计算机上安装Python网络爬虫环境。 一、安装python开发环境 进…...

【MyBatis系列】MyBatis字符串问题
💝💝💝欢迎来到我的博客,很高兴能够在这里和您见面!希望您在这里可以感受到一份轻松愉快的氛围,不仅可以获得有趣的内容和知识,也可以畅所欲言、分享您的想法和见解。 推荐:kwan 的首页,持续学…...
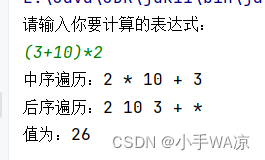
【Java】构建表达式二叉树和表达式二叉树求值
问题背景 1. 实现一个简单的计算器。通过键盘输入一个包含圆括号、加减乘除等符号组成的算术表达式字符串,输出该算术表达式的值。要求: (1)系统至少能实现加、减、乘、除等运算; (2)利用二叉…...

采用Python 将PDF文件按照页码进行切分并保存
工作中经常会遇到 需要将一个大的PDF文件 进行切分,比如仅需要大PDF文件的某几页 或者连续几页,一开始都是用会员版本的WPS,但是对于程序员,就是要采用技术白嫖 这里就介绍一个 python的PDF 包 PyPDF2 其安装方式也很简单 p…...
H264视频编码原理
说到视频,我们首先想到的可能就是占内存。我们知道一个视频是由一连串图像序列组成的,视频中图像一般是 YUV 格式。假设有一个电影视频,分辨率是 1080P,帧率是 25fps,并且时长是 2 小时,如果不做视频压缩的…...
UDP实现群聊
代码: import java.awt.*; import java.awt.event.*; import javax.swing.*; import java.net.*; import java.io.IOException; import java.lang.String;public class liaotian extends JFrame{private static final int DEFAULT_PORT8899;private JLabel stateLB…...

Go Module 依赖冲突调试方法
Go Module 依赖冲突调试方法 在Go语言开发中,依赖管理是一个关键环节。随着项目规模的扩大,依赖的第三方库越来越多,版本冲突问题也愈发常见。Go Module作为官方推荐的依赖管理工具,虽然简化了依赖管理流程,但在多级依…...

开源可部署!PyTorch 2.8 RTX 4090D镜像在企业AIGC生产环境落地实践
开源可部署!PyTorch 2.8 RTX 4090D镜像在企业AIGC生产环境落地实践 1. 为什么选择这个深度学习镜像 在当今AI技术快速发展的背景下,企业面临的最大挑战之一是如何快速搭建稳定高效的AI开发环境。传统方式需要手动配置CUDA、PyTorch和各种依赖库&#x…...

VisDrone2019-MOT转COCO踩坑实录:为什么你的转换脚本总报错?附修复方案
VisDrone2019-MOT转COCO实战避坑指南:从报错解析到工业级解决方案 当你第一次尝试将VisDrone2019-MOT数据集转换为COCO格式时,可能会遇到各种令人抓狂的报错信息。这不是你的问题——这个转换过程确实存在许多隐藏的陷阱。本文将带你深入剖析五个最常见的…...
)
软件实施交付转运维学习第三天:Linux系统命令基础(部分)
从实施到运维的蜕变之路,掌握命令就是掌握Linux的灵魂写在前面作为一名从软件实施交付转向运维的工程师,我深刻体会到:Linux命令不仅仅是简单的指令,更是与操作系统对话的语言。当我们站在实施和运维的交界处,掌握Linu…...
)
OpenClaw人人养虾:配置Anthropic (Claude)
Anthropic 是 Claude 系列模型的开发者。Claude 以出色的指令遵循能力、深度推理和长文本处理著称。OpenClaw 支持通过 API Key 或 Claude Code CLI OAuth 接入。 认证方式 方式一:API Key(推荐) 前往 Anthropic Console 创建 API Key在 O…...

【卷积神经网络作业实现人脸的关键点定位功能】
下面是完成这道题目的代码:import os import cv2 import numpy as np import pandas as pd import torch import torch.nn as nn from torch.utils.data import Dataset,DataLoader from torchvision import transforms import matplotlib.pyplot as plt1. 数据集定…...

深入OpenHarmony NAPI引擎:从‘@ohos.hilog’导入到so库加载的底层链路剖析
深入OpenHarmony NAPI引擎:从‘ohos.hilog’导入到so库加载的底层链路剖析 当开发者在OpenHarmony应用中写下import hilog from ohos.hilog时,背后隐藏着一套精密的系统级协作机制。这条看似简单的语句,实际上触发了从JavaScript语法解析到原…...

华为 eNSP 安装全攻略:Windows 11 25H2 完美适配
本教程适用范围 ✅ Windows 7(所有版本)✅ Windows 10(所有版本)✅ Windows 11 23H2 及以下✅ Windows 11 24H2(OS 内部版本 ≥ 26100.3624)✅ Windows 11 25H2❌ Windows 11 24H2(OS 内部版本…...

无人机开发者必看:如何基于QGC源码定制你的专属地面站?从环境搭建到第一个插件开发
无人机开发者必看:如何基于QGC源码定制你的专属地面站?从环境搭建到第一个插件开发 在无人机技术迅猛发展的今天,开源地面站软件QGroundControl(QGC)已成为行业标准工具之一。但对于追求个性化功能或特定应用场景的开发…...

2026年项目管理工具选型指南:功能对比、适用场景与避坑建议
项目管理工具早已不只是任务看板,而是连接目标、需求、计划、资源、交付、知识与复盘的管理底座。本文选取 ONES、Tower、Jira、Asana、monday.com、ClickUp、Microsoft Planner、Smartsheet、Notion 九款主流项目管理工具展开评估,帮助企业中高层研发负…...