elasticsearch|大数据|elasticsearch的api部分实战操作以及用户和密码的管理
一,
前言
本文主要内容是通过elasticsearch的api来进行一些集群的管理和信息查询工作,以及elasticsearch用户的增删改查和密码的重设以及重置如何操作
接上文:elasticsearch|大数据|elasticsearch低版本集群的部署安装和安全增强---密码设置问题-CSDN博客
上文主要介绍了elasticsearch低版本集群的部署和密码的设定,这些是大大的提高了集群的安全性,但关于security(安全性)只是稍微提及,本文将要更加的深入的介绍这些安全措施,其次是部署完集群仅仅是第一步,如何正确的使用,高效的使用集群才是最终的目的,本文也将从这些方面做一个简单的论述。
二,
elasticsearch的安全插件----xpack
该插件主要是两个功能,第一个是通过config文件夹下的elasticsearch-keystone文件加密api,使得在使用api的时候必须要先检验预设的用户和密码
其次是ssl加密,通过certgen这个工具生成自签的ca证书(高版本的es这个工具可能改名),以提高elasticsearch的网络安全
在主配置文件中,有以下三个选项,这三个选项是这两个功能的开关:
xpack.security.enabled: true
xpack.security.transport.ssl.enabled: false
xpack.security.http.ssl.ssl.enabled: false
上文讲了密码校验的开启,ssl如何开启没有说,本文就把这个补充上吧
xpack.security.transport.ssl.enabled: false 这个选项应该是集群间ssl自签证书验证,防止恶意的增添节点
xpack.security.http.ssl.ssl.enabled: false 这个选项应该是使用自签证书,外部访问集群的时候需要证书验证,通俗的说就是https
那么,先开启xpack.security.transport.ssl.enabled,具体步骤如下:
1,在master节点生成ca证书(这个证书带密码,也可以不带密码,我这里用了密码,随意设置一个记得住的就可以了)# 生成elastic-stack-ca.p12文件
[root@node1 es]# ./bin/x-pack/certutil ca
This tool assists you in the generation of X.509 certificates and certificate
signing requests for use with SSL/TLS in the Elastic stack.The 'ca' mode generates a new 'certificate authority'
This will create a new X.509 certificate and private key that can be used
to sign certificate when running in 'cert' mode.Use the 'ca-dn' option if you wish to configure the 'distinguished name'
of the certificate authorityBy default the 'ca' mode produces a single PKCS#12 output file which holds:* The CA certificate* The CA's private keyIf you elect to generate PEM format certificates (the -pem option), then the output will
be a zip file containing individual files for the CA certificate and private keyPlease enter the desired output file [elastic-stack-ca.p12]:
Enter password for elastic-stack-ca.p12 :
2,生成elastic-certificates.p12这个文件,在其它节点生成同样的文件,命令稍微修改一下#### 生成elastic-certificates.p12文件,供elasticsearch使用(只在master节点生成,然后拷贝到其它节点即可,scp命令或者什么其它的方式都可以,不得在其它节点自己生成):
[root@node1 es]# ./bin/x-pack/certutil cert --ca elastic-stack-ca.p12
This tool assists you in the generation of X.509 certificates and certificate
signing requests for use with SSL/TLS in the Elastic stack.The 'cert' mode generates X.509 certificate and private keys.* By default, this generates a single certificate and key for useon a single instance.* The '-multiple' option will prompt you to enter details for multipleinstances and will generate a certificate and key for each one* The '-in' option allows for the certificate generation to be automated by describingthe details of each instance in a YAML file* An instance is any piece of the Elastic Stack that requires a SSL certificate.Depending on your configuration, Elasticsearch, Logstash, Kibana, and Beatsmay all require a certificate and private key.* The minimum required value for each instance is a name. This can simply be thehostname, which will be used as the Common Name of the certificate. A fulldistinguished name may also be used.* A filename value may be required for each instance. This is necessary when thename would result in an invalid file or directory name. The name provided hereis used as the directory name (within the zip) and the prefix for the key andcertificate files. The filename is required if you are prompted and the nameis not displayed in the prompt.* IP addresses and DNS names are optional. Multiple values can be specified as acomma separated string. If no IP addresses or DNS names are provided, you maydisable hostname verification in your SSL configuration.* All certificates generated by this tool will be signed by a certificate authority (CA).* The tool can automatically generate a new CA for you, or you can provide your own with the-ca or -ca-cert command line options.By default the 'cert' mode produces a single PKCS#12 output file which holds:* The instance certificate* The private key for the instance certificate* The CA certificateIf you elect to generate PEM format certificates (the -pem option), then the output will
be a zip file containing individual files for the instance certificate, the key and the CA certificateIf you elect to generate multiple instances certificates, the output will be a zip file
containing all the generated certificatesEnter password for CA (elastic-stack-ca.p12) :
Please enter the desired output file [elastic-certificates.p12]:
Enter password for elastic-certificates.p12 : Certificates written to /data/es/elastic-certificates.p12This file should be properly secured as it contains the private key for
your instance.This file is a self contained file and can be copied and used 'as is'
For each Elastic product that you wish to configure, you should copy
this '.p12' file to the relevant configuration directory
and then follow the SSL configuration instructions in the product guide.For client applications, you may only need to copy the CA certificate and
configure the client to trust this certificate.
3,如果该证书设置了证书,那么需要节点认证通过,否则会报没有权限读取(每个节点都执行):
./bin/elasticsearch-keystore add xpack.security.transport.ssl.keystore.secure_password
./bin/elasticsearch-keystore add xpack.security.transport.ssl.truststore.secure_password
4,为了防止elasticsearch因为权限问题启动失败,再次递归赋属组:
chown -Rf es. /data/es5,elasticsearch主配置文件的修改
在主配置文件末尾添加如下内容:
xpack.security.enabled: true
xpack.security.transport.ssl.enabled: true
http.cors.enabled: true
http.cors.allow-origin: "*"
http.cors.allow-methods : OPTIONS, HEAD, GET, POST, PUT, DELETE
http.cors.allow-headers : X-Requested-With,X-Auth-Token,Content-Type,Content-Length
xpack.security.transport.ssl.verification_mode: certificate
xpack.security.transport.ssl.keystore.path: /data/es/config/cert/elastic-certificates.p12
xpack.security.transport.ssl.truststore.path: /data/es/config/cert/elastic-certificates.p12
6,在补充说明一下:
因为elasticsearch集群是使用的发现机制,因此,master在扫描到同网段其它的服务器的9300-9305端口的时候,就会将其自动加入集群,而如果没有任何验证的加入节点是非常危险的,因此,证书的密码建议是最好设置,恶意节点将会因为没有证书文件并通过节点认证而无法随意加入集群,这样,我们的集群将会比较的安全。
verification_mode 控制服务器证书的验证。有效值为:
- # full 验证提供的证书是否由可信机构 (CA) 签名,并验证服务器的主机名(或 IP 地址)是否与证书中标识的名称相匹配。
- # strict 验证提供的证书是否由可信机构 (CA) 签名,并验证服务器的主机名(或 IP 地址)是否与证书中标识的名称相匹配。如果 Subject Alternative Name 为空,则返回错误。
- # certificate 验证提供的证书是否由可信机构 (CA) 签名,但不执行任何主机名验证。
- # none 不执行服务器证书的验证。此模式会禁用 SSL/TLS 的许多安全优势,应仅在谨慎考虑后使用。它主要用作尝试解决 TLS 错误时的临时诊断机制;强烈建议不要在生产环境中使用它。
keystore:存放公钥,私钥,数字签名等信息
truststore:存放信任的证书
keystore和truststore都存放key,不同的地方是truststore只存放公钥的数字证书,代表了可以信任的证书,keystore存放私钥相关.
三,
elasticsearch利用x-pack开启https
得先说明,https是可以使用自签证书的,虽然实际意义不大,那在elasticsearch里自然也是可以使用自签证书的了,在elasticsearch里主要是通过certutil这个工具生成的,该工具主要是自动化,使用简单。
集群主机名信息:
[root@node4 ~]# cat /etc/hosts
127.0.0.1   localhost localhost.localdomain localhost4 localhost4.localdomain4
::1         localhost localhost.localdomain localhost6 localhost6.localdomain6# kubekey hosts BEGIN
192.168.123.14  node4.cluster.local node4 node-4
192.168.123.11  node1.cluster.local node1 node-1
192.168.123.12  node2.cluster.local node2 node-2
192.168.123.13  node3.cluster.local node3 node-3
127.0.0.1 lb.kubesphere.local
# kubekey hosts END
根据以上信息,编写证书信息文件(主机名和IP地址一一对应哦):
[root@node4 ~]# cat instances.yml
instances:- name: "node-1"dns: ['192.168.123.11']- name: "node-2"dns: ['192.168.123.12']- name: "node-3"dns: ['192.168.123.13']    - name: 'node-4'dns: ['192.168.123.14']
执行以下命令生成证书包:
###注:生成的证书格式是pem的,可以直接使用,无需任何转换(哪个服务器都可以,随便找个服务器就可以了)
/data/es/bin/x-pack/certutil cert ca --pem --in instances.yml --out /root/certs.zip解压上面在root根目录下生成的证书包:
replace ca/ca.crt? [y]es, [n]o, [A]ll, [N]one, [r]ename: Ainflating: ca/ca.crt inflating: node-1/node-1.crt inflating: node-1/node-1.key inflating: node-2/node-2.crt inflating: node-2/node-2.key inflating: node-3/node-3.crt inflating: node-3/node-3.key inflating: node-4/node-4.crt inflating: node-4/node-4.key 可以看到有5个文件夹,在elasticsearch的主配置文件末尾添加如下内容:
node-1服务器:
xpack.security.http.ssl.enabled: true
xpack.security.http.ssl.key: /data/es/config/cert/node-1.key
xpack.security.http.ssl.certificate: /data/es/config/cert/node-1.crt
xpack.security.http.ssl.certificate_authorities: /data/es/config/cert/ca.crt
node-2服务器:
xpack.security.http.ssl.enabled: true
xpack.security.http.ssl.key: /data/es/config/cert/node-2.key
xpack.security.http.ssl.certificate: /data/es/config/cert/node-2.crt
xpack.security.http.ssl.certificate_authorities: /data/es/config/cert/ca.crt
node-3服务器:
xpack.security.http.ssl.enabled: true
xpack.security.http.ssl.key: /data/es/config/cert/node-3.key
xpack.security.http.ssl.certificate: /data/es/config/cert/node-3.crt
xpack.security.http.ssl.certificate_authorities: /data/es/config/cert/ca.crt
node-4服务器:
xpack.security.http.ssl.enabled: true
xpack.security.http.ssl.key: /data/es/config/cert/node-4.key
xpack.security.http.ssl.certificate: /data/es/config/cert/node-4.crt
xpack.security.http.ssl.certificate_authorities: /data/es/config/cert/ca.crt
以上配置都是用的绝对路径,因此,将前面的cert.zip 文件内的对应文件放置到对应的服务器的指定路径下即可了,注意,注意,需要给证书赋予es用户权限,这一步不能漏,也就是chown -Rf /data/es 这个命令
然后重启所有节点的elasticsearch服务
如果没有报错的话,打开浏览器输入以下网址将可以看到https开启了:

可以看到13服务器有日志警告,不过无所吊谓:
[2023-12-12T23:04:38,187][INFO ][o.e.c.s.ClusterApplierService] [node-2] added {{node-1}{Ihs-2_jwTte3q7zd82z9cg}{2ooshKAZR4epjmfAJ0U2IQ}{192.168.123.11}{192.168.123.11:9300}{ml.machine_memory=8975544320, ml.max_open_jobs=20, ml.enabled=true},}, reason: apply cluster state (from master [master {node-3}{kZxWJkP1Tjqo1DkDLcKg0w}{qPA_ePYYTW21FGt2xhMe8A}{192.168.123.13}{192.168.123.13:9300}{ml.machine_memory=8370089984, ml.max_open_jobs=20, ml.enabled=true} committed version [80]])
[2023-12-12T23:05:20,748][WARN ][o.e.x.s.t.n.SecurityNetty4HttpServerTransport] [node-2] http client did not trust this server's certificate, closing connection [id: 0x240d6693, L:0.0.0.0/0.0.0.0:19200 ! R:/192.168.123.1:59482]
[2023-12-12T23:05:20,748][WARN ][o.e.x.s.t.n.SecurityNetty4HttpServerTransport] [node-2] http client did not trust this server's certificate, closing connection [id: 0xef2c0f9e, L:0.0.0.0/0.0.0.0:19200 ! R:/192.168.123.1:59483]
[2023-12-12T23:05:28,605][WARN ][o.e.x.s.t.n.SecurityNetty4HttpServerTransport] [node-2] http client did not trust this server's certificate, closing connection [id: 0x8abd3207, L:0.0.0.0/0.0.0.0:19200 ! R:/192.168.123.1:59488]
[2023-12-12T23:05:43,343][WARN ][o.e.x.s.t.n.SecurityNetty4HttpServerTransport] [node-2] http client did not trust this server's certificate, closing connection [id: 0xd9b903fb, L:0.0.0.0/0.0.0.0:19200 ! R:/192.168.123.1:59489]
四,
报错一览:
[2023-12-12T22:07:44,555][ERROR][o.e.b.Bootstrap          ] Exception
java.lang.IllegalStateException: failed to load plugin class [org.elasticsearch.xpack.core.XPackPlugin]at org.elasticsearch.plugins.PluginsService.loadPlugin(PluginsService.java:563) ~[elasticsearch-6.2.4.jar:6.2.4]at org.elasticsearch.plugins.PluginsService.loadBundle(PluginsService.java:505) ~[elasticsearch-6.2.4.jar:6.2.4]at org.elasticsearch.plugins.PluginsService.loadBundles(PluginsService.java:422) ~[elasticsearch-6.2.4.jar:6.2.4]at org.elasticsearch.plugins.PluginsService.<init>(PluginsService.java:146) ~[elasticsearch-6.2.4.jar:6.2.4]at org.elasticsearch.node.Node.<init>(Node.java:303) ~[elasticsearch-6.2.4.jar:6.2.4]at org.elasticsearch.node.Node.<init>(Node.java:246) ~[elasticsearch-6.2.4.jar:6.2.4]at org.elasticsearch.bootstrap.Bootstrap$5.<init>(Bootstrap.java:213) ~[elasticsearch-6.2.4.jar:6.2.4]at org.elasticsearch.bootstrap.Bootstrap.setup(Bootstrap.java:213) ~[elasticsearch-6.2.4.jar:6.2.4]at org.elasticsearch.bootstrap.Bootstrap.init(Bootstrap.java:323) [elasticsearch-6.2.4.jar:6.2.4]at org.elasticsearch.bootstrap.Elasticsearch.init(Elasticsearch.java:121) [elasticsearch-6.2.4.jar:6.2.4]at org.elasticsearch.bootstrap.Elasticsearch.execute(Elasticsearch.java:112) [elasticsearch-6.2.4.jar:6.2.4]at org.elasticsearch.cli.EnvironmentAwareCommand.execute(EnvironmentAwareCommand.java:86) [elasticsearch-6.2.4.jar:6.2.4]at org.elasticsearch.cli.Command.mainWithoutErrorHandling(Command.java:124) [elasticsearch-cli-6.2.4.jar:6.2.4]at org.elasticsearch.cli.Command.main(Command.java:90) [elasticsearch-cli-6.2.4.jar:6.2.4]at org.elasticsearch.bootstrap.Elasticsearch.main(Elasticsearch.java:92) [elasticsearch-6.2.4.jar:6.2.4]at org.elasticsearch.bootstrap.Elasticsearch.main(Elasticsearch.java:85) [elasticsearch-6.2.4.jar:6.2.4]
Caused by: java.lang.reflect.InvocationTargetExceptionat sun.reflect.NativeConstructorAccessorImpl.newInstance0(Native Method) ~[?:?]at sun.reflect.NativeConstructorAccessorImpl.newInstance(NativeConstructorAccessorImpl.java:62) ~[?:?]at sun.reflect.DelegatingConstructorAccessorImpl.newInstance(DelegatingConstructorAccessorImpl.java:45) ~[?:?]at java.lang.reflect.Constructor.newInstance(Constructor.java:423) ~[?:1.8.0_392]at org.elasticsearch.plugins.PluginsService.loadPlugin(PluginsService.java:554) ~[elasticsearch-6.2.4.jar:6.2.4]... 15 more
Caused by: org.elasticsearch.ElasticsearchException: failed to initialize a TrustManagerFactoryat org.elasticsearch.xpack.core.ssl.StoreTrustConfig.createTrustManager(StoreTrustConfig.java:72) ~[?:?]at org.elasticsearch.xpack.core.ssl.SSLService.createSslContext(SSLService.java:419) ~[?:?]at java.util.HashMap.computeIfAbsent(HashMap.java:1128) ~[?:1.8.0_392]at org.elasticsearch.xpack.core.ssl.SSLService.lambda$loadSSLConfigurations$0(SSLService.java:465) ~[?:?]at java.util.ArrayList.forEach(ArrayList.java:1259) ~[?:1.8.0_392]at org.elasticsearch.xpack.core.ssl.SSLService.loadSSLConfigurations(SSLService.java:464) ~[?:?]at org.elasticsearch.xpack.core.ssl.SSLService.<init>(SSLService.java:91) ~[?:?]at org.elasticsearch.xpack.core.XPackPlugin.<init>(XPackPlugin.java:127) ~[?:?]at sun.reflect.NativeConstructorAccessorImpl.newInstance0(Native Method) ~[?:?]at sun.reflect.NativeConstructorAccessorImpl.newInstance(NativeConstructorAccessorImpl.java:62) ~[?:?]at sun.reflect.DelegatingConstructorAccessorImpl.newInstance(DelegatingConstructorAccessorImpl.java:45) ~[?:?]at java.lang.reflect.Constructor.newInstance(Constructor.java:423) ~[?:1.8.0_392]at org.elasticsearch.plugins.PluginsService.loadPlugin(PluginsService.java:554) ~[elasticsearch-6.2.4.jar:6.2.4]... 15 more
Caused by: java.io.IOException: keystore password was incorrectat sun.security.pkcs12.PKCS12KeyStore.engineLoad(PKCS12KeyStore.java:2089) ~[?:?]at java.security.KeyStore.load(KeyStore.java:1445) ~[?:1.8.0_392]at org.elasticsearch.xpack.core.ssl.CertUtils.readKeyStore(CertUtils.java:276) ~[?:?]at org.elasticsearch.xpack.core.ssl.CertUtils.trustManager(CertUtils.java:267) ~[?:?]at org.elasticsearch.xpack.core.ssl.StoreTrustConfig.createTrustManager(StoreTrustConfig.java:70) ~[?:?]at org.elasticsearch.xpack.core.ssl.SSLService.createSslContext(SSLService.java:419) ~[?:?]at java.util.HashMap.computeIfAbsent(HashMap.java:1128) ~[?:1.8.0_392]at org.elasticsearch.xpack.core.ssl.SSLService.lambda$loadSSLConfigurations$0(SSLService.java:465) ~[?:?]at java.util.ArrayList.forEach(ArrayList.java:1259) ~[?:1.8.0_392]at org.elasticsearch.xpack.core.ssl.SSLService.loadSSLConfigurations(SSLService.java:464) ~[?:?]at org.elasticsearch.xpack.core.ssl.SSLService.<init>(SSLService.java:91) ~[?:?]at org.elasticsearch.xpack.core.XPackPlugin.<init>(XPackPlugin.java:127) ~[?:?]at sun.reflect.NativeConstructorAccessorImpl.newInstance0(Native Method) ~[?:?]at sun.reflect.NativeConstructorAccessorImpl.newInstance(NativeConstructorAccessorImpl.java:62) ~[?:?]at sun.reflect.DelegatingConstructorAccessorImpl.newInstance(DelegatingConstructorAccessorImpl.java:45) ~[?:?]at java.lang.reflect.Constructor.newInstance(Constructor.java:423) ~[?:1.8.0_392]at org.elasticsearch.plugins.PluginsService.loadPlugin(PluginsService.java:554) ~[elasticsearch-6.2.4.jar:6.2.4]
以上报错关键词是java.io.IOException: keystore password was incorrect和 sun.reflect.NativeConstructorAccessorImpl.newInstance0(Native Method)
很明显是io读写错误,根本原因是无权读写,这里说的应该是前面添加的证书文件没有添加es属组才造成的,因此,chown -Rf /data/es ,在重启服务,发现没有报错了
五,
简单的elasticsearch的api使用
1,
查看所有节点
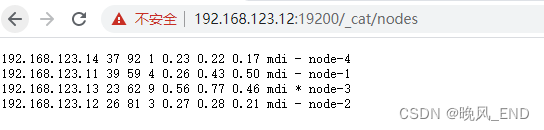
[root@node1 x-pack]# curl -k -XGET https://192.168.123.11:19200/_cat/nodes -uelastic
Enter host password for user 'elastic':
192.168.123.14 45 93 0 0.28 0.26 0.32 mdi - node-4
192.168.123.13 26 63 2 0.36 0.18 0.20 mdi * node-3
192.168.123.12 23 81 1 0.54 0.34 0.29 mdi - node-2
192.168.123.11 36 61 1 0.06 0.15 0.20 mdi - node-1第一列(ip):es节点ip
第二列(heap.percent):堆内存占比
第三列(ram.percent):内存使用占比
第四列(cpu):cpu使用率
第五列(load_1m):1分钟内平均load情况,ms
第六列(load_5m):5分钟内平均load情况,ms
第七列(load_15m):15分钟内平均load情况,ms
第八列(node.role):节点权限
第九列(master):是否master节点,*为master节点
第十列(name):节点名称
2,
查看所有索引信息:
[root@node1 x-pack]# curl -k -XGET https://192.168.123.11:19200/_cat/indices -uelastic
Enter host password for user 'elastic':
green open .watcher-history-7-2023.12.09 _WVuCnwrSlGtYaLbSAfbLg 1 1   549     0   1.5mb 808.3kb
green open .watcher-history-7-2023.12.10 zcAH_IgISayByx6-K4ueGQ 1 1  3989     0  11.3mb   5.6mb
green open .monitoring-alerts-6          Pm5Cw8UkQAamSkvOxccFow 1 1     7     0  84.1kb    42kb
green open .triggered_watches            -XApiGASS1a_jDOQMmthaA 1 1     0     0 146.5kb  73.2kb
green open .monitoring-es-6-2023.12.09   4GLFZLlsRH6nj4ZKIUsxvw 1 1  7439    28     9mb   4.5mb
green open .monitoring-es-6-2023.12.10   h1y4V6UMQFGecE78sfBqIA 1 1 58643 31012  81.1mb  40.5mb
green open my_index                      ApVYPzGuQS60iOFF_ur6nA 5 1     2     0  17.9kb   8.9kb
green open .watcher-history-7-2023.12.12 XZkWSqt1Txm-vpSCYWMlNg 1 1   585     0     2mb     1mb
green open .security-6                   VMkr4AP3TbOI1fVJCF9ZJQ 1 3     3     0  39.4kb   9.8kb
green open .watches                      S9Gd2ZUuTtazqQpN45sx9Q 1 1     6     0 469.1kb  58.7kb
green open .monitoring-es-6-2023.12.12   HkMeJ9DAQSue1nZJrRMtYg 1 1 10765    32  16.5mb   8.2mbhealth:	索引的健康状态
status:	索引的开启状态
index:	索引名字
uuid:	索引的uuid
pri:	索引的主分片数量
rep:	索引的复制分片数量
docs.count:	索引下的文档总数
docs.deleted:	索引下删除状态的文档数
store.size:	主分片+复制分片的大小
pri.store.size:	主分片的大小
3,
查看节点的健康状态:
[root@node1 x-pack]# curl -k -XGET https://192.168.123.11:19200/_cat/health -uelastic
Enter host password for user 'elastic':
1702398729 00:32:09 myes green 4 4 32 15 0 0 0 0 - 100.0%epoch:	自标准时间(1970-01-01 00:00:00)以来的秒数
timestamp:	时间
cluster:	集群名称
status:	集群状态
node.total:	节点总数
node.data:	数据节点总数
shards:	分片总数
pri:	主分片总数
repo:	复制节点的数量
init:	初始化节点的数量
unassign:	未分配分片的数量
pending_tasks:	待定任务数
max_task_wait_time:	等待最长任务的等待时间
active_shards_percent:	活动分片百分比
这里集群状态为绿色green表示健康,黄色yellow表示集群有问题,需要介入排查问题,红色red表示集群不求行了,需要深度介入,要不就是摆烂,一拍两散。
全部主分片为active状态则为绿色,active的判断标准是分片为started或relocating状态,
备注:当source节点的分片处于relocating,那么target节点的同个分片处于INITIALIZING。INITIALIZING状态可能是节点从其他节点恢复(relocating、replica copy)、snapshot恢复或者从本地恢复
简单的说
绿色:索引的所有分片都正常分配。
黄色:至少有一个副本没有得到正确的分配。
红色:至少有一个主分片没有得到正确的分配。
3.
查看集群所有的索引的状态:
[root@node1 x-pack]# curl -k -XGET https://192.168.123.11:19200/_cluster/health?level=indices  -uelastic
Enter host password for user 'elastic':
{"cluster_name":"myes","status":"green","timed_out":false,"number_of_nodes":4,"number_of_data_nodes":4,"active_primary_shards":15,"active_shards":32,"relocating_shards":0,"initializing_shards":0,"unassigned_shards":0,"delayed_unassigned_shards":0,"number_of_pending_tasks":0,"number_of_in_flight_fetch":0,"task_max_waiting_in_queue_millis":0,"active_shards_percent_as_number":100.0,"indices":{".monitoring-es-6-2023.12.10":{"status":"green","number_of_shards":1,"number_of_replicas":1,"active_primary_shards":1,"active_shards":2,"relocating_shards":0,"initializing_shards":0,"unassigned_shards":0},".watcher-history-7-2023.12.09":{"status":"green","number_of_shards":1,"number_of_replicas":1,"active_primary_shards":1,"active_shards":2,"relocating_shards":0,"initializing_shards":0,"unassigned_shards":0},".triggered_watches":{"status":"green","number_of_shards":1,"number_of_replicas":1,"active_primary_shards":1,"active_shards":2,"relocating_shards":0,"initializing_shards":0,"unassigned_shards":0},".monitoring-es-6-2023.12.12":{"status":"green","number_of_shards":1,"number_of_replicas":1,"active_primary_shards":1,"active_shards":2,"relocating_shards":0,"initializing_shards":0,"unassigned_shards":0},".monitoring-alerts-6":{"status":"green","number_of_shards":1,"number_of_replicas":1,"active_primary_shards":1,"active_shards":2,"relocating_shards":0,"initializing_shards":0,"unassigned_shards":0},"my_index":{"status":"green","number_of_shards":5,"number_of_replicas":1,"active_primary_shards":5,"active_shards":10,"relocating_shards":0,"initializing_shards":0,"unassigned_shards":0},".watcher-history-7-2023.12.12":{"status":"green","number_of_shards":1,"number_of_replicas":1,"active_primary_shards":1,"active_shards":2,"relocating_shards":0,"initializing_shards":0,"unassigned_shards":0},".monitoring-es-6-2023.12.09":{"status":"green","number_of_shards":1,"number_of_replicas":1,"active_primary_shards":1,"active_shards":2,"relocating_shards":0,"initializing_shards":0,"unassigned_shards":0},".watcher-history-7-2023.12.10":{"status":"green","number_of_shards":1,"number_of_replicas":1,"active_primary_shards":1,"active_shards":2,"relocating_shards":0,"initializing_shards":0,"unassigned_shards":0},".watches":{"status":"green","number_of_shards":1,"number_of_replicas":1,"active_primary_shards":1,"active_shards":2,"relocating_shards":0,"initializing_shards":0,"unassigned_shards":0},".security-6":{"status":"green","number_of_shards":1,"number_of_replicas":3,"active_primary_shards":1,"active_shards":4,"relocating_shards":0,"initializing_shards":0,"unassigned_shards":0}}}
当然了,我这个示例健康的很
4,
在使用的插件信息:
这个没什么好说的,我现在就只用了x-pack插件
[root@node1 x-pack]# curl -k -XGET https://192.168.123.11:19200/_cat/plugins  -uelastic
Enter host password for user 'elastic':
node-4 x-pack-core        6.2.4
node-4 x-pack-deprecation 6.2.4
node-4 x-pack-graph       6.2.4
node-4 x-pack-logstash    6.2.4
node-4 x-pack-ml          6.2.4
node-4 x-pack-monitoring  6.2.4
node-4 x-pack-security    6.2.4
node-4 x-pack-upgrade     6.2.4
node-4 x-pack-watcher     6.2.4
node-3 x-pack-core        6.2.4
node-3 x-pack-deprecation 6.2.4
node-3 x-pack-graph       6.2.4
node-3 x-pack-logstash    6.2.4
node-3 x-pack-ml          6.2.4
node-3 x-pack-monitoring  6.2.4
node-3 x-pack-security    6.2.4
node-3 x-pack-upgrade     6.2.4
node-3 x-pack-watcher     6.2.4
node-2 x-pack-core        6.2.4
node-2 x-pack-deprecation 6.2.4
node-2 x-pack-graph       6.2.4
node-2 x-pack-logstash    6.2.4
node-2 x-pack-ml          6.2.4
node-2 x-pack-monitoring  6.2.4
node-2 x-pack-security    6.2.4
node-2 x-pack-upgrade     6.2.4
node-2 x-pack-watcher     6.2.4
node-1 x-pack-core        6.2.4
node-1 x-pack-deprecation 6.2.4
node-1 x-pack-graph       6.2.4
node-1 x-pack-logstash    6.2.4
node-1 x-pack-ml          6.2.4
node-1 x-pack-monitoring  6.2.4
node-1 x-pack-security    6.2.4
node-1 x-pack-upgrade     6.2.4
node-1 x-pack-watcher     6.2.4
5,
通过api重置用户密码
这个比较有意思,现在是启用了https,那么,https的时候怎么通过api重置呢?
一开始报错如下:
[root@node1 ~]# curl -k -H "Content-Type:application/json" -XPOST -u elastic  ‘https://192.168.123.11:19200/_xpack/security/user/elastic/_password‘ -d ‘{ "password" : "123456" }
Enter host password for user 'elastic':
curl: (1) Protocol ‘https not supported or disabled in libcurl
curl: (6) Could not resolve host: password; Unknown error
curl: (6) Could not resolve host: ; Unknown error
curl: (7) Failed to connect to 0.1.226.64: Invalid argument
curl: (3) [globbing] unmatched close brace/bracket at pos 1
关键报错是Protocol ‘https not supported or disabled in libcurl,根据百度信息,说是curl命令可能不支持https,OK,curl -V 命令可以查询到,是支持https的,-k参数也添加了:
(不支持https的curl版本是curl 7.19.4,而我的版本是7.29.0)
[root@node1 ~]# curl -V
curl 7.29.0 (x86_64-redhat-linux-gnu) libcurl/7.29.0 NSS/3.36 zlib/1.2.7 libidn/1.28 libssh2/1.4.3
Protocols: dict file ftp ftps gopher http https imap imaps ldap ldaps pop3 pop3s rtsp scp sftp smtp smtps telnet tftp
Features: AsynchDNS GSS-Negotiate IDN IPv6 Largefile NTLM NTLM_WB SSL libz unix-sockets
OK,暂时无果后,继续找寻解决办法,有一个博文说了https也就是URL要使用双引号包裹,报错的命令里是单引号,那就试一试,命令更改为如下:
[root@node1 ~]# curl -k  -H "Content-Type:application/json" -XPOST -u elastic  "https://192.168.123.11:19200/_xpack/security/user/elastic/_password" -d '{ "password" : "123456" }'
Enter host password for user 'elastic':
{}
完美重置密码!!!
6,
查看所有用户的信息
[root@node1 ~]# curl -k  -H "Content-Type:application/json" -XGET   "https://192.168.123.11:19200/_xpack/security/user" -uelastic
Enter host password for user 'elastic':
{"elastic":{"username":"elastic","roles":["superuser"],"full_name":null,"email":null,"metadata":{"_reserved":true},"enabled":true},"kibana":{"username":"kibana","roles":["kibana_system"],"full_name":null,"email":null,"metadata":{"_reserved":true},"enabled":true},"logstash_system":{"username":"logstash_system","roles":["logstash_system"],"full_name":null,"email":null,"metadata":{"_reserved":true},"enabled":true}}
相关文章:
elasticsearch|大数据|elasticsearch的api部分实战操作以及用户和密码的管理
一, 前言 本文主要内容是通过elasticsearch的api来进行一些集群的管理和信息查询工作,以及elasticsearch用户的增删改查和密码的重设以及重置如何操作 接上文:elasticsearch|大数据|elasticsearch低版本集群的部署安装和安全增强---密码设…...

Android多进程和跨进程通讯方式
前言 我们经常开发过程中经常会听到线程和进程,在讲述Android进程多进程前我打算先简单梳理一下这俩者。 了解什么是进程与线程 进程: 系统中正在运行的一个应用程序,某个程序一旦运行就是一个进程,是资源分配的最小单位&#…...

通过Jenkins将应用发布到K8s1.24.3
一、准备基础环境 cat >> /etc/hosts <<EOF 192.168.180.210 k8s-master 192.168.180.200 k8s-node1 192.168.180.190 k8s-node2 192.168.180.180 gitlab 192.168.180.170 jenkins 192.168.180.160 harbor EOF 配置主机名 hostnamectl set-hostname k8s-master &am…...

正则表达式入门与实践
文章目录 一、为什么要有正则二、正则表达式基础概念三、Pattern与Matcher类的使用(一)Pattern类的常用方法(二)Matcher类的常用方法四、常用正则规则及其含义(一)规范表示(二)数量表示(三)逻辑运算符五、String对正则表达式的支持六、实践演练(一)匹配给定文本中的…...
C++初阶(十六)优先级队列
📘北尘_:个人主页 🌎个人专栏:《Linux操作系统》《经典算法试题 》《C》 《数据结构与算法》 ☀️走在路上,不忘来时的初心 文章目录 一、priority_queue的介绍和使用1、priority_queue的介绍2、priority_queue的使用 二、priori…...

深入探索C语言中的二叉树:数据结构之旅
引言 在计算机科学领域,数据结构是基础中的基础。在众多数据结构中,二叉树因其在各种操作中的高效性而脱颖而出。二叉树是一种特殊的树形结构,每个节点最多有两个子节点:左子节点和右子节点。这种结构使得搜索、插入、删除等操作…...

如何发现服务器被入侵了,服务器被入侵了该如何处理?
作为现代社会的重要基础设施之一,服务器的安全性备受关注。服务器被侵入可能导致严重的数据泄露、系统瘫痪等问题,因此及时排查服务器是否被侵入,成为了保障信息安全的重要环节。小德将给大家介绍服务器是否被侵入的排查方案,并采…...
CSDN一键注释功能
这是什么牛逼哄哄的功能 看这里: 然后: 再试一个: 输出结果是?package yuyi03.interview;/*** ClassName: InterviewTest2* Package: yuyi03.interview* Description:** Author 雨翼轻尘* Create 2023/12/14 0014 0:08*/ publ…...
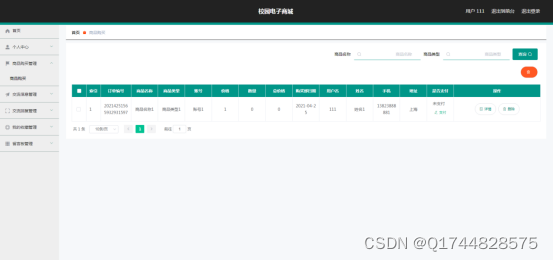
基于JAVA的校园电子商城系统论文
摘 要 网络技术和计算机技术发展至今,已经拥有了深厚的理论基础,并在现实中进行了充分运用,尤其是基于计算机运行的软件更是受到各界的关注。加上现在人们已经步入信息时代,所以对于信息的宣传和管理就很关键。因此校园购物信息的…...

直播传媒公司网站搭建作用如何
直播已然成为抖快等平台的主要生态之一,近些年主播也成为了一种新行业,相关的mcn机构直播传播公司等也时有开业,以旗下主播带来高盈利,而在实际运作中也有一些痛点难题: 1、机构宣传展示难 不少散主播往往会选择合作…...

数据结构与算法-动态规划-机器人达到指定位置方法数
机器人达到指定位置方法数 来自左程云老师书中的一道题 【题目】 假设有排成一行的 N 个位置,记为 1~N,N 一定大于或等于 2。开始时机器人在其中的 M 位置上(M 一定是 1~N 中的一个),机器人可以往左走或…...
-docker的基本使用)
K8S学习指南(2)-docker的基本使用
文章目录 引言安装 DockerDocker 基本概念1. 镜像(Images)示例:拉取并运行一个 Nginx 镜像 2. 容器(Containers)示例:查看运行中的容器 3. 仓库(Repository)示例:推送镜像…...

java 执行linux 命令
文章目录 前言一、linux命令执行二、使用步骤三、踩坑 前言 java 执行linux 命令; 本文模拟复制linux文件到指定文件夹后打zip包后返回zip名称,提供给下载接口下载zip; 一、linux命令执行 linux命令执行Process process Runtime.getRunti…...
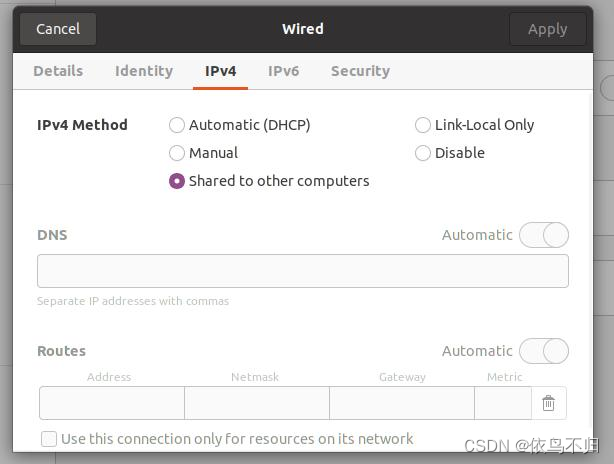
ubuntu将本机的wifi网络通过网线分享给另一台机器(用于没有有线网络,重装系统后无wifi驱动或者另一台设备没有wifi网卡)
1.将两台机器通过网线连接 2.在pci ethernet中设置选择另一台机器的mac address,ipv4中选择share to other computer,另一台机器上设置为动态ip,连接上之后另一台机器即可上网。...

Docker + Jenkins + Gitee 自动化部署项目
1.简介 各位看官老爷,本文为Jenkins实战,注重实际过程,阅读完会有以下收获: 了解如何使用Docker安装Jenkins了解如何使用Jenkins部署maven项目了解如何使用JenkinsGitee实现自动化部署 2.Jenkins介绍 相信,正在读这…...

ChatGPT 应用开发(一)ChatGPT OpenAI API 免代理调用方式(通过 Cloudflare 的 AI Gateway)
前言 开发 ChatGPT 应用,我觉得最前置的点就是能使用 ChatGPT API 接口。首先我自己要能成功访问,这没问题,会魔法就可以本地调用。 那用户如何调用到我的应用 API 呢,我的理解是通过用户能访问到的中转服务器向 OpenAI 发起访问…...

【TC3xx】GETH
目录 一、RGMII 二、SMI接口 三、TC3xx MCAL 3.1 MCU 3.2 Port 3.3 DMA 3.4 中断配置 3.5 ETH 3.6 集成 一、RGMII TC3xx支持MII/RMII/RGMII三种以太网数据通信接口。其中RGMII经常用于MAC和MAC之间,或MAC与PHY之间的通信,RGMII的带宽可以是10M…...
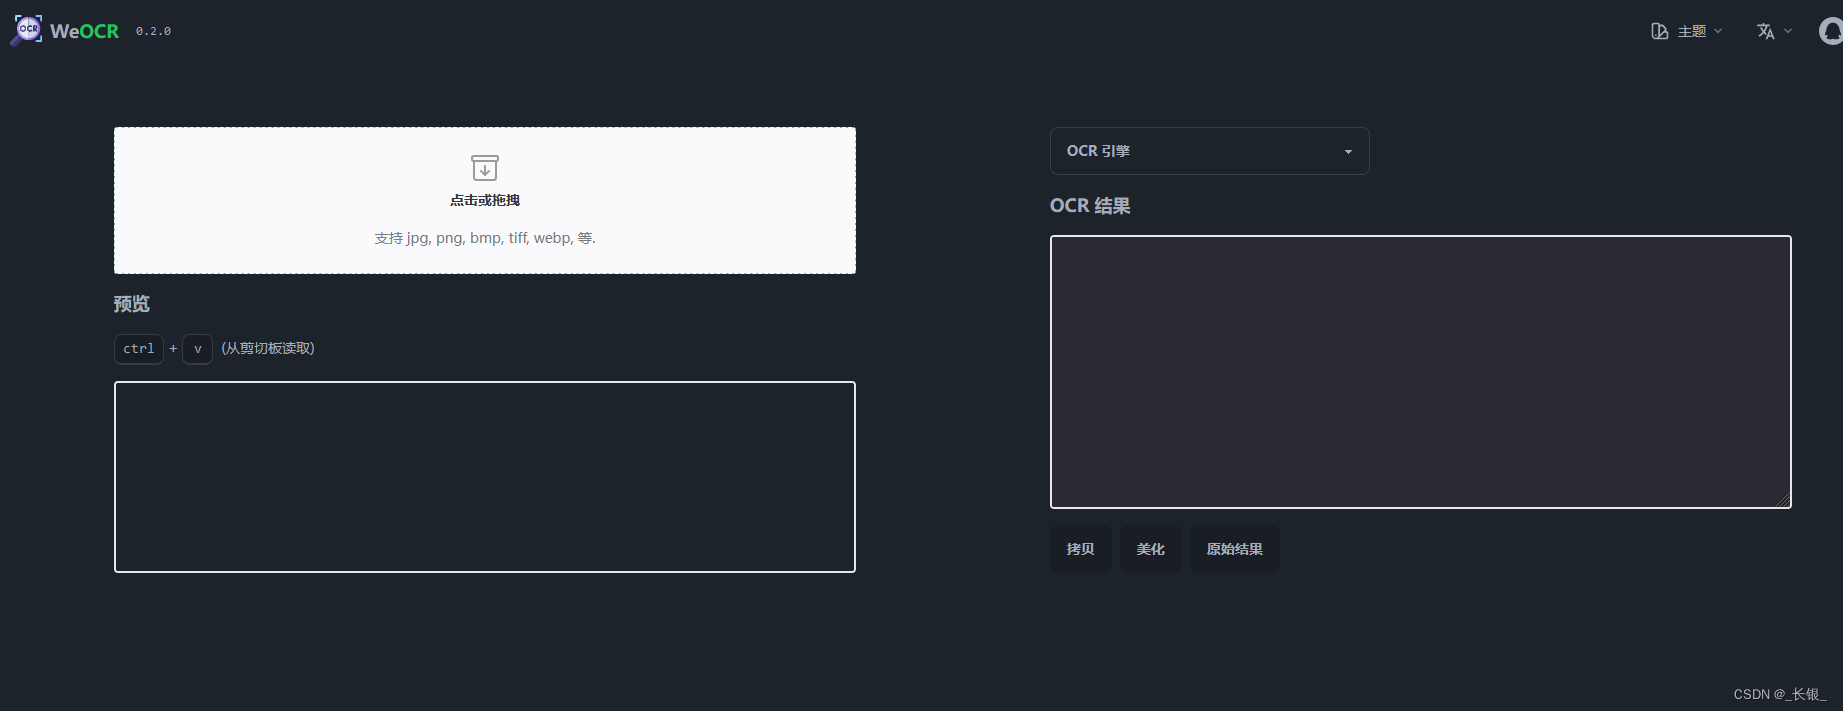
不需要联网的ocr项目
地址 GitHub - plantree/ocr-pwa: A simple PWA for OCR, based on Tesseract. 协议 mit 界面 推荐理由 可以离线使用,隐私安全...

【Git使用总结】
Git使用总结 随着软件开发和团队协作的日益重要,Git作为一种强大的版本控制系统,已经成为了开发人员不可或缺的工具。本文将对Git的使用进行总结,以帮助读者更好地掌握Git的用法和技巧。 一、Git的基本概念 在开始使用Git之前,…...

仿照MyBatis手写一个持久层框架学习
首先数据准备,创建MySQL数据库mybatis,创建表并插入数据。 DROP TABLE IF EXISTS user_t; CREATE TABLE user_t ( id INT PRIMARY KEY, username VARCHAR ( 128 ) ); INSERT INTO user_t VALUES(1,Tom); INSERT INTO user_t VALUES(2,Jerry);JDBC API允…...

前端倒计时误差!
提示:记录工作中遇到的需求及解决办法 文章目录 前言一、误差从何而来?二、五大解决方案1. 动态校准法(基础版)2. Web Worker 计时3. 服务器时间同步4. Performance API 高精度计时5. 页面可见性API优化三、生产环境最佳实践四、终极解决方案架构前言 前几天听说公司某个项…...
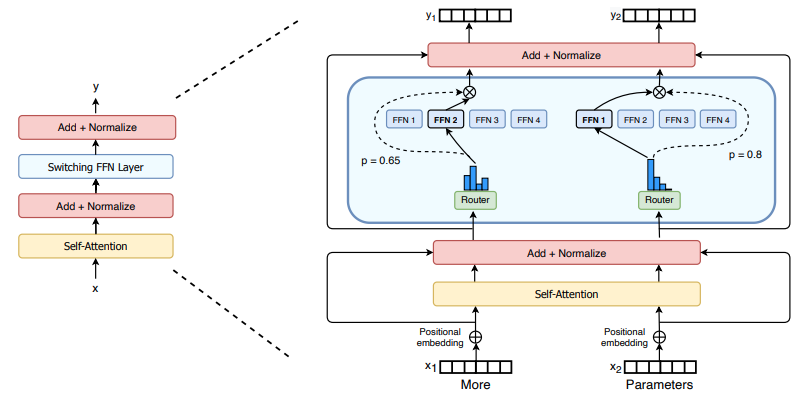
(二)TensorRT-LLM | 模型导出(v0.20.0rc3)
0. 概述 上一节 对安装和使用有个基本介绍。根据这个 issue 的描述,后续 TensorRT-LLM 团队可能更专注于更新和维护 pytorch backend。但 tensorrt backend 作为先前一直开发的工作,其中包含了大量可以学习的地方。本文主要看看它导出模型的部分&#x…...

JAVA后端开发——多租户
数据隔离是多租户系统中的核心概念,确保一个租户(在这个系统中可能是一个公司或一个独立的客户)的数据对其他租户是不可见的。在 RuoYi 框架(您当前项目所使用的基础框架)中,这通常是通过在数据表中增加一个…...

Python Ovito统计金刚石结构数量
大家好,我是小马老师。 本文介绍python ovito方法统计金刚石结构的方法。 Ovito Identify diamond structure命令可以识别和统计金刚石结构,但是无法直接输出结构的变化情况。 本文使用python调用ovito包的方法,可以持续统计各步的金刚石结构,具体代码如下: from ovito…...

pycharm 设置环境出错
pycharm 设置环境出错 pycharm 新建项目,设置虚拟环境,出错 pycharm 出错 Cannot open Local Failed to start [powershell.exe, -NoExit, -ExecutionPolicy, Bypass, -File, C:\Program Files\JetBrains\PyCharm 2024.1.3\plugins\terminal\shell-int…...
基于小程序老人监护管理系统源码数据库文档
摘 要 近年来,随着我国人口老龄化问题日益严重,独居和居住养老机构的的老年人数量越来越多。而随着老年人数量的逐步增长,随之而来的是日益突出的老年人问题,尤其是老年人的健康问题,尤其是老年人产生健康问题后&…...
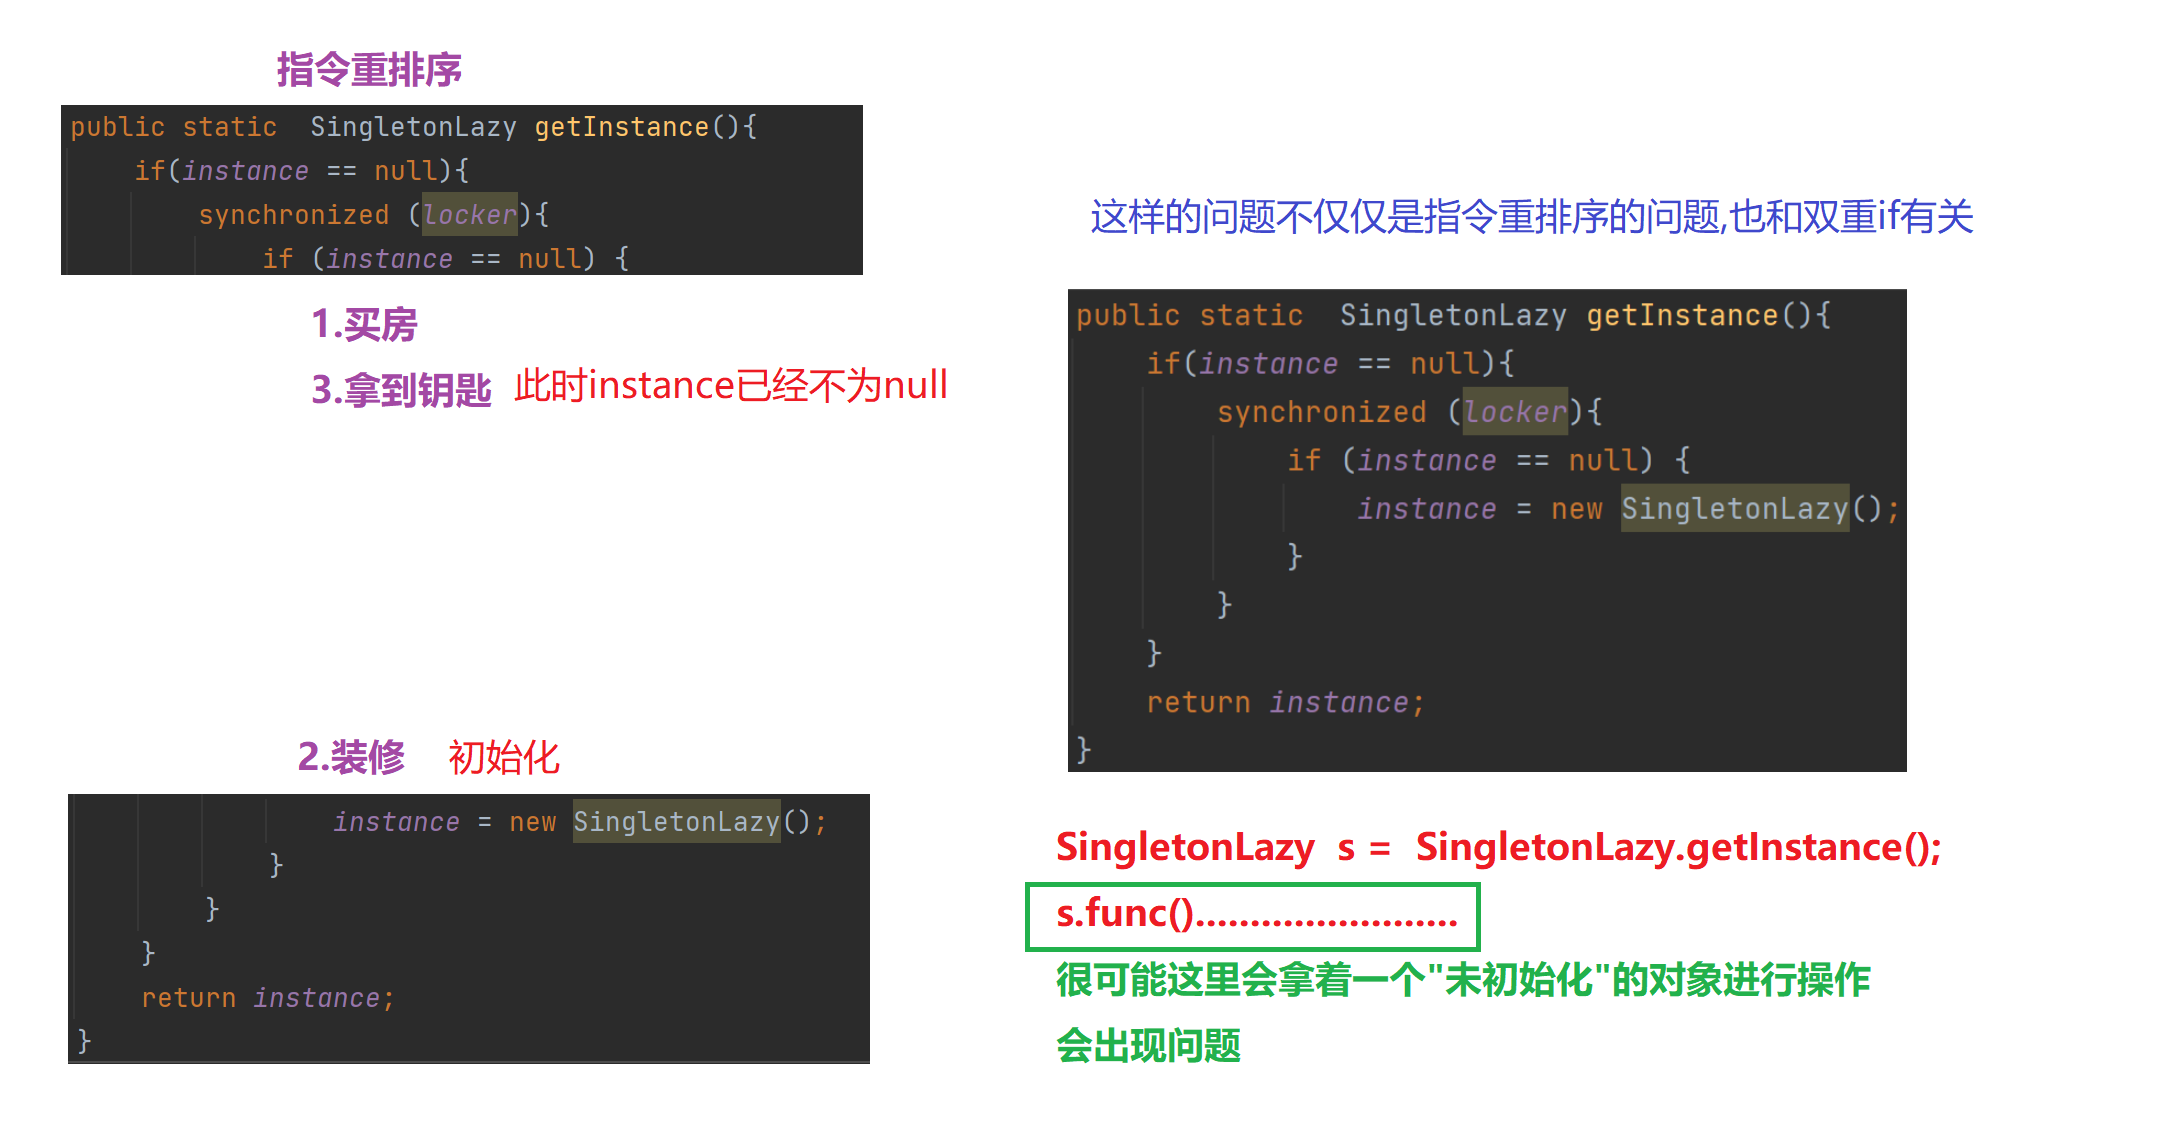
【多线程初阶】单例模式 指令重排序问题
文章目录 1.单例模式1)饿汉模式2)懒汉模式①.单线程版本②.多线程版本 2.分析单例模式里的线程安全问题1)饿汉模式2)懒汉模式懒汉模式是如何出现线程安全问题的 3.解决问题进一步优化加锁导致的执行效率优化预防内存可见性问题 4.解决指令重排序问题 1.单例模式 单例模式确保某…...

LINUX编译vlc
下载 VideoLAN / VLC GitLab 选择最新的发布版本 准备 sudo apt install -y xcb bison sudo apt install -y autopoint sudo apt install -y autoconf automake libtool编译ffmpeg LINUX FFMPEG编译汇总(最简化)_底部的附件列表中】: ffmpeg - lzip…...
代理服务器-LVS的3种模式与调度算法
作者介绍:简历上没有一个精通的运维工程师。请点击上方的蓝色《运维小路》关注我,下面的思维导图也是预计更新的内容和当前进度(不定时更新)。 我们上一章介绍了Web服务器,其中以Nginx为主,本章我们来讲解几个代理软件:…...

今日行情明日机会——20250609
上证指数放量上涨,接近3400点,个股涨多跌少。 深证放量上涨,但有个小上影线,相对上证走势更弱。 2025年6月9日涨停股主要行业方向分析(基于最新图片数据) 1. 医药(11家涨停) 代表标…...