RabbitMq基本使用
目录
- SpringAMQP
- 1.准备Demo工程
- 2.快速入门
- 1.1.消息发送
- 1.2.消息接收
- 1.3.测试
- 3.WorkQueues模型
- 3.1.消息发送
- 3.2.消息接收
- 3.3.测试
- 3.4.能者多劳
- 3.5.总结
SpringAMQP
将来我们开发业务功能的时候,肯定不会在控制台收发消息,而是应该基于编程的方式。由于RabbitMQ采用了AMQP协议,因此它具备跨语言的特性。任何语言只要遵循AMQP协议收发消息,都可以与RabbitMQ交互。并且RabbitMQ官方也提供了各种不同语言的客户端。
但是,RabbitMQ官方提供的Java客户端编码相对复杂,一般生产环境下我们更多会结合Spring来使用。而Spring的官方刚好基于RabbitMQ提供了这样一套消息收发的模板工具:SpringAMQP。并且还基于SpringBoot对其实现了自动装配,使用起来非常方便。
SpringAmqp的官方地址:
Spring AMQP
SpringAMQP提供了三个功能:
- 自动声明队列、交换机及其绑定关系
- 基于注解的监听器模式,异步接收消息
- 封装了RabbitTemplate工具,用于发送消息
这一章我们就一起学习一下,如何利用SpringAMQP实现对RabbitMQ的消息收发。
1.准备Demo工程
在父工程下建立两个新模块 consumer 和 publisher,暂时不需要添加任何依赖,使用 maven 作为管理工具。
创建项目 SpringBoot 启动依赖,名字为 ConsumerApplication 和 PublisherApplication。
package com.example.consumer;import org.springframework.boot.SpringApplication;
import org.springframework.boot.autoconfigure.SpringBootApplication;@SpringBootApplication
public class ConsumerApplication {public static void main(String[] args) {SpringApplication.run(ConsumerApplication.class, args);}
}
package com.example.publisher;import org.springframework.boot.SpringApplication;
import org.springframework.boot.autoconfigure.SpringBootApplication;@SpringBootApplication
public class PublisherApplication {public static void main(String[] args) {SpringApplication.run(PublisherApplication.class);}
}
用Idea打开,项目结构如图:
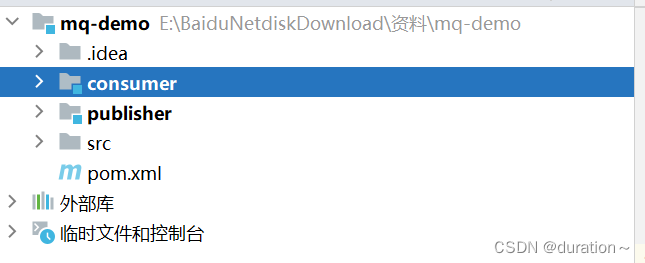
包括三部分:
- mq-demo:父工程,管理项目依赖
- publisher:消息的发送者
- consumer:消息的消费者
在mq-demo这个父工程中,已经配置好了SpringAMQP相关的依赖:
<?xml version="1.0" encoding="UTF-8"?>
<project xmlns="http://maven.apache.org/POM/4.0.0"xmlns:xsi="http://www.w3.org/2001/XMLSchema-instance"xsi:schemaLocation="http://maven.apache.org/POM/4.0.0 http://maven.apache.org/xsd/maven-4.0.0.xsd"><modelVersion>4.0.0</modelVersion><groupId>cn.example.demo</groupId><artifactId>mq-demo</artifactId><version>1.0-SNAPSHOT</version><modules><module>publisher</module><module>consumer</module></modules><packaging>pom</packaging><parent><groupId>org.springframework.boot</groupId><artifactId>spring-boot-starter-parent</artifactId><version>2.7.12</version><relativePath/></parent><properties><maven.compiler.source>8</maven.compiler.source><maven.compiler.target>8</maven.compiler.target></properties><dependencies><dependency><groupId>org.projectlombok</groupId><artifactId>lombok</artifactId></dependency><!--AMQP依赖,包含RabbitMQ--><dependency><groupId>org.springframework.boot</groupId><artifactId>spring-boot-starter-amqp</artifactId></dependency><!--单元测试--><dependency><groupId>org.springframework.boot</groupId><artifactId>spring-boot-starter-test</artifactId></dependency></dependencies>
</project>
因此,子工程中就可以直接使用SpringAMQP了。
2.快速入门
在之前的案例中,我们都是经过交换机发送消息到队列,不过有时候为了测试方便,我们也可以直接向队列发送消息,跳过交换机。
在入门案例中,我们就演示这样的简单模型,如图:

也就是:
- publisher直接发送消息到队列
- 消费者监听并处理队列中的消息
::: warning
注意:这种模式一般测试使用,很少在生产中使用。
:::
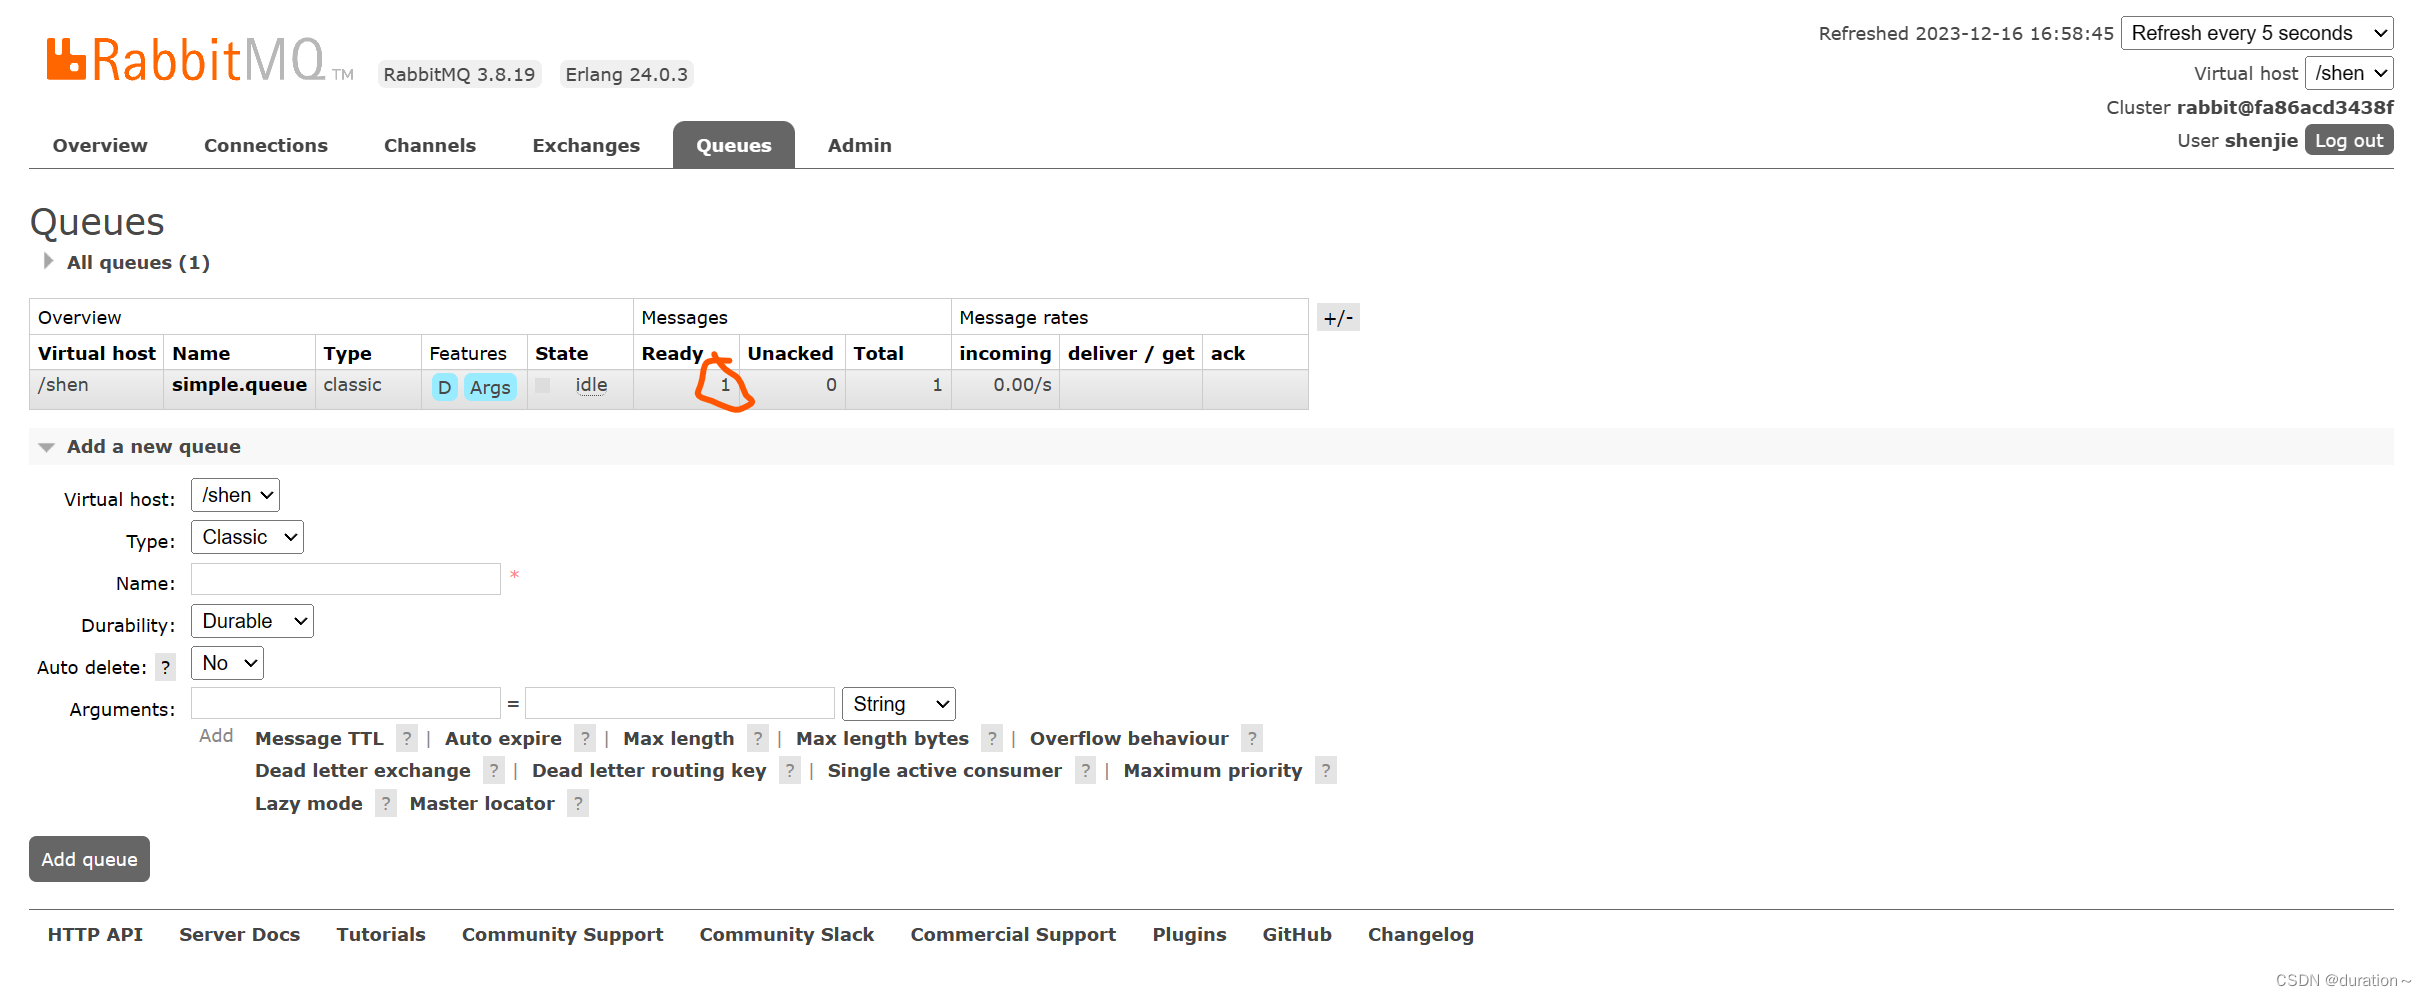
为了方便测试,我们现在控制台新建一个队列:simple.queue
添加成功:

接下来,我们就可以利用Java代码收发消息了。
1.1.消息发送
开启服务(之前已经创建了 docker 实例,并且名称为 myrabbitmq)
docker start myrabbitmq
首先配置MQ地址,在publisher服务的application.yml中添加配置:
spring:rabbitmq:host: 192.168.193.141 # 你的虚拟机IPport: 5672 # 客户端端口,之前的15672是管理界面virtual-host: /shen # 虚拟主机username: shenjie # 用户名password: 123456 # 密码
然后在publisher服务中编写测试类SpringAmqpTest,并利用RabbitTemplate实现消息发送:
package com.example.publisher;import org.junit.jupiter.api.Test;
import org.springframework.amqp.rabbit.core.RabbitTemplate;
import org.springframework.beans.factory.annotation.Autowired;
import org.springframework.boot.test.context.SpringBootTest;@SpringBootTestpublic class SpringAmqpTest {@Autowiredprivate RabbitTemplate rabbitTemplate;@Testvoid testSendMessage2Queue() {String queueName = "simple.queue";String msg = "hello,amqp";//注意这里的消息msg可以是任意Object类型。rabbitTemplate.convertAndSend(queueName,msg);}
}
打开控制台,可以看到消息已经发送到队列中:
接下来,我们再来实现消息接收。
1.2.消息接收
首先配置MQ地址,在consumer服务的application.yml中添加配置:
spring:rabbitmq:host: 192.168.193.141 # 你的虚拟机IPport: 5672 # 端口virtual-host: /shen # 虚拟主机username: shenjie # 用户名password: 123456 # 密码
然后在consumer服务的com.itheima.example.listener包中新建一个类SpringRabbitListener,代码如下:
package com.example.consumer.listeners;import lombok.extern.slf4j.Slf4j;
import org.springframework.amqp.rabbit.annotation.RabbitListener;
import org.springframework.stereotype.Component;@Slf4j
@Component
public class MqListenerTest {@RabbitListener(queues = {"simple.queue"})public void listenSimpleQueue(String msg){//取决于消息发送的类型,spring 自动转换消息类型// 利用RabbitListener来声明要监听的队列信息// 将来一旦监听的队列中有了消息,就会推送给当前服务,调用当前方法,处理消息。// 可以看到方法体中接收的就是消息体的内容System.out.println("spring 消费者接收到消息:【" + msg + "】");}}
1.3.测试
启动consumer服务,然后在publisher服务中运行测试代码,发送MQ消息。最终consumer收到消息:

3.WorkQueues模型
Work queues,任务模型。简单来说就是让多个消费者绑定到一个队列,共同消费队列中的消息。

当消息处理比较耗时的时候,可能生产消息的速度会远远大于消息的消费速度。长此以往,消息就会堆积越来越多,无法及时处理。
此时就可以使用work 模型,多个消费者共同处理消息处理,消息处理的速度就能大大提高了。
接下来,我们就来模拟这样的场景。
首先,我们在控制台创建一个新的队列,命名为work.queue:

3.1.消息发送
这次我们循环发送,模拟大量消息堆积现象。
在publisher服务中的SpringAmqpTest类中添加一个测试方法:
/*** workQueue* 向队列中不停发送消息,模拟消息堆积。*/
@Test
public void testWorkQueue() throws InterruptedException {// 队列名称String queueName = "simple.queue";// 消息String message = "hello, message_";for (int i = 0; i < 50; i++) {// 发送消息,每20毫秒发送一次,相当于每秒发送50条消息rabbitTemplate.convertAndSend(queueName, message + i);Thread.sleep(20);}
}
3.2.消息接收
要模拟多个消费者绑定同一个队列,我们在consumer服务的SpringRabbitListener中添加2个新的方法:
@RabbitListener(queues = "work.queue")
public void listenWorkQueue1(String msg) throws InterruptedException {System.out.println("消费者1接收到消息:【" + msg + "】" + LocalTime.now());Thread.sleep(20);
}@RabbitListener(queues = "work.queue")
public void listenWorkQueue2(String msg) throws InterruptedException {System.err.println("消费者2........接收到消息:【" + msg + "】" + LocalTime.now());Thread.sleep(200);
}
注意到这两消费者,都设置了Thead.sleep,模拟任务耗时:
- 消费者1 sleep了20毫秒,相当于每秒钟处理50个消息
- 消费者2 sleep了200毫秒,相当于每秒处理5个消息
3.3.测试
启动ConsumerApplication后,在执行publisher服务中刚刚编写的发送测试方法testWorkQueue。
最终结果如下:
消费者1接收到消息:【hello, message_0】21:06:00.869555300
消费者2........接收到消息:【hello, message_1】21:06:00.884518
消费者1接收到消息:【hello, message_2】21:06:00.907454400
消费者1接收到消息:【hello, message_4】21:06:00.953332100
消费者1接收到消息:【hello, message_6】21:06:00.997867300
消费者1接收到消息:【hello, message_8】21:06:01.042178700
消费者2........接收到消息:【hello, message_3】21:06:01.086478800
消费者1接收到消息:【hello, message_10】21:06:01.087476600
消费者1接收到消息:【hello, message_12】21:06:01.132578300
消费者1接收到消息:【hello, message_14】21:06:01.175851200
消费者1接收到消息:【hello, message_16】21:06:01.218533400
消费者1接收到消息:【hello, message_18】21:06:01.261322900
消费者2........接收到消息:【hello, message_5】21:06:01.287003700
消费者1接收到消息:【hello, message_20】21:06:01.304412400
消费者1接收到消息:【hello, message_22】21:06:01.349950100
消费者1接收到消息:【hello, message_24】21:06:01.394533900
消费者1接收到消息:【hello, message_26】21:06:01.439876500
消费者1接收到消息:【hello, message_28】21:06:01.482937800
消费者2........接收到消息:【hello, message_7】21:06:01.488977100
消费者1接收到消息:【hello, message_30】21:06:01.526409300
消费者1接收到消息:【hello, message_32】21:06:01.572148
消费者1接收到消息:【hello, message_34】21:06:01.618264800
消费者1接收到消息:【hello, message_36】21:06:01.660780600
消费者2........接收到消息:【hello, message_9】21:06:01.689189300
消费者1接收到消息:【hello, message_38】21:06:01.705261
消费者1接收到消息:【hello, message_40】21:06:01.746927300
消费者1接收到消息:【hello, message_42】21:06:01.789835
消费者1接收到消息:【hello, message_44】21:06:01.834393100
消费者1接收到消息:【hello, message_46】21:06:01.875312100
消费者2........接收到消息:【hello, message_11】21:06:01.889969500
消费者1接收到消息:【hello, message_48】21:06:01.920702500
消费者2........接收到消息:【hello, message_13】21:06:02.090725900
消费者2........接收到消息:【hello, message_15】21:06:02.293060600
消费者2........接收到消息:【hello, message_17】21:06:02.493748
消费者2........接收到消息:【hello, message_19】21:06:02.696635100
消费者2........接收到消息:【hello, message_21】21:06:02.896809700
消费者2........接收到消息:【hello, message_23】21:06:03.099533400
消费者2........接收到消息:【hello, message_25】21:06:03.301446400
消费者2........接收到消息:【hello, message_27】21:06:03.504999100
消费者2........接收到消息:【hello, message_29】21:06:03.705702500
消费者2........接收到消息:【hello, message_31】21:06:03.906601200
消费者2........接收到消息:【hello, message_33】21:06:04.108118500
消费者2........接收到消息:【hello, message_35】21:06:04.308945400
消费者2........接收到消息:【hello, message_37】21:06:04.511547700
消费者2........接收到消息:【hello, message_39】21:06:04.714038400
消费者2........接收到消息:【hello, message_41】21:06:04.916192700
消费者2........接收到消息:【hello, message_43】21:06:05.116286400
消费者2........接收到消息:【hello, message_45】21:06:05.318055100
消费者2........接收到消息:【hello, message_47】21:06:05.520656400
消费者2........接收到消息:【hello, message_49】21:06:05.723106700
可以看到消费者1和消费者2竟然每人消费了25条消息:
- 消费者1很快完成了自己的25条消息
- 消费者2却在缓慢的处理自己的25条消息。
也就是说消息是平均分配给每个消费者,并没有考虑到消费者的处理能力。导致1个消费者空闲,另一个消费者忙的不可开交。没有充分利用每一个消费者的能力,最终消息处理的耗时远远超过了1秒。这样显然是有问题的。
3.4.能者多劳
消费者消息推送限制默认情况下,RabbitMQ的会将消息依次轮询投递给绑定在队列上的每一个消费者。但这并没有考虑到消费者是否已经处理完消息,可能出现消息堆积。
在spring中有一个简单的配置,可以解决这个问题。我们修改consumer服务的application.yml文件,添加配置:
spring:rabbitmq:listener:simple:prefetch: 1 # 每次只能获取一条消息,处理完成才能获取下一个消息
再次测试,发现结果如下:
消费者1接收到消息:【hello, message_0】21:12:51.659664200
消费者2........接收到消息:【hello, message_1】21:12:51.680610
消费者1接收到消息:【hello, message_2】21:12:51.703625
消费者1接收到消息:【hello, message_3】21:12:51.724330100
消费者1接收到消息:【hello, message_4】21:12:51.746651100
消费者1接收到消息:【hello, message_5】21:12:51.768401400
消费者1接收到消息:【hello, message_6】21:12:51.790511400
消费者1接收到消息:【hello, message_7】21:12:51.812559800
消费者1接收到消息:【hello, message_8】21:12:51.834500600
消费者1接收到消息:【hello, message_9】21:12:51.857438800
消费者1接收到消息:【hello, message_10】21:12:51.880379600
消费者2........接收到消息:【hello, message_11】21:12:51.899327100
消费者1接收到消息:【hello, message_12】21:12:51.922828400
消费者1接收到消息:【hello, message_13】21:12:51.945617400
消费者1接收到消息:【hello, message_14】21:12:51.968942500
消费者1接收到消息:【hello, message_15】21:12:51.992215400
消费者1接收到消息:【hello, message_16】21:12:52.013325600
消费者1接收到消息:【hello, message_17】21:12:52.035687100
消费者1接收到消息:【hello, message_18】21:12:52.058188
消费者1接收到消息:【hello, message_19】21:12:52.081208400
消费者2........接收到消息:【hello, message_20】21:12:52.103406200
消费者1接收到消息:【hello, message_21】21:12:52.123827300
消费者1接收到消息:【hello, message_22】21:12:52.146165100
消费者1接收到消息:【hello, message_23】21:12:52.168828300
消费者1接收到消息:【hello, message_24】21:12:52.191769500
消费者1接收到消息:【hello, message_25】21:12:52.214839100
消费者1接收到消息:【hello, message_26】21:12:52.238998700
消费者1接收到消息:【hello, message_27】21:12:52.259772600
消费者1接收到消息:【hello, message_28】21:12:52.284131800
消费者2........接收到消息:【hello, message_29】21:12:52.306190600
消费者1接收到消息:【hello, message_30】21:12:52.325315800
消费者1接收到消息:【hello, message_31】21:12:52.347012500
消费者1接收到消息:【hello, message_32】21:12:52.368508600
消费者1接收到消息:【hello, message_33】21:12:52.391785100
消费者1接收到消息:【hello, message_34】21:12:52.416383800
消费者1接收到消息:【hello, message_35】21:12:52.439019
消费者1接收到消息:【hello, message_36】21:12:52.461733900
消费者1接收到消息:【hello, message_37】21:12:52.485990
消费者1接收到消息:【hello, message_38】21:12:52.509219900
消费者2........接收到消息:【hello, message_39】21:12:52.523683400
消费者1接收到消息:【hello, message_40】21:12:52.547412100
消费者1接收到消息:【hello, message_41】21:12:52.571191800
消费者1接收到消息:【hello, message_42】21:12:52.593024600
消费者1接收到消息:【hello, message_43】21:12:52.616731800
消费者1接收到消息:【hello, message_44】21:12:52.640317
消费者1接收到消息:【hello, message_45】21:12:52.663111100
消费者1接收到消息:【hello, message_46】21:12:52.686727
消费者1接收到消息:【hello, message_47】21:12:52.709266500
消费者2........接收到消息:【hello, message_48】21:12:52.725884900
消费者1接收到消息:【hello, message_49】21:12:52.746299900
可以发现,由于消费者1处理速度较快,所以处理了更多的消息;消费者2处理速度较慢,只处理了6条消息。而最终总的执行耗时也在1秒左右,大大提升。
正所谓能者多劳,这样充分利用了每一个消费者的处理能力,可以有效避免消息积压问题。
3.5.总结
Work模型的使用:
- 多个消费者绑定到一个队列,可以加快消息处理速度,同一条消息只会被一个消费者处理。
- 通过设置prefetch来控制消费者预取的消息数量。
相关文章:
RabbitMq基本使用
目录 SpringAMQP1.准备Demo工程2.快速入门1.1.消息发送1.2.消息接收1.3.测试 3.WorkQueues模型3.1.消息发送3.2.消息接收3.3.测试3.4.能者多劳3.5.总结 SpringAMQP 将来我们开发业务功能的时候,肯定不会在控制台收发消息,而是应该基于编程的方式。由于R…...
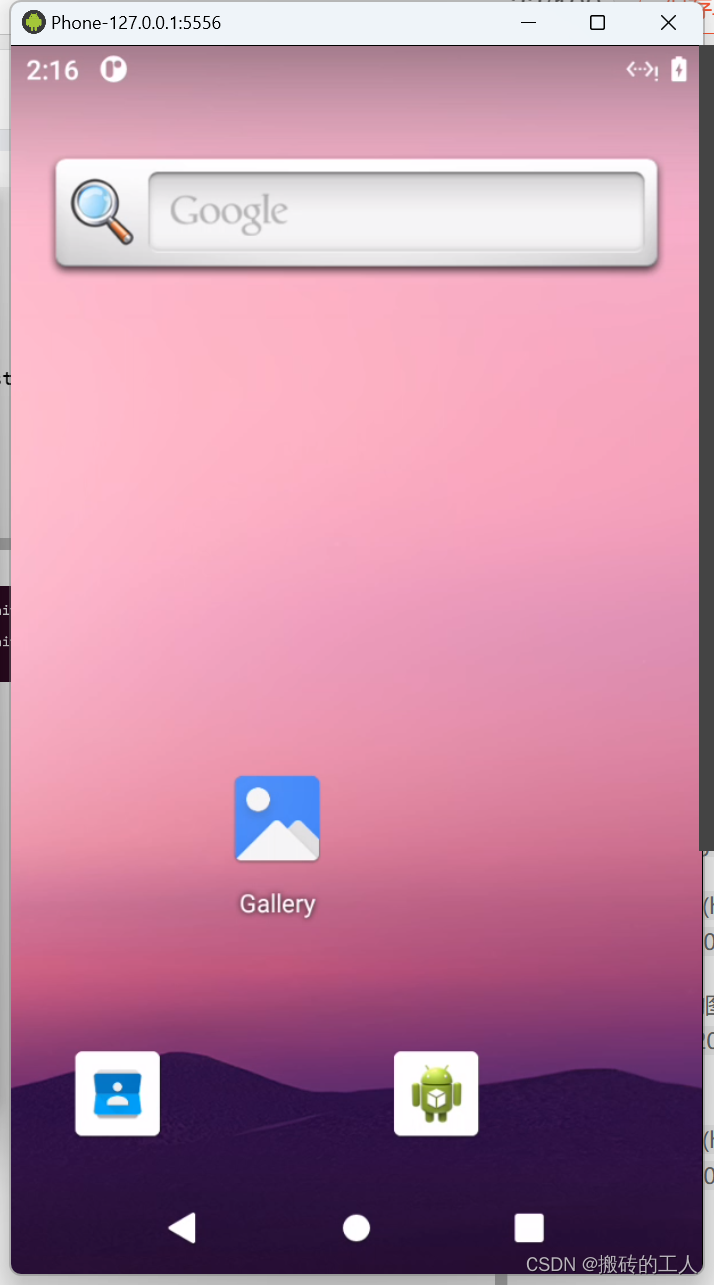
windows wsl2 ubuntu上部署 redroid云手机
Redroid WSL2部署文档 下载wsl内核源码 #文档注明 5.15和5.10 版本内核可以部署成功,这里我当前最新的发布版本 #下载wsl 源码 wget --progressbar:force --output-documentlinux-msft-wsl-5.15.133.1.tar.gz https://codeload.github.com/microsoft/WSL2-Linux-Ker…...

创维电视机 | 用当贝播放器解决创维电视机不能播放MKV视频的问题
小故事在下面,感兴趣可以看看,开头我就直接放解决方案 创维电视虽然是基于Android开发的,可以安装apk软件,但是基本不能用,一定要选择适配电视的视频播放器,或者使用本文中提供的创维版当贝播放器。 原软…...
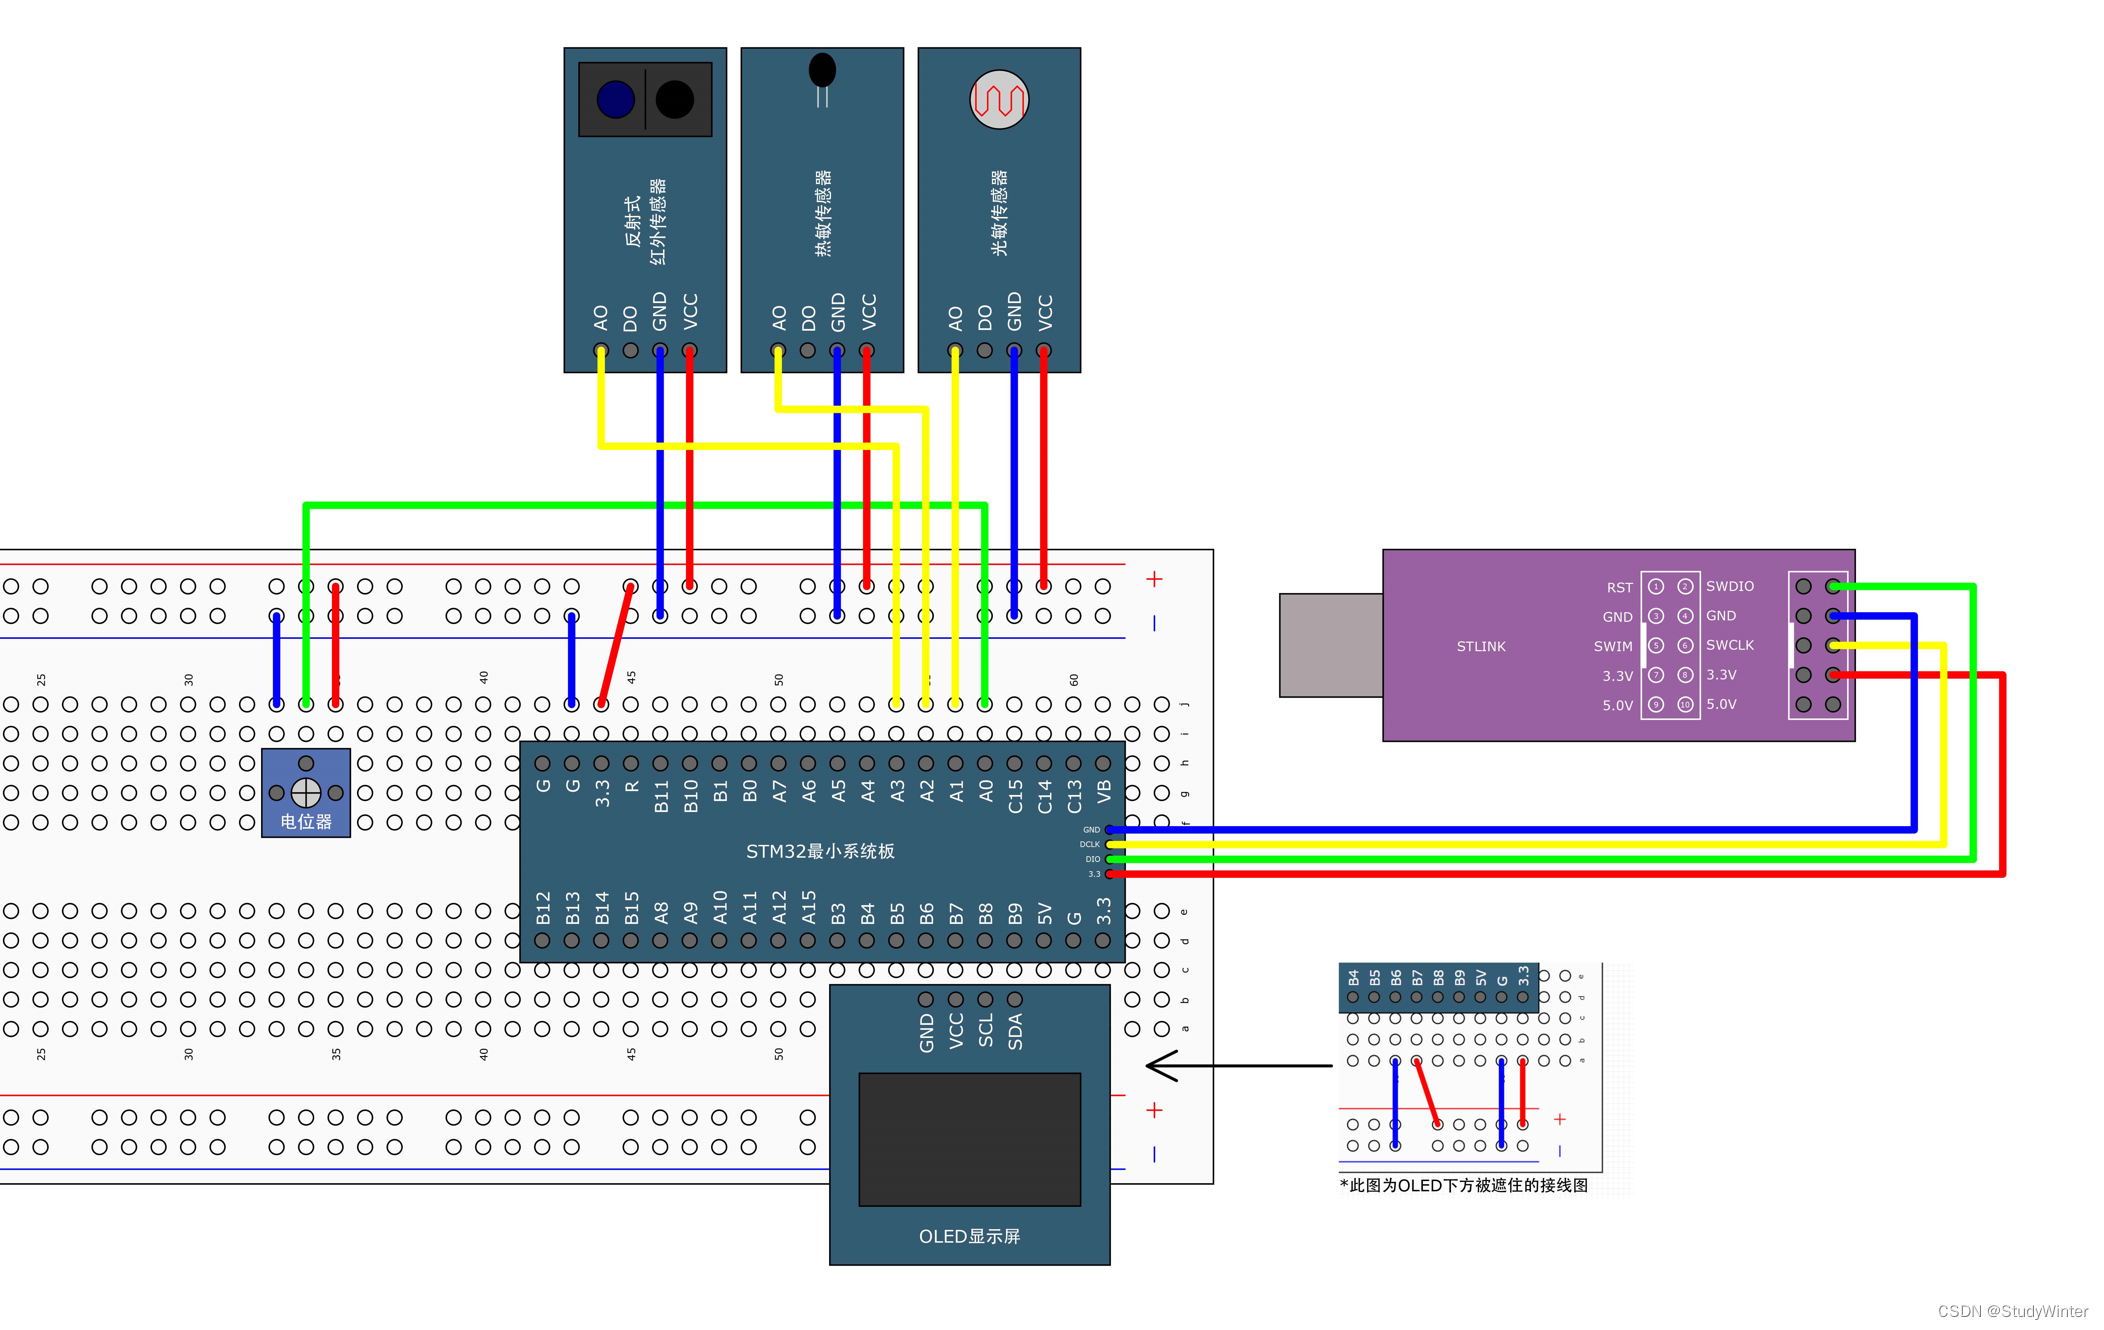
【STM32】DMA直接存储器存取
1 DMA简介 DMA(Direct Memory Access)直接存储器存取 可以直接访问STM32的存储器的,包括运行SRAM、程序存储器Flash和寄存器等等 DMA可以提供外设寄存器和存储器或者存储器和存储器之间的高速数据传输,无须CPU干预,节…...
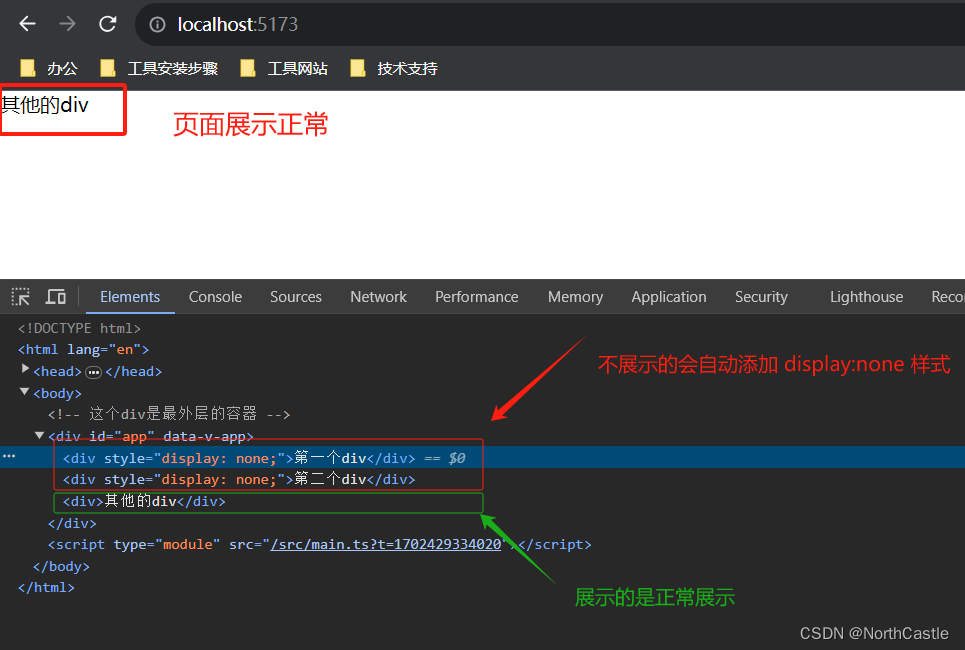
Vue3-09-条件渲染-v-show 的基本使用
v-show 的作用 v-show 可以根据条件表达式的值【展示】或【隐藏】html 元素。v-show 的特点 v-show 的实现方式是 控制 dom 元素的 css的 display的属性, 因此,无论该元素是否展示,该元素都会正常渲染在页面上, 当v-show 的 条件…...
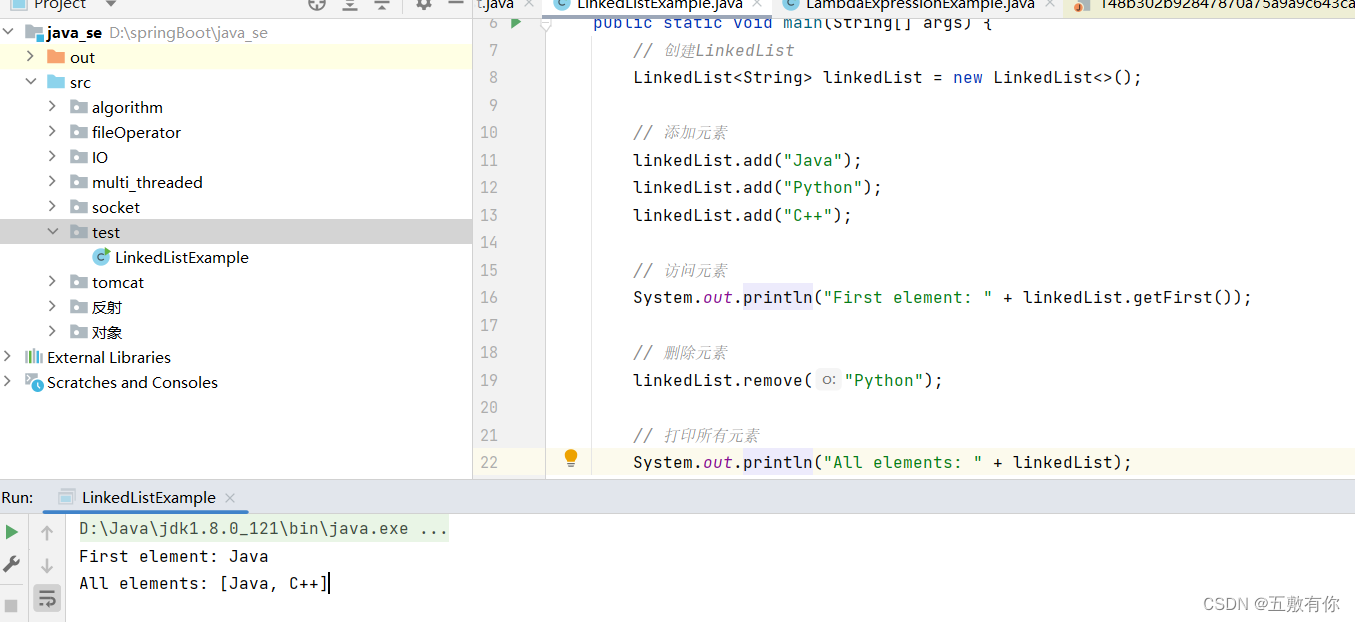
ArrayList与LinkLIst
ArrayList 在Java中,ArrayList是java.util包中的一个类,它实现了List接口,是一个动态数组,可以根据需要自动增长或缩小。下面是ArrayList的一些基本特性以及其底层原理的简要讲解: ArrayList基本特性: 动…...
)
位运算(、|、^、~、>>、<<)
分类 编程技术 1.位运算概述 从现代计算机中所有的数据二进制的形式存储在设备中。即 0、1 两种状态,计算机对二进制数据进行的运算(、-、*、/)都是叫位运算,即将符号位共同参与运算的运算。 口说无凭,举一个简单的例子来看下 CPU 是如何进…...
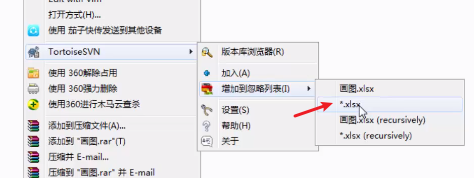
Centos7部署SVN
文章目录 (1)SVN概述(2)SVN与Samba共享(3)安装SVN(4)SVN搭建实例(5)pc连接svn服务器(6)svn图标所代表含义 (1)…...

Vue中this.$nextTick的执行时机
一、Vue中this.$nextTick的执行时机,整体可分为两种情况: 第一种:下一次 Dom 更新之后执行(即等待DOM更新结束之后,执行nextTick的延迟回调函数); 第二种:页面挂载后 (m…...

Unity中的ShaderToy
文章目录 前言一、ShaderToy网站二、ShaderToy基本框架1、我们可以在ShaderToy网站中,这样看用到的GLSL文档2、void mainImage 是我们的程序入口,类似于片断着色器3、fragColor作为输出变量,为屏幕每一像素的颜色,alpha一般赋值为…...
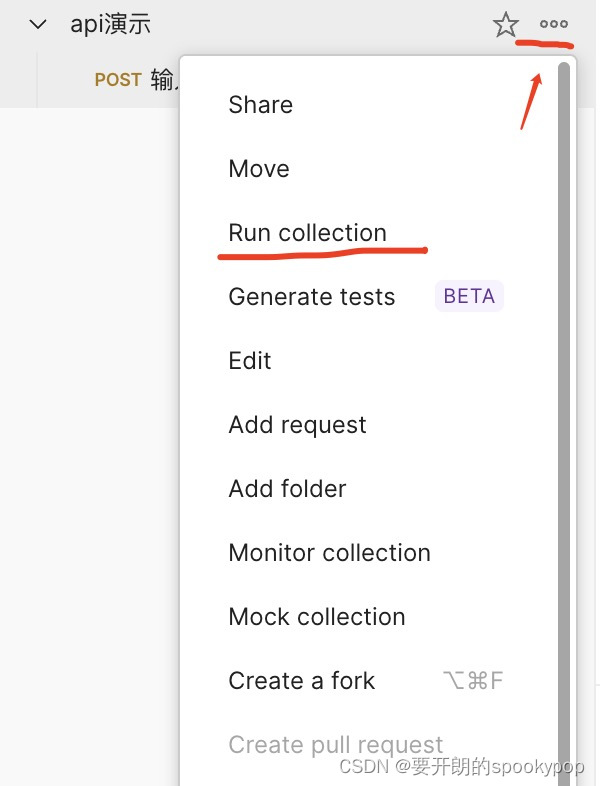
2 使用postman进行接口测试
上一篇:1 接口测试介绍-CSDN博客 拿到开发提供的接口文档后,结合需求文档开始做接口测试用例设计,下面用最常见也最简单的注册功能介绍整个流程。 说明:以演示接口测试流程为主,不对演示功能做详细的测试,…...

【数据库设计和SQL基础语法】--查询数据--聚合函数
一、聚合函数概述 1.1 定义 聚合函数是一类在数据库中用于对多个行进行计算并返回单个结果的函数。它们能够对数据进行汇总、统计和计算,常用于提取有关数据集的摘要信息。聚合函数在 SQL 查询中广泛应用,包括统计总数、平均值、最大值、最小值等。 1…...
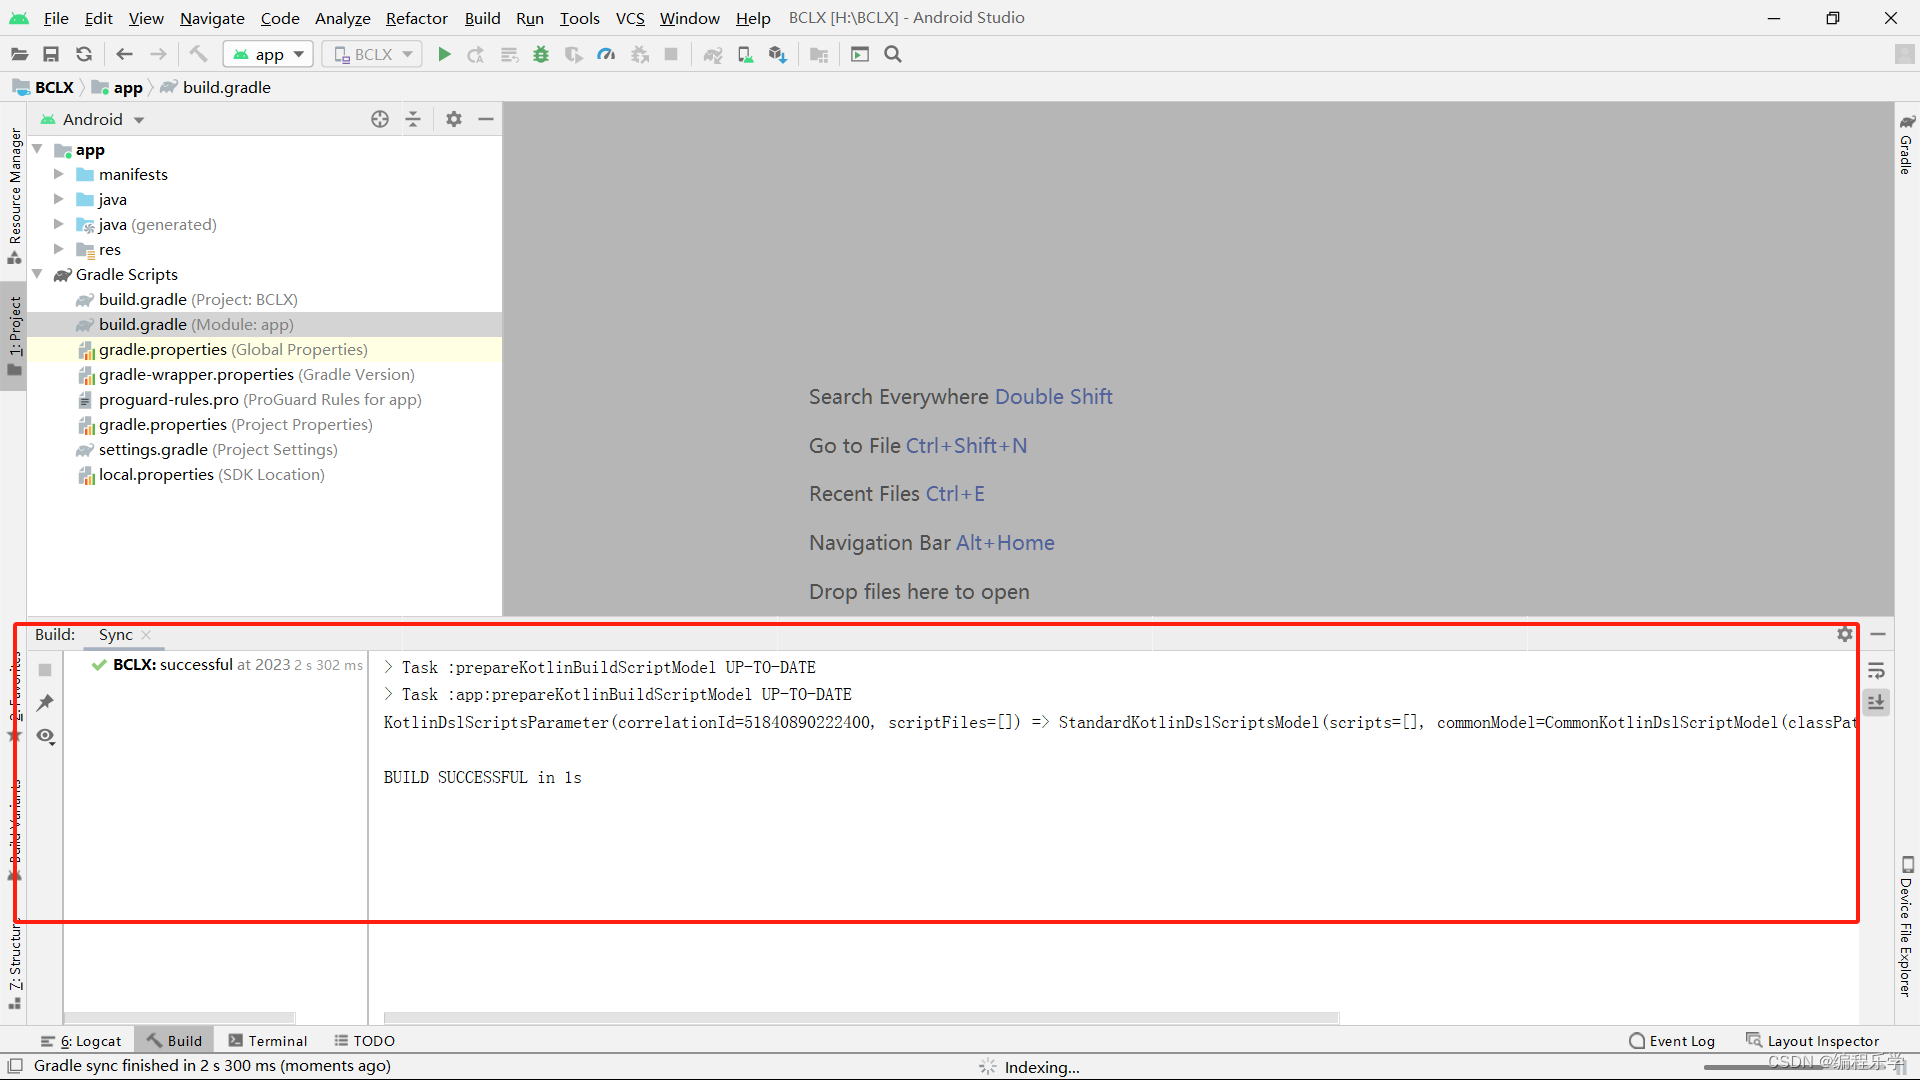
Module ‘app‘: platform ‘android-33‘ not found.
目录 一、报错信息 二、解决方法 一、报错信息 Module app: platform android-33 not found. 检查你的应用程序的build.gradle文件中的targetSdkVersion和compileSdkVersion是否正确设置为已安装的Android SDK版本。 确保你的Android Studio已正确安装并配置了所需的Android …...

MySQL按序批量操作大量数据
MySQL按序批量操作大量数据(Java、springboot、mybatisplus、ElasticSearch) 以同步全量MySQL数据到ElasticSearch为例。 核心代码 业务逻辑: public boolean syncToElasticsearch() {log.info("Starting data synchronization to El…...
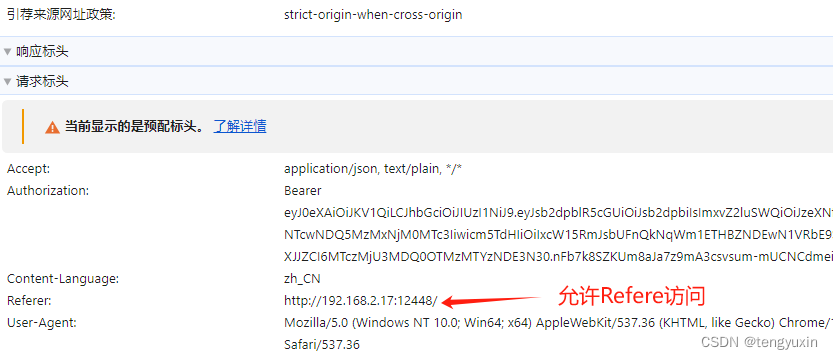
strict-origin-when-cross-origin
严格限制同源策略 (1)允许服务器的同源IP地址访问 (2)允许Referer --- 后端服务器要配置...

【置顶】 本博博文汇总
文章目录 前言音视频ijkplayer源码分析FFmpeg、音视频协议Andriod系统音视频框架C、C Android&Java源码分析、绘制、渲染Dalvik、Art虚拟机Java并发 计算机基础操作系统计算机网络设计模式、数据结构、算法 前言 23年底了,想来也工作十年,也一直在c…...
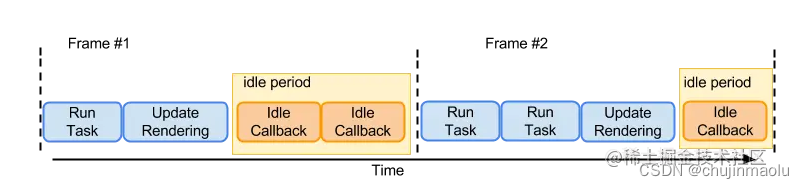
react.js源码二
三、调度Scheduler scheduling(调度)是fiber reconciliation的一个过程,主要决定应该在何时做什么?在stack reconciler中,reconciliation是“一气呵成”,对于函数来说,这没什么问题,因为我们只想要函数的运行结果,但对于UI来说还需要考虑以下问题: 并不是所有的state更…...

如何学习英语
前言 首先写一些自己的感言吧,其实从大学的时候就在不断地听英语,学英语,但是到毕业十几年后,英语一直没起到什么作用,当然最有作用的时候就是几次英语面试吧。 工作之后有一段学习英语的经历,当时花费了…...

robot测试自动化
一. 安装 黑羽robot 首先确保你电脑上安装好了 Python 3.7 或者 3.8 版本的解释器 hyrobot 使用说明1 | 白月黑羽 安装RF 黑羽robot基于Robot Framework ,所以必须先安装RobotFramework 直接执行如下Pip命令即可: pip install robotframework...
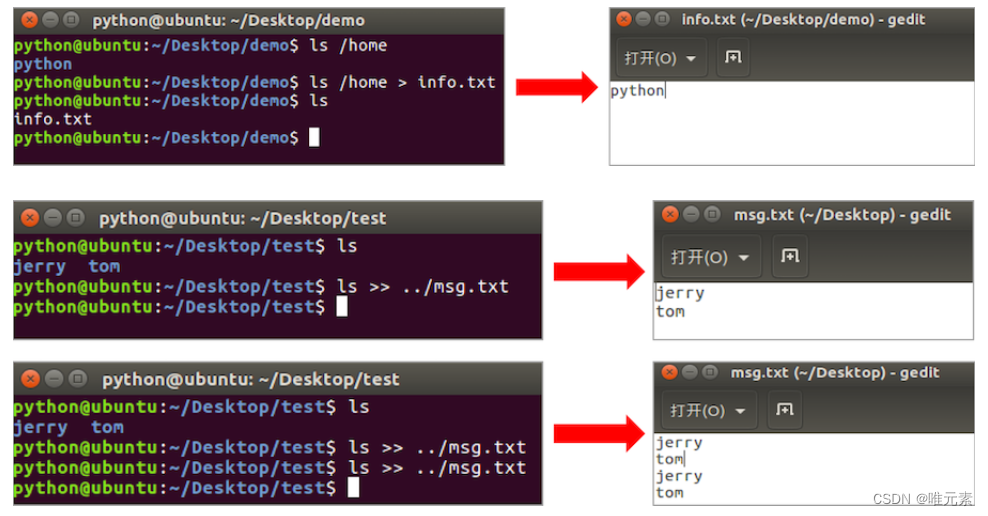
Linux---重定向命令
1. 重定向命令的介绍 重定向也称为输出重定向,把在终端执行命令的结果保存到目标文件。 2. 重定向命令的使用 命令说明>如果文件存在会覆盖原有文件内容,相当于文件操作中的‘w’模式>>如果文件存在会追加写入文件末尾,相当于文件…...

Python爬虫实战:研究MechanicalSoup库相关技术
一、MechanicalSoup 库概述 1.1 库简介 MechanicalSoup 是一个 Python 库,专为自动化交互网站而设计。它结合了 requests 的 HTTP 请求能力和 BeautifulSoup 的 HTML 解析能力,提供了直观的 API,让我们可以像人类用户一样浏览网页、填写表单和提交请求。 1.2 主要功能特点…...

【Linux】shell脚本忽略错误继续执行
在 shell 脚本中,可以使用 set -e 命令来设置脚本在遇到错误时退出执行。如果你希望脚本忽略错误并继续执行,可以在脚本开头添加 set e 命令来取消该设置。 举例1 #!/bin/bash# 取消 set -e 的设置 set e# 执行命令,并忽略错误 rm somefile…...

【OSG学习笔记】Day 18: 碰撞检测与物理交互
物理引擎(Physics Engine) 物理引擎 是一种通过计算机模拟物理规律(如力学、碰撞、重力、流体动力学等)的软件工具或库。 它的核心目标是在虚拟环境中逼真地模拟物体的运动和交互,广泛应用于 游戏开发、动画制作、虚…...
Python:操作 Excel 折叠
💖亲爱的技术爱好者们,热烈欢迎来到 Kant2048 的博客!我是 Thomas Kant,很开心能在CSDN上与你们相遇~💖 本博客的精华专栏: 【自动化测试】 【测试经验】 【人工智能】 【Python】 Python 操作 Excel 系列 读取单元格数据按行写入设置行高和列宽自动调整行高和列宽水平…...

鸿蒙中用HarmonyOS SDK应用服务 HarmonyOS5开发一个生活电费的缴纳和查询小程序
一、项目初始化与配置 1. 创建项目 ohpm init harmony/utility-payment-app 2. 配置权限 // module.json5 {"requestPermissions": [{"name": "ohos.permission.INTERNET"},{"name": "ohos.permission.GET_NETWORK_INFO"…...

实现弹窗随键盘上移居中
实现弹窗随键盘上移的核心思路 在Android中,可以通过监听键盘的显示和隐藏事件,动态调整弹窗的位置。关键点在于获取键盘高度,并计算剩余屏幕空间以重新定位弹窗。 // 在Activity或Fragment中设置键盘监听 val rootView findViewById<V…...
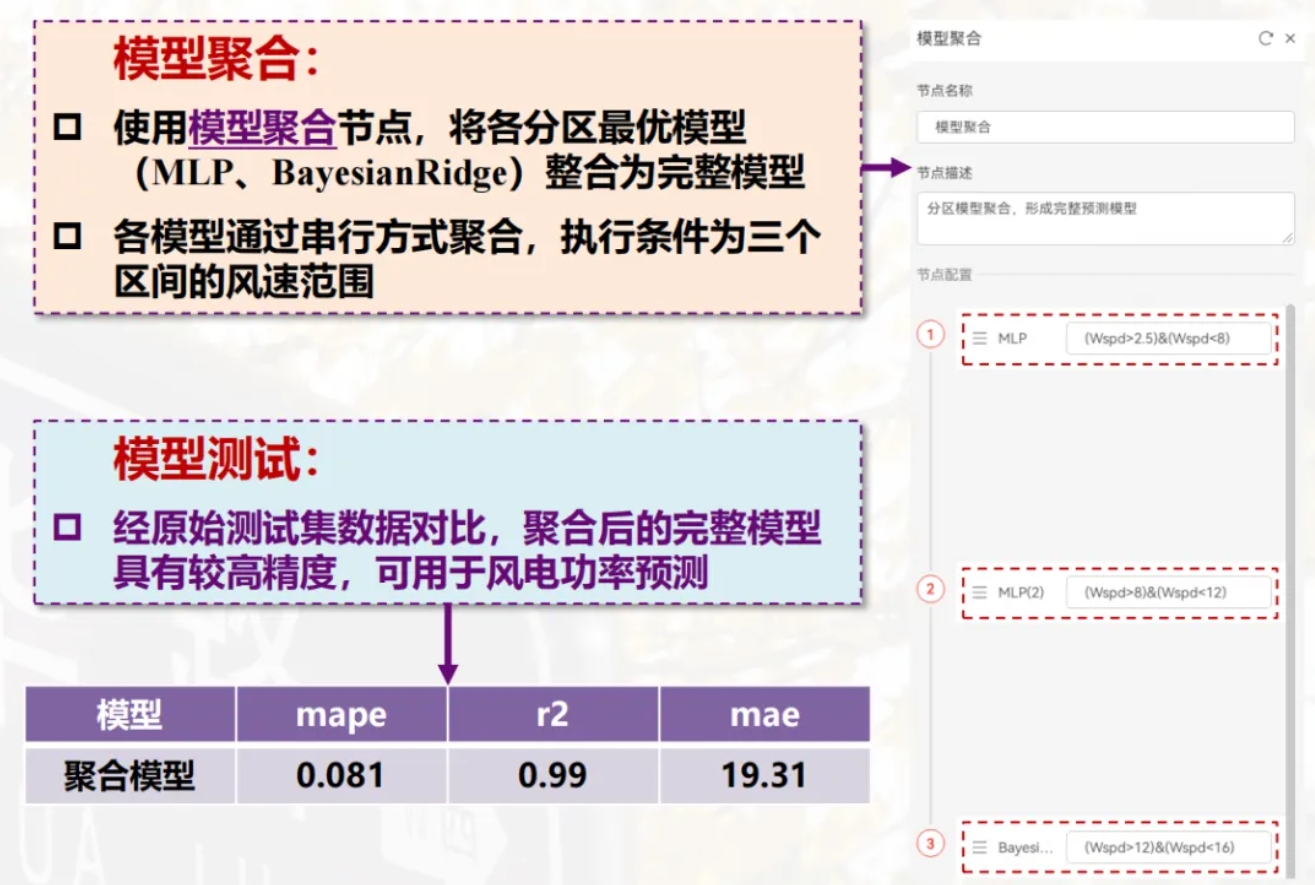
用机器学习破解新能源领域的“弃风”难题
音乐发烧友深有体会,玩音乐的本质就是玩电网。火电声音偏暖,水电偏冷,风电偏空旷。至于太阳能发的电,则略显朦胧和单薄。 不知你是否有感觉,近两年家里的音响声音越来越冷,听起来越来越单薄? —…...
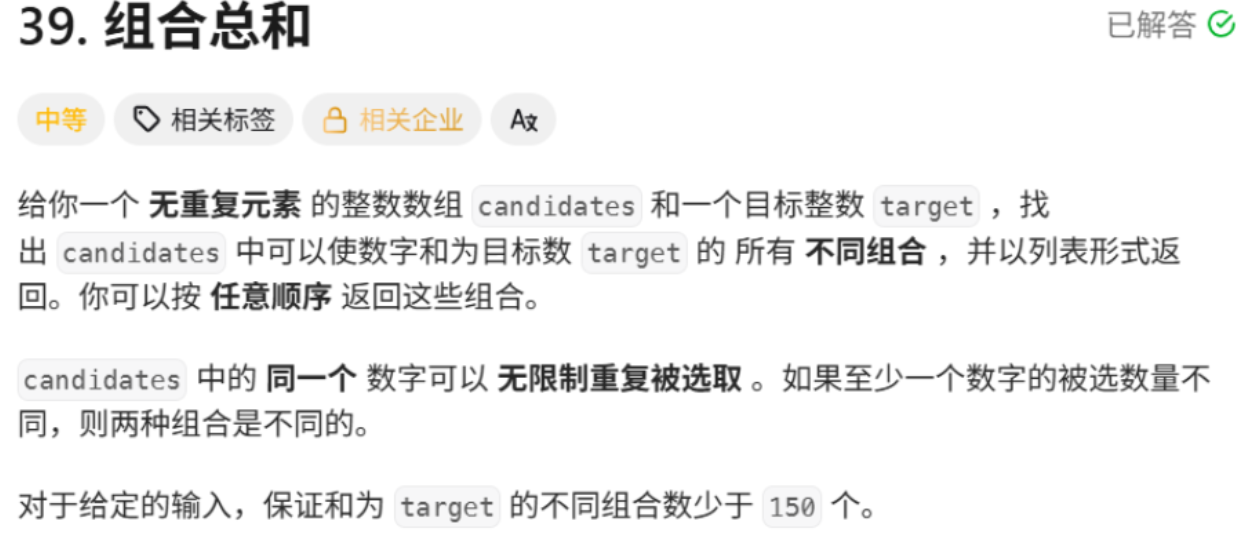
回溯算法学习
一、电话号码的字母组合 import java.util.ArrayList; import java.util.List;import javax.management.loading.PrivateClassLoader;public class letterCombinations {private static final String[] KEYPAD {"", //0"", //1"abc", //2"…...

A2A JS SDK 完整教程:快速入门指南
目录 什么是 A2A JS SDK?A2A JS 安装与设置A2A JS 核心概念创建你的第一个 A2A JS 代理A2A JS 服务端开发A2A JS 客户端使用A2A JS 高级特性A2A JS 最佳实践A2A JS 故障排除 什么是 A2A JS SDK? A2A JS SDK 是一个专为 JavaScript/TypeScript 开发者设计的强大库ÿ…...

离线语音识别方案分析
随着人工智能技术的不断发展,语音识别技术也得到了广泛的应用,从智能家居到车载系统,语音识别正在改变我们与设备的交互方式。尤其是离线语音识别,由于其在没有网络连接的情况下仍然能提供稳定、准确的语音处理能力,广…...