SSM整合实战(Spring、SpringMVC、MyBatis)
五、SSM整合实战
目录
- 一、SSM整合理解
- 1. 什么是SSM整合?
- 2. SSM整合核心理解五连问!
- 2.1 SSM整合涉及几个IoC容器?
- 2.2 每个IoC容器盛放哪些组件?
- 2.3 IoC容器之间是什么关系?
- 2.4 需要几个配置文件和对应IoC容器关系?
- 2.5 IoC容器初始化方式?
- 二、SSM整合配置实战
- 1. 依赖添加
- 2. 控制层配置编写(SpringMVC整合)
- 3. 业务层配置编写(AOP / TX整合)
- 4. 持久层配置编写(MyBatis整合)
- 5. 容器初始化配置web.xml
- 6. 整合测试
- 三、前端程序搭建和运行
- 1. 案例功能和接口分析
- 1.1 案例功能预览
- 1.2 接口分析
- 2. 前端工程导入
- 3. 启动测试
- 1. 案例功能和接口分析
- 四、后端程序实现和测试
- 1. 准备工作
- 2. 功能实现
- 3. 前后联调
- 五、SSM技术栈总结
- 1. Spring框架总结
- 1.1 技术点总结
- 1.2 配置总结
- 1.3 注解总结
- 2. Spring MVC 框架总结
- 2.1 技术点总结
- 2.2 配置总结
- 2.3 注解总结
- 3. MyBatis框架总结
- 3.1 技术点总结
- 3.2 配置总结
- 3.3 注解总结
- 1. Spring框架总结
一、SSM整合理解
1. 什么是SSM整合?
本质:Spring接管一切(将框架核心组件交给Spring进行IoC管理),代码更加简洁。
- SpringMVC管理web相关组件
- Spring管理业务层、持久层、以及数据库相关(DataSource,MyBatis)的组件
- SSM整合最终就是编写IoC配置文件
2. SSM整合核心理解五连问!
2.1 SSM整合涉及几个IoC容器?
我们提到过SpringMVC/DispatcherServlet 加载 spring-mvc.xml,此时整个 Web 应用中只创建一个 IoC 容器。如果将Mybatis、配置声明式事务,全部在 spring-mvc.xml 配置文件中配置也是可以的。可是这样会导致配置文件太长,不容易维护。
通常情况下,SSM整合我们会创建两个IoC容器,分开管理SSM下的核心组件!
2.2 每个IoC容器盛放哪些组件?
| 容器名 | 创建类 | 盛放组件 |
|---|---|---|
| web容器 | DispatcherServlet | web相关组件(controller,springmvc核心组件) |
| root容器 | ContextLoaderListener | 业务和持久层相关组件(service,aop,tx,dataSource,mybatis,mapper等) |
2.3 IoC容器之间是什么关系?
结论:两个组件分别创建的 IOC 容器是父子关系。
- 父容器:ContextLoaderListener 创建的 IOC 容器(root容器)
- 子容器:DispatcherServlet 创建的 IOC 容器(web容器)
源码部分:
ContextLoaderListener将实例化root容器,存储到ServletContext:
/*** Initialize Spring's web application context for the given servlet context,* using the application context provided at construction time, or creating a new one* according to the "{@link #CONTEXT_CLASS_PARAM contextClass}" and* "{@link #CONFIG_LOCATION_PARAM contextConfigLocation}" context-params.* @param servletContext current servlet context* @return the new WebApplicationContext* @see #ContextLoader(WebApplicationContext)* @see #CONTEXT_CLASS_PARAM* @see #CONFIG_LOCATION_PARAM*/public WebApplicationContext initWebApplicationContext(ServletContext servletContext) {if (servletContext.getAttribute(WebApplicationContext.ROOT_WEB_APPLICATION_CONTEXT_ATTRIBUTE) != null) {throw new IllegalStateException("Cannot initialize context because there is already a root application context present - " +"check whether you have multiple ContextLoader* definitions in your web.xml!");}servletContext.log("Initializing Spring root WebApplicationContext");Log logger = LogFactory.getLog(ContextLoader.class);if (logger.isInfoEnabled()) {logger.info("Root WebApplicationContext: initialization started");}long startTime = System.currentTimeMillis();try {// Store context in local instance variable, to guarantee that// it is available on ServletContext shutdown.if (this.context == null) {this.context = createWebApplicationContext(servletContext);}if (this.context instanceof ConfigurableWebApplicationContext cwac && !cwac.isActive()) {// The context has not yet been refreshed -> provide services such as// setting the parent context, setting the application context id, etcif (cwac.getParent() == null) {// The context instance was injected without an explicit parent ->// determine parent for root web application context, if any.ApplicationContext parent = loadParentContext(servletContext);cwac.setParent(parent);}configureAndRefreshWebApplicationContext(cwac, servletContext);}//将root容器存储到servletContext中servletContext.setAttribute(WebApplicationContext.ROOT_WEB_APPLICATION_CONTEXT_ATTRIBUTE, this.context);ClassLoader ccl = Thread.currentThread().getContextClassLoader();if (ccl == ContextLoader.class.getClassLoader()) {currentContext = this.context;}else if (ccl != null) {currentContextPerThread.put(ccl, this.context);}if (logger.isInfoEnabled()) {long elapsedTime = System.currentTimeMillis() - startTime;logger.info("Root WebApplicationContext initialized in " + elapsedTime + " ms");}return this.context;}catch (RuntimeException | Error ex) {logger.error("Context initialization failed", ex);servletContext.setAttribute(WebApplicationContext.ROOT_WEB_APPLICATION_CONTEXT_ATTRIBUTE, ex);throw ex;}}DispatcherServlet读取root容器,并且设置为web容器的父容器:
protected WebApplicationContext createWebApplicationContext(@Nullable ApplicationContext parent) {Class<?> contextClass = getContextClass();if (!ConfigurableWebApplicationContext.class.isAssignableFrom(contextClass)) {throw new ApplicationContextException("Fatal initialization error in servlet with name '" + getServletName() +"': custom WebApplicationContext class [" + contextClass.getName() +"] is not of type ConfigurableWebApplicationContext");}ConfigurableWebApplicationContext wac =(ConfigurableWebApplicationContext) BeanUtils.instantiateClass(contextClass);wac.setEnvironment(getEnvironment());//将root容器取出,并设置为父容器wac.setParent(parent);String configLocation = getContextConfigLocation();if (configLocation != null) {wac.setConfigLocation(configLocation);}configureAndRefreshWebApplicationContext(wac);return wac;}
容器访问流程:


2.4 需要几个配置文件和对应IoC容器关系?
文件的数量不是固定的,但是至少要两个,为了方便编写,我们可以三层架构每层对应一个配置文件,分别指定两个容器加载即可!
建议配置文件:
| 配置名 | 对应内容 | 对应容器 |
|---|---|---|
| spring-mvc.xml | controller,springmvc相关 | web容器 |
| spring-service.xml | service,aop,tx相关 | root容器 |
| spring-mapper.xml | mapper,datasource,mybatis相关 | root容器 |
2.5 IoC容器初始化方式?
在一个 Web 应用中就会出现两个 IOC 容器
- DispatcherServlet 创建一个 IOC 容器
- ContextLoaderListener 创建一个 IOC 容器
配置方式:
<!-- 通过全局初始化参数指定 Spring 配置文件的位置  root ioc容器配置-->
<context-param><param-name>contextConfigLocation</param-name><param-value>classpath:spring-service.xml,classpath:spring-mapper.xml</param-value>
</context-param><listener><!-- 指定全类名,配置监听器 --><listener-class>org.springframework.web.context.ContextLoaderListener</listener-class>
</listener><!-- web容器配置-->
<!-- 配置SpringMVC中负责处理请求的核心Servlet,也被称为SpringMVC的前端控制器 -->
<servlet><servlet-name>DispatcherServlet</servlet-name><!-- DispatcherServlet的全类名 --><servlet-class>org.springframework.web.servlet.DispatcherServlet</servlet-class><!-- 通过初始化参数指定SpringMVC配置文件位置 --><init-param><!-- 如果不记得contextConfigLocation配置项的名称,可以到DispatcherServlet的父类FrameworkServlet中查找 --><param-name>contextConfigLocation</param-name><!-- 使用classpath:说明这个路径从类路径的根目录开始才查找 --><param-value>classpath:spring-mvc.xml</param-value></init-param><!-- 作为框架的核心组件,在启动过程中有大量的初始化操作要做,这些操作放在第一次请求时才执行非常不恰当 --><!-- 我们应该将DispatcherServlet设置为随Web应用一起启动 --><load-on-startup>1</load-on-startup></servlet><servlet-mapping><servlet-name>DispatcherServlet</servlet-name><!-- 对DispatcherServlet来说,url-pattern有两种方式配置 --><!-- 方式一:配置“/”,表示匹配整个Web应用范围内所有请求。这里有一个硬性规定:不能写成“/*”。只有这一个地方有这个特殊要求,以后我们再配置Filter还是可以正常写“/*”。 --><!-- 方式二:配置“*.扩展名”,表示匹配整个Web应用范围内部分请求 --><url-pattern>/</url-pattern>
</servlet-mapping>
二、SSM整合配置实战
1. 依赖添加
-
数据库准备
依然沿用mybatis数据库测试脚本!
CREATE DATABASE `mybatis-example`;USE `mybatis-example`;CREATE TABLE `t_emp`(emp_id INT AUTO_INCREMENT,emp_name CHAR(100),emp_salary DOUBLE(10,5),PRIMARY KEY(emp_id) );INSERT INTO `t_emp`(emp_name,emp_salary) VALUES("tom",200.33); INSERT INTO `t_emp`(emp_name,emp_salary) VALUES("jerry",666.66); INSERT INTO `t_emp`(emp_name,emp_salary) VALUES("andy",777.77); -
准备项目
part04-ssm-integration
转成web项目
-
依赖导入
pom.xml
<?xml version="1.0" encoding="UTF-8"?><project xmlns="http://maven.apache.org/POM/4.0.0" xmlns:xsi="http://www.w3.org/2001/XMLSchema-instance" xsi:schemaLocation="http://maven.apache.org/POM/4.0.0 http://maven.apache.org/xsd/maven-4.0.0.xsd"> <modelVersion>4.0.0</modelVersion> <groupId>com.atguigu</groupId> <artifactId>part04-ssm-integration</artifactId> <version>1.0-SNAPSHOT</version> <packaging>war</packaging><properties><spring.version>6.0.6</spring.version><jakarta.annotation-api.version>2.1.1</jakarta.annotation-api.version><jakarta.jakartaee-web-api.version>9.1.0</jakarta.jakartaee-web-api.version><jackson-databind.version>2.15.0</jackson-databind.version><hibernate-validator.version>8.0.0.Final</hibernate-validator.version><commons-fileupload.version>1.3.1</commons-fileupload.version><mybatis.version>3.5.11</mybatis.version><mysql.version>8.0.25</mysql.version><pagehelper.version>5.1.11</pagehelper.version><druid.version>1.2.8</druid.version><mybatis-spring.version>3.0.2</mybatis-spring.version><jakarta.servlet.jsp.jstl-api.version>3.0.0</jakarta.servlet.jsp.jstl-api.version><logback.version>1.2.3</logback.version><lombok.version>1.18.26</lombok.version><maven.compiler.source>17</maven.compiler.source><maven.compiler.target>17</maven.compiler.target> <project.build.sourceEncoding>UTF-8</project.build.sourceEncoding> </properties><!--需要依赖清单分析:springioc/dispring-context / 6.0.6aopspring-aop / 6.0.6spring-aspects / 6.0.6txspring-tx / 6.0.6spring-jdbc / 6.0.6jakarta.annotation-api / 2.1.1springmvcspring-webmvc 6.0.6jakarta.jakartaee-web-api 9.1.0jackson-databind 2.15.0hibernate-validator / hibernate-validator-annotation-processor 8.0.0.Finalcommons-fileupload / 1.3.1mybatismybatis / 3.5.11mysql / 8.0.25pagehelper / 5.1.11整合需要加载spring容器 spring-web / 6.0.6整合mybatis mybatis-spring x x数据库连接池 druid / xlombok lombok / 1.18.26logback logback/ 1.2.3--><dependencies><!--spring pom.xml依赖--><dependency><groupId>org.springframework</groupId><artifactId>spring-context</artifactId><version>${spring.version}</version></dependency><dependency><groupId>jakarta.annotation</groupId><artifactId>jakarta.annotation-api</artifactId><version>${jakarta.annotation-api.version}</version></dependency><dependency><groupId>org.springframework</groupId><artifactId>spring-aop</artifactId><version>${spring.version}</version></dependency><dependency><groupId>org.springframework</groupId><artifactId>spring-aspects</artifactId><version>${spring.version}</version></dependency><dependency><groupId>org.springframework</groupId><artifactId>spring-tx</artifactId><version>${spring.version}</version></dependency><dependency><groupId>org.springframework</groupId><artifactId>spring-jdbc</artifactId><version>${spring.version}</version></dependency><!--springmvcspring-webmvc 6.0.6jakarta.jakartaee-web-api 9.1.0jackson-databind 2.15.0hibernate-validator / hibernate-validator-annotation-processor 8.0.0.Finalcommons-fileupload / 1.3.1--><dependency><groupId>org.springframework</groupId><artifactId>spring-webmvc</artifactId><version>${spring.version}</version></dependency><dependency><groupId>jakarta.platform</groupId><artifactId>jakarta.jakartaee-web-api</artifactId><version>${jakarta.jakartaee-web-api.version}</version><scope>provided</scope></dependency><!-- jsp需要依赖! jstl--><dependency><groupId>jakarta.servlet.jsp.jstl</groupId><artifactId>jakarta.servlet.jsp.jstl-api</artifactId><version>${jakarta.servlet.jsp.jstl-api.version}</version></dependency><!-- https://mvnrepository.com/artifact/commons-fileupload/commons-fileupload --><dependency><groupId>commons-fileupload</groupId><artifactId>commons-fileupload</artifactId><version>${commons-fileupload.version}</version></dependency><dependency><groupId>com.fasterxml.jackson.core</groupId><artifactId>jackson-databind</artifactId><version>${jackson-databind.version}</version></dependency><!-- https://mvnrepository.com/artifact/org.hibernate.validator/hibernate-validator --><dependency><groupId>org.hibernate.validator</groupId><artifactId>hibernate-validator</artifactId><version>${hibernate-validator.version}</version></dependency><!-- https://mvnrepository.com/artifact/org.hibernate.validator/hibernate-validator-annotation-processor --><dependency><groupId>org.hibernate.validator</groupId><artifactId>hibernate-validator-annotation-processor</artifactId><version>${hibernate-validator.version}</version></dependency><!--mybatismybatis / 3.5.11mysql / 8.0.25pagehelper / 5.1.11--><!-- mybatis依赖 --><dependency><groupId>org.mybatis</groupId><artifactId>mybatis</artifactId><version>${mybatis.version}</version></dependency><!-- MySQL驱动 mybatis底层依赖jdbc驱动实现,本次不需要导入连接池,mybatis自带! --><dependency><groupId>mysql</groupId><artifactId>mysql-connector-java</artifactId><version>${mysql.version}</version></dependency><dependency><groupId>com.github.pagehelper</groupId><artifactId>pagehelper</artifactId><version>${pagehelper.version}</version></dependency><!-- 整合第三方特殊依赖 --><dependency><groupId>org.springframework</groupId><artifactId>spring-web</artifactId><version>${spring.version}</version></dependency><dependency><groupId>org.mybatis</groupId><artifactId>mybatis-spring</artifactId><version>${mybatis-spring.version}</version></dependency><!-- 日志 , 会自动传递slf4j门面--><dependency><groupId>ch.qos.logback</groupId><artifactId>logback-classic</artifactId><version>${logback.version}</version></dependency><dependency><groupId>org.projectlombok</groupId><artifactId>lombok</artifactId><version>${lombok.version}</version></dependency><dependency><groupId>com.alibaba</groupId><artifactId>druid</artifactId><version>${druid.version}</version></dependency></dependencies></project> -
实体类添加
com.atguigu.pojo
@Data public class Employee {private Integer empId;private String empName;private Double empSalary; } -
logback配置
位置:resources/logback.xml
<?xml version="1.0" encoding="UTF-8"?>
<configuration debug="true"><!-- 指定日志输出的位置,ConsoleAppender表示输出到控制台 --><appender name="STDOUT"class="ch.qos.logback.core.ConsoleAppender"><encoder><!-- 日志输出的格式 --><!-- 按照顺序分别是:时间、日志级别、线程名称、打印日志的类、日志主体内容、换行 --><pattern>[%d{HH:mm:ss.SSS}] [%-5level] [%thread] [%logger] [%msg]%n</pattern><charset>UTF-8</charset></encoder></appender><!-- 设置全局日志级别。日志级别按顺序分别是:TRACE、DEBUG、INFO、WARN、ERROR --><!-- 指定任何一个日志级别都只打印当前级别和后面级别的日志。 --><root level="DEBUG"><!-- 指定打印日志的appender,这里通过“STDOUT”引用了前面配置的appender --><appender-ref ref="STDOUT" /></root><!-- 根据特殊需求指定局部日志级别,可也是包名或全类名。 --><logger name="com.atguigu.mybatis" level="DEBUG" /></configuration>
2. 控制层配置编写(SpringMVC整合)
主要配置controller,springmvc相关! 本次先不配置文件上传!
位置:resources/spring-mvc.xml(命名随意)
<?xml version="1.0" encoding="UTF-8"?>
<beans xmlns="http://www.springframework.org/schema/beans"xmlns:xsi="http://www.w3.org/2001/XMLSchema-instance"xmlns:context="http://www.springframework.org/schema/context"xmlns:mvc="http://www.springframework.org/schema/mvc"xsi:schemaLocation="http://www.springframework.org/schema/beans http://www.springframework.org/schema/beans/spring-beans.xsd http://www.springframework.org/schema/context https://www.springframework.org/schema/context/spring-context.xsd http://www.springframework.org/schema/mvc https://www.springframework.org/schema/mvc/spring-mvc.xsd"><!-- 扫描controller对应的包,将handler加入到ioc--><context:component-scan base-package="com.atguigu.controller" /><!--注意: 导入mvc命名空间!mvc:annotation-driven 是一个整合标签他会导入handlerMapping和handlerAdapter他会导入json数据格式转化器等等--><mvc:annotation-driven /><!-- viewResolver 不需要配置,因为我们不需要查找逻辑视图!!! --><!-- 加入这个配置,SpringMVC 就会在遇到没有 @RequestMapping 的请求时放它过去 --><!-- 所谓放它过去就是让这个请求去找它原本要访问的资源 --><mvc:default-servlet-handler/><!-- 配置动态页面语言jsp的视图解析器,快速查找jsp--><bean class="org.springframework.web.servlet.view.InternalResourceViewResolver"><property name="viewClass" value="org.springframework.web.servlet.view.JstlView"/><property name="prefix" value="/WEB-INF/views/"/><property name="suffix" value=".jsp"/></bean></beans>
3. 业务层配置编写(AOP / TX整合)
主要配置service,注解aop和声明事务相关!
位置:resources/spring-service.xml(命名随意)
<?xml version="1.0" encoding="UTF-8"?>
<beans xmlns="http://www.springframework.org/schema/beans"xmlns:xsi="http://www.w3.org/2001/XMLSchema-instance"xmlns:context="http://www.springframework.org/schema/context"xmlns:aop="http://www.springframework.org/schema/aop" xmlns:tx="http://www.springframework.org/schema/tx"xsi:schemaLocation="http://www.springframework.org/schema/beans http://www.springframework.org/schema/beans/spring-beans.xsd http://www.springframework.org/schema/context https://www.springframework.org/schema/context/spring-context.xsd http://www.springframework.org/schema/aop https://www.springframework.org/schema/aop/spring-aop.xsd http://www.springframework.org/schema/tx http://www.springframework.org/schema/tx/spring-tx.xsd"><!-- 业务层bean,增强,切点等都在此层配置 --><context:component-scan base-package="com.atguigu.service,com.atguigu.advice,com.atguigu.pointcut" /><!-- 事务注解开启 注意:数据库配置将在mapper文件中,最终会被加载到同一个容器中,此处爆红运行正常!--><bean id="transactionManager" class="org.springframework.jdbc.datasource.DataSourceTransactionManager" ><property name="dataSource" ref="dataSource" /></bean><tx:annotation-driven transaction-manager="transactionManager" />
</beans>
4. 持久层配置编写(MyBatis整合)
jdbc外部配置
位置:resources/jdbc.properties
jdbc.user=root
jdbc.password=root
jdbc.url=jdbc:mysql:///mybatis-example
jdbc.driver=com.mysql.cj.jdbc.Driver
持久层配置
位置:resources/spring-mapper.xml(命名随意)
<?xml version="1.0" encoding="UTF-8"?>
<beans xmlns="http://www.springframework.org/schema/beans"xmlns:xsi="http://www.w3.org/2001/XMLSchema-instance"xmlns:context="http://www.springframework.org/schema/context"xsi:schemaLocation="http://www.springframework.org/schema/beans http://www.springframework.org/schema/beans/spring-beans.xsd http://www.springframework.org/schema/context https://www.springframework.org/schema/context/spring-context.xsd"><!-- 加载外部属性文件 --><context:property-placeholder location="classpath:jdbc.properties"/><!-- 配置数据源 注意: dataSource被service配置文件中引用,命名为:dataSource--><bean id="dataSource" class="com.alibaba.druid.pool.DruidDataSource"><property name="username" value="${jdbc.user}"/><property name="password" value="${jdbc.password}"/><property name="driverClassName" value="${jdbc.driver}"/><property name="url" value="${jdbc.url}"/></bean></beans>
配置mybatis方式1:保留mybaits全局配置
准备mybatis-config.xml文件:去掉数据库信息,去掉mapper包映射(xml中配置)
<?xml version="1.0" encoding="UTF-8" ?>
<!DOCTYPE configurationPUBLIC "-//mybatis.org//DTD Config 3.0//EN""http://mybatis.org/dtd/mybatis-3-config.dtd">
<configuration><settings><!-- 开启驼峰式映射--><setting name="mapUnderscoreToCamelCase" value="true"/><!-- 开启logback日志输出--><setting name="logImpl" value="SLF4J"/><!--开启resultMap自动映射 --><setting name="autoMappingBehavior" value="FULL"/></settings><typeAliases><!-- 给实体类起别名 --><package name="com.atguigu.pojo"/></typeAliases><plugins><plugin interceptor="com.github.pagehelper.PageInterceptor"><!--helperDialect:分页插件会自动检测当前的数据库链接,自动选择合适的分页方式。你可以配置helperDialect属性来指定分页插件使用哪种方言。配置时,可以使用下面的缩写值:oracle,mysql,mariadb,sqlite,hsqldb,postgresql,db2,sqlserver,informix,h2,sqlserver2012,derby(完整内容看 PageAutoDialect) 特别注意:使用 SqlServer2012 数据库时,https://github.com/pagehelper/Mybatis-PageHelper/blob/master/wikis/zh/HowToUse.md#%E5%A6%82%E4%BD%95%E9%85%8D%E7%BD%AE%E6%95%B0%E6%8D%AE%E5%BA%93%E6%96%B9%E8%A8%80--><property name="helperDialect" value="mysql"/></plugin></plugins></configuration>
修改spring-mapper.xml
<?xml version="1.0" encoding="UTF-8"?>
<beans xmlns="http://www.springframework.org/schema/beans"xmlns:xsi="http://www.w3.org/2001/XMLSchema-instance"xmlns:context="http://www.springframework.org/schema/context"xsi:schemaLocation="http://www.springframework.org/schema/beans http://www.springframework.org/schema/beans/spring-beans.xsd http://www.springframework.org/schema/context https://www.springframework.org/schema/context/spring-context.xsd"><!-- 加载外部属性文件 --><context:property-placeholder location="classpath:jdbc.properties"/><!-- 配置数据源 注意: dataSource被service配置文件中引用,命名为:dataSource--><bean id="dataSource" class="com.alibaba.druid.pool.DruidDataSource"><property name="username" value="${jdbc.user}"/><property name="password" value="${jdbc.password}"/><property name="driverClassName" value="${jdbc.driver}"/><property name="url" value="${jdbc.url}"/></bean><!-- 方式1: 引用外部配置文件 --><!-- 配置 SqlSessionFactoryBean --><bean id="sqlSessionFactory" class="org.mybatis.spring.SqlSessionFactoryBean"><!-- 指定 Mybatis 全局配置文件位置 --><property name="configLocation" value="classpath:mybatis-config.xml"/><!-- 指定 Mapper 配置文件位置 --><property name="mapperLocations" value="classpath:mappers/*Mapper.xml"/><!-- 装配数据源 --><property name="dataSource" ref="dataSource"/></bean><!-- 配置 Mapper接口类型的bean的扫描器 --><bean id="mapperScannerConfigurer" class="org.mybatis.spring.mapper.MapperScannerConfigurer"><property name="basePackage" value="com.atguigu.mapper"/></bean></beans>
配置mybatis方式2:完全配置文件实现
修改spring-mapper.xml
<?xml version="1.0" encoding="UTF-8"?>
<beans xmlns="http://www.springframework.org/schema/beans"xmlns:xsi="http://www.w3.org/2001/XMLSchema-instance"xmlns:context="http://www.springframework.org/schema/context"xsi:schemaLocation="http://www.springframework.org/schema/beans http://www.springframework.org/schema/beans/spring-beans.xsd http://www.springframework.org/schema/context https://www.springframework.org/schema/context/spring-context.xsd"><!-- 加载外部属性文件 --><context:property-placeholder location="classpath:jdbc.properties"/><!-- 配置数据源 注意: dataSource被service配置文件中引用,命名为:dataSource--><bean id="dataSource" class="com.alibaba.druid.pool.DruidDataSource"><property name="username" value="${jdbc.user}"/><property name="password" value="${jdbc.password}"/><property name="driverClassName" value="${jdbc.driver}"/><property name="url" value="${jdbc.url}"/></bean><!-- 方式2: 彻底舍弃Mybatis全局配置文件 --><!-- 配置 SqlSessionFactoryBean --><bean id="sqlSessionFactory" class="org.mybatis.spring.SqlSessionFactoryBean"><!-- 舍弃 Mybatis 全局配置文件,使用 configuration 属性 --><property name="configuration"><bean class="org.apache.ibatis.session.Configuration"><property name="mapUnderscoreToCamelCase" value="true"/></bean></property><!-- 舍弃 Mybatis 全局配置文件,使用 typeAliasesPackage 属性配置实体类所在包 --><property name="typeAliasesPackage" value="com.atguigu.pojo"/><!-- 指定 Mapper 配置文件位置 --><property name="mapperLocations" value="classpath:mappers/*Mapper.xml"/><!-- 装配数据源 --><property name="dataSource" ref="dataSource"/><!-- 分页插件 --><property name="plugins"><array><bean class="com.github.pagehelper.PageInterceptor"><property name="properties"><props><!-- 启用合理化设置。当页码为负数时,设置为1, 当页码超过最大页时设置为最大页 --><prop key="reasonable">true</prop><prop key="pageHelperDialect">mysql</prop></props></property></bean></array></property></bean><!-- 配置 Mapper接口类型的bean的扫描器--><bean id="mapperScannerConfigurer" class="org.mybatis.spring.mapper.MapperScannerConfigurer"><property name="basePackage" value="com.atguigu.mapper"/></bean><!-- 也可以使用mybatis-spring名称空间 --><mybatis-spring:scan base-package="com.atguigu.mapper"/></beans>
5. 容器初始化配置web.xml
<?xml version="1.0" encoding="UTF-8"?>
<web-app xmlns="http://xmlns.jcp.org/xml/ns/javaee"xmlns:xsi="http://www.w3.org/2001/XMLSchema-instance"xsi:schemaLocation="http://xmlns.jcp.org/xml/ns/javaee http://xmlns.jcp.org/xml/ns/javaee/web-app_4_0.xsd"version="4.0"><!-- ContextLoaderListener --><!-- 通过 context-param 指定 Spring 框架的配置文件位置 --><context-param><param-name>contextConfigLocation</param-name><param-value>classpath:spring-service.xml,classpath:spring-mapper.xml</param-value></context-param><!-- 配置 ContextLoaderListener --><listener><listener-class>org.springframework.web.context.ContextLoaderListener</listener-class></listener><!-- DispatcherServlet --><servlet><servlet-name>dispatcherServlet</servlet-name><servlet-class>org.springframework.web.servlet.DispatcherServlet</servlet-class><init-param><param-name>contextConfigLocation</param-name><param-value>classpath:spring-mvc.xml</param-value></init-param><load-on-startup>1</load-on-startup></servlet><servlet-mapping><servlet-name>dispatcherServlet</servlet-name><url-pattern>/</url-pattern></servlet-mapping>
</web-app>
6. 整合测试
-
需求
查询所有员工信息,返回对应json数据!
-
controller
@Slf4j @RestController @RequestMapping("/employee") public class EmployeeController {@Autowiredprivate EmployeeService employeeService;@GetMapping("list")public List<Employee> retList(){List<Employee> employees = employeeService.findAll();log.info("员工数据:{}",employees);return employees;} } -
service
@Service public class EmployeeServiceImpl implements EmployeeService {@Autowiredprivate EmployeeMapper employeeMapper;/*** 查询所有员工信息*/@Overridepublic List<Employee> findAll() {List<Employee> employeeList = employeeMapper.queryAll();return employeeList;} } -
mapper
mapper接口 包:com.atguigu.mapper
public interface EmployeeMapper {List<Employee> queryAll();
}
mapper XML 文件位置: resources/mappers
<?xml version="1.0" encoding="UTF-8" ?>
<!DOCTYPE mapperPUBLIC "-//mybatis.org//DTD Mapper 3.0//EN""https://mybatis.org/dtd/mybatis-3-mapper.dtd">
<!-- namespace等于mapper接口类的全限定名,这样实现对应 -->
<mapper namespace="com.atguigu.mapper.EmployeeMapper"><select id="queryAll" resultType="employee"><!-- #{empId}代表动态传入的参数,并且进行赋值!后面详细讲解 -->select emp_id empId,emp_name empName, emp_salary empSalary from t_emp</select></mapper>
三、前端程序搭建和运行
1. 案例功能和接口分析
1.1 案例功能预览
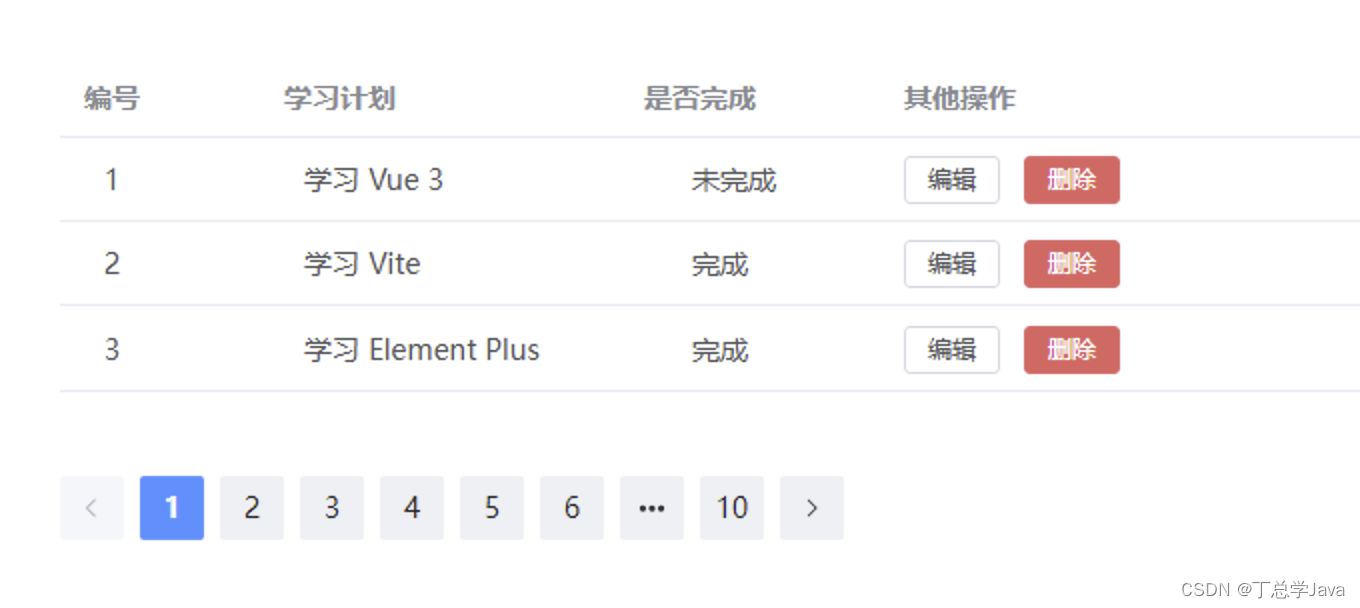
1.2 接口分析
- 学习计划分页查询
/* 需求说明查询全部数据页数据 请求urischedule/{pageSize}/{currentPage} 请求方式 get 响应的json{"code":200,"flag":true,"data":{//本页数据data:[{id:1,title:'学习java',completed:true},{id:2,title:'学习html',completed:true},{id:3,title:'学习css',completed:true},{id:4,title:'学习js',completed:true},{id:5,title:'学习vue',completed:true}], //分页参数pageSize:5, // 每页数据条数 页大小total:0 , // 总记录数currentPage:1 // 当前页码}} */ - 学习计划删除
/* 需求说明根据id删除日程 请求urischedule/{id} 请求方式 delete 响应的json{"code":200,"flag":true,"data":null} */ - 学习计划保存
/* 需求说明增加日程 请求urischedule 请求方式 post 请求体中的JSON{title: '',completed: false} 响应的json{"code":200,"flag":true,"data":null} */ - 学习计划修改
/*
需求说明根据id修改数据
请求urischedule
请求方式 put
请求体中的JSON{id: 1,title: '',completed: false}
响应的json{"code":200,"flag":true,"data":null}
*/
2. 前端工程导入
3. 启动测试
npm i //安装依赖
npm run dev //运行测试
四、后端程序实现和测试
1. 准备工作
-
准备数据库脚本
CREATE TABLE schedule (id INT NOT NULL AUTO_INCREMENT,title VARCHAR(255) NOT NULL,completed BOOLEAN NOT NULL,PRIMARY KEY (id) );INSERT INTO schedule (title, completed) VALUES('学习java', true),('学习Python', false),('学习C++', true),('学习JavaScript', false),('学习HTML5', true),('学习CSS3', false),('学习Vue.js', true),('学习React', false),('学习Angular', true),('学习Node.js', false),('学习Express', true),('学习Koa', false),('学习MongoDB', true),('学习MySQL', false),('学习Redis', true),('学习Git', false),('学习Docker', true),('学习Kubernetes', false),('学习AWS', true),('学习Azure', false); -
准备pojo
包:com.atguigu.pojo
/*** projectName: com.atguigu.pojo** description: 任务实体类*/ @Data public class Schedule {private Integer id;private String title;private Boolean completed; } -
准备 R
包:com.atguigu.utils
*** projectName: com.atguigu.utils** description: 返回结果类*/
public class R {private int code = 200; //200成功状态码private boolean flag = true; //返回状态private Object data;  //返回具体数据
public static R ok(Object data){R r = new R();r.data = data;return r;}public static R fail(Object data){R r = new R();r.code = 500; //错误码r.flag = false; //错误状态r.data = data;return r;}public int getCode() {return code;}public void setCode(int code) {this.code = code;}public boolean isFlag() {return flag;}public void setFlag(boolean flag) {this.flag = flag;}public Object getData() {return data;}public void setData(Object data) {this.data = data;} } -
准备 PageBean
包:com.atguigu.utils
@Data
@NoArgsConstructor
@AllArgsConstructor
public class PageBean<T> {private int currentPage;   // 当前页码private int pageSize;      // 每页显示的数据量private long total;    // 总数据条数private List<T> data;      // 当前页的数据集合
}
2. 功能实现
- 分页查询
-
controller
/*@CrossOrigin 注释在带注释的控制器方法上启用跨源请求*/ @CrossOrigin @RequestMapping("schedule") @RestController public class ScheduleController {@Autowiredprivate ScheduleService scheduleService;@GetMapping("/{pageSize}/{currentPage}")public R showList(@PathVariable(name = "pageSize") int pageSize, @PathVariable(name = "currentPage") int currentPage){PageBean<Schedule> pageBean = scheduleService.findByPage(pageSize,currentPage);return R.ok(pageBean);} } -
service
@Slf4j @Service public class ScheduleServiceImpl implements ScheduleService {@Autowiredprivate ScheduleMapper scheduleMapper;/*** 分页数据查询,返回分页pageBean** @param pageSize* @param currentPage* @return*/@Overridepublic PageBean<Schedule> findByPage(int pageSize, int currentPage) {//1.设置分页参数PageHelper.startPage(currentPage,pageSize);//2.数据库查询List<Schedule> list = scheduleMapper.queryPage();//3.结果获取PageInfo<Schedule> pageInfo = new PageInfo<>(list);//4.pageBean封装PageBean<Schedule> pageBean = new PageBean<>(pageInfo.getPageNum(),pageInfo.getPageSize(),pageInfo.getTotal(),pageInfo.getList());log.info("分页查询结果:{}",pageBean);return pageBean;}} -
mapper
mapper接口
public interface ScheduleMapper {List<Schedule> queryPage();
}
mapperxml文件
<?xml version="1.0" encoding="UTF-8" ?>
<!DOCTYPE mapperPUBLIC "-//mybatis.org//DTD Mapper 3.0//EN""https://mybatis.org/dtd/mybatis-3-mapper.dtd">
<!-- namespace等于mapper接口类的全限定名,这样实现对应 -->
<mapper namespace="com.atguigu.mapper.ScheduleMapper"><select id="queryPage" resultType="schedule">select * from schedule</select>
</mapper>
-
- 计划添加
-
controller
@PostMapping public R saveSchedule(@RequestBody Schedule schedule){scheduleService.saveSchedule(schedule);return R.ok(null); } -
service
/*** 保存学习计划** @param schedule*/ @Override public void saveSchedule(Schedule schedule) {scheduleMapper.insert(schedule); } -
mapper
mapper接口
void insert(Schedule schedule);mapperxml文件
<insert id="insert">insert into schedule (title, completed)values(#{title}, #{completed});
</insert>
-
- 计划删除
- controller
@DeleteMapping("/{id}") public R removeSchedule(@PathVariable Integer id){scheduleService.removeById(id);return R.ok(null); } - service
/*** 移除学习计划** @param id*/ @Override public void removeById(Integer id) {scheduleMapper.delete(id); } - mapper
mapper接口
mapperxml文件void delete(Integer id);<delete id="delete">delete from schedule where id = #{id} </delete>
- controller
- 计划修改
- controller
@PutMappingpublic R changeSchedule(@RequestBody Schedule schedule){scheduleService.updateSchedule(schedule);return R.ok(null); } - service
/*** 更新学习计划** @param schedule*/ @Override public void updateSchedule(Schedule schedule) {scheduleMapper.update(schedule); } - mapper
mapper接口
mapperxml文件void update(Schedule schedule);<update id="update">update schedule set title = #{title} , completed = #{completed}where id = #{id} </update>
- controller
3. 前后联调
-
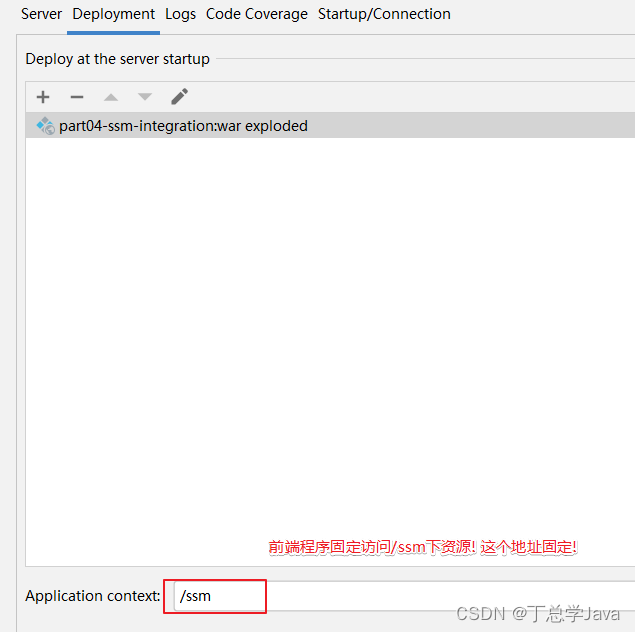
后台项目根路径设计
-
启动测试即可
五、SSM技术栈总结
1. Spring框架总结
1.1 技术点总结
- 控制反转(IoC,Inversion of Control)和依赖注入(DI,Dependency Injection)
- Spring AOP(Aspect-Oriented Programming)面向切面编程
- Spring TX声明式事务实现
1.2 配置总结
- IoC/DI配置
-
xml
<bean id="petStore" class="org.springframework.samples.jpetstore.services.PetStoreServiceImpl"><property name="accountDao" ref="accountDao"/><property name="itemDao" ref="itemDao"/><!-- additional collaborators and configuration for this bean go here --> </bean> -
注解
注解 说明 @Component 该注解用于描述 Spring 中的 Bean,它是一个泛化的概念,仅仅表示容器中的一个组件(Bean),并且可以作用在应用的任何层次,例如 Service 层、Dao 层等。 使用时只需将该注解标注在相应类上即可。 @Repository 该注解用于将数据访问层(Dao 层)的类标识为 Spring 中的 Bean,其功能与 @Component 相同。 @Service 该注解通常作用在业务层(Service 层),用于将业务层的类标识为 Spring 中的 Bean,其功能与 @Component 相同。 @Controller 该注解通常作用在控制层(如SpringMVC 的 Controller),用于将控制层的类标识为 Spring 中的 Bean,其功能与 @Component 相同。 <?xml version="1.0" encoding="UTF-8"?> <beans xmlns="http://www.springframework.org/schema/beans"xmlns:xsi="http://www.w3.org/2001/XMLSchema-instance"xmlns:context="http://www.springframework.org/schema/context"xsi:schemaLocation="http://www.springframework.org/schema/beans http://www.springframework.org/schema/beans/spring-beans.xsd http://www.springframework.org/schema/context https://www.springframework.org/schema/context/spring-context.xsd"><!-- 配置自动扫描的包 --><!-- 1.包要精准,提高性能!2.会扫描指定的包和子包内容3.多个包可以使用,分割 例如: com.atguigu.controller,com.atguigu.service等--><context:component-scan base-package="com.atguigu.components"/></beans> -
配置类

//标注当前类是配置类,替代application.xml
@Configuration
//引入jdbc.properties文件
@PropertySource({"classpath:application.properties","classpath:jdbc.properties"})
@ComponentScan(basePackages = {"com.atguigu.components"})
@Import(其他的配置类.class)
public class MyConfiguration {//如果第三方类进行IoC管理,无法直接使用@Component相关注解//解决方案: xml方式可以使用<bean标签//解决方案: 配置类方式,可以使用方法返回值+@Bean注解@Beanpublic DataSource createDataSource(@Value("${jdbc.user:default}") String username,@Value("${jdbc.password}")String password,@Value("${jdbc.url}")String url,@Value("${jdbc.driver}")String driverClassName){//使用Java代码实例化DruidDataSource dataSource = new DruidDataSource();dataSource.setUsername(username);dataSource.setPassword(password);dataSource.setUrl(url);dataSource.setDriverClassName(driverClassName);//返回结果即可return dataSource;}@Beanpublic XxxMapper createMapper(DataSource createDataSource){}}
-
- AOP配置
- 注解
<?xml version="1.0" encoding="UTF-8"?> <beans xmlns="http://www.springframework.org/schema/beans"xmlns:xsi="http://www.w3.org/2001/XMLSchema-instance"xmlns:context="http://www.springframework.org/schema/context"xmlns:aop="http://www.springframework.org/schema/aop"xsi:schemaLocation="http://www.springframework.org/schema/beans http://www.springframework.org/schema/beans/spring-beans.xsd http://www.springframework.org/schema/context https://www.springframework.org/schema/context/spring-context.xsd http://www.springframework.org/schema/aop https://www.springframework.org/schema/aop/spring-aop.xsd"><!-- 进行包扫描--><context:component-scan base-package="com.atguigu" /><!-- 开启aspectj框架注解支持--><aop:aspectj-autoproxy /> </beans>@Aspect @Order 值越小优先级越高 @Before @After @AfterReturning @AfterThrowing @Around @Pointcut - xml(了解)
<!-- 配置目标类的bean -->
<bean id="calculatorPure" class="com.atguigu.aop.imp.CalculatorPureImpl"/><!-- 配置切面类的bean -->
<bean id="logAspect" class="com.atguigu.aop.aspect.LogAspect"/><!-- 配置AOP -->
<aop:config><!-- 配置切入点表达式 --><aop:pointcut id="logPointCut" expression="execution(* *..*.*(..))"/><!-- aop:aspect标签:配置切面 --><!-- ref属性:关联切面类的bean --><aop:aspect ref="logAspect"><!-- aop:before标签:配置前置通知 --><!-- method属性:指定前置通知的方法名 --><!-- pointcut-ref属性:引用切入点表达式 --><aop:before method="printLogBeforeCore" pointcut-ref="logPointCut"/><!-- aop:after-returning标签:配置返回通知 --><!-- returning属性:指定通知方法中用来接收目标方法返回值的参数名 --><aop:after-returningmethod="printLogAfterCoreSuccess"pointcut-ref="logPointCut"returning="targetMethodReturnValue"/><!-- aop:after-throwing标签:配置异常通知 --><!-- throwing属性:指定通知方法中用来接收目标方法抛出异常的异常对象的参数名 --><aop:after-throwingmethod="printLogAfterCoreException"pointcut-ref="logPointCut"throwing="targetMethodException"/><!-- aop:after标签:配置后置通知 --><aop:after method="printLogCoreFinallyEnd" pointcut-ref="logPointCut"/><!-- aop:around标签:配置环绕通知 --><!--<aop:around method="……" pointcut-ref="logPointCut"/>--></aop:aspect></aop:config>
- 注解
- TX配置
-
注解
<bean id="transactionManager" class="org.springframework.jdbc.datasource.DataSourceTransactionManager"><!-- 事务管理器的bean只需要装配数据源,其他属性保持默认值即可 --><property name="dataSource" ref="druidDataSource"/>
</bean>
<!-- 开启基于注解的声明式事务功能 -->
<!-- 使用transaction-manager属性指定当前使用是事务管理器的bean -->
<!-- transaction-manager属性的默认值是transactionManager,如果事务管理器bean的id正好就是这个默认值,则可以省略这个属性 -->
<tx:annotation-driven transaction-manager="transactionManager"/>
@Transactional
-
xml(了解)
<?xml version="1.0" encoding="UTF-8"?>
<beans xmlns="http://www.springframework.org/schema/beans"xmlns:xsi="http://www.w3.org/2001/XMLSchema-instance"xmlns:context="http://www.springframework.org/schema/context"xmlns:tx="http://www.springframework.org/schema/tx"xmlns:aop="http://www.springframework.org/schema/aop"xsi:schemaLocation="http://www.springframework.org/schema/beans http://www.springframework.org/schema/beans/spring-beans.xsd http://www.springframework.org/schema/context https://www.springframework.org/schema/context/spring-context.xsd http://www.springframework.org/schema/tx http://www.springframework.org/schema/tx/spring-tx.xsd http://www.springframework.org/schema/aop https://www.springframework.org/schema/aop/spring-aop.xsd"><!-- 扫描包 --><context:component-scan base-package="com.atguigu" /><!-- 导入外部属性文件 --><context:property-placeholder location="classpath:jdbc.properties" /><!-- 配置数据源 --><bean id="druidDataSource" class="com.alibaba.druid.pool.DruidDataSource"><property name="url" value="${atguigu.url}"/><property name="driverClassName" value="${atguigu.driver}"/><property name="username" value="${atguigu.username}"/><property name="password" value="${atguigu.password}"/></bean><!-- 配置 JdbcTemplate --><bean id="jdbcTemplate" class="org.springframework.jdbc.core.JdbcTemplate"><!-- 装配数据源 --><property name="dataSource" ref="druidDataSource"/></bean><!-- 配置事务管理器 --><bean id="transactionManager" class="org.springframework.jdbc.datasource.DataSourceTransactionManager"><!-- 事务管理器的bean只需要装配数据源,其他属性保持默认值即可 --><property name="dataSource" ref="druidDataSource"/></bean><!-- tx:advice标签:配置事务通知 --><!-- id属性:给事务通知标签设置唯一标识,便于引用 --><!-- transaction-manager属性:关联事务管理器 --><tx:advice id="txAdvice" transaction-manager="transactionManager"><tx:attributes><!-- tx:method标签:配置具体的事务方法 --><!-- name属性:指定方法名,可以使用星号代表多个字符 --><tx:method name="get*" read-only="true"/><tx:method name="query*" read-only="true"/><tx:method name="find*" read-only="true"/><!-- read-only属性:设置只读属性 --><!-- rollback-for属性:设置回滚的异常 --><!-- no-rollback-for属性:设置不回滚的异常 --><!-- isolation属性:设置事务的隔离级别 --><!-- timeout属性:设置事务的超时属性 --><!-- propagation属性:设置事务的传播行为 --><tx:method name="save*" read-only="false" rollback-for="java.lang.Exception" propagation="REQUIRES_NEW"/><tx:method name="update*" read-only="false" rollback-for="java.lang.Exception" propagation="REQUIRES_NEW"/><tx:method name="delete*" read-only="false" rollback-for="java.lang.Exception" propagation="REQUIRES_NEW"/><!-- 兜个底--><tx:method name="*" /></tx:attributes></tx:advice><aop:config><!-- 配置切入点表达式,将事务功能定位到具体方法上 --><aop:pointcut id="txPoincut" expression="execution(* *..*Service.*(..))"/><!-- 将事务通知和切入点表达式关联起来 --><aop:advisor advice-ref="txAdvice" pointcut-ref="txPoincut"/></aop:config>
</beans>
-
1.3 注解总结
-
ioc/di注解:
@Autowired:自动装配 Bean,可用于构造方法、属性和方法上,配合
@Qualifier使用实现按名称注入。@Qualifier:指定需要注入的 Bean 的名称,通常和
@Autowired一起使用。@Resource:和
@Autowired类似,可以实现按名称注入,不过是 JSR-250 规范的注解。@Value:注入 properties 文件中的属性值,还可以注入 SpEL 表达式的值。
@Component:通用的组件注解,通常用于标记 Spring 管理的 Bean。
@Controller:标记 Spring MVC 控制器,也是
@Component的一种。@Service:标记 Service 层组件,也是
@Component的一种。@Repository:标记数据访问层组件,是
@Component的一种。 -
aop注解:
@Aspect:声明一个切面类。
@Pointcut:定义切入点表达式。
@Before:前置通知,在目标方法执行之前执行。
@AfterReturning:后置通知,在目标方法执行之后执行,返回结果时执行。
@AfterThrowing:异常通知,在目标方法抛出异常时执行。
@After:最终通知,在目标方法执行之后执行,无论是否发生异常都执行。
@Around:环绕通知,在目标方法执行前后执行,可以控制目标方法的执行。
-
tx注解:
@Transactional:声明一个事务方法,可以配置事务的属性,如传播行为、隔离级别、超时时间等。
2. Spring MVC 框架总结
2.1 技术点总结
-
简化参数接收
接收param / json / 文件 / 原生api / 共享域
-
简化数据响应
响应 页面 / 转发和重定向 / json / 文件
2.2 配置总结
<?xml version="1.0" encoding="UTF-8"?>
<beans xmlns="http://www.springframework.org/schema/beans"xmlns:xsi="http://www.w3.org/2001/XMLSchema-instance"xmlns:context="http://www.springframework.org/schema/context"xmlns:mvc="http://www.springframework.org/schema/mvc"xsi:schemaLocation="http://www.springframework.org/schema/beans http://www.springframework.org/schema/beans/spring-beans.xsd http://www.springframework.org/schema/context https://www.springframework.org/schema/context/spring-context.xsd http://www.springframework.org/schema/mvc https://www.springframework.org/schema/mvc/spring-mvc.xsd"><!-- 扫描controller对应的包,将handler加入到ioc  handler--><context:component-scan base-package="com.atguigu.controller" /><!--注意: 导入mvc命名空间!mvc:annotation-driven 是一个整合标签他会导入handlerMapping和handlerAdapter他会导入json数据格式转化器等等--><mvc:annotation-driven /><!-- viewResolver 不需要配置,因为我们不需要查找逻辑视图!!! --><!-- 加入这个配置,SpringMVC 就会在遇到没有 @RequestMapping 的请求时放它过去 --><!-- 所谓放它过去就是让这个请求去找它原本要访问的资源 --><mvc:default-servlet-handler/><!-- 配置动态页面语言jsp的视图解析器,快速查找jsp--><bean class="org.springframework.web.servlet.view.InternalResourceViewResolver"><property name="viewClass" value="org.springframework.web.servlet.view.JstlView"/><property name="prefix" value="/WEB-INF/views/"/><property name="suffix" value=".jsp"/></bean></beans>
2.3 注解总结
-
控制器相关
@Controller:用于定义控制器类;@RestController:与@Controller类似,但返回值都会被转换为 JSON 格式;@RequestMapping:用于定义请求 URI 与控制器方法的映射关系;@CrossOrigin:用于标注在 Controller 类或处理请求的方法上,表示允许跨域请求; -
接收参数相关
@RequestParam:用于获取请求参数的值;@RequestBody:用于获取 POST 请求的请求体(Request Body);@RequestHeader:用于获取请求头信息;@CookieValue:用于获取 Cookie 中的值。@PathVariable:用于获取 URI 中的参数值; -
响应数据相关
@ResponseBody:用于将 Controller 中方法返回的对象转换成指定格式(通常是 JSON 或 XML)的对象,并将其作为响应正文返回; -
校验注解相关
@Validate:用于开启对象的数据校验;@NotNull:用于检验是否为 null;@NotBlank:用于检验是否为 null 或空字符串;@Size:用于检验字符串、数组、集合的长度范围;@Min:用于检验数字的最小值;@Max:用于检验数字的最大值;@DecimalMin:用于检验 BigDecimal 和 BigInteger 的最小值;@DecimalMax:用于检验 BigDecimal 和 BigInteger 的最大值;@Pattern:用于检验正则表达式。
3. MyBatis框架总结
3.1 技术点总结
- 映射文件及 SQL 语句编写
- MyBatis 动态 SQL
- MyBatis 多表映射
- MyBatis 逆向工程
3.2 配置总结
- mapper配置
MyBatis 的真正强大在于它的语句映射,这是它的魔力所在。由于它的异常强大,映射器的 XML 文件就显得相对简单。 如果拿它跟具有相同功能的 JDBC 代码进行对比,你会立即发现省掉了将近 95% 的代码。MyBatis 致力于减少使用成本,让用户能更专注于 SQL 代码。SQL 映射文件只有很少的几个顶级元素(按照应被定义的顺序列出):resultMap – 描述如何从数据库结果集中加载对象,是最复杂也是最强大的元素。sql – 可被其它语句引用的可重用语句块。insert – 映射插入语句。update – 映射更新语句。delete – 映射删除语句。select – 映射查询语句。 - mybatis配置
MyBatis 的配置文件包含了会深深影响 MyBatis 行为的设置和属性信息。 配置文档的顶层结构如下:configuration(配置)properties(属性)settings(设置)typeAliases(类型别名)typeHandlers(类型处理器) String [] , varchar()objectFactory(对象工厂)plugins(插件)environments(环境配置)environment(环境变量)transactionManager(事务管理器)dataSource(数据源)databaseIdProvider(数据库厂商标识)mappers(映射器)
3.3 注解总结
@Param:在 MyBatis 中,@Param 注解主要用于解决在调用映射器方法时传递多个参数的问题。当你在映射器接口中定义的方法有多个参数时,你需要使用 @Param 注解来明确指出每个参数的名称,以便在 SQL 映射文件中引用它们。
例如,假设你有以下映射器接口方法:
void updateUser(@Param("id") int id, @Param("name") String name, @Param("age") int age);
在这个例子中,你定义了一个名为 updateUser 的方法,它接受三个参数:id、name 和 age。每个参数都使用了 @Param 注解,并给出了一个名称。
然后,在相应的 SQL 映射文件中,你可以使用这些名称来引用这些参数。例如:
<update id="updateUser">  UPDATE user  SET name = #{name}, age = #{age}  WHERE id = #{id}
</update>
在这个例子中,#{name}、#{age} 和 #{id} 分别引用了传递给 updateUser 方法的 name、age 和 id 参数。
总的来说,@Param 注解在 MyBatis 中用于明确指出方法的参数名称,以便在 SQL 映射文件中引用它们。
相关文章:
SSM整合实战(Spring、SpringMVC、MyBatis)
五、SSM整合实战 目录 一、SSM整合理解 1. 什么是SSM整合?2. SSM整合核心理解五连问! 2.1 SSM整合涉及几个IoC容器?2.2 每个IoC容器盛放哪些组件?2.3 IoC容器之间是什么关系?2.4 需要几个配置文件和对应IoC容器关系&…...

QT调用外部exe及无终端弹窗的解决方案、并实现进程输出信息获取
博主使用QT调用外部exe程序,外部exe程序有printf输出,起初使用的是C语言中的system()方法,但在笔记本上有概率出现终端窗口一闪而过的情况,后修改了调用方案。 1. QT调用外部exe 使用QT中的QProcess方法 #include <QProcess…...
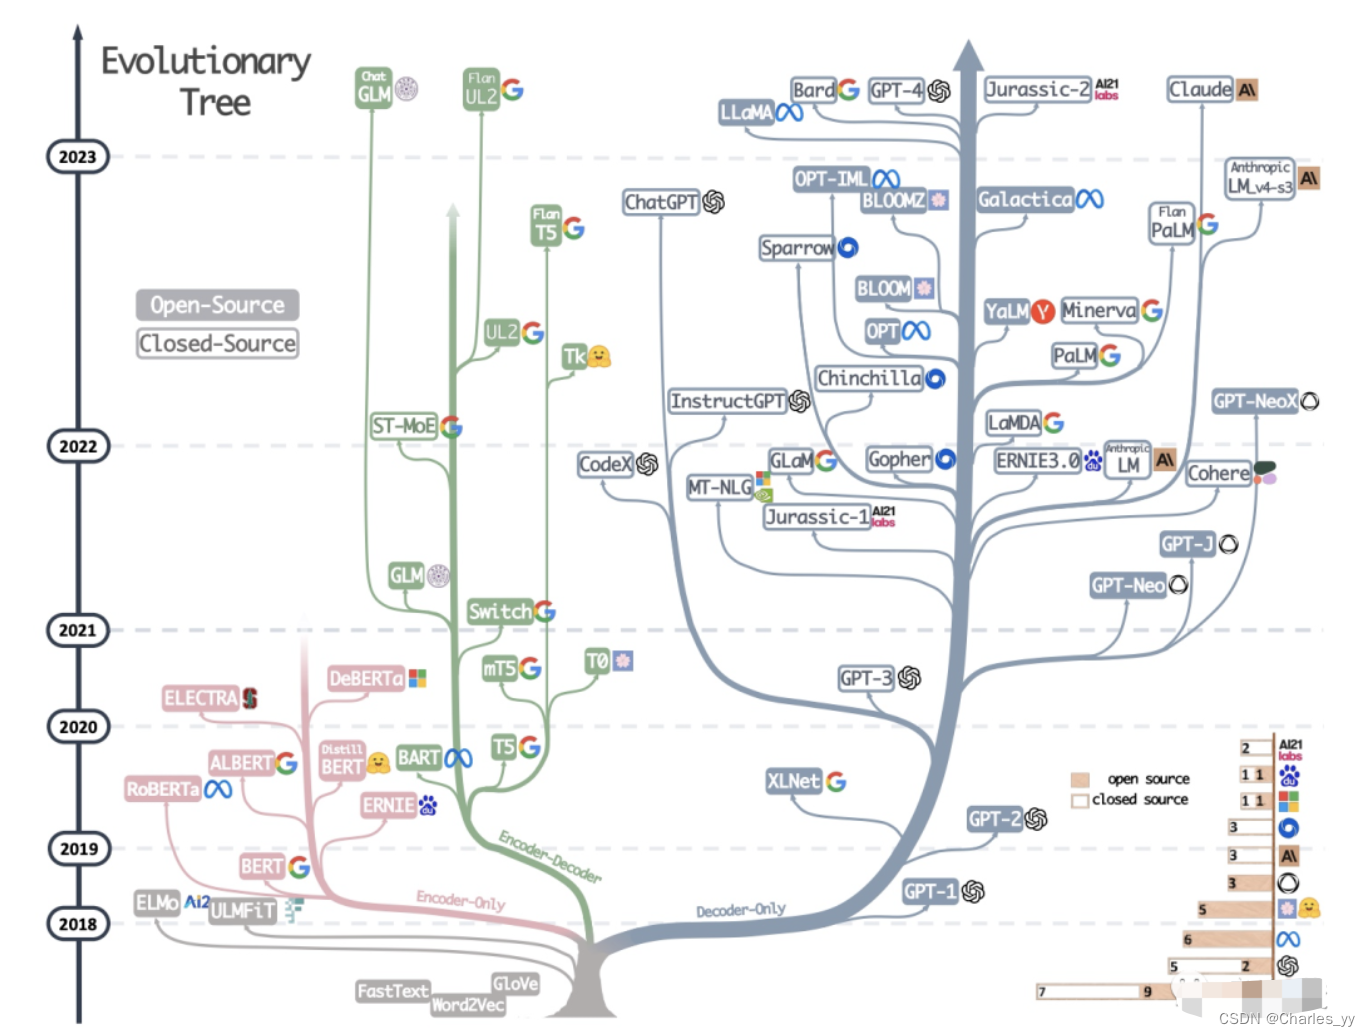
大语言模型的三种主要架构 Decoder-Only、Encoder-Only、Encoder-Decoder
现代大型语言模型(LLM)的演变进化树,如下图: https://arxiv.org/pdf/2304.13712.pdf 基于 Transformer 模型以非灰色显示: decoder-only 模型在蓝色分支, encoder-only 模型在粉色分支, encod…...

【MySQL】外连接 where 和 on 的区别
力扣题 1、题目地址 1158. 市场分析 I 2、模拟表 User Column NameTypeuser_idintjoin_datedatefavorite_brandvarchar user_id 是此表主键(具有唯一值的列)。表中描述了购物网站的用户信息,用户可以在此网站上进行商品买卖。 Orders…...
【优化】XXLJOB修改为使用虚拟线程
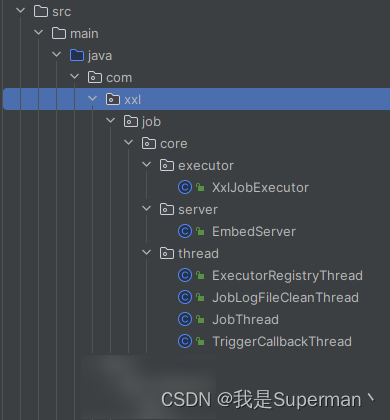
【优化】XXLJOB修改为使用虚拟线程 新建这几个目录 类, 去找项目对应的xxljob的源码 主要是将 new Thread 改为 虚拟线程 Thread.ofVirtual().name("VT").unstarted 以下代码是 xxljob 2.3.0版本 举一反三 去修改对应版本的代码 <!-- 定…...
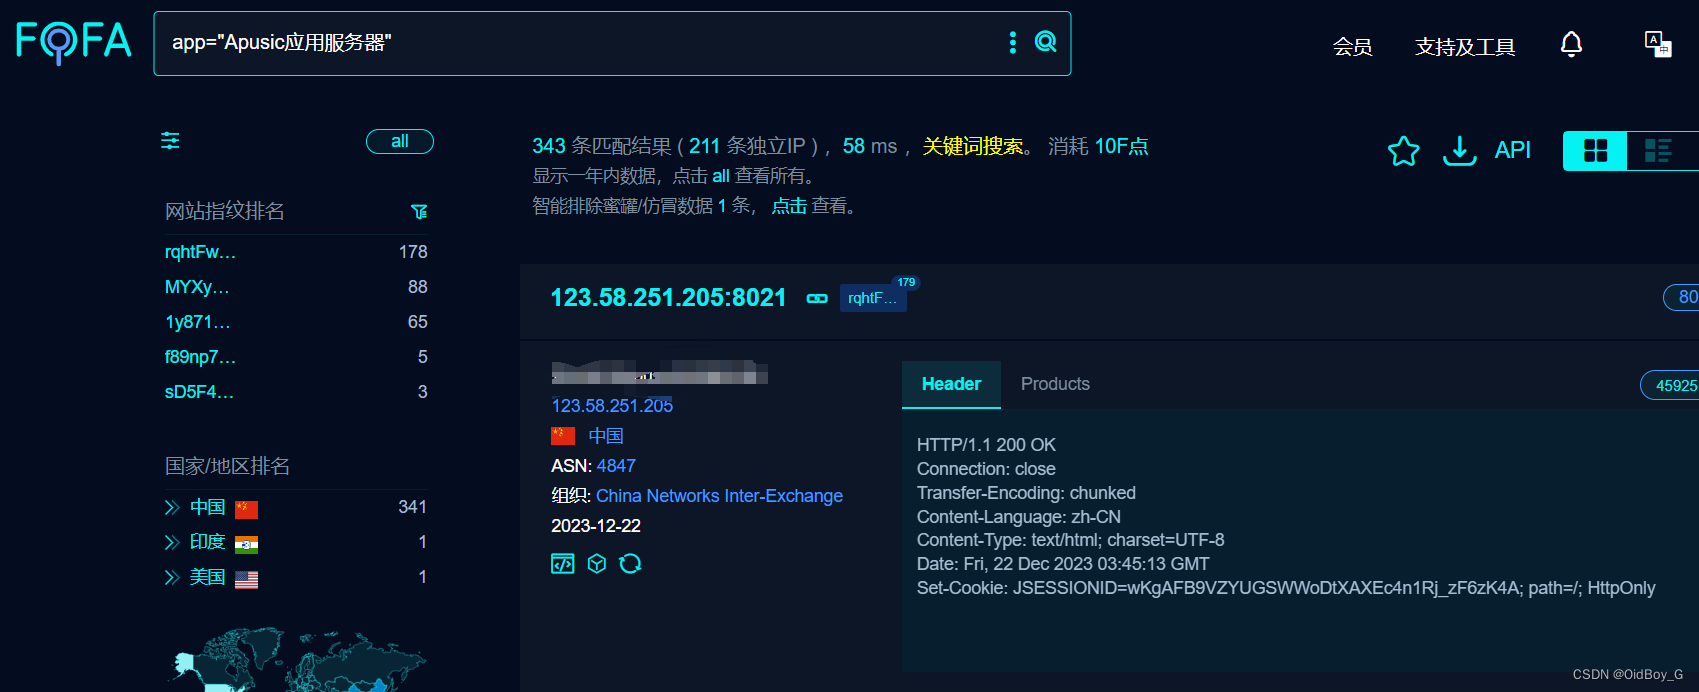
金蝶Apusic应用服务器 loadTree JNDI注入漏洞复现(QVD-2023-48297)
0x01 产品简介 金蝶Apusic应用服务器是一款企业级应用服务器,支持Java EE技术,适用于各种商业环境。 0x02 漏洞概述 由于金蝶Apusic应用服务器权限验证不当,导致攻击者可以向loadTree接口执行JNDI注入,造成远程代码执行漏洞。利用该漏洞需低版本JDK。(漏洞比较旧,8月份…...
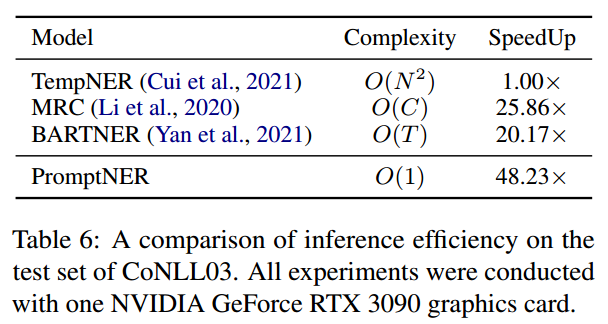
PromptNER: Prompt Locating and Typing for Named Entity Recognition
原文链接: https://aclanthology.org/2023.acl-long.698.pdf ACL 2023 介绍 问题 目前将prompt方法应用在ner中主要有两种方法:对枚举的span类型进行预测,或者通过构建特殊的prompt来对实体进行定位。但作者认为这些方法存在以下问题…...
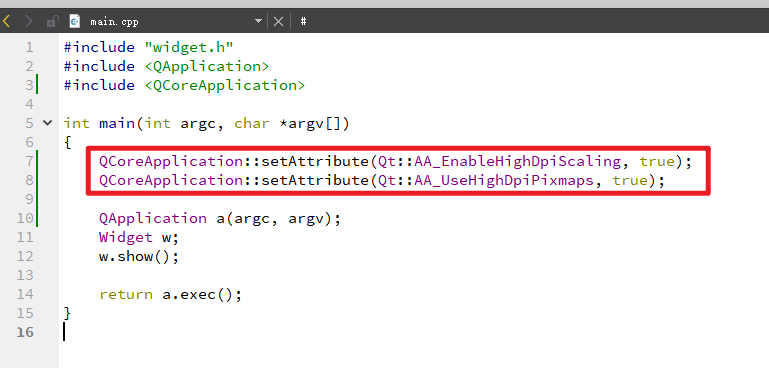
QT编写应用的界面自适应分辨率的解决方案
博主在工作机上完成QT软件开发(控件大小与字体大小比例正常),部署到客户机后,发现控件大小与字体大小比例失调,具体表现为控件装不下字体,即字体显示不全,推测是软件不能自适应分辨率导致的。 文…...

Kubernetes pod ip 暴露
1. k8s pod 和 service 网络暴露 借助 iptables 的路由转发功能,打通k8s集群内的pod和service网络,与外部网络联通 # 查看集群的 pod 网段和 service 网段 kubectl -n kube-system describe cm kubeadm-config networking:dnsDomain: cluster.localpod…...
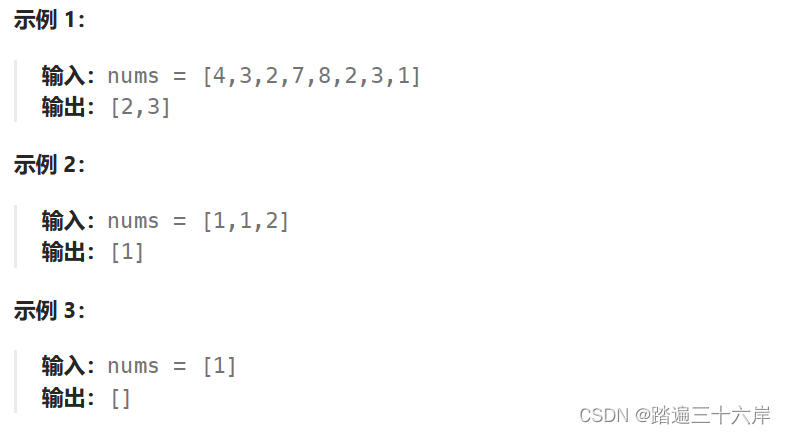
442. 数组中重复的数据
数组中重复的数据 描述 : 给你一个长度为 n 的整数数组 nums ,其中 nums 的所有整数都在范围 [1, n] 内,且每个整数出现 一次 或 两次 。请你找出所有出现 两次 的整数,并以数组形式返回。 你必须设计并实现一个时间复杂度为 O(n) 且仅使用…...

Qt/C++视频监控Onvif工具/组播搜索/显示监控画面/图片参数调节/OSD管理/祖传原创
一、前言 能够写出简单易用而又不失功能强大的组件,一直是我的追求,简单主要体现在易用性,不能搞一些繁琐的流程和一些极难使用的API接口,或者一些看不懂的很难以理解的函数名称,一定是要越简单越好。功能强大主要体现…...
word2003 open word2007+
Win 7 C:\Documents and Settings\Administrator\Application Data\Microsoft\Templates 还是不行,重装office2003吧,再安装转换插件,但是再高版本好像没转换工具...
windows安装、基本使用vim
标题:windows安装、基本使用vim 1.下载并安装GVIM 百度网盘链接 提取码:2apr 进入安装界面,如下,勾选 其它都是默认即可 参考; 2.在powershell中使用vim 参考blog:window10安装vim编辑器 安装好后&…...
【SpringBoot快速入门】(1)SpringBoot的开发步骤、工程构建方法以及工程的快速启动详细讲解
目录 SpringBoot简介1 SpringBoot快速入门1.1 开发步骤1.1.1 创建新模块1.1.2 创建 Controller1.1.3 启动服务器1.1.4 进行测试 2 对比3 官网构建工程3.1 进入SpringBoot官网3.2 选择依赖3.3 生成工程 4 SpringBoot工程快速启动4.1 问题导入4.2 打包4.3 启动 之前我们已经学习的…...
Day69力扣打卡
打卡记录...
机器学习:手撕 AlphaGo(一)
图 1-1: AphaGo 结构概览 1. 前言 AlphaGo 是一个非常经典的模型,不论从影响力还是模型设计上。它的技术迭代演进路径:AlphaGo,AlphaGoZero,AlphaZero,MuZero 更是十分精彩。相信有很多同学因为听了 AlphaGo 的故事对…...
ElasticSearch学习篇9_文本相似度计算方法现状以及基于改进的 Jaccard 算法代码实现
背景 XOP亿级别题库的试题召回以及搜题的举一反三业务场景都涉及使用文本相似搜索技术,学习此方面技术以便更好的服务于业务场景。 目前基于集合的Jaccard算法以及基于编辑距离的Levenshtein在计算文本相似度场景中有着各自的特点,为了优化具体的计算时…...
大创项目推荐 深度学习+python+opencv实现动物识别 - 图像识别
文章目录 0 前言1 课题背景2 实现效果3 卷积神经网络3.1卷积层3.2 池化层3.3 激活函数:3.4 全连接层3.5 使用tensorflow中keras模块实现卷积神经网络 4 inception_v3网络5 最后 0 前言 🔥 优质竞赛项目系列,今天要分享的是 🚩 *…...

Debezium系列之:Flink SQL消费Debezium数据格式,同步数据到下游存储系统
Debezium系列之:Flink SQL消费Debezium数据格式,同步数据到下游存储系统 一、Debezium二、依赖三、使用Debezium Format四、可用元数据五、Format参数六、重复的变更事件七、消费 Debezium Postgres Connector 产生的数据八、数据类型映射一、Debezium Debezium 是一个 CDC(…...

webrtc支持的最小宽度和高度
代码在:h264/sps_parser.cc // // IMPORTANT ONES! Now were getting to resolution. First we read the pic // width/height in macroblocks (16x16), which gives us the base resolution, // and then we continue on until we hit the frame crop offsets, wh…...

springboot+vue房屋租赁管理系统boot--毕业论文
目录项目技术支持可定制开发之功能亮点源码获取详细视频演示 :文章底部获取博主联系方式!同行可合作项目技术支持 后端语言框架支持: 数据库工具:Navicat/SQLyog等都可以 前端开发框架:vue.js 数据库 mysql 版本不限 1 java(SSM/s…...

告别账号切换折磨,让矩阵运营更轻松
做小红书矩阵运营的痛:运营10个、100个账号,每天反复切换登录、输密码,半天时间浪费在无效操作上;私信评论散在各后台,漏回慢回流失客源,还得熬夜守手机,苦不堪言。如果你也被这些问题折磨&…...

SAP SQ01 用户权限查询 - AGR_USER 表关系解析与应用
1. 从SQ01查询说起:为什么AGR_USER表是权限管理的“核心枢纽” 如果你在SAP系统里做过权限相关的查询或者审计,大概率用过SQ01这个事务码。SQ01是SAP标准的查询工具,功能强大,但说实话,我第一次用它来查用户权限的时候…...

终极指南:macOS开发环境自动化部署从入门到精通
终极指南:macOS开发环境自动化部署从入门到精通 【免费下载链接】mac-dev-playbook geerlingguy/mac-dev-playbook: 该 GitHub 仓库是针对 macOS 开发环境的一个 Ansible playbook,用于自动化设置和配置开发者所需的工具链、软件包和偏好设置。 项目地…...

MongoDB分片集群实战:从零搭建高可用分布式数据库
1. 为什么你需要一个MongoDB分片集群? 如果你正在读这篇文章,我猜你大概率已经遇到了单台MongoDB服务器的瓶颈。可能是磁盘空间快满了,加硬盘也解决不了根本问题;也可能是查询速度越来越慢,即使加了索引,面…...

大型活动交通拥堵治理的视觉算法应用
大型活动下智慧交通的视觉分析应用 一、背景与挑战 大型活动(如演唱会、马拉松赛事、高考中考等)期间,城市交通面临瞬时人流车流激增、传统摄像头模糊、交通拥堵识别滞后等问题。以演唱会为例,暖城商圈曾因观众集中离场导致周边…...

2021-03-15 iview一些问题
1.iview 在使用tree组件时,发现没有set类的方法,只有get,那么要改变tree值,只能遍历treeData,递归修改treeData的checked,发现无法更改,原因在于check模式下,子元素的勾选状态跟父节…...

C++ 求圆面积的程序(Program to find area of a circle)
给定半径r,求圆的面积。圆的面积应精确到小数点后5位。 例子: 输入:r 5 输出:78.53982 解释:由于面积 PI * r * r 3.14159265358979323846 * 5 * 5 78.53982,因为我们只保留小数点后 5 位数字。 输…...

代理篇12|深入理解 Vite中的Proxy接口代理配置
在前端开发中,常常会遇到 跨域请求接口 的情况。为了解决这个问题,Vite 和 Webpack 都提供了 proxy 代理功能,用于将本地开发请求转发到后端服务器。 什么是代理(proxy)? 代理是在开发过程中,前端项目通过开发服务器,将指定的请求“转发”到真实的后端服务器,从而绕…...

MySQL账号权限管理指南:安全创建账户与精细授权技巧
在MySQL数据库管理中,合理创建用户账号并分配精确权限是保障数据安全的核心环节。直接使用root账号进行所有操作不仅危险且难以审计操作行为。今天我们来全面解析MySQL账号创建与权限分配的专业方法。 一、为何需要创建独立账号? 最小权限原则…...