在Jetpack Compose中使用ExoPlayer实现直播流和音频均衡器

在Jetpack Compose中使用ExoPlayer实现直播流和音频均衡器
背景
ExoPlayer与Media3的能力结合,为Android应用程序播放多媒体内容提供了强大的解决方案。在本教程中,我们将介绍如何设置带有Media3的ExoPlayer来支持使用M3U8 URL进行直播流。此外,我们还将探讨如何集成音频均衡器,为用户提供个性化的音频体验。
使用ExoPlayer进行直播流涉及到利用ExoPlayer库的强大能力,在互联网上实时播放多媒体内容。
在这个探索中,我们将深入了解ExoPlayer如何实现无缝播放直播流URL的复杂性,为用户提供沉浸式体验。
ExoPlayer如何处理直播流?
使用ExoPlayer进行直播流主要围绕着有效地处理音频和视频内容的实时传输。该过程包括几个关键阶段:
- 内容源(
Content Source):使用摄像机和麦克风捕获直播内容,然后将此直播流可用于流媒体。 - 编码(
Encoding):捕获的内容被编码为适用于流媒体的数字格式。这涉及将原始音频和视频数据压缩并转换为与流媒体协议兼容的格式。 - 流媒体服务器(
Streaming Server):编码数据发送到充当中央枢纽的流媒体服务器。该服务器通过向用户设备发送数据包来管理多个观众的直播内容分发。 - ExoPlayer集成(
ExoPlayer Integration):将具有强大能力的ExoPlayer集成到应用程序中,以处理直播流的播放。应用程序获取直播流URL,并配置ExoPlayer以处理流媒体协议(例如HLS或DASH)。 - 观众设备(
Viewer’s Device):用户通过各种设备访问直播流,包括智能手机、平板电脑、计算机或智能电视。观众设备上的ExoPlayer实例解码接收到的数据,使他们可以实时观看或收听直播内容。
设置ExoPlayer以进行直播流
要将ExoPlayer集成到我们的应用程序中以进行直播流,我们需要遵循以下关键步骤:
1.添加依赖项
在项目的build.gradle文件中包含必要的依赖项:
// Exoplayer dependencies
implementation("androidx.media3:media3-exoplayer:1.2.0")
implementation("androidx.media3:media3-ui:1.2.0")
implementation("androidx.media3:media3-exoplayer-hls:1.2.0")
这些依赖项确保应用程序可以利用ExoPlayer的功能进行直播流。
- 创建ExoPlayerManager
我们将创建一个管理器类来处理ExoPlayer实例。这可以确保应用程序的整个生命周期中只有一个播放器实例。
object ExoPlayerManager {private var exoPlayer: ExoPlayer? = nullfun getExoPlayer(context: Context): ExoPlayer {if (exoPlayer == null) {exoPlayer = ExoPlayer.Builder(context).build()}return exoPlayer!!}fun releaseExoPlayer() {exoPlayer?.release()exoPlayer = null}
}
- 初始化ExoPlayer
在您的Composable函数中,使用示例HLS流URL初始化ExoPlayer:
@Composable
fun LiveStreamingScreen() {// Obtain the current context and lifecycle owner using LocalContext and LocalLifecycleOwnerval context = LocalContext.currentval lifecycleOwner = LocalLifecycleOwner.current// Remember the ExoPlayer instance to persist across recompositionsval exoPlayer = remember { ExoPlayerManager.getExoPlayer(context) }// Launch an effect to initialize ExoPlayer and set up the media sourceLaunchedEffect(key1 = Unit) {// Create a data source factory for handling media requestsval dataSourceFactory = DefaultHttpDataSource.Factory()// Define the URI for the sample HLS streamval uri = Uri.Builder().encodedPath("http://sample.vodobox.net/skate_phantom_flex_4k/skate_phantom_flex_4k.m3u8").build()val mediaItem = MediaItem.Builder().setUri(uri).build()// Create an HlsMediaSource from the media item for handling HTTP Live Streaming (HLS) content val internetVideoSource =HlsMediaSource.Factory(dataSourceFactory).createMediaSource(mediaItem)exoPlayer.setMediaSource(internetVideoSource)exoPlayer.prepare()// Will be used in later implementation for EqualizerviewModel.onStart(exoPlayer.audioSessionId)}// ...
}
- 显示ExoPlayer视图
将ExoPlayer视图集成到您的Composable函数中
// ...
Box(modifier = Modifier.fillMaxSize()) {AndroidView(modifier =Modifier.fillMaxWidth().aspectRatio(1.4f).padding(top = 16.dp).background(Color.Black),factory = {PlayerView(context).apply {// Connect the ExoPlayer instance to the PlayerViewplayer = exoPlayer// Configure ExoPlayer settingsexoPlayer.repeatMode = Player.REPEAT_MODE_ONEexoPlayer.playWhenReady = falseuseController = true}})
}
// ...- 观察生命周期事件并释放资源
设置DisposableEffects来观察生命周期事件,并在组合函数被释放时释放ExoPlayer:
// ...
// Observe lifecycle events (e.g., app resume and pause)
// and adjust ExoPlayer's playback state accordingly.
DisposableEffect(key1 = lifecycleOwner) {val observer = LifecycleEventObserver { _, event ->if (event == Lifecycle.Event.ON_RESUME) {exoPlayer.playWhenReady = true} else if (event == Lifecycle.Event.ON_PAUSE) {exoPlayer.playWhenReady = false}}lifecycleOwner.lifecycle.addObserver(observer)onDispose {lifecycleOwner.lifecycle.removeObserver(observer)}
}// Release the ExoPlayer when the composable is disposed
// This helps in proper resource management
DisposableEffect(key1 = Unit) {onDispose { ExoPlayerManager.releaseExoPlayer() }
}
// ...
设置音频均衡器
现在,让我们探讨如何在使用Jetpack Compose的Exoplayer设置中集成音频均衡器。这将允许用户通过调整预设均衡器设置或创建自定义均衡器配置来自定义音频体验。
音频均衡器通过提供对音频输出的细粒度控制来增强用户体验。
- 添加依赖项
在项目的build.gradle文件中包含必要的依赖项:
implementation("com.google.dagger:hilt-android:2.48")kapt("com.google.dagger:hilt-android-compiler:2.47")implementation("androidx.hilt:hilt-navigation-compose:1.1.0")//Gsonimplementation("com.google.code.gson:gson:2.9.1")
以上是示例依赖项,您可以根据您的项目需要进行相应的更改。
这些依赖项确保您的应用程序可以利用Hilt进行依赖注入和Gson以高效地将复杂数据存储在首选项中。
- 定义均衡器预设和增益值
我们定义了一组预设,例如Flat,Acoustic,和Rock,每个预设都有相应的增益值来控制音频频率。这些预设将作为用户自定义其音频体验的起点。
// Equalizer presets and gain values
val effectType = arrayListOf("Custom", "Flat", "Acoustic", "Dance","Hip Hop", "Jazz", "Pop", "Rock", "Podcast"
)// Constants for presets
const val PRESET_CUSTOM = 0
const val PRESET_FLAT = 1
const val PRESET_ACOUSTIC = 2
const val PRESET_DANCE_LOUNGE = 3
const val PRESET_HIP_HOP = 4
const val PRESET_JAZZ_BLUES = 5
const val PRESET_POP = 6
const val PRESET_ROCK = 7
const val PRESET_PODCAST = 8// Gain values for each preset
val FLAT = arrayListOf(0.0, 0.0, 0.0, 0.0, 0.0)
val ACOUSTIC = arrayListOf(0.44, 0.12, 0.12, 0.34, 0.2)
val DANCE = arrayListOf(0.52, 0.08, 0.28, 0.48, 0.06)
val HIP_HOPE = arrayListOf(0.44, 0.06, -0.14, 0.1, 0.38)
val JAZZ = arrayListOf(0.32, 0.0, 0.22, 0.1, 0.2)
val POP = arrayListOf(-0.14, 0.28, 0.38, 0.22, -0.2)
val ROCK = arrayListOf(0.38, 0.2, -0.04, 0.02, 0.34)
val PODCAST = arrayListOf(-0.12, 0.26, 0.36, 0.16, -0.2)
在上面的代码中,我们定义了一个EqualizerConfiguration数据类,它包含了预设设置和自定义频段设置的列表。EqualizerPreset类表示一个均衡器预设,包括名称和增益值的列表。CustomEqualizerBand类表示自定义的均衡器频段,包括频率和增益值。通过使用这些数据结构,我们可以轻松地管理和应用均衡器配置。
- 创建音频效果数据类
音频效果数据类包含了关于所选效果类型及其相应增益值的重要信息。这个数据类充当用户偏好与音频均衡器实际实现之间的桥梁。
// 表示音频效果配置的数据类
data class AudioEffects(var selectedEffectType: Int = 0,var gainValues: ArrayList<Double>
)
在这里,selectedEffectType表示所选的音频预设,而gainValues则存储了不同频段的自定义增益值。这个数据类封装了用户的音频偏好设置。
- 创建AppModule进行依赖注入
为了实现清晰模块化的依赖注入,我们引入了AppModule。这个模块使用@InstallIn(SingletonComponent::class)进行标注,提供了诸如Gson和SharedPreferences等必要的依赖项。
@Module
@InstallIn(SingletonComponent::class)
class AppModule {@Provides@Singletonfun provideGson(): Gson {val gsonBuilder = GsonBuilder()return gsonBuilder.create()}@Named(AUDIO_EFFECT_PREFERENCES)@Providesfun provideAudioEffectPreferences(application: Application): SharedPreferences {return application.getSharedPreferences(AUDIO_EFFECT_PREFERENCES, Context.MODE_PRIVATE)}
}
在这个模块中,provideGson提供了一个Gson的单例实例,而provideAudioEffectPreferences则提供了一个特定用于音频效果偏好设置的SharedPreferences实例。这个模块对于管理整个应用程序的依赖项非常重要。
- 使用
SharedPreferences和Gson实现均衡器偏好设置
为了提供无缝的用户体验,我们将利用SharedPreferences来持久化与音频均衡器相关的用户偏好设置。此外,我们使用Gson进行高效的数据序列化,使我们能够将复杂的数据结构转换为易于存储和检索的格式。通过创建一个EqualizerPreferences类,我们确保用户不必重复设置他们的均衡器偏好设置。
const val AUDIO_EFFECT_PREFERENCES = "audio_effect_preferences"private const val AUDIO_EFFECT_IS_EQUALIZER_ENABLED = "is_equalizer_enabled"
private const val AUDIO_EFFECT_EQUALIZER_SETTING = "equalizer_audio_effect"
private const val AUDIO_EFFECT_LOWEST_BAND_LEVEL = "equalizer_lowest_band_level"@Singleton
class EqualizerPreferences
@Inject constructor(@param:Named(AUDIO_EFFECT_PREFERENCES) private val sharedPreferences: SharedPreferences,private val gson: Gson
) {var isEqualizerEnabled: Booleanget() = sharedPreferences.getBoolean(AUDIO_EFFECT_IS_EQUALIZER_ENABLED, false)set(isEnable) = sharedPreferences.edit().putBoolean(AUDIO_EFFECT_IS_EQUALIZER_ENABLED, isEnable).apply()// Getting and setting the user's audio preferencesvar audioEffects: AudioEffects?get() {val json = sharedPreferences.getString(AUDIO_EFFECT_EQUALIZER_SETTING, null)if (json != null) {try {return gson.fromJson(json, AudioEffects::class.java)} catch (t: Throwable) {t.printStackTrace()}}return null}set(audioEffects) {var json: String? = nullif (audioEffects != null) {json = gson.toJson(audioEffects)}sharedPreferences.edit().putString(AUDIO_EFFECT_EQUALIZER_SETTING, json).apply()}var lowestBandLevel: Intget() = sharedPreferences.getInt(AUDIO_EFFECT_LOWEST_BAND_LEVEL, 0)set(value) = sharedPreferences.edit().putInt(AUDIO_EFFECT_LOWEST_BAND_LEVEL, value).apply()
}
上述代码展示了如何使用SharedPreferences和Gson来保存和加载音频效果配置。saveAudioEffects方法将AudioEffects对象转换为JSON字符串,并将其保存在SharedPreferences中。loadAudioEffects方法从SharedPreferences中获取JSON字符串,并将其转换回AudioEffects对象。通过使用EqualizerPreferences类,我们可以方便地管理和访问均衡器偏好设置。
在这里,Gson在将我们的AudioEffects数据类转换为JSON字符串以存储在SharedPreferences中方面起着至关重要的作用。这确保了一种无缝且高效的方式来存储和检索复杂的数据结构。
- 创建一个音频均衡器ViewModel
创建一个强大的AudioEqualizerViewModel,负责管理音频均衡器逻辑。这个ViewModel初始化均衡器,处理预设选择,并根据用户交互更新设置。
@HiltViewModel
class AudioEqualizerViewModel @Inject constructor(private val equalizerPreferences: EqualizerPreferences
) : ViewModel() {// MutableStateFlow to observe and emit changes in audio effectsval audioEffects = MutableStateFlow<AudioEffects?>(null)// Instance of the Equalizer class from the Android system libraryprivate var equalizer: Equalizer? = null// MutableStateFlow to observe and emit changes in the equalizer's enable/disable stateval enableEqualizer = MutableStateFlow(false)// Unique audio session ID associated with the Exoplayerprivate var audioSessionId = 0init {// Retrieve and set the initial equalizer enable/disable state and audio effects from preferencesenableEqualizer.value = equalizerPreferences.isEqualizerEnabledaudioEffects.tryEmit(equalizerPreferences.audioEffects)if (audioEffects.value == null) {audioEffects.tryEmit(AudioEffects(PRESET_FLAT, FLAT))}}// Will be called when exoplayer instance is created and we have audioSessionIdfun onStart(sessionId: Int) {audioSessionId = sessionIdequalizer?.enabled = enableEqualizer.valueequalizer = Equalizer(Int.MAX_VALUE, audioSessionId)// Set the lowest band level based on the equalizer's capabilitiesequalizerPreferences.lowestBandLevel = equalizer?.bandLevelRange?.get(0)?.toInt() ?: 0// Apply gain values to the equalizer based on the stored audio effectsaudioEffects.value?.gainValues?.forEachIndexed { index, value ->val bandLevel = (value * 1000).toInt().toShort()equalizer?.setBandLevel(index.toShort(), bandLevel)}}// Method called when a preset is selectedfun onSelectPreset(presetPosition: Int) {// Return if no audio effects are availableif (audioEffects.value == null) return// Determine the gain values based on the selected presetval gain = if (presetPosition == PRESET_CUSTOM) {ArrayList(audioEffects.value!!.gainValues)} else {ArrayList(getPresetGainValue(presetPosition))}// Update the audio effects with the selected preset and gain valuesaudioEffects.tryEmit(AudioEffects(presetPosition, gain))equalizerPreferences.audioEffects = audioEffects.value// Apply the gain values to the equalizerequalizer?.apply {gain.forEachIndexed { index, value ->val bandLevel = (value * 1000).toInt().toShort()setBandLevel(index.toShort(), bandLevel)}}}// Method called when a specific band level is changed by the userfun onBandLevelChanged(changedBand: Int, newGainValue: Int) {// Retrieve the lowest band level from preferencesval lowest = equalizerPreferences.lowestBandLevel// Calculate the new band levelval bandLevel = newGainValue.plus(lowest)// Apply the new band level to the equalizerequalizer?.setBandLevel(changedBand.toShort(), bandLevel.toShort())val list = ArrayList(audioEffects.value!!.gainValues)list[changedBand] = (newGainValue.toDouble() / 1000)audioEffects.tryEmit(AudioEffects(PRESET_CUSTOM,list))equalizerPreferences.audioEffects = audioEffects.value}// Method called to toggle the equalizer's enable/disable statefun toggleEqualizer() {enableEqualizer.tryEmit(!enableEqualizer.value)equalizer?.enabled = enableEqualizer.valueequalizerPreferences.isEqualizerEnabled = enableEqualizer.valueif (!enableEqualizer.value) {audioEffects.tryEmit(AudioEffects(PRESET_FLAT, FLAT))equalizerPreferences.audioEffects = audioEffects.value}}// Method to retrieve gain values for a specific presetprivate fun getPresetGainValue(index: Int): List<Double> {return when (index) {PRESET_FLAT -> FLATPRESET_ACOUSTIC -> ACOUSTICPRESET_DANCE_LOUNGE -> DANCEPRESET_HIP_HOP -> HIP_HOPEPRESET_JAZZ_BLUES -> JAZZPRESET_POP -> POPPRESET_ROCK -> ROCKPRESET_PODCAST -> PODCASTelse -> FLAT}}
}
这个ViewModel高效地管理音频均衡器的状态,处理用户交互,并确保使用SharedPreferences持久化用户偏好设置。
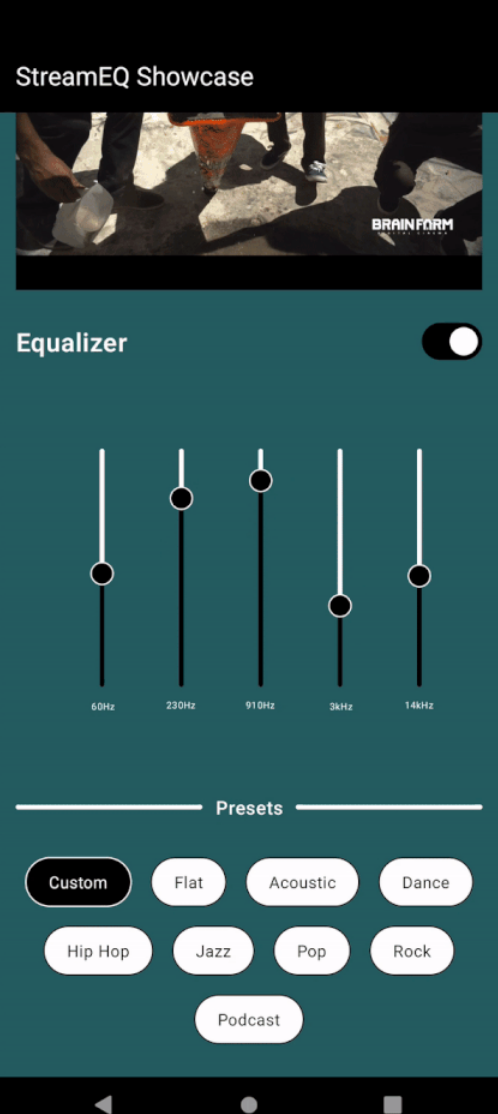
- 开发均衡器开关视图、预设视图和均衡器视图组件
设计一个用户友好的均衡器开关、均衡器视图和预设视图组件,让用户可以可视化和调整均衡器设置。开关允许用户使用均衡器启用/禁用音频设置,而均衡器视图将包含不同频率带的滑块,提供高度可定制的音频体验。预设视图将包含一些预定义的效果类型,可以直接应用到均衡器上。
Switch View
Row(modifier = Modifier.fillMaxWidth(),horizontalArrangement = Arrangement.SpaceBetween,verticalAlignment = Alignment.CenterVertically
) {Text(text = stringResource(R.string.equalizer_title_text),fontSize = MaterialTheme.typography.titleLarge.fontSize,fontWeight = FontWeight.SemiBold,color = Color.White)Switch(checked = enableEqualizer,onCheckedChange = { // Toggle the equalizer's enable/disable stateviewModel.toggleEqualizer() },colors =SwitchDefaults.colors(checkedTrackColor = Color.Black,checkedIconColor = Color.Black,uncheckedTrackColor = Color.White,uncheckedBorderColor = Color.Black,))
}

EqualizerView
@OptIn(ExperimentalMaterial3Api::class)
@Composable
fun EqualizerView(viewModel: AudioEqualizerViewModel) {// Frequency labels for the equalizer bandsval xAxisLabels = listOf("60Hz", "230Hz", "910Hz", "3kHz", "14kHz")// Collect the current state of audio effects from the ViewModelval audioEffects by viewModel.audioEffects.collectAsState()// Column layout to arrange UI elements verticallyColumn(modifier = Modifier.fillMaxWidth().fillMaxHeight().graphicsLayer {// Rotate the entire column to display frequency labels/sliders verticallyrotationZ = 270f},verticalArrangement = Arrangement.SpaceEvenly,horizontalAlignment = Alignment.CenterHorizontally) {// Iterate through frequency labels and create corresponding UI elementsfor (index in xAxisLabels.indices) {Row(modifier = Modifier.padding(top = 20.dp).width(220.dp)) {// Each frequency label and its corresponding slider are placed in a BoxBox {// Display the frequency label with rotationText(text = xAxisLabels[index],modifier = Modifier.wrapContentWidth().align(Alignment.CenterStart).rotate(90f),color = Color.White,fontSize = 8.sp,textAlign = TextAlign.Start)// Slider component for adjusting the gain value of each frequency bandSlider(modifier = Modifier.offset(x = 20.dp),// Bind the slider value to the corresponding gain value from the ViewModelvalue = audioEffects!!.gainValues[index].times(1000f).toFloat().coerceIn(-3000f, 3000f),onValueChange = {// Notify the ViewModel when a slider value changesviewModel.onBandLevelChanged(index, it.toInt())},valueRange = -3000f..3000f,colors = SliderDefaults.colors(thumbColor = Color.Black,activeTrackColor = Color.Black,inactiveTrackColor = Color.White),thumb = {// Customized appearance of the slider's thumbBox(modifier = Modifier.size(20.dp).border(1.dp,Color.White,CircleShape).clip(CircleShape).background(Color.Black, CircleShape))})}}}}
}

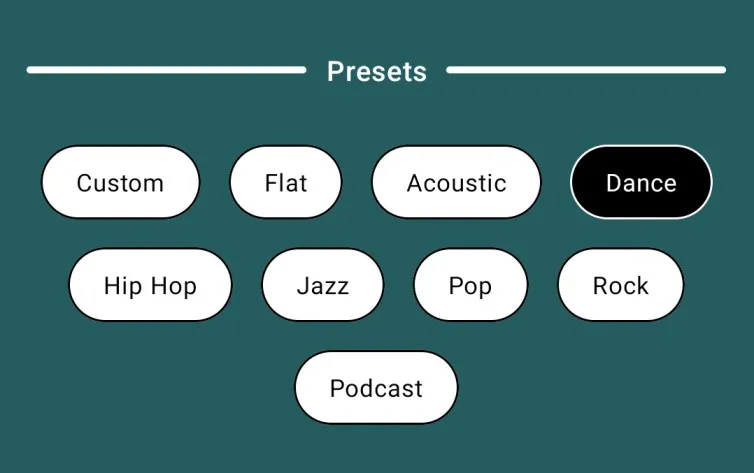
PresetsView
@Composable
fun PresetsView(viewModel: AudioEqualizerViewModel) {// Collect the current state of audio effects from the ViewModelval audioEffects by viewModel.audioEffects.collectAsState()// Group the effect types into chunks of 4 for layoutval groupedList = effectType.chunked(4)// Row containing the title and dividersRow(verticalAlignment = Alignment.CenterVertically) {Divider(modifier = Modifier.weight(1f).height(4.dp).clip(RoundedCornerShape(4.dp)),color = Color.White,thickness = 1.dp)// Title textText(text = stringResource(R.string.presets_title_text),fontSize = MaterialTheme.typography.titleMedium.fontSize,fontWeight = FontWeight.Medium,color = Color.White,modifier = Modifier.wrapContentWidth().weight(0.5f).padding(4.dp).zIndex(1f),textAlign = TextAlign.Center)Divider(modifier = Modifier.weight(1f).height(4.dp).clip(RoundedCornerShape(4.dp)),color = Color.White,thickness = 1.dp)}Spacer(modifier = Modifier.height(20.dp))// Iterate through grouped effect types and create UI elementsfor (itemList in groupedList) {BoxWithConstraints(modifier = Modifier.fillMaxWidth()) {// Calculate padding and spacing based on screen widthval horizontalPadding =if (maxWidth < 320.dp) 8.dp else if (maxWidth > 400.dp) 40.dp else 20.dpval horizontalSpacing = if (maxWidth > 400.dp) 24.dp else 16.dp// Row containing individual preset itemsRow(modifier = Modifier.fillMaxWidth().padding(vertical = 8.dp),horizontalArrangement = Arrangement.spacedBy(space = horizontalSpacing,alignment = Alignment.CenterHorizontally),verticalAlignment = Alignment.CenterVertically) {for (item in itemList) {// Get the index of the current itemval index by remember {mutableIntStateOf(effectType.indexOf(item))}// Create a clickable preset itemBoxWithConstraints(modifier = Modifier.wrapContentSize().border(1.dp,if (index == audioEffects?.selectedEffectType) Color.White else Color.Black,RoundedCornerShape(40.dp)).clip(RoundedCornerShape(40.dp)).clickable {// Notify the ViewModel when a preset is selectedviewModel.onSelectPreset(index)}.background(if (index == audioEffects?.selectedEffectType) Color.Black else Color.White),contentAlignment = Alignment.Center) {// Display the preset item textText(text = item,style = MaterialTheme.typography.bodySmall,modifier = Modifier.padding(horizontal = horizontalPadding,vertical = 12.dp),fontSize = 14.sp,color = if (index == audioEffects?.selectedEffectType) Color.White else Color.Black,maxLines = 1,overflow = TextOverflow.Ellipsis)}}}}}
}
现在,让我们使用AnimatedVisibility从父组件中调用上述函数!
@Composable
fun AudioEqualizerScreen() {val viewModel = hiltViewModel<AudioEqualizerViewModel>()val enableEqualizer by viewModel.enableEqualizer.collectAsState()Column {Row(modifier = Modifier.fillMaxWidth(),horizontalArrangement = Arrangement.SpaceBetween,verticalAlignment = Alignment.CenterVertically) {Text(text = stringResource(R.string.equalizer_title_text),fontSize = MaterialTheme.typography.titleLarge.fontSize,fontWeight = FontWeight.SemiBold,color = Color.White)Switch(checked = enableEqualizer,onCheckedChange = { viewModel.toggleEqualizer() },colors =SwitchDefaults.colors(checkedTrackColor = Color.Black,checkedIconColor = Color.Black,uncheckedTrackColor = Color.White,uncheckedBorderColor = Color.Black,))}AnimatedVisibility(visible = enableEqualizer,enter = fadeIn() + slideInVertically { fullHeight -> -fullHeight / 2 },exit = fadeOut() + slideOutVertically { fullHeight -> -fullHeight / 3 }) {EqualizerView(viewModel = viewModel)}AnimatedVisibility(visible = enableEqualizer,enter = fadeIn() + slideInVertically { fullHeight -> -fullHeight / 2 },exit = fadeOut() + slideOutVertically { fullHeight -> -fullHeight / 2 }) {PresetsView(viewModel)}}
}
结论
在本篇博客中,我们为在Jetpack Compose应用程序中设置ExoPlayer进行实时流式传输和集成音频均衡器打下了基础。这个组合为带有可定制均衡器设置的音频流提供了无缝的用户体验。
Github
https://github.com/cp-megh-l/audio-equalizer-compose
相关文章:
在Jetpack Compose中使用ExoPlayer实现直播流和音频均衡器
在Jetpack Compose中使用ExoPlayer实现直播流和音频均衡器 背景 ExoPlayer与Media3的能力结合,为Android应用程序播放多媒体内容提供了强大的解决方案。在本教程中,我们将介绍如何设置带有Media3的ExoPlayer来支持使用M3U8 URL进行直播流。此外&#x…...

持续集成交付CICD:Jira 远程触发 Jenkins 实现更新 GitLab 分支
目录 一、实验 1.环境 2.GitLab 查看项目 3.Jira新建模块 4. Jira 通过Webhook 触发Jenkins流水线 3.Jira 远程触发 Jenkins 实现更新 GitLab 分支 二、问题 1.Jira 配置网络钩子失败 2. Jira 远程触发Jenkins 报错 一、实验 1.环境 (1)主机 …...

基于SSM的面向TCP_IP的网络互联实验平台
文章目录 项目介绍主要功能截图:部分代码展示设计总结项目获取方式🍅 作者主页:超级无敌暴龙战士塔塔开 🍅 简介:Java领域优质创作者🏆、 简历模板、学习资料、面试题库【关注我,都给你】 🍅文末获取源码联系🍅 项目介绍 基于SSM的面向TCP和IP的网络互联实验平台…...
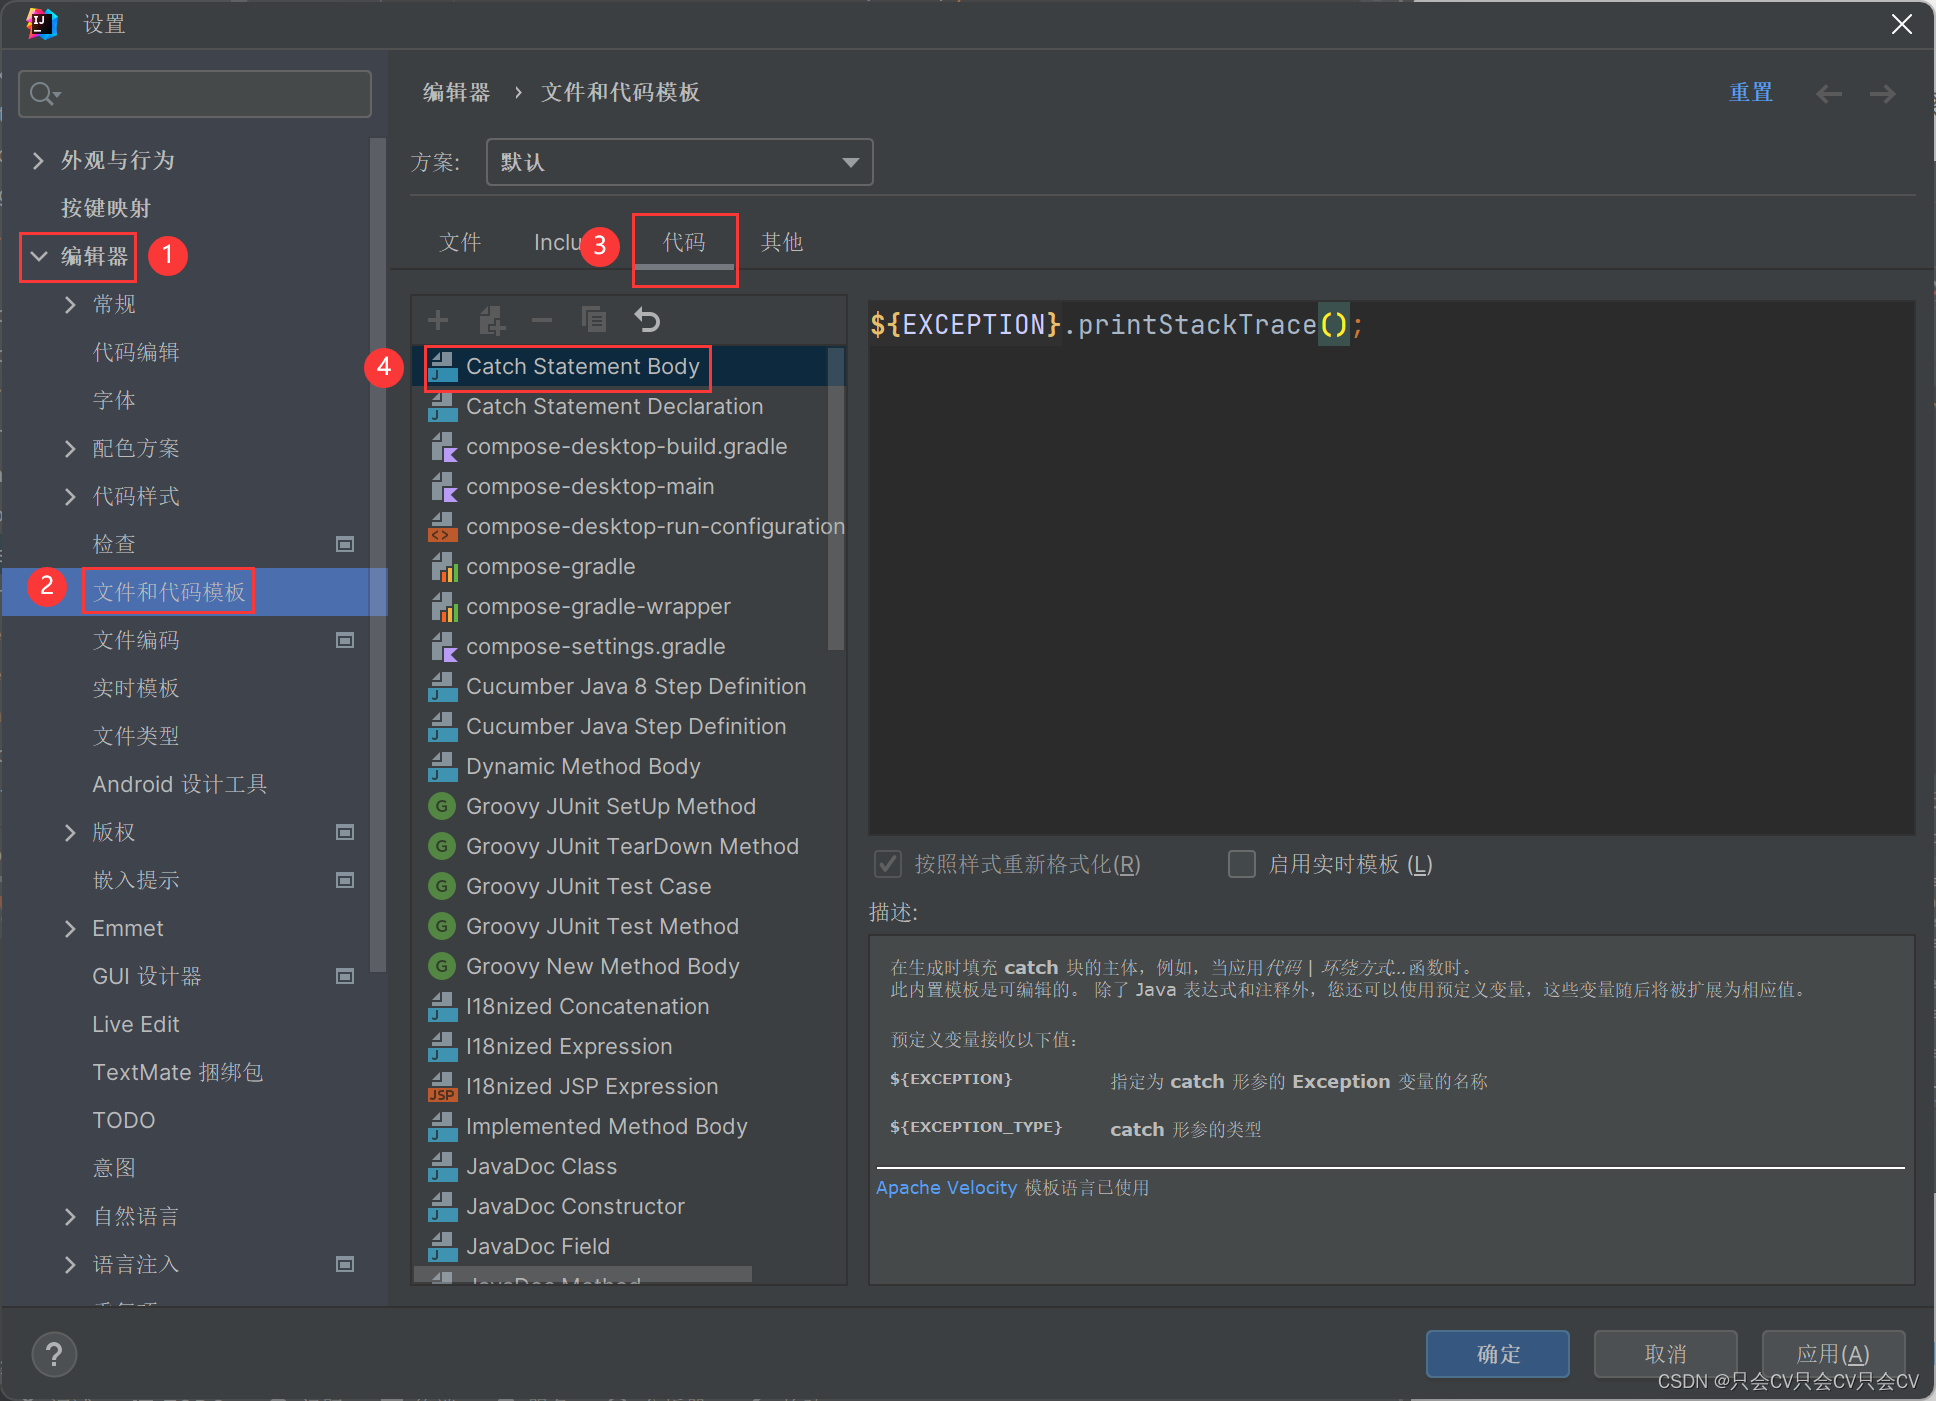
【IDEA】try-catch自动生成中修改catch的内容
编辑器 --> 文件和代码模板 --> 代码 --> Catch Statement Body...

2024 十大AI预测
每周跟踪AI热点新闻动向和震撼发展 想要探索生成式人工智能的前沿进展吗?订阅我们的简报,深入解析最新的技术突破、实际应用案例和未来的趋势。与全球数同行一同,从行业内部的深度分析和实用指南中受益。不要错过这个机会,成为AI领…...
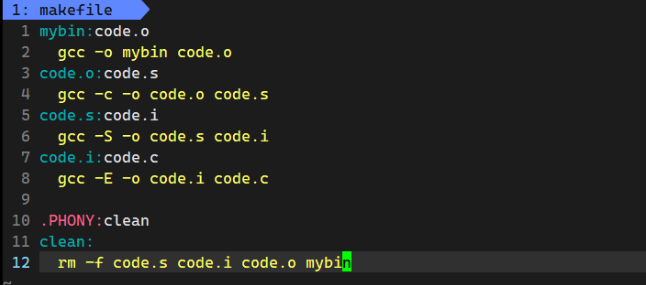
【Linux基础开发工具】gcc/g++使用make/Makefile
目录 前言 gcc/g的使用 1. 语言的发展 1.1 语言和编译器自举的过程 1.2 程序翻译的过程: 2. 动静态库的理解 Linux项目自动化构建工具-make/makefile 1. 快速上手使用 2. makefile/make执行顺序的理解 前言 了解完vim编辑器的使用,接下来就可以尝…...

Windows Nginx版本升级
记录windows系统上nginx版本从1.22.1直接升级到1.25.3,全程一步到位! nginx官网: https://nginx.org/ C:\Windows\system32>cd C:\nginx# 查看当前nginx版本C:\nginx>nginx -v nginx version: nginx/1.22.1# 停止nginx服务C:\nginx>net stop ng…...
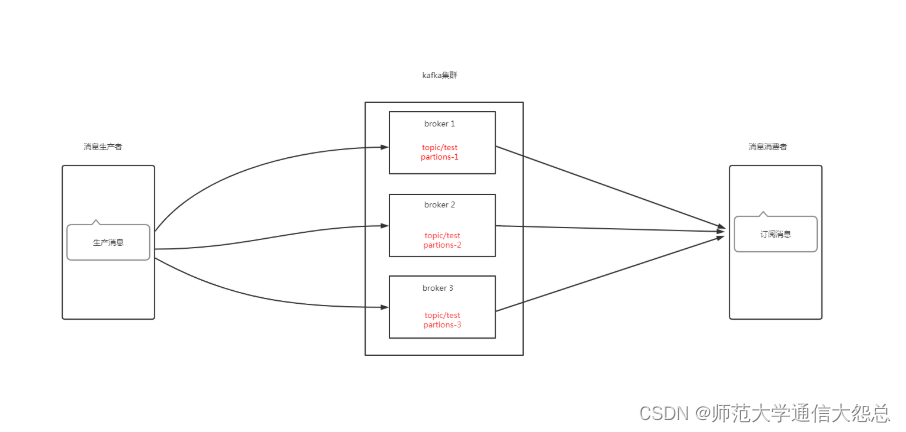
kubernetes集群 应用实践 kafka部署
kubernetes集群 应用实践 kafka部署 零.1、环境说明 零.2、kafka架构说明 zookeeper在kafka集群中的作用 一、Broker注册 二、Topic注册 三、Topic Partition选主 四、生产者负载均衡 五、消费者负载均衡 一、持久化存储资源准备 1.1 创建共享目录 [rootnfsserver ~]# mkdir -…...
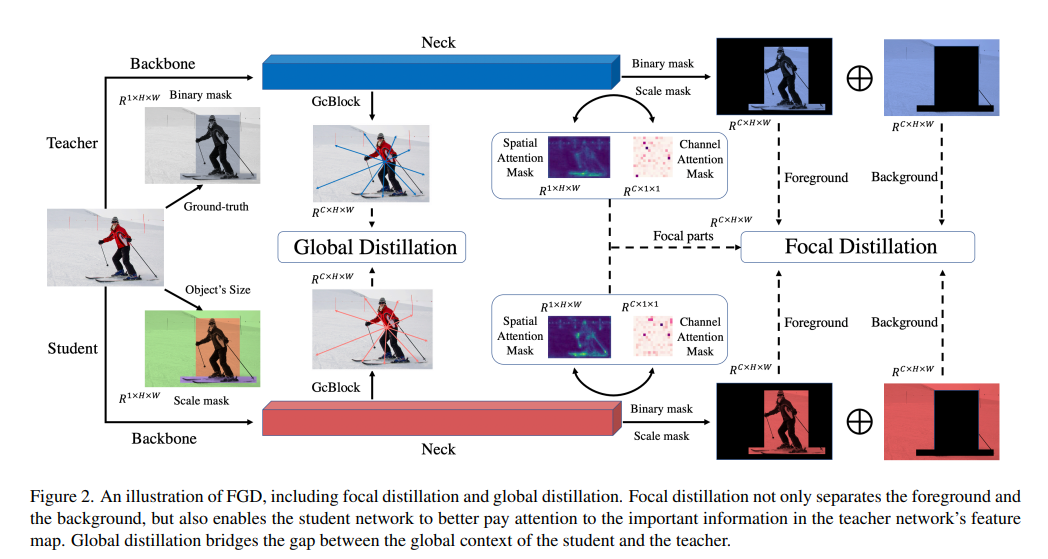
Featured Based知识蒸馏及代码(3): Focal and Global Knowledge (FGD)
文章目录 1. 摘要2. Focal and Global 蒸馏的原理2.1 常规的feature based蒸馏算法2.2 Focal Distillation2.3 Global Distillation2.4 total loss3. 实验完整代码论文: htt...
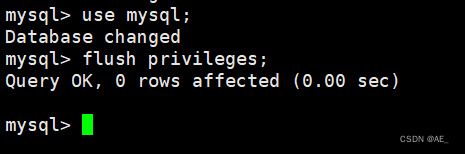
CentOs 安装MySQL
1、拉取安装包 wget --no-check-certificate dev.mysql.com/get/mysql-community-release-el6-5.noarch.rpm 成功拉取 2、安装 yum install mysql-community-release-el6-5.noarch.rpm 过程中可能需要你同意一些东西,y 即可 然后稍微检查一下 yum repolist enabled…...
基于Java (spring-boot)的在线考试管理系统
一、项目介绍 系统功能说明 1、系统共有管理员、老师、学生三个角色,管理员拥有系统最高权限。 2、老师拥有考试管理、题库管理、成绩管理、学生管理四个模块。 3、学生可以参与考试、查看成绩、试题练习、留言等功能 二、作品包含 三、项目技术 后端语言&…...
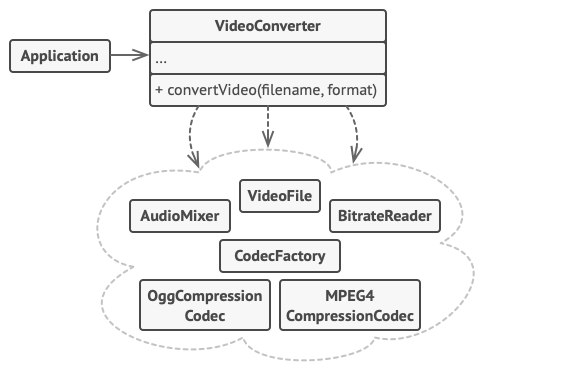
5. 结构型模式 - 外观模式
亦称: Facade 意图 外观模式是一种结构型设计模式, 能为程序库、 框架或其他复杂类提供一个简单的接口 问题 假设你必须在代码中使用某个复杂的库或框架中的众多对象。 正常情况下, 你需要负责所有对象的初始化工作、 管理其依赖关系并按正确…...
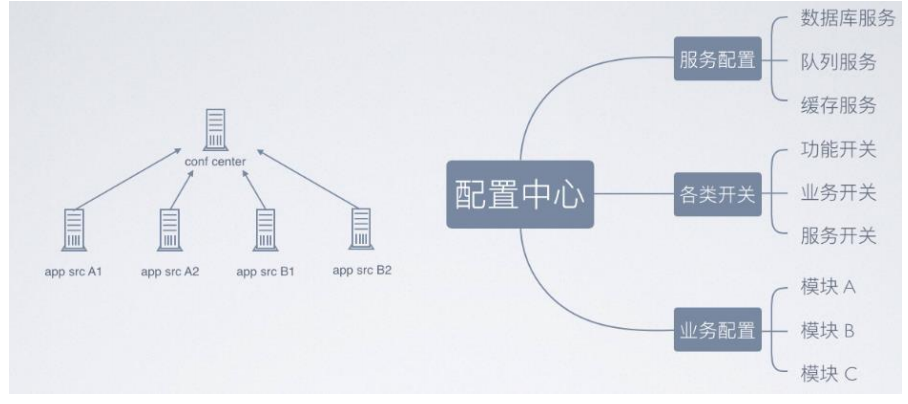
微服务之配置中心与服务跟踪
zookeeper 配置中心 实现的架构图如下所示,采取数据加载到内存方式解决高效获取的问题,借助 zookeeper 的节点监听机制来实现实时感知。 配置中心数据分类 事件调度(kafka) 消息服务和事件的统一调度,常用用 kafka …...

链表 典型习题
160 相交链表:遍历,统计是否出现过 /*** Definition for singly-linked list.* struct ListNode {* int val;* ListNode *next;* ListNode(int x) : val(x), next(NULL) {}* };*/ class Solution { public:ListNode *getIntersectionNode(L…...
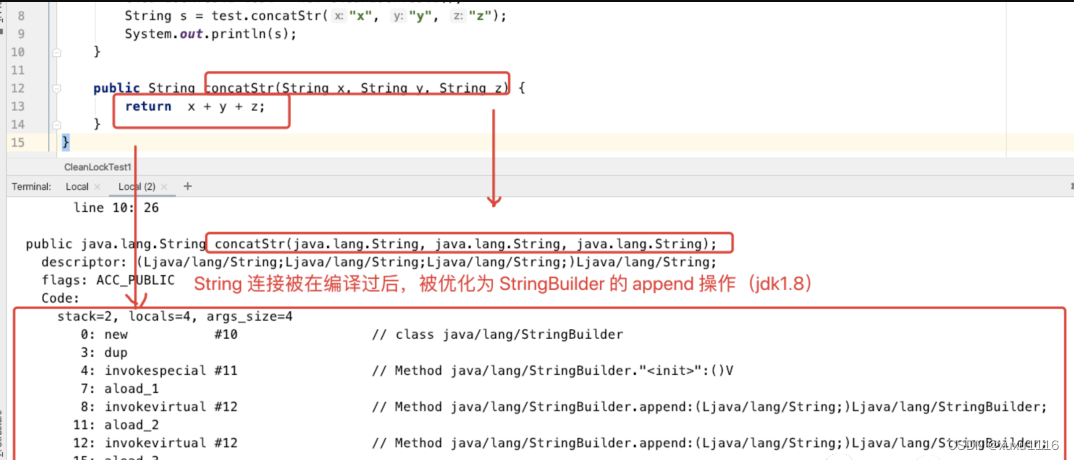
面试题:JVM 对锁都进行了哪些优化?
文章目录 锁优化自旋锁和自适应自旋锁消除锁粗化逃逸分析方法逃逸线程逃逸通过逃逸分析,编译器对代码的优化 锁优化 jvm 在加锁的过程中,会采用自旋、自适应、锁消除、锁粗化等优化手段来提升代码执行效率。 自旋锁和自适应自旋 现在大多的处理器都是…...

SSM整合实战(Spring、SpringMVC、MyBatis)
五、SSM整合实战 目录 一、SSM整合理解 1. 什么是SSM整合?2. SSM整合核心理解五连问! 2.1 SSM整合涉及几个IoC容器?2.2 每个IoC容器盛放哪些组件?2.3 IoC容器之间是什么关系?2.4 需要几个配置文件和对应IoC容器关系&…...

QT调用外部exe及无终端弹窗的解决方案、并实现进程输出信息获取
博主使用QT调用外部exe程序,外部exe程序有printf输出,起初使用的是C语言中的system()方法,但在笔记本上有概率出现终端窗口一闪而过的情况,后修改了调用方案。 1. QT调用外部exe 使用QT中的QProcess方法 #include <QProcess…...
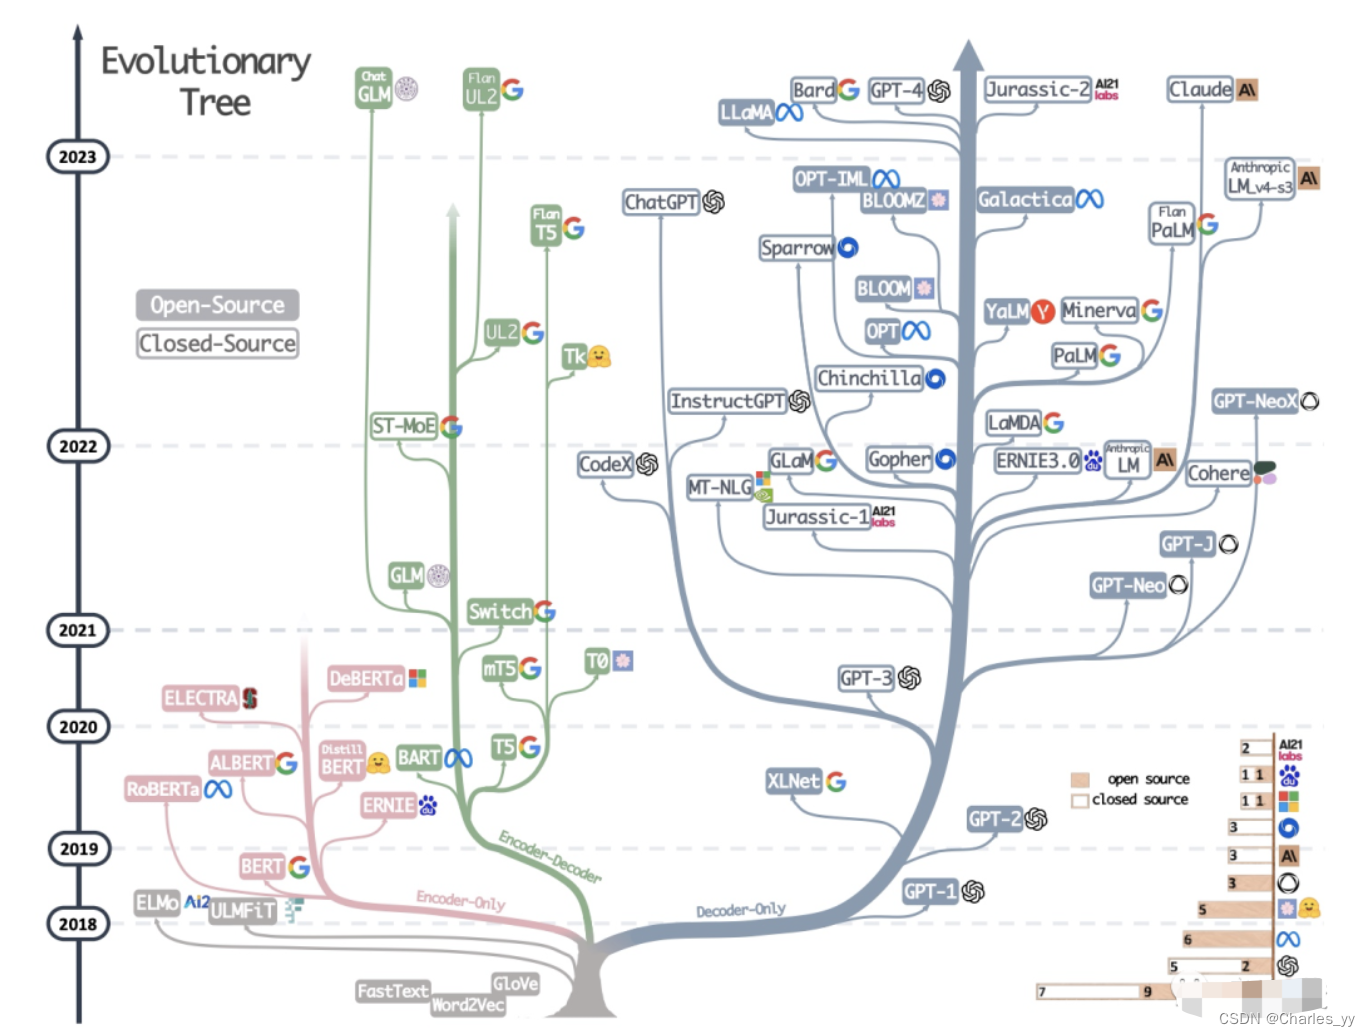
大语言模型的三种主要架构 Decoder-Only、Encoder-Only、Encoder-Decoder
现代大型语言模型(LLM)的演变进化树,如下图: https://arxiv.org/pdf/2304.13712.pdf 基于 Transformer 模型以非灰色显示: decoder-only 模型在蓝色分支, encoder-only 模型在粉色分支, encod…...

【MySQL】外连接 where 和 on 的区别
力扣题 1、题目地址 1158. 市场分析 I 2、模拟表 User Column NameTypeuser_idintjoin_datedatefavorite_brandvarchar user_id 是此表主键(具有唯一值的列)。表中描述了购物网站的用户信息,用户可以在此网站上进行商品买卖。 Orders…...
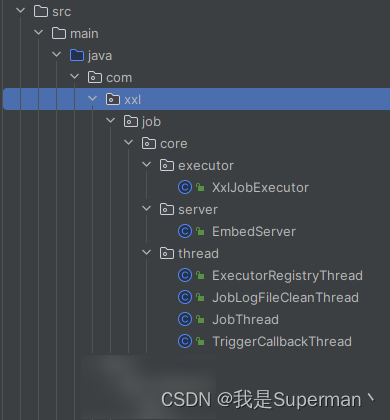
【优化】XXLJOB修改为使用虚拟线程
【优化】XXLJOB修改为使用虚拟线程 新建这几个目录 类, 去找项目对应的xxljob的源码 主要是将 new Thread 改为 虚拟线程 Thread.ofVirtual().name("VT").unstarted 以下代码是 xxljob 2.3.0版本 举一反三 去修改对应版本的代码 <!-- 定…...
网络编程(Modbus进阶)
思维导图 Modbus RTU(先学一点理论) 概念 Modbus RTU 是工业自动化领域 最广泛应用的串行通信协议,由 Modicon 公司(现施耐德电气)于 1979 年推出。它以 高效率、强健性、易实现的特点成为工业控制系统的通信标准。 包…...
)
uniapp 对接腾讯云IM群组成员管理(增删改查)
UniApp 实战:腾讯云IM群组成员管理(增删改查) 一、前言 在社交类App开发中,群组成员管理是核心功能之一。本文将基于UniApp框架,结合腾讯云IM SDK,详细讲解如何实现群组成员的增删改查全流程。 权限校验…...

[2025CVPR]DeepVideo-R1:基于难度感知回归GRPO的视频强化微调框架详解
突破视频大语言模型推理瓶颈,在多个视频基准上实现SOTA性能 一、核心问题与创新亮点 1.1 GRPO在视频任务中的两大挑战 安全措施依赖问题 GRPO使用min和clip函数限制策略更新幅度,导致: 梯度抑制:当新旧策略差异过大时梯度消失收敛困难:策略无法充分优化# 传统GRPO的梯…...

Ubuntu系统下交叉编译openssl
一、参考资料 OpenSSL&&libcurl库的交叉编译 - hesetone - 博客园 二、准备工作 1. 编译环境 宿主机:Ubuntu 20.04.6 LTSHost:ARM32位交叉编译器:arm-linux-gnueabihf-gcc-11.1.0 2. 设置交叉编译工具链 在交叉编译之前&#x…...
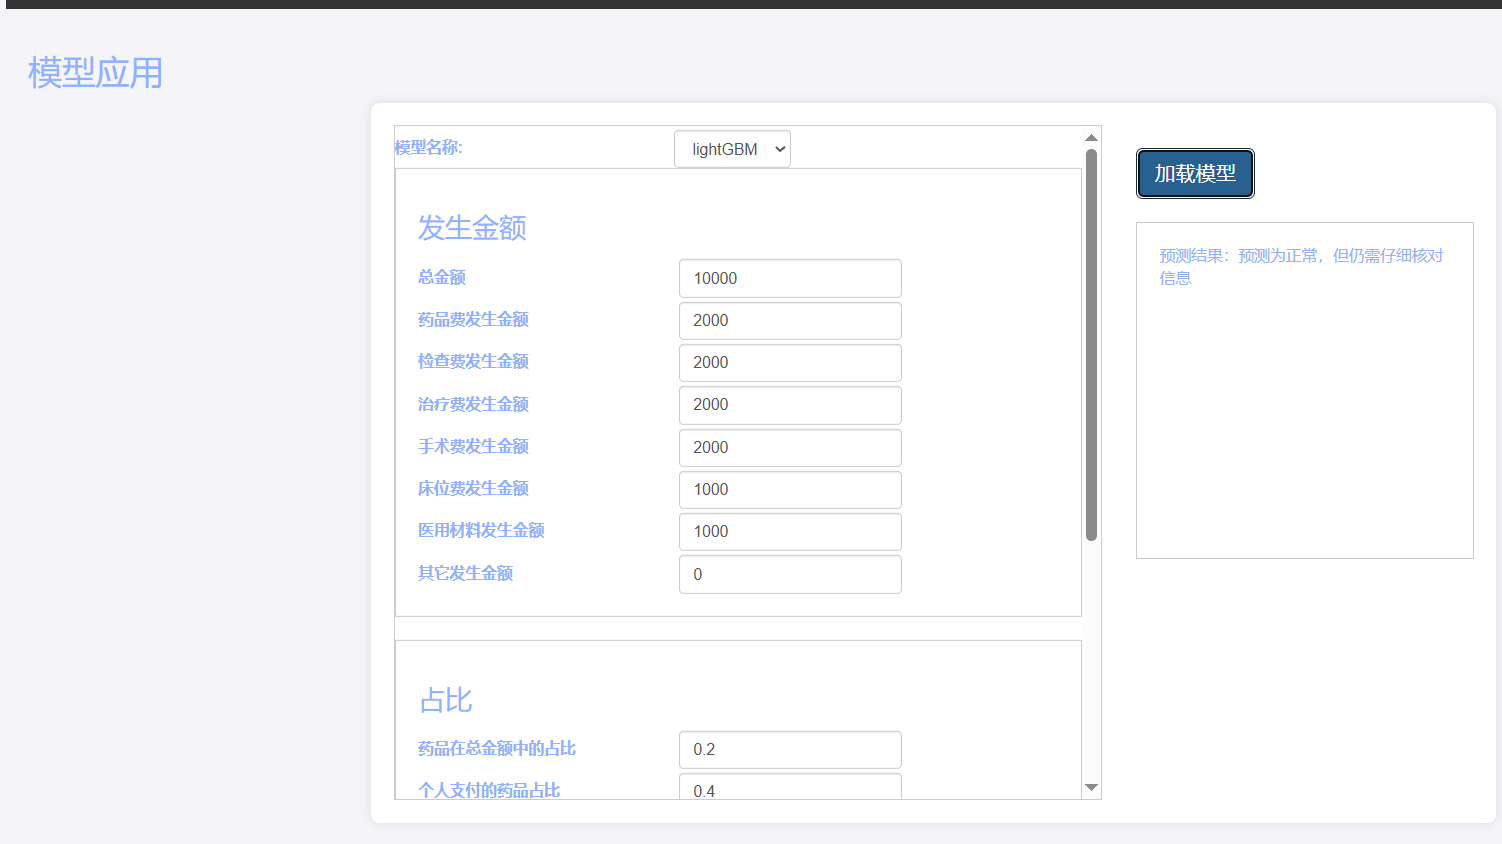
基于Flask实现的医疗保险欺诈识别监测模型
基于Flask实现的医疗保险欺诈识别监测模型 项目截图 项目简介 社会医疗保险是国家通过立法形式强制实施,由雇主和个人按一定比例缴纳保险费,建立社会医疗保险基金,支付雇员医疗费用的一种医疗保险制度, 它是促进社会文明和进步的…...
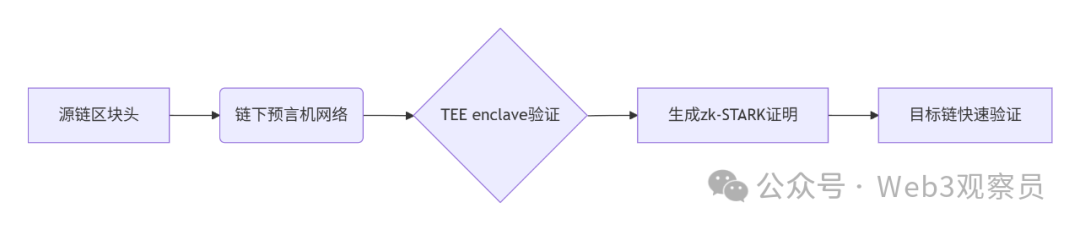
跨链模式:多链互操作架构与性能扩展方案
跨链模式:多链互操作架构与性能扩展方案 ——构建下一代区块链互联网的技术基石 一、跨链架构的核心范式演进 1. 分层协议栈:模块化解耦设计 现代跨链系统采用分层协议栈实现灵活扩展(H2Cross架构): 适配层…...

企业如何增强终端安全?
在数字化转型加速的今天,企业的业务运行越来越依赖于终端设备。从员工的笔记本电脑、智能手机,到工厂里的物联网设备、智能传感器,这些终端构成了企业与外部世界连接的 “神经末梢”。然而,随着远程办公的常态化和设备接入的爆炸式…...
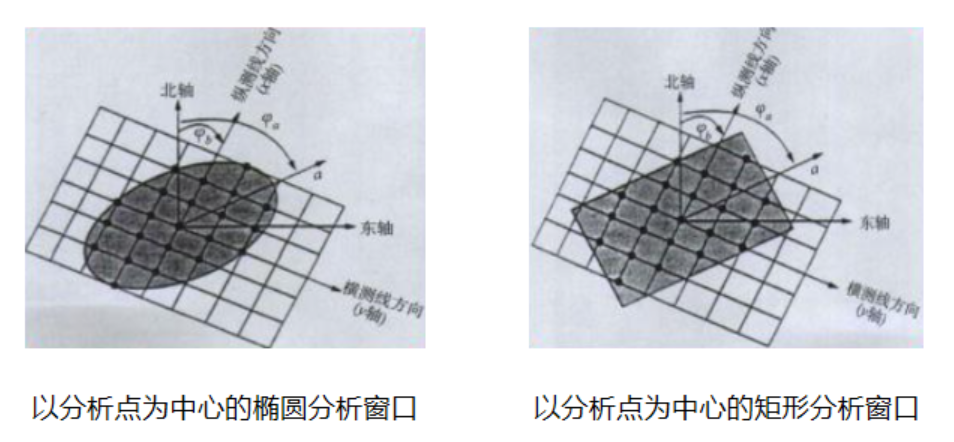
论文笔记——相干体技术在裂缝预测中的应用研究
目录 相关地震知识补充地震数据的认识地震几何属性 相干体算法定义基本原理第一代相干体技术:基于互相关的相干体技术(Correlation)第二代相干体技术:基于相似的相干体技术(Semblance)基于多道相似的相干体…...

Java求职者面试指南:Spring、Spring Boot、MyBatis框架与计算机基础问题解析
Java求职者面试指南:Spring、Spring Boot、MyBatis框架与计算机基础问题解析 一、第一轮提问(基础概念问题) 1. 请解释Spring框架的核心容器是什么?它在Spring中起到什么作用? Spring框架的核心容器是IoC容器&#…...

GruntJS-前端自动化任务运行器从入门到实战
Grunt 完全指南:从入门到实战 一、Grunt 是什么? Grunt是一个基于 Node.js 的前端自动化任务运行器,主要用于自动化执行项目开发中重复性高的任务,例如文件压缩、代码编译、语法检查、单元测试、文件合并等。通过配置简洁的任务…...