react+AntDesign 之 pc端项目案例
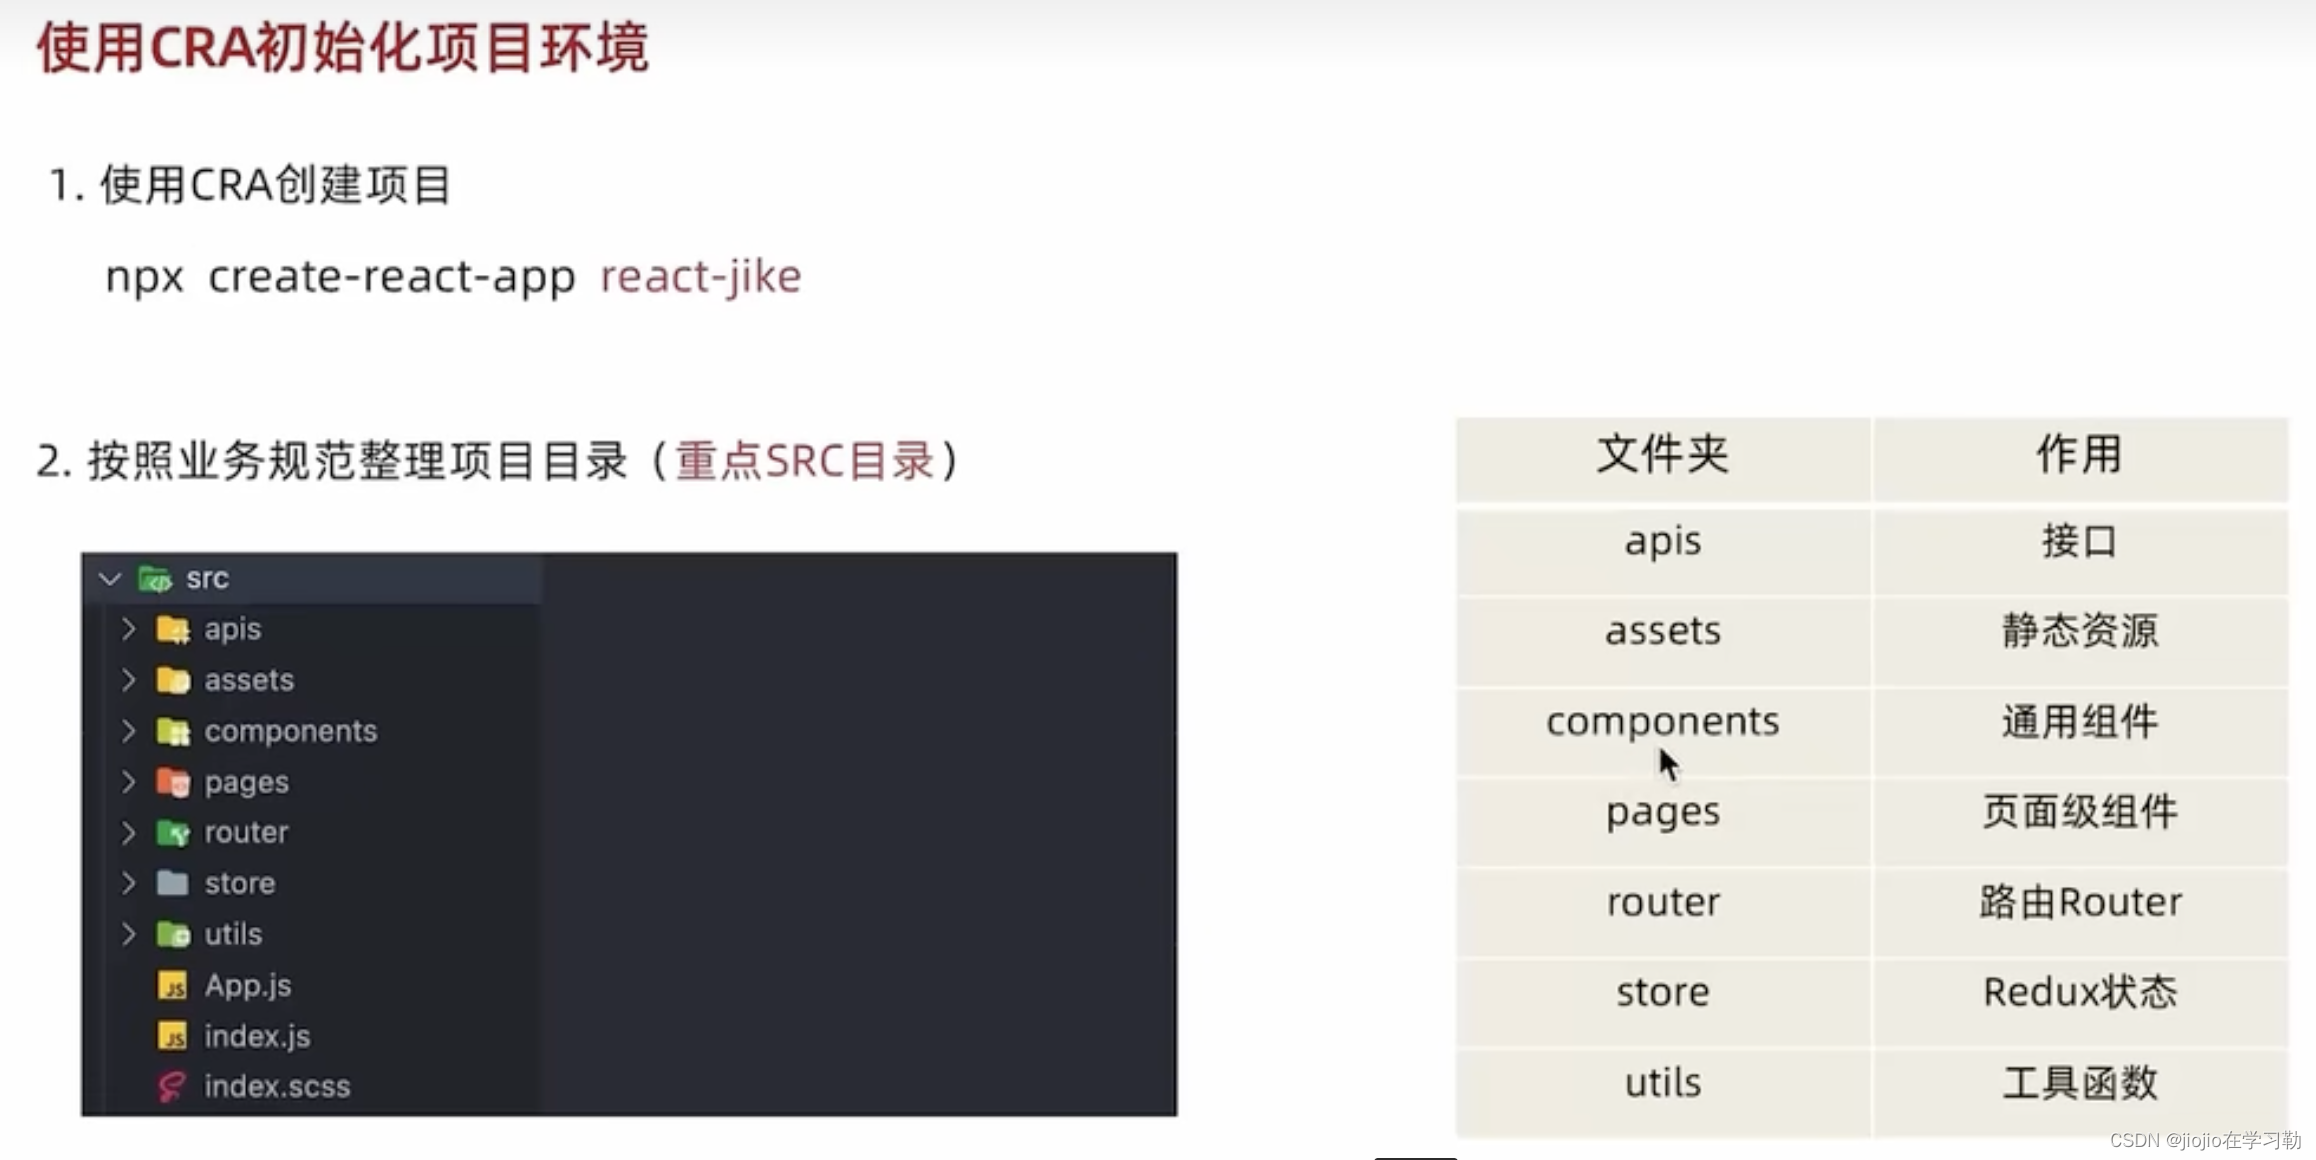
1.环境搭建以及初始化目录
CRA是一个底层基于webpack快速创建React项目的脚手架工具
# 使用npx创建项目
npx create-react-app react-jike# 进入到项
cd react-jike# 启动项目
npm start
2.安装SCSS
SASS 是一种预编译的 CSS,支持一些比较高级的语法,可以提高编写样式的效率,CRA接入scss非常简单只需要我们装一个sass工具
- 安装解析 sass 的包:
npm i sass -D - 创建全局样式文件:
index.scss
3.安装Ant Design
npm install antd --save
4.配置基础路由Router

npm i react-router-dom
pages/Layout/index.js
const Layout = () => {return <div>this is layout</div>
}
export default Layout
pages/Login/index.js
const Login = () => {return <div>this is login</div>
}
export default Login
router/index.js
import { createBrowserRouter } from 'react-router-dom'import Login from '../pages/Login'
import Layout from '../pages/Layout'const router = createBrowserRouter([{path: '/',element: <Layout />,},{path: '/login',element: <Login />,},
])export default router
index.js
import React from 'react'
import ReactDOM from 'react-dom/client'
import './index.scss'
import router from './router'
import { RouterProvider } from 'react-router-dom'ReactDOM.createRoot(document.getElementById('root')).render(<RouterProvider router={router} />
)
5.配置别名路径@
- 安装
craco工具包 - 增加
craco.config.js配置文件 - 修改
scripts 命令 - 测试是否生效
npm i @craco/craco -D
const path = require('path')module.exports = {// webpack 配置webpack: {// 配置别名alias: {// 约定:使用 @ 表示 src 文件所在路径'@': path.resolve(__dirname, 'src')}}
}
"scripts": {"start": "craco start","build": "craco build","test": "craco test","eject": "react-scripts eject"
}
import { createBrowserRouter } from 'react-router-dom'import Login from '@/pages/Login'
import Layout from '@/pages/Layout'const router = createBrowserRouter([{path: '/',element: <Layout />,},{path: '/login',element: <Login />,},
])export default router
VsCode提示配置
实现步骤
- 在项目根目录创建
jsconfig.json配置文件 - 在配置文件中添加以下配置
代码实现
{"compilerOptions": {"baseUrl": "./","paths": {"@/*": ["src/*"]}}
}
:::warning
说明:VSCode会自动读取jsconfig.json 中的配置,让vscode知道@就是src目录
:::
6.gitee管理项目
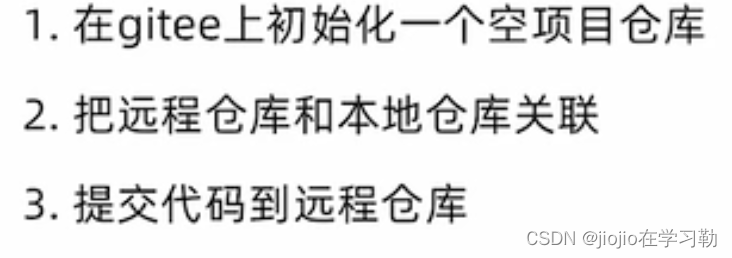
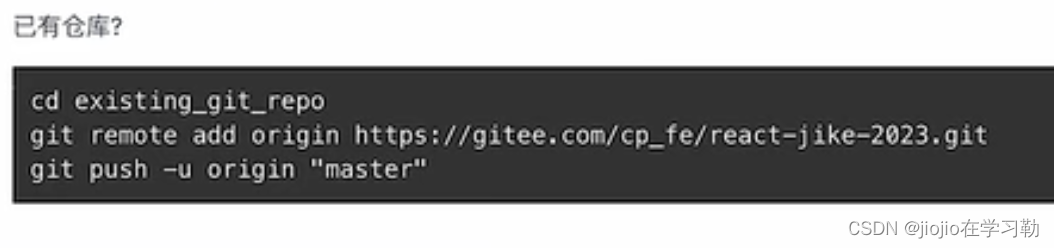
git remote add origin http
git add .
git commit -m 'init'
git push
7.登陆模块开发
**实现步骤**1. 在 `Login/index.js` 中创建登录页面基本结构2. 在 Login 目录中创建 index.scss 文件,指定组件样式3. 将 `logo.png` 和 `login.png` 拷贝到 assets 目录中
代码实现
pages/Login/index.js
import './index.scss'
import { Card, Form, Input, Button } from 'antd'
import logo from '@/assets/logo.png'const Login = () => {return (<div className="login"><Card className="login-container"><img className="login-logo" src={logo} alt="" />{/* 登录表单 */}<Form><Form.Item><Input size="large" placeholder="请输入手机号" /></Form.Item><Form.Item><Input size="large" placeholder="请输入验证码" /></Form.Item><Form.Item><Button type="primary" htmlType="submit" size="large" block>登录</Button></Form.Item></Form></Card></div>)
}export default Login
pages/Login/index.scss
.login {width: 100%;height: 100%;position: absolute;left: 0;top: 0;background: center/cover url('~@/assets/login.png');.login-logo {width: 200px;height: 60px;display: block;margin: 0 auto 20px;}.login-container {width: 440px;height: 360px;position: absolute;left: 50%;top: 50%;transform: translate(-50%, -50%);box-shadow: 0 0 50px rgb(0 0 0 / 10%);}.login-checkbox-label {color: #1890ff;}
}
表单校验实现
**实现步骤**
1. 为 Form 组件添加 `validateTrigger` 属性,指定校验触发时机的集合
2. **为 Form.Item 组件添加 name 属性**
3. 为 Form.Item 组件添加 `rules` 属性,用来添加表单校验规则对象
代码实现
page/Login/index.js
const Login = () => {return (<Form validateTrigger={['onBlur']}><Form.Itemname="mobile"rules={[{ required: true, message: '请输入手机号' },{pattern: /^1[3-9]\d{9}$/,message: '手机号码格式不对'}]}><Input size="large" placeholder="请输入手机号" /></Form.Item><Form.Itemname="code"rules={[{ required: true, message: '请输入验证码' },]}><Input size="large" placeholder="请输入验证码" maxLength={6} /></Form.Item><Form.Item><Button type="primary" htmlType="submit" size="large" block>登录</Button></Form.Item></Form>)
}
获取登录表单数据
**实现步骤**
1. 为 Form 组件添加 `onFinish` 属性,该事件会在点击登录按钮时触发
2. 创建 onFinish 函数,通过函数参数 values 拿到表单值
3. Form 组件添加 `initialValues` 属性,来初始化表单值
代码实现
pages/Login/index.js
// 点击登录按钮时触发 参数values即是表单输入数据
const onFinish = formValue => {console.log(formValue)
}<FormonFinish={ onFinish }
>...</Form>
封装request工具模块
业务背景: 前端需要和后端拉取接口数据,axios是使用最广的工具插件,针对于项目中的使用,我们需要做一些简单的封装
**实现步骤**1. 安装 axios 到项目 2. 创建 utils/request.js 文件3. 创建 axios 实例,配置 `baseURL,请求拦截器,响应拦截器` 4. 在 utils/index.js 中,统一导出request
npm i axios
import axios from 'axios'const http = axios.create({baseURL: 'http://geek.itheima.net/v1_0',timeout: 5000
})// 添加请求拦截器
http.interceptors.request.use((config)=> {return config}, (error)=> {return Promise.reject(error)
})// 添加响应拦截器
http.interceptors.response.use((response)=> {// 2xx 范围内的状态码都会触发该函数。// 对响应数据做点什么return response.data}, (error)=> {// 超出 2xx 范围的状态码都会触发该函数。// 对响应错误做点什么return Promise.reject(error)
})export { http }
import { request } from './request'
export { request }
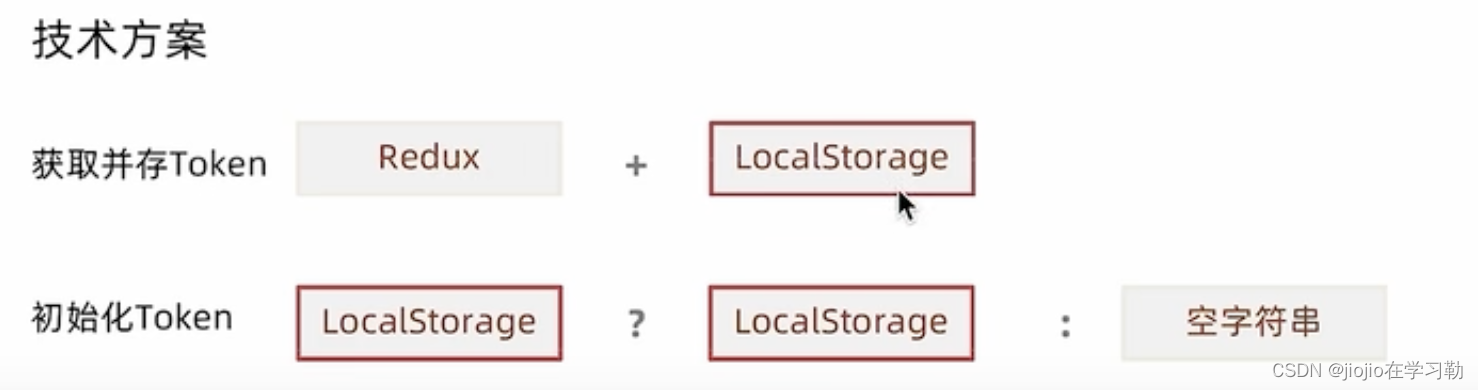
使用Redux管理token
npm i react-redux @reduxjs/toolkit //安装Redux相关工具包
配置Redux
import { createSlice } from '@reduxjs/toolkit'
import { http } from '@/utils'
const userStore = createSlice({name: 'user',// 数据状态initialState: {token:''},// 同步修改方法reducers: {setUserInfo (state, action) {state.userInfo = action.payload}}
})// 解构出actionCreater
const { setUserInfo } = userStore.actions// 获取reducer函数
const userReducer = userStore.reducer// 异步方法封装
const fetchLogin = (loginForm) => {return async (dispatch) => {const res = await http.post('/authorizations', loginForm)dispatch(setUserInfo(res.data.token))}
}export { fetchLogin }export default userReducer
store下index.js
import { configureStore } from '@reduxjs/toolkit'import userReducer from './modules/user'export default configureStore({reducer: {// 注册子模块user: userReducer}
})
实现登录逻辑
业务逻辑:
- 跳转到首页
- 提示用户登录成功
import { message } from 'antd'
import useStore from '@/store'
import { fetchLogin } from '@/store/modules/user'
import { useDispatch } from 'react-redux'const Login = () => {const dispatch = useDispatch()const navigate = useNavigate()const onFinish = async formValue => {await dispatch(fetchLogin(formValue))navigate('/')message.success('登录成功')}return (<div className="login"><!-- 省略... --></div>)
}export default Login
token持久化
业务背景: Token数据具有一定的时效时间,通常在几个小时,有效时间内无需重新获取,而基于Redux的存储方式又是基于内存的,刷新就会丢失,为了保持持久化,我们需要单独做处理
封装存取方法
// 封装存取方法const TOKENKEY = 'token_key'function setToken (token) {return localStorage.setItem(TOKENKEY, token)
}function getToken () {return localStorage.getItem(TOKENKEY)
}function clearToken () {return localStorage.removeItem(TOKENKEY)
}export {setToken,getToken,clearToken
}
实现持久化逻辑
import { createSlice } from '@reduxjs/toolkit'
import { setToken as _setToken, getToken, removeToken } from '@/utils'
import { loginAPI, getProfileAPI } from '@/apis/user'const userStore = createSlice({name: "user",// 数据状态initialState: {token: getToken() || '',userInfo: {}},// 同步修改方法reducers: {setToken (state, action) {state.token = action.payload_setToken(action.payload)},setUserInfo (state, action) {state.userInfo = action.payload},clearUserInfo (state) {state.token = ''state.userInfo = {}removeToken()}}
})// 解构出actionCreaterconst { setToken, setUserInfo, clearUserInfo } = userStore.actions// 获取reducer函数const userReducer = userStore.reducer// 登录获取token异步方法封装
const fetchLogin = (loginForm) => {return async (dispatch) => {const res = await loginAPI(loginForm)dispatch(setToken(res.data.token))}
}// 获取个人用户信息异步方法
const fetchUserInfo = () => {return async (dispatch) => {const res = await getProfileAPI()dispatch(setUserInfo(res.data))}
}export { fetchLogin, fetchUserInfo, clearUserInfo }export default userReducer
刷新浏览器,通过Redux调试工具查看token数据
请求拦截器注入token
业务背景: Token作为用户的数据标识,在接口层面起到了接口权限控制的作用,也就是说后端有很多接口都需要通过查看当前请求头信息中是否含有token数据,来决定是否正常返回数据
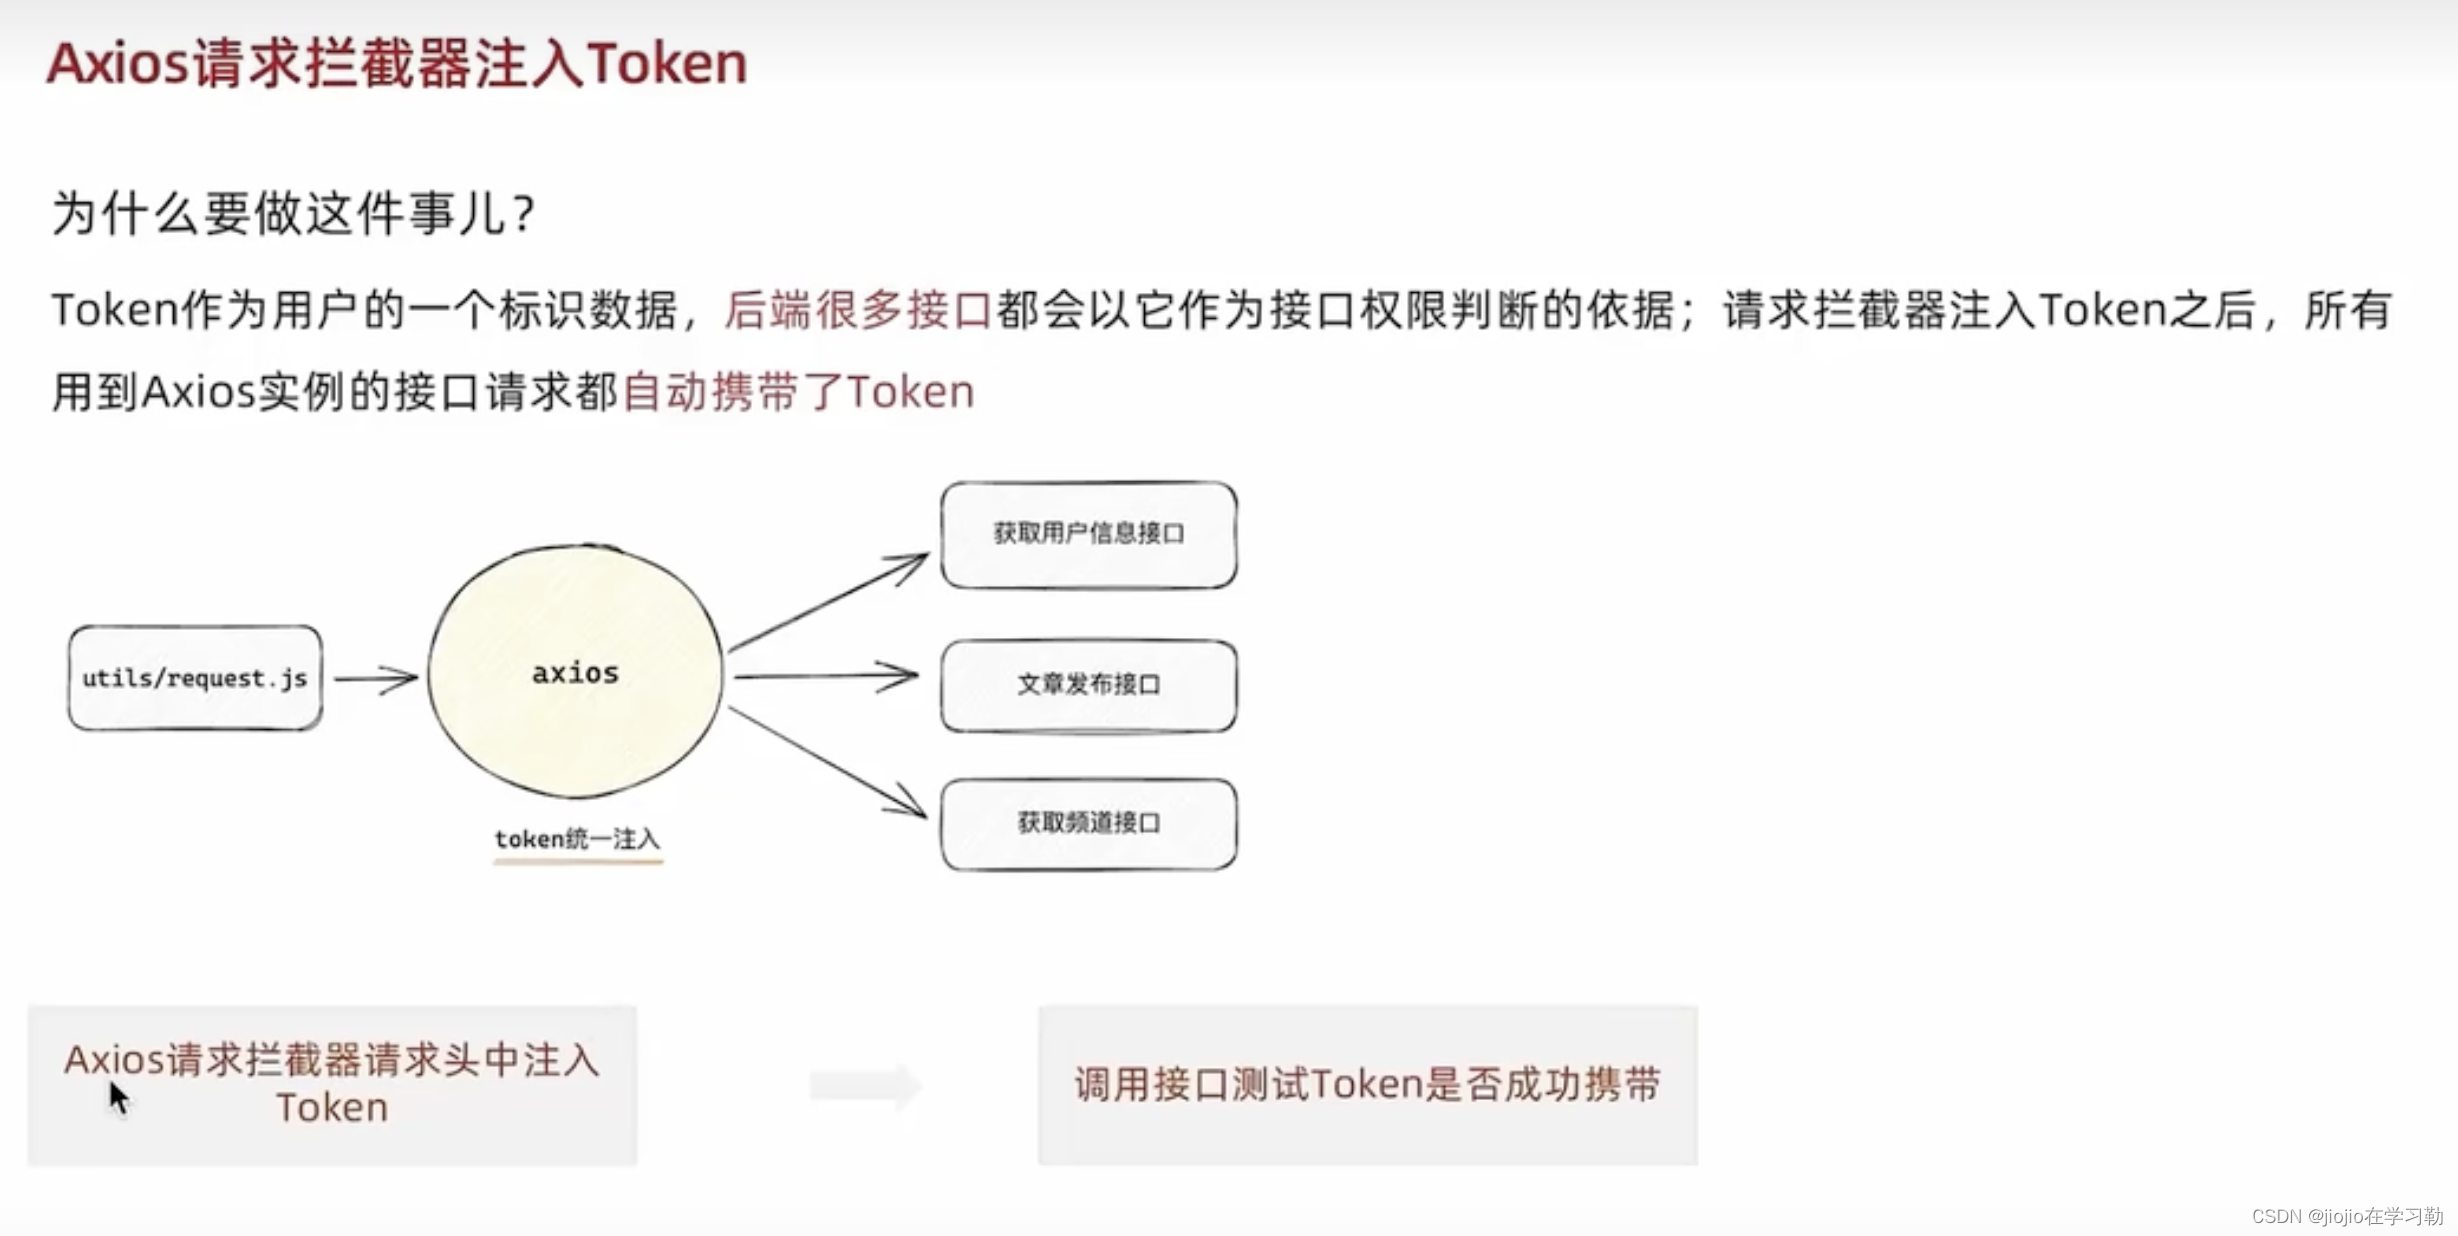
拼接方式:config.headers.Authorization =
Bearer ${token}}
utils/request.js
// 添加请求拦截器
request.interceptors.request.use(config => {// if not login add tokenconst token = getToken()if (token) {config.headers.Authorization = `Bearer ${token}`}return config
})
// 添加响应拦截器
// 在响应返回到客户端之前 做拦截 重点处理返回的数据
request.interceptors.response.use((response) => {// 2xx 范围内的状态码都会触发该函数。// 对响应数据做点什么return response.data
}, (error) => {// 超出 2xx 范围的状态码都会触发该函数。// 对响应错误做点什么// 监控401 token失效console.dir(error)if (error.response.status === 401) {removeToken()router.navigate('/login')window.location.reload()}return Promise.reject(error)
})export { request }
路由鉴权实现
业务背景:封装
AuthRoute路由鉴权高阶组件,实现未登录拦截,并跳转到登录页面
实现思路:判断本地是否有token,如果有,就返回子组件,否则就重定向到登录Login

**实现步骤**
1. 在 components 目录中,创建 `AuthRoute/index.jsx` 文件
2. 登录时,直接渲染相应页面组件
3. 未登录时,重定向到登录页面
4. 将需要鉴权的页面路由配置,替换为 AuthRoute 组件渲染
代码实现
components/AuthRoute/index.jsx
import { getToken } from '@/utils'
import { Navigate } from 'react-router-dom'const AuthRoute = ({ children }) => {const isToken = getToken()if (isToken) {return <>{children}</>} else {return <Navigate to="/login" replace />}
}export default AuthRoute
src/router/index.jsx
import { createBrowserRouter } from 'react-router-dom'import Login from '@/pages/Login'
import Layout from '@/pages/Layout'
import AuthRoute from '@/components/Auth'const router = createBrowserRouter([{path: '/',element: <AuthRoute><Layout /></AuthRoute>,},{path: '/login',element: <Login />,},
])export default router
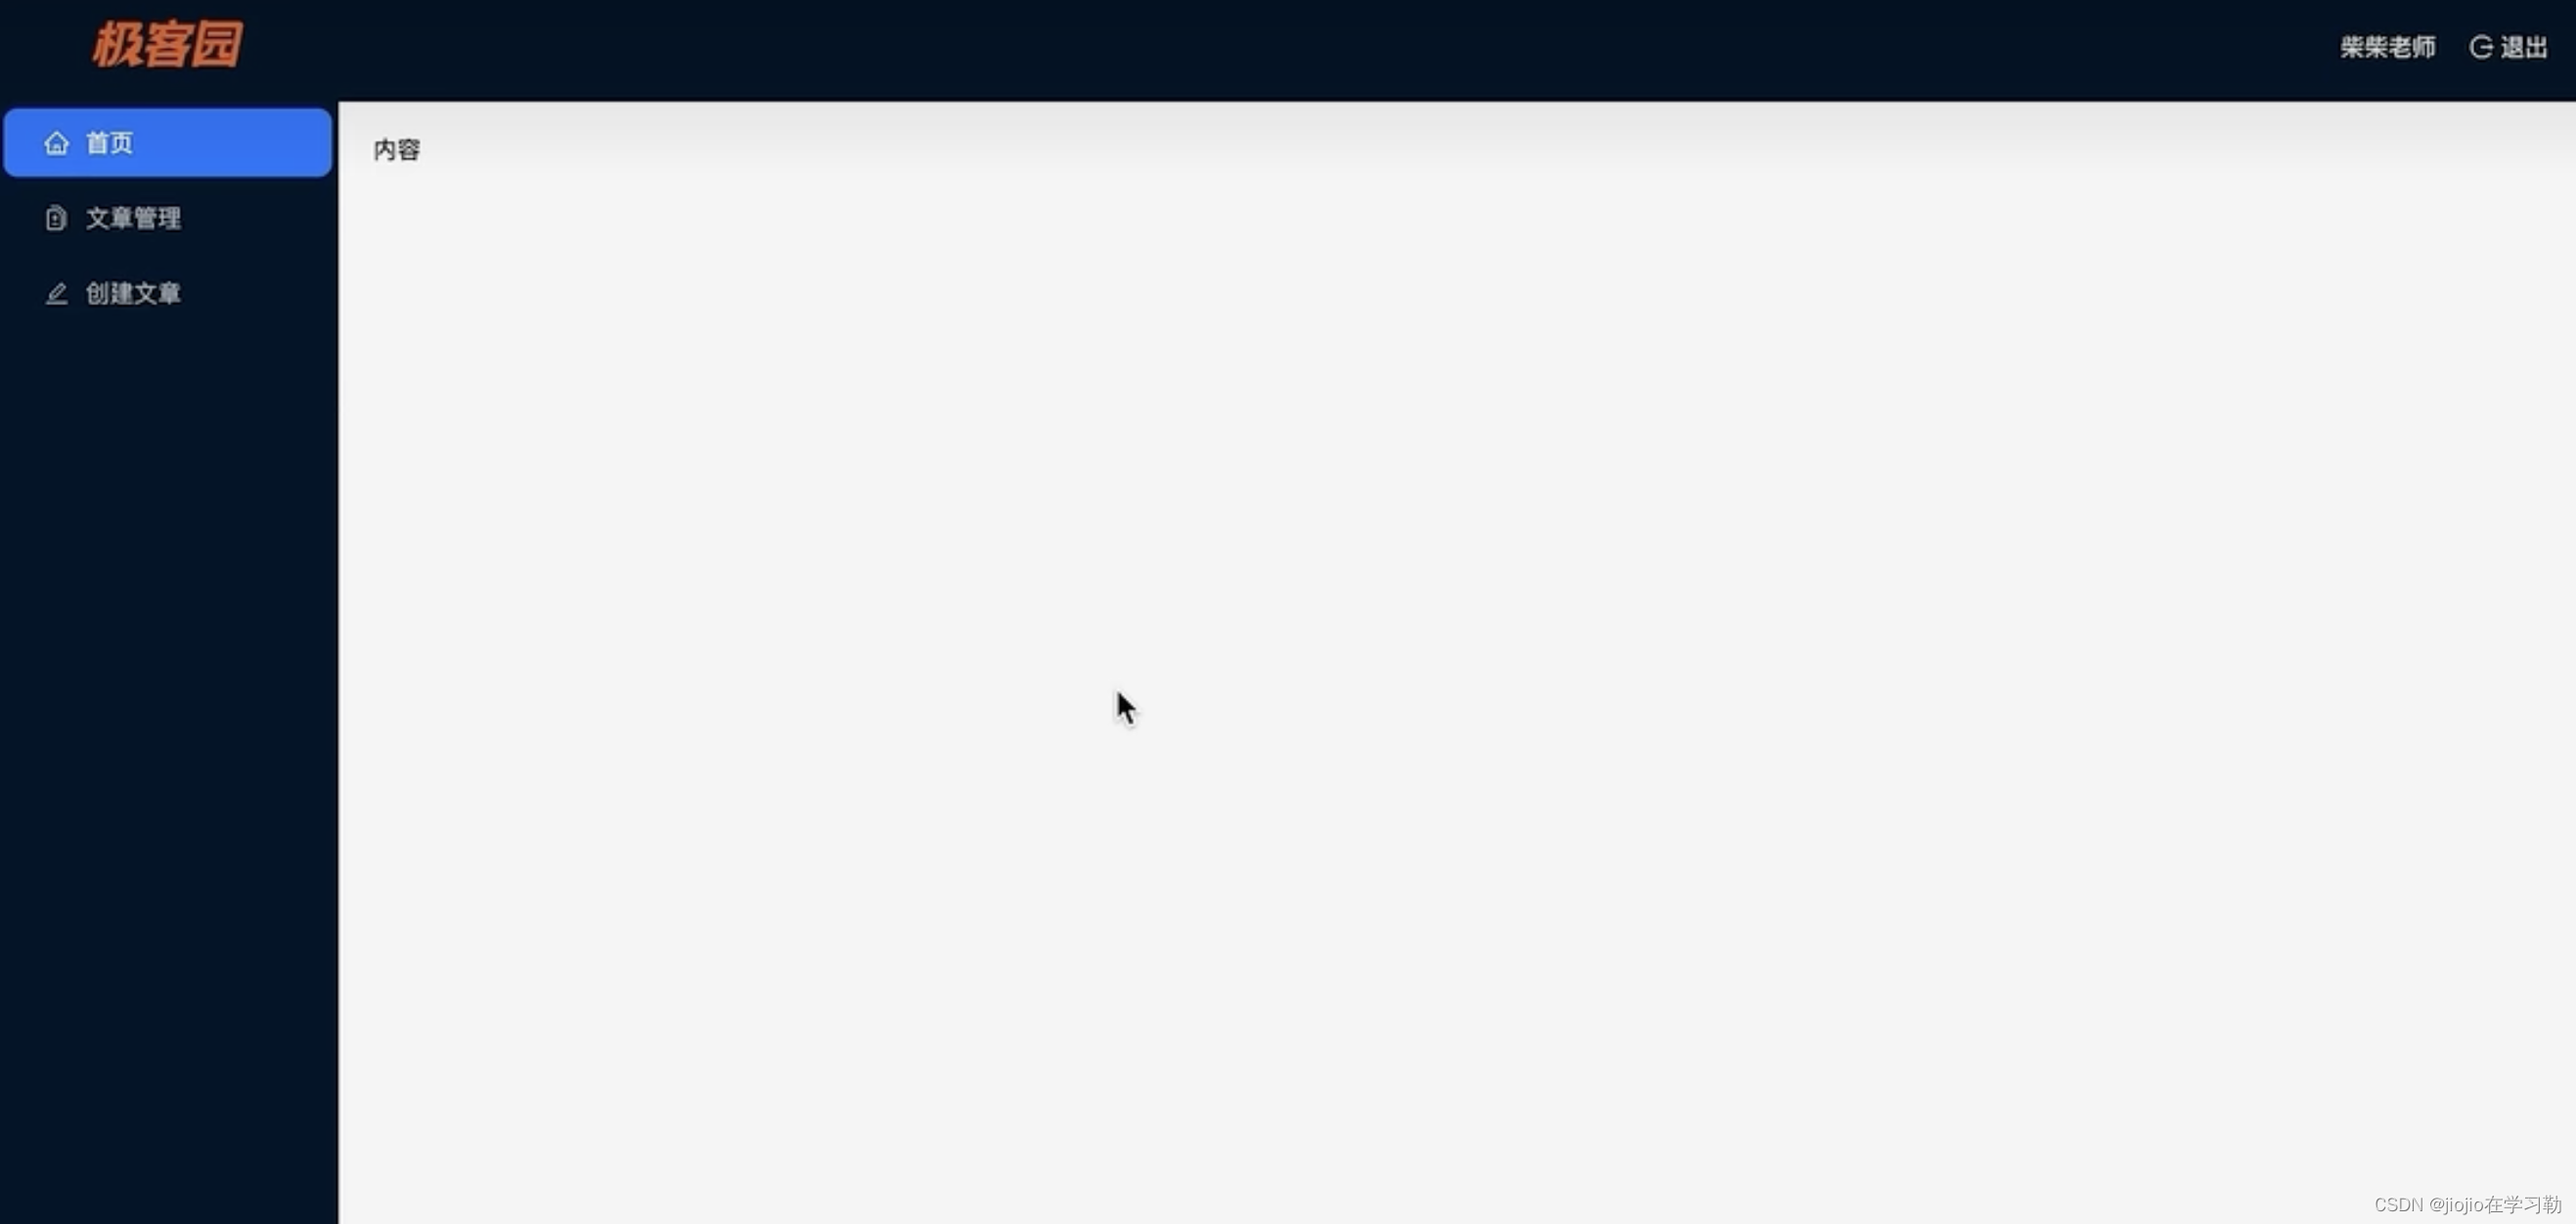
9.layout模块
基本结构和样式reset
实现步骤
- 打开
antd/Layout布局组件文档,找到示例:顶部-侧边布局-通栏 - 拷贝示例代码到我们的 Layout 页面中
- 分析并调整页面布局
代码实现
pages/Layout/index.js
import { Layout, Menu, Popconfirm } from 'antd'
import {HomeOutlined,DiffOutlined,EditOutlined,LogoutOutlined,
} from '@ant-design/icons'
import './index.scss'const { Header, Sider } = Layoutconst items = [{label: '首页',key: '1',icon: <HomeOutlined />,},{label: '文章管理',key: '2',icon: <DiffOutlined />,},{label: '创建文章',key: '3',icon: <EditOutlined />,},
]const GeekLayout = () => {return (<Layout><Header className="header"><div className="logo" /><div className="user-info"><span className="user-name">柴柴老师</span><span className="user-logout"><Popconfirm title="是否确认退出?" okText="退出" cancelText="取消"><LogoutOutlined /> 退出</Popconfirm></span></div></Header><Layout><Sider width={200} className="site-layout-background"><Menumode="inline"theme="dark"defaultSelectedKeys={['1']}items={items}style={{ height: '100%', borderRight: 0 }}></Menu></Sider><Layout className="layout-content" style={{ padding: 20 }}>内容</Layout></Layout></Layout>)
}
export default GeekLayout
pages/Layout/index.scss
.ant-layout {height: 100%;
}.header {padding: 0;
}.logo {width: 200px;height: 60px;background: url('~@/assets/logo.png') no-repeat center / 160px auto;
}.layout-content {overflow-y: auto;
}.user-info {position: absolute;right: 0;top: 0;padding-right: 20px;color: #fff;.user-name {margin-right: 20px;}.user-logout {display: inline-block;cursor: pointer;}
}
.ant-layout-header {padding: 0 !important;
}
样式reset
npm install normalize.css
html,
body {margin: 0;height: 100%;
}#root {height: 100%;
}
二级路由配置

使用步骤
- 在 pages 目录中,分别创建:Home(数据概览)/Article(内容管理)/Publish(发布文章)页面文件夹
- 分别在三个文件夹中创建 index.jsx 并创建基础组件后导出
- 在
router/index.js中配置嵌套子路由,在Layout中配置二级路由出口 - 使用 Link 修改左侧菜单内容,与子路由规则匹配实现路由切换
代码实现
pages/Home/index.js
const Home = () => {return <div>Home</div>
}
export default Home
pages/Article/index.js
const Article = () => {return <div>Article</div>
}
export default Article
pages/Publish/index.js
const Publish = () => {return <div>Publish</div>
}
export default Publish
router/index.js
import { createBrowserRouter } from 'react-router-dom'import Login from '@/pages/Login'
import Layout from '@/pages/Layout'
import Publish from '@/pages/Publish'
import Article from '@/pages/Article'
import Home from '@/pages/Home'
import { AuthRoute } from '@/components/Auth'const router = createBrowserRouter([{path: '/',element: (<AuthRoute><Layout /></AuthRoute>),children: [{index: true,element: <Home />,},{path: 'article',element: <Article />,},{path: 'publish',element: <Publish />,},],},{path: '/login',element: <Login />,},
])export default router
配置二级路由出口
<Layout className="layout-content" style={{ padding: 20 }}><Outlet />
</Layout>
路由菜单点击交互实现
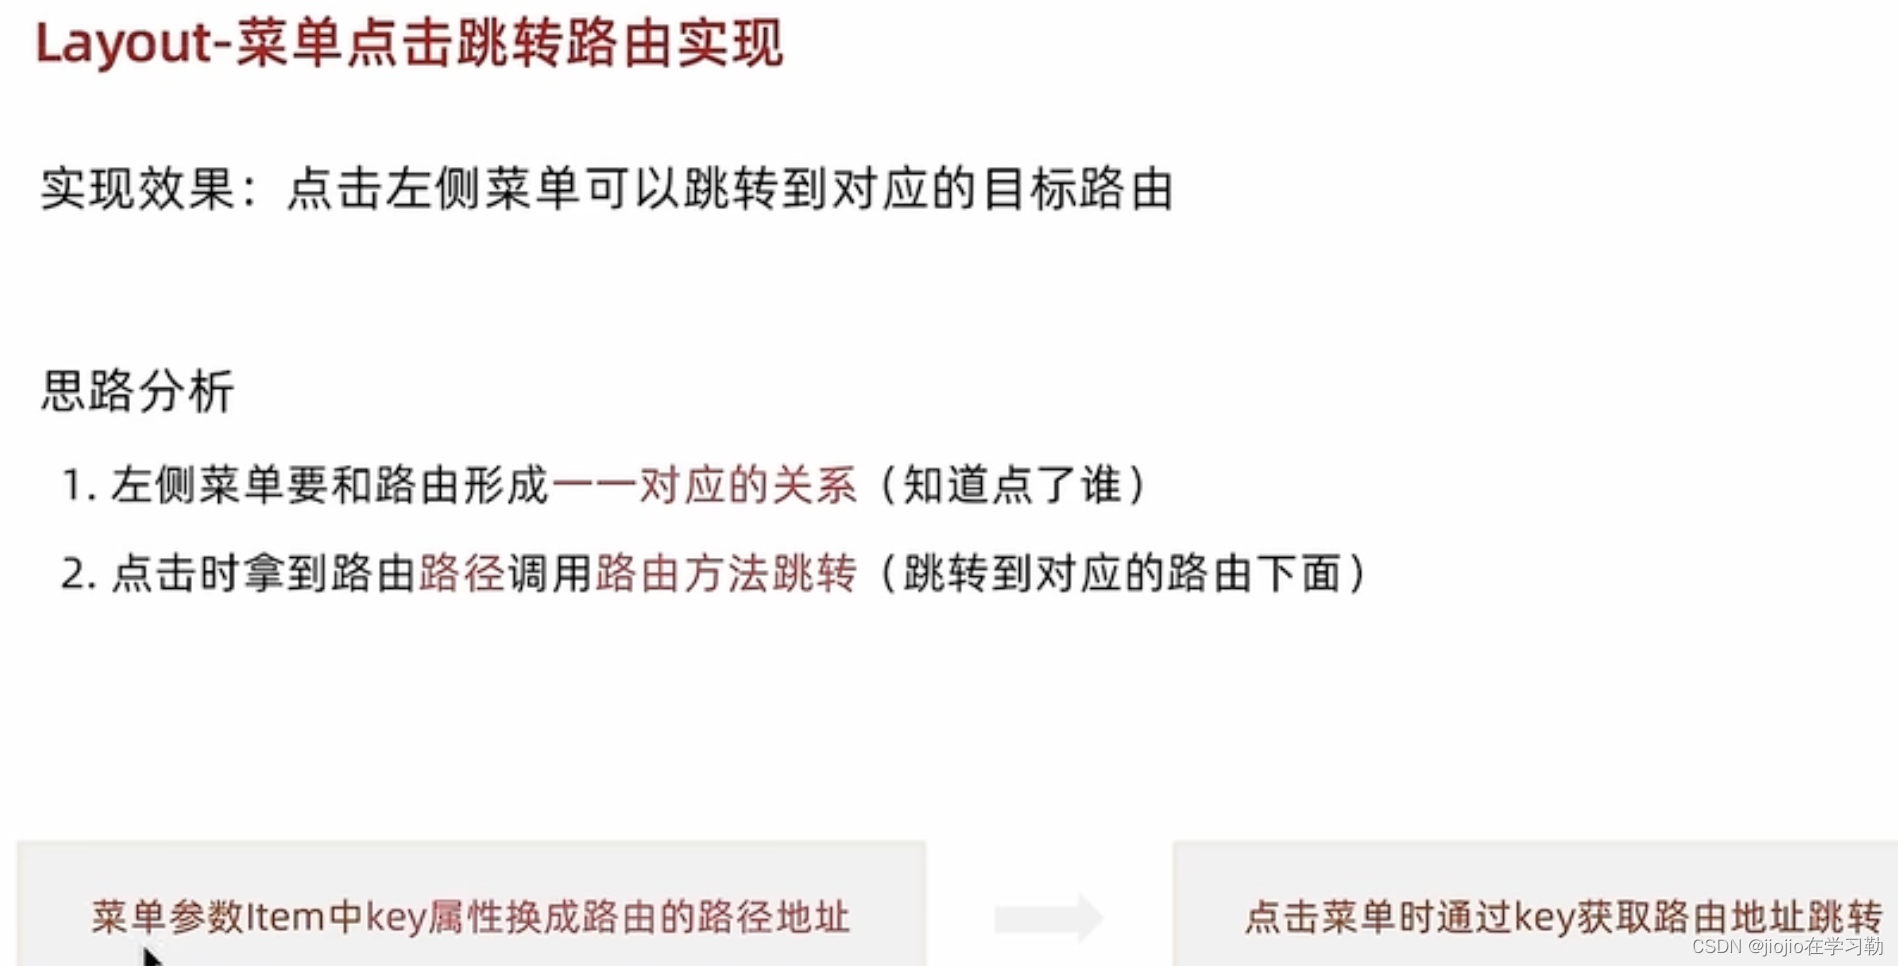
点击菜单跳转路由
import { Outlet, useNavigate } from 'react-router-dom'const items = [{label: '首页',key: '/',icon: <HomeOutlined />,},{label: '文章管理',key: '/article',icon: <DiffOutlined />,},{label: '创建文章',key: '/publish',icon: <EditOutlined />,},
]const GeekLayout = () => {const navigate = useNavigate()const menuClick = (route) => {navigate(route.key)}return (<Menumode="inline"theme="dark"selectedKeys={selectedKey}items={items}style={{ height: '100%', borderRight: 0 }}onClick={menuClick}/> )
}
export default GeekLayout
菜单反向高亮
const GeekLayout = () => {// 省略部分代码const location = useLocation()const selectedKey = location.pathnamereturn (<Layout><Header className="header"><div className="logo" /><div className="user-info"><span className="user-name">{name}</span><span className="user-logout"><Popconfirm title="是否确认退出?" okText="退出" cancelText="取消"><LogoutOutlined /> 退出</Popconfirm></span></div></Header><Layout><Sider width={200} className="site-layout-background"><Menumode="inline"theme="dark"selectedKeys={selectedKey}items={items}style={{ height: '100%', borderRight: 0 }}onClick={menuClickHandler}></Menu></Sider><Layout className="layout-content" style={{ padding: 20 }}><Outlet /></Layout></Layout></Layout>)
}
展示个人信息
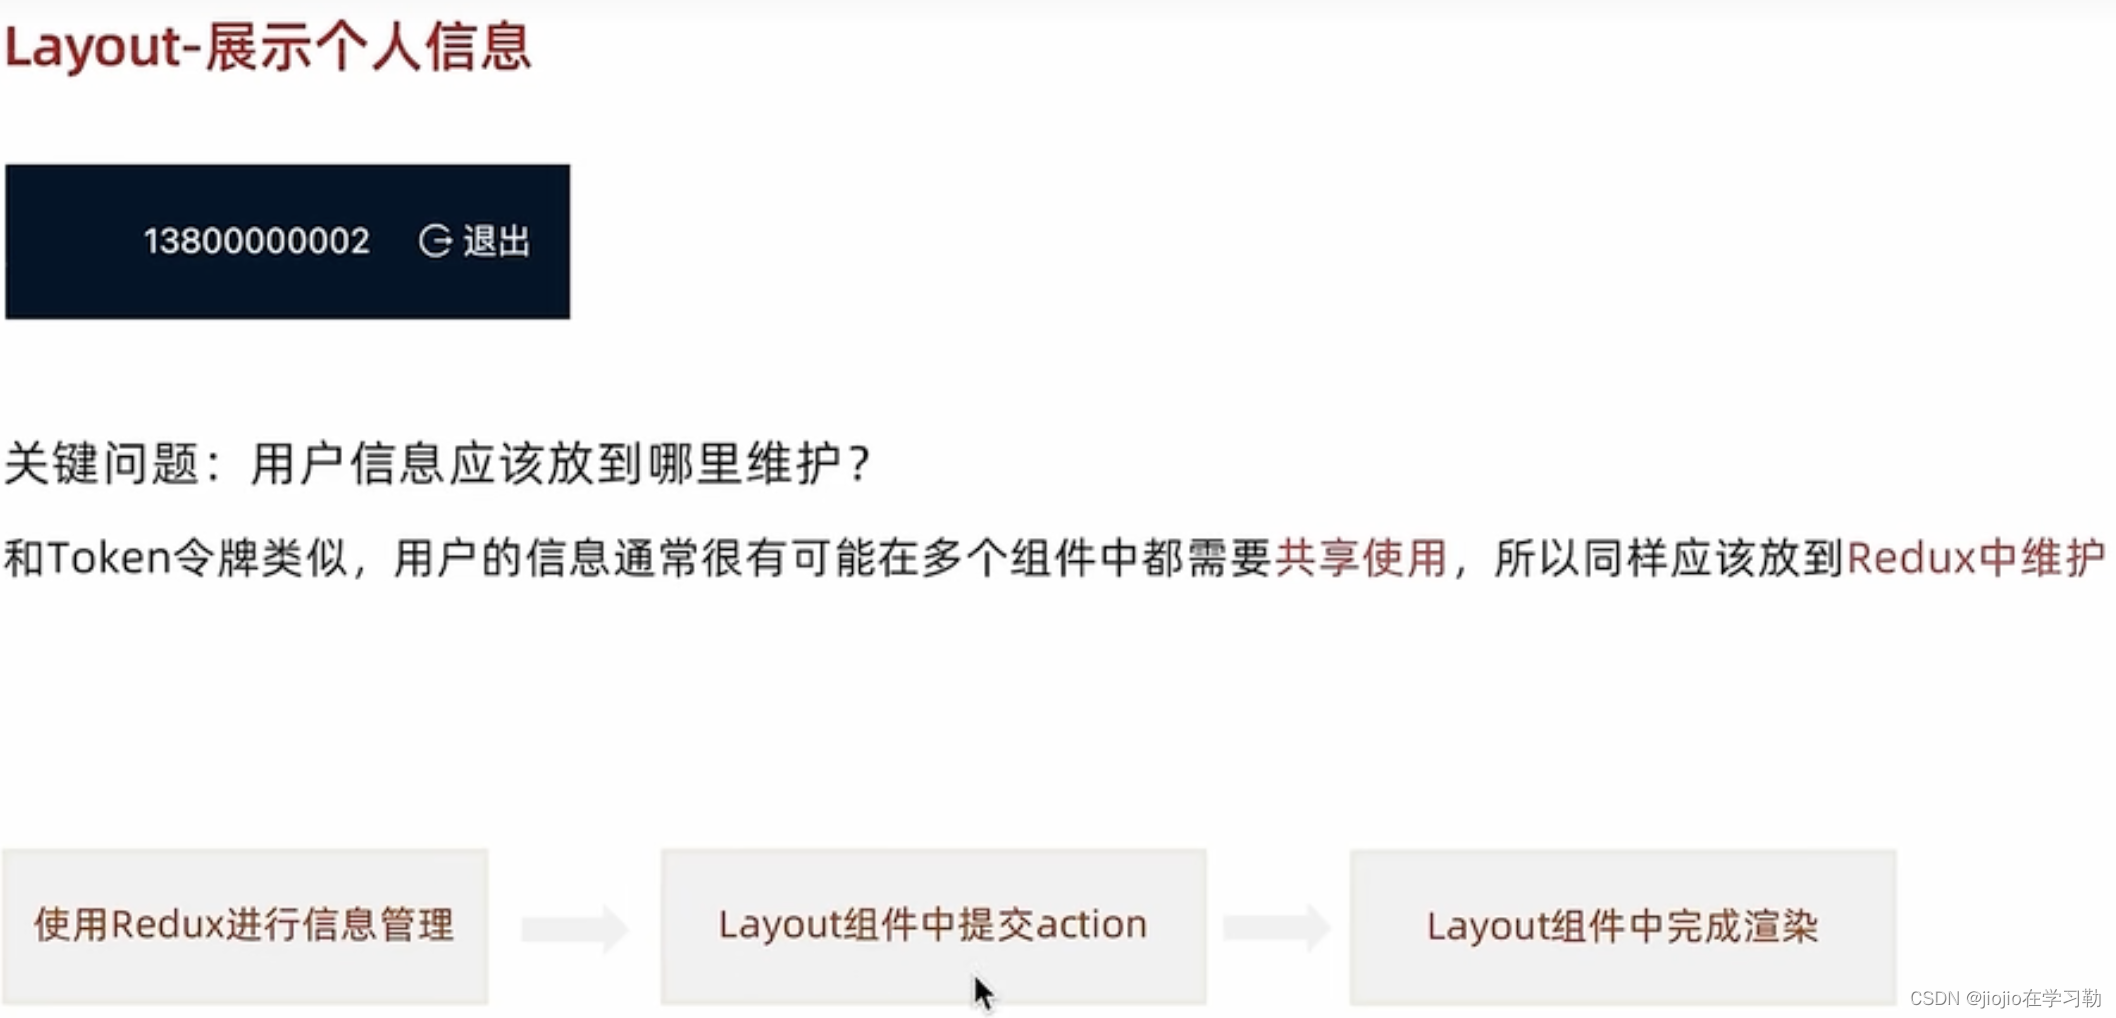
实现步骤
- 在Redux的store中编写获取用户信息的相关逻辑
- 在Layout组件中触发action的执行
- 在Layout组件使用使用store中的数据进行用户名的渲染
代码实现
store/userStore.js
import { createSlice } from '@reduxjs/toolkit'
import { http } from '@/utils/request'
import { getToken, setToken } from '@/utils'
const userStore = createSlice({name: 'user',// 数据initialState: {token: getToken() || '',userInfo: {}},// 同步修改方法reducers: {setUserToken (state, action) {state.token = action.payload// 存入本地setToken(state.token)},setUserInfo (state, action) {state.userInfo = action.payload}}
})// 解构出actionCreater
const { setUserToken, setUserInfo } = userStore.actions// 获取reducer函数
const userReducer = userStore.reducerconst fetchLogin = (loginForm) => {return async (dispatch) => {const res = await http.post('/authorizations', loginForm)dispatch(setUserToken(res.data.token))}
}const fetchUserInfo = () => {return async (dispatch) => {const res = await http.get('/user/profile')dispatch(setUserInfo(res.data))}
}export { fetchLogin, fetchUserInfo }export default userReducer
pages/Layout/index.js
// 省略部分代码
import { fetchUserInfo } from '@/store/modules/user'
import { useDispatch, useSelector } from 'react-redux'const GeekLayout = () => {const dispatch = useDispatch()const name = useSelector(state => state.user.userInfo.name)useEffect(() => {dispatch(fetchUserInfo())}, [dispatch])return (<Layout><Header className="header"><div className="logo" /><div className="user-info"><span className="user-name">{name}</span><span className="user-logout"><Popconfirm title="是否确认退出?" okText="退出" cancelText="取消"><LogoutOutlined /> 退出</Popconfirm></span></div></Header><Layout><Sider width={200} className="site-layout-background"><Menumode="inline"theme="dark"defaultSelectedKeys={['1']}items={items}style={{ height: '100%', borderRight: 0 }}></Menu></Sider><Layout className="layout-content" style={{ padding: 20 }}><Outlet /></Layout></Layout></Layout>)
}
export default GeekLayout
退出登录实现
实现步骤
- 为气泡确认框添加确认回调事件
- 在
store/userStore.js中新增退出登录的action函数,在其中删除token - 在回调事件中,调用userStore中的退出action
- 清除用户信息,返回登录页面
代码实现
store/modules/user.js
import { createSlice } from '@reduxjs/toolkit'
import { http } from '@/utils/request'
import { clearToken, getToken, setToken } from '@/utils'
const userStore = createSlice({name: 'user',// 数据initialState: {token: getToken() || '',userInfo: {}},// 同步修改方法reducers: {setUserToken (state, action) {state.token = action.payload// 存入本地setToken(state.token)},setUserInfo (state, action) {state.userInfo = action.payload},clearUserInfo (state) {state.token = ''state.userInfo = {}clearToken()}}
})// 解构出actionCreater
const { setUserToken, setUserInfo, clearUserInfo } = userStore.actions// 获取reducer函数
const userReducer = userStore.reducerexport { fetchLogin, fetchUserInfo, clearUserInfo }export default userReducer
pages/Layout/index.js
const GeekLayout = () => {// 退出登录const loginOut = () => {dispatch(clearUserInfo())navigator('/login')}return (<Layout><Header className="header"><div className="logo" /><div className="user-info"><span className="user-name">{name}</span><span className="user-logout"><Popconfirm title="是否确认退出?" okText="退出" cancelText="取消" onConfirm={loginOut}><LogoutOutlined /> 退出</Popconfirm></span></div></Header><Layout><Sider width={200} className="site-layout-background"><Menumode="inline"theme="dark"selectedKeys={selectedKey}items={items}style={{ height: '100%', borderRight: 0 }}onClick={menuClickHandler}></Menu></Sider><Layout className="layout-content" style={{ padding: 20 }}><Outlet /></Layout></Layout></Layout>)
}
处理Token失效
业务背景:如果用户一段时间不做任何操作,到时之后应该清除所有过期用户信息跳回到登录
http.interceptors.response.use((response) => {// 2xx 范围内的状态码都会触发该函数。// 对响应数据做点什么return response.data
}, (error) => {// 超出 2xx 范围的状态码都会触发该函数。// 对响应错误做点什么console.dir(error)if (error.response.status === 401) {clearToken()router.navigate('/login')window.location.reload()}return Promise.reject(error)
})
首页Home图表展示
图表基础Demo实现
图表类业务渲染,我们可以通过下面的顺序来实现
- 跑通基础DEMO
- 按照实际业务需求进行修改
安装echarts
npm i echarts
实现基础Demo
import { useEffect, useRef } from 'react'
import * as echarts from 'echarts'const Home = () => {const chartRef = useRef(null)useEffect(() => {// 1. 生成实例const myChart = echarts.init(chartRef.current)// 2. 准备图表参数const option = {xAxis: {type: 'category',data: ['Mon', 'Tue', 'Wed', 'Thu', 'Fri', 'Sat', 'Sun']},yAxis: {type: 'value'},series: [{data: [120, 200, 150, 80, 70, 110, 130],type: 'bar'}]}// 3. 渲染参数myChart.setOption(option)}, [])return (<div><div ref={chartRef} style={{ width: '400px', height: '300px' }} /></div >)
}export default Home
组件封装
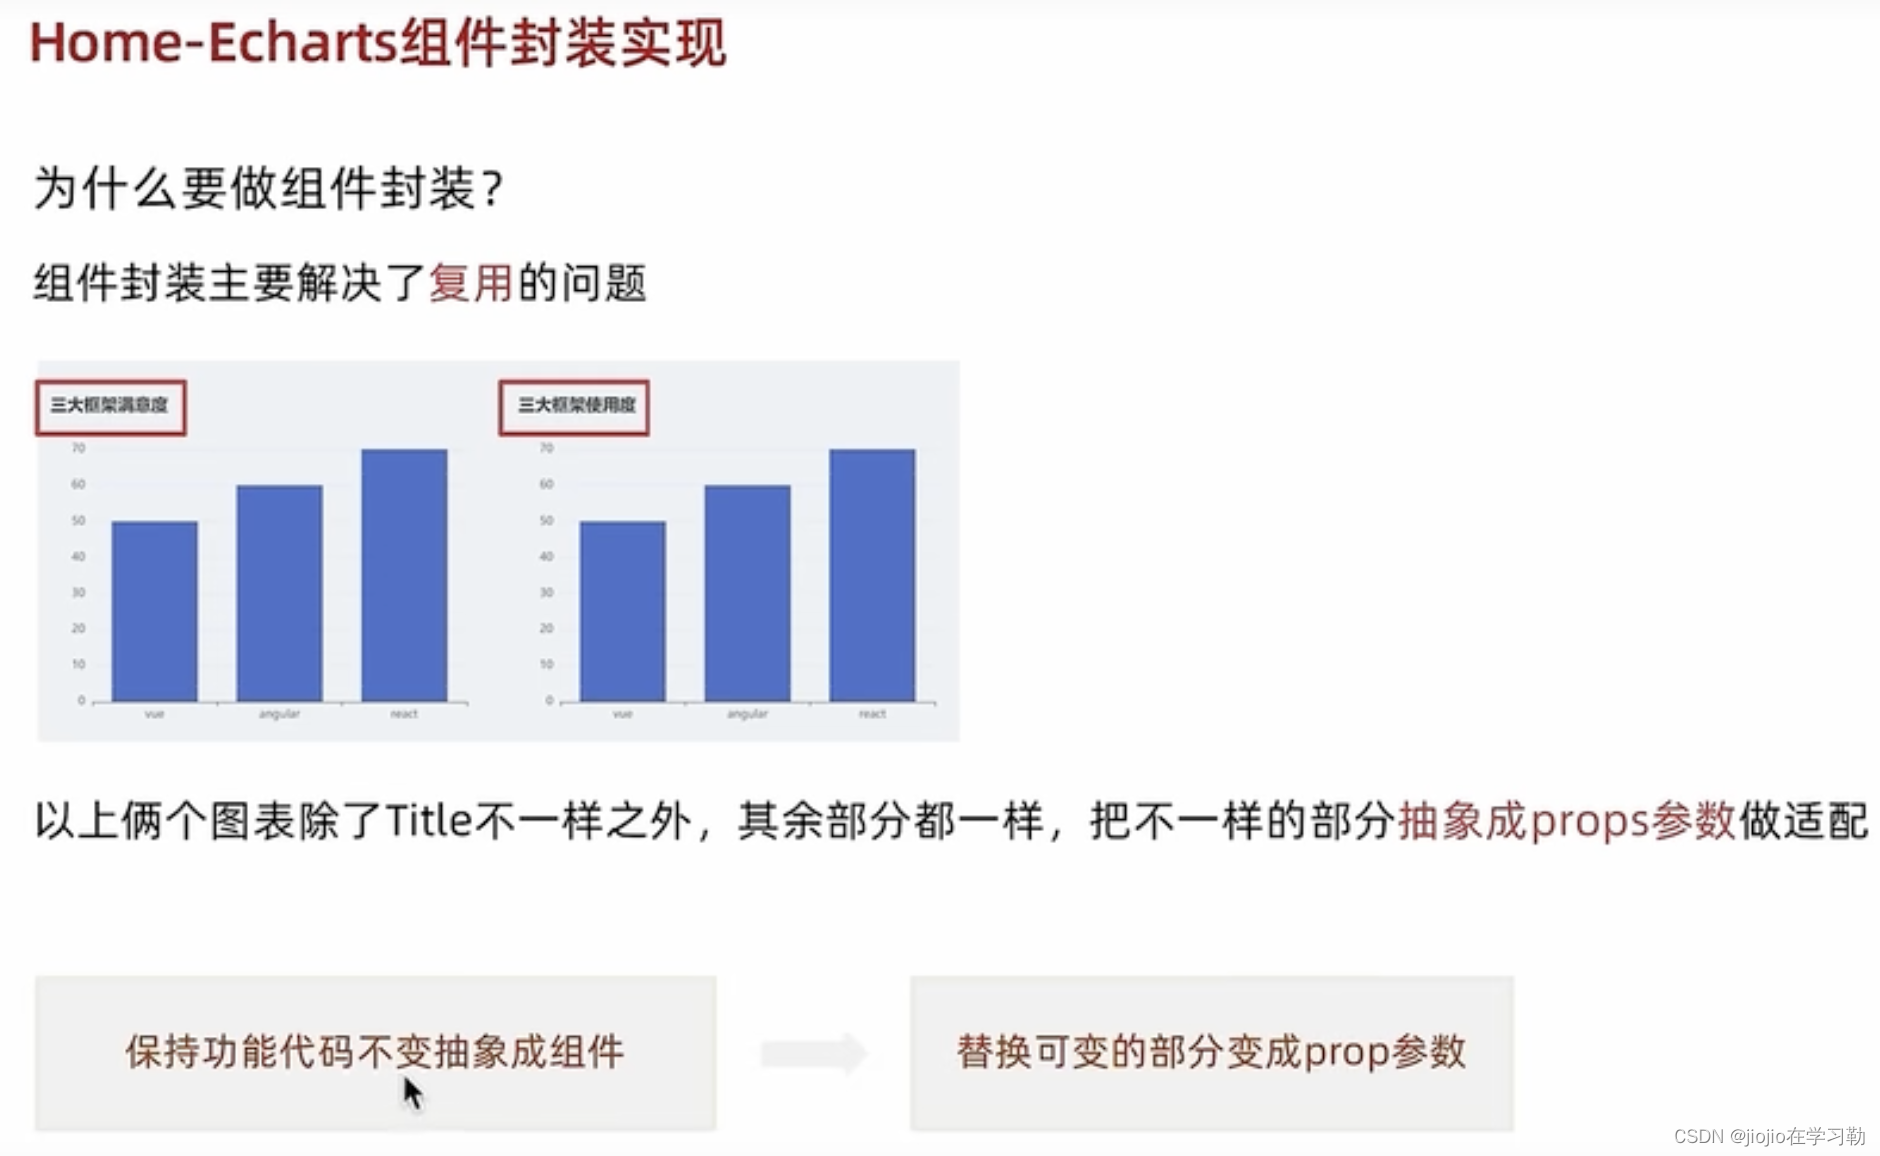
基础抽象
import { useRef, useEffect } from 'react'
import * as echarts from 'echarts'const BarChart = () => {const chartRef = useRef(null)useEffect(() => {// 1. 生成实例const myChart = echarts.init(chartRef.current)// 2. 准备图表参数const option = {xAxis: {type: 'category',data: ['Mon', 'Tue', 'Wed', 'Thu', 'Fri', 'Sat', 'Sun']},yAxis: {type: 'value'},series: [{data: [120, 200, 150, 80, 70, 110, 130],type: 'bar'}]}// 3. 渲染参数myChart.setOption(option)}, [])return <div ref={chartRef} style={{ width: '400px', height: '300px' }}></div>
}export { BarChart }
抽象可变参数
import { useRef, useEffect } from 'react'
import * as echarts from 'echarts'const BarChart = ({ xData, sData, style = { width: '400px', height: '300px' } }) => {const chartRef = useRef(null)useEffect(() => {// 1. 生成实例const myChart = echarts.init(chartRef.current)// 2. 准备图表参数const option = {xAxis: {type: 'category',data: xData},yAxis: {type: 'value'},series: [{data: sData,type: 'bar'}]}// 3. 渲染参数myChart.setOption(option)}, [sData, xData])return <div ref={chartRef} style={style}></div>
}export { BarChart }
import { BarChart } from './BarChart'const Home = () => {return (<div><BarChartxData={['Vue', 'React', 'Angular']}sData={[2000, 5000, 1000]} /><BarChartxData={['Vue', 'React', 'Angular']}sData={[200, 500, 100]}style={{ width: '500px', height: '400px' }} /></div >)
}export default Home
10.API模块封装
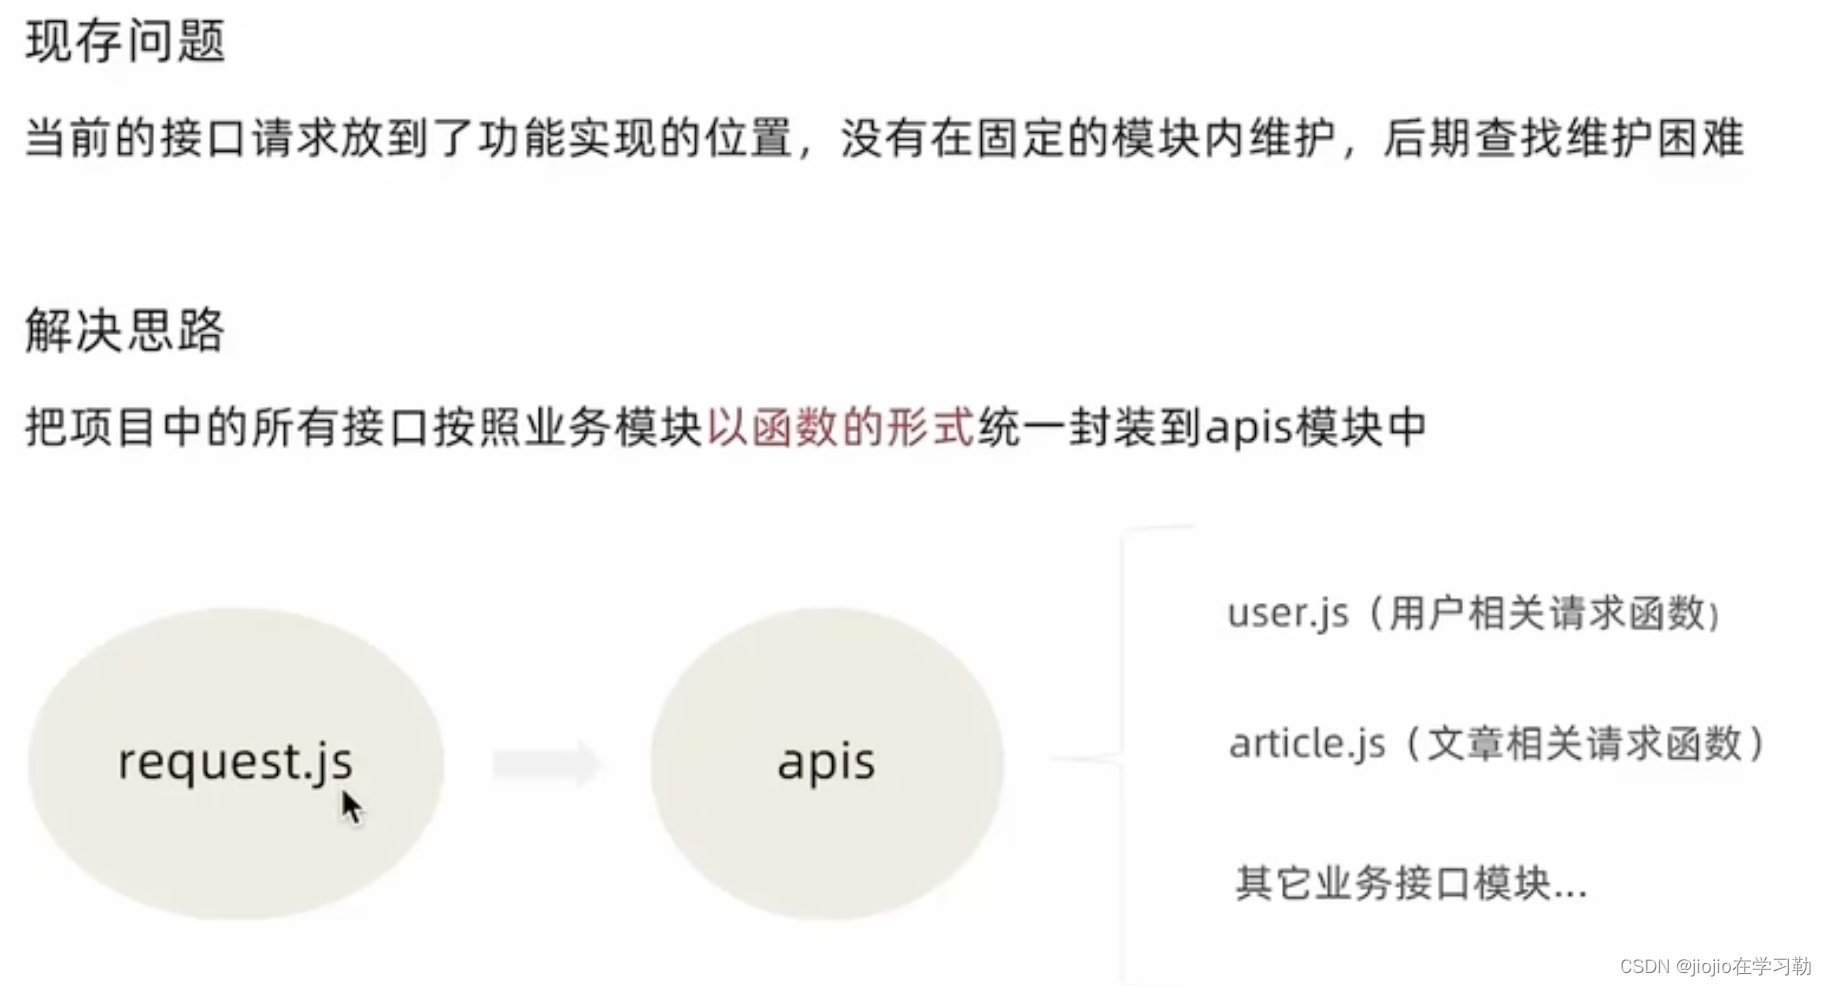
// 用户相关的所有请求
import { request } from "@/utils"
// 1. 登录请求export function loginAPI (formData) {return request({url: '/authorizations',method: 'POST',data: formData})
}// 2. 获取用户信息export function getProfileAPI () {return request({url: '/user/profile',method: 'GET'})
}
11.发布文章模块
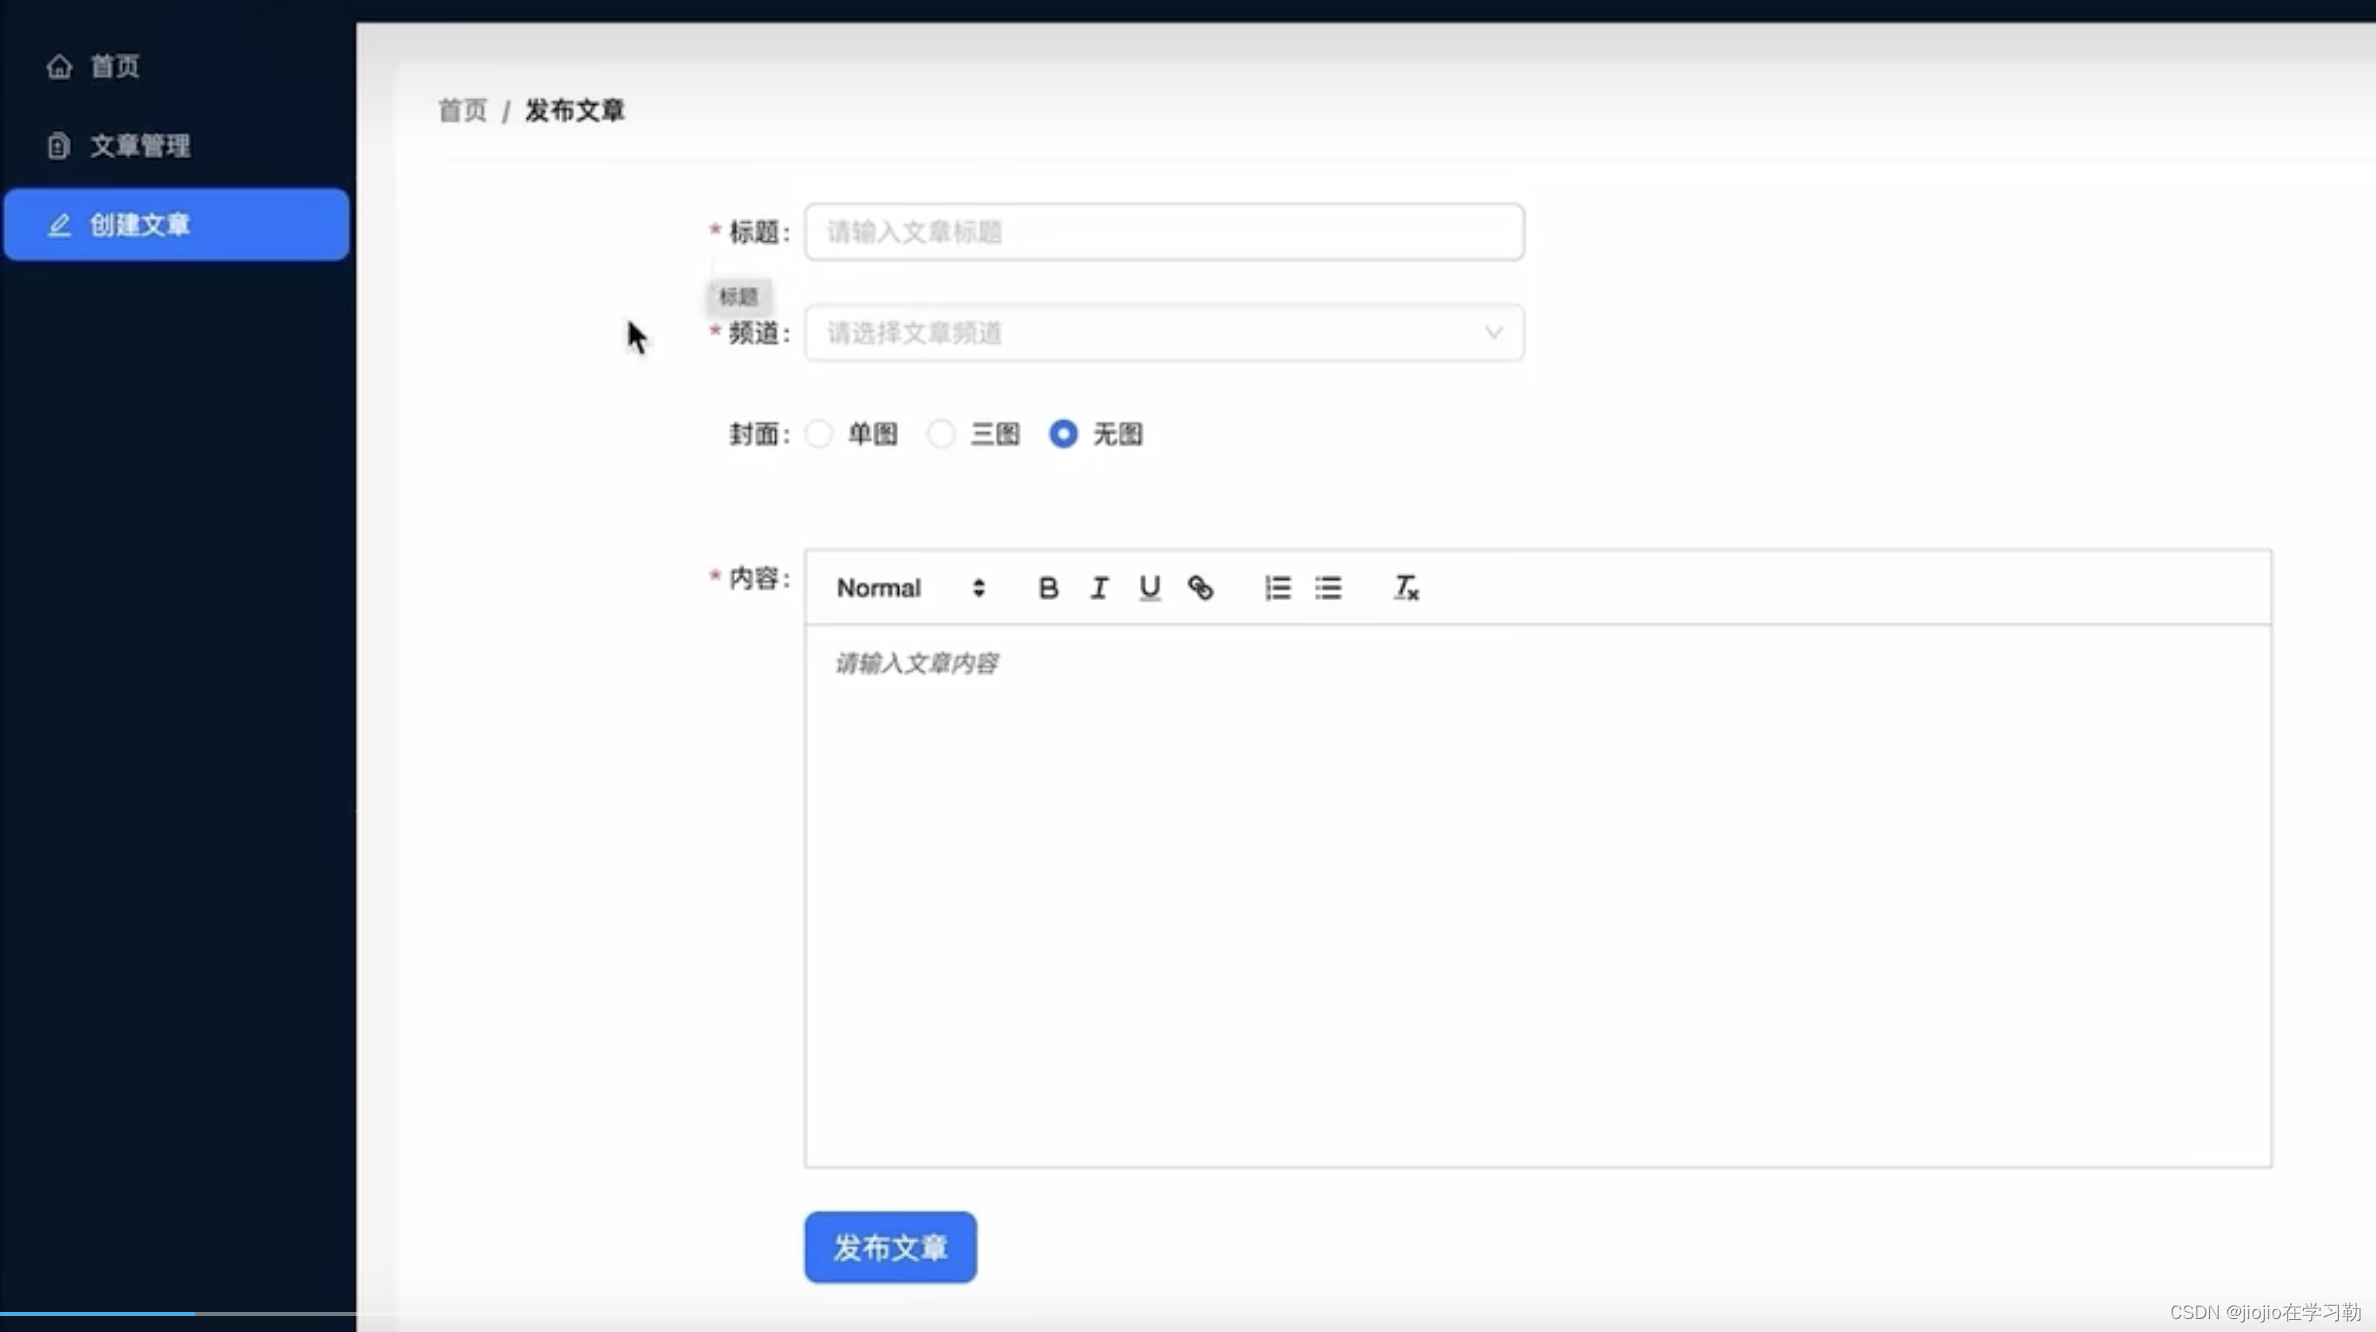
实现基础文章发布
创建基础结构
import {Card,Breadcrumb,Form,Button,Radio,Input,Upload,Space,Select
} from 'antd'
import { PlusOutlined } from '@ant-design/icons'
import { Link } from 'react-router-dom'
import './index.scss'const { Option } = Selectconst Publish = () => {return (<div className="publish"><Cardtitle={<Breadcrumb items={[{ title: <Link to={'/'}>首页</Link> },{ title: '发布文章' },]}/>}><FormlabelCol={{ span: 4 }}wrapperCol={{ span: 16 }}initialValues={{ type: 1 }}><Form.Itemlabel="标题"name="title"rules={[{ required: true, message: '请输入文章标题' }]}><Input placeholder="请输入文章标题" style={{ width: 400 }} /></Form.Item><Form.Itemlabel="频道"name="channel_id"rules={[{ required: true, message: '请选择文章频道' }]}><Select placeholder="请选择文章频道" style={{ width: 400 }}><Option value={0}>推荐</Option></Select></Form.Item><Form.Itemlabel="内容"name="content"rules={[{ required: true, message: '请输入文章内容' }]}></Form.Item><Form.Item wrapperCol={{ offset: 4 }}><Space><Button size="large" type="primary" htmlType="submit">发布文章</Button></Space></Form.Item></Form></Card></div>)
}export default Publish
pages/Publish/index.scss
.publish {position: relative;
}.ant-upload-list {.ant-upload-list-picture-card-container,.ant-upload-select {width: 146px;height: 146px;}
}
准备富文本编辑器
**实现步骤**1. 安装富文本编辑器 2. 导入富文本编辑器组件以及样式文件3. 渲染富文本编辑器组件4. 调整富文本编辑器的样式
代码落地
1-安装 react-quill
npm i react-quill@2.0.0-beta.2
2-导入资源渲染组件
import ReactQuill from 'react-quill'
import 'react-quill/dist/quill.snow.css'const Publish = () => {return (// ...<FormlabelCol={{ span: 4 }}wrapperCol={{ span: 16 }}><Form.Itemlabel="内容"name="content"rules={[{ required: true, message: '请输入文章内容' }]}><ReactQuillclassName="publish-quill"theme="snow"placeholder="请输入文章内容"/></Form.Item></Form>)
}
.publish-quill {.ql-editor {min-height: 300px;}
}
频道数据获取
实现步骤
- 使用useState初始化数据和修改数据的方法
- 在useEffect中调用接口并保存数据
- 使用数据渲染对应模版
代码实现
import { http } from '@/utils'// 频道列表
const [channels, setChannels] = useState([])// 调用接口
useEffect(() => {async function fetchChannels() {const res = await http.get('/channels')setChannels(res.data.channels)}fetchChannels()
}, [])// 模板渲染
return (<Form.Itemlabel="频道"name="channel_id"rules={[{ required: true, message: '请选择文章频道' }]}><Select placeholder="请选择文章频道" style={{ width: 200 }}>{channels.map(item => (<Option key={item.id} value={item.id}>{item.name}</Option>))}</Select></Form.Item>
)
发布文章
// 发布文章
const onFinish = async (formValue) => {const { channel_id, content, title } = formValueconst params = {channel_id,content,title,type: 1,cover: {type: 1,images: []}}await http.post('/mp/articles?draft=false', params)message.success('发布文章成功')
}
上传封面实现
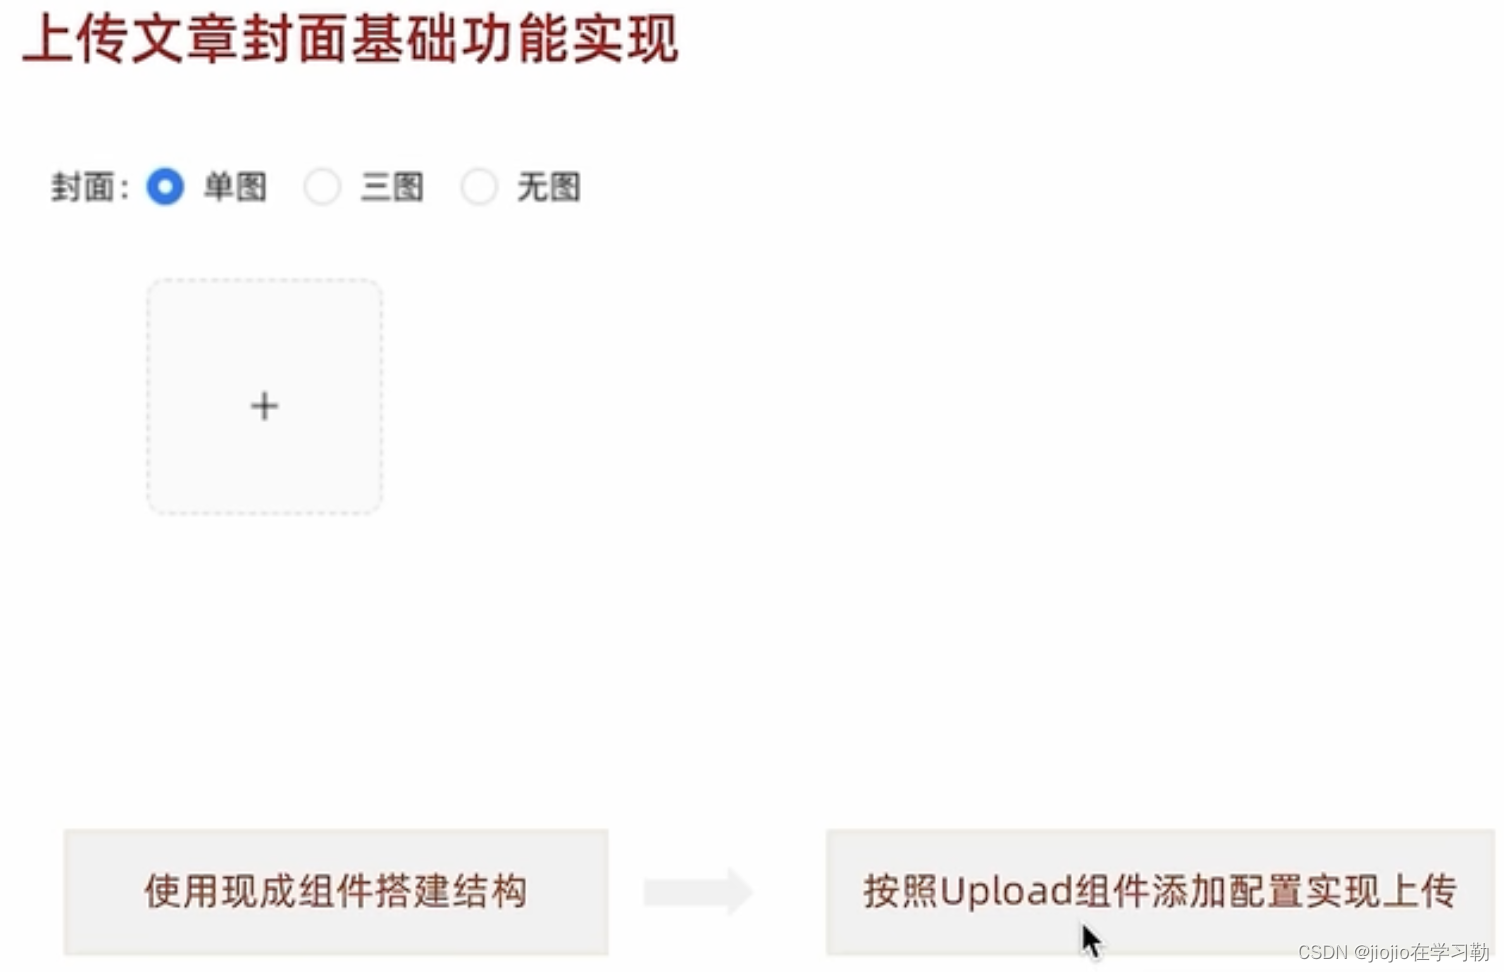
准备上传结构
<Form.Item label="封面"><Form.Item name="type"><Radio.Group><Radio value={1}>单图</Radio><Radio value={3}>三图</Radio><Radio value={0}>无图</Radio></Radio.Group></Form.Item><UploadlistType="picture-card"showUploadList><div style={{ marginTop: 8 }}><PlusOutlined /></div></Upload>
</Form.Item>
实现基础上传
实现步骤
- 为 Upload 组件添加
action 属性,配置封面图片上传接口地址 - 为 Upload组件添加
name属性, 接口要求的字段名 - 为 Upload 添加
onChange 属性,在事件中拿到当前图片数据,并存储到React状态中
代码实现
import { useState } from 'react'const Publish = () => {// 上传图片const [imageList, setImageList] = useState([])const onUploadChange = (info) => {setImageList(info.fileList)}return (<Form.Item label="封面"><Form.Item name="type"><Radio.Group><Radio value={1}>单图</Radio><Radio value={3}>三图</Radio><Radio value={0}>无图</Radio></Radio.Group></Form.Item><Uploadname="image"listType="picture-card"showUploadListaction={'http://geek.itheima.net/v1_0/upload'}onChange={onUploadChange}><div style={{ marginTop: 8 }}><PlusOutlined /></div></Upload></Form.Item>)
}
切换图片Type
**实现步骤**
1. 点击单选框时拿到当前的类型value
2. 根据value控制上传组件的显示(大于零时才显示)
const Publish = ()=>{// 控制图片Typeconst [imageType, setImageType] = useState(0)const onTypeChange = (e) => {console.log(e)setImageType(e.target.value)}return (<FormItem><Radio.Group onChange={onTypeChange}><Radio value={1}>单图</Radio><Radio value={3}>三图</Radio><Radio value={0}>无图</Radio></Radio.Group>{imageType > 0 &&<Uploadname="image"listType="picture-card"showUploadListaction={'http://geek.itheima.net/v1_0/upload'}onChange={onUploadChange}><div style={{ marginTop: 8 }}><PlusOutlined /></div></Upload>}</FormItem>)
}
控制最大上传图片数量
实现步骤
- 通过 maxCount 属性限制图片的上传图片数量
{imageType > 0 &&
<Uploadname="image"listType="picture-card"className="avatar-uploader"showUploadListaction={'http://geek.itheima.net/v1_0/upload'}onChange={onUploadChange}maxCount={imageType}multiple={imageType > 1}
><div style={{ marginTop: 8 }}><PlusOutlined /></div>
</Upload>}
暂存图片列表实现
业务描述
如果当前为三图模式,已经完成了上传,选择单图只显示一张,再切换到三图继续显示三张,该如何实现?
实现思路
在上传完毕之后通过ref存储所有图片,需要几张就显示几张,其实也就是把ref当仓库,用多少拿多少
实现步骤
- 通过useRef创建一个暂存仓库,在上传完毕图片的时候把图片列表存入
- 如果是单图模式,就从仓库里取第一张图,以数组的形式存入fileList
- 如果是三图模式,就把仓库里所有的图片,以数组的形式存入fileList
代码实现
const Publish = () => {// 上传图片const cacheImageList = useRef([])const [imageList, setImageList] = useState([])const onUploadChange = (info) => {setImageList(info.fileList)cacheImageList.current = info.fileList}// 控制图片Typeconst [imageType, setImageType] = useState(0)const onRadioChange = (e) => {const type = e.target.valuesetImageType(type)if (type === 1) {// 单图,截取第一张展示const imgList = cacheImageList.current[0] ? [cacheImageList.current[0]] : []setImageList(imgList)} else if (type === 3) {// 三图,取所有图片展示setImageList(cacheImageList.current)}}return ({imageType > 0 &&<Uploadname="image"listType="picture-card"className="avatar-uploader"showUploadListaction={'http://geek.itheima.net/v1_0/upload'}onChange={onUploadChange}maxCount={imageType}multiple={imageType > 1}fileList={imageList}><div style={{ marginTop: 8 }}><PlusOutlined /></div></Upload>}
)
}
注意:需要给Upload组件添加fileList属性,达成受控的目的
发布带封面的文章
校验图片类型和数量是否吻合
// 发布文章const onFinish = async (formValue) => {if (imageType !== imageList.length) return message.warning('图片类型和数量不一致')const { channel_id, content, title } = formValueconst params = {channel_id,content,title,type: imageType,cover: {type: imageType,images: imageList.map(item => item.response.data.url)}}await http.post('/mp/articles?draft=false', params)message.success('发布文章成功')}
12.文章列表模块
静态结构创建
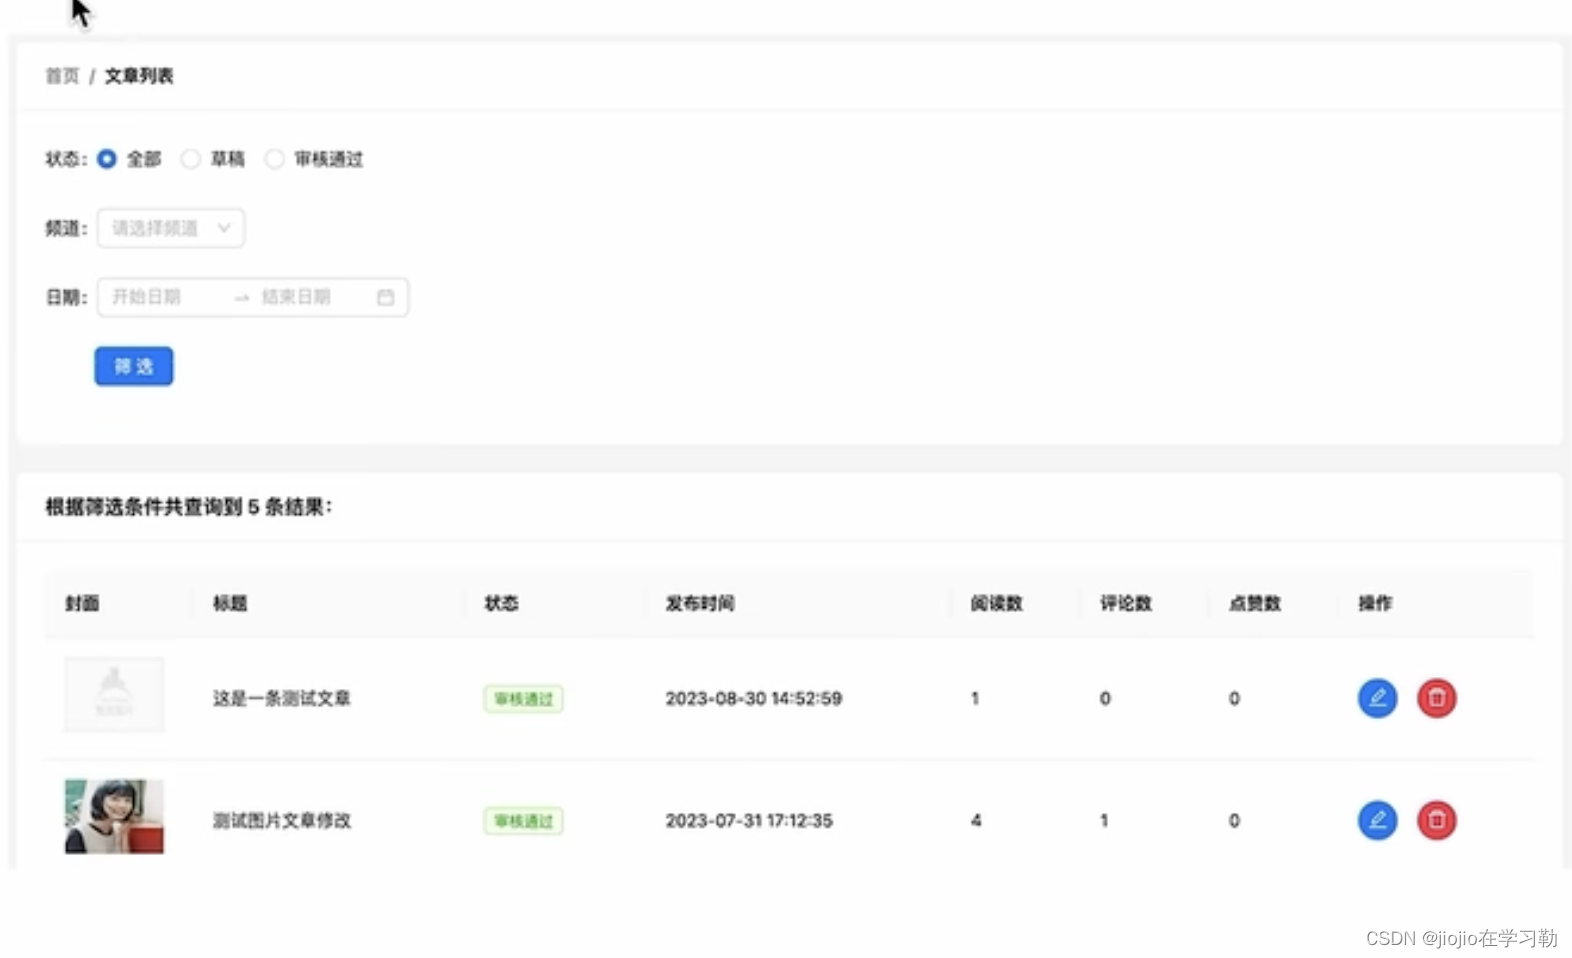
筛选区结构搭建
- 如何让RangePicker日期范围选择框选择中文
- Select组件配合Form.Item使用时,如何配置默认选中项
<Form initialValues={{ status: null }} >
代码实现
import { Link } from 'react-router-dom'
import { Card, Breadcrumb, Form, Button, Radio, DatePicker, Select } from 'antd'
import locale from 'antd/es/date-picker/locale/zh_CN'const { Option } = Select
const { RangePicker } = DatePickerconst Article = () => {return (<div><Cardtitle={<Breadcrumb items={[{ title: <Link to={'/'}>首页</Link> },{ title: '文章列表' },]} />}style={{ marginBottom: 20 }}><Form initialValues={{ status: '' }}><Form.Item label="状态" name="status"><Radio.Group><Radio value={''}>全部</Radio><Radio value={0}>草稿</Radio><Radio value={2}>审核通过</Radio></Radio.Group></Form.Item><Form.Item label="频道" name="channel_id"><Selectplaceholder="请选择文章频道"defaultValue="lucy"style={{ width: 120 }}><Option value="jack">Jack</Option><Option value="lucy">Lucy</Option></Select></Form.Item><Form.Item label="日期" name="date">{/* 传入locale属性 控制中文显示*/}<RangePicker locale={locale}></RangePicker></Form.Item><Form.Item><Button type="primary" htmlType="submit" style={{ marginLeft: 40 }}>筛选</Button></Form.Item></Form></Card></div>)
}export default Article
表格区域结构
代码实现
// 导入资源
import { Table, Tag, Space } from 'antd'
import { EditOutlined, DeleteOutlined } from '@ant-design/icons'
import img404 from '@/assets/error.png'const Article = () => {// 准备列数据const columns = [{title: '封面',dataIndex: 'cover',width: 120,render: cover => {return <img src={cover.images[0] || img404} width={80} height={60} alt="" />}},{title: '标题',dataIndex: 'title',width: 220},{title: '状态',dataIndex: 'status',render: data => <Tag color="green">审核通过</Tag>},{title: '发布时间',dataIndex: 'pubdate'},{title: '阅读数',dataIndex: 'read_count'},{title: '评论数',dataIndex: 'comment_count'},{title: '点赞数',dataIndex: 'like_count'},{title: '操作',render: data => {return (<Space size="middle"><Button type="primary" shape="circle" icon={<EditOutlined />} /><Buttontype="primary"dangershape="circle"icon={<DeleteOutlined />}/></Space>)}}]// 准备表格body数据const data = [{id: '8218',comment_count: 0,cover: {images: [],},like_count: 0,pubdate: '2019-03-11 09:00:00',read_count: 2,status: 2,title: 'wkwebview离线化加载h5资源解决方案'}]return (<div>{/*        */}<Card title={`根据筛选条件共查询到 count 条结果:`}><Table rowKey="id" columns={columns} dataSource={data} /></Card></div>)
}
渲染频道数据
实现步骤
- 使用axios获取数据
- 将使用频道数据列表改写下拉框组件
代码实现
pages/Article/index.js
const Article = ()=>{// 获取频道列表const [channels, setChannels] = useState([])useEffect(() => {async function fetchChannels() {const res = await http.get('/channels')setChannels(res.data.channels)}fetchChannels()}, [])// 渲染模板
return (<Form.Item label="频道" name="channel_id" ><Select placeholder="请选择频道" style={{ width: 200 }} >{channels.map(item => (<Option key={item.id} value={item.id}>{item.name}</Option>))}</Select></Form.Item>)
}
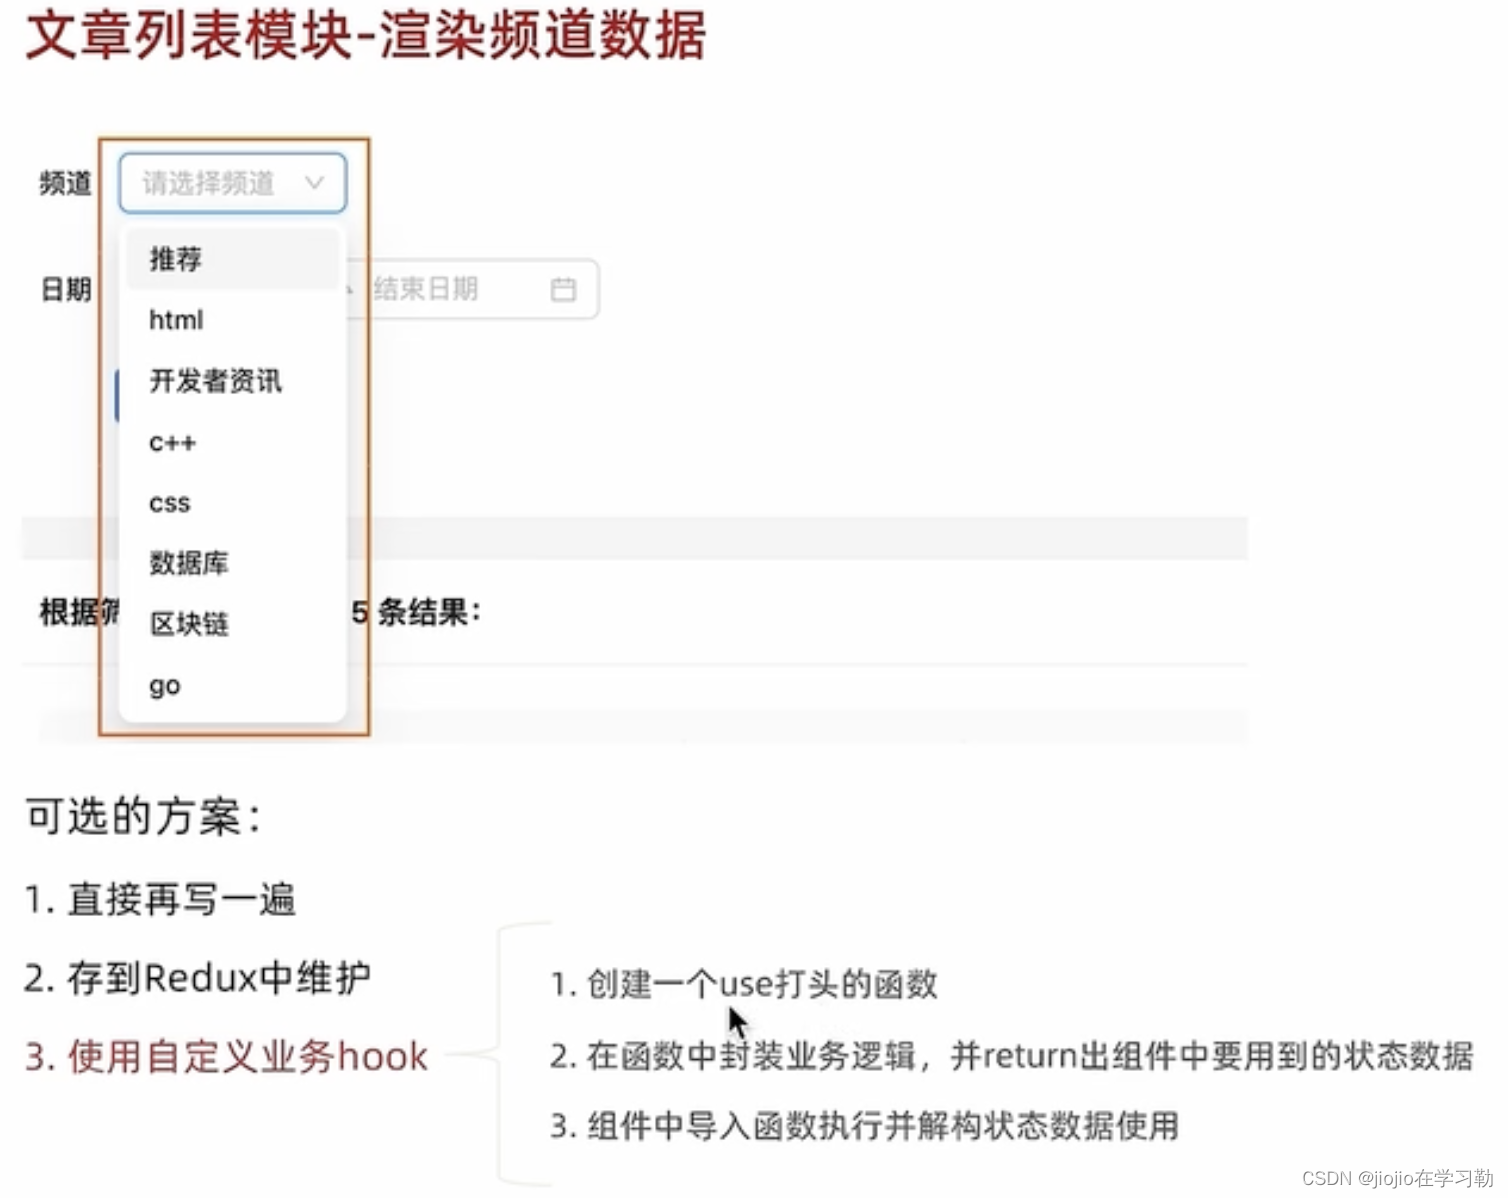
hooks/useChannel.js
// 封装获取频道列表的逻辑
import { useState, useEffect } from 'react'
import { getChannelAPI } from '@/apis/article'
function useChannel () {// 1. 获取频道列表所有的逻辑// 获取频道列表const [channelList, setChannelList] = useState([])useEffect(() => {// 1. 封装函数 在函数体内调用接口const getChannelList = async () => {const res = await getChannelAPI()setChannelList(res.data.channels)}// 2. 调用函数getChannelList()}, [])// 2. 把组件中要用到的数据return出去return {channelList}
}export { useChannel }
pages/Article/index.js
import { useChannel } from '@/hooks/useChannel'
const { channelList } = useChannel()
<Form.Item label="频道" name="channel_id"><Select placeholder="请选择文章频道" style={{ width: 120 }}>{channelList.map(item => <Option key={item.id} value={item.id}>{item.name}</Option>)}</Select>
</Form.Item>
渲染表格数据
实现步骤
- 声明列表相关数据管理
- 使用useState声明参数相关数据管理
- 调用接口获取数据
- 使用接口数据渲染模板
代码实现
const Article = ()=>{// 省略部分代码...// 文章列表数据管理const [article, setArticleList] = useState({list: [],count: 0})const [params, setParams] = useState({page: 1,per_page: 4,begin_pubdate: null,end_pubdate: null,status: null,channel_id: null})useEffect(() => {async function fetchArticleList () {const res = await http.get('/mp/articles', { params })const { results, total_count } = res.datasetArticleList({list: results,count: total_count})}fetchArticleList()}, [params])// 模板渲染return (<Card title={`根据筛选条件共查询到 ${article.count} 条结果:`}><TabledataSource={article.list}columns={columns}/></Card>)
}
筛选功能实现
实现步骤
- 为表单添加
onFinish属性监听表单提交事件,获取参数 - 根据接口字段格式要求格式化参数格式
- 修改
params参数并重新使用新参数重新请求数据
代码实现
// 获取文章列表const [list, setList] = useState([])const [count, setCount] = useState(0)async function getList (reqData = {}) {const res = await getArticleListAPI(reqData)setList(res.data.results)setCount(res.data.total_count)}useEffect(() => {getList()}, [])// 筛选文章列表const onFinish = async (formValue) => {console.log(formValue)// 1. 准备参数const { channel_id, date, status } = formValueconst reqData = {status,channel_id,begin_pubdate: date[0].format('YYYY-MM-DD'),end_pubdate: date[1].format('YYYY-MM-DD'),}// 2. 使用参数获取新的列表getList(reqData)}
分页功能实现
实现步骤
- 为Table组件指定pagination属性来展示分页效果
- 在分页切换事件中获取到筛选表单中选中的数据
- 使用当前页数据修改params参数依赖引起接口重新调用获取最新数据
代码实现
const pageChange = (page) => {// 拿到当前页参数 修改params 引起接口更新setParams({...params,page})
}return (<Table rowKey="id" columns={columns} dataSource={article.list} pagination={{current: params.page,pageSize: params.per_page,onChange: pageChange,total: article.count}} />
)
删除功能
实现步骤
- 给删除文章按钮绑定点击事件
- 弹出确认窗口,询问用户是否确定删除文章
- 拿到参数调用删除接口,更新列表
代码实现
// 删除回调
const delArticle = async (data) => {await http.delete(`/mp/articles/${data.id}`)// 更新列表setParams({page: 1,per_page: 10})
}const columns = [// ...{title: '操作',render: data => {return (<Space size="middle"><Button type="primary" shape="circle" icon={<EditOutlined />} /><Popconfirmtitle="确认删除该条文章吗?"onConfirm={() => delArticle(data)}okText="确认"cancelText="取消"><Buttontype="primary"dangershape="circle"icon={<DeleteOutlined />}/></Popconfirm></Space>)}
]
编辑文章跳转
代码实现
const columns = [// ...{title: '操作',render: data => (<Space size="middle"><Buttontype="primary"shape="circle"icon={<EditOutlined />}onClick={() => navagite(`/publish?id=${data.id}`)} />/></Space>)}
]
相关文章:
react+AntDesign 之 pc端项目案例
1.环境搭建以及初始化目录 CRA是一个底层基于webpack快速创建React项目的脚手架工具 # 使用npx创建项目 npx create-react-app react-jike# 进入到项 cd react-jike# 启动项目 npm start2.安装SCSS SASS 是一种预编译的 CSS,支持一些比较高级的语法,…...
实验笔记之——基于COLMAP的Instant-NGP与3D Gaussian Splatting的对比
之前博客进行了COLMAP在服务器下的测试 实验笔记之——Linux实现COLMAP-CSDN博客文章浏览阅读794次,点赞24次,收藏6次。学习笔记之——NeRF SLAM(基于神经辐射场的SLAM)-CSDN博客NeRF 所做的任务是 Novel View Synthesis…...
实战环境搭建-linux下安装悟空CRM
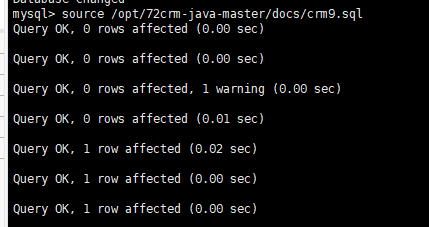
下载地址如下: 链接:https://pan.baidu.com/s/1OI9EA8Nc8ymWlERS9i0vjg?pwd=ws5c 提取码:ws5c 上传crm的程序包,如下图: 输入 unzip 72crm-java-master.zip 进行解压 create database crm9; use crm9; source /opt/72crm-java-master/docs/crm9.sql 修改/home/wukongcr…...

Redis 7.0性能大揭秘:如何优化缓存命中率?
Redis 7.0,这货不仅仅是一个简单的缓存工具,它更是一款高性能的数据结构服务器。现在,大家都知道缓存命中率对性能影响特别大,但怎么优化它呢? 本文,已收录于,我的技术网站 ddkk.com࿰…...

【深度学习每日小知识】Data Augmentation 数据增强
数据增强是通过对原始数据进行各种转换和修改来人工生成附加数据的过程,旨在增加机器学习模型中训练数据的大小和多样性。这对于计算机视觉领域尤为重要,因为图像经常被用作输入数据。 计算机视觉中的数据增强 数据增强的主要目标是解决过拟合问题&…...
网络调试 UDP1,开发板用动态地址-入门6
https://www.bilibili.com/video/BV1zx411d7eC?p11&vd_source109fb20ee1f39e5212cd7a443a0286c5 1, 开发板连接路由器 1.1,烧录无OS UDP例程 1.2,Mini USB连接电脑 1.3,开发板LAN接口连接路由器 2. Ping开发板与电脑之间通信* 2.1 根据…...

【Gin实战教程】快速入门
Gin是一个轻量级的Web框架,使用Go语言开发。它具有高性能、易用性和灵活性的特点,是构建可扩展的Web应用程序的理想选择。 首先,Gin是一个高性能的框架。它基于Go语言的原生HTTP包进行开发,利用了Go语言的并发特性和协程模型&…...

WPF真入门教程26--项目案例--欧姆龙PLC通讯工具
1、案例介绍 前面已经完成了25篇的文章介绍,概括起来就是从0开始,一步步熟悉了wpf的概念,UI布局控件,资源样式文件的使用,MVVM模式介绍,命令Command等内容,这节来完成一个实际的项目开发&#…...
C++ OpenGL 3D Game Tutorial 2: Making OpenGL 3D Engine学习笔记
视频地址https://www.youtube.com/watch?vPH5kH8h82L8&listPLv8DnRaQOs5-MR-zbP1QUdq5FL0FWqVzg&index3 一、main类 接上一篇内容,main.cpp的内容增加了一些代码,显得严谨一些: #include<OGL3D/Game/OGame.h> #include<i…...

Redis小计(4)
目录 1.Set和Get操作 2.mset和mget 3.mset,mget,set后加参数的优点 4.incr,incrby,incrbyfloat 1.Set和Get操作 flushall:清除所有k-v键值对。(删库跑路小技巧) set k v[ex | px]:设置超时…...
)
【React】常用Hook函数的梳理和总结(第二篇)
1. 前言 本篇梳理和总结React中常用的Hook函数。 欢迎大家来到Hook的世界,真的贼好用~ 2. 常用Hook函数 Hook说明示例useState(initialState) 功能:为函数组件添加状态变量,输入可是基本数据类型或引用数据类型,也可以是不带参数…...

【JaveWeb教程】(15) SpringBootWeb之 响应 详细代码示例讲解
目录 SpringBootWeb请求响应2. 响应2.1 ResponseBody2.2 统一响应结果2.3 案例2.3.1 需求说明2.3.2 准备工作2.3.3 实现步骤2.3.4 代码实现2.3.5 测试2.3.6 问题分析 SpringBootWeb请求响应 2. 响应 前面我们学习过HTTL协议的交互方式:请求响应模式(有…...

「 PyMuPDF专栏 」PyMuPDF为PDF文件添加注释
文章目录 一、PyMuPDF的安装与基本使用1. 安装PyMuPDF库的方法2. 导入PyMuPDF库二、新建PDF文档1. 创建一个空白的PDF文档三、添加注释1. 导入库并打开PDF文件2. 选择要添加注释的页面3. 创建并添加注释3.1. 文本注释3.1.1. 完整代码3.1.2. 注释效果图3.2. 高亮注释3.2.1. 完整…...

5 - 视图|存储过程
视图|存储过程 视图视图基本使用使用视图视图进阶 存储过程创建存储过程存储过程进阶存储过程参数循环结构 视图 视图是虚拟存在的表 表头下的数据在真表里 表头下的数据存储在创建视图时 在select命令访问的真表里 优点: 安全数据独立简单 用户无需关…...

系统学习Python——警告信息的控制模块warnings:警告过滤器-[基础知识]
分类目录:《系统学习Python》总目录 警告过滤器控制着警告是否被忽略、显示或转为错误(触发异常)。 从概念上讲,警告过滤器维护着一个经过排序的过滤器类别列表;任何具体的警告都会依次与列表中的每种过滤器进行匹配&…...

vue中高德地图使用
1、安装 npm i amap/amap-jsapi-loader --save2、封装地图组件 <template><div id"map" ref"mapcontainer"></div> </template><script> import AMapLoader from "amap/amap-jsapi-loader"; export default {befo…...

算法训练营Day33
#Java #贪心 开源学习资料 Feeling and experiences: 单调递增的数字:力扣题目链接 当且仅当每个相邻位数上的数字 x 和 y 满足 x < y 时,我们称这个整数是单调递增的。 给定一个整数 n ,返回 小于或等于 n 的最大数字&am…...

.net6解除文件上传限制。Multipart body length limit 16384 exceeded
在C#中上传文件时如果不修改默认文件的上传大小会提示Multipart body length limit 16384 exceeded这个错误提示表明你的请求中的Multipart body长度超过了16384字节的限制。这通常意味着你正在尝试发送一个太大的请求体,可能是因为包含了太多数据或者太大的文件。要…...

电子电器架构网络演化 —— 车载以太网TSN
电子电器架构网络演化 —— 车载以太网TSN 我是穿拖鞋的汉子,魔都中坚持长期主义的汽车电子工程师。 老规矩,分享一段喜欢的文字,避免自己成为高知识低文化的工程师: 屏蔽力是信息过载时代一个人的特殊竞争力,任何消…...

智能门锁触控工作原理中应用的电容式触摸芯片
智能门锁的识别技术中,密码几乎成为标配功能。相比机械按键的触控方式,电容式触控方式可以在加上一层玻璃甚至金属一体成型之后与用户进行交互,由于进行了物理性隔离,使得外壳更具完整性,物理上安全性更佳。电容式触控…...

0421晨间日记
- 关键词 - 上午- 吃饭- 从五台山到大同 - 下午- 云冈石窟- 石头要好雕刻,就意味着容易损毁- 国家要统治- 人生来就是苦的,让你接受是苦的- 地主因为信佛,得到了好处的,愿意捐钱修建- 大同古城墙- 这个建立起来确实很壮观- 但是高…...
)
告别手动配置!用SCons一键生成MDK5工程(附RT-Thread实战模板)
告别手动配置!用SCons一键生成MDK5工程(附RT-Thread实战模板) 在嵌入式开发中,手动配置Keil MDK工程往往是最耗时的环节之一。每次添加新文件、调整路径或修改编译选项,都需要在GUI界面中反复点击。这种重复劳动不仅效…...
)
ccmusic-database效果展示:16流派Top5预测准确率统计(含Confidence阈值分析)
ccmusic-database效果展示:16流派Top5预测准确率统计(含Confidence阈值分析) 1. 项目概述 音乐流派分类一直是音频分析领域的核心挑战之一。ccmusic-database项目基于深度学习方法,构建了一个能够准确识别16种音乐流派的智能分类…...

安卓逆向效率翻倍:用NP管理器3.0.18的Dex混淆与资源加密,给你的APK加把“锁”
安卓应用安全加固实战:NP管理器3.0高级混淆与加密技术解析 在移动应用开发领域,安全防护始终是开发者面临的核心挑战之一。随着安卓生态的开放特性,APK文件被反编译、篡改的风险与日俱增。对于金融、游戏等高价值应用而言,一套完善…...
)
从逻辑漏洞到清晰闭环:用流程图思维提升你的PRD文档质量(附避坑清单)
从逻辑漏洞到清晰闭环:用流程图思维提升你的PRD文档质量(附避坑清单) 在互联网产品开发中,PRD文档的质量往往决定了整个团队的协作效率。我们常遇到这样的场景:开发过程中突然发现某个关键流程存在逻辑断点,…...
)
Java Loom插件部署实录(2024最新版IDEA/Eclipse兼容清单+离线安装包获取通道)
第一章:Java 项目 Loom 响应式编程转型指南Project Loom 与响应式编程并非互斥范式,而是可协同演进的技术路径。Loom 的虚拟线程(Virtual Threads)为传统阻塞式 I/O 密集型响应式栈(如 Spring WebFlux Reactor&#x…...

DeepSeek融资3亿美元:是向资本低头,还是Agent时代的战略补给?
【DeepSeek融资消息引发猜测】4月17日,The Information放出消息,DeepSeek正在和部分机构洽谈融资事宜,目标至少3亿美元,估值超过100亿。消息传开后,不少观点认为梁文锋开始扛不住了,DeepSeek缺钱并尝试商业…...

Kaggle房价预测:用Pandas和Seaborn做数据分析,这10个坑新手最容易踩
Kaggle房价预测:数据分析新手避坑指南 第一次接触Kaggle的房价预测比赛时,我被数据里隐藏的陷阱绊倒了好几次。记得当时信心满满地提交了第一版预测结果,排名却惨不忍睹——问题就出在最基础的数据分析环节。这篇文章不是教你按部就班地做数据…...

如何用May协程库5分钟构建高性能并发服务器
如何用May协程库5分钟构建高性能并发服务器 【免费下载链接】may rust stackful coroutine library 项目地址: https://gitcode.com/gh_mirrors/ma/may May是一个轻量级的Rust栈式协程库,能帮助开发者轻松构建高性能的并发服务器。本文将带你快速上手&#x…...

三步实现微信聊天记录永久保存与深度分析
三步实现微信聊天记录永久保存与深度分析 【免费下载链接】WeChatMsg 提取微信聊天记录,将其导出成HTML、Word、CSV文档永久保存,对聊天记录进行分析生成年度聊天报告 项目地址: https://gitcode.com/GitHub_Trending/we/WeChatMsg 你是否曾因手机…...