android学习笔记----SQLite数据库
用SQLite语句执行:
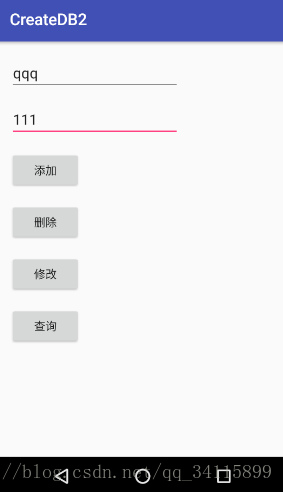
首先看到界面:
代码如下:
MainActivity.java
import android.support.v7.app.AppCompatActivity;
import android.os.Bundle;
import android.text.TextUtils;
import android.view.View;
import android.widget.EditText;
import android.widget.Toast;import com.example.createdb2.dao.ContactInfoDao;public class MainActivity extends AppCompatActivity {private EditText et_name;private EditText et_phone;private ContactInfoDao dao;@Overrideprotected void onCreate(Bundle savedInstanceState) {super.onCreate(savedInstanceState);setContentView(R.layout.activity_main);// 1.找到需要用到的控件et_name = (EditText) findViewById(R.id.et_name);et_phone = (EditText) findViewById(R.id.et_phone);// 2.new一个Dao出来dao = new ContactInfoDao(this, "mydb.db", null, 1);}/*** 添加一条联系人信息** @param view*/public void add(View view) {// 做具体的添加操作String name = et_name.getText().toString().trim();String phone = et_phone.getText().toString().trim();if (TextUtils.isEmpty(name) || TextUtils.isEmpty(phone)) {Toast.makeText(this, "不能为空", Toast.LENGTH_SHORT).show();return;} else {dao.add(name, phone);Toast.makeText(this, "添加成功", Toast.LENGTH_SHORT).show();}}/*** 删除一条联系人信息** @param view*/public void delete(View view) {String name = et_name.getText().toString().trim();if (TextUtils.isEmpty(name)) {Toast.makeText(this, "不能为空", Toast.LENGTH_SHORT).show();return;} else {dao.delete(name);Toast.makeText(this, "删除成功", Toast.LENGTH_SHORT).show();}}/*** 修改联系人号码** @param view*/public void update(View view) {String name = et_name.getText().toString().trim();String phone = et_phone.getText().toString().trim();if (TextUtils.isEmpty(name) || TextUtils.isEmpty(phone)) {Toast.makeText(this, "不能为空", Toast.LENGTH_SHORT).show();return;} else {dao.update(phone, name);Toast.makeText(this, "修改成功", Toast.LENGTH_SHORT).show();}}/*** 查询联系人号码** @param view*/public void query(View view) {String name = et_name.getText().toString().trim();if (TextUtils.isEmpty(name)) {Toast.makeText(this, "不能为空", Toast.LENGTH_SHORT).show();return;} else {String phone = dao.query(name);if (phone != null) {Toast.makeText(this, "查询到的号码为:" + phone, Toast.LENGTH_SHORT).show();} else {Toast.makeText(this, "无此联系人信息", Toast.LENGTH_SHORT).show();}}}
}
ContactInfoDao.java
import android.content.Context;
import android.database.Cursor;
import android.database.sqlite.SQLiteDatabase;import com.example.createdb2.MyDBOpenHelper;public class ContactInfoDao {private final MyDBOpenHelper helper;public ContactInfoDao(Context context, String name, SQLiteDatabase.CursorFactory factory, int version) {helper = new MyDBOpenHelper(context, name, factory, version);}/*** create table aa(id integer primary key autoincrement, name char(20), phone varchar(20));* create table temp as select id, name from aa; //* temp表没有了PRIMARY KEY AUTOINCREMENT,查看建表语句CREATE TABLE "temp"(id INT,NAME TEXT);* integer变成了int* char变成text* 新表中没有旧表中的primary key,Extra,auto_increment等属性,需要自己手动加,具体参看后面的修改表即字段属性.** @param name  联系人姓名* @param phone 联系人电话*/public void add(String name, String phone) {SQLiteDatabase db = helper.getWritableDatabase(); // 如果数据库已存在就打开,否则创建一个新数据库db.execSQL("insert into contactinfo (name, phone) values(?, ?)", new Object[]{name, phone});// 记得关闭数据库,释放资源db.close();}/*** 删除一条记录** @param name 联系人姓名*/public void delete(String name) {SQLiteDatabase db = helper.getWritableDatabase();db.execSQL("delete from contactinfo where name = ?", new Object[]{name});// 记得关闭数据库,释放资源db.close();}/*** 更新一条记录** @param name  联系人姓名* @param phone 联系人电话*/public void update(String phone, String name) {SQLiteDatabase db = helper.getWritableDatabase();db.execSQL("update contactinfo set phone = ? where name = ?;", new Object[]{phone, name});// 记得关闭数据库,释放资源db.close();}/*** 查询联系人的电话号码** @param name 联系人姓名*/public String query(String name) {SQLiteDatabase db = helper.getReadableDatabase();Cursor cursor = db.rawQuery("select phone from contactinfo where name = ?", new String[]{name});String phone = null;if (cursor.moveToNext()) {phone = cursor.getString(0);}// 记得关闭数据库,释放资源cursor.close();db.close();return phone;}
}
笔记批注:
SQLiteOpenHelper是个抽象类,里面有2个抽象方法onCreate()和onUpdate(),我们必须在自己的帮助类里面重写这2个方法,然后分别在这两个方法中实现创建、升级数据库逻辑。
SQLiteOpenHelper还有2个非常重要的实例方法getReadableDatabase()和getWritableDatabase()。这两个方法都可以创建或者打开一个现有的数据库(如果数据库已存在则直接打开,否则创建一个新的数据库),并返回一个可对数据库进行读写的对象。
不同的是,当数据库不可写入的时候(如磁盘空间已满),getReadableDatabase()方法返回的对象将以只读的方式去打开数据库,而getWritableDatabase()方法将抛出异常。
构建出SQLiteOpenHelper的实例之后,在调用它的getReadableDatabase()和getWritableDatabase()就能够创建数据库了。数据库文件在/data/data//databases目录下。
sqlite中是不支持删除列操作的,所以网上 alter table [table_name] drop column [col_name] 这个语句在sqlite中是无效的(这不是MySQL),而替代的方法可以如下: 1.根据原表创建一张新表 2.删除原表
3.将新表重名为旧表的名称
慎用create table as select,比如想删除一列phone
create table aa(id integer primary key autoincrement, name char(20), phone varchar(20)); create table temp as select id, name from aa;
新表中没有旧表中的primary key,Extra,auto_increment等属性,需要自己手动加,具体参看后面的修改表即字段属性.
那么新表temp就没了主键,不会自动增长,查看建表语句integer变成了int, char变成text。
只能创建类似于这样给出明确约束的
CREATE TABLE temp(id INTEGER PRIMARY KEY AUTOINCREMENT, NAME CHAR(20));
MyDBOpenHelper.java
import android.content.Context;
import android.database.sqlite.SQLiteDatabase;
import android.database.sqlite.SQLiteOpenHelper;
import android.util.Log;
import android.widget.Toast;public class MyDBOpenHelper extends SQLiteOpenHelper {private String TAG = "MyDBOpenHelper";private Context mContext;// 第一个参数是上下文// 第二个参数是数据库名称// 第三个参数null表示使用默认的游标工厂// 第四个参数是数据库的版本号,数据库只能升级,不能降级,版本号只能变大不能变小public MyDBOpenHelper(Context context, String name, SQLiteDatabase.CursorFactory factory, int version) {super(context, name, factory, version);// 更改一下版本号会调用onUpgrademContext = context;}// 当数据库第一次被创建的时候调用的方法,适合在这个方法里面把数据库的表结构定义出来// 当app再次启动会发现已经存在mydb.db数据库了,因此不会再创建一次@Overridepublic void onCreate(SQLiteDatabase db) {Log.d(TAG, "数据库被创建了: ");// MySQL是AUTO_INCREMENT, SQLite是AUTOINCREMENTdb.execSQL("CREATE TABLE contactinfo(id INTEGER PRIMARY KEY AUTOINCREMENT, NAME CHAR(20), phone VARCHAR(20));");Toast.makeText(mContext, "Create succeeded", Toast.LENGTH_SHORT).show();}// 当数据库更新的时候调用的方法@Overridepublic void onUpgrade(SQLiteDatabase db, int oldVersion, int newVersion) {Log.d(TAG, "数据库被更新了: ");//db.execSQL("ALTER TABLE contactinfo ADD account VARCHAR(20);");db.execSQL("drop table if exists contactinfo");onCreate(db);}
}
笔记批注:
当我们重新运行程序时,数据库因为已经存在,不会再次创建,所以这个onCreate方法不会再次调用,怎么办呢?当然卸载程序再次运行也可以,这样的做法比较极端。这里就可以用到SQLiteOpenHelper的升级功能了。
db.execSQL(“drop table if exists contactinfo”);
onCreate(db);
如果存在contactinfo表就删除掉,然后再次调用onCreate方法,如果没有删除直接onCreate,那么系统会发现这张表存在,直接报错。
那么如何让onUpdate()方法能够执行呢?我们这里的MyDBOpenHelper构造器第四个参数是当前数据库的版本号,之前传入的是1,现在只要传入一个比1大的数字即可运行onUpdate方法。
activity_main.xml
<?xml version="1.0" encoding="utf-8"?>
<android.support.constraint.ConstraintLayout xmlns:android="http://schemas.android.com/apk/res/android"xmlns:app="http://schemas.android.com/apk/res-auto"xmlns:tools="http://schemas.android.com/tools"android:layout_width="match_parent"android:layout_height="match_parent"tools:context=".MainActivity"><EditTextandroid:id="@+id/et_name"android:layout_width="wrap_content"android:layout_height="wrap_content"android:layout_marginLeft="16dp"android:layout_marginTop="16dp"android:ems="10"android:hint="请输入联系人的姓名"android:inputType="textPersonName"app:layout_constraintStart_toStartOf="parent"app:layout_constraintTop_toTopOf="parent" /><EditTextandroid:id="@+id/et_phone"android:layout_width="wrap_content"android:layout_height="wrap_content"android:layout_marginLeft="16dp"android:layout_marginTop="12dp"android:ems="10"android:hint="请输入联系人的电话"android:inputType="number"app:layout_constraintStart_toStartOf="parent"app:layout_constraintTop_toBottomOf="@+id/et_name" /><Buttonandroid:id="@+id/button"android:layout_width="wrap_content"android:layout_height="wrap_content"android:layout_marginLeft="16dp"android:layout_marginTop="16dp"android:onClick="add"android:text="添加"app:layout_constraintStart_toStartOf="parent"app:layout_constraintTop_toBottomOf="@+id/et_phone" /><Buttonandroid:id="@+id/button2"android:layout_width="wrap_content"android:layout_height="wrap_content"android:layout_marginLeft="16dp"android:layout_marginTop="16dp"android:onClick="delete"android:text="删除"app:layout_constraintStart_toStartOf="parent"app:layout_constraintTop_toBottomOf="@+id/button" /><Buttonandroid:id="@+id/button3"android:layout_width="wrap_content"android:layout_height="wrap_content"android:layout_marginLeft="16dp"android:layout_marginTop="16dp"android:onClick="update"android:text="修改"app:layout_constraintStart_toStartOf="parent"app:layout_constraintTop_toBottomOf="@+id/button2" /><Buttonandroid:id="@+id/button4"android:layout_width="wrap_content"android:layout_height="wrap_content"android:layout_marginLeft="16dp"android:layout_marginTop="16dp"android:onClick="query"android:text="查询"app:layout_constraintStart_toStartOf="parent"app:layout_constraintTop_toBottomOf="@+id/button3" />
</android.support.constraint.ConstraintLayout>
当输入数据然后点击添加的时候数据库会被创建(如果数据库还没被创建),数据会添加成功
我们可以把数据库导出到SQLite Expert去查看表内容,也可以直接在控制台查看一个大概,查看数据库和表有没有被创建。
这里只演示在控制台操作。
在Terminal或者在系统控制台输入adb shell
然后进行如下操作:
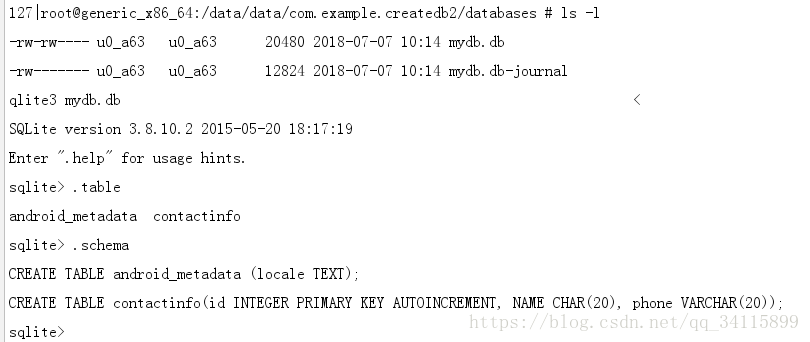
用cd命令进入到/data/data/com.example.createdb2/databases 目录
注意:7.0及以上的模拟器无法进入com.xxxxxx.xxxxx,没有权限,示例只能在6.0及以下,当然,我们是可以直接找到mydb.db导出,然后用SQLite Expert去查看就更好了。在这里只是演示以下控制台该怎么做。
这个目录中,mydb.db是我们创建的
另一个是mydb.db-journal,这是为了让数据库能够支持事务而产生的临时日志文件,通常情况下这个文件的大小是0字节
接下来输入sqlite3 mydb.db 打开mydb.db数据库
输入.table命令查看数据库中有哪些表,这个android_metadata是每个数据库中都会自动生成的,不用管。
另一张contactinfo是我们在MyDBOpenHelper中创建的。
接着可以用.schema命令查看它们的建表语句。
最后可以输入.exit或.quit命令退出数据库的编辑,再键入exit就可以退出设备控制台了。


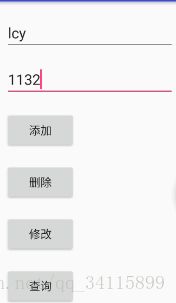
也可以直接写sql语句查询,如图
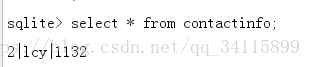
这里数据库版本是2
补充知识点:改变dos编码方式:chcp 936 //变成GBK编码
chcp 65001 //变成UTF-8编码
利用SQLiteDatabase中自带的增删改查操作:
ContactInfoDao.java
import android.content.ContentValues;
import android.content.Context;
import android.database.Cursor;
import android.database.sqlite.SQLiteDatabase;import com.example.createdb3.MyDBOpenHelper;public class ContactInfoDao {private final MyDBOpenHelper helper;private String TAG = "ContactInfoDao";public ContactInfoDao(Context context, String name, SQLiteDatabase.CursorFactory factory, int version) {helper = new MyDBOpenHelper(context, name, factory, version);}/*** create table aa(id integer primary key autoincrement, name char(20), phone varchar(20));* create table temp as select id, name from aa; //* temp表没有了PRIMARY KEY AUTOINCREMENT,查看建表语句CREATE TABLE "temp"(id INT,NAME TEXT);* integer变成了int* char变成text* 新表中没有旧表中的primary key,Extra,auto_increment等属性,需要自己手动加,具体参看后面的修改表即字段属性.* 添加一条记录** @param name  联系人姓名* @param phone 联系人电话* @return 返回的是添加在数据库的行号,-1代表失败*/public long add(String name, String phone) {SQLiteDatabase db = helper.getWritableDatabase(); // 如果数据库已存在就打开,否则创建一个新数据库// db.execSQL("insert into contactinfo (name, phone) values(?, ?)", new Object[]{name, phone});ContentValues values = new ContentValues();values.put("name", name);values.put("phone", phone);long rowId = db.insert("contactinfo", null, values);// 记得关闭数据库,释放资源db.close();return rowId;}/*** 根据姓名删除一条记录** @param name 联系人姓名* @return 返回0代表的是没有做任何记录,返回的整数int值代表删除了几条数据*/public int delete(String name) {SQLiteDatabase db = helper.getWritableDatabase();// db.execSQL("delete from contactinfo where name = ?", new Object[]{name});int rowId = db.delete("contactinfo", "name=?", new String[]{name});// 记得关闭数据库,释放资源db.close();return rowId;}/*** 修改联系人电话号码** @param name  联系人姓名* @param phone 联系人新电话* @return rowId代表更新了多少行记录*/public int update(String phone, String name) {SQLiteDatabase db = helper.getWritableDatabase();// db.execSQL("update contactinfo set phone = ? where name = ?;", new Object[]{phone, name});ContentValues values = new ContentValues();values.put("phone", phone);int rowId = db.update("contactinfo", values, "name = ?", new String[]{name});// 记得关闭数据库,释放资源db.close();return rowId;}/*** 查询联系人的电话号码** @param name 联系人姓名* @return 电话号码*/public Cursor query(String name) {SQLiteDatabase db = helper.getReadableDatabase();// Cursor cursor = db.rawQuery("select phone from contactinfo where name = ?", new String[]{name});/*Cursor cursor = db.query("contactinfo", new String[]{"phone"}, "name = ?", new String[]{name}, null, null, null);String phone = null;if (cursor.moveToNext()) {phone = cursor.getString(0);}*/Cursor cursor = db.query("contactinfo", null, "name = ?", new String[]{name}, null, null, null);// 记得关闭数据库,释放资源// db.close();// 当用ContentProvider返回一个Cursor时,db是不能关闭的// 否则抛出java.lang.IllegalStateException: Cannot perform this operation because the connection pool has been closed.return cursor;}
}
再把MainActivity.java里面的query()方法改掉就行了
/*** 查询联系人号码** @param view*/public void query(View view) {String name = et_name.getText().toString().trim();if (TextUtils.isEmpty(name)) {Toast.makeText(this, "不能为空", Toast.LENGTH_SHORT).show();return;} else {Cursor cursor = dao.query(name);String phone = null;StringBuffer str = new StringBuffer();if (cursor.moveToFirst()) { // 将光标移动到第一行,如果游标为空,此方法将返回false。String str1 = null;do {phone = cursor.getString(cursor.getColumnIndex("phone"));str1 = "name:" + name + " phone:" + phone;Log.d(TAG, str1);str.append(str1 + "\n");} while (cursor.moveToNext());// 将光标移动到下一行,如果游标已经超过结果集中的最后一个条目,此方法将返回false。str.deleteCharAt(str.length() - 1); // StringBuffer没有trim()}cursor.close();if (phone != null) {Toast.makeText(this, "查询到的联系人信息为:\n" + str, Toast.LENGTH_SHORT).show();} else {Toast.makeText(this, "无此联系人信息", Toast.LENGTH_SHORT).show();}}}
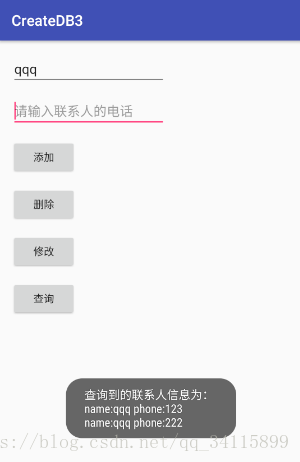
添加同一个人多次时可以一次查出来。
注意:当用ContentProvider返回一个Cursor时,db是不能关闭的,否则抛出异常java.lang.IllegalStateException: Cannot perform this operation because the connection pool has been closed.
笔记批注:
public long insert (String table, String nullColumnHack, ContentValues values)
参数介绍:
table: 要插入数据的表的名称
nullColumnHack:当values参数为空或者里面没有内容的时候,我们insert是会失败的(底层数据库不允许插入一个空行),为了防止这种情况,我们要在这里指定一个列名,到时候如果发现将要插入的行为空行时,就会将你指定的这个列名的值设为null,然后再向数据库中插入。
values:一个ContentValues对象,类似一个map.通过键值对的形式存储值。
这里很多人会迷惑,nullColumnHack到底干什么用的,为什么会出现呢。当我们不设定一列的时候,不都是数据库给设为默认值吗?很多字段设置默认值也是null,这里显示的设置也是null,有什么区别吗,怎么会显示设置了之后就允许插入了呢?
其实在底层,各种insert方法最后都回去调用insertWithOnConflict方法,这里我们粘贴出该方法的部分实现
/** * General method for inserting a row into the database. * * @param table the table to insert the row into * @param nullColumnHack SQL doesn't allow inserting a completely empty row, * so if initialValues is empty this column will explicitly be * assigned a NULL value * @param initialValues this map contains the initial column values for the * row. The keys should be the column names and the values the * column values * @param conflictAlgorithm for insert conflict resolver * @return the row ID of the newly inserted row * OR the primary key of the existing row if the input param 'conflictAlgorithm' = * {@link #CONFLICT_IGNORE} * OR -1 if any error */ public long insertWithOnConflict(String table, String nullColumnHack, ContentValues initialValues, int conflictAlgorithm) { if (!isOpen()) { throw new IllegalStateException("database not open"); } // Measurements show most sql lengths <= 152 StringBuilder sql = new StringBuilder(152); sql.append("INSERT"); sql.append(CONFLICT_VALUES[conflictAlgorithm]); sql.append(" INTO "); sql.append(table); // Measurements show most values lengths < 40 StringBuilder values = new StringBuilder(40); Set<Map.Entry<String, Object>> entrySet = null; if (initialValues != null && initialValues.size() > 0) { entrySet = initialValues.valueSet(); Iterator<Map.Entry<String, Object>> entriesIter = entrySet.iterator(); sql.append('('); boolean needSeparator = false; while (entriesIter.hasNext()) { if (needSeparator) { sql.append(", "); values.append(", "); } needSeparator = true; Map.Entry<String, Object> entry = entriesIter.next(); sql.append(entry.getKey()); values.append('?'); } sql.append(')'); } else { sql.append("(" + nullColumnHack + ") "); values.append("NULL"); }
这里我们可以看到,当我们的ContentValues类型的数据initialValues为null,或者size<=0时,就会再sql语句中添加nullColumnHack的设置。我们可以想象一下,如果我们不添加nullColumnHack的话,那么我们的sql语句最终的结果将会类似insert into tableName()values();这显然是不允许的。而如果我们添加上nullColumnHack呢,sql将会变成这样,insert into tableName (nullColumnHack)values(null);这样很显然就是可以的。
public int delete (String table, String whereClause, String[] whereArgs)
删除数据库中行的方便方法。
table:要从其中删除的表
whereClause:删除时要应用的可选WHERE子句。传递NULL将删除所有行。
whereArgs:您可以在WHERE子句中包括?s,该子句将由WHERE Args的值替换。这些值将被绑定为String。
public int update (String table, ContentValues values, String whereClause, String[] whereArgs)
更新数据库中行的方便方法。
table:要更新的表
values:从列名到新列值的映射。NULL是将被转换为NULL的有效值。
whereClause:更新时要应用的可选WHERE子句。传递NULL将更新所有行。
whereArgs: 您可以在WHERE子句中包括?s,该子句将由WHERE Args的值替换。这些值将被绑定为String。
public Cursor query (String table, String[] columns, String selection, String[] selectionArgs, String groupBy, String having, String orderBy)
查询给定的URL,返回Cursor结果集。
table:要编译查询的表名。
columns:返回哪些列的列表。传递NULL将返回所有列,这是不鼓励的,以防止从存储区读取不被使用的数据。
selection:一个过滤器,声明要返回的行,格式化为SQLWHERE子句(不包括WHERE本身)。传递NULL将返回给定表的所有行。
selectionArgs:您可以在选择中包括?s,它将被selectionArgs的值替换,以便它们出现在所选内容中。这些值将被绑定为String。
groupBy:一个过滤器,声明如何分组行,格式化为SQL GROUP BY子句(本身不包括组)。传递NULL将导致行不被分组。
having:如果正在使用行分组,则筛选器将声明要在游标中包含哪些行组,格式为SQL HARING子句(不包括HAVING本身)。传递NULL将导致包括所有行组,并且在不使用行分组时是必需的。
orderBy:如何对行进行排序,格式化为SQLOrderBy子句(不包括Order本身)。传递NULL将使用默认排序顺序,排序顺序可能是无序的。
query有4个重载方法,建议查官方api。
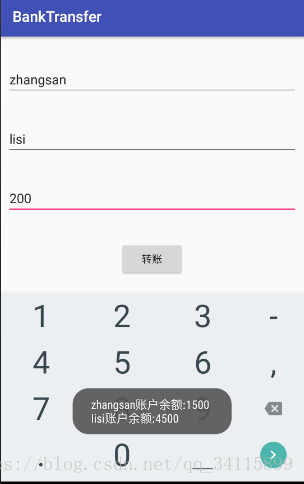
SQLite数据库的事务介绍:
MainActivity.java
import android.content.ContentValues;
import android.database.Cursor;
import android.database.sqlite.SQLiteDatabase;
import android.os.Bundle;
import android.support.v7.app.AppCompatActivity;
import android.util.Log;
import android.view.View;
import android.widget.EditText;
import android.widget.Toast;public class MainActivity extends AppCompatActivity {private String TAG = "MainActivity";private MyOpenHelper helper;private EditText editText1, editText2, editText3;private String table = "info";@Overrideprotected void onCreate(Bundle savedInstanceState) {super.onCreate(savedInstanceState);setContentView(R.layout.activity_main);helper = new MyOpenHelper(this, table, null, 1);editText1 = (EditText) findViewById(R.id.editText1);editText2 = (EditText) findViewById(R.id.editText2);editText3 = (EditText) findViewById(R.id.editText3);}public String queryColumn(Cursor cursor, String s) {String ss = null;if (cursor.moveToFirst()) { // 必须moveToFirst()否则异常ss = cursor.getString(cursor.getColumnIndex(s));}return ss;}public void onclick(View view) {SQLiteDatabase db = helper.getReadableDatabase();String name1 = editText1.getText().toString().trim();String name2 = editText2.getText().toString().trim();String str = editText3.getText().toString().trim();// 使用事务进行转账db.beginTransaction(); // 开启事务try {Cursor cursor = db.query(table, new String[]{"money"}, "name = ?",new String[]{name1}, null, null, null);int money = Integer.valueOf(queryColumn(cursor, "money"));// 实现转账的逻辑,实际就是写sql语句//db.execSQL("update info set money = money - ? where name = ?", new Object[]{str, name1});ContentValues values = new ContentValues();int remain = money - Integer.valueOf(str);if (remain < 0) {Toast.makeText(this, "您的余额不足,转账失败", Toast.LENGTH_SHORT).show();return;}values.put("money", remain + "");db.update(table, values, "name = ?", new String[]{name1});// int i = 9 / 0; // 让事务回滚示例// db.execSQL("update info set money = money + ? where name = ?", new Object[]{str, name2});cursor = db.query(table, new String[]{"money"}, "name = ?",new String[]{name2}, null, null, null);int money1 = Integer.valueOf(queryColumn(cursor, "money"));ContentValues values1 = new ContentValues();int remain1 = money1 + Integer.valueOf(str);if (remain1 < 0) {return;}values1.put("money", remain1 + "");db.update(table, values1, "name = ?", new String[]{name2});// 转账之后的cursorcursor = db.query(table, new String[]{"money"}, "name = ?",new String[]{name1}, null, null, null);String query1 = queryColumn(cursor, "money");cursor = db.query(table, new String[]{"money"}, "name = ?",new String[]{name2}, null, null, null);String query2 = queryColumn(cursor, "money");cursor.close();Log.d(TAG, name1 + "账户余额:" + query1 + "\n");Log.d(TAG, name2 + "账户余额:" + query2 + "\n");Toast.makeText(this, name1 + "账户余额:" + query1 + "\n" + name2 + "账户余额:" + query2, Toast.LENGTH_LONG).show();// 给当前事务设置一个成功的标记db.setTransactionSuccessful();} catch (Exception e) { // 有catch不至于程序崩溃Toast.makeText(this, "服务器忙,请稍后再试", Toast.LENGTH_SHORT).show();} finally {db.endTransaction(); // 关闭事务,如果未执行setTransactionSuccessful,则回滚}}
}
MyOpenHelper.java
import android.content.Context;
import android.database.sqlite.SQLiteDatabase;
import android.database.sqlite.SQLiteOpenHelper;
import android.util.Log;public class MyOpenHelper extends SQLiteOpenHelper {private String TAG = "MyOpenHelper";public MyOpenHelper(Context context, String name, SQLiteDatabase.CursorFactory factory, int version) {super(context, name, factory, version);}/*** 当数据库第一次创建时调用,特别适合用于表的初始化* @param db*/@Overridepublic void onCreate(SQLiteDatabase db) {Log.d(TAG, "数据库被创建了,onCreate里面开始建表 ");db.execSQL("create table info (_id integer primary key autoincrement, name varchar(20), phone varchar(20), money varchar(20))");db.execSQL("insert into info ('name', 'phone', 'money') values('zhangsan', '138888', '2000')");db.execSQL("insert into info ('name', 'phone', 'money') values('lisi', '139999', '4000')");}@Overridepublic void onUpgrade(SQLiteDatabase db, int oldVersion, int newVersion) {db.execSQL("drop table if exists info");onCreate(db);}
}
activity_mainxml
<?xml version="1.0" encoding="utf-8"?>
<android.support.constraint.ConstraintLayout xmlns:android="http://schemas.android.com/apk/res/android"xmlns:app="http://schemas.android.com/apk/res-auto"xmlns:tools="http://schemas.android.com/tools"android:layout_width="match_parent"android:layout_height="match_parent"tools:context=".MainActivity"><Buttonandroid:id="@+id/button"android:layout_width="wrap_content"android:layout_height="wrap_content"android:layout_marginBottom="8dp"android:layout_marginLeft="8dp"android:layout_marginRight="8dp"android:layout_marginTop="8dp"android:onClick="onclick"android:text="转账"app:layout_constraintBottom_toBottomOf="parent"app:layout_constraintEnd_toEndOf="parent"app:layout_constraintStart_toStartOf="parent"app:layout_constraintTop_toTopOf="parent" /><EditTextandroid:id="@+id/editText3"android:layout_width="match_parent"android:layout_height="wrap_content"android:layout_marginBottom="8dp"android:layout_marginLeft="8dp"android:layout_marginRight="8dp"android:layout_marginTop="8dp"android:hint="请输入转账金额"android:inputType="number"app:layout_constraintBottom_toTopOf="@+id/button"app:layout_constraintEnd_toEndOf="parent"app:layout_constraintStart_toStartOf="parent"app:layout_constraintTop_toBottomOf="@+id/editText2" /><EditTextandroid:id="@+id/editText2"android:layout_width="match_parent"android:layout_height="wrap_content"android:layout_marginBottom="8dp"android:layout_marginLeft="8dp"android:layout_marginRight="8dp"android:layout_marginTop="8dp"android:ems="10"android:hint="请输入收款人姓名"android:inputType="textPersonName"app:layout_constraintBottom_toTopOf="@+id/editText1"app:layout_constraintEnd_toEndOf="parent"app:layout_constraintStart_toStartOf="parent"app:layout_constraintTop_toBottomOf="@+id/editText3" /><EditTextandroid:id="@+id/editText1"android:layout_width="match_parent"android:layout_height="wrap_content"android:layout_marginBottom="8dp"android:layout_marginLeft="8dp"android:layout_marginRight="8dp"android:layout_marginTop="8dp"android:ems="10"android:hint="请输入转账人姓名"android:inputType="textPersonName"app:layout_constraintBottom_toTopOf="@+id/editText2"app:layout_constraintEnd_toEndOf="parent"app:layout_constraintStart_toStartOf="parent"app:layout_constraintTop_toTopOf="parent" />
</android.support.constraint.ConstraintLayout>
更多Android进阶指南 可以扫码 解锁 《Android十大板块文档》

1.Android车载应用开发系统学习指南(附项目实战)
2.Android Framework学习指南,助力成为系统级开发高手
3.2023最新Android中高级面试题汇总+解析,告别零offer
4.企业级Android音视频开发学习路线+项目实战(附源码)
5.Android Jetpack从入门到精通,构建高质量UI界面
6.Flutter技术解析与实战,跨平台首要之选
7.Kotlin从入门到实战,全方面提升架构基础
8.高级Android插件化与组件化(含实战教程和源码)
9.Android 性能优化实战+360°全方面性能调优
10.Android零基础入门到精通,高手进阶之路
敲代码不易,关注一下吧。ღ( ´・ᴗ・` ) 🤔
相关文章:
android学习笔记----SQLite数据库
用SQLite语句执行: 首先看到界面: 代码如下: MainActivity.java import android.support.v7.app.AppCompatActivity; import android.os.Bundle; import android.text.TextUtils; import android.view.View; import android.widget.EditTe…...

开发知识点-Flutter移动应用开发
支持 安卓 IOS Android 鸿蒙 第一章dart基础章节介绍 移动电商——Flutter-广告Banner组件制作 移动电商——Flutter实战课程介绍 Flutter实例——路由跳转的动画效果...

视频尺寸魔方:分层遮掩3D扩散模型在视频尺寸延展的应用
▐ 摘要 视频延展(Video Outpainting)是对视频的边界进行扩展的任务。与图像延展不同,视频延展需要考虑到填充区域的时序一致性,这使得问题更具挑战性。在本文中,我们介绍了一个新颖的基于扩散模型的视频尺寸延展方法——分层遮掩3D扩散模型(…...

openssl3.2/test/certs - 061 - other@good.org not permitted by CA1
文章目录 openssl3.2/test/certs - 061 - othergood.org not permitted by CA1概述笔记END openssl3.2/test/certs - 061 - othergood.org not permitted by CA1 概述 openssl3.2 - 官方demo学习 - test - certs 笔记 /*! * \file D:\my_dev\my_local_git_prj\study\openSS…...

如何实现无公网ip远程访问本地websocket服务端【内网穿透】
文章目录 1. Java 服务端demo环境2. 在pom文件引入第三包封装的netty框架maven坐标3. 创建服务端,以接口模式调用,方便外部调用4. 启动服务,出现以下信息表示启动成功,暴露端口默认99995. 创建隧道映射内网端口6. 查看状态->在线隧道,复制所创建隧道的公网地址加端口号7. 以…...

pip清华源怎么换回来
怎么临时使用清华源 pip install scrapy -i https://pypi.Python.org/simple/怎么永久换源 pip config set global.index-url https://pypi.tuna.tsinghua.edu.cn/simple修改清华源后怎么换回来 删掉/home/XXX/.config/pip/pip.conf...

[Go]认识Beego框架
对比Gin的简洁,自己之前基于Gin撸了一个架子,确实比beego目录看着舒服多了,不过最近接触到beego的项目,beego的bee工具使用还是很方便,来简单梳理下细节; Beego是一个开源的Go语言Web应用框架,…...
JWT登录
JWT JSON Web Token(JSON Web令牌) 是一个开放标准(rfc7519),它定义了一种紧凑的、自包含的方式,用于在各方之间以JSON对象安全地传输信息。此信息可以验证和信任,因为它是数字签名的。jwt可以使用秘密〈使用HNAC算法…...

MySQL和Redis的事务有什么异同?
MySQL和Redis是两种不同类型的数据库管理系统,它们在事务处理方面有一些重要的异同点。 MySQL事务: ACID属性: MySQL是一个关系型数据库管理系统(RDBMS),支持ACID属性,即原子性(Ato…...
【C#】基础巩固
最近写代码的时候各种灵感勃发,有了灵感,就该实现了,可是,实现起来有些不流畅,总是有这样,那样的卡壳,总结下来发现了几个问题。 1、C#基础内容不是特别牢靠,理解的不到位ÿ…...
)
基于Skywalking开发分布式监控(一)
接手为微服务系统搞链路监控项目一年多,也和skywalking打了一年多的交道,也应该有个总结,主要谈一下搭建监控系统遇到的难点和解决方案。 说明: 本文的代码均由本地演示代码替代,非实际代码 为啥选skywalking…...

高防服务器什么意思
高防服务器什么意思,为什么要用高防服务器,小编为您整理发布高防服务器什么意思的解读。 高防服务器是指具备较高防御能力的服务器,能够抵御DDoS/CC等网络攻击。 高防服务器通常用于保护游戏、APP、金融、电商等业务,这些领域因为…...
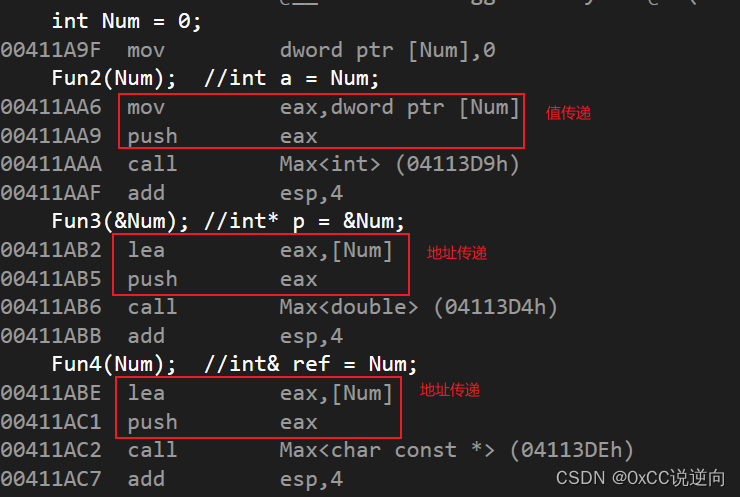
C/C++ - Auto Reference
目录 auto Reference auto 当使用auto关键字声明变量时,C编译器会根据变量的初始化表达式推断出变量的类型。 自动类型推断:auto关键字用于自动推断变量的类型,使得变量的类型可以根据初始化表达式进行推导。 初始化表达式&#x…...
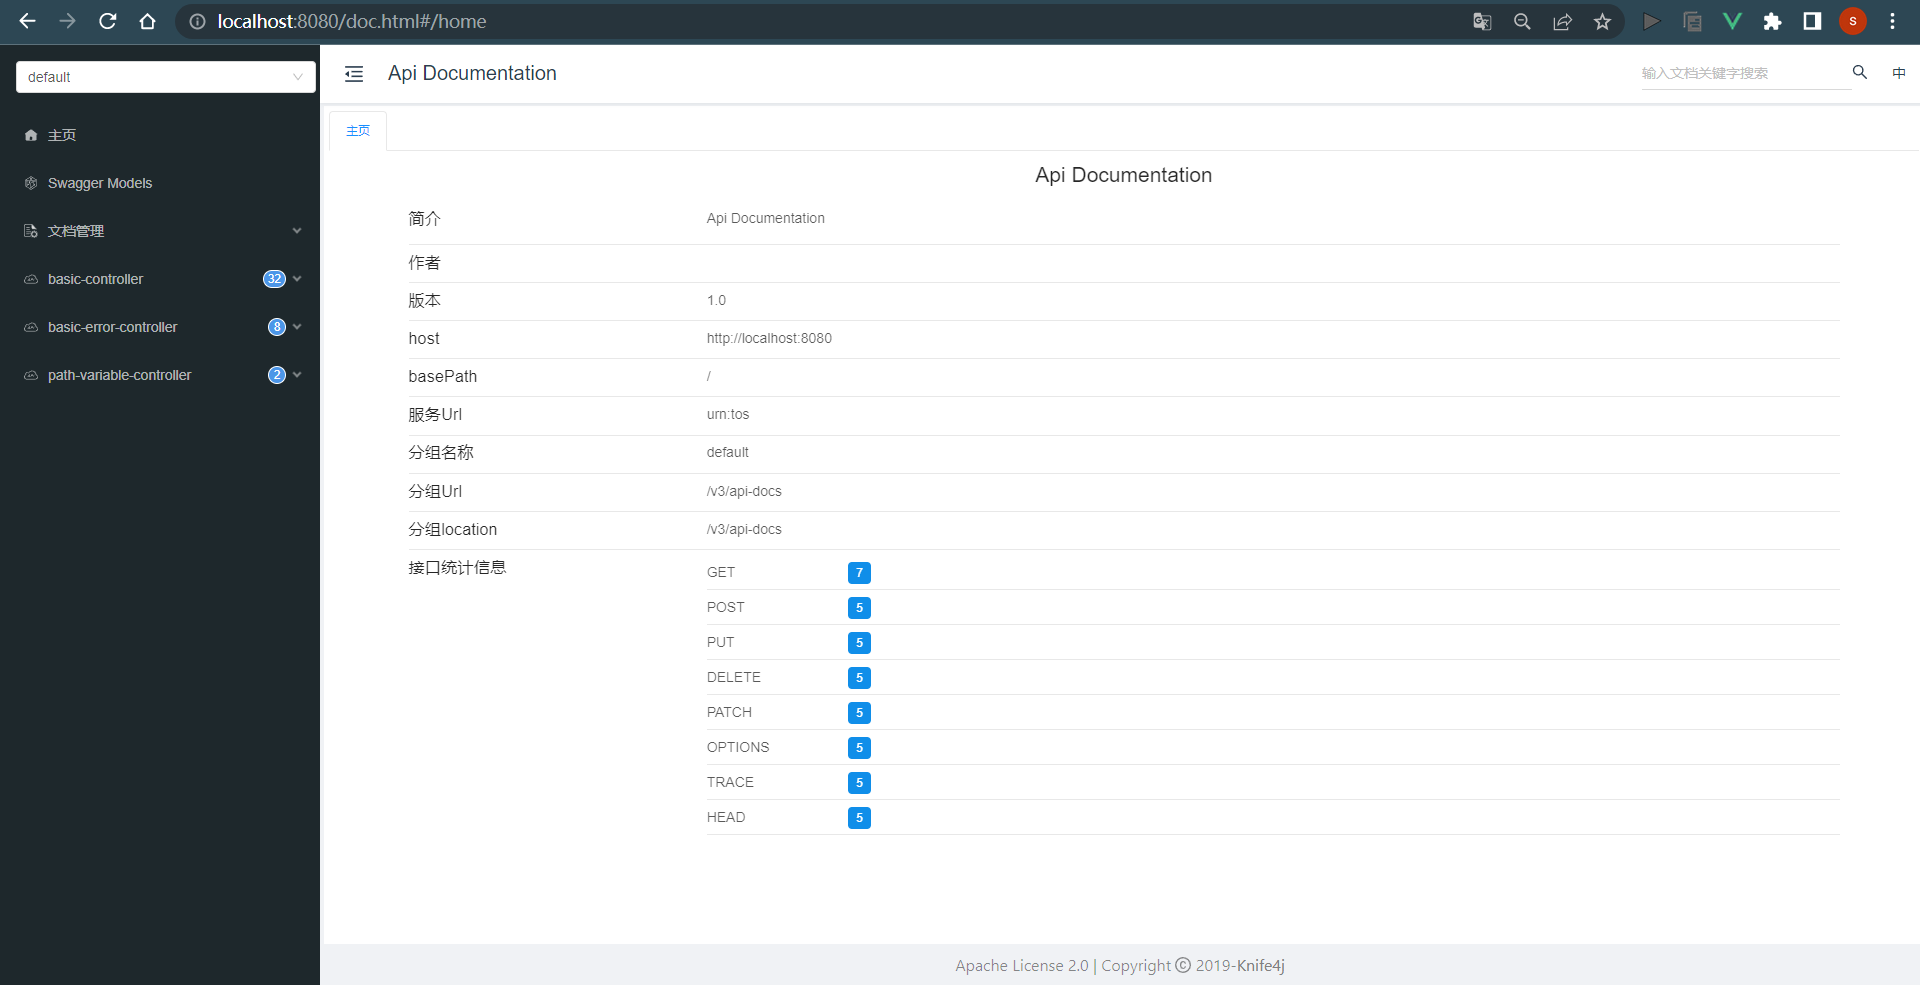
springboot项目快速引入knife4j
引入依赖 <dependency><groupId>com.github.xiaoymin</groupId><artifactId>knife4j-spring-boot-starter</artifactId><version>3.0.3</version> </dependency>knife4j配置文件 basePackage改为自己存放接口的包名 /*** Kn…...
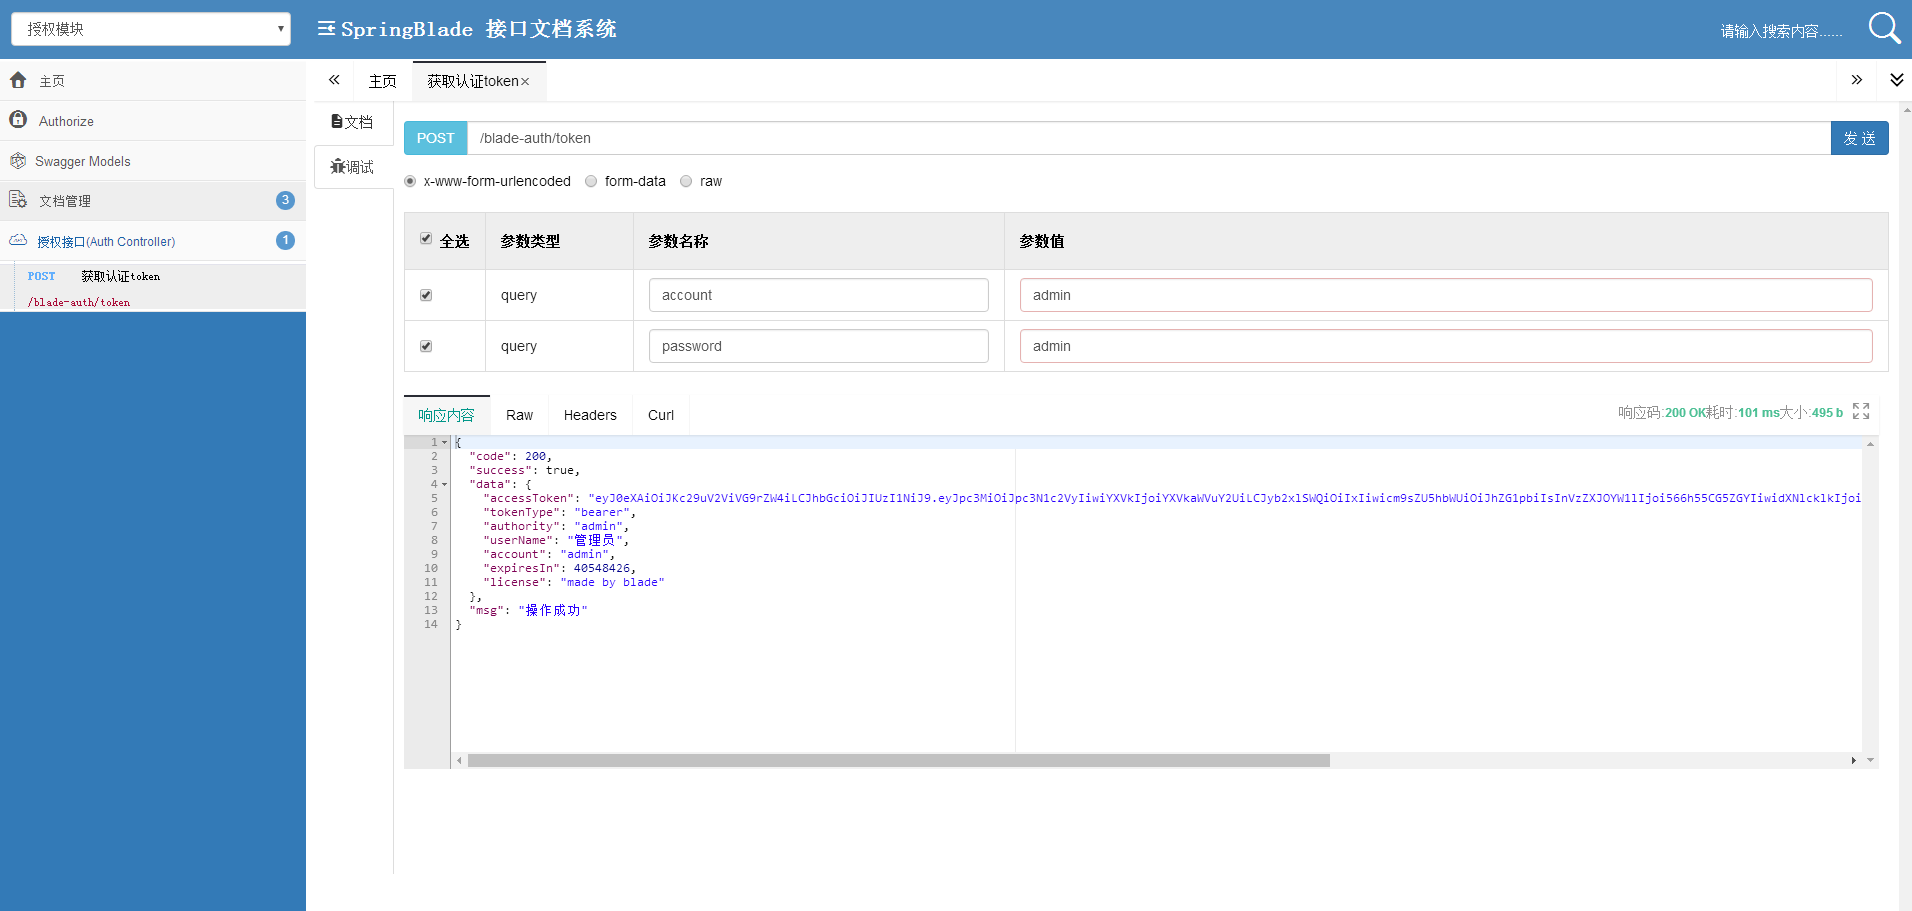
SpringBlade微服务开发平台
采用前后端分离的模式,前端开源两个框架:Sword (基于 React、Ant Design)、Saber (基于 Vue、Element-UI)后端采用SpringCloud全家桶,并同时对其基础组件做了高度的封装,单独开源出一个框架:BladeToolBladeTool已推送至…...

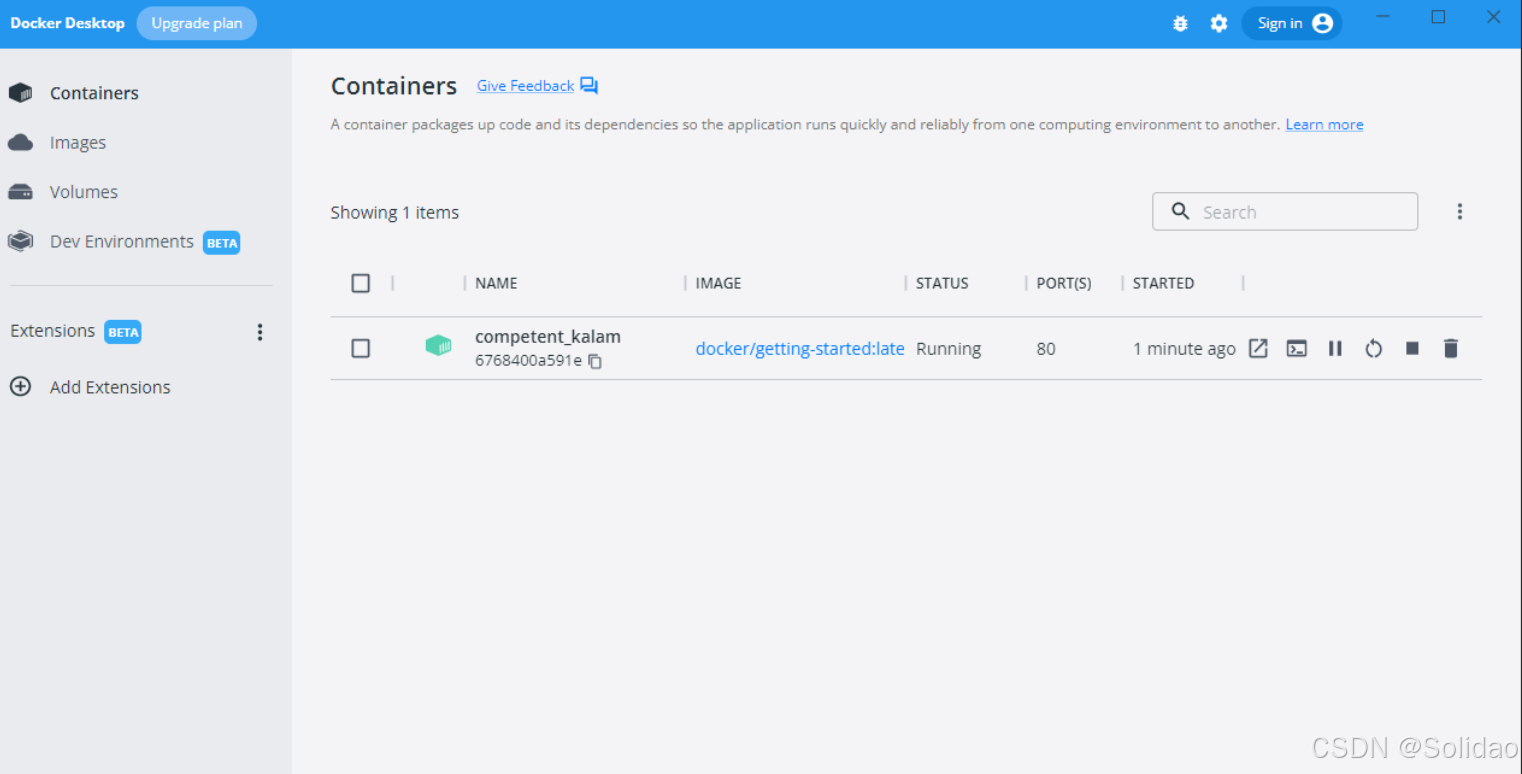
【运维】Ubuntu18.04系统docker方式安装ElasticSearch和kibana
前言 最近需要搭建一套测试环境,用到了ElasticSearch( 简称es)搜索引擎,安装过程有些曲折,记录下来作为经验。 正文 环境 Ubuntu18.04 操作系统Docker Server Version: 20.10.7ElasticSearch Version: 8.5.3Kibana Version: 8.5.3 说明 E…...

五种单例模式
在整个程序中,保持只有一个实例对象,就是单例模式。 单例模式可以减少构建,GC的次数,提升性能,还能减少堆内存的开销。 1. 懒汉式 在需要使用对象的时候,才进行创建 通过private构造方法,确保…...

【ceph】ceph关于清洗数据scrub的参数分析
本站以分享各种运维经验和运维所需要的技能为主 《python零基础入门》:python零基础入门学习 《python运维脚本》: python运维脚本实践 《shell》:shell学习 《terraform》持续更新中:terraform_Aws学习零基础入门到最佳实战 《k8…...

自然语言NLP学习
2-7 门控循环单元(GRU)_哔哩哔哩_bilibili GRU LSTM 双向RNN CNN 卷积神经网络 输入层 转化为向量表示 dropout ppl 标量 在物理学和数学中,标量(Scalar)是一个只有大小、没有方向的量。它只用一个数值就可以完全…...
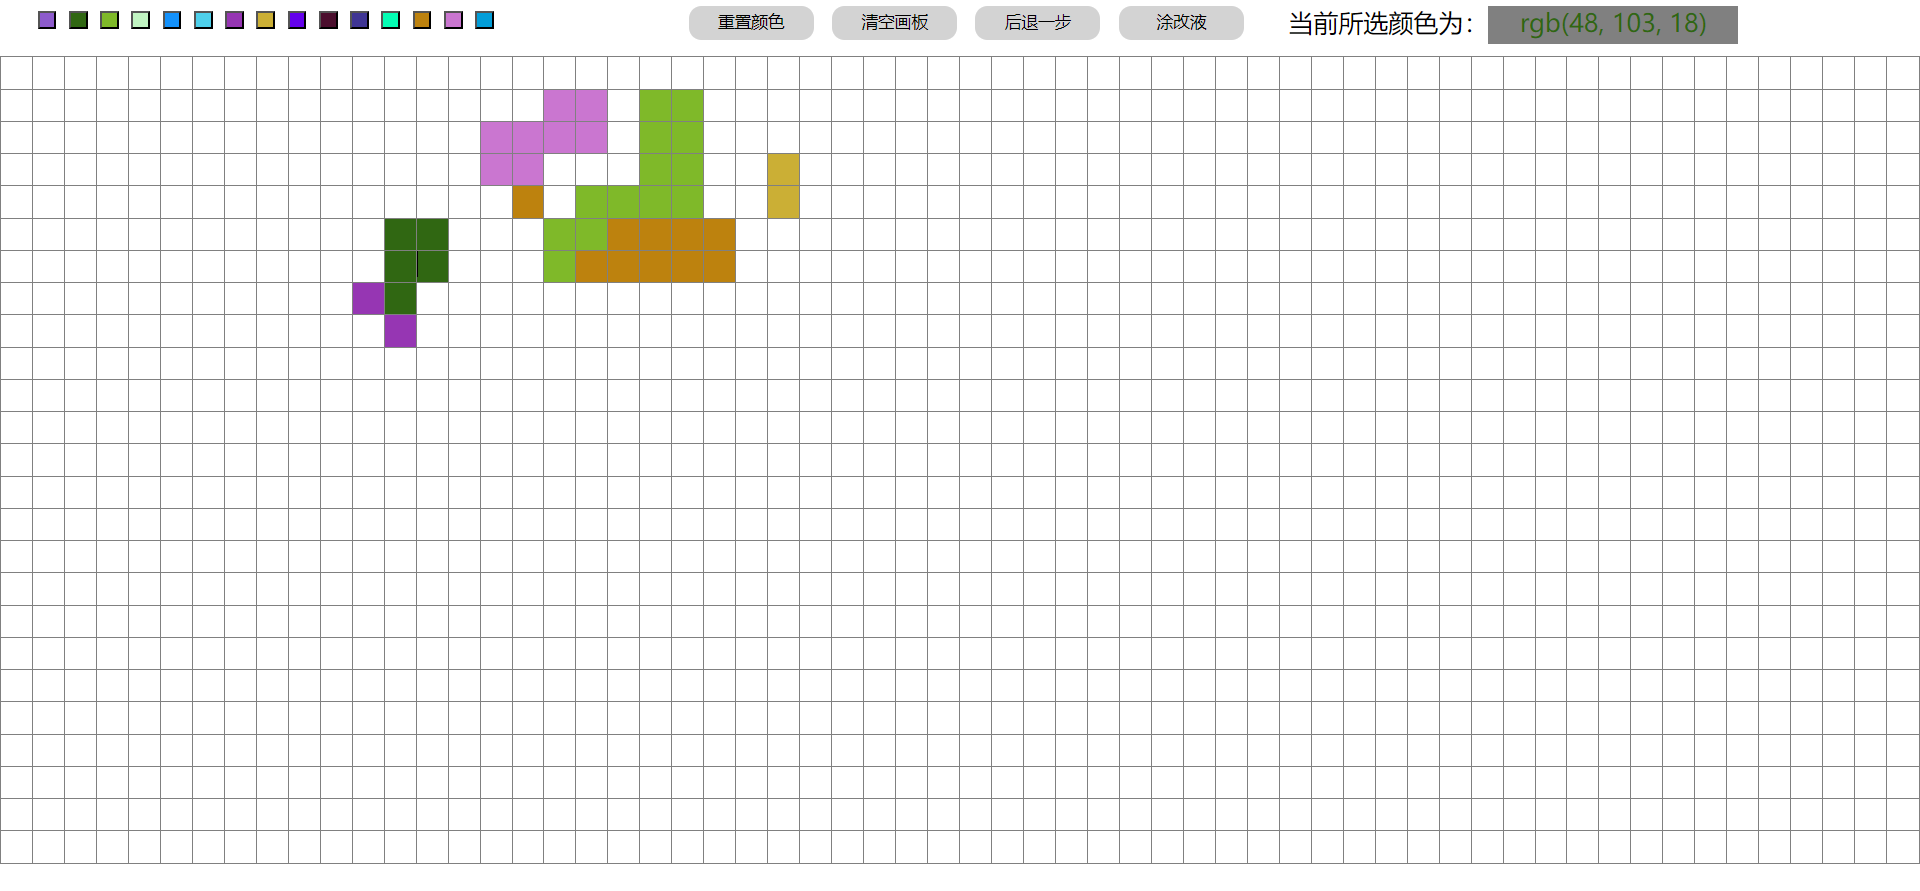
js实现填涂画板
文章目录 1实现效果2 实现代码 凑个数,存粹是好玩儿,哈哈... 1实现效果 最上方一栏: 左侧是颜色按钮,点击选中颜色, 中间是功能按钮,重置颜色、清空画板、回退、涂改液(填涂色置为白色ÿ…...

Linux 文件类型,目录与路径,文件与目录管理
文件类型 后面的字符表示文件类型标志 普通文件:-(纯文本文件,二进制文件,数据格式文件) 如文本文件、图片、程序文件等。 目录文件:d(directory) 用来存放其他文件或子目录。 设备…...

在HarmonyOS ArkTS ArkUI-X 5.0及以上版本中,手势开发全攻略:
在 HarmonyOS 应用开发中,手势交互是连接用户与设备的核心纽带。ArkTS 框架提供了丰富的手势处理能力,既支持点击、长按、拖拽等基础单一手势的精细控制,也能通过多种绑定策略解决父子组件的手势竞争问题。本文将结合官方开发文档,…...
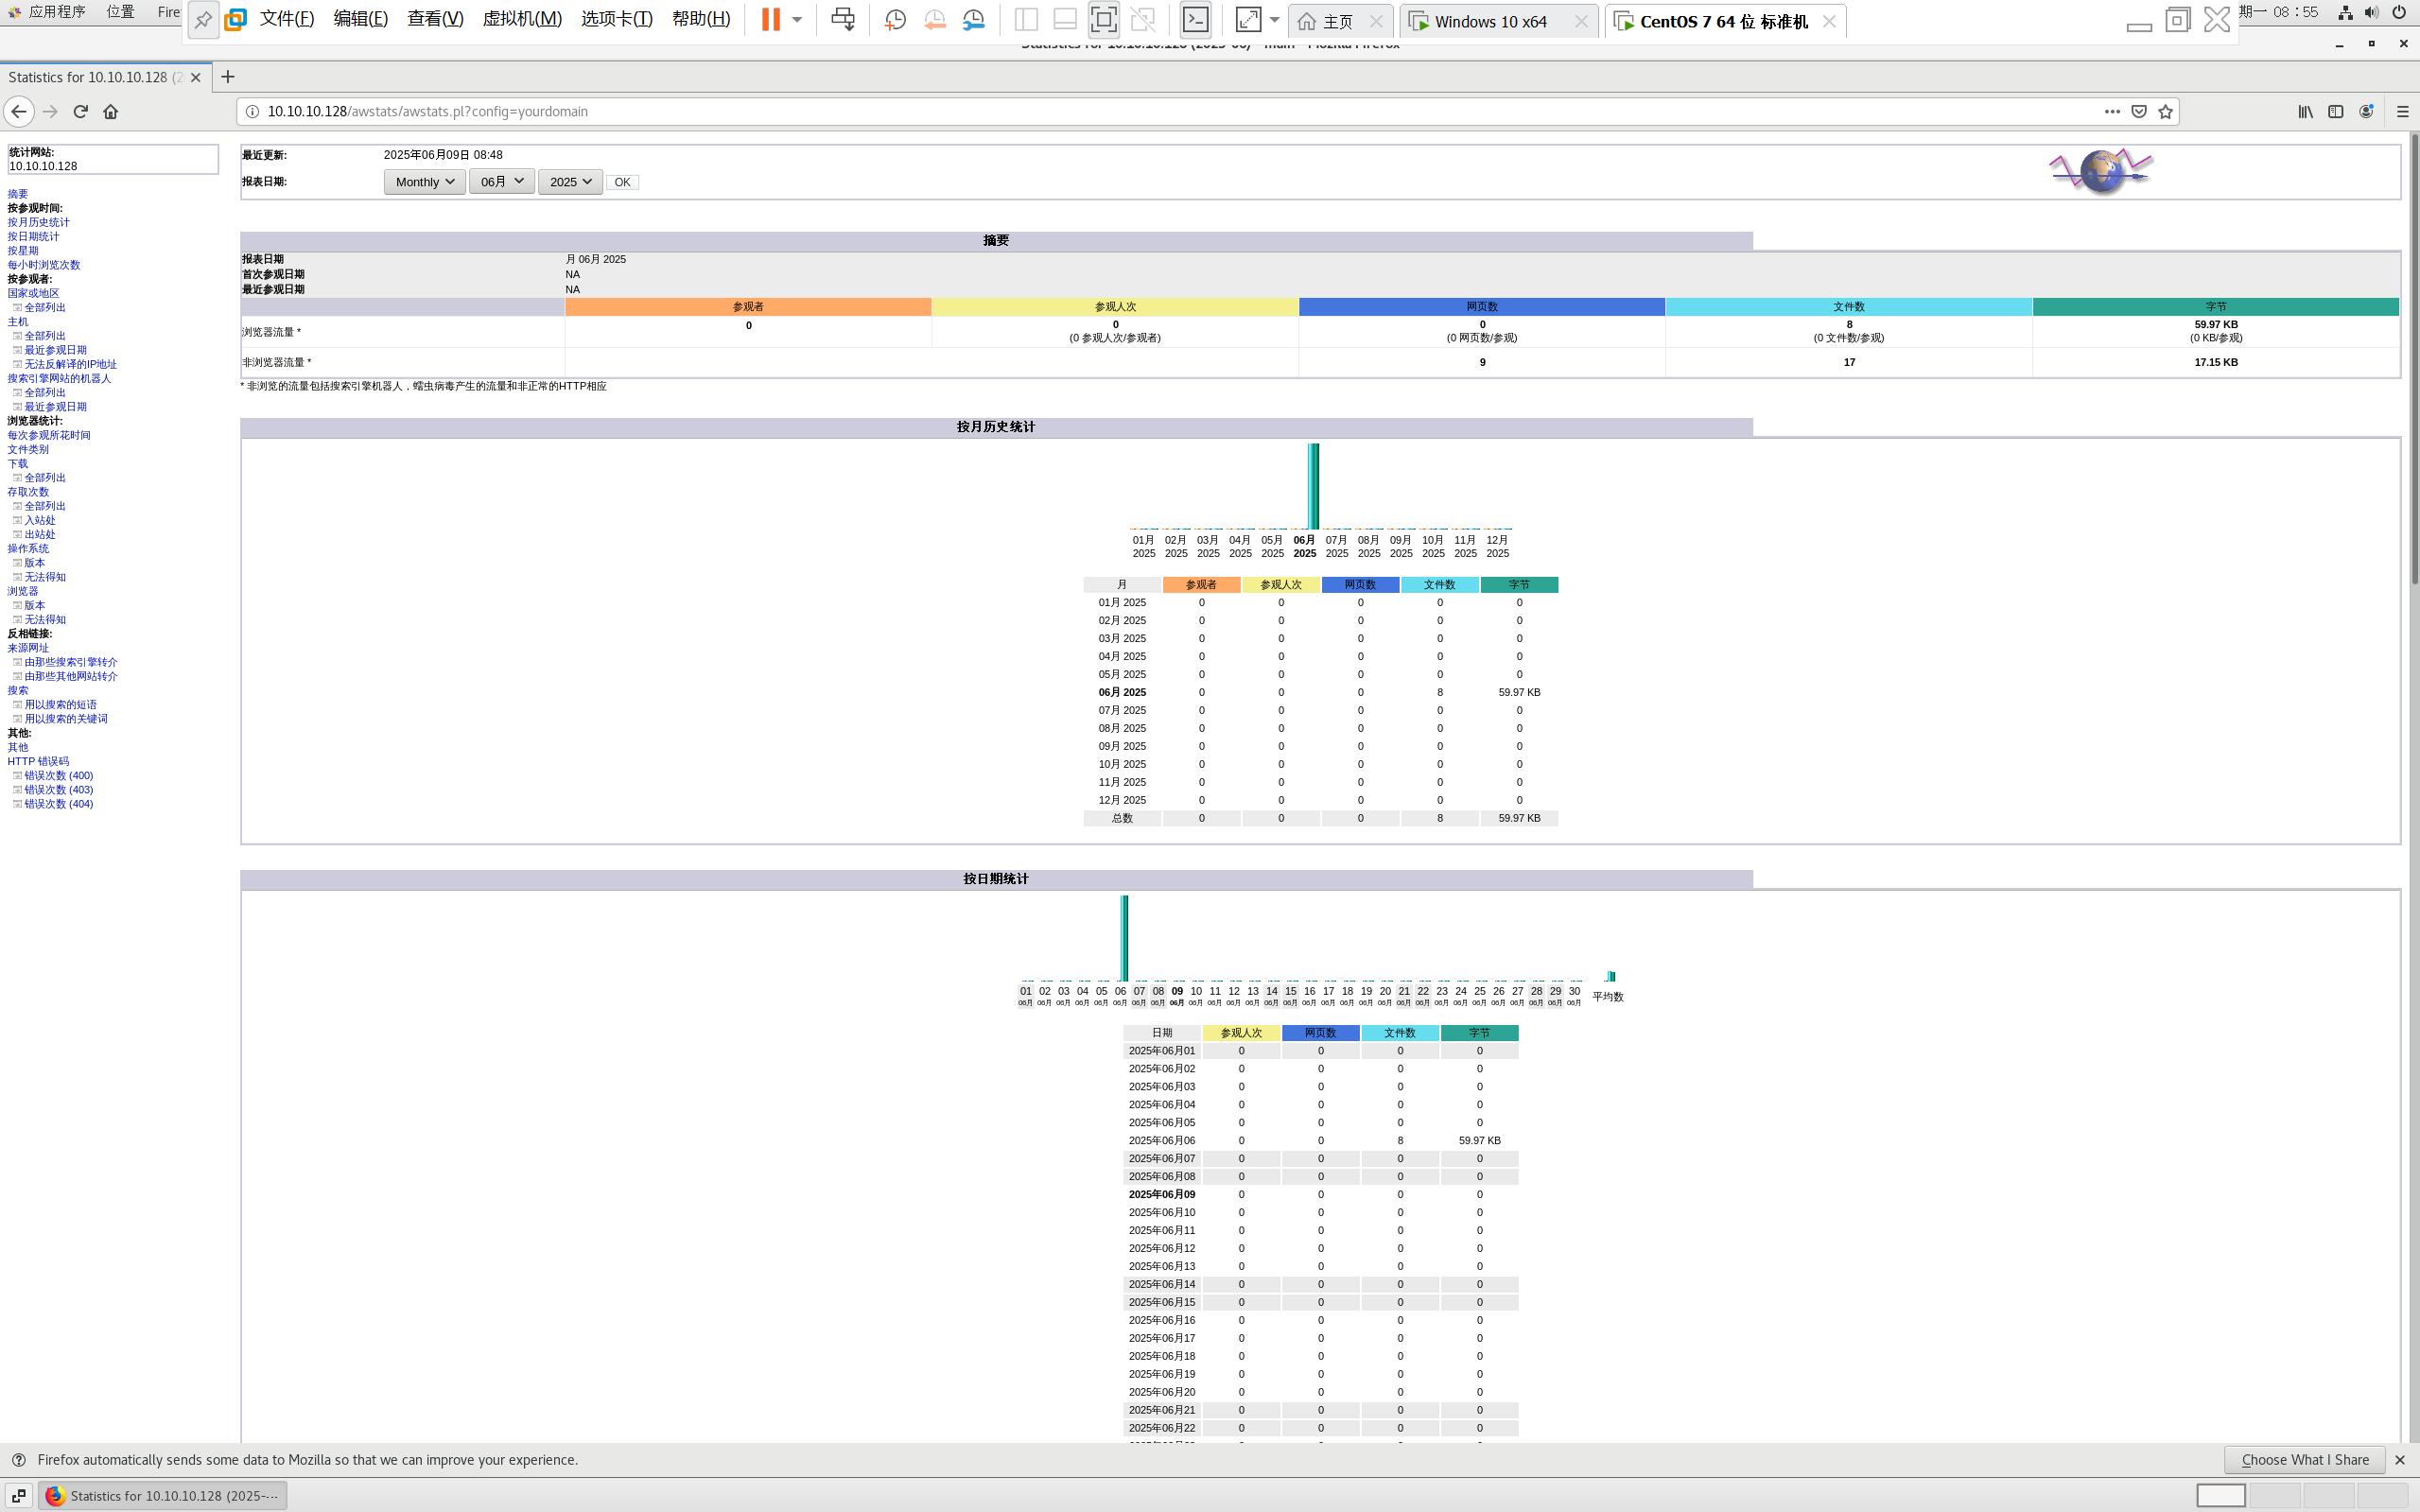
centos 7 部署awstats 网站访问检测
一、基础环境准备(两种安装方式都要做) bash # 安装必要依赖 yum install -y httpd perl mod_perl perl-Time-HiRes perl-DateTime systemctl enable httpd # 设置 Apache 开机自启 systemctl start httpd # 启动 Apache二、安装 AWStats࿰…...
【第二十一章 SDIO接口(SDIO)】
第二十一章 SDIO接口 目录 第二十一章 SDIO接口(SDIO) 1 SDIO 主要功能 2 SDIO 总线拓扑 3 SDIO 功能描述 3.1 SDIO 适配器 3.2 SDIOAHB 接口 4 卡功能描述 4.1 卡识别模式 4.2 卡复位 4.3 操作电压范围确认 4.4 卡识别过程 4.5 写数据块 4.6 读数据块 4.7 数据流…...

3403. 从盒子中找出字典序最大的字符串 I
3403. 从盒子中找出字典序最大的字符串 I 题目链接:3403. 从盒子中找出字典序最大的字符串 I 代码如下: class Solution { public:string answerString(string word, int numFriends) {if (numFriends 1) {return word;}string res;for (int i 0;i &…...

CMake控制VS2022项目文件分组
我们可以通过 CMake 控制源文件的组织结构,使它们在 VS 解决方案资源管理器中以“组”(Filter)的形式进行分类展示。 🎯 目标 通过 CMake 脚本将 .cpp、.h 等源文件分组显示在 Visual Studio 2022 的解决方案资源管理器中。 ✅ 支持的方法汇总(共4种) 方法描述是否推荐…...

AI,如何重构理解、匹配与决策?
AI 时代,我们如何理解消费? 作者|王彬 封面|Unplash 人们通过信息理解世界。 曾几何时,PC 与移动互联网重塑了人们的购物路径:信息变得唾手可得,商品决策变得高度依赖内容。 但 AI 时代的来…...
与常用工具深度洞察App瓶颈)
iOS性能调优实战:借助克魔(KeyMob)与常用工具深度洞察App瓶颈
在日常iOS开发过程中,性能问题往往是最令人头疼的一类Bug。尤其是在App上线前的压测阶段或是处理用户反馈的高发期,开发者往往需要面对卡顿、崩溃、能耗异常、日志混乱等一系列问题。这些问题表面上看似偶发,但背后往往隐藏着系统资源调度不当…...

深度剖析 DeepSeek 开源模型部署与应用:策略、权衡与未来走向
在人工智能技术呈指数级发展的当下,大模型已然成为推动各行业变革的核心驱动力。DeepSeek 开源模型以其卓越的性能和灵活的开源特性,吸引了众多企业与开发者的目光。如何高效且合理地部署与运用 DeepSeek 模型,成为释放其巨大潜力的关键所在&…...
从物理机到云原生:全面解析计算虚拟化技术的演进与应用
前言:我的虚拟化技术探索之旅 我最早接触"虚拟机"的概念是从Java开始的——JVM(Java Virtual Machine)让"一次编写,到处运行"成为可能。这个软件层面的虚拟化让我着迷,但直到后来接触VMware和Doc…...