Flutter 动画(显式动画、隐式动画、Hero动画、页面转场动画、交错动画)
前言
当前案例 Flutter SDK版本:3.13.2
显式动画
Tween({this.begin,this.end}) 两个构造参数,分别是 开始值 和 结束值,根据这两个值,提供了控制动画的方法,以下是常用的;
- controller.forward() : 向前,执行 begin 到 end 的动画,执行结束后,处于end状态;
- controller.reverse() : 反向,当动画已经完成,进行还原动画;
- controller.reset() : 重置,当动画已经完成,进行还原,注意这个是直接还原,没有动画;

使用方式一
使用 addListener() 和 setState();
import 'package:flutter/material.dart';class TweenAnimation extends StatefulWidget {const TweenAnimation({super.key});@overrideState<TweenAnimation> createState() => _TweenAnimationState();
}/// 使用 addListener() 和 setState()
class _TweenAnimationState extends State<TweenAnimation>with SingleTickerProviderStateMixin {late Animation<double> animation;late AnimationController controller;@overridevoid initState() {super.initState();controller = AnimationController(duration: const Duration(milliseconds: 2000), vsync: this);animation = Tween<double>(begin: 50, end: 100).animate(controller)..addListener(() {setState(() {}); // 更新UI})..addStatusListener((status) {debugPrint('status:$status'); // 监听动画执行状态});}@overridevoid dispose() {controller.dispose();super.dispose();}@overrideWidget build(BuildContext context) {return Scaffold(appBar: AppBar(title: const Text('显式动画',style: TextStyle(fontSize: 20),)),body: SizedBox(width: MediaQuery.of(context).size.width,height: MediaQuery.of(context).size.height,child: Column(mainAxisAlignment: MainAxisAlignment.spaceAround,children: [Row(mainAxisAlignment: MainAxisAlignment.center,children: [SizedBox(width: animation.value,height: animation.value,child: const FlutterLogo(),),ElevatedButton(onPressed: () {if (controller.isCompleted) {controller.reverse();} else {controller.forward();}// controller.forward(); // 向前,执行 begin 到 end 的动画,执行结束后,处于end状态// controller.reverse(); // 反向,当动画已经完成,进行还原动画// controller.reset(); // 重置,当动画已经完成,进行还原,注意这个是直接还原,没有动画},child: const Text('缩放'),)],)],),),);}
}
使用方式二
AnimatedWidget,解决痛点:不需要再使用 addListener() 和 setState();
import 'package:flutter/material.dart';class TweenAnimation extends StatefulWidget {const TweenAnimation({super.key});@overrideState<TweenAnimation> createState() => _TweenAnimationState();
}/// 测试 AnimatedWidget
class _TweenAnimationState extends State<TweenAnimation>with SingleTickerProviderStateMixin {late Animation<double> animation;late AnimationController controller;@overridevoid initState() {super.initState();controller = AnimationController(duration: const Duration(milliseconds: 2000), vsync: this);animation = Tween<double>(begin: 50, end: 100).animate(controller)..addStatusListener((status) {debugPrint('status:$status'); // 监听动画执行状态});}@overridevoid dispose() {controller.dispose();super.dispose();}@overrideWidget build(BuildContext context) {return Scaffold(appBar: AppBar(title: const Text('显式动画',style: TextStyle(fontSize: 20),)),body: SizedBox(width: MediaQuery.of(context).size.width,height: MediaQuery.of(context).size.height,child: Column(mainAxisAlignment: MainAxisAlignment.spaceAround,children: [Row(mainAxisAlignment: MainAxisAlignment.center,children: [AnimatedLogo(animation: animation),ElevatedButton(onPressed: () {if (controller.isCompleted) {controller.reverse();} else {controller.forward();}// controller.forward(); // 向前,执行 begin 到 end 的动画,执行结束后,处于end状态// controller.reverse(); // 反向,当动画已经完成,进行还原动画// controller.reset(); // 重置,当动画已经完成,进行还原,注意这个是直接还原,没有动画},child: const Text('缩放'),)],)],),),);}
}/// 使用 AnimatedWidget,创建显式动画
/// 解决痛点:不需要再使用 addListener() 和 setState()
class AnimatedLogo extends AnimatedWidget {const AnimatedLogo({super.key, required Animation<double> animation}): super(listenable: animation);@overrideWidget build(BuildContext context) {final animation = listenable as Animation<double>;return Center(child: Container(margin: const EdgeInsets.symmetric(vertical: 10),width: animation.value,height: animation.value,child: const FlutterLogo(),),);}
}
使用方式三
使用 内置的显式动画 widget;
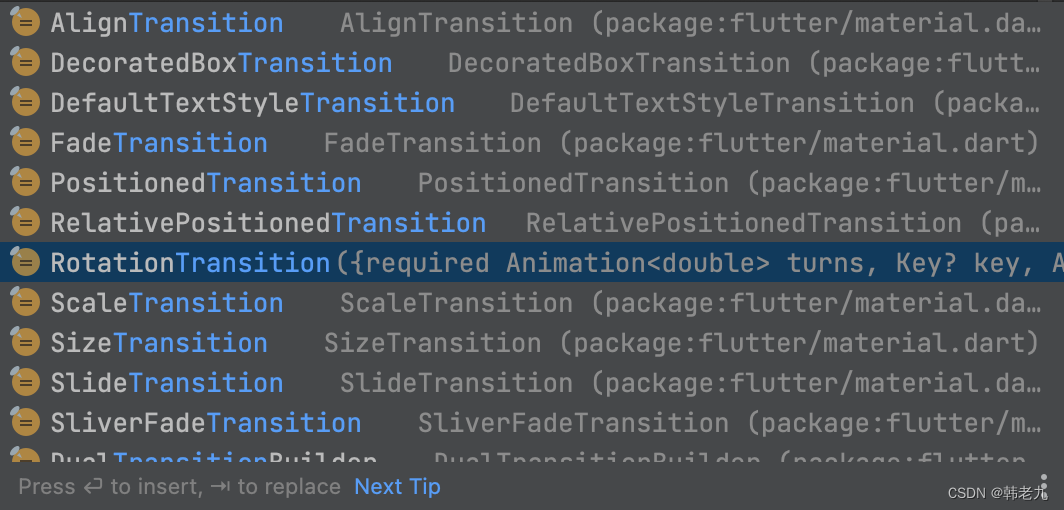
后缀是 Transition 的组件,几乎都是 显式动画 widget;
import 'package:flutter/material.dart';class TweenAnimation extends StatefulWidget {const TweenAnimation({super.key});@overrideState<TweenAnimation> createState() => _TweenAnimationState();
}/// 使用 内置的显式动画Widget
class _TweenAnimationState extends State<TweenAnimation>with SingleTickerProviderStateMixin {late Animation<double> animation;late AnimationController controller;@overridevoid initState() {super.initState();controller = AnimationController(duration: const Duration(milliseconds: 1000), vsync: this);animation = Tween<double>(begin: 0.1, end: 1.0).animate(controller)..addListener(() {setState(() {}); // 更新UI})..addStatusListener((status) {debugPrint('status:$status'); // 监听动画执行状态});}@overridevoid dispose() {controller.dispose();super.dispose();}@overrideWidget build(BuildContext context) {return Scaffold(appBar: AppBar(title: const Text('显式动画',style: TextStyle(fontSize: 20),)),body: SizedBox(width: MediaQuery.of(context).size.width,height: MediaQuery.of(context).size.height,child: Column(mainAxisAlignment: MainAxisAlignment.spaceAround,children: [Row(mainAxisAlignment: MainAxisAlignment.center,children: [/// 单个显示动画FadeTransition(opacity: animation,child: const SizedBox(width: 100,height: 100,child: FlutterLogo(),),),/// 多个显示动画 配合使用// FadeTransition( // 淡入淡出//   opacity: animation,//   child: RotationTransition( // 旋转//     turns: animation,//     child: ScaleTransition( // 更替//       scale: animation,//       child: const SizedBox(//         width: 100,//         height: 100,//         child: FlutterLogo(),//       ),//     ),//   ),// ),ElevatedButton(onPressed: () {if (controller.isCompleted) {controller.reverse();} else {controller.forward();}// controller.forward(); // 向前,执行 begin 到 end 的动画,执行结束后,处于end状态// controller.reverse(); // 反向,当动画已经完成,进行还原动画// controller.reset(); // 重置,当动画已经完成,进行还原,注意这个是直接还原,没有动画},child: const Text('淡入淡出'),)],)],),),);}
}
使用方式四
AnimatedBuilder,这种方式感觉是 通过逻辑 动态选择 Widget,比如 flag ? widgetA : widgetB;
官方解释:
- AnimatedBuilder 知道如何渲染过渡效果
- 但 AnimatedBuilder 不会渲染 widget,也不会控制动画对象。
- 使用 AnimatedBuilder 描述一个动画是其他 widget 构建方法的一部分。
- 如果只是单纯需要用可重复使用的动画定义一个 widget,可参考文档:简单使用 AnimatedWidget。
import 'package:flutter/material.dart';class TweenAnimation extends StatefulWidget {const TweenAnimation({super.key});@overrideState<TweenAnimation> createState() => _TweenAnimationState();
}/// 测试 AnimatedBuilder
class _TweenAnimationState extends State<TweenAnimation>with SingleTickerProviderStateMixin {late Animation<double> animation;late AnimationController controller;@overridevoid initState() {super.initState();controller = AnimationController(duration: const Duration(milliseconds: 2000), vsync: this);animation = Tween<double>(begin: 50, end: 100).animate(controller)..addStatusListener((status) {debugPrint('status:$status'); // 监听动画执行状态});}@overridevoid dispose() {controller.dispose();super.dispose();}@overrideWidget build(BuildContext context) {return Scaffold(appBar: AppBar(title: const Text('显式动画',style: TextStyle(fontSize: 20),)),body: SizedBox(width: MediaQuery.of(context).size.width,height: MediaQuery.of(context).size.height,child: Column(mainAxisAlignment: MainAxisAlignment.spaceAround,children: [Row(mainAxisAlignment: MainAxisAlignment.center,children: [GrowTransition(animation: animation,child: const FlutterLogo()),ElevatedButton(onPressed: () {if (controller.isCompleted) {controller.reverse();} else {controller.forward();}// controller.forward(); // 向前,执行 begin 到 end 的动画,执行结束后,处于end状态// controller.reverse(); // 反向,当动画已经完成,进行还原动画// controller.reset(); // 重置,当动画已经完成,进行还原,注意这个是直接还原,没有动画},child: const Text('缩放'),)],)],),),);}
}class GrowTransition extends StatelessWidget {final Widget child;final Animation<double> animation;const GrowTransition({required this.child, required this.animation, super.key});@overrideWidget build(BuildContext context) {return Center(child: AnimatedBuilder(animation: animation,builder: (context, child) {return SizedBox(width: animation.value,height: animation.value,child: child,);},child: child,),);}
}
使用方式五
CurvedAnimation 曲线动画,一个Widget,同时使用多个动画;
import 'package:flutter/material.dart';class TweenAnimation extends StatefulWidget {const TweenAnimation({super.key});@overrideState<TweenAnimation> createState() => _TweenAnimationState();
}/// 测试 动画同步使用
class _TweenAnimationState extends State<TweenAnimation>with SingleTickerProviderStateMixin {late Animation<double> animation;late AnimationController controller;@overridevoid initState() {super.initState();controller = AnimationController(duration: const Duration(milliseconds: 2000), vsync: this);animation = CurvedAnimation(parent: controller, curve: Curves.easeIn)..addStatusListener((status) {debugPrint('status:$status'); // 监听动画执行状态});}@overridevoid dispose() {controller.dispose();super.dispose();}@overrideWidget build(BuildContext context) {return Scaffold(appBar: AppBar(title: const Text('显式动画',style: TextStyle(fontSize: 20),)),body: SizedBox(width: MediaQuery.of(context).size.width,height: MediaQuery.of(context).size.height,child: Column(mainAxisAlignment: MainAxisAlignment.spaceAround,children: [Row(mainAxisAlignment: MainAxisAlignment.center,children: [AnimatedLogoSync(animation: animation),ElevatedButton(onPressed: () {if (controller.isCompleted) {controller.reverse();} else {controller.forward();}// controller.forward(); // 向前,执行 begin 到 end 的动画,执行结束后,处于end状态// controller.reverse(); // 反向,当动画已经完成,进行还原动画// controller.reset(); // 重置,当动画已经完成,进行还原,注意这个是直接还原,没有动画},child: const Text('缩放 + 淡入淡出'),)],)],),),);}
}/// 动画同步使用
class AnimatedLogoSync extends AnimatedWidget {AnimatedLogoSync({super.key, required Animation<double> animation}): super(listenable: animation);final Tween<double> _opacityTween = Tween<double>(begin: 0.1, end: 1);final Tween<double> _sizeTween = Tween<double>(begin: 50, end: 100);@overrideWidget build(BuildContext context) {final animation = listenable as Animation<double>;return Center(child: Opacity(opacity: _opacityTween.evaluate(animation),child: SizedBox(width: _sizeTween.evaluate(animation),height: _sizeTween.evaluate(animation),child: const FlutterLogo(),),),);}
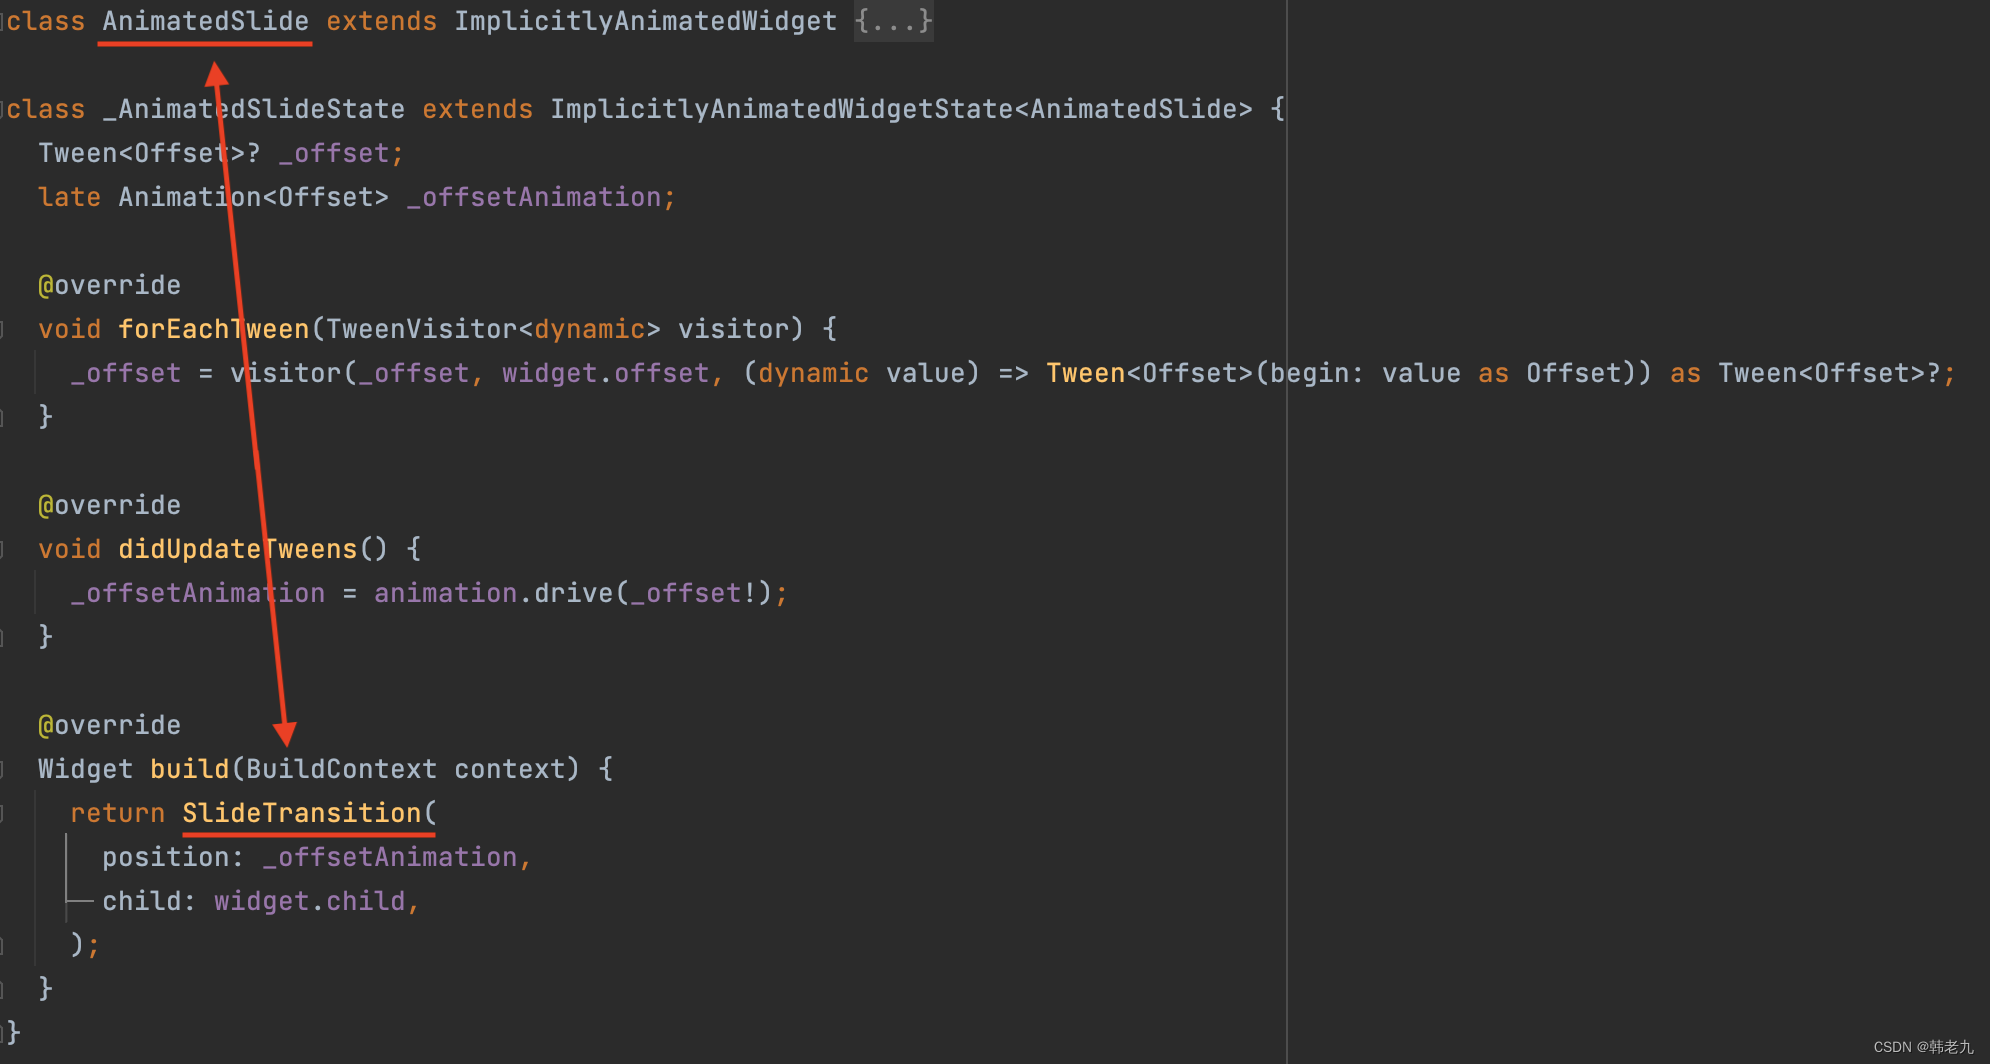
}隐式动画
- 根据属性值变化,为 UI 中的 widget 添加动作并创造视觉效果,有些库包含各种各样可以帮你管理动画的widget,这些widgets被统称为 隐式动画 或 隐式动画 widget。
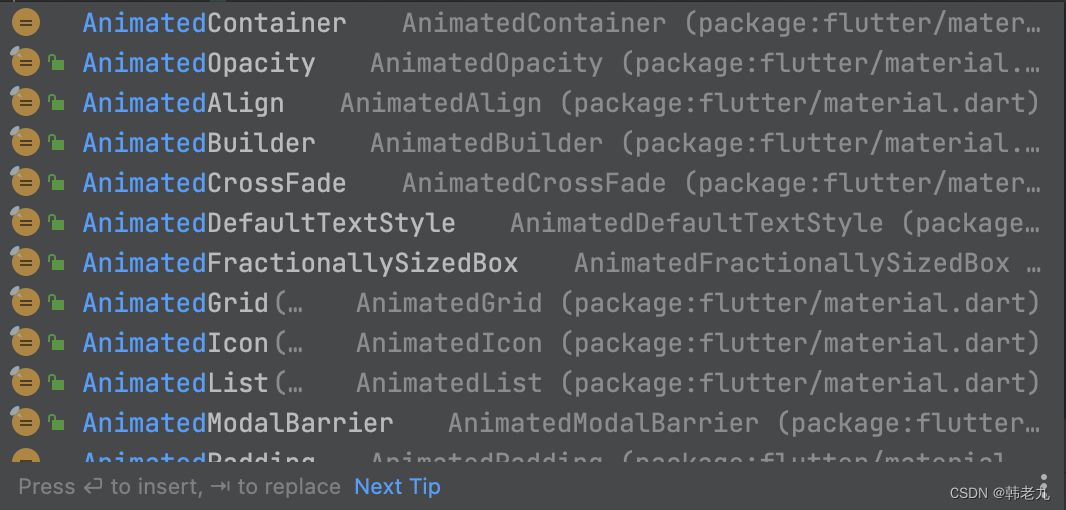
- 前缀是 Animated 的组件,几乎都是 隐式动画 widget;
import 'dart:math';import 'package:flutter/material.dart';class ImplicitAnimation extends StatefulWidget {const ImplicitAnimation({super.key});@overrideState<ImplicitAnimation> createState() => _ImplicitAnimationState();
}class _ImplicitAnimationState extends State<ImplicitAnimation> {double opacity = 0;late Color color;late double borderRadius;late double margin;double randomBorderRadius() {return Random().nextDouble() * 64;}double randomMargin() {return Random().nextDouble() * 32;}Color randomColor() {return Color(0xFFFFFFFF & Random().nextInt(0xFFFFFFFF));}@overridevoid initState() {super.initState();color = randomColor();borderRadius = randomBorderRadius();margin = randomMargin();}@overrideWidget build(BuildContext context) {return Scaffold(appBar: AppBar(title: const Text('隐式动画',style: TextStyle(fontSize: 20),)),body: SizedBox(width: MediaQuery.of(context).size.width,height: MediaQuery.of(context).size.height,child: Column(mainAxisAlignment: MainAxisAlignment.spaceAround,children: [Row(mainAxisAlignment: MainAxisAlignment.center,children: [AnimatedOpacity(opacity: opacity,curve: Curves.easeInOutBack,duration: const Duration(milliseconds: 1000),child: Container(width: 50,height: 50,margin: const EdgeInsets.only(right: 12),color: Colors.primaries[2],),),ElevatedButton(onPressed: () {if(opacity == 0) {opacity = 1;} else {opacity = 0;}setState(() {});},child: const Text('淡入或淡出'),)],),Row(mainAxisAlignment: MainAxisAlignment.center,children: [AnimatedContainer(width: 50,height: 50,margin: EdgeInsets.all(margin),decoration: BoxDecoration(color: color,borderRadius: BorderRadius.circular(borderRadius)),curve: Curves.easeInBack,duration: const Duration(milliseconds: 1000),),ElevatedButton(onPressed: () {color = randomColor();borderRadius = randomBorderRadius();margin = randomMargin();setState(() {});},child: const Text('形状变化'),)],)],),),);}}
显示和隐式的区别
看图,隐式动画 就是 显示动画 封装后的产物,是不是很蒙,这有什么意义?
应用场景不同:如果想 控制动画,使用 显示动画,controller.forward()、controller.reverse()、controller.reset(),反之只是在Widget属性值发生改变,进行UI过渡这种简单操作,使用 隐式动画;
误区
Flutter显式动画的关键对象 Tween,翻译过来 补间,联想到 Android原生的补间动画,就会有一个问题,Android原生的补间动画,只是视觉上的UI变化,对象属性并非真正改变,那么Flutter是否也是如此?
答案:非也,是真的改变了,和Android原生补间动画不同,看图:
以下偏移动画,在Flutter中的,点击偏移后的矩形位置,可以触发提示,反之Android原生不可以,只能在矩形原来的位置,才能触发;


Flutte 提示库 以及 封装相关 的代码
fluttertoast: ^8.2.4toast_util.dart
import 'package:flutter/material.dart';
import 'package:fluttertoast/fluttertoast.dart';class ToastUtil {static FToast fToast = FToast();static void init(BuildContext context) {fToast.init(context);}static void showToast(String msg) {Widget toast = Row(mainAxisAlignment: MainAxisAlignment.center,children: [Container(padding: const EdgeInsets.symmetric(horizontal: 24.0, vertical: 12.0),decoration: BoxDecoration(borderRadius: BorderRadius.circular(25.0),color: Colors.greenAccent,),alignment: Alignment.center,child: Text(msg),)],);fToast.showToast(child: toast,gravity: ToastGravity.BOTTOM,toastDuration: const Duration(seconds: 2),);}
}
Flutter显示动画 代码
import 'package:flutter/material.dart';
import 'package:flutter_animation/util/toast_util.dart';class TweenAnimation extends StatefulWidget {const TweenAnimation({super.key});@overrideState<TweenAnimation> createState() => _TweenAnimationState();
}/// 测试显式动画,属性是否真的改变了
class _TweenAnimationState extends State<TweenAnimation>with SingleTickerProviderStateMixin {late Animation<Offset> animation;late AnimationController controller;@overridevoid initState() {super.initState();controller = AnimationController(duration: const Duration(milliseconds: 500), vsync: this);animation =Tween<Offset>(begin: const Offset(0, 0), end: const Offset(1.5, 0)).animate(controller)..addStatusListener((status) {debugPrint('status:$status'); // 监听动画执行状态});}@overridevoid dispose() {controller.dispose();super.dispose();}@overrideWidget build(BuildContext context) {return Scaffold(appBar: AppBar(title: const Text('Flutter 显式动画',style: TextStyle(fontSize: 20),)),body: Container(width: MediaQuery.of(context).size.width,height: MediaQuery.of(context).size.height,color: Colors.primaries[5],child: Stack(children: [Align(alignment: Alignment.center,child: Container(width: 80,height: 80,decoration: BoxDecoration(border: Border.all(color: Colors.white, width: 1.0),),),),Align(alignment: Alignment.center,child: SlideTransition(position: animation,child: InkWell(onTap: () {ToastUtil.showToast('点击了');},child: Container(width: 80,height: 80,color: Colors.primaries[2],),),),),Positioned(left: (MediaQuery.of(context).size.width / 2) - 35,top: 200,child: ElevatedButton(onPressed: () {if (controller.isCompleted) {controller.reverse();} else {controller.forward();}// controller.forward(); // 向前,执行 begin 到 end 的动画,执行结束后,处于end状态// controller.reverse(); // 反向,当动画已经完成,进行还原动画// controller.reset(); // 重置,当动画已经完成,进行还原,注意这个是直接还原,没有动画},child: const Text('偏移'),),)],),),);}
}
Flutter隐式动画 代码
import 'package:flutter/material.dart';
import 'package:flutter_animation/util/toast_util.dart';class ImplicitAnimation extends StatefulWidget {const ImplicitAnimation({super.key});@overrideState<ImplicitAnimation> createState() => _ImplicitAnimationState();
}/// 测试隐式动画,属性是否真的改变了
class _ImplicitAnimationState extends State<ImplicitAnimation> {late double offsetX = 0;@overrideWidget build(BuildContext context) {return Scaffold(appBar: AppBar(title: const Text('Flutter 隐式动画',style: TextStyle(fontSize: 20),)),body: Container(width: MediaQuery.of(context).size.width,height: MediaQuery.of(context).size.height,color: Colors.primaries[5],child: Stack(children: [Align(alignment: Alignment.center,child: Container(width: 80,height: 80,decoration: BoxDecoration(border: Border.all(color: Colors.white, width: 1.0),),),),Align(alignment: Alignment.center,child: AnimatedSlide(offset: Offset(offsetX, 0),duration: const Duration(milliseconds: 500),child: InkWell(onTap: () {ToastUtil.showToast('点击了');},child: Container(width: 80,height: 80,color: Colors.primaries[2],),),),),Positioned(left: (MediaQuery.of(context).size.width / 2) - 35,top: 200,child: ElevatedButton(onPressed: () {if (offsetX == 0) {offsetX = 1.5;} else {offsetX = 0;}setState(() {});},child: const Text('偏移'),),)],),),);}
}
Android原生补间动画 代码
<?xml version="1.0" encoding="utf-8"?>
<FrameLayout xmlns:android="http://schemas.android.com/apk/res/android"android:layout_width="match_parent"android:layout_height="match_parent"android:orientation="vertical"><TextViewandroid:layout_width="match_parent"android:layout_height="50dp"android:background="@android:color/holo_blue_light"android:gravity="center|left"android:text="Android原生 补间动画"android:paddingStart="16dp"android:textColor="@android:color/white"android:textSize="20sp" /><TextViewandroid:id="@+id/border"android:layout_width="50dp"android:layout_height="50dp"android:layout_gravity="center"android:layout_marginBottom="50dp"android:background="@drawable/border" /><TextViewandroid:id="@+id/offset_box"android:layout_width="50dp"android:layout_height="50dp"android:layout_gravity="center"android:layout_marginBottom="50dp"android:background="@android:color/holo_orange_light" /><Buttonandroid:id="@+id/offset_x"android:layout_width="wrap_content"android:layout_height="wrap_content"android:layout_gravity="center"android:layout_marginTop="12dp"android:text="偏移" /></FrameLayout>
import android.app.Activity
import android.os.Bundle
import android.view.View
import android.view.animation.TranslateAnimation
import android.widget.Toast
import com.example.flutter_animation.databinding.ActivityMainBindingclass MainActivity : Activity(), View.OnClickListener {private lateinit var bind: ActivityMainBindingoverride fun onCreate(savedInstanceState: Bundle?) {super.onCreate(savedInstanceState)bind = ActivityMainBinding.inflate(layoutInflater)setContentView(bind.root)bind.offsetX.setOnClickListener(this)bind.offsetBox.setOnClickListener(this)}private fun offsetAnimation() {val translateAnimation = TranslateAnimation(0f, 200f, 0f, 0f)translateAnimation.duration = 800translateAnimation.fillAfter = truebind.offsetBox.startAnimation(translateAnimation)}override fun onClick(v: View?) {if (bind.offsetX == v) {offsetAnimation()} else if (bind.offsetBox == v) {Toast.makeText(this,"点击了",Toast.LENGTH_SHORT).show()}}}Hero动画
应用于 元素共享 的动画。
下面这三个图片详情案例的使用方式,将 Widget 从 A页面 共享到 B页面 后,改变Widget大小,被称为 标准 hero 动画;
图片详情案例一:本地图片

import 'package:flutter/cupertino.dart';
import 'package:flutter/material.dart';import 'package:flutter/scheduler.dart' show timeDilation;class HeroAnimation extends StatefulWidget {const HeroAnimation({super.key});@overrideState<HeroAnimation> createState() => _HeroAnimationState();
}/// 将 Widget 从 A页面 共享到 B页面 后,改变Widget大小
class _HeroAnimationState extends State<HeroAnimation> {/// 测试本地图片final List<String> images = ['assets/images/01.jpg','assets/images/02.jpg','assets/images/03.jpg','assets/images/04.jpg',];@overrideWidget build(BuildContext context) {// 减慢动画速度,可以通过此值帮助开发,// 注意这个值是针对所有动画,所以路由动画也会受影响// timeDilation = 10.0;return Scaffold(appBar: AppBar(title: const Text('Photo List Page'),),body: Container(width: MediaQuery.of(context).size.width,height: MediaQuery.of(context).size.height,alignment: Alignment.topLeft,child: GridView.count(padding: const EdgeInsets.all(10),crossAxisCount: 2,mainAxisSpacing: 10,crossAxisSpacing: 10,children: List.generate(images.length,(index) => PhotoHero(photo: images[index],size: 100,onTap: () {Navigator.of(context).push(CupertinoPageRoute<void>(builder: (context) => PhotoDetail(size: MediaQuery.of(context).size.width,photo: images[index]),));},)),),),);}
}class PhotoHero extends StatelessWidget {const PhotoHero({super.key,required this.photo,this.onTap,required this.size,});final String photo;final VoidCallback? onTap;final double size;@overrideWidget build(BuildContext context) {return SizedBox(width: size,height: size,child: Hero(tag: photo,child: Material(color: Colors.transparent,child: InkWell(onTap: onTap,/// 测试本地图片child: Image.asset(photo,fit: BoxFit.cover,),),),),);}
}class PhotoDetail extends StatelessWidget {const PhotoDetail({super.key,required this.photo,required this.size,});final String photo;final double size;@overrideWidget build(BuildContext context) {return Scaffold(appBar: AppBar(title: const Text('Photo Detail Page'),),body: Column(children: [Container(color: Colors.lightBlueAccent,padding: const EdgeInsets.all(16),alignment: Alignment.topCenter,child: PhotoHero(photo: photo,size: size,onTap: () {Navigator.of(context).pop();},),),const Text('详情xxx',style: TextStyle(fontSize: 20),)],),);}
}
图片详情案例二:网络图片
可以看出,在有延迟的情况下,效果没有本地图片好;

import 'package:flutter/cupertino.dart';
import 'package:flutter/material.dart';import 'package:flutter/scheduler.dart' show timeDilation;class HeroAnimation extends StatefulWidget {const HeroAnimation({super.key});@overrideState<HeroAnimation> createState() => _HeroAnimationState();
}/// 将 Widget 从 A页面 共享到 B页面 后,改变Widget大小
class _HeroAnimationState extends State<HeroAnimation> {/// 测试网络图片final List<String> images = ['https://img1.baidu.com/it/u=1161835547,3275770506&fm=253&fmt=auto&app=138&f=JPEG?w=800&h=500','https://p9.toutiaoimg.com/origin/pgc-image/6d817289d3b44d53bb6e55aa81e41bd2?from=pc','https://img0.baidu.com/it/u=102503057,4196586556&fm=253&fmt=auto&app=138&f=BMP?w=500&h=724','https://lmg.jj20.com/up/allimg/1114/041421115008/210414115008-3-1200.jpg',];@overrideWidget build(BuildContext context) {// 减慢动画速度,可以通过此值帮助开发,// 注意这个值是针对所有动画,所以路由动画也会受影响// timeDilation = 10.0;return Scaffold(appBar: AppBar(title: const Text('Photo List Page'),),body: Container(width: MediaQuery.of(context).size.width,height: MediaQuery.of(context).size.height,alignment: Alignment.topLeft,child: GridView.count(padding: const EdgeInsets.all(10),crossAxisCount: 2,mainAxisSpacing: 10,crossAxisSpacing: 10,children: List.generate(images.length,(index) => PhotoHero(photo: images[index],size: 100,onTap: () {Navigator.of(context).push(CupertinoPageRoute<void>(builder: (context) => PhotoDetail(size: MediaQuery.of(context).size.width,photo: images[index]),));},)),),),);}
}class PhotoHero extends StatelessWidget {const PhotoHero({super.key,required this.photo,this.onTap,required this.size,});final String photo;final VoidCallback? onTap;final double size;@overrideWidget build(BuildContext context) {return SizedBox(width: size,height: size,child: Hero(tag: photo,child: Material(color: Colors.transparent,child: InkWell(onTap: onTap,/// 测试网络图片child: Image.network(photo,fit: BoxFit.cover,),),),),);}
}class PhotoDetail extends StatelessWidget {const PhotoDetail({super.key,required this.photo,required this.size,});final String photo;final double size;@overrideWidget build(BuildContext context) {return Scaffold(appBar: AppBar(title: const Text('Photo Detail Page'),),body: Column(children: [Container(color: Colors.lightBlueAccent,padding: const EdgeInsets.all(16),alignment: Alignment.topCenter,child: PhotoHero(photo: photo,size: size,onTap: () {Navigator.of(context).pop();},),),const Text('详情xxx',style: TextStyle(fontSize: 20),)],),);}
}
图片详情案例三:背景透明

import 'package:flutter/material.dart';import 'package:flutter/scheduler.dart' show timeDilation;class HeroAnimation extends StatefulWidget {const HeroAnimation({super.key});@overrideState<HeroAnimation> createState() => _HeroAnimationState();
}/// 测试 新页面背景透明色 的图片详情
class _HeroAnimationState extends State<HeroAnimation> {/// 测试本地图片final List<String> images = ['assets/images/01.jpg','assets/images/02.jpg','assets/images/03.jpg','assets/images/04.jpg',];@overrideWidget build(BuildContext context) {// 减慢动画速度,可以通过此值帮助开发,// 注意这个值是针对所有动画,所以路由动画也会受影响// timeDilation = 10.0;return Scaffold(appBar: AppBar(title: const Text('Photo List Page'),),body: Container(width: MediaQuery.of(context).size.width,height: MediaQuery.of(context).size.height,alignment: Alignment.topLeft,child: GridView.count(padding: const EdgeInsets.all(10),crossAxisCount: 2,mainAxisSpacing: 10,crossAxisSpacing: 10,children: List.generate(images.length,(index) => PhotoHero(photo: images[index],size: 100,onTap: () {Navigator.of(context).push(PageRouteBuilder<void>(opaque: false, // 新页面,背景色不透明度pageBuilder: (context, animation, secondaryAnimation) {return PhotoDetail(size: MediaQuery.of(context).size.width,photo: images[index]);},),);},)),),),);}
}class PhotoHero extends StatelessWidget {const PhotoHero({super.key,required this.photo,this.onTap,required this.size,});final String photo;final VoidCallback? onTap;final double size;@overrideWidget build(BuildContext context) {return SizedBox(width: size,height: size,child: Hero(tag: photo,child: Material(color: Colors.transparent,child: InkWell(onTap: onTap,/// 测试本地图片child: Image.asset(photo,fit: BoxFit.cover,),),),),);}
}class PhotoDetail extends StatelessWidget {const PhotoDetail({super.key,required this.photo,required this.size,});final String photo;final double size;@overrideWidget build(BuildContext context) {return Scaffold(backgroundColor: Colors.transparent,// backgroundColor: const Color(0x66000000),body: Column(mainAxisAlignment: MainAxisAlignment.center,children: [Container(padding: const EdgeInsets.all(16),alignment: Alignment.center,child: PhotoHero(photo: photo,size: size,onTap: () {Navigator.of(context).pop();},),),const Text('详情xxx',style: TextStyle(fontSize: 20,color: Colors.white),)],),);}
}
图片形状转换案例:圆形 转 矩形
这个案例的使用方式,被称为 径向hero动画;
- 径向hero动画的 径 是半径距离,圆形状 向 矩形状转换,矩形状的对角半径距离 = 圆形状半径距离 * 2;
- 这个是官方模版代码,我也没改什么;
- 官方代码地址:https://github.com/cfug/flutter.cn/blob/main/examples/_animation/radial_hero_animation/lib/main.dart
- 问题:这种官方代码是 初始化为 圆形 点击向 矩形改变的方式,我尝试反向操作:初始化为 矩形 点击向 圆形改变,但没有成功,如果有哪位同学找到实现方式,麻烦评论区留言;
我是这样修改的:
class RadialExpansion extends StatelessWidget {... ... @overrideWidget build(BuildContext context) {/// 原来的代码// 控制形状变化的核心代码// return ClipOval( // 圆形//   child: Center(//     child: SizedBox(//       width: clipRectSize,//       height: clipRectSize,//       child: ClipRect( // 矩形//         child: child,//       ),//     ),//   ),// );/// 尝试修改 形状顺序return ClipRect( // 矩形child: Center(child: SizedBox(width: clipRectSize,height: clipRectSize,child: ClipOval( // 圆形child: child,),),),);}
}
官方代码演示
import 'package:flutter/material.dart';
import 'dart:math' as math;import 'package:flutter/scheduler.dart' show timeDilation;class HeroAnimation extends StatefulWidget {const HeroAnimation({super.key});@overrideState<HeroAnimation> createState() => _HeroAnimationState();
}/// 将 Widget 从 A页面 共享到 B页面 后,改变Widget形状
class _HeroAnimationState extends State<HeroAnimation> {static double kMinRadius = 32.0;static double kMaxRadius = 128.0;static Interval opacityCurve =const Interval(0.0, 0.75, curve: Curves.fastOutSlowIn);static RectTween _createRectTween(Rect? begin, Rect? end) {return MaterialRectCenterArcTween(begin: begin, end: end);}static Widget _buildPage(BuildContext context, String imageName, String description) {return Container(color: Theme.of(context).canvasColor,child: Center(child: Card(elevation: 8,child: Column(mainAxisSize: MainAxisSize.min,children: [SizedBox(width: kMaxRadius * 2.0,height: kMaxRadius * 2.0,child: Hero(createRectTween: _createRectTween,tag: imageName,child: RadialExpansion(maxRadius: kMaxRadius,child: Photo(photo: imageName,onTap: () {Navigator.of(context).pop();},),),),),Text(description,style: const TextStyle(fontWeight: FontWeight.bold),textScaleFactor: 3,),const SizedBox(height: 16),],),),),);}Widget _buildHero(BuildContext context,String imageName,String description,) {return SizedBox(width: kMinRadius * 2.0,height: kMinRadius * 2.0,child: Hero(createRectTween: _createRectTween,tag: imageName,child: RadialExpansion(maxRadius: kMaxRadius,child: Photo(photo: imageName,onTap: () {Navigator.of(context).push(PageRouteBuilder<void>(pageBuilder: (context, animation, secondaryAnimation) {return AnimatedBuilder(animation: animation,builder: (context, child) {return Opacity(opacity: opacityCurve.transform(animation.value),child: _buildPage(context, imageName, description),);},);},),);},),),),);}@overrideWidget build(BuildContext context) {timeDilation = 5.0; // 1.0 is normal animation speed.return Scaffold(appBar: AppBar(title: const Text('Radial Transition Demo'),),body: Container(padding: const EdgeInsets.all(32),alignment: FractionalOffset.bottomLeft,child: Row(mainAxisAlignment: MainAxisAlignment.spaceBetween,children: [_buildHero(context, 'assets/images/01.jpg', 'Chair'),_buildHero(context, 'assets/images/02.jpg', 'Binoculars'),_buildHero(context, 'assets/images/03.jpg', 'Beach ball'),_buildHero(context, 'assets/images/04.jpg', 'Beach ball'),],),),);}
}class Photo extends StatelessWidget {const Photo({super.key, required this.photo, this.onTap});final String photo;final VoidCallback? onTap;@overrideWidget build(BuildContext context) {return Material(// Slightly opaque color appears where the image has transparency.color: Theme.of(context).primaryColor.withOpacity(0.25),child: InkWell(onTap: onTap,child: LayoutBuilder(builder: (context, size) {return Image.asset(photo,fit: BoxFit.contain,);},),),);}
}class RadialExpansion extends StatelessWidget {const RadialExpansion({super.key,required this.maxRadius,this.child,}) : clipRectSize = 2.0 * (maxRadius / math.sqrt2);final double maxRadius;final double clipRectSize;final Widget? child;@overrideWidget build(BuildContext context) {// 控制形状变化的核心代码return ClipOval( // 圆形child: Center(child: SizedBox(width: clipRectSize,height: clipRectSize,child: ClipRect( // 矩形child: child,),),),);}
}
页面转场动画
在自定义路由时,添加动画,自定义路由需要用到PageRouteBuilder<T>;
import 'package:flutter/material.dart';/// 为页面切换加入动画效果
class PageAnimation extends StatefulWidget {const PageAnimation({super.key});@overrideState<PageAnimation> createState() => _PageAnimationState();
}class _PageAnimationState extends State<PageAnimation> {@overrideWidget build(BuildContext context) {return Scaffold(appBar: AppBar(title: const Text('为页面切换加入动画效果',style: TextStyle(fontSize: 20),)),body: SizedBox(width: MediaQuery.of(context).size.width,height: MediaQuery.of(context).size.height,child: Column(mainAxisAlignment: MainAxisAlignment.center,crossAxisAlignment: CrossAxisAlignment.center,children: [ElevatedButton(onPressed: () {Navigator.of(context).push(_createRouteX());},child: const Text('X轴偏移',style: TextStyle(fontSize: 20),)),ElevatedButton(onPressed: () {Navigator.of(context).push(_createRouteY());},child: const Text('Y轴偏移',style: TextStyle(fontSize: 20),)),ElevatedButton(onPressed: () {Navigator.of(context).push(_createRouteMix());},child: const Text('混合动画',style: TextStyle(fontSize: 20),)),],),),);}/// X轴 平移动画,切换页面Route _createRouteX() {return PageRouteBuilder(// opaque: false, // 新页面,背景色不透明度pageBuilder: (context, animation, secondaryAnimation) => const TestPage01(),transitionsBuilder: (context, animation, secondaryAnimation, child) {const begin = Offset(1.0, 0.0); // 将 dx 参数设为 1,这代表在水平方向左切换整个页面的宽度const end = Offset.zero;const curve = Curves.ease;var tween =Tween(begin: begin, end: end).chain(CurveTween(curve: curve));return SlideTransition(position: animation.drive(tween),child: child,);});}/// Y轴 平移动画,切换页面Route _createRouteY() {return PageRouteBuilder(// opaque: false, // 新页面,背景色不透明度pageBuilder: (context, animation, secondaryAnimation) => const TestPage01(),transitionsBuilder: (context, animation, secondaryAnimation, child) {const begin = Offset(0.0, 1.0); // 将 dy 参数设为 1,这代表在竖直方向上切换整个页面的高度const end = Offset.zero;const curve = Curves.ease;var tween =Tween(begin: begin, end: end).chain(CurveTween(curve: curve));return SlideTransition(position: animation.drive(tween),child: child,);});}/// 多个动画配合,切换页面Route _createRouteMix() {return PageRouteBuilder(// opaque: false, // 新页面,背景色不透明度pageBuilder: (context, animation, secondaryAnimation) => const TestPage01(),transitionsBuilder: (context, animation, secondaryAnimation, child) {var tween = Tween<double>(begin: 0.1, end: 1.0).chain(CurveTween(curve: Curves.ease));return FadeTransition(// 淡入淡出opacity: animation.drive(tween),child: RotationTransition(// 旋转turns: animation.drive(tween),child: ScaleTransition(// 更替scale: animation.drive(tween),child: child,),),);});}
}class TestPage01 extends StatelessWidget {const TestPage01({super.key});@overrideWidget build(BuildContext context) {return Scaffold(backgroundColor: Colors.lightBlue,appBar: AppBar(title: const Text('TestPage01'),),);}
}
交错动画
多个动画配合使用
这个案例是官方的,原汁原味;
import 'package:flutter/material.dart';
import 'package:flutter/scheduler.dart' show timeDilation;class IntertwinedAnimation extends StatefulWidget {const IntertwinedAnimation({super.key});@overrideState<IntertwinedAnimation> createState() => _IntertwinedAnimationState();
}class _IntertwinedAnimationState extends State<IntertwinedAnimation>with SingleTickerProviderStateMixin {late AnimationController _controller;@overridevoid initState() {super.initState();_controller = AnimationController(duration: const Duration(milliseconds: 2000), vsync: this);}@overridevoid dispose() {_controller.dispose();super.dispose();}Future<void> _playAnimation() async {try {await _controller.forward().orCancel;await _controller.reverse().orCancel;} on TickerCanceled {}}@overrideWidget build(BuildContext context) {// timeDilation = 10.0;return Scaffold(appBar: AppBar(title: const Text('交错动画',style: TextStyle(fontSize: 20),)),body: GestureDetector(behavior: HitTestBehavior.opaque,onTap: () {_playAnimation();},child: Center(child: Container(width: 300,height: 300,decoration: BoxDecoration(color: Colors.black.withOpacity(0.1),border: Border.all(color: Colors.black.withOpacity(0.5),)),child: StaggerAnimation(controller: _controller),),),),);}
}class StaggerAnimation extends StatelessWidget {final Animation<double> controller;final Animation<double> opacity;final Animation<double> width;final Animation<double> height;final Animation<EdgeInsets> padding;final Animation<BorderRadius?> borderRadius;final Animation<Color?> color;StaggerAnimation({super.key, required this.controller}): opacity = Tween<double>(begin: 0.0,end: 1.0,).animate(CurvedAnimation(parent: controller,curve: const Interval(0.0,0.100,curve: Curves.ease,))),width = Tween<double>(begin: 50.0,end: 150.0,).animate(CurvedAnimation(parent: controller,curve: const Interval(0.125,0.250,curve: Curves.ease,))),height = Tween<double>(begin: 50.0, end: 150.0).animate(CurvedAnimation(parent: controller,curve: const Interval(0.250,0.375,curve: Curves.ease,))),padding = EdgeInsetsTween(begin: const EdgeInsets.only(bottom: 16),end: const EdgeInsets.only(bottom: 75),).animate(CurvedAnimation(parent: controller,curve: const Interval(0.250,0.375,curve: Curves.ease,))),borderRadius = BorderRadiusTween(begin: BorderRadius.circular(4),end: BorderRadius.circular(75),).animate(CurvedAnimation(parent: controller,curve: const Interval(0.375,0.500,curve: Curves.ease,))),color = ColorTween(begin: Colors.indigo[100], end: Colors.orange[400]).animate(CurvedAnimation(parent: controller,curve: const Interval(0.500,0.750,curve: Curves.ease,)));Widget _buildAnimation(BuildContext context, Widget? child) {return Container(padding: padding.value,alignment: Alignment.bottomCenter,child: Opacity(opacity: opacity.value,child: Container(width: width.value,height: height.value,decoration: BoxDecoration(color: color.value,border: Border.all(color: Colors.indigo[300]!,width: 3,),borderRadius: borderRadius.value),),),);}@overrideWidget build(BuildContext context) {return AnimatedBuilder(builder: _buildAnimation,animation: controller,);}
}
依次执行动画
这个案例是根据官方demo改的,它那个太复杂了,不利于新手阅读(个人觉得);
官方文档:创建一个交错效果的侧边栏菜单 - Flutter 中文文档 - Flutter 中文开发者网站 - Flutter
import 'package:flutter/material.dart';class Intertwined02Animation extends StatefulWidget {const Intertwined02Animation({super.key});@overrideState<Intertwined02Animation> createState() => _Intertwined02AnimationState();
}class _Intertwined02AnimationState extends State<Intertwined02Animation> {@overrideWidget build(BuildContext context) {return Scaffold(body: SizedBox(width: MediaQuery.of(context).size.width,height: MediaQuery.of(context).size.height,child: const TableList(),// child: const Column(//   crossAxisAlignment: CrossAxisAlignment.center,//   children: [//     TableList()//   ],// ),),);}
}class TableList extends StatefulWidget {const TableList({super.key});@overrideState<TableList> createState() => _TableListState();
}class _TableListState extends State<TableList> with SingleTickerProviderStateMixin {/// 遍历循环写法late AnimationController _controller;final Duration _durationTime = const Duration(milliseconds: 3000);@overrideinitState() {super.initState();_controller = AnimationController(vsync: this, duration: _durationTime);_controller.forward();}@overridevoid dispose() {_controller.dispose();super.dispose();}/// 遍历IntervalList<Interval> _createInterval() {List<Interval> intervals = [];// Interval(0.0,0.5);// Interval(0.5,0.75);// Interval(0.75,1.0);double begin = 0.0;double end = 0.5;for (int i = 0; i < 3; i++) {if (i == 0) {intervals.add(Interval(begin, end));} else {begin = end;end = begin + 0.25;intervals.add(Interval(begin, end));}// debugPrint('begin:$begin --- end:$end');}return intervals;}/// 遍历循环组件List<Widget> _createWidget() {var intervals = _createInterval();List<Widget> listItems = [];for (int i = 0; i < 3; i++) {listItems.add(AnimatedBuilder(animation: _controller,builder: (context, child) {var animationPercent = Curves.easeOut.transform(intervals[i].transform(_controller.value));final opacity = animationPercent;final slideDistance = (1.0 - animationPercent) * 150;return Opacity(opacity: i == 2 ? opacity : 1,child: Transform.translate(offset: Offset(slideDistance, 100 + (i * 50)),child: child,));},child: Container(width: 100,height: 50,color: Colors.lightBlue,),));}return listItems;}@overrideWidget build(BuildContext context) {return SizedBox(width: MediaQuery.of(context).size.width,height: MediaQuery.of(context).size.height,child: Column(children: _createWidget(),),);}/// 非遍历循环写法
// late AnimationController _controller;
//
// final Interval _intervalA = const Interval(0.0, 0.5);
// final Interval _intervalB = const Interval(0.5, 0.8);
// final Interval _intervalC = const Interval(0.8, 1.0);
//
// final Duration _durationTime = const Duration(milliseconds: 3000);
//
// @override
// void initState() {
//   super.initState();
//   _controller = AnimationController(vsync: this, duration: _durationTime);
//   _controller.forward();
// }
//
// @override
// void dispose() {
//   _controller.dispose();
//   super.dispose();
// }
//
// @override
// Widget build(BuildContext context) {
//   return SizedBox(
//     width: MediaQuery.of(context).size.width,
//     height: MediaQuery.of(context).size.height,
//     child: Column(
//       children: [
//         AnimatedBuilder(
//           animation: _controller,
//           builder: (context,child) {
//             var animationPercent = Curves.easeOut.transform(_intervalA.transform(_controller.value));
//             final slideDistance = (1.0 - animationPercent) * 150;
//             return Transform.translate(
//               offset: Offset(slideDistance,100),
//               child: child
//             );
//           },
//           child: Container(
//             width: 100,
//             height: 50,
//             color: Colors.lightBlue,
//           ),
//         ),
//         AnimatedBuilder(
//           animation: _controller,
//           builder: (context,child) {
//             var animationPercent = Curves.easeOut.transform(_intervalB.transform(_controller.value));
//             final slideDistance = (1.0 - animationPercent) * 150;
//             return Transform.translate(
//                 offset: Offset(slideDistance,150),
//                 child: child
//             );
//           },
//           child: Container(
//             width: 100,
//             height: 50,
//             color: Colors.lightBlue,
//           ),
//         ),
//         AnimatedBuilder(
//           animation: _controller,
//           builder: (context,child) {
//             var animationPercent = Curves.easeOut.transform(_intervalC.transform(_controller.value));
//             final opacity = animationPercent;
//             final slideDistance = (1.0 - animationPercent) * 150;
//             return Opacity(
//               opacity: opacity,
//               child: Transform.translate(
//                   offset: Offset(slideDistance,200),
//                   child: child
//               ),
//             );
//           },
//           child: Container(
//             width: 100,
//             height: 50,
//             color: Colors.lightBlue,
//           ),
//         ),
//       ],
//     ),
//   );
// }/// 基础版本写法
// late AnimationController _controller;
// final Duration _durationTime = const Duration(milliseconds: 2000);
// // 0.0 - 1.0 / 0% - 100%
// final Interval _interval = const Interval(0.5, 1.0); // 延迟 50% 再开始 启动动画,执行到 100%
// // final Interval _interval = const Interval(0.5, 0.7); // 延迟 50% 再开始 启动动画,后期的执行速度,增加 30%
// // final Interval _interval = const Interval(0.0, 0.1); // 不延迟 动画执行速度,增加 90%
//
// @override
// void initState() {
//   super.initState();
//   _controller = AnimationController(vsync: this, duration: _durationTime);
//   _controller.forward();
// }
//
// @override
// void dispose() {
//   _controller.dispose();
//   super.dispose();
// }// @override
// Widget build(BuildContext context) {
//   return AnimatedBuilder(
//       animation: _controller,
//       builder: (context,child) {
//         // var animationPercent = Curves.easeOut.transform(_controller.value); // 加动画曲线
//         // var animationPercent = _interval.transform(_controller.value); // 加动画间隔
//         var animationPercent = Curves.easeOut.transform(_interval.transform(_controller.value)); // 动画曲线 + 动画间隔
//
//         final slideDistance = (1.0 - animationPercent) * 150; // 就是对150 做递减
//         // debugPrint('animationPercent:$animationPercent --- slideDistance:$slideDistance');
//         debugPrint('slideDistance:$slideDistance');
//
//         return Transform.translate(
//           offset: Offset(0,slideDistance),
//           child: child
//         );
//       },
//     child: Container(
//       width: 100,
//       height: 50,
//       color: Colors.lightBlue,
//     ),
//   );
// }
}
官方文档
动画效果介绍 - Flutter 中文文档 - Flutter 中文开发者网站 - Flutter
相关文章:
Flutter 动画(显式动画、隐式动画、Hero动画、页面转场动画、交错动画)
前言 当前案例 Flutter SDK版本:3.13.2 显式动画 Tween({this.begin,this.end}) 两个构造参数,分别是 开始值 和 结束值,根据这两个值,提供了控制动画的方法,以下是常用的; controller.forward() : 向前…...
用HTML5 Canvas创造视觉盛宴——动态彩色线条效果
目录 一、程序代码 二、代码原理 三、运行效果 一、程序代码 <!DOCTYPE html PUBLIC "-//W3C//DTD XHTML 1.0 Transitional//EN" "http://www.w3.org/TR/xhtml1/DTD/xhtml1-transitional.dtd"> <!-- 声明文档类型为XHTML 1.0 Transitional -…...
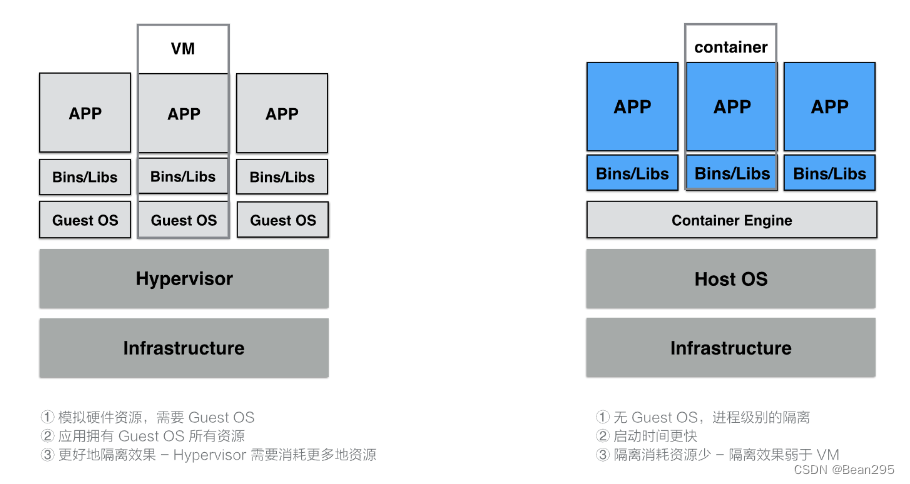
云原生介绍与容器的基本概念
云原生介绍 1、云原生的定义 云原生为用户指定了一条低心智负担的、敏捷的、能够以可扩展、可复制的方式最大化地利用云的能力、发挥云的价值的最佳路径。 2、云原生思想两个理论 第一个理论基础是:不可变基础设施。 第二个理论基础是:云应用编排理…...
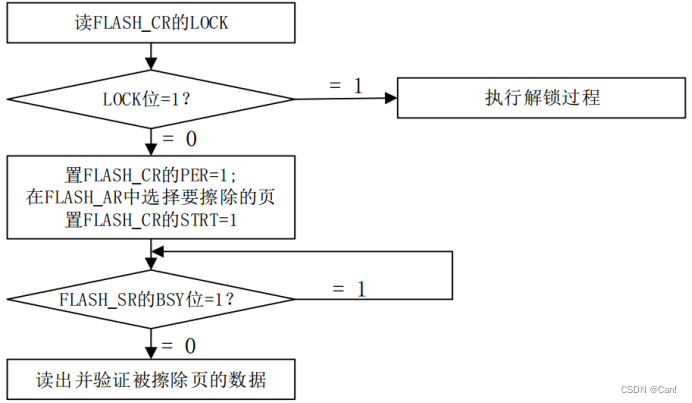
Flash存储
目录 一、MCU读写擦除Flash步骤 1、写flash步骤: 2、读flash步骤: 3、擦除flash步骤: 4、要注意的地方: 一、MCU读写擦除Flash步骤 1、写flash步骤: (1)解锁 2、读flash步骤: 3、擦除flash步骤&#x…...
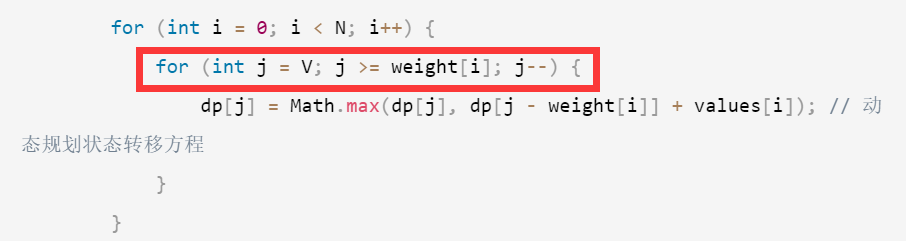
Day 44 | 动态规划 完全背包、518. 零钱兑换 II 、 377. 组合总和 Ⅳ
完全背包 题目 文章讲解 视频讲解 完全背包和0-1背包的区别在于:物品是否可以重复使用 思路:对于完全背包问题,内层循环的遍历方式应该是从weight[i]开始一直遍历到V,而不是从V到weight[i]。这样可以确保每种物品可以被选择多次…...
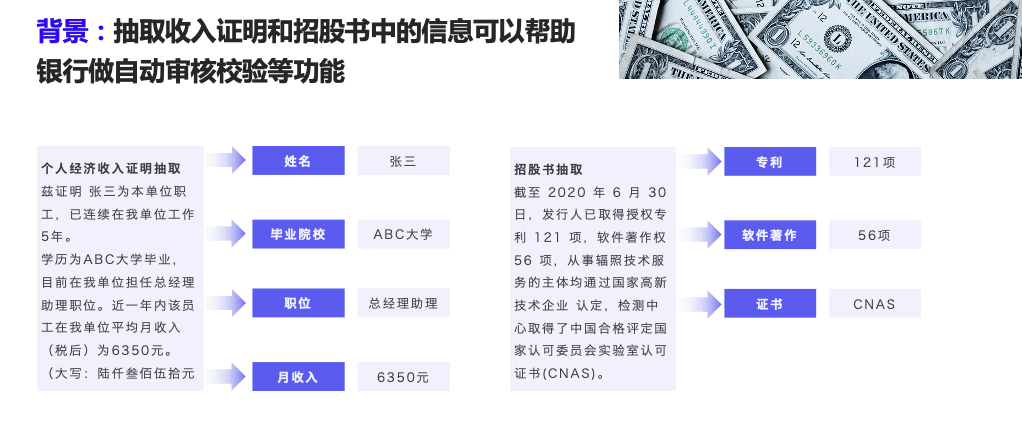
使用PaddleNLP UIE模型提取上市公司PDF公告关键信息
项目地址:使用PaddleNLP UIE模型抽取PDF版上市公司公告 - 飞桨AI Studio星河社区 (baidu.com) 背景介绍 本项目将演示如何通过PDFPlumber库和PaddleNLP UIE模型,抽取公告中的相关信息。本次任务的PDF内容是破产清算的相关公告,目标是获取受理…...
软件工程师,OpenAI Sora驾到,快来围观
概述 近期,OpenAI在其官方网站上公布了Sora文生视频模型的详细信息,展示了其令人印象深刻的能力,包括根据文本输入快速生成长达一分钟的高清视频。Sora的强大之处在于其能够根据文本描述,生成长达60秒的视频,其中包含&…...

【Linux 04】编辑器 vim 详细介绍
文章目录 🌈 Ⅰ 基本概念🌈 Ⅱ 基本操作1. 进入 / 退出 vim2. vim 模式切换 🌈 Ⅲ 命令模式1. 光标的移动2. 复制与粘贴3. 剪切与删除4. 撤销与恢复 🌈 Ⅳ 底行模式1. 保存文件2. 查找字符3. 退出文件4. 替换内容5. 显示行号6. 外…...
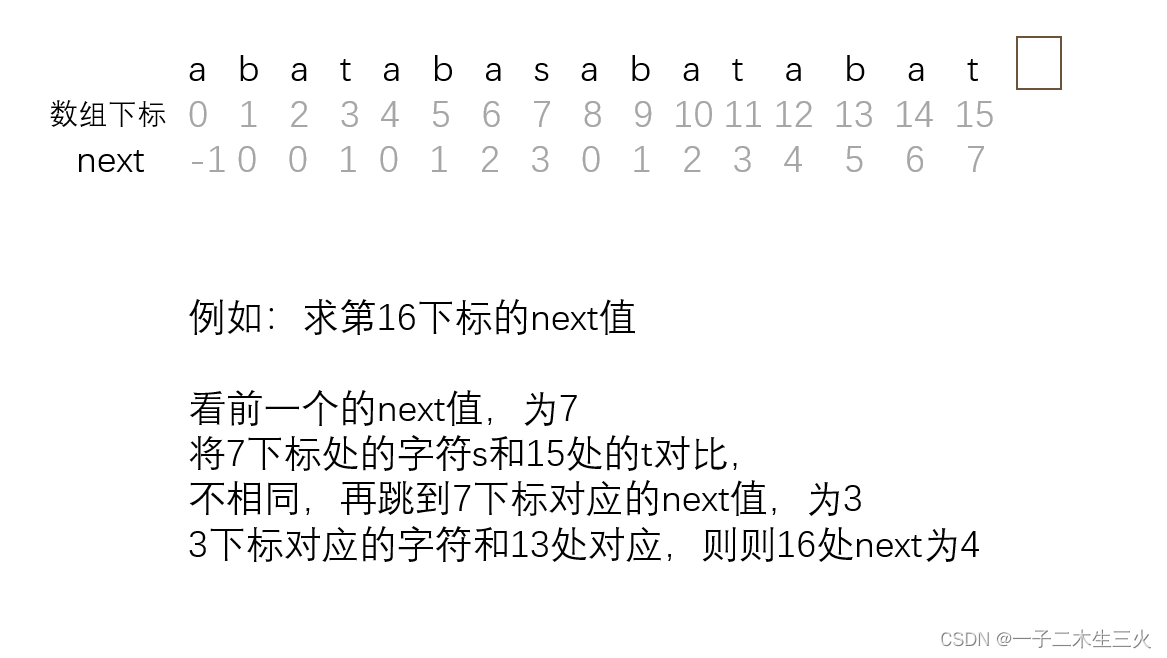
KMP算法详解
1. 问题引入 链接:leetcode_28 题目:s1字符串是否包含s2字符串,如果包含返回s1中包含s2的最左开头位置,不包含返回-1 暴力方法就是s1的每个位置都做开头,然后去匹配s2整体,时间复杂度O(n*m) KMP算法可以…...
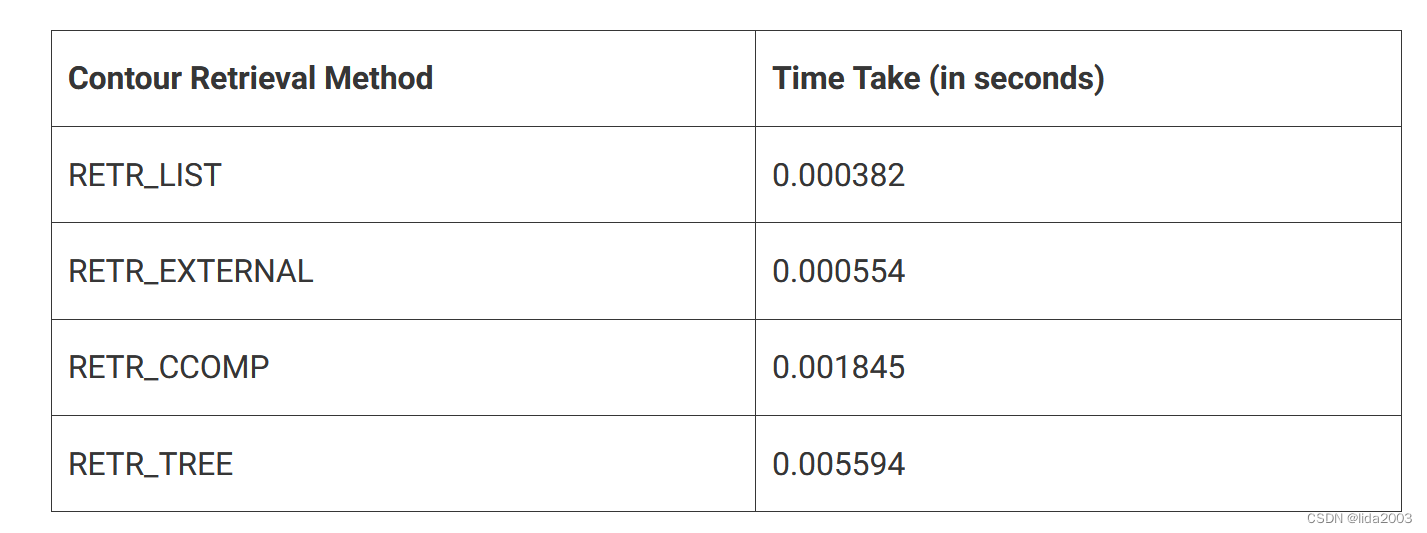
ubuntu22.04@laptop OpenCV Get Started: 013_contour_detection
ubuntu22.04laptop OpenCV Get Started: 013_contour_detection 1. 源由2. 应用Demo2.1 C应用Demo2.2 Python应用Demo 3. contour_approx应用3.1 读取图像并将其转换为灰度格式3.2 应用二进制阈值过滤算法3.3 查找对象轮廓3.4 绘制对象轮廓3.5 效果3.6 CHAIN_APPROX_SIMPLE v.s…...
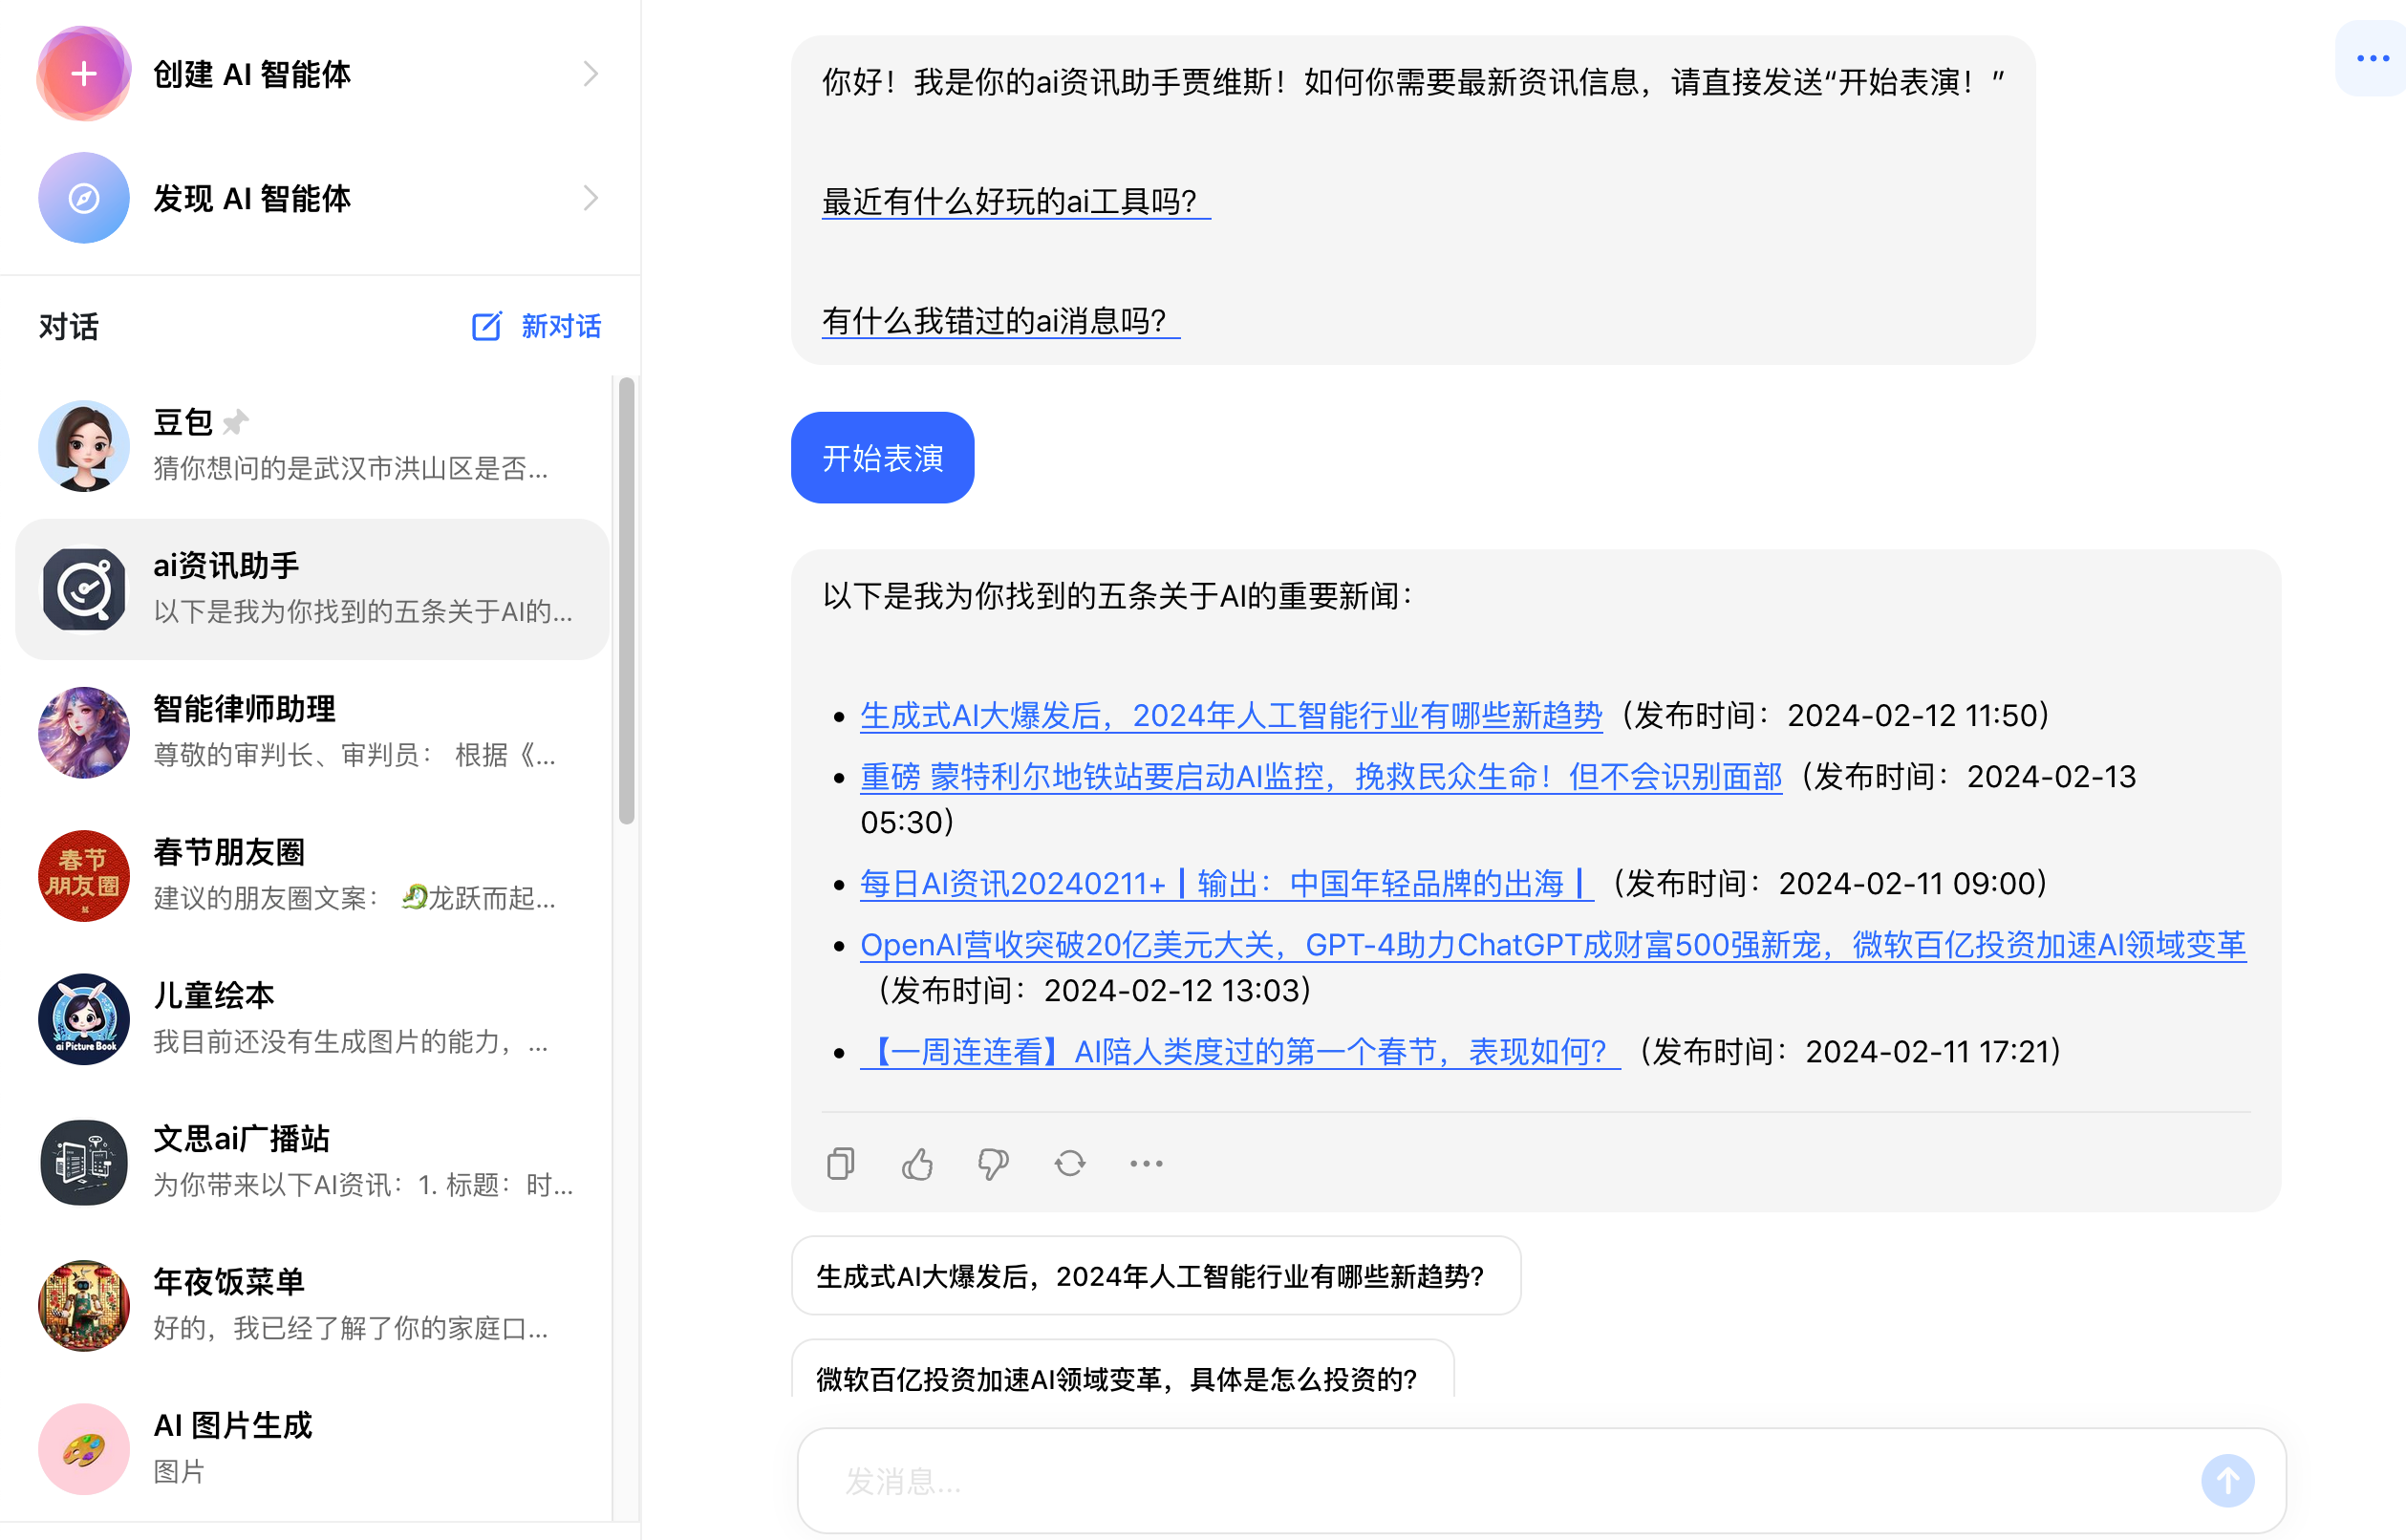
[ai笔记5] 个人AI资讯助手实战
欢迎来到文思源想的ai空间,这是技术老兵重学ai以及成长思考的第5篇分享,也是把ai场景化应用的第一篇实操内容! 既然要充分学习和了解ai,自然少不了要时常看看ai相关资讯,所以今天特地用字节的“扣子”做了一个ai的资讯…...
)
QT+OSG/osgEarth编译之八十九:osgdb_ply+Qt编译(一套代码、一套框架,跨平台编译,版本:OSG-3.6.5插件库osgdb_ply)
文章目录 一、osgdb_ply介绍二、文件分析三、pro文件四、编译实践一、osgdb_ply介绍 斯坦福三角形格式(Stanford Triangle Format)是一种用于存储三维模型数据的文件格式,也称为 PLY 格式。它最初由斯坦福大学图形实验室开发,用于存储和共享三维扫描和计算机图形数据。 P…...
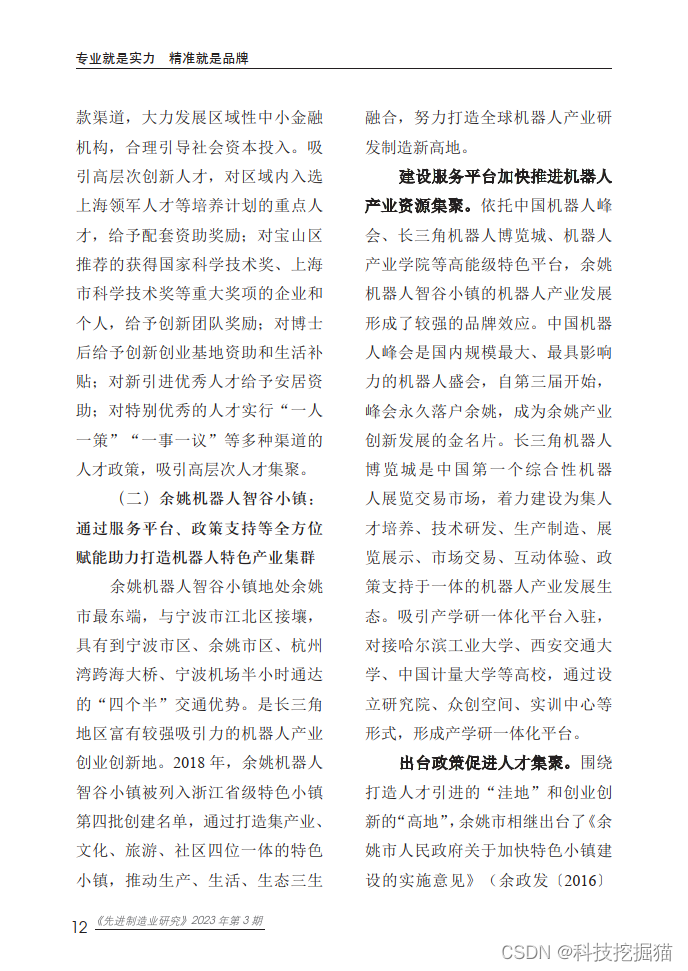
机器人专题:我国机器人产业园区发展现状、问题、经验及建议
今天分享的是机器人系列深度研究报告:《机器人专题:我国机器人产业园区发展现状、问题、经验及建议》。 (报告出品方:赛迪研究院) 报告共计:26页 机器人作为推动工业化发展和数字中国建设的重要工具&…...
算法沉淀——哈希算法(leetcode真题剖析)
算法沉淀——哈希算法 01.两数之和02.判定是否互为字符重排03.存在重复元素04.存在重复元素 II05.字母异位词分组 哈希算法(Hash Algorithm)是一种将任意长度的输入(也称为消息)映射为固定长度的输出的算法。这个输出通常称为哈希…...
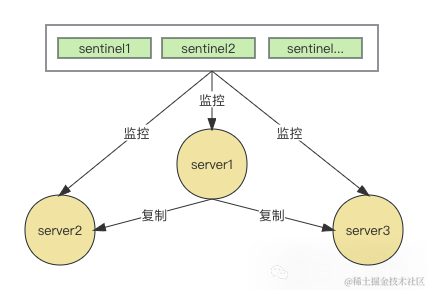
深入理解Redis哨兵原理
哨兵模式介绍 在深入理解Redis主从架构中Redis 的主从架构中,由于主从模式是读写分离的,如果主节点(master)挂了,那么将没有主节点来服务客户端的写操作请求,也没有主节点给从节点(slave&#…...
)
MySQL-存储过程(PROCEDURE)
文章目录 1. 什么是存储过程?2. 存储过程的优点3. MySQL中的变量3.1 系统变量3.2 用户自定义变量3.3 局部变量 4. 存储过程的相关语法4.1 创建存储过程(CREATE)4.2 查看存储过程(SHOW)4.3 修改存储过程(ALT…...
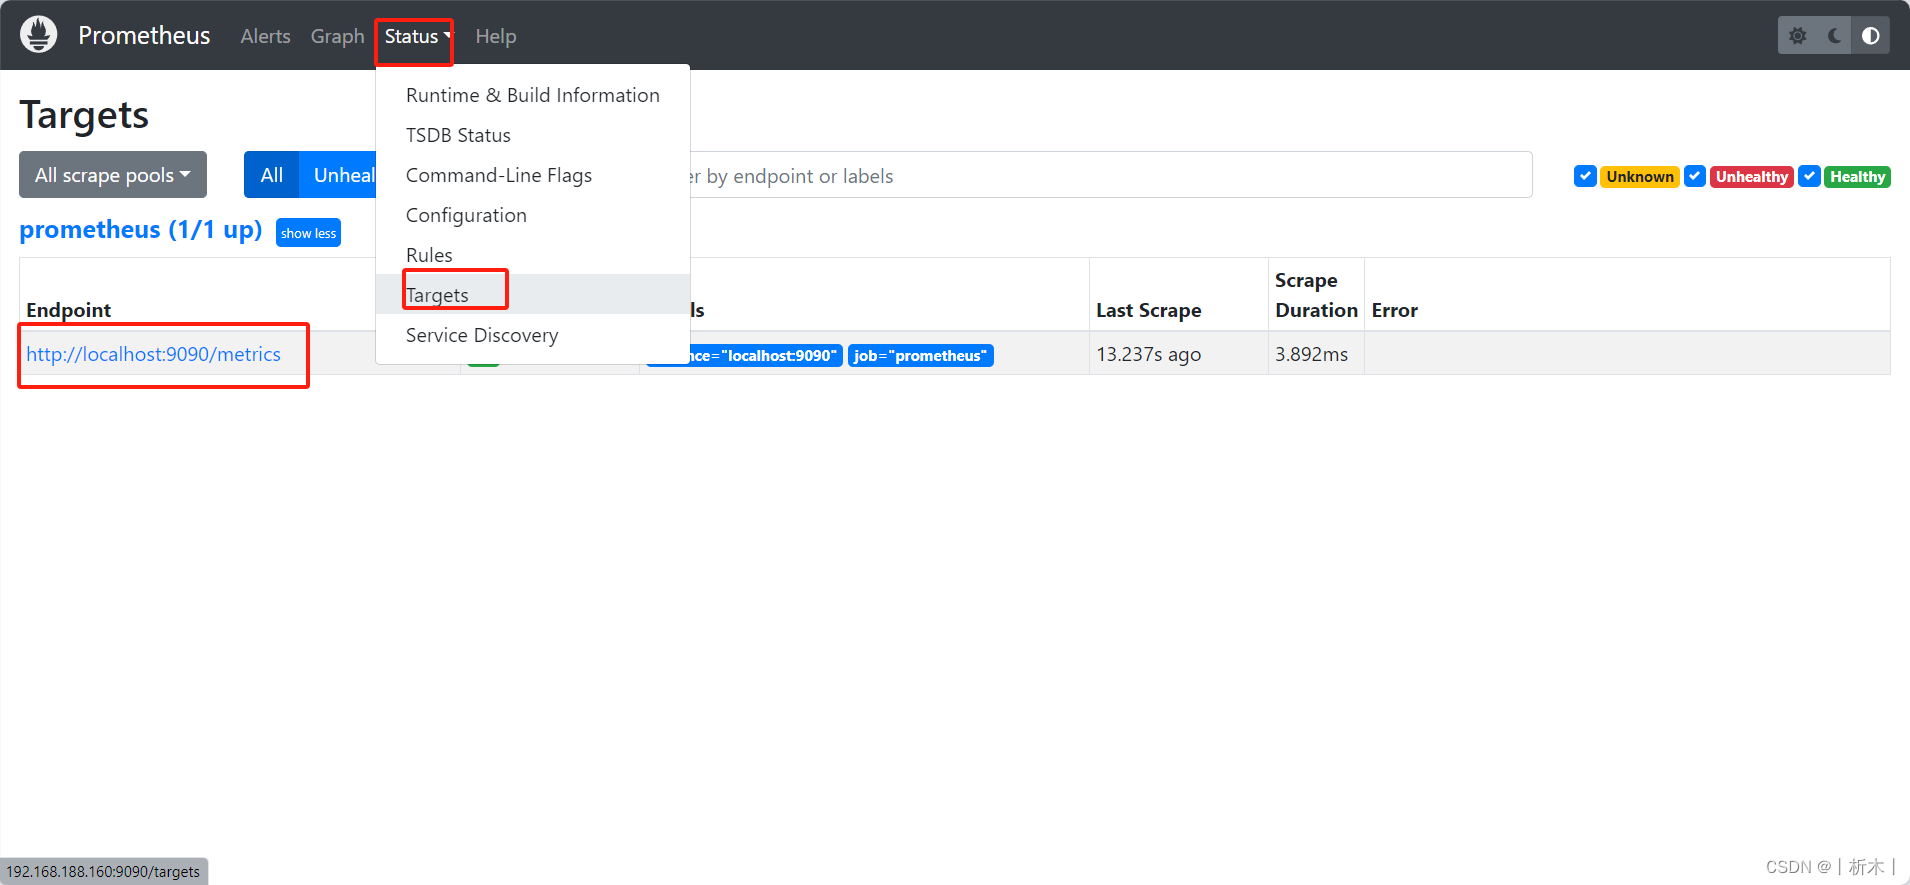
linux系统监控工具prometheus的安装以及监控mysql
prometheus 安装服务端客户端监控mysql prometheus浏览器查看 安装 https://prometheus.io/download/下载客户端和服务端以及需要监控的所有的包服务端 官网下载下载prometheustar -xf prometheus-2.47.2.linux-amd64.tar.gz -C /usr/local/ cd /usr/local/ mv prometheus-2.…...

初识tensorflow程序设计模式
文章目录 建立计算图tensorflow placeholdertensorflow数值运算常用的方法 tensorboard启动tensorboard的方法 建立一维与二维张量建立一维张量建立二维张量建立新的二维张量 矩阵的基本运算矩阵的加法矩阵乘法与加法 github地址https://github.com/fz861062923/TensorFlow 建…...
)
【QT+QGIS跨平台编译】之三十八:【GDAL+Qt跨平台编译】(一套代码、一套框架,跨平台编译)
文章目录 一、gdal介绍二、文件下载三、文件分析四、pro文件五、编译实践一、gdal介绍 GDAL(Geospatial Data Abstraction Library)是一个用于读取、写入和处理地理空间数据的开源库。它支持多种栅格和矢量地理空间数据格式,包括常见的GeoTIFF、Shapefile、NetCDF、HDF5等,…...

黑马鸿蒙教程学习1:Helloworld
今年打算粗略学习下鸿蒙开发,当作兴趣爱好,通过下华为那个鸿蒙开发认证, 发现黑马的课程不错,有视频和完整的代码和课件下载,装个devstudio就行了,建议32G内存。 今年的确是鸿蒙大爆发的一年呀,…...

OpenClaw 入门完整教程:从零搭建自托管AI网关
OpenClaw入门到实战:自托管AI网关完整部署指南 作者:鲲鹏AI探索局 | 标签:OpenClaw, AI Agent, 自托管, 多平台聊天, 网关部署 摘要 本文详细介绍OpenClaw——一个开源自托管AI网关的安装、配置和实战部署全过程。通过实际案例演示如何连接T…...

ZYNQ PS侧DDR3内存配置避坑指南:以ACZ702开发板为例,手把手教你搞定MT41K128M16
ZYNQ PS侧DDR3内存配置实战:从硬件原理到Vivado参数设置全解析 当你第一次拿到ACZ702这样的ZYNQ开发板,准备配置PS侧的DDR3内存时,是否遇到过这样的困惑:为什么在Vivado中找不到DDR管脚约束选项?为什么按照传统FPGA的D…...

革新性PDF可视化标记技术:从原理到实践的全方位解析
革新性PDF可视化标记技术:从原理到实践的全方位解析 【免费下载链接】obsidian-pdf-plus PDF: the most Obsidian-native PDF annotation & viewing tool ever. Comes with optional Vim keybindings. 项目地址: https://gitcode.com/gh_mirrors/ob/obsidian-…...

嵌入式C语言状态机编程实践与优化
1. 状态机编程基础概念在嵌入式系统开发中,状态机(State Machine)是一种极其重要的编程范式。它通过定义系统可能处于的状态集合、状态之间的转换条件以及状态转换时执行的动作,来清晰地描述系统的行为逻辑。状态机之所以在嵌入式领域广泛应用࿰…...

Seqlist 顺序表 的实现c语言
本小结重点: 你将学到 函数基础 传值传地址的区别结构体指针 简单循环控制 理解物理结构与存储结构的区别多文件分布 简单来说就是对动态数组进行函数封装,简化了很多功能所以很多就是对数组的利用,但更多是对结构体数组,所…...

基于高斯过程回归的MATLAB时间序列区间预测代码实现与解析
基于高斯过程回归(GPR)的时间序列区间预测 GPR时间序列区间预测 matlab代码 暂无Matlab版本要求 -- 推荐 2018B 版本及以上做时间序列最烦的就是拍脑袋给个“明天涨3%左右”——“左右”到底是正负0.5还是正负3?如果是风电发电的负荷申报,正负差多了要罚…...

OpCore-Simplify:3步搞定黑苹果EFI配置,告别繁琐手动调试
OpCore-Simplify:3步搞定黑苹果EFI配置,告别繁琐手动调试 【免费下载链接】OpCore-Simplify A tool designed to simplify the creation of OpenCore EFI 项目地址: https://gitcode.com/GitHub_Trending/op/OpCore-Simplify 你是否曾经被黑苹果复…...

Graphormer效果对比评测:vs GCN、GAT、GIN在分子回归任务上的表现
Graphormer效果对比评测:vs GCN、GAT、GIN在分子回归任务上的表现 1. 引言 在药物发现和材料科学领域,准确预测分子属性是一个关键挑战。传统方法依赖昂贵的实验或复杂的量子化学计算,而图神经网络(GNN)提供了一种更高效的替代方案。本文将…...

4步轻松搞定Windows系统优化:Win11Debloat让你的电脑重获新生
4步轻松搞定Windows系统优化:Win11Debloat让你的电脑重获新生 【免费下载链接】Win11Debloat A simple, lightweight PowerShell script that allows you to remove pre-installed apps, disable telemetry, as well as perform various other changes to declutter…...

5步高效使用小说下载工具:零基础也能掌握的开源项目全攻略
5步高效使用小说下载工具:零基础也能掌握的开源项目全攻略 【免费下载链接】novel-downloader 一个可扩展的通用型小说下载器。 项目地址: https://gitcode.com/gh_mirrors/no/novel-downloader 在数字阅读时代,拥有一款可靠的小说下载工具能让你…...