一文带你入门angular(中)
一、angular中的dom操作原生和ViewChild两种方式以及css3动画
1.原生操作
import { Component } from '@angular/core';@Component({selector: 'app-footer',templateUrl: './footer.component.html',styleUrls: ['./footer.component.scss']
})
export class FooterComponent {flag: boolean = truengOnInit() {//在这个生命周期函数里面,组件和指令只是初始化完成,不是dom加载完毕var ownBox: any = document.getElementById("box")ownBox.style.color = "red"//所以dom元素上添加ngIf指令,控制台会报错var ownBox2: any = document.getElementById("box1")ownBox2.style.color = "blue"}ngAfterViewInit(): void {//在这个生命周期函数就可以,因为dom加载完毕,建议dom操作防止此处var ownBox2: any = document.getElementById("box1")ownBox2.style.color = "blue"}
}
<p>footer works!</p>
<div id="box">这是一个盒子
</div><div id="box1" *ngIf="flag">这是第2个盒子
</div>
2.ViewChild操作
//核心模块引入ViewChild
import { Component, ViewChild } from '@angular/core';@Component({selector: 'app-footer',templateUrl: './footer.component.html',styleUrls: ['./footer.component.scss']
})export class FooterComponent {//装饰器获取dom节点,此处相当于把box dom节点赋值给了Box@ViewChild("box") Box: any;constructor() { }ngAfterViewInit(): void {// nativeElement在this.Box打印出后显示的方法console.log(this.Box.nativeElement);// 这样也可以操作this.Box.nativeElement.style.color = "blue"this.Box.nativeElement.style.width = "100px"this.Box.nativeElement.style.height = "100px"this.Box.nativeElement.style.background = "orange"console.log(this.Box.nativeElement.innerHTML);//viewchild方法}
}
<p #box>viewchild方法</p>3.父子组件中通过ViewChild调用子组件的方法
父组件header.component.ts:
import { Component, ViewChild } from '@angular/core';@Component({selector: 'app-header',templateUrl: './header.component.html',styleUrls: ['./header.component.scss']
})
export class HeaderComponent {//装饰器@ViewChild("child") Child: anyngAfterViewInit(): void {this.Child.children()}handle() {//调用子组件里面的方法this.Child.children()}
}
父组件header.component.html:
<p>我是header组件</p>
<app-footer #child></app-footer>
<button (click)="handle()">获取子组件里面的方法</button>
子组件footer.component.ts:
//核心模块引入ViewChild
import { Component, ViewChild } from '@angular/core';@Component({selector: 'app-footer',templateUrl: './footer.component.html',styleUrls: ['./footer.component.scss']
})export class FooterComponent {//装饰器获取dom节点,此处相当于把box dom节点赋值给了Box@ViewChild("box") Box: any;constructor() {}ngAfterViewInit(): void {// nativeElement在this.Box打印出后显示的方法console.log(this.Box.nativeElement);// 这样也可以操作this.Box.nativeElement.style.color = "blue"this.Box.nativeElement.style.width = "100px"this.Box.nativeElement.style.height = "100px"this.Box.nativeElement.style.background = "orange"console.log(this.Box.nativeElement.innerHTML);//viewchild方法}children() {console.log("我是子组件里的方法");}
}
4.css3动画
transition.component.html:
<div class="contain">内容区域<button (click)="show()">弹出侧边栏</button>
</div>
<aside id="aside">侧边栏区域
</aside>
transition.component.scss定义样式:
#aside {width: 200px;height: 100%;right: 0;top: 0;background-color: aqua;position: absolute;transform: translate(100%, 0);transition: all 2s;
}
然后在style.scss设置全局样式,解决导航条显现问题:
body {width: 100%;overflow-x: hidden;
}
transition.component.ts获取dom并操作:
import { Component } from '@angular/core';@Component({selector: 'app-transition',templateUrl: './transition.component.html',styleUrls: ['./transition.component.scss']
})
export class TransitionComponent {ngAfterViewInit(): void {}show() {var aside1: any = document.getElementById("aside")aside1.style.transform = "translate(0,0)"}}
二、父子之间通讯以及组件之间通讯
1.父组件给子组件@input
①子组件可以获取父组件的数据
②子组件可以执行父组件的方法
father.component.ts:
import { Component } from '@angular/core';@Component({selector: 'app-father',templateUrl: './father.component.html',styleUrls: ['./father.component.scss']
})
export class FatherComponent {// 1.定义数据msg = "我是通讯信息"child() {alert("我是父组件的方法")}
}
father.component.html:
<p>我是父组件</p>
<hr>
<!-- 2.msg传值 child传方法  this传整个组件 -->
<app-child [msg]="msg" [child]="child" [every]="this"></app-child>
child.component.ts:
// 3.引入Input
import { Component, Input } from '@angular/core';@Component({selector: 'app-child',templateUrl: './child.component.html',styleUrls: ['./child.component.scss']
})
export class ChildComponent {@Input() msg: any@Input() child: any@Input() every: anyconstructor() {}getFather() {this.child()console.log(this.every.msg);}
}
child.component.html:
<!-- 获取父组件信息 -->
<p>我是子组件--{{msg}}</p>
<button (click)="getFather()">执行父组件传过来的方法</button>
2.子组件给父组件传值@ViewChild
①父组件可以获取子组件的数据
②父组件可以获取子组件的方法
father.compoent.ts:
import { Component, ViewChild } from '@angular/core';@Component({selector: 'app-father',templateUrl: './father.component.html',styleUrls: ['./father.component.scss']
})
export class FatherComponent {@ViewChild("child") child: anygetChild() {this.child.child()}
}
father.compoent.html:
<p>我是父组件--{{child.msg}}</p>
<button (click)="getChild()">获取子组件里面的方法</button>
<hr><app-child #child></app-child>
child.compoent.ts:
import { Component } from '@angular/core';@Component({selector: 'app-child',templateUrl: './child.component.html',styleUrls: ['./child.component.scss']
})
export class ChildComponent {// 定义数据msg = "我是子组件的msg"constructor() {}child() {alert("我是子组件的方法")}
}
child.compoent.html:
<p>我是子组件</p>效果图:

3.子组件通过@Output触发父组件的方法
child.component.ts:
// 1.引入Output,EventEmitter
import { Component, Output, EventEmitter } from '@angular/core';@Component({selector: 'app-child',templateUrl: './child.component.html',styleUrls: ['./child.component.scss']
})
export class ChildComponent {//2.new一个实例@Output() public outer = new EventEmitter()constructor() {}sendFather() {alert(1111)this.outer.emit("我是子组件的数据")}
}
child.component.html:
<p>我是子组件</p>
<button (click)="sendFather()">通过@Output触发父组件方法</button>
father.component.ts:
import { Component, ViewChild } from '@angular/core';@Component({selector: 'app-father',templateUrl: './father.component.html',styleUrls: ['./father.component.scss']
})
export class FatherComponent {@ViewChild("child") child: anygetChild() {this.child.child()}run(e: any) {alert("我是父组件的方法")console.log(e);//获取到的时emit过来的数据}
}
father.component.html:
<p>我是父组件</p>
<button (click)="getChild()">获取子组件里面的方法</button>
<hr>
<!-- 注意outer要和@Output() public outer = new EventEmitter()里面的outer一致 -->
<app-child #child (outer)="run($event)"></app-child>
4.非父子组件传值:
1.组件之间传值可以使用localstorage
2.共享方法可以使用service(可参考上篇使用)
三、生命周期函数
这里只讲一下使用,详细钩子请参考官网:Angular - 生命周期钩子
import { Component, ViewChild } from '@angular/core';@Component({selector: 'app-header',templateUrl: './header.component.html',styleUrls: ['./header.component.scss']
})
export class HeaderComponent {constructor() {console.log("0-constructor---除了使用简单的值对局部变量进行初始化之外,什么都不用做");}ngOnChanges() {console.log("1-ngOnChanges---当被绑定的输入属性的值发生变化时调用,父子传值时会被触发");}ngOnInit() {console.log("2-ngOnInit---请求数据一般放在这里");}ngDoCheck() {console.log("3-ngDoCheck---检测,并在angular发生无法或者不愿自己检测的变化时作出反应");}ngAfterContentInit() {console.log("4-ngAfterContentInit---当把内容投影到组件之后调用");}ngAfterContentChecked() {console.log("5-ngAfterContentChecked---每次完成被投影组件内容的变更检测之后调用");}ngAfterViewInit() {console.log("6-ngAfterViewInit---初始化完组件视图及其子视图之后调用,dom操作放在这个里面");}ngAfterViewChecked() {console.log("7-ngAfterViewChecked---每次完成组件视图和子视图的变更检测之后调用");}ngOnDestroy() {console.log("8-ngOnDestroy---销毁");}
}
四、RxJS(类似于vue中的promise)
RxJS是 ReactiveX编程理念的JavaScript版本。ReactiveX来自微软,它是一种针对异步数据流的编程。简单来说,它将一切数据,包括HTTP请求,DOM事件或者普通数据等包装成流的形式,然后用强大丰富的操作符对流进行处理,使你能以同步编程的方式处理异步数据,并组合不同的操作符来轻松优雅的实现你所需要的功能。
RxJS是一种针对异步数据流编程工具,或者叫响应式扩展编程;可不管如何解释RxlS其目标就是异步编程,Angular引入 RxJS为了就是让异步可控、更简单。RxlS里面提供了很多模块。这里我们主要使用RxJS里面最常用的Observable和fromEvent。
目前常见的异步编程的几种方法:
1.回调函数
comoon.service.ts:
import { Injectable } from '@angular/core';@Injectable({providedIn: 'root'
})
export class ComoonService {constructor() {}out() {return "service"}//解决方式,传入回调函数data(cb: any) {setTimeout(() => {var data = "张三"// return datacb(data)}, 1000)}
}
header.component.ts:
import { Component } from '@angular/core';
import { ComoonService } from "../../services/comoon.service"
@Component({selector: 'app-header',templateUrl: './header.component.html',styleUrls: ['./header.component.scss']
})
export class HeaderComponent {constructor(public res: ComoonService) {}ngOnInit() {// let str = this.res.data()//undefined,获取不到service里的异步// console.log(str);this.res.data((data: any) => {console.log(data);//张三})}
}
2.事件监听/发布订阅
3.promise
comoon.service.ts:
import { Injectable } from '@angular/core';@Injectable({providedIn: 'root'
})
export class ComoonService {constructor() {}PromiseData() {return new Promise((resolve, reject) => {setTimeout(() => {var username = "张三"resolve(username)}, 1000)})}
}
header.component.ts:
import { Component } from '@angular/core';
import { ComoonService } from "../../services/comoon.service"
@Component({selector: 'app-header',templateUrl: './header.component.html',styleUrls: ['./header.component.scss']
})
export class HeaderComponent {constructor(public res: ComoonService) {}ngOnInit() {let getData = this.res.PromiseData()getData.then((data) => {console.log(data);//张三})}
}
4.Rxjs
comoon.service.ts:
import { Injectable } from '@angular/core';
//1.引入Observable
import { Observable } from "rxjs"
@Injectable({providedIn: 'root'
})
export class ComoonService {constructor() {}// 2.使用,其中observe为参数可以自定义RxjsData() {return new Observable((observe) => {setTimeout(() => {var username = "张三"observe.next(username)}, 1000)})}
}
header.component.ts:
import { Component } from '@angular/core';
import { ComoonService } from "../../services/comoon.service"
@Component({selector: 'app-header',templateUrl: './header.component.html',styleUrls: ['./header.component.scss']
})
export class HeaderComponent {constructor(public res: ComoonService) {}ngOnInit() {var RxjsData = this.res.RxjsData()// 通过subscribe返回数据RxjsData.subscribe((data) => {console.log(data);})}
}
从上面例子我们感觉promise和 RxJS 的用法基本相似。其实Rxjs相比promise要强大很多。比如Rxjs中可以中途撤回、Rxjs可以发射多个值、RxJS提供了多种工具函数等等。
5. Rxjs unsubscribe取消订阅
promise的创建之后,动作是无法撤回的。Observable不一样,动作可以通过unsbscribe()方法中途撤回,而且Observable在内部做了智能的处理。
header.component.ts:
import { Component } from '@angular/core';
import { ComoonService } from "../../services/comoon.service"
@Component({selector: 'app-header',templateUrl: './header.component.html',styleUrls: ['./header.component.scss']
})
export class HeaderComponent {constructor(public res: ComoonService) {}ngOnInit() {var RxjsData = this.res.RxjsData()// 通过subscribe返回数据var result = RxjsData.subscribe((data) => {console.log(data);})// 取消订阅,注意定时器时间要小于service定时器的时间setTimeout(() => {result.unsubscribe()}, 1000)}
}
6. Rxjs订阅后多次执行
如果我们想让异步里面的方法多次执行,这一点 Promise是做不到的,对于Promise来说,最终结果要么resole(兑现)、要么reject(拒绝),而且都只能触发一次。如果在同一个Promise 对象上多次调用resolve方法,则会抛异常。而 Observable不一样,它可以不断地触发下一个值,就像 next()这个方法的名字所暗示的那样。
comoon.service.ts:
import { Injectable } from '@angular/core';
//1.引入Observable
import { Observable } from "rxjs"
@Injectable({providedIn: 'root'
})
export class ComoonService {constructor() {}RxjsData() {let num = 0return new Observable((observe) => {setInterval(() => {num++var username = "张三" + numobserve.next(username)}, 1000)})}
}
header.component.ts:
import { Component } from '@angular/core';
import { ComoonService } from "../../services/comoon.service"
@Component({selector: 'app-header',templateUrl: './header.component.html',styleUrls: ['./header.component.scss']
})
export class HeaderComponent {constructor(public res: ComoonService) {}ngOnInit() {var RxjsData = this.res.RxjsData()// 通过subscribe返回数据var result = RxjsData.subscribe((data) => {console.log(data);})}
}
以上效果promise只执行一次。
相关文章:
一文带你入门angular(中)
一、angular中的dom操作原生和ViewChild两种方式以及css3动画 1.原生操作 import { Component } from angular/core;Component({selector: app-footer,templateUrl: ./footer.component.html,styleUrls: [./footer.component.scss] }) export class FooterComponent {flag: b…...
设计多线程。)
单例设计模式共享数据问题分析、解决(c++11)设计多线程。
系列文章目录 单例设计模式共享数据问题分析、解决; 文章目录系列文章目录前言一、单例模式1.1 基本概念1.2 单例设计模式共享数据问题分析、解决1.3 std::call_once()介绍二、代码案例1.代码示例总结前言 关键内容:c11、多线程、共享数据、单例类 本章内容参考git…...

Embedding-based Retrieval in Facebook Search
facebook的社交网络检索与传统的搜索检索的差异是,除了考虑文本,还要考虑搜索者的背景。通用搜索主要考虑的是文本匹配,并没有涉及到个性化。像淘宝,youtube这些其实都是涉及到了用户自身行为的,除了搜索还有推荐&…...

xmu 离散数学 卢杨班作业详解【8-12章】
文章目录第八章 树23456810第九章46811第十章24567第十一章14571116第十二章131317第八章 树 2 (2) 设有k片树叶 2∗m2∗43∗3k2*m2*43*3k2∗m2∗43∗3k n23kn23kn23k mn−1mn-1mn−1 联立解得k9 T中有9片树叶 3 有三颗非同构的生成树 4 (1) c --abc e–abed f–dgf…...

Linux入门篇-权限管理
简介 用户管理也是和权限相关的知识点。权限的作用 权限对于普通文件和目录文件作用是不一样的 。[kioskfoundation0 ~]$ ls -l total 264 -rw-rw-r--. 2 kiosk kiosk 31943 May 29 2019 ClassPrep.txt -rw-rw-r--. 2 kiosk kiosk 7605 Jun 14 2019 ClassRHAPrep.txt -rw-rw-r…...
Linux(基于 Centos7) 常用操作
1.Linux 简介Linux 是一种 免费使用、自由传播的类 Unix 操作系统Linux操作系统内核,由林纳斯托瓦兹在1991年10月5日首次发布...Linux 是一套开源操作系统,它有稳定、消耗资源小、安全性高等特点大多数人都是直接使用 Linux 发行版(就是将 Li…...

Math类详解与Random类、三种随机数生成方式(java)
文章目录📖前言:🎀认识Random类🎀三种随机数生成方式🎀Math类的用途🎀Math类的方法📖前言: 本篇博客主要以介绍Math类的常用方法及认识Random类,及三种随机数生成方式 …...

Mac编译QT程序出现Undefined symbols for architecture x86_64
在Mac编写日志服务类, Logging_d.h内容如下 #pragma once #include <QLoggingCategory> Q_DECLARE_LOGGING_CATEGORY(hovering) Q_DECLARE_LOGGING_CATEGORY(creation) Q_DECLARE_LOGGING_CATEGORY(mouseevents) Q_DECLARE_LOGGING_CATEGORY(state) Q_DECLARE_LOGGING_C…...
蓝桥杯-李白打酒加强版
蓝桥杯-李白打酒加强版1、问题描述2、解题思路3、代码实现1、问题描述 话说大诗人李白, 一生好饮。幸好他从不开车。 一天, 他提着酒显, 从家里出来, 酒显中有酒 2 斗。他边走边唱: 无事街上走,提显去打酒。 逢店加一倍, 遇花喝一斗。 这一路上, 他一共遇到店 N 次…...
 记录第一场ABC)
AtCoder Beginner Contest 292 (A - E) 记录第一场ABC
AtCoder Beginner Contest 292 A - E前言Q1 A - CAPS LOCKQ2 Yellow and Red CardQ3 Four VariablesQ4 D - Unicyclic ComponentsQ5 E - Transitivity前言 本来晚上在打Acwing周赛,最后一题Trie想不出来咋写,看群里有人说ABC要开始了,想着没…...
ubuntu安装使用putty
一、安装 安装虚拟机串口 sudo apt-get install putty sudo apt install -y setserial 二、使用 虚拟机连接串口 sudo setserial -g /dev/ttyS* 查看硬件对应串口 找到不是unknown的串口 sudo putty...

【CS144】Lab5与Lab6总结
Lab5与Lab6Lab汇总Lab5概述Lab6概述由于Lab5和Lab6相对比较简单(跟着文档一步一步写就行),于是放在一起做一个简单概述(主要是懒得写了…) Lab汇总 Lab5概述 lab5要求实现一个IP与Ethernet(以太网&#x…...

GDScript 导出变量 (Godot4.0)
概述 导出变量的功能在3.x版本中也是有的,但是4.0版本对其进行了语法上的改进。 导出变量在日常的游戏制作中提供节点的自定义参数化调节功能时非常有用,除此之外还用于自定义资源。 本文是(Bilibili巽星石)在4.0官方文档《GDScr…...

shell:#!/usr/bin/env python作用是什么
我们经常会在别人的脚本文件里看到第一行是下面这样 #!/usr/bin/python或者 #!/usr/bin/env python 那么他们有什么用呢? 要理解它,得把这一行语句拆成两部分。 第一部分是 #! 第二部分是 /usr/bin/python 或者 /usr/bin/env python 关于 #! 这个…...

计算机行业AIGC算力时代系列报告-ChatGPT芯片算力:研究框架
报告下载: 计算机行业AIGC算力时代系列报告-ChatGPT芯片算力:研究框架 简介 “AI算力时代已经来临,计算机行业正在经历着一场前所未有的变革!” 这是一个充满活力和兴奋的时代,人工智能(AI)已…...
『MyBatis技术内幕』源码调试前提
准备源代码包 下载源代码 3.4.6 版本 https://github.com/mybatis/mybatis-3/releases?page2 通过 idea 导入然后回自动下载所有依赖,根据 3.4.6 版本的 pom.xml 找到依赖的 mybatis-parent 版本 <parent><groupId>org.mybatis</groupId><ar…...

# Linux最新2022年面试题大汇总,附答案
# Linux最新2022年面试题大汇总,附答案 ### [1、cp(copy单词缩写,复制功能)](最新2021年面试题大汇总,附答案.md#1cpcopy单词缩写复制功能) cp /opt/java/java.log /opt/logs/ ;把java.log 复制到/opt/logs/下 cp /…...

css中重难点整理
一、vertical-align 在学习vertical-align的时候,可能会很困惑。即使网上有一大推文章讲veitical-align,感觉看完好像懂了,等自己布局的时候用到vertical-align的时候好像对它又很陌生。这就是我在布局的时候遇到的问题。 本来vertical-align就很不好理…...
JavaScript-扫盲
文章目录1. 前言2. 第一个 JavaScript 程序3. javaScript 的基础语法3.1 变量3.2 数据类型3.3 运算符3.4 条件语句3.5 数组3.6 函数3.7 作用域3.8 对象4. WebAPI4.1 DOM 基本概念4.2 常用 DOM API4.3 事件4.4 操作元素4.5 网页版猜数字游戏4.6 留言版1. 前言 提问 java 和 java…...
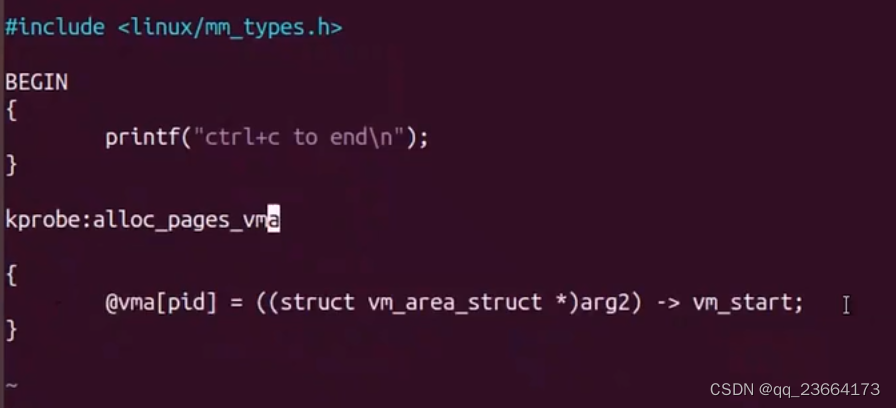
bpftrace 笔记
bpftrace -e BEFIN {printf("hello world!\n");}获取调用 vfs_read 函数的进程id, 每2s打印一次 bpftrace -e kprobe:vfs_read {ID pid;} interval:s:2 {printf{"ID:%d\n", ID);}用户态调试 bpftrace -e uprobe:/*/a.out:and {printf("ID:%d\n&qu…...

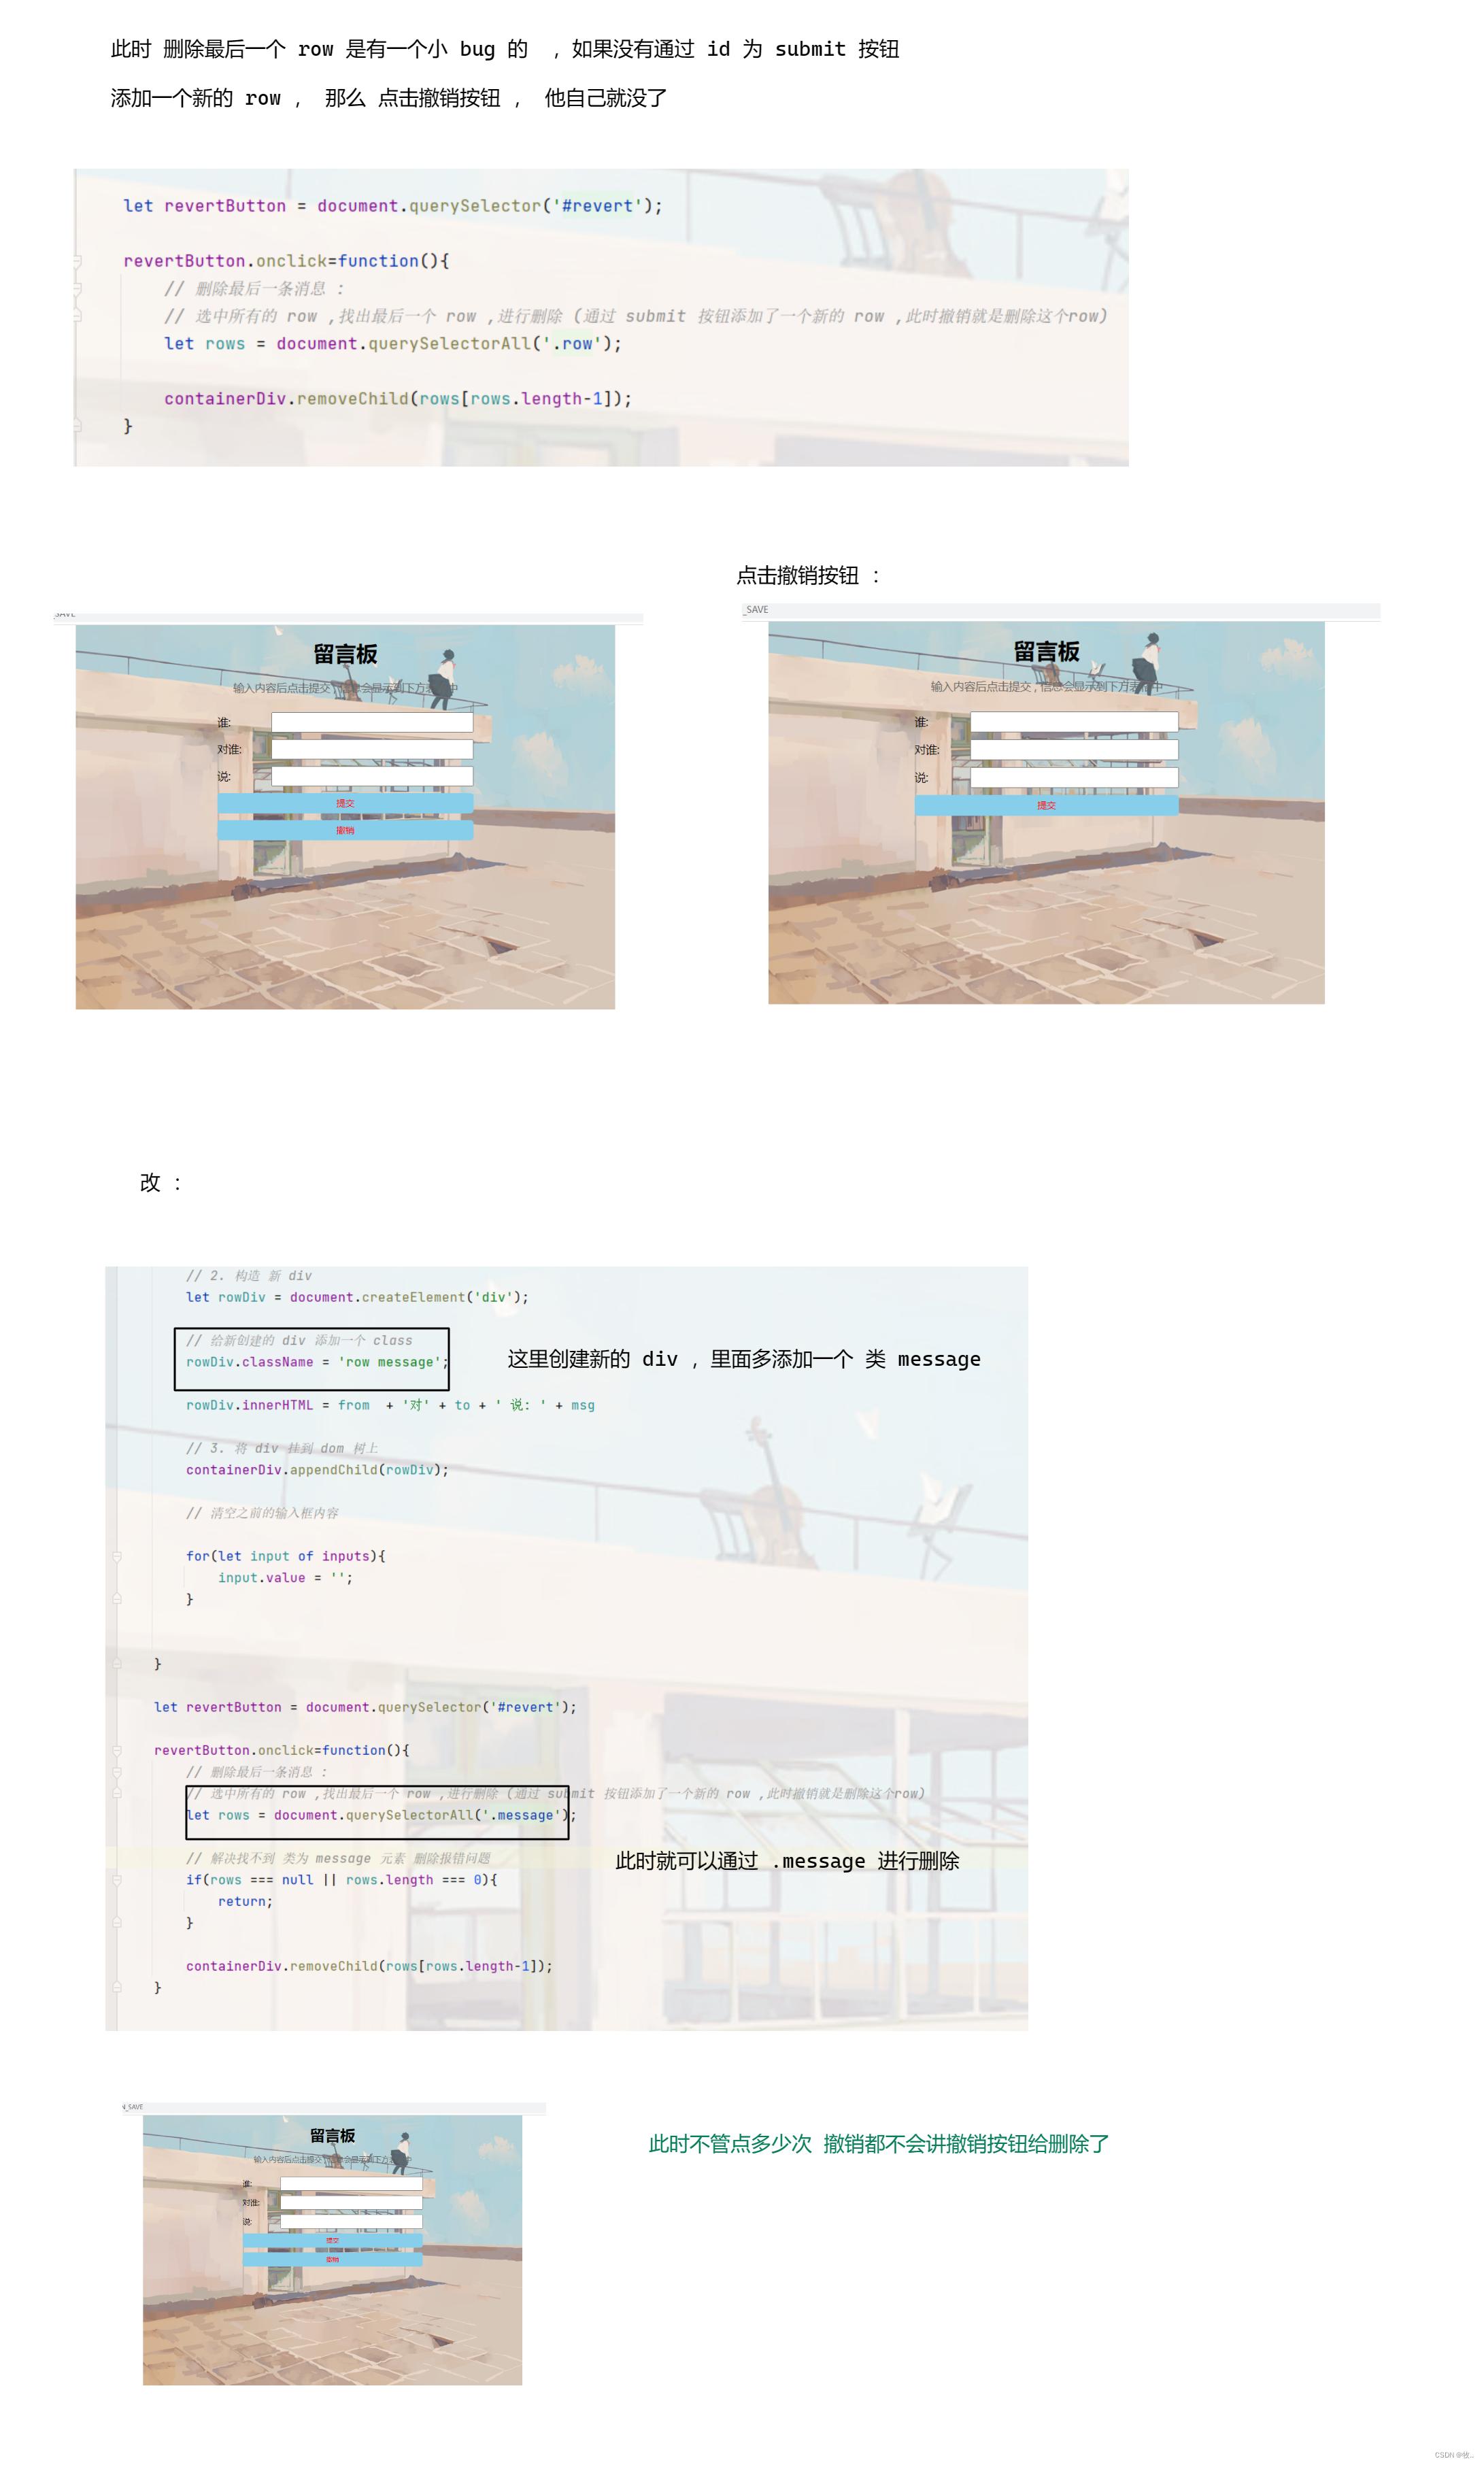
Vue记事本应用实现教程
文章目录 1. 项目介绍2. 开发环境准备3. 设计应用界面4. 创建Vue实例和数据模型5. 实现记事本功能5.1 添加新记事项5.2 删除记事项5.3 清空所有记事 6. 添加样式7. 功能扩展:显示创建时间8. 功能扩展:记事项搜索9. 完整代码10. Vue知识点解析10.1 数据绑…...
大话软工笔记—需求分析概述
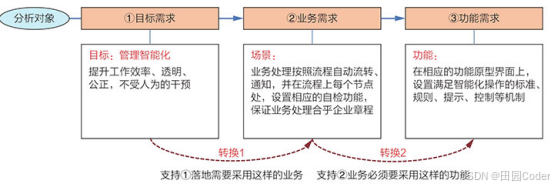
需求分析,就是要对需求调研收集到的资料信息逐个地进行拆分、研究,从大量的不确定“需求”中确定出哪些需求最终要转换为确定的“功能需求”。 需求分析的作用非常重要,后续设计的依据主要来自于需求分析的成果,包括: 项目的目的…...
【人工智能】神经网络的优化器optimizer(二):Adagrad自适应学习率优化器
一.自适应梯度算法Adagrad概述 Adagrad(Adaptive Gradient Algorithm)是一种自适应学习率的优化算法,由Duchi等人在2011年提出。其核心思想是针对不同参数自动调整学习率,适合处理稀疏数据和不同参数梯度差异较大的场景。Adagrad通…...
Python:操作 Excel 折叠
💖亲爱的技术爱好者们,热烈欢迎来到 Kant2048 的博客!我是 Thomas Kant,很开心能在CSDN上与你们相遇~💖 本博客的精华专栏: 【自动化测试】 【测试经验】 【人工智能】 【Python】 Python 操作 Excel 系列 读取单元格数据按行写入设置行高和列宽自动调整行高和列宽水平…...

服务器硬防的应用场景都有哪些?
服务器硬防是指一种通过硬件设备层面的安全措施来防御服务器系统受到网络攻击的方式,避免服务器受到各种恶意攻击和网络威胁,那么,服务器硬防通常都会应用在哪些场景当中呢? 硬防服务器中一般会配备入侵检测系统和预防系统&#x…...

TRS收益互换:跨境资本流动的金融创新工具与系统化解决方案
一、TRS收益互换的本质与业务逻辑 (一)概念解析 TRS(Total Return Swap)收益互换是一种金融衍生工具,指交易双方约定在未来一定期限内,基于特定资产或指数的表现进行现金流交换的协议。其核心特征包括&am…...

【git】把本地更改提交远程新分支feature_g
创建并切换新分支 git checkout -b feature_g 添加并提交更改 git add . git commit -m “实现图片上传功能” 推送到远程 git push -u origin feature_g...
uniapp微信小程序视频实时流+pc端预览方案
方案类型技术实现是否免费优点缺点适用场景延迟范围开发复杂度WebSocket图片帧定时拍照Base64传输✅ 完全免费无需服务器 纯前端实现高延迟高流量 帧率极低个人demo测试 超低频监控500ms-2s⭐⭐RTMP推流TRTC/即构SDK推流❌ 付费方案 (部分有免费额度&#x…...

拉力测试cuda pytorch 把 4070显卡拉满
import torch import timedef stress_test_gpu(matrix_size16384, duration300):"""对GPU进行压力测试,通过持续的矩阵乘法来最大化GPU利用率参数:matrix_size: 矩阵维度大小,增大可提高计算复杂度duration: 测试持续时间(秒&…...

成都鼎讯硬核科技!雷达目标与干扰模拟器,以卓越性能制胜电磁频谱战
在现代战争中,电磁频谱已成为继陆、海、空、天之后的 “第五维战场”,雷达作为电磁频谱领域的关键装备,其干扰与抗干扰能力的较量,直接影响着战争的胜负走向。由成都鼎讯科技匠心打造的雷达目标与干扰模拟器,凭借数字射…...