后端程序员入门react笔记(八)-redux的使用和项目搭建
一个更好用的文档
添加链接描述
箭头函数的简化
//简化前
function countIncreAction(data) {return {type:"INCREMENT",data}
}
//简化后
const countIncreAction =data=>({type:"INCREMENT",data
})
react UI组件库相关资料
组件库连接和推荐
antd组件库文档
Material UI
举例
import React, {Component} from 'react';
import { Button, DatePicker } from 'antd';class App extends Component {render() {return (// 注意此处要用BrowserRouter包括根组件,可以提到index.js里面包裹App标签<div><ul><Button type="primary">PRESS ME</Button><DatePicker placeholder="select date" /></ul></div>);}
}
export default App;
export和export default区别
- export 和 export default 都是es6语法中用来导出组件的
- 可以导出的文档类型有( 数据、常量、函数、js文件、模块等)
区别
- 一个文件中如果有多个模块需要export,则使用export
export  class Com extends Component{render() {return (<div ><h1>这是头部</h1></div>)}
}export const str = '我是要被导出的str'// import 引入方式
import { Com , str } // 引入时需要解构出来 可以解构多个 用 , 号隔开
- export default 看名字就知道了,一个文件中只有一个模块被声明
function  fn (){console.log('我是fn函数')
}export default fn //exprot default  导出时不会去关注 文件内容  只要名称对应即可//export 必须写在 文件最后;// 引入方式
import fn from '../'
redux
- redux是一个专门用于做状态怪的js库
- 可以用在vue、react、angular项目中,但基本与react配合使用
- 作用:集中式管理react应用中的多个组件共享的状态,可以把组件内需要共享的状态交给redux管理
应用场景
- 状态共享:某个组件的状态,需要让其他组件可以随时拿到(共享)
- 组件通信:一个组件需要改变另一个组件的状态(通信)
- 总体原则:能不用就不用,如果不用比较吃力才用
流程图
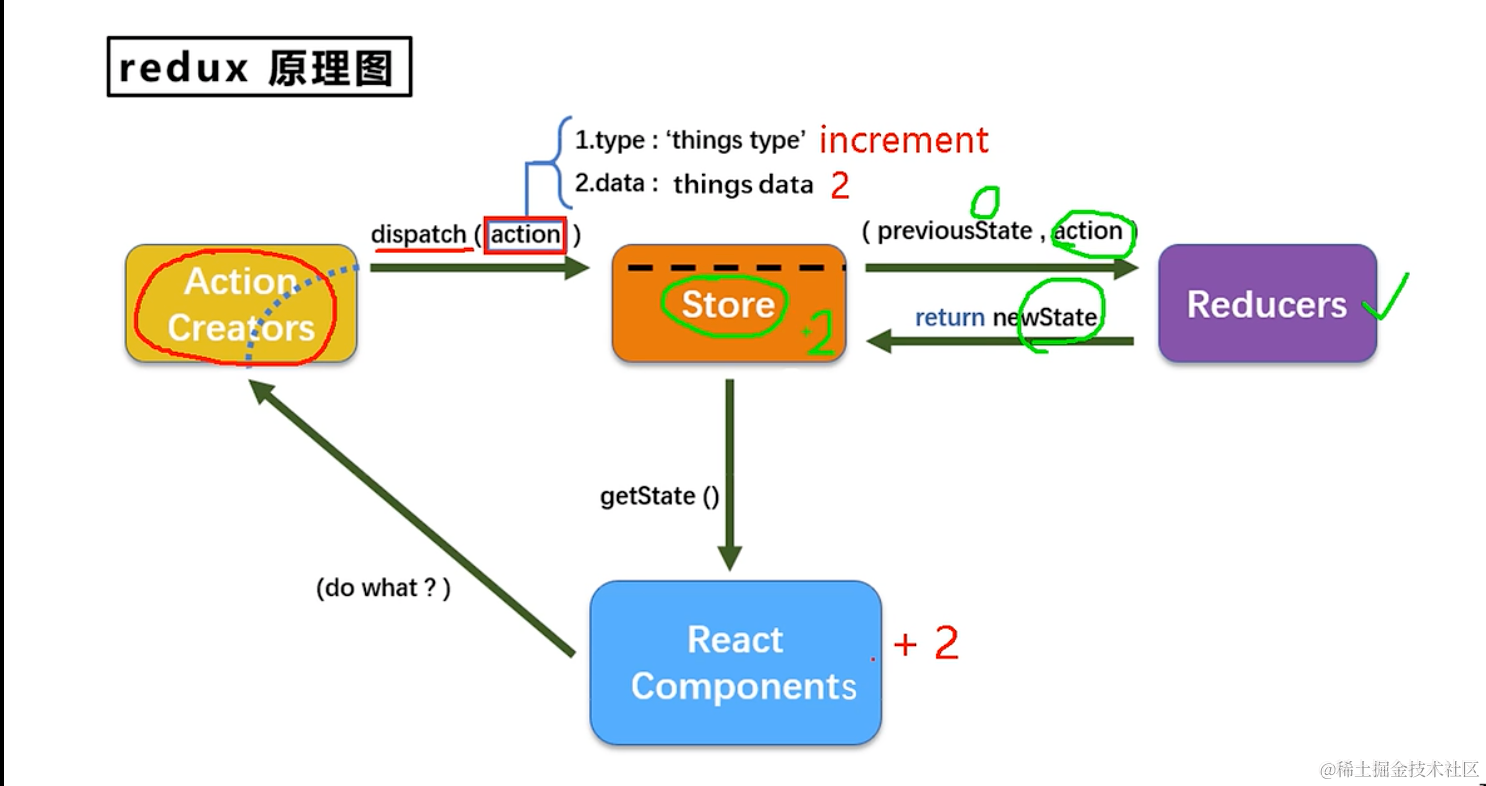
我们先来看一下redux的工作流程,可以有一个大概的印象,我们看到,redux的核心有三个,一个是action creator, 一个是store,一个是reducers,其中redux的核心是什么?是store,我们调用redux,其实就是调用store的api,那么store负责api,谁负责干活呢?reducer,真正负责处理逻辑是在reducer里面。react component 我们自己的组件,负责和store交互
我们可以先来看一个简单的列子
- store的实现,其实store是不用我们实现的,我们只需要引入redux包,create一个store就可以了。
//引入store
import {createStore} from "redux"
import {countReducer} from "./count_reducer"
//引入reducer
export default createStore(countReducer)- store负责和组件交互,但是需要依赖注入,即store要把任务交给谁处理,真正处理的这个人,就是reducer,所以我们写一个reducer的逻辑,reducer就是一个纯function,接收两个参数,一个是基础数据,一个是操作方式。
export function countReducer(state = 1, action) {const {type,data}=actionconsole.log(state,action);switch (type) {case 'INCREMENT'://注意,这个return的值就是statereturn state + data*1;case 'DECREMENT':return state - data*1;default:return state;}
}
- 至此 store和reducer我们都编辑完毕了,但是我们在组建中怎么调用呢?我们接下来编写组件
import React, {Component, createRef} from 'react';
import store from "../../redux/store"class Count extends Component {sel=createRef();increment=()=>{const {value}=this.sel.current//store去分发任务store.dispatch({type: "INCREMENT",data:value})}decrement=()=>{const {value}=this.sel.current//store去分发任务store.dispatch({type: "DECREMENT",data:value})}incrementOdd=()=>{const {value}=this.sel.currentconst oldVal=store.getState()//store去分发任务if(oldVal%2===0){return}store.dispatch({type: "INCREMENT",data:value})}incrementAsync=()=>{const {value}=this.sel.currentsetTimeout(()=>{//store去分发任务store.dispatch({type: "INCREMENT",data:value})},1000)}render() {return (<div>{/*store.getState() 后去state的值*/}<h1>当前求和为:{store.getState()}</h1><select name="" id="" ref={this.sel}><option value="1">1</option><option value="2">2</option><option value="3">3</option></select><button onClick={this.increment}>+</button><button onClick={this.decrement}>-</button><button onClick={this.incrementOdd}>奇数加</button><button onClick={this.incrementAsync}>异步加</button></div>);}
}export default Count;
- 我们通过store.dispatch去分发任务,修改了state,但是redux有一个问题,他只负责存储和更新state,但是不负责调render,这就导致我们的state变化之后页面不能刷新,所以,我们还得调用一下setstate接口来更新render,那么另一个问题又来了,什么时候去setstate呢?我们需要redux告知我们,这个api就是
store.subscribe,所以我们在index.js就给监听上
import React from 'react';
import ReactDOM from "react-dom/client";
import App from "./App";
import store from "./redux/store"
// ReactDOM.createRoot(document.getElementById("root")).render(app)
const root=ReactDOM.createRoot(document.getElementById("root"))
root.render(<App />)//注意App标签一定不要预先定义,否则会编译为静态标签而导致无法更新
store.subscribe(()=>{root.render(<App />)
})- 自此,一个简单的redux功能实现了。
redux demo实例
- 前面我们用了store和reducer,但是action是什么我并未涉及,接下来我们看怎么创建一个action文件count_action.js
const countIncreAction =data=>({type:"INCREMENT",data
})const countdecreAction = (data) => ({type: "DECREMENT",data
})
- 诶,我们发现一个现象,这个写法和我们使用store分发任务有点像
decrement=()=>{const {value}=this.sel.current//store去分发任务store.dispatch({type: "DECREMENT",data:value})}
- 那我们怎么把我们自己写的换成action呢,我们来替换一下,我们先引入,再替换
import React, {Component, createRef} from 'react';
import store from "../../redux/store"
import {countIncreAction,countdecreAction} from "../../redux/count_action"class Count extends Component {sel=createRef();increment=()=>{const {value}=this.sel.current//store去分发任务store.dispatch(countIncreAction(value))}
}export default Count;
- 关于一些优化,我们知道,在代码中,如果能用常量或者变量代替字符串,那么就用变量或者常量在代码中使用,那么我们可以使用一个常量文件来管理这些
异步action
action 可以返回一个对象,交由store去用,但是如果是我们想要一个异步的action怎么办呢?我们的对象里面也不支持自定义时间啊。redux很明显不支持,但是有一个组件提供了这种功能,就是redux-thunk,它通过store可以接收第二个参数,以applyMiddleware的形式让store可以接收function。我们来看一下,首先我们创建一个可以接收function的store
//引入store
import {applyMiddleware, createStore} from "redux"
import {countReducer} from "./count_reducer"
import {thunk} from "redux-thunk"
//引入reducer
export default createStore(countReducer,applyMiddleware(thunk))
- 那么我们在使用的时候就可以简单这样使用
incrementAsync=()=>{const {value}=this.sel.currentstore.dispatch(countIncreAsyncAction(value,1000))}
react-redux
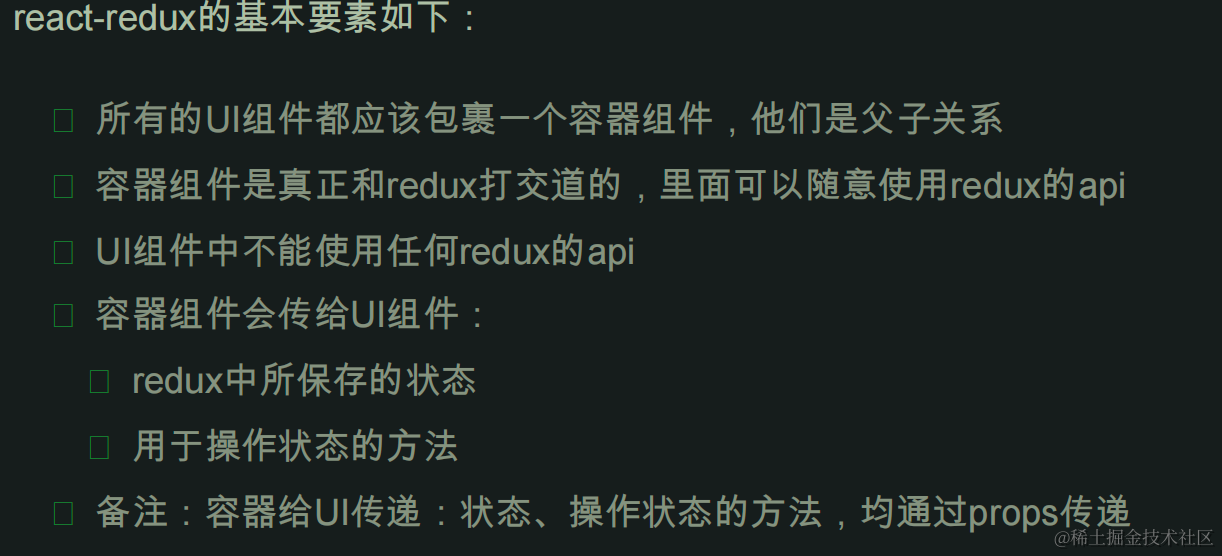
react-redux是由官方出的一个组件库,用来简化对redux的操作。redux对组件做了区分,一种是UI组件,负责页面展示,一种是容器组件负责逻辑处理,既然是这样,那么和redux能交互的就只有容器组件(container),容器组件拿到数据后通过props传递给UI组件(component)
我们把count.jsx改成纯UI组件,如下
import React, {Component, createRef} from 'react';
class CountUI extends Component {sel=createRef();increment=()=>{const {value}=this.sel.current}decrement=()=>{const {value}=this.sel.current}incrementOdd=()=>{const {value}=this.sel.current}incrementAsync=()=>{const {value}=this.sel.current}render() {return (<div><h1>当前求和为:0</h1><select name="" id="" ref={this.sel}><option value="1">1</option><option value="2">2</option><option value="3">3</option></select><button onClick={this.increment}>+</button><button onClick={this.decrement}>-</button><button onClick={this.incrementOdd}>奇数加</button><button onClick={this.incrementAsync}>异步加</button></div>);}
}
export default CountUI;
- 我们创建一个container组件
//这个文件就是容器组件,负责和redux交互并传递数据给UI组件
//引入UI组件
import {CountUI} from "../../components/count/count"
import {connect} from "react-redux"
//创建一个
//创建一个容器组件并暴露
export default connect()(CountUI)
- 我们说过,容器不仅要传递数据给UI组件,还需要和redux交互呢,和redux交互其实就是调用store的接口,那么我们怎么和store联系上呢?我们在App里面改一下。
    render() {return (<div><Count store={store} /></div>);}
}
connect
具体来说,connect接收两个参数,
- 一个是mapStateToProps,默认传入state参数,也就是讲state数据以props的形式传递给子组件
- 一个是mapDispathcToProps ,默认传入一个dispatch参数,用来指定分发任务给哪个action,接下来我们看一下这redux,component,container的交互
//这个文件就是容器组件,负责和redux交互并传递数据给UI组件
//引入UI组件
import {CountUI} from "../../components/count/count"
import {connect} from "react-redux"
import {countDecreAction, countIncreAction, countIncreAsyncAction} from "../../redux/count_action"
//在此指定数据,即把那些state赋值给props
function mapStateToProps(state) {return {count: state}
}
//在此指定redux,即让哪个redux来处理数据
function mapDispathcToProps(dispatch) {return {add: (data) =>dispatch(countIncreAction(data)),addOdd: (data) =>dispatch(countIncreAction(data)),addAsync: (data) =>dispatch(countIncreAsyncAction(data,1000)),sub: (data) => dispatch(countDecreAction(data))}
}
//创建一个容器组件并暴露
//参数解释:mapStateToProps用来传递数据  mapDispathcToProps用来指定redux ,返回一个函数后,然后指定要绑定哪个UI组件
export default connect(mapStateToProps, mapDispathcToProps)(CountUI)- 容器组件写好之后,我们在UI组件怎么调用呢,很简单,从props获取即可
import React, {Component, createRef} from 'react';
export class CountUI extends Component {sel=createRef();increment=()=>{const {value}=this.sel.currentthis.props.add(value)}decrement=()=>{const {value}=this.sel.currentthis.props.sub(value)}incrementOdd=()=>{const oldValue=this.props.countconst {value}=this.sel.currentif (oldValue%2===0){return}this.props.addOdd(value)}incrementAsync=()=>{const {value}=this.sel.currentthis.props.addAsync(value)}render() {return (<div><h1>当前求和为:{this.props.count}</h1><select name="" id="" ref={this.sel}><option value="1">1</option><option value="2">2</option><option value="3">3</option></select><button onClick={this.increment}>+</button><button onClick={this.decrement}>-</button><button onClick={this.incrementOdd}>奇数加</button><button onClick={this.incrementAsync}>异步加</button></div>);}
}
- 简化版
//这个文件就是容器组件,负责和redux交互并传递数据给UI组件
//引入UI组件
import {CountUI} from "../../components/count/count"
import {connect} from "react-redux"
import {countDecreAction, countIncreAction, countIncreAsyncAction} from "../../redux/count_action"
export default connect(state => ({count: state}),{add: countIncreAction,addOdd: countIncreAction,addAsync: countIncreAsyncAction,sub: countDecreAction}
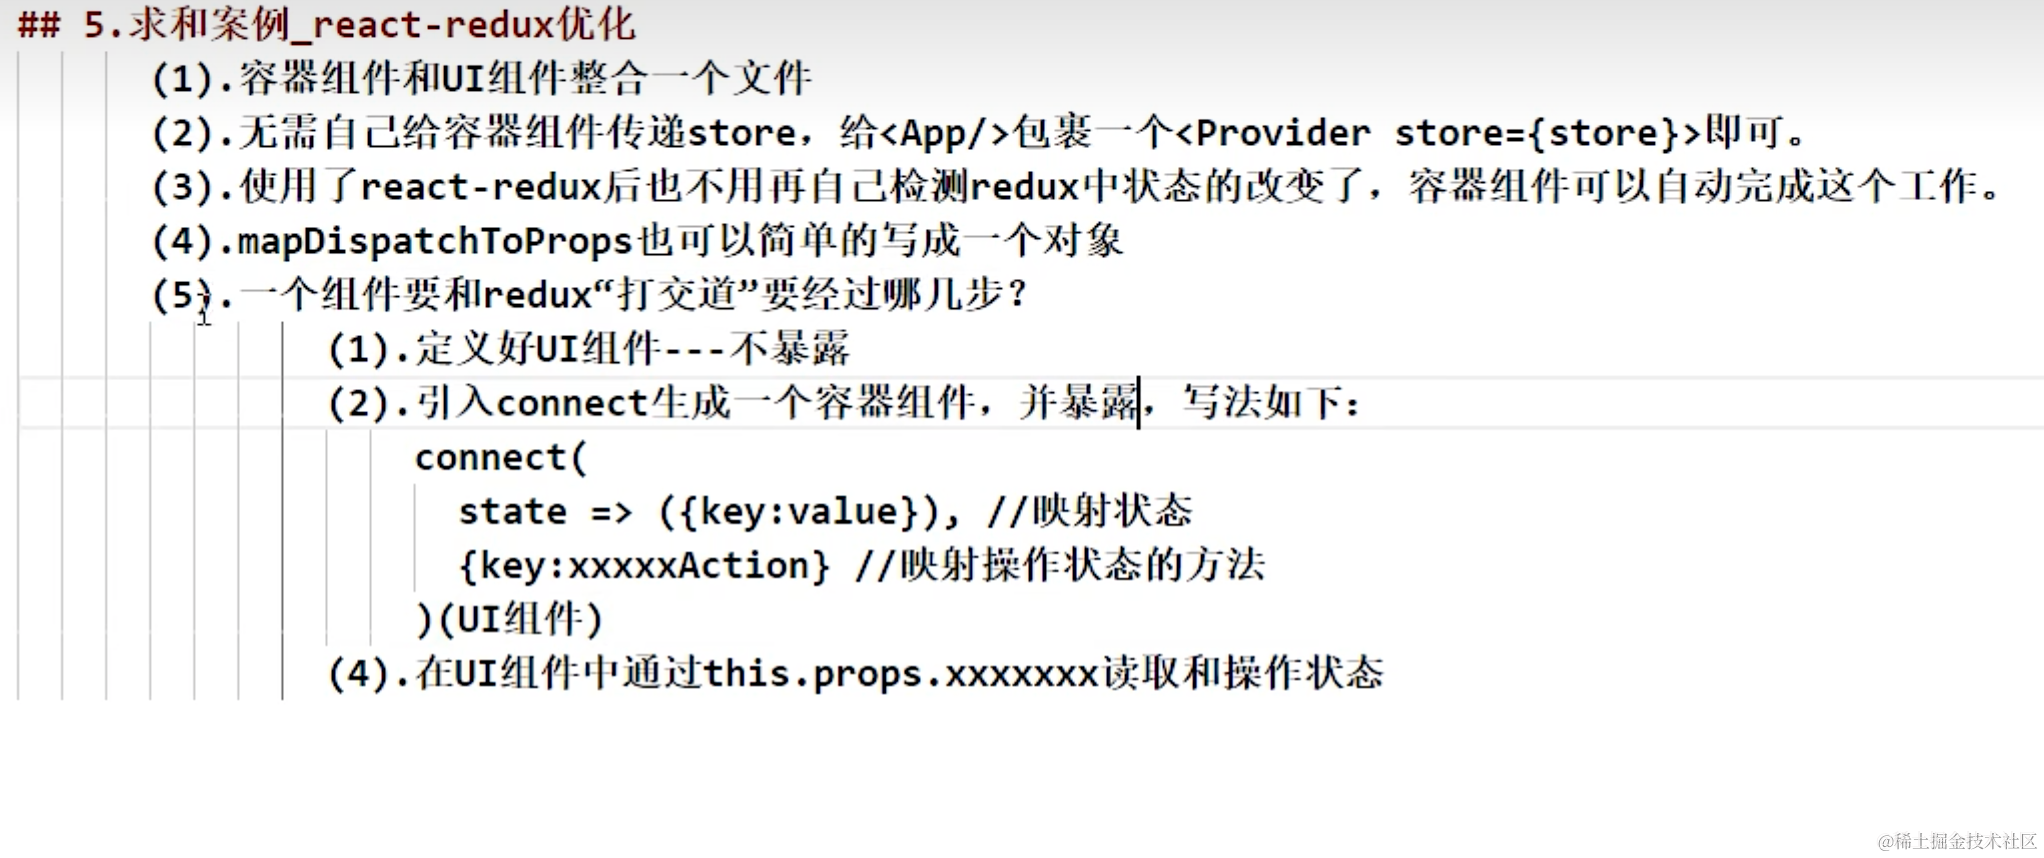
)(CountUI)react-redux的优化
- 既然react-redux 是对redux进行了优化,那么react-redux会不会在state发生变化的时候来实现自动render呢?答案是肯定的,我们来试一下
import React from 'react';
import ReactDOM from "react-dom/client";
import App from "./App";
import store from "./redux/store"
// ReactDOM.createRoot(document.getElementById("root")).render(app)
const root=ReactDOM.createRoot(document.getElementById("root"))
root.render(<App />)
// 使用react-redux 注释掉监听store
// store.subscribe(()=>{
//     root.render(<App />)
// })- provider
我们知道,每个容器组件我们都需要传递一个store,像这样
<Count1 store={store} />
<Count2 store={store} />
<Count3 store={store} />
这样看起来明显是不科学的,那么有没有一种方法,让我们写一次,就可以不用写了呢,有,首先第一点我想到的就是用一个特殊标签包裹一下这些组件,只要在标签内的,都默认传递了store,react真的这么做了,这饿就是provider ,我们来看一下怎么用
import React from 'react';
import ReactDOM from "react-dom/client";
import App from "./App";
import {Provider} from "react-redux"
import store from "./redux/store"
const root=ReactDOM.createRoot(document.getElementById("root"))
root.render(<Provider store={store}><App /></Provider>)
- 我们还可以把UI组件整合到container里面去,组成一个文件
多组件数据共享
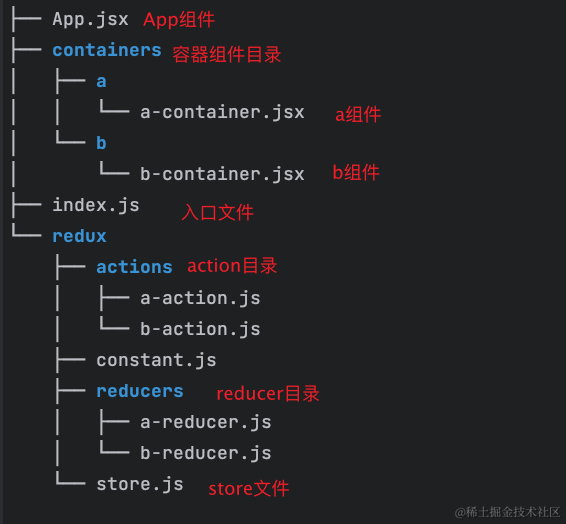
- 我们先来创建这样一个项目目录,在src目录下,来实现数据共享
- 我们先从最简单的来,先来定义action文件
a-action.js
export const AAction = data=>({data:data,type:'AAction'})
b-action.js
export const BAction = data=>({data:data,type:'BAction'})
- 再来编写reducer
a-reducer.js
const initUser=[{id:1,name:'小a',age:18}]
export const aReducer = (state = initUser, action) => {
const {type, data} = action
switch (action.type) {
case 'AAction':
return [data,...state]
default:
return state
}
}
b-reducer.js
const initUser=[{id:1,name:'小b',age:118}]
export const bReducer = (state = initUser, action) => {
const {type, data} = action
switch (action.type) {
case 'BAction':
return [data,...state]
default:
return state
}
}
- action reducer都有了,我们开始写store,我们知道创建store的这行代码
export default createStore(countReducer,applyMiddleware(thunk)),里面的参数接收的是一个reducer,那么如果我有多个reducer怎么办呢?我们就用到了combineReducers
//引入store
import {combineReducers, createStore} from "redux"
//引入reducer  import {aReducer} from "./reducers/a-reducer"
import {bReducer} from "./reducers/b-reducer"
//将多个reducer写入一个对象 注意是key=>value 格式书写
const rootReducer = combineReducers({
"areducer":aReducer,
"breducer":bReducer
})
export default createStore(rootReducer)
- 我们在index.js中引入store,使用provider支持对容器的store传递
import React from 'react';
import ReactDOM from "react-dom/client";
import App from "./App";
import {Provider} from "react-redux"
import store from "./redux/store"
const root=ReactDOM.createRoot(document.getElementById("root"))
root.render(<Provider store={store}><App /></Provider>)
- 在a容器组件中暴露connect
import React, {Component, createRef} from 'react';
import {nanoid} from "nanoid";
import {AAction} from "../../redux/actions/a-action";
import {connect} from "react-redux"; class AUI extends Component { nameRef=createRef();
ageRef=createRef(); addUser=()=>{
let id=nanoid();
let name=this.nameRef.current.value;
let age=this.ageRef.current.value;
this.props.addAUser({id,name,age});
}
render() {
// console.log(this.props);
const {auser,buser}=this.props
return (
<div>
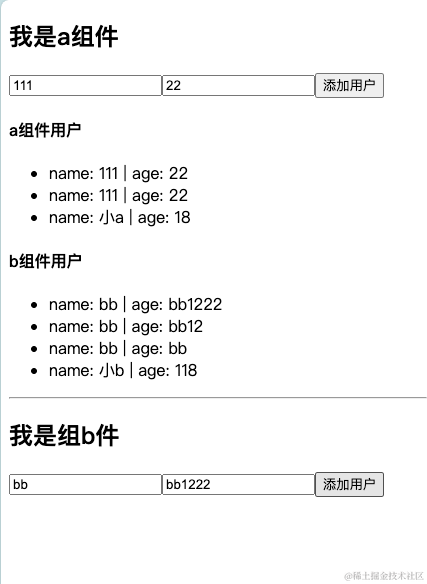
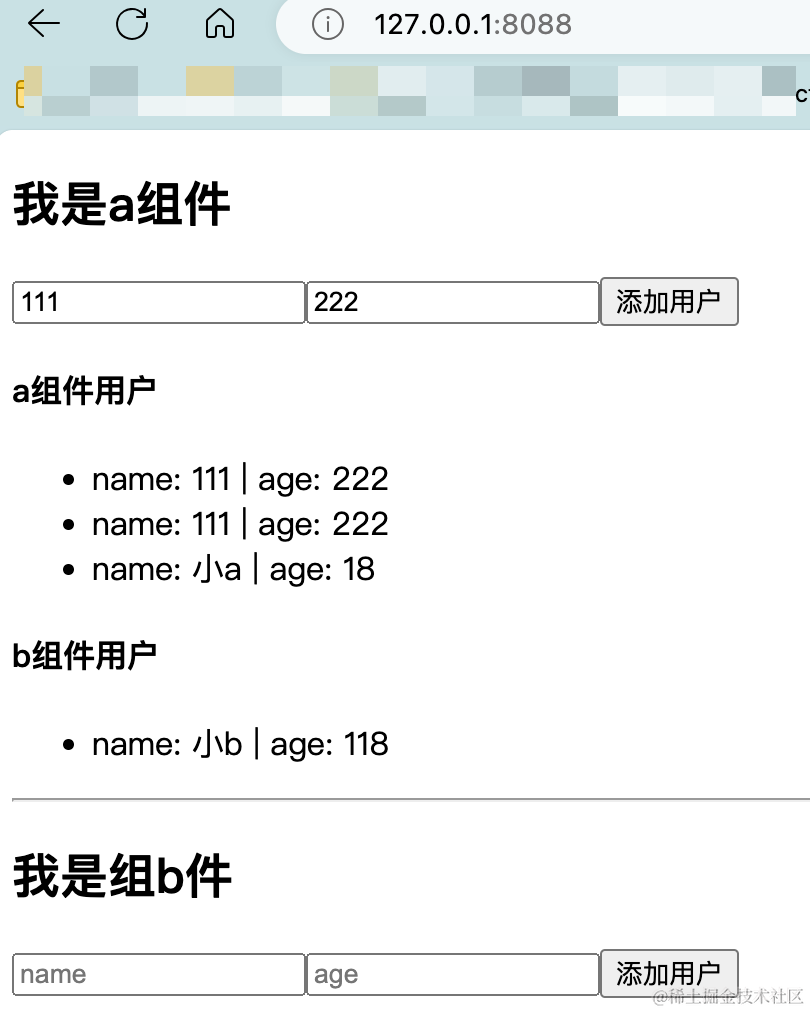
<h2>我是a组件</h2>
<input type="text" ref={this.nameRef} placeholder="name"/>
<input type="text" ref={this.ageRef} placeholder="age"/>
<button onClick={this.addUser}>添加用户</button>
<h4>a组件用户</h4>
<ul>
{auser.map((item=><li key={item.id}>name: {item.name} | age: {item.age}</li>))}
</ul>
<h4>b组件用户</h4>
<ul>
{buser.map((item=><li key={item.id}>name: {item.name} | age: {item.age}</li>))}
</ul>
</div>
);
}
}
//注意,取state的时候要根据前面定义的key来取
export default connect(state=>({auser:state.areducer,buser:state.breducer}),{addAUser:AAction})(AUI);
- 在b容器组件中暴露connect
import React, {Component, createRef} from 'react';
import {nanoid} from "nanoid";
import {connect} from "react-redux";
import {BAction} from "../../redux/actions/b-action";  class BUI extends Component {
nameRef=createRef();
ageRef=createRef();  addUser=()=>{
let id=nanoid();
let name=this.nameRef.current.value;
let age=this.ageRef.current.value;
this.props.addBUser({id,name,age});
}
render() {
return (
<div>
<h2>我是组b件</h2>
<input type="text" ref={this.nameRef} placeholder="name"/>
<input type="text" ref={this.ageRef} placeholder="age"/>
<button onClick={this.addUser}>添加用户</button>
</div>
);
}
}  export default connect(state=>({buser:state.breducer}),{addBUser:BAction})(BUI);
- 最终效果如下,b组件添加用户,会在a组件中展示
-
组件数据的交互,关键在于给某个组件state赋值的时候,
{auser:state.areducer,buser:state.breducer} -
注意数组和对象的地址引用,这种引用只对比引用地址是否一致,并不会对比地址指向的数据是否一致,从而导致页面不会更新。
redux-devtool
拓展安装 npm install redux-devtools-extension --legacy-peer-deps
//引入store
import {combineReducers, createStore} from "redux"
//引入reducer  import {aReducer} from "./reducers/a-reducer"
import {bReducer} from "./reducers/b-reducer"
//引入devtools
import {composeWithDevTools} from "redux-devtools-extension"
//将多个reducer写入一个对象 注意是key=>value 格式书写
const rootReducer = combineReducers({
"areducer":aReducer,
"breducer":bReducer
})
export default createStore(rootReducer,composeWithDevTools())
打包
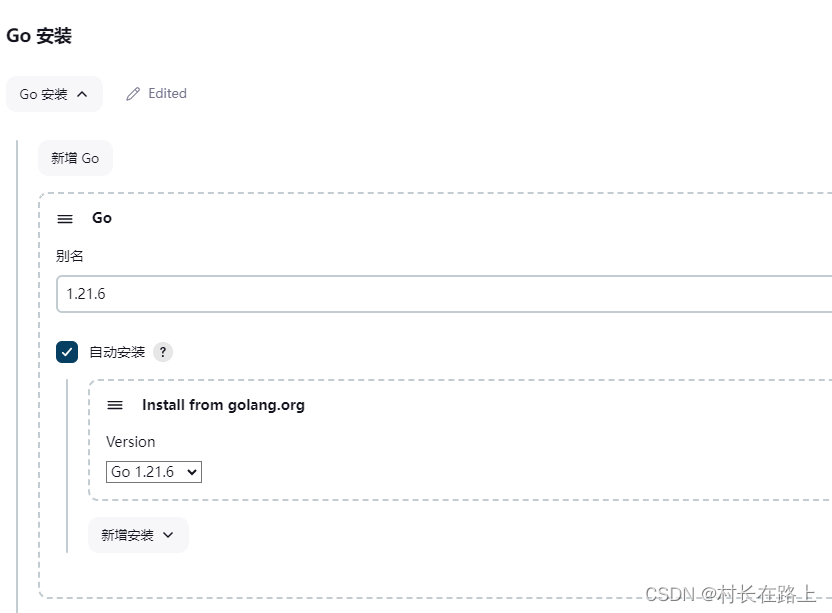
执行打包命令npm run build开始编译,编译完毕,会在项目根目录生成一个build目录,我们启动一个服务器指定目录即可执行
比如我使用go作为服务器来执行build目录,即可正常访问目录,用nginx,node也是同理
package mainimport ("fmt""net/http""os"
)func main() {//     设置静态文件目录为React应用程序的build文件夹路径fmt.Println(os.Getwd())fs := http.FileServer(http.Dir("./tmp/build"))// 创建一个处理静态文件的handlerhttp.Handle("/", fs)// 启动服务器并监听端口err := http.ListenAndServe(":8088", nil)if err != nil {panic(err)}
}
- 我们也可以使用serve来启动项目
安装serve$ npm install -g serve,启动serve,在build同目录下,serve build即可启动服务。
一般上线的话需要搭配node 或者nginx来启动。
相关文章:
后端程序员入门react笔记(八)-redux的使用和项目搭建
一个更好用的文档 添加链接描述 箭头函数的简化 //简化前 function countIncreAction(data) {return {type:"INCREMENT",data} } //简化后 const countIncreAction data>({type:"INCREMENT",data })react UI组件库相关资料 组件库连接和推荐 antd组…...
深度学习 精选笔记(13.2)深度卷积神经网络-AlexNet模型
学习参考: 动手学深度学习2.0Deep-Learning-with-TensorFlow-bookpytorchlightning ①如有冒犯、请联系侵删。 ②已写完的笔记文章会不定时一直修订修改(删、改、增),以达到集多方教程的精华于一文的目的。 ③非常推荐上面(学习参考&#x…...
【C#图解教程】笔记
文章目录 1. C#和.NET框架.NET框架的组成.NET框架的特点CLRCLICLI的重要组成部分各种缩写 2. C#编程概括标识符命名规则: 多重标记和值格式化数字字符串对齐说明符格式字段标准数字格式说明符标准数字格式说明符 表 3. 类型、存储和变量数据成员和函数成员预定义类型…...
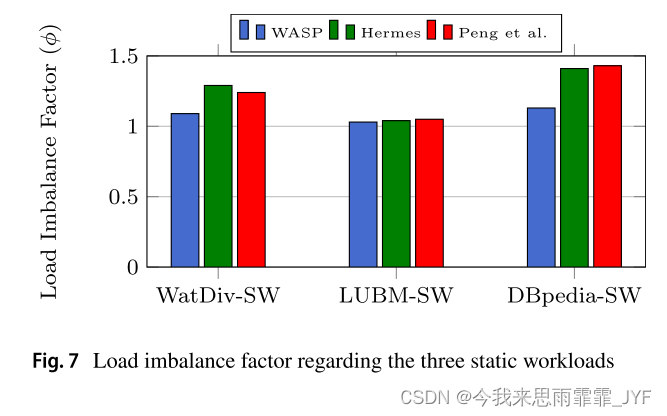
A Workload‑Adaptive Streaming Partitioner for Distributed Graph Stores(2021)
用于分布式图存储的工作负载自适应流分区器 对象:动态流式大图 划分方式:混合割 方法:增量重划分 考虑了图查询算法,基于动态工作负载 考虑了双动态:工作负载动态;图拓扑结构动态 缺点:分配新顶…...

鸿蒙Harmony应用开发—ArkTS声明式开发(基础手势:Search)
搜索框组件,适用于浏览器的搜索内容输入框等应用场景。 说明: 该组件从API Version 8开始支持。后续版本如有新增内容,则采用上角标单独标记该内容的起始版本。 子组件 无 接口 Search(options?: { value?: string, placeholder?: Reso…...

GPIO八种工作模式实践总结
到目前为止我还是没搞懂,GPIO口输入输出模式下,PULLUP、PULLDOWN以及NOPULL之间的区别,从实践角度讲,也就是我亲自测试来看,能划分的区别有以下几点: GPIO_INPUT 在输入模式下使用HAL_GPIO_WritePin不能改变…...
ElementUI两个小坑
1.form表单绑定的是一个对象,表单里的一个输入项是对象的一个属性之一,修改输入项,表单没刷新的问题, <el-form :model"formData" :rules"rules" ref"editForm" class"demo-ruleForm"…...

前端基础——HTML傻瓜式入门(2)
该文章Github地址:https://github.com/AntonyCheng/html-notes 在此介绍一下作者开源的SpringBoot项目初始化模板(Github仓库地址:https://github.com/AntonyCheng/spring-boot-init-template & CSDN文章地址:https://blog.c…...
操作系统(AndroidIOS)图像绘图的基本原理
屏幕显示图像的过程 我们知道,屏幕是由一个个物理显示单元组成,每一个单元我们可以称之为一个物理像素点,而每一个像素点可以发出多种颜色。 而图像,就是在不同的物理像素点上显示不同的颜色构成的。 像素点的颜色 像素的颜色是…...
测试用例的设计(2)
目录 1.前言 2.正交排列(正交表) 2.1什么是正交表 2.2正交表的例子 2.3正交表的两个重要性质 3.如何构造一个正交表 3.1下载工具 3.1构造前提 4.场景设计法 5.错误猜测法 1.前言 我们在前面的文章里讲了测试用例的几种设计方法,分别是等价类发,把测试例子划分成不同的类…...

HTML与CSS
前言 Java 程序员一提起前端知识,心情那是五味杂陈,百感交集。 说不学它吧,说不定进公司以后,就会被抓壮丁去时不时写点前端代码说学它吧,HTML、CSS、JavaScript 哪个不得下大功夫才能精通?学一点够不够用…...

App推广不再难!Xinstall神器助你快速获客,提升用户留存
在如今的移动互联网时代,App推广已经成为了各大应用商家争夺用户的重要手段。然而,面对竞争激烈的市场环境,如何快速提升推广效率,先人一步获得用户呢?这就需要我们借助专业的App全渠道统计服务商——Xinstall的力量。…...

MySQL建表以及excel内容导入
最近自学MySQL的使用,需要将整理好的excel数据导入数据库中,记录一下数据导入流程。 --建立数据库 create table SP_sjk ( --增加列 id NUMBER(20), mc VARCHAR2(300) ) /*表空间储存参数配置。一个数据库从逻辑上来说是由一个或多个表空间所组成&#…...

让el-input与其他组件能够显示在同一行
让el-input与其他组件能够显示在同一行 说明:由于el-input标签使用会默认占满一行,所以在某些需要多个展示一行的时候不适用,因此需要能够跟其他组件显示在同一行。 效果: 1、el-input标签内使用css属性inline 111<el-inp…...
)
学完Efficient c++ (44-45)
条款 44:将与参数无关的代码抽离模板 模板可以节省时间和避免代码重复,编译器会为填入的每个不同模板参数具现化出一份对应的代码,但长此以外,可能会造成代码膨胀(code bloat),生成浮夸的二进制…...
鸿蒙Harmony应用开发—ArkTS声明式开发(容器组件:ColumnSplit)
将子组件纵向布局,并在每个子组件之间插入一根横向的分割线。 说明: 该组件从API Version 7开始支持。后续版本如有新增内容,则采用上角标单独标记该内容的起始版本。 子组件 可以包含子组件。 ColumnSplit通过分割线限制子组件的高度。初始…...
jenkins部署go应用 基于docker-compose
丢弃旧的的构建 github 拉取代码 指定go的编译版本 安装插件 拉取代码是排除指定的配置文件 比如 conf/config.yaml 文件 填写配置文件内容 比如测试环境一些主机信息 等 可以配置里面 构建的时候选择此文件替换开发提交的配置文件。。。。 编写docker-compose 文件 docker…...
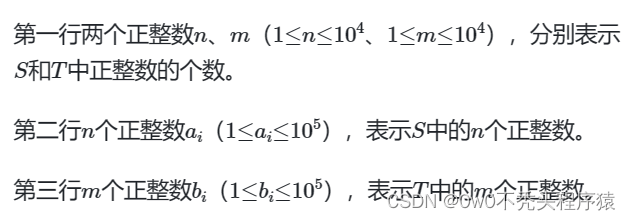
【晴问算法】入门篇—贪心算法—整数配对
题目描述 有两个正整数集合S、T,其中S中有n个正整数,T中有m个正整数。定义一次配对操作为:从两个集合中各取出一个数a和b,满足a∈S、b∈T、a≤b,配对的数不能再放回集合。问最多可以进行多少次这样的配对操作。 输入描…...
)
九种背包问题(C++)
0-1背包,背包大小target,占用容积vec[i][0],可以带来的利益是vec[i][1] 一件物品只能取一次,先遍历物品然后遍历背包更新不同容积下最大的利益 int func(vector<vector<int>>&vec,int target){vector<int>dp(target1,…...

008:安装Docker
安装Docker 如果不太熟悉Linux命令,不想学习Linux命令,可以直接看文末NAS面板章节,通过面板,像使用Window一样操作NAS。 一、安装 Docker 1.安装 Docker wget -qO- https://get.docker.com/ | sh2.启动 Docker 服务 sudo sys…...

告别原生QDockWidget的烦恼:用KDDockWidgets给你的Qt应用做个高级‘拖拽’手术
告别原生QDockWidget的烦恼:用KDDockWidgets给你的Qt应用做个高级‘拖拽’手术 如果你正在开发一款需要复杂界面布局的专业工具软件——无论是IDE、数据分析平台还是图形编辑器,Qt的原生QDockWidget可能已经让你头疼不已。那些无法实现的窗口合并需求、简…...

AI技能学习地图:从模型部署到LLM应用的全链路实践指南
1. 项目概述:一份AI技能学习的“藏宝图”如果你最近也在关注AI领域,特别是想系统性地提升自己的AI应用能力,却苦于信息过载、资源零散,那么你很可能需要一份高质量的“导航图”。今天要聊的这个项目,rafsilva85/awesom…...

别再让缓存背锅了!用webpack给Vue2打包文件加时间戳和压缩的保姆级教程
彻底解决Vue2打包缓存问题:时间戳与压缩实战指南 每次项目更新后,总有用户反馈页面显示异常,而开发者却坚称代码已经部署。这种"薛定谔的更新"状态,往往源于浏览器缓存机制在作祟。本文将手把手教你如何通过webpack配置…...

Tiled地图编辑器完整指南:如何轻松创建专业级2D游戏场景
Tiled地图编辑器完整指南:如何轻松创建专业级2D游戏场景 【免费下载链接】tiled Flexible level editor 项目地址: https://gitcode.com/gh_mirrors/ti/tiled 还在为2D游戏场景制作而烦恼吗?Tiled地图编辑器是你的终极解决方案。这款免费开源的2D…...
》读书笔记2)
01导论——《大数据平台架构(主编:吕欣 黄宏斌)》读书笔记2
当数据爆炸撞上传统技术,我们如何绝地求生? 问题的诞生:数据洪流与旧船票 过去的企业系统像一艘设计精良的小船,能稳稳载着【结构化数据】在风平浪静的水域航行。但突然之间,社交媒体的评论、监控摄像头的视频、传感器…...

终极免费歌词下载指南:如何一键获取网易云和QQ音乐的LRC歌词文件
终极免费歌词下载指南:如何一键获取网易云和QQ音乐的LRC歌词文件 【免费下载链接】163MusicLyrics 云音乐歌词获取处理工具【网易云、QQ音乐】 项目地址: https://gitcode.com/GitHub_Trending/16/163MusicLyrics 还在为找不到心爱歌曲的歌词而烦恼吗&#x…...

3个实战技巧:掌握PyDirectInput高效应用的完整指南
3个实战技巧:掌握PyDirectInput高效应用的完整指南 【免费下载链接】pydirectinput Python mouse and keyboard input automation for Windows using Direct Input. 项目地址: https://gitcode.com/gh_mirrors/py/pydirectinput PyDirectInput是一个专为Wind…...

从Spring Boot项目里‘偷’图:手把手教你用PlantUML插件,自动生成UML类图
从Spring Boot项目自动生成UML类图的工程实践 在真实的软件开发过程中,UML类图往往被视为文档编制的"必修课",却鲜少发挥其真正的工程价值。传统的手动绘制方式不仅效率低下,更难以与快速迭代的代码保持同步。本文将颠覆这一现状&a…...

终极指南:如何快速将网站转换为可编辑的Figma设计
终极指南:如何快速将网站转换为可编辑的Figma设计 【免费下载链接】figma-html Convert any website to editable Figma designs 项目地址: https://gitcode.com/gh_mirrors/fi/figma-html 在当今快节奏的数字化时代,设计师和开发者之间的协作效率…...

收藏!2026最新AI风口解读:零基础也能入行,大模型训练师年薪可达45W+
最近刷热搜的朋友,大概率都刷到了“某科技巨头拟千亿级加码AI”的重磅消息。 尽管官方尚未官宣,但明眼人都能看出:AI早已不是行业内的专属“黑话”,而是全面渗透到生活、工作、娱乐的每一个角落,成为2026年最具确定性的…...