WPF---1.入门学习

🎈个人主页:靓仔很忙i
💻B 站主页:👉B站👈
🎉欢迎 👍点赞✍评论⭐收藏
🤗收录专栏:WPF
🤝希望本文对您有所裨益,如有不足之处,欢迎在评论区提出指正,让我们共同学习、交流进步!
热重载
.csproj的PropertyGroup添加
<XamlDebuggingInformation>True</XamlDebuggingInformation>
调试中添加环境变量:
XAML_HOT_RELOAD_ACCURACY_OVER_PERF 1
学习来源
布局
wpf布局原则
一个窗口中只能包含一个元素
不应显示设置元素尺寸
不应使用坐标设置元素的位置
可以嵌套布局容器
StackPanel-->表单条件查找布局
DataGrid
wpf布局容器
StackPanel: 水平或垂直排列元素,Orientation属性分别: Horizontal / Vertical
WrapPanel : 水平或垂直排列元素、针对剩余空间不足会进行换行或换列进行排列
DockPanel : 根据容器的边界、元素进行Dock.Top、Left、Right、Bottom设置
Grid : 类似table表格、可灵活设置行列并放置控件元素、比较常用
Canvas : 使用固定的坐标设置元素的位置、不具备锚定停靠等功能。
Grid
<Grid><Grid.RowDefinitions><!--自适应,根据内容的高度设置--><!--<RowDefinition Height="AUTO"/>--><!--绝对定位--><!--<RowDefinition Height="200"/>--><!--比例--><RowDefinition Height="2*"/><RowDefinition/></Grid.RowDefinitions><Grid.ColumnDefinitions><ColumnDefinition/><ColumnDefinition/></Grid.ColumnDefinitions><!--<Button Background="Yellow" Height="150"></Button><Button Background="Red" Height="50"></Button>--><Button Grid.Column="1"></Button><Button Grid.Column="1" Grid.Row="1" Background="Black"></Button><Button Grid.Row="1" Background="Blue"></Button><!--跨行列--><!--<Button Grid.Row="1" Grid.ColumnSpan="2" Background="Red"></Button>--></Grid>
布局容器
<Grid><Grid.RowDefinitions><RowDefinition/><RowDefinition/></Grid.RowDefinitions><Grid.ColumnDefinitions><ColumnDefinition/><ColumnDefinition/></Grid.ColumnDefinitions><StackPanel><Button Width="100" Height="50">Button</Button><Button Width="100" Height="50">Button</Button><Button Width="100" Height="50">Button</Button><Button Width="100" Height="50">Button</Button><Button Width="100" Height="50">Button</Button><Button Width="100" Height="50">Button</Button><Button Width="100" Height="50">Button</Button></StackPanel><WrapPanel Grid.Row="1" Orientation="Vertical"><Button Width="100" Height="50">Button</Button><Button Width="100" Height="50">Button</Button><Button Width="100" Height="50">Button</Button><Button Width="100" Height="50">Button</Button><Button Width="100" Height="50">Button</Button><Button Width="100" Height="50">Button</Button><Button Width="100" Height="50">Button</Button></WrapPanel><DockPanel Grid.Column="1" LastChildFill="False"> <Button Width="80" Height="50" DockPanel.Dock="Bottom">Button1</Button><Button Width="80" Height="50" DockPanel.Dock="Left">Button1</Button><Button Width="80" Height="50" DockPanel.Dock="Right">Button1</Button><Button Width="80" Height="50" DockPanel.Dock="Top">Button1</Button></DockPanel><UniformGrid Grid.Row="1" Grid.Column="1" Rows="3" Columns="3"><Button>Button</Button><Button>Button</Button><Button>Button</Button><Button>Button</Button><Button>Button</Button><Button>Button</Button><Button>Button</Button><Button>Button</Button></UniformGrid></Grid>
Canvas
<Canvas Margin="10,10,10,10" Background="White" ><Rectangle Name="rect" Canvas.Left="100" Canvas.Top="180" Fill="Black" Stroke="Red"  Width="200" Height="200"/><Ellipse  Name="el" Canvas.Left="500" Canvas.Top="150" Fill="Azure" Stroke="Green" Width="180" Height="180"/>
</Canvas>
样式
WPF中的各类控件元素, 都可以自由的设置其样式。 诸如:
字体(FontFamily)
字体大小(FontSize)
背景颜色(Background)
字体颜色(Foreground)
边距(Margin)
水平位置(HorizontalAlignment)
垂直位置(VerticalAlignment) 等等。
<Window.Resources><Style x:Key="TextBlockStyle" TargetType="{x:Type TextBlock}"><Setter Property="FontFamily" Value="宋体"/><Setter Property="FontSize" Value="30"/><Setter Property="Foreground" Value="Red"/><Setter Property="FontWeight" Value="Bold"/></Style></Window.Resources><StackPanel HorizontalAlignment="Center" VerticalAlignment="Center"><TextBlock Text="字体一" Style="{StaticResource TextBlockStyle}"/><TextBlock Text="字体一" Style="{StaticResource TextBlockStyle}"/><TextBlock Text="字体一" Style="{StaticResource TextBlockStyle}"/></StackPanel>
触发器
顾名思义, 触发器可以理解为, 当达到了触发的条件, 那么就执行预期内的响应, 可以是样式、数据变化、动画等。
触发器通过 Style.Triggers集合连接到样式中, 每个样式都可以有任意多个触发器, 并且每个触发器都是 System.Windows.TriggerBase的派生类实例, 以下是触发器的类型
Trigger : 监测依赖属性的变化、触发器生效
MultiTrigger : 通过多个条件的设置、达到满足条件、触发器生效
DataTrigger : 通过数据的变化、触发器生效
MultiDataTrigger : 多个数据条件的触发器
EventTrigger : 事件触发器, 触发了某类事件时, 触发器生效。
Trigger
<Window.Resources><Style x:Key="TextBlockStyle" TargetType="{x:Type TextBlock}"><Style.Triggers><Trigger Property="IsMouseOver" Value="true"><Setter Property="Foreground" Value="Blue"/></Trigger></Style.Triggers><Setter Property="FontFamily" Value="宋体"/><Setter Property="FontSize" Value="30"/><Setter Property="Foreground" Value="Red"/><Setter Property="FontWeight" Value="Bold"/></Style></Window.Resources><StackPanel HorizontalAlignment="Center" VerticalAlignment="Center"><TextBlock Text="字体一" Style="{StaticResource TextBlockStyle}"/><TextBlock Text="字体一" Style="{StaticResource TextBlockStyle}"/><TextBlock Text="字体一" Style="{StaticResource TextBlockStyle}"/></StackPanel>
MultiTrigger
<Window.Resources><Style x:Key="TextBlockStyle" TargetType="{x:Type Button}"><Style.Triggers><MultiTrigger><MultiTrigger.Conditions><Condition Property="IsMouseOver" Value="true"/><Condition Property="IsPressed" Value="true"/></MultiTrigger.Conditions><MultiTrigger.Setters><Setter Property="Foreground" Value="Black"/></MultiTrigger.Setters></MultiTrigger></Style.Triggers><Setter Property="FontFamily" Value="宋体"/><Setter Property="FontSize" Value="30"/><Setter Property="Foreground" Value="Red"/><Setter Property="FontWeight" Value="Bold"/></Style></Window.Resources><StackPanel HorizontalAlignment="Center" VerticalAlignment="Center"><Button Content="按钮一" Style="{StaticResource TextBlockStyle}"/><Button Content="按钮一" Style="{StaticResource TextBlockStyle}"/><Button Content="按钮一" Style="{StaticResource TextBlockStyle}"/></StackPanel>
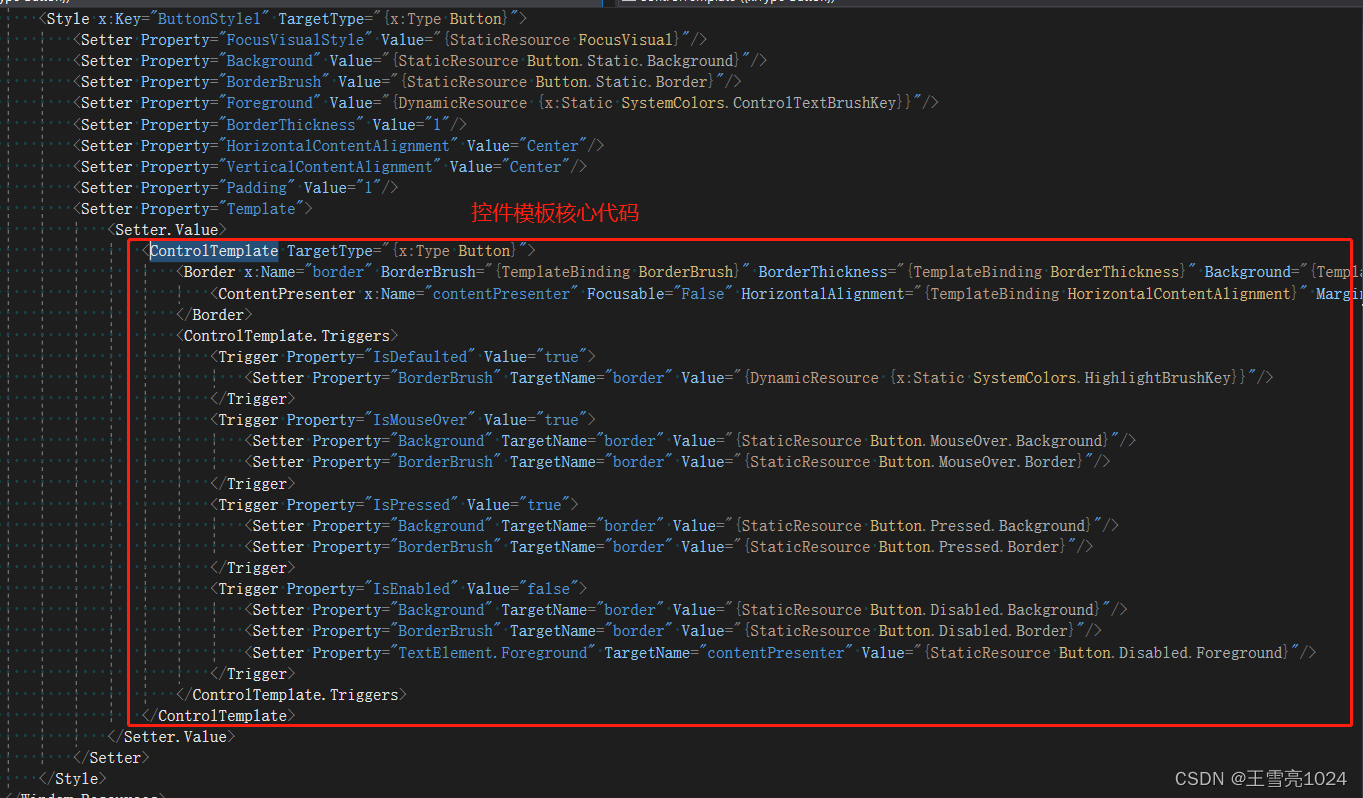
控件模板
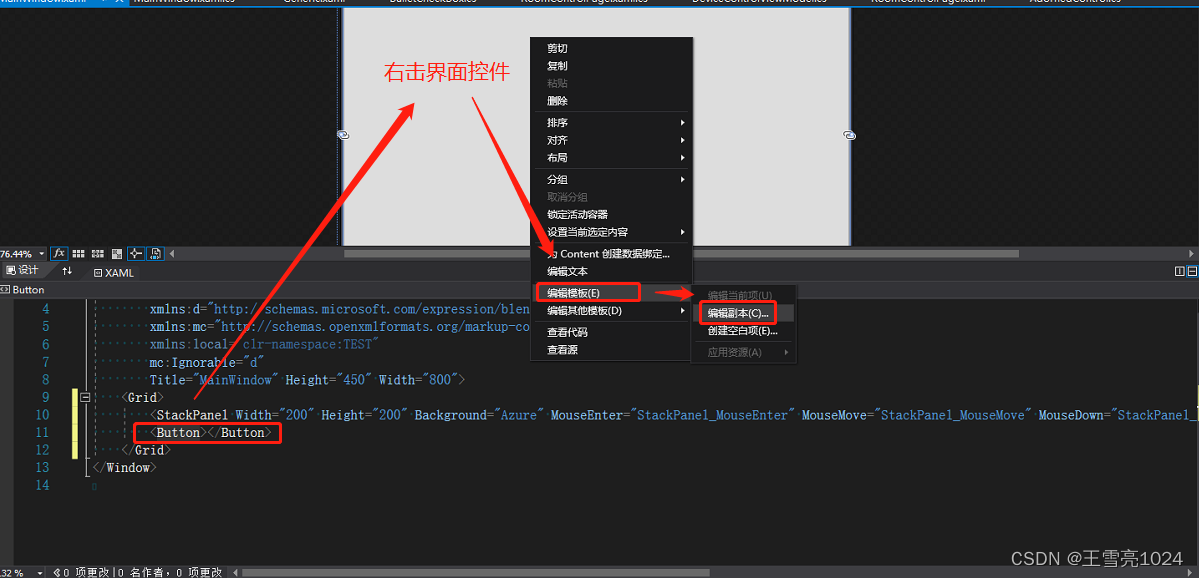
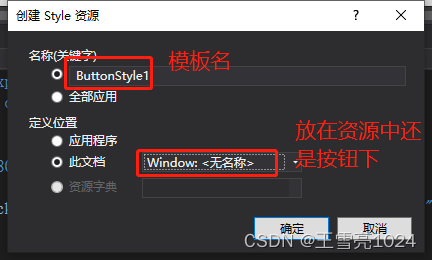
回到当前的xaml文件中
数据模板
https://www.cnblogs.com/wzh2010/p/6425060.html
元素绑定 资源绑定 DataContext绑定 属性绑定、按钮绑定
元素绑定
OneWay(单向绑定) : 当源属性发生变化更新目标属性, 类似上面的例子中, 滑动变化更新文本的数据
TwoWay(双向绑定) : 当源属性发生变化更新目标属性, 目标属性发生变化也更新源属性。
OneTime(单次模式) : 根据第一次源属性设置目标属性, 在此之后所有改变都无效。
OneWayToSource : 和OneWay类型, 只不过整个过程倒置。
Default : 既可以是双向,也可以是单项, 除非明确表明某种模式, 否则采用该默认绑定
单向绑定
<StackPanel HorizontalAlignment="Center" VerticalAlignment="Center"><Slider x:Name="slider" Width="200"/><TextBox Text="{Binding ElementName=slider,Path=Value,UpdateSourceTrigger=PropertyChanged}" ></TextBox></StackPanel>
单次模式
<StackPanel HorizontalAlignment="Center" VerticalAlignment="Center"><Slider x:Name="slider" Width="200" Value="2"/><TextBox Text="{Binding ElementName=slider,Path=Value,Mode=OneTime,UpdateSourceTrigger=PropertyChanged}" ></TextBox></StackPanel>
绑定到非元素
Source绑定
<Window.Resources><TextBox x:Key="txt">Hello World</TextBox></Window.Resources><StackPanel HorizontalAlignment="Center" VerticalAlignment="Center"><TextBox Text="{Binding Source={StaticResource txt},Path=Text}" ></TextBox></StackPanel>
DataSource绑定
public MainWindow(){InitializeComponent();nameTextBox.DataContext = new Person() { name="xlwang"};}public class Person {public String name { get; set; }}<Window.Resources><TextBox x:Key="txt">Hello World</TextBox></Window.Resources><StackPanel HorizontalAlignment="Center" VerticalAlignment="Center"><TextBox x:Name="nameTextBox" Text="{Binding name,FallbackValue='Not Found'}" Width="200" ></TextBox></StackPanel>
数据绑定
mvvm
实现思路:实现通知接口 实现Icommand接口 创建界面对应的viewmodel 界面后台初始化数据 界面绑定数据
实现通知接口
class NotificationObject : INotifyPropertyChanged{public event PropertyChangedEventHandler PropertyChanged;public void RaisePropertyChanged(string propetyName) {if (this.PropertyChanged != null) {this.PropertyChanged.Invoke(this,new PropertyChangedEventArgs(propetyName));}}}
实现ICommand接口
class DelegateCommand : ICommand{public event EventHandler CanExecuteChanged;public bool CanExecute(object parameter){if (CanExecuteFun == null){return true;}return this.CanExecuteFun(parameter);}public void Execute(object parameter){if (ExecuteAction == null){return;}this.ExecuteAction(parameter);}public Action<object> ExecuteAction { get; set; }public Func<object,bool> CanExecuteFun { get; set; }}
创建界面对应的viewmodel
class Window2ViewModel:NotificationObject{public Window2ViewModel(){this.addCommand = new DelegateCommand();this.addCommand.ExecuteAction = new Action<object>(this.add);}private double _val1;public double val1{get { return _val1; }set { _val1 = value;this.RaisePropertyChanged("val1");}}private double _val2;public double val2{get { return _val2; }set{_val2 = value;this.RaisePropertyChanged("val2");}}private double _result;public double result{get { return _result; }set{_result = value;this.RaisePropertyChanged("result");}}public DelegateCommand addCommand { get; set; }private void add(object param) {this.result = this.val1 + this.val2;}}
界面数据绑定
public Window2(){InitializeComponent();this.DataContext = new Window2ViewModel();}
界面
<StackPanel><!--<TextBox x:Name="txt1" Text="{Binding val1}"></TextBox><TextBox x:Name="txt2" Text="{Binding val2}"></TextBox><TextBox x:Name="result" Text="{Binding result}"></TextBox>--><Slider x:Name="s1" Value="{Binding val1}"></Slider><Slider x:Name="s2" Value="{Binding val2}"></Slider><Slider x:Name="result" Value="{Binding result}"></Slider><Button Content="提交" Command="{Binding addCommand}"></Button></StackPanel>
mvvvm练习
window.xaml
<Window x:Class="wpf_study.Window1"xmlns="http://schemas.microsoft.com/winfx/2006/xaml/presentation"xmlns:x="http://schemas.microsoft.com/winfx/2006/xaml"xmlns:d="http://schemas.microsoft.com/expression/blend/2008"xmlns:mc="http://schemas.openxmlformats.org/markup-compatibility/2006"xmlns:local="clr-namespace:wpf_study"mc:Ignorable="d"Title="Window1" Height="450" Width="800" ><Window.Resources></Window.Resources><Grid><Grid.RowDefinitions><RowDefinition Height="60"></RowDefinition><RowDefinition></RowDefinition></Grid.RowDefinitions><StackPanel><Button Content="添加" Command="{Binding addCommand}" ></Button></StackPanel><DataGrid Grid.Row="1" x:Name="dg" AutoGenerateColumns="False" ColumnWidth="*" ItemsSource="{Binding stuList}"><DataGrid.Columns><DataGridTextColumn Header="序号" Binding="{Binding id}"></DataGridTextColumn><DataGridTextColumn Header="姓名" Binding="{Binding UserName}"></DataGridTextColumn><DataGridTemplateColumn Header="操作"><DataGridTemplateColumn.CellTemplate><DataTemplate><StackPanel Orientation="Horizontal"><Button Content="修改" ></Button><Button Content="删除" CommandParameter="{Binding id}"Command="{Binding DataContext.delCommand,RelativeSource={RelativeSource Mode=FindAncestor,AncestorType=DataGrid}}"></Button></StackPanel></DataTemplate></DataGridTemplateColumn.CellTemplate></DataGridTemplateColumn></DataGrid.Columns></DataGrid></Grid>
</Window>
window.xaml.cs
using GalaSoft.MvvmLight.Command;
using System;
using System.Collections.Generic;
using System.ComponentModel;
using System.Linq;
using System.Text;
using System.Threading.Tasks;
using System.Windows;
using System.Windows.Controls;
using System.Windows.Data;
using System.Windows.Documents;
using System.Windows.Input;
using System.Windows.Media;
using System.Windows.Media.Imaging;
using System.Windows.Shapes;
using wpf_study.viewmodel;namespace wpf_study
{/// <summary>/// Window1.xaml 的交互逻辑/// </summary>public partial class Window1 : Window{public Window1(){InitializeComponent();this.DataContext = new Window1ModelView();}}
}
windowModelView.cs
using GalaSoft.MvvmLight;
using GalaSoft.MvvmLight.Command;
using System;
using System.Collections.Generic;
using System.Collections.ObjectModel;
using System.Linq;
using System.Text;
using System.Threading.Tasks;
using System.Windows;namespace wpf_study.viewmodel
{class Window1ModelView:ViewModelBase{#region 暴露命令private RelayCommand _addCommand;public RelayCommand addCommand{get{if (_addCommand == null){_addCommand = new RelayCommand(() => {int rand = new Random().Next(0, 1000);stuList.Add(new Student() { UserName = String.Format("random{0}", rand), id = rand });});}return _addCommand;}}private RelayCommand<int> _delCommand;public RelayCommand<int> delCommand{get{if (_delCommand == null){_delCommand = new RelayCommand<int>((o) => {MessageBox.Show("删除" + o);});}return _delCommand;}}#endregion#region 暴露数据private ObservableCollection<Student> _stuList;public ObservableCollection<Student> stuList{get { return _stuList; }set{_stuList = value;RaisePropertyChanged("stuList");}}#endregionpublic Window1ModelView() {stuList = new ObservableCollection<Student>();stuList.Add(new Student() { UserName = "小王", id = 1 });stuList.Add(new Student() { UserName = "小李", id = 2 });stuList.Add(new Student() { UserName = "小张", id = 3 });stuList.Add(new Student() { UserName = "小黑", id = 4 });}}public class Student:ViewModelBase{private string userName;public string UserName{get { return userName; }set { userName = value;RaisePropertyChanged("UserName");}}private int _id;public int id{get { return _id; }set {_id = value;RaisePropertyChanged("id");}}}
}
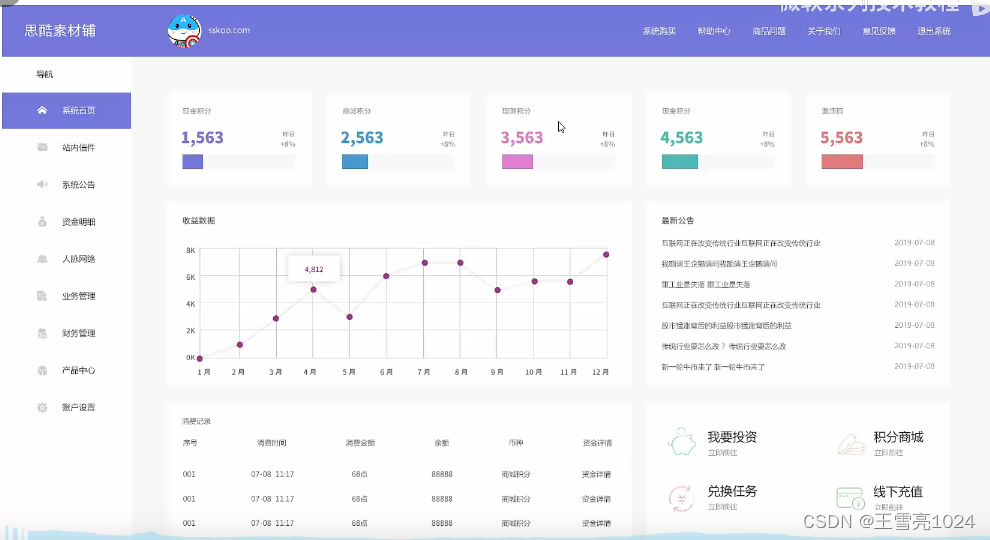
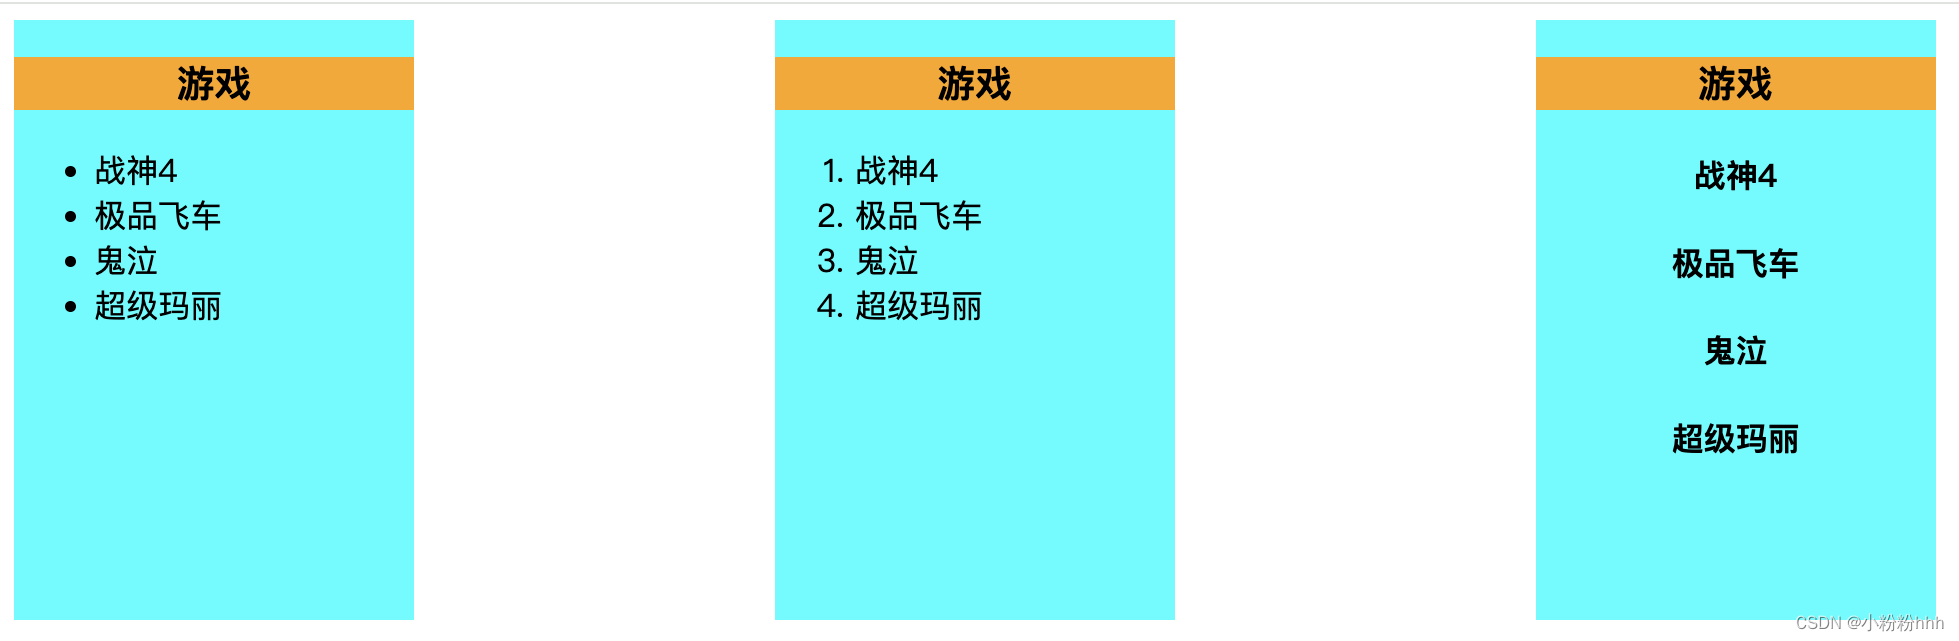
大练习
使用布局容器,排版出下面布局
相关文章:
WPF---1.入门学习
🎈个人主页:靓仔很忙i 💻B 站主页:👉B站👈 🎉欢迎 👍点赞✍评论⭐收藏 🤗收录专栏:WPF 🤝希望本文对您有所裨益,如有不足之处…...

Vue3 + Vite + TS + Element-Plus + Pinia项目(5)对axios进行封装
1、在src文件夹下新建config文件夹后,新建baseURL.ts文件,用来配置http主链接 2、在src文件夹下新建http文件夹后,新建request.ts文件,内容如下 import axios from "axios" import { ElMessage } from element-plus im…...
)
【Rust】——编写自动化测试(一)
🎃个人专栏: 🐬 算法设计与分析:算法设计与分析_IT闫的博客-CSDN博客 🐳Java基础:Java基础_IT闫的博客-CSDN博客 🐋c语言:c语言_IT闫的博客-CSDN博客 🐟MySQL:…...

第十二章 微服务核心(一)
一、Spring Boot 1.1 SpringBoot 构建方式 1.1.1 通过官网自动生成 进入官网:https://spring.io/,点击 Projects --> Spring Framework; 拖动滚动条到中间位置,点击 Spring Initializr 或者直接通过 https://start.spring…...
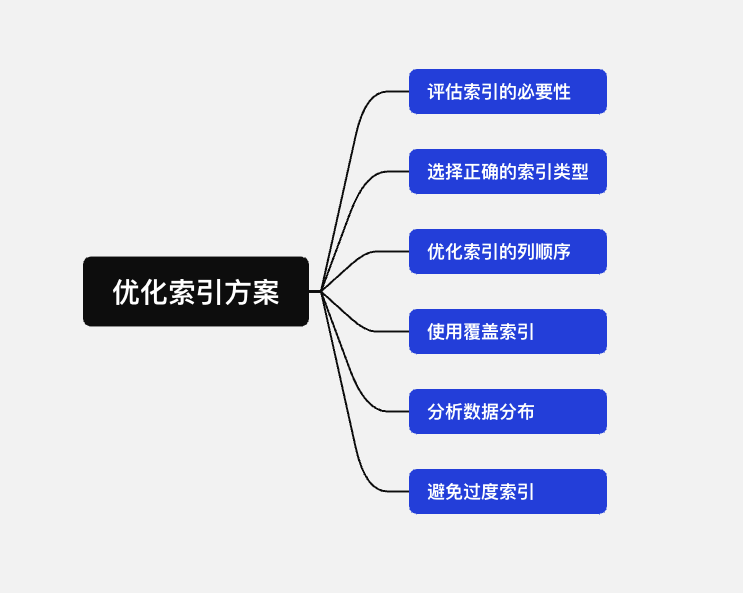
MySQL索引18连问,谁能顶住
前言 过完这个节,就要进入金银季,准备了 18 道 MySQL 索引题,一定用得上。 作者:感谢每一个支持: github 1. 索引是什么 索引是一种数据结构,用来帮助提升查询和检索数据速度。可以理解为一本书的目录&…...
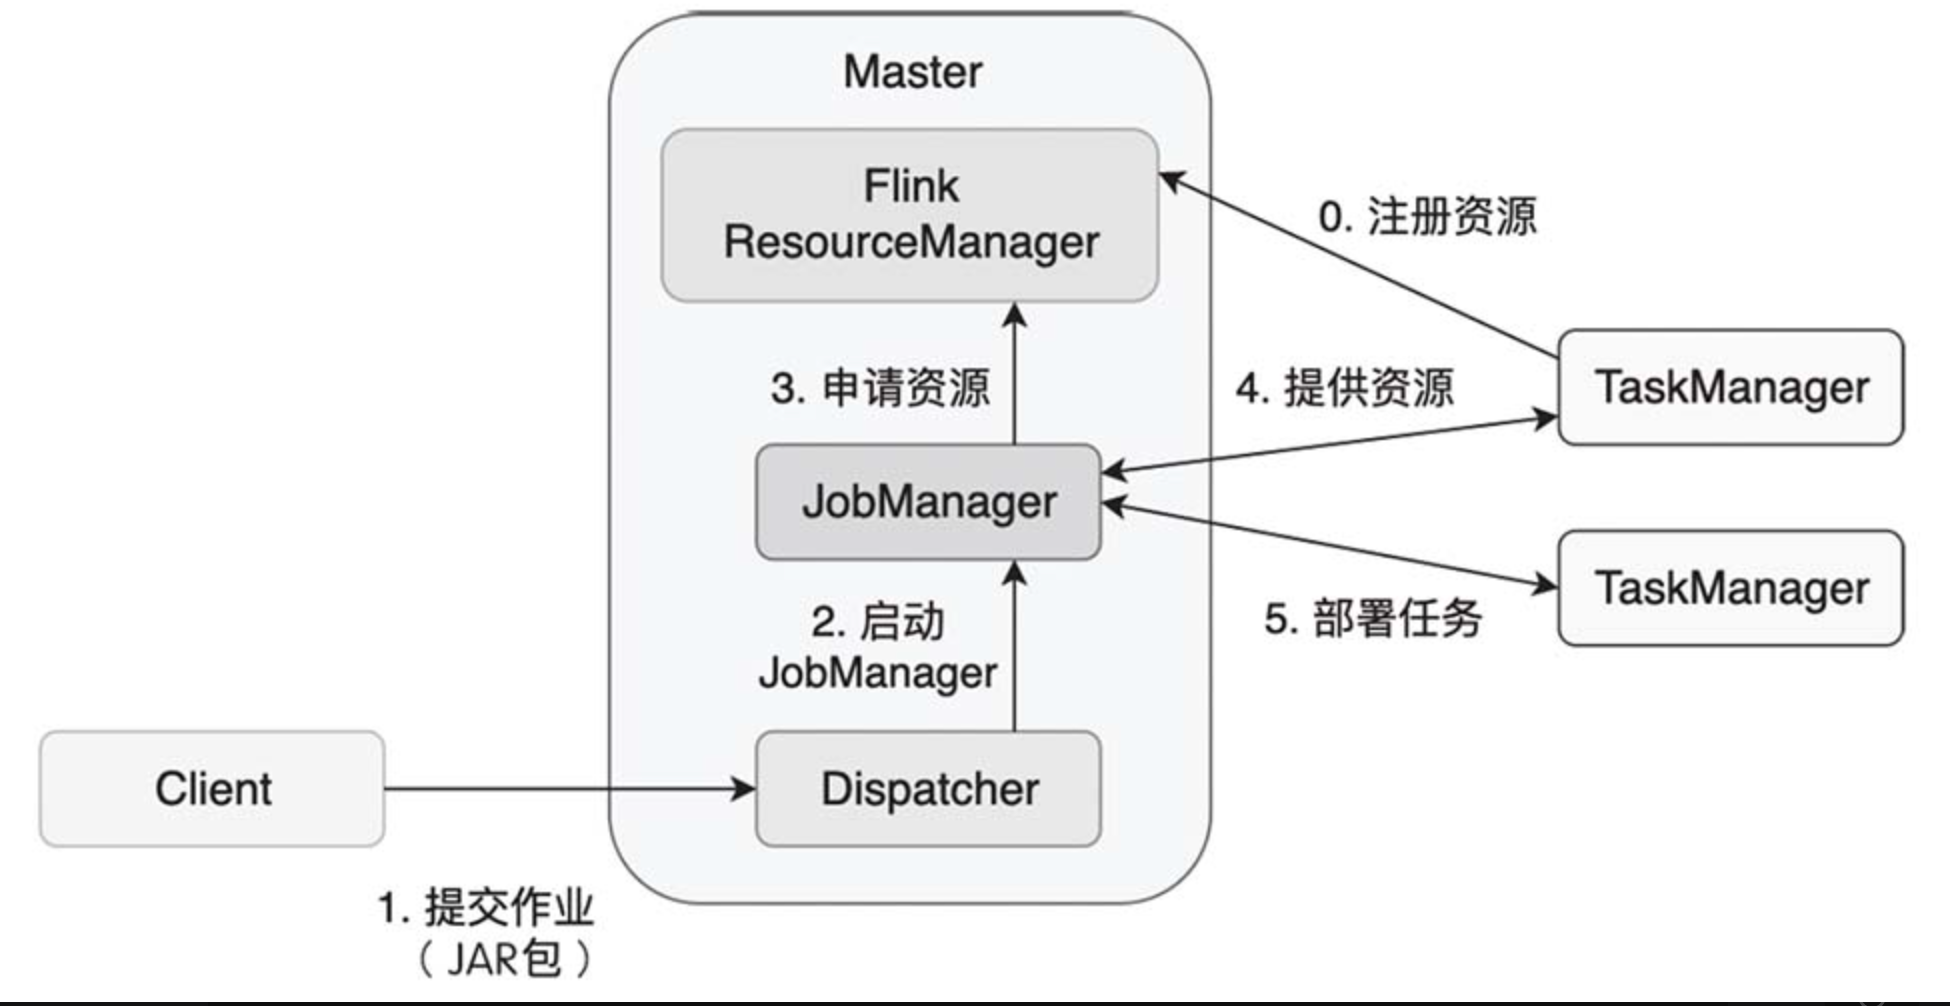
[flink 实时流基础系列]揭开flink的什么面纱基础一
Apache Flink 是一个框架和分布式处理引擎,用于在无边界和有边界数据流上进行有状态的计算。Flink 能在所有常见集群环境中运行,并能以内存速度和任意规模进行计算。 文章目录 0. 处理无界和有界数据无界流有界流 1. Flink程序和数据流图2. 为什么一定要…...
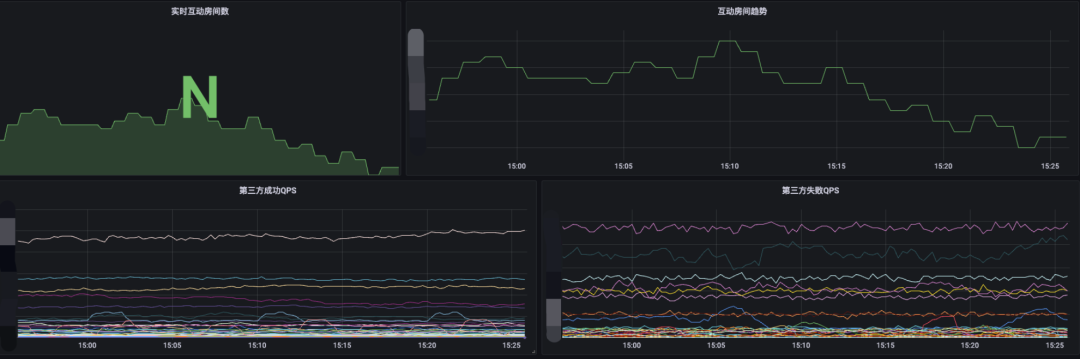
开放平台 - 互动玩法演进之路
本期作者 1. 背景 随着直播业务和用户规模日益壮大,如何丰富直播间内容、增强直播间内用户互动效果,提升营收数据变得更加关键。为此,直播互动玩法应运而生。通过弹幕、礼物、点赞、大航海等方式,用户可以参与主播的直播内容。B站…...
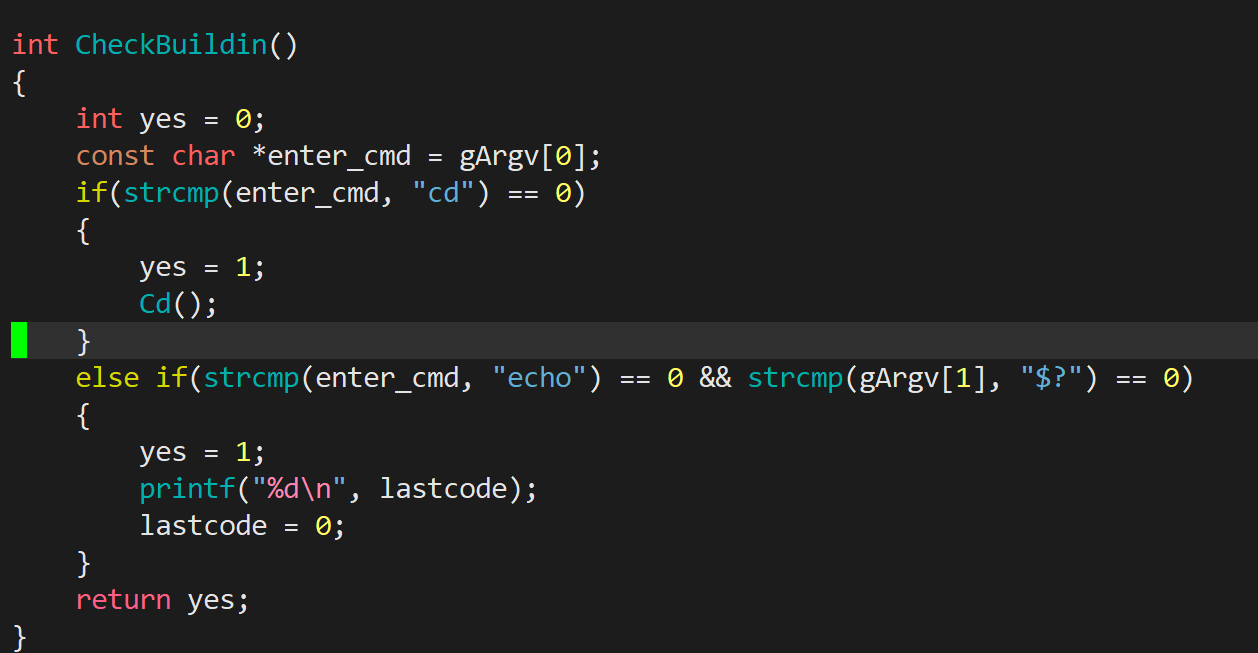
Linux之进程控制进程终止进程等待进程的程序替换替换函数实现简易shell
文章目录 一、进程创建1.1 fork的使用 二、进程终止2.1 终止是在做什么?2.2 终止的3种情况&&退出码的理解2.3 进程常见退出方法 三、进程等待3.1 为什么要进行进程等待?3.2 取子进程退出信息status3.3 宏WIFEXITED和WEXITSTATUS(获取…...

RegSeg 学习笔记(待完善)
论文阅读 解决的问题 引用别的论文的内容 可以用 controlf 寻找想要的内容 PPM 空间金字塔池化改进 SPP / SPPF / SimSPPF / ASPP / RFB / SPPCSPC / SPPFCSPC / SPPELAN  ASPP STDC:short-term dense concatenate module 和 DDRNet SE-ResNeXt …...

Qt中常用宏定义
Qt中常用宏定义 一、Q_DECLARE_PRIVATE(Class)二、Q_DECLARE_PRIVATE_D(Dptr, Class)三、Q_DECLARE_PUBLIC(Class)四、Q_D(Class) 和 Q_Q(Class) 一、Q_DECLARE_PRIVATE(Class) #define Q_DECLARE_PRIVATE(Class) inline Class##Private* d_func() { # 此处的 d_ptr 是属于QOb…...

【计算机网络】第 9 问:四种信道划分介质访问控制?
目录 正文什么是信道划分介质访问控制?什么是多路复用技术?四种信道划分介质访问控制1. 频分多路复用 FDM2. 时分多路复用 TDM3. 波分多路复用 WDM4. 码分多路复用 CDM 正文 什么是信道划分介质访问控制? 信道划分介质访问控制(…...
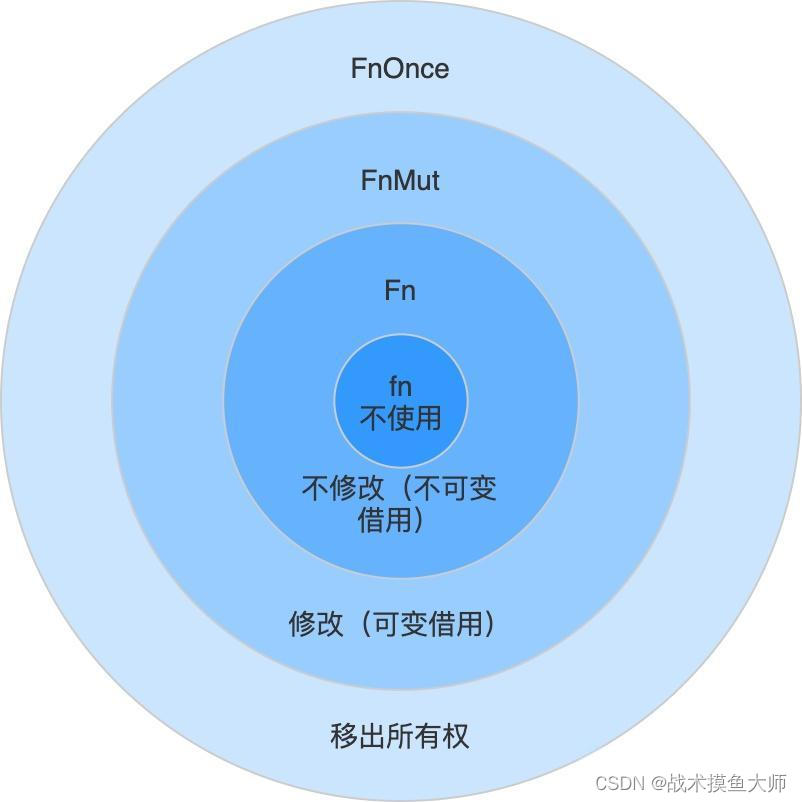
Rust编程(五)终章:查漏补缺
闭包 & 迭代器 闭包(Closure)通常是指词法闭包,是一个持有外部环境变量的函数。外部环境是指闭包定义时所在的词法作用域。外部环境变量,在函数式编程范式中也被称为自由变量,是指并不是在闭包内定义的变量。将自…...
LLM漫谈(五)| 从q star视角解密OpenAI 2027年实现AGI计划
最近,网上疯传OpenAI2027年关于AGI的计划。在本文,我们将针对部分细节以第一人称进行分享。 摘要:OpenAI于2022年8月开始训练一个125万亿参数的多模态模型。第一个阶段是Arrakis,也叫Q*,该模型于2023年12月完成训练&…...

【echart】数据可视化+vue+vite遇到问题
1、vue3使用echars图表报错:"Initialize failed:invalid dom" 原因是因为:Dom没有完成加载时,echarts.init() 就已经开始执行了,获取不到Dom,无法进行操作 解决:加个延时 onMounted(async () …...

mac m1安装和使用nvm的问题
mac m1安装和使用nvm的问题 使用nvm管理多版本node 每个项目可能用的node版本不同,所以需要多个版本node来回切换 但是最近遇到安装v14.19.0时一直安装失败的问题。 首先说明一下,用的电脑是mac M1芯片 Downloading and installing node v14.19.0... …...

git泄露
git泄露 CTFHub技能树-Web-信息泄露-备份文件下载 当前大量开发人员使用git进行版本控制,对站点自动部署。如果配置不当,可能会将.git文件夹直接部署到线上环境。这就引起了git泄露漏洞。 工具GitHack使用:python2 GitHack.py URL地址/.git/ git命令…...

Java项目:78 springboot学生宿舍管理系统的设计与开发
作者主页:源码空间codegym 简介:Java领域优质创作者、Java项目、学习资料、技术互助 文中获取源码 项目介绍 系统的角色:管理员、宿管、学生 管理员管理宿管员,管理学生,修改密码,维护个人信息。 宿管员…...

ArcGis Pro Python工具箱教程 03 工具箱中工具自定义
ArcGis Pro Python工具箱教程 03 工具箱中工具自定义 用于定义工作工具类的方法 工具方法必选或可选描述__ init __必需项right-aligned 初始化工具类。getParameterInfo可选定义工具的参数。isLicensed可选返回工具是否获得执行许可。updateParameters可选在用户每次在工具对…...
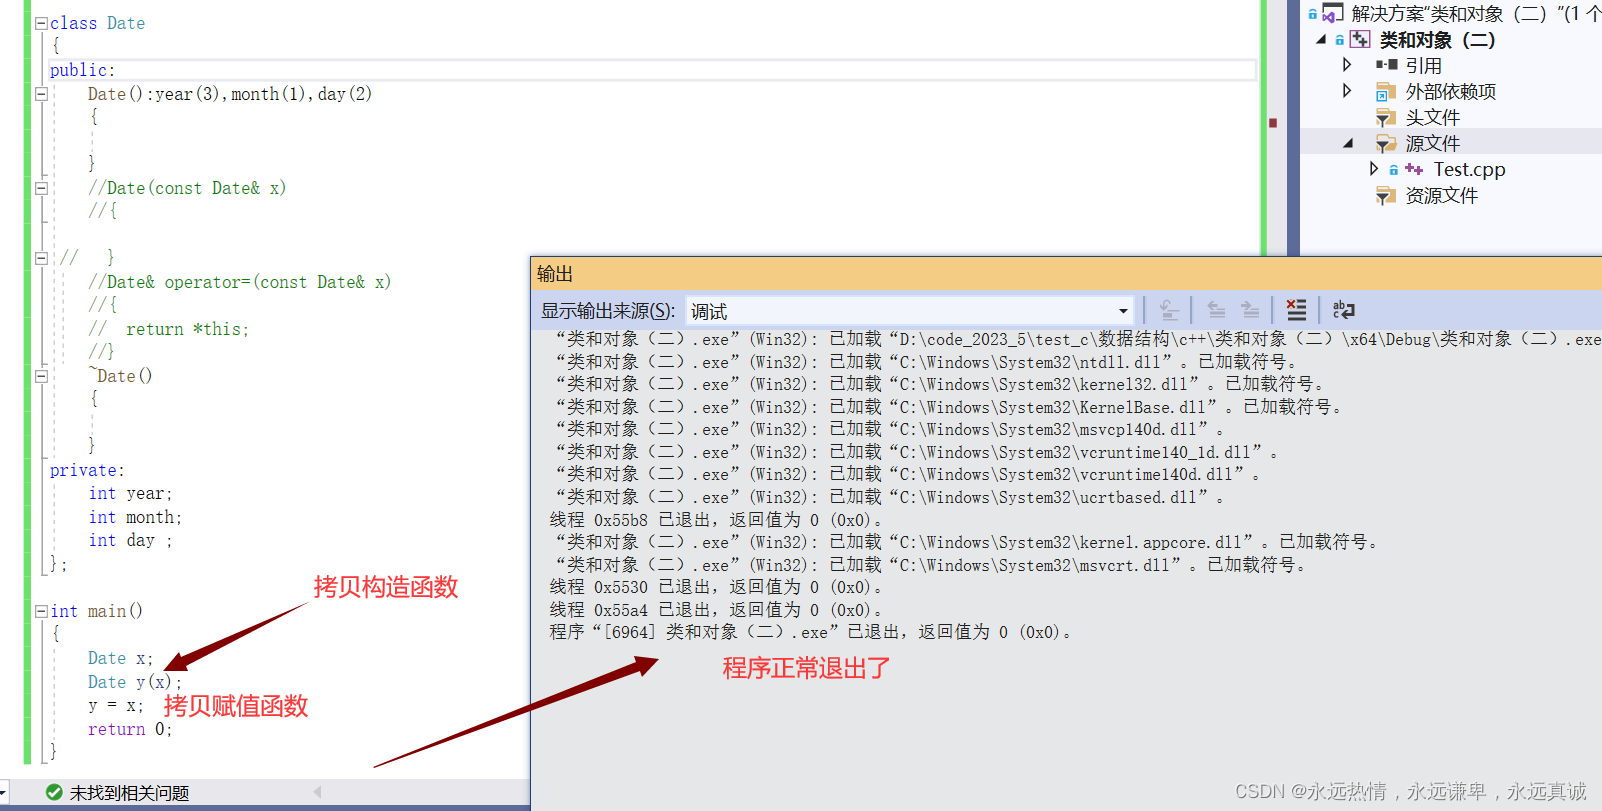
【C++初阶】之类和对象(中)
【C初阶】之类和对象(中) ✍ 类的六个默认成员函数✍ 构造函数🏄 为什么需要构造函数🏄 默认构造函数🏄 为什么编译器能自动调用默认构造函数🏄 自己写的构造函数🏄 构造函数的特性 ✍ 拷贝构造…...
Vue2(十一):脚手架配置代理、github案例、插槽
一、脚手架配置代理 1.回顾常用的ajax发送方式: (1)xhr 比较麻烦,不常用 (2)jQuery 核心是封装dom操作,所以也不常用 (3)axios 优势:体积小、是promis…...

立创开源无线开关功率计Pro:ESP32-C3+INA228打造50V/320A机器人安全监控方案
立创开源无线开关功率计Pro:ESP32-C3INA228打造50V/320A机器人安全监控方案 大家好,我是老张,一个在机器人圈子里摸爬滚打了十来年的嵌入式工程师。今天想跟大家聊聊一个在调试机器人时特别头疼,但又特别重要的事儿——安全。 不…...
)
嵌入式开发必备:3种高效合并Hex文件的实战技巧(附工具推荐)
嵌入式开发必备:3种高效合并Hex文件的实战技巧(附工具推荐) 在嵌入式系统开发中,Bootloader和应用程序的协同工作是一个常见需求。想象一下这样的场景:生产线上的工人需要为数百台设备烧录程序,如果每次都要…...

一手实测首个龙虾模型:长路径任务不失误,一人包揽全栈开发
克雷西 发自 凹非寺量子位 | 公众号 QbitAI终于,“养虾人”们也有自己的专属模型了。就在今天,智谱稍早前开始内测的神秘模型Pony-Alpha-2终于揭开了真实身份——全球首个“龙虾特供”模型GLM-5-Turbo。而且为了让你更方便地吃虾,这次智谱还专…...

三机九节点电力系统 Simulink 仿真模型探索
【三机九节点电力系统Simulink仿真模型】 3机9节点Matlab/Simulink电力系统仿真模型 1个风机 2个同步机 风电渗透率20.7%最近在研究电力系统仿真,搭建了一个超有意思的三机九节点 Matlab/Simulink 电力系统仿真模型,来和大家分享一下。这个模型可不简单…...

StructBERT中文句子相似度实测:200字符长句、中英混排处理效果展示
StructBERT中文句子相似度实测:200字符长句、中英混排处理效果展示 1. 工具概述与核心能力 StructBERT是由百度研发的预训练语言模型,在中文自然语言处理任务中表现出色。本次实测的StructBERT文本相似度计算工具基于该模型实现,专门用于评…...

InfluxDB时序数据库入门:从安装到第一个Measurement的完整指南
InfluxDB时序数据库实战:从零构建物联网数据监控系统 时序数据库正在成为物联网、DevOps和金融科技领域的核心技术栈。作为这一领域的佼佼者,InfluxDB以其高效的写入性能和灵活的数据模型,帮助开发者轻松应对海量时间序列数据的存储与分析挑战…...

Realistic Vision V5.1 前端交互开发:Vue3实现实时图像生成与预览界面
Realistic Vision V5.1 前端交互开发:Vue3实现实时图像生成与预览界面 最近在做一个挺有意思的项目,需要为团队内部部署的Realistic Vision V5.1模型搭建一个操作界面。这个模型生成的人像和场景图质量相当不错,但每次想调整参数、换个提示词…...

在德州找刑事律师,如何选到最专业的?
在德州选择一位专业的刑事律师对于维护自身合法权益至关重要。以下是一些实用的指南和建议,帮助您找到最适合的刑事律师。为什么需要刑事律师?刑事律师在刑事诉讼过程中扮演着重要角色,他们能够提供法律咨询、代理辩护、申请取保候审、阅卷、…...

零基础玩转YOLOFuse:RGB+红外双流融合检测保姆级教程
零基础玩转YOLOFuse:RGB红外双流融合检测保姆级教程 你是不是遇到过这样的问题:在夜晚、雾天或者光线不好的时候,摄像头拍出来的画面一片模糊,根本看不清有没有人或者车?传统的目标检测模型这时候就“瞎”了ÿ…...
)
Godot游戏开发实战:如何用OpenStreetMap数据快速生成3D城市模型(附完整代码)
Godot游戏开发实战:如何用OpenStreetMap数据快速生成3D城市模型(附完整代码) 当独立游戏开发者想要构建一个真实的城市环境时,手动建模往往耗时费力。而OpenStreetMap(OSM)这个开源地理数据库,正…...