【Android】源码解析Activity的结构分析
源码解析Activity的结构分析
目录
- 1、Activity、View、Window有什么关联?
- 2、Activity的结构构建流程
- 3 源码解析Activity的构成
- 3.1 Activity的Attach方法
- 3.2 Activity的OnCreate
- 4、WindowManager与View的关系
- 总结
- 1、一个Activity对应几个WindowManage,对应几个Window?
- 2、DecorView在哪被创建?
- 3、PhoneWindow和Window有什么关系?
- 4、在Activity的onResume方法调用Handler的post可以获取View的宽高吗?View的post方法能拿到View的宽高?
参考文献:
1、Android进阶之光第二版
2、Android 源码分析 - Activity的结构分析
3、反思|Android LayoutInflater机制的设计与实现
1、Activity、View、Window有什么关联?
用一个简单的例子理解它们,假设现在正在装修一个新房子:
📌
Activity相当于一个房子。
Window相当于房子的窗户,可以通过窗户观察到房子。
WindowManage相当于管家,控制窗户的开关。
View相当于各种各样的家具。
layoutInflater相当于室内装修师 将家具(View)正确的摆放在房子(Activity)中。
XML文件就像是装修图纸,将不同的家具(View)排列组合
通过一个图理解它们之间的层级关系:
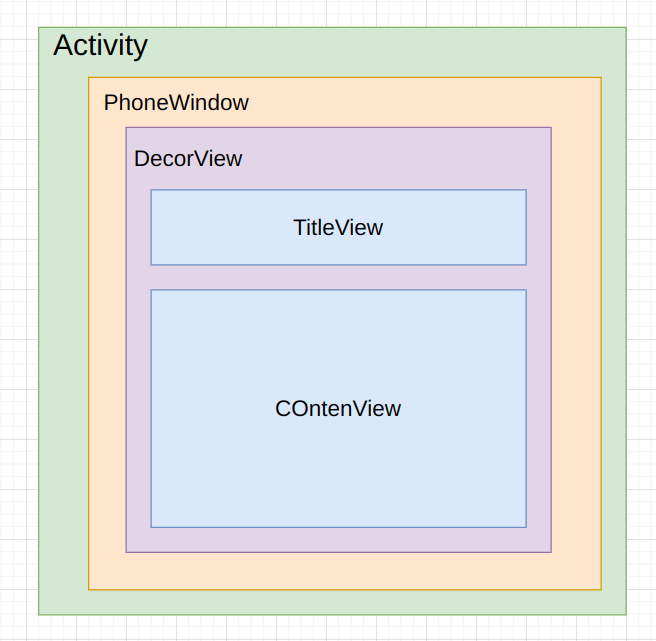
关于Activity和Window,DecorView怎么关联起来参考:View事件的分发机制
2、Activity的结构构建流程

首先简单介绍一下各个部分的作用:
ActivityThread:每个流程调用起始地点
Activity:相当于是一个管理者,负责创建WindowManager和Window。
Window:承载着View,同时代Activity处理一切View的事务。
WindowManager:从字面意思来理解是Window的管理,其实是管理Window上的View,包括addView和remove。
3 源码解析Activity的构成
3.1 Activity的Attach方法
在Activity的Attach方法中主要做了两件事:
- 初始化mWindow,通过new PhoneWindow调用它的构造方法。
- 初始化WindowManage,并且将它set到Window中
接下来具体看看源码在干啥:
@UnsupportedAppUsage
private WindowManager mWindowManager;final void attach(Context context, ActivityThread aThread,Instrumentation instr, IBinder token, int ident,Application application, Intent intent, ActivityInfo info,CharSequence title, Activity parent, String id,NonConfigurationInstances lastNonConfigurationInstances,Configuration config, String referrer, IVoiceInteractor voiceInteractor,Window window, ActivityConfigCallback activityConfigCallback) {// ······mWindow = new PhoneWindow(this, window, activityConfigCallback);  //1// ······//  2mWindow.setWindowManager((WindowManager)context.getSystemService(Context.WINDOW_SERVICE),mToken, mComponent.flattenToString(),(info.flags & ActivityInfo.FLAG_HARDWARE_ACCELERATED) != 0);// ······mWindowManager = mWindow.getWindowManager();  //3
}
这里的context.getSystemService方法就是用来返回一个WindowManage对象
@Override
public Object getSystemService(@ServiceName @NonNull String name) {if (getBaseContext() == null) {throw new IllegalStateException("System services not available to Activities before onCreate()");}if (WINDOW_SERVICE.equals(name)) {return mWindowManager;} else if (SEARCH_SERVICE.equals(name)) {ensureSearchManager();return mSearchManager;}return super.getSystemService(name);
}
一个小疑问,为什么先setWindowManager接下来又通过getWindowManager获取mWindowManager,但是getSystemService返回的也是这个mWindowManager,这是在做什么?
实际上Android在这里做了一个缓存,在第一次创建时super.getSystemService(name);调用系统级别的管理器WindowManager,再之后的创建每一次都是同一个WindowManager。
当我们调用 context.getSystemService(Context.WINDOW_SERVICE) 时,实际上返回的是 WindowManagerGlobal 中唯一的那个 WindowManagerImpl 实例的一个代理对象。这种设计使得整个系统只存在一个真正的 WindowManagerImpl 实例,所有视图都是由它来管理和调度的。
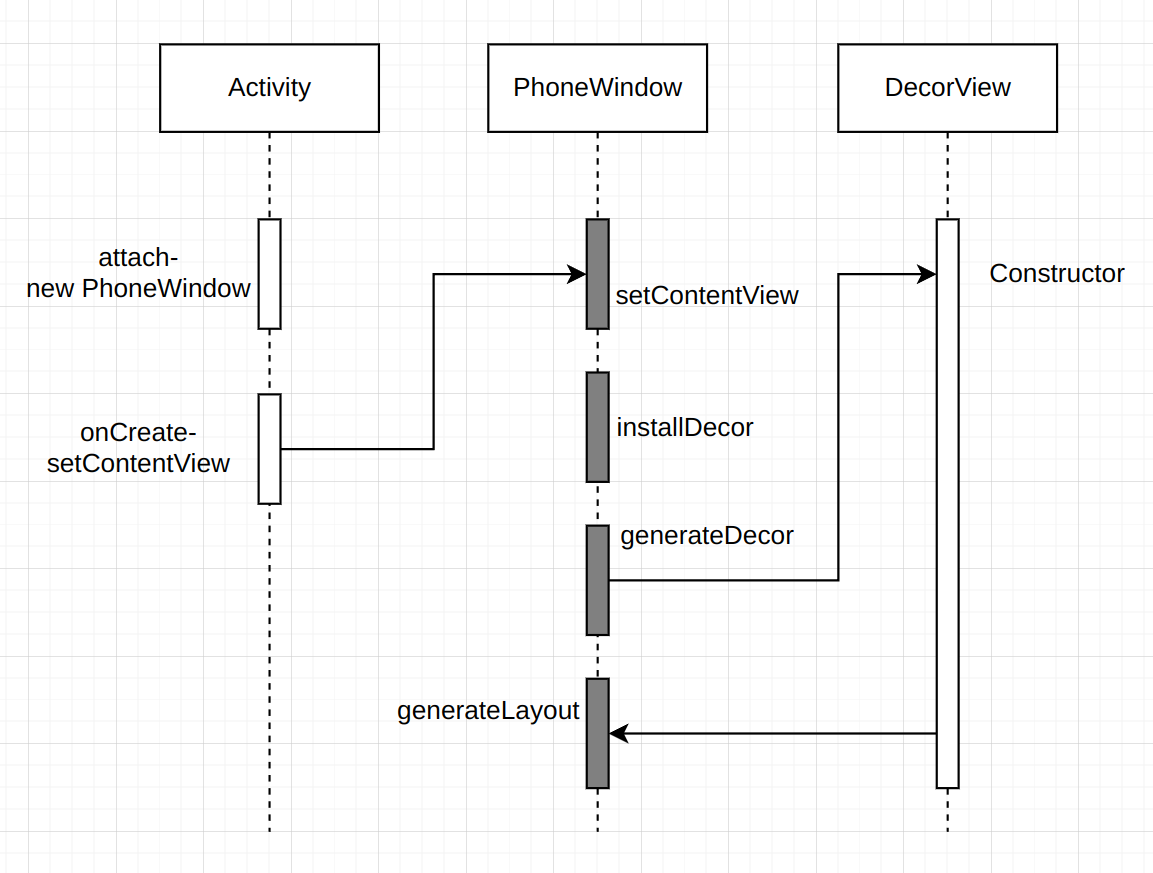
3.2 Activity的OnCreate
OnCreate主要通过setContentView方法给当前页面设置一个布局,实际上 Activity的setContentView并没有做什么工作,主要是Window的setContentView方法实现了这个功能。
当一个事件点击后首先传递给Activity,在我们写Activity时会调用setContentView方法来加载布局,我们看一下setContenView方法在做什么:
//frameworks/base/core/java/android/app/Activity.javapublic void setContentView(@LayoutRes int layoutResID) {getWindow().setContentView(layoutResID);initWindowDecorActionBar();
}
发现它首先调用了getWindow的setContentview方法,那么getWindow是什么呢?它返回了一个mWindow对象,查看代码后再Activity的attach方法中发现了它。
mWindow = new PhoneWindow(this, window, activityConfigCallback);
它原来是一个PhoneWindow,接下来我们看看它的setContentView方法在做什么。
@Override
public void setContentView(int layoutResID) {// Note: FEATURE_CONTENT_TRANSITIONS may be set in the process of installing the window// decor, when theme attributes and the like are crystalized. Do not check the feature// before this happens.if (mContentParent == null) {installDecor();   //1} else if (!hasFeature(FEATURE_CONTENT_TRANSITIONS)) {mContentParent.removeAllViews();}if (hasFeature(FEATURE_CONTENT_TRANSITIONS)) {final Scene newScene = Scene.getSceneForLayout(mContentParent, layoutResID,getContext());transitionTo(newScene);} else {mLayoutInflater.inflate(layoutResID, mContentParent);}mContentParent.requestApplyInsets();final Callback cb = getCallback();if (cb != null && !isDestroyed()) {cb.onContentChanged();}mContentParentExplicitlySet = true;
}
FEATURE_CONTENT_TRANSITIONS是一个用于启用内容转换特性的标志,作用时提供一种动画效果过渡的切换视图。
我们重点看一下mContentParent为null时installDecor()方法做了什么。这个方法比较长,看一下重点地方:
private void installDecor() {mForceDecorInstall = false;if (mDecor == null) {mDecor = generateDecor(-1); //1mDecor.setDescendantFocusability(ViewGroup.FOCUS_AFTER_DESCENDANTS);mDecor.setIsRootNamespace(true);if (!mInvalidatePanelMenuPosted && mInvalidatePanelMenuFeatures != 0) {mDecor.postOnAnimation(mInvalidatePanelMenuRunnable);}} else {mDecor.setWindow(this);}if (mContentParent == null) {mContentParent = generateLayout(mDecor); //2
看一下注释1的代码做了什么事情,发现这个generateDecor创建了一个DecorView。
protected DecorView generateDecor(int featureId) {// System process doesn't have application context and in that case we need to directly use// the context we have. Otherwise we want the application context, so we don't cling to the// activity.Context context;if (mUseDecorContext) {Context applicationContext = getContext().getApplicationContext();if (applicationContext == null) {context = getContext();} else {context = new DecorContext(applicationContext, this);if (mTheme != -1) {context.setTheme(mTheme);}}} else {context = getContext();}return new DecorView(context, featureId, this, getAttributes());
}
查看DecorView源码发现,它继承了Fragment。
public class DecorView extends FrameLayout implements RootViewSurfaceTaker, WindowCallbacks
接下来我们再回到installDecor() 方法,看一下注释2 中的generateLayout(mDecor)做了什么事。
这段代码很长,具体就不展示了。其中最重要的一点就是根据不同的情况给LayoutResource加载不同的布局。我们查看其中的一个布局文件R.layout.screen_title。这个文件在:frameworks/base/core/res/res/layout/screen_title.xml中,代码如下所示:
<LinearLayout xmlns:android="http://schemas.android.com/apk/res/android"android:orientation="vertical"android:fitsSystemWindows="true"><!-- Popout bar for action modes --><ViewStub android:id="@+id/action_mode_bar_stub"android:inflatedId="@+id/action_mode_bar"android:layout="@layout/action_mode_bar"android:layout_width="match_parent"android:layout_height="wrap_content"android:theme="?attr/actionBarTheme" /><FrameLayoutandroid:layout_width="match_parent" android:layout_height="?android:attr/windowTitleSize"style="?android:attr/windowTitleBackgroundStyle"><TextView android:id="@android:id/title" style="?android:attr/windowTitleStyle"android:background="@null"android:fadingEdge="horizontal"android:gravity="center_vertical"android:layout_width="match_parent"android:layout_height="match_parent" /></FrameLayout><FrameLayout android:id="@android:id/content"android:layout_width="match_parent" android:layout_height="0dip"android:layout_weight="1"android:foregroundGravity="fill_horizontal|top"android:foreground="?android:attr/windowContentOverlay" />
</LinearLayout>
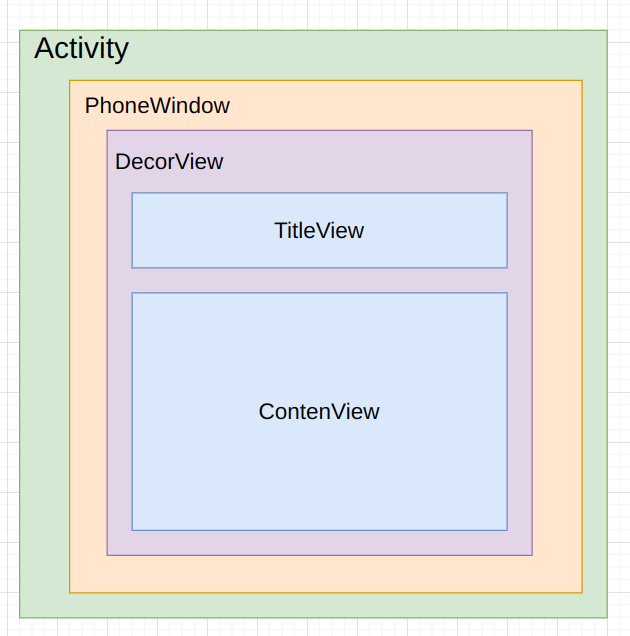
上面的ViewStub是用来显示Actionbar的,下面的两个Fragment一个是Title用于显示标题,另一个是Conten,用来显示内容。
刚刚通过这段源码分析可以知道一个Activity包含了一个Window对象,这个对象是PhoneWindow来实现的。PhoneWindow将DecorView作为整个应用窗口的根View,这个DecorView将屏幕分成两个区域,一个区域是TitleView,另一个区域是ContenView。而我们平常写的布局都是展示在ContenView中。如图:
4、WindowManager与View的关系
众所周知,DecrorView的ViewParent是ViewRootImpl,而View最重要的三大流程就是由ViewRootImpl触发的。
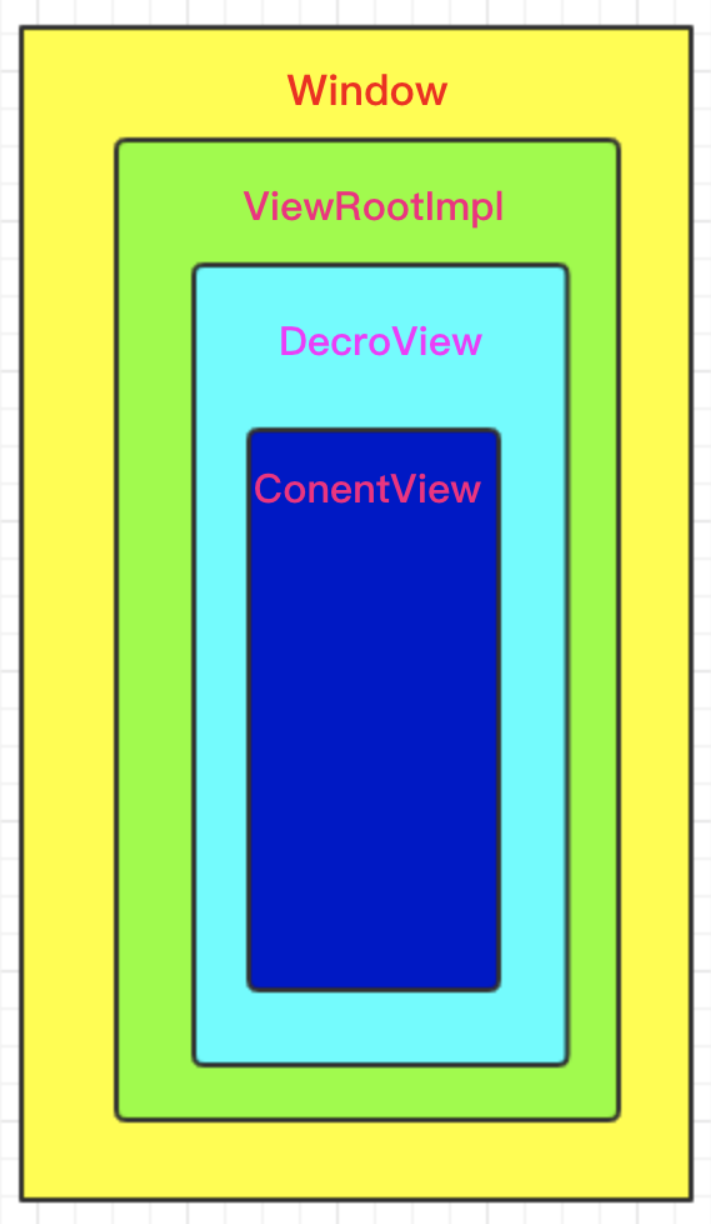
结合上面的流程我们知道了DecroView的创建过程,那么它是如何被绑定到Window上的呢?ViewRootImpl又是怎么和Window、DecroView建立联系的?
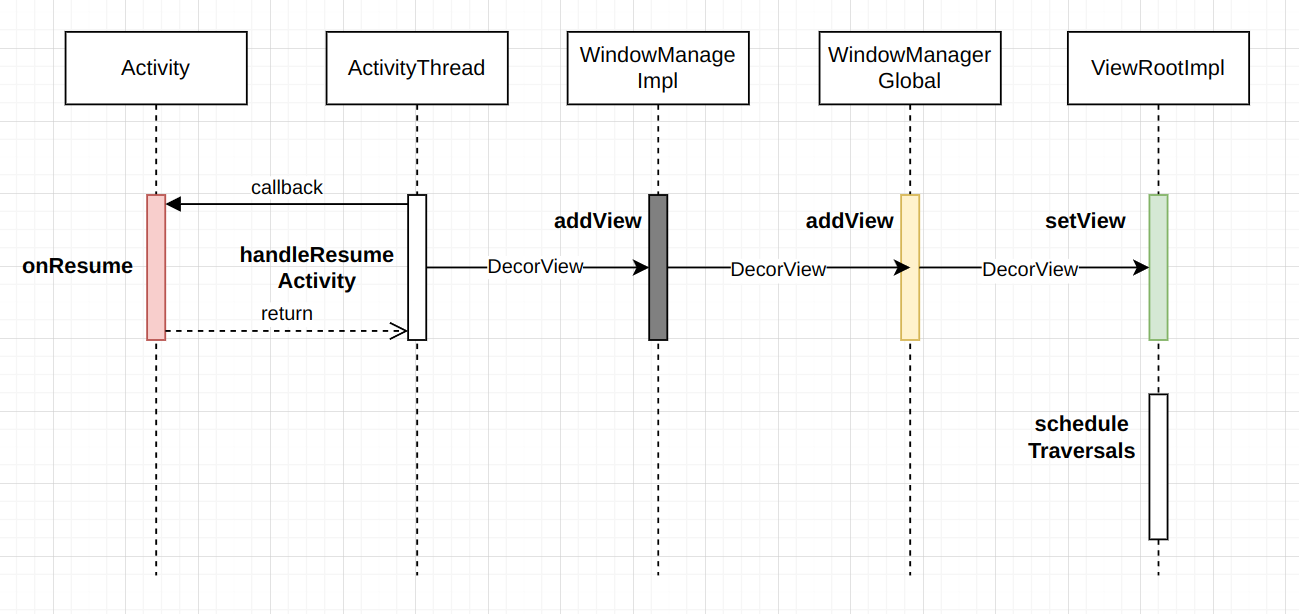
我们先看一下ActivityThread的handleResumeActivity方法在干什么:
代码较长这里截取关键地方
@Override
public void handleResumeActivity(ActivityClientRecord r, boolean finalStateRequest,boolean isForward, boolean shouldSendCompatFakeFocus, String reason) {//........// TODO 将resumeArgs推送到活动中以供考虑// 对于双恢复和 r.mFinish = true 的情况,跳过以下步骤。// 1if (!performResumeActivity(r, finalStateRequest, reason)) {return;}//........if (r.window == null && !a.mFinished && willBeVisible) {r.window = r.activity.getWindow();View decor = r.window.getDecorView();  //2decor.setVisibility(View.INVISIBLE);ViewManager wm = a.getWindowManager(); //3WindowManager.LayoutParams l = r.window.getAttributes();a.mDecor = decor;l.type = WindowManager.LayoutParams.TYPE_BASE_APPLICATION;l.softInputMode |= forwardBit;if (r.mPreserveWindow) {a.mWindowAdded = true;r.mPreserveWindow = false;// Normally the ViewRoot sets up callbacks with the Activity// in addView->ViewRootImpl#setView. If we are instead reusing// the decor view we have to notify the view root that the// callbacks may have changed.ViewRootImpl impl = decor.getViewRootImpl();if (impl != null) {impl.notifyChildRebuilt();}}if (a.mVisibleFromClient) {if (!a.mWindowAdded) {a.mWindowAdded = true;wm.addView(decor, l); //4} else {// The activity will get a callback for this {@link LayoutParams} change// earlier. However, at that time the decor will not be set (this is set// in this method), so no action will be taken. This call ensures the// callback occurs with the decor set.a.onWindowAttributesChanged(l);}}//..........}
handleResumeActivity主要做了两件事件,第一件事情在注释1处,通过performResumeActivity进而回调Activity的onResume方法。
第二件事是注释2,3,4共同完成,它将一个DecorView添加到了WindowManage中。
我们详细看一下这个addView的过程,通过查找发现这个addView实际上是WindowManageImpl的addView。
//WindowManageImpl@Override
public void addView(@NonNull View view, @NonNull ViewGroup.LayoutParams params) {applyTokens(params);mGlobal.addView(view, params, mContext.getDisplayNoVerify(), mParentWindow,mContext.getUserId());
}
在这个方法中调用了mGlobal的addView方法,继续查找源码发现mGlobal居然是一个WindowManagerGlobal。看一下它的addView在干什么,同样的代码过长,我们在这选出重点代码。
//WindowManagerGlobalprivate final ArrayList<View> mViews = new ArrayList<View>();
private final ArrayList<ViewRootImpl> mRoots = new ArrayList<ViewRootImpl>();
private final ArrayList<WindowManager.LayoutParams> mParams =new ArrayList<WindowManager.LayoutParams>();public void addView(View view, ViewGroup.LayoutParams params,Display display, Window parentWindow, int userId) {//.....// 1if (windowlessSession == null) {root = new ViewRootImpl(view.getContext(), display);} else {root = new ViewRootImpl(view.getContext(), display,windowlessSession, new WindowlessWindowLayout());}view.setLayoutParams(wparams);mViews.add(view);mRoots.add(root);mParams.add(wparams);// do this last because it fires off messages to start doing thingstry {root.setView(view, wparams, panelParentView, userId); //2} catch (RuntimeException e) {final int viewIndex = (index >= 0) ? index : (mViews.size() - 1);// BadTokenException or InvalidDisplayException, clean up.if (viewIndex >= 0) {removeViewLocked(viewIndex, true);}throw e;}//.....}这个方法也主要干了两件事,在注释1处初始化了ViewRootImpl,在注释2处通过这个set方法将DecorView绑定到了ViewRootImpl中,并且触发了View的三大流程1。
通过上面的分析我们知道,每个Window都对应着一个DecorView,而从这里我们可以发现,每个DecorView都对应着一个ViewRootImpl。
📌从而得知,如果是一个Dialog或者其他新
Window的界面,必定有一个新的ViewRootImpl来触发View的三大流程,而不是由宿主Window的ViwRootImpl触发的。
总结
1、一个Activity对应几个WindowManage,对应几个Window?
通过3.1源码分析可知,一个Activity对应一个WindowManage,而一个WindowManage对应一个Window。并且一个Window对应一个DecorView,而每个DecorView着对应一个ViewRootImpl。
有一些特殊情况下可能会存在多个
DecorView,比如系统弹出对话框或者悬浮窗口等。但是这些额外的DecorView通常不是直接与Activity关联的,而是由系统创建和管理的。在这些情况下,虽然存在多个DecorView,但它们不是在同一个Window中,并且与主Activity的DecorView是独立的。
2、DecorView在哪被创建?
DecorView是在Window被创建的时候同步创建的,具体来说,DecorView 在 PhoneWindow 的 setContentView() 方法中被创建。Window会通过LayoutInflater将选定的DecorView布局加载并实例化成View对象。这个View对象就是DecorView。
最后,DecorView会被设置为Window的顶级View,所有的UI界面都是附加到这个DecorView的子View上ContentView。
3、PhoneWindow和Window有什么关系?
它们是继承关系,PhoneWindow继承了Window,并针对手机平台的特性进行了具体实现和扩展。
4、在Activity的onResume方法调用Handler的post可以获取View的宽高吗?View的post方法能拿到View的宽高?
通过4部分的代码分析,我们知道Activity的onResume方法的执行是在ViewRootImpl触发测量过程之前,同时ViewRootImpl是通过如下的方式来触发测量过程的:
void scheduleTraversals() {if (!mTraversalScheduled) {mTraversalScheduled = true;mTraversalBarrier = mHandler.getLooper().getQueue().postSyncBarrier();mChoreographer.postCallback(Choreographer.CALLBACK_TRAVERSAL, mTraversalRunnable, null);notifyRendererOfFramePending();pokeDrawLockIfNeeded();}
}
这里使用了一个Handler.post了一个异步消息来进行测量。尽管post的是异步消息,但在onResume方法中无法保证中立即获取到正确的视图宽高,在Activity的onResume方法调用Handler.post不能获取View的宽高。

View.post方法可以获取View的宽高,View.post 方法添加的消息会在主线程空闲时被处理,这时候通常是在视图的测量和布局过程完成之后。
View 的三大流程通常指的是 View 的绘制流程、布局流程和事件分发流程。 ↩︎
相关文章:
【Android】源码解析Activity的结构分析
源码解析Activity的结构分析 目录 1、Activity、View、Window有什么关联?2、Activity的结构构建流程3 源码解析Activity的构成 3.1 Activity的Attach方法3.2 Activity的OnCreate 4、WindowManager与View的关系总结 1、一个Activity对应几个WindowManage࿰…...
小猪APP分发:重塑应用分发市场的创新力量
在移动互联网蓬勃发展的今天,应用分发平台作为连接开发者与用户的桥梁,扮演着至关重要的角色。然而,随着市场的饱和,如何在众多平台中脱颖而出,为开发者提供更宽广的舞台,同时确保用户能够便捷、安全地获取…...

区块链 | IPFS 工作原理入门
🦊原文:What is the InterPlanetary File System (IPFS), and how does it work? 🦊写在前面:本文属于搬运博客,自己留存学习。 1 去中心化互联网 尽管万维网是一个全球性的网络,但在数据存储方面&#…...
减速机齿数速算
1.齿轮相关参数 1.1 模数 , 因为 齿数*齿距 Pi*直径 所以:直径/齿数 齿距/PI 模数 国标现行标准(截止2024/5)是: GB/ 1357-2008 / ISO 54-1996 模数有国标的一个序列标准: 1.2.轴径 轴径的国标是&a…...
面试题深入了解)
2万字长文:海豚调度器(DolphinScheduler)面试题深入了解
目录 海豚调度器的主要功能和特点 海豚调度器与Oozie、Azkaban等调度器相比的优势...
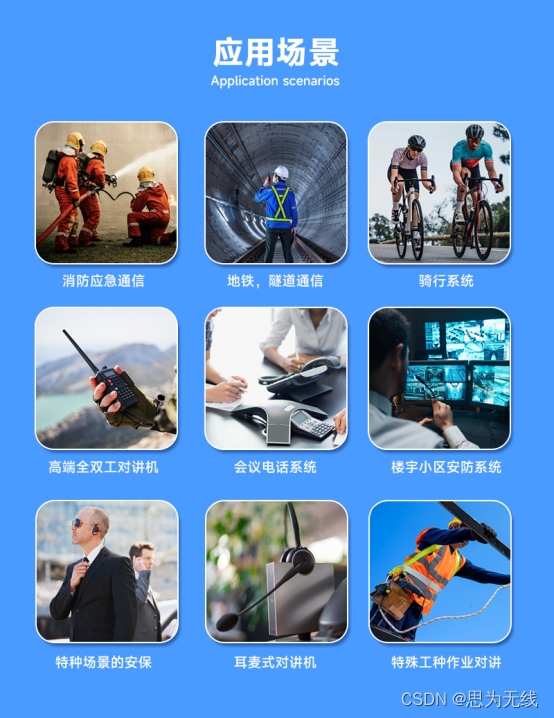
全双工音频对讲模块-支持空中升级、多级无线中继
SA618F30是一款高集成的大功率全双工无线音频模块,发射功率高达32dBm。该音频模块简化接口,只需外接音频功放或麦克风即可作为一个小型对讲机,方便快捷嵌入到各类手持设备中。支持多级无线中继,支持OTA空中升级。 SA618F30配备1W…...
Spring事务生命周期)
Spring扩展点(二)Spring事务生命周期
Spring事务生命周期 Spring事务事务生命周期 接口 TransactionSynchronizationTransactionalEventListener(另一种监听事务周期的方式) Spring事务 Spring对JDBC事务做了封装,使其易于使用。主要分为声明式事务和编程式事务。 Transactiona…...

foobar2000 for Mac:卓越音乐播放器
当您在寻找一款音质卓越、功能丰富的音频播放器时,foobar2000 for Mac无疑是您的首选。它拥有简洁明了的界面设计,易于上手,同时支持多种音频格式,让您无需担心兼容性问题。 foobar2000 for Mac v2.6.4免激活版下载 foobar2000 fo…...
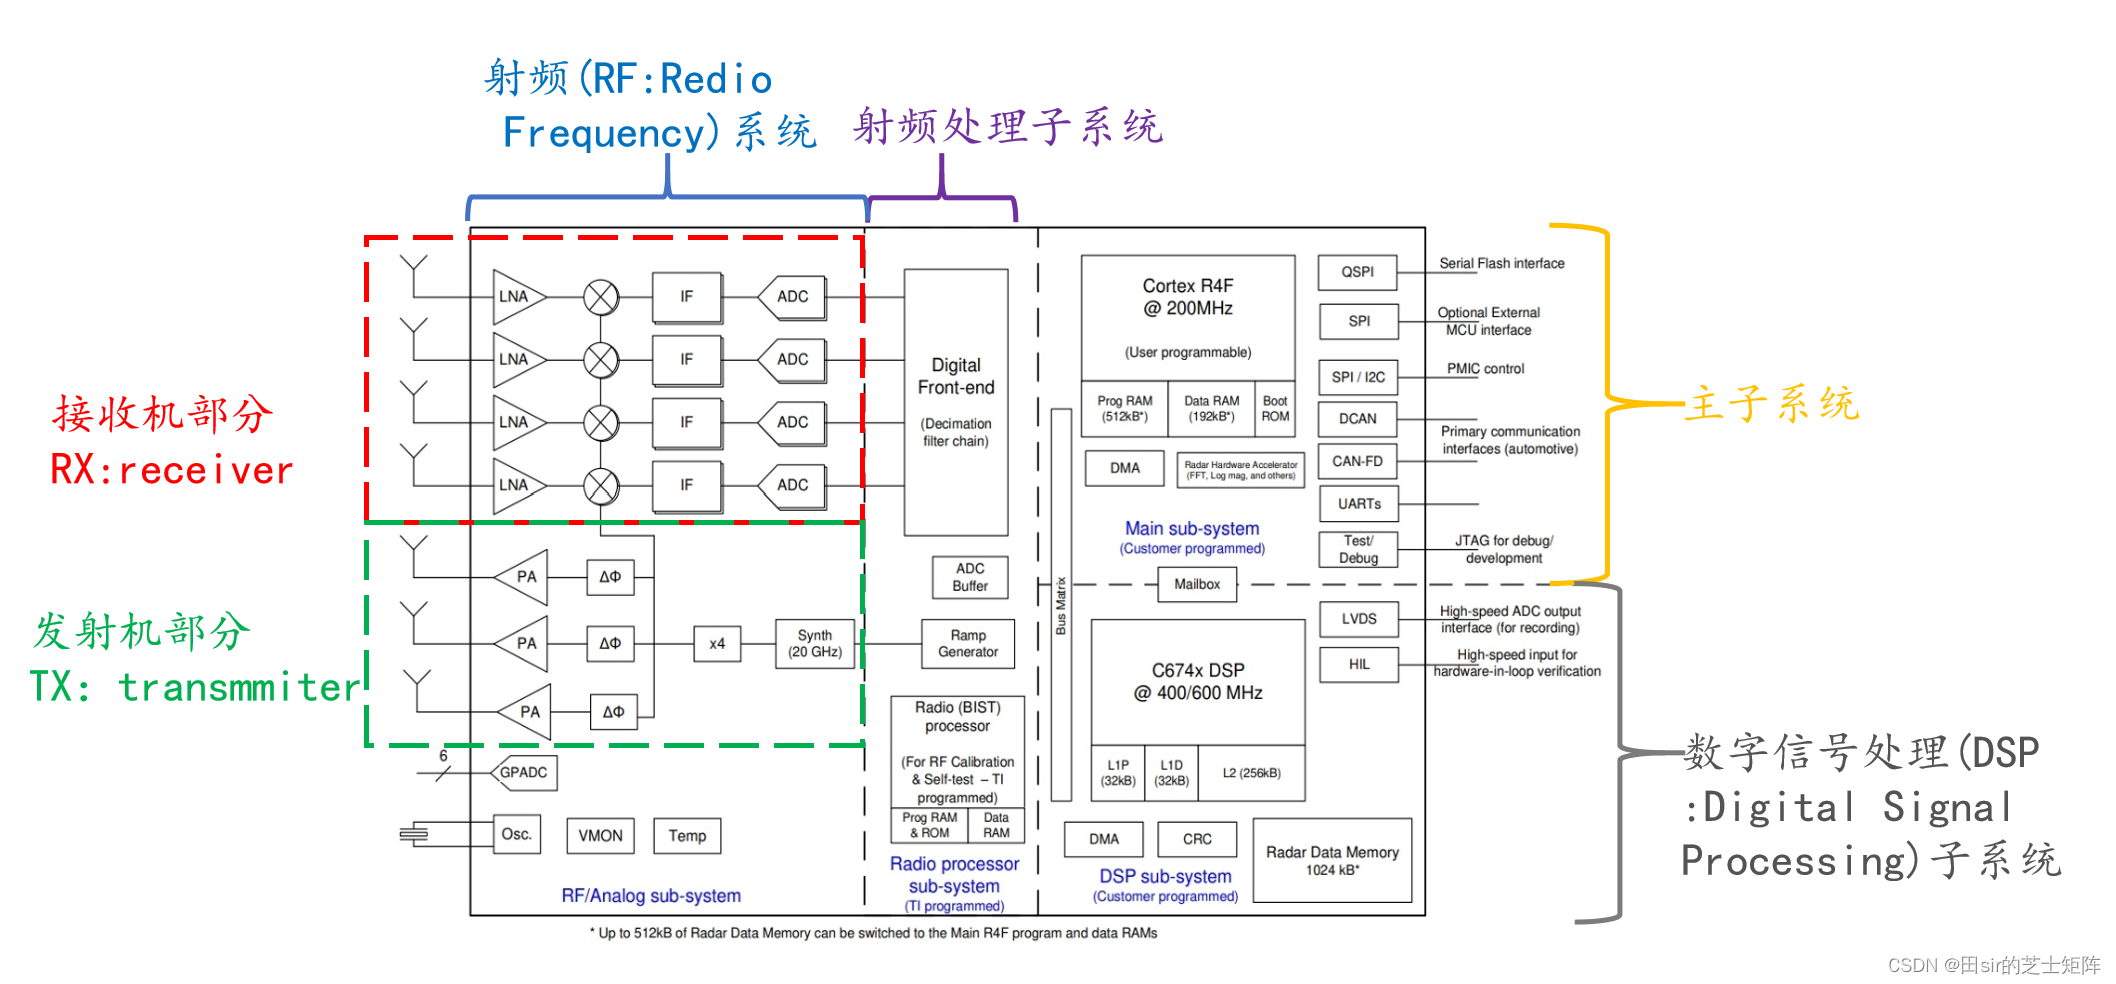
【自动驾驶|毫米波雷达】初识毫米波雷达射频前端硬件
第一次更新:2024/5/4 目录 整体概述 混频器(MIXER) 低通滤波器(LPF:Low-Pass filter) 数模转换器(ADC:Analog to Digital Converter) 毫米波雷达功能框图 整体概述 完…...
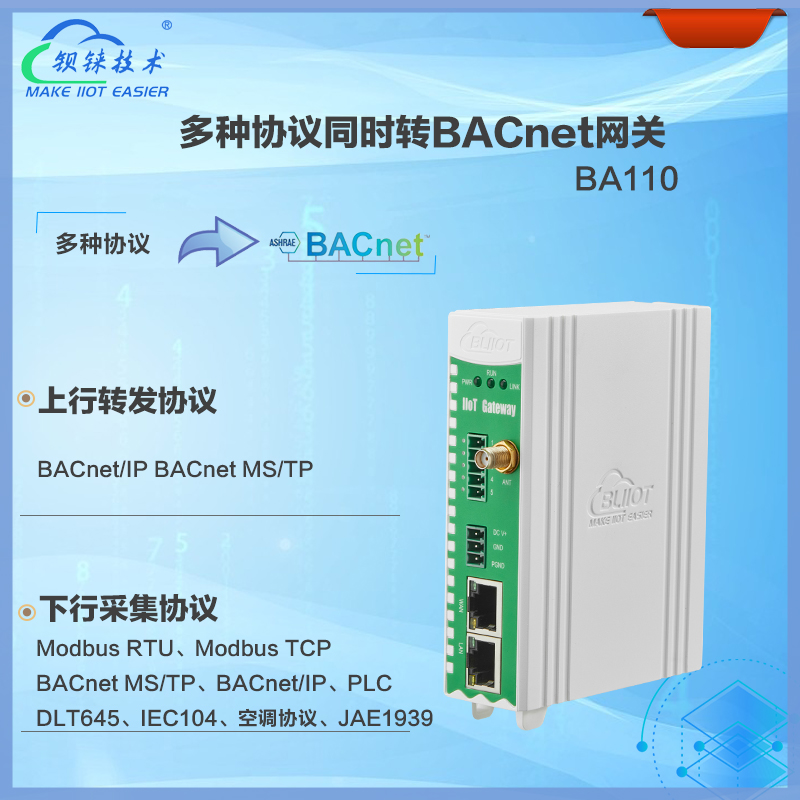
实战BACnet/IP标准通信网关在楼宇自动化中的应用
智慧楼宇建设实现不同设备间的互联互通是一项巨大挑战,尤其是在那些历史悠久的建筑中,新旧系统并存的情况尤为普遍。某大型商业综合体就面临着这样的困境:老旧的暖通空调系统采用Modbus RTU协议,而新部署的能源管理系统却要求BACn…...

设计模式的原则与分类
一、设计模式的原则 1、单一职责原则 一个类只需要负责一种职责即可,一个类发生变化的原因,必然是所负责的职责发生变化 2、接口隔离原则 单一职责原则是接口隔离原则的基础,单一职责原则注重职责的划分,从职责角度进行类和接口…...
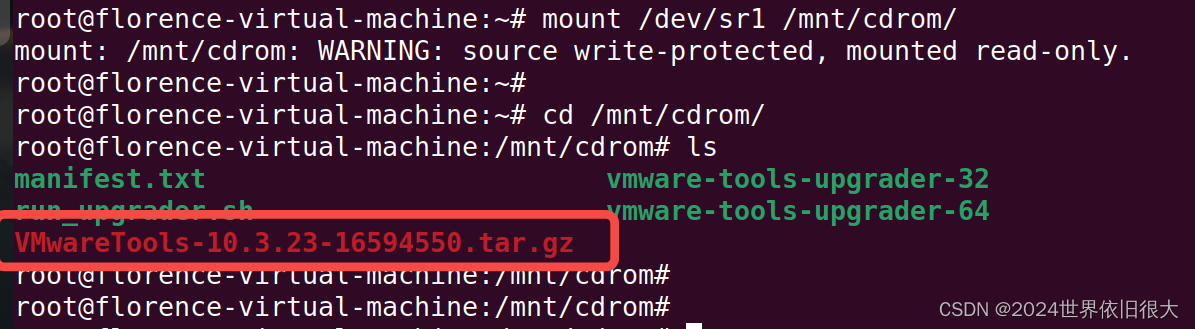
在ubuntu虚拟机中手动安装VMware Tools(VMware Workstation 17 player)
可参考官方文档:在 Linux 虚拟机中手动安装 VMware Tools 以下列出我在安装过程中遇见的问题: 1、“安装VMware Tools”选项为灰,无法选中 原因是VMware Tools的安装包镜像在Player的安装目录下,需要在虚拟机启动的时候加载这个…...
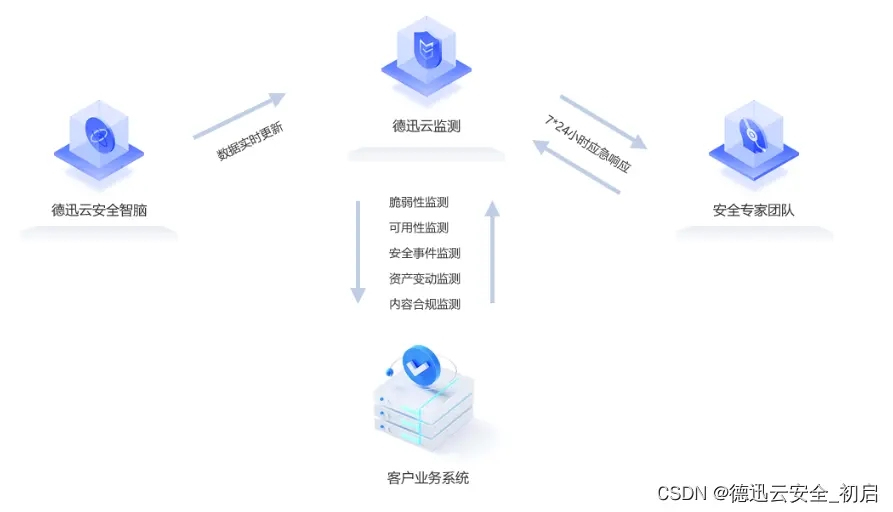
十个数据安全最佳实践:保护数据的简单方法
在德迅云安全将介绍数据安全的主要原则,并了解适用于大多数行业的 10 种数据安全最佳实践,以及云端安全检测的重要性。 数据威胁和维护数据安全的好处 什么是数据安全? 数据安全是旨在保护组织敏感资产的流程和工具的组合。有价值的数据在…...

【leetcode】二分搜索题目总结
704. 二分查找 class Solution { public:int search(vector<int>& nums, int target) {int left 0, right nums.size() - 1;while (left < right) {int mid left (right - left) / 2;if (nums[mid] target) {return mid;} else if (nums[mid] < target) …...

六西格玛项目的核心要素:理论学习、实践应用与项目经验
许多朋友担心,没有项目经验是否就意味着无法考取六西格玛证书。针对这一疑问,张驰咨询为大家详细解答。 首先,需要明确的是,六西格玛项目不仅仅是一种管理工具或方法,更是一种追求卓越、持续改进的思维方式。它强调通…...
)
21-ESP32-S3实时时钟(RTC)
ESP32-S3实时时钟(RTC)的使用 ESP32-S3是一款高性能的Wi-Fi和蓝牙集成的系统级芯片(SoC),它包含一个实时时钟(RTC)模块,可以在系统的其他部分关闭时继续运行,以节省电能…...
17.接口自动化学习-日志
1.日志输出渠道 (1)文件格式 xx.log (2)控制台输出 2.日志级别 debug<info<warnning<error<critical 3.代码实现 from utils.handle_path import log_path import logging import datetime def logger(fileLogTr…...

python直接发布到网站wordpress之二发布图片
在我的上一篇文章中已经给出了python操作wordpress的环境和发布文字的教程: python直接发布到网站wordpress之一只发布文字-CSDN博客 本篇实现发布带图片的内容,无图无真相嘛。 直接上代码: from wordpress_xmlrpc.methods.media import …...
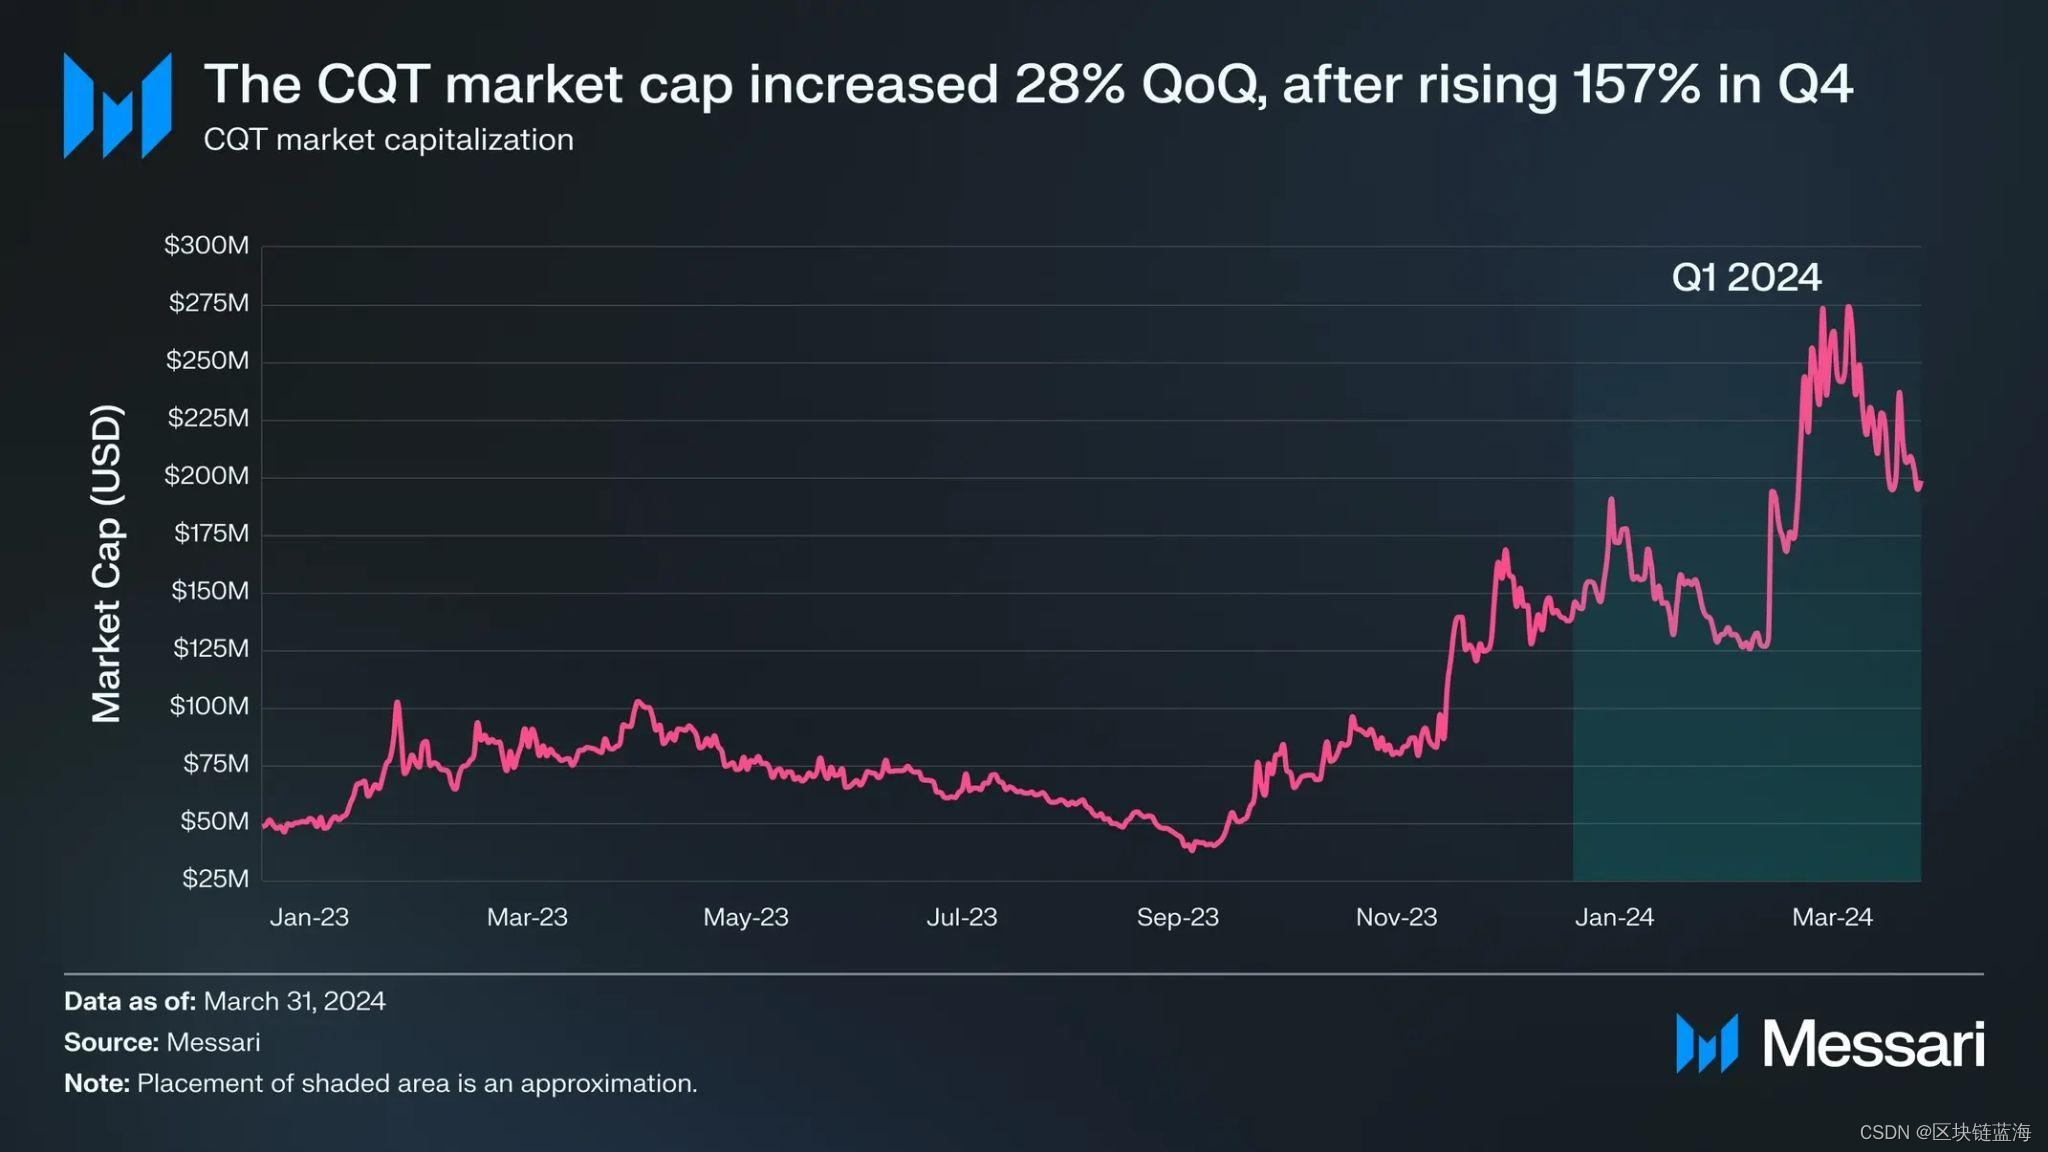
Messari 报告摘要 :Covalent Network(CQT)2024 年第一季度表现
摘要: 尽管 CQT 代币流通供应量增加了 20%(新增 1.04 亿枚 CQT),但 CQT 的质押百分比仅从 2023 年第一季度的 22% 增长到了 2024 年第一季度的 29%。 CQT 的市值季度环比增长了 28%,多次达到 2.75 亿美元,…...

PGP加密技术:保护信息安全的利器
随着数字化时代的到来,个人和企业对信息安全的需求日益增长。PGP(Pretty Good Privacy)加密技术作为一项强大的加密工具,为保护敏感数据提供了一种有效的方法。本文将探讨PGP加密技术的基本原理、应用场景以及其在现代信息安全中的…...
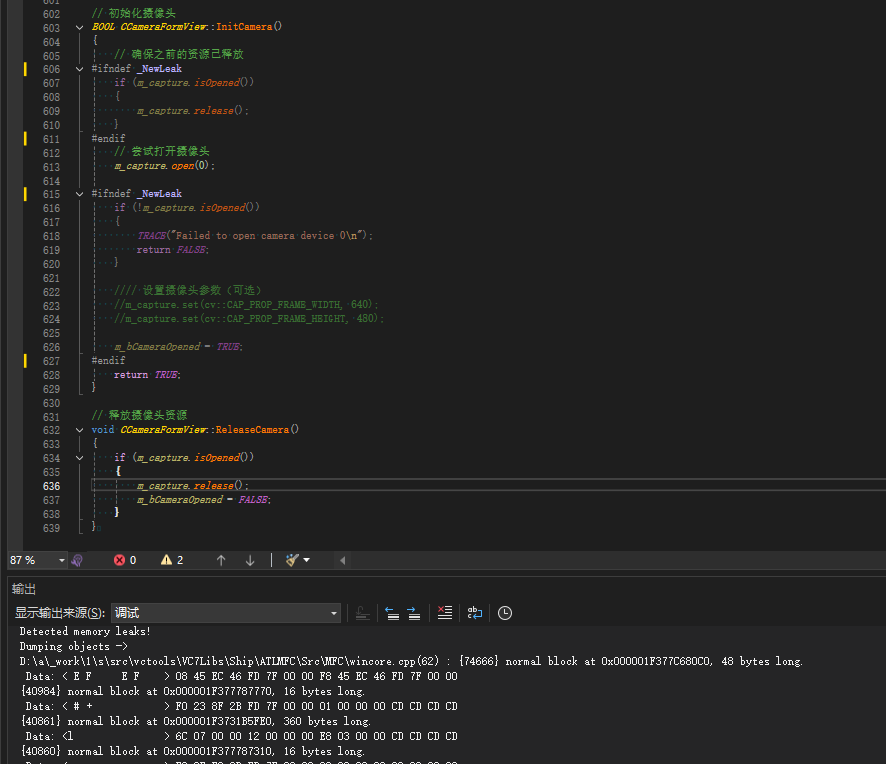
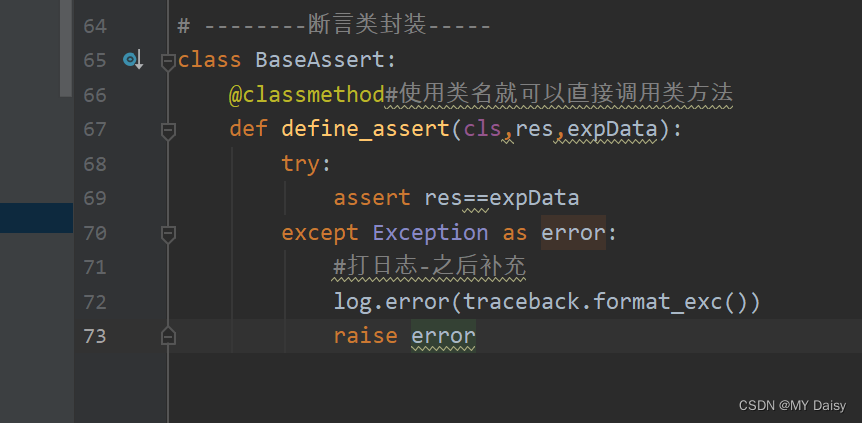
MFC内存泄露
1、泄露代码示例 void X::SetApplicationBtn() {CMFCRibbonApplicationButton* pBtn GetApplicationButton();// 获取 Ribbon Bar 指针// 创建自定义按钮CCustomRibbonAppButton* pCustomButton new CCustomRibbonAppButton();pCustomButton->SetImage(IDB_BITMAP_Jdp26)…...
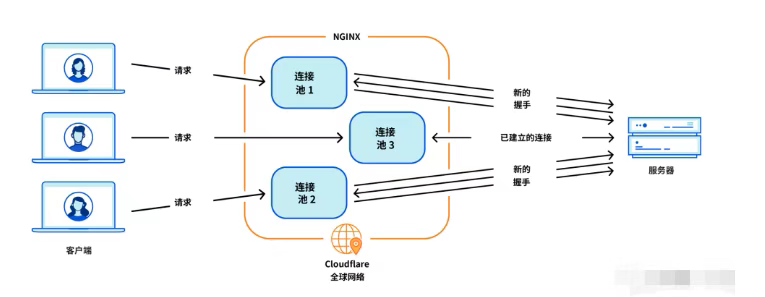
Cloudflare 从 Nginx 到 Pingora:性能、效率与安全的全面升级
在互联网的快速发展中,高性能、高效率和高安全性的网络服务成为了各大互联网基础设施提供商的核心追求。Cloudflare 作为全球领先的互联网安全和基础设施公司,近期做出了一个重大技术决策:弃用长期使用的 Nginx,转而采用其内部开发…...
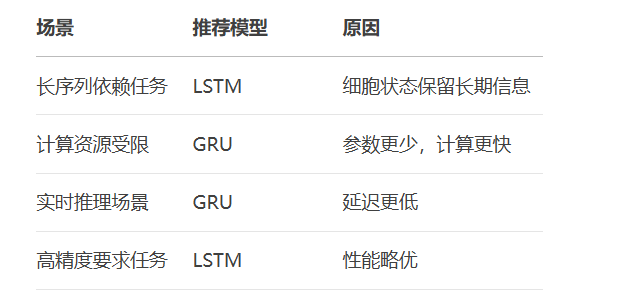
RNN避坑指南:从数学推导到LSTM/GRU工业级部署实战流程
本文较长,建议点赞收藏,以免遗失。更多AI大模型应用开发学习视频及资料,尽在聚客AI学院。 本文全面剖析RNN核心原理,深入讲解梯度消失/爆炸问题,并通过LSTM/GRU结构实现解决方案,提供时间序列预测和文本生成…...

蓝桥杯 冶炼金属
原题目链接 🔧 冶炼金属转换率推测题解 📜 原题描述 小蓝有一个神奇的炉子用于将普通金属 O O O 冶炼成为一种特殊金属 X X X。这个炉子有一个属性叫转换率 V V V,是一个正整数,表示每 V V V 个普通金属 O O O 可以冶炼出 …...

管理学院权限管理系统开发总结
文章目录 🎓 管理学院权限管理系统开发总结 - 现代化Web应用实践之路📝 项目概述🏗️ 技术架构设计后端技术栈前端技术栈 💡 核心功能特性1. 用户管理模块2. 权限管理系统3. 统计报表功能4. 用户体验优化 🗄️ 数据库设…...

C语言中提供的第三方库之哈希表实现
一. 简介 前面一篇文章简单学习了C语言中第三方库(uthash库)提供对哈希表的操作,文章如下: C语言中提供的第三方库uthash常用接口-CSDN博客 本文简单学习一下第三方库 uthash库对哈希表的操作。 二. uthash库哈希表操作示例 u…...
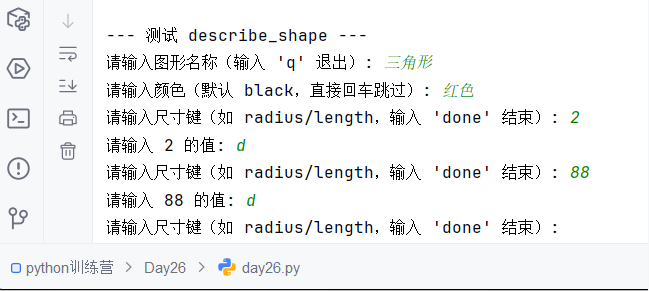
Python训练营-Day26-函数专题1:函数定义与参数
题目1:计算圆的面积 任务: 编写一个名为 calculate_circle_area 的函数,该函数接收圆的半径 radius 作为参数,并返回圆的面积。圆的面积 π * radius (可以使用 math.pi 作为 π 的值)要求:函数接收一个位置参数 radi…...

用递归算法解锁「子集」问题 —— LeetCode 78题解析
文章目录 一、题目介绍二、递归思路详解:从决策树开始理解三、解法一:二叉决策树 DFS四、解法二:组合式回溯写法(推荐)五、解法对比 递归算法是编程中一种非常强大且常见的思想,它能够优雅地解决很多复杂的…...
PH热榜 | 2025-06-08
1. Thiings 标语:一套超过1900个免费AI生成的3D图标集合 介绍:Thiings是一个不断扩展的免费AI生成3D图标库,目前已有超过1900个图标。你可以按照主题浏览,生成自己的图标,或者下载整个图标集。所有图标都可以在个人或…...
智警杯备赛--excel模块
数据透视与图表制作 创建步骤 创建 1.在Excel的插入或者数据标签页下找到数据透视表的按钮 2.将数据放进“请选择单元格区域“中,点击确定 这是最终结果,但是由于环境启不了,这里用的是自己的excel,真实的环境中的excel根据实训…...