一些关于深度聚类以及部分对比学习的论文阅读笔记
目录
- 资料
- SwAV
- 问题
- 方法
- 方法的创新点
- 为什么有效
- 有什么可以借鉴的地方
- 聚类
- Multi-crop
- 代码
- PCL
- 代码
- Feature Alignment and Uniformity for Test Time Adaptation
- 代码
- SimSiam
资料
深度聚类算法研究综述(很赞,从聚类方法和深度学习方法两个方面进行了总结,我这个可能作为综述前的一篇文章,要是捋出头绪也写一写):https://www.cnblogs.com/kailugaji/p/15574267.html
对比学习代码库:https://github.com/HobbitLong/PyContrast?tab=readme-ov-file
SwAV
论文:https://arxiv.org/pdf/2006.09882
代码:https://github.com/facebookresearch/swav
视频(像我一样的小白必看):https://www.bilibili.com/video/BV1754y187Ki/?spm_id_from=333.337.search-card.all.click
问题
现有的方法通常是在线工作的,依赖于大量的显示的成对特征的比较,在计算上是有挑战性的。
方法
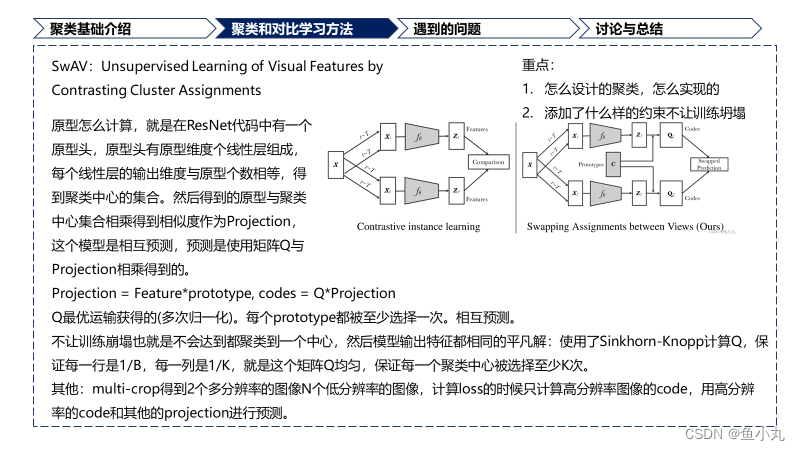
提出了SwAV,不需要成对进行比较。方法同时对数据进行聚类,同时价钱同一图像不同增强之间的一致性,不是像对比学习一样直接表示特征。
提出了新的数据增强multi-crop,在不增加内存或计算需求的情况下,使用不同分辨率的视图混合代替两个全分辨率视图。
方法的创新点
不需要进行成对比较。
我们的方法是内存有效的,就是不需要大的memory bank或者特殊的动量网络。
为什么有效
L ( z t , z s ) = l ( z t , q s ) + l ( z s , q t ) , L(zt, zs) =\mathscr{l}(z_t, q_s) +\mathscr{l}(z_s, q_t), L(zt,zs)=l(zt,qs)+l(zs,qt),
通过将一组特征匹配到一组K个原型中来计算他们的code q t , q s q_t,q_s qt,qs。
假设:两个特征包含相同的信息,那么是可以通过其中一个feature去预测另一个的code的。

有什么可以借鉴的地方
聚类
聚类前的特征先投影到单位球面上得到 z n t z_{nt} znt。
然后把 z n t z_{nt} znt映射到K个可训练的原型向量上,得到 c o d e code code。
如何计算code
SwAV的损失建立了从feature z s z_s zs到预测code q t q_t qt,从 z t z_t zt到预测code q s q_s qs的交换预测的问题。损失是CE Loss,是计算的code和 z i z_i zi和所有在 C C C中的原型之间的点积计算softmax得到的概率值。
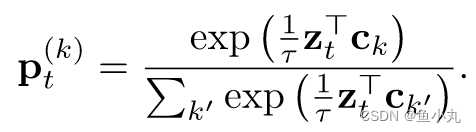
l ( z t , q s ) = − ∑ k q s ( k ) log p t ( k ) l(z_t, q_s) = − \sum\limits_{k} q_s^{(k)} \log p^{(k)}_t l(zt,qs)=−k∑qs(k)logpt(k)
where p t ( k ) p^{(k)}_t pt(k)是第t个feature z t z_t zt与第k个clusterinng centroid c k c_k ck进行乘积然后乘以 1 τ \frac{1}{τ} τ1计算softmax。
下面这个式子是把展开后的 p t ( k ) p^{(k)}_t pt(k)带入到损失中,然后拆开得到的,前面两个是分子,后面是分母。

原型C的跨批次使用,SwAV将多个实例聚类到原型。使得同一个批次中所有的样本都被原型等分。约束了不同图像的编码是不同的,避免了每个图像都有相同编码的平凡解。
使用Q矩阵把特征映射到原型,优化Q来最大化特征和原型之间的相似性。
max Q ∈ Q T r ( Q T C T Z ) + ε H ( Q ) , \max\limits_{Q∈Q} Tr (Q^TC^TZ) + εH(Q), Q∈QmaxTr(QTCTZ)+εH(Q),
H(·)是熵,控制映射是平滑的,但是强的熵正则化会导致平凡解,模型会坍塌,所以保持 ε ε ε要小。
对Q矩阵进行约束。
Q = { Q ∈ R + K × B + ∣ Q 1 B = 1 K 1 K , Q T 1 K = 1 B 1 B } , Q= \{ Q ∈ R^{K×B}_{+} + | Q_{1B} = \frac{1}{K} 1_K , Q^T1_K = \frac{1}{B} 1_B \} , Q={Q∈R+K×B+∣Q1B=K11K,QT1K=B11B},
式中:1K表示K维向量。这些约束要求批次中平均每个原型至少被选择B K次。使用连续的Q*,不进行离散化,因为获得离散码所需的舍入是比梯度更新更激进的优化步骤。在使模型快速收敛的同时,却导致了更差的解。
在集合Q上,取正规化指数矩阵的形式。
Q ∗ = D i a g ( u ) e x p ( C T Z ε ) D i a g ( v ) , Q^* = Diag(u) exp( \frac{C^TZ}{ε} ) Diag(v), Q∗=Diag(u)exp(εCTZ)Diag(v),
其中u和v分别是RK和RB中的重整化向量。重整化向量通过使用迭代的Sinkhorn - Knopp算法,使用少量的矩阵乘法来计算。思考一下u,v怎么整的,我记得代码中有Sinkhorn - Knopp算法。
我们可以使用小批量数据。如果batchsize太小,我们使用之前批次的特征来增加Prob中Z的大小。我们在训练损失中只使用了批特征的编码。
Multi-crop
正如先前的工作所指出的那样,通过捕获场景或对象部分之间的关系信息,比较图像中的随机裁剪起着核心作用。
为了保证内存大小保持不变,有两个高分辨率的裁剪图像,和一些低分辨率(小的)裁剪图像。我们计算code的时候只计算两个高分辨率的图像。计算损失的时候,是用其他图像的特征分别去预测两个高分辨率的特征得到的损失。
L ( z t 1 , z t 2 , . . . , z t V + 2 ) = ∑ i ∈ 1 , 2 ∑ v = 1 V + 2 1 v ≠ i l ( z t v , q t i ) . L(z_{t_1} , z_{t_2} , . . . , z_{t_{V +2}} ) = \sum\limits_{i∈{1,2}} \sum\limits_{v=1}^{V +2}1_{v\neq i}l(z_{t_v} , q_{t_i} ). L(zt1,zt2,...,ztV+2)=i∈1,2∑v=1∑V+21v=il(ztv,qti).
代码
下面是训练阶段的代码主要是计算指定的裁剪id的图片计算聚类分配q(也就是文章中的Q)。然后其他所有的裁剪id计算z经过预测头得到的输出p(下面变量中的out)。计算q和out的一致性损失。
def train(train_loader, model, optimizer, epoch, lr_schedule, queue):batch_time = AverageMeter()data_time = AverageMeter()losses = AverageMeter()# 创建用于记录批次时间、数据加载时间和损失的对象model.train()# 将模型设为训练模式use_the_queue = False# 队列使用标志end = time.time()for it, inputs in enumerate(train_loader):# measure data loading timedata_time.update(time.time() - end)# update learning rateiteration = epoch * len(train_loader) + itfor param_group in optimizer.param_groups:param_group["lr"] = lr_schedule[iteration]#是不是两个值# normalize the prototypeswith torch.no_grad():#对原型向量进行归一化w = model.module.prototypes.weight.data.clone()w = nn.functional.normalize(w, dim=1, p=2)model.module.prototypes.weight.copy_(w)# ============ multi-res forward passes ... ============embedding, output = model(inputs)#得到输出embedding = embedding.detach()bs = inputs[0].size(0)#多尺度前向传播,得到embedding和output,分离嵌入,这个嵌入是做什么的呢,这个嵌入为啥要detach()# ============ swav loss ... ============loss = 0for i, crop_id in enumerate(args.crops_for_assign):#遍历指定的裁剪的图像,也就是两个分辨率大的哪个,对每个裁剪计算输出with torch.no_grad():out = output[bs * crop_id: bs * (crop_id + 1)].detach()#思考一下,这个就是指定的id的图像的位置,这些裁剪的id的图像长度为bs# time to use the queue"""如果队列不为空,并且使用队列或队列已满,则将队列中的嵌入与当前输出拼接。更新队列,移动旧的嵌入,并插入新的嵌入。"""if queue is not None:#为什么使用queue?if use_the_queue or not torch.all(queue[i, -1, :] == 0):use_the_queue = Trueout = torch.cat((torch.mm(queue[i],#Q#相乘是计算相似度吗model.module.prototypes.weight.t()#C), out))# fill the queuequeue[i, bs:] = queue[i, :-bs].clone()#移动queue[i, :bs] = embedding[crop_id * bs: (crop_id + 1) * bs]#crop_id是一个数吧# get assignments获取聚类分配。q = distributed_sinkhorn(out)[-bs:]#这个是获得q这个是聚类分配的q#计算SwAV损失,遍历所有裁剪图像,计算输出和聚类分配之间的交叉熵损失。# cluster assignment predictionsubloss = 0for v in np.delete(np.arange(np.sum(args.nmb_crops)), crop_id):#这个才是每一个裁剪图像x = output[bs * v: bs * (v + 1)] / args.temperaturesubloss -= torch.mean(torch.sum(q * F.log_softmax(x, dim=1), dim=1))#聚类和输出进行损失计算。loss += subloss / (np.sum(args.nmb_crops) - 1)loss /= len(args.crops_for_assign)# ============ backward and optim step ... ============optimizer.zero_grad()if args.use_fp16:with apex.amp.scale_loss(loss, optimizer) as scaled_loss:scaled_loss.backward()else:loss.backward()# cancel gradients for the prototypesif iteration < args.freeze_prototypes_niters:for name, p in model.named_parameters():if "prototypes" in name:p.grad = Noneoptimizer.step()# ============ misc ... ============losses.update(loss.item(), inputs[0].size(0))batch_time.update(time.time() - end)end = time.time()if args.rank ==0 and it % 50 == 0:logger.info("Epoch: [{0}][{1}]\t""Time {batch_time.val:.3f} ({batch_time.avg:.3f})\t""Data {data_time.val:.3f} ({data_time.avg:.3f})\t""Loss {loss.val:.4f} ({loss.avg:.4f})\t""Lr: {lr:.4f}".format(epoch,it,batch_time=batch_time,data_time=data_time,loss=losses,lr=optimizer.optim.param_groups[0]["lr"],))return (epoch, losses.avg), queue
下面这个是计算的聚类分配的代码。
@torch.no_grad()#优化原型分配Q是将feature映射到C的一个函数
def distributed_sinkhorn(out):#这个是最有最优传输的Q = torch.exp(out / args.epsilon).t() # Q is K-by-B for consistency with notations from our paper#计算输入张量out的指数并进行转置,得到一个大小为K*B的矩阵# 计算总的样本数量BB = Q.shape[1] * args.world_size # number of samples to assign# K是原型的数量,即Q矩阵的行数K = Q.shape[0] # how many prototypes# make the matrix sums to 1sum_Q = torch.sum(Q)dist.all_reduce(sum_Q)Q /= sum_Qfor it in range(args.sinkhorn_iterations):#迭代这些次数# normalize each row: total weight per prototype must be 1/Ksum_of_rows = torch.sum(Q, dim=1, keepdim=True)dist.all_reduce(sum_of_rows)Q /= sum_of_rowsQ /= K# normalize each column: total weight per sample must be 1/BQ /= torch.sum(Q, dim=0, keepdim=True)Q /= BQ *= B # the colomns must sum to 1 so that Q is an assignmentreturn Q.t()
resnet代码中添加了原型头和预测头。
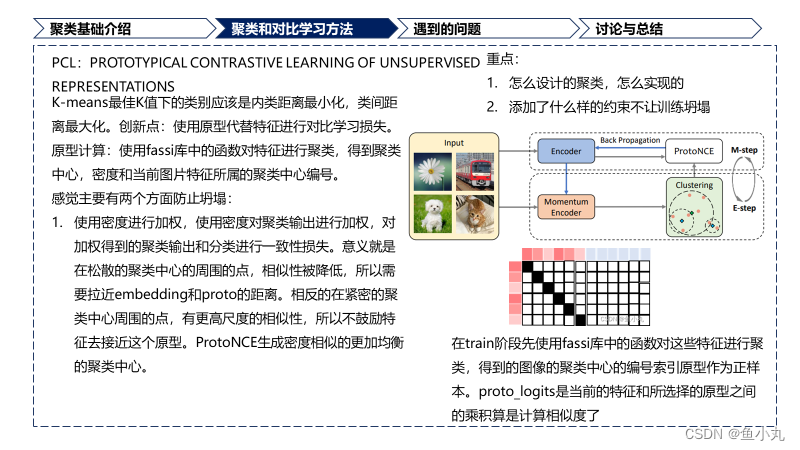
PCL
论文:https://arxiv.org/pdf/2005.04966
代码:https://github.com/salesforce/PCL
A prototype is define as “a representative embedding for a group of semantically similar instance”.#原型的定义是全篇的精髓,也是紧紧围绕的中心。
这篇文章是用原型做对比学习。
K-means最佳K值下的类别应该是类内距离最小化类间距离最大化

无监督视觉表示学习的任务是学习一个 embedding 函数把 x x x 映射到 v = { v 1 , v 2 , … , v n } v = \{v_1, v2, … ,v_n \} v={v1,v2,…,vn},其中 v i = f θ ( x i ) v_i = f_{\theta}(x_i) vi=fθ(xi)。
本文使用prototyprs c c c 取代 v ′ v' v′,并且使用每个prototype的密度估计 ϕ \phi ϕ代替固定的温度系数 τ \tau τ,所以设计了一个原型的对比学习损失。这个是一个创新点。
使用所有特征到原型的距离的二范数来度量密度。
意义就是在松散的聚类中心的周围的点,相似性被降低,所以需要拉近embedding和proto的距离。
相反的在紧密的聚类中心周围的点,有更高尺度的相似性,所以不鼓励特征去接近这个原型。
ProtoNCE生成密度相似的更加均衡的聚类中心。
后面就是把这个方法套入到EM算法中,和EM算法的推导几乎一模一样。感兴趣的可以看EM算法的推导。https://zhuanlan.zhihu.com/p/36331115
最后一个是互信息的进行分析。这里主要是从互信息的角度解释了为什么Proto NCE由于Info NCE。
主要有以下几个优点:
1. Proto NCE忽略了个体的noise,能够获得更加高水平的语义特征。
2. 与Info NCE相比,原型与标签之间存在更大的互信息。这些得益于有效的聚类。
代码
主要使用了fassi库中的clus进行聚类。在Moco的代码上进行修改。
模型代码前面和Moco相同,主要是后面使用了输入的聚类相关信息与特征进行
主要理解下面这段代码就行。
在train阶段先使用fassi库中的函数对这些特征进行聚类,得到的图像的聚类中心的编号索引原型作为正样本。proto_logits是当前的特征和所选择的原型之间的乘积算是计算相似度了。刚开始不明白的点是为什么label是使用linspace进行生成的,侧面是样本,上面是聚类中心的话,我们选择的pos_proto是按照每个样本索引获得的原型的索引,根据原型的索引的到的原型作为正样本,所以标签是linspace得到的没问题。然后还有一点就是它的密度。因为它的这个”密度“的衡量是特征到聚类中心的距离的二范数得到的,所以这个数越大,密度越小,这个数越小密度越大,作为分母,”密度“越大,然后logit值越小,与label之间的差距越大,loss高就迫使模型给它拉近。我的猜测。

if cluster_result is not None: #如果提供了聚类结果,则执行以下代码块。proto_labels = []proto_logits = []for n, (im2cluster,prototypes,density) in enumerate(zip(cluster_result['im2cluster'],cluster_result['centroids'],cluster_result['density'])):# get positive prototypespos_proto_id = im2cluster[index]#得看看这个im2cluster和prototypes是怎么合在一起的pos_prototypes = prototypes[pos_proto_id] #初始化原型标签和对数几率的列表,并遍历聚类结果。# sample negative prototypes#获取正样本的原型ID和对应的原型。all_proto_id = [i for i in range(im2cluster.max()+1)]# neg_proto_id = set(all_proto_id)-set(pos_proto_id.tolist())#剩下的就是负的原型neg_proto_id = sample(neg_proto_id,self.r) #sample r negative prototypes neg_prototypes = prototypes[neg_proto_id] #这些就是负的原型 #采样负样本的原型。proto_selected = torch.cat([pos_prototypes,neg_prototypes],dim=0)#选择的原型# compute prototypical logitslogits_proto = torch.mm(q,proto_selected.t())#q就是当前得到的特征# targets for prototype assignmentlabels_proto = torch.linspace(0, q.size(0)-1, steps=q.size(0)).long().cuda()##这些是聚类的label# scaling temperatures for the selected prototypestemp_proto = density[torch.cat([pos_proto_id,torch.LongTensor(neg_proto_id).cuda()],dim=0)]#logits_proto /= temp_proto #proto_labels.append(labels_proto)proto_logits.append(logits_proto)return logits, labels, proto_logits, proto_labelselse:return logits, labels, None, None下面是完整的模型的代码。
import torch
import torch.nn as nn
from random import sampleclass MoCo(nn.Module):"""Build a MoCo model with: a query encoder, a key encoder, and a queuehttps://arxiv.org/abs/1911.05722"""def __init__(self, base_encoder, dim=128, r=16384, m=0.999, T=0.1, mlp=False):"""dim: feature dimension (default: 128)r: queue size; number of negative samples/prototypes (default: 16384)m: momentum for updating key encoder (default: 0.999)T: softmax temperature mlp: whether to use mlp projection"""super(MoCo, self).__init__()self.r = rself.m = mself.T = T# create the encoders# num_classes is the output fc dimensionself.encoder_q = base_encoder(num_classes=dim)self.encoder_k = base_encoder(num_classes=dim)if mlp:  # hack: brute-force replacementdim_mlp = self.encoder_q.fc.weight.shape[1]self.encoder_q.fc = nn.Sequential(nn.Linear(dim_mlp, dim_mlp), nn.ReLU(), self.encoder_q.fc)self.encoder_k.fc = nn.Sequential(nn.Linear(dim_mlp, dim_mlp), nn.ReLU(), self.encoder_k.fc)for param_q, param_k in zip(self.encoder_q.parameters(), self.encoder_k.parameters()):param_k.data.copy_(param_q.data)  # initializeparam_k.requires_grad = False  # not update by gradient# create the queueself.register_buffer("queue", torch.randn(dim, r))#使用了队列,队列里面是特征吗self.queue = nn.functional.normalize(self.queue, dim=0)self.register_buffer("queue_ptr", torch.zeros(1, dtype=torch.long))@torch.no_grad()def _momentum_update_key_encoder(self):#动量更新"""Momentum update of the key encoder"""for param_q, param_k in zip(self.encoder_q.parameters(), self.encoder_k.parameters()):param_k.data = param_k.data * self.m + param_q.data * (1. - self.m)@torch.no_grad()def _dequeue_and_enqueue(self, keys):# gather keys before updating queuekeys = concat_all_gather(keys)batch_size = keys.shape[0]ptr = int(self.queue_ptr)assert self.r % batch_size == 0  # for simplicity# replace the keys at ptr (dequeue and enqueue)self.queue[:, ptr:ptr + batch_size] = keys.Tptr = (ptr + batch_size) % self.r  # move pointerself.queue_ptr[0] = ptr@torch.no_grad()def _batch_shuffle_ddp(self, x):"""Batch shuffle, for making use of BatchNorm.*** Only support DistributedDataParallel (DDP) model. ***"""# gather from all gpusbatch_size_this = x.shape[0]x_gather = concat_all_gather(x)batch_size_all = x_gather.shape[0]num_gpus = batch_size_all // batch_size_this# random shuffle indexidx_shuffle = torch.randperm(batch_size_all).cuda()# broadcast to all gpustorch.distributed.broadcast(idx_shuffle, src=0)# index for restoringidx_unshuffle = torch.argsort(idx_shuffle)# shuffled index for this gpugpu_idx = torch.distributed.get_rank()idx_this = idx_shuffle.view(num_gpus, -1)[gpu_idx]return x_gather[idx_this], idx_unshuffle@torch.no_grad()def _batch_unshuffle_ddp(self, x, idx_unshuffle):"""Undo batch shuffle.*** Only support DistributedDataParallel (DDP) model. ***"""# gather from all gpusbatch_size_this = x.shape[0]x_gather = concat_all_gather(x)batch_size_all = x_gather.shape[0]num_gpus = batch_size_all // batch_size_this# restored index for this gpugpu_idx = torch.distributed.get_rank()idx_this = idx_unshuffle.view(num_gpus, -1)[gpu_idx]return x_gather[idx_this]def forward(self, im_q, im_k=None, is_eval=False, cluster_result=None, index=None):"""Input:im_q: a batch of query imagesim_k: a batch of key imagesis_eval: return momentum embeddings (used for clustering)cluster_result: cluster assignments, centroids, and densityindex: indices for training samplesOutput:logits, targets, proto_logits, proto_targets"""if is_eval:k = self.encoder_k(im_q)  k = nn.functional.normalize(k, dim=1)            return k# compute key featureswith torch.no_grad():  # no gradient to keysself._momentum_update_key_encoder()  # update the key encoder# shuffle for making use of BNim_k, idx_unshuffle = self._batch_shuffle_ddp(im_k)k = self.encoder_k(im_k)  # keys: NxCk = nn.functional.normalize(k, dim=1)# undo shufflek = self._batch_unshuffle_ddp(k, idx_unshuffle)# compute query featuresq = self.encoder_q(im_q)  # queries: NxCq = nn.functional.normalize(q, dim=1)# compute logits# Einstein sum is more intuitive# positive logits: Nx1l_pos = torch.einsum('nc,nc->n', [q, k]).unsqueeze(-1)# negative logits: Nxrl_neg = torch.einsum('nc,ck->nk', [q, self.queue.clone().detach()])#k个原型,每个是c维度# logits: Nx(1+r)logits = torch.cat([l_pos, l_neg], dim=1)# apply temperaturelogits /= self.T# labels: positive key indicatorslabels = torch.zeros(logits.shape[0], dtype=torch.long).cuda()# dequeue and enqueueself._dequeue_and_enqueue(k)#下面这个就属于空白区域了# prototypical contrastif cluster_result is not None:  #如果提供了聚类结果,则执行以下代码块。proto_labels = []proto_logits = []for n, (im2cluster,prototypes,density) in enumerate(zip(cluster_result['im2cluster'],cluster_result['centroids'],cluster_result['density'])):# get positive prototypespos_proto_id = im2cluster[index]#得看看这个im2cluster和prototypes是怎么合在一起的pos_prototypes = prototypes[pos_proto_id]    #初始化原型标签和对数几率的列表,并遍历聚类结果。# sample negative prototypes#获取正样本的原型ID和对应的原型。all_proto_id = [i for i in range(im2cluster.max()+1)]#       neg_proto_id = set(all_proto_id)-set(pos_proto_id.tolist())#剩下的就是负的原型neg_proto_id = sample(neg_proto_id,self.r) #sample r negative prototypes neg_prototypes = prototypes[neg_proto_id]  #这些就是负的原型  #采样负样本的原型。proto_selected = torch.cat([pos_prototypes,neg_prototypes],dim=0)#选择的原型# compute prototypical logitslogits_proto = torch.mm(q,proto_selected.t())#q就是当前得到的特征# targets for prototype assignmentlabels_proto = torch.linspace(0, q.size(0)-1, steps=q.size(0)).long().cuda()##这些是聚类的label# scaling temperatures for the selected prototypestemp_proto = density[torch.cat([pos_proto_id,torch.LongTensor(neg_proto_id).cuda()],dim=0)]#logits_proto /= temp_proto #proto_labels.append(labels_proto)proto_logits.append(logits_proto)return logits, labels, proto_logits, proto_labelselse:return logits, labels, None, None
值得学习的地方我感觉就是这个run_kmeans聚类了,调用了fassi库。
def run_kmeans(x, args):#就是使用faiss库中的函数完成的聚类。"""Args:x: data to be clustered"""print('performing kmeans clustering')results = {'im2cluster':[],'centroids':[],'density':[]}#初始化一个字典用来存储聚类结果for seed, num_cluster in enumerate(args.num_cluster):#遍历聚类中心# intialize faiss clustering parametersd = x.shape[1]#获取x的维度d应该x就是个二维的k = int(num_cluster)clus = faiss.Clustering(d, k)#创建一个聚类对象,指定数据维度和聚类数量clus.verbose = Trueclus.niter = 20#迭代次数为20clus.nredo = 5#重新聚类次数为5clus.seed = seedclus.max_points_per_centroid = 1000#每个中心点的最大样本数clus.min_points_per_centroid = 10res = faiss.StandardGpuResources()#初始化聚类资源cfg = faiss.GpuIndexFlatConfig()#创建gpu索引配置cfg.useFloat16 = Falsecfg.device = args.gpu index = faiss.GpuIndexFlatL2(res, d, cfg)#创建一个L2位置索引 clus.train(x, index) #利用clus对象在index上训练数据xD, I = index.search(x, 1) # for each sample, find cluster distance and assignments搜索数据'x'找到每个样本的聚类距离D和分配rim2cluster = [int(n[0]) for n in I]#转换成列表每个元素对应一个样本所属的聚类# get cluster centroidscentroids = faiss.vector_to_array(clus.centroids).reshape(k,d)#获取聚类中心点,将其转换成numpy数组# sample-to-centroid distances for each cluster Dcluster = [[] for c in range(k)]#初始化一个列表用于存储每个聚类的样本距离for im,i in enumerate(im2cluster):Dcluster[i].append(D[im][0])# concentration estimation (phi) density = np.zeros(k)#density初始化为0数组for i,dist in enumerate(Dcluster):#计算密度,是距离的开根号然后取平均if len(dist)>1:#计算每个聚类的密度,如果聚类中样本数大于 1,则计算距离的均值并进行缩放。d = (np.asarray(dist)**0.5).mean()/np.log(len(dist)+10) density[i] = d #if cluster only has one point, use the max to estimate its concentration dmax = density.max()#获取最大密度 dmax。for i,dist in enumerate(Dcluster):#对于只有一个样本的聚类,使用 dmax 作为其密度。if len(dist)<=1:density[i] = dmax density = density.clip(np.percentile(density,10),np.percentile(density,90)) #clamp extreme values for stability#对密度进行裁剪,限制在第 10 和第 90 百分位之间。density = args.temperature*density/density.mean() #scale the mean to temperature 将密度缩放到指定温度 args.temperature。# convert to cuda Tensors for broadcastcentroids = torch.Tensor(centroids).cuda()centroids = nn.functional.normalize(centroids, p=2, dim=1) im2cluster = torch.LongTensor(im2cluster).cuda() density = torch.Tensor(density).cuda()#将每个聚类的结果添加到 results 字典中。results['centroids'].append(centroids)results['density'].append(density)results['im2cluster'].append(im2cluster) return resultsFeature Alignment and Uniformity for Test Time Adaptation
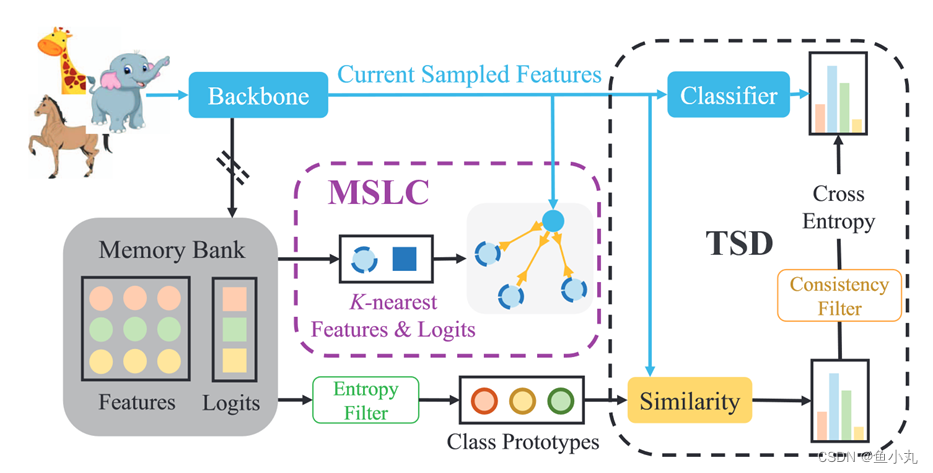
这个是我接触的第一篇我搞懂一点的聚类。
这个就是直接的feature聚类。
第一次将TTA作为特征修订问题来解决。
代码
主体代码如下:
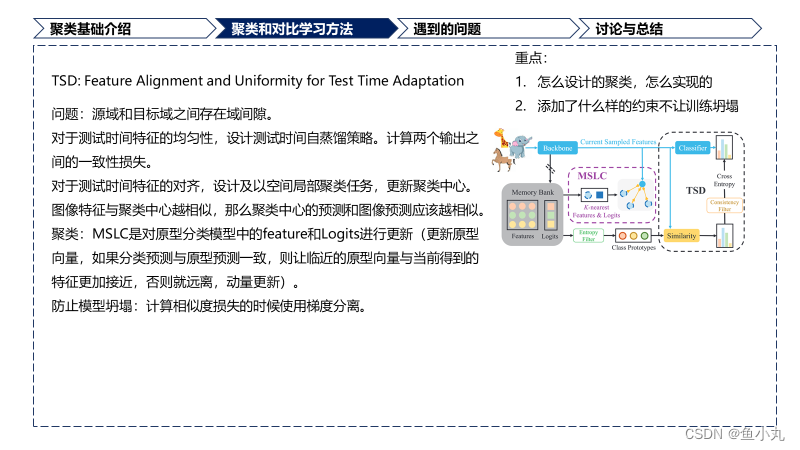
本文主要有两个任务:
一个是一致性任务:计算两个输出之间的一致性损失主要代码在 def prototype_loss(self,z,p,labels=None,use_hard=False,tau=1)这个函数中,然后其中z是特征,p是weights = s u p p o r t s T supports^T supportsTlabels这个是支持特征与score之间对应的矩阵,dist = z ∗ p T z *p^T z∗pT意思就是将当前样本的特征与这个weights(代码中的p)相乘得到BK的值,也就是dist作为聚类任务的输出。labels经过argmax得到硬标签。
另一个是对齐,更新聚类中心。在topk_cluster这个函数中,z.detach().clone()特征supports支持的特征memory中保存的,self.scores得分,p是分类头输出,k是几个近邻。
先进行归一化,然后用特征计算相似度矩阵,选k个最相似的score与p计算差值平方作为距离,
loss = -sim_matrix*diff_scores越接近,最后输出应该越相似。
class TSD(nn.Module):"""Test-time Self-Distillation (TSD)CVPR 2023"""def __init__(self,model,optimizer,lam=0,filter_K=100,steps=1,episodic=False):super().__init__()self.model = modelself.featurizer = model.featurizer#这个是进行特征提取self.classifier = model.classifier#分类头self.optimizer = optimizerself.steps = stepsassert steps > 0, "requires >= 1 step(s) to forward and update"self.episodic = episodic#是否是记忆的self.filter_K = filter_K#选择的支持样本的数量warmup_supports = self.classifier.fc.weight.data.detach()#获取分类头的权重self.num_classes = warmup_supports.size()[0]#获取类别的数量self.warmup_supports = warmup_supports#这个是进行初始化warmup_prob = self.classifier(self.warmup_supports)#获取分类头的输出self.warmup_ent = softmax_entropy(warmup_prob)#这个是计算熵值#self.warmup_labels = F.one_hot(warmup_prob.argmax(1), num_classes=self.num_classes).float()#获取预测的标签,然后one-hot编码self.warmup_scores = F.softmax(warmup_prob,1)#self.supports = self.warmup_supports.data#这个是进行初始化,self.labels = self.warmup_labels.dataself.ent = self.warmup_ent.dataself.scores = self.warmup_scores.dataself.lam = lamdef forward(self,x):z = self.featurizer(x)p = self.classifier(z)#模型预测yhat = F.one_hot(p.argmax(1), num_classes=self.num_classes).float()#得到的预测标签ent = softmax_entropy(p)#计算熵值,用来进行过滤⭐⭐⭐scores = F.softmax(p,1)#计算概率⭐⭐⭐#如果可以我可以直接用这个代码,#概率值的分布,scores进行概率更新with torch.no_grad():self.supports = self.supports.to(z.device)self.labels = self.labels.to(z.device)self.ent = self.ent.to(z.device)self.scores = self.scores.to(z.device)#移动到当前设备上self.supports = torch.cat([self.supports,z])#为什么都合并起来self.labels = torch.cat([self.labels,yhat])self.ent = torch.cat([self.ent,ent])#熵值self.scores = torch.cat([self.scores,scores])supports, labels = self.select_supports()#选择,是不是保持支持样本的数量,合并起来是为了更新,然后选择就是进行更新supports = F.normalize(supports, dim=1)#归一化weights = (supports.T @ (labels))#计算权重,是不是就是那个把概率当成权值,然后对feature进行加权求和dist,loss = self.prototype_loss(z,weights.T,scores,use_hard=False)loss_local = topk_cluster(z.detach().clone(),supports,self.scores,p,k=3)#计算损失loss += self.lam*loss_local#加上一个正则项self.optimizer.zero_grad()loss.backward()self.optimizer.step()return pdef select_supports(self):ent_s = self.ent#获取样本的熵值,根据熵值来进行样本选择?y_hat = self.labels.argmax(dim=1).long()#从对象的标签属性中获得预测的标签,以及类别索引filter_K = self.filter_K#这个是支持的样本数量if filter_K == -1:#如果filter_K=-1,那么就是所有的样本indices = torch.LongTensor(list(range(len(ent_s))))#获得indiceindices = []#这个是indices1 = torch.LongTensor(list(range(len(ent_s)))).cuda()for i in range(self.num_classes):#对每一个类别进行操作_, indices2 = torch.sort(ent_s[y_hat == i])#对当前类别的熵值进行排序,就是获得熵值最小的样本indices.append(indices1[y_hat==i][indices2][:filter_K])#放入到indices中存起来,#这个就是对每一个类别进行操作,然后把每一个类别的熵值最小的样本放入到indices中indices = torch.cat(indices)#就是进行indices的catself.supports = self.supports[indices]#合并成一个张量self.labels = self.labels[indices]#更新支持,标签和熵,这个进行更新了,前面的cat之后,在这里进行选取然后更新?????self.ent = self.ent[indices]self.scores = self.scores[indices]return self.supports, self.labels#软标签和支持样本def prototype_loss(self,z,p,labels=None,use_hard=False,tau=1):#这个是原型损失#z [batch_size,feature_dim]#p [num_class,feature_dim]#labels [batch_size,] z = F.normalize(z,1)#featurep = F.normalize(p,1)#logit?、"""在原型损失函数 prototype_loss() 中,p 用来表示类别的原型。在这个具体的实现中,p 并不是传统意义上的原型向量,而是一个包含每个类别预测概率的张量。这种方法的一个优势是它能够通过概率分布更好地捕捉类别之间的关系,而不仅仅是通过一个固定的原型向量来表示类别。在原型损失函数中,dist 是通过计算 z 和 p 之间的点积得到的。然后,根据是否使用硬标签(use_hard)来选择使用软标签或硬标签来进行损失计算。在软标签情况下,使用了交叉熵损失函数,而在硬标签情况下,直接使用了 F.cross_entropy 函数来计算损失。因此,虽然p 不是传统意义上的原型向量,但在这个实现中,它被用作表示类别的概率分布,被输入到损失函数中与特征向量 z 进行比较和损失计算。"""dist = z @ p.T / tau#logit和feature的点积,计算这个feature和每个类别的特征中心的相似度"""z 是一个形状为 [batch_size, feature_dim] 的张量,表示输入数据的特征向量。这些特征向量经过某些层的处理后得到。p 是一个形状为 [num_class, feature_dim] 的张量,表示原型向量。每个类别都有一个原型向量,这些原型向量通常是通过类别特征的均值来获得的。"""if labels is None:_,labels = dist.max(1)#根据相似度来进行分类if use_hard:"""use hard label for supervision """#_,labels = dist.max(1) #for prototype-based pseudo-labellabels = labels.argmax(1) #for logits-based pseudo-labelloss = F.cross_entropy(dist,labels)else:"""use soft label for supervision """#label不是none的话就loss = softmax_kl_loss(labels.detach(),dist).sum(1).mean(0) #detach is **necessary**#loss = softmax_kl_loss(dist,labels.detach()).sum(1).mean(0) achieves comparable resultsreturn dist,loss
下面是相关的一些功能上的代码。
def topk_labels(feature,supports,scores,k=3):feature = F.normalize(feature,1)supports = F.normalize(supports,1)sim_matrix = feature @ supports.T #B,M_,idx_near = torch.topk(sim_matrix,k,dim=1) #batch x Kscores_near = scores[idx_near] #batch x K x num_classsoft_labels = torch.mean(scores_near,1) #batch x num_classsoft_labels = torch.argmax(soft_labels,1)return soft_labelsdef topk_cluster(feature,supports,scores,p,k=3):#p: outputs of model batch x num_classfeature = F.normalize(feature,1)supports = F.normalize(supports,1)sim_matrix = feature @ supports.T #B,Mtopk_sim_matrix,idx_near = torch.topk(sim_matrix,k,dim=1) #batch x Kscores_near = scores[idx_near].detach().clone() #batch x K x num_classdiff_scores = torch.sum((p.unsqueeze(1) - scores_near)**2,-1)loss = -1.0* topk_sim_matrix * diff_scoresreturn loss.mean()def knn_affinity(X,knn):#x [N,D]N = X.size(0)X = F.normalize(X,1)dist = torch.norm(X.unsqueeze(0) - X.unsqueeze(1), dim=-1, p=2) # [N, N]n_neighbors = min(knn + 1, N)knn_index = dist.topk(n_neighbors, -1, largest=False).indices[:, 1:] # [N, knn]W = torch.zeros(N, N, device=X.device)W.scatter_(dim=-1, index=knn_index, value=1.0)return Wdef softmax_mse_loss(input_logits, target_logits):"""Takes softmax on both sides and returns MSE lossNote:- Returns the sum over all examples. Divide by the batch size afterwardsif you want the mean.- Sends gradients to inputs but not the targets."""assert input_logits.size() == target_logits.size()input_softmax = F.softmax(input_logits, dim=1)target_softmax = F.softmax(target_logits, dim=1)mse_loss = (input_softmax-target_softmax)**2return mse_lossdef softmax_kl_loss(input_logits, target_logits):"""对 input_logits 使用 F.log_softmax 函数进行 softmax 操作,并取对数得到对数概率值。对 target_logits 使用 F.softmax 函数进行 softmax 操作,得到概率分布。使用 F.kl_div 函数计算两个概率分布之间的 KL 散度。参数 reduction='none' 表示不对 KL 散度进行求和,保留每个样本的 KL 散度值。""""""Takes softmax on both sides and returns KL divergenceNote:- Returns the sum over all examples. Divide by the batch size afterwardsif you want the mean.- Sends gradients to inputs but not the targets."""assert input_logits.size() == target_logits.size()input_log_softmax = F.log_softmax(input_logits, dim=1)target_softmax = F.softmax(target_logits, dim=1)kl_div = F.kl_div(input_log_softmax, target_softmax, reduction='none')return kl_div def get_distances(X, Y, dist_type="cosine"):#计算距离"""Args:X: (N, D) tensorY: (M, D) tensor"""if dist_type == "euclidean":distances = torch.cdist(X, Y)elif dist_type == "cosine":distances = 1 - torch.matmul(F.normalize(X, dim=1), F.normalize(Y, dim=1).T)else:raise NotImplementedError(f"{dist_type} distance not implemented.")return distances@torch.no_grad()
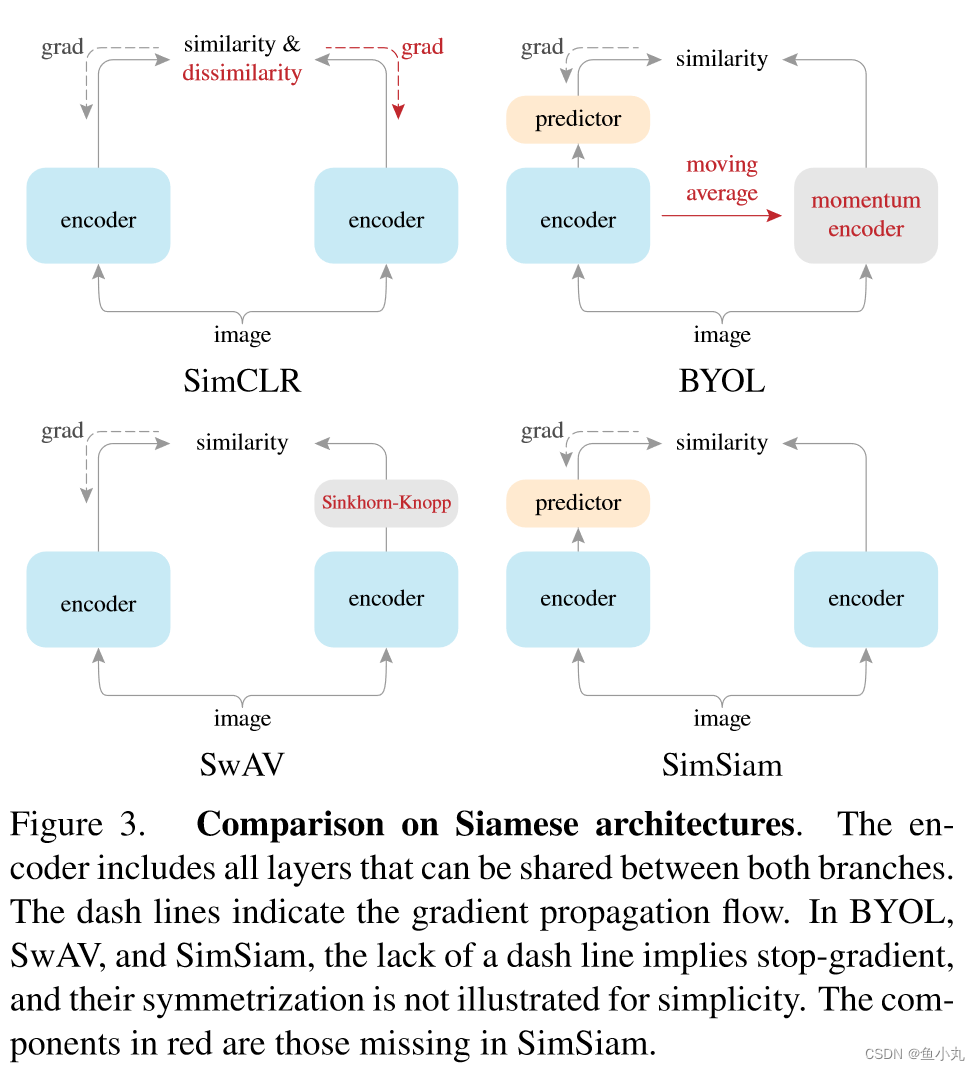
def soft_k_nearest_neighbors(features, features_bank, probs_bank):pred_probs = []K = 4for feats in features.split(64):distances = get_distances(feats, features_bank,"cosine")_, idxs = distances.sort()idxs = idxs[:, : K]# (64, num_nbrs, num_classes), average over dim=1probs = probs_bank[idxs, :].mean(1)pred_probs.append(probs)pred_probs = torch.cat(pred_probs)_, pred_labels = pred_probs.max(dim=1)return pred_labels, pred_probsSimSiam
论文:https://arxiv.org/abs/2011.10566
代码:https://github.com/facebookresearch/simsiam
论文写的很好了,大家都去看论文吧。代码很简单和伪代码差不多。
相关文章:
一些关于深度聚类以及部分对比学习的论文阅读笔记
目录 资料SwAV问题方法方法的创新点为什么有效有什么可以借鉴的地方聚类Multi-crop 代码 PCL代码 Feature Alignment and Uniformity for Test Time Adaptation代码 SimSiam 资料 深度聚类算法研究综述(很赞,从聚类方法和深度学习方法两个方面进行了总结࿰…...
【ARM-Linux篇】u-boot编译
一、u-boot简介 uboot是一种通用的引导加载程序,它可以用于多种嵌入式系统,支持多种操作系统,如Linux, Android,NetBSD等。uboot的主要作用是将操作系统内核从存储设备(如Flash, SD卡等)加载到内存中,并执…...

Lombok一文通
1、Lombok简介 作为java的忠实粉丝,但也不得不承认,java是一门比较啰嗦的语言,很多代码的编写远不如其他静态语言方便,更别说跟脚本语言比较了。 因此,lombok应运而生。 Lombok是一种工具库,它提供了一组…...

Seq2Seq模型:详述其发展历程、深远影响与结构深度剖析
Seq2Seq(Sequence-to-Sequence)模型是一种深度学习架构,专为处理从一个输入序列到一个输出序列的映射任务设计。这种模型最初应用于机器翻译任务,但因其灵活性和有效性,现已被广泛应用于自然语言处理(NLP&a…...
公网如何访问内网?
公网和内网已经成为我们生活中不可或缺的存在。由于内网的安全性考虑,公网无法直接访问内网资源。如何实现公网访问内网呢?本文将介绍一种名为【天联】的私有通道技术,通过安全加密,保障数据传输的安全性。 【天联】私有通道技术 …...

手机定制开发_基于天玑900的5G安卓手机定制方案
手机定制方案基于联发科天玑900强劲旗舰八核2.4GHz处理器。这款处理器采用了6nm先进制程工艺,为用户带来了痛快淋漓的性能体验。不论是进行游戏还是日常娱乐,用户都能轻松驾驭。手机搭载了最新的Android 13操作系统,提高了数据读取的准确性&a…...

免费,C++蓝桥杯等级考试真题--第2级
C蓝桥杯等级考试真题–第2级...

panic 、asset、crash 的含义和区别
在编程中,“panic” 和 “assert” 都是用于处理错误和异常情况的机制,但在不同的编程语言和框架中有一些区别。 panic: 含义:通常表示程序发生了无法恢复的错误或异常情况,需要立即终止程序的执行。 用法࿱…...

解决Windows 10通过SSH连接Ubuntu 20.04时的“Permission Denied”错误
在使用SSH连接远程服务器时,我们经常可能遇到各种连接错误,其中“Permission denied, please try again”是较为常见的一种。本文将分享一次实际案例的解决过程,帮助你理解如何排查并解决这类问题。 问题描述 在尝试从Windows 10系统通过SS…...

Windows 下 PostgreSQL 图形化界面安装、配置详解
相信大家对PostgreSQL都不陌生吧,自从MySQL被Oracle所控制后,PostgreSQL就成为了国内去O的首选数据库了,并且PostgreSQL目前不受任何商业公司控制,所以国内很多厂商都是基于PostgreSQL做二次开发来实现数据库自主可控的目标(国内很…...

曾巩,散文的艺术与哲思
曾巩,字子固,世称南丰先生,南丰(今江西)人,生于北宋真宗天禧三年(公元1019年),卒于北宋元丰六年(公元1083年),享年64岁。他是中国北宋…...

【SpringBoot】怎么在一个大的SpringBoot项目中创建多个小的SpringBoot项目,从而形成子父依赖
父子项目工程创建 步骤 先创建父项目 具体操作步骤请看本文章:使用maven工程创建spring boot项目 创建子项目 file- project structure module–new module 剩下步骤请看创建父工程时的操作使用maven工程创建spring boot项目 应用 确认即可 之后创建启动类…...

vue3组件通信与props
title: vue3组件通信与props date: 2024/5/31 下午9:00:57 updated: 2024/5/31 下午9:00:57 categories: 前端开发 tags: Vue3组件Props详解生命周期数据通信模板语法Composition API单向数据流 Vue 3 组件基础 在 Vue 3 中,组件是构建用户界面的基本单位&#…...

并发和异步编程:详细概述
01 Concurrency and Asynchronous Programming: a Detailed Overview 并发和异步编程:详细概述 Asynchronous programming is one of those topics many programmers find confusing. You come to the point when you think you’ve got it, only to later realize that the …...
交易员摩拳擦掌,就在今年夏天,极端气候引爆商品?
有史以来最严重的高温炙烤下,从农业到能源到航运都可能受到严重负面影响,大宗商品市场波动将大幅加剧。 2024年有望成为有史以来最炎热的一年,随着北半球步入夏季,世界各地都将遭受由全球变暖造成的极端高温困扰。极端天气不仅给民…...
数据结构学习笔记
1. 数组 (Array) 定义 数组是一种线性数据结构,用于存储固定大小的相同类型元素集合。每个元素都有一个索引,用于快速访问。 特点 优点:访问速度快,通过索引直接访问O(1)时间复杂度。缺点:大小固定,插入…...

vscode导入自定义模块报错ModuleNotFoundError解决方案
问题描述 我的项目为great_gas_or_agents,目录结构如下: log_data_extract main.py math_algorithm 现在我运行main.py,报错:from math_algorithm.utils import parse_month_match_request,ModuleNotFoundError: No …...

go mod包管理与应用,常见错误排查方法
go mod包管理 go 中 包管理使用go mod 进行包管理 go mod init 项目名称 go mod init myproject_go生成的go.mod中有 module myproject_go 创建目录go_service 其下有两个go文件,go_request.go go_write.go . 根目录下有main.go入口文件。于是项目结构类似于&…...

数据结构作业
第1章 绪论 单选题 数据在计算机的存储器中表示时,逻辑上相邻的两个元素对应的物理地址也是相邻的,这种存储结构称之为________。 B. 顺序存储结构 算法指的是________。 D. 求解特定问题的指令有限序列 下面程序段的时间复杂度为:_______…...

项目纪实 | 版本升级操作get!GreatDB分布式升级过程详解
某客户项目现场,因其业务系统要用到数据库新版本中的功能特性,因此考虑升级现有数据库版本。在升级之前,万里数据库项目团队帮助客户在本地测试环境构造了相同的基础版本,导入部分生产数据,尽量复刻生产环境进行升级&a…...
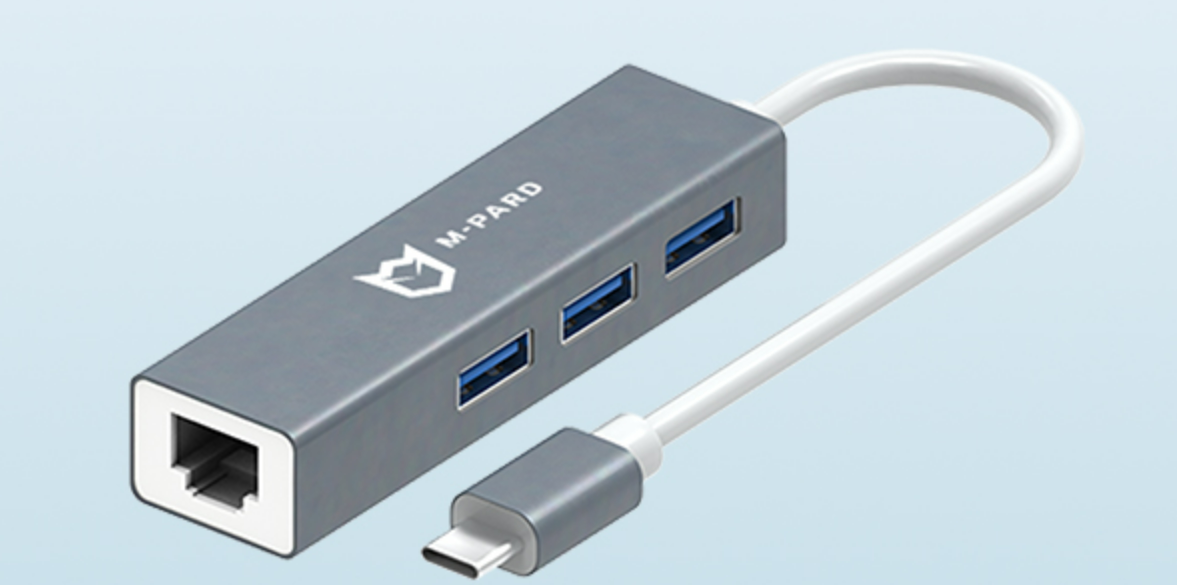
铭豹扩展坞 USB转网口 突然无法识别解决方法
当 USB 转网口扩展坞在一台笔记本上无法识别,但在其他电脑上正常工作时,问题通常出在笔记本自身或其与扩展坞的兼容性上。以下是系统化的定位思路和排查步骤,帮助你快速找到故障原因: 背景: 一个M-pard(铭豹)扩展坞的网卡突然无法识别了,扩展出来的三个USB接口正常。…...

conda相比python好处
Conda 作为 Python 的环境和包管理工具,相比原生 Python 生态(如 pip 虚拟环境)有许多独特优势,尤其在多项目管理、依赖处理和跨平台兼容性等方面表现更优。以下是 Conda 的核心好处: 一、一站式环境管理:…...

STM32F4基本定时器使用和原理详解
STM32F4基本定时器使用和原理详解 前言如何确定定时器挂载在哪条时钟线上配置及使用方法参数配置PrescalerCounter ModeCounter Periodauto-reload preloadTrigger Event Selection 中断配置生成的代码及使用方法初始化代码基本定时器触发DCA或者ADC的代码讲解中断代码定时启动…...
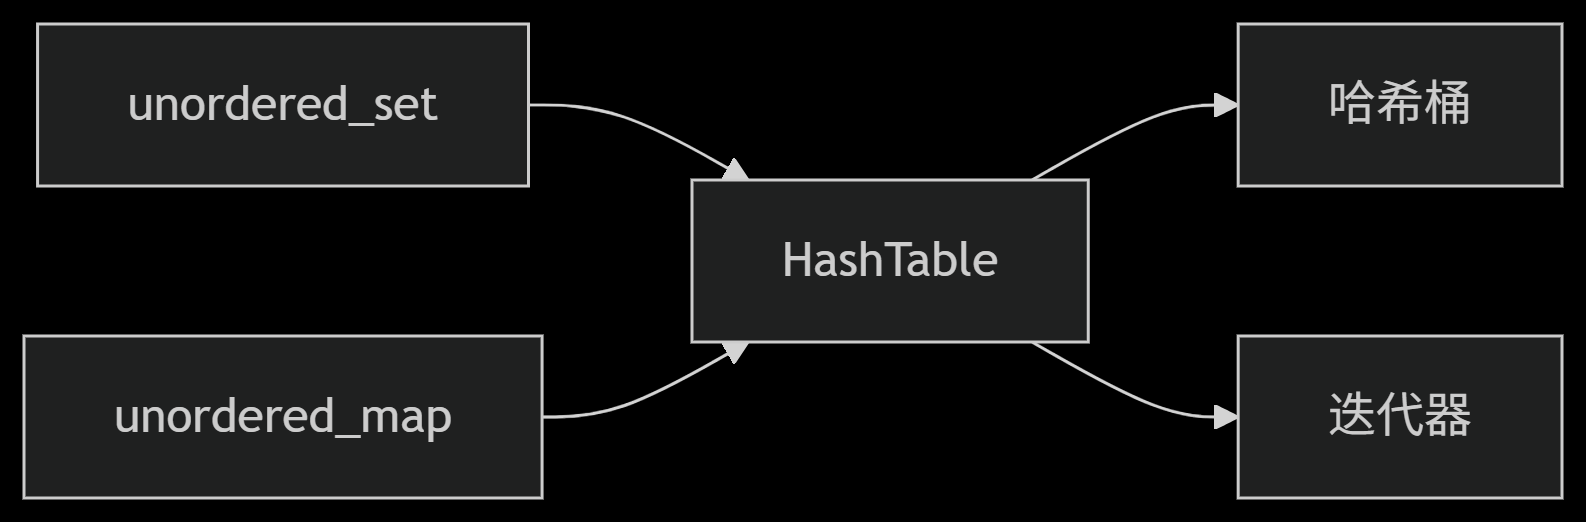
从零实现STL哈希容器:unordered_map/unordered_set封装详解
本篇文章是对C学习的STL哈希容器自主实现部分的学习分享 希望也能为你带来些帮助~ 那咱们废话不多说,直接开始吧! 一、源码结构分析 1. SGISTL30实现剖析 // hash_set核心结构 template <class Value, class HashFcn, ...> class hash_set {ty…...
 自用)
css3笔记 (1) 自用
outline: none 用于移除元素获得焦点时默认的轮廓线 broder:0 用于移除边框 font-size:0 用于设置字体不显示 list-style: none 消除<li> 标签默认样式 margin: xx auto 版心居中 width:100% 通栏 vertical-align 作用于行内元素 / 表格单元格ÿ…...

如何理解 IP 数据报中的 TTL?
目录 前言理解 前言 面试灵魂一问:说说对 IP 数据报中 TTL 的理解?我们都知道,IP 数据报由首部和数据两部分组成,首部又分为两部分:固定部分和可变部分,共占 20 字节,而即将讨论的 TTL 就位于首…...
)
【HarmonyOS 5 开发速记】如何获取用户信息(头像/昵称/手机号)
1.获取 authorizationCode: 2.利用 authorizationCode 获取 accessToken:文档中心 3.获取手机:文档中心 4.获取昵称头像:文档中心 首先创建 request 若要获取手机号,scope必填 phone,permissions 必填 …...
Reasoning over Uncertain Text by Generative Large Language Models
https://ojs.aaai.org/index.php/AAAI/article/view/34674/36829https://ojs.aaai.org/index.php/AAAI/article/view/34674/36829 1. 概述 文本中的不确定性在许多语境中传达,从日常对话到特定领域的文档(例如医学文档)(Heritage 2013;Landmark、Gulbrandsen 和 Svenevei…...

服务器--宝塔命令
一、宝塔面板安装命令 ⚠️ 必须使用 root 用户 或 sudo 权限执行! sudo su - 1. CentOS 系统: yum install -y wget && wget -O install.sh http://download.bt.cn/install/install_6.0.sh && sh install.sh2. Ubuntu / Debian 系统…...
逻辑回归暴力训练预测金融欺诈
简述 「使用逻辑回归暴力预测金融欺诈,并不断增加特征维度持续测试」的做法,体现了一种逐步建模与迭代验证的实验思路,在金融欺诈检测中非常有价值,本文作为一篇回顾性记录了早年间公司给某行做反欺诈预测用到的技术和思路。百度…...