前端Vue小兔鲜儿电商项目实战Day04
一、二级分类 - 整体认识和路由配置
1. 配置二级路由
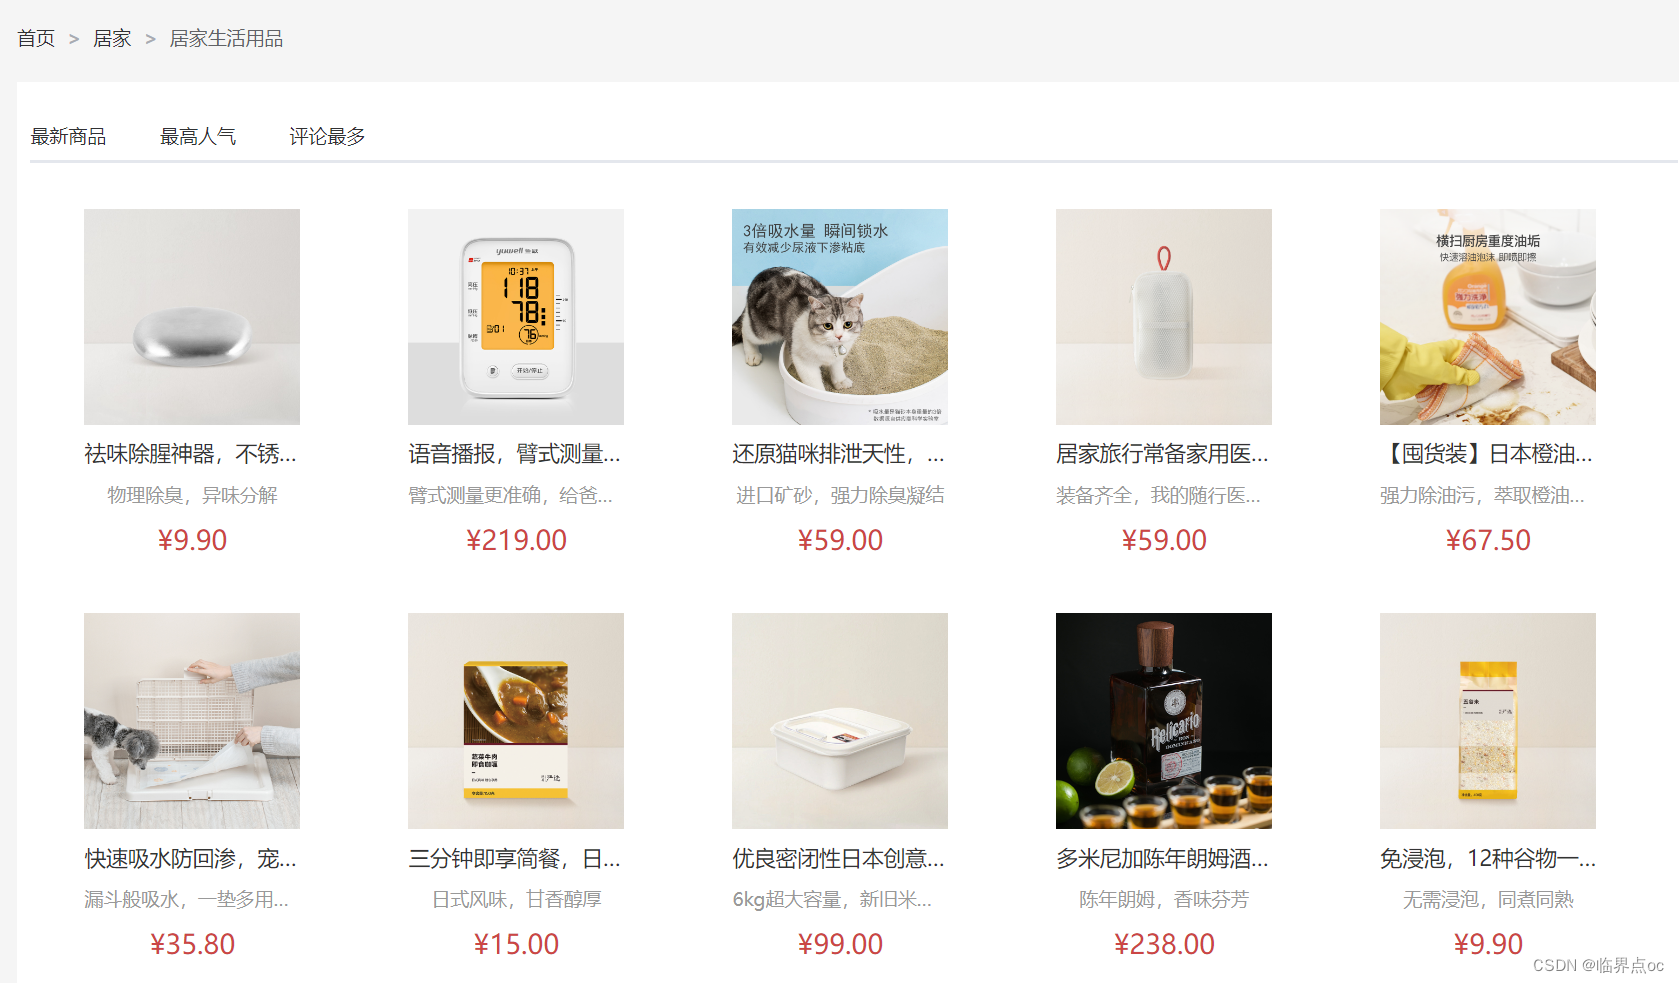
 ①准备组件模板 - src/views/SubCategory/index.vue
<script setup></script><template><div class="container"><!-- 面包屑 --><div class="bread-container"><el-breadcrumb separator=">"><el-breadcrumb-item :to="{ path: '/' }">首页</el-breadcrumb-item><el-breadcrumb-item :to="{ path: '/' }">居家 </el-breadcrumb-item><el-breadcrumb-item>居家生活用品</el-breadcrumb-item></el-breadcrumb></div><div class="sub-container"><el-tabs><el-tab-pane label="最新商品" name="publishTime"></el-tab-pane><el-tab-pane label="最高人气" name="orderNum"></el-tab-pane><el-tab-pane label="评论最多" name="evaluateNum"></el-tab-pane></el-tabs><div class="body"><!-- 商品列表--></div></div></div>
</template><style lang="scss" scoped>
.bread-container {padding: 25px 0;color: #666;
}.sub-container {padding: 20px 10px;background-color: #fff;.body {display: flex;flex-wrap: wrap;padding: 0 10px;}.goods-item {display: block;width: 220px;margin-right: 20px;padding: 20px 30px;text-align: center;img {width: 160px;height: 160px;}p {padding-top: 10px;}.name {font-size: 16px;}.desc {color: #999;height: 29px;}.price {color: $priceColor;font-size: 20px;}}.pagination-container {margin-top: 20px;display: flex;justify-content: center;}
}
</style>
②配置路由关系 - src/router.index.js
import { createRouter, createWebHistory } from 'vue-router'
import Login from '@/views/Login/index.vue'
import Layout from '@/views/Layout/index.vue'
import Home from '@/views/Home/index.vue'
import Category from '@/views/Category/index.vue'
import SubCategory from '@/views/SubCategory/index.vue'const router = createRouter({history: createWebHistory(import.meta.env.BASE_URL),routes: [{path: '/',component: Layout,children: [{path: '',component: Home},{path: 'category/:id',component: Category},{path: 'category/sub/:id',component: SubCategory}]},{path: '/login',component: Login}]
})export default router
③配置跳转 - src/views/Category/index.vue
<!-- 分类列表渲染 --><div class="sub-list"><h3>全部分类</h3><ul><li v-for="i in categoryData.children" :key="i.id"><RouterLink :to="`/category/sub/${i.id}`"><img :src="i.picture" /><p>{{ i.name }}</p></RouterLink></li></ul></div>二、面包屑导航实现

①准备接口 - src/apis/category.js
// 获取二级分类列表数据
export const getCategoryFilterAPI = (id) => {return instance({url: '/category/sub/filter',params: {id}})
}
②获取数据渲染模板 - src/views/SubCategory/index.vue
<script setup>
import { ref } from 'vue'
import { useRoute } from 'vue-router'
import { getCategoryFilterAPI } from '@/apis/category.js'const route = useRoute()// 获取面包屑导航数据
const filterData = ref([])
const getFilterData = async () => {const res = await getCategoryFilterAPI(route.params.id)filterData.value = res.result
}getFilterData()
</script><template><div class="container"><!-- 面包屑 --><div class="bread-container"><el-breadcrumb separator=">"><el-breadcrumb-item :to="{ path: '/' }">首页</el-breadcrumb-item><el-breadcrumb-item:to="{ path: `/category/${filterData.parentId}` }">{{ filterData.parentName }}</el-breadcrumb-item><el-breadcrumb-item>{{ filterData.name }}</el-breadcrumb-item></el-breadcrumb></div><div class="sub-container"><el-tabs><el-tab-pane label="最新商品" name="publishTime"></el-tab-pane><el-tab-pane label="最高人气" name="orderNum"></el-tab-pane><el-tab-pane label="评论最多" name="evaluateNum"></el-tab-pane></el-tabs><div class="body"><!-- 商品列表--></div></div></div>
</template>
三、二级分类 - 商品列表实现

1. 基础参数获取基础列表

①封装接口 - src/apis/category.js
// 获取导航数据
export const getSubCategoryAPI = (data) => {return instance({url: '/category/goods/temporary',method: 'POST',data})
}
②获取数据列表 - src/views/SubCategory/index.vue
<script setup>
import { ref } from 'vue'
import { useRoute } from 'vue-router'
import { getCategoryFilterAPI, getSubCategoryAPI } from '@/apis/category.js'
import GoodsItem from '../Home/components/GoodsItem.vue'const route = useRoute()// 获取面包屑导航数据
const filterData = ref([])
const getFilterData = async () => {const res = await getCategoryFilterAPI(route.params.id)filterData.value = res.result
}
getFilterData()// 获取基础列表数据
const goodsList = ref([])
const reqData = ref({categoryId: route.params.id,page: 1,pageSize: 20,sortField: 'publishTime'
})
const getGoodsList = async () => {const res = await getSubCategoryAPI(reqData.value)//   console.log(res)goodsList.value = res.result.items
}
getGoodsList()
</script><template><div class="container"><!-- 面包屑 --><div class="bread-container"><el-breadcrumb separator=">"><el-breadcrumb-item :to="{ path: '/' }">首页</el-breadcrumb-item><el-breadcrumb-item:to="{ path: `/category/${filterData.parentId}` }">{{ filterData.parentName }}</el-breadcrumb-item><el-breadcrumb-item>{{ filterData.name }}</el-breadcrumb-item></el-breadcrumb></div><div class="sub-container"><el-tabs><el-tab-pane label="最新商品" name="publishTime"></el-tab-pane><el-tab-pane label="最高人气" name="orderNum"></el-tab-pane><el-tab-pane label="评论最多" name="evaluateNum"></el-tab-pane></el-tabs><div class="body"><!-- 商品列表--><GoodsItem v-for="good in goodsList" :key="good.id" :good="good" /></div></div></div>
</template>
2. 添加额外参数实现筛选功能
Tabs 标签页 | Element Plus

核心思想:tab组件切换时修改reqData中的sortField字段,重新拉取接口列表
src/views/SubCategory/index.vue
<script setup>
// tab切换回调
const tabChange = () => {console.log('tab切换了', reqData.value.sortField)reqData.value.page = 1getGoodList()
}
</script><template><el-tabs v-model="reqData.sortField" @tab-change="tabChange"><el-tab-pane label="最新商品" name="publishTime"></el-tab-pane><el-tab-pane label="最高人气" name="orderNum"></el-tab-pane><el-tab-pane label="评论最多" name="evaluateNum"></el-tab-pane></el-tabs>
</template>
3. 列表无限加载功能实现
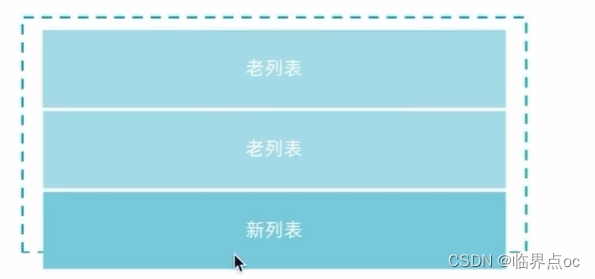
Infinite Scroll 无限滚动 | Element Plus
核心实现逻辑:使用elementPlus提供的 v-infinite-scroll指令 监听是否满足触底条件,满足加载条件时让页面参数加一获取下一页数据,做新老数据拼接渲染。

<script setup>
// 是否禁用
const disabled = ref(false)
// 加载更多
const load = async () => {// 获取下一页的送数据reqData.value.page += 1const res = await getSubCategoryAPI(reqData.value)// 新老数据拼接goodsList.value = [...goodsList.value, ...res.result.items]// 加载完毕 停止监听if (res.result.items.length === 0) {disabled.value = true}
}
</script><divclass="body"v-infinite-scroll="load"infinite-scroll-disabled="disabled"><!-- 商品列表--><GoodsItem v-for="good in goodsList" :key="good.id" :good="good" />
</div>
四、二级分类 - 定制路由scrollBehavior
1. 定制路由行文解决什么问题
接口:RouterScrollBehavior | Vue Router
在不同路由切换到时候,可以自动滚动到页面的顶部,而不是停留在原先的位置。
如何配置:vue-router支持scrollBehavior配置项,可以指定路由切换时的滚动位置
src/router/index.js
import { createRouter, createWebHistory } from 'vue-router'
import Login from '@/views/Login/index.vue'
import Layout from '@/views/Layout/index.vue'
import Home from '@/views/Home/index.vue'
import Category from '@/views/Category/index.vue'
import SubCategory from '@/views/SubCategory/index.vue'const router = createRouter({history: createWebHistory(import.meta.env.BASE_URL),routes: [// ......],// 路由滚动行为定制scrollBehavior() {return {top: 0}}
})export default router
五、详情页 - 整体认识和路由配置
1. 路由配置

①创建详情组件 - src/views/Detail/index.vue
<script setup></script><template><div class="xtx-goods-page"><div class="container"><div class="bread-container"><el-breadcrumb separator=">"><el-breadcrumb-item :to="{ path: '/' }">首页</el-breadcrumb-item><el-breadcrumb-item :to="{ path: '/' }">母婴 </el-breadcrumb-item><el-breadcrumb-item :to="{ path: '/' }">跑步鞋 </el-breadcrumb-item><el-breadcrumb-item>抓绒保暖,毛毛虫子儿童运动鞋</el-breadcrumb-item></el-breadcrumb></div><!-- 商品信息 --><div class="info-container"><div><div class="goods-info"><div class="media"><!-- 图片预览区 --><!-- 统计数量 --><ul class="goods-sales"><li><p>销量人气</p><p>100+</p><p><i class="iconfont icon-task-filling"></i>销量人气</p></li><li><p>商品评价</p><p>200+</p><p><i class="iconfont icon-comment-filling"></i>查看评价</p></li><li><p>收藏人气</p><p>300+</p><p><i class="iconfont icon-favorite-filling"></i>收藏商品</p></li><li><p>品牌信息</p><p>400+</p><p><i class="iconfont icon-dynamic-filling"></i>品牌主页</p></li></ul></div><div class="spec"><!-- 商品信息区 --><p class="g-name">抓绒保暖,毛毛虫儿童鞋</p><p class="g-desc">好穿</p><p class="g-price"><span>200</span><span> 100</span></p><div class="g-service"><dl><dt>促销</dt><dd>12月好物放送,App领券购买直降120元</dd></dl><dl><dt>服务</dt><dd><span>无忧退货</span><span>快速退款</span><span>免费包邮</span><a href="javascript:;">了解详情</a></dd></dl></div><!-- sku组件 --><!-- 数据组件 --><!-- 按钮组件 --><div><el-button size="large" class="btn"> 加入购物车 </el-button></div></div></div><div class="goods-footer"><div class="goods-article"><!-- 商品详情 --><div class="goods-tabs"><nav><a>商品详情</a></nav><div class="goods-detail"><!-- 属性 --><ul class="attrs"><li v-for="item in 3" :key="item.value"><span class="dt">白色</span><span class="dd">纯棉</span></li></ul><!-- 图片 --></div></div></div><!-- 24热榜+专题推荐 --><div class="goods-aside"></div></div></div></div></div></div>
</template><style scoped lang="scss">
.xtx-goods-page {.goods-info {min-height: 600px;background: #fff;display: flex;.media {width: 580px;height: 600px;padding: 30px 50px;}.spec {flex: 1;padding: 30px 30px 30px 0;}}.goods-footer {display: flex;margin-top: 20px;.goods-article {width: 940px;margin-right: 20px;}.goods-aside {width: 280px;min-height: 1000px;}}.goods-tabs {min-height: 600px;background: #fff;}.goods-warn {min-height: 600px;background: #fff;margin-top: 20px;}.number-box {display: flex;align-items: center;.label {width: 60px;color: #999;padding-left: 10px;}}.g-name {font-size: 22px;}.g-desc {color: #999;margin-top: 10px;}.g-price {margin-top: 10px;span {&::before {content: '¥';font-size: 14px;}&:first-child {color: $priceColor;margin-right: 10px;font-size: 22px;}&:last-child {color: #999;text-decoration: line-through;font-size: 16px;}}}.g-service {background: #f5f5f5;width: 500px;padding: 20px 10px 0 10px;margin-top: 10px;dl {padding-bottom: 20px;display: flex;align-items: center;dt {width: 50px;color: #999;}dd {color: #666;&:last-child {span {margin-right: 10px;&::before {content: '•';color: $xtxColor;margin-right: 2px;}}a {color: $xtxColor;}}}}}.goods-sales {display: flex;width: 400px;align-items: center;text-align: center;height: 140px;li {flex: 1;position: relative;~ li::after {position: absolute;top: 10px;left: 0;height: 60px;border-left: 1px solid #e4e4e4;content: '';}p {&:first-child {color: #999;}&:nth-child(2) {color: $priceColor;margin-top: 10px;}&:last-child {color: #666;margin-top: 10px;i {color: $xtxColor;font-size: 14px;margin-right: 2px;}&:hover {color: $xtxColor;cursor: pointer;}}}}}
}.goods-tabs {min-height: 600px;background: #fff;nav {height: 70px;line-height: 70px;display: flex;border-bottom: 1px solid #f5f5f5;a {padding: 0 40px;font-size: 18px;position: relative;> span {color: $priceColor;font-size: 16px;margin-left: 10px;}}}
}.goods-detail {padding: 40px;.attrs {display: flex;flex-wrap: wrap;margin-bottom: 30px;li {display: flex;margin-bottom: 10px;width: 50%;.dt {width: 100px;color: #999;}.dd {flex: 1;color: #666;}}}> img {width: 100%;}
}.btn {margin-top: 20px;
}.bread-container {padding: 25px 0;
}
</style>
②配置路由 - src/router/index.js
import { createRouter, createWebHistory } from 'vue-router'
// ... ...
import Category from '@/views/Category/index.vue'
import SubCategory from '@/views/SubCategory/index.vue'
import Detail from '@/views/Detail/index.vue'const router = createRouter({history: createWebHistory(import.meta.env.BASE_URL),routes: [{path: '/',component: Layout,children: [// ... ... {path: 'category/sub/:id',component: SubCategory},{path: 'detail/:id',component: Detail}]},{path: '/login',component: Login}],// 路由滚动行为定制scrollBehavior() {return {top: 0}}
})export default router
③绑定模板测试跳转 - src/views/Home/components/HomeNew.vue
<RouterLink :to="`/detail/${item.id}`"><img :src="item.picture" alt="" /><p class="name">{{ item.name }}</p><p class="price">¥{{ item.price }}</p>
</RouterLink>六、详情页 - 基础数据渲染

1. 封装接口 - src/apis/detail.js
import instance from '@/utils/http.js'// 获取详情数据
export const getDetail = (id) => {return instance({url: '/goods',params: {id}})
}
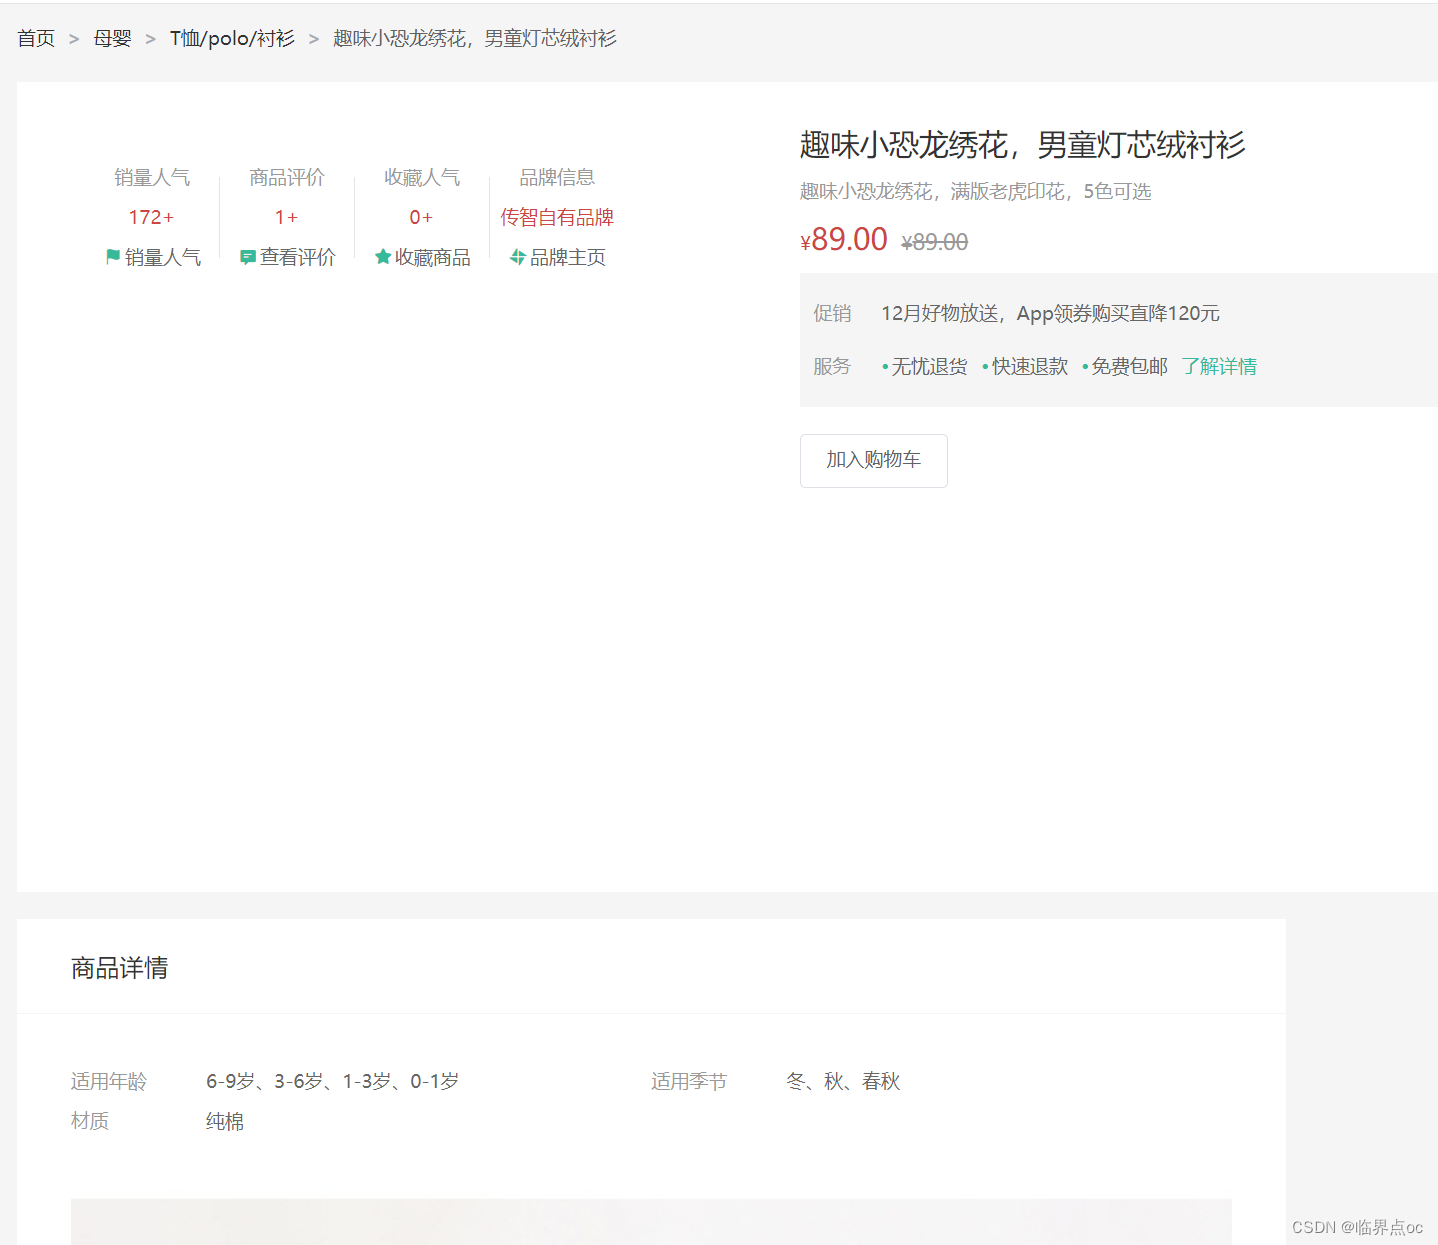
2. 获取数据渲染模板 -src/views/Detail/index.vue
<script setup>
import { getDetail } from '@/apis/detail.js'
import { ref } from 'vue'
import { useRoute } from 'vue-router'const loading = ref(false)const goods = ref({})
const route = useRoute()
const getGoods = async () => {loading.value = trueconst res = await getDetail(route.params.id)goods.value = res.resultconsole.log(goods.value)loading.value = false
}
getGoods()
</script><template><div class="xtx-goods-page" v-loading="loading"><!-- 有数据时才渲染 --><div class="container" v-if="goods.details"><div class="bread-container"><el-breadcrumb separator=">"><el-breadcrumb-item :to="{ path: '/' }">首页</el-breadcrumb-item><el-breadcrumb-item:to="{ path: `/category/${goods.categories[1].id}` }">{{ goods.categories[1].name }}</el-breadcrumb-item><!-- 可选链写法:只有前面的有值才继续访问后面的 --><!-- <el-breadcrumb-item:to="{ path: `/category/${goods.categories?.[1].id}` }">{{ goods.categories?.[1].name }}</el-breadcrumb-item> --><el-breadcrumb-item:to="{ path: `/category/sub/${goods.categories[0].id}` }">{{ goods.categories[0].name }}</el-breadcrumb-item><el-breadcrumb-item>{{ goods.name }}</el-breadcrumb-item></el-breadcrumb></div><!-- 商品信息 --><div class="info-container"><div><div class="goods-info"><div class="media"><!-- 图片预览区 --><!-- 统计数量 --><ul class="goods-sales"><li><p>销量人气</p><p>{{ goods.salesCount }}+</p><p><i class="iconfont icon-task-filling"></i>销量人气</p></li><li><p>商品评价</p><p>{{ goods.commentCount }}+</p><p><i class="iconfont icon-comment-filling"></i>查看评价</p></li><li><p>收藏人气</p><p>{{ goods.collectCount }}+</p><p><i class="iconfont icon-favorite-filling"></i>收藏商品</p></li><li><p>品牌信息</p><p>{{ goods.brand.name }}</p><p><i class="iconfont icon-dynamic-filling"></i>品牌主页</p></li></ul></div><div class="spec"><!-- 商品信息区 --><p class="g-name">{{ goods.name }}</p><p class="g-desc">{{ goods.desc }}</p><p class="g-price"><span>{{ goods.price }}</span><span>{{ goods.oldPrice }}</span></p><div class="g-service"><dl><dt>促销</dt><dd>12月好物放送,App领券购买直降120元</dd></dl><dl><dt>服务</dt><dd><span>无忧退货</span><span>快速退款</span><span>免费包邮</span><a href="javascript:;">了解详情</a></dd></dl></div><!-- sku组件 --><!-- 数据组件 --><!-- 按钮组件 --><div><el-button size="large" class="btn"> 加入购物车 </el-button></div></div></div><div class="goods-footer"><div class="goods-article"><!-- 商品详情 --><div class="goods-tabs"><nav><a>商品详情</a></nav><div class="goods-detail"><!-- 属性 --><ul class="attrs"><liv-for="item in goods.details.properties":key="item.value"><span class="dt">{{ item.name }}</span><span class="dd">{{ item.value }}</span></li></ul><!-- 图片 --><imgv-for="img in goods.details.pictures":key="img"v-img-lazy="img":src="img"alt=""/></div></div></div><!-- 24热榜+专题推荐 --><div class="goods-aside"></div></div></div></div></div></div>
</template><style scoped lang="scss">
// ... ...
</style>

七、详情页 - 热榜区域实现
1. 模块实现整体分析

结论:两块热榜相比,结构一致,标题title和列表内容不同

①封装接口 - src/apis/detail.js
/*** 获取热榜商品* @param {Number} id - 商品id* @param {Number} type - 1代表24小时热销榜 2代表周热销榜* @param {Number} limit - 获取个数*/
export const getHotGoodsAPI = ({ id, type, limit = 3 }) => {return instance({url: '/goods/hot',params: {id,type,limit}})
}
②获取基础数据渲染模板 - src/views/Detail/components/DetailHot.vue
<script setup>
// 以24小时热榜获取数据渲染模板
// 1. 封装接口
// 2. 调用接口渲染模板
import { ref, computed } from 'vue'
import { useRoute } from 'vue-router'
import { getHotGoodsAPI } from '@/apis/detail.js'// 设计props参数 适配不同的title和数据
const props = defineProps({type: {type: Number,default: 1}
})const titleMap = {1: '24小时热榜',2: '周热榜'
}
const title = computed(() => titleMap[props.type])const goodList = ref([])
const route = useRoute()
const getHotList = async () => {const res = await getHotGoodsAPI({id: route.params.id,type: props.type})goodList.value = res.result
}
getHotList()
</script><template><div class="goods-hot"><h3>{{ title }}</h3><!-- 商品区块 --><RouterLink:to="`/detail/${item.id}`"class="goods-item"v-for="item in goodList":key="item.id"><img :src="item.picture" alt="" /><p class="name ellipsis">{{ item.name }}</p><p class="desc ellipsis">{{ item.desc }}</p><p class="price">¥{{ item.price }}</p></RouterLink></div>
</template><style scoped lang="scss">
.goods-hot {h3 {height: 70px;background: $helpColor;color: #fff;font-size: 18px;line-height: 70px;padding-left: 25px;margin-bottom: 10px;font-weight: normal;}.goods-item {display: block;padding: 20px 30px;text-align: center;background: #fff;img {width: 160px;height: 160px;}p {padding-top: 10px;}.name {font-size: 16px;}.desc {color: #999;height: 29px;}.price {color: $priceColor;font-size: 20px;}}
}
</style>
③src/views/Detail/index.vue
import DetailHot from './components/DetailHot.vue'<!-- 24热榜+专题推荐 --><div class="goods-aside"><!-- 24小时榜单 --><DetailHot :type="1"></DetailHot><!-- 周日榜单 -->DetailHot :type="2"></DetailHot>
</div>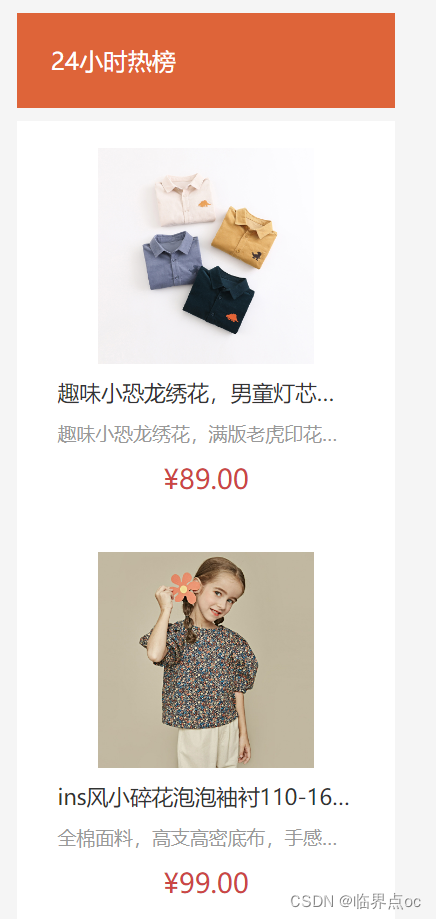
八、详情页 - 图片预览组件封装
1. 组件功能分析

2. 通关小图切换大图实现
思路:维护一个数组图片列表,鼠标划入小图记录当前小图标的下标值,通过下标值在数组中取对应图片,显示到大图位置。

src/components/ImageView/index.vue
<script setup>
import { ref } from 'vue'// 图片列表
const imageList = ['https://yanxuan-item.nosdn.127.net/d917c92e663c5ed0bb577c7ded73e4ec.png','https://yanxuan-item.nosdn.127.net/e801b9572f0b0c02a52952b01adab967.jpg','https://yanxuan-item.nosdn.127.net/b52c447ad472d51adbdde1a83f550ac2.jpg','https://yanxuan-item.nosdn.127.net/f93243224dc37674dfca5874fe089c60.jpg','https://yanxuan-item.nosdn.127.net/f881cfe7de9a576aaeea6ee0d1d24823.jpg'
]// 1. 小图切换大图显示
const activeIndex = ref(0)
const enterHandler = (index) => {activeIndex.value = index//   console.log(activeIndex.value)
}
</script><template><div class="goods-image"><!-- 左侧大图--><div class="middle" ref="target"><img :src="imageList[activeIndex]" alt="" /><!-- 蒙层小滑块 --><div class="layer" :style="{ left: `0px`, top: `0px` }"></div></div><!-- 小图列表 --><ul class="small"><liv-for="(img, i) in imageList":key="i"@mouseenter="enterHandler(i)":class="{ active: i === activeIndex }"><img :src="img" alt="" /></li></ul><!-- 放大镜大图 --><divclass="large":style="[{backgroundImage: `url(${imageList[0]})`,backgroundPositionX: `0px`,backgroundPositionY: `0px`}]"v-show="false"></div></div>
</template><style scoped lang="scss">
.goods-image {width: 480px;height: 400px;position: relative;display: flex;.middle {width: 400px;height: 400px;background: #f5f5f5;}.large {position: absolute;top: 0;left: 412px;width: 400px;height: 400px;z-index: 500;box-shadow: 0 0 10px rgba(0, 0, 0, 0.1);background-repeat: no-repeat;// 背景图:盒子的大小 = 2:1  将来控制背景图的移动来实现放大的效果查看 background-positionbackground-size: 800px 800px;background-color: #f8f8f8;}.layer {width: 200px;height: 200px;background: rgba(0, 0, 0, 0.2);// 绝对定位 然后跟随咱们鼠标控制left和top属性就可以让滑块移动起来left: 0;top: 0;position: absolute;}.small {width: 80px;li {width: 68px;height: 68px;margin-left: 12px;margin-bottom: 15px;cursor: pointer;&:hover,&.active {border: 2px solid $xtxColor;}}}
}
</style>
3. 放大镜效果实现
功能拆解:
- ①左侧滑块跟随鼠标移动
- ②右侧大图放大效果实现
- ③鼠标移入控制滑块和大图显示隐藏
①滑块跟随鼠标移动
思路:获取到当前的鼠标在盒子内的相对位置(useMouseInElement),控制滑块跟随鼠标移动(left/top)
useMouseInElement | VueUse

1. 有效移动范围内的计算逻辑
- 横向:100 < elementX < 300, left = elementX - 小滑块宽度一半
- 纵向:100 < elementY < 300, top = elementY - 小滑块高度一半
2. 边界距离控制
- 横向:elementY > 300 -> left = 200, elementX < 100 -> left = 0
- 纵向:elementY > 300 -> top = 200, elementY < 100 -> top = 0
②大图放大效果实现
效果:为实现放大效果,大图的宽度是小图的两倍
思路:大图的移动方向和滑块移动方向相反,且数值为2倍
③鼠标移入控制滑块和大图显示隐藏
思路:鼠标移入盒子(isOutsize),滑块和大图才显示(v-show)
src/components/ImageView/index.vue
<script setup>
import { ref, watch } from 'vue'
import { useMouseInElement } from '@vueuse/core'// 图片列表
const imageList = ['https://yanxuan-item.nosdn.127.net/d917c92e663c5ed0bb577c7ded73e4ec.png','https://yanxuan-item.nosdn.127.net/e801b9572f0b0c02a52952b01adab967.jpg','https://yanxuan-item.nosdn.127.net/b52c447ad472d51adbdde1a83f550ac2.jpg','https://yanxuan-item.nosdn.127.net/f93243224dc37674dfca5874fe089c60.jpg','https://yanxuan-item.nosdn.127.net/f881cfe7de9a576aaeea6ee0d1d24823.jpg'
]// 1. 小图切换大图显示
const activeIndex = ref(0)
const enterHandler = (index) => {activeIndex.value = index//   console.log(activeIndex.value)
}// 2. 获取鼠标相对位置
const target = ref(null)
const { elementX, elementY, isOutside } = useMouseInElement(target)// 3. 控制滑块跟随鼠标移动(监听elementX/Y变化,一旦变化,重新设置left/top)
const left = ref(0)
const top = ref(0)
const positionX = ref(0)
const positionY = ref(0)
watch([elementX, elementY, isOutside], () => {// 鼠标不在盒子边界内,直接不执行后面的逻辑if (isOutside.value) return// 有效范围内控制滑块距离// 横向if (elementX.value > 100 && elementX.value < 300) {left.value = elementX.value - 100}// 纵向if (elementY.value > 100 && elementY.value < 300) {top.value = elementY.value - 100}// 处理边界// 横向if (elementX.value > 300) {left.value = 200}if (elementX.value < 100) {left.value = 0}// 纵向if (elementY.value > 3000) {top.value = 200}if (elementY.value < 100) {top.value = 0}// 控制大图的显示positionX.value = -left.value * 2positionY.value = -top.value * 2
})
</script><template><!-- {{ elementX }} {{ elementY }} {{ isOutside }} --><div class="goods-image"><!-- 左侧大图--><div class="middle" ref="target"><img :src="imageList[activeIndex]" alt="" /><!-- 蒙层小滑块 --><divclass="layer"v-show="!isOutside":style="{ left: `${left}px`, top: `${top}px` }"></div></div><!-- 小图列表 --><ul class="small"><liv-for="(img, i) in imageList":key="i"@mouseenter="enterHandler(i)":class="{ active: i === activeIndex }"><img :src="img" alt="" /></li></ul><!-- 放大镜大图 --><divclass="large":style="[{backgroundImage: `url(${imageList[activeIndex]})`,backgroundPositionX: `${positionX}px`,backgroundPositionY: `${positionY}px`}]"v-show="!isOutside"></div></div>
</template><style scoped lang="scss">
.goods-image {width: 480px;height: 400px;position: relative;display: flex;.middle {width: 400px;height: 400px;background: #f5f5f5;}.large {position: absolute;top: 0;left: 412px;width: 400px;height: 400px;z-index: 500;box-shadow: 0 0 10px rgba(0, 0, 0, 0.1);background-repeat: no-repeat;// 背景图:盒子的大小 = 2:1  将来控制背景图的移动来实现放大的效果查看 background-positionbackground-size: 800px 800px;background-color: #f8f8f8;}.layer {width: 200px;height: 200px;background: rgba(0, 0, 0, 0.2);// 绝对定位 然后跟随咱们鼠标控制left和top属性就可以让滑块移动起来left: 0;top: 0;position: absolute;}.small {width: 80px;li {width: 68px;height: 68px;margin-left: 12px;margin-bottom: 15px;cursor: pointer;&:hover,&.active {border: 2px solid $xtxColor;}}}
}
</style>
src/views/Detail/index.vue
import ImageView from '@/components/ImageView/index.vue'
<div class="media"><!-- 图片预览区 --><ImageView></ImageView><!-- 统计数量 --><!-- ...... -->
</div>
4. 组件props适配
组件中的图片列表不能写死,需要通关props参数把接口数据传入
src/components/ImageView/index.vue
// props适配图片列表
defineProps({imageList: {type: Array,default: () => []}
})// 图片列表
/* const imageList = ['https://yanxuan-item.nosdn.127.net/d917c92e663c5ed0bb577c7ded73e4ec.png','https://yanxuan-item.nosdn.127.net/e801b9572f0b0c02a52952b01adab967.jpg','https://yanxuan-item.nosdn.127.net/b52c447ad472d51adbdde1a83f550ac2.jpg','https://yanxuan-item.nosdn.127.net/f93243224dc37674dfca5874fe089c60.jpg','https://yanxuan-item.nosdn.127.net/f881cfe7de9a576aaeea6ee0d1d24823.jpg'
] */
src/views/Detail/index.vue
<div class="media"><!-- 图片预览区 --><ImageView :imageList="goods.mainPictures"></ImageView><!-- 统计数量 --><!-- ... ... -->
</div>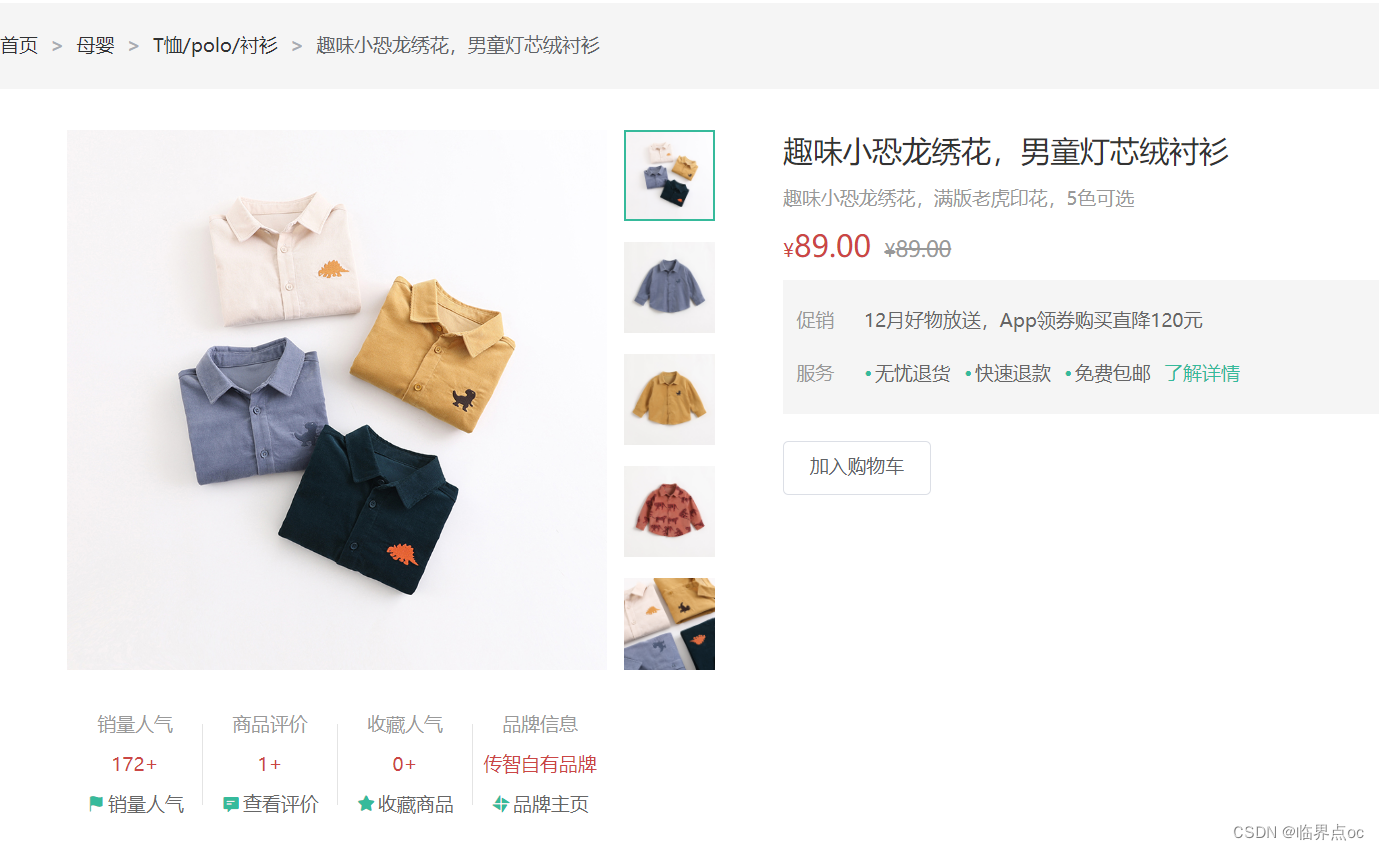
5. 总结
1. 封装复杂交互组件的通用思路

2. 图片预览组件的封装逻辑

九、详情页 - 认识SKU组件
1. SKU的概念
存货单位(stock keeping unit),也翻译为库存单元,是一个会计学名词,定义为库存管理中的最小可用单元,例如纺织品中一个SKU通常表示规格、颜色、款式,而在连锁零售门店中有时称单品为一个SKU。
SKU组件的作用:产出当前用户选择的商品规格,为加入购物车操作提供数据信息
2. SKU组件使用
问:在实际工作中,经常会遇到别人写好的组件,熟悉一个三方组件,首先重点看什么?
答:props和emit,props决定了当前组件接收什么数据,emit决定了会产出什么数据。
验证组件是否成功使用:

①src/components/XtxSku/index.vue
<template><div class="goods-sku"><dl v-for="item in goods.specs" :key="item.id"><dt>{{ item.name }}</dt><dd><template v-for="val in item.values" :key="val.name"><img:class="{ selected: val.selected, disabled: val.disabled }"@click="clickSpecs(item, val)"v-if="val.picture":src="val.picture"/><span:class="{ selected: val.selected, disabled: val.disabled }"@click="clickSpecs(item, val)"v-else>{{ val.name }}</span></template></dd></dl></div>
</template><script>
import { watchEffect } from 'vue'
import getPowerSet from './power-set'
const spliter = '★'
// 根据skus数据得到路径字典对象
const getPathMap = (skus) => {const pathMap = {}if (skus && skus.length > 0) {skus.forEach((sku) => {// 1. 过滤出有库存有效的skuif (sku.inventory) {// 2. 得到sku属性值数组const specs = sku.specs.map((spec) => spec.valueName)// 3. 得到sku属性值数组的子集const powerSet = getPowerSet(specs)// 4. 设置给路径字典对象powerSet.forEach((set) => {const key = set.join(spliter)// 如果没有就先初始化一个空数组if (!pathMap[key]) {pathMap[key] = []}pathMap[key].push(sku.id)})}})}return pathMap
}// 初始化禁用状态
function initDisabledStatus(specs, pathMap) {if (specs && specs.length > 0) {specs.forEach((spec) => {spec.values.forEach((val) => {// 设置禁用状态val.disabled = !pathMap[val.name]})})}
}// 得到当前选中规格集合
const getSelectedArr = (specs) => {const selectedArr = []specs.forEach((spec, index) => {const selectedVal = spec.values.find((val) => val.selected)if (selectedVal) {selectedArr[index] = selectedVal.name} else {selectedArr[index] = undefined}})return selectedArr
}// 更新按钮的禁用状态
const updateDisabledStatus = (specs, pathMap) => {// 遍历每一种规格specs.forEach((item, i) => {// 拿到当前选择的项目const selectedArr = getSelectedArr(specs)// 遍历每一个按钮item.values.forEach((val) => {if (!val.selected) {selectedArr[i] = val.name// 去掉undefined之后组合成keyconst key = selectedArr.filter((value) => value).join(spliter)val.disabled = !pathMap[key]}})})
}export default {name: 'XtxGoodSku',props: {// specs:所有的规格信息  skus:所有的sku组合goods: {type: Object,default: () => ({ specs: [], skus: [] })}},emits: ['change'],setup(props, { emit }) {let pathMap = {}watchEffect(() => {// 得到所有字典集合pathMap = getPathMap(props.goods.skus)// 组件初始化的时候更新禁用状态initDisabledStatus(props.goods.specs, pathMap)})const clickSpecs = (item, val) => {if (val.disabled) return false// 选中与取消选中逻辑if (val.selected) {val.selected = false} else {item.values.forEach((bv) => {bv.selected = false})val.selected = true}// 点击之后再次更新选中状态updateDisabledStatus(props.goods.specs, pathMap)// 把选择的sku信息传出去给父组件// 触发change事件将sku数据传递出去const selectedArr = getSelectedArr(props.goods.specs).filter((value) => value)// 如果选中得规格数量和传入得规格总数相等则传出完整信息(都选择了)// 否则传出空对象if (selectedArr.length === props.goods.specs.length) {// 从路径字典中得到skuIdconst skuId = pathMap[selectedArr.join(spliter)][0]const sku = props.goods.skus.find((sku) => sku.id === skuId)// 传递数据给父组件emit('change', {skuId: sku.id,price: sku.price,oldPrice: sku.oldPrice,inventory: sku.inventory,specsText: sku.specs.reduce((p, n) => `${p} ${n.name}:${n.valueName}`, '').trim()})} else {emit('change', {})}}return { clickSpecs }}
}
</script><style scoped lang="scss">
@mixin sku-state-mixin {border: 1px solid #e4e4e4;margin-right: 10px;cursor: pointer;&.selected {border-color: $xtxColor;}&.disabled {opacity: 0.6;border-style: dashed;cursor: not-allowed;}
}.goods-sku {padding-left: 10px;padding-top: 20px;dl {display: flex;padding-bottom: 20px;align-items: center;dt {width: 50px;color: #999;}dd {flex: 1;color: #666;> img {width: 50px;height: 50px;margin-bottom: 4px;@include sku-state-mixin;}> span {display: inline-block;height: 30px;line-height: 28px;padding: 0 20px;margin-bottom: 4px;@include sku-state-mixin;}}}
}
</style>
src/components/XtxSku/power-set.js
export default function bwPowerSet(originalSet) {const subSets = []// We will have 2^n possible combinations (where n is a length of original set).// It is because for every element of original set we will decide whether to include// it or not (2 options for each set element).const numberOfCombinations = 2 ** originalSet.length// Each number in binary representation in a range from 0 to 2^n does exactly what we need:// it shows by its bits (0 or 1) whether to include related element from the set or not.// For example, for the set {1, 2, 3} the binary number of 0b010 would mean that we need to// include only "2" to the current set.for (let combinationIndex = 0;combinationIndex < numberOfCombinations;combinationIndex += 1) {const subSet = []for (let setElementIndex = 0;setElementIndex < originalSet.length;setElementIndex += 1) {// Decide whether we need to include current element into the subset or not.if (combinationIndex & (1 << setElementIndex)) {subSet.push(originalSet[setElementIndex])}}// Add current subset to the list of all subsets.subSets.push(subSet)}return subSets
}
②src/views/Detail/index.vue
<script setup>
// sku规格被操作时
const skuChange = (sku) => {console.log(sku)
}
</script><template>
<!-- sku组件 -->
<XtxSku :goods="goods" @change="skuChange"></XtxSku>
</template>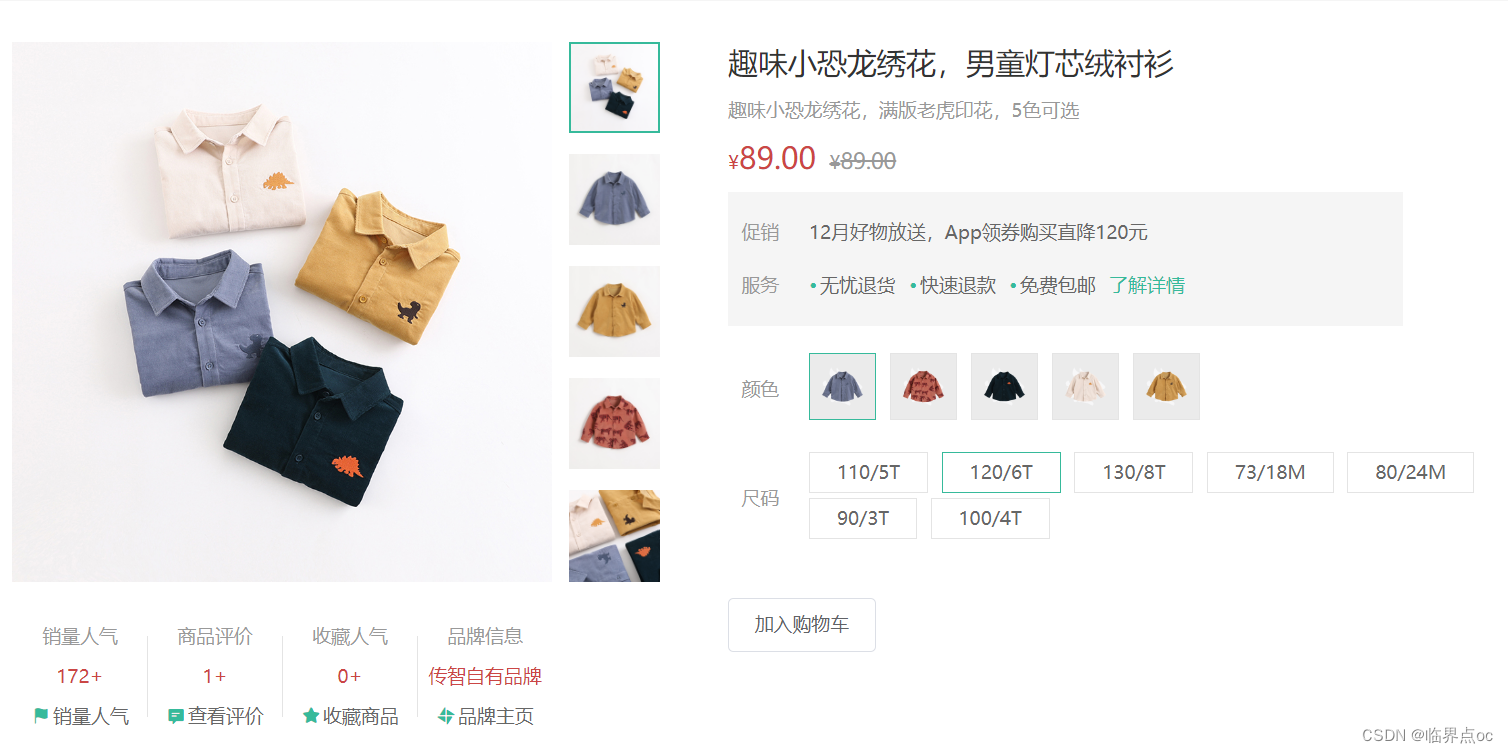
十、详情页 - 通用组件统一注册全局
1. 为什么要优化
背景:components目录下有可能还会有很多其他通用型组件,有可能在多个业务模块中共享,所有统一进行全局组件注册比较好。
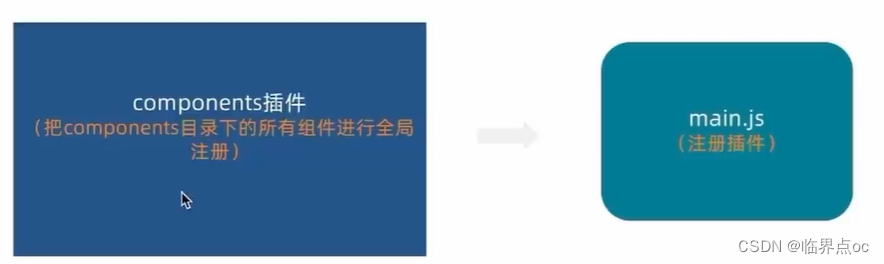
①src/components/index.js
// 把components中的所有组件进行全局化注册
// 通过插件的方式
import ImageView from './ImageView/index.vue'
import Sku from './XtxSku/index.vue'export const componentPlugin = {install(app) {// app.component('组件名字', 组件配置对象)app.component('XtxImageView', ImageView)app.component('XtxSku', Sku)}
}
②main.js
import { createApp } from 'vue'
import { createPinia } from 'pinia'import App from './App.vue'
import router from './router'
// 引入初始化样式文件
import '@/styles/common.scss'
// 引入懒加载指令插件并注册
import { lazyPlugin } from '@/direactives'
// 引入全局组件插件
import { componentPlugin } from '@/components/index.js'const app = createApp(App)app.use(createPinia())
app.use(router)
app.use(lazyPlugin)
app.use(componentPlugin)app.mount('#app')
③src/views/Detail/index.vue - 修改
// import ImageView from '@/components/ImageView/index.vue'
// import XtxSku from '@/components/XtxSku/index.vue'<!-- 图片预览区 -->
<XtxImageView :imageList="goods.mainPictures"></XtxImageView>
<!-- sku组件 -->
<XtxSku :goods="goods" @change="skuChange"></XtxSku>
相关文章:
前端Vue小兔鲜儿电商项目实战Day04
一、二级分类 - 整体认识和路由配置 1. 配置二级路由 ①准备组件模板 - src/views/SubCategory/index.vue <script setup></script><template><div class"container"><!-- 面包屑 --><div class"bread-container">…...

TypeScript的简单总结
TypeScript 深度总结 引言 TypeScript,作为JavaScript的一个强类型超集,由Microsoft在2012年推出并维护至今,它不仅继承了JavaScript的所有特性,还引入了静态类型系统和其他现代编程特性,为开发者提供了一个更安全、…...

I.MX6ULL UART 串口通信实验
系列文章目录 I.MX6ULL UART 串口通信实验 I.MX6ULL UART 串口通信实验 系列文章目录一、前言二、I.MX6U 串口简介2.1 UART 简介2.2 I.MX6U UART 简介 三、硬件原理分析四、实验程序编写五、编译下载验证5.1编写 Makefile 和链接脚本5.2 编译下载 一、前言 不管是单片机开发还…...

systemctlm-cosim-demo项目分析
概述 systemctlm-cosim-demo项目是Xilinx的systemc库的demo工程。 环境安装 qemu安装 cd xilinx_proj/Downloads git clone https://github.com/Xilinx/qemu.git cd qemu git checkout 74d70f8008# Configure and build # zynq7000 # ./configure --target-list"arm-s…...
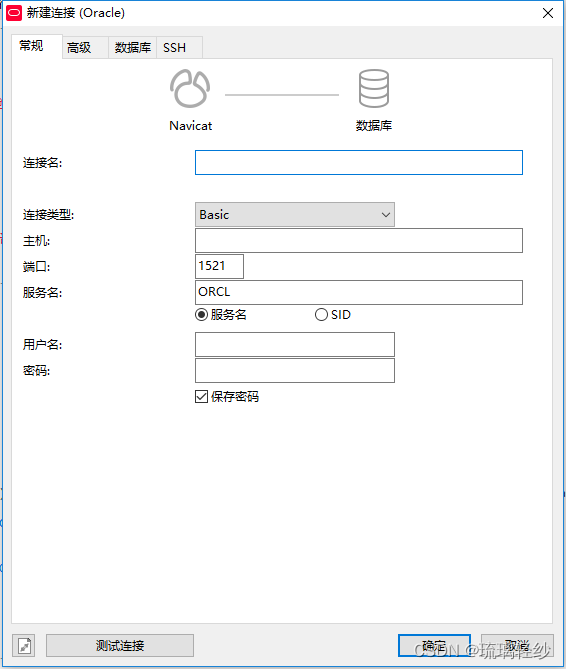
SQL学习小记(四)Navicat中连接Oracle数据库的详细步骤
五分钟解决Oracle连接问题:DPI-1047: Cannot locate a 64-bit Oracle Client library: “The specified module could not be SQL学习小记(四)Navicat中连接Oracle 1. 错误信息2. 解决过程2.1.版本查询2.2. 官网下载2.3. 设置Navicat的oci环…...

mysql聚簇索引
1.聚簇索引是物理索引,数据在表里是按顺序存储的,物理上是连续的,一般选主键id作为聚簇索引,且一张表里只能有一个聚簇索引。 2.只有InnoDB支持聚簇索引。 3.非聚簇索引是逻辑索引,将数据的某个字段抽取出来组成独立的…...

【云原生】Kubernetes----PersistentVolume(PV)与PersistentVolumeClaim(PVC)详解
目录 引言 一、存储卷 (一)存储卷定义 (二)存储卷的作用 1.数据持久化 2.数据共享 3.解耦 4.灵活性 (三)存储卷的分类 1.emptyDir存储卷 1.1 定义 1.2 特点 1.3 示例 2.hostPath存储卷 2.1 …...

Adobe Premiere 专业视频编辑软件资源下载安装!pr 2024最新版软件分享
Adobe Premiere,作为一款非线性视频编辑软件,它打破了传统线性编辑的限制,为用户提供了更加灵活和自由的创作空间。 在电影制作领域,Adobe Premiere的出色表现赢得了众多导演和剪辑师的青睐。其强大的编辑功能使得影片的剪辑过程更…...

c++------类和对象(下)包含了this指针、构造函数、析构函数、拷贝构造等
文章目录 前言一、this指针1.1、this指针的引出1.2、 this指针的特性 二、类的默认的六个构造函数2.1、构造函数简述2.2构造函数 三、析构函数3.1、析构函数引出3.2、特点: 四、拷贝构造4.1、引入4.2、特征:4.3、默认拷贝构造函数 总结 前言 在本节中&a…...

git版本控制工具常用命令
一、本地仓库管理 push 向远程推送代码 pulll 拉取代码 二、远程仓库管理 三、分支操作 本地主分支master 远程主分支main head指向当前分支 查看:git branch 创建分支: git branch 名字 切换分支:git checkout 名字 合并分支:git…...
展示广告多模态召回模型:混合模态专家模型
✍🏻 本文作者:俊广、卓立、凌潼、青萤 1. 背景 随着在搜索、推荐、广告技术上多年的迭代积累,业界逐步形成了召回(匹配)、粗排、精排这一多阶段的系统架构。其中,召回作为链路的最前端,决定了业…...

好的一些网安资源
镜像:https://msdn.itellyou.cn/ 编程学习{ 菜鸟教程:https://www.runoob.com/ w3school:https://www.w3school.com.cn/ https://www.dotcpp.com/ http://zh.cppreference.com/ https://beginnersbook.com/ https://www.ai8py.com/ }…...

Linux chmod 命令
Linux chmod 命令 在 Linux 操作系统中,chmod 命令是非常重要的。它可以用于修改文件和目录的访问权限,以及控制用户对系统资源的访问。在这篇博客中,我们将深入探讨 chmod 命令的使用方法,以及如何使用它来管理文件和目录的访问…...

SDL教程(二)——Qt+SDL播放器
前言 这篇文章主要是使用SDL来打开视频,显示视频。后续会再继续使用SDL来结合FFmpeg。来能够直接使用网上的demo进行学习。 正文 一、环境 Qt 5.15.2 MSVC2019 64bit Win11 二、Qt搭建SDL Qt搭建,我觉得相比用VS2019来说,更为方便&…...
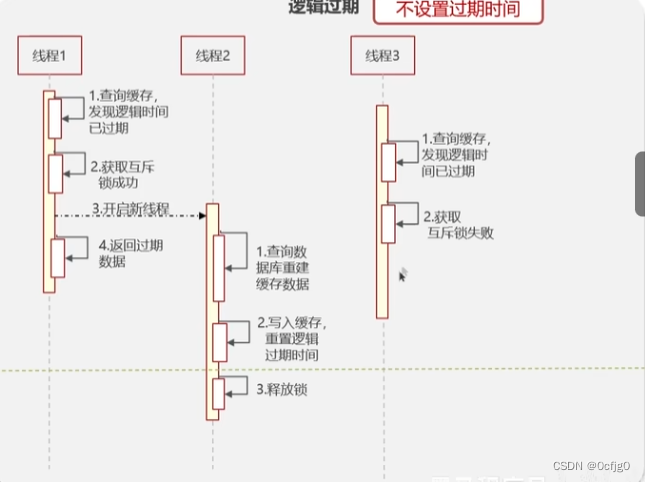
Java面试题:解决Redis缓存击穿问题
缓存击穿 当一个key过期时,需要对这个key进行数据重建 在重建的时间内如果有大量的并发请求进入,就会绕过缓存进入数据库,会瞬间击垮DB 重建时间可能因为数据是多个表的混合结果需要分头统计而延长,从而更容易出现缓存击穿问题 缓存击穿的解决方案 添加互斥锁 先查询缓存…...
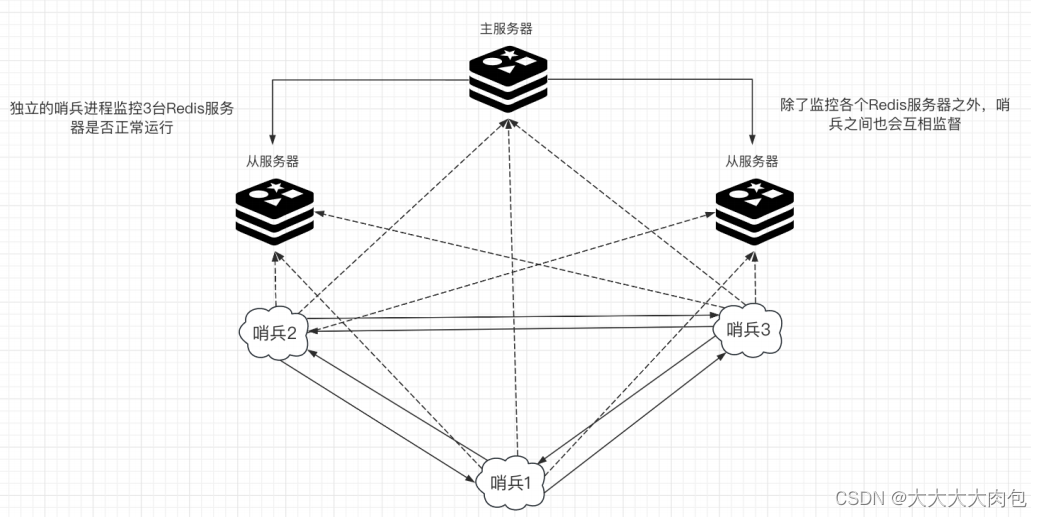
Redis的哨兵模式
什么是哨兵模式 Redis的哨兵模式( Sentinel mode )是⼀个⾼可⽤解决⽅案,当运⾏多个 Redis 实例并且需要⾃动故障转移时,哨兵模式⾮常有⽤。 在⼀个典型的哨兵模式下,⾄少需要3 个哨兵实例来避免 “ 脑裂 ” ÿ…...
Hadoop伪分布式安装教程
Hadoop伪分布式安装教程 一、安装背景1.1 软件列表1.2 系统软件列表 二、安装Hadoop2.1 安装 Java 环境2.1.1 前期准备2.1.2 文件传输2.1.3 解压文件2.1.4 配置 jdk 的环境变量2.1.5 输入 java、javac、java -version 命令检验 jdk 是否安装成功 2.2 Hadoop 下载地址[hadoop](h…...
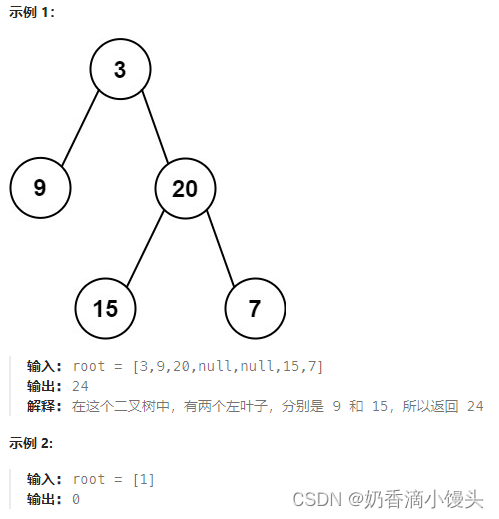
Day43 代码随想录打卡|二叉树篇---左叶子之和
题目(leecode T404): 给定二叉树的根节点 root ,返回所有左叶子之和。 方法: 迭代法:计算所有的左叶子节点,那我们就必然要找到所有的左叶子节点。那么怎么找呢?如何针对cur->l…...

微信小程序动画
微信小程序动画属性:提升用户体验的利器 引言 随着移动互联网技术的快速发展,微信小程序已经成为开发者和用户的热门选择。其轻便、快捷、即用即走的特点使得它在各种场景中都有广泛的应用。而动画作为一种重要的视觉元素,在增强用户体验方…...

js, ellipsis属性, 超出宽度自动省略... , 并且显示2行
overflow:hidden; display:-webkit-box; -webkit-line-clamp:2; -webkit-box-orient:vertical; text-overflow:ellipsis;...

Nunchaku-flux-1-dev图像生成实战:Python爬虫数据驱动创意灵感
Nunchaku-flux-1-dev图像生成实战:Python爬虫数据驱动创意灵感 你是不是也遇到过这样的创作瓶颈?想用AI生成一些独特风格的图片,但脑子里空荡荡的,想不出好的描述词,或者翻来覆去总是那几个风格。自己手动收集灵感又太…...

别再为Cesium加载百度地图偏移发愁了!手把手教你用gcoord库搞定BD09与WGS84坐标系转换
Cesium与百度地图集成:坐标系转换的终极解决方案 当你在Cesium项目中尝试加载百度地图时,是否遇到过地图显示位置偏移的问题?这种偏移并非代码错误,而是源于百度地图采用的BD09坐标系与Cesium使用的WGS84坐标系之间的差异。本文将…...

打开软件弹出jscript.dll丢失如何修复? 分享免费解决方法
在使用电脑系统时经常会出现丢失找不到某些文件的情况,由于很多常用软件都是采用 Microsoft Visual Studio 编写的,所以这类软件的运行需要依赖微软Visual C运行库,比如像 QQ、迅雷、Adobe 软件等等,如果没有安装VC运行库或者安装…...

【5G核心网】free5GC UE上下文释放流程源码解析
1. free5GC UE上下文释放流程概述 在5G核心网架构中,UE上下文释放是一个关键流程,它直接影响着网络资源的利用效率和用户体验。free5GC作为开源的5G核心网实现,其UE上下文释放流程遵循3GPP标准规范,但在具体实现上有其独特之处。这…...
)
GD32 Embedded Builder实战:从零开始配置GD32VW553的GPIO(含FreeRTOS适配指南)
GD32VW553 GPIO深度开发实战:FreeRTOS环境下的高效外设控制 引言 在嵌入式开发领域,GD32系列微控制器凭借其出色的性价比和丰富的生态资源,正逐渐成为工程师们的新宠。作为GD32家族中的无线连接明星产品,GD32VW553集成了蓝牙和Wi-…...

unrpa工具全方位使用指南:从入门到精通
unrpa工具全方位使用指南:从入门到精通 【免费下载链接】unrpa A program to extract files from the RPA archive format. 项目地址: https://gitcode.com/gh_mirrors/un/unrpa 一、认知:揭开unrpa的神秘面纱 工具定位与核心价值 unrpa是一款专…...

CHORD-X视觉战术指挥系统数据库课程设计参考:战术信息管理系统
CHORD-X视觉战术指挥系统数据库课程设计参考:战术信息管理系统 1. 项目背景与目标 如果你正在为数据库课程设计寻找一个既有技术深度又有实际应用价值的项目,那么这个基于“CHORD-X视觉战术指挥系统”的战术信息管理系统,或许能给你带来不少…...

从TSP到CVRP:用经典聚类+量子路由破解物流容量限制难题
量子计算与经典算法融合:破解物流路径优化中的容量约束挑战 当物流企业面对每天数千个配送点的路径规划时,传统算法往往在计算时间和解决方案质量之间陷入两难。这种被称为"容量约束车辆路径问题"(CVRP)的挑战,已经成为制约现代物流…...

当信号遇见MATLAB:手把手玩转采样与重建的魔法
MATLAB滤波器 信号与系统 sa函数信号采样与重建 基于MATLAB的设计抽样信号采样与重建。 (供学习交流)带源码,带注释。 6500字信号采样:从连续到离散的魔术 实验室的示波器屏幕上跳动着优美的正弦曲线,窗外的蝉鸣声忽…...

交稿前一晚!AI论文工具 千笔·专业学术智能体 VS Checkjie,全流程写作神器!
毕业论文写作,是每一位学生必须面对的“硬仗”,从选题到答辩PPT,每一个环节都可能成为压垮人的最后一根稻草。尤其是在交稿前一晚,时间紧迫、思路混乱、格式错误、查重不通过……种种问题接踵而至,让人焦头烂额。面对这…...