OpenGL-ES 学习(6)---- Ubuntu OES 环境搭建
OpenGL-ES Ubuntu 环境搭建
此的方法在 ubuntu 和 deepin 上验证都可以成功搭建
目录
- OpenGL-ES Ubuntu 环境搭建
- 软件包安装
- 第一个三角形
- 基于 glfw 实现
- 基于 X11 实现
软件包安装
sudo apt install libx11-dev
sudo apt install libglfw3 libglfw3-dev
sudo apt-get install libgles2-mesa
sudo apt-get install libgles2-mesa-dev
检查环境是否安装成功:
/usr/include 下是否有 EGL GL GLES2 GLES3 的目录
Note: 上面的环境中同时安装了 x11 和 glfw,实际上只需要安装一个自己需要的即可, x11 和 glfw 都是为 OES 环境对接到窗口系统中,
个人觉得 x11 的API 对 egl 的封装比较标准话一些,可以用于学习 egl 的api
第一个三角形
基于 glfw 实现
#include <stdio.h>
#include <time.h>
#include <GLES2/gl2.h>
#include <GLFW/glfw3.h>// Vertex Shader source code
// Vertex Shader source code
const GLchar* vertexSource ="#version 300 es\n""layout(location = 0) in vec4 position;\n""void main() {\n"" gl_Position = position;\n""}\n";// Fragment Shader source code
const GLchar* fragmentSource ="#version 300 es\n""precision mediump float;\n""out vec4 fragColor;\n""void main() {\n"" fragColor = vec4(1.0, 0.0, 0.0, 1.0);\n""}\n";int main() {printf("main testsuites enter n");// Initialize GLFWif (!glfwInit()) {fprintf(stderr, "Failed to initialize GLFW\n");return -1;}// Create a windowed mode window and its OpenGL contextGLFWwindow* window = glfwCreateWindow(640, 480, "opengles-glfw", NULL, NULL);if (!window) {fprintf(stderr, "Failed to create GLFW window\n");glfwTerminate();return -1;}// Make the window's context currentglfwMakeContextCurrent(window);// Load the OpenGL ES functionsglClearColor(0.0f, 0.0f, 0.0f, 1.0f);// Create and compile the vertex shaderGLint status;GLuint vertexShader = glCreateShader(GL_VERTEX_SHADER);glShaderSource(vertexShader, 1, &vertexSource, NULL);glCompileShader(vertexShader);// Check for compilation errorsif (status != GL_TRUE) {char buffer[512];glGetShaderInfoLog(vertexShader, 512, NULL, buffer);fprintf(stderr, "Vertex Shader Compile Error: %s\n", buffer);}// Create and compile the fragment shaderGLuint fragmentShader = glCreateShader(GL_FRAGMENT_SHADER);glShaderSource(fragmentShader, 1, &fragmentSource, NULL);glCompileShader(fragmentShader);glGetShaderiv(fragmentShader, GL_COMPILE_STATUS, &status);if (status != GL_TRUE) {char buffer[512];glGetShaderInfoLog(fragmentShader, 512, NULL, buffer);fprintf(stderr, "Fragment Shader Compile Error: %s\n", buffer);}// Link the vertex and fragment shader into a shader programGLuint shaderProgram = glCreateProgram();glAttachShader(shaderProgram, vertexShader);glAttachShader(shaderProgram, fragmentShader);glLinkProgram(shaderProgram);// Specify the layout of the vertex dataGLfloat vertices[] = {0.0f, 0.5f, 0.0f,0.5f, -0.5f, 0.0f,-0.5f, -0.5f, 0.0f,};GLuint vbo;glGenBuffers(1, &vbo);glBindBuffer(GL_ARRAY_BUFFER, vbo);glBufferData(GL_ARRAY_BUFFER, sizeof(vertices), vertices, GL_STATIC_DRAW);// Specify the layout of the vertex dataglUseProgram(shaderProgram);glBindBuffer(GL_ARRAY_BUFFER, vbo);glVertexAttribPointer(0, 3, GL_FLOAT, GL_FALSE, 3 * sizeof(GLfloat), 0);glEnableVertexAttribArray(0);// Main loopwhile (!glfwWindowShouldClose(window)) {// calculate for extecute time,about 16.6ms every period{struct timespec currentts;static uint64_t timeInMiliSeconds = 0;clock_gettime(CLOCK_REALTIME, ¤tts);uint64_t currentMilliseconds = currentts.tv_sec * 1000LL + currentts.tv_nsec / 1000000;int periodInMs = currentMilliseconds - timeInMiliSeconds;timeInMiliSeconds = currentMilliseconds;printf("current time in milliseconds %lld period:%d\n", currentMilliseconds,(periodInMs > 0 ? periodInMs : -1));}// Clear the screenglClear(GL_COLOR_BUFFER_BIT);// Draw the triangleglUseProgram(shaderProgram);glBindBuffer(GL_ARRAY_BUFFER, vbo);glEnableVertexAttribArray(0);glDrawArrays(GL_TRIANGLES, 0, 3);// Swap front and back buffersglfwSwapBuffers(window);// Poll for and process eventsglfwPollEvents();}// Clean upglDeleteBuffers(1, &vbo);glDeleteProgram(shaderProgram);glDeleteShader(vertexShader);glDeleteShader(fragmentShader);glfwDestroyWindow(window);glfwTerminate();return 0;
}
基本步骤如下:
-
GLFW初始化和窗口创建
初始化GLFW并设置OpenGL ES上下文版本
创建窗口并设置上下文,将创建的窗口用于opengl-es上下文,此时opengl-es和系统的窗口系统相关联 , 创建着色器,编译着色器,最近将其链接到一个程序对象 -
编译顶点着色器和片段着色器,并将它们链接到一个程序中
-
定义一个简单的三角形顶点数据,并绘制三角形
-
设置视口,清除颜色缓冲区,加载顶点数据,并调用绘制命令
-
主循环中不断交换缓冲区并处理事件,以保持窗口响应。
-
删除程序和着色器,销毁窗口,并终止GLFW
对应的 CMakeLists.txt 实现
cmake_minimum_required(VERSION 3.27)
project(opengles_glfw C)set(CMAKE_C_STANDARD 11)find_package(PkgConfig REQUIRED)
pkg_search_module(GLFW REQUIRED glfw3)include_directories(${GLFW_INCLUDE_DIRS})add_executable(opengles_glfw main.c)
target_link_libraries(opengles_glfw ${GLFW_LIBRARIES} GLESv2)
在程序主循环中,还添加了计时相关的代码逻辑,在glfw 的模式下,主循环也是跟屏幕刷新率相同也是60Hz, 可以看到每次循环体的执行间隔都是 16.6ms
current time in milliseconds 1717986851291 period:14
current time in milliseconds 1717986851308 period:17
current time in milliseconds 1717986851324 period:16
基于 X11 实现
基于 X11 实现的 opengl-es 环境如下:
#include <malloc.h>
#include "glesbasicTriangle.h"typedef struct {GLuint programObject;
} UserData;static int initInternal(ESContext* esContext) {UserData *userData = esContext->userData;// Vertex Shader source codeconst char* vertexShaderSource ="#version 300 es                            \n""layout(location = 0) in vec4 a_position;   \n""void main() {\n""   gl_Position = a_position;\n""}\n";// Fragment Shader source codeconst char* fragmentShaderSource ="#version 300 es                            \n""precision mediump float;\n""layout(location = 0) out vec4 outColor;             \n""void main() {\n""   outColor = vec4(1.0, 0.0, 0.0, 1.0);\n""}\n";// 这里封装了 createshader-compilershader-createprogramobject-link programoobject 的操作GLuint programObject = esLoadProgram(vertexShaderSource, fragmentShaderSource);if (programObject == 0) {return GL_FALSE;}// Store the program objectuserData->programObject = programObject;return GL_TRUE;
}static int drawLoopInternal(ESContext* esContext) {// Vertex dataGLfloat vertices[] = {0.0f,  0.5f, 0.0f,-0.5f, -0.5f, 0.0f,0.5f, -0.5f, 0.0f};// Set the viewportglViewport(0, 0, 640, 480);UserData *userData = esContext->userData;glUseProgram(userData->programObject);// Clear the color bufferglClearColor(0.0, 0.0, 0.0, 1.0);glClear(GL_COLOR_BUFFER_BIT);glVertexAttribPointer(0, 3, GL_FLOAT, GL_FALSE, 0, vertices);glEnableVertexAttribArray(0);// Draw the triangleglDrawArrays(GL_TRIANGLES, 0, 3);// Swap bufferseglSwapBuffers(esContext->eglDisplay, esContext->eglSurface);
}static int cleanupInternal(ESContext* esContext) {printf("%s enter!.\n",__FUNCTION__);UserData *userData = esContext->userData;glDeleteProgram(userData->programObject);eglDestroySurface(esContext->eglDisplay, esContext->eglSurface);eglDestroyContext(esContext->eglDisplay, esContext->eglContext);eglTerminate(esContext->eglDisplay);XDestroyWindow(esContext->x_display, esContext->win);XCloseDisplay(esContext->x_display);return GL_TRUE;
}int testbasicDrawTriangle(ESContext* esContext) {printf("%s enter!.\n", __FUNCTION__);esContext->userData = (UserData*)malloc(sizeof(UserData));initInternal(esContext);while (1) {XEvent xev;while (XPending(esContext->x_display)) {XNextEvent(esContext->x_display, &xev);if (xev.type == KeyPress) {cleanupInternal(esContext);}}drawLoopInternal(esContext);}}
其中在调用 testbasicDrawTriangle 之前, 还有窗口系统的准备工作需要完成,实现就是下面的函数:esCreateWindow 其他文件中实现, main 函数在调用 testbasicDrawTriangle 之前,就已经调用了 esCreateWindow 函数
GLboolean esCreateWindow ( ESContext *esContext, const char *title, GLint width, GLint height, GLuint flags )
{
// Open X11 displayEGLint majorVersion;EGLint minorVersion;Display* x_display = XOpenDisplay(NULL);if (x_display == NULL) {printf("Failed to open X display\n");return GL_FALSE;}esContext->x_display = x_display;esContext->width = width;esContext->height = height;// Create X11 windowWindow root = DefaultRootWindow(esContext->x_display);XSetWindowAttributes swa;swa.event_mask = ExposureMask | PointerMotionMask | KeyPressMask;Window win = XCreateWindow(esContext->x_display, root,0, 0, width, height, 0,CopyFromParent, InputOutput,CopyFromParent, CWEventMask,&swa);XMapWindow(esContext->x_display, win);XStoreName(esContext->x_display, win, title);esContext->win = win;// Initialize EGLEGLDisplay egl_display = eglGetDisplay((EGLNativeDisplayType)esContext->x_display);if (egl_display == EGL_NO_DISPLAY) {printf("Failed to get EGL display\n");return GL_FALSE;}esContext->eglDisplay = egl_display;if (!eglInitialize(esContext->eglDisplay, &majorVersion, &minorVersion)) {printf("Failed to initialize EGL\n");return GL_FALSE;}printf("%s majorVersion:%d minorVersion:%d \n", __FUNCTION__, majorVersion, minorVersion);// Choose an EGL configEGLint configAttribs[] = {EGL_SURFACE_TYPE, EGL_WINDOW_BIT,EGL_BLUE_SIZE, 8,EGL_GREEN_SIZE, 8,EGL_RED_SIZE, 8,EGL_DEPTH_SIZE, 8,EGL_RENDERABLE_TYPE, EGL_OPENGL_ES2_BIT,EGL_NONE};EGLint attribList[] ={EGL_RED_SIZE,       5,EGL_GREEN_SIZE,     6,EGL_BLUE_SIZE,      5,EGL_ALPHA_SIZE,     ( flags & ES_WINDOW_ALPHA ) ? 8 : EGL_DONT_CARE,EGL_DEPTH_SIZE,     ( flags & ES_WINDOW_DEPTH ) ? 8 : EGL_DONT_CARE,EGL_STENCIL_SIZE,   ( flags & ES_WINDOW_STENCIL ) ? 8 : EGL_DONT_CARE,EGL_SAMPLE_BUFFERS, ( flags & ES_WINDOW_MULTISAMPLE ) ? 1 : 0,// if EGL_KHR_create_context extension is supported, then we will use// EGL_OPENGL_ES3_BIT_KHR instead of EGL_OPENGL_ES2_BIT in the attribute listEGL_RENDERABLE_TYPE, GetContextRenderableType ( esContext->eglDisplay ),EGL_NONE};EGLConfig egl_config;EGLint numConfigs;eglChooseConfig(esContext->eglDisplay, attribList, &egl_config, 1, &numConfigs);if (numConfigs != 1) {printf("Failed to choose EGL config\n");return GL_FALSE;}// Create an EGL window surfaceEGLSurface egl_surface = eglCreateWindowSurface(esContext->eglDisplay, egl_config, (EGLNativeWindowType)esContext->win, NULL);if (egl_surface == EGL_NO_SURFACE) {printf("Failed to create EGL surface\n");return GL_FALSE;}esContext->eglSurface = egl_surface;// Create an EGL contextEGLint contextAttribs[] = { EGL_CONTEXT_CLIENT_VERSION, 2, EGL_NONE };EGLContext egl_context = eglCreateContext(esContext->eglDisplay, egl_config, EGL_NO_CONTEXT, contextAttribs);if (egl_context == EGL_NO_CONTEXT) {printf("Failed to create EGL context\n");return GL_FALSE;}esContext->eglContext = egl_context;// Make the context currentif (!eglMakeCurrent(esContext->eglDisplay, esContext->eglSurface , esContext->eglSurface , esContext->eglContext)) {printf("Failed to make EGL context current\n");return GL_FALSE;}return GL_TRUE;
}
在 esCreateWindow 的代码中,使用 x_display 关联到了 egl 的display 对象中,同时,使用在 eglCreateWindowSurface 中 使用了 x11 创建的 win handle 创建 EGLSurface
其余绘制三角形的步骤和 glfw 的基本一致
实现效果如下:

相关文章:
OpenGL-ES 学习(6)---- Ubuntu OES 环境搭建
OpenGL-ES Ubuntu 环境搭建 此的方法在 ubuntu 和 deepin 上验证都可以成功搭建 目录 OpenGL-ES Ubuntu 环境搭建软件包安装第一个三角形基于 glfw 实现基于 X11 实现 软件包安装 sudo apt install libx11-dev sudo apt install libglfw3 libglfw3-dev sudo apt-get install…...
Django学习二:配置mysql,创建model实例,自动创建数据库表,对mysql数据库表已经创建好的进行直接操作和实验。
文章目录 前言一、项目初始化搭建1、创建项目:test_models_django2、创建应用app01 二、配置mysql三、创建model实例,自动创建数据库表1、创建对象User类2、执行命令 四、思考问题(****)1、是否会生成新表呢(答案报错&…...

对象创建的4种模式
1. 工厂模式 这种模式抽象了创建具体对象的过程,用函数来封装以特定接口创建对象的细节 缺点:没有解决对象识别的问题(即怎样知道一个对象的类型) function createPerson(name, age, job) {var o new Object();o.name name;o.ag…...

如何判断 是否 需要 CSS 中的媒体查询
以下是一些常见的使用媒体查询的场景: 响应式布局:当设备的屏幕尺寸变化时,我们可以使用媒体查询来调整布局,以适应不同的屏幕尺寸。 设备特性适配:我们可以使用媒体查询来检测设备的特性,如设备方向、分辨…...
设计模式-装饰器模式(结构型)
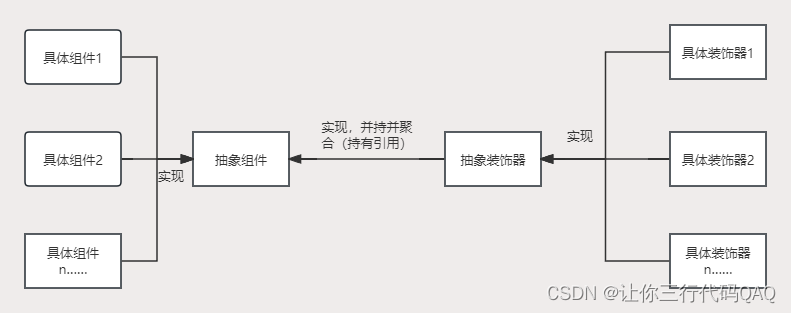
装饰器模式 装饰器模式是一种结构模式,通过装饰器模式可以在不改变原有类结构的情况下向一个新对象添加新功能,是现有类的包装。 图解 角色 抽象组件:定义组件的抽象方法具体组件:实现组件的抽象方法抽象装饰器:实现…...

升级HarmonyOS 4.2,开启健康生活篇章
夏日来临,华为智能手表携 HarmonyOS 4.2 版本邀您体验,它不仅可以作为时尚单品搭配夏日绚丽服饰,还能充当你的健康管家,从而更了解自己的身体,开启智能健康生活篇章。 高血糖风险评估优化,健康监测更精准 …...

给gRPC增加负载均衡功能
在现代的分布式系统中,负载均衡是确保服务高可用性和性能的关键技术之一。而gRPC作为一种高性能的RPC框架,自然也支持负载均衡功能。本文将探讨如何为gRPC服务增加负载均衡功能,从而提高系统的性能和可扩展性。 什么是负载均衡? …...
【优选算法】详解target类求和问题(附总结)
目录 1.两数求和 题目: 算法思路: 代码: 2.!!!三数之和 题目 算法思路: 代码: 3.四数字和 题目: 算法思路: 代码: 总结&易错点&…...

【数据结构】图论入门
引入 数据的逻辑结构: 集合:数据元素间除“同属于一个集合”外,无其他关系线性结构:一个对一个,例如:线性表、栈、队列树形结构:一个对多个,例如:树图形结构࿱…...

11_1 Linux NFS服务与触发挂载autofs
11_1 Linux NFS服务与触发挂载服务 文章目录 11_1 Linux NFS服务与触发挂载服务[toc]1. NFS服务基础1.1 示例 2. 触发挂载autofs2.1 触发挂载基础2.2 触发挂载进阶autofs与NFS 文件共享服务:scp、FTP、web(httpd)、NFS 1. NFS服务基础 Netwo…...
开发uniapp 小程序时遇到的问题
1、【微信开发者工具报错】routeDone with a webviewId XXX that is not the current page 解决方案: 在app.json 中添加 “lazyCodeLoading”: “requiredComponents” uniapp的话加到manifest.json下的mp-weixin 外部链接文章:解决方案文章1 解决方案文章2 &qu…...
怎样快速获取Vmware VCP 证书,线上考试,voucher报名优惠
之前考一个VCP证书,要花大一万的费用,可贵了,考试费不贵,贵就贵在培训费,要拿到证书,必须交培训费,即使vmware你玩的很溜,不需要再培训了,但是一笔贵到肉疼的培训费你得拿…...

LeetCode 1141, 134, 142
目录 1141. 查询近30天活跃用户数题目链接表要求知识点思路代码 134. 加油站题目链接标签普通版思路代码 简化版思路代码 142. 环形链表 II题目链接标签思路代码 1141. 查询近30天活跃用户数 题目链接 1141. 查询近30天活跃用户数 表 表Activity的字段为user_id,…...

华为FPGA工程师面试题
FPGA工程师面试会涉及多个方面,包括基础知识、项目经验、编程能力、硬件调试和分析等。以下是一些必问的面试题: 基础知识题: 请解释FPGA的基本组成和工作原理。描述FPGA中的可编程互联资源以及它们在构建复杂数字电路中的作用。请解释嵌入式多用途块(如BRAM、DSP slices、…...
Windows11上安装docker(WSL2后端)和使用docker安装MySQL和达梦数据库
Windows11上安装docker(WSL2后端)和使用docker安装MySQL和达梦数据库 1. 操作系统环境2. 首先安装wsl2.1 关于wsl2.2 安装wsl2.3 查看可用的wsl2.4 安装ubuntu-22.042.5 查看、启动ubuntu-22.04应用2.6 上面安装开了daili2.7 wsl的更多参考 3. 下载Docke…...
UnityXR Interactable Toolkit如何实现Climb爬梯子
前言 在VR中,通常会有一些交互需要我们做爬梯子,爬墙的操作,之前用VRTK3时,里面是还有这个Demo的,最近看XRI,发现也除了一个爬的示例,今天我们就来讲解一下 如何在Unity中使用XR Interaction Toolkit实现爬行(Climb)操作 环境配置 步骤 1:设置XR环境 确保你的Uni…...
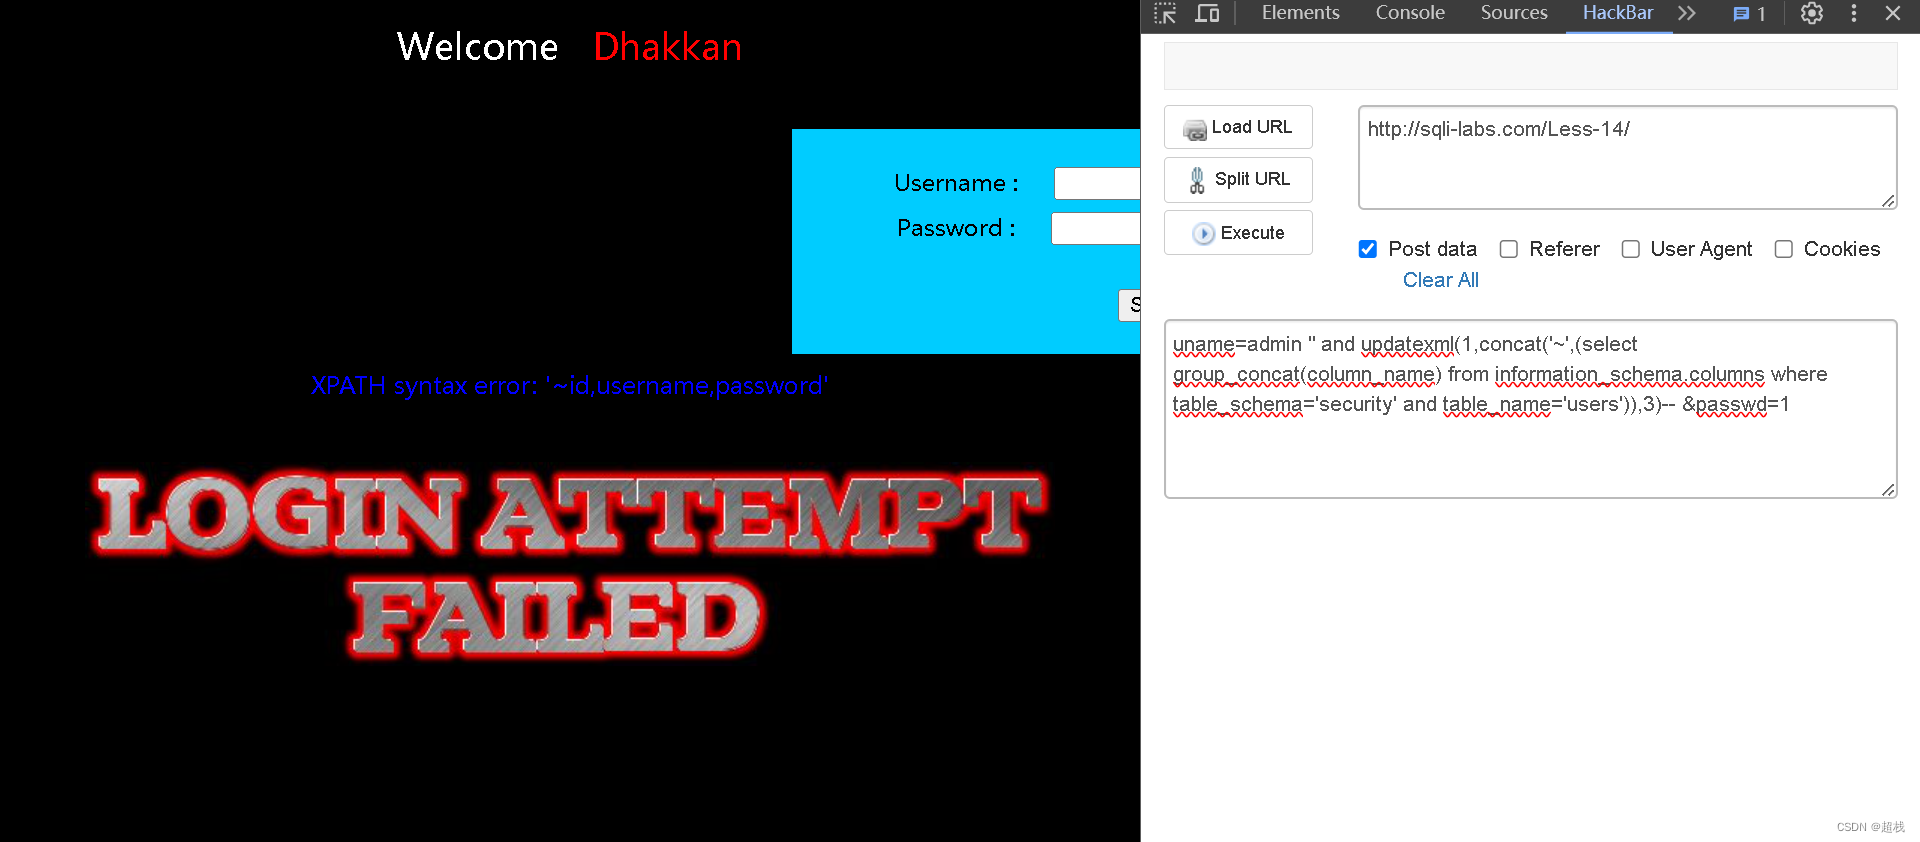
sqli-labs 靶场 less-11~14 第十一关、第十二关、第十三关、第十四关详解:联合注入、错误注入
SQLi-Labs是一个用于学习和练习SQL注入漏洞的开源应用程序。通过它,我们可以学习如何识别和利用不同类型的SQL注入漏洞,并了解如何修复和防范这些漏洞。Less 11 SQLI DUMB SERIES-11判断注入点 尝试在用户名这个字段实施注入,且试出SQL语句闭合方式为单…...

国内外网络安全现状分析
一、国内网络安全现状 1.1 国内网络安全威胁 国内的网络安全威胁主要表现在以下几个方面: 恶意软件:包括计算机病毒、蠕虫、木马和间谍软件等,它们能感染计算机系统、窃取敏感信息或破坏系统功能。网络钓鱼:通过伪装成可信任的…...

vscode copilot git commit 生成效果太差,用其他模型替换
问题 众所周知,copilot git commit 就像在随机生成 git commit 这种较为复杂的内容还是交给大模型做比较合适 方法 刚好,gitlens 最近开发了 AI commit的功能,其提供配置url api可以实现自定义模型 gitlens 只有3种模型可用:…...

计算机毕业设计hadoop+spark+hive舆情分析系统 微博数据分析可视化大屏 微博情感分析 微博爬虫 微博大数据 微博推荐系统 微博预测系统
本 科 毕 业 论 文 论文题目:基于Hadoop的热点舆情数据分析与可视化 姓名: 金泓羽 学号: 20200804050115 导师: 关英 职称&…...

零门槛NAS搭建:WinNAS如何让普通电脑秒变私有云?
一、核心优势:专为Windows用户设计的极简NAS WinNAS由深圳耘想存储科技开发,是一款收费低廉但功能全面的Windows NAS工具,主打“无学习成本部署” 。与其他NAS软件相比,其优势在于: 无需硬件改造:将任意W…...

SciencePlots——绘制论文中的图片
文章目录 安装一、风格二、1 资源 安装 # 安装最新版 pip install githttps://github.com/garrettj403/SciencePlots.git# 安装稳定版 pip install SciencePlots一、风格 简单好用的深度学习论文绘图专用工具包–Science Plot 二、 1 资源 论文绘图神器来了:一行…...

DockerHub与私有镜像仓库在容器化中的应用与管理
哈喽,大家好,我是左手python! Docker Hub的应用与管理 Docker Hub的基本概念与使用方法 Docker Hub是Docker官方提供的一个公共镜像仓库,用户可以在其中找到各种操作系统、软件和应用的镜像。开发者可以通过Docker Hub轻松获取所…...
练习(含atoi的模拟实现,自定义类型等练习)
一、结构体大小的计算及位段 (结构体大小计算及位段 详解请看:自定义类型:结构体进阶-CSDN博客) 1.在32位系统环境,编译选项为4字节对齐,那么sizeof(A)和sizeof(B)是多少? #pragma pack(4)st…...

ssc377d修改flash分区大小
1、flash的分区默认分配16M、 / # df -h Filesystem Size Used Available Use% Mounted on /dev/root 1.9M 1.9M 0 100% / /dev/mtdblock4 3.0M...

基于数字孪生的水厂可视化平台建设:架构与实践
分享大纲: 1、数字孪生水厂可视化平台建设背景 2、数字孪生水厂可视化平台建设架构 3、数字孪生水厂可视化平台建设成效 近几年,数字孪生水厂的建设开展的如火如荼。作为提升水厂管理效率、优化资源的调度手段,基于数字孪生的水厂可视化平台的…...

【Web 进阶篇】优雅的接口设计:统一响应、全局异常处理与参数校验
系列回顾: 在上一篇中,我们成功地为应用集成了数据库,并使用 Spring Data JPA 实现了基本的 CRUD API。我们的应用现在能“记忆”数据了!但是,如果你仔细审视那些 API,会发现它们还很“粗糙”:有…...

3403. 从盒子中找出字典序最大的字符串 I
3403. 从盒子中找出字典序最大的字符串 I 题目链接:3403. 从盒子中找出字典序最大的字符串 I 代码如下: class Solution { public:string answerString(string word, int numFriends) {if (numFriends 1) {return word;}string res;for (int i 0;i &…...
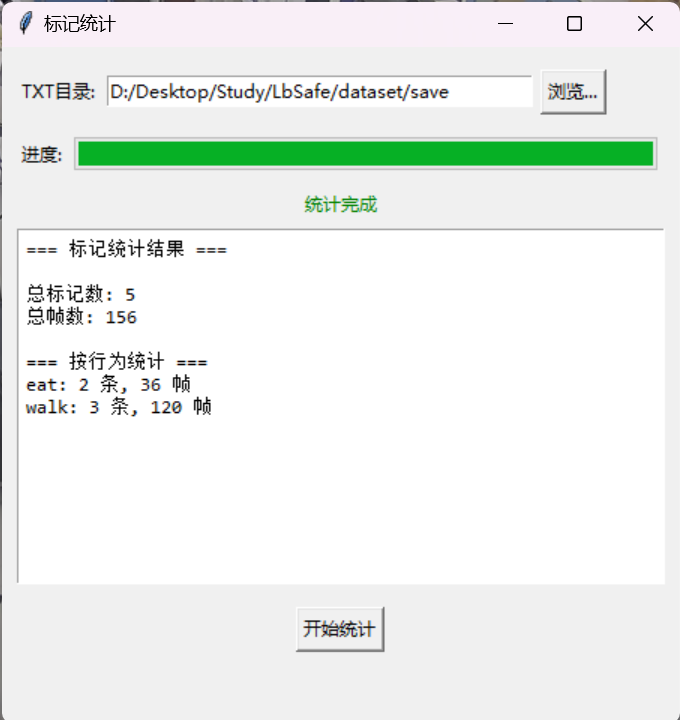
视频行为标注工具BehaviLabel(源码+使用介绍+Windows.Exe版本)
前言: 最近在做行为检测相关的模型,用的是时空图卷积网络(STGCN),但原有kinetic-400数据集数据质量较低,需要进行细粒度的标注,同时粗略搜了下已有开源工具基本都集中于图像分割这块,…...

git: early EOF
macOS报错: Initialized empty Git repository in /usr/local/Homebrew/Library/Taps/homebrew/homebrew-core/.git/ remote: Enumerating objects: 2691797, done. remote: Counting objects: 100% (1760/1760), done. remote: Compressing objects: 100% (636/636…...