AIRNet模型使用与代码分析(All-In-One Image Restoration Network)
AIRNet提出了一种较为简易的pipeline,以单一网络结构应对多种任务需求(不同类型,不同程度)。但在效果上看,ALL-In-One是不如One-By-One的,且本文方法的亮点是batch内选择patch进行对比学习。在与sota对比上,仅是Denoise任务精度占优,在Derain与Dehaze任务上,效果不如One-By-One的MPRNet方法。本博客对AIRNet的关键结构实现,loss实现,data_patch实现进行深入分析,并对模型进行推理使用。
其论文的详细可以阅读:https://blog.csdn.net/a486259/article/details/139559389?spm=1001.2014.3001.5501
项目地址:https://blog.csdn.net/a486259/article/details/139559389?spm=1001.2014.3001.5501
项目依赖:torch、mmcv-full
安装mmcv-full时,需要注意torch所对应的cuda版本,要与系统中的cuda版本一致。
1、模型结构
AirNet的网络结构如下所示,输入图像x交由CBDE提取到嵌入空间z,z与x输入到DGRN模块的DGG block中逐步优化,最终输出预测结果。
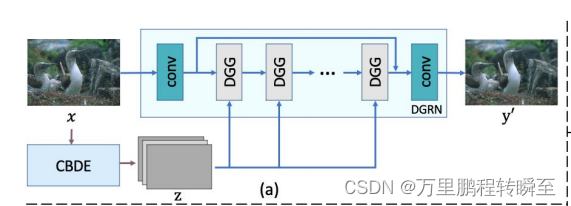
模型代码在net\model.py
from torch import nnfrom net.encoder import CBDE
from net.DGRN import DGRNclass AirNet(nn.Module):def __init__(self, opt):super(AirNet, self).__init__()# Encoderself.E = CBDE(opt)  #编码特征值# Restorerself.R = DGRN(opt) #特征解码def forward(self, x_query, x_key):if self.training:fea, logits, labels, inter = self.E(x_query, x_key)restored = self.R(x_query, inter)return restored, logits, labelselse:fea, inter = self.E(x_query, x_query)restored = self.R(x_query, inter)return restored
1.1 CBDE模块
CBDE模块的功能是在模块内进行对比学习,核心是MoCo. Moco论文地址:https://arxiv.org/pdf/1911.05722
class CBDE(nn.Module):def __init__(self, opt):super(CBDE, self).__init__()dim = 256# Encoderself.E = MoCo(base_encoder=ResEncoder, dim=dim, K=opt.batch_size * dim)def forward(self, x_query, x_key):if self.training:# degradation-aware represenetion learningfea, logits, labels, inter = self.E(x_query, x_key)return fea, logits, labels, interelse:# degradation-aware represenetion learningfea, inter = self.E(x_query, x_query)return fea, interResEncoder所对应的网络结构如下所示

在AIRNet中的CBDE模块里的MoCo模块的关键代码如下,其在内部自行完成了正负样本的分配,最终输出logits, labels用于计算对比损失的loss。但其所优化的模块实际上是ResEncoder。MoCo模块只是在训练阶段起作用,在推理阶段是不起作用的。
class MoCo(nn.Module):def forward(self, im_q, im_k):"""Input:im_q: a batch of query imagesim_k: a batch of key imagesOutput:logits, targets"""if self.training:# compute query featuresembedding, q, inter = self.encoder_q(im_q) # queries: NxCq = nn.functional.normalize(q, dim=1)# compute key featureswith torch.no_grad(): # no gradient to keysself._momentum_update_key_encoder() # update the key encoder_, k, _ = self.encoder_k(im_k) # keys: NxCk = nn.functional.normalize(k, dim=1)# compute logits# Einstein sum is more intuitive# positive logits: Nx1l_pos = torch.einsum('nc,nc->n', [q, k]).unsqueeze(-1)# negative logits: NxKl_neg = torch.einsum('nc,ck->nk', [q, self.queue.clone().detach()])# logits: Nx(1+K)logits = torch.cat([l_pos, l_neg], dim=1)# apply temperaturelogits /= self.T# labels: positive key indicatorslabels = torch.zeros(logits.shape[0], dtype=torch.long).cuda()# dequeue and enqueueself._dequeue_and_enqueue(k)return embedding, logits, labels, interelse:embedding, _, inter = self.encoder_q(im_q)return embedding, inter
1.2 DGRN模块
DGRN模块的实现代码如下所示,可以看到核心是DGG模块,其不断迭代优化输入图像。
class DGRN(nn.Module):def __init__(self, opt, conv=default_conv):super(DGRN, self).__init__()self.n_groups = 5n_blocks = 5n_feats = 64kernel_size = 3# head modulemodules_head = [conv(3, n_feats, kernel_size)]self.head = nn.Sequential(*modules_head)# bodymodules_body = [DGG(default_conv, n_feats, kernel_size, n_blocks) \for _ in range(self.n_groups)]modules_body.append(conv(n_feats, n_feats, kernel_size))self.body = nn.Sequential(*modules_body)# tailmodules_tail = [conv(n_feats, 3, kernel_size)]self.tail = nn.Sequential(*modules_tail)def forward(self, x, inter):# headx = self.head(x)# bodyres = xfor i in range(self.n_groups):res = self.body[i](res, inter)res = self.body[-1](res)res = res + x# tailx = self.tail(res)return x

DGG模块的结构示意如下所示
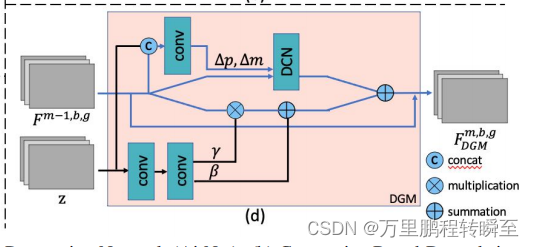
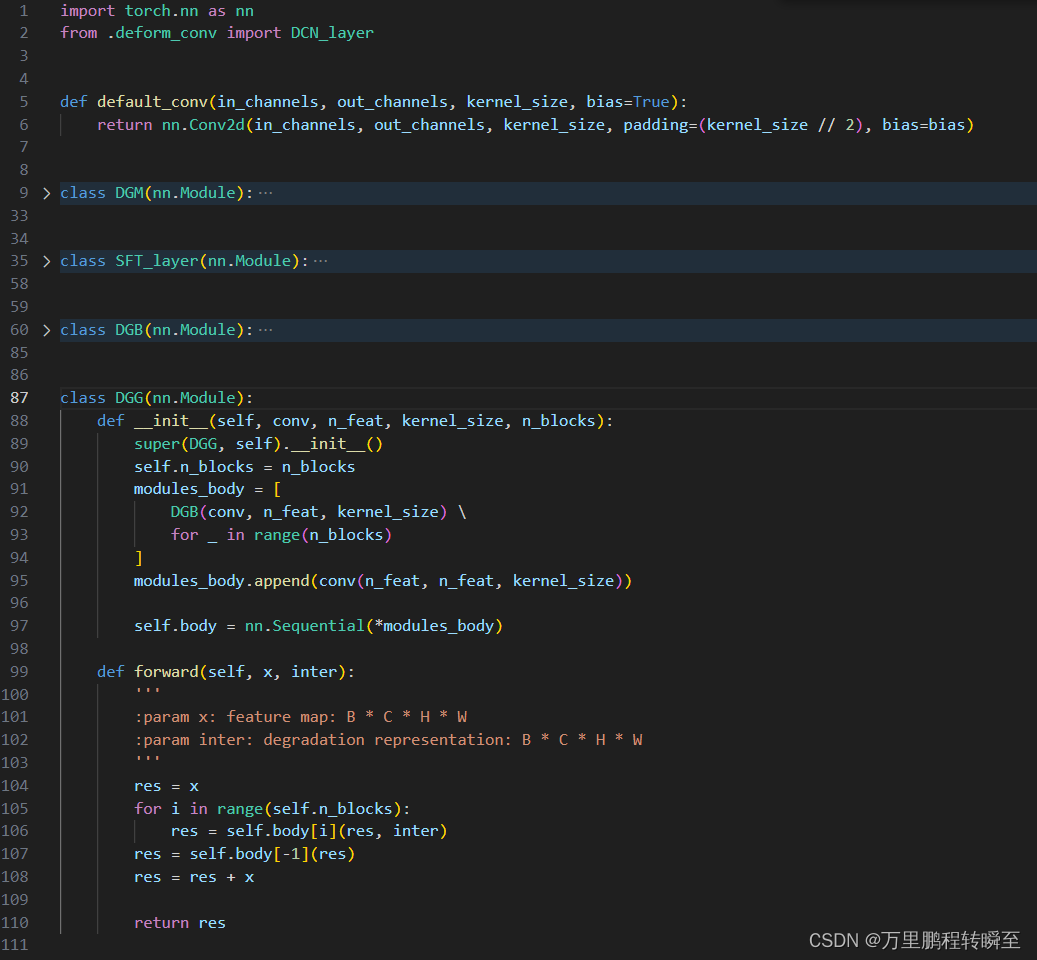
DGG代码实现如下所示,DGG模块内嵌DGB模块,DGB模块内嵌DGM模块,DGM模块内嵌SFT_layer模块与DCN_layer(可变性卷积)
2、loss实现
AIRNet中提到的loss如下所示,其中Lrec是L1 loss,Lcl是Moco模块实现的对比损失。

AIRNet的loss实现代码在train.py中,CE loss是针对CBDE(Moco模块)的输出进行计算,l1 loss是针对修复图像与清晰图片。
# Network Constructionnet = AirNet(opt).cuda()net.train()# Optimizer and Lossoptimizer = optim.Adam(net.parameters(), lr=opt.lr)CE = nn.CrossEntropyLoss().cuda()l1 = nn.L1Loss().cuda()# Start trainingprint('Start training...')for epoch in range(opt.epochs):for ([clean_name, de_id], degrad_patch_1, degrad_patch_2, clean_patch_1, clean_patch_2) in tqdm(trainloader):degrad_patch_1, degrad_patch_2 = degrad_patch_1.cuda(), degrad_patch_2.cuda()clean_patch_1, clean_patch_2 = clean_patch_1.cuda(), clean_patch_2.cuda()optimizer.zero_grad()if epoch < opt.epochs_encoder:_, output, target, _ = net.E(x_query=degrad_patch_1, x_key=degrad_patch_2)contrast_loss = CE(output, target)loss = contrast_losselse:restored, output, target = net(x_query=degrad_patch_1, x_key=degrad_patch_2)contrast_loss = CE(output, target)l1_loss = l1(restored, clean_patch_1)loss = l1_loss + 0.1 * contrast_loss# backwardloss.backward()optimizer.step()
这里可以看出来,AIRNet首先是训练CBDE模块,最后才训练CBDE模块+DGRN模块。
3、TrainDataset
TrainDataset的实现代码在utils\dataset_utils.py中,首先找到__getitem__函数进行分析。以下代码为关键部分,删除了大部分在逻辑上重复的部分。TrainDataset一共支持5种数据类型,‘denoise_15’: 0, ‘denoise_25’: 1, ‘denoise_50’: 2,是不需要图像对的(在代码里面自动对图像添加噪声);‘derain’: 3, ‘dehaze’: 4是需要图像对进行训练的。
class TrainDataset(Dataset):def __init__(self, args):super(TrainDataset, self).__init__()self.args = argsself.rs_ids = []self.hazy_ids = []self.D = Degradation(args)self.de_temp = 0self.de_type = self.args.de_typeself.de_dict = {'denoise_15': 0, 'denoise_25': 1, 'denoise_50': 2, 'derain': 3, 'dehaze': 4}self._init_ids()self.crop_transform = Compose([ToPILImage(),RandomCrop(args.patch_size),])self.toTensor = ToTensor()def __getitem__(self, _):de_id = self.de_dict[self.de_type[self.de_temp]]if de_id < 3:if de_id == 0:clean_id = self.s15_ids[self.s15_counter]self.s15_counter = (self.s15_counter + 1) % self.num_cleanif self.s15_counter == 0:random.shuffle(self.s15_ids)# clean_id = random.randint(0, len(self.clean_ids) - 1)clean_img = crop_img(np.array(Image.open(clean_id).convert('RGB')), base=16)clean_patch_1, clean_patch_2 = self.crop_transform(clean_img), self.crop_transform(clean_img)clean_patch_1, clean_patch_2 = np.array(clean_patch_1), np.array(clean_patch_2)# clean_name = self.clean_ids[clean_id].split("/")[-1].split('.')[0]clean_name = clean_id.split("/")[-1].split('.')[0]clean_patch_1, clean_patch_2 = random_augmentation(clean_patch_1, clean_patch_2)degrad_patch_1, degrad_patch_2 = self.D.degrade(clean_patch_1, clean_patch_2, de_id)clean_patch_1, clean_patch_2 = self.toTensor(clean_patch_1), self.toTensor(clean_patch_2)degrad_patch_1, degrad_patch_2 = self.toTensor(degrad_patch_1), self.toTensor(degrad_patch_2)self.de_temp = (self.de_temp + 1) % len(self.de_type)if self.de_temp == 0:random.shuffle(self.de_type)return [clean_name, de_id], degrad_patch_1, degrad_patch_2, clean_patch_1, clean_patch_2
可以看出TrainDataset返回的数据有:degrad_patch_1, degrad_patch_2, clean_patch_1, clean_patch_2。
3.1 clean_patch分析
通过以下代码可以看出 clean_patch_1, clean_patch_2是来自于同一个图片,然后基于crop_transform变化,变成了2个对象
clean_img = crop_img(np.array(Image.open(clean_id).convert('RGB')), base=16)clean_patch_1, clean_patch_2 = self.crop_transform(clean_img), self.crop_transform(clean_img)# clean_name = self.clean_ids[clean_id].split("/")[-1].split('.')[0]clean_name = clean_id.split("/")[-1].split('.')[0]clean_patch_1, clean_patch_2 = random_augmentation(clean_patch_1, clean_patch_2)
crop_transform的定义如下,可见是随机进行crop
crop_transform = Compose([ToPILImage(),RandomCrop(args.patch_size),])
random_augmentation的实现代码如下,可以看到只是随机对图像进行翻转或旋转,其目的是尽可能使随机crop得到clean_patch_1, clean_patch_2差异更大,避免裁剪出高度相似的patch。
def random_augmentation(*args):out = []flag_aug = random.randint(1, 7)for data in args:out.append(data_augmentation(data, flag_aug).copy())return out
def data_augmentation(image, mode):if mode == 0:# originalout = image.numpy()elif mode == 1:# flip up and downout = np.flipud(image)elif mode == 2:# rotate counterwise 90 degreeout = np.rot90(image)elif mode == 3:# rotate 90 degree and flip up and downout = np.rot90(image)out = np.flipud(out)elif mode == 4:# rotate 180 degreeout = np.rot90(image, k=2)elif mode == 5:# rotate 180 degree and flipout = np.rot90(image, k=2)out = np.flipud(out)elif mode == 6:# rotate 270 degreeout = np.rot90(image, k=3)elif mode == 7:# rotate 270 degree and flipout = np.rot90(image, k=3)out = np.flipud(out)else:raise Exception('Invalid choice of image transformation')return out
3.2 degrad_patch分析
degrad_patch来自于clean_patch,可以看到是通过D.degrade进行转换的。
degrad_patch_1, degrad_patch_2 = self.D.degrade(clean_patch_1, clean_patch_2, de_id)
D.degrade相关的代码如下,可以看到只是对图像添加噪声。难怪AIRNet在图像去噪上效果最好。
class Degradation(object):def __init__(self, args):super(Degradation, self).__init__()self.args = argsself.toTensor = ToTensor()self.crop_transform = Compose([ToPILImage(),RandomCrop(args.patch_size),])def _add_gaussian_noise(self, clean_patch, sigma):# noise = torch.randn(*(clean_patch.shape))# clean_patch = self.toTensor(clean_patch)noise = np.random.randn(*clean_patch.shape)noisy_patch = np.clip(clean_patch + noise * sigma, 0, 255).astype(np.uint8)# noisy_patch = torch.clamp(clean_patch + noise * sigma, 0, 255).type(torch.int32)return noisy_patch, clean_patchdef _degrade_by_type(self, clean_patch, degrade_type):if degrade_type == 0:# denoise sigma=15degraded_patch, clean_patch = self._add_gaussian_noise(clean_patch, sigma=15)elif degrade_type == 1:# denoise sigma=25degraded_patch, clean_patch = self._add_gaussian_noise(clean_patch, sigma=25)elif degrade_type == 2:# denoise sigma=50degraded_patch, clean_patch = self._add_gaussian_noise(clean_patch, sigma=50)return degraded_patch, clean_patchdef degrade(self, clean_patch_1, clean_patch_2, degrade_type=None):if degrade_type == None:degrade_type = random.randint(0, 3)else:degrade_type = degrade_typedegrad_patch_1, _ = self._degrade_by_type(clean_patch_1, degrade_type)degrad_patch_2, _ = self._degrade_by_type(clean_patch_2, degrade_type)return degrad_patch_1, degrad_patch_24、推理演示
项目中默认包含了All.pth,要单独任务的模型可以到预训练模型下载地址: Google Drive and Baidu Netdisk (password: cr7d). 下载模型放到 ckpt/ 目录下
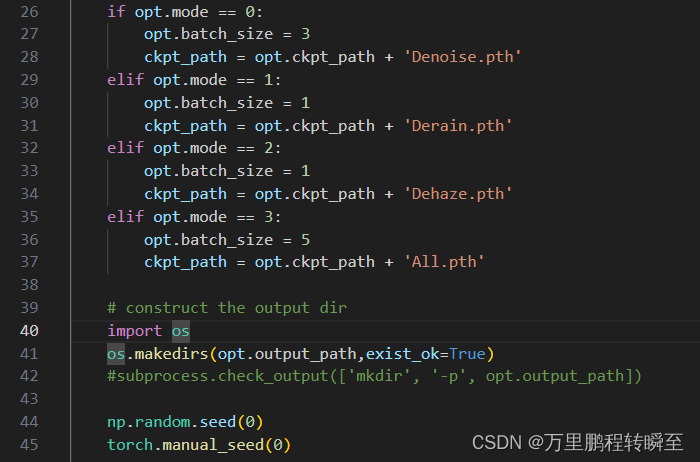
打开demo.py,将 subprocess.check_output(['mkdir', '-p', opt.output_path]) 替换为os.makedirs(opt.output_path,exist_ok=True),避免在window上报错,具体修改如下所示
demo.py默认从test\demo目录下读取图片进行测试,可见原始图像如下
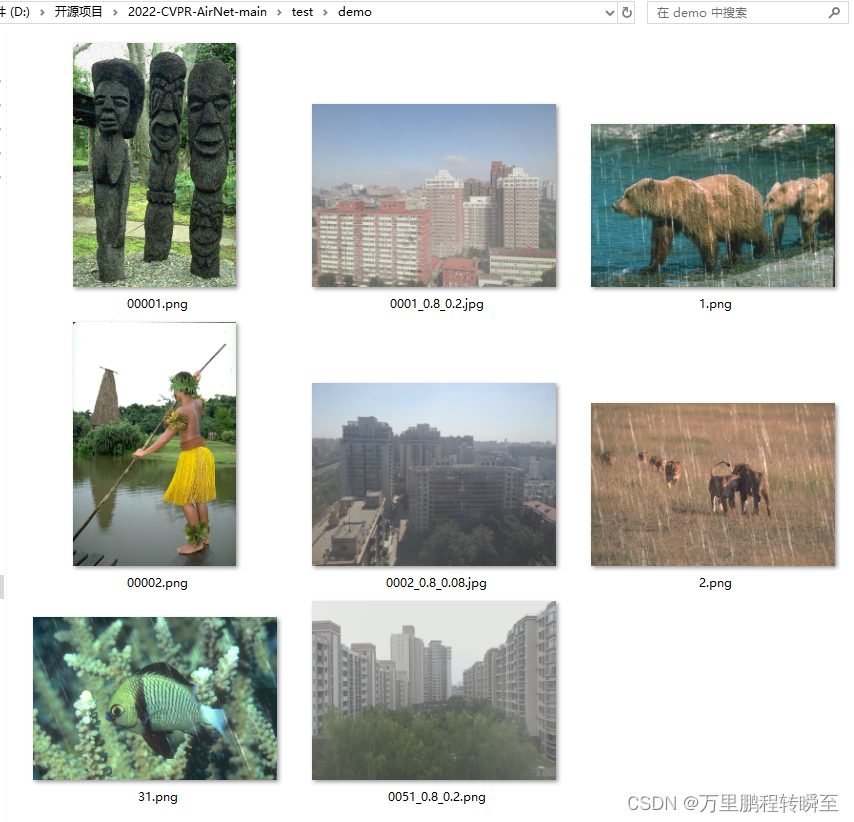
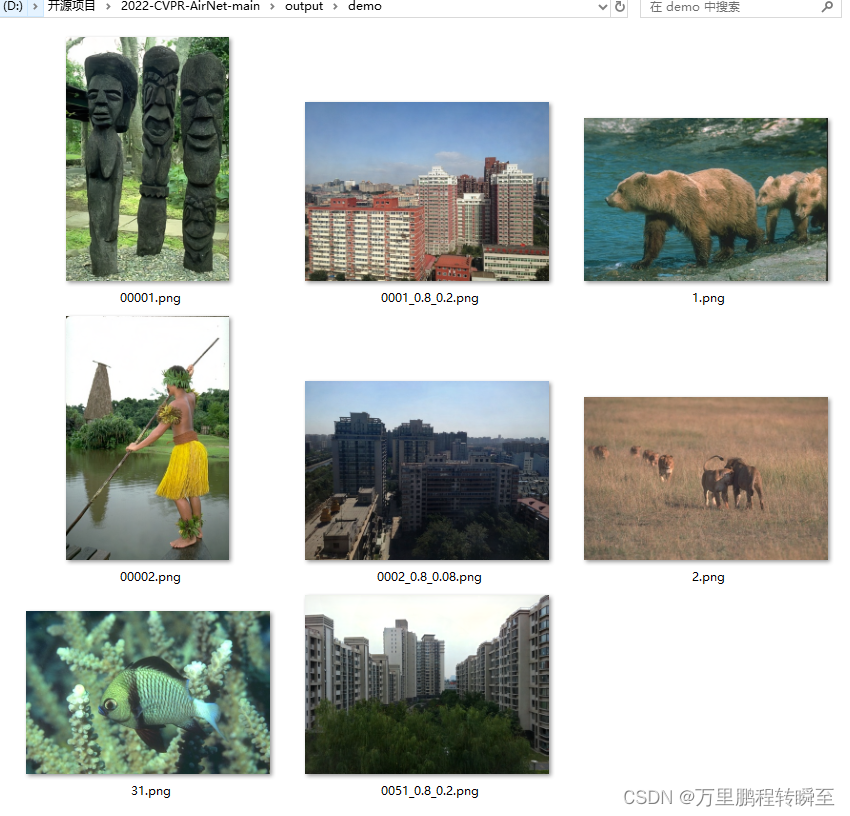
代码运行后的输出结果默认保存在 output\demo目录下,可见对于去雨,去雾,去噪声效果都比较好。
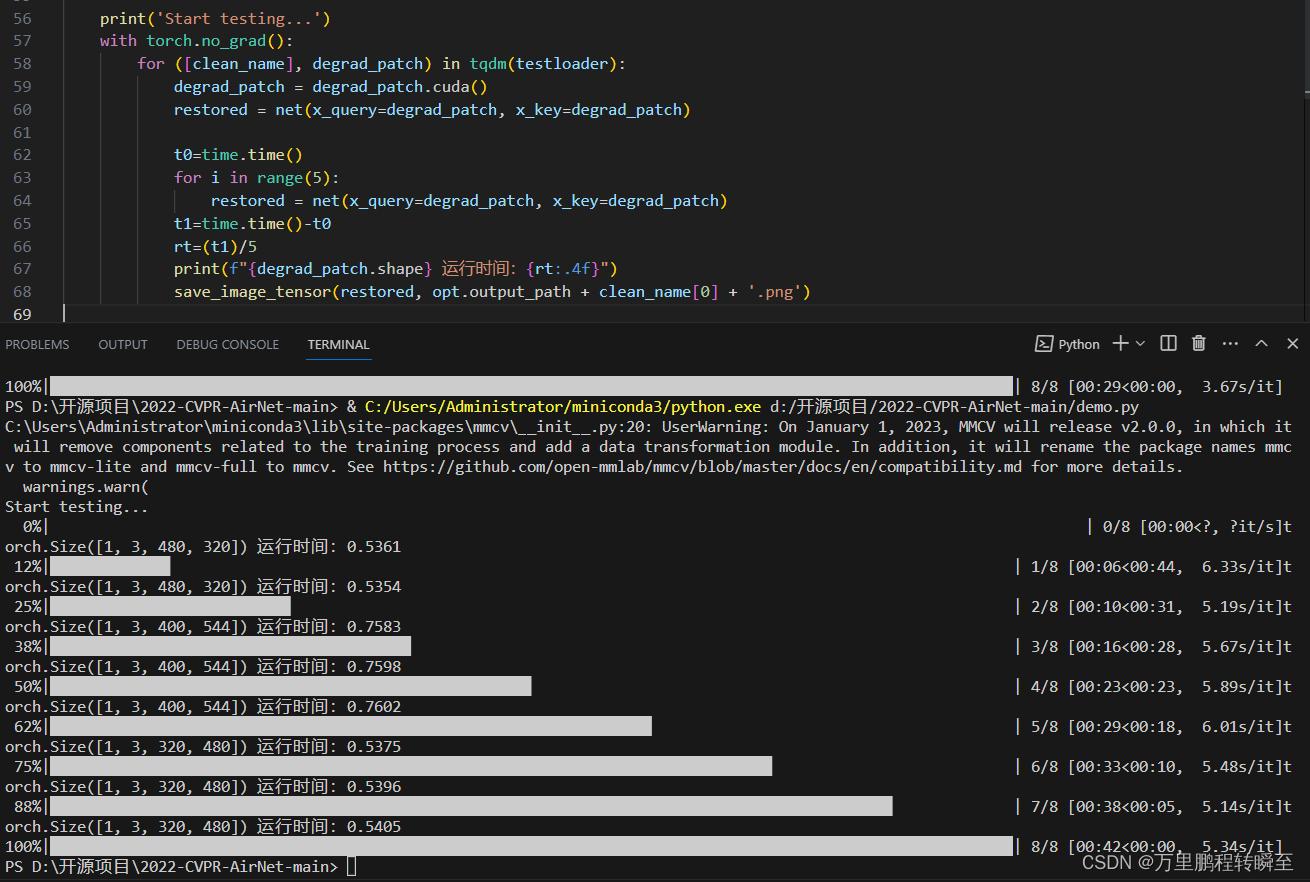
模型推理时间如下所示,可以看到对一张320, 480的图片,要0.54s
相关文章:

AIRNet模型使用与代码分析(All-In-One Image Restoration Network)
AIRNet提出了一种较为简易的pipeline,以单一网络结构应对多种任务需求(不同类型,不同程度)。但在效果上看,ALL-In-One是不如One-By-One的,且本文方法的亮点是batch内选择patch进行对比学习。在与sota对比上…...

欧洲杯“球迷狂欢趴”开启,容声带来“健康养鲜”新理念
6月15日,容声冰箱在深圳举行了异彩纷呈的“欧洲杯养鲜补给站 球迷狂欢趴”系列活动。 容声国内营销总经理韩栋现场发布“以品质领先 为健康养鲜”的主题内容,强调容声将以健康养鲜技术产品的升级迭代,满足用户品质生活需求。 作为有着41年发…...

人工智能对零售业的影响
机器人、人工智能相关领域 news/events (专栏目录) 本文目录 一、人工智能如何改变零售格局二、利用人工智能实现购物体验自动化三、利用人工智能改善库存管理四、通过人工智能解决方案增强客户服务五、利用人工智能分析消费者行为六、利用 AI 打造个性化…...

Spring Boot + EasyExcel + SqlServer 进行批量处理数据
前言 在日常开发和工作中,我们可能要根据用户上传的文件做一系列的处理,本篇文章就以Excel表格文件为例,模拟用户上传Excel文件,讲述后端如何高效的进行数据的处理。 一.引入 EasyExcel 依赖 <!-- https://mvnrepository.com/…...
深入理解指针(四)
目录 1. 回调函数是什么? 2. qsort使用举例 2.1冒泡排序 2.2使用qsort函数排序整型数据 2.3 使用qsort排序结构数据(名字) 2.4 使用qsort排序结构数据(年龄) 3. qsort函数的模拟实现 1. 回调函数是什么? 回调函数就是⼀个通过函数指针调⽤的函数。 如果你把函数…...

k-means聚类模型的优缺点
一、k-means聚类模型的优点 1. 简单高效:k-means算法思想简单直观,易于实现。它通过迭代计算样本点与聚类中心之间的距离,并不断调整聚类中心的位置,直至满足终止条件。由于其计算过程相对直接,所以具有较高的执行效率…...
我的创作纪念日(1825天)
Ⅰ、机缘 1. 记得是大一、大二的时候就听学校的大牛说,可以通过写 CSDN 博客,来提升自己的代码和逻辑能力,虽然即将到了写作的第六个年头,但感觉这句话依旧受用; 2、今年一整年的创作都没有停止,本年度几乎是每周都来…...
Studio One 6.6.2 for Mac怎么激活,有Studio One 6激活码吗?
如果您是一名音乐制作人,您是否曾经为了寻找一个合适的音频工作站而苦恼过?Studio One 6 for Mac是一款非常适合您的MacBook的音频工作站。它可以帮助您轻松地录制、编辑、混音和发布您的音乐作品。 Studio One 6.6.2 for Mac具有直观的界面和强大的功能…...

Windows搭建nacos集群
Nacos是阿里巴巴的产品,现在是SpringCloud中的一个组件。相比Eureka功能更加丰富,在国内受欢迎程度较高。 下载地址:Tags alibaba/nacos GitHub 链接:百度网盘 请输入提取码 提取码:8888 解压文件夹 目录说明&am…...

kotlin 中的字符
一、字符类型 1、kotlin中,字符用Char类型表示,值使用单引号 括起来。 fun main() {val a: Char 1println(a) // 1println("a类型为:${a.javaClass.simpleName}") // a类型为:char } 2、特殊字符的表示。 \t——制…...

yocto根文件系统如何配置静态IP地址
在Yocto根文件系统中配置静态IP地址,你可以参考以下步骤。请注意,这些步骤可能会因Yocto版本和具体硬件平台的不同而略有差异。 1. 获取网络配置信息 首先,你需要从网络运维方获取分配的IP地址、子网掩码、默认网关和DNS信息。 2. 确定配置文…...

【博客720】时序数据库基石:LSM Tree的辅助优化
时序数据库基石:LSM Tree的辅助优化 场景: LSM Tree其实本质是一种思想,而具体是否需要WAL,内存表用什么有序数据结构来组织,磁盘上的SSTable用什么结构来存放,是否需要布隆过滤器来加快不存在数据的判断等…...
C++前期概念(重)
目录 命名空间 命名空间定义 1. 正常的命名空间定义 2. 命名空间可以嵌套 3.头文件中的合并 命名空间使用 命名空间的使用有三种方式: 1:加命名空间名称及作用域限定符(::) 2:用using将命名空间中某个成员引入 3:使用using namespa…...

Java字符串加密HMAC-SHA1密钥,转换成Base64编码
新建一个maven测试项目,直接把代码复制过去就行,把data和secretKey的值替换成想加密的值。 package test;import javax.crypto.Mac; import javax.crypto.spec.SecretKeySpec; import java.security.InvalidKeyException; import java.security.NoSuchA…...
【网络架构】Nginx
目录 一、I/O模型 1.1 Linux 的 I/O 1.2 零拷贝技术 1.3 网络IO模型 1.3.1 阻塞型 I/O 模型(blocking IO)编辑 1.3.2非阻塞型 I/O 模型 (nonblocking IO)编辑 1.3.3 多路复用 I/O 型 ( I/O multiplexing )编辑 1.3.4 信号驱动式 I/O 模型 …...

C# OpenCvSharp 逻辑运算-bitwise_and、bitwise_or、bitwise_not、bitwise_xor
bitwise_and 函数 🤝 作用或原理: 将两幅图像进行与运算,通过逻辑与运算可以单独提取图像中的某些感兴趣区域。如果有掩码参数,则只计算掩码覆盖的图像区域。 示例: 在实际应用中,可以用 bitwise_and 来提取图像中的某些部分。例如,我们可以从图像中提取出一个特定的颜…...
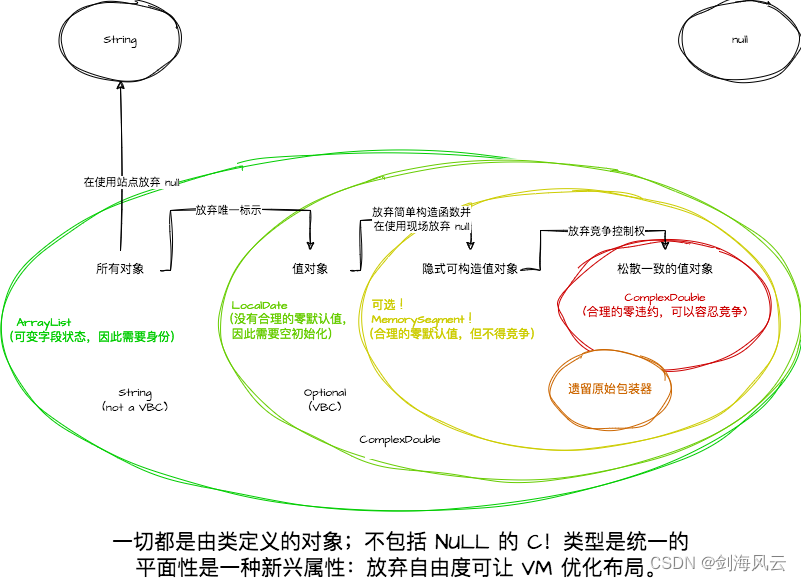
JVM常用概念之扁平化堆容器
扁平化堆容器是OpenJDK Valhalla 项目提出的,其主要目标为将值对象扁平化到其堆容器中,同时支持这些容器的所有指定行为,从而达到不影响原有功能的情况下,显著减少内存空间的占用(理想条件下可以减少24倍)。…...
)
python面试题5:浅拷贝和深拷贝之间有什么区别?(难度--中等)
文章目录 题目回答1.浅拷贝2.深拷贝 题目 浅拷贝和深拷贝之间有什么区别? 回答 1.浅拷贝 浅拷贝对于不可变数据,如字符串,整数,数组,往往是直接复制其的值。对于可变对象如列表,则是指向同一个地址。这…...

Jetson Linux 上安装ZMQ
1. 安装ZMQ 框架 apt-get install libzmq3-dev 2. 或者自己build ZMQ https://github.com/zeromq/libzmq.git 参考官网教程 3. 安装CPPZMQ CPPZMQ 是ZMQ 的友好的C封装,只需要一个zmq.hpp 头文件即可 git clone https://github.com/zeromq/cppzmq.git cd cppz…...
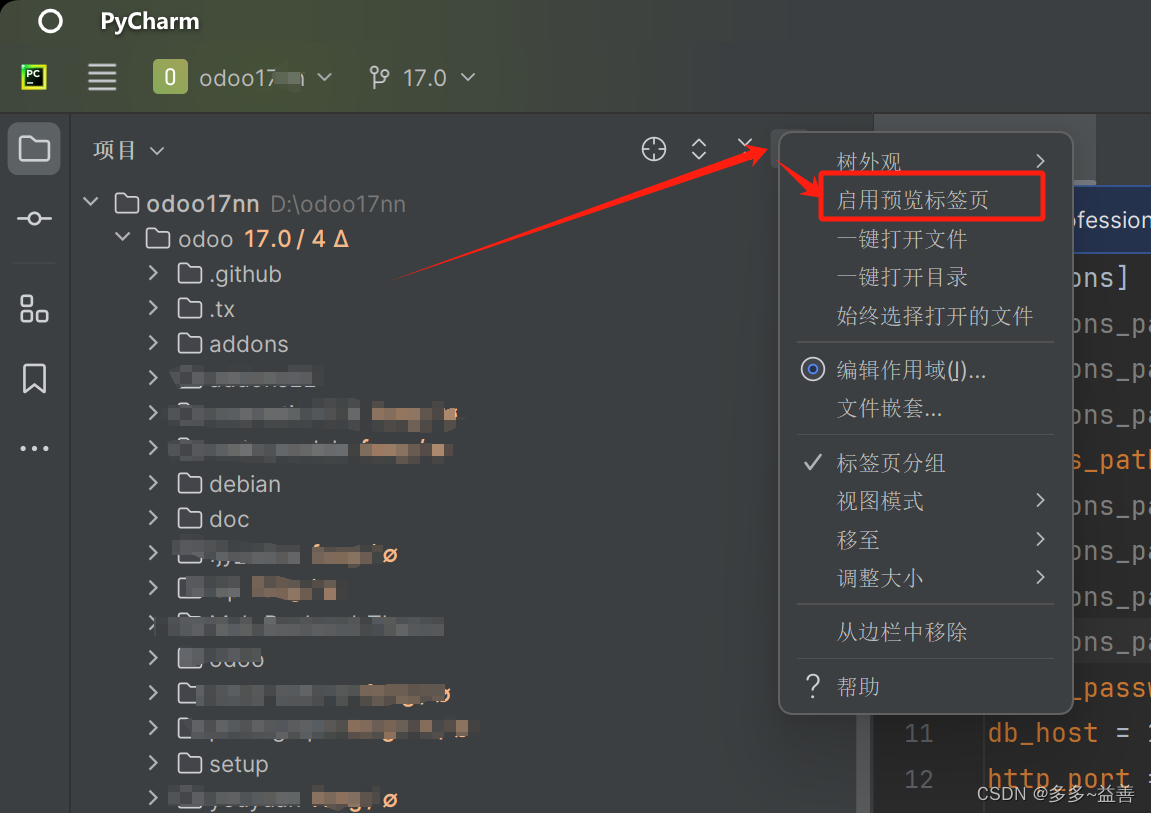
【Pycharm】设置双击打开文件
概要 习惯真可怕。很多小伙伴用习惯了VsCode开发,或者其他一些开发工具,然后某些开发工具是单击目录文件就能打开预览的,而换到pycharm后,发现目录是双击才能打开预览,那么这个用起来就特别不习惯。 解决办法 只需一…...

Vim 调用外部命令学习笔记
Vim 外部命令集成完全指南 文章目录 Vim 外部命令集成完全指南核心概念理解命令语法解析语法对比 常用外部命令详解文本排序与去重文本筛选与搜索高级 grep 搜索技巧文本替换与编辑字符处理高级文本处理编程语言处理其他实用命令 范围操作示例指定行范围处理复合命令示例 实用技…...

微软PowerBI考试 PL300-选择 Power BI 模型框架【附练习数据】
微软PowerBI考试 PL300-选择 Power BI 模型框架 20 多年来,Microsoft 持续对企业商业智能 (BI) 进行大量投资。 Azure Analysis Services (AAS) 和 SQL Server Analysis Services (SSAS) 基于无数企业使用的成熟的 BI 数据建模技术。 同样的技术也是 Power BI 数据…...

DockerHub与私有镜像仓库在容器化中的应用与管理
哈喽,大家好,我是左手python! Docker Hub的应用与管理 Docker Hub的基本概念与使用方法 Docker Hub是Docker官方提供的一个公共镜像仓库,用户可以在其中找到各种操作系统、软件和应用的镜像。开发者可以通过Docker Hub轻松获取所…...
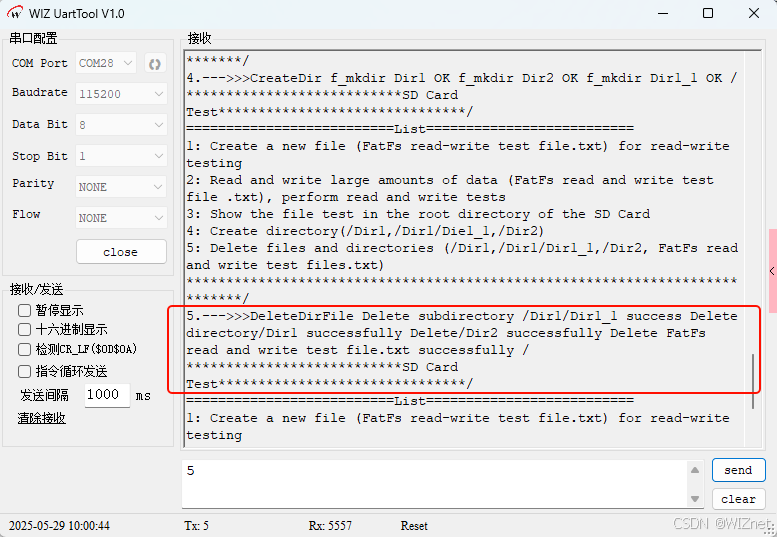
【第二十一章 SDIO接口(SDIO)】
第二十一章 SDIO接口 目录 第二十一章 SDIO接口(SDIO) 1 SDIO 主要功能 2 SDIO 总线拓扑 3 SDIO 功能描述 3.1 SDIO 适配器 3.2 SDIOAHB 接口 4 卡功能描述 4.1 卡识别模式 4.2 卡复位 4.3 操作电压范围确认 4.4 卡识别过程 4.5 写数据块 4.6 读数据块 4.7 数据流…...

Android15默认授权浮窗权限
我们经常有那种需求,客户需要定制的apk集成在ROM中,并且默认授予其【显示在其他应用的上层】权限,也就是我们常说的浮窗权限,那么我们就可以通过以下方法在wms、ams等系统服务的systemReady()方法中调用即可实现预置应用默认授权浮…...
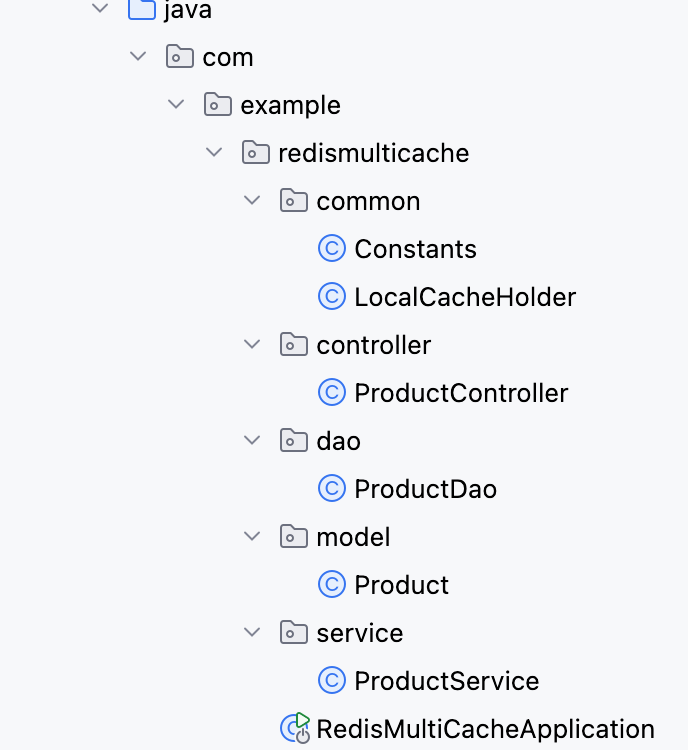
【Redis】笔记|第8节|大厂高并发缓存架构实战与优化
缓存架构 代码结构 代码详情 功能点: 多级缓存,先查本地缓存,再查Redis,最后才查数据库热点数据重建逻辑使用分布式锁,二次查询更新缓存采用读写锁提升性能采用Redis的发布订阅机制通知所有实例更新本地缓存适用读多…...

微服务通信安全:深入解析mTLS的原理与实践
🔥「炎码工坊」技术弹药已装填! 点击关注 → 解锁工业级干货【工具实测|项目避坑|源码燃烧指南】 一、引言:微服务时代的通信安全挑战 随着云原生和微服务架构的普及,服务间的通信安全成为系统设计的核心议题。传统的单体架构中&…...

向量几何的二元性:叉乘模长与内积投影的深层联系
在数学与物理的空间世界中,向量运算构成了理解几何结构的基石。叉乘(外积)与点积(内积)作为向量代数的两大支柱,表面上呈现出截然不同的几何意义与代数形式,却在深层次上揭示了向量间相互作用的…...
【技巧】dify前端源代码修改第一弹-增加tab页
回到目录 【技巧】dify前端源代码修改第一弹-增加tab页 尝试修改dify的前端源代码,在知识库增加一个tab页"HELLO WORLD",完成后的效果如下 [gif01] 1. 前端代码进入调试模式 参考 【部署】win10的wsl环境下启动dify的web前端服务 启动调试…...

C#中用于控制自定义特性(Attribute)
我们来详细解释一下 [AttributeUsage(AttributeTargets.Class, AllowMultiple false, Inherited false)] 这个 C# 属性。 在 C# 中,Attribute(特性)是一种用于向程序元素(如类、方法、属性等)添加元数据的机制。Attr…...
