iOS 中 attribute((constructor)) 修饰的函数
开发环境声明:此文描述的 attribute((constructor)) 特指使用 Objective-C 开发 iOS、MacOS,Swift 语言不支持这种属性修饰符。
初识 attribute((constructor))
在 Objective-C 开发中,attribute((constructor)) 是一个 GCC 和 Clang 编译器特性,允许开发者在程序启动时自动执行一些函数。使用这个属性修饰的函数会在 main 函数之前执行,通常用于初始化一些全局状态或者执行一些在程序开始时就需要完成的操作。
使用 attribute((constructor))
这种属性的使用方法很简单,只需要在函数定义前加上 __attribute__((constructor)) 修饰符即可。
#import <Foundation/Foundation.h>__attribute__((constructor))
void myCustomInitializer(void) {NSLog(@"This function is called before main");
}int main(int argc, const char * argv[]) {@autoreleasepool {NSLog(@"Hello, World!");}return 0;
}
在上面的代码中,myCustomInitializer 函数会在 main 函数之前执行。当你运行这个程序时,你会看到控制台输出:
This function is called before main
Hello, World!
应用场景
- 全局状态初始化:可以用于初始化一些全局变量或状态,这些变量在程序开始时就需要使用。
- 日志初始化:如果有全局的日志系统,可以在程序启动时进行初始化。
- 注册插件或模块:在应用启动时自动注册一些插件或模块,使其在整个应用生命周期中可用。
注意事项
- 执行顺序:如果有多个使用
attribute((constructor))修饰的函数,执行顺序是不确定的,因此不要依赖于特定的执行顺序。 - 执行时间:这些函数会在
main函数之前执行,因此会增加应用的启动时间,要谨慎使用,尽量避免进行耗时操作。 - Objective-C 的使用:虽然可以在 Objective-C 中使用,但要注意和 Objective-C runtime 的初始化顺序相互配合,避免在 Objective-C runtime 尚未完全初始化时进行依赖 Objective-C 特性的操作。
更复杂的例子
下面是一个更复杂的例子,展示了如何使用 attribute((constructor)) 初始化一个全局对象:
#import <Foundation/Foundation.h>@interface MyGlobalManager : NSObject
+ (void)initializeManager;
@end@implementation MyGlobalManager+ (void)initializeManager {NSLog(@"MyGlobalManager is initialized");// 全局初始化代码
}@end__attribute__((constructor))
void initializeGlobalManager(void) {[MyGlobalManager initializeManager];
}int main(int argc, const char * argv[]) {@autoreleasepool {NSLog(@"Application is starting");// 应用的其他代码}return 0;
}
运行这个程序,你会看到:
MyGlobalManager is initialized
Application is starting
What about attribute((constructor)) in Swift ?
在 Swift 中,无法直接使用 __attribute__((constructor)) 这种 GCC/Clang 特性,因为 Swift 语言不支持这种属性修饰符 (已经在开头声明)。不过,我们可以通过其他方法实现类似的效果,例如使用 @UIApplicationMain、全局变量的初始化方法、或使用 Objective-C 的方法结合 Swift 来达到在程序启动时执行某些代码的目的。
使用 Swift 实现类似效果
1. 全局变量的初始化
Swift 中全局变量在应用启动时会初始化,可以利用这一特性来执行一些初始化代码。
import Foundationlet initialize: Void = {print("This code runs before main")
}()@UIApplicationMain
class AppDelegate: UIResponder, UIApplicationDelegate {var window: UIWindow?func application(_ application: UIApplication, didFinishLaunchingWithOptions launchOptions: [UIApplication.LaunchOptionsKey: Any]?) -> Bool {print("Application did finish launching")return true}
}
在这个例子中,全局变量 initialize 在应用启动时会被初始化,因此其闭包中的代码会在 main 函数之前执行。
2. 使用 Objective-C 桥接
如果需要使用 __attribute__((constructor)) 特性,可以在 Objective-C 文件中定义,然后在 Swift 中调用。
Objective-C 部分
创建一个 Objective-C 文件,例如 Initializer.m:
// Initializer.m
#import <Foundation/Foundation.h>__attribute__((constructor))
static void myConstructor() {NSLog(@"Objective-C constructor is called before main");
}
创建一个桥接头文件,例如 YourProject-Bridging-Header.h,并在其中导入 Initializer.h:
// YourProject-Bridging-Header.h
#import "Initializer.h"
Swift 部分
确保在 Xcode 项目的设置中配置了桥接头文件,然后正常使用 Swift 编写应用:
import UIKit@UIApplicationMain
class AppDelegate: UIResponder, UIApplicationDelegate {var window: UIWindow?func application(_ application: UIApplication, didFinishLaunchingWithOptions launchOptions: [UIApplication.LaunchOptionsKey: Any]?) -> Bool {print("Application did finish launching")return true}
}
运行这个项目时,控制台会输出:
Objective-C constructor is called before main
Application did finish launching
3. 使用 UIApplicationMain
在 Swift 中,@UIApplicationMain 会自动生成一个 main 函数并处理应用的启动过程,实际上你很少需要显式编写初始化代码。通过在 AppDelegate 中的 application(_:didFinishLaunchingWithOptions:) 方法中进行初始化,也能实现类似效果:
@UIApplicationMain
class AppDelegate: UIResponder, UIApplicationDelegate {var window: UIWindow?func application(_ application: UIApplication, didFinishLaunchingWithOptions launchOptions: [UIApplication.LaunchOptionsKey: Any]?) -> Bool {// 初始化代码print("Application did finish launching")return true}
}
通过 attribute((constructor)) 实现组件化
通过 __attribute__((constructor)) 实现组件化的主要思路是利用这一特性来自动注册或初始化组件,使得每个组件在应用启动时都能自动执行其初始化代码。这在模块化或插件化系统中非常有用,因为它可以自动地将组件注册到系统中,而不需要在应用启动时显式地调用每个组件的初始化代码。
下面详细说明如何通过 __attribute__((constructor)) 实现组件化,并提供一个具体的例子。
组件化的基本思路
- 定义一个组件协议:每个组件都需要实现这个协议。
- 组件注册器:一个全局的组件注册器,用来管理所有注册的组件。
- 使用
__attribute__((constructor)):每个组件通过__attribute__((constructor))注册到全局注册器中。
具体步骤
1. 定义组件协议
首先,定义一个组件协议(例如 Component),所有组件都需要实现这个协议:
// Component.h
#import <Foundation/Foundation.h>@protocol Component <NSObject>
@required
- (void)initializeComponent;
@end
2. 组件注册器
创建一个全局的组件注册器,用来管理和调用所有注册的组件:
// ComponentRegistry.h
#import <Foundation/Foundation.h>@interface ComponentRegistry : NSObject
+ (instancetype)sharedInstance;
- (void)registerComponent:(id<Component>)component;
- (void)initializeAllComponents;
@end// ComponentRegistry.m
#import "ComponentRegistry.h"@interface ComponentRegistry ()
@property (nonatomic, strong) NSMutableArray<id<Component>> *components;
@end@implementation ComponentRegistry+ (instancetype)sharedInstance {static ComponentRegistry *sharedInstance = nil;static dispatch_once_t onceToken;dispatch_once(&onceToken, ^{sharedInstance = [[self alloc] init];});return sharedInstance;
}- (instancetype)init {if (self = [super init]) {_components = [NSMutableArray array];}return self;
}- (void)registerComponent:(id<Component>)component {[self.components addObject:component];
}- (void)initializeAllComponents {for (id<Component> component in self.components) {[component initializeComponent];}
}@end
3. 定义组件并使用 __attribute__((constructor)) 进行注册
每个组件通过 __attribute__((constructor)) 将自己注册到组件注册器中:
// MyComponent.h
#import <Foundation/Foundation.h>
#import "Component.h"@interface MyComponent : NSObject <Component>
@end// MyComponent.m
#import "MyComponent.h"
#import "ComponentRegistry.h"@implementation MyComponent- (void)initializeComponent {NSLog(@"MyComponent is initialized");
}__attribute__((constructor))
static void registerMyComponent(void) {MyComponent *component = [[MyComponent alloc] init];[[ComponentRegistry sharedInstance] registerComponent:component];
}@end
4. 在应用启动时初始化所有组件
在 AppDelegate 的 application:didFinishLaunchingWithOptions: 方法中,调用组件注册器的初始化方法:
// AppDelegate.m
#import "AppDelegate.h"
#import "ComponentRegistry.h"@interface AppDelegate ()
@end@implementation AppDelegate- (BOOL)application:(UIApplication *)application didFinishLaunchingWithOptions:(NSDictionary *)launchOptions {// Initialize all registered components[[ComponentRegistry sharedInstance] initializeAllComponents];return YES;
}@end
完整的示例
- Component.h
#import <Foundation/Foundation.h>@protocol Component <NSObject>
@required
- (void)initializeComponent;
@end
- ComponentRegistry.h
#import <Foundation/Foundation.h>
#import "Component.h"@interface ComponentRegistry : NSObject
+ (instancetype)sharedInstance;
- (void)registerComponent:(id<Component>)component;
- (void)initializeAllComponents;
@end
- ComponentRegistry.m
#import "ComponentRegistry.h"@interface ComponentRegistry ()
@property (nonatomic, strong) NSMutableArray<id<Component>> *components;
@end@implementation ComponentRegistry+ (instancetype)sharedInstance {static ComponentRegistry *sharedInstance = nil;static dispatch_once_t onceToken;dispatch_once(&onceToken, ^{sharedInstance = [[self alloc] init];});return sharedInstance;
}- (instancetype)init {if (self = [super init]) {_components = [NSMutableArray array];}return self;
}- (void)registerComponent:(id<Component>)component {[self.components addObject:component];
}- (void)initializeAllComponents {for (id<Component> component in self.components) {[component initializeComponent];}
}@end
- MyComponent.h
#import <Foundation/Foundation.h>
#import "Component.h"@interface MyComponent : NSObject <Component>
@end
- MyComponent.m
#import "MyComponent.h"
#import "ComponentRegistry.h"@implementation MyComponent- (void)initializeComponent {NSLog(@"MyComponent is initialized");
}__attribute__((constructor))
static void registerMyComponent(void) {MyComponent *component = [[MyComponent alloc] init];[[ComponentRegistry sharedInstance] registerComponent:component];
}@end
- AppDelegate.m
#import "AppDelegate.h"
#import "ComponentRegistry.h"@interface AppDelegate ()
@end@implementation AppDelegate- (BOOL)application:(UIApplication *)application didFinishLaunchingWithOptions:(NSDictionary *)launchOptions {// Initialize all registered components[[ComponentRegistry sharedInstance] initializeAllComponents];return YES;
}@end
要点总结
__attribute__((constructor)) 是一个非常有用的特性,允许开发者在程序启动时自动执行一些初始化操作。不过在使用时要注意性能影响和执行顺序,避免对应用启动时间产生负面影响。它适用于需要在应用启动时进行一些全局初始化工作的场景,但要避免在这些函数中进行耗时的操作。
虽然 Swift 本身不支持 __attribute__((constructor)),但我们可以通过全局变量初始化、使用 Objective-C 桥接以及在 AppDelegate 中进行初始化来实现类似的效果。这些方法在实际开发中都非常实用,并且可以满足绝大多数初始化需求。
通过 __attribute__((constructor)) 特性,可以在应用启动时自动注册和初始化各个组件,从而实现模块化和插件化的效果。这种方法简化了组件的初始化流程,使代码更具模块化和可扩展性。不过,在使用这种技术时,要注意性能影响和组件的初始化顺序问题,以确保应用能稳定、高效地启动。
相关文章:
) 修饰的函数)
iOS 中 attribute((constructor)) 修饰的函数
开发环境声明:此文描述的 attribute((constructor)) 特指使用 Objective-C 开发 iOS、MacOS,Swift 语言不支持这种属性修饰符。 初识 attribute((constructor)) 在 Objective-C 开发中,attribute((constructor)) 是一个 GCC 和 Clang 编译器…...

原生js实现图片预览控件,支持丝滑拖拽,滚轮放缩,放缩聚焦
手撸源代码如下:注释应该很详细了,拿去直用 可以放到在线编辑器测试,记得修改图片路径 菜鸟教程在线编辑器 <html lang"en"><head><meta charset"UTF-8"><meta name"viewport" conten…...
C语言入门课程学习笔记9:指针
C语言入门课程学习笔记9 第41课 - 指针:一种特殊的变量实验-指针的使用小结 第42课 - 深入理解指针与地址实验-指针的类型实验实验小结 第43课 - 指针与数组(上)实验小结 第44课 - 指针与数组(下)实验实验小结 第45课 …...

借助 Cloudflare D1 和 Drizzle 在 Astro 上实现全栈
使用 Cloudflare D1 和 Drizzle ORM 将后端添加到 Astro 项目的分步指南 文章目录 安装 Astro添加 Cloudflare 适配器部署到 Pages安装 wrangler 并登录创建 D1 数据库创建 wrangler.toml 文件将 .wrangler 添加到 .gitignore更新 astro.config.ts安装 Drizzle 依赖项创建 driz…...
SUSE linux 15的网络管理
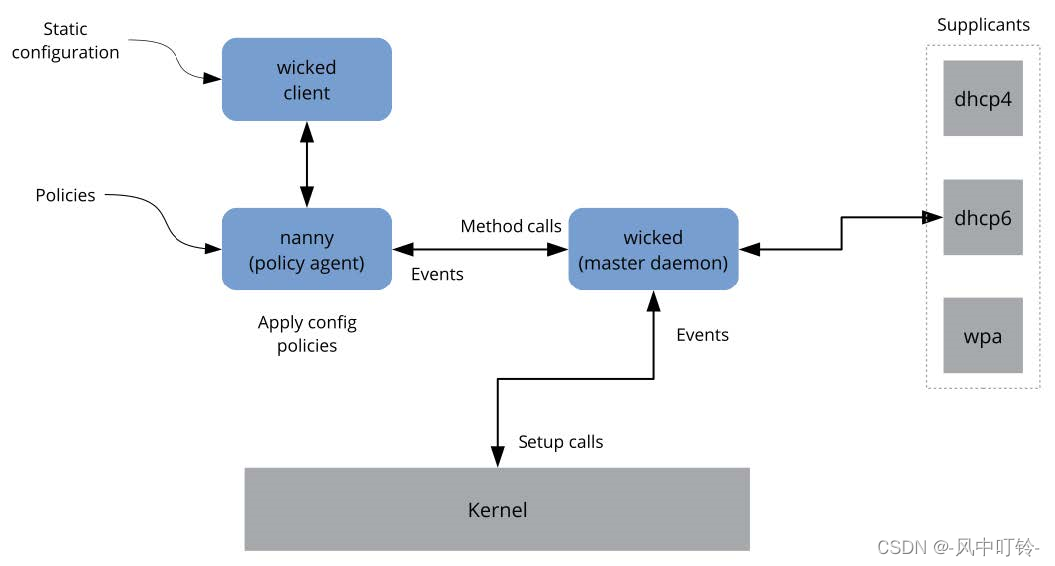
1 手工配置网络 wicked提供了一种新的网络配置框架。自SUSE 12起,SUSE使用了新的网络管理工具wicked,这个是区别与其他常见发行版的。常见的发行版目前大多使用的是NetworkManager服务进行网络管理。 1.1 wicked网络配置 传统网络接口管理面临的挑战之…...

海康威视-下载的录像视频浏览器播放问题
目录 1、播放异常比对 2、视频编码检查 2.1、正常视频解析 2.2、海康视频解析 2.3、比对工具 3、转码 3.1、maven依赖 3.2、实现代码 4、验证 在前面的文章(海康威视-按时间下载录像文件_海康威视 sdk 下载录像 大小0-CSDN博客)中,通…...
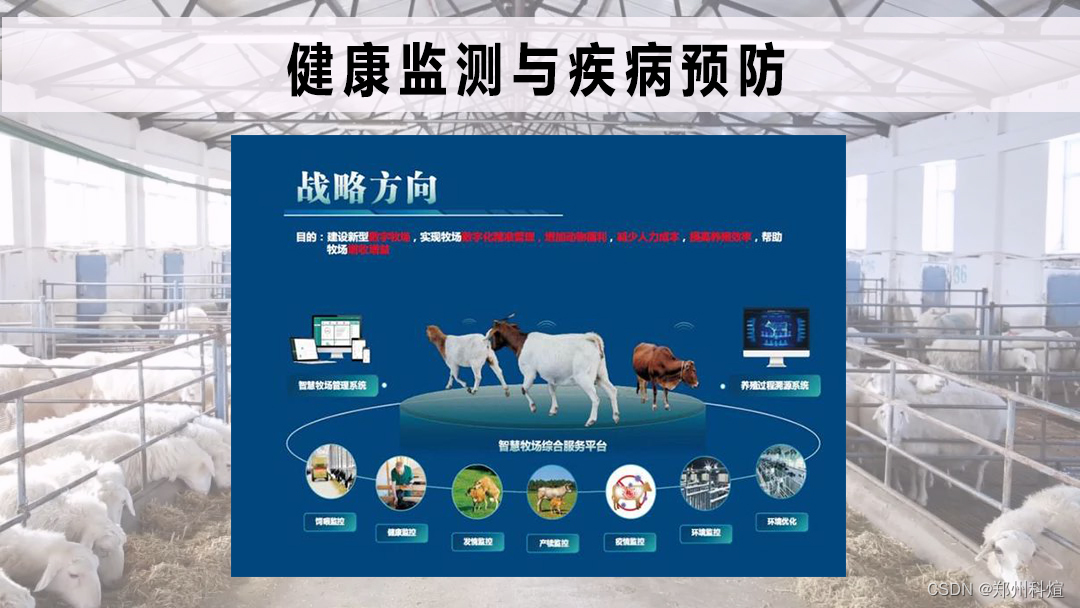
养殖自动化管理系统:开启智慧养殖新篇章
在现代农业的快速演进中,养殖业正经历一场前所未有的技术革命。养殖自动化管理系统,作为这场变革的前沿科技,正逐步成为推动行业高效、环保、可持续发展的关键力量。本文将深入探讨自动化养殖系统如何通过精准管理、智能监控、数据驱动决策&a…...
SmartEDA革新来袭:融合Multisim与Proteus精髓,引领电子设计新纪元!
在电子设计领域,每一次技术的革新都如同春风化雨,滋润着设计师们的心田。今天,我们迎来了一个划时代的电子设计自动化(EDA)工具——SmartEDA,它不仅融合了业界知名的Multisim和Proteus的精华,更…...

【FFmpeg】AVFormatContext结构体
【FFmpeg】AVFormatContext结构体 1.AVFormatContext结构体1.2 const struct AVInputFormat *iformat1.3 const struct AVOutputFormat *oformat 参考: FFMPEG结构体分析:AVFormatContext 示例工程: 【FFmpeg】调用ffmpeg库实现264软编 【FF…...

【SpringSecurity】认证与鉴权框架SpringSecurity——授权
目录 权限系统的必要性常见的权限管理框架SpringSecurity授权基本流程准备脚本限制访问资源所需权限菜单实体类和Mapper封装权限信息封装认证/鉴权失败处理认证失败封装鉴权失败封装配置SpringSecurity 过滤器跨域处理接口添加鉴权hasAuthority/hasAnyAuthorityhasRole/ hasA…...

深入解析FTP:原理、架构与搭建方式
在当今互联网世界中,文件传输是日常工作和生活中不可或缺的一部分。FTP(File Transfer Protocol,文件传输协议)作为一种老而弥坚的协议,一直在文件传输领域发挥着重要作用。本文将从技术人的角度,详细分析F…...

Springboot与RestTemplate
RestTemplate是Spring提供的用于访问Rest服务的客户端,RestTemplate提供了多种便捷访问远程Http服务的方法,能够大大提高客户端的编写效率。 一、使用Get进行访问 1、获取json格式 使用 getForEntity() API 发起 GET 请求: RestTemplate restTemplate…...

端口发布与暴露
端口发布与暴露 目录 发布端口发布到临时端口发布所有端口试一试 使用 Docker CLI使用 Docker Compose 如果你一直在跟随本指南,你应该理解容器为应用程序的每个组件提供了隔离的进程。每个组件 - 如 React 前端、Python API 和 Postgres 数据库 - 都运行在自己的…...

Unity:使用Texture2D动态创建的图像无法正常显示 / 修改图像后未生效
开发中遇到需要动态绘制图像的需求,前后文代码如下所示: Texture2D newImageTexture new Texture2D(width, height); Color32[] newImagePixels new Color32[height * width];for (int y 0; y < height ; y) {for (int x 0; x < width; x){if…...

【LinuxC语言】详解TCP/IP
文章目录 前言TCP与UDP协议的介绍TCP协议流式传输TCP的三次握手连接TCP的四次挥手连接断开总结前言 在我们的日常生活中,无论是浏览网页,还是发送电子邮件,甚至是在线视频聊天,都离不开网络通信。而在网络通信中,TCP和UDP协议起着至关重要的作用。本文将以通俗易懂的语言…...

数字化转型下的企业人力资源信息系统研究
随着数字化转型的加速,企业人力资源管理面临着全新的挑战和机遇。传统的人力资源信息系统(HRIS)在新时代的要求下必须进行深刻的革新和升级,以更好地支持企业的发展战略和员工的需求。 数据驱动的决策支持 在当今这个信息化迅猛发…...

docker camunda 8.5 部署步骤
Camunda Platform 8 环境准备 Docker 版本要求 Docker 20.10.16 is required; docker compose version 1.27.0.;github 开源地址:https://github.com/camunda/camunda-platformcamunda7 文档地址:https://docs.camunda.org/manual/7.21/user-guide/process-engine/社区地址: …...
应用场景——委托与Lambda表达式的结合使用详解)
学懂C#编程:常用高级技术——委托(Delegate)应用场景——委托与Lambda表达式的结合使用详解
在C#中,委托与Lambda表达式的结合使用是现代编程实践中的一个重要且强大的特性,它极大地提高了代码的简洁性和可读性。下面将详细讲解这两个概念如何协同工作,以及如何在实际编程中有效利用它们。 委托基础 委托是C#中的一种引用类型&#x…...
05-java基础——循环习题
循环的选择:知道循环的次数或者知道循环的范围就使用for循环,其次再使用while循环 猜数字 程序自动生成一个1-100之间的随机数,在代码中使用键盘录入去猜出这个数字是多少? 要求:使用循环猜,一直猜中为止…...

网络安全等级保护测评
网络安全等级保护 《GB17859 计算机信息系统安全保护等级划分准则》 规定计算机信息系统安全保护等级共分五级 《中华人民共和国网络安全法》 “国家实行网络安全等级保护制度。 等级测评 测评机构依据国家网络安全等级保护制度规定,按照有关 管理规范和…...

华硕笔记本性能优化神器:G-Helper硬件管理工具完全指南
华硕笔记本性能优化神器:G-Helper硬件管理工具完全指南 【免费下载链接】g-helper Lightweight Armoury Crate alternative for Asus laptops. Control tool for ROG Zephyrus G14, G15, G16, M16, Flow X13, Flow X16, TUF, Strix, Scar and other models 项目地…...

RakNet网络消息处理全攻略:从BitStream到MessageIdentifiers的深度解析
RakNet网络消息处理全攻略:从BitStream到MessageIdentifiers的深度解析 【免费下载链接】RakNet RakNet is a cross platform, open source, C networking engine for game programmers. 项目地址: https://gitcode.com/gh_mirrors/ra/RakNet RakNet是一款跨…...

UNIT-00模型实现智能C盘清理建议与系统优化方案生成
UNIT-00模型实现智能C盘清理建议与系统优化方案生成 不知道你有没有遇到过这种情况:电脑用着用着,突然弹出一个红色警告,告诉你C盘空间不足。点开一看,那个小小的C盘图标已经红得刺眼,可用空间只剩下可怜的几百兆。这…...
Visual Studio Code 远程开发:调试 Pixel Mind Decoder 调用代码
Visual Studio Code 远程开发:调试 Pixel Mind Decoder 调用代码 1. 前言:为什么需要远程开发 当你需要在GPU服务器上运行和调试AI模型代码时,直接在本地开发会遇到各种环境问题。Visual Studio Code的远程开发功能可以让你像在本地一样编写…...

16QAM星座图映射与MATLAB误码率仿真分析
1. 16QAM调制技术基础 第一次接触16QAM时,我被那些散落在坐标系上的小点深深吸引。这就像夜空中的星座,每个光点都承载着独特的信息。16QAM(16进制正交幅度调制)是现代通信系统中非常实用的一种调制方式,它巧妙地将幅度…...

解决UniApp Camera拍照区域裁剪难题:我的Canvas绘制与上传优化方案
UniApp Camera精准裁剪与性能优化实战:从VIN码识别到文档扫描 在移动应用开发中,相机功能的高效实现往往决定着核心用户体验。特别是在需要精确识别特定区域内容的场景下——无论是汽车VIN码扫描、证件识别还是文档数字化处理——开发者都会面临三个关键…...

免杀实战:DLL劫持与白加黑攻击的进阶对抗技巧
1. DLL劫持技术原理与实战应用 DLL劫持(DLL Hijacking)是一种利用Windows系统动态链接库加载机制的安全漏洞进行攻击的技术。简单来说,就是当程序运行时,它会按照特定顺序搜索并加载所需的DLL文件。如果攻击者能够将一个恶意的DLL…...

科研提示词
科研提示词 来自于Github项目:https://github.com/Leey21/awesome-ai-research-writing Make AI Writing Better for Everyone 📖 为什么做这个项目 当你第三次调试同一个润色 prompt 时,隔壁组的同学可能已经用现成的模板改完了三篇论文。 …...

Fish Speech-1.5镜像部署稳定性测试:7×24小时高负载压力测试报告
Fish Speech-1.5镜像部署稳定性测试:724小时高负载压力测试报告 1. 测试背景与目标 Fish Speech V1.5作为当前领先的文本转语音模型,基于超过100万小时的多语言音频数据训练而成,支持包括中文、英语、日语在内的13种语言。在实际应用中&…...

MQ137氨气传感器驱动与温湿度补偿实战指南
1. MQ137氨气传感器底层驱动技术解析与工程实践指南MQ137是一种基于金属氧化物半导体(MOS)原理的电化学气体传感器,专为高灵敏度检测氨气(NH₃)设计。其核心敏感元件为SnO₂基陶瓷管,表面涂覆贵金属催化剂&…...