Nacos2.X 配置中心源码分析:客户端如何拉取配置、服务端配置发布客户端监听机制
文章目录
- Nacos配置中心源码
- 总流程图
- NacosClient源码分析
- 获取配置
- 注册监听器
- NacosServer源码分析
- 配置dump
- 配置发布
Nacos配置中心源码
总流程图
Nacos2.1.0源码分析在线流程图

源码的版本为2.1.0 ,并在配置了下面两个启动参数,一个表示单机启动,一个是指定nacos的工作目录,其中会存放各种运行文件方便查看
-Dnacos.standalone=true
-Dnacos.home=D:\nacos-cluster\nacos2.1.0standalone
NacosClient源码分析
在NacosClient端服务注册中心核心的接口是NamingService,而配置中心核心的接口是ConfigService
我们可以添加一个配置,然后查看这里的实例代码

/*
* Demo for Nacos
* pom.xml<dependency><groupId>com.alibaba.nacos</groupId><artifactId>nacos-client</artifactId><version>${version}</version></dependency>
*/
package com.alibaba.nacos.example;import java.util.Properties;
import java.util.concurrent.Executor;
import com.alibaba.nacos.api.NacosFactory;
import com.alibaba.nacos.api.config.ConfigService;
import com.alibaba.nacos.api.config.listener.Listener;
import com.alibaba.nacos.api.exception.NacosException;/*** Config service example** @author Nacos**/
public class ConfigExample {public static void main(String[] args) throws NacosException, InterruptedException {String serverAddr = "localhost";String dataId = "nacos-config-demo.yaml";String group = "DEFAULT_GROUP";Properties properties = new Properties();properties.put(PropertyKeyConst.SERVER_ADDR, serverAddr);//获取配置服务ConfigService configService = NacosFactory.createConfigService(properties);//获取配置String content = configService.getConfig(dataId, group, 5000);System.out.println(content);//注册监听器configService.addListener(dataId, group, new Listener() {@Overridepublic void receiveConfigInfo(String configInfo) {System.out.println("recieve:" + configInfo);}@Overridepublic Executor getExecutor() {return null;}});//发布配置//boolean isPublishOk = configService.publishConfig(dataId, group, "content");//System.out.println(isPublishOk);//发送properties格式configService.publishConfig(dataId,group,"common.age=30", ConfigType.PROPERTIES.getType());Thread.sleep(3000);content = configService.getConfig(dataId, group, 5000);System.out.println(content);/*		boolean isRemoveOk = configService.removeConfig(dataId, group);System.out.println(isRemoveOk);Thread.sleep(3000);content = configService.getConfig(dataId, group, 5000);System.out.println(content);Thread.sleep(300000);*/}
}
获取配置
总结:
获取配置的主要方法是 NacosConfigService 类的 getConfig 方法,通常情况下该方法直接从本地文件中取得配置的值,如果本地文件不存在或者内容为空,则再通过grpc从远端拉取配置,并保存到本地快照中。
NacosServer端的处理是从磁盘读取配置文件./nacosHome/data/config-data/DEFAULT_GROUP/dataId,然后将读取到的content返回

接下来的源码就是这里一块的流程,它是如何调用到NacosConfigService 类的 getConfig ()方法
public interface ConfigService {String getConfig(String dataId, String group, long timeoutMs) throws NacosException;......
}

还是一样,从spring.factiries文件中起步

进入到NacosConfigBootstrapConfiguration自动配置类的,这其中会创建一个NacosPropertySourceLocatorbean对象
@Configuration(proxyBeanMethods = false)
@ConditionalOnProperty(name = {"spring.cloud.nacos.config.enabled"},matchIfMissing = true
)
public class NacosConfigBootstrapConfiguration {public NacosConfigBootstrapConfiguration() {}@Bean@ConditionalOnMissingBeanpublic NacosConfigProperties nacosConfigProperties() {return new NacosConfigProperties();}@Bean@ConditionalOnMissingBeanpublic NacosConfigManager nacosConfigManager(NacosConfigProperties nacosConfigProperties) {return new NacosConfigManager(nacosConfigProperties);}// 核心bean@Beanpublic NacosPropertySourceLocator nacosPropertySourceLocator(NacosConfigManager nacosConfigManager) {return new NacosPropertySourceLocator(nacosConfigManager);}@Bean@ConditionalOnMissingBean(search = SearchStrategy.CURRENT)@ConditionalOnNonDefaultBehaviorpublic ConfigurationPropertiesRebinder smartConfigurationPropertiesRebinder(ConfigurationPropertiesBeans beans) {return new SmartConfigurationPropertiesRebinder(beans);}
}
在NacosPropertySourceLocator这个bean中,它的接口中的默认方法会调用locate()方法:
-
加载共享配置文件,也就是
shared-configs配置项指定的数组 -
加载加载扩展的配置文件,也就是
extension-configs配置项指定的数组 -
加载和应用名相关的几个默认配置文件,比如order-service-dev.yml
-
上面三个方法中都会各自调用到
loadNacosDataIfPresent()-->loadNacosPropertySource(...)-->NacosPropertySourceBuilder.build()
public class NacosPropertySourceLocator implements PropertySourceLocator {public PropertySource<?> locate(Environment env) {this.nacosConfigProperties.setEnvironment(env);// 获取配置中心服务ConfigServiceConfigService configService = this.nacosConfigManager.getConfigService();if (null == configService) {log.warn("no instance of config service found, can't load config from nacos");return null;} else {long timeout = (long)this.nacosConfigProperties.getTimeout();this.nacosPropertySourceBuilder = new NacosPropertySourceBuilder(configService, timeout);String name = this.nacosConfigProperties.getName();String dataIdPrefix = this.nacosConfigProperties.getPrefix();if (StringUtils.isEmpty(dataIdPrefix)) {dataIdPrefix = name;}if (StringUtils.isEmpty(dataIdPrefix)) {dataIdPrefix = env.getProperty("spring.application.name");}CompositePropertySource composite = new CompositePropertySource("NACOS");// 加载共享配置文件this.loadSharedConfiguration(composite);// 加载扩展的配置文件this.loadExtConfiguration(composite);// 加载当前应用配置文件// 在该方法中会进行下面三行的逻辑/*dataIdPrefixdataIdPrefix + "." + fileExtensiondataIdPrefix + "-" + profile + "." + fileExtension*/this.loadApplicationConfiguration(composite, dataIdPrefix, this.nacosConfigProperties, env);return composite;}}// 可以详细看一下,NacosClient启动时,是怎么根据微服务名去取配置文件的private void loadApplicationConfiguration() {String fileExtension = properties.getFileExtension();String nacosGroup = properties.getGroup();// 最先使用微服务名 调用下面的loadNacosDataIfPresent()方法this.loadNacosDataIfPresent(compositePropertySource, dataIdPrefix, nacosGroup, fileExtension, true);// 接下来是使用微服务名+文件后缀名的方式 调用下面的loadNacosDataIfPresent()方法this.loadNacosDataIfPresent(compositePropertySource, dataIdPrefix + "." + fileExtension, nacosGroup, fileExtension, true);String[] var7 = environment.getActiveProfiles();int var8 = var7.length;for(int var9 = 0; var9 < var8; ++var9) {String profile = var7[var9];// 第三次使用 微服务名+profile + 文件后缀名 调用下面的loadNacosDataIfPresent()方法String dataId = dataIdPrefix + "-" + profile + "." + fileExtension;this.loadNacosDataIfPresent(compositePropertySource, dataId, nacosGroup, fileExtension, true);}}// 在上面三个加载共享、扩展、当前应用名方法中,最终都会调用到下面的loadNacosDataIfPresent(...) 方法中private void loadNacosDataIfPresent(...) {if (null != dataId && dataId.trim().length() >= 1) {if (null != group && group.trim().length() >= 1) {// 调用loadNacosPropertySource()方法NacosPropertySource propertySource = this.loadNacosPropertySource(dataId, group, fileExtension, isRefreshable);this.addFirstPropertySource(composite, propertySource, false);}}}// loadNacosDataIfPresent(...) ---> loadNacosPropertySource(...)private NacosPropertySource loadNacosPropertySource(...) {return NacosContextRefresher.getRefreshCount() != 0L && !isRefreshable ? NacosPropertySourceRepository.getNacosPropertySource(dataId, group) : // 这里会进入到NacosPropertySourceBuilder类的build方法this.nacosPropertySourceBuilder.build(dataId, group, fileExtension, isRefreshable);}}
NacosPropertySourceBuilder类的代码调用流程:
- 这里就会调用到核心接口
configService接口实现类的getConfig()方法
public class NacosPropertySourceBuilder {......NacosPropertySource build(String dataId, String group, String fileExtension, boolean isRefreshable) {// 这里会先调用loadNacosData()方法List<PropertySource<?>> propertySources = this.loadNacosData(dataId, group, fileExtension);NacosPropertySource nacosPropertySource = new NacosPropertySource(propertySources, group, dataId, new Date(), isRefreshable);NacosPropertySourceRepository.collectNacosPropertySource(nacosPropertySource);return nacosPropertySource;}// build(...) ---> loadNacosData(...)private List<PropertySource<?>> loadNacosData(String dataId, String group, String fileExtension) {String data = null;try {// 这里进入到了configService接口实现类的getConfig()方法data = this.configService.getConfig(dataId, group, this.timeout);if (StringUtils.isEmpty(data)) {log.warn("Ignore the empty nacos configuration and get it based on dataId[{}] & group[{}]", dataId, group);return Collections.emptyList();}if (log.isDebugEnabled()) {log.debug(String.format("Loading nacos data, dataId: '%s', group: '%s', data: %s", dataId, group, data));}return NacosDataParserHandler.getInstance().parseNacosData(dataId, data, fileExtension);} catch (NacosException var6) {log.error("get data from Nacos error,dataId:{} ", dataId, var6);} catch (Exception var7) {log.error("parse data from Nacos error,dataId:{},data:{}", new Object[]{dataId, data, var7});}return Collections.emptyList();}}
核心方法,NacosClient向NacosServer发送请求,拉取配置的方法。
前面的调用栈如果不会,可以直接在下面getConfig()方法出打一个断点,然后从debug中看调用栈。方法具体的实现:
- NacosClient端,这里首先会读取本地文件,本地是有一个缓存的
- 如果本地缓存中没有我们需要的配置,那么就需要从NacosServer端拉取配置了
- 发送请求,获取响应数据
- 将数据在本地文件中缓存一份
// 只是方法调用
public String getConfig(String dataId, String group, long timeoutMs) throws NacosException {return getConfigInner(namespace, dataId, group, timeoutMs);
}private String getConfigInner(String tenant, String dataId, String group, long timeoutMs) throws NacosException {group = blank2defaultGroup(group);ParamUtils.checkKeyParam(dataId, group);ConfigResponse cr = new ConfigResponse();cr.setDataId(dataId);cr.setTenant(tenant);cr.setGroup(group);// use local config first// NacosClient端,这里首先会读取本地文件,本地是有一个缓存的String content = LocalConfigInfoProcessor.getFailover(worker.getAgentName(), dataId, group, tenant);if (content != null) {LOGGER.warn(..);cr.setContent(content);String encryptedDataKey = LocalEncryptedDataKeyProcessor.getEncryptDataKeyFailover(agent.getName(), dataId, group, tenant);cr.setEncryptedDataKey(encryptedDataKey);configFilterChainManager.doFilter(null, cr);content = cr.getContent();return content;}// 如果本地缓存中没有我们需要的配置,那么就需要从NacosServer端拉取配置了try {// 从服务端获取配置ConfigResponse response = worker.getServerConfig(dataId, group, tenant, timeoutMs, false);cr.setContent(response.getContent());cr.setEncryptedDataKey(response.getEncryptedDataKey());configFilterChainManager.doFilter(null, cr);content = cr.getContent();return content;} catch (NacosException ioe) {if (NacosException.NO_RIGHT == ioe.getErrCode()) {throw ioe;}LOGGER.warn(..);}LOGGER.warn(..);// 再从本地文件缓存中找content = LocalConfigInfoProcessor.getSnapshot(worker.getAgentName(), dataId, group, tenant);cr.setContent(content);String encryptedDataKey = LocalEncryptedDataKeyProcessor.getEncryptDataKeyFailover(agent.getName(), dataId, group, tenant);cr.setEncryptedDataKey(encryptedDataKey);configFilterChainManager.doFilter(null, cr);content = cr.getContent();return content;
}//--------------------------
public ConfigResponse getServerConfig(String dataId, String group, String tenant, long readTimeout, boolean notify)throws NacosException {// 默认组名if (StringUtils.isBlank(group)) {group = Constants.DEFAULT_GROUP;}// 从服务端查询配置return this.agent.queryConfig(dataId, group, tenant, readTimeout, notify);
}// 向NacosServer发送请求,拉取配置数据,并在本地文件中缓存一份
public ConfigResponse queryConfig(String dataId, String group, String tenant, long readTimeouts, boolean notify)throws NacosException {ConfigQueryRequest request = ConfigQueryRequest.build(dataId, group, tenant);request.putHeader(NOTIFY_HEADER, String.valueOf(notify));RpcClient rpcClient = getOneRunningClient();if (notify) {CacheData cacheData = cacheMap.get().get(GroupKey.getKeyTenant(dataId, group, tenant));if (cacheData != null) {rpcClient = ensureRpcClient(String.valueOf(cacheData.getTaskId()));}}// 发送请求,获取响应数据ConfigQueryResponse response = (ConfigQueryResponse) requestProxy(rpcClient, request, readTimeouts);ConfigResponse configResponse = new ConfigResponse();if (response.isSuccess()) {// 将数据在本地文件中缓存一份LocalConfigInfoProcessor.saveSnapshot(this.getName(), dataId, group, tenant, response.getContent());configResponse.setContent(response.getContent());String configType;if (StringUtils.isNotBlank(response.getContentType())) {configType = response.getContentType();} else {configType = ConfigType.TEXT.getType();}configResponse.setConfigType(configType);String encryptedDataKey = response.getEncryptedDataKey();LocalEncryptedDataKeyProcessor.saveEncryptDataKeySnapshot(agent.getName(), dataId, group, tenant, encryptedDataKey);configResponse.setEncryptedDataKey(encryptedDataKey);return configResponse;} else if (response.getErrorCode() == ConfigQueryResponse.CONFIG_NOT_FOUND) {LocalConfigInfoProcessor.saveSnapshot(this.getName(), dataId, group, tenant, null);LocalEncryptedDataKeyProcessor.saveEncryptDataKeySnapshot(agent.getName(), dataId, group, tenant, null);return configResponse;} else if (response.getErrorCode() == ConfigQueryResponse.CONFIG_QUERY_CONFLICT) {...}
}
注册监听器
结论:
- 从spring.facotries文件中开始,其中一个bean会监听spring容器启动完成的事件
- 然后它会为当前应用添加监听器:遍历每个dataId,添加监听器。
- 当nacosServer端更改了配置,这里监听器中的方法就会运行,这里都会发布一个RefreshEvent事件
- 处理RefreshEvent事件的方法中会
- 刷新环境变量
- 销毁@RefreshScope注解修改的bean实例
NacosServer端如果修改了配置,就会发布一个事件,而在NacosClient端这边就会有一个EventListener去监听该事件并进行相应的处理。
在ConfigService接口中,有三个和监听器相关的方法
public interface ConfigService {String getConfigAndSignListener(String dataId, String group, long timeoutMs, Listener listener)throws NacosException;void addListener(String dataId, String group, Listener listener) throws NacosException;void removeListener(String dataId, String group, Listener listener);}

接下来进入源码中,入口是NacosConfigAutoConfiguration自动配置的NacosContextRefresherbean 对象
@Configuration(proxyBeanMethods = false)
@ConditionalOnProperty(name = {"spring.cloud.nacos.config.enabled"},matchIfMissing = true
)
public class NacosConfigAutoConfiguration {...@Beanpublic NacosContextRefresher nacosContextRefresher(NacosConfigManager nacosConfigManager, NacosRefreshHistory nacosRefreshHistory) {return new NacosContextRefresher(nacosConfigManager, nacosRefreshHistory);}...
}
该类它监听了ApplicationReadyEvent事件,
-
在spring容器启动完成后就会调用该类的
onApplicationEvent()方法 -
给当前应用注册nacos监听器
-
为每个 dataId注册监听器
-
当某个dataId发生了更改,这里都会发布一个RefreshEvent事件
public class NacosContextRefresher implements ApplicationListener<ApplicationReadyEvent> , ApplicationContextAware {// 在spring容器启动完成后就会调用该类的onApplicationEvent()方法public void onApplicationEvent(ApplicationReadyEvent event) {if (this.ready.compareAndSet(false, true)) {// 给当前应用注册nacos监听器this.registerNacosListenersForApplications();}}// 给当前应用注册nacos监听器private void registerNacosListenersForApplications() {// 是否刷新配置,默认为trueif (this.isRefreshEnabled()) {Iterator var1 = NacosPropertySourceRepository.getAll().iterator();// 遍历每个dataIdwhile(var1.hasNext()) {NacosPropertySource propertySource = (NacosPropertySource)var1.next();if (propertySource.isRefreshable()) {String dataId = propertySource.getDataId();// 为每个 dataId注册监听器this.registerNacosListener(propertySource.getGroup(), dataId);}}}}// 为每个 dataId注册监听器private void registerNacosListener(final String groupKey, final String dataKey) {String key = NacosPropertySourceRepository.getMapKey(dataKey, groupKey);// 定义一个监听器Listener listener = (Listener)this.listenerMap.computeIfAbsent(key, (lst) -> {return new AbstractSharedListener() {public void innerReceive(String dataId, String group, String configInfo) {NacosContextRefresher.refreshCountIncrement();// 配置的历史记录NacosContextRefresher.this.nacosRefreshHistory.addRefreshRecord(dataId, group, configInfo);// 发布一个RefreshEvent事件,会在处理该事件的位置真正进行刷新配置项NacosContextRefresher.this.applicationContext.publishEvent(new RefreshEvent(this, (Object)null, "..."));}};});try {// 调用configService接口的addListener()添加监听器this.configService.addListener(dataKey, groupKey, listener);} catch (NacosException var6) {log.warn(String.format("register fail for nacos listener ,dataId=[%s],group=[%s]", dataKey, groupKey), var6);}}
}
当NacosServer端某个配置文件改动后,就会回调上面监听器的innerReceive()方法,在该方法中就会发布RefreshEvent事件,处理该事件的是RefreshEventListener类中的onApplicationEvent()方法:
- 直接调用refresh()方法
public class RefreshEventListener implements SmartApplicationListener {...public void onApplicationEvent(ApplicationEvent event) {if (event instanceof ApplicationReadyEvent) {this.handle((ApplicationReadyEvent)event);} else if (event instanceof RefreshEvent) {// 处理RefreshEvent事件,调用handler()方法this.handle((RefreshEvent)event);}}public void handle(ApplicationReadyEvent event) {this.ready.compareAndSet(false, true);}public void handle(RefreshEvent event) {if (this.ready.get()) {// 这里就会调用refresh()方法进行刷新Set<String> keys = this.refresh.refresh();}}
}
接下来就进入到了ContextRefresher类的refresh()方法:
- 刷新环境变量
- 销毁@RefreshScope注解修改的bean实例
public synchronized Set<String> refresh() {// 刷新环境变量Set<String> keys = this.refreshEnvironment();// 销毁@RefreshScope注解修改的bean实例this.scope.refreshAll();return keys;
}
NacosServer源码分析
配置dump
服务端启动时就会依赖 DumpService 的 init 方法,从数据库中 load 配置存储在本地磁盘上,并将一些重要的元信息例如 MD5 值缓存在内存中。服务端会根据心跳文件中保存的最后一次心跳时间,来判断到底是从数据库 dump 全量配置数据还是部分增量配置数据(如果机器上次心跳间隔是 6h 以内的话)。
全量 dump 当然先清空磁盘缓存,然后根据主键 ID 每次捞取一千条配置刷进磁盘和内存。增量 dump 就是捞取最近六小时的新增配置(包括更新的和删除的),先按照这批数据刷新一遍内存和文件,再根据内存里所有的数据全量去比对一遍数据库,如果有改变的再同步一次,相比于全量 dump 的话会减少一定的数据库 IO 和磁盘 IO 次数。
配置发布

结论:
-
更改数据库中的数据,持久化信息到mysql
-
触发一个ConfigDataChangeEvent事件。至此请求结束。
-
接下来就处理上面的事件:
-
遍历Nacos集群下的所有节点,包括自己
-
生成一个http/rpc的任务对象去执行,这里就直接看rpc任务对象的处理
-
判断是不是当前节点,如果是就调用dump()方法去处理
-
将更改的数据保存至本地磁盘中
-
生成md5,并通过一个key将md5存入cache中,再发布一个LocalDataChangeEvent事件,该事件存了key
处理上方事件的方法中会开启一个任务,在任务的run()方法中会真正调用客户端发送grpc请求,发送一个ConfigChangeNotifyRequest请求对象
-
-
如果不是当前节点就发送grpc请求为其他节点同步修改配置项
-
NacosClient端的处理
- 接收到ConfigChangeNotifyRequest请求对象,然后就放入了一个阻塞队列中。
- 客户端while死循环,队列中有任务了/每隔5s 从队列中获取任务/null,去执行配置监听器方法
- 根据CacheData对象远程获取配置内容,进行md5的比较
- 如果有变化就通知监听器去处理,这就回到了nacosClient端获取配置中的流程了
我们接下来分析,在NacosServer端修改了配置,点击发布配置,NacosClient怎么就能接收到是哪一个dataId修改了嘞
发布配置官方接口文档
这里实际上是调用的NacosServer的/nacos/v2/cs/config接口,处理该请求的是ConfigController.publishConfig()方法
在这一次请求中其实就是做了两件事:将更新写入数据库中,然后发布一个事件,将事件添加进队列中,此时请求就结束了。
在controller方法中有两行核心的方法
// 进入service层,核心方法
// 持久化配置信息到数据库
persistService.insertOrUpdate(srcIp, srcUser, configInfo, time, configAdvanceInfo, false);// 触发ConfigDataChangeEvent事件,这是客户端能感知配置更新的根本原因
ConfigChangePublisher.notifyConfigChange(new ConfigDataChangeEvent(false, dataId, group, tenant, time.getTime()));
持久化配置信息到数据库就没必须继续看下去了,我们接下来看看notifyConfigChange()方法的实现:
- 该方法就是单纯的一层一层方法调用
public class ConfigChangePublisher {public static void notifyConfigChange(ConfigDataChangeEvent event) {if (PropertyUtil.isEmbeddedStorage() && !EnvUtil.getStandaloneMode()) {return;}// 该方法继续调用NotifyCenter.publishEvent(event);}
}public static boolean publishEvent(final Event event) {try {// 该方法继续调用return publishEvent(event.getClass(), event);} catch (Throwable ex) {LOGGER.error("There was an exception to the message publishing : ", ex);return false;}
}private static boolean publishEvent(final Class<? extends Event> eventType, final Event event) {if (ClassUtils.isAssignableFrom(SlowEvent.class, eventType)) {return INSTANCE.sharePublisher.publish(event);}final String topic = ClassUtils.getCanonicalName(eventType);EventPublisher publisher = INSTANCE.publisherMap.get(topic);if (publisher != null) {// 该方法继续调用return publisher.publish(event);}return false;
}
这里就会进入到DefaultPublisher类的publish(event)方法中。该类非常重要,Nacos很多功能都用的这统一的一套事件发布与订阅。
public boolean publish(Event event) {checkIsStart();// 如果队列中写满了,那么就返回false,下面就直接处理了// 该类的run()方法中会死循环从队列中取任务执行boolean success = this.queue.offer(event);if (!success) {LOGGER.warn("Unable to plug in due to interruption, synchronize sending time, event : {}", event);// 处理事件receiveEvent(event);return true;}return true;
}
此时,本次http请求就已经结束了,这里将事件放入队列中后就会有其他的订阅者来异步处理事件。
这样的设计也实现了发布任务与处理任务之间的解耦
此时队列中有了任务,在NacosServer中任务订阅者此时还需要做两件事:
- 通知集群其他Nacos节点进行更新
- 通知NacosClient端配置发生了更改
public void notifySubscriber(final Subscriber subscriber, final Event event) {LOGGER.debug("[NotifyCenter] the {} will received by {}", event, subscriber);// 订阅者需要去处理事件// 主要做两件事 通知集群其他Nacos节点进行更新、通知NacosClient端配置发生了更改final Runnable job = () -> subscriber.onEvent(event);final Executor executor = subscriber.executor();if (executor != null) {executor.execute(job);} else {try {job.run();} catch (Throwable e) {LOGGER.error("Event callback exception: ", e);}}
}
这里会进入到AsyncNotifyService的构造方法中:
- 遍历集群环境下的所有节点
- 创建任务添加进http/grpc的队列中
- 从http/grpc的队列中取任务执行
public AsyncNotifyService(ServerMemberManager memberManager) {...// Register A Subscriber to subscribe ConfigDataChangeEvent.NotifyCenter.registerSubscriber(new Subscriber() {@Overridepublic void onEvent(Event event) {// Generate ConfigDataChangeEvent concurrentlyif (event instanceof ConfigDataChangeEvent) {ConfigDataChangeEvent evt = (ConfigDataChangeEvent) event;long dumpTs = evt.lastModifiedTs;String dataId = evt.dataId;String group = evt.group;String tenant = evt.tenant;String tag = evt.tag;// 获取nacos集群下的各个节点Collection<Member> ipList = memberManager.allMembers();// In fact, any type of queue here can beQueue<NotifySingleTask> httpQueue = new LinkedList<NotifySingleTask>();Queue<NotifySingleRpcTask> rpcQueue = new LinkedList<NotifySingleRpcTask>();for (Member member : ipList) {// 使用http/rpc的方式通知各节点,具体的dataId被修改了// 这里先添加进队列,下面的if中处理if (!MemberUtil.isSupportedLongCon(member)) {httpQueue.add(new NotifySingleTask(dataId, group, tenant, tag, dumpTs, member.getAddress(),evt.isBeta));} else {rpcQueue.add(new NotifySingleRpcTask(dataId, group, tenant, tag, dumpTs, evt.isBeta, member));}}// 处理队列中的任务if (!httpQueue.isEmpty()) {ConfigExecutor.executeAsyncNotify(new AsyncTask(nacosAsyncRestTemplate, httpQueue));}if (!rpcQueue.isEmpty()) {// 直接看AsyncRpcTask类中的run()方法ConfigExecutor.executeAsyncNotify(new AsyncRpcTask(rpcQueue));}}}......});}
我们这里是nacos2.X的版本,所以我这里就自己看AsyncRpcTask类的run()方法:
- 调用dump()方法
- 发送请求,同步其他节点数据变化
public void run() {while (!queue.isEmpty()) {NotifySingleRpcTask task = queue.poll();ConfigChangeClusterSyncRequest syncRequest = new ConfigChangeClusterSyncRequest();syncRequest.setDataId(task.getDataId());syncRequest.setGroup(task.getGroup());syncRequest.setBeta(task.isBeta);syncRequest.setLastModified(task.getLastModified());syncRequest.setTag(task.tag);syncRequest.setTenant(task.getTenant());Member member = task.member;// 判断member是不是当前节点if (memberManager.getSelf().equals(member)) {// 如果是当前节点就直接调用dump()方法// 这里又会经过服务注册那边当服务更改后为订阅者进行推送的流程中,这里最终是会到DumpProcessor.process()方法if (syncRequest.isBeta()) {dumpService.dump(syncRequest.getDataId(), syncRequest.getGroup(), syncRequest.getTenant(),syncRequest.getLastModified(), NetUtils.localIP(), true);} else {dumpService.dump(syncRequest.getDataId(), syncRequest.getGroup(), syncRequest.getTenant(),syncRequest.getTag(), syncRequest.getLastModified(), NetUtils.localIP());}continue;}// 其他节点if (memberManager.hasMember(member.getAddress())) {boolean unHealthNeedDelay = memberManager.isUnHealth(member.getAddress());if (unHealthNeedDelay) {...} else {if (!MemberUtil.isSupportedLongCon(member)) {asyncTaskExecute(new NotifySingleTask(task.getDataId(), task.getGroup(), task.getTenant(), task.tag,task.getLastModified(), member.getAddress(), task.isBeta));} else {try {// 为nacos集群中的其他节点进行同步配置变化configClusterRpcClientProxy.syncConfigChange(member, syncRequest, new AsyncRpcNotifyCallBack(task));} catch (Exception e) {MetricsMonitor.getConfigNotifyException().increment();asyncTaskExecute(task);}}}} else {//No nothig if  member has offline.}}
}
dump()这里又会经过服务注册那边当服务更改后为订阅者进行推送的流程中:先将task存入一个队列中 --> 去队列中的任务 --> 各自的任务处理类去处理。这里最终是会到DumpProcessor.process()方法:
- 方法调用process() --> configDump() —>dump()
- 将配置保存在磁盘文件中
- 配置发生变化,更新md5
- 发布LocalDataChangeEvent事件
目的告诉NacosClient端,配置发生了改变。处理该事件的RpcConfigChangeNotifier.onEvent()
public boolean process(NacosTask task) {...// 直接看这里最后的configDump()方法return DumpConfigHandler.configDump(build.build());
}public static boolean configDump(ConfigDumpEvent event){......if (StringUtils.isBlank(event.getTag())) {......boolean result;if (!event.isRemove()) {// 核心方法,进入到这里// 写入磁盘result = ConfigCacheService.dump(dataId, group, namespaceId, content, lastModified, type, encryptedDataKey);if (result) {ConfigTraceService.logDumpEvent(dataId, group, namespaceId, null, lastModified, event.getHandleIp(),ConfigTraceService.DUMP_EVENT_OK, System.currentTimeMillis() - lastModified,content.length());}} else {......}return result;} else {.......}public static boolean dump(String dataId, String group, String tenant, String content, long lastModifiedTs,String type, String encryptedDataKey) {......try {// 根据content配置内容生成一个md5。content中的内容有变化那么生成的md5也肯定是不一样的final String md5 = MD5Utils.md5Hex(content, Constants.ENCODE);// 配置的最后一次更新时间if (lastModifiedTs < ConfigCacheService.getLastModifiedTs(groupKey)) {DUMP_LOG.warn(...);return true;}if (md5.equals(ConfigCacheService.getContentMd5(groupKey)) && DiskUtil.targetFile(dataId, group, tenant).exists()) {DUMP_LOG.warn(...);} else if (!PropertyUtil.isDirectRead()) {// 将配置保存在磁盘文件中DiskUtil.saveToDisk(dataId, group, tenant, content);}// 配置发生变化,更新md5// 继续跟入该方法updateMd5(groupKey, md5, lastModifiedTs, encryptedDataKey);return true;} catch (IOException ioe) {......return false;} finally {releaseWriteLock(groupKey);}}public static void updateMd5(String groupKey, String md5, long lastModifiedTs, String encryptedDataKey) {// 根据groupKey,将md5数据保存在缓存中CacheItem cache = makeSure(groupKey, encryptedDataKey, false);if (cache.md5 == null || !cache.md5.equals(md5)) {cache.md5 = md5;cache.lastModifiedTs = lastModifiedTs;// 发布LocalDataChangeEvent事件,包含groupKey// 目的告诉NacosClient端,配置发生了改变。处理该事件的RpcConfigChangeNotifier.onEvent()NotifyCenter.publishEvent(new LocalDataChangeEvent(groupKey));}}
接下来看看RpcConfigChangeNotifier.onEvent()的方法逻辑:
- 遍历各个客户端
- 发送grpc请求
@Override
public void onEvent(LocalDataChangeEvent event) {...configDataChanged(groupKey, dataId, group, tenant, isBeta, betaIps, tag);}public void configDataChanged(String groupKey, String dataId, String group, String tenant, boolean isBeta,List<String> betaIps, String tag) {// 其实就代表着Client集合Set<String> listeners = configChangeListenContext.getListeners(groupKey);if (CollectionUtils.isEmpty(listeners)) {return;}int notifyClientCount = 0;// 遍历各个客户端for (final String client : listeners) {Connection connection = connectionManager.getConnection(client);if (connection == null) {continue;}ConnectionMeta metaInfo = connection.getMetaInfo();//一些检查校验String clientIp = metaInfo.getClientIp();String clientTag = metaInfo.getTag();if (isBeta && betaIps != null && !betaIps.contains(clientIp)) {continue;}if (StringUtils.isNotBlank(tag) && !tag.equals(clientTag)) {continue;}// 封装一个请求对象ConfigChangeNotifyRequestConfigChangeNotifyRequest notifyRequest = ConfigChangeNotifyRequest.build(dataId, group, tenant);// 创建rpc推送任务,在RpcPushTask.run()方法中推送客户端RpcPushTask rpcPushRetryTask = new RpcPushTask(notifyRequest, 50, client, clientIp, metaInfo.getAppName());push(rpcPushRetryTask);notifyClientCount++;}}public void run() {tryTimes++;if (!tpsMonitorManager.applyTpsForClientIp(POINT_CONFIG_PUSH, connectionId, clientIp)) {push(this);} else {// 这里推送客户端,客户端再进行refresh操作rpcPushService.pushWithCallback(connectionId, notifyRequest, new AbstractPushCallBack(3000L) {@Overridepublic void onSuccess() {tpsMonitorManager.applyTpsForClientIp(POINT_CONFIG_PUSH_SUCCESS, connectionId, clientIp);}@Overridepublic void onFail(Throwable e) {tpsMonitorManager.applyTpsForClientIp(POINT_CONFIG_PUSH_FAIL, connectionId, clientIp);Loggers.REMOTE_PUSH.warn("Push fail", e);push(RpcPushTask.this);}}, ConfigExecutor.getClientConfigNotifierServiceExecutor());}}
相关文章:
Nacos2.X 配置中心源码分析:客户端如何拉取配置、服务端配置发布客户端监听机制
文章目录 Nacos配置中心源码总流程图NacosClient源码分析获取配置注册监听器 NacosServer源码分析配置dump配置发布 Nacos配置中心源码 总流程图 Nacos2.1.0源码分析在线流程图 源码的版本为2.1.0 ,并在配置了下面两个启动参数,一个表示单机启动&#…...

phpstudy框架,window平台,如何开端口给局域网访问?
Windows平台上使用phpstudy框架开端口给同事访问,主要涉及到几个步骤:查看并确认本机IP地址、配置phpstudy及网站项目、开放防火墙端口以及确保同事能够通过局域网访问。以下是详细的步骤说明: 1. 查看并确认本机IP地址 首先,需…...

高性能Python网络框架实现网络应用详解
概要 Python作为一种广泛使用的编程语言,其简洁易读的语法和强大的生态系统,使得它在Web开发领域占据重要位置。高性能的网络框架是构建高效网络应用的关键因素之一。本文将介绍几个高性能的Python网络框架,详细描述它们的特点、使用场景及具体示例代码,帮助高效实现网络应…...

万字学习——DCU编程实战
参考资料 2.1 DCU软件栈(DCU ToolKit, DTK) DCU 开发与使用文档 (hpccube.com) DCU软件栈 DCU的软件栈—DCU Toolkit(DTK) HIP(Heterogeneous-Compute Interface for Portability)是AMD公司在2016年提出…...

Neo4j 图数据库 高级操作
Neo4j 图数据库 高级操作 文章目录 Neo4j 图数据库 高级操作1 批量添加节点、关系1.1 直接使用 UNWIND 批量创建关系1.2 使用 CSV 文件批量创建关系1.3 选择方法 2 索引2.1 创建单一属性索引2.2 创建组合属性索引2.3 创建全文索引2.4 列出所有索引2.5 删除索引2.6 注意事项 3 清…...

《RWKV》论文笔记
原文出处 [2305.13048] RWKV: Reinventing RNNs for the Transformer Era (arxiv.org) 原文笔记 What RWKV(RawKuv):Reinventing RNNs for the Transformer Era 本文贡献如下: 提出了 RWKV 网络架构,结合了RNNS 和Transformer 的优点,同…...
——显色指数(Ra))
相机光学(二十九)——显色指数(Ra)
显指Ra是衡量光源显色性的数值,表示光源对物体颜色的还原能力。显色性是指光源对物体颜色的呈现能力,即光源照射在同一颜色的物体上时,所呈现的颜色特性。通常用显色指数(CRI)来表示光源的显色性,而显指Ra是…...

【Swoole 的生命周期,文件描述符,协程数量,以及默认值】
目录 Swoole 的生命周期 Swoole 文件描述符(FD)缓存 Swoole设置协程的数量 Swoole 默认值 Swoole 是一个基于 PHP 的高性能网络通信引擎,它采用 C 编写,提供了协程和高性能的网络编程支持。Swoole 支持多种网络服务器和客户端…...

“不要卷模型,要卷应用”之高考志愿填报智能体
摘要:李总的发言深刻洞察了当前人工智能领域的发展趋势与核心价值所在,具有高度的前瞻性和实践性。“大家不要卷模型,要卷应用”这一观点强调了在当前人工智能领域,应该更加注重技术的实际应用而非单纯的技术竞赛或模型优化。个性…...

k8s离线部署芋道源码后端
目录 概述实践Dockerfilek8s部署脚本 概述 本篇将对 k8s离线部署芋道源码后端 进行详细的说明,对如何构建 Dockerfile,如何整合 Nginx,如何整合 ingress 进行实践。 相关文章:[nacos在k8s上的集群安装实践] k8s离线部署芋道源码前…...
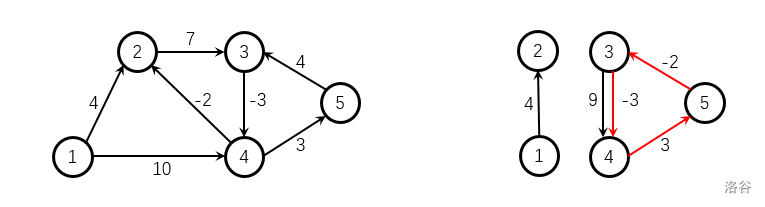
图论·Day01
P3371 P4779 P3371 【模板】单源最短路径(弱化版) 注意的点: 边有重复,选择最小边!对于SPFA算法容易出现重大BUG,没有负权值的边时不要使用!!! 70分代码 朴素板dijsk…...

hutool ExcelUtil 导出导入excel
引入依赖 <dependency><groupId>cn.hutool</groupId><artifactId>hutool-all</artifactId><version>5.8.15</version></dependency>文件导入 public void savelist(String filepath,String keyname){ExcelReader reader Exce…...

打卡第7天-----哈希表
继续坚持✊,我现在看到leetcode上的题不再没有思路了,真的是思路决定出路,在做题之前一定要把思路梳理清楚。 一、四数相加 leetcode题目编号:第454题.四数相加II 题目描述: 给定四个包含整数的数组列表 A , B , C , …...
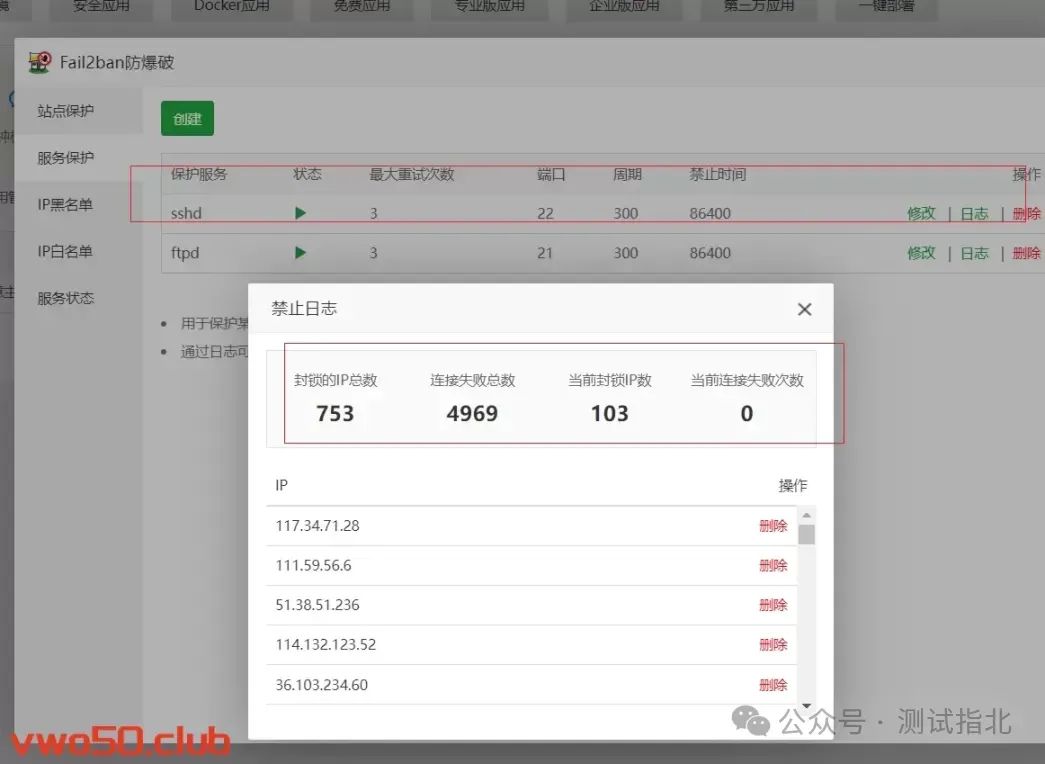
【Linux】WEB网站网络防火墙(WAF软件)Fail2ban:保护服务器免受恶意攻击的必备工具
随着互联网的迅速发展,服务器的安全性日益成为用户和管理员关注的焦点。恶意攻击者不断寻找机会侵入服务器,窃取敏感信息、破坏数据或者滥用系统资源。为了抵御这些威胁,许多安全工具应运而生,其中一款备受推崇的工具就是 Fail2ba…...

妙笔生词智能写歌词软件:创新助力还是艺术之殇?
在音乐创作日益普及和多样化的当下,各种辅助工具层出不穷,妙笔生词智能写歌词软件便是其中之一。那么,它到底表现如何呢? 妙笔生词智能写歌词软件(veve522)的突出优点在于其便捷性和高效性。对于那些灵感稍…...
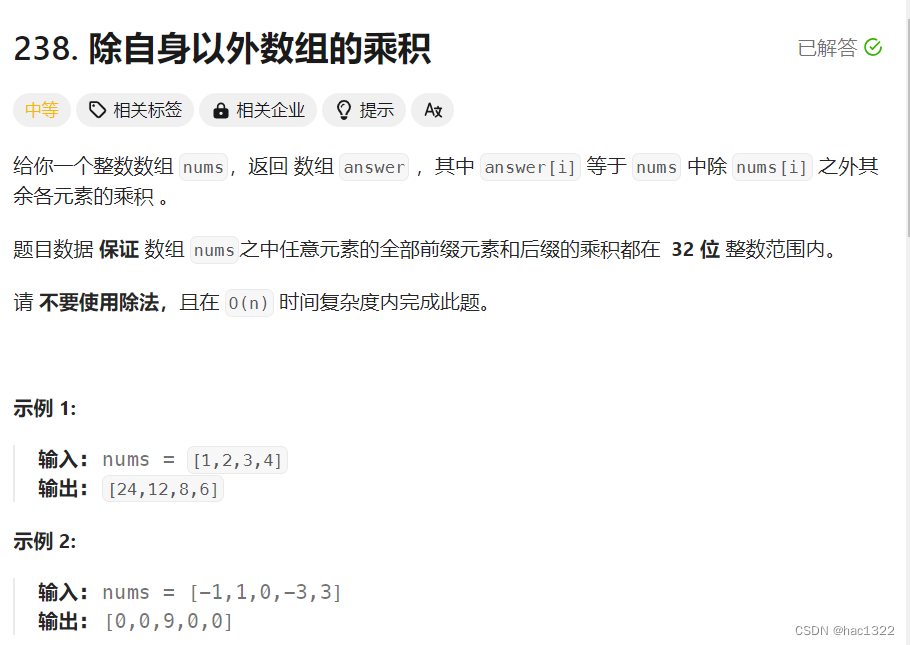
力扣hot100-普通数组
文章目录 题目:最大子数组和方法1 动态规划方法2 题目:合并区间题解 题目:轮转数组方法1-使用额外的数组方法2-三次反转数组 题目:除自身以外数组的乘积方法1-用到了除法方法2-前后缀乘积法 题目:最大子数组和 原题链…...
深入浅出Transformer:大语言模型的核心技术
引言 随着自然语言处理(NLP)领域的不断发展,Transformer模型逐渐成为现代大语言模型的核心技术。无论是BERT、GPT系列,还是最近的T5和Transformer-XL,这些模型的背后都离不开Transformer架构。本文将详细介绍Transfor…...

MacOS隐藏文件打开指南
MacOS隐藏文件打开指南 方法一: 直接按下键盘上的【commandshift.】,这时候就可以在mac系统中就会自动显示隐藏的文件夹了 方法二: 在终端查看 ls -la...

grafana数据展示
目录 一、安装步骤 二、如何添加喜欢的界面 三、自动添加注册客户端主机 一、安装步骤 启动成功后 可以查看端口3000是否启动 如果启动了就在浏览器输入IP地址:3000 账号密码默认是admin 然后点击 log in 第一次会让你修改密码 根据自定义密码然后就能登录到界面…...

53-4 内网代理6 - frp搭建三层代理
前提:53-3 内网代理5 - frp搭建二级代理-CSDN博客 三级网络代理 在办公区入侵后,发现需要进一步渗透核心区网络(192.168.60.0/24),并登录域控制器的远程桌面。使用FRP在EDMZ区、办公区与核心区之间建立三级网络的SOCKS5代理,以便访问核心区的域控制器。 VPS上的FRP服…...
。】2022-5-15)
【根据当天日期输出明天的日期(需对闰年做判定)。】2022-5-15
缘由根据当天日期输出明天的日期(需对闰年做判定)。日期类型结构体如下: struct data{ int year; int month; int day;};-编程语言-CSDN问答 struct mdata{ int year; int month; int day; }mdata; int 天数(int year, int month) {switch (month){case 1: case 3:…...
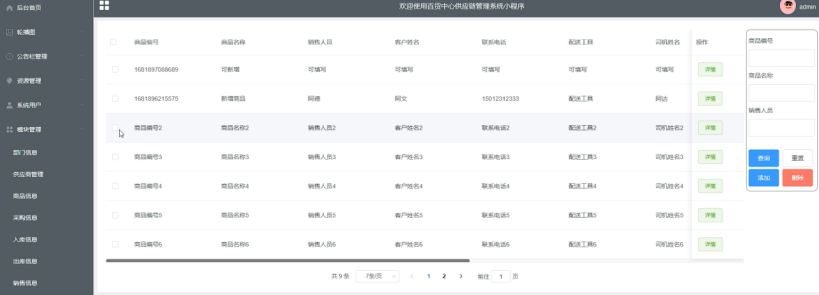
springboot 百货中心供应链管理系统小程序
一、前言 随着我国经济迅速发展,人们对手机的需求越来越大,各种手机软件也都在被广泛应用,但是对于手机进行数据信息管理,对于手机的各种软件也是备受用户的喜爱,百货中心供应链管理系统被用户普遍使用,为方…...

基于当前项目通过npm包形式暴露公共组件
1.package.sjon文件配置 其中xh-flowable就是暴露出去的npm包名 2.创建tpyes文件夹,并新增内容 3.创建package文件夹...

Spring Boot面试题精选汇总
🤟致敬读者 🟩感谢阅读🟦笑口常开🟪生日快乐⬛早点睡觉 📘博主相关 🟧博主信息🟨博客首页🟫专栏推荐🟥活动信息 文章目录 Spring Boot面试题精选汇总⚙️ **一、核心概…...

selenium学习实战【Python爬虫】
selenium学习实战【Python爬虫】 文章目录 selenium学习实战【Python爬虫】一、声明二、学习目标三、安装依赖3.1 安装selenium库3.2 安装浏览器驱动3.2.1 查看Edge版本3.2.2 驱动安装 四、代码讲解4.1 配置浏览器4.2 加载更多4.3 寻找内容4.4 完整代码 五、报告文件爬取5.1 提…...

AI病理诊断七剑下天山,医疗未来触手可及
一、病理诊断困局:刀尖上的医学艺术 1.1 金标准背后的隐痛 病理诊断被誉为"诊断的诊断",医生需通过显微镜观察组织切片,在细胞迷宫中捕捉癌变信号。某省病理质控报告显示,基层医院误诊率达12%-15%,专家会诊…...
【电力电子】基于STM32F103C8T6单片机双极性SPWM逆变(硬件篇)
本项目是基于 STM32F103C8T6 微控制器的 SPWM(正弦脉宽调制)电源模块,能够生成可调频率和幅值的正弦波交流电源输出。该项目适用于逆变器、UPS电源、变频器等应用场景。 供电电源 输入电压采集 上图为本设计的电源电路,图中 D1 为二极管, 其目的是防止正负极电源反接, …...

算术操作符与类型转换:从基础到精通
目录 前言:从基础到实践——探索运算符与类型转换的奥秘 算术操作符超级详解 算术操作符:、-、*、/、% 赋值操作符:和复合赋值 单⽬操作符:、--、、- 前言:从基础到实践——探索运算符与类型转换的奥秘 在先前的文…...
一些实用的chrome扩展0x01
简介 浏览器扩展程序有助于自动化任务、查找隐藏的漏洞、隐藏自身痕迹。以下列出了一些必备扩展程序,无论是测试应用程序、搜寻漏洞还是收集情报,它们都能提升工作流程。 FoxyProxy 代理管理工具,此扩展简化了使用代理(如 Burp…...

Java 与 MySQL 性能优化:MySQL 慢 SQL 诊断与分析方法详解
文章目录 一、开启慢查询日志,定位耗时SQL1.1 查看慢查询日志是否开启1.2 临时开启慢查询日志1.3 永久开启慢查询日志1.4 分析慢查询日志 二、使用EXPLAIN分析SQL执行计划2.1 EXPLAIN的基本使用2.2 EXPLAIN分析案例2.3 根据EXPLAIN结果优化SQL 三、使用SHOW PROFILE…...