prompt第三讲-PromptTemplate
文章目录
- 前提回顾
- PromptTemplate
- prompt 模板定义
- 以f-string渲染格式
- 以mustache渲染格式
- 以jinja2渲染格式
- 直接实例化PromptTemplate
- PromptTemplate核心变量
- prompt value生成
- invoke
- format_prompt(不建议使用)
- format(不建议使用)
- batch
- stream
- ainvoke
- PromptTemplate核心方法
- partial变量
- partial方法
- 直接实例化指定partical_variables
- save保存
- from_file加载
- dict
- __add__
- from_examples
- 属性
- 总结
- 遗留问题
前提回顾
前面已经讲了什么是prompt模板,以及什么是prompt和prompt value,并且用langchain来实现了一个中英翻译助手,下面是部分代码,如果要看完整代码,请看上一小节
[prompt第二讲-langchain实现中英翻译助手]
# -*- coding: utf-8 -*-
"""
@Time : 2024/7/8 9:44
@Auth : leon
"""
from langchain_core.prompts import PromptTemplate
# 1. prompt模板定义
prompt_template = PromptTemplate.from_template("""
你是一个翻译助手,你擅长将中文翻译为英文,请将我发送给你的question的内容翻译为英文,不要返回无关的内容,只需返回最终翻译结果,下面的history examples中提供了一些具体的案例,为你提供一些参考:## history examples:
question:美丽->answer:beautiful;
question:男孩->answer:boy;
question:男人->answer:man;
question:456->answer:four hundred and fifty-six;
question:1->answer:one;
question:34->answer:thirty-four;## user true task:
question:{user_input_words}->answer:
""")
从上面可以看出,定义prompt模板用到的是PromptTemplate,所以下面就来讲讲PromptTemplate
PromptTemplate
首先来讲讲prompt模板的定义,定义出了模板之后,就可以根据不同的变量来产出不同的prompt value,prompt value
就可以随时的转为字符串和message,字符串就是我们说的prompt,message最终底层也是转为字符串的,也是prompt。
那在langchain中,prompt模板定义方法有很多种,而PromptTemplate是其中的一种
prompt 模板定义
通过PromptTemplate的from_template方法来定义出一个PromptTemplate
以f-string渲染格式
from langchain_core.prompts import PromptTemplate
# 1. prompt模板定义
prompt_template = PromptTemplate.from_template("""
你是一个翻译助手,你擅长将中文翻译为英文,请将我发送给你的question的内容翻译为英文,不要返回无关的内容,只需返回最终翻译结果,下面的history examples中提供了一些具体的案例,为你提供一些参考:## history examples:
question:美丽->answer:beautiful;
question:男孩->answer:boy;
question:男人->answer:man;
question:456->answer:four hundred and fifty-six;
question:1->answer:one;
question:34->answer:thirty-four;## user true task:
question:{user_input_words}->answer:
""")
print(prompt_template.template)
print(prompt_template.input_variables)
print(prompt_template.template_format)
print(prompt_template.input_types)
print(prompt_template.partial_variables)
代码原理
- 传入一个具有一定格式的字符串,上面默认是python原生支持的f-string格式形式,变量要以{}的形式。
- 传入到PromptTemplate的from_template方法后,会默认根据f-string的形式来解析这个字符串,提取出中括号里的变量
- 根据解析出的内容实例化一个PromptTemplate对象,将传入的字符串放到template中,提取的变量放到input_variables中
以mustache渲染格式
上面是默认以f-string的格式识别和处理传入的模板,我们可以不显示的指定参数,但是如果以mustache形式渲染,则需要显示的指定,
mustache则是以{{}}的形式来定义变量
from langchain_core.prompts import PromptTemplate
# 1. prompt模板定义
prompt_template = PromptTemplate.from_template("""
你是一个翻译助手,你擅长将中文翻译为英文,请将我发送给你的question的内容翻译为英文,不要返回无关的内容,只需返回最终翻译结果,下面的history examples中提供了一些具体的案例,为你提供一些参考:## history examples:
question:美丽->answer:beautiful;
question:男孩->answer:boy;
question:男人->answer:man;
question:456->answer:four hundred and fifty-six;
question:1->answer:one;
question:34->answer:thirty-four;## user true task:
question:{{user_input_words}}->answer:
""",
template_format="mustache")
print(prompt_template.template)
print(prompt_template.input_variables)
print(prompt_template.template_format)
print(prompt_template.input_types)
print(prompt_template.partial_variables)
以jinja2渲染格式
jinja2定义变量的形式和mustache是一样的,都是{{}}的形势
from langchain_core.prompts import PromptTemplate
# 1. prompt模板定义
prompt_template = PromptTemplate.from_template("""
你是一个翻译助手,你擅长将中文翻译为英文,请将我发送给你的question的内容翻译为英文,不要返回无关的内容,只需返回最终翻译结果,下面的history examples中提供了一些具体的案例,为你提供一些参考:## history examples:
question:美丽->answer:beautiful;
question:男孩->answer:boy;
question:男人->answer:man;
question:456->answer:four hundred and fifty-six;
question:1->answer:one;
question:34->answer:thirty-four;## user true task:
question:{{user_input_words}}->answer:
""",
template_format="jinja2")
print(prompt_template.template)
print(prompt_template.input_variables)
print(prompt_template.template_format)
print(prompt_template.input_types)
print(prompt_template.partial_variables)
直接实例化PromptTemplate
在第一个以f-string那部分我进行了简单的代码讲解,我们发现其实本质上就是先解析我丢进去的模板,然后将解析的内容作为参数,来实例化一个PromptTemplate
既然最终都要实例化PromptTemplate对象,那为啥不直接就来实例化呢?下面我们就直接来实例化PromptTemplate,顺便也能看到langchain定义的这个模板内部
是什么结构。
from langchain_core.prompts import PromptTemplate
prompt_template = PromptTemplate(template="""
你是一个翻译助手,你擅长将中文翻译为英文,请将我发送给你的question的内容翻译为英文,不要返回无关的内容,只需返回最终翻译结果,下面的history examples中提供了一些具体的案例,为你提供一些参考:## history examples:
question:美丽->answer:beautiful;
question:男孩->answer:boy;
question:男人->answer:man;
question:456->answer:four hundred and fifty-six;
question:1->answer:one;
question:34->answer:thirty-four;## user true task:
question:{{user_input_words}}->answer:
""",
input_variables=['user_input_words'])
print(prompt_template.template)
print(prompt_template.input_variables)
print(prompt_template.template_format)
print(prompt_template.input_types)
print(prompt_template.partial_variables)
PromptTemplate核心变量
从最后直接实例化方法和我添加的print打印的信息来看,我们先来看看PromptTemplate具有的几个最核心的字符串
- template:用于存储字符串模板
- input_variables:用于存储变量,这个变量可以是直接从字符串模板中解析出来,也可以是自己指定,只要是和模板中的变量一样就行
- template_format:渲染的格式,这个格式指导着如何解析template
- partial_variables:这是一个前置变量,可以被前置定义,这个我后面用到的时候会自然的引出
前三种方法和最后一种的差别只是在于,前三种帮我们自动提取了变量,而最后一种则是我们直接告诉PromptTemplate变量是谁
prompt value生成
PromptTemplate因为继承了底层的runnable,所以关于prompt valu的生成都是遵守runnable的接口的(invoke ainvoke batch …)
通过这些接口可以将用户传入的变量添加到prompt模板中生成1个或者多个prompt
invoke
invoke实现了单输入单输出的关系,通常要求传入一个关于变量赋值的字典,生成prompt value。传入的字典中:
key为模板变量,value为具体的变量值
from langchain_core.prompts import PromptTemplate
# 1. 以f-string格式渲染
prompt_template = PromptTemplate.from_template("""
你是一个翻译助手,你擅长将中文翻译为英文,请将我发送给你的question的内容翻译为英文,不要返回无关的内容,只需返回最终翻译结果,下面的history examples中提供了一些具体的案例,为你提供一些参考:## history examples:
question:美丽->answer:beautiful;
question:男孩->answer:boy;
question:男人->answer:man;
question:456->answer:four hundred and fifty-six;
question:1->answer:one;
question:34->answer:thirty-four;## user true task:
question:{user_input_words}->answer:
""")
# 1.1. invoke传入字典
prompt = prompt_template.invoke({"user_input_words":"你好"})
print(prompt)
但是如果模板中变量只有一个,可以直接传入值,而无需指定变量(出于规范考虑,不建议直接传入变量)
from langchain_core.prompts import PromptTemplate
# 1. 以f-string格式渲染
prompt_template = PromptTemplate.from_template("""
你是一个中英文翻译助手,你需要把我发给你的question翻译为英文,下面的examples是一些具体翻译的案例,翻译的时候请参考案例来翻译,注意只输出最终翻译的结果,:
examples:
question:美丽->beautiful;
question:男孩->boy;
question:男人->man;
question:456->four hundred and fifty-six;
question:1->one;
question:34->thirty-four
question:{user_input_chinese}
""")
prompt = prompt_template.invoke("你好")
print(prompt)
下面根据源码讲解一下invoke的原理
invoke原理
- 校验config
- 校验输入变量
3. 输入变量如果不是一个字典,并且模板中只有一个变量的话,就会将input_variables中保存的变量名拿出来,组成一个字典
4. 如果传入的是一个字典,如果字典和保存在input_variables中有差异,则报错。
5. 返回校验后的输入字典 - 格式化模板(交给子类),生成prompt value
注意:最后的结果中,生成是一个prompt value,而不是一个prompt,前面也提到了,这和prompt的差别就在于prompt value提供了字符串到message的互转
format_prompt(不建议使用)
from langchain_core.prompts import PromptTemplate
# 1. 以f-string格式渲染
prompt_template = PromptTemplate.from_template("""
你是一个翻译助手,你擅长将中文翻译为英文,请将我发送给你的question的内容翻译为英文,不要返回无关的内容,只需返回最终翻译结果,下面的history examples中提供了一些具体的案例,为你提供一些参考:## history examples:
question:美丽->answer:beautiful;
question:男孩->answer:boy;
question:男人->answer:man;
question:456->answer:four hundred and fifty-six;
question:1->answer:one;
question:34->answer:thirty-four;## user true task:
question:{user_input_words}->answer:
""")
prompt= prompt_template.format_prompt(user_input_words="你好")
print(prompt)
这个方法本质上就是直接完成invoke的第3步的工作,invoke第3步就是调用了这个方法,所以可以说这个方法和invoke的差别在于少了一些前置的校验。
同时呢?考虑到和runnable的使用范式的统一,这个方法我个人是不建议使用。
format(不建议使用)
from langchain_core.prompts import PromptTemplate
# 1. 以f-string格式渲染
prompt_template = PromptTemplate.from_template("""
你是一个翻译助手,你擅长将中文翻译为英文,请将我发送给你的question的内容翻译为英文,不要返回无关的内容,只需返回最终翻译结果,下面的history examples中提供了一些具体的案例,为你提供一些参考:## history examples:
question:美丽->answer:beautiful;
question:男孩->answer:boy;
question:男人->answer:man;
question:456->answer:four hundred and fifty-six;
question:1->answer:one;
question:34->answer:thirty-four;## user true task:
question:{user_input_words}->answer:
""")
prompt= prompt_template.format(user_input_words="你好")
print(prompt)
这个方法本质上就是是完成format_prompt的子任务,等于说format是直接生成了一个字符串的prompt,format_prompt进一步将其包装为prompt value
同样的,考虑到和runnable的使用范式的统一,这个方法我个人是不建议使用。
batch
batch实现了多输入多输出的关系,传入多组变量字典,生成多个prompt value
from langchain_core.prompts import PromptTemplate
# 1. 以f-string格式渲染
prompt_template = PromptTemplate.from_template("""
你是一个翻译助手,你擅长将中文翻译为英文,请将我发送给你的question的内容翻译为英文,不要返回无关的内容,只需返回最终翻译结果,下面的history examples中提供了一些具体的案例,为你提供一些参考:## history examples:
question:美丽->answer:beautiful;
question:男孩->answer:boy;
question:男人->answer:man;
question:456->answer:four hundred and fifty-six;
question:1->answer:one;
question:34->answer:thirty-four;## user true task:
question:{user_input_words}->answer:
""")
prompt = prompt_template.batch([{"user_input_words":"你好"},{"user_input_words":"你是谁?"}])
print(prompt)
batch的本质我已经在最开始就讲过,如果没有特殊情况,遵从的就是runnable的batch设计原理:[runnable底层原理]
stream
batch实现了流式输出效果,流式输出prompt value
from langchain_core.prompts import PromptTemplate
# 1. 以f-string格式渲染
prompt_template = PromptTemplate.from_template("""
你是一个翻译助手,你擅长将中文翻译为英文,请将我发送给你的question的内容翻译为英文,不要返回无关的内容,只需返回最终翻译结果,下面的history examples中提供了一些具体的案例,为你提供一些参考:## history examples:
question:美丽->answer:beautiful;
question:男孩->answer:boy;
question:男人->answer:man;
question:456->answer:four hundred and fifty-six;
question:1->answer:one;
question:34->answer:thirty-four;## user true task:
question:{user_input_words}->answer:
""")
for i in prompt_template.stream({"user_input_words":"Jinja2 是一个功能更加强大的 Python 模板引擎,常用于 Web 开发,尤其是 Flask 和 Django 框架中。它支持复杂的控制结构,如循环和条件语句"}):print(i)
这里其实是看不出流输出的感觉的,是因为prompt value本身就不支持挨个yield单个字词出来,关于它的原理,参考我之前讲的::[runnable底层原理]
ainvoke
异步实现单输入单输出关系
import asyncio
from langchain_core.prompts import PromptTemplate
# 1. 以f-string格式渲染
prompt_template = PromptTemplate.from_template("""
你是一个翻译助手,你擅长将中文翻译为英文,请将我发送给你的question的内容翻译为英文,不要返回无关的内容,只需返回最终翻译结果,下面的history examples中提供了一些具体的案例,为你提供一些参考:## history examples:
question:美丽->answer:beautiful;
question:男孩->answer:boy;
question:男人->answer:man;
question:456->answer:four hundred and fifty-six;
question:1->answer:one;
question:34->answer:thirty-four;## user true task:
question:{user_input_words}->answer:
""")
async def main():return await asyncio.gather(prompt_template.ainvoke({"user_input_words":"你好"}),prompt_template.ainvoke({"user_input_words":"我不好"}))res = asyncio.run(main())
print(res)
ainvoke的本质我已经在最开始就讲过,如果没有特殊情况,遵从的就是runnable的ainvoke设计原理:[runnable底层原理]
其他的还有abatch、astream,道理是差不多的。
PromptTemplate核心方法
前面总结了PromptTemplate的几个核心变量,现在总结一下PromptTemplate核心方法
- invoke:单输入单输出关系,传递一组变量字典,得到一个prompt value
2. format_prompt:invoke的底层支持,生成prompt value
3. format:format_prompt的底层支持,生成字符串prompt - batch:多输入多输出关系,传递多组变量字典,得到多个prompt value
- stream:流式输出prompt value
- ainvoke:异步invoke
- abatch:异步batch
- astream:异步stream
partial变量
上面我们举了一个中文到英文的翻译助手
现在我们可以做得更宽泛一些,可以做一个翻译助手,至于是翻译什么语言到什么语言,则交给用户自己去定义
这里就用到了partital,它本质就是在生成真正的prompt前先固定一些变量,根据partital变量生成一个新的prompt模板
下面还是通过两种方法来讲解这个变量
partial方法
# -*- coding: utf-8 -*-
"""
@Time : 2024/7/8 9:44
@Auth : leon
"""
from langchain_core.prompts import PromptTemplate
# 4. 定义部分变量
prompt_template = PromptTemplate.from_template("""
你是一个翻译助手,你擅长将{source_language}翻译为{dst_language},请将我发送给你的question的内容翻译为{dst_language},不要返回无关的内容,只需返回最终翻译结果,下面的history examples中提供了一些具体的案例,为你提供一些参考:## history examples:
question:美丽->answer:beautiful;
question:男孩->answer:boy;
question:男人->answer:man;
question:456->answer:four hundred and fifty-six;
question:1->answer:one;
question:34->answer:thirty-four;## user true task:
question:{user_input_words}->answer:
""")
lag2lag = input("你想我成为什么翻译助手(格式如:中文-英文):")
source_language,dst_language = lag2lag.split('-')
new_prompt_template = prompt_template.partial(source_language=source_language,dst_language=dst_language)
print("助手初始化完毕,您的翻译助手上线!!!")
# 2. llm定义
from langchain_community.llms import Tongyi
from pydantic_settings import BaseSettings,SettingsConfigDict"""
2,1 获取千问的key
我这么写的原因是因为方便我上传项目到github的同时,不暴露我的key,所以我把可以key保存到了最外部的一个.env文件中
这样我每一次同步到github的时候就不会把key也推出去,你们测试的时候,可以直接写成
qwen_key="sk-cc2209cec48c4bc966fb4acda169e",这样省事。
"""
class ModelConfig(BaseSettings):model_config = SettingsConfigDict(env_file="../../../.env",env_file_encoding="utf-8")qwen_key:strdeepseek_key:strdeepseek_base_url:strmodel_config = ModelConfig()
qwen_key = model_config.qwen_key
# 1. 读取配置信息,获取模型key
llm = Tongyi(dashscope_api_key=qwen_key)while(True):user_input_word = input(f"请输入需要翻译的{source_language}:")if user_input_word.lower() =="quit":breakelse:prompt = new_prompt_template.invoke({"user_input_words":user_input_word})print(llm.invoke(prompt))
下面分析一下原理
partial方法原理
- 传入变量并赋值到初始的prompt模板中,生成新的prompt模板
- 传入的变量保存到partical_variables中
- 从最开始模板中的input_variables中剔除partical_variables部分,
也就是说,最开始所有的变量都属于input_variables,当你调用了partial方法之后,input_variables中的部分变量会被移动到partical_variables中
直接实例化指定partical_variables
# -*- coding: utf-8 -*-
"""
@Time : 2024/7/8 9:44
@Auth : leon
"""
from langchain_core.prompts import PromptTemplate
# 4. 定义部分变量
lag2lag = input("你想我成为什么翻译助手(格式如:中文-英文):")
source_language,dst_language = lag2lag.split('-')prompt_template = PromptTemplate(template="""
你是一个翻译助手,你擅长将{source_language}翻译为{dst_language},请将我发送给你的question的内容翻译为{dst_language},不要返回无关的内容,只需返回最终翻译结果,下面的history examples中提供了一些具体的案例,为你提供一些参考:## history examples:
question:美丽->answer:beautiful;
question:男孩->answer:boy;
question:男人->answer:man;
question:456->answer:four hundred and fifty-six;
question:1->answer:one;
question:34->answer:thirty-four;## user true task:
question:{user_input_words}->answer:
"""
,input_variables=["user_input_words"]
,partial_variables={'source_language':source_language,"dst_language":dst_language})print("助手初始化完毕,您的翻译助手上线!!!")
# 2. llm定义
from langchain_community.llms import Tongyi
from pydantic_settings import BaseSettings,SettingsConfigDict"""
2,1 获取千问的key
我这么写的原因是因为方便我上传项目到github的同时,不暴露我的key,所以我把可以key保存到了最外部的一个.env文件中
这样我每一次同步到github的时候就不会把key也推出去,你们测试的时候,可以直接写成
qwen_key="sk-cc2209cec48c4bc966fb4acda169e",这样省事。
"""
class ModelConfig(BaseSettings):model_config = SettingsConfigDict(env_file="../../../.env",env_file_encoding="utf-8")qwen_key:strdeepseek_key:strdeepseek_base_url:strmodel_config = ModelConfig()
qwen_key = model_config.qwen_key
# 1. 读取配置信息,获取模型key
llm = Tongyi(dashscope_api_key=qwen_key)while(True):user_input_word = input(f"请输入需要翻译的{source_language}:")if user_input_word.lower() =="quit":breakelse:prompt = prompt_template.invoke({"user_input_words":user_input_word})print(llm.invoke(prompt))
save保存
ok了,现在我们开发好了一个翻译助手了,核心就是设计了一个prompt模板,现在我想要发布到开源社区或者给别人
使用,我们可以保存这个模板,但是需要注意两点:
- 如果你的模板里含有partial_variables,是无法保存的;
- 只能保存为json格式或者是yml格式
所以综合这两种考虑,我们不能保存调用过partial方法后的prompt模板,也不能保存直接实例化时指定了partial_variables的模板,我们只能保存最初的模板,这也符合需求,因为你保存了调用
partial后的模板的话,这些前置变量的值都被填进去了,用户也没法自定义,也就失去了这个模板的意义,所以下面演示一下如何保存最初的prompt模板
最重要:你可以观察一下保存后的文件,如果有中文,则只会显示16进制,但是现在的保存方法,是不支持传入编码参数的,如果你要让他正常显示中文和加载中文,需要到源码下的修改save方法,
在open的时候加入编码参数,这一点来看langchain还是不够国际化,垃圾
from langchain_core.prompts import PromptTemplate
# 5. 保存prompt模板
from langchain_core.prompts import PromptTemplate
# 5. 保存prompt模板
prompt_template_1 = PromptTemplate.from_template("""
你是一个翻译助手,你擅长将{source_language}翻译为{dst_language},请将我发送给你的question的内容翻译为{dst_language},不要返回无关的内容,只需返回最终翻译结果,下面的history examples中提供了一些具体的案例,为你提供一些参考:## history examples:
question:美丽->answer:beautiful;
question:男孩->answer:boy;
question:男人->answer:man;
question:456->answer:four hundred and fifty-six;
question:1->answer:one;
question:34->answer:thirty-four;## user true task:
question:{user_input_words}->answer:
""")
prompt_template_1.save("./data/translate-lang2lang.yml")
from_file加载
加载上一步保存的prompt模板文件,加载之后又可以正常使用partical了。
同样的,需要注意编码问题。
from langchain_core.prompts import PromptTemplate
prompt_template = PromptTemplate.from_file("data/translate-lang2lang.yml")
lag2lag = input("你想我成为什么翻译助手(格式如:中文-英文):")
source_language,dst_language = lag2lag.split('-')
new_prompt_template = prompt_template.partial(source_language=source_language,dst_language=dst_language)
print(new_prompt_template)
其他的还有一些方法和属性,下面简单的列举一下
dict
将prompt模板转为字典
from langchain_core.prompts import PromptTemplate
# 5. 保存prompt模板
prompt_template_1 = PromptTemplate.from_template("""
你是一个翻译助手,你擅长将{source_language}翻译为{dst_language},请将我发送给你的question的内容翻译为{dst_language},不要返回无关的内容,只需返回最终翻译结果,下面的history examples中提供了一些具体的案例,为你提供一些参考:## history examples:
question:美丽->answer:beautiful;
question:男孩->answer:boy;
question:男人->answer:man;
question:456->answer:four hundred and fifty-six;
question:1->answer:one;
question:34->answer:thirty-four;## user true task:
question:{user_input_words}->answer:
""")
print(prompt_template_1.dict())
add
实现了prompt模板之间的相加
from langchain_core.prompts import PromptTemplate
# 5. 保存prompt模板
prompt_template_1 = PromptTemplate.from_template("""
你是一个翻译助手,你擅长将{source_language}翻译为{dst_language},请将我发送给你的question的内容翻译为{dst_language},不要返回无关的内容,只需返回最终翻译结果,下面的history examples中提供了一些具体的案例,为你提供一些参考:## history examples:
question:美丽->answer:beautiful;
question:男孩->answer:boy;
question:男人->answer:man;
question:456->answer:four hundred and fifty-six;
question:1->answer:one;
question:34->answer:thirty-four;## user true task:
question:{user_input_words}->answer:
""")prompt_template_3 = PromptTemplate.from_template("""这是第二个prompt模板:{user_input_words_3}""")
new_prompt = prompt_template_1+"这是新的模板:{user_input_words_2}"+prompt_template_3
print(new_prompt)
从上面可以看出,相加的对象可以是多个PromptTemplate之间,也可以是PromptTemplate和字符串直接
本质上就是将模板统一,变量统一
from_examples
根据案例实例化一个PromptTemplate(不够优雅,不细讲了,后面会有更优雅的方法)
属性
from langchain_core.prompts import PromptTemplate
# 5. 保存prompt模板
prompt_template_1 = PromptTemplate.from_template("""
你是一个翻译助手,你擅长将{source_language}翻译为{dst_language},请将我发送给你的question的内容翻译为{dst_language},不要返回无关的内容,只需返回最终翻译结果,下面的history examples中提供了一些具体的案例,为你提供一些参考:## history examples:
question:美丽->answer:beautiful;
question:男孩->answer:boy;
question:男人->answer:man;
question:456->answer:four hundred and fifty-six;
question:1->answer:one;
question:34->answer:thirty-four;## user true task:
question:{user_input_words}->answer:
""")print(prompt_template_1.InputType)
print(prompt_template_1.OutputType)
print(prompt_template_1.input_schema)
print(prompt_template_1.output_schema)
print(prompt_template_1.config_schema)
稍微总结一下:
- InputType:获取输入类型
- OutputType:获取输出类型
- input_schema:获取输入schema
- output_schema:获取输出schema
- config_schema:获取config的schema
总结
基本上PromptTemplate也已将讲完了,下面做一个小总结
- 变量
2. template:用于存储字符串模板
3. input_variables:用于存储变量,这个变量可以是直接从字符串模板中解析出来,也可以是自己指定,只要是和模板中的变量一样就行
4. template_format:渲染的格式,这个格式指导着如何解析template
5. partial_variables:这是一个前置变量,可以被前置定义 - 方法
- invoke:单输入单输出关系,传递一组变量字典,得到一个prompt value
2. format_prompt:invoke的底层支持,生成prompt value
3. format:format_prompt的底层支持,生成字符串prompt - batch:多输入多输出关系,传递多组变量字典,得到多个prompt value
- stream:流式输出prompt value
- ainvoke:异步invoke
- abatch:异步batch
- astream:异步stream
- dict:将prompt模板转为字典
- invoke:单输入单输出关系,传递一组变量字典,得到一个prompt value
- 属性
- InputType:获取输入类型
- OutputType:获取输出类型
- input_schema:获取输入schema
- output_schema:获取输出schema
- config_schema:获取config的schema
遗留问题
从案例来说,还有一个问题,就是当我们在做翻译助手的时候,当我们是中英文翻译助手的时候,案例是符合我们的标准的,但是当我们是其他的翻译助手
时,比如中德翻译时,案例就对不上了,这也是下一章我们要解决的问题。
附上筋斗云,会有完整教程和代码:https://github.com/traveler-leon/langchain-learning.git
相关文章:

prompt第三讲-PromptTemplate
文章目录 前提回顾PromptTemplateprompt 模板定义以f-string渲染格式以mustache渲染格式以jinja2渲染格式直接实例化PromptTemplatePromptTemplate核心变量 prompt value生成invokeformat_prompt(不建议使用)format(不建议使用) batchstreamainvoke PromptTemplate核心方法part…...

卷积神经网络图像识别车辆类型
卷积神经网络图像识别车辆类型 1、图像 自行车: 汽车: 摩托车: 2、数据集目录 3、流程 1、获取数据,把图像转成矩阵,并随机划分训练集、测试集 2、把标签转为数值,将标签向量转换为二值矩阵 3、图像数据归一化,0-1之间的值 4、构造卷积神经网络 5、设置图像输入…...

【接口设计】用 Swagger 实现接口文档
用 Swagger 实现接口文档 1.配置 Swagger1.1 添加 Swagger 依赖1.2 创建 Swagger 配置类 2.编写接口文档 在项目开发中,一般都是由前后端工程师共同定义接口,编写接口文档,之后大家根据这个接口文档进行开发、维护。为了便于编写和维护稳定&a…...

TensorFlow系列:第四讲:MobileNetV2实战
一. 加载数据集 编写工具类,实现数据集的加载 import keras""" 加载数据集工具类 """class DatasetLoader:def __init__(self, path_url, image_size(224, 224), batch_size32, class_modecategorical):self.path_url path_urlself…...

Redis+Caffeine 实现两级缓存实战
RedisCaffeine 实现两级缓存 背景 事情的开始是这样的,前段时间接了个需求,给公司的商城官网提供一个查询预计送达时间的接口。接口很简单,根据请求传的城市仓库发货时间查询快递的预计送达时间。因为商城下单就会调用这个接口ÿ…...

SpringBoot:SpringBoot中如何实现对Http接口进行监控
一、前言 Spring Boot Actuator是Spring Boot提供的一个模块,用于监控和管理Spring Boot应用程序的运行时信息。它提供了一组监控端点(endpoints),用于获取应用程序的健康状态、性能指标、配置信息等,并支持通过 HTTP …...

STM32-I2C硬件外设
本博文建议与我上一篇I2C 通信协议共同理解 合成一套关于I2C软硬件体系 STM32内部集成了硬件I2C收发电路,可以由硬件自动执行时钟生成、起始终止条件生成、应答位收发、数据收发等功能,减轻CPU的负担 特点: 多主机功能&#x…...

暑假第一次作业
第一步:给R1,R2,R3,R4配IP [R1-GigabitEthernet0/0/0]ip address 192.168.1.1 24 [R1-Serial4/0/0]ip address 15.0.0.1 24 [R2-GigabitEthernet0/0/0]ip address 192.168.2.1 24 [R2-Serial4/0/0]ip address 25.0.0.1 24 [R3-GigabitEthernet0/0/0]ip address 192.…...

【算法专题】快速排序
1. 颜色分类 75. 颜色分类 - 力扣(LeetCode) 依据题意,我们需要把只包含0、1、2的数组划分为三个部分,事实上,在我们前面学习过的【算法专题】双指针算法-CSDN博客中,有一道题叫做移动零,题目要…...

debian 12 PXE Server 批量部署系统
pxe server 前言 PXE(Preboot eXecution Environment,预启动执行环境)是一种网络启动协议,允许计算机通过网络启动而不是使用本地硬盘。PXE服务器是实现这一功能的服务器,它提供了启动镜像和引导加载程序,…...

【Pytorch】RNN for Image Classification
文章目录 1 RNN 的定义2 RNN 输入 input, h_03 RNN 输出 output, h_n4 多层5 小试牛刀 学习参考来自 pytorch中nn.RNN()总结RNN for Image Classification(RNN图片分类–MNIST数据集)pytorch使用-nn.RNNBuilding RNNs is Fun with PyTorch and Google Colab 1 RNN 的定义 nn.…...

基于Java的飞机大战游戏的设计与实现论文
点击下载源码 基于Java的飞机大战游戏的设计与实现 摘 要 现如今,随着智能手机的兴起与普及,加上4G(the 4th Generation mobile communication ,第四代移动通信技术)网络的深入,越来越多的IT行业开始向手机…...

初识影刀:EXCEL根据部门筛选低值易耗品
第一次知道这个办公自动化的软件还是在招聘网站上,了解之后发现对于办公中重复性的工作还是挺有帮助的,特别是那些操作非EXCEL的重复性工作,当然用在EXCEL上更加方便,有些操作比写VBA便捷。 下面就是一个了解基本操作后ÿ…...

nginx的四层负载均衡实战
目录 1 环境准备 1.1 mysql 部署 1.2 nginx 部署 1.3 关闭防火墙和selinux 2 nginx配置 2.1 修改nginx主配置文件 2.2 创建stream配置文件 2.3 重启nginx 3 测试四层代理是否轮循成功 3.1 远程链接通过代理服务器访问 3.2 动图演示 4 四层反向代理算法介绍 4.1 轮询࿰…...

中职网络安全B模块Cenots6.8数据库
任务环境说明: ✓ 服务器场景:CentOS6.8(开放链接) ✓ 用户名:root;密码:123456 进入虚拟机操作系统:CentOS 6.8,登陆数据库(用户名:root&#x…...

BGP笔记的基本概要
技术背景: 在只有IGP(诸如OSPF、IS-IS、RIP等协议,因为最初是被设计在一个单域中进行一个路由操纵,因此被统一称为Interior Gateway Protocol,内部网关协议)的时代,域间路由无法实现一个全局路由…...

【Redis】复制(Replica)
文章目录 一、复制是什么?二、 基本命令三、 配置(分为配置文件和命令配置)3.1 配置文件3.2 命令配置3.3 嵌套连接3.4 关闭从属关系 四、 复制原理五、 缺点 以下是本篇文章正文内容 一、复制是什么? 主从复制 masterÿ…...

封装了一个仿照抖音效果的iOS评论弹窗
需求背景 开发一个类似抖音评论弹窗交互效果的弹窗,支持滑动消失, 滑动查看评论 效果如下图 思路 创建一个视图,该视图上面放置一个tableView, 该视图上添加一个滑动手势,同时设置代理,实现代理方法 (BOOL)gestur…...

【JavaWeb程序设计】Servlet(二)
目录 一、改进上一篇博客Servlet(一)的第一题 1. 运行截图 2. 建表 3. 实体类 4. JSP页面 4.1 login.jsp 4.2 loginSuccess.jsp 4.3 loginFail.jsp 5. mybatis-config.xml 6. 工具类:创建SqlSessionFactory实例,进行 My…...

php探针
php探针是用来探测空间、服务器运行状况和PHP信息用的,探针可以实时查看服务器硬盘资源、内存占用、网卡流量、系统负载、服务器时间等信息。 下面就分享下我是怎样利用php探针来探测服务器网站空间速度、性能、安全功能等。 具体步骤如下: 1.从网上下…...

使用VSCode开发Django指南
使用VSCode开发Django指南 一、概述 Django 是一个高级 Python 框架,专为快速、安全和可扩展的 Web 开发而设计。Django 包含对 URL 路由、页面模板和数据处理的丰富支持。 本文将创建一个简单的 Django 应用,其中包含三个使用通用基本模板的页面。在此…...
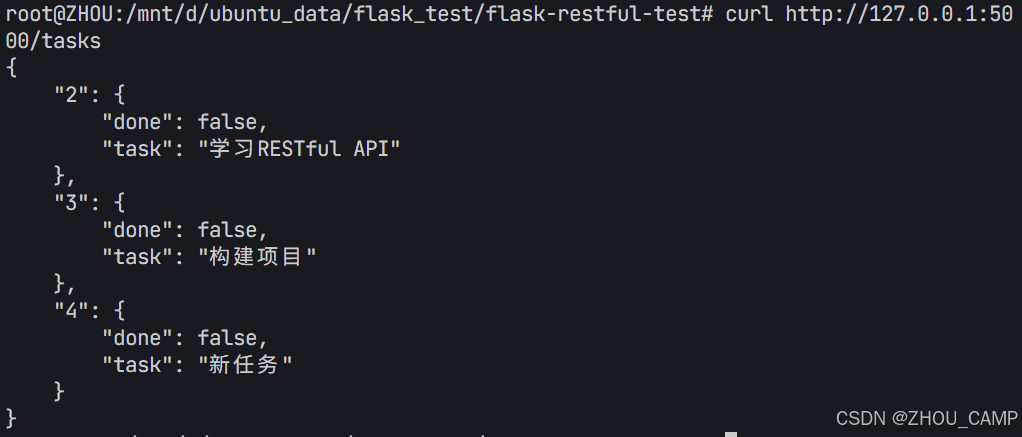
Flask RESTful 示例
目录 1. 环境准备2. 安装依赖3. 修改main.py4. 运行应用5. API使用示例获取所有任务获取单个任务创建新任务更新任务删除任务 中文乱码问题: 下面创建一个简单的Flask RESTful API示例。首先,我们需要创建环境,安装必要的依赖,然后…...

中南大学无人机智能体的全面评估!BEDI:用于评估无人机上具身智能体的综合性基准测试
作者:Mingning Guo, Mengwei Wu, Jiarun He, Shaoxian Li, Haifeng Li, Chao Tao单位:中南大学地球科学与信息物理学院论文标题:BEDI: A Comprehensive Benchmark for Evaluating Embodied Agents on UAVs论文链接:https://arxiv.…...

【SpringBoot】100、SpringBoot中使用自定义注解+AOP实现参数自动解密
在实际项目中,用户注册、登录、修改密码等操作,都涉及到参数传输安全问题。所以我们需要在前端对账户、密码等敏感信息加密传输,在后端接收到数据后能自动解密。 1、引入依赖 <dependency><groupId>org.springframework.boot</groupId><artifactId...
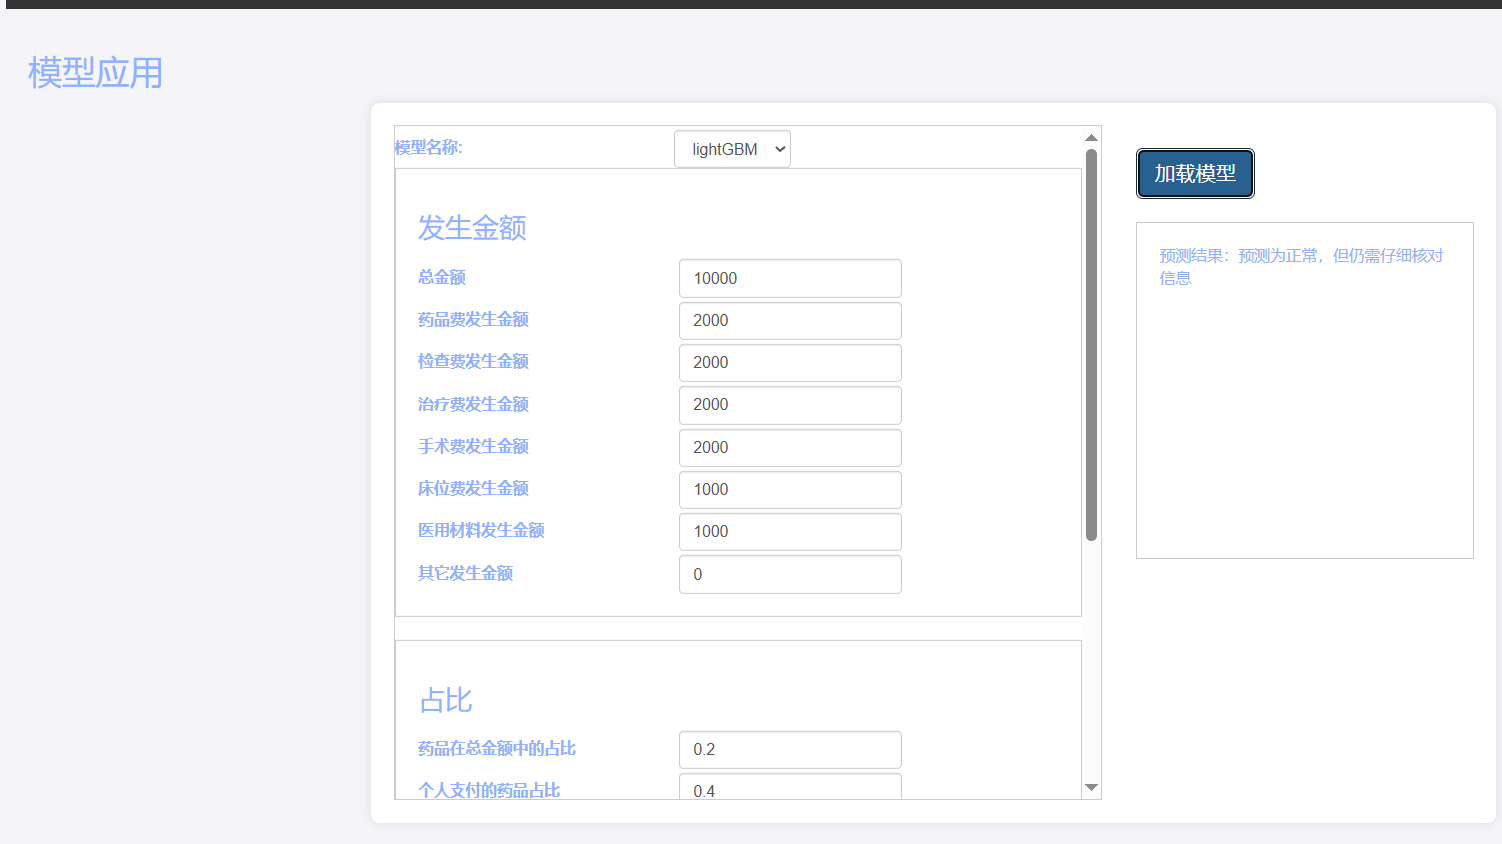
基于Flask实现的医疗保险欺诈识别监测模型
基于Flask实现的医疗保险欺诈识别监测模型 项目截图 项目简介 社会医疗保险是国家通过立法形式强制实施,由雇主和个人按一定比例缴纳保险费,建立社会医疗保险基金,支付雇员医疗费用的一种医疗保险制度, 它是促进社会文明和进步的…...

1688商品列表API与其他数据源的对接思路
将1688商品列表API与其他数据源对接时,需结合业务场景设计数据流转链路,重点关注数据格式兼容性、接口调用频率控制及数据一致性维护。以下是具体对接思路及关键技术点: 一、核心对接场景与目标 商品数据同步 场景:将1688商品信息…...
:滤镜命令)
ffmpeg(四):滤镜命令
FFmpeg 的滤镜命令是用于音视频处理中的强大工具,可以完成剪裁、缩放、加水印、调色、合成、旋转、模糊、叠加字幕等复杂的操作。其核心语法格式一般如下: ffmpeg -i input.mp4 -vf "滤镜参数" output.mp4或者带音频滤镜: ffmpeg…...
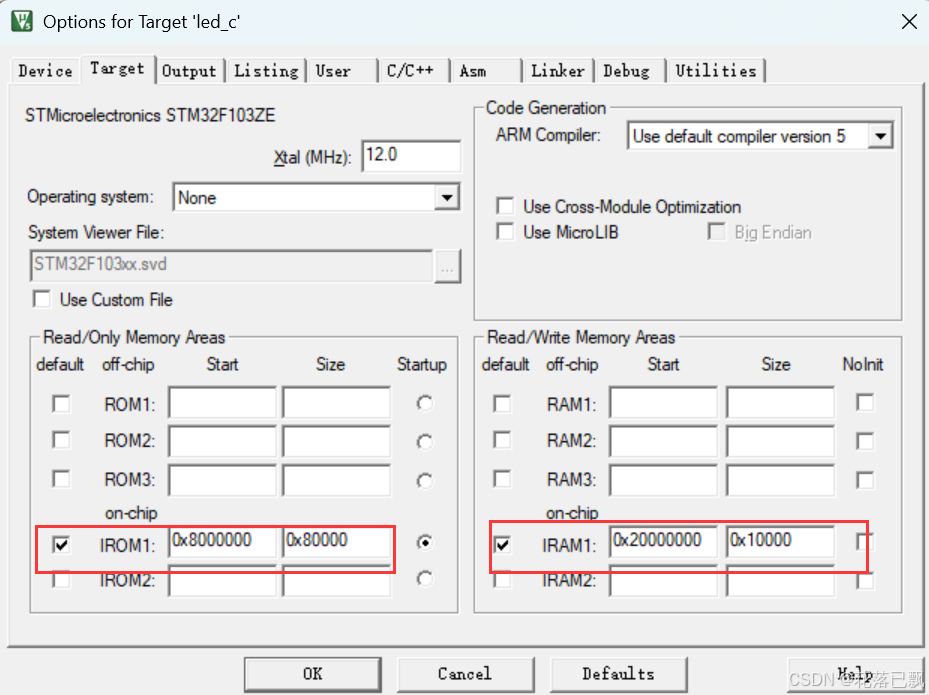
Keil 中设置 STM32 Flash 和 RAM 地址详解
文章目录 Keil 中设置 STM32 Flash 和 RAM 地址详解一、Flash 和 RAM 配置界面(Target 选项卡)1. IROM1(用于配置 Flash)2. IRAM1(用于配置 RAM)二、链接器设置界面(Linker 选项卡)1. 勾选“Use Memory Layout from Target Dialog”2. 查看链接器参数(如果没有勾选上面…...

【OSG学习笔记】Day 16: 骨骼动画与蒙皮(osgAnimation)
骨骼动画基础 骨骼动画是 3D 计算机图形中常用的技术,它通过以下两个主要组件实现角色动画。 骨骼系统 (Skeleton):由层级结构的骨头组成,类似于人体骨骼蒙皮 (Mesh Skinning):将模型网格顶点绑定到骨骼上,使骨骼移动…...

DeepSeek 技术赋能无人农场协同作业:用 AI 重构农田管理 “神经网”
目录 一、引言二、DeepSeek 技术大揭秘2.1 核心架构解析2.2 关键技术剖析 三、智能农业无人农场协同作业现状3.1 发展现状概述3.2 协同作业模式介绍 四、DeepSeek 的 “农场奇妙游”4.1 数据处理与分析4.2 作物生长监测与预测4.3 病虫害防治4.4 农机协同作业调度 五、实际案例大…...