企业高性能web服务器
web服务器介绍
Apache HTTP Server:也称为Apache,是一个开源的HTTP服务器,目前是全球使用最广泛的Web服务器
Nginx:Nginx是一个高性能的HTTP和反向代理服务器,也是一个IMAP/POP3/SMTP服务器
Microsoft Internet Information Services (IIS):IIS是由微软开发的一种Web服务器软件,用于在Windows操作系统上提供服务
Lighttpd:Lighttpd是一个开源的Web服务器,具有低内存占用和高并发处理能力
Node.js:Node.js本身并不是一个HTTP服务器,但它可以通过HTTP模块创建一个HTTP服务器,因此也可以用作HTTP服务程序
Tomcat:Tomcat是一个开源的Java Servlet容器,用于在Java平台上提供HTTP服务
Jetty:Jetty是一个开源的Java HTTP服务器和Servlet容器,具有高性能和低内存占用的特点
Caddy:Caddy是一个现代的,易于使用的HTTP/2服务器,具有自动HTTPS功能
apache

Apache(或httpd)服务,是Internet上使用最多的Web服务器技术之一,通俗来讲就是一个用于搭建网站的服务。
有两个版本:1.x和2.x
http:超文本传输协议,通过线路以明文形式发送,默认使用80端口/TCP
https:经TLS/SSL安全加密的超文本传输协议,默认使用443端口/TCP
Apache的配置文件
	配置文件   存放位置
服务目录	/etc/httpd
主配置文件	/etc/httpd/conf/httpd.conf
虚拟主机的配置文件目录
配置文件								存放位置
服务目录							   /etc/httpd
主配置文件					       /etc/httpd/conf/httpd.conf
虚拟主机的配置文件目录				   /etc/httpd/conf.d
基于用户的配置文件					   /etc/httpd/conf.d/userdir.conf
日志文件目录					       /etc/httpd/logs
默认的网站数据目录					   /var/www/html
主配置文件的重要参数
主配置文件:/etc/httpd/conf/httpd.conf
参数	作用	参数	作用
serverRoot			服务目录			Servername				网站服务器的域名
Listen			监听的IP地址端口号		DocumentRoot			默认网站数据目录
User			运行服务的用户		Directory				文件目录权限
Group			运行服务的用户组		DirectoryIndex			默认的索引页面
Serveradmin		管理员邮箱			ErrorLog				错误日志文件
Apache prefork 模型
- 预派生模式,有一个主控制进程,然后生成多个子进程,使用select模型,最大并发1024
- 每个子进程有一个独立的线程响应用户请求
- 相对比较占用内存,但是比较稳定,可以设置最大和最小进程数
- 是最古老的一种模式,也是最稳定的模式,适用于访问量不是很大的场景
优点:稳定缺点:每个用户请求需要对应开启一个进程,占用资源较多,并发性差,不适用于高并发场景

Apache worker 模型
- 一种多进程和多线程混合的模型
- 有一个控制进程,启动多个子进程
- 每个子进程里面包含固定的线程
- 使用线程程来处理请求
- 当线程不够使用的时候会再启动一个新的子进程,然后在进程里面再启动线程处理请求,
- 由于其使用了线程处理请求,因此可以承受更高的并发
优点:相比prefork 占用的内存较少,可以同时处理更多的请求缺点:使用keepalive的长连接方式,某个线程会一直被占据,即使没有传输数据,也需要一直等待到超时才会被释放。如果过多的线程,被这样占据,也会导致在高并发场景下的无服务线程可用(该问题在prefork模式下,同样会发生)

Apache event模型
- Apache中最新的模式,2012年发布的apache 2.4.X系列正式支持event 模型,属于事件驱动模型(epoll)
- 每个进程响应多个请求,在现在版本里的已经是稳定可用的模式
- 它和worker模式很像,最大的区别在于,它解决了keepalive场景下长期被占用的线程的资源浪费问题(某些线程因为被keepalive,空挂在哪里等待,中间几乎没有请求过来,甚至等到超时)event MPM中,会有一个专门的线程来管理这些keepalive类型的线程
- 当有真实请求过来的时候,将请求传递给服务线程,执行完毕后,又允许它释放。这样增强了高并发场景下的请求处理能力
优点:单线程响应多请求,占据更少的内存,高并发下表现更优秀,会有一个专门的线程来管理keepalive类型的线程,当有真实请求过来的时候,将请求传递给服务线程,执行完毕后,又允许它释放缺点:没有线程安全控制

Nginx—高性能的web服务器

Nginx (engine x) 是一个高性能的HTTP和反向代理web服务器,同时也提IMAP/POP3/SMTP服务。
Nginx是由伊戈尔·赛索耶夫为俄罗斯访问量第二的Rambler.ru站点(俄文Рамблер)开发的,第一个公开版本0.1.0发布于2004年10月4日。其将源代码以类BSD许可证的形式发布,因它的稳定性、丰富的功能集、简单的配置文件和低系统资源的消耗而闻名。2011年6月1日,nginx 1.0.4发布。
Nginx是一款轻量级的Web 服务器/反向代理服务器及电子邮件(IMAP/POP3)代理服务器,在BSD-like 协议下发行。其特点是占有内存少,并发能力强,事实上nginx的并发能力在同类型的网页服务器中表现较好,中国大陆使用nginx网站用户有:百度、京东、新浪、网易、腾讯、淘宝等。
Nginx 是高性能的 HTTP 和反向代理的web服务器,处理高并发能力是十分强大的,能经受高负 载的考验,有报告表明能支持高达 50,000 个并发连接数。
Nginx支持热部署,启动简单,可以做到7*24不间断运行。几个月都不需要重新启动。
基于Nginx的工作场景:
nginx的源码编译
nginx官网:
https://nginx.org/en/download.html
我们使用1.24.0.版本的
[root@nginx ~]# ll
总用量 1096
drwxr-xr-x. 2 root root       6  8月  9 05:33 公共
drwxr-xr-x. 2 root root       6  8月  9 05:33 模板
drwxr-xr-x. 2 root root       6  8月  9 05:33 视频
drwxr-xr-x. 2 root root       6  8月  9 05:33 图片
drwxr-xr-x. 2 root root       6  8月  9 05:33 文档
drwxr-xr-x. 2 root root       6  8月  9 05:33 下载
drwxr-xr-x. 2 root root       6  8月  9 05:33 音乐
drwxr-xr-x. 2 root root       6  8月  9 05:33 桌面
-rw-------. 1 root root    1235  8月  9 05:26 anaconda-ks.cfg
-rw-r--r--. 1 root root 1112471  8月 15 07:21 nginx-1.24.0.tar.gz
-rw-r--r--. 1 root root     597  8月  9 05:44 vmset.sh
我们将nginx压缩包解压缩
[root@nginx ~]# tar -zxvf nginx-1.24.0.tar.gz
[root@nginx nginx-1.24.0]# ll
总用量 816
drwxr-xr-x. 6 1001 1001   4096  8月 15 07:22 auto
-rw-r--r--. 1 1001 1001 323312  4月 10  2023 CHANGES
-rw-r--r--. 1 1001 1001 494234  4月 10  2023 CHANGES.ru
drwxr-xr-x. 2 1001 1001    168  8月 15 07:22 conf
-rwxr-xr-x. 1 1001 1001   2611  4月 10  2023 configure
drwxr-xr-x. 4 1001 1001     72  8月 15 07:22 contrib
drwxr-xr-x. 2 1001 1001     40  8月 15 07:22 html
-rw-r--r--. 1 1001 1001   1397  4月 10  2023 LICENSE
drwxr-xr-x. 2 1001 1001     21  8月 15 07:22 man
-rw-r--r--. 1 1001 1001     49  4月 10  2023 README
drwxr-xr-x. 9 1001 1001     91  8月 15 07:22 src
创建名为nginx的用户和组
[root@nginx objs]# useradd -s /sbin/nologin -M nginx
[root@nginx objs]# id nginx
用户id=1001(nginx) 组id=1001(nginx) 组=1001(nginx)# 不可以登陆其中有个文件configure,他的作用是环境检测,检测我们当前环境安装nginx缺少那些依赖。
[root@Nginx nginx-1.24.0]# ./configure --prefix=/usr/local/nginx \
# 指定我们的安装目录
--user=nginx \ # 指定nginx运行用户
--group=nginx \ # 指定nginx运行组
--with-http_ssl_module \ # 支持https://
--with-http_v2_module \ # 支持http版本2
--with-http_realip_module \ # 支持ip透传
--with-http_stub_status_module \ # 支持状态页面
--with-http_gzip_static_module \ # 支持压缩
--with-pcre \ # 支持正则
--with-stream \ # 支持tcp反向代理
--with-stream_ssl_module \ # 支持tcp的ssl加密
--with-stream_realip_module # 支持tcp的透传ip
我们可以通过执行这个文件,并在其后通过加一些参数来指定我们的nginx需要的功能,但是增加的参数越多,需要的依赖就越多,可以通过--help来查看我们需要的参数
[root@nginx nginx-1.24.0]# ./configure --prefix=/usr/local/nginx \
> --user=nginx \
> --group=nginx \
> --with-http_ssl_module \
> --with-http_v2_module \
> --with-http_realip_module \
> --with-http_stub_status_module \
> --with-http_gzip_static_module \
> --with-pcre \
> --with-stream \
> --with-stream_ssl_module
checking for OS+ Linux 5.14.0-162.6.1.el9_1.x86_64 x86_64
checking for C compiler ... not found./configure: error: C compiler cc is not found
根据报错信息可知,我们缺少了 C语言的编译器,yum安装即可:
[root@nginx nginx-1.24.0]# yum install gcc -y
安装完成后再次执行上一个命令
./configure: error: the HTTP rewrite module requires the PCRE library.
You can either disable the module by using --without-http_rewrite_module
option, or install the PCRE library into the system, or build the PCRE library
statically from the source with nginx by using --with-pcre=<path> option.
这次给的报错,发现少了一个PCRE,我们可以通过yum search 来找对应的包
[root@nginx nginx-1.24.0]# yum search PCRE
正在更新 Subscription Management 软件仓库。
无法读取客户身份本系统尚未在权利服务器中注册。可使用 subscription-manager 进行注册。上次元数据过期检查:0:03:00 前,执行于 2024年08月15日 星期四 07时42分29秒。
============================= 名称 和 概况 匹配:PCRE =============================
pcre-cpp.i686 : C++ bindings for PCRE
pcre-cpp.x86_64 : C++ bindings for PCRE
pcre-devel.i686 : Development files for pcre
pcre-devel.x86_64 : Development files for pcre   # 这就是pcre的开发包
pcre-utf16.i686 : UTF-16 variant of PCRE
pcre-utf16.x86_64 : UTF-16 variant of PCRE
pcre-utf32.i686 : UTF-32 variant of PCRE
pcre-utf32.x86_64 : UTF-32 variant of PCRE
pcre2-devel.i686 : Development files for pcre2
pcre2-devel.x86_64 : Development files for pcre2
pcre2-syntax.noarch : Documentation for PCRE2 regular expressions
pcre2-utf16.i686 : UTF-16 variant of PCRE2
pcre2-utf16.x86_64 : UTF-16 variant of PCRE2
pcre2-utf32.x86_64 : UTF-32 variant of PCRE2
pcre2-utf32.i686 : UTF-32 variant of PCRE2
postfix-pcre.x86_64 : Postfix PCRE map support
================================= 名称 匹配:PCRE =================================
pcre.x86_64 : Perl-compatible regular expression library
pcre.i686 : Perl-compatible regular expression library
pcre2.x86_64 : Perl-compatible regular expression library
pcre2.i686 : Perl-compatible regular expression library
找到后继续安装,然后执行上一条命令
[root@nginx nginx-1.24.0]# yum install pcre-devel.x86_64 -y
./configure: error: SSL modules require the OpenSSL library.
You can either do not enable the modules, or install the OpenSSL library
into the system, or build the OpenSSL library statically from the source
with nginx by using --with-openssl=<path> option.
这次的报错发现少了一个OpenSSL,我们继续找他对应的包
[root@nginx nginx-1.24.0]# yum search openssl
正在更新 Subscription Management 软件仓库。
无法读取客户身份本系统尚未在权利服务器中注册。可使用 subscription-manager 进行注册。上次元数据过期检查:0:07:56 前,执行于 2024年08月15日 星期四 07时42分29秒。
===================================================================== 名称 精准匹配:openssl =====================================================================
openssl.x86_64 : Utilities from the general purpose cryptography library with TLS implementation
=================================================================== 名称 和 概况 匹配:openssl ===================================================================
apr-util-openssl.x86_64 : APR utility library OpenSSL crypto support
openssl-devel.i686 : Files for development of applications which will use OpenSSL
openssl-devel.x86_64 : Files for development of applications which will use OpenSSL
openssl-perl.x86_64 : Perl scripts provided with OpenSSL
openssl-pkcs11.x86_64 : A PKCS#11 engine for use with OpenSSL
openssl-pkcs11.i686 : A PKCS#11 engine for use with OpenSSL
perl-Crypt-OpenSSL-Bignum.x86_64 : Perl interface to OpenSSL for Bignum
perl-Crypt-OpenSSL-RSA.x86_64 : Perl interface to OpenSSL for RSA
perl-Crypt-OpenSSL-Random.x86_64 : OpenSSL/LibreSSL pseudo-random number generator access
rsyslog-openssl.x86_64 : TLS protocol support for rsyslog via OpenSSL library
xmlsec1-openssl.x86_64 : OpenSSL crypto plugin for XML Security Library
xmlsec1-openssl.i686 : OpenSSL crypto plugin for XML Security Library
======================================================================= 名称 匹配:openssl =======================================================================
compat-openssl11.i686 : Utilities from the general purpose cryptography library with TLS implementation
compat-openssl11.x86_64 : Utilities from the general purpose cryptography library with TLS implementation
openssl-libs.x86_64 : A general purpose cryptography library with TLS implementation
openssl-libs.i686 : A general purpose cryptography library with TLS implementation
======================================================================= 概况 匹配:openssl =======================================================================
perl-Net-SSLeay.x86_64 : Perl extension for using OpenSSL
qatengine.x86_64 : Intel QuickAssist Technology (QAT) OpenSSL Engine
然后安装对应的包openssl_devel.x86_64,我们的系统是x86_64的
[root@nginx nginx-1.24.0]# yum install openssl-devel.x86_64 -y
安装完成后,继续执行上一条命令
./configure: error: the HTTP gzip module requires the zlib library.
You can either disable the module by using --without-http_gzip_module
option, or install the zlib library into the system, or build the zlib library
statically from the source with nginx by using --with-zlib=<path> option.
根据报错发现少了个zlib,根据之前的经验,我们可以尝试安装zlib-devel 这个包
[root@nginx nginx-1.24.0]# yum install zlib-devel -y
然后继续执行上一条命令
Configuration summary+ using system PCRE library+ using system OpenSSL library+ using system zlib librarynginx path prefix: "/usr/local/nginx"nginx binary file: "/usr/local/nginx/sbin/nginx"nginx modules path: "/usr/local/nginx/modules"nginx configuration prefix: "/usr/local/nginx/conf"nginx configuration file: "/usr/local/nginx/conf/nginx.conf"nginx pid file: "/usr/local/nginx/logs/nginx.pid"nginx error log file: "/usr/local/nginx/logs/error.log"nginx http access log file: "/usr/local/nginx/logs/access.log"nginx http client request body temporary files: "client_body_temp"nginx http proxy temporary files: "proxy_temp"nginx http fastcgi temporary files: "fastcgi_temp"nginx http uwsgi temporary files: "uwsgi_temp"nginx http scgi temporary files: "scgi_temp"
到这,所有的依赖都安装完成,检测完成。
[root@nginx nginx-1.24.0]# ll
总用量 820
drwxr-xr-x. 6 1001 1001   4096  8月 15 07:22 auto
-rw-r--r--. 1 1001 1001 323312  4月 10  2023 CHANGES
-rw-r--r--. 1 1001 1001 494234  4月 10  2023 CHANGES.ru
drwxr-xr-x. 2 1001 1001    168  8月 15 07:22 conf
-rwxr-xr-x. 1 1001 1001   2611  4月 10  2023 configure
drwxr-xr-x. 4 1001 1001     72  8月 15 07:22 contrib
drwxr-xr-x. 2 1001 1001     40  8月 15 07:22 html
-rw-r--r--. 1 1001 1001   1397  4月 10  2023 LICENSE
-rw-r--r--. 1 root root    438  8月 15 07:54 Makefile
drwxr-xr-x. 2 1001 1001     21  8月 15 07:22 man
drwxr-xr-x. 3 root root    125  8月 15 07:54 objs
-rw-r--r--. 1 1001 1001     49  4月 10  2023 README
drwxr-xr-x. 9 1001 1001     91  8月 15 07:22 src# 检测编译完成后objs里面生成的文件才是我们这个软件运行时所需要的
[root@nginx nginx-1.24.0]# make clean
通过make clean我们可以将我们之前检测的操作换原,换原成最初状态,对应的检测完成后新增的两个包也会消失
然后执行我们下面的命令,进行编译
[root@nginx nginx-1.24.0]# make && make install
make:这部分命令用于编译源代码。make命令会根据Makefile文件中定义的规则来编译源代码,生成可执行文件或者库文件等。在这个过程中,会检查是否有必要重新编译文件(即源文件是否被修改过),然后仅编译那些被修改过的文件,以提高编译效率。如果一切顺利,make命令执行完毕后,会在当前源代码目录下生成编译好的可执行文件或者库文件,但不会自动安装到系统的指定目录下。
make install:在make命令成功执行后,make install命令才会被执行。这个命令会根据Makefile中定义的安装规则,将编译好的文件安装到指定的目录,比如/usr/local/nginx(这取决于Makefile的配置)。这一步通常涉及复制文件到系统目录、设置权限等操作,以便系统可以正常使用这些文件。
[root@nginx nginx-1.24.0]# cd objs/
[root@nginx objs]# ll
总用量 5672
-rw-r--r--. 1 root root   17214  8月 15 07:54 autoconf.err
-rw-r--r--. 1 root root   52929  8月 15 07:54 Makefile
-rwxr-xr-x. 1 root root 5654232  8月 15 08:04 nginx
-rw-r--r--. 1 root root    5537  8月 15 08:04 nginx.8
-rw-r--r--. 1 root root    7990  8月 15 07:54 ngx_auto_config.h
-rw-r--r--. 1 root root     657  8月 15 07:54 ngx_auto_headers.h
-rw-r--r--. 1 root root    8758  8月 15 07:54 ngx_modules.c
-rw-r--r--. 1 root root   42928  8月 15 08:04 ngx_modules.o
drwxr-xr-x. 9 root root      91  8月 15 07:54 src
现在objs里面的文件就是我们的启动程序
此时我们可以通过自带的执行脚本启动nginx
[root@nginx ~]# cd /usr/local/nginx/sbin/
[root@nginx sbin]# ll
总用量 5524
-rwxr-xr-x. 1 root root 5654232  8月 15 08:04 nginx
[root@nginx sbin]# ./nginx
我们可以通过ps查看nginx是否启动
[root@nginx sbin]# ps aux | grep nginx
root       14829  0.0  0.0   9832   932 ?        Ss   08:10   0:00 nginx: master process ./nginx
nginx      14830  0.0  0.2  13720  5388 ?        S    08:10   0:00 nginx: worker process
root       14833  0.0  0.1 221680  2376 pts/1    S+   08:11   0:00 grep --color=auto nginx
nginx默认两个进程,一个master管理进程和worker工作进程
查看端口
[root@nginx sbin]# netstat -antlupe | grep nginx
tcp        0      0 0.0.0.0:80              0.0.0.0:*               LISTEN      0          47399      14829/nginx: master
[root@nginx sbin]# ss -ltn | grep :80
LISTEN 0      511          0.0.0.0:80        0.0.0.0:*
[root@nginx sbin]# lsof -i :80
COMMAND   PID  USER   FD   TYPE DEVICE SIZE/OFF NODE NAME
nginx   14829  root    6u  IPv4  47399      0t0  TCP *:http (LISTEN)
nginx   14830 nginx    6u  IPv4  47399      0t0  TCP *:http (LISTEN)
以上三种方式都可以使用
因为此时开启了debug模式,使用编译完成后的文件比较大
[root@nginx sbin]# du -sh nginx
5.4M    nginx
我们可以关掉debug模式,重新编译
[root@nginx sbin]# ./nginx -s stop
# 先关闭nginx
[root@nginx sbin]# rm -rf /usr/local/nginx/
# 删除nginx文件[root@nginx nginx-1.24.0]# make clean
rm -rf Makefile objs# 回到检测之前的状态[root@nginx nginx-1.24.0]# ll
总用量 816
drwxr-xr-x. 6 nginx nginx 4096 8月 15 07:22 auto
-rw-r--r--. 1 nginx nginx 323312 4月 10 2023 CHANGES
-rw-r--r--. 1 nginx nginx 494234 4月 10 2023 CHANGES.ru
drwxr-xr-x. 2 nginx nginx 168 8月 15 07:22 conf
-rwxr-xr-x. 1 nginx nginx 2611 4月 10 2023 configure
drwxr-xr-x. 4 nginx nginx 72 8月 15 07:22 contrib
drwxr-xr-x. 2 nginx nginx 40 8月 15 07:22 html
-rw-r--r--. 1 nginx nginx 1397 4月 10 2023 LICENSE
drwxr-xr-x. 2 nginx nginx 21 8月 15 07:22 man
-rw-r--r--. 1 nginx nginx 49 4月 10 2023 README
drwxr-xr-x. 9 nginx nginx 91 8月 15 07:22 src
关闭nginx的debug模式
[root@nginx nginx-1.24.0]# vim auto/cc/gcc# debug
# CFLAGS="$CFLAGS -g"
#通过vim文本编辑器锁定debug,将这个参数禁止掉
然后再执行之前的检测操作,最后我们再查看编译后的大小
[root@nginx sbin]# du -sh nginx
1.2M    nginx
[root@nginx sbin]# pwd
/usr/local/nginx/sbin#关闭了debug模式后,明显变小
为了启动nginx的时候不写那么一长串,我们可以通过增加参数达到效果
[root@nginx ~]# vim ~/.bash_profile# .bash_profile# Get the aliases and functions
if [ -f ~/.bashrc ]; then. ~/.bashrc
fi# User specific environment and startup programs
export  PATH=$PATH:/usr/local/nginx/sbin
#在最后一行增加
[root@nginx ~]# source ~/.bash_profile#重新加载并执行当前用户主目录下的.bash_profile文件中的命令和设置。现在只需要一个nginx就可以启动
[root@nginx ~]# nginx
[root@nginx ~]# netstat -antlupe | grep nginx
tcp        0      0 0.0.0.0:80              0.0.0.0:*               LISTEN      0          54991      18045/nginx: master
nginx的配置目录
[root@nginx conf]# pwd
/usr/local/nginx/conf
配置文件
[root@nginx conf]# vim nginx.conf
查看版本
[root@nginx ~]# nginx -v
nginx version: nginx/1.24.0
nginx的平滑升级及版本回滚
平滑升级流程

- 将旧Nginx二进制文件换成新Nginx程序文件(注意先备份)
- 向master进程发送USR2信号
- master进程修改pid文件名加上后缀.oldbin,成为nginx.pid.oldbin
- master进程用新Nginx文件启动新master进程成为旧master的子进程,系统中将有新旧两个Nginx主进程共同提供Web服务,当前新的请求仍然由旧Nginx的worker进程进行处理,将新生成的master进程的PID存放至新生成的pid文件nginx.pid
- 向旧的Nginx服务进程发送WINCH信号,使旧的Nginx worker进程平滑停止
- 向旧master进程发送QUIT信号,关闭老master,并删除Nginx.pid.oldbin文件
- 如果发现升级有问题,可以回滚∶向老master发送HUP,向新master发送QUIT
实战
升级
我们先上传一个高版本的nginx软件包,我就要1.26.1版本
[root@nginx ~]# ll
总用量 2312
drwxr-xr-x. 2 root  root        6  8月  9 05:33 公共
drwxr-xr-x. 2 root  root        6  8月  9 05:33 模板
drwxr-xr-x. 2 root  root        6  8月  9 05:33 视频
drwxr-xr-x. 2 root  root        6  8月  9 05:33 图片
drwxr-xr-x. 2 root  root        6  8月  9 05:33 文档
drwxr-xr-x. 2 root  root        6  8月  9 05:33 下载
drwxr-xr-x. 2 root  root        6  8月  9 05:33 音乐
drwxr-xr-x. 2 root  root        6  8月  9 05:33 桌面
-rw-------. 1 root  root     1235  8月  9 05:26 anaconda-ks.cfg
drwxr-xr-x. 9 nginx nginx     186  8月 15 08:27 nginx-1.24.0
-rw-r--r--. 1 root  root  1112471  8月 15 07:21 nginx-1.24.0.tar.gz
-rw-r--r--. 1 root  root  1244738  8月 15 08:47 nginx-1.26.1.tar.gz
进行解压缩,之后就是进行检测编译,但这次只需执行make,无需执行make install,因为老版本的nginx依然在工作
[root@nginx ~]# tar -zxvf nginx-1.26.1.tar.gz
[root@nginx ~]# cd nginx-1.26.1/
[root@nginx nginx-1.26.1]# ./configure --prefix=/usr/local/nginx --user=nginx --group=nginx --with-http_ssl_module --with-http_v2_module --with-http_realip_module --with-http_stub_status_module --with-http_gzip_static_module --with-pcre --with-stream --with-stream_ssl_module
[root@Nginx nginx-1.26.1]# make
此时我们就有了两个版本的nginx
[root@nginx nginx-1.26.1]# ll objs/nginx  /usr/local/nginx/sbin/nginx
-rwxr-xr-x. 1 root root 5727344  8月 15 08:51 objs/nginx
-rwxr-xr-x. 1 root root 1237312 8月 15 08:27 /usr/local/nginx/sbin/nginx#一个是当前正在使用的,一个是编译好的[root@nginx sbin]# ll
总用量 1212
-rwxr-xr-x. 1 root root 1237312 8月 15 08:27 nginx
[root@nginx sbin]# cp nginx nginx.24
[root@nginx sbin]# ll
总用量 2424
-rwxr-xr-x. 1 root root 1237312 8月 15 08:27 nginx
-rwxr-xr-x. 1 root root 1237312 8月 15 08:53 nginx.24
把新版本的复制过去,把之前的版本就覆盖了,然后使用nginx -t 进行检查
[root@nginx sbin]# \cp -f /root/nginx-1.26.1/objs/nginx /usr/local/nginx/sbin/
[root@nginx sbin]# ll
总用量 6808
-rwxr-xr-x. 1 root root 5727344  8月 15 08:55 nginx
-rwxr-xr-x. 1 root root 1237312  8月 15 08:53 nginx.24
[root@nginx sbin]# nginx -t
nginx: the configuration file /usr/local/nginx/conf/nginx.conf syntax is ok
nginx: configuration file /usr/local/nginx/conf/nginx.conf test is successful
此时注意,在没有升级前我们的版本为1.24.0
[root@nginx sbin]# ps -aux | grep nginx
root       21245  0.0  0.1   9836  3620 ?        Ss   09:10   0:00 nginx: master process nginx
nginx      21272  0.0  0.2  13724  5340 ?        S    09:12   0:00 nginx: worker process
root       21385  0.0  0.1 221680  2312 pts/1    S+   09:20   0:00 grep --color=auto nginx
[root@nginx sbin]# kill -USR2 21245
[root@nginx sbin]# ps -aux | grep nginx
root       21245  0.0  0.1   9836  3620 ?        Ss   09:10   0:00 nginx: master process nginx
nginx      21272  0.0  0.2  13724  5340 ?        S    09:12   0:00 nginx: worker process
root       21386  0.0  0.2   9836  5916 ?        S    09:21   0:00 nginx: master process nginx
nginx      21387  0.0  0.2  13724  4756 ?        S    09:21   0:00 nginx: worker process
root       21395  0.0  0.1 221680  2300 pts/1    S+   09:21   0:00 grep --color=auto nginx
USR2 平滑升级可执行程序,将存储有旧版本主进程PID的文件重命名为nginx.pid.oldbin,并启动新的nginx
此时两个 master 的进程都在运行 , 只是旧的 master 不在监听 , 由新的 master 监听 80此时 Nginx 开启一个新的 master 进程,这个 master 进程会生成新的 worker 进程,这就是升级后的 Nginx 进程,此时老的进程不会自动退出,但是当接收到新的请求不作处理而是交给新的进程处理。
我们通过-WINCH 参数回收旧版本,新版本生效
[root@nginx sbin]# kill -WINCH 21245
# 将老版本的worker进程回收掉
[root@nginx sbin]# ps -aux | grep nginx
root       21245  0.0  0.1   9836  3620 ?        Ss   09:10   0:00 nginx: master process nginx
root       21386  0.0  0.2   9836  5916 ?        S    09:21   0:00 nginx: master process nginx
nginx      21387  0.0  0.2  13724  4756 ?        S    09:21   0:00 nginx: worker process
root       21398  0.0  0.1 221680  2384 pts/1    S+   09:22   0:00 grep --color=auto nginx

回滚
[root@nginx sbin]# cp nginx nginx.26
[root@nginx sbin]# ll
总用量 8020
-rwxr-xr-x. 1 root root 1237312  8月 15 09:20 nginx
-rwxr-xr-x. 1 root root 1237312  8月 15 09:25 nginx.24
-rwxr-xr-x. 1 root root 5727344  8月 15 09:11 nginx.26
[root@nginx sbin]# mv nginx.24 nginx
mv:是否覆盖'nginx'? y
[root@nginx sbin]# kill -HUP 21245   # 把老版本的worker激活
[root@nginx sbin]# ps aux | grep nginx
root       21245  0.0  0.1   9836  3620 ?        Ss   09:10   0:00 nginx: master process nginx
root       21386  0.0  0.2   9836  5916 ?        S    09:21   0:00 nginx: master process nginx
nginx      21387  0.0  0.2  13724  5184 ?        S    09:21   0:00 nginx: worker process
nginx      21413  0.0  0.2  13724  4800 ?        S    09:27   0:00 nginx: worker process
root       21417  0.0  0.1 221680  2292 pts/1    S+   09:27   0:00 grep --color=auto nginx
[root@nginx sbin]# kill -WINCH 21386  # 回收新版本的worker
[root@nginx sbin]# ps aux | grep nginx
root       21245  0.0  0.1   9836  3620 ?        Ss   09:10   0:00 nginx: master process nginx
root       21386  0.0  0.2   9836  5916 ?        S    09:21   0:00 nginx: master process nginx
nginx      21413  0.0  0.2  13724  4800 ?        S    09:27   0:00 nginx: worker process
root       21419  0.0  0.1 221680  2372 pts/1    S+   09:27   0:00 grep --color=auto nginx

如果不行让别人访问时看到你的版本,我们可以通过在 这个目录里面修改配置文件
[root@nginx core]# pwd
/root/nginx-1.26.1/src/core[root@nginx core]# ls
nginx.c           ngx_crc32.h  ngx_md5.c              ngx_proxy_protocol.h  ngx_shmtx.h
nginx.h           ngx_crc.h    ngx_md5.h              ngx_queue.c           ngx_slab.c
ngx_array.c       ngx_crypt.c  ngx_module.c           ngx_queue.h           ngx_slab.h
ngx_array.h       ngx_crypt.h  ngx_module.h           ngx_radix_tree.c      ngx_spinlock.c
ngx_bpf.c         ngx_cycle.c  ngx_murmurhash.c       ngx_radix_tree.h      ngx_string.c
ngx_bpf.h         ngx_cycle.h  ngx_murmurhash.h       ngx_rbtree.c          ngx_string.h
ngx_buf.c         ngx_file.c   ngx_open_file_cache.c  ngx_rbtree.h          ngx_syslog.c
ngx_buf.h         ngx_file.h   ngx_open_file_cache.h  ngx_regex.c           ngx_syslog.h
ngx_conf_file.c   ngx_hash.c   ngx_output_chain.c     ngx_regex.h           ngx_thread_pool.c
ngx_conf_file.h   ngx_hash.h   ngx_palloc.c           ngx_resolver.c        ngx_thread_pool.h
ngx_config.h      ngx_inet.c   ngx_palloc.h           ngx_resolver.h        ngx_times.c
ngx_connection.c  ngx_inet.h   ngx_parse.c            ngx_rwlock.c          ngx_times.h
ngx_connection.h  ngx_list.c   ngx_parse.h            ngx_rwlock.h
ngx_core.h        ngx_list.h   ngx_parse_time.c       ngx_sha1.c
ngx_cpuinfo.c     ngx_log.c    ngx_parse_time.h       ngx_sha1.h
ngx_crc32.c       ngx_log.h    ngx_proxy_protocol.c   ngx_shmtx.c
[root@nginx core]# vim nginx.h/** Copyright (C) Igor Sysoev* Copyright (C) Nginx, Inc.*/#ifndef _NGINX_H_INCLUDED_
#define _NGINX_H_INCLUDED_#define nginx_version      1026001
#define NGINX_VERSION      "1.0"
#define NGINX_VER          "lf/" NGINX_VERSION#ifdef NGX_BUILD
#define NGINX_VER_BUILD    NGINX_VER " (" NGX_BUILD ")"
#else
#define NGINX_VER_BUILD    NGINX_VER
#endif#define NGINX_VAR          "NGINX"
#define NGX_OLDPID_EXT     ".oldbin"#endif /* _NGINX_H_INCLUDED_ */
~
相关文章:
企业高性能web服务器
web服务器介绍 Apache HTTP Server:也称为Apache,是一个开源的HTTP服务器,目前是全球使用最广泛的Web服务器 Nginx:Nginx是一个高性能的HTTP和反向代理服务器,也是一个IMAP/POP3/SMTP服务器 Microsoft Internet Inform…...

数据库:深入解析SQL分组与聚合——提升数据查询效率的关键技巧
数据库:深入解析SQL分组与聚合——提升数据查询效率的关键技巧 在数据分析和数据库管理中,SQL 的分组与排序操作是不可或缺的工具。本篇博客将深入探讨 GROUP BY 和 ORDER BY 的使用方法,并通过实际案例说明如何通过分组实现数据聚合以及如何…...

【CSS】数字英文css没有转换成...换行点、没有换行、拆分的问题(非常常见的需求)
默认情况下,连续的英文或数字文本不会在空格处换行,这可能导致布局问题。 解决方案 要解决这个问题,可以使用以下几种CSS属性: word-break: 控制单词如何换行。设置为break-all可以让任何字符都能成为换行点。word-wrap: 控制是…...

C++ string模拟实现
一 如何区分自定义类与标准库中的同名类 // string.h #define _CRT_SECURE_NO_WARNINGS 1 #pragma once #include<iostream> using namespace std;namespace bit {class string{} }// Test.cpp include "string.h"int main() {return 0; } 既然要模拟实现str…...

Lora 全文翻译
作者: 地点:hby 来源:https://arxiv.org/pdf/2106.09685 工具:文心 LORA: LOW-RANK ADAPTATION OF LARGE LANGUAGE MODELS 摘要 自然语言处理的一个重要范式包括在通用领域数据上进行大规模预训练,并适应特定任务或…...
)
结题阶段(2024年8月)
海门区教育科学 “十四五”规划2022年度立项课题 结题鉴定材料 课 题 名 称 高中信息技术项目化教学的研究与应用 课题负责人 郭书艳 所 在 单 位 江苏省包场高级中学 报 送 日 期 2024 年 6 月 20 日…...

贪吃蛇(C语言详解)
贪吃蛇游戏运行画面-CSDN直播 目录 贪吃蛇游戏运行画面-CSDN直播 1. 实验目标 2. Win32 API介绍 2.1 Win32 API 2.2 控制台程序(Console) 2.3 控制台屏幕上的坐标COORD 2.4 GetStdHandle 2.5 GetConsoleCursorlnfo 2.5.1 CONSOLE_CURSOR_INFO …...
与国际专线(IPLC)服务)
国际以太网专线(IEPL)与国际专线(IPLC)服务
中国联通国际公司产品: 国际以太网专线 (IEPL)/国际专线(IPLC) 在全球化的今天,企业越来越依赖于高速、稳定且安全的国际网络连接来支持其跨国业务活动。中国联通国际公司作为中国领先的电信运营商之一,在这一领域提供了多种优质…...

vue 子父组件互相改值
在Vue.js中,子组件想要修改父组件的状态(如数据属性的值)时,通常遵循以下步骤: 父组件向子组件传递数据:通过props(属性)将需要被子组件操作的值传入子组件。例如,在父组…...

java之拼图小游戏(开源)
public class LoginJFrame extends JFrame {//表示登录界面,以后所有跟登录相关的都写在这里public LoginJFrame() {//设置界面的长和宽this.setSize(603,680);//设置界面的标题this.setTitle("拼图登陆界面");//设置界面置顶this.setAlwaysOnTop(true);/…...

Linux Shell批量测试IP连通性
Linux 通过Shell脚本来实现读取txt文件中的IP地址,并使用telnet对其后的所有端口进行测试,判断是否可以连接。每个IP地址的端口测试时间限制为5秒。 IP文件 : ips.txt 192.168.1.1 22,80,443 192.168.1.2 21,25,110 192.168.1.3 8080每一行包含一个IP地…...

已解决:anaocnda如何备份环境与安装环境
1.使用pip进行备份 激活对应的虚拟环境,切换到桌面或者想备份的位置。 备份即可: pip freeze > requirements.txt如何安装备份? pip install -r requirements.txt2.使用conda进行备份 激活对应的虚拟环境,切换到桌面或者想…...
自动化与高效设计:推理技术在FPGA中的应用
想象一下,你正在设计一个复杂的电路系统,就像在搭建一座精巧的积木城堡。你手头有各种形状和功能的积木块,这些积木块可以组合成任何你需要的结构。在这个过程中,你有两种主要的方法:一种是手动挑选和搭建每一块积木&a…...

对react模块和模块化理解
在React开发中,模块化和React模块是两个紧密相关但又有区别的概念。理解它们对于构建高效、可维护的React应用至关重要。 模块化 模块化是一种将大型代码库拆分成更小、更易于管理的部分(即模块)的软件设计技术。每个模块都封装了特定的功能…...

CAN总线-----帧格式
目录 前言 一、CAN总线帧格式分类 1.数据帧(重点) 2.遥控帧 3.错误帧 4.过载帧 5.间隔帧 二、位填充 三、波形实例 前言 本期我们就开始学习CAN总线的帧格式,对应帧格式的话,在前面我们学习I2C协议和SPI协议等协议的时候…...

UE网络同步(一) —— 一个项目入门UE网络同步之概念解释
最近在学习UE网络同步,发现了一个非常好的教程,并且附带了项目文件,这里从这个小项目入手,理解UE的网络同步 教程链接:https://www.youtube.com/watch?vJOJP0CvpB8w 项目链接:https://github.com/awforsyt…...

MATLAB中rsf2csf函数用法
目录 语法 说明 示例 将实数 Schur 形式变换为复数 Schur 形式 rsf2csf函数的功能是将实数 Schur 形式转换为复数 Schur 形式。 语法 [Unew,Tnew] rsf2csf(U,T) 说明 [Unew,Tnew] rsf2csf(U,T) 将实矩阵 X 的 [U,T] schur(X) 的输出从实数 Schur 形式变换为复数 Sc…...

Java基础 文字小游戏
souf System.out.printf("你好啊%s","张三") 输出你好啊张三 System.out.printn()放在中间可以换行 System.out.printf("%s你好啊%s","张三","李四") 输出 张三你好啊李四 只有输出没有换行效果。 制作一个文字小游戏…...
)
「数组」归并排序 / if语句优化|小区间插入优化(C++)
概述 在上一篇文章中,我们介绍了快速排序以及随机快速排序: 「数组」快速排序 / 随机值优化|小区间插入优化(C) 今天,我们来介绍归并排序。 相比于快速排序是冒泡排序融合了分治思想后形成的究极promax进化版&…...
颠覆传统 北大新型MoM架构挑战Transformer模型,显著提升计算效率
挑战传统的Transformer模型设计 在深度学习和自然语言处理领域,Transformer模型已经成为一种标准的架构,广泛应用于各种任务中。传统的Transformer模型依赖于一个固定的、按深度排序的层次结构,每一层的输出都作为下一层的输入。这种设计虽然…...
突破不可导策略的训练难题:零阶优化与强化学习的深度嵌合
强化学习(Reinforcement Learning, RL)是工业领域智能控制的重要方法。它的基本原理是将最优控制问题建模为马尔可夫决策过程,然后使用强化学习的Actor-Critic机制(中文译作“知行互动”机制),逐步迭代求解…...
Docker 运行 Kafka 带 SASL 认证教程
Docker 运行 Kafka 带 SASL 认证教程 Docker 运行 Kafka 带 SASL 认证教程一、说明二、环境准备三、编写 Docker Compose 和 jaas文件docker-compose.yml代码说明:server_jaas.conf 四、启动服务五、验证服务六、连接kafka服务七、总结 Docker 运行 Kafka 带 SASL 认…...

系统设计 --- MongoDB亿级数据查询优化策略
系统设计 --- MongoDB亿级数据查询分表策略 背景Solution --- 分表 背景 使用audit log实现Audi Trail功能 Audit Trail范围: 六个月数据量: 每秒5-7条audi log,共计7千万 – 1亿条数据需要实现全文检索按照时间倒序因为license问题,不能使用ELK只能使用…...

JVM垃圾回收机制全解析
Java虚拟机(JVM)中的垃圾收集器(Garbage Collector,简称GC)是用于自动管理内存的机制。它负责识别和清除不再被程序使用的对象,从而释放内存空间,避免内存泄漏和内存溢出等问题。垃圾收集器在Ja…...
最新SpringBoot+SpringCloud+Nacos微服务框架分享
文章目录 前言一、服务规划二、架构核心1.cloud的pom2.gateway的异常handler3.gateway的filter4、admin的pom5、admin的登录核心 三、code-helper分享总结 前言 最近有个活蛮赶的,根据Excel列的需求预估的工时直接打骨折,不要问我为什么,主要…...

工程地质软件市场:发展现状、趋势与策略建议
一、引言 在工程建设领域,准确把握地质条件是确保项目顺利推进和安全运营的关键。工程地质软件作为处理、分析、模拟和展示工程地质数据的重要工具,正发挥着日益重要的作用。它凭借强大的数据处理能力、三维建模功能、空间分析工具和可视化展示手段&…...

生成 Git SSH 证书
🔑 1. 生成 SSH 密钥对 在终端(Windows 使用 Git Bash,Mac/Linux 使用 Terminal)执行命令: ssh-keygen -t rsa -b 4096 -C "your_emailexample.com" 参数说明: -t rsa&#x…...

C++ 求圆面积的程序(Program to find area of a circle)
给定半径r,求圆的面积。圆的面积应精确到小数点后5位。 例子: 输入:r 5 输出:78.53982 解释:由于面积 PI * r * r 3.14159265358979323846 * 5 * 5 78.53982,因为我们只保留小数点后 5 位数字。 输…...
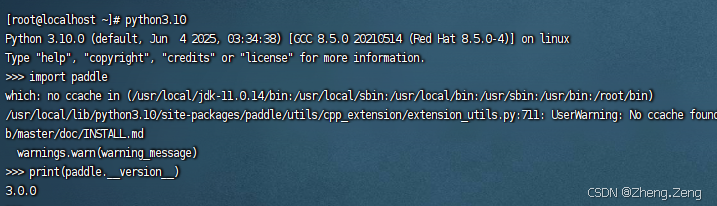
第一篇:Liunx环境下搭建PaddlePaddle 3.0基础环境(Liunx Centos8.5安装Python3.10+pip3.10)
第一篇:Liunx环境下搭建PaddlePaddle 3.0基础环境(Liunx Centos8.5安装Python3.10pip3.10) 一:前言二:安装编译依赖二:安装Python3.10三:安装PIP3.10四:安装Paddlepaddle基础框架4.1…...

绕过 Xcode?使用 Appuploader和主流工具实现 iOS 上架自动化
iOS 应用的发布流程一直是开发链路中最“苹果味”的环节:强依赖 Xcode、必须使用 macOS、各种证书和描述文件配置……对很多跨平台开发者来说,这一套流程并不友好。 特别是当你的项目主要在 Windows 或 Linux 下开发(例如 Flutter、React Na…...