Flutter TextField和Button组件开发登录页面案例
In this section, we’ll go through building a basic login screen using the Button and TextField widgets. We’ll follow a step-bystep approach, allowing you to code along and understand each part of the process. Let’s get started!
在本节中,我们将使用“Button”和“TextField”小部件构建一个基本的登录屏幕。我们将遵循一步一步的方法,允许您编写代码并理解过程的每个部分。我们开始吧!
Scenario: Creating a Login Screen
场景:创建登录界面
Imagine you’re building a mobile app that requires user authentication. You want users to be able to log in securely, so you need to design a login screen. This screen should include fields for users to enter their username and password, along with a “Login” button to initiate the authentication process. Additionally, you want to ensure that the password remains hidden as users type it.
假设您正在构建一个需要用户身份验证的移动应用程序。您希望用户能够安全登录,因此需要设计一个登录屏幕。该屏幕应该包括供用户输入用户名和密码的字段,以及用于启动身份验证过程的“Login”按钮。此外,您希望确保在用户键入密码时保持隐藏。
Step 1: Setting Up Your Project
步骤1:设置项目
Before we begin, make sure you have your Flutter project set up. If you haven’t done this yet, refer to previous sections for guidance.
在我们开始之前,确保你有你的Flutter项目设置。如果您还没有这样做,请参考前面的部分以获得指导。
Step 2: Building the Login Screen
步骤 2:创建登录屏幕
Open lib/main.dart: Open the lib/main.dart file in yourproject.
打开 lib/main.dart: 在您的项目中打开 lib/main.dart 文件。
Import Required Packages: Make sure you have thenecessary package imports at the top of the file:
导入所需软件包: 确保在文件顶部有必要的软件包导入:
import ‘package:flutter/material.dart’;
Create the Main Function: Replace the existing main function with the following code:
创建主函数: 用以下代码替换现有的 main 函数:
void main() {runApp(MyApp());
}
Create MyApp Class: Define the MyApp class as follows:
创建 MyApp 类: 定义 MyApp 类如下:
class MyApp extends StatelessWidget {const MyApp({super.key});Widget build(BuildContext context) {return const MaterialApp(title: "用户登录",home: LoginScreen(),);}
}
Create LoginScreen Class: Now, let’s create the LoginScreen class inside the lib folder. This will be the main screen of our app:
class LoginScreen extends StatelessWidget {const LoginScreen({super.key});Widget build(BuildContext context) {return Scaffold(appBar: AppBar(title: const Text("用户登录"),),body: Center(child: Padding(padding: const EdgeInsets.all(16),child: Column(mainAxisAlignment: MainAxisAlignment.center,children: <Widget>[],),)),);}
}
Add TextFields and Button: Inside the Column widget, add the following code to create two TextField widgets for username and password inputs, and an ElevatedButton for login:
添加文本字段和按钮: 在 “列 ”部件中添加以下代码,创建两个用于输入用户名和密码的 TextField 部件,以及一个用于登录的 ElevatedButton:
Column(mainAxisAlignment: MainAxisAlignment.center,children: <Widget>[const TextField(decoration: InputDecoration(labelText: "账号"),),const SizedBox(height: 20),const TextField(decoration: InputDecoration(labelText: "密码"),obscureText: true,),const SizedBox(height: 20),ElevatedButton(onPressed: () {// Add your login logic here},child: const Text("登录"),),],
),
此时main.dart的完整代码如下:
import "package:flutter/material.dart";void main() {runApp(const MyApp());
}class MyApp extends StatelessWidget {const MyApp({super.key});Widget build(BuildContext context) {return const MaterialApp(title: "用户登录",home: LoginScreen(),);}
}class LoginScreen extends StatelessWidget {const LoginScreen({super.key});Widget build(BuildContext context) {return Scaffold(appBar: AppBar(title: const Text("用户登录"),),body: Center(child: Padding(padding: const EdgeInsets.all(16),child: Column(mainAxisAlignment: MainAxisAlignment.center,children: <Widget>[Column(mainAxisAlignment: MainAxisAlignment.center,children: <Widget>[const TextField(decoration: InputDecoration(labelText: "账号"),),const SizedBox(height: 20),const TextField(decoration: InputDecoration(labelText: "密码"),obscureText: true,),const SizedBox(height: 20),ElevatedButton(onPressed: () {// Add your login logic here},child: const Text("登录"),),],),],),)),);}
}
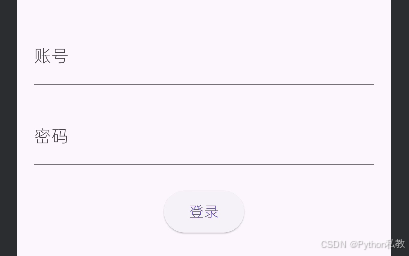
效果预览如下:
Step 3: Exploring the Code
步骤 3:探索代码
Inside the LoginScreen widget, we’ve added two TextField widgets for username and password input, along with a SizedBox to create spacing.
在 LoginScreen 部件中,我们添加了两个用于输入用户名和密码的 TextField 部件,以及一个用于创建间距的 SizedBox。
TextField (Username Input): The first TextField widget allows users to enter their username. We’ve used the decoration property with the InputDecoration class to provide a visual hint (label) inside the text field. The labelText parameter sets the label for the text field, helping users understand what to enter.
TextField(用户名输入): 第一个 TextField 部件允许用户输入用户名。我们使用 InputDecoration 类的装饰属性在文本字段内提供视觉提示(标签)。labelText 参数设置了文本字段的标签,帮助用户了解要输入的内容。
TextField (Password Input): The second TextField widget is used for password input. For security reasons, we’ve set the obscureText property to true. This property hides the entered text, displaying it as dots, asterisks, or other obscured characters. This way, sensitive information like passwords remains hidden.
TextField(密码输入): 第二个 TextField widget 用于密码输入。出于安全考虑,我们将 obscureText 属性设置为 true。该属性会隐藏输入的文本,显示为点、星号或其他模糊字符。这样,像密码这样的敏感信息就会被隐藏起来。
SizedBox: This widget creates a space between the text fields and the button, providing visual separation and improving the layout. The height parameter in SizedBox sets the amount of vertical space between widgets.
SizedBox: 该部件可在文本字段和按钮之间创建一个空间,提供视觉分隔并改善布局。SizedBox 中的高度参数设置了部件之间的垂直空间大小。
ElevatedButton: This widget serves as the login button. For now, the onPressed property is empty. You can later add your login logic here.
ElevatedButton: 该部件用作登录按钮。目前,onPressed 属性为空。您可以稍后在此处添加登录逻辑。
Step 4: Run Your App
步骤 4:运行应用程序
Save your changes and run the app using the command:
保存更改并使用命令运行应用程序:
flutter run
Step 5: Exploring the Login Screen
步骤 5:探索登录屏幕
As the app launches, you’ll see a simple login screen with fields for entering a username and password, along with a “Login” button. Although the button doesn’t currently perform any action, this example provides a foundation for adding authentication logic and creating a functional login experience.
应用程序启动后,您会看到一个简单的登录屏幕,上面有输入用户名和密码的字段,以及一个 “登录 ”按钮。虽然按钮目前不执行任何操作,但这个示例为添加身份验证逻辑和创建功能性登录体验奠定了基础。
代码优化
之前的代码有一个不必要的Column组件嵌套, 去掉后改写如下:
import "package:flutter/material.dart";void main() {runApp(const MyApp());
}class MyApp extends StatelessWidget {const MyApp({super.key});Widget build(BuildContext context) {return const MaterialApp(title: "用户登录",home: LoginScreen(),);}
}class LoginScreen extends StatelessWidget {const LoginScreen({super.key});Widget build(BuildContext context) {return Scaffold(appBar: AppBar(title: const Text("用户登录"),),body: Center(child: Padding(padding: const EdgeInsets.all(16),child: Column(mainAxisAlignment: MainAxisAlignment.center,children: <Widget>[const TextField(decoration: InputDecoration(labelText: "账号"),),const SizedBox(height: 20),const TextField(decoration: InputDecoration(labelText: "密码"),obscureText: true,),const SizedBox(height: 20),ElevatedButton(onPressed: () {// Add your login logic here},child: const Text("登录"),),],),)),);}
}
相关文章:
Flutter TextField和Button组件开发登录页面案例
In this section, we’ll go through building a basic login screen using the Button and TextField widgets. We’ll follow a step-bystep approach, allowing you to code along and understand each part of the process. Let’s get started! 在本节中,我们…...

【vue + mockjs】Mockjs——数据接口模拟
一、mockjs 根据规则生成随机数据,通过拦截 ajax 请求来实现"模拟前端数据接口“的作用。 二、安装 // yarn yarn add mockjs// npm npm install mockjs --save-dev 三、主要模块 mock 根据数据模板生成对应的随机数据Random 工具函数, 调用具体的类型函数…...
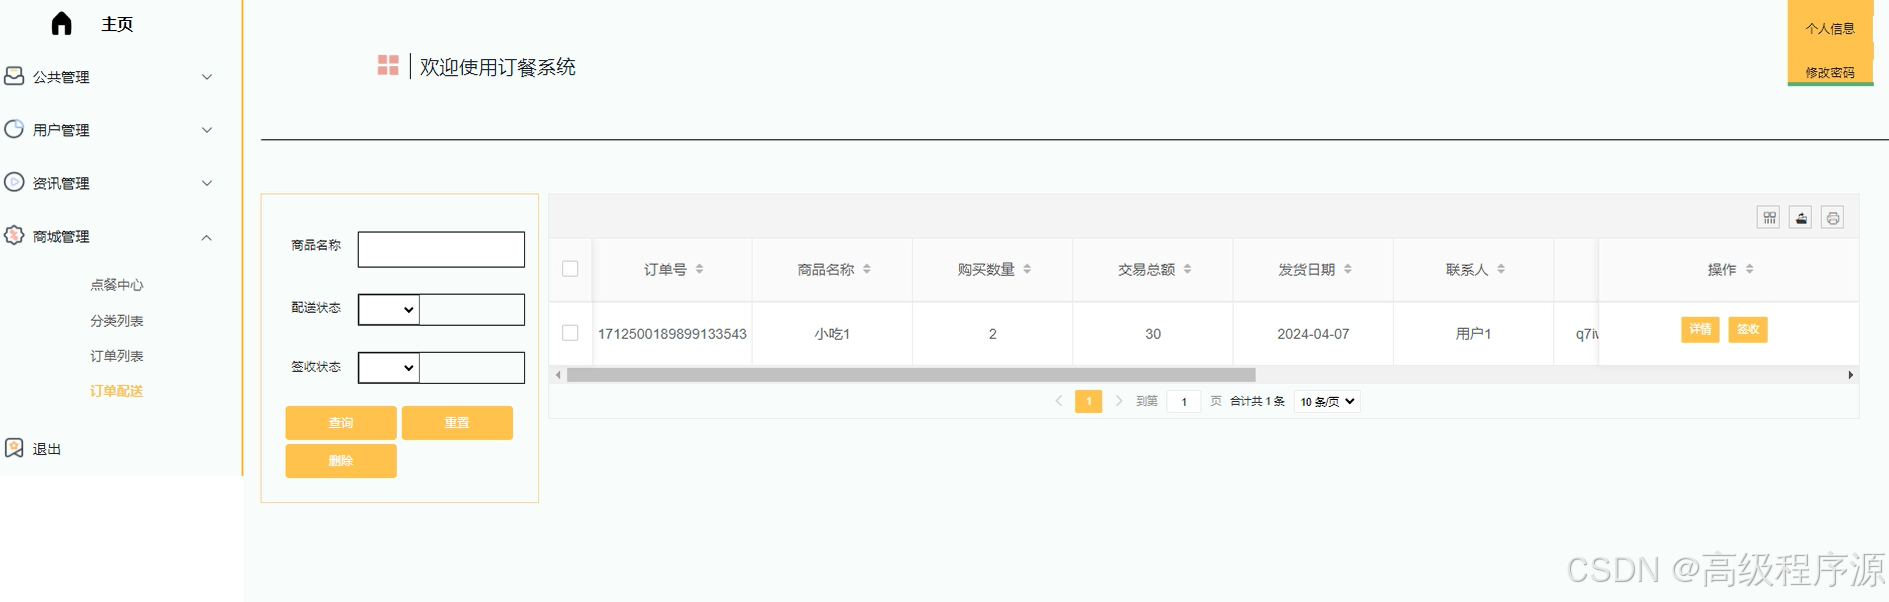
ssm订餐系统-计算机毕业设计源码26763
摘 要 本文提出了基于SSM框架的订餐系统的设计与实现。该系统通过前后端分离的方式,采用SpringMVCSpringMyBatis(SSM)框架进行开发,实现了用户注册、登录、点餐、购物车、订单管理等功能。系统设计了用户注册模块,用户…...
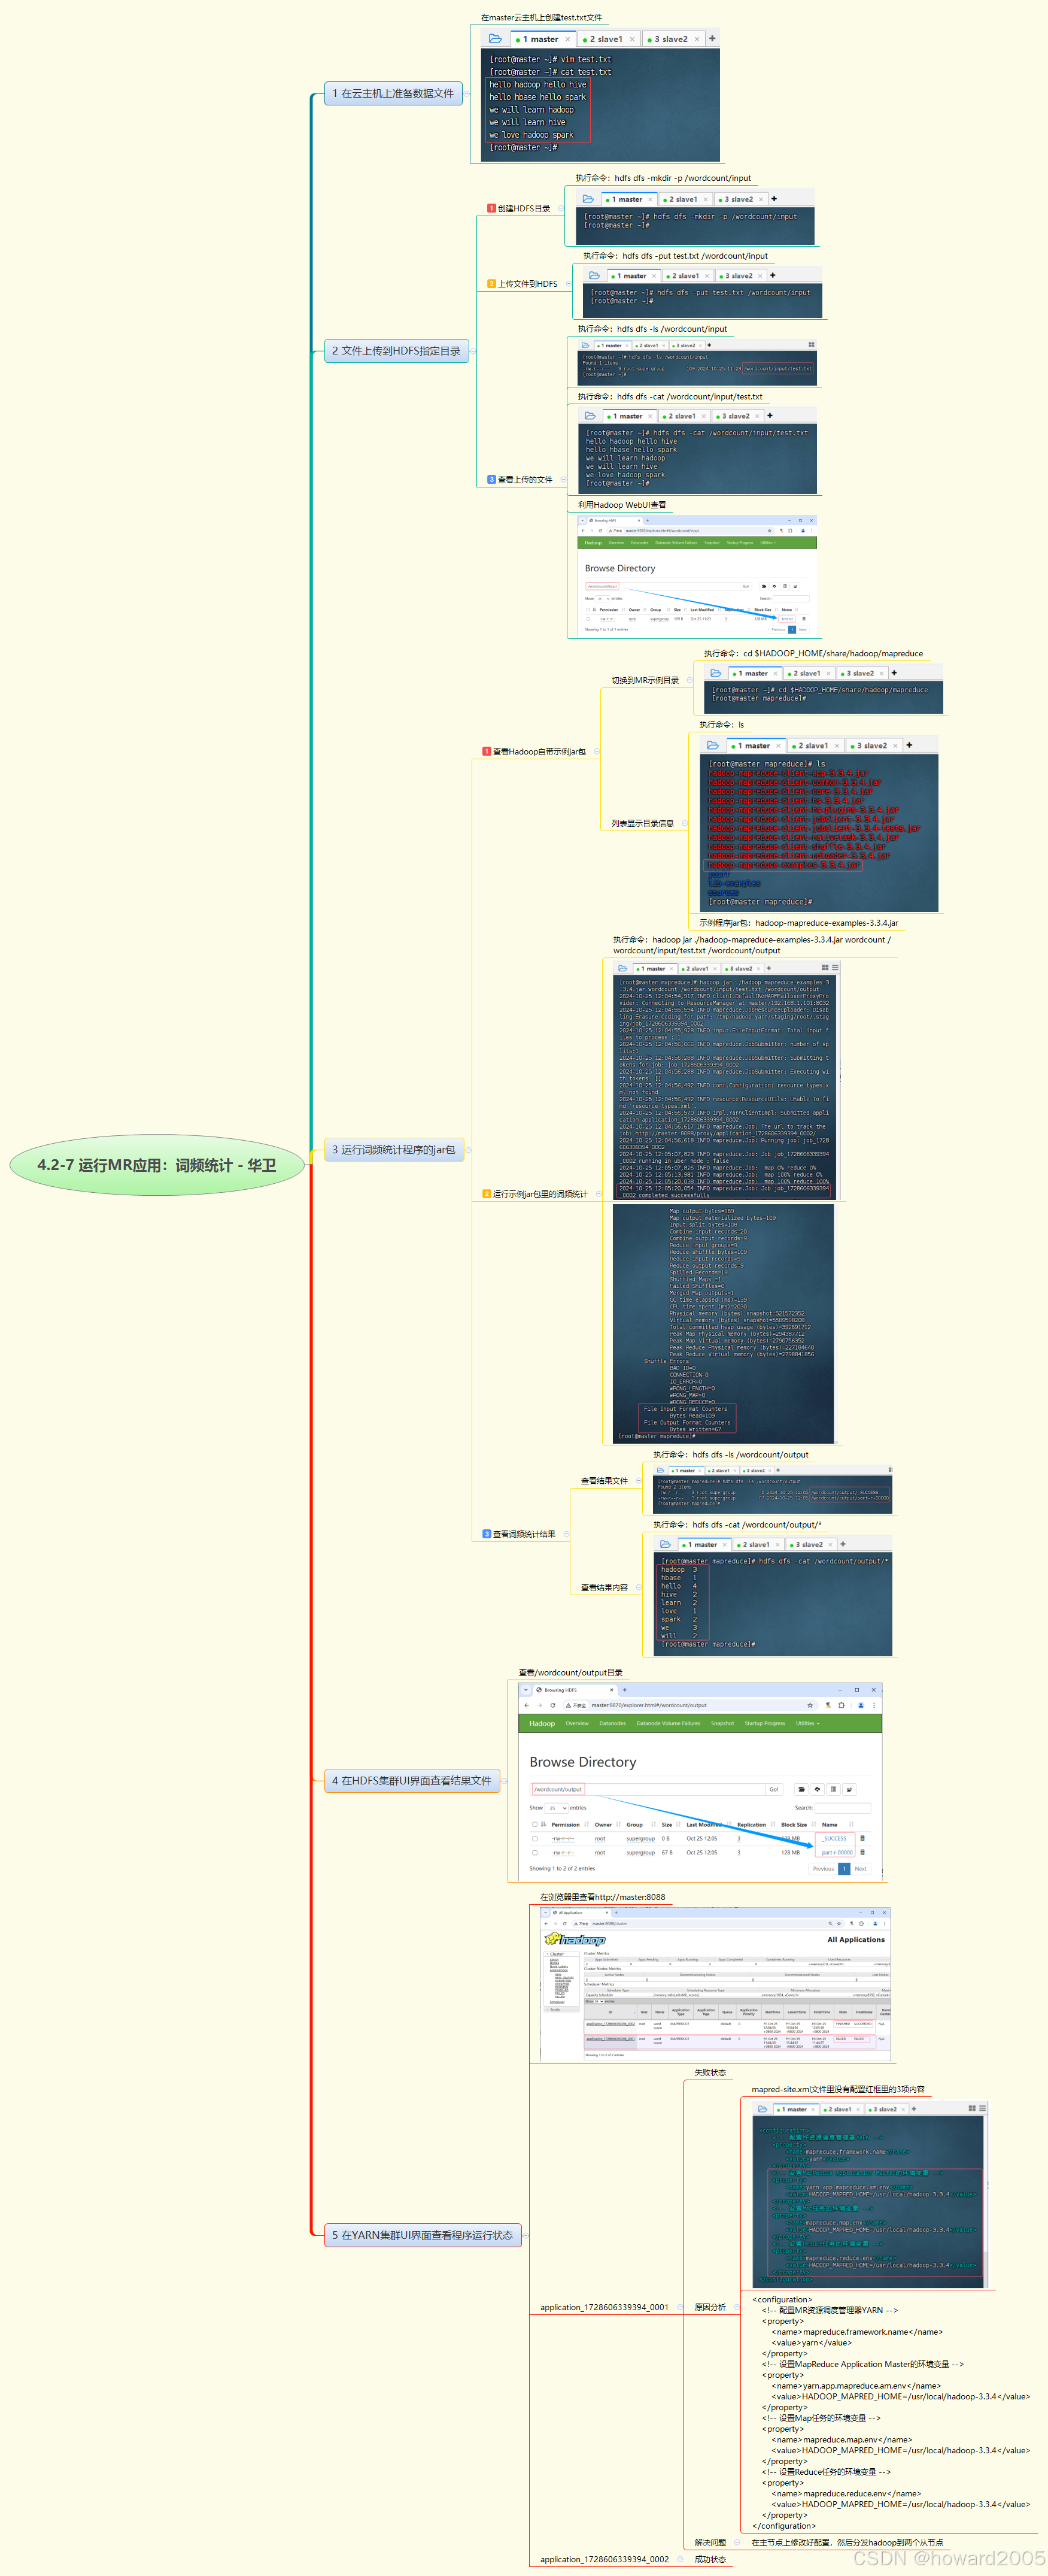
4.2-7 运行MR应用:词频统计
文章目录 1. 准备数据文件2. 文件上传到HDFS指定目录2.1 创建HDFS目录2.2 上传文件到HDFS2.3 查看上传的文件 3. 运行词频统计程序的jar包3.1 查看Hadoop自带示例jar包3.2 运行示例jar包里的词频统计 4. 查看词频统计结果5. 在HDFS集群UI界面查看结果文件6. 在YARN集群UI界面查…...
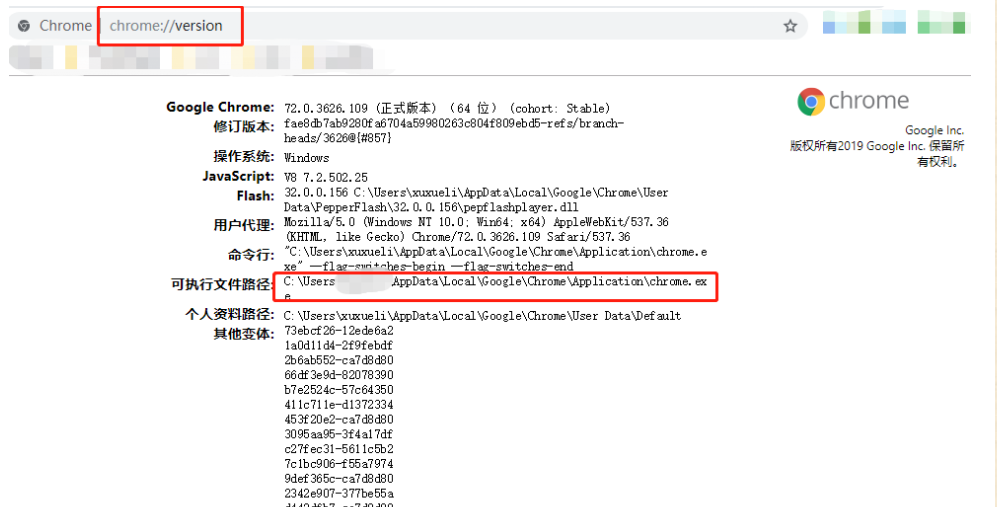
查看Chrome安装路
谷歌Google浏览器查看安装路径,浏览器Google Chrome浏览器查看安装路径 chrome://version/ 来源:笔记云...

深入剖析Canvas的getBoundingClientRect:精准定位与交互事件实现
软考鸭微信小程序 过软考,来软考鸭! 提供软考免费软考讲解视频、题库、软考试题、软考模考、软考查分、软考咨询等服务 在前端开发中,Canvas是一个强大的绘图工具,它允许开发者在网页上动态地绘制图形、图像和动画。然而,仅仅能够绘制图形是不…...
)
SQL SERVER 2005/2008/2012/2016/2020 数据库状态为“可疑”的解决方法(亲测可用)
当数据库发生这种操作故障时,可以按如下操作步骤可解决此方法,打开数据库里的Sql 查询编辑器窗口,运行以下的命令。 1、修改数据库为紧急模式 ALTER DATABASE demo SET EMERGENCY 2、使数据库变为单用户模式 ALTER DATABASE demo SET SINGL…...
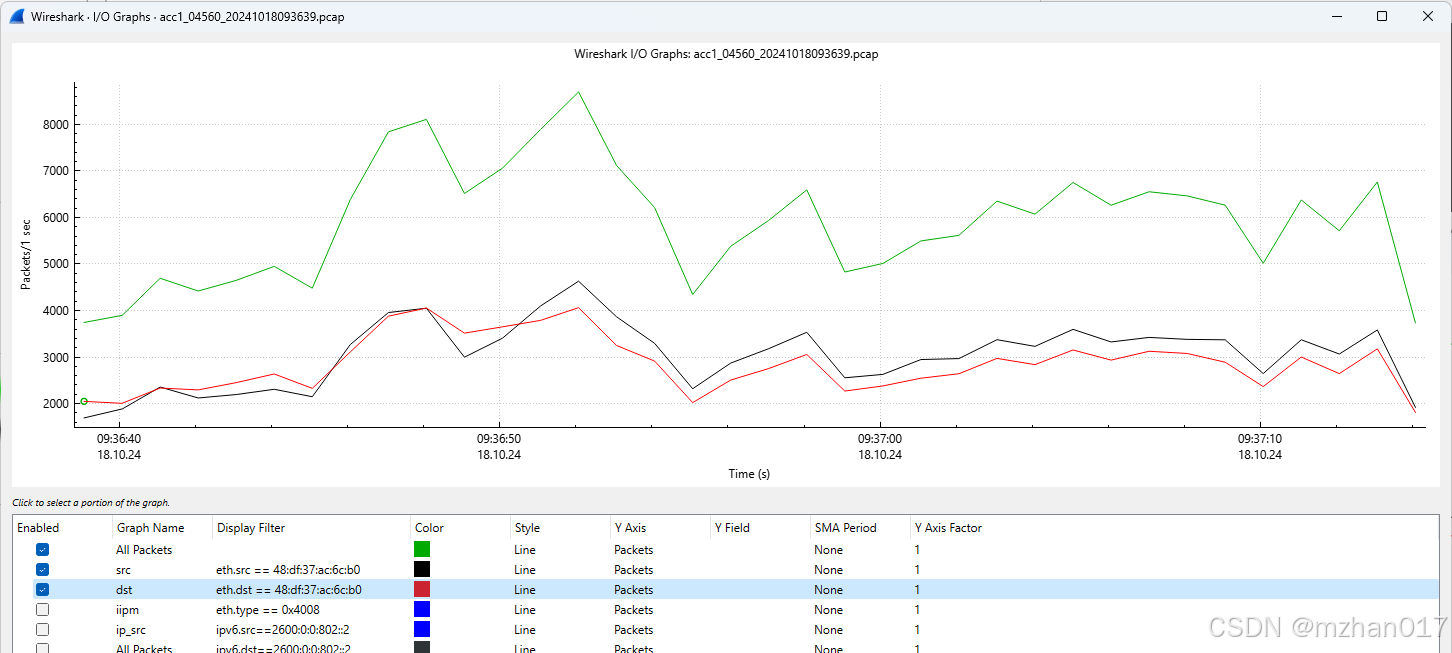
Linux: network: wireshark IO图的一个问题
今天遇到一个问题,发现wireshark画的IO图,前几秒没有数据,但是根据Raw的pcap看,是有包的,这就迷惑了。 经同事提醒,这个IO在设置了多个画图filter的时候,可能导致开始前几秒没有输出。如下图 这…...
TMGM平台可靠么?交易是否安全?
在选择外汇交易平台时,安全性与可靠性是投资者最关注的要素之一。作为全球知名的外汇及差价合约交易平台,TMGM(tmgm-pt.com)的安全性与可靠性可以从多个方面进行评估,包括监管环境、资金安全、客户服务、交易技术与服务…...
软工毕设开题建议
文章目录 🚩 1 前言1.1 选题注意事项1.1.1 难度怎么把控?1.1.2 题目名称怎么取? 1.2 开题选题推荐1.2.1 起因1.2.2 核心- 如何避坑(重中之重)1.2.3 怎么办呢? 🚩2 选题概览🚩 3 项目概览题目1 : 深度学习社…...

Python自动化发票处理:使用Pytesseract和Pandas从图像中提取信息并保存到Excel
1. 引言 在财务部门,处理大量的纸质或扫描版发票是一项既耗时又容易出错的任务。通过使用Python中的pytesseract(一个OCR工具)和pandas库,我们可以自动化这一过程,从而提高工作效率并减少错误。 2. 安装所需库 首先…...

新手直播方案
简介 新手直播方案 ,低成本方案 手机/电脑 直接直播手机软件电脑直播手机采集卡麦电脑直播多摄像机 机位多路采集卡 多路麦加电脑(高成本方案) 直播推流方案 需要摄像头 方案一 :手机 电脑同步下载 网络摄像头 软件(…...
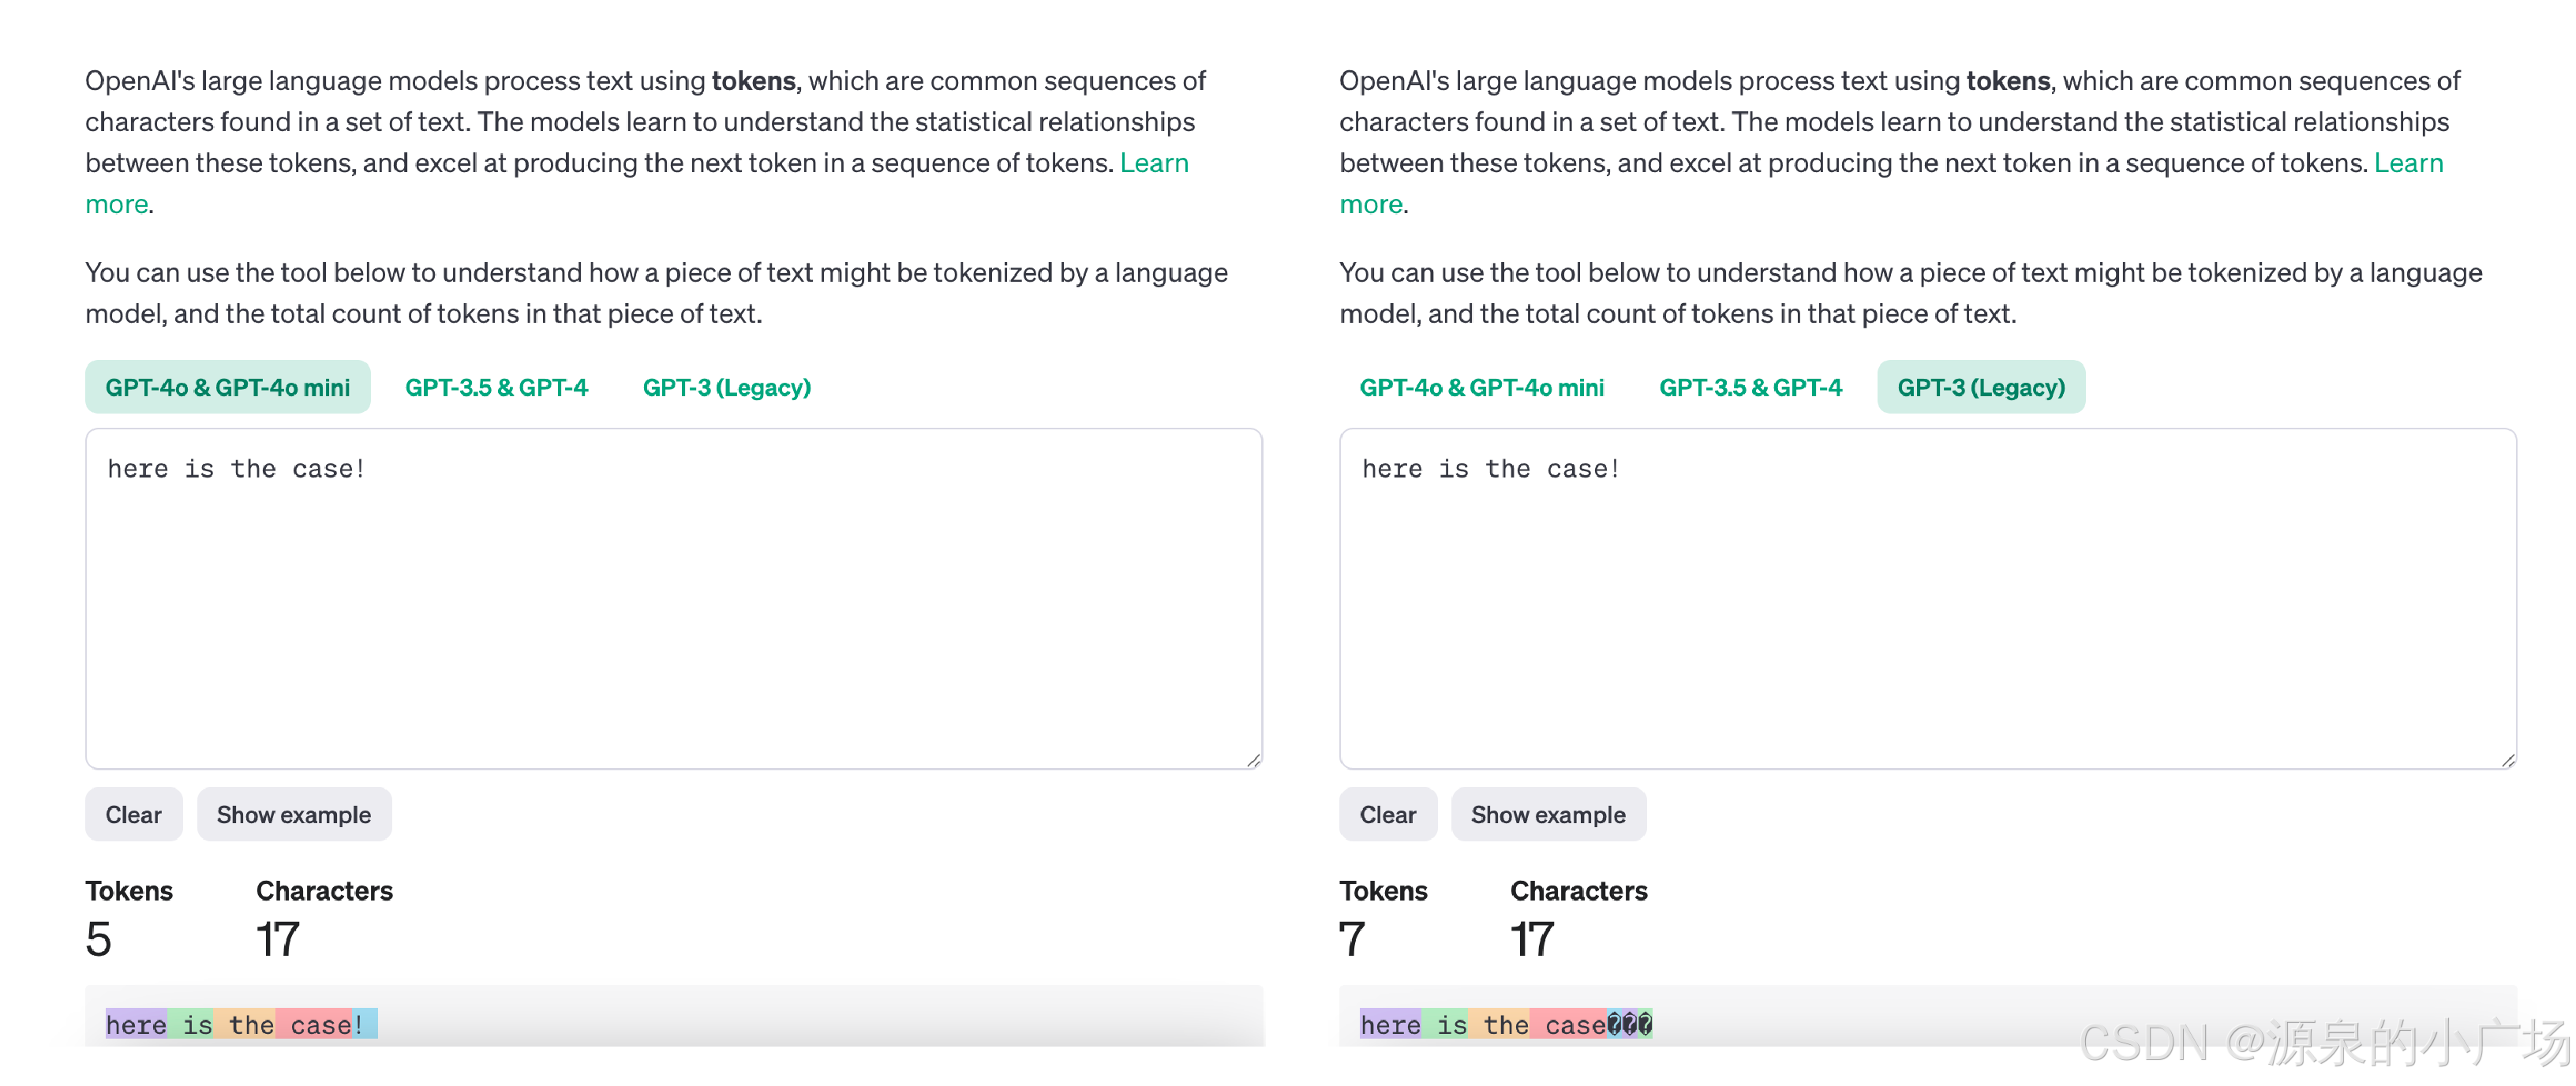
【大模型理论篇】主流大模型的分词器选择及讨论(BPE/BBPE/WordPiece/Unigram)
1. 背景分析 分词是将输入和输出文本拆分成更小单位的过程,使得大模型能够处理。token可以是单词、字符、子词或符号,取决于模型的类型和大小。分词可以帮助模型处理不同的语言、词汇和格式,并降低计算和内存成本。分词还可以通过影响token的…...
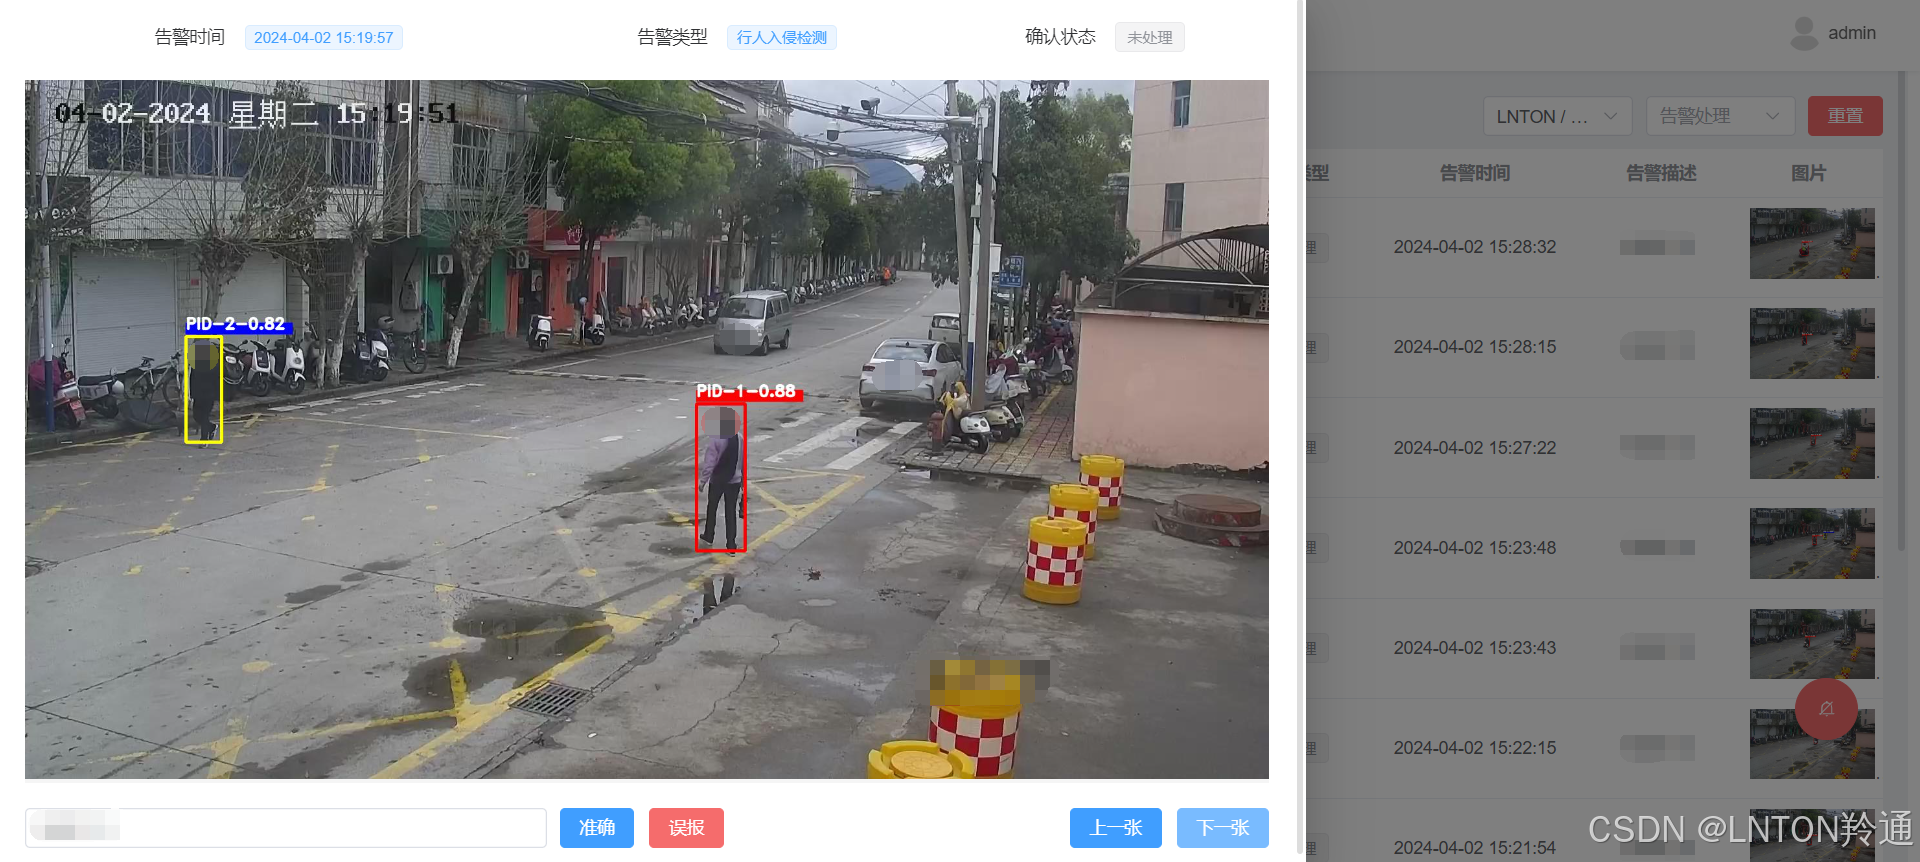
入侵检测算法平台部署LiteAIServer视频智能分析平台行人入侵检测算法
在当今科技日新月异的时代,行人入侵检测技术作为安全防护的重要组成部分,正经历着前所未有的发展。入侵检测算法平台部署LiteAIServer作为这一领域的佼佼者,凭借其卓越的技术实力与广泛的应用价值,正逐步成为守护公共安全的新利器…...
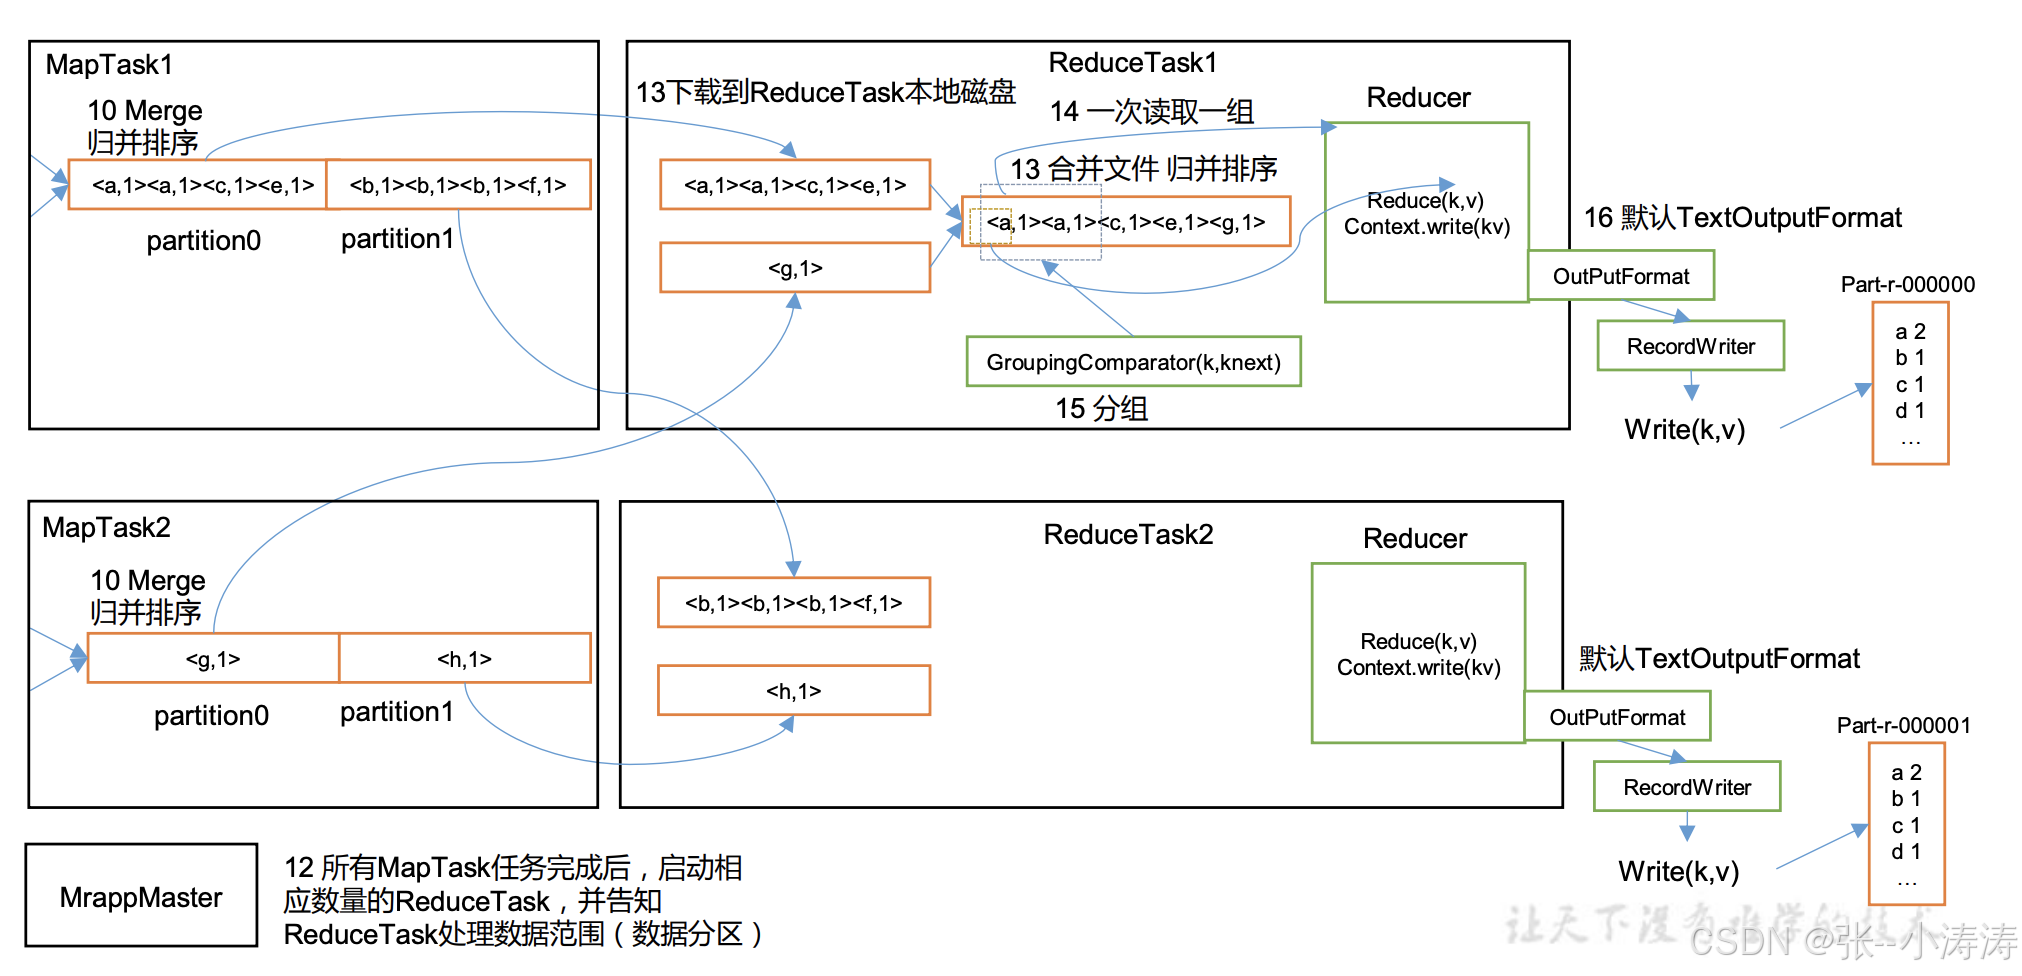
000010 - Mapreduce框架原理
Mapreduce框架原理 1. InputFormat 数据输入1.1 切片与 MapTask 并行度决定机制1.2 Job 提交流程源码和切片源码详解1.2.1 Job 提交流程源码详解1.2.2 FileInputFormat 切片源码解析(input.getSplits(job)) 1.3 FileInputFormat 切片机制1.3.1 切片机制1…...

OpenCV未定义标识符CV_XXX
报错“未定义标识符CV_XXX”,即编译器找不到常量CV_XXX,如果代码是基于旧版本的OpenCV编写的,而环境中安装的是一个更新的版本,可能会导致一些标识符被重命名或移除,导致不匹配情况。 经常遇到的包括:CV_R…...

flask服务通过gunicorn启动
使用 Gunicorn 启动 Flask 服务通常可以提升 Flask 应用的性能。以下是通过 Gunicorn 启动 Flask 服务的步骤: 1. 安装依赖 首先,确保已安装 Flask 和 Gunicorn: pip install flask gunicorn2. 创建 Flask 应用 创建一个简单的 Flask 应用…...

用更多的钱买电脑而不是手机
如果,我们对自己的定义是知识工作者,那么在工作、学习相关的电子设备投入上,真的别舍不得花钱。 需要留意的是,手机,对于大部分在电脑前工作的人,不是工作设备。在我看来,每年投入到电脑的钱&…...

10.25学习
1.程序链接库 程序链接库(Library),通常简称为库,是程序设计中一种常用的代码组织方式。它包含了一组预先编写好的代码,这些代码可以被多个不同的程序调用,以实现特定的功能。使用链接库的主要目的包括&am…...

用xshell给服务器上传jar包
首先,用xshell登录并进入到你的jar包目录下 然后使用 sudo rz -be命令,就可以选择本地文件了,选择jar包上传 一般如果提示传输失败,大概率是你的文件夹下有这个jar包了,名字相同冲突了, 那么你需要用这个…...

终极OBS虚拟背景插件指南:3步实现专业级AI抠像直播
终极OBS虚拟背景插件指南:3步实现专业级AI抠像直播 【免费下载链接】obs-backgroundremoval An OBS plugin for removing background in portrait images (video), making it easy to replace the background when recording or streaming. 项目地址: https://git…...

终极黑苹果配置指南:OpCore-Simplify如何15分钟搞定OpenCore EFI
终极黑苹果配置指南:OpCore-Simplify如何15分钟搞定OpenCore EFI 【免费下载链接】OpCore-Simplify A tool designed to simplify the creation of OpenCore EFI 项目地址: https://gitcode.com/GitHub_Trending/op/OpCore-Simplify 还在为复杂的黑苹果配置而…...

告别原生QDockWidget的烦恼:用KDDockWidgets给你的Qt应用做个高级‘拖拽’手术
告别原生QDockWidget的烦恼:用KDDockWidgets给你的Qt应用做个高级‘拖拽’手术 如果你正在开发一款需要复杂界面布局的专业工具软件——无论是IDE、数据分析平台还是图形编辑器,Qt的原生QDockWidget可能已经让你头疼不已。那些无法实现的窗口合并需求、简…...

5分钟搞定黑苹果配置:OpCore-Simplify让复杂EFI构建像搭积木一样简单
5分钟搞定黑苹果配置:OpCore-Simplify让复杂EFI构建像搭积木一样简单 【免费下载链接】OpCore-Simplify A tool designed to simplify the creation of OpenCore EFI 项目地址: https://gitcode.com/GitHub_Trending/op/OpCore-Simplify 黑苹果配置对技术爱好…...
崛起 + 开源效率革命——AI正在从“数字“走向“物理“)
【卷卷观察】Physical AI(具身智能)崛起 + 开源效率革命——AI正在从“数字“走向“物理“
结论先挂出来:AI这波浪潮正在发生结构性分化,一边是数字世界的agent疯狂落地,一边是物理世界的AI开始暴走。两条线都在跑,但物理AI这一支很多人还没真正重视。上周末跟一个创业的朋友吃饭,他在做具身智能方向ÿ…...

TCP/IP 协议:网络通信的基石
TCP/IP 协议:网络通信的基石 引言 TCP/IP协议,即传输控制协议/互联网协议,是互联网和计算机网络通信的基础。它定义了数据如何在网络中传输,以及如何确保数据传输的可靠性和高效性。本文将深入探讨TCP/IP协议的原理、工作方式以及…...

5分钟掌握:免费高效的.NET Core Mod加载器Reloaded-II完全指南
5分钟掌握:免费高效的.NET Core Mod加载器Reloaded-II完全指南 【免费下载链接】Reloaded-II Universal .NET Core Powered Modding Framework for any Native Game X86, X64. 项目地址: https://gitcode.com/gh_mirrors/re/Reloaded-II Reloaded-II是一款基…...

STM32 ADC采集声音信号踩坑记:LM386电路设计、分贝校准与OLED动态显示优化
STM32声音信号采集实战:从电路设计到动态显示的深度优化 当我们需要用STM32测量环境噪声时,往往会遇到信号微弱、显示闪烁、数据不准等问题。上周我在做一个智能噪音监测装置时,就深刻体会到了这一点——麦克风输出的信号幅度太小,…...

Qianfan-OCR API使用教程:从Codex示例到自定义业务集成
Qianfan-OCR API使用教程:从Codex示例到自定义业务集成 1. 前言:为什么选择Qianfan-OCR 如果你正在寻找一个简单易用但功能强大的OCR(光学字符识别)解决方案,Qianfan-OCR API值得考虑。这个API不仅能处理常规的印刷体…...

告别信号槽连接失败:深入Qt MOC机制,解决Q_OBJECT宏的五大常见坑
告别信号槽连接失败:深入Qt MOC机制,解决Q_OBJECT宏的五大常见坑 在Qt开发中,信号与槽机制无疑是框架最耀眼的明珠之一。但当你满怀信心地写下connect语句,却发现运行时连接始终无效时,那种挫败感足以让任何开发者抓狂…...