resnet50,clip,Faiss+Flask简易图文搜索服务
一、实现
文件夹目录结构:
templates
-----upload.html
faiss_app.py
前端代码:
<!DOCTYPE html>
<html lang="en">
<head><meta charset="UTF-8"><meta name="viewport" content="width=device-width, initial-scale=1.0"><title>Search and Show Multiple Images</title><style>#image-container {display: flex;flex-wrap: wrap;}#image-container img {max-width: 150px;margin: 10px;}</style>
</head>
<body><h1>Search Images</h1><!-- 上传表单 --><form id="upload-form" enctype="multipart/form-data"><input type="file" id="file-input" name="file" accept="image/*" required><input type="submit" value="Upload"></form><!-- 搜索框 --><form id="search-form"><input type="text" id="search-input" name="query" placeholder="Enter search term" required><input type="submit" value="Search"></form><h2>Search Results</h2><!-- 显示搜索返回的多张图片 --><div id="image-container"></div><!-- 使用JS处理表单提交 --><script>document.getElementById('search-form').addEventListener('submit', async function(event) {event.preventDefault();  // 阻止表单默认提交行为const query = document.getElementById('search-input').value;  // 获取搜索框中的输入内容try {// 发送GET请求,将搜索关键词发送到后端const response = await fetch(`/search?query=${encodeURIComponent(query)}`, {method: 'GET',});// 确保服务器返回JSON数据const data = await response.json();// 清空图片容器const imageContainer = document.getElementById('image-container');imageContainer.innerHTML = '';// 遍历后端返回的图片URL数组,动态创建<img>标签并渲染data.image_urls.forEach(url => {const imgElement = document.createElement('img');imgElement.src = url;  // 设置图片的src属性为返回的URLimageContainer.appendChild(imgElement);  // 将图片添加到容器中});} catch (error) {console.error('Error searching for images:', error);}});document.getElementById('upload-form').addEventListener('submit', async function(event) {event.preventDefault();  // 阻止表单默认提交行为const fileInput = document.getElementById('file-input');const formData = new FormData();formData.append('file', fileInput.files[0]);  // 获取用户上传的图片文件try {// 发送POST请求,将图片发送到后端const response = await fetch('/search_by_images', {method: 'POST',body: formData});// 确保服务器返回JSON数据const data = await response.json();// 清空图片容器const imageContainer = document.getElementById('image-container');imageContainer.innerHTML = '';// 遍历后端返回的图片URL数组,动态创建<img>标签并渲染data.image_urls.forEach(url => {const imgElement = document.createElement('img');imgElement.src = url;  // 设置图片的src属性为返回的URLimageContainer.appendChild(imgElement);  // 将图片添加到容器中});} catch (error) {console.error('Error uploading file:', error);}});</script>
</body>
</html>
后端代码:
from sentence_transformers import SentenceTransformer, util
from torchvision import models, transforms
from PIL import Image
from flask import Flask, request, jsonify, current_app, render_template, send_from_directory, url_for
from werkzeug.utils import secure_filename
import faiss
import os, glob
import numpy as np
from markupsafe import escape
import shutil#Load CLIP model
model = SentenceTransformer('clip-ViT-B-32')
IMAGE_EXTENSIONS = {'.jpg', '.jpeg', '.png', '.gif', '.bmp'}UPLOAD_FOLDER = 'uploads/'
IMAGES_PATH  = "C:\\Users\\cccc\\Pictures\\cls_auto_config"def generate_clip_embeddings(images_path, model):image_paths = []# 使用 os.walk 遍历所有子目录和文件for root, dirs, files in os.walk(images_path):for file in files:# 获取文件的扩展名并转换为小写ext = os.path.splitext(file)[1].lower()# 判断是否是图片文件if ext in IMAGE_EXTENSIONS:image_paths.append(os.path.join(root, file)) embeddings = []for img_path in image_paths:image = Image.open(img_path)embedding = model.encode(image)embeddings.append(embedding)return embeddings, image_pathsdef generate_res50_embeddings(images_path):# Load the pretrained modelres50_model = models.resnet50(pretrained=True)res50_model = res50_model.eval()# Define the image transformationstransform = transforms.Compose([transforms.Resize(256),transforms.CenterCrop(224),transforms.ToTensor(),transforms.Normalize(mean=[0.485, 0.456, 0.406], std=[0.229, 0.224, 0.225]),])image_paths = []# 使用 os.walk 遍历所有子目录和文件for root, dirs, files in os.walk(images_path):for file in files:# 获取文件的扩展名并转换为小写ext = os.path.splitext(file)[1].lower()# 判断是否是图片文件if ext in IMAGE_EXTENSIONS:image_paths.append(os.path.join(root, file)) embeddings = []for img_path in image_paths:image = Image.open(img_path)# Apply the transformations and get the image vectorimage = transform(image).unsqueeze(0)image_vector = res50_model(image).detach().numpy()embeddings.append(image_vector[0])return embeddings, image_pathsdef create_faiss_index(embeddings, image_paths, output_path):dimension = len(embeddings[0])# 分情况创建Faiss索引对象if len(image_paths) < 39 * 256:# 如果条目很少,直接用最普通的L2索引faiss_index = faiss.IndexFlatL2(dimension)elif len(image_paths) < 39 * 4096:# 如果条目少于39 × 4096,就只用PQ量化,不使用IVFfaiss_index = faiss.index_factory(dimension, 'OPQ64_256,PQ64x8')else:# 否则就加上IVFfaiss_index = faiss.index_factory(dimension, 'OPQ64_256,IVF4096,PQ64x8')res = faiss.StandardGpuResources()co = faiss.GpuClonerOptions()co.useFloat16 = Truefaiss_index = faiss.index_cpu_to_gpu(res, 0, faiss_index, co)#index = faiss.IndexFlatIP(dimension)faiss_index = faiss.IndexIDMap(faiss_index)vectors = np.array(embeddings).astype(np.float32)# Add vectors to the index with IDsfaiss_index.add_with_ids(vectors, np.array(range(len(embeddings))))# Save the indexfaiss_index = faiss.index_gpu_to_cpu(faiss_index)faiss.write_index(faiss_index, output_path)print(f"Index created and saved to {output_path}")# Save image pathswith open(output_path + '.paths', 'w') as f:for img_path in image_paths:f.write(img_path + '\n')return faiss_indexdef load_faiss_index(index_path):faiss_index = faiss.read_index(index_path)with open(index_path + '.paths', 'r') as f:image_paths = [line.strip() for line in f]print(f"Index loaded from {index_path}")if not faiss_index.is_trained:raise RuntimeError(f'从[{index_path}]加载的Faiss索引未训练')res = faiss.StandardGpuResources()co = faiss.GpuClonerOptions()co.useFloat16 = Truefaiss_index = faiss.index_cpu_to_gpu(res, 0, faiss_index, co)return faiss_index, image_pathsdef retrieve_similar_images(query, model, index, image_paths, top_k=3):# query preprocess:if query.endswith(('.png', '.jpg', '.jpeg', '.tiff', '.bmp', '.gif')):query = Image.open(query)query_features = model.encode(query)query_features = query_features.astype(np.float32).reshape(1, -1)distances, indices = index.search(query_features, top_k)retrieved_images = [image_paths[int(idx)] for idx in indices[0]]return query, retrieved_imagesdef retrieve_res50_similar_images(query, index, image_paths, top_k=3):# query preprocess:if query.endswith(('.png', '.jpg', '.jpeg', '.tiff', '.bmp', '.gif')):image = Image.open(query)# Load the pretrained modelres50_model = models.resnet50(pretrained=True)res50_model = res50_model.eval()# Define the image transformationstransform = transforms.Compose([transforms.Resize(256),transforms.CenterCrop(224),transforms.ToTensor(),transforms.Normalize(mean=[0.485, 0.456, 0.406], std=[0.229, 0.224, 0.225]),])# Apply the transformations and get the image vectorimage = transform(image).unsqueeze(0)query_features = res50_model(image).detach().numpy()query_features = query_features[0]query_features = query_features.astype(np.float32).reshape(1, -1)distances, indices = index.search(query_features, top_k)retrieved_images = [image_paths[int(idx)] for idx in indices[0]]return query, retrieved_images# 检查文件扩展名是否允许
def allowed_file(filename):return '.' in filename and "." + filename.rsplit('.', 1)[1].lower() in IMAGE_EXTENSIONSdef search():query = request.args.get('query')  # 获取搜索关键词safe_query = escape(query)if not query:return jsonify({"error": "No search query provided"}), 400index, image_paths = None, []OUTPUT_INDEX_PATH = f"{app.config['UPLOAD_FOLDER']}/vector.index"if os.path.exists(OUTPUT_INDEX_PATH):index, image_paths = load_faiss_index(OUTPUT_INDEX_PATH)else:# embeddings, image_paths = generate_clip_embeddings(IMAGES_PATH, model)embeddings, image_paths = generate_res50_embeddings(IMAGES_PATH)index = create_faiss_index(embeddings, image_paths, OUTPUT_INDEX_PATH)query, retrieved_images = retrieve_similar_images(query, model, index, image_paths, top_k=5)image_urls = []for path in retrieved_images:base_name = os.path.basename(path)shutil.copy(path, os.path.join(app.config['UPLOAD_FOLDER'], base_name))image_urls.append(url_for('uploaded_file_path', filename=base_name))return jsonify({"image_urls": image_urls})def search_by_images():# 检查请求中是否有文件if 'file' not in request.files:return jsonify({"error": "No file part"}), 400file = request.files['file']# 检查文件是否为空if file.filename == '':return jsonify({"error": "No selected file"}), 400print(file.filename)if file and allowed_file(file.filename):filename = secure_filename(file.filename)filepath = os.path.join(app.config['UPLOAD_FOLDER'], filename)file.save(filepath)index, image_paths = None, []OUTPUT_INDEX_PATH = f"{app.config['UPLOAD_FOLDER']}/images_vector.index"if os.path.exists(OUTPUT_INDEX_PATH):index, image_paths = load_faiss_index(OUTPUT_INDEX_PATH)else:embeddings, image_paths = generate_res50_embeddings(IMAGES_PATH)index = create_faiss_index(embeddings, image_paths, OUTPUT_INDEX_PATH)filepath, retrieved_images = retrieve_res50_similar_images(filepath, index, image_paths, top_k=5)image_urls = []for path in retrieved_images:base_name = os.path.basename(path)shutil.copy(path, os.path.join(app.config['UPLOAD_FOLDER'], base_name))image_urls.append(url_for('uploaded_file_path', filename=base_name))return jsonify({"image_urls": image_urls})else:return jsonify({"error": "Invalid file"}), 400def index():return render_template('upload.html')# 提供静态文件的访问路径
def uploaded_file_path(filename):return send_from_directory(app.config['UPLOAD_FOLDER'], filename)if __name__ == "__main__":app = Flask(__name__)app.config['UPLOAD_FOLDER'] = UPLOAD_FOLDERif not os.path.exists(UPLOAD_FOLDER):os.makedirs(UPLOAD_FOLDER)# 主页显示上传表单app.route('/')(index)app.route('/search', methods=['GET'])(search)app.route('/uploads/images/<filename>')(uploaded_file_path)app.route('/search_by_images', methods=['POST'])(search_by_images)app.run(host='0.0.0.0', port=8080, debug=True)
二、实现效果

三、参考文章
1. https://towardsdatascience.com/building-an-image-similarity-search-engine-with-faiss-and-clip-2211126d08fa
2.向量数据库Faiss的搭建与使用 - 很久8899 - 博客园
相关文章:
resnet50,clip,Faiss+Flask简易图文搜索服务
一、实现 文件夹目录结构: templates -----upload.html faiss_app.py 前端代码: <!DOCTYPE html> <html lang"en"> <head><meta charset"UTF-8"><meta name"viewport" content"widt…...

使用OkHttp进行HTTPS请求的Kotlin实现
OkHttp简介 OkHttp是一个高效的HTTP客户端,它支持同步和异步请求,自动处理重试和失败,支持HTTPS,并且可以轻松地与Kotlin协程集成。OkHttp的设计目标是提供最简洁的API,同时保持高性能和低延迟。 为什么选择OkHttp …...
使用Mac下载MySQL修改密码
Mac下载MySQL MySQL官网链接MySQL 当进入到官网后下滑到community社区,进行下载 然后选择community sever下载 这里就是要下载的界面,如果需要下载之前版本的话可以点击archives, 可能会因为这是外网原因,有时候下…...

运维面试题.云计算面试题集锦第一套
运维+网络安全学科基础升就业 测试题(总分100分) 一,单词翻译(10分,直接写在答题卡上) 二,单选题(每题2分,共30题): 1.如下哪个属于管道符?( ) A、|| B、<< C、// D、| 2.有一备份程序mybackup,需要在周一至周五下午1点和晚上8点各运行一次,下面哪条cront…...

CSS-flex布局
flex常用语法 display: flex 父级元素相关 flex-direction 主轴方向【水平方向(默认)、垂直方向】justify-content 主轴上的对齐方式【flex-end结束对齐、space-between两端对齐、center】align-items 交叉轴的对齐方式【center、flex-end】flex-wrap…...

Linux:进程的优先级 进程切换
文章目录 前言一、进程优先级1.1 基本概念1.2 查看系统进程1.3 PRI和NI1.4 调整优先级1.4.1 top命令1.4.2 nice命令1.4.3 renice命令 二、进程切换2.1 补充概念2.2 进程的运行和切换步骤(重要) 二、Linux2.6内核进程O(1)调度队列(重要&#x…...

web应用安全和信息泄露
使用springboot开发的应用可能存在各种使用不当导致的信息泄露和漏洞,在此记录 1:spring actuator导致的信息泄露 使用spring actuator你可以选择通过使用HTTP端点或使用JMX来管理和监控你的应用程序。 审计、健康和指标收集也可以自动应用于你的应用程…...

创建vue3项目步骤
脚手架创建项目: pnpm create vue Cd 项目名称安装依赖:Pnpm iPnpm Lint:修复所有文件风格 ,不然eslint语法警告报错要双引号Pnpm dev启动项目 拦截错误代码提交到git仓库:提交前做代码检查 pnpm dlx husky-in…...

尽量通俗易懂地概述.Net U nity跨语言/跨平台相关知识
本文参考来自唐老狮,Unity3D高级编程:主程手记,ai等途径 仅作学习笔记交流分享 目录 1. .Net是什么? 2. .Net框架的核心要点? 跨语言和跨平台 .Net x Unity跨平台发展史 Net Framework 2002 Unity跨平台之 Mono 2004 Unity跨平台之 IL2CPP 2015 二者区别 .NET Core …...

【AlphaFold3】开源本地的安装及使用
文章目录 安装安装DockerInstalling Docker on Host启用Rootless Docker 安装 GPU 支持安装 NVIDIA 驱动程序安装 NVIDIA 对 Docker 的支持 获取 AlphaFold 3 源代码获取基因数据库获取模型参数构建将运行 AlphaFold 3 的 Docker 容器 参考 AlphaFold3: https://github.com/goo…...
vue2/vue3中使用的富文本编辑器vue-quill
前言: 整理下常用的富文本编辑器工具。 vue3: 实现效果: 实现步骤: 1、安装插件, 编辑器核心插件 vueup/vue-quill yarn add pnpm i npm i cnpm i vueup/vue-quill vueup/vue-quill 2、安装选择性插件 &a…...

论文阅读《BEVFormer v2》
BEVFormer v2: Adapting Modern Image Backbones to Bird’s-Eye-View Recognition via Perspective Supervision 目录 摘要1 介绍2 相关工作2.1 BEV三维目标检测器 摘要 我们提出了一种具有透视监督的新型鸟瞰图(BEV)检测器,其收敛速度更快…...
自动化运维(k8s):一键获取指定命名空间镜像包脚本
前言:脚本写成并非一蹴而就,需要不断的调式和修改,这里也是改到了7版本才在 生产环境 中验证成功。 该命令 和 脚本适用于以下场景:在某些项目中,由于特定的安全或政策要求,不允许连接到你的镜像仓库。然而…...

HarmonyOS ArkUI(基于ArkTS) 开发布局 (上)
一 ArkUI(基于ArkTS)概述 基于ArkTS的声明式开发范式的方舟开发框架是一套开发极简、高性能、支持跨设备的UI开发框架,提供了构建应用UI所必需的能力 点击详情 特点 开发效率高,开发体验好 代码简洁:通过接近自然语义的方式描述UI&#x…...

第九部分 :1.STM32之通信接口《精讲》(USART,I2C,SPI,CAN,USB)
本芯片使用的是STM32F103C8T6型号 STM32F103C8T6是STM32F1系列中的一种较常用的低成本ARM Cortex-M3内核MCU,具有丰富的通信接口,包括USART、SPI、I2C等。下面是该芯片上通信接口的管脚分布、每个接口的工作模式、常用应用场景和注意事项。 1. USART (通…...

5. langgraph中的react agent使用 (从零构建一个react agent)
1. 定义 Agent 状态 首先,我们需要定义 Agent 的状态,这包括 Agent 所持有的消息。 from typing import (Annotated,Sequence,TypedDict, ) from langchain_core.messages import BaseMessage from langgraph.graph.message import add_messagesclass …...

uniapp vue3的下拉刷新和上拉加载
开启页面的下拉刷新,注意这个不是可滚动视图的下拉刷新. 一般页面建议使用页面外的,不要使用scroll-view里面的下拉刷新. pages: "pages": [ {"path": "pages/index/index","style": {"navigationBarTitleText": "首…...

STM32设计井下瓦斯检测联网WIFI加Zigbee多路节点协调器传输
目录 目录 前言 一、本设计主要实现哪些很“开门”功能? 二、电路设计原理图 1.电路图采用Altium Designer进行设计: 2.实物展示图片 三、程序源代码设计 四、获取资料内容 前言 本系统基于STM32微控制器和Zigbee无线通信技术,设计了…...

Vue 3 中的原生事件监听与组件事件处理详解
Vue 3 中的原生事件监听与组件事件处理完全指南 在 Vue 3 中,事件监听和事件处理是组件交互中的关键部分。Vue 提供了一套简单而强大的事件处理机制,可以方便地监听 DOM 原生事件和组件自定义事件。本篇文章将详细介绍 Vue 3 中事件的使用,包…...

Flink Source 详解
Flink Source 详解 原文 flip-27 FLIP-27 介绍了新版本Source 接口定义及架构 相比于SourceFunction,新版本的Source更具灵活性,原因是将“splits数据获取”与真“正数据获取”逻辑进行了分离 重要部件 Source 作为工厂类,会创建以下两…...

Chapter03-Authentication vulnerabilities
文章目录 1. 身份验证简介1.1 What is authentication1.2 difference between authentication and authorization1.3 身份验证机制失效的原因1.4 身份验证机制失效的影响 2. 基于登录功能的漏洞2.1 密码爆破2.2 用户名枚举2.3 有缺陷的暴力破解防护2.3.1 如果用户登录尝试失败次…...
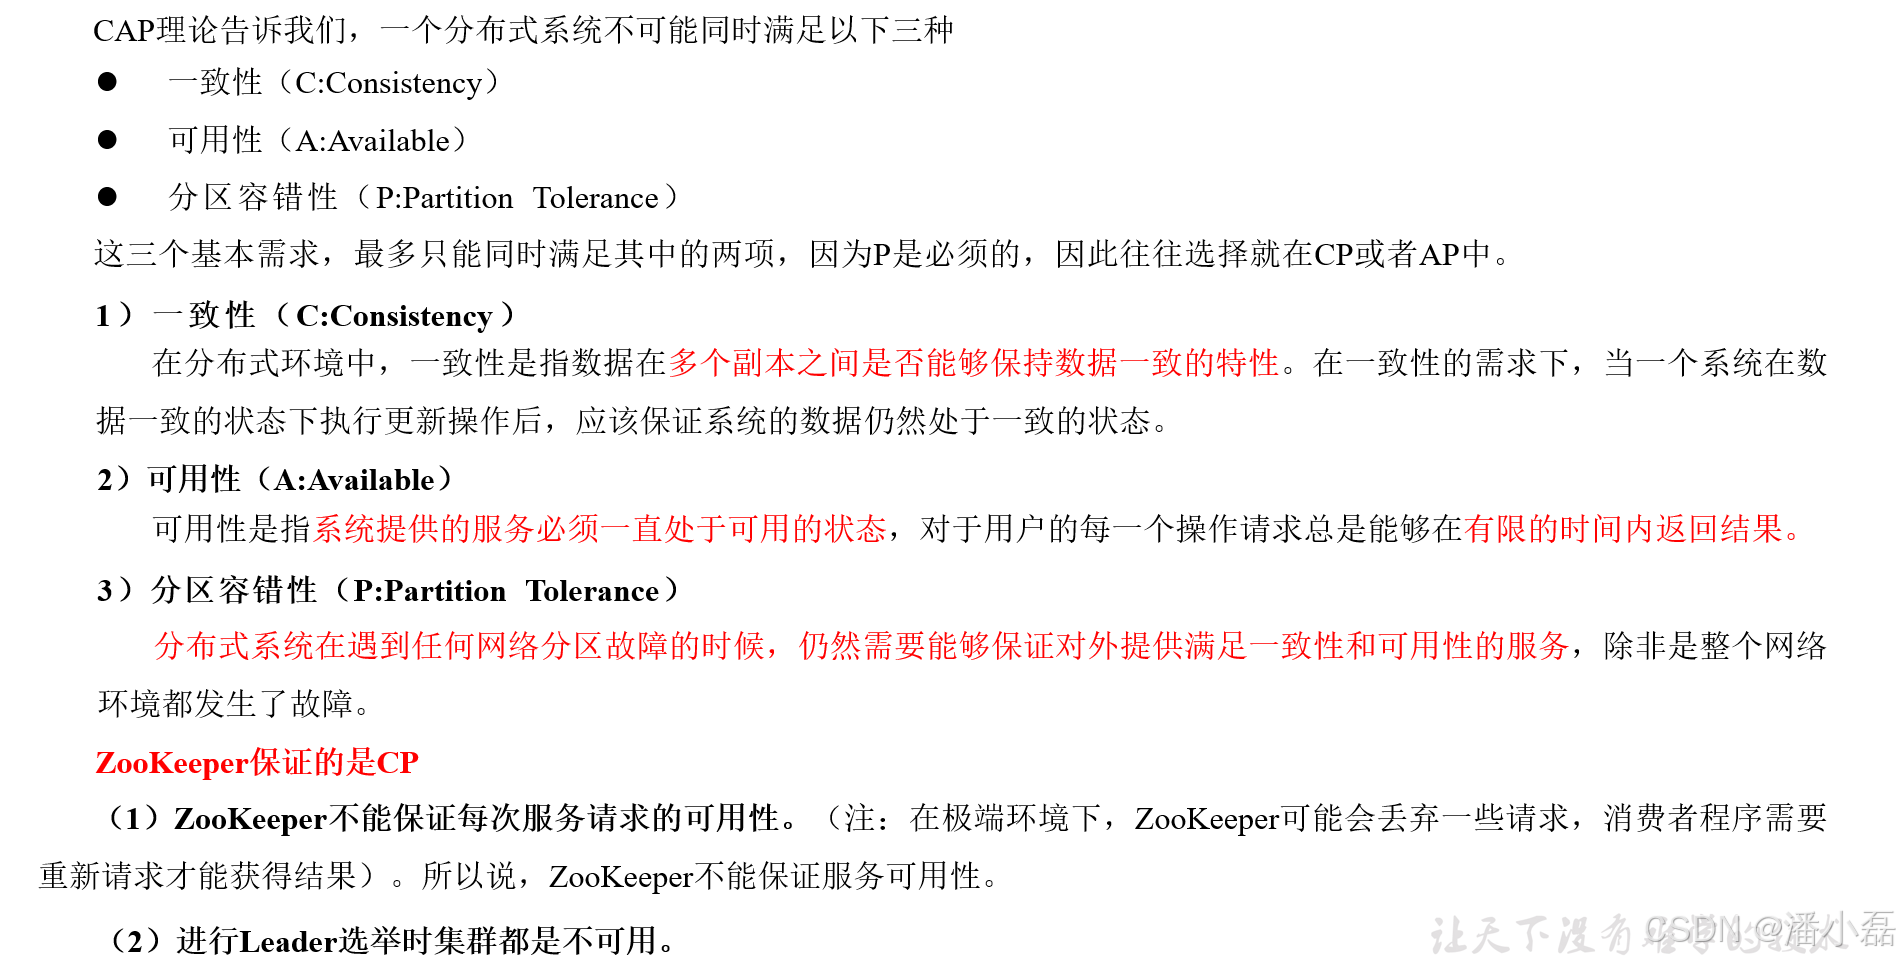
高频面试之3Zookeeper
高频面试之3Zookeeper 文章目录 高频面试之3Zookeeper3.1 常用命令3.2 选举机制3.3 Zookeeper符合法则中哪两个?3.4 Zookeeper脑裂3.5 Zookeeper用来干嘛了 3.1 常用命令 ls、get、create、delete、deleteall3.2 选举机制 半数机制(过半机制࿰…...

STM32F4基本定时器使用和原理详解
STM32F4基本定时器使用和原理详解 前言如何确定定时器挂载在哪条时钟线上配置及使用方法参数配置PrescalerCounter ModeCounter Periodauto-reload preloadTrigger Event Selection 中断配置生成的代码及使用方法初始化代码基本定时器触发DCA或者ADC的代码讲解中断代码定时启动…...

oracle与MySQL数据库之间数据同步的技术要点
Oracle与MySQL数据库之间的数据同步是一个涉及多个技术要点的复杂任务。由于Oracle和MySQL的架构差异,它们的数据同步要求既要保持数据的准确性和一致性,又要处理好性能问题。以下是一些主要的技术要点: 数据结构差异 数据类型差异ÿ…...

【android bluetooth 框架分析 04】【bt-framework 层详解 1】【BluetoothProperties介绍】
1. BluetoothProperties介绍 libsysprop/srcs/android/sysprop/BluetoothProperties.sysprop BluetoothProperties.sysprop 是 Android AOSP 中的一种 系统属性定义文件(System Property Definition File),用于声明和管理 Bluetooth 模块相…...
Module Federation 和 Native Federation 的比较
前言 Module Federation 是 Webpack 5 引入的微前端架构方案,允许不同独立构建的应用在运行时动态共享模块。 Native Federation 是 Angular 官方基于 Module Federation 理念实现的专为 Angular 优化的微前端方案。 概念解析 Module Federation (模块联邦) Modul…...
AI书签管理工具开发全记录(十九):嵌入资源处理
1.前言 📝 在上一篇文章中,我们完成了书签的导入导出功能。本篇文章我们研究如何处理嵌入资源,方便后续将资源打包到一个可执行文件中。 2.embed介绍 🎯 Go 1.16 引入了革命性的 embed 包,彻底改变了静态资源管理的…...
STM32---外部32.768K晶振(LSE)无法起振问题
晶振是否起振主要就检查两个1、晶振与MCU是否兼容;2、晶振的负载电容是否匹配 目录 一、判断晶振与MCU是否兼容 二、判断负载电容是否匹配 1. 晶振负载电容(CL)与匹配电容(CL1、CL2)的关系 2. 如何选择 CL1 和 CL…...

WebRTC从入门到实践 - 零基础教程
WebRTC从入门到实践 - 零基础教程 目录 WebRTC简介 基础概念 工作原理 开发环境搭建 基础实践 三个实战案例 常见问题解答 1. WebRTC简介 1.1 什么是WebRTC? WebRTC(Web Real-Time Communication)是一个支持网页浏览器进行实时语音…...

Python实现简单音频数据压缩与解压算法
Python实现简单音频数据压缩与解压算法 引言 在音频数据处理中,压缩算法是降低存储成本和传输效率的关键技术。Python作为一门灵活且功能强大的编程语言,提供了丰富的库和工具来实现音频数据的压缩与解压。本文将通过一个简单的音频数据压缩与解压算法…...