源码分析Spring Boot (v3.3.0)
  .   ____          _            __ _ _/\\ / ___'_ __ _ _(_)_ __  __ _ \ \ \ \
( ( )\___ | '_ | '_| | '_ \/ _` | \ \ \ \\\/  ___)| |_)| | | | | || (_| |  ) ) ) )'  |____| .__|_| |_|_| |_\__, | / / / /=========|_|==============|___/=/_/_/_/:: Spring Boot ::                (v3.3.0)//笔记背景:工作5年左右,熟练使用springboot,会使用一些自定义springboot配置类,希望全面了解springboot启动流程
//阅读约1小时
pom
<dependency><groupId>org.springframework.boot</groupId><artifactId>spring-boot-starter-web</artifactId>
</dependency>
- jdk: openjdk_21
- 源码:git@github.com:shenshuxin01/upDownloadFlie.git
//启动类
@SpringBootApplication
public class UpdownloadfileApplication {public static void main(String[] args) {SpringApplication.run(UpdownloadfileApplication.class, args);// SpringApplication springApplication = new SpringApplication(new Class<?>[]{UpdownloadfileApplication.class});// springApplication.run(args);}}
1. 实例化SpringApplication
调用代码
/**创建新 SpringApplication 实例。应用程序上下文将从指定的主要源加载 bean(有关详细信息,请参见 class-level 文档)。可以在调用 run(String...)之前自定义实例。参数:resourceLoader – 要使用的资源加载器 primarySources – 主要的 bean 来源另请参见:run(Class, String[]), setSources(Set)*/
@SuppressWarnings({ "unchecked", "rawtypes" })
public SpringApplication(ResourceLoader resourceLoader, Class<?>... primarySources) {this.resourceLoader = resourceLoader;Assert.notNull(primarySources, "PrimarySources must not be null");this.primarySources = new LinkedHashSet<>(Arrays.asList(primarySources));this.webApplicationType = WebApplicationType.deduceFromClasspath();this.bootstrapRegistryInitializers = new ArrayList<>(getSpringFactoriesInstances(BootstrapRegistryInitializer.class));setInitializers((Collection) getSpringFactoriesInstances(ApplicationContextInitializer.class));setListeners((Collection) getSpringFactoriesInstances(ApplicationListener.class));this.mainApplicationClass = deduceMainApplicationClass();
}
1.1. 推断web类型是servlet还是reactive还是none
通过包名去匹配 ClassUtils.isPresent("org.springframework.web.servlet.DispatcherServlet")
1.2. 初始化BootstrapRegistryInitializer对象
回调接口,可用于在使用前对其进行初始化 BootstrapRegistry 。
调用方法:getSpringFactoriesInstances(BootstrapRegistryInitializer.class)
private <T> List<T> getSpringFactoriesInstances(Class<BootstrapRegistryInitializer> type, ArgumentResolver argumentResolver) {return SpringFactoriesLoader.forDefaultResourceLocation(getClassLoader()).load(type, argumentResolver);
}
这个方法分为两部分
- 扫描META-INF/spring.factories资源
- 实例化BootstrapRegistryInitializer类
1.2.1. 扫描META-INF/spring.factories资源
调用方法:Map<String, List<String>> loadFactoriesResource(ClassLoader classLoader, "META-INF/spring.factories")
核心方法是: classLoader.getResources("META-INF/spring.factories")获取到java环境中的所有此文件夹下面的文件,例如返回MAP结构
key = "org.springframework.boot.ApplicationContextFactory"
value = 0 = "org.springframework.boot.web.reactive.context.ReactiveWebServerApplicationContextFactory"1 = "org.springframework.boot.web.servlet.context.ServletWebServerApplicationContextFactory"
就是spring.factories文件里面的内容
1.2.2. 实例化BootstrapRegistryInitializer类
转换成全限定类名: org.springframework.boot.BootstrapRegistryInitializer
去匹配上面的MAP获取实例化列表类名
1.2.3. 如果项目中引入了spring-cloud-starter-config,就会加载BootstrapRegistryInitializer对象
(可用于加载远程配置中心 springboot-config、nacos)
<dependency><groupId>org.springframework.cloud</groupId><artifactId>spring-cloud-starter-config</artifactId>
</dependency>
这个jar包的META-INF/spring.factories文件中包含
# Spring Boot BootstrapRegistryInitializers
org.springframework.boot.BootstrapRegistryInitializer=\
org.springframework.cloud.config.client.ConfigClientRetryBootstrapper
1.2.4. BootstrapRegistryInitializer实现类列表
bootstrapRegistryInitializers = {ArrayList@3639} size = 0
1.3. 初始化ApplicationContextInitializer对象
用于在刷新之前初始化 Spring ConfigurableApplicationContext 的回调接口。
通常用于需要对应用程序上下文进行一些编程初始化的 Web 应用程序。
调用方法:getSpringFactoriesInstances(ApplicationContextInitializer.class)
private <T> List<T> getSpringFactoriesInstances(Class<ApplicationContextInitializer> type, ArgumentResolver argumentResolver) {return SpringFactoriesLoader.forDefaultResourceLocation(getClassLoader()).load(type, argumentResolver);
}
原理同上
1.3.1. ApplicationContextInitializer实现类列表
initializers = {ArrayList@3658} size = 70 = {DelegatingApplicationContextInitializer@3552} 1 = {SharedMetadataReaderFactoryContextInitializer@3589} 2 = {ContextIdApplicationContextInitializer@3509} 3 = {ConfigurationWarningsApplicationContextInitializer@3648} 4 = {RSocketPortInfoApplicationContextInitializer@3573} 5 = {ServerPortInfoApplicationContextInitializer@3581} 6 = {ConditionEvaluationReportLoggingListener@3606}
1.4. 初始化ApplicationListener对象
由应用程序事件侦听器实现的接口。
基于 Observer 设计模式的标准 EventListener 接口。
可以 ApplicationListener 泛型地声明它感兴趣的事件类型。当注册到 Spring ApplicationContext时,事件将被相应地过滤,仅针对匹配的事件对象调用侦听器。
调用方法:getSpringFactoriesInstances(ApplicationListener.class)
private <T> List<T> getSpringFactoriesInstances(Class<ApplicationListener> type, ArgumentResolver argumentResolver) {return SpringFactoriesLoader.forDefaultResourceLocation(getClassLoader()).load(type, argumentResolver);
}
原理同上
1.4.1. ApplicationListener实现类列表
listeners = {ArrayList@3699} size = 80 = {EnvironmentPostProcessorApplicationListener@3706} 1 = {AnsiOutputApplicationListener@3707} 2 = {LoggingApplicationListener@3708} 3 = {BackgroundPreinitializer@3709} 4 = {DelegatingApplicationListener@3710} 5 = {ParentContextCloserApplicationListener@3711} 6 = {ClearCachesApplicationListener@3712} 7 = {FileEncodingApplicationListener@3713}
1.5. 推断启动类
this.mainApplicationClass = deduceMainApplicationClass();
获取当前堆栈帧信息遍历
if getMethodName() == "main": return Class<?>;
2. 运行run()方法
调用代码
/**运行 Spring 应用程序,创建并刷新新的 ApplicationContext.参数:args – 应用程序参数(通常从 Java 主方法传递)返回:一个正在运行的 ApplicationContext*/
public ConfigurableApplicationContext run(String... args) {Startup startup = Startup.create();if (this.registerShutdownHook) {SpringApplication.shutdownHook.enableShutdownHookAddition();}DefaultBootstrapContext bootstrapContext = createBootstrapContext();ConfigurableApplicationContext context = null;configureHeadlessProperty();SpringApplicationRunListeners listeners = getRunListeners(args);listeners.starting(bootstrapContext, this.mainApplicationClass);try {ApplicationArguments applicationArguments = new DefaultApplicationArguments(args);ConfigurableEnvironment environment = prepareEnvironment(listeners, bootstrapContext, applicationArguments);Banner printedBanner = printBanner(environment);context = createApplicationContext();context.setApplicationStartup(this.applicationStartup);//赋值prepareContext(bootstrapContext, context, environment, listeners, applicationArguments, printedBanner);refreshContext(context);afterRefresh(context, applicationArguments);//空实现startup.started();if (this.logStartupInfo) {//输出启动日志 Started UpdownloadfileApplication in 407.403 seconds (process running for 411.983)new StartupInfoLogger(this.mainApplicationClass).logStarted(getApplicationLog(), startup);}//EventPublishingRunListener发布 ApplicationStartedEvent事件给监听器listeners.started(context, startup.timeTakenToStarted());//获取Runner实例bean,并调用接口方法,例如CommandLineRunner接口,实现初始化代码,自定义业务逻辑callRunners(context, applicationArguments);}catch (Throwable ex) {throw handleRunFailure(context, ex, listeners);}try {if (context.isRunning()) {listeners.ready(context, startup.ready());}}catch (Throwable ex) {throw handleRunFailure(context, ex, null);}return context;
}
2.1. 启动计时器
Startup startup = Startup.create();
private final Long startTime = System.currentTimeMillis();
2.2. 创建启动上下文
DefaultBootstrapContext bootstrapContext = createBootstrapContext();
实例化BootstrapContext并调用实现类的initializer方法,如果项目集成了nacos配置中心,这一步就会调用。
private DefaultBootstrapContext createBootstrapContext() {DefaultBootstrapContext bootstrapContext = new DefaultBootstrapContext();this.bootstrapRegistryInitializers.forEach((initializer) -> initializer.initialize(bootstrapContext));return bootstrapContext;
}
DefaultBootstrapContext主要实现的接口方法:
/**
向注册表注册特定类型。如果指定的类型已注册且尚未作为 获取 singleton,则它将被替换。
参数:
type – 实例类型 instanceSupplier – 实例供应商*/
<T> void register(Class<T> type, InstanceSupplier<T> instanceSupplier);/**
如果类型已注册,则从上下文中返回实例。如果之前未访问过该实例,则会创建该实例。
参数:
type – 实例类型
返回:
由 Context 管理的实例
抛出:
IllegalStateException – 如果类型尚未注册*/
<T> T get(Class<T> type) throws IllegalStateException;
2.3. 设置无图形环境true
private void configureHeadlessProperty() {System.setPropertyIfAbsent("java.awt.headless",true);
}
在无头模式下,Java 应用程序无法使用任何依赖于图形环境的功能,如 AWT(Abstract Window Toolkit)和 Swing。这包括:•创建窗口和对话框•显示图像•使用剪贴板•播放音频
2.4. 创建运行监听getRunListeners实例
SpringApplicationRunListeners listeners = getRunListeners(args);
获取配置的类并实例化
private SpringApplicationRunListeners getRunListeners(String[] args) {List<SpringApplicationRunListener> listeners = getSpringFactoriesInstances(SpringApplicationRunListener.class);SpringApplicationHook hook = applicationHook.get();SpringApplicationRunListener hookListener = hook.getRunListener(this);if (hookListener != null) { //第一次启动,这里是null。listeners.add(hookListener);}return new SpringApplicationRunListeners(listeners);
}
getSpringFactoriesInstances方法创建的对象:
listeners = {ArrayList@3099} size = 10 = {EventPublishingRunListener@3098}
EventPublishingRunListener实现的接口方法:
public interface SpringApplicationRunListener{/*** 在 run 方法首次启动时立即调用。可用于非常早期的初始化。*/void starting(ConfigurableBootstrapContext bootstrapContext);/*** 在准备好环境后但在创建环境之前 ApplicationContext 调用。*/void environmentPrepared(ConfigurableBootstrapContext bootstrapContext, ConfigurableEnvironment environment);//省略...
}
2.5. 启动运行监听实例EventPublishingRunListener
listeners.starting(bootstrapContext, this.mainApplicationClass);
void starting(ConfigurableBootstrapContext bootstrapContext, Class<?> mainApplicationClass) {this.listeners.forEach((listener) -> listener.starting(bootstrapContext));
}
这里的listeners集合只有一个对象EventPublishingRunListener,注意这个监听是runListeners,而不是最开始的applicationListeners,
2.5.1. 再来看一下这个对象的starting方法
@Override
public void starting(ConfigurableBootstrapContext bootstrapContext) {multicastInitialEvent(new ApplicationStartingEvent(bootstrapContext, this.application, this.args));
}private void multicastInitialEvent(ApplicationEvent event) {refreshApplicationListeners();//保证监听器只执行一次,把已经执行过的监听器在集合中删除this.initialMulticaster.multicastEvent(event);//执行监听器方法
}@Override
public void multicastEvent(ApplicationEvent event) {for (ApplicationListener<?> listener : getApplicationListeners(event, type)) {//从applicationListeners中获取类型是ApplicationStartingEvent的监听器listener.onApplicationEvent(event);}
}
2.5.2. 上一步获取到的ApplicationEvent监听器
getApplicationListeners(event, type) = {ArrayList@3309} size = 30 = {LoggingApplicationListener@3174} 1 = {BackgroundPreinitializer@3175} 2 = {DelegatingApplicationListener@3176}
ApplicationListener函数式接口的方法:
void onApplicationEvent(E event);
2.6. 加载环境配置
ConfigurableEnvironment environment = prepareEnvironment(listeners, bootstrapContext, applicationArguments);
方法内容
private ConfigurableEnvironment prepareEnvironment(SpringApplicationRunListeners listeners,DefaultBootstrapContext bootstrapContext, ApplicationArguments applicationArguments) {// Create and configure the environmentConfigurableEnvironment environment = getOrCreateEnvironment();configureEnvironment(environment, applicationArguments.getSourceArgs());ConfigurationPropertySources.attach(environment);listeners.environmentPrepared(bootstrapContext, environment);DefaultPropertiesPropertySource.moveToEnd(environment);//把default配置放到最后Assert.state(!environment.containsProperty("spring.main.environment-prefix"),"Environment prefix cannot be set via properties.");bindToSpringApplication(environment);if (!this.isCustomEnvironment) {EnvironmentConverter environmentConverter = new EnvironmentConverter(getClassLoader());environment = environmentConverter.convertEnvironmentIfNecessary(environment, deduceEnvironmentClass());}ConfigurationPropertySources.attach(environment);//把configurationProperties配置放到集合中第一个return environment;
}
2.6.1. 创建环境实例
ConfigurableEnvironment environment = getOrCreateEnvironment();
//getOrCreateEnvironment这个方法中主要代码是
SpringFactoriesLoader.loadFactories(ApplicationContextFactory.class);//就是从spring.factories文件中加载实例
// 默认获取到2个实例
//  0 = {ReactiveWebServerApplicationContextFactory@2803}
//  1 = {ServletWebServerApplicationContextFactory@2804}
return new ApplicationServletEnvironment();//最终是创建了这个servlet类型环境上下文
ApplicationServletEnvironment这个类实现了PropertyResolver接口
public interface PropertyResolver {String getProperty(String key);
2.6.2. 配置环境上下文
configureEnvironment(environment, applicationArguments.getSourceArgs());
protected void configureEnvironment(ConfigurableEnvironment environment, String[] args) {if (this.addConversionService) {//添加转换服务,用于解析配置文件做类型转换environment.setConversionService(new ApplicationConversionService());}//解析命令行参数configurePropertySources(environment, args);//配置默认激活文件 spring.profiles.activeconfigureProfiles(environment, args);
}//添加转换服务主要代码
converterRegistry.addConverter(new ByteBufferConverter((ConversionService) converterRegistry));
converterRegistry.addConverter(new StringToTimeZoneConverter());
converterRegistry.addConverter(new ZoneIdToTimeZoneConverter());
converterRegistry.addConverter(new ZonedDateTimeToCalendarConverter());
converterRegistry.addConverter(new ObjectToObjectConverter());
converterRegistry.addConverter(new IdToEntityConverter((ConversionService) converterRegistry));
converterRegistry.addConverter(new FallbackObjectToStringConverter());
converterRegistry.addConverter(new ObjectToOptionalConverter((ConversionService) converterRegistry));
registry.addFormatter(new CharArrayFormatter());
registry.addFormatter(new InetAddressFormatter());
registry.addFormatter(new IsoOffsetFormatter());
2.6.3. 继续添加系统环境
ConfigurationPropertySources.attach(environment);
attach方法主要逻辑:
public static void attach(Environment environment) {MutablePropertySources sources = ((ConfigurableEnvironment) environment).getPropertySources();attached = new ConfigurationPropertySourcesPropertySource("configurationProperties",new SpringConfigurationPropertySources(sources));sources.addFirst(attached);
}
2.6.4. 执行监听器配置环境
listeners.environmentPrepared(bootstrapContext, environment);
void environmentPrepared(ConfigurableBootstrapContext bootstrapContext, ConfigurableEnvironment environment) {//注意这个监听是runListeners,而不是最开始的applicationListeners//listeners集合只有一个对象`EventPublishingRunListener`this.listeners.forEach((listener) -> listener.environmentPrepared(bootstrapContext, environment));
}
//代码继续往下执行,调用EventPublishingRunListener.environmentPrepared()方法
@Override
public void environmentPrepared(ConfigurableBootstrapContext bootstrapContext, ConfigurableEnvironment environment) {multicastInitialEvent(//这里创建了一个ApplicationEnvironmentPreparedEvent事件类new ApplicationEnvironmentPreparedEvent(bootstrapContext, this.application, this.args, environment));
}private void multicastInitialEvent(ApplicationEvent event) {refreshApplicationListeners();//保证监听器只执行一次,把已经执行过的监听器在集合中删除this.initialMulticaster.multicastEvent(event);//执行监听器方法
}
//代码继续执行
@Override
public void multicastEvent(ApplicationEvent event) {//入参是ApplicationEnvironmentPreparedEvent事件类for (ApplicationListener<?> listener : getApplicationListeners(event, type)) {//从applicationListeners中获取类型是ApplicationEnvironmentPreparedEvent的监听器listener.onApplicationEvent(event);}
}
2.6.4.1. EventPublishingRunListener待执行的事件类
从applicationListeners中获取类型是ApplicationEnvironmentPreparedEvent的监听器:
getApplicationListeners(event, type) = {ArrayList@4265} size = 60 = {EnvironmentPostProcessorApplicationListener@3936} 1 = {AnsiOutputApplicationListener@4267} 2 = {LoggingApplicationListener@4268} 3 = {BackgroundPreinitializer@4269} 4 = {DelegatingApplicationListener@4270} 5 = {FileEncodingApplicationListener@3894}
上面这几步和【2.6.1.】标题逻辑一样
2.6.4.1.1. EnvironmentPostProcessorApplicationListener监听器执行onApplicationEvent事件
//下面是给applicationEnvironment环境上下文新增配置
private void onApplicationEnvironmentPreparedEvent(ApplicationEnvironmentPreparedEvent event) {ConfigurableEnvironment environment = event.getEnvironment();SpringApplication application = event.getSpringApplication();for (EnvironmentPostProcessor postProcessor : getEnvironmentPostProcessors(application.getResourceLoader(), event.getBootstrapContext())) {postProcessor.postProcessEnvironment(environment, application);}
}
//调用了load方法
@Override
public List<EnvironmentPostProcessor> getEnvironmentPostProcessors(DeferredLogFactory logFactory, ConfigurableBootstrapContext bootstrapContext) {ArgumentResolver argumentResolver = ArgumentResolver.of(DeferredLogFactory.class, logFactory);argumentResolver = argumentResolver.and(ConfigurableBootstrapContext.class, bootstrapContext);argumentResolver = argumentResolver.and(BootstrapContext.class, bootstrapContext);argumentResolver = argumentResolver.and(BootstrapRegistry.class, bootstrapContext);//这一步就是把spring.factories配置的EnvironmentPostProcessor类实例化,具体参考【1.2.】标题return this.loader.load(EnvironmentPostProcessor.class, argumentResolver);
}
this.loader.load获取到的实例
getEnvironmentPostProcessors() = {ArrayList@4241} size = 70 = {RandomValuePropertySourceEnvironmentPostProcessor@4243} 1 = {SystemEnvironmentPropertySourceEnvironmentPostProcessor@4244} 2 = {CloudFoundryVcapEnvironmentPostProcessor@4245} 3 = {SpringApplicationJsonEnvironmentPostProcessor@4246} 4 = {ConfigDataEnvironmentPostProcessor@4247} 5 = {ReactorEnvironmentPostProcessor@4248} 6 = {IntegrationPropertiesEnvironmentPostProcessor@4249}
代码遍历执行上面的实例,运行postProcessEnvironment()方法。下面重点看一下ConfigDataEnvironmentPostProcessor类
2.6.4.1.1.1. ConfigDataEnvironmentPostProcessor加载项目配置数据
ConfigDataEnvironmentPostProcessor类中的方法
void postProcessEnvironment(ConfigurableEnvironment environment, ResourceLoader resourceLoader, Collection<String> additionalProfiles) {this.logger.trace("Post-processing environment to add config data");resourceLoader = (resourceLoader != null) ? resourceLoader : new DefaultResourceLoader();//重点看下面这个方法getConfigDataEnvironment(environment, resourceLoader, additionalProfiles)//创建configDataEnvironment对象.processAndApply();//扫描配置并写入environment
}
//创建configDataEnvironment对象
class ConfigDataEnvironment{//初始化静态块static {List<ConfigDataLocation> locations = new ArrayList<>();locations.add(ConfigDataLocation.of("optional:classpath:/;optional:classpath:/config/"));locations.add(ConfigDataLocation.of("optional:file:./;optional:file:./config/;optional:file:./config/*/"));DEFAULT_SEARCH_LOCATIONS = locations.toArray(new ConfigDataLocation[0]);}//ConfigDataEnvironment中的方法void processAndApply() {ConfigDataImporter importer = new ConfigDataImporter(this.logFactory, this.notFoundAction, this.resolvers,this.loaders);registerBootstrapBinder(this.contributors, null, DENY_INACTIVE_BINDING);ConfigDataEnvironmentContributors contributors = processInitial(this.contributors, importer);ConfigDataActivationContext activationContext = createActivationContext(contributors.getBinder(null, BinderOption.FAIL_ON_BIND_TO_INACTIVE_SOURCE));contributors = processWithoutProfiles(contributors, importer, activationContext);activationContext = withProfiles(contributors, activationContext);contributors = processWithProfiles(contributors, importer, activationContext);//这一步会读取项目中的src/main/resources/application.properties等文件applyToEnvironment(contributors, activationContext, importer.getLoadedLocations(),importer.getOptionalLocations());}
}
processAndApply()方法会向applicationEnvironment环境上下文新增配置
name = "Config resource 'class path resource [application.properties]' via location 'optional:classpath:/'"
source = {Collections$UnmodifiableMap@5118}  size = 5"spring.application.name" -> {OriginTrackedValue$OriginTrackedCharSequence@5127} "updownloadfile""spring.servlet.multipart.max-file-size" -> {OriginTrackedValue$OriginTrackedCharSequence@5129} "500MB""spring.servlet.multipart.max-request-size" -> {OriginTrackedValue$OriginTrackedCharSequence@5131} "500MB""ssx.up.path" -> {OriginTrackedValue$OriginTrackedCharSequence@5133} "C:/Users/shenshuxin/Downloads/up/""spring.threads.virtual.enabled" -> {OriginTrackedValue$OriginTrackedCharSequence@5135} "true"
2.7. 打印banner图
Banner printedBanner = printBanner(environment);
没什么好说的
  .   ____          _            __ _ _/\\ / ___'_ __ _ _(_)_ __  __ _ \ \ \ \
( ( )\___ | '_ | '_| | '_ \/ _` | \ \ \ \\\/  ___)| |_)| | | | | || (_| |  ) ) ) )'  |____| .__|_| |_|_| |_\__, | / / / /=========|_|==============|___/=/_/_/_/:: Spring Boot ::                (v3.3.0)
2.8. 创建applicationContext上下文
context = createApplicationContext();
//其中的主要方法:
class DefaultApplicationContextFactory implements ApplicationContextFactory {private ConfigurableApplicationContext getFromSpringFactories(WebApplicationType webApplicationType) {for (ApplicationContextFactory candidate : SpringFactoriesLoader.loadFactories(ApplicationContextFactory.class)) {//实际上创建的是 AnnotationConfigServletWebServerApplicationContext extends ConfigurableApplicationContext   ConfigurableApplicationContext result = candidate.create(webApplicationType);if (result != null) {return result;}}}
}
2.8.1. 创建beanFactory
创建applicationContext的构造方法中,默认创建了beanFactory
private final Map<String, Object> singletonObjects = new ConcurrentHashMap<>(256);public GenericApplicationContext() {this.beanFactory = new DefaultListableBeanFactory();
}
2.8.1.1. beanFactory实现的主要方法
//注册bean到singletonObjects
void registerSingleton(String beanName, Object singletonObject);//获取bean从singletonObjects
Object getSingleton(String beanName);
2.8.1.2. DefaultListableBeanFactory构造方法
RootBeanDefinition def = new RootBeanDefinition(ConfigurationClassPostProcessor.class);
def.setSource(source);
beanDefs.add(registerPostProcessor(registry, def, "org.springframework.context.annotation.internalConfigurationAnnotationProcessor"));
这个类ConfigurationClassPostProcessor很重要,在扫描项目中的bean的时候用到了
2.9. 配置上下文applicationContext
prepareContext(bootstrapContext, context, environment, listeners, applicationArguments, printedBanner);
private void prepareContext(DefaultBootstrapContext bootstrapContext, ConfigurableApplicationContext context,ConfigurableEnvironment environment, SpringApplicationRunListeners listeners,ApplicationArguments applicationArguments, Banner printedBanner) {context.setEnvironment(environment);//赋值环境变量postProcessApplicationContext(context);//转换服务赋值到beanFactoryaddAotGeneratedInitializerIfNecessary(this.initializers);//AOT是一种编译技术,可以在编译时生成优化的字节码,从而在运行时提高性能applyInitializers(context);listeners.contextPrepared(context);bootstrapContext.close(context);if (this.logStartupInfo) {logStartupInfo(context.getParent() == null);logStartupProfileInfo(context);}// Add boot specific singleton beansConfigurableListableBeanFactory beanFactory = context.getBeanFactory();beanFactory.registerSingleton("springApplicationArguments", applicationArguments);if (printedBanner != null) {beanFactory.registerSingleton("springBootBanner", printedBanner);}if (beanFactory instanceof AbstractAutowireCapableBeanFactory autowireCapableBeanFactory) {autowireCapableBeanFactory.setAllowCircularReferences(this.allowCircularReferences);if (beanFactory instanceof DefaultListableBeanFactory listableBeanFactory) {listableBeanFactory.setAllowBeanDefinitionOverriding(this.allowBeanDefinitionOverriding);}}if (this.lazyInitialization) {context.addBeanFactoryPostProcessor(new LazyInitializationBeanFactoryPostProcessor());}if (this.keepAlive) {context.addApplicationListener(new KeepAlive());}context.addBeanFactoryPostProcessor(new PropertySourceOrderingBeanFactoryPostProcessor(context));if (!AotDetector.useGeneratedArtifacts()) {// Load the sourcesSet<Object> sources = getAllSources();Assert.notEmpty(sources, "Sources must not be empty");load(context, sources.toArray(new Object[0]));}listeners.contextLoaded(context);
}
2.9.1. 运行applicationInitializers
applyInitializers(context);
//获取applicationContextInitializer集合并调用初始化方法
//这里的集合是在【1.3.】标题中添加的
protected void applyInitializers(ConfigurableApplicationContext context) {for (ApplicationContextInitializer initializer : getInitializers()) {Class<?> requiredType = GenericTypeResolver.resolveTypeArgument(initializer.getClass(),ApplicationContextInitializer.class);Assert.isInstanceOf(requiredType, context, "Unable to call initializer.");initializer.initialize(context);//初始化}
}
// 0 = {DelegatingApplicationContextInitializer@5971}
// 1 = {SharedMetadataReaderFactoryContextInitializer@5972}
// 2 = {ContextIdApplicationContextInitializer@5973}
// 3 = {ConfigurationWarningsApplicationContextInitializer@5974}
// 4 = {RSocketPortInfoApplicationContextInitializer@5975}
// 5 = {ServerPortInfoApplicationContextInitializer@5976}
// 6 = {ConditionEvaluationReportLoggingListener@5977}
BeanDefinitionRegistryPostProcessor接口定义
public interface BeanDefinitionRegistryPostProcessor extends BeanFactoryPostProcessor {//在标准初始化后修改应用程序上下文的内部 Bean 定义注册表void postProcessBeanDefinitionRegistry(BeanDefinitionRegistry registry) throws BeansException;//在标准初始化后修改应用程序上下文的内部 Bean 工厂@Overridedefault void postProcessBeanFactory(ConfigurableListableBeanFactory beanFactory) throws BeansException {}
}
2.9.1.1. SharedMetadataReaderFactoryContextInitializer初始化方法
新增CachingMetadataReaderFactoryPostProcessor,实现了BeanDefinitionRegistryPostProcessor接口
BeanFactoryPostProcessor postProcessor = new CachingMetadataReaderFactoryPostProcessor(applicationContext);
applicationContext.addBeanFactoryPostProcessor(postProcessor);
2.9.1.2. ConfigurationWarningsApplicationContextInitializer初始化方法
新增ConfigurationWarningsPostProcessor,实现了BeanDefinitionRegistryPostProcessor接口
context.addBeanFactoryPostProcessor(new ConfigurationWarningsPostProcessor(getChecks()));
2.9.2. 运行applicationContextInitializedEvent监听事件
listeners.contextPrepared(context);
void contextPrepared(ConfigurableApplicationContext context) {//注意这里的this.listeners是apringApplicationRunListeners,只有一个实例 EventPublishingRunListenerthis.listeners.forEach((listener) -> listener.contextPrepared(context));
}@Override
public void contextPrepared(ConfigurableApplicationContext context) {//创建上下文初始化完成事件 ApplicationContextInitializedEventmulticastInitialEvent(new ApplicationContextInitializedEvent(this.application, this.args, context));
}private void multicastInitialEvent(ApplicationEvent event) {refreshApplicationListeners();//保证监听器只执行一次,把已经执行过的监听器在集合中删除this.initialMulticaster.multicastEvent(event);//执行监听器方法
}//代码继续执行
@Override
public void multicastEvent(ApplicationEvent event) {//入参是ApplicationContextInitializedEvent事件类for (ApplicationListener<?> listener : getApplicationListeners(event, type)) {//从applicationListeners中获取类型是ApplicationContextInitializedEvent的监听器listener.onApplicationEvent(event);}
}
2.9.2.1. Event监听获取到的ApplicationContextInitializedEvent实例
getApplicationListeners(event, type) = {ArrayList@6345} size = 20 = {BackgroundPreinitializer@6218} 1 = {DelegatingApplicationListener@6225}
经过断点查看,这两个实例的onApplicationEvent()方法没有重要的处理逻辑
2.9.3. 运行bootstrapRegistryLinstner结束事件
bootstrapContext.close(context);
public void close(ConfigurableApplicationContext applicationContext) {this.events.multicastEvent(new BootstrapContextClosedEvent(this, applicationContext));
}@Override
public void multicastEvent(ApplicationEvent event, @Nullable ResolvableType eventType) {Executor executor = getTaskExecutor();//获取BootstrapContextClosedEvent类型的监听器,这里没有获取到for (ApplicationListener<?> listener : getApplicationListeners(event, type)) {invokeListener(listener, event);}
}
2.9.4. 配置日志
if (this.logStartupInfo) {logStartupInfo(context.getParent() == null);logStartupProfileInfo(context);
}
//创建StartupInfoLogger
new StartupInfoLogger(this.mainApplicationClass).logStarting(getApplicationLog());
//2024-11-07T17:02:39.195+08:00  INFO 25720 --- [updownloadfile] [           main] c.s.u.UpdownloadfileApplication          : Starting UpdownloadfileApplication using
//2024-11-07T17:05:03.604+08:00  INFO 25720 --- [updownloadfile] [           main] c.s.u.UpdownloadfileApplication          : No active profile set, falling back to 1 default profile: "default"
2.9.5. 添加bean到beanFactory
beanFactory.registerSingleton("springApplicationArguments", applicationArguments);
beanFactory.registerSingleton("springBootBanner", printedBanner);
beanFactory.registerBeanDefinition("updownloadfileApplication", AnnotatedGenericBeanDefinition);
2.9.5.1. 添加PropertySourceOrderingBeanFactoryPostProcessor
context.addBeanFactoryPostProcessor(new PropertySourceOrderingBeanFactoryPostProcessor(context));
2.9.6. 运行ApplicationPreparedEvent监听事件
listeners.contextLoaded(context);
void contextLoaded(ConfigurableApplicationContext context) {//注意这里的this.listeners是apringApplicationRunListeners,只有一个实例 EventPublishingRunListenerthis.listeners.forEach((listener) -> listener.contextLoaded(context));
}@Override
public void contextLoaded(ConfigurableApplicationContext context) {for (ApplicationListener<?> listener : this.application.getListeners()) {//获取所有的applicationListeners,调用setApplicationContext方法if (listener instanceof ApplicationContextAware contextAware) {contextAware.setApplicationContext(context);}context.addApplicationListener(listener);}multicastInitialEvent(new ApplicationPreparedEvent(this.application, this.args, context));
}private void multicastInitialEvent(ApplicationEvent event) {refreshApplicationListeners();//保证监听器只执行一次,把已经执行过的监听器在集合中删除this.initialMulticaster.multicastEvent(event);//执行监听器方法
}//代码继续执行
@Override
public void multicastEvent(ApplicationEvent event) {//入参是ApplicationPreparedEvent事件类for (ApplicationListener<?> listener : getApplicationListeners(event, type)) {//从applicationListeners中获取类型是ApplicationPreparedEvent的监听器listener.onApplicationEvent(event);}
}
2.9.6.1. 获取到的applicationPreparedEvent事件
getApplicationListeners(event, type) = {ArrayList@5139} size = 40 = {EnvironmentPostProcessorApplicationListener@5027} //将所有延迟日志切换到它们提供的目标1 = {LoggingApplicationListener@5136} 2 = {BackgroundPreinitializer@5137} 3 = {DelegatingApplicationListener@5138}
2.9.6.2. ApplicationContextAware接口作用
准备完成applicationContext之后,最后一步是执行event监听context完成事件
if (listener instanceof ApplicationContextAware contextAware) {contextAware.setApplicationContext(context);
}
这一步里面会调用setApplicationContext()方法
/*** 接口,由任何希望被通知 ApplicationContext 其运行的对象实现。* 例如,当对象需要访问一组协作 bean 时,实现此接口是有意义的。请注意,通过 bean 引用进行配置比仅仅为了 bean 查找目的实现此接口更可取。*/
public interface ApplicationContextAware extends Aware {/*** 设置运行此对象的 ApplicationContext。通常,此调用将用于初始化对象。*/void setApplicationContext(ApplicationContext applicationContext) throws BeansException;
}
2.9.7. 完成contextPrepare方法后,beanFactory中的bean信息
beanDefinitionNames = {ArrayList@4019} size = 60 = "org.springframework.context.annotation.internalConfigurationAnnotationProcessor"1 = "org.springframework.context.annotation.internalAutowiredAnnotationProcessor"2 = "org.springframework.context.annotation.internalCommonAnnotationProcessor"3 = "org.springframework.context.event.internalEventListenerProcessor"4 = "org.springframework.context.event.internalEventListenerFactory"5 = "updownloadfileApplication"registeredSingletons = {LinkedHashSet@4041} size = 70 = "org.springframework.boot.context.ContextIdApplicationContextInitializer$ContextId"1 = "autoConfigurationReport"2 = "springApplicationArguments"3 = "springBootBanner"4 = "springBootLoggingSystem"5 = "springBootLoggerGroups"6 = "springBootLoggingLifecycle"
2.10. 刷新上下文applicationContext
refreshContext(context);
具体方法:
@Override
public void refresh() throws BeansException, IllegalStateException {this.startupShutdownLock.lock();try {this.startupShutdownThread = Thread.currentThread();StartupStep contextRefresh = this.applicationStartup.start("spring.context.refresh");// Prepare this context for refreshing.//初始化environment环境配置信息//校验environment配置信息是否正确prepareRefresh();// Tell the subclass to refresh the internal bean factory.//刷新序列化id(暂时没有用到)ConfigurableListableBeanFactory beanFactory = obtainFreshBeanFactory();// Prepare the bean factory for use in this context.//设置bean忽略某些类(EnvironmentAware、ApplicationContextAware)、添加bean到beanFactory(environment、systemProperties、applicationStartup)prepareBeanFactory(beanFactory);try {// Allows post-processing of the bean factory in context subclasses.//使用给定的 BeanFactory 注册特定于 Web 的范围(“request”、“session”、“globalSession”),就像 WebApplicationContext 使用的那样。postProcessBeanFactory(beanFactory);StartupStep beanPostProcess = this.applicationStartup.start("spring.context.beans.post-process");// Invoke factory processors registered as beans in the context.//扫描项目中的bean,详情看下面的解释invokeBeanFactoryPostProcessors(beanFactory);// Register bean processors that intercept bean creation.//注册BeanPostProcessor,初始化Bean前后钩子registerBeanPostProcessors(beanFactory);beanPostProcess.end();// Initialize message source for this context.//用于解析消息的 Strategy 接口,支持此类消息的参数化和国际化。initMessageSource();// Initialize event multicaster for this context.//事件发布器 负责将事件广播给所有注册的监听器(ApplicationListener)。initApplicationEventMulticaster();// Initialize other special beans in specific context subclasses.//创建tomcat服务onRefresh();// Check for listener beans and register them.//注册监听registerListeners();// Instantiate all remaining (non-lazy-init) singletons.//实例化所有的单例、非懒加载的Bean实例finishBeanFactoryInitialization(beanFactory);// Last step: publish corresponding event.//清除缓存、发布ContextRefreshedEvent事件finishRefresh();}catch (RuntimeException | Error ex ) {if (logger.isWarnEnabled()) {logger.warn("Exception encountered during context initialization - " +"cancelling refresh attempt: " + ex);}// Destroy already created singletons to avoid dangling resources.destroyBeans();// Reset 'active' flag.cancelRefresh(ex);// Propagate exception to caller.throw ex;}finally {contextRefresh.end();}}finally {this.startupShutdownThread = null;this.startupShutdownLock.unlock();}
}
2.10.1. 调用beanFactoryPostProcessors方法
invokeBeanFactoryPostProcessors(beanFactory);
protected void invokeBeanFactoryPostProcessors(ConfigurableListableBeanFactory beanFactory) {//静态方法PostProcessorRegistrationDelegate.invokeBeanFactoryPostProcessors(beanFactory, getBeanFactoryPostProcessors());
}
2.10.1.1. getBeanFactoryPostProcessors集合
this.beanFactoryPostProcessors = {ArrayList@4190} size = 30 = {SharedMetadataReaderFactoryContextInitializer$CachingMetadataReaderFactoryPostProcessor@4816} 1 = {ConfigurationWarningsApplicationContextInitializer$ConfigurationWarningsPostProcessor@4817} 2 = {SpringApplication$PropertySourceOrderingBeanFactoryPostProcessor@4818}
上面这三个processor来源位置:
- 标题【2.9.1.1. SharedMetadataReaderFactoryContextInitializer初始化方法】
- 标题【2.9.1.2. ConfigurationWarningsApplicationContextInitializer初始化方法】
- 标题【2.9.5.1. 添加PropertySourceOrderingBeanFactoryPostProcessor】
2.10.1.2. invokeBeanFactoryPostProcessors方法
源码太长,这里没有粘贴上
https://github.com/spring-projects/spring-framework/blob/6.1.x/spring-context/src/main/java/org/springframework/context/support/PostProcessorRegistrationDelegate.java
2.10.1.2.1. 先执行BeanDefinitionRegistryPostProcessor接口
实现此接口的类有两个
SharedMetadataReaderFactoryContextInitializer,作用是注册了beanDef:SharedMetadataReaderFactoryBeanConfigurationWarningsApplicationContextInitializer,作用是检查启动类的包名cn.shenshuxin.updownloadfile是否和org.springframework相等
2.10.1.2.2. 执行beanFactory中实现BeanDefinitionRegistryPostProcessor接口的bean
- First, invoke the BeanDefinitionRegistryPostProcessors that implement PriorityOrdered.
先获取bean是BeanDefinitionRegistryPostProcessor并且实现了PriorityOrdered接口,只有一个符合的bean:ConfigurationClassPostProcessor,然后调用BeanDefinitionRegistryPostProcessor接口的方法。下面重点分析这个逻辑 - Next, invoke the BeanDefinitionRegistryPostProcessors that implement Ordered. 然后再获取实现了
Ordered接口的bean然后调用接口方法。这个地方没有重要的逻辑 - Finally, invoke all other BeanDefinitionRegistryPostProcessors until no further ones appear. 最后获取剩余的接口然后调用接口方法。这个地方没有重要的逻辑
2.10.1.2.2.1. ConfigurationClassPostProcessor扫描项目中的所有bean
此时beanFactory中的beanDef列表0 = "org.springframework.context.annotation.internalConfigurationAnnotationProcessor"1 = "org.springframework.context.annotation.internalAutowiredAnnotationProcessor"2 = "org.springframework.context.annotation.internalCommonAnnotationProcessor"3 = "org.springframework.context.event.internalEventListenerProcessor"4 = "org.springframework.context.event.internalEventListenerFactory"5 = "updownloadfileApplication"6 = "org.springframework.boot.autoconfigure.internalCachingMetadataReaderFactory"
- 获取到beanFactory中类型是
AnnotatedGenericBeanDefinition的bean,只有一个updownloadfileApplication也就是启动类 - 实例化
ConfigurationClassParser,并调用parse("updownloadfileApplication")方法 - parse方法中最重要的逻辑,循环扫描项目中的bean并加载到beanFactory
protected void processConfigurationClass(ConfigurationClass configClass, Predicate<String> filter) throws IOException {// Recursively process the configuration class and its superclass hierarchy.SourceClass sourceClass = null;try {sourceClass = asSourceClass(configClass, filter);//sourceClass = {ConfigurationClassParser$SourceClass@5008} "cn.shenshuxin.updownloadfile.UpdownloadfileApplication"do {//主要解析方法doProcessConfigurationClasssourceClass = doProcessConfigurationClass(configClass, sourceClass, filter);}while (sourceClass != null);}//临时存储项目中创建的bean类this.configurationClasses.put(configClass, configClass);//Map<ConfigurationClass, ConfigurationClass>
}/**
通过从源类中读取注释、成员和方法,应用处理并构建一个完整的 ConfigurationClass 。当发现相关源时,可以多次调用此方法。
参数:
configClass – 正在构建的 Configuration 类 sourceClass – 源类
返回:
超类,或者 null 如果未找到或以前处理过*/
protected final SourceClass doProcessConfigurationClass(ConfigurationClass configClass, SourceClass sourceClass, Predicate<String> filter)throws IOException {//configClass是启动类UpdownloadfileApplication,有一个@SpringBootApplication注解(继承了@Component)if (configClass.getMetadata().isAnnotated(Component.class.getName())) {// Recursively process any member (nested) classes first //如果启动类存在内部类,就获取内部类,递归调用当前这个doProcessConfigurationClass方法processMemberClasses(configClass, sourceClass, filter);}// Process any @PropertySource annotations//获取自定义的配置文件,解析到Environment环境上下文中 例如@PropertySource("classpath:/com/myco/app.properties")for (AnnotationAttributes propertySource : AnnotationConfigUtils.attributesForRepeatable(sourceClass.getMetadata(), org.springframework.context.annotation.PropertySource.class,PropertySources.class, true)) {if (this.propertySourceRegistry != null) {this.propertySourceRegistry.processPropertySource(propertySource);}else {logger.info("Ignoring @PropertySource annotation on [" + sourceClass.getMetadata().getClassName() +"]. Reason: Environment must implement ConfigurableEnvironment");}}// Search for locally declared @ComponentScan annotations first.//获取启动类的@ComponentScan注解,并且是直接存在于启动类而非继承(忽略@SpringbootApplication继承的注解),这里没获取到Set<AnnotationAttributes> componentScans = AnnotationConfigUtils.attributesForRepeatable(sourceClass.getMetadata(), ComponentScan.class, ComponentScans.class,MergedAnnotation::isDirectlyPresent);// Fall back to searching for @ComponentScan meta-annotations (which indirectly// includes locally declared composed annotations).//获取启动类的@ComponentScan注解,或者继承的注解。这里获取到了basePackages -> {String[0]@6193} []空数组if (componentScans.isEmpty()) {componentScans = AnnotationConfigUtils.attributesForRepeatable(sourceClass.getMetadata(),ComponentScan.class, ComponentScans.class, MergedAnnotation::isMetaPresent);}//扫描启动类包下resourcePattern -> **/*.class的类if (!componentScans.isEmpty() &&!this.conditionEvaluator.shouldSkip(sourceClass.getMetadata(), ConfigurationPhase.REGISTER_BEAN)) {for (AnnotationAttributes componentScan : componentScans) {// The config class is annotated with @ComponentScan -> perform the scan immediately//如果basePackages是空数组,赋值启动类的包名cn.shenshuxin.updownloadfile;//这个parse方法里面是扫描classpath*:cn/shenshuxin/updownloadfile/**/*.class类,通过File类实现的。过滤出包含@Componet注解的类Set<BeanDefinitionHolder> scannedBeanDefinitions =this.componentScanParser.parse(componentScan, sourceClass.getMetadata().getClassName());//这里只获取到一个符合条件的[cn.shenshuxin.updownloadfile.contr.Controller]// Check the set of scanned definitions for any further config classes and parse recursively if neededfor (BeanDefinitionHolder holder : scannedBeanDefinitions) {BeanDefinition bdCand = holder.getBeanDefinition().getOriginatingBeanDefinition();if (bdCand == null) {bdCand = holder.getBeanDefinition();}if (ConfigurationClassUtils.checkConfigurationClassCandidate(bdCand, this.metadataReaderFactory)) {//这个parse方法 className = "cn.shenshuxin.updownloadfile.contr.Controller",beanName = "controller"//里面就是递归调用当前doProcessConfigurationClass方法parse(bdCand.getBeanClassName(), holder.getBeanName());//上面的方法执行完毕后,this.configurationClasses里面新增一个类 [cn/shenshuxin/updownloadfile/contr/Controller.class]}}}}// Process any @Import annotations//获取source类(启动类)上面的@Import注解的值 (@SpringbootApplication继承的注解)//新增了一个importBeanDefinitionRegistrars ={AutoConfigurationPackages$Registrar@5427}//新增了一个deferredImportSelectors ={ConfigurationClassParser$DeferredImportSelectorHolder@7331} (AutoConfigurationImportSelector)这里导入了一个最重要自动配置类!详细往后看processImports(configClass, sourceClass, getImports(sourceClass), filter, true);// Process any @ImportResource annotations//指示一个或多个包含要导入的 Bean 定义的资源。与 @Import一样//项目这里没有配置 是nullAnnotationAttributes importResource =AnnotationConfigUtils.attributesFor(sourceClass.getMetadata(), ImportResource.class);if (importResource != null) {String[] resources = importResource.getStringArray("locations");Class<? extends BeanDefinitionReader> readerClass = importResource.getClass("reader");for (String resource : resources) {String resolvedResource = this.environment.resolveRequiredPlaceholders(resource);configClass.addImportedResource(resolvedResource, readerClass);}}// Process individual @Bean methods//获取source类(启动类)里面的方法, @Bean注解的配置方法。并添加到 Set<BeanMethod> beanMethods集合中//项目这里没有配置 是nullSet<MethodMetadata> beanMethods = retrieveBeanMethodMetadata(sourceClass);for (MethodMetadata methodMetadata : beanMethods) {configClass.addBeanMethod(new BeanMethod(methodMetadata, configClass));}// Process default methods on interfaces//获取source类(启动类)的父类,如果父类中的方法存在@Bean注解,也添加到Set<BeanMethod> beanMethods集合中。这里是递归获取父类processInterfaces(configClass, sourceClass);// Process superclass, if any//获取source类(启动类)的父类,如果父类也是一个自定义的类,就返回父类的sourceClass。继续执行doProcessConfigurationClass这个方法if (sourceClass.getMetadata().hasSuperClass()) {String superclass = sourceClass.getMetadata().getSuperClassName();if (superclass != null && !superclass.startsWith("java") &&!this.knownSuperclasses.containsKey(superclass)) {this.knownSuperclasses.put(superclass, configClass);// Superclass found, return its annotation metadata and recursereturn sourceClass.getSuperClass();}}// No superclass -> processing is completereturn null;
}
- parse方法中另一个重要的逻辑,循环扫描第三方jar包中的bean并加载到beanFactory
//下面这个集合只有一个元素,是在上面的processImports方法添加的:ConfigurationClassParser$DeferredImportSelectorHolder@7331} 说明一下,这个写法ConfigurationClassParser类里面的内部类DeferredImportSelectorHolder
this.deferredImportSelectorHandler.process();public void process() {//下面这个列表只有一个元素:{ConfigurationClassParser$DeferredImportSelectorHolder@7331} (AutoConfigurationImportSelector)这里获取了一个最重要自动配置类!List<DeferredImportSelectorHolder> deferredImports = this.deferredImportSelectors;this.deferredImportSelectors = null;try {if (deferredImports != null) {DeferredImportSelectorGroupingHandler handler = new DeferredImportSelectorGroupingHandler();deferredImports.sort(DEFERRED_IMPORT_COMPARATOR);//把AutoConfigurationImportSelector实例添加到handler对象的groupings集合中deferredImports.forEach(handler::register);//核心逻辑:导入配置类handler.processGroupImports();}}finally {this.deferredImportSelectors = new ArrayList<>();}
}//核心逻辑:导入配置类
public void processGroupImports() {//this.groupings集合中只有一个元素 AutoConfigurationImportSelectorfor (DeferredImportSelectorGrouping grouping : this.groupings.values()) {//先看getImports()方法:扫描所有的jar包获取配置类grouping.getImports().forEach(autoConfigClass -> {//扫描配置类中相关的Bean对象,里面其实调用了processConfigurationClass()方法,参考上面标题【##### 2.10.1.2.2.1. ConfigurationClassPostProcessor扫描项目中的所有bean】第三步【3. parse方法中最重要的逻辑,循环扫描项目中的bean并加载到beanFactory】processImports("updownloadfileApplication", autoConfigClass);});}
}//扫描所有的jar包获取配置类
protected List<String> getImports(AnnotationMetadata annotationMetadata) {//annotationMetadata是{updownloadfileApplication}AnnotationAttributes attributes = getAttributes(annotationMetadata);//通过classLoader获取类资源:META-INF/spring/org.springframework.boot.autoconfigure.AutoConfiguration.imports//注意这个是META-INF/spring/%s.imports格式的,并不是META-INF/spring.factories因为这是springboot3版本List<String> configurations = getCandidateConfigurations(annotationMetadata, attributes);//我这里扫描到了274个配置AutoConfiguration类,例如://org.springframework.boot.autoconfigure.data.redis.RedisAutoConfiguration//org.springframework.boot.autoconfigure.jdbc.JdbcClientAutoConfiguration//org.springframework.boot.autoconfigure.web.servlet.DispatcherServletAutoConfiguration//等等configurations = removeDuplicates(configurations);//去重Set<String> exclusions = getExclusions(annotationMetadata, attributes);//删除指定的类(可以在@SpringbootApplication注解中配置)checkExcludedClasses(configurations, exclusions);configurations.removeAll(exclusions);//过滤器:实现逻辑是获取项目中配置的META-INF/spring.factories文件中的AutoConfigurationImportFilter.class,然后执行过滤filterconfigurations = getConfigurationClassFilter().filter(configurations);fireAutoConfigurationImportEvents(configurations, exclusions);//经过滤后,剩下77个配置类return configurations;
}
- 扫描项目中所有的bean包含第三方jar的bean,完成后
configurationClasses = {LinkedHashMap@5000} size = 131这个集合的配置类
//通过配置类信息创建对应的beanDefinition到 beanFactory中
this.reader.loadBeanDefinitions(configClasses);//这个逻辑完成后,beanFactory中信息:
//beanDefinitionNames = size = 322//registeredSingletons = {LinkedHashSet@5928}  size = 130 = "org.springframework.boot.context.ContextIdApplicationContextInitializer$ContextId"1 = "autoConfigurationReport"2 = "springApplicationArguments"3 = "springBootBanner"4 = "springBootLoggingSystem"5 = "springBootLoggerGroups"6 = "springBootLoggingLifecycle"7 = "environment"8 = "systemProperties"9 = "systemEnvironment"10 = "applicationStartup"11 = "org.springframework.boot.autoconfigure.internalCachingMetadataReaderFactory"12 = "org.springframework.context.annotation.internalConfigurationAnnotationProcessor"
2.10.1.2.3. 执行beanFactory中实现BeanFactoryPostProcessor接口的bean
逻辑和上面的执行BeanDefinitionRegistryPostProcessor一样,只不过是匹配BeanFactoryPostProcessor这个类的实现
// First, invoke the BeanFactoryPostProcessors that implement PriorityOrdered.
invokeBeanFactoryPostProcessors(priorityOrderedPostProcessors, beanFactory);
// Next, invoke the BeanFactoryPostProcessors that implement Ordered.
invokeBeanFactoryPostProcessors(orderedPostProcessors, beanFactory);
// Finally, invoke all other BeanFactoryPostProcessors.
invokeBeanFactoryPostProcessors(nonOrderedPostProcessors, beanFactory);//这些后置处理器的逻辑例如:
String[] errorControllerBeans = beanFactory.getBeanNamesForType(ErrorController.class, false, false);
//处理errorControllerBeans自定义的逻辑
2.10.2. 注册BeanPostProcessor,初始化Bean前后钩子
registerBeanPostProcessors(beanFactory);
//扫描bean:BeanPostProcessor
String[] postProcessorNames = beanFactory.getBeanNamesForType(BeanPostProcessor.class, true, false);
// First, register the BeanPostProcessors that implement PriorityOrdered.
registerBeanPostProcessors(beanFactory, priorityOrderedPostProcessors);
// Now, register all regular BeanPostProcessors.
registerBeanPostProcessors(beanFactory, nonOrderedPostProcessors);
// Finally, re-register all internal BeanPostProcessors.
registerBeanPostProcessors(beanFactory, internalPostProcessors);//上面的registerBeanPostProcessors方法核心逻辑是:
this.beanPostProcessors.addAll(beanPostProcessors); //List<BeanPostProcessor>
2.10.2.1. BeanPostProcessor作用
public interface BeanPostProcessor {/**BeanPostProcessor 在任何 bean 初始化回调(如 InitializingBean afterPropertiesSet 的或自定义的 init-method)之前,将此函数应用于给定的新 bean 实例。该 bean 将已填充属性值。返回的 bean 实例可能是原始 bean 实例的包装器。默认实现按原样返回给定 bean 的 Implementation。参数:bean – 新的 bean 实例 beanName – 豆子的名称返回:要使用的 bean 实例,原始实例或包装实例;如果 null,则不会调用后续的 BeanPostProcessors*/@Nullabledefault Object postProcessBeforeInitialization(Object bean, String beanName) throws BeansException {return bean;}/**在任何 bean 初始化回调(如 InitializingBean afterPropertiesSet 或自定义 init-method)之后,将此函数BeanPostProcessor应用于给定的新 bean 实例。该 bean 将已填充属性值。返回的 bean 实例可能是原始 bean 实例的包装器。如果是 FactoryBean,则将为 FactoryBean 实例和 FactoryBean 创建的对象(从 Spring 2.0 开始)调用此回调。后处理器可以通过相应的 bean instanceof FactoryBean 检查来决定是应用于 FactoryBean 还是 created 对象,还是同时应用于两者。与所有其他BeanPostProcessor回调相反,此回调也将在方法触发InstantiationAwareBeanPostProcessor.postProcessBeforeInstantiation短路后调用。默认实现按原样返回给定 bean 的 Implementation。参数:bean – 新的 bean 实例 beanName – 豆子的名称返回:要使用的 bean 实例,原始实例或包装实例;如果 null,则不会调用后续的 BeanPostProcessors*/@Nullabledefault Object postProcessAfterInitialization(Object bean, String beanName) throws BeansException {return bean;}
}
可以自己定义一个Bean实现BeanPostProcessor接口,之后在bean实例化的时候就会调用自定义的逻辑
2.10.2.2. 处理后BeanPostProcessor的集合数据
beanPostProcessors = {AbstractBeanFactory$BeanPostProcessorCacheAwareList@5918} size = 140 = {ApplicationContextAwareProcessor@12199} //重点 setApplicationContext方法1 = {WebApplicationContextServletContextAwareProcessor@12201} 2 = {ConfigurationClassPostProcessor$ImportAwareBeanPostProcessor@12202} 3 = {PostProcessorRegistrationDelegate$BeanPostProcessorChecker@12203} 4 = {ConfigurationPropertiesBindingPostProcessor@12013} 5 = {InfrastructureAdvisorAutoProxyCreator@12069} "proxyTargetClass=true; optimize=false; opaque=false; exposeProxy=false; frozen=false"6 = {WebServerFactoryCustomizerBeanPostProcessor@12191} 7 = {ErrorPageRegistrarBeanPostProcessor@12192} 8 = {HealthEndpointConfiguration$HealthEndpointGroupsBeanPostProcessor@12193} 9 = {MeterRegistryPostProcessor@12194} 10 = {ObservationRegistryPostProcessor@12195} 11 = {CommonAnnotationBeanPostProcessor@12014} //重点 @PostConstruct12 = {AutowiredAnnotationBeanPostProcessor@12015} //重点 @Autowired13 = {ApplicationListenerDetector@12388}
2.10.3. 创建tomcat服务
private void createWebServer() {WebServer webServer = this.webServer;ServletContext servletContext = getServletContext();if (webServer == null && servletContext == null) {StartupStep createWebServer = getApplicationStartup().start("spring.boot.webserver.create");ServletWebServerFactory factory = getWebServerFactory();createWebServer.tag("factory", factory.getClass().toString());this.webServer = factory.getWebServer(getSelfInitializer());createWebServer.end();getBeanFactory().registerSingleton("webServerGracefulShutdown",new WebServerGracefulShutdownLifecycle(this.webServer));getBeanFactory().registerSingleton("webServerStartStop",new WebServerStartStopLifecycle(this, this.webServer));}else if (servletContext != null) {try {getSelfInitializer().onStartup(servletContext);}catch (ServletException ex) {throw new ApplicationContextException("Cannot initialize servlet context", ex);}}initPropertySources();
}
3. 特殊说明
以上就是springboot3.3版本的启动流程,其中创建webServer Tomcat部分没有详细展开,这个是springboot-mvc依赖的功能,放到另一篇文字中了。
下面是一项扩展功能,自定义配置类
3.1. 自定义ApplicationContextAware接口
@Component
public class MyApplicationContextAware implements ApplicationContextAware {/*** 实例化bean的时候调用这个方法*/@Overridepublic void setApplicationContext(ApplicationContext applicationContext) throws BeansException {Environment environment = applicationContext.getEnvironment();Object xxx = applicationContext.getBean("xxx");System.out.println("获取到的env和xxx"+environment+xxx);}
}
这个接口作用就是实例化bean的时候,调用这个方法,结合上述分析源码,实现这一个功能应该是在refresh上下文中,registerBeanPostProcessors方法中配置了ApplicationContextAwareProcessor后置处理器。当实例化MyApplicationContextAwarebean时候,会触发postProcessor后置处理器逻辑。
3.2. @Autowired @PostConstruct注解分析
@Component
public class MyAutowired {UpdownloadfileApplication main;@Autowiredprivate void setMain(UpdownloadfileApplication updownloadfileApplication){main= updownloadfileApplication;}@PostConstructprivate void p(){System.out.println("post");}
}
这个接口作用就是实例化bean的时候,属性赋值,结合上述分析源码,实现这一个功能应该是在refresh上下文中,registerBeanPostProcessors方法中配置了AutowiredAnnotationBeanPostProcessor后置处理器和CommonAnnotationBeanPostProcessor后置处理器。当实例化MyAutowiredbean时候,会触发postProcessor后置处理器逻辑。
3.3. getBean方法分析
以实例化上一步MyAutowired为例
getBean("myAutowired")
public Object getBean(String name) throws BeansException {return doGetBean(name, null, null, false);
}
doGetBean()
getSingleton()
createBean()
doCreateBean()
protected Object doCreateBean(String beanName, RootBeanDefinition mbd, @Nullable Object[] args){//bean中的成员变量赋值 会调用@Autowired注解的实现 AutowiredAnnotationBeanPostProcessorpopulateBean(beanName, mbd, instanceWrapper);//实例化bean//也调用了所有实现BeanPostProcessor接口的实现类,例如包含ApplicationContextAware接口实现、@PostConstruct注解实现、InitializingBean接口实现exposedObject = initializeBean(beanName, exposedObject, mbd);return exposedObject;
}
这几个调用顺序:
@AutowiredApplicationContextAware@PostConstructInitializingBean
相关文章:
)
源码分析Spring Boot (v3.3.0)
. ____ _ __ _ _/\\ / ____ __ _ _(_)_ __ __ _ \ \ \ \ ( ( )\___ | _ | _| | _ \/ _ | \ \ \ \\\/ ___)| |_)| | | | | || (_| | ) ) ) ) |____| .__|_| |_|_| |_\__, | / / / /|_||___//_/_/_/:: Spring Boot :: (v3.3.0)//笔记背…...

IPv6 NDP 记录
NDP(Neighbor Discovery Protocol,邻居发现协议) 是 IPv6 的一个关键协议,它组合了 IPv4 中的 ARP、ICMP 路由器发现和 ICMP 重定向等协议,并对它们作出了改进。该协议使用 ICMPv6 协议实现,作为 IPv6 的基…...
)
linux常用命令(文件操作)
目录 1. ls - 列出目录内容 2. cd - 更改目录 3. pwd - 打印当前工作目录 4. mkdir - 创建目录 5. rm - 删除文件或目录 6. cp - 复制文件或目录 7. mv - 移动或重命名文件 8. touch - 更新文件访问和修改时间 9. cat - 显示文件内容 10. grep - 搜索文本 11. chmod…...

内存管理 I(内存管理的基本原理和要求、连续分配管理方式)
一、内存管理的基本原理和要求 内存管理(Memory Management)是操作系统设计中最重要和最复杂的内容之一。虽然计算机硬件技术一直在飞速发展,内存容量也在不断增大,但仍然不可能将所有用户进程和系统所需要的全部程序与数据放入主…...

【Redis】基于Redis实现秒杀功能
业务的流程大概就是,先判断优惠卷是否过期,然后判断是否有库存,最好进行扣减库存,加入全局唯一id,然后生成订单。 一、超卖问题 真是的场景下可能会有超卖问题,比如开200个线程进行抢购,抢100个…...

Hadoop 使用过程中 15 个常见问题的详细描述、解决方案
目录 问题 1:配置文件路径错误问题描述解决方案Python 实现 问题 2:YARN 资源配置不足问题描述解决方案Python 实现 问题 3:DataNode 无法启动问题描述解决方案Python 实现 问题 4:NameNode 格式化失败问题描述解决方案Python 实现…...

【Flutter 问题系列第 84 篇】如何清除指定网络图片的缓存
这是【Flutter 问题系列第 84 篇】,如果觉得有用的话,欢迎关注专栏。 博文当前所用 Flutter SDK:3.24.3、Dart SDK:3.5.3,网络图片缓存用的插件 cached_network_image: 3.4.1,缓存的网络图像的存储和检索用…...

【UE5】使用基元数据对材质传参,从而避免新建材质实例
在项目中,经常会遇到这样的需求:多个模型(例如 100 个)使用相同的材质,但每个模型需要不同的参数设置,比如不同的颜色或随机种子等。 在这种情况下,创建 100 个实例材质不是最佳选择。正确的做…...

鸿蒙动画开发07——粒子动画
1、概 述 粒子动画是在一定范围内随机生成的大量粒子产生运动而组成的动画。 动画元素是一个个粒子,这些粒子可以是圆点、图片。我们可以通过对粒子在颜色、透明度、大小、速度、加速度、自旋角度等维度变化做动画,来营造一种氛围感,比如下…...

IDEA2023 创建SpringBoot项目(一)
一、Spring Boot是由Pivotal团队提供的全新框架,其设计目的是用来简化新Spring应用的初始搭建以及开发过程。该框架使用了特定的方式来进行配置,从而使开发人员不再需要定义样板化的配置。 二、快速开发 1.打开IDEA选择 File->New->Project 2、…...

VSCode:终端打开一片空白,无cmd
第一步:找到右下角设置图标 第二步:找到 Terminal - Integrated - Default Profile: Windows: 选择一个本地存在的命令方式,重启即可 也可以直接在右下角直接选择...

Zea maize GO
1.涉及到新旧基因组的转化 B73v4_to_B73v5 (davidbioinformatics只支持新版基因组) MaizeGDB Map文件下载https://download.maizegdb.org/Pan-genes/B73_gene_xref/小处理脚本(制作map文件) import pandas as pd# 读取CSV文件 …...

Android开发实战班 - 数据持久化 - 数据加密与安全
在 Android 应用开发中,数据安全至关重要,尤其是在处理敏感信息(如用户密码、支付信息、个人隐私数据等)时。数据加密是保护数据安全的重要手段,可以有效防止数据泄露、篡改和未经授权的访问。本章节将介绍 Android 开…...

EDA实验设计-led灯管动态显示;VHDL;Quartus编程
EDA实验设计-led灯管动态显示;VHDL;Quartus编程 引脚配置实现代码RTL引脚展示现象记录效果展示 引脚配置 #------------------GLOBAL--------------------# set_global_assignment -name RESERVE_ALL_UNUSED_PINS "AS INPUT TRI-STATED" set_…...

Eclipse 查找功能深度解析
Eclipse 查找功能深度解析 Eclipse 是一款广受欢迎的集成开发环境(IDE),它为各种编程语言提供了强大的开发工具。在本文中,我们将深入探讨 Eclipse 的查找功能,这是开发者日常工作中不可或缺的一部分。无论是查找代码中的特定字符串,还是进行更复杂的搜索,如正则表达式…...

第三百二十九节 Java网络教程 - Java网络UDP套接字
Java网络教程 - Java网络UDP套接字 TCP套接字是面向连接的,基于流。基于UDP的套接字是无连接的,基于数据报。 使用UDP发送的数据块称为数据报或UDP数据包。每个UDP分组具有数据,目的地IP地址和目的地端口号。 无连接套接字在通信之前不建立…...
)
Leetcode215. 数组中的第K个最大元素(HOT100)
链接 第一次: class Solution { public:int findKthLargest(vector<int>& nums, int k) {sort(nums.begin(),nums.end());int n nums.size();return nums[n-k];} }; 这显然不能出现在面试中,因为面试官考察的不是这个。 正确的代码&#…...

QT与嵌入式——搭建串口
1、源码 由于我需要不止一个串口来进行数据交互,所以简单的封装了一下 void Usb_Init(QString portName, QSerialPort *Port) {Port->setPortName(portName);Port->setBaudRate(QSerialPort::Baud115200); // 设置波特率,根据你的开发板配置修改…...

Shell编程-6
声明:学习视频来自b站up主 泷羽sec,如涉及侵权马上删除文章 感谢泷羽sec 团队的教学 视频地址:shell(6)if条件判断与for循环结构_哔哩哔哩_bilibili 一、if条件判断 在Shell脚本中,if语句用于基于条件的评估来执行不同的代码块。…...

使用 Postman 设置 Bearer Token 进行身份验证
学习笔记 1. 打开 Postman 并创建新请求 打开 Postman。 在左上角点击 按钮,创建一个新的请求。 2. 选择 HTTP 方法 在请求类型(默认为 GET)旁边的下拉菜单中,选择你需要的 HTTP 方法,如 POST、GET、PUT 等。 3…...
)
Java 语言特性(面试系列2)
一、SQL 基础 1. 复杂查询 (1)连接查询(JOIN) 内连接(INNER JOIN):返回两表匹配的记录。 SELECT e.name, d.dept_name FROM employees e INNER JOIN departments d ON e.dept_id d.dept_id; 左…...

【杂谈】-递归进化:人工智能的自我改进与监管挑战
递归进化:人工智能的自我改进与监管挑战 文章目录 递归进化:人工智能的自我改进与监管挑战1、自我改进型人工智能的崛起2、人工智能如何挑战人类监管?3、确保人工智能受控的策略4、人类在人工智能发展中的角色5、平衡自主性与控制力6、总结与…...
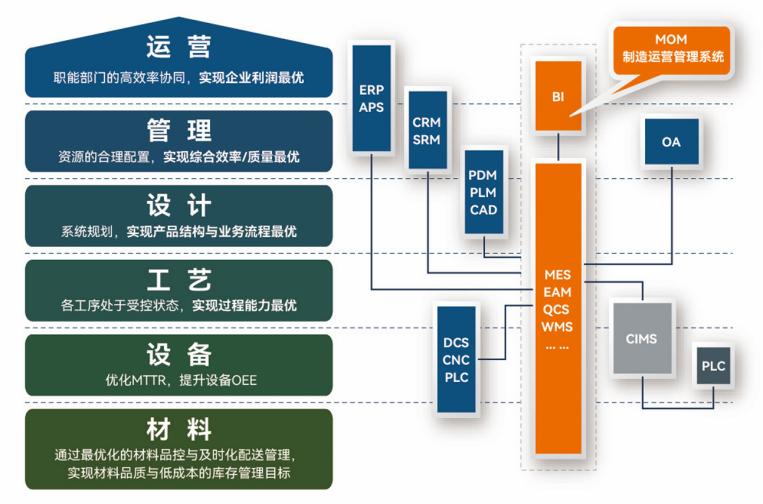
盘古信息PCB行业解决方案:以全域场景重构,激活智造新未来
一、破局:PCB行业的时代之问 在数字经济蓬勃发展的浪潮中,PCB(印制电路板)作为 “电子产品之母”,其重要性愈发凸显。随着 5G、人工智能等新兴技术的加速渗透,PCB行业面临着前所未有的挑战与机遇。产品迭代…...

以下是对华为 HarmonyOS NETX 5属性动画(ArkTS)文档的结构化整理,通过层级标题、表格和代码块提升可读性:
一、属性动画概述NETX 作用:实现组件通用属性的渐变过渡效果,提升用户体验。支持属性:width、height、backgroundColor、opacity、scale、rotate、translate等。注意事项: 布局类属性(如宽高)变化时&#…...
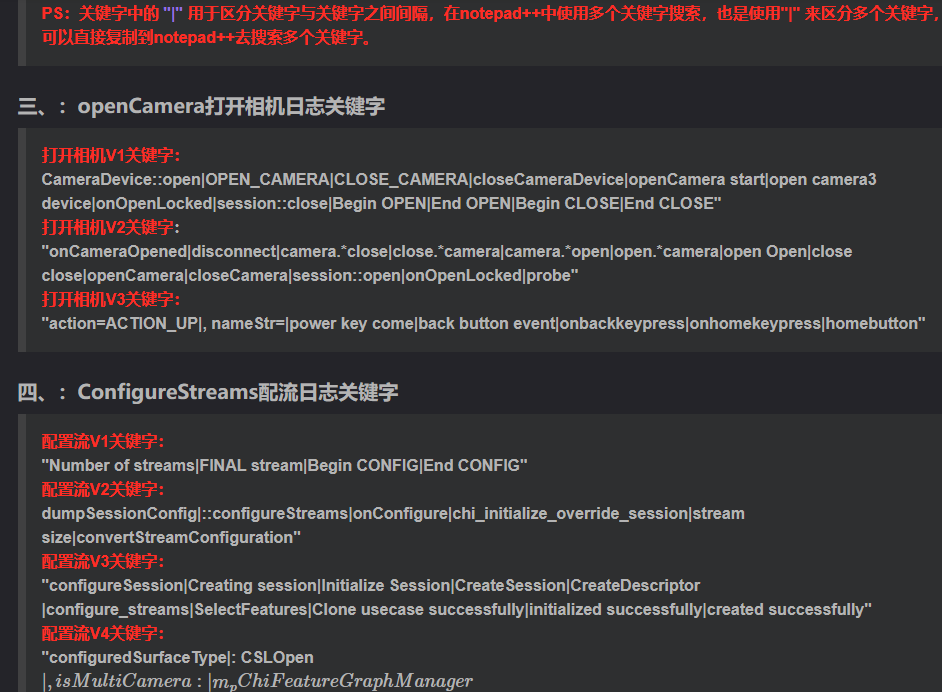
相机Camera日志实例分析之二:相机Camx【专业模式开启直方图拍照】单帧流程日志详解
【关注我,后续持续新增专题博文,谢谢!!!】 上一篇我们讲了: 这一篇我们开始讲: 目录 一、场景操作步骤 二、日志基础关键字分级如下 三、场景日志如下: 一、场景操作步骤 操作步…...
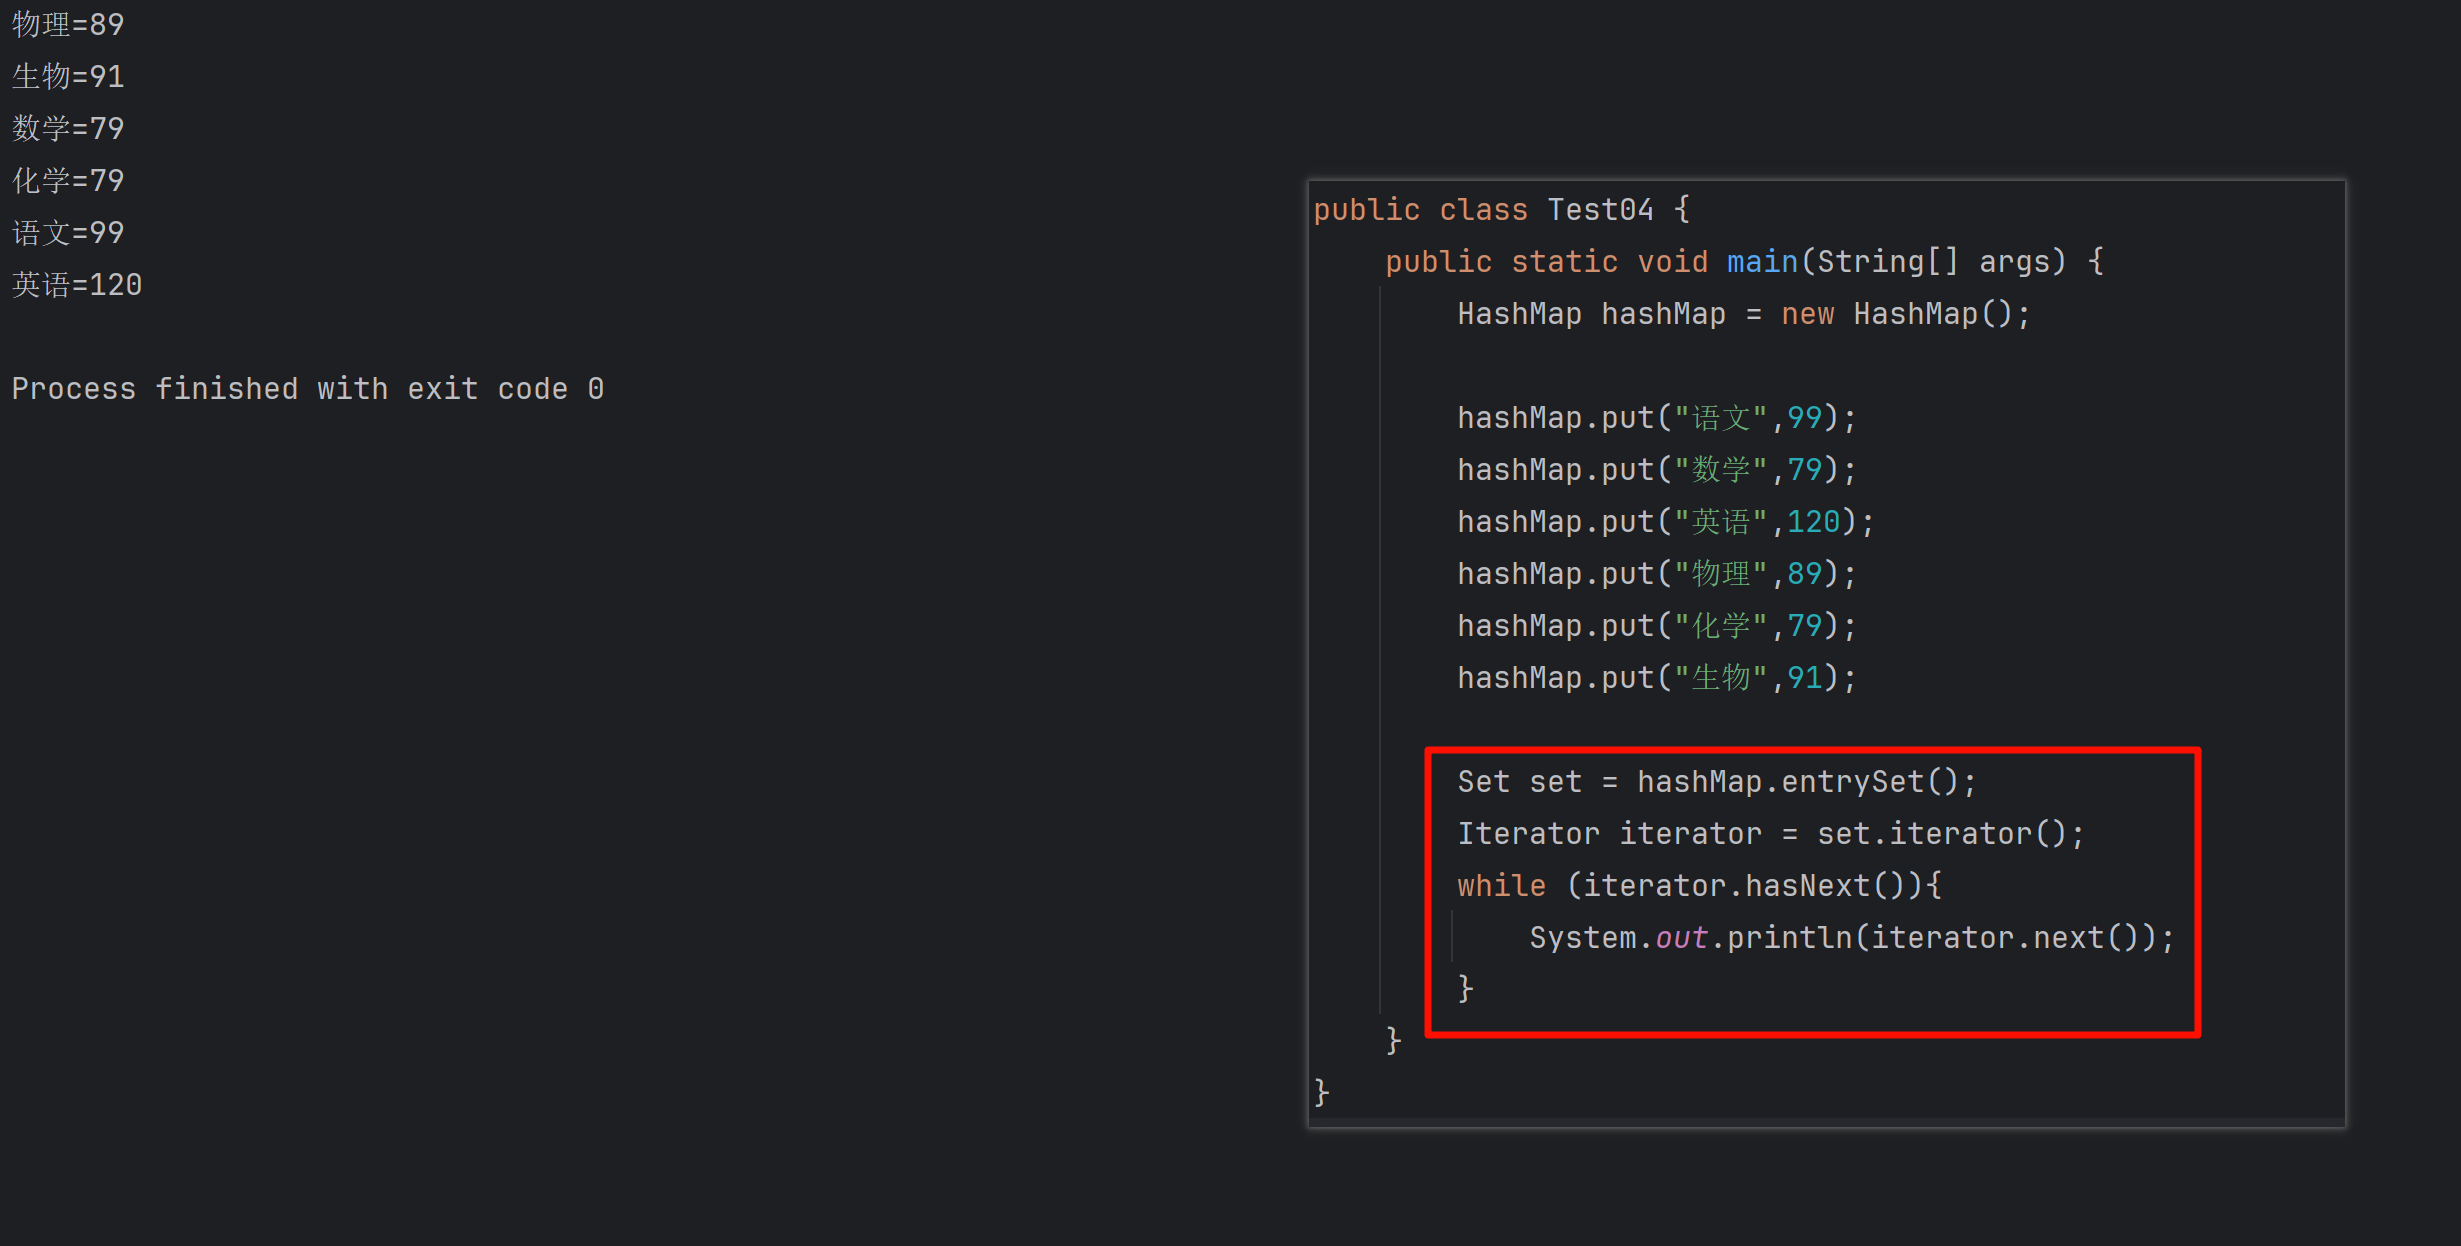
遍历 Map 类型集合的方法汇总
1 方法一 先用方法 keySet() 获取集合中的所有键。再通过 gey(key) 方法用对应键获取值 import java.util.HashMap; import java.util.Set;public class Test {public static void main(String[] args) {HashMap hashMap new HashMap();hashMap.put("语文",99);has…...
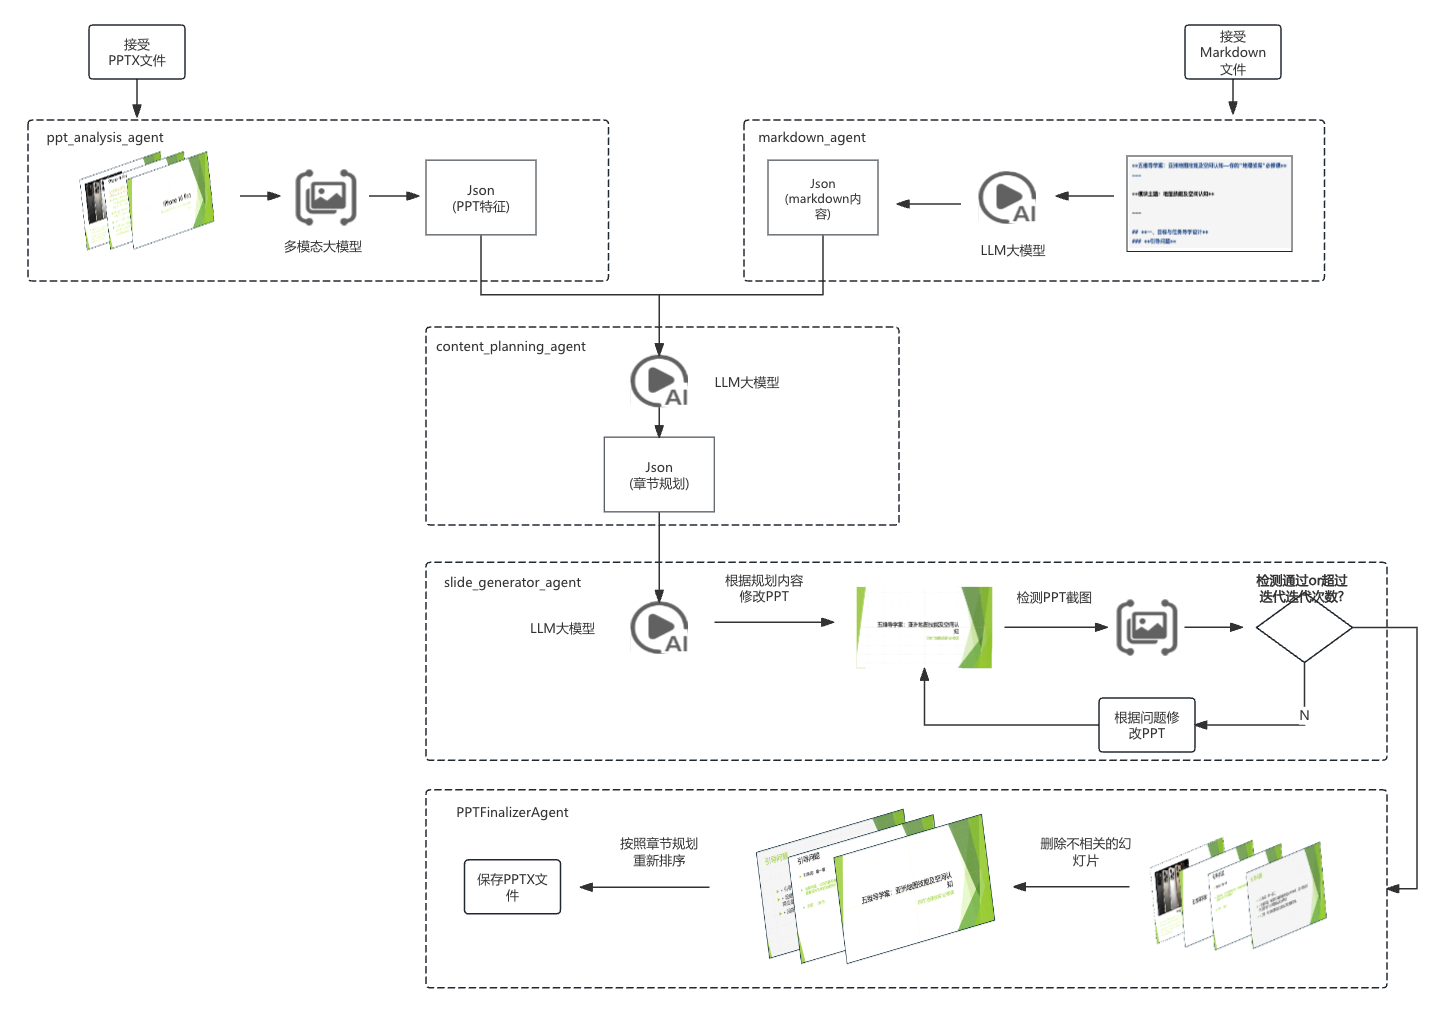
【项目实战】通过多模态+LangGraph实现PPT生成助手
PPT自动生成系统 基于LangGraph的PPT自动生成系统,可以将Markdown文档自动转换为PPT演示文稿。 功能特点 Markdown解析:自动解析Markdown文档结构PPT模板分析:分析PPT模板的布局和风格智能布局决策:匹配内容与合适的PPT布局自动…...

Robots.txt 文件
什么是robots.txt? robots.txt 是一个位于网站根目录下的文本文件(如:https://example.com/robots.txt),它用于指导网络爬虫(如搜索引擎的蜘蛛程序)如何抓取该网站的内容。这个文件遵循 Robots…...
)
安卓基础(aar)
重新设置java21的环境,临时设置 $env:JAVA_HOME "D:\Android Studio\jbr" 查看当前环境变量 JAVA_HOME 的值 echo $env:JAVA_HOME 构建ARR文件 ./gradlew :private-lib:assembleRelease 目录是这样的: MyApp/ ├── app/ …...
【电力电子】基于STM32F103C8T6单片机双极性SPWM逆变(硬件篇)
本项目是基于 STM32F103C8T6 微控制器的 SPWM(正弦脉宽调制)电源模块,能够生成可调频率和幅值的正弦波交流电源输出。该项目适用于逆变器、UPS电源、变频器等应用场景。 供电电源 输入电压采集 上图为本设计的电源电路,图中 D1 为二极管, 其目的是防止正负极电源反接, …...
