三:安装服务-controller node
一:工具、环境准备-controller node
二:OpenStack环境准备-controller node
三:安装服务-controller node
四:工具、环境准备-compute node
五:OpenStack环境准备-compute node
六:安装服务-compute node
七:仪表盘安装
文章目录
- Identity service – keystone installation
- 1)Install and configure
- a. 先准备 - 创建数据库
- b. 安装并配置组件
- c. 配置 Apache HTTP 服务器
- d. 完成安装
- 2)Create a domain, projects, users, and roles
- a. a formal way to create a new domain would be:
- b. Create the service project:
- c. creates the myproject project and myuser user:
- 3)Verify operation
- 4)Create OpenStack client environment scripts
- a. 创建脚本
- b. 使用脚本
- Image service – glance installation
- 1)Install and configure
- a. 先准备 - 创建数据库
- b. 安装并配置组件
- c. 完成安装
- Placement service – placement installation
- 1)Install and configure
- a. 先准备 - 创建数据库
- b. 配置用户和端点
- c. 安装并配置组件
- d. 完成安装
- 2)Verify Installation
- Compute service – nova installation
- 1)Install and configure
- a. 先准备 - 创建数据库
- b. 安装并配置组件
- c. 完成安装
- 2)Verify operation
- Networking service – neutron installation
- 1)Install and configure
- a. 先准备 - 创建数据库
- 2)配置 Provider networks
- a. 安装组件:
- b. 配置服务器组件
- c. 配置 Modular Layer 2 (ML2) plug-in
- d. 配置 Open vSwitch agent
- e. 配置 DHCP agent
- 1)Install and configure
- b. 配置 metadata agent
- c. 配置计算服务去使用网络服务
- d. 完成安装
官方指导手册:
Install OpenStack services
At a minimum, you need to install the following services. Install the services in the order specified below:
- Identity service> Image service
- Placement service
- Compute service
- Networking service
- 切换至超级用户模式:
执行指令:
sudo su
Identity service – keystone installation
1)Install and configure
a. 先准备 - 创建数据库
mysql
CREATE DATABASE keystone;
GRANT ALL PRIVILEGES ON keystone.* TO 'keystone'@'localhost' IDENTIFIED BY '123456';
GRANT ALL PRIVILEGES ON keystone.* TO 'keystone'@'%' IDENTIFIED BY '123456';
EXIT;
123456是创建的数据库 keystone 的密码
名为 KEYSTONE_DBPASS
b. 安装并配置组件
-
- 安装软件包
执行指令:
apt install keystone -y
-
- 编辑文件
执行指令:
vim /etc/keystone/keystone.conf
修改 [database] 的内容:
[database]
connection = mysql+pymysql://keystone:123456@controller/keystone
123456是数据库 keystone 的密码
名为 KEYSTONE_DBPASS
修改 [token] 的内容:
[token]
provider = fernet
-
- 填充身份认证服务数据库
执行指令:
su -s /bin/sh -c "keystone-manage db_sync" keystone
-
- 初始化 Fernet 密钥库
执行指令:
keystone-manage fernet_setup --keystone-user keystone --keystone-group keystone
keystone-manage credential_setup --keystone-user keystone --keystone-group keystone
-
- 引导身份认证服务
执行指令:
keystone-manage bootstrap --bootstrap-password 123456 \--bootstrap-admin-url http://controller:5000/v3/ \--bootstrap-internal-url http://controller:5000/v3/ \--bootstrap-public-url http://controller:5000/v3/ \--bootstrap-region-id RegionOne
123456是为 Keystone 的管理员用户设置的密码,
名为 ADMIN_PASS
若是想修改密码,则修改指令中的密码后再执行一遍,则修改成功
c. 配置 Apache HTTP 服务器
- 编辑文件
执行指令:
vim /etc/apache2/apache2.conf
添加以下内容:
ServerName controller
d. 完成安装
-
- 重启 Apache 服务器
执行指令:
service apache2 restart
-
- 设置适当的环境变量配置管理账户
执行指令:
export OS_USERNAME=admin
export OS_PASSWORD=123456
export OS_PROJECT_NAME=admin
export OS_USER_DOMAIN_NAME=Default
export OS_PROJECT_DOMAIN_NAME=Default
export OS_AUTH_URL=http://controller:5000/v3
export OS_IDENTITY_API_VERSION=3
123456是为管理员用户密码,
即上面b. 安装并配置组件中的- 5. 引导身份认证服务中设置的密码
名为 ADMIN_PASS
2)Create a domain, projects, users, and roles
创建域、项目、用户、角色
a. a formal way to create a new domain would be:
虽然已存在 default 域,但有必要给大家看一下创建新 域 的方法:
- 创建
example域
执行指令:
openstack domain create --description "An Example Domain" example
报错:
root@controller[16:00:36]:/home/cbz# openstack domain create --description "An Example Domain" example
The request you have made requires authentication. (HTTP 401) (Request-ID: req-88316b44-39c2-466e-ab3f-98e55e38dbc4)
这种报错就是密码填错,即上面
d. 完成安装中的- 2.设置适当的环境变量配置管理账户中密码设置错误
应该是上面b. 安装并配置组件中的- 5. 引导身份认证服务中设置的密码
可以修改密码后,重新执行export OS_PASSWORD=123456以更正密码
正常输出应该是:
root@controller[16:03:02]:/home/cbz# openstack domain create --description "An Example Domain" example
+-------------+----------------------------------+
| Field       | Value                            |
+-------------+----------------------------------+
| description | An Example Domain                |
| enabled     | True                             |
| id          | eba741af628c4d6896d945ab1770ef66 |
| name        | example                          |
| options     | {}                               |
| tags        | []                               |
+-------------+----------------------------------+
b. Create the service project:
- 创建
service项目
执行指令:
openstack project create --domain default --description "Service Project" service
输出示例:
root@controller[16:03:10]:/home/cbz# openstack project create --domain default --description "Service Project" service
+-------------+----------------------------------+
| Field       | Value                            |
+-------------+----------------------------------+
| description | Service Project                  |
| domain_id   | default                          |
| enabled     | True                             |
| id          | 576e3951211243298fb79e5f28d1f52d |
| is_domain   | False                            |
| name        | service                          |
| options     | {}                               |
| parent_id   | default                          |
| tags        | []                               |
+-------------+----------------------------------+
c. creates the myproject project and myuser user:
常规(非管理员)任务应使用无权限项目和用户。例如,本指南创建了 myproject 项目和 myuser 用户。
-
- 创建
myproject项目
- 创建
执行指令:
openstack project create --domain default --description "Demo Project" myproject
输出示例:
root@controller[00:12:34]:/home/cbz# openstack project create --domain default --description "Demo Project" myproject+-------------+----------------------------------+
| Field       | Value                            |
+-------------+----------------------------------+
| description | Demo Project                     |
| domain_id   | default                          |
| enabled     | True                             |
| id          | 63c7e4891938403e8180e0d67420aac8 |
| is_domain   | False                            |
| name        | myproject                        |
| options     | {}                               |
| parent_id   | default                          |
| tags        | []                               |
+-------------+----------------------------------+
注意:为该项目创建其他用户时,请勿重复此步骤。
-
- 创建
myuser用户
- 创建
执行指令:
openstack user create --domain default --password-prompt myuser
输出示例:
root@controller[00:13:13]:/home/cbz# openstack user create --domain default --password-prompt myuserUser Password:
Repeat User Password:
+---------------------+----------------------------------+
| Field               | Value                            |
+---------------------+----------------------------------+
| domain_id           | default                          |
| enabled             | True                             |
| id                  | 24e175ee7479427cb61b0fbc366215b0 |
| name                | myuser                           |
| options             | {}                               |
| password_expires_at | None                             |
+---------------------+----------------------------------+
创建 myuser 用户并为其设置密码
123456
-
- 创建
myrole角色
- 创建
执行指令:
openstack role create myrole
输出示例:
root@controller[00:14:11]:/home/cbz# openstack role create myrole
+-------------+----------------------------------+
| Field       | Value                            |
+-------------+----------------------------------+
| description | None                             |
| domain_id   | None                             |
| id          | 0f94d52860e1407f86e1ca0ae57493e9 |
| name        | myrole                           |
| options     | {}                               |
+-------------+----------------------------------+-
- 添加
myrole到项目myproject、用户myuser
- 添加
执行指令:
openstack role add --project myproject --user myuser myrole
当前指令没有输出
3)Verify operation
-
- 注销临时环境变量 OS_AUTH_URL 和 OS_PASSWORD
执行指令:
unset OS_AUTH_URL OS_PASSWORD
-
- 以 admin 用户申请身份验证令牌
执行指令:
openstack --os-auth-url http://controller:5000/v3 \--os-project-domain-name Default --os-user-domain-name Default \--os-project-name admin --os-username admin token issue
输出:
root@controller[00:18:01]:/home/cbz# openstack --os-auth-url http://controller:5000/v3 \
>   --os-project-domain-name Default --os-user-domain-name Default \
>   --os-project-name admin --os-username admin token issue
Password:
+------------+-----------------------------------------------------------------------------------------------------------------------------------------------------------------------------------------+
| Field      | Value                                                                                                                                                                                   |
+------------+-----------------------------------------------------------------------------------------------------------------------------------------------------------------------------------------+
| expires    | 2024-11-30T17:18:09+0000                                                                                                                                                                |
| id         | gAAAAABnSzrBaZUJwnDubg9l_iUP551xDqUy30Xc_6_PP5q_JWTwNdr8ONYY1XO2-A10l-afVckoTUbqzBMTt9Y-RvJfRXKtBeyxrW9BLPrcbrlrgAsxMOb7JpOfhyIYwZV4CuPL650jqqxVpC0g4hkUcvIX4yr9B-bZ2o_IF195wAsqtbP-JxA |
| project_id | d241a7b2af4d44bcb018f1d52a28a1d2                                                                                                                                                        |
| user_id    | 8d12b000481c49c8aa8a6a3d10037aa8                                                                                                                                                        |
+------------+-----------------------------------------------------------------------------------------------------------------------------------------------------------------------------------------+
密码为上面
Identity service – keystone installation中的1)Install and configure中的b. 安装并配置组件中的- 5. 引导身份认证服务中设置的密码
当然,如果全部密码都统一设置为
123456的话,不必理会
-
- 以 myuser 用户申请身份验证令牌
执行指令:
openstack --os-auth-url http://controller:5000/v3 \--os-project-domain-name Default --os-user-domain-name Default \--os-project-name myproject --os-username myuser token issue
输出示例:
root@controller[00:21:48]:/home/cbz# openstack --os-auth-url http://controller:5000/v3 \
>   --os-project-domain-name Default --os-user-domain-name Default \
>   --os-project-name myproject --os-username myuser token issue
Password:
+------------+-----------------------------------------------------------------------------------------------------------------------------------------------------------------------------------------+
| Field      | Value                                                                                                                                                                                   |
+------------+-----------------------------------------------------------------------------------------------------------------------------------------------------------------------------------------+
| expires    | 2024-11-30T17:22:03+0000                                                                                                                                                                |
| id         | gAAAAABnSzurHvYIsKRqmK4OMo5tunK28wlMQS2oDH61k-r5KJ99TDejjlgx7qavkw2QogsajexU-8gqhrEkCg80oFCnxksXjGUnlbSBFh-MXxSSRgur3BNMvsDHEjAWOklWBU2JZlqx1kVqjWVGbMMn2UvaCTKeo-IBhA1AEeKnHwvgyrDYbbg |
| project_id | 63c7e4891938403e8180e0d67420aac8                                                                                                                                                        |
| user_id    | 24e175ee7479427cb61b0fbc366215b0                                                                                                                                                        |
+------------+-----------------------------------------------------------------------------------------------------------------------------------------------------------------------------------------+
输入上面创建的用户
myuser的密码
当然,如果全部密码都统一设置为
123456的话,不必理会
报错:
root@controller[00:18:09]:/home/cbz# openstack --os-auth-url http://controller:5000/v3 \
>   --os-project-domain-name Default --os-user-domain-name Default \
>   --os-project-name myproject --os-username myuser token issue
Password:
The request you have made requires authentication. (HTTP 401) (Request-ID: req-1aa5cb9b-995a-4077-a453-703cd4b15594)
密码输错了!!!
4)Create OpenStack client environment scripts
a. 创建脚本
-
- 创建并编辑
admin-openrc文件
- 创建并编辑
执行指令:
vim ~/admin-openrc
进入一个新文件!!!
注意是创建在 ~/ 目录下!!!
添加以下内容:
export OS_PROJECT_DOMAIN_NAME=Default
export OS_USER_DOMAIN_NAME=Default
export OS_PROJECT_NAME=admin
export OS_USERNAME=admin
export OS_PASSWORD=123456
export OS_AUTH_URL=http://controller:5000/v3
export OS_IDENTITY_API_VERSION=3
export OS_IMAGE_API_VERSION=2
123456是为管理员用户密码,
即上面b. 安装并配置组件中的- 5. 引导身份认证服务中设置的密码
名为 ADMIN_PASS
-
- 创建并编辑
demo-openrc文件
- 创建并编辑
执行指令:
vim ~/demo-openrc
添加以下内容:
export OS_PROJECT_DOMAIN_NAME=Default
export OS_USER_DOMAIN_NAME=Default
export OS_PROJECT_NAME=myproject
export OS_USERNAME=myuser
export OS_PASSWORD=123456
export OS_AUTH_URL=http://controller:5000/v3
export OS_IDENTITY_API_VERSION=3
export OS_IMAGE_API_VERSION=2
123456是为用户 myuser 的密码,
名为 DEMO_PASS
b. 使用脚本
-
- 加载 admin-openrc 文件
执行指令:
cd ~/
. admin-openrc
报错:
root@controller[00:27:50]:/home/cbz# . admin-openrc
bash: admin-openrc: No such file or directory
这种情况是未将目录跳转到 ’~/‘中,
须要执行cd ~/
-
- 申请身份验证令牌
执行指令:
openstack token issue
输出示例:
root@controller[00:32:39]:~# openstack token issue
+------------+-----------------------------------------------------------------------------------------------------------------------------------------------------------------------------------------+
| Field      | Value                                                                                                                                                                                   |
+------------+-----------------------------------------------------------------------------------------------------------------------------------------------------------------------------------------+
| expires    | 2024-11-30T17:32:42+0000                                                                                                                                                                |
| id         | gAAAAABnSz4q02THl5sazdWvLw09HeUGK8-Rq65UrH24rzQzMdEMvnzuPWrS7aeVQHp0FKUHDwlm-LUzQH3ROUCsdl00vgYQ8t7uT510MyT2LRX_c8WKt4F1Umo32suxgwYIdKr5xb2t2CN0e-OOgKLgDcOijUA0a54k2MSxgyFKXSUvwLMa-6g |
| project_id | d241a7b2af4d44bcb018f1d52a28a1d2                                                                                                                                                        |
| user_id    | 8d12b000481c49c8aa8a6a3d10037aa8                                                                                                                                                        |
+------------+-----------------------------------------------------------------------------------------------------------------------------------------------------------------------------------------+
报错:
root@controller[00:31:45]:~# openstack token issue
The request you have made requires authentication. (HTTP 401) (Request-ID: req-983ef1a8-88b6-4821-9ab9-05c72a5a81e8)
密码没设置对!!!
密码为上面
Identity service – keystone installation中的1)Install and configure中的b. 安装并配置组件中的- 5. 引导身份认证服务中设置的密码
当然,如果全部密码都统一设置为
123456的话,不必理会
Image service – glance installation
1)Install and configure
a. 先准备 - 创建数据库
-
- 创建数据库
执行指令:
mysql
执行 mysql 指令:
CREATE DATABASE glance;
GRANT ALL PRIVILEGES ON glance.* TO 'glance'@'localhost' IDENTIFIED BY '123456';
GRANT ALL PRIVILEGES ON glance.* TO 'glance'@'%' IDENTIFIED BY '123456';
EXIT;
123456是创建的数据库 glance 的密码
名为 GLANCE_DBPASS
-
- 加载 admin-openrc 文件
执行指令:
. admin-openrc
-
- 创建
glance用户
- 创建
执行指令:
openstack user create --domain default --password-prompt glance
输出示例:
root@controller[01:00:52]:~# openstack user create --domain default --password-prompt glance
User Password:123456
Repeat User Password:123456
+---------------------+----------------------------------+
| Field               | Value                            |
+---------------------+----------------------------------+
| domain_id           | default                          |
| enabled             | True                             |
| id                  | 5e6cf17e4c8a40b798ee97f57ac86314 |
| name                | glance                           |
| options             | {}                               |
| password_expires_at | None                             |
+---------------------+----------------------------------+
创建用户 glance 并为其设置密码
123456
-
- 添加
admin角色到glance用户、service项目中
- 添加
执行指令:
openstack role add --project service --user glance admin
此指令没有输出
-
- 创建 glance 服务实例
执行指令:
openstack service create --name glance --description "OpenStack Image" image
输出示例:
root@controller[01:04:06]:~# openstack service create --name glance --description "OpenStack Image" image
+-------------+----------------------------------+
| Field       | Value                            |
+-------------+----------------------------------+
| description | OpenStack Image                  |
| enabled     | True                             |
| id          | 1567a217dd2540d5b75e1a16c70b2b75 |
| name        | glance                           |
| type        | image                            |
+-------------+----------------------------------+
-
- 创建镜像服务 API 端点:
执行指令:
openstack endpoint create --region RegionOne image public http://controller:9292
openstack endpoint create --region RegionOne image internal http://controller:9292
openstack endpoint create --region RegionOne image admin http://controller:9292
输出示例:
root@controller[01:04:16]:~# openstack endpoint create --region RegionOne image public http://controller:9292
+--------------+----------------------------------+
| Field        | Value                            |
+--------------+----------------------------------+
| enabled      | True                             |
| id           | 4acbef3ff8544fe9b0efcea016dfb04f |
| interface    | public                           |
| region       | RegionOne                        |
| region_id    | RegionOne                        |
| service_id   | 1567a217dd2540d5b75e1a16c70b2b75 |
| service_name | glance                           |
| service_type | image                            |
| url          | http://controller:9292           |
+--------------+----------------------------------+
root@controller[01:04:35]:~# openstack endpoint create --region RegionOne image internal http://controller:9292
+--------------+----------------------------------+
| Field        | Value                            |
+--------------+----------------------------------+
| enabled      | True                             |
| id           | 79efda062d24421fa2058db675a1b2df |
| interface    | internal                         |
| region       | RegionOne                        |
| region_id    | RegionOne                        |
| service_id   | 1567a217dd2540d5b75e1a16c70b2b75 |
| service_name | glance                           |
| service_type | image                            |
| url          | http://controller:9292           |
+--------------+----------------------------------+
root@controller[01:04:36]:~# openstack endpoint create --region RegionOne image admin http://controller:9292
+--------------+----------------------------------+
| Field        | Value                            |
+--------------+----------------------------------+
| enabled      | True                             |
| id           | f905f7f870494fffa2bf32e5465a8830 |
| interface    | admin                            |
| region       | RegionOne                        |
| region_id    | RegionOne                        |
| service_id   | 1567a217dd2540d5b75e1a16c70b2b75 |
| service_name | glance                           |
| service_type | image                            |
| url          | http://controller:9292           |
+--------------+----------------------------------+
b. 安装并配置组件
-
- 安装软件包
执行指令:
apt install glance -y
-
- 编辑文件
执行指令:
vim /etc/glance/glance-api.conf
在 [database] 中添加以下内容:
[database]
connection = mysql+pymysql://glance:123456@controller/glance
123456是数据库 glance 的密码,
名为 GLANCE_DBPASS
将 [keystone_authtoken] 中的其他所有选项都给注释掉,再添加以下内容:
[keystone_authtoken]
www_authenticate_uri = http://controller:5000
auth_url = http://controller:5000
memcached_servers = controller:11211
auth_type = password
project_domain_name = Default
user_domain_name = Default
project_name = service
username = glance
password = 123456
123456是用户 glance 的密码,
名为 GLANCE_PASS
在 [paste_deploy] 中添加以下内容:
[paste_deploy]
flavor = keystone
在 [glance_store] 中添加以下内容:
[glance_store]
stores = file,http
default_store = file
filesystem_store_datadir = /var/lib/glance/images/
在 [paste_deploy] 中添加以下内容:
[oslo_limit]
auth_url = http://controller:5000
auth_type = password
user_domain_id = default
username = glance
system_scope = all
password = 123456
endpoint_id = 340be3625e9b4239a6415d034e98aace
region_name = RegionOne
123456是用户 glance 的密码,
名为 GLANCE_PASS
若没有对应的 [paste_deploy] 节段,则手动添加,也就是将上面这段包括 [paste_deploy] 的内容全粘贴到文件中
-
- 填充镜像服务数据库:
执行指令:
su -s /bin/sh -c "glance-manage db_sync" glance
输出:
root@controller[01:21:18]:~# su -s /bin/sh -c "glance-manage db_sync" glance
2024-12-01 01:21:28.473 30852 INFO alembic.runtime.migration [-] Context impl MySQLImpl.
2024-12-01 01:21:28.474 30852 INFO alembic.runtime.migration [-] Will assume non-transactional DDL.
2024-12-01 01:21:28.479 30852 INFO alembic.runtime.migration [-] Context impl MySQLImpl.
2024-12-01 01:21:28.480 30852 INFO alembic.runtime.migration [-] Will assume non-transactional DDL.
INFO  [alembic.runtime.migration] Context impl MySQLImpl.
INFO  [alembic.runtime.migration] Will assume non-transactional DDL.
/usr/lib/python3/dist-packages/pymysql/cursors.py:170: Warning: (1280, "Name 'alembic_version_pkc' ignored for PRIMARY key.")result = self._query(query)
INFO  [alembic.runtime.migration] Running upgrade  -> liberty, liberty initial
INFO  [alembic.runtime.migration] Running upgrade liberty -> mitaka01, add index on created_at and updated_at columns of 'images' table
INFO  [alembic.runtime.migration] Running upgrade mitaka01 -> mitaka02, update metadef os_nova_server
INFO  [alembic.runtime.migration] Running upgrade mitaka02 -> ocata_expand01, add visibility to images
INFO  [alembic.runtime.migration] Running upgrade ocata_expand01 -> pike_expand01, empty expand for symmetry with pike_contract01
INFO  [alembic.runtime.migration] Running upgrade pike_expand01 -> queens_expand01
INFO  [alembic.runtime.migration] Running upgrade queens_expand01 -> rocky_expand01, add os_hidden column to images table
INFO  [alembic.runtime.migration] Running upgrade rocky_expand01 -> rocky_expand02, add os_hash_algo and os_hash_value columns to images table
INFO  [alembic.runtime.migration] Running upgrade rocky_expand02 -> train_expand01, empty expand for symmetry with train_contract01
INFO  [alembic.runtime.migration] Running upgrade train_expand01 -> ussuri_expand01, empty expand for symmetry with ussuri_expand01
INFO  [alembic.runtime.migration] Context impl MySQLImpl.
INFO  [alembic.runtime.migration] Will assume non-transactional DDL.
Upgraded database to: ussuri_expand01, current revision(s): ussuri_expand01
INFO  [alembic.runtime.migration] Context impl MySQLImpl.
INFO  [alembic.runtime.migration] Will assume non-transactional DDL.
INFO  [alembic.runtime.migration] Context impl MySQLImpl.
INFO  [alembic.runtime.migration] Will assume non-transactional DDL.
Database migration is up to date. No migration needed.
INFO  [alembic.runtime.migration] Context impl MySQLImpl.
INFO  [alembic.runtime.migration] Will assume non-transactional DDL.
INFO  [alembic.runtime.migration] Context impl MySQLImpl.
INFO  [alembic.runtime.migration] Will assume non-transactional DDL.
INFO  [alembic.runtime.migration] Running upgrade mitaka02 -> ocata_contract01, remove is_public from images
INFO  [alembic.runtime.migration] Running upgrade ocata_contract01 -> pike_contract01, drop glare artifacts tables
INFO  [alembic.runtime.migration] Running upgrade pike_contract01 -> queens_contract01
INFO  [alembic.runtime.migration] Running upgrade queens_contract01 -> rocky_contract01
INFO  [alembic.runtime.migration] Running upgrade rocky_contract01 -> rocky_contract02
INFO  [alembic.runtime.migration] Running upgrade rocky_contract02 -> train_contract01
INFO  [alembic.runtime.migration] Running upgrade train_contract01 -> ussuri_contract01
INFO  [alembic.runtime.migration] Context impl MySQLImpl.
INFO  [alembic.runtime.migration] Will assume non-transactional DDL.
Upgraded database to: ussuri_contract01, current revision(s): ussuri_contract01
INFO  [alembic.runtime.migration] Context impl MySQLImpl.
INFO  [alembic.runtime.migration] Will assume non-transactional DDL.
Database is synced successfully.
c. 完成安装
- 重启镜像服务:
执行指令:
service glance-api restart
没有输出
## 2)Verify operation
以下这段 Verify operation 的内容作验证作用,可不执行!!!!!!!
跳过跳过跳过 这一步
-
- 加载 admin-openrc 文件:
执行指令:
. admin-openrc
-
- 下载源镜像:
执行指令:
wget https://github.com/cirros-dev/cirros/releases/download/0.4.0/cirros-0.4.0-x86_64-disk.img -O cirros-0.4.0-x86_64-disk.img
-
- 将镜像上传到镜像服务
执行指令:
glance image-create --name "cirros" --file cirros-0.4.0-x86_64-disk.img --disk-format qcow2 --container-format bare --visibility=public
输出示例:
$ glance image-create --name "cirros" \--file cirros-0.4.0-x86_64-disk.img \--disk-format qcow2 --container-format bare \--visibility=public+------------------+------------------------------------------------------+
| Field            | Value                                                |
+------------------+------------------------------------------------------+
| checksum         | 133eae9fb1c98f45894a4e60d8736619                     |
| container_format | bare                                                 |
| created_at       | 2015-03-26T16:52:10Z                                 |
| disk_format      | qcow2                                                |
| file             | /v2/images/cc5c6982-4910-471e-b864-1098015901b5/file |
| id               | cc5c6982-4910-471e-b864-1098015901b5                 |
| min_disk         | 0                                                    |
| min_ram          | 0                                                    |
| name             | cirros                                               |
| owner            | ae7a98326b9c455588edd2656d723b9d                     |
| protected        | False                                                |
| schema           | /v2/schemas/image                                    |
| size             | 13200896                                             |
| status           | active                                               |
| tags             |                                                      |
| updated_at       | 2015-03-26T16:52:10Z                                 |
| virtual_size     | None                                                 |
| visibility       | public                                               |
+------------------+------------------------------------------------------+
-
- 确认上传图像并验证属性
执行指令:
glance image-list
输出示例:
$ glance image-list+--------------------------------------+--------+--------+
| ID                                   | Name   | Status |
+--------------------------------------+--------+--------+
| 38047887-61a7-41ea-9b49-27987d5e8bb9 | cirros | active |
+--------------------------------------+--------+--------+
Placement service – placement installation
1)Install and configure
a. 先准备 - 创建数据库
- 创建数据库
执行指令:
mysql
执行 mysql 指令:
CREATE DATABASE placement;
GRANT ALL PRIVILEGES ON placement.* TO 'placement'@'localhost' IDENTIFIED BY '123456';
GRANT ALL PRIVILEGES ON placement.* TO 'placement'@'%' IDENTIFIED BY '123456';
EXIT;
123456是创建的数据库 glance 的密码
名为 PLACEMENT_DBPASS
b. 配置用户和端点
-
- 加载 admin-openrc 文件
执行指令:
. admin-openrc
-
- 创建
placement服务用户:
- 创建
执行指令:
openstack user create --domain default --password-prompt placement
输出示例:
root@controller[01:25:56]:~# openstack user create --domain default --password-prompt placement
User Password:
Repeat User Password:
+---------------------+----------------------------------+
| Field               | Value                            |
+---------------------+----------------------------------+
| domain_id           | default                          |
| enabled             | True                             |
| id                  | 5408f1094e174b549f5dbeee81640870 |
| name                | placement                        |
| options             | {}                               |
| password_expires_at | None                             |
+---------------------+----------------------------------+
创建用户 placement 并为其设置密码
123456
-
- 添加
placement用户到service项目、admin角色中
- 添加
执行指令:
openstack role add --project service --user placement admin
此指令没有输出
-
- 创建 Placement API 实例
执行指令:
openstack service create --name placement --description "Placement API" placement
输出示例:
root@controller[01:28:40]:~# openstack service create --name placement --description "Placement API" placement
+-------------+----------------------------------+
| Field       | Value                            |
+-------------+----------------------------------+
| description | Placement API                    |
| enabled     | True                             |
| id          | a56358f3e45e4410a7f71f49d036b72c |
| name        | placement                        |
| type        | placement                        |
+-------------+----------------------------------+
-
- 创建 Placement API 服务端点
执行指令:
openstack endpoint create --region RegionOne placement public http://controller:8778
openstack endpoint create --region RegionOne placement internal http://controller:8778
openstack endpoint create --region RegionOne placement admin http://controller:8778
输出示例:
root@controller[01:28:59]:~# openstack endpoint create --region RegionOne placement public http://controller:8778
+--------------+----------------------------------+
| Field        | Value                            |
+--------------+----------------------------------+
| enabled      | True                             |
| id           | 6445ffb85a8a41f08779e0347a572e3a |
| interface    | public                           |
| region       | RegionOne                        |
| region_id    | RegionOne                        |
| service_id   | a56358f3e45e4410a7f71f49d036b72c |
| service_name | placement                        |
| service_type | placement                        |
| url          | http://controller:8778           |
+--------------+----------------------------------+
root@controller[01:30:30]:~# openstack endpoint create --region RegionOne placement internal http://controller:8778
+--------------+----------------------------------+
| Field        | Value                            |
+--------------+----------------------------------+
| enabled      | True                             |
| id           | 89eef2ded4644079a922bb4b63b7d0f7 |
| interface    | internal                         |
| region       | RegionOne                        |
| region_id    | RegionOne                        |
| service_id   | a56358f3e45e4410a7f71f49d036b72c |
| service_name | placement                        |
| service_type 聼 placement                        |
| url          | http://controller:8778           |
+--------------+----------------------------------+
root@controller[01:30:31]:~# openstack endpoint create --region RegionOne placement admin http://controller:8778
+--------------+----------------------------------+
| Field        | Value                            |
+--------------+----------------------------------+
| enabled      | True                             |
| id           | 7feb3d722a2045c6bbcae3977d093662 |
| interface    | admin                            |
| region       | RegionOne                        |
| region_id    | RegionOne                        |
| service_id   | a56358f3e45e4410a7f71f49d036b72c |
| service_name | placement                        |
| service_type | placement                        |
| url          | http://controller:8778           |
+--------------+----------------------------------+
c. 安装并配置组件
-
- 安装软件包
执行指令:
apt install placement-api -y
-
- 编辑文件
执行指令:
vim /etc/placement/placement.conf
在 [placement_database] 中添加以下内容:
[placement_database]
connection = mysql+pymysql://placement:123456@controller/placement
123456是数据库 placement 的密码,
名为 PLACEMENT_DBPASS
在 [api] 中添加以下内容:
[api]
auth_strategy = keystone
将 [keystone_authtoken] 中的其他所有选项都给注释掉,再添加以下内容:
[keystone_authtoken]
auth_url = http://controller:5000/v3
memcached_servers = controller:11211
auth_type = password
project_domain_name = Default
user_domain_name = Default
project_name = service
username = placement
password = 123456
123456是用户 placement 的密码,
名为 PLACEMENT_PASS
-
- 填充 placement 数据库:
执行指令:
su -s /bin/sh -c "placement-manage db sync" placement
此指令没有输出
报错:
root@controller[01:41:08]:~# su -s /bin/sh -c "placement-manage db sync" placement
/usr/lib/python3/dist-packages/pymysql/cursors.py:170: Warning: (1280, "Name 'alembic_version_pkc' ignored for PRIMARY key.")result = self._query(query)
该警告是由于数据库迁移脚本在执行时尝试设置主键,而数据库中已经有一个主键。
尽管有警告,数据库迁移可能已经成功。可以通过以下命令验证:
执行指令:
placement-manage db version
如果返回最新的数据库版本号,则说明迁移成功。如:
root@controller[01:41:24]:~# placement-manage db version
b5c396305c25
d. 完成安装
- 重新加载 web 服务器
执行指令:
service apache2 restart
2)Verify Installation
-
- 加载 admin-openrc 文件
执行指令:
. admin-openrc
-
- 检查执行状态
执行指令:
placement-status upgrade check
输出示例:
root@controller[01:47:38]:~# placement-status upgrade check
+----------------------------------+
| Upgrade Check Results            |
+----------------------------------+
| Check: Missing Root Provider IDs |
| Result: Success                  |
| Details: None                    |
+----------------------------------+
| Check: Incomplete Consumers      |
| Result: Success                  |
| Details: None                    |
+----------------------------------+
-
- 安装 osc-placement 插件
执行指令:
apt install pip3 -y
pip3 install osc-placement
报错则使用
apt install pip -y
apt install pip -y
pip install osc-placement
-
- 列出可用的资源类别和特性
执行指令:
openstack --os-placement-api-version 1.2 resource class list --sort-column name
输出示例:
root@controller[01:49:48]:~# openstack --os-placement-api-version 1.2 resource class list --sort-column name
+----------------------------+
| name                       |
+----------------------------+
| DISK_GB                    |
| FPGA                       |
| IPV4_ADDRESS               |
| MEMORY_MB                  |
| MEM_ENCRYPTION_CONTEXT     |
| NET_BW_EGR_KILOBIT_PER_SEC |
| NET_BW_IGR_KILOBIT_PER_SEC |
| NUMA_CORE                  |
| NUMA_MEMORY_MB             |
| NUMA_SOCKET                |
| NUMA_THREAD                |
| PCI_DEVICE                 |
| PCPU                       |
| PGPU                       |
| SRIOV_NET_VF               |
| VCPU                       |
| VGPU                       |
| VGPU_DISPLAY_HEAD          |
+----------------------------+
执行指令:
openstack --os-placement-api-version 1.6 trait list --sort-column name
输出示例:
$ openstack --os-placement-api-version 1.2 resource class list --sort-column name
+----------------------------+
| name                       |
+----------------------------+
| DISK_GB                    |
| IPV4_ADDRESS               |
| ...                        |$ openstack --os-placement-api-version 1.6 trait list --sort-column name
+---------------------------------------+
| name                                  |
+---------------------------------------+
| COMPUTE_DEVICE_TAGGING                |
| COMPUTE_NET_ATTACH_INTERFACE          |
| ...                                   |
Compute service – nova installation
1)Install and configure
a. 先准备 - 创建数据库
-
- 创建数据库
执行指令:
mysql
执行 mysql 指令:
CREATE DATABASE nova_api;
CREATE DATABASE nova;
CREATE DATABASE nova_cell0;GRANT ALL PRIVILEGES ON nova_api.* TO 'nova'@'localhost' IDENTIFIED BY '123456';
GRANT ALL PRIVILEGES ON nova_api.* TO 'nova'@'%' IDENTIFIED BY '123456';GRANT ALL PRIVILEGES ON nova.* TO 'nova'@'localhost' IDENTIFIED BY '123456';
GRANT ALL PRIVILEGES ON nova.* TO 'nova'@'%' IDENTIFIED BY '123456';GRANT ALL PRIVILEGES ON nova_cell0.* TO 'nova'@'localhost' IDENTIFIED BY '123456';
GRANT ALL PRIVILEGES ON nova_cell0.* TO 'nova'@'%' IDENTIFIED BY '123456';EXIT;
123456是创建的数据库 nova_api、nova、nova_cell0 的密码
统一设置名为 NOVA_DBPASS
-
- 加载 admin-openrc 文件
执行指令:
. admin-openrc
-
- 创建
nova用户
- 创建
执行指令:
openstack user create --domain default --password-prompt nova
输出示例:
root@controller[01:58:41]:~# openstack user create --domain default --password-prompt nova
User Password:123456
Repeat User Password:123456
+---------------------+----------------------------------+
| Field               | Value                            |
+---------------------+----------------------------------+
| domain_id           | default                          |
| enabled             | True                             |
| id                  | 0addb0d559f7423fbe259aa781b07117 |
| name                | nova                             |
| options             | {}                               |
| password_expires_at | None                             |
+---------------------+----------------------------------+
创建用户 nova 并为其设置密码
123456
-
- 添加
admin角色到nova用户上
- 添加
执行指令:
openstack role add --project service --user nova admin
此指令没有输出
-
- 创建 nova 服务实例
执行指令:
openstack service create --name nova --description "OpenStack Compute" compute
输出示例:
root@controller[01:59:56]:~# openstack service create --name nova --description "OpenStack Compute" compute
+-------------+----------------------------------+
| Field       | Value                            |
+-------------+----------------------------------+
| description | OpenStack Compute                |
| enabled     | True                             |
| id          | 83e7b7e19b9d4500bbcf3f92ff5d2b9d |
| name        | nova                             |
| type        | compute                          |
+-------------+----------------------------------+
-
- 创建 compute API 服务端点
执行指令:
openstack endpoint create --region RegionOne compute public http://controller:8774/v2.1
openstack endpoint create --region RegionOne compute internal http://controller:8774/v2.1
openstack endpoint create --region RegionOne compute admin http://controller:8774/v2.1
输出示例:
root@controller[02:00:09]:~# openstack endpoint create --region RegionOne compute public http://controller:8774/v2.1
+--------------+----------------------------------+
| Field        | Value                            |
+--------------+----------------------------------+
| enabled      | True                             |
| id           | fc17680b5d6e4389a6ae7eb6d5eed2c0 |
| interface    | public                           |
| region       | RegionOne                        |
| region_id    | RegionOne                        |
| service_id   | 83e7b7e19b9d4500bbcf3f92ff5d2b9d |
| service_name | nova                             |
| service_type | compute                          |
| url          | http://controller:8774/v2.1      |
+--------------+----------------------------------+
root@controller[02:00:39]:~# openstack endpoint create --region RegionOne compute internal http://controller:8774/v2.1
+--------------+----------------------------------+
| Field        | Value                            |
+--------------+----------------------------------+
| enabled      | True                             |
| id           | 57d7f9654b2e4e4d8d7937857396c081 |
| interface    | internal                         |
| region       | RegionOne                        |
| region_id    | RegionOne                        |
| service_id   | 83e7b7e19b9d4500bbcf3f92ff5d2b9d |
| service_name | nova                             |
| service_type | compute                          |
| url          | http://controller:8774/v2.1      |
+--------------+----------------------------------+
root@controller[02:00:40]:~# openstack endpoint create --region RegionOne compute admin http://controller:8774/v2.1
+--------------+----------------------------------+
| Field        | Value                            |
+--------------+----------------------------------+
| enabled      | True                             |
| id           | eb72b94371254d9badf80845790f1cc6 |
| interface    | admin                            |
| region       | RegionOne                        |
| region_id    | RegionOne                        |
| service_id   | 83e7b7e19b9d4500bbcf3f92ff5d2b9d |
| service_name | nova                             |
| service_type | compute                          |
| url          | http://controller:8774/v2.1      |
+--------------+----------------------------------+
b. 安装并配置组件
-
- 安装软件包
执行指令:
apt install nova-api nova-conductor nova-novncproxy nova-scheduler -y
-
- 编辑文件
执行指令:
vim /etc/nova/nova.conf
在 [api_database] 中添加以下内容:
[api_database]
connection = mysql+pymysql://nova:123456@controller/nova_api
123456是数据库 nova 的密码,
名为 NOVA_DBPASS
在 [database] 中添加以下内容:
[database]
connection = mysql+pymysql://nova:123456@controller/nova
123456是数据库 nova 的密码,
名为 NOVA_DBPASS
在 [DEFAULT] 中添加以下内容:
[DEFAULT]
transport_url = rabbit://openstack:123456@controller:5672/
my_ip = 192.168.10.10
123456是用户 admin 的密码,
名为 RABBIT_PASS
192.168.10.10 替换成 ens33 中对应的 ip 地址
移除掉 [DEFAULT] 中的
log_dir项
在 [api] 中添加以下内容:
[api]
auth_strategy = keystone
将 [keystone_authtoken] 中的其他所有选项都给注释掉,再添加以下内容:
[keystone_authtoken]
www_authenticate_uri = http://controller:5000/
auth_url = http://controller:5000/
memcached_servers = controller:11211
auth_type = password
project_domain_name = Default
user_domain_name = Default
project_name = service
username = nova
password = 123456
123456是用户 admin 的密码,
名为 NOVA_PASS
在 [service_user] 中添加以下内容:
[service_user]
send_service_user_token = true
auth_url = https://controller/identity
auth_strategy = keystone
auth_type = password
project_domain_name = Default
project_name = service
user_domain_name = Default
username = nova
password = 123456
123456是用户 admin 的密码,
名为 NOVA_PASS
在 [glance] 中添加以下内容:
[glance]
api_servers = http://controller:9292
在 [placement] 中添加以下内容:
[placement]
region_name = RegionOne
project_domain_name = Default
project_name = service
auth_type = password
user_domain_name = Default
auth_url = http://controller:5000/v3
username = placement
password = 123456
123456是用户 admin 的密码,
名为 PLACEMENT_PASS
-
- 填充 nova-api 数据库
执行指令:
su -s /bin/sh -c "nova-manage api_db sync" nova
输出示例:
(有很多)
2024-12-01 02:14:07.743 43606 INFO migrate.versioning.api [-] 76 -> 77...
2024-12-01 02:14:07.746 43606 INFO migrate.versioning.api [-] done
-
- 注册 cell0 数据库
执行指令:
su -s /bin/sh -c "nova-manage cell_v2 map_cell0" nova
没有输出
-
- 创建 cell1 单元
执行指令:
su -s /bin/sh -c "nova-manage cell_v2 create_cell --name=cell1 --verbose" nova
输出示例:
root@controller[02:14:17]:~# su -s /bin/sh -c "nova-manage cell_v2 create_cell --name=cell1 --verbose" nova
--transport-url not provided in the command line, using the value [DEFAULT]/transport_url from the configuration file
--database_connection not provided in the command line, using the value [database]/connection from the configuration file
ea2f189e-e2da-4128-9bad-7637ddfe53d6
-
- 填充 nova 数据库
执行指令:
su -s /bin/sh -c "nova-manage db sync" nova
输出示例:
(有很多)
2024-12-01 02:17:29.828 44378 INFO migrate.versioning.api [req-c94a6eee-348c-49e0-b140-6610f7bd0391 - - - - -] done
2024-12-01 02:17:29.828 44378 INFO migrate.versioning.api [req-c94a6eee-348c-49e0-b140-6610f7bd0391 - - - - -] 411 -> 412...
2024-12-01 02:17:29.832 44378 INFO migrate.versioning.api [req-c94a6eee-348c-49e0-b140-6610f7bd0391 - - - - -] done
-
- Verify nova cell0 and cell1 are registered correctly
执行指令:
su -s /bin/sh -c "nova-manage cell_v2 list_cells" nova
输出示例:
root@controller[02:17:29]:~# su -s /bin/sh -c "nova-manage cell_v2 list_cells" nova
+-------+--------------------------------------+------------------------------------------+-------------------------------------------------+----------+
|  Name |                 UUID                 |              Transport URL               |               Database Connection               | Disabled |
+-------+--------------------------------------+------------------------------------------+-------------------------------------------------+----------+
| cell0 | 00000000-0000-0000-0000-000000000000 |                  none:/                  | mysql+pymysql://nova:****@controller/nova_cell0 |  False   |
| cell1 | ea2f189e-e2da-4128-9bad-7637ddfe53d6 | rabbit://openstack:****@controller:5672/ |    mysql+pymysql://nova:****@controller/nova    |  False   |
+-------+--------------------------------------+------------------------------------------+-------------------------------------------------+----------+
c. 完成安装
执行指令:
service nova-api restart
service nova-scheduler restart
service nova-conductor restart
service nova-novncproxy restart
没有输出
2)Verify operation
Verify operation 应在完成 compute 节点配置完成后再执行
-
- 加载 admin-openrc 文件
执行指令:
. admin-openrc
-
- 列出服务组件
执行指令:
openstack compute service list
输出示例:
root@controller[02:21:35]:~# openstack compute service list
+----+----------------+------------+----------+---------+-------+----------------------------+
| ID | Binary         | Host       | Zone     | Status  | State | Updated At                 |
+----+----------------+------------+----------+---------+-------+----------------------------+
|  5 | nova-scheduler | controller | internal | enabled | up    | 2024-11-30T18:21:36.000000 |
|  6 | nova-conductor | controller | internal | enabled | up    | 2024-11-30T18:21:36.000000 |
|  7 | nova-compute   | controller | nova     | enabled | up    | 2024-11-30T18:21:38.000000 |
+----+----------------+------------+----------+---------+-------+----------------------------+
-
- 列出 API 端点
执行指令:
openstack catalog list
输出示例:
$ openstack catalog list+-----------+-----------+-----------------------------------------+
| Name      | Type      | Endpoints                               |
+-----------+-----------+-----------------------------------------+
| keystone  | identity  | RegionOne                               |
|           |           |   public: http://controller:5000/v3/    |
|           |           | RegionOne                               |
|           |           |   internal: http://controller:5000/v3/  |
|           |           | RegionOne                               |
|           |           |   admin: http://controller:5000/v3/     |
|           |           |                                         |
| glance    | image     | RegionOne                               |
|           |           |   admin: http://controller:9292         |
|           |           | RegionOne                               |
|           |           |   public: http://controller:9292        |
|           |           | RegionOne                               |
|           |           |   internal: http://controller:9292      |
|           |           |                                         |
| nova      | compute   | RegionOne                               |
|           |           |   admin: http://controller:8774/v2.1    |
|           |           | RegionOne                               |
|           |           |   internal: http://controller:8774/v2.1 |
|           |           | RegionOne                               |
|           |           |   public: http://controller:8774/v2.1   |
|           |           |                                         |
| placement | placement | RegionOne                               |
|           |           |   public: http://controller:8778        |
|           |           | RegionOne                               |
|           |           |   admin: http://controller:8778         |
|           |           | RegionOne                               |
|           |           |   internal: http://controller:8778      |
|           |           |                                         |
+-----------+-----------+-----------------------------------------+
-
- 列出镜像
执行指令:
openstack image list
输出示例:
$ openstack image list+--------------------------------------+-------------+-------------+
| ID                                   | Name        | Status      |
+--------------------------------------+-------------+-------------+
| 9a76d9f9-9620-4f2e-8c69-6c5691fae163 | cirros      | active      |
+--------------------------------------+-------------+-------------+
没输出也正常,不报错就没事
-
- 检查 cells 和 placement API 都成功运行
执行指令:
nova-status upgrade check
输出示例:
# nova-status upgrade check+--------------------------------------------------------------------+
| Upgrade Check Results                                              |
+--------------------------------------------------------------------+
| Check: Cells v2                                                    |
| Result: Success                                                    |
| Details: None                                                      |
+--------------------------------------------------------------------+
| Check: Placement API                                               |
| Result: Success                                                    |
| Details: None                                                      |
+--------------------------------------------------------------------+
| Check: Cinder API                                                  |
| Result: Success                                                    |
| Details: None                                                      |
+--------------------------------------------------------------------+
| Check: Policy File JSON to YAML Migration                          |
| Result: Success                                                    |
| Details: None                                                      |
+--------------------------------------------------------------------+
| Check: Older than N-1 computes                                     |
| Result: Success                                                    |
| Details: None                                                      |
+--------------------------------------------------------------------+
Networking service – neutron installation
1)Install and configure
a. 先准备 - 创建数据库
-
- 创建数据库
执行指令:
mysql -u root -p
执行 mysql 指令:
CREATE DATABASE neutron;
GRANT ALL PRIVILEGES ON neutron.* TO 'neutron'@'localhost' IDENTIFIED BY '123456';
GRANT ALL PRIVILEGES ON neutron.* TO 'neutron'@'%' IDENTIFIED BY '123456';
EXIT;
123456是创建的数据库 neutron 的密码
名为 NEUTRON_DBPASS
-
- 加载 admin-openrc 文件
执行指令:
. admin-openrc
-
- 创建
neutron用户
- 创建
执行指令:
openstack user create --domain default --password-prompt neutron
输出示例:
root@controller[02:26:02]:~# openstack user create --domain default --password-prompt neutron
User Password:123456
Repeat User Password:123456
+---------------------+----------------------------------+
| Field               | Value                            |
+---------------------+----------------------------------+
| domain_id           | default                          |
| enabled             | True                             |
| id                  | 030c5d042e6c418581c805b781d69268 |
| name                | neutron                          |
| options             | {}                               |
| password_expires_at | None                             |
+---------------------+----------------------------------+
创建用户 neutron 并为其设置密码
123456
-
- 添加
admin角色到neutron用户中
- 添加
执行指令:
openstack role add --project service --user neutron admin
没有输出
-
- 创建 neutron 服务实例
执行指令:
openstack service create --name neutron --description "OpenStack Networking" network
输出示例:
root@controller[02:27:14]:~# openstack service create --name neutron --description "OpenStack Networking" network
+-------------+----------------------------------+
| Field       | Value                            |
+-------------+----------------------------------+
| description | OpenStack Networking             |
| enabled     | True                             |
| id          | d139db5c69e74111b3397acaf85c2efc |
| name        | neutron                          |
| type        | network                          |
+-------------+----------------------------------+-
- 创建网络服务 APT 端点
执行指令:
openstack endpoint create --region RegionOne network public http://controller:9696
openstack endpoint create --region RegionOne network internal http://controller:9696
openstack endpoint create --region RegionOne network admin http://controller:9696
输出示例:
root@controller[02:27:14]:~# openstack service create --name neutron --description "OpenStack Networking" network
+-------------+----------------------------------+
| Field       | Value                            |
+-------------+----------------------------------+
| description | OpenStack Networking             |
| enabled     | True                             |
| id          | d139db5c69e74111b3397acaf85c2efc |
| name        | neutron                          |
| type        | network                          |
+-------------+----------------------------------+
root@controller[02:27:27]:~# openstack endpoint create --region RegionOne network public http://controller:9696
+--------------+----------------------------------+
| Field        | Value                            |
+--------------+----------------------------------+
| enabled      | True                             |
| id           | c2e950790afd40409328b635b1d5d54e |
| interface    | public                           |
| region       | RegionOne                        |
| region_id    | RegionOne                        |
| service_id   | d139db5c69e74111b3397acaf85c2efc |
| service_name | neutron                          |
| service_type | network                          |
| url          | http://controller:9696           |
+--------------+----------------------------------+
root@controller[02:28:09]:~# openstack endpoint create --region RegionOne network internal http://controller:9696
+--------------+----------------------------------+
| Field        | Value                            |
+--------------+----------------------------------+
| enabled      | True                             |
| id           | cba6cca26ae641e1989d1dcf0025da6b |
| interface    | internal                         |
| region       | RegionOne                        |
| region_id    | RegionOne                        |
| service_id   | d139db5c69e74111b3397acaf85c2efc |
| service_name | neutron                          |
| service_type | network                          |
| url          | http://controller:9696           |
+--------------+----------------------------------+
root@controller[02:28:10]:~# openstack endpoint create --region RegionOne network admin http://controller:9696
+--------------+----------------------------------+
| Field        | Value                            |
+--------------+----------------------------------+
| enabled      | True                             |
| id           | 615958b7e595420daa3f7230ad43bbea |
| interface    | admin                            |
| region       | RegionOne                        |
| region_id    | RegionOne                        |
| service_id   | d139db5c69e74111b3397acaf85c2efc |
| service_name | neutron                          |
| service_type | network                          |
| url          | http://controller:9696           |
+--------------+----------------------------------+
2)配置 Provider networks
a. 安装组件:
- 安装软件包
执行指令:
apt install neutron-server neutron-plugin-ml2 neutron-openvswitch-agent neutron-dhcp-agent neutron-metadata-agent -y
b. 配置服务器组件
- 编辑文件:
执行指令:
vim /etc/neutron/neutron.conf
将 [database] 中的其他所有选项都给注释掉,再添加以下内容:
[database]
connection = mysql+pymysql://neutron:123456@controller/neutron
123456是数据库 neutron 的密码,
名为 NEUTRON_DBPASS
在 [DEFAULT] 中添加以下内容:
[DEFAULT]
core_plugin = ml2
service_plugins =
transport_url = rabbit://openstack:123456@controller
auth_strategy = keystone
notify_nova_on_port_status_changes = true
notify_nova_on_port_data_changes = true
123456是用户 keystone 的密码,
名为 RABBIT_PASS
将 [keystone_authtoken] 中的其他所有选项都给注释掉,再添加以下内容:
[keystone_authtoken]
www_authenticate_uri = http://controller:5000
auth_url = http://controller:5000
memcached_servers = controller:11211
auth_type = password
project_domain_name = Default
user_domain_name = Default
project_name = service
username = neutron
password = 123456
123456是用户 neutron 的密码,
名为 NEUTRON_PASS
在 [nova] 中添加以下内容:
[nova]
auth_url = http://controller:5000
auth_type = password
project_domain_name = Default
user_domain_name = Default
region_name = RegionOne
project_name = service
username = nova
password = 123456
123456是用户 neutron 的密码,
名为 NOVA_PASS
在 [oslo_concurrency] 中添加以下内容:
[oslo_concurrency]
lock_path = /var/lib/neutron/tmp
c. 配置 Modular Layer 2 (ML2) plug-in
- 编辑文件:
执行指令:
vim /etc/neutron/plugins/ml2/ml2_conf.ini
在 [ml2] 中添加以下内容:
[ml2]
type_drivers = flat,vlan
tenant_network_types =
mechanism_drivers = openvswitch
extension_drivers = port_security
在 [ml2_type_flat] 中添加以下内容:
[ml2_type_flat]
flat_networks = provider
d. 配置 Open vSwitch agent
-
- 编辑文件
执行指令:
vim /etc/neutron/plugins/ml2/openvswitch_agent.ini
在 [ovs] 中添加以下内容:
[ovs]
bridge_mappings = provider:ens33
在 [securitygroup] 中添加以下内容:
[securitygroup]
enable_security_group = true
firewall_driver = openvswitch
#firewall_driver = iptables_hybrid
-
- 验证以下值是否都设为 1
执行指令:
sysctl net.bridge.bridge-nf-call-iptables
sysctl net.bridge.bridge-nf-call-ip6tables
输出示例:
root@controller[02:39:36]:~# sysctl net.bridge.bridge-nf-call-iptables
net.bridge.bridge-nf-call-iptables = 1
root@controller[02:39:42]:~# sysctl net.bridge.bridge-nf-call-ip6tables
net.bridge.bridge-nf-call-ip6tables = 1
e. 配置 DHCP agent
- 编辑以下文件:
执行指令:
vim /etc/neutron/dhcp_agent.ini
在 [DEFAULT] 中添加以下内容:
[DEFAULT]
interface_driver = openvswitch
dhcp_driver = neutron.agent.linux.dhcp.Dnsmasq
enable_isolated_metadata = true
1)Install and configure
b. 配置 metadata agent
- 编辑文件
执行指令:
vim /etc/neutron/metadata_agent.ini
在 [DEFAULT] 中添加以下内容:
[DEFAULT]
nova_metadata_host = controller
metadata_proxy_shared_secret = 123456
123456为 METADATA_SECRET ,但这一般使用openssl rand -hex 10生成的密钥作为该密码。
c. 配置计算服务去使用网络服务
- 编辑文件
执行指令:
vim /etc/nova/nova.conf
在 [neutron] 中添加以下内容:
[neutron]
auth_url = http://controller:5000
auth_type = password
project_domain_name = Default
user_domain_name = Default
region_name = RegionOne
project_name = service
username = neutron
password = 123456
service_metadata_proxy = true
metadata_proxy_shared_secret = 123456
password = 123456 是用户 neutron 的密码,名为 NEUTRON_PASS
metadata_proxy_shared_secret = 123456 是上一段中设置的密码,名为 METADATA_SECRET
d. 完成安装
-
- 填充数据库
执行指令:
su -s /bin/sh -c "neutron-db-manage --config-file /etc/neutron/neutron.conf --config-file /etc/neutron/plugins/ml2/ml2_conf.ini upgrade head" neutron
输出:
(有很多)
INFO  [alembic.runtime.migration] Running upgrade b12a3ef66e62 -> 97c25b0d2353
INFO  [alembic.runtime.migration] Running upgrade 97c25b0d2353 -> 2e0d7a8a1586
INFO  [alembic.runtime.migration] Running upgrade 2e0d7a8a1586 -> 5c85685d616dOK
-
- 重启 compute API 服务
执行指令:
service nova-api restart
-
- 重启网络服务
执行指令:
service neutron-server restart
service neutron-openvswitch-agent restart
service neutron-dhcp-agent restart
执行指令:
service neutron-metadata-agent restart
这个指令完成的有点慢
相关文章:

三:安装服务-controller node
一:工具、环境准备-controller node 二:OpenStack环境准备-controller node 三:安装服务-controller node 四:工具、环境准备-compute node 五:OpenStack环境准备-compute node 六:安装服务-compute node 七…...
自定义类型: 结构体、枚举 、联合
目录 结构体 结构体类型的声明 匿名结构体 结构的自引用 结构体变量的定义和初始化 结构体成员变量的访问 结构体内存对齐 结构体传参 位段 位段类型的声明 位段的内存分配 位段的跨平台问题 位段的应用 枚举 枚举类型的定义 枚举的优点 联合体(共用体) 联合…...

Bert+CRF的NER实战
CRF(条件随机场-Conditional Random Field) 原始本文:我在北京吃炸酱面 标注示例: 我O在O北B-PLA京I-PLA吃O炸B-FOOD酱I-FOOD面I-FOOD CRF: 目的:提出一些不可能出现的预测组合(例如I-PLA不能…...

永久停用PostgreSQL 归档功能
文章目录 引言永久停用归档功能归档的优势归档的劣势开启归档的情况关闭归档的情况see also引言 PostgreSQL 是一个开源的关系型数据库系统,支持数据归档(WAL),可以实现数据备份、恢复和灾难恢复等功能。在使用 PostgreSQL 的过程中,如果 PostgreSQL 数据库开启了归档(a…...

《数字图像处理基础》学习07-图像几何变换之最近邻插值法放大图像
目录 一,概念 二,题目及matlab实现 1,解题思路 2,matlab实现 1)matlab思路 2)完整代码 三,放大图像及matlab实现 一,概念 通过上一篇,我已经学习了使用最邻近插…...

pip安装库时报错(请求超时)
天行健,君子以自强不息;地势坤,君子以厚德载物。 每个人都有惰性,但不断学习是好好生活的根本,共勉! 文章均为学习整理笔记,分享记录为主,如有错误请指正,共同学习进步。…...

XPath表达式详解及其在Web开发中的应用
XPath(XML Path Language)是一种强大的查询语言,用于在XML文档中选择节点。由于HTML可以被视为一种特殊的XML,因此XPath同样适用于HTML文档。XPath允许开发者通过元素的层级结构和属性来选择节点或节点集合,这使得它成…...

Qt中Socket网络编程
文章目录 Qt中Socket网络编程服务器端客户端 Qt中Socket网络编程 这里就拿b站上爱编程的小丙的demo来做总结吧,首先要感谢成功带我入门的人:爱编程的小丙和程序员长风,这两个人是讲Socket编程我听懂的课555,接下来就总结一下Qt中…...

【05】Selenium+Python 两种文件上传方式(AutoIt)
上传文件的两种方式 一、input标签上传文件 可以用send_keys方法直接上传文件 示例代码 input标签上传文件import time from selenium import webdriver from chromedriver_py import binary_path # this will get you the path variable from selenium.webdriver.common.by i…...

Python网络编程
网络编程 Socket(套接字) socket 位于 网络协议中的 数据传输层、 该层 主要 可以通过 UDP 或者 TCP协议 实现 数据的传输 TCP 协议 VS UDP协议 tcp : 是一个 可靠的 ,面向 连接的协议。 数据在网络传输中 是安全的,不易丢失的。 TCP连接 在建立的时候&…...

openssl生成ca证书
常见CA文件夹 1、生成CA钥匙 openssl genrsa -out ./private/cakey.pem 2、生成CA自签名 openssl req -new -x509 -key ./private/cakey.pem -out ./cacert.crt -days 3650 3、生成http服务器私钥 openssl genrsa -out ./data/frontt.project.com.key 2048 4、CA给http服务器…...

Oracle RAC 环境下数据文件误建在本地目录的处理过程
问题描述 在 Oracle RAC 环境中,有时会误将数据文件创建在本地目录,导致其他节点无法访问该数据文件,从而报出 ORA-01157 和 ORA-01110 错误。 问题分析 错误日志 Mon Nov 16 19:02:38 2021 Errors in file /u01/app/oracle/diag/rdbms/orc…...

新质驱动·科东软件受邀出席2024智能网联+低空经济暨第二届湾区汽车T9+N闭门会议
为推进广东省加快发展新质生产力,贯彻落实“百县千镇万村高质量发展工程”,推动韶关市新丰县智能网联新能源汽车、低空经济与数字技术的创新与发展,充分发挥湾区汽车产业链头部企业的带动作用。韶关市指导、珠三角湾区智能网联新能源汽车产业…...

windows11 使用体验记录
好的地方: UI上字体风格貌似更好看了,文件夹增加了多个标签,类似于浏览器既可以打开多个窗口,也可以在同一个窗口中打开多个标签页 不好的地方: 桌面右下角点击日期时间,显示日期,时间呢&…...

202页MES项目需求方案深入解读,学习MES系统设计规划
202页MES项目需求方案深入解读,学习MES系统设计规划 MES项目需求方案旨在实现制造执行、效率提升、精细化管理等多个方面的功能。整体结构分为七大部分,包括制造执行、效率、精细化、品质在线、设备、用户思想和数据互联。制造执行部分关注订单、品质数据…...

前端css实例
前端css实例 一、带条纹的表格 <!DOCTYPE html> <html lang"en"> <head><meta charset"UTF-8"><meta name"viewport" content"widthdevice-width, initial-scale1.0"><title>条纹样式的表格<…...

YOLO的框架及版本迭代
YOLO(You Only Look Once)是一种非常流行的实时目标检测算法,其特点是将目标检测任务转换为一个回归问题,通过一次前向传播就可以同时完成目标的分类和定位。以下是YOLO框架的整体架构和工作原理: 一、YOLO的基本框架…...
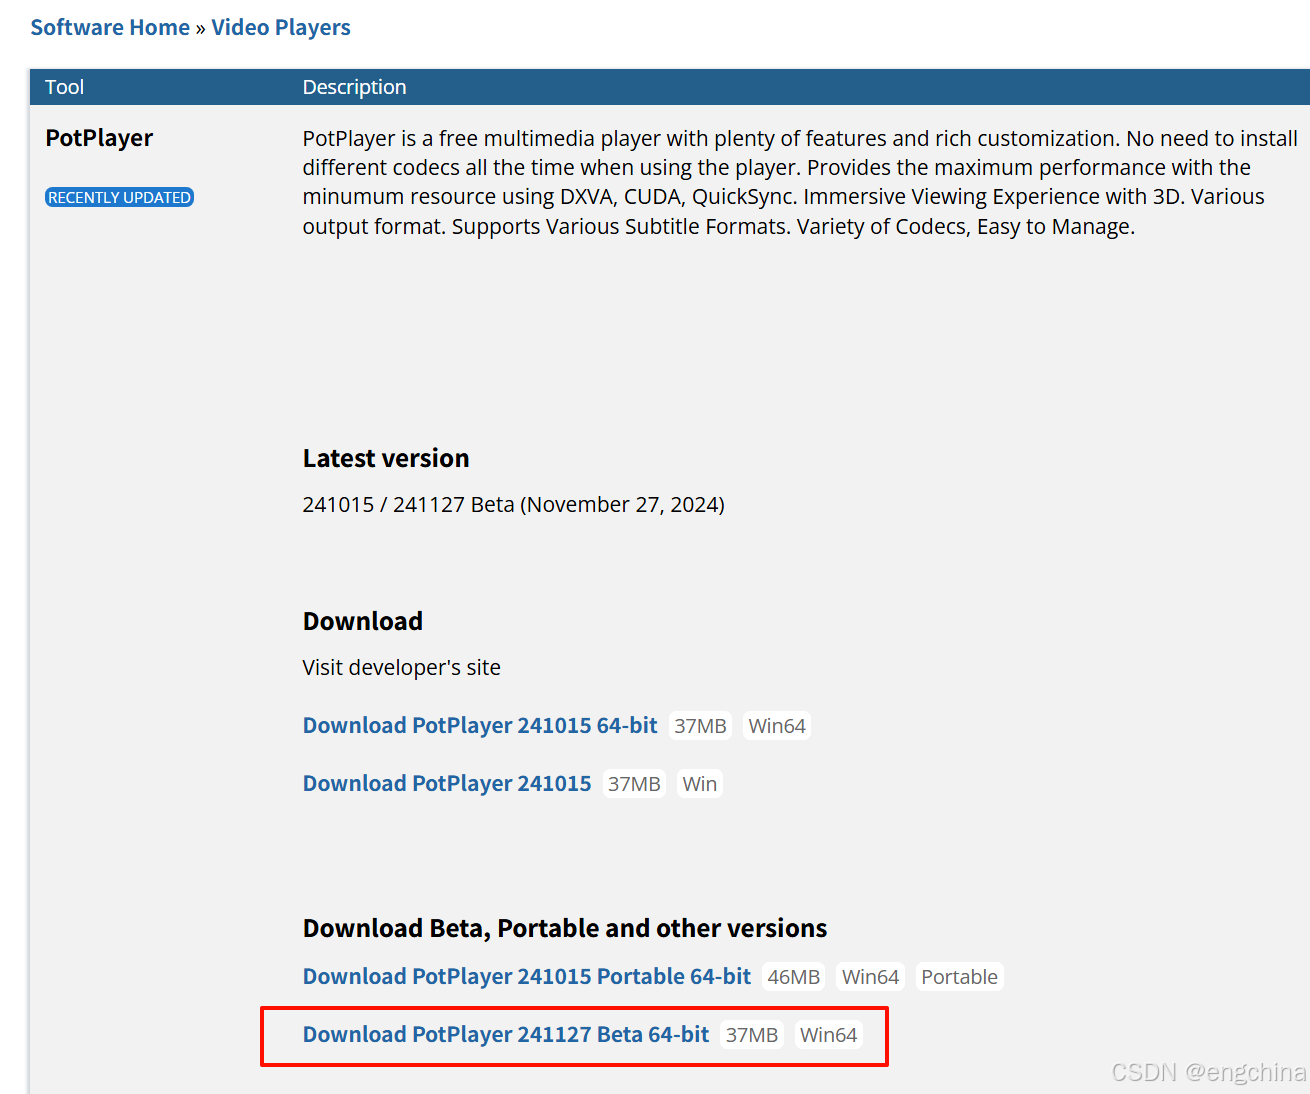
PotPlayer 最新版本支持使用 Whisper 自动识别语音生成字幕
PotPlayer 最新版本支持使用 Whisper 自动识别语音生成字幕 设置使用下载地址 设置 使用 下载地址 https://www.videohelp.com/software/PotPlayer...
)
JavaScript零基础入门速通(中)
目录 1. 函数 1.1 函数声明 1.2 返回值 1.3 匿名函数 1.4 箭头函数 2. 对象 2.1 创建对象 2.2 访问和修改对象的属性 2.3 对象方法 3. 数组 3.1 创建数组 3.2 数组方法 3.3 遍历数组 4. 作用域 4.1 全局作用域 4.2 局部作用域 4.3 块级作用域 5. 事件处理 5…...

【Yarn Bug】 yarn 安装依赖出现的网络连接问题
最近,在初始化 Ant Design Pro 前端脚手架过程中,使用 yarn 安装依赖时遇到了网络连接问题,具体错误信息提示为 info There appears to be trouble with your network connection. Retrying...。通过百度查询,得知出现这种问题的原…...
)
告别BLAST卡顿!用FastANI和Skani快速搞定微生物基因组ANI计算(附实战对比)
微生物基因组分析提速指南:FastANI与Skani的性能对决与实战应用 当实验室的测序仪日夜不停地吐出海量微生物基因组数据时,生物信息学分析流程中的ANI计算环节往往成为效率瓶颈。传统BLAST-based方法在应对数十甚至上百个基因组比较时,不仅耗时…...

全志A40I Android7.1系统开机自启动实现与优化指南
1. 全志A40I Android7.1开机自启动基础原理 全志A40I作为一款广泛应用于嵌入式设备的芯片,在Android7.1系统下实现开机自启动有其特殊性。与传统的Linux系统不同,Android的自启动机制更复杂,需要同时考虑内核层和应用层的配合。我曾在多个A40…...
)
YOLOv5与DeepSort结合优化:如何调整参数让目标跟踪更精准(附代码对比)
YOLOv5与DeepSort参数调优实战:提升目标跟踪精度的关键策略 在计算机视觉领域,目标跟踪技术正从实验室快速走向工业应用。当基础功能实现后,如何让系统在实际场景中表现更稳定、更精准,成为开发者面临的核心挑战。本文将深入剖析Y…...

STM32万能红外遥控器开发实战
1. 项目概述这个基于STM32的万能红外遥控器项目,是我在智能家居领域的一次实战尝试。作为一名嵌入式开发者,我经常遇到家里遥控器太多、操作繁琐的问题。市面上的智能遥控器要么功能单一,要么价格昂贵,于是决定自己动手开发一款多…...

unknown
unknown...

轻松掌握gallery多渠道打包:为不同应用商店构建专属本地AI平台版本
轻松掌握gallery多渠道打包:为不同应用商店构建专属本地AI平台版本 【免费下载链接】gallery A gallery that showcases on-device ML/GenAI use cases and allows people to try and use models locally. 项目地址: https://gitcode.com/GitHub_Trending/gallery…...

你的RAG应用安全吗?藏在向量数据库里的‘特洛伊木马’——外部数据注入风险详解
RAG应用安全深度剖析:如何抵御外部数据源中的"特洛伊木马" 当你在咖啡馆用手机查看银行账户时,是否想过那个看似无害的二维码可能藏着窃取密码的指令?类似的威胁正在AI领域上演——攻击者通过污染RAG(检索增强生成&…...

SecGPT-14B API保护:防止OpenClaw任务过度消耗模型资源
SecGPT-14B API保护:防止OpenClaw任务过度消耗模型资源 1. 为什么需要API保护机制 上周我在本地部署了SecGPT-14B模型,并尝试通过OpenClaw实现自动化安全报告生成。凌晨3点突然收到服务器告警——模型服务因资源耗尽崩溃了。检查日志发现,O…...

实战指南,基于快马平台快速构建用于工业质检的yolo缺陷检测系统
今天想和大家分享一个很实用的工业质检项目实战经验——基于YOLO模型快速搭建零件缺陷检测系统。这个项目特别适合需要快速验证算法效果的场景,我在InsCode(快马)平台上只用半天就完成了从原型到部署的全流程。 项目背景与需求分析 工业质检对精度和实时性要求很高&…...

**发散创新:基于Go语言实现的Raft共识算法实战解析**在分布式系统中,**一
发散创新:基于Go语言实现的Raft共识算法实战解析 在分布式系统中,一致性是核心挑战之一。而Raft共识算法因其简洁性和可理解性,已成为当前主流的分布式一致性协议(如etcd、Consul均采用Raft)。本文将带你深入用Go语言从…...