一文说清flink从编码到部署上线
引言:目前flink的文章比较多,但一般都关注某一特定方面,很少有一个文章,从一个简单的例子入手,说清楚从编码、构建、部署全流程是怎么样的。所以编写本文,自己做个记录备查同时跟大家分享一下。本文以简单的mysql cdc为例展开说明。
环境说明:MySQL:5.7;flink:1.14.0;hadoop:3.0.0;操作系统:CentOS 7.6;JDK:1.8.0_401。
1.MySQL
1.1 创建数据库和测试数据
数据库脚本:
CREATE DATABASE `flinktest`;
USE `flinktest`;
CREATE TABLE `products` (`id` int(11) NOT NULL AUTO_INCREMENT,`name` varchar(255) NOT NULL,`description` varchar(512) DEFAULT NULL,PRIMARY KEY (`id`)
) ENGINE=InnoDB AUTO_INCREMENT=9 DEFAULT CHARSET=utf8mb4;insert  into `products`(`id`,`name`,`description`) values
(1,'aaa','aaaa'),
(2,'ccc','ccc'),
(3,'dd','ddd'),
(4,'eeee','eee'),
(5,'ffff','ffff'),
(6,'hhhh','hhhh'),
(7,'iiii','iiii'),
(8,'jjjj','jjjj');
账号使用root就行。
1.2 开启binlog
参考:https://core815.blog.csdn.net/article/details/144233298
踩坑:测试过程中发现mysql 9.0一直无法获取更新的数据,最终使用的5.7。
2.编码
2.1 主要实现
package com.zl;import com.ververica.cdc.connectors.mysql.source.MySqlSource;
import com.ververica.cdc.connectors.mysql.table.StartupOptions;
import com.ververica.cdc.debezium.JsonDebeziumDeserializationSchema;
import org.apache.flink.api.common.eventtime.WatermarkStrategy;
import org.apache.flink.configuration.Configuration;
import org.apache.flink.configuration.RestOptions;
import org.apache.flink.streaming.api.datastream.DataStreamSource;
import org.apache.flink.streaming.api.datastream.SingleOutputStreamOperator;
import org.apache.flink.streaming.api.environment.StreamExecutionEnvironment;
import org.apache.flink.streaming.api.functions.ProcessFunction;
import org.apache.flink.util.Collector;import java.util.Arrays;
import java.util.List;
import java.util.logging.Level;
import java.util.logging.Logger;import static com.mysql.cj.conf.PropertyKey.useSSL;public class MysqlExample {public static void main(String[] args) throws Exception {List<String> SYNC_TABLES = Arrays.asList("flinktest.products");MySqlSource<String> mySqlSource = MySqlSource.<String>builder().hostname("10.86.37.169").port(3306).databaseList("flinktest").tableList(String.join(",", SYNC_TABLES)).username("root").password("pwd").startupOptions(StartupOptions.initial()).deserializer(new JsonDebeziumDeserializationSchema()).build();/// 配置flink访问页面-开始/* Configuration config = new Configuration();// 启用 Web UI,访问地址【http://ip:port】config.setBoolean("web.ui.enabled", true); config.setString(RestOptions.BIND_PORT,"8081");
//        这个使用jar直接运行可以,如果提交给yarn会报错,需要改为getExecutionEnvironment()StreamExecutionEnvironment env = StreamExecutionEnvironment.createLocalEnvironmentWithWebUI(config);*////配置flink访问页面-结束StreamExecutionEnvironment env = StreamExecutionEnvironment.getExecutionEnvironment();env.setParallelism(1);/// 设置CK存储-开始(不需要可注释掉)// hadoop部署见:https://core815.blog.csdn.net/article/details/144022938// hdfs访问地址见:/home/hadoop-3.3.3/etc/hadoop/core-site.xmlenv.getCheckpointConfig().setCheckpointStorage("hdfs://10.86.97.191:9000"+"/flinktest/");env.getCheckpointConfig().setCheckpointInterval(3000);/// 设置CK存储-结束// 如果不能正常读取mysql的binlog://①可能是mysql没有打开binlog或者mysql版本不支持(当前在mysql5.7.20环境下,功能正常);// ②可能是数据库ip、port、账号、密码错误。env.fromSource(mySqlSource, WatermarkStrategy.noWatermarks(), "MySQL Source").setParallelism(1).print();env.execute("Print MySQL Snapshot + Binlog");}}
2.2 依赖
<project xmlns="http://maven.apache.org/POM/4.0.0"xmlns:xsi="http://www.w3.org/2001/XMLSchema-instance"xsi:schemaLocation="http://maven.apache.org/POM/4.0.0http://maven.apache.org/maven-v4_0_0.xsd"><modelVersion>4.0.0</modelVersion><groupId>com.zl.flinkcdc</groupId><artifactId>FlickCDC</artifactId><packaging>jar</packaging><version>1.0-SNAPSHOT</version><name>FlickCDC</name><properties><project.build.sourceEncoding>UTF-8</project.build.sourceEncoding><project.reporting.outputEncoding>UTF-8</project.reporting.outputEncoding><maven.compiler.source>8</maven.compiler.source><maven.compiler.target>8</maven.compiler.target><flink-version>1.14.0</flink-version><flink-cdc-version>2.4.0</flink-cdc-version><hadoop.version>3.0.0</hadoop.version><slf4j.version>1.7.25</slf4j.version><log4j.version>2.16.0</log4j.version></properties><dependencies><dependency><groupId>junit</groupId><artifactId>junit</artifactId><version>3.8.1</version><scope>test</scope></dependency><dependency><groupId>org.apache.flink</groupId><artifactId>flink-java</artifactId><version>${flink-version}</version></dependency><dependency><groupId>org.apache.flink</groupId><artifactId>flink-streaming-java_2.11</artifactId><version>${flink-version}</version></dependency><dependency><groupId>com.ververica</groupId><artifactId>flink-connector-mysql-cdc</artifactId><version>${flink-cdc-version}</version></dependency><dependency><groupId>org.apache.flink</groupId><artifactId>flink-shaded-guava</artifactId><version>30.1.1-jre-15.0</version></dependency><!--<dependency><groupId>org.apache.flink</groupId><artifactId>flink-shaded-guava</artifactId><version>18.0-13.0</version></dependency>--><dependency><groupId>org.apache.flink</groupId><artifactId>flink-connector-base</artifactId><version>${flink-version}</version></dependency><dependency><groupId>org.apache.flink</groupId><artifactId>flink-clients_2.11</artifactId><version>${flink-version}</version></dependency><dependency><groupId>org.apache.flink</groupId><artifactId>flink-table-common</artifactId><version>${flink-version}</version></dependency><dependency><groupId>org.apache.flink</groupId><artifactId>flink-runtime-web_2.11</artifactId><version>${flink-version}</version></dependency><!--        hadoop相关依赖--><dependency><groupId>org.apache.hadoop</groupId><artifactId>hadoop-client</artifactId><version>${hadoop.version}</version><scope>provided</scope><exclusions><exclusion><artifactId>commons-cli</artifactId><groupId>commons-cli</groupId></exclusion><exclusion><artifactId>commons-compress</artifactId><groupId>org.apache.commons</groupId></exclusion><exclusion><artifactId>guava</artifactId><groupId>com.google.guava</groupId></exclusion><exclusion><artifactId>jackson-annotations</artifactId><groupId>com.fasterxml.jackson.core</groupId></exclusion><exclusion><artifactId>jackson-core</artifactId><groupId>com.fasterxml.jackson.core</groupId></exclusion><exclusion><artifactId>jackson-databind</artifactId><groupId>com.fasterxml.jackson.core</groupId></exclusion><exclusion><artifactId>slf4j-api</artifactId><groupId>org.slf4j</groupId></exclusion></exclusions></dependency><dependency><groupId>org.apache.hadoop</groupId><artifactId>hadoop-common</artifactId><version>${hadoop.version}</version><scope>provided</scope><exclusions><exclusion><artifactId>asm</artifactId><groupId>org.ow2.asm</groupId></exclusion><exclusion><artifactId>avro</artifactId><groupId>org.apache.avro</groupId></exclusion><exclusion><artifactId>commons-cli</artifactId><groupId>commons-cli</groupId></exclusion><exclusion><artifactId>commons-codec</artifactId><groupId>commons-codec</groupId></exclusion><exclusion><artifactId>commons-compress</artifactId><groupId>org.apache.commons</groupId></exclusion><exclusion><artifactId>commons-io</artifactId><groupId>commons-io</groupId></exclusion><exclusion><artifactId>commons-lang3</artifactId><groupId>org.apache.commons</groupId></exclusion><exclusion><artifactId>commons-logging</artifactId><groupId>commons-logging</groupId></exclusion><exclusion><artifactId>commons-math3</artifactId><groupId>org.apache.commons</groupId></exclusion><exclusion><artifactId>guava</artifactId><groupId>com.google.guava</groupId></exclusion><exclusion><artifactId>jackson-databind</artifactId><groupId>com.fasterxml.jackson.core</groupId></exclusion><exclusion><artifactId>jaxb-api</artifactId><groupId>javax.xml.bind</groupId></exclusion><exclusion><artifactId>log4j</artifactId><groupId>log4j</groupId></exclusion><exclusion><artifactId>nimbus-jose-jwt</artifactId><groupId>com.nimbusds</groupId></exclusion><exclusion><artifactId>slf4j-api</artifactId><groupId>org.slf4j</groupId></exclusion><exclusion><artifactId>slf4j-log4j12</artifactId><groupId>org.slf4j</groupId></exclusion><exclusion><artifactId>zookeeper</artifactId><groupId>org.apache.zookeeper</groupId></exclusion><exclusion><artifactId>jsr305</artifactId><groupId>com.google.code.findbugs</groupId></exclusion><exclusion><artifactId>gson</artifactId><groupId>com.google.code.gson</groupId></exclusion></exclusions></dependency><dependency><groupId>org.apache.hadoop</groupId><artifactId>hadoop-hdfs</artifactId><version>${hadoop.version}</version><scope>provided</scope><exclusions><exclusion><artifactId>commons-cli</artifactId><groupId>commons-cli</groupId></exclusion><exclusion><artifactId>guava</artifactId><groupId>com.google.guava</groupId></exclusion><exclusion><artifactId>jackson-databind</artifactId><groupId>com.fasterxml.jackson.core</groupId></exclusion></exclusions></dependency><dependency><groupId>commons-cli</groupId><artifactId>commons-cli</artifactId><version>1.5.0</version></dependency><!--mvn install:install-file -Dfile=D:/maven/flink-shaded-hadoop-3-uber-3.1.1.7.2.9.0-173-9.0.jar-DgroupId=org.apache.flink -DartifactId=flink-shaded-hadoop-3 -Dversion=3.1.1.7.2.9.0-173-9.0 -Dpackaging=jar--><dependency><groupId>org.apache.flink</groupId><artifactId>flink-shaded-hadoop-3</artifactId><version>3.1.1.7.2.9.0-173-9.0</version></dependency></dependencies><build><plugins><plugin><groupId>org.apache.maven.plugins</groupId><artifactId>maven-assembly-plugin</artifactId><version>3.0.0</version><configuration><descriptorRefs><descriptorRef>jar-with-dependencies</descriptorRef></descriptorRefs><archive><manifest><addClasspath>true</addClasspath><mainClass>com.zl.MysqlExample</mainClass></manifest></archive></configuration><executions><execution><id>make-assembly</id><phase>package</phase><goals><goal>single</goal></goals></execution></executions></plugin></plugins></build>
</project>
完整代码见:https://gitee.com/core815/flink-cdc-mysql
3.打包
mvn版本:3.5.4。
到pom.xml所在路径,执行“mvn package”

打包效果:

4.jar直接运行
java -jar FlickCDC-1.0-SNAPSHOT-jar-with-dependencies.jar

5.flink yarn运行
hadoop、flink、yarn环境见:https://core815.blog.csdn.net/article/details/144022938
把FlickCDC-1.0-SNAPSHOT-jar-with-dependencies.jar放到“/home”路径下。
执行下面命令:
flink run-application -t yarn-application -Dparallelism.default=1 -Denv.java.opts=" -Dfile.encoding=UTF-8 -Dsun.jnu.encoding=UTF-8" -Dtaskmanager.memory.process.size=1g -Dyarn.application.name="FlinkCdcMysql" -Dtaskmanager.numberOfTaskSlots=1 -c com.zl.MysqlExample /home/FlickCDC-1.0-SNAPSHOT-jar-with-dependencies.jar
控制台看到如下打印:

yarn管理页面:

运行日志查看步骤:


下面即可看到完整日志:

6.常见问题
6.1 问题1
日志错误:
The MySQL server has a timezone offset (0 seconds ahead of UTC) which does not match the configured timezone Asia/Shanghai. Specify the right server-time-zone to avoid inconsistencies for time-related fields.
解决:
修改my.cnf文件。
[mysqld]
default-time-zone=‘Asia/Shanghai’
重启MySQL服务。
6.2 问题2:hdfs
日志错误:
Permission denied: user=PC2023, access=WRITE, inode=“/”:root:supergroup:drwxr-xr-x
解决:
临时解决
hadoop fs -chmod -R 777 /
6.3 问题3:guava30 guava18冲突
分析:
flink 1.13 cdc2.3的组合容易出这个问题。
解决:
参考:https://developer.aliyun.com/ask/574901
flink 使用1.14.0版本;cdc使用2.4.0版本。
6.4 问题4
日志错误:
/user/root/.flink/application_1733492706887_0002/log4j.properties could only be written to 0 of the 1 minReplication nodes
解决:
https://www.pianshen.com/article/1554707968/
相关文章:
一文说清flink从编码到部署上线
引言:目前flink的文章比较多,但一般都关注某一特定方面,很少有一个文章,从一个简单的例子入手,说清楚从编码、构建、部署全流程是怎么样的。所以编写本文,自己做个记录备查同时跟大家分享一下。本文以简单的mysql cdc为例展开说明。 环境说明:MySQL:5.7;flink:1.14.0…...

【5G】5G Physical Layer物理层(一)
5G多址接入和物理层与长期演进(LTE)存在一些差异。在下行方向,5G与LTE相似,依旧采用正交频分多址(OFDMA)。而在上行方向,5G采用了OFDMA和单载波频分多址(SC-FDMA)&#x…...

GauHuman阅读笔记【3D Human Modelling】
笔记目录 1. 基本信息2. 理解(个人初步理解,随时更改)3. 精读SummaryResearch Objective(s)Background / Problem StatementMethod(s)EvaluationConclusionReferences1. 基本信息 题目:GauHuman: Articulated Gaussian Splatting from Monocular Human Videos时间:2023.12…...

qemu安装arm64架构银河麒麟
qemu虚拟化软件,可以在一个平台上模拟另一个硬件平台,可以支持多种处理器架构。 一、安装 安装教程:https://blog.csdn.net/qq_36035382/article/details/125308044 下载链接:https://qemu.weilnetz.de/w64/2024/ 我下载的是 …...
 中,integer 和 integer_range的区别)
在Elasticsearch (ES) 中,integer 和 integer_range的区别
在Elasticsearch (ES) 中,integer 和 integer_range 是两种不同的字段类型,它们用于存储和查询不同类型的数据。 Integer: integer 类型是用于存储32位整数值的简单数据类型。这个类型的字段适合用来表示单一的整数数值,例如用户的年龄、商品的数量等。支持标准的数值操作,…...

Playwright中Page类的方法
导航和页面操作 goto(url: str, **kwargs: Any): 导航到一个URL。 reload(**kwargs: Any): 重新加载当前页面。 go_back(**kwargs: Any): 导航到会话历史记录中的前一个页面。 go_forward(**kwargs: Any): 导航到会话历史记录中的下一个页面。 set_default_navigation_tim…...

硬链接方式重建mysql大表
硬链接方式重建mysql大表 操作步骤 选择数据库 select datadir; 进入数据文件目录 cd /data/mysql/mydata/testdb 创建硬连接 ln test_trans_msg_xx.ibd test_service_trans_msg_xx.ibd.bak ll test_trans_msg_xx* 进库删除表 DROP TABLE test_trans_msg_xx; 重建表 CREATE T…...

GPIO在ZYNQ7000中的结构和相关寄存器解析
GPIO MASK DATA LSW和 MASK DATA MSW LSW和MSW分别是LSW (Least Significant Word)和MSW (Most Significant Word)。 因为DATA是u32,所以如果寄存器的基址是XGPIOPS_DATA_LSW_OFFSET,那么32位就能同时让高16位的MASK DATA MSW]31:16和 MASK DATA LSW的bit7同时为…...

Qt Xlsx安装教程
Qt Xlsx安装教程 安装perl 如果没有安装perl,请参考perl Window安装教程 下载QtXlsxWriter源码 下载地址 ming32-make编译32 lib库 C:\Qt\Qt5.12.12\5.12.12\mingw73_32>d: D:\>cd D:\Code\QtXlsxWriter-master\QtXlsxWriter-master D:\Code\QtXlsxWrit…...

Certimate自动化SSL证书部署至IIS服务器
前言:笔者上一篇内容已经部署好了Certimate开源系统,于是开始搭建部署至Linux和Windows服务器,Linux服务器十分的顺利,申请证书-部署证书很快的完成了,但是部署至Windows Server的IIS服务时,遇到一些阻碍&a…...

【中工开发者】鸿蒙商城实战项目(启动页和引导页)
创建一个空项目 先创建一个新的项目选择第一个,然后点击finish 接下来为项目写一个名字,然后点击finish。 把index页面的代码改成下面代码块的代码,就能产生下面的效果 Entry Component struct Index {build() {Column(){Blank()Column(){…...
: Part 63)
跟李笑来学美式俚语(Most Common American Idioms): Part 63
Most Common American Idioms: Part 63 前言 本文是学习李笑来的Most Common American Idioms这本书的学习笔记,自用。 Github仓库链接:https://github.com/xiaolai/most-common-american-idioms 使用方法: 直接下载下来(或者clone到本地…...

scala中如何解决乘机排名相关的问题
任务目标: 1.计算每个同学的总分和平均分 2.按总分排名,取前三名 3.按单科排名,取前三名 好的,我们可以用Scala来完成这个任务。下面是一个简单的示例代码,它将演示如何实现这些功能: // 假设我们有一个…...

OpenCV相机标定与3D重建(10)眼标定函数calibrateHandEye()的使用
操作系统:ubuntu22.04 OpenCV版本:OpenCV4.9 IDE:Visual Studio Code 编程语言:C11 算法描述 计算手眼标定: g T c _{}^{g}\textrm{T}_c gTc cv::calibrateHandEye 是 OpenCV 中用于手眼标定的函数。该函数通过已知的机器人…...

Hadoop生态圈框架部署(九-2)- Hive HA(高可用)部署
文章目录 前言一、Hive部署(手动部署)下载Hive1. 上传安装包2. 解压Hive安装包2.1 解压2.2 重命名2.3 解决冲突2.3.1 解决guava冲突2.3.2 解决SLF4J冲突 3. 配置Hive3.1 配置Hive环境变量3.2 修改 hive-site.xml 配置文件3.3 配置MySQL驱动包3.3.1 下在M…...

docker 相关操作
1. 以下是一些常见的 Docker 命令: docker --version显示安装的 Docker 版本。 docker pull <image_name>从 Docker Hub 或其他镜像仓库下载镜像。 docker build -t <image_name> <path>从指定路径的 Dockerfile 构建 Docker 镜像。 docker i…...

AI作图效率高,亲测ToDesk、顺网云、青椒云多款云电脑AIGC实践创作
一、引言 随着人工智能生成内容(AIGC)的兴起,越来越多的创作者开始探索高效的文字处理和AI绘图方式,而云电脑也正成为AIGC创作中的重要工具。相比于传统的本地硬件,云电脑在AIGC场景中展现出了显著的优势,…...
;53. 寻宝(kruskal算法))
【代码随想录day57】【C++复健】 53. 寻宝(prim算法);53. 寻宝(kruskal算法)
53. 寻宝(prim算法) 好像在研究生的算法课上学过prim算法和kruskal算法,不过当时只是了解了一下大致的概念和流程,并没有涉及到如何去写代码的部分,今天也算是学习了一下这两个算法的代码应该如何去实现,还…...

C++中多态
1) 什么是多态性?C中如何实现多态? 多态性是指通过基类指针或引用调用派生类的函数,实现不同的行为 多态性可以提高代码的灵活性和可扩展性,使程序能够根据不同的对象类型执行不同的操作。 2)C中如何实现多态&#…...
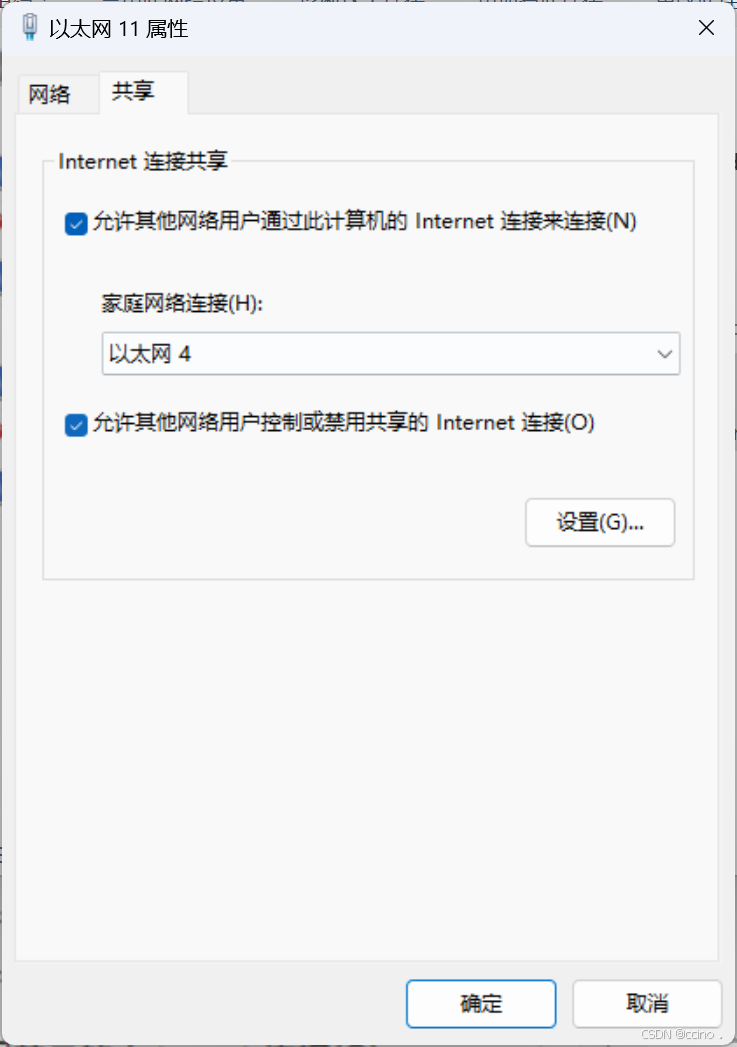
【实现多网卡电脑的网络连接共享】
电脑A配备有两张网卡,分别命名为eth0和eth1(对于拥有超过两张网卡的情况,解决方案相似)。其中,eth0网卡能够连接到Internet,而eth1网卡则通过网线直接与另一台电脑B相连(在实际应用中࿰…...

k8s从入门到放弃之Ingress七层负载
k8s从入门到放弃之Ingress七层负载 在Kubernetes(简称K8s)中,Ingress是一个API对象,它允许你定义如何从集群外部访问集群内部的服务。Ingress可以提供负载均衡、SSL终结和基于名称的虚拟主机等功能。通过Ingress,你可…...
(二)TensorRT-LLM | 模型导出(v0.20.0rc3)
0. 概述 上一节 对安装和使用有个基本介绍。根据这个 issue 的描述,后续 TensorRT-LLM 团队可能更专注于更新和维护 pytorch backend。但 tensorrt backend 作为先前一直开发的工作,其中包含了大量可以学习的地方。本文主要看看它导出模型的部分&#x…...
2025盘古石杯决赛【手机取证】
前言 第三届盘古石杯国际电子数据取证大赛决赛 最后一题没有解出来,实在找不到,希望有大佬教一下我。 还有就会议时间,我感觉不是图片时间,因为在电脑看到是其他时间用老会议系统开的会。 手机取证 1、分析鸿蒙手机检材&#x…...

涂鸦T5AI手搓语音、emoji、otto机器人从入门到实战
“🤖手搓TuyaAI语音指令 😍秒变表情包大师,让萌系Otto机器人🔥玩出智能新花样!开整!” 🤖 Otto机器人 → 直接点明主体 手搓TuyaAI语音 → 强调 自主编程/自定义 语音控制(TuyaAI…...
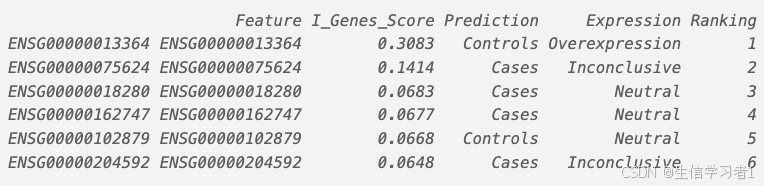
【数据分析】R版IntelliGenes用于生物标志物发现的可解释机器学习
禁止商业或二改转载,仅供自学使用,侵权必究,如需截取部分内容请后台联系作者! 文章目录 介绍流程步骤1. 输入数据2. 特征选择3. 模型训练4. I-Genes 评分计算5. 输出结果 IntelliGenesR 安装包1. 特征选择2. 模型训练和评估3. I-Genes 评分计…...

Python ROS2【机器人中间件框架】 简介
销量过万TEEIS德国护膝夏天用薄款 优惠券冠生园 百花蜂蜜428g 挤压瓶纯蜂蜜巨奇严选 鞋子除臭剂360ml 多芬身体磨砂膏280g健70%-75%酒精消毒棉片湿巾1418cm 80片/袋3袋大包清洁食品用消毒 优惠券AIMORNY52朵红玫瑰永生香皂花同城配送非鲜花七夕情人节生日礼物送女友 热卖妙洁棉…...

在树莓派上添加音频输入设备的几种方法
在树莓派上添加音频输入设备可以通过以下步骤完成,具体方法取决于设备类型(如USB麦克风、3.5mm接口麦克风或HDMI音频输入)。以下是详细指南: 1. 连接音频输入设备 USB麦克风/声卡:直接插入树莓派的USB接口。3.5mm麦克…...
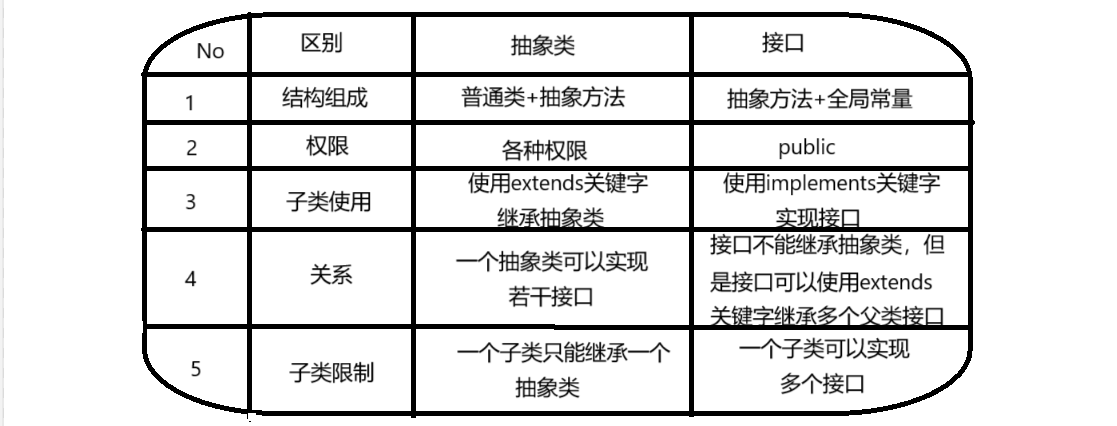
抽象类和接口(全)
一、抽象类 1.概念:如果⼀个类中没有包含⾜够的信息来描绘⼀个具体的对象,这样的类就是抽象类。 像是没有实际⼯作的⽅法,我们可以把它设计成⼀个抽象⽅法,包含抽象⽅法的类我们称为抽象类。 2.语法 在Java中,⼀个类如果被 abs…...

多元隐函数 偏导公式
我们来推导隐函数 z z ( x , y ) z z(x, y) zz(x,y) 的偏导公式,给定一个隐函数关系: F ( x , y , z ( x , y ) ) 0 F(x, y, z(x, y)) 0 F(x,y,z(x,y))0 🧠 目标: 求 ∂ z ∂ x \frac{\partial z}{\partial x} ∂x∂z、 …...
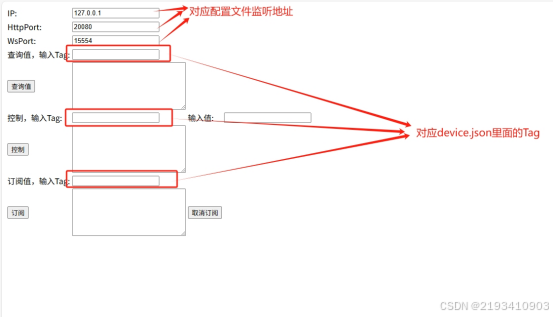
如何把工业通信协议转换成http websocket
1.现状 工业通信协议多数工作在边缘设备上,比如:PLC、IOT盒子等。上层业务系统需要根据不同的工业协议做对应开发,当设备上用的是modbus从站时,采集设备数据需要开发modbus主站;当设备上用的是西门子PN协议时…...